1
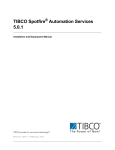
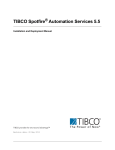
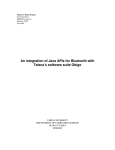
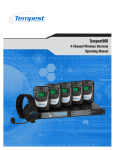
Sun SPOT
Plug-in
Manual
FROG Recognizer of
Gestures
Team Better Recognize
Version 1.0
March 28, 2010
Copyright ©2009-2010 Computer Science Department, Texas Christian University
Sun SPOTs are devices created by Sun Microsystems.
Sun SPOT Plug-in Manual
FROG
Revision Sign-off
By signing the following, the team member asserts that he/she has read the entire document and
has, to the best of his or her knowledge, found the information contained herein to be accurate,
relevant, and free of typographical error.
Name
Signature
Date
Josh
Alvord
Alex
Grosso
Jose
Marquez
Sneha
Popley
Phillip
Stromberg
Ford
Wesner
Revision Sign-off
Page i
Sun SPOT Plug-in Manual
FROG
Revision History
The following is a history of revisions of this document.
Document Version
Date Edited
Version 1.0
03/28/10
Revision History
Changes
Initial Draft
Page ii
Sun SPOT Plug-in Manual
FROG
Table of Contents
Revision Sign-off ............................................................................................................................ i
Revision History ............................................................................................................................ ii
1. Introduction ............................................................................................................................. 1
1.1 Purpose ............................................................................................................................. 1
1.2 Scope ................................................................................................................................ 1
1.3 Definition of Terms .......................................................................................................... 1
2. Preparations............................................................................................................................. 2
2.1 Installing the Sun SPOT SDK .......................................................................................... 2
2.1.1
Java Development Kit ............................................................................................... 2
2.1.2
Apache ANT ............................................................................................................. 4
2.1.3
Sun SPOT SDK Installer .......................................................................................... 4
3. Deploying FROG Code to SPOTs .......................................................................................... 5
4. Using SPOTs with FROG ....................................................................................................... 6
4.1 Connecting to a SPOT ...................................................................................................... 6
4.2 Enabling Onboard Filters ................................................................................................. 7
4.3 Performing Gestures ......................................................................................................... 8
4.4 Errors and Malfunctions ................................................................................................... 9
5. Modifying FROG SPOT Code.............................................................................................. 10
5.1 Description of Classes .................................................................................................... 10
5.1.1
FrogSpot .................................................................................................................. 10
5.1.2
The Managers.......................................................................................................... 10
5.2 Importing to Eclipse ....................................................................................................... 11
5.2.1
Required JARs ........................................................................................................ 11
5.2.2
Building and Deploying FROG SPOT Code .......................................................... 12
6. Modifying the SpotPlugin Code ........................................................................................... 13
6.1 Description of Classes .................................................................................................... 13
6.1.1
SpotPlugin ............................................................................................................... 13
6.1.2
SpotConnection ....................................................................................................... 13
6.2 Importing to Eclipse ....................................................................................................... 14
6.2.1
Required JARs ........................................................................................................ 14
6.2.2
Required Binaries.................................................................................................... 15
Table of Contents
Page iii
Sun SPOT Plug-in Manual
FROG
1. Introduction
1.1 Purpose
This document serves to outline the basic installation and use of the Sun SPOT plug-in with the
FROG Recognizer of Gestures program. The entire installation process is covered including
installation of prerequisite software.
1.2 Scope
This document will be useful for both users and developers for FROG. How to program SPOTs
or flash custom libraries is not covered here. SPOT programming topics are covered remarkably
well at http://www.sunspotworld.com.
1.3 Definition of Terms
Gesture
A continuous combination of motions made by an individual (usually with
the hands) that are related and meaningful as a whole. Gestures are the
entities which shall be modeled as well as recognized by the FROG project.
Training Instance
A training instance is a single motion of the mobile device by a user
representing a gesture to be trained.
Training Session
A training session is a collection of training sets created by a user. A
session is saved in a file format and reloaded to perform recognition. A
training session can be thought of as a project file containing
representations of multiple gestures.
Training Set
A training set is a sequence of training instances created by the user in
order to train a gesture. A training set can be thought of as the complete set
of data used to create an HMM representation of a gesture.
Introduction
Page 1
Sun SPOT Plug-in Manual
FROG
2. Preparations
2.1 Installing the Sun SPOT SDK
Whether you will be developing with Sun SPOTs or just using them with FROG, you will need
the Sun SPOT SDK to deploy the FROG code to your SPOTs and more.
2.1.1 Java Development Kit
The SPOT SDK will need to compile as well as execute Java code, requiring the download of the
JDK. Since FROG requires JRE version 6.0+, it would be wise to install JDK version 6.0+ as
well. The latest version of the JDK may be obtained at Sun/Oracle's website:
http://www.java.com/en/download/manual.jsp
After the Java Development Kit has been installed, two environmental variables must be set for
the SDK to properly detect its presence. The JDK's bin folder must be in your system's PATH
variable. Figure 2-3 shows what this looks like for Windows users.
Figure 2-1: Environment variable settings can be found by going to System in the Control Panel
Preparations
Page 2
Sun SPOT Plug-in Manual
FROG
Figure 2-2: The "Advanced" tab of System Properties. Click Environment Variables next.
Figure 2-3: Adding the location of the JDK's bin folder to the Path variable in Windows XP
Additionally, the variable JAVA_HOME must be set to the root of your JDK installation folder.
You may need to create this variable if the JDK installer did not do it for you. In testing it was
Preparations
Page 3
Sun SPOT Plug-in Manual
FROG
observed that the Windows installers (for XP, Vista, and 7) did not set this variable. Figure 2-4
shows how this should look. The value of the variable should be exactly what you put into the
Path variable but without the \bin folder on the end.
Figure 2-4: Creating a JAVA_HOME variable in Windows XP
2.1.2 Apache ANT
ANT is required by the SPOT SDK to simplify the processes of detecting SPOTs, deploying
code, and running code. Fortunately, the SPOT SDK can install this for you. What it fails to do,
however (at least on Windows machines), is place the ANT bin folder in the Path variable. You
can add the ANT bin folder to the PATH variable just like with the JDK's bin folder.
Figure 2-5: Adding ANT's bin folder to the Path variable in Windows XP
2.1.3 Sun SPOT SDK Installer
The Sun SPOT SDK Installer can be downloaded and launched from the Sun SPOT World
website: http://www.sunspotworld.com. It can be found on the left navigation bar "Download"
and then "Install."
The installer will check to make sure you have the necessary prerequisite software and then
install the SDK to a directory of your choosing.
Preparations
Page 4
Sun SPOT Plug-in Manual
FROG
3. Deploying FROG Code to SPOTs
Before you can begin using a Sun SPOT with FROG, the SPOT must have the FROG MIDlet
deployed and running first. Thanks to ANT, the process of deploying code is much easier.
After the SPOT SDK has been installed, you can open a terminal or command prompt and
navigate to the directory containing the source code for the FROG SPOT plugin. The source
code can be found on the FROG Project CD.
Figure 3-1: Command Prompt opened to FROG SPOT directory
To deploy the code to a Sun SPOT, make sure the SPOT is plugged into your computer and type
"ant deploy" at the command line. This should cause the code to be downloaded on to the SPOT.
The next time the SPOT is rebooted, it will be running the FROG SPOT code.
You must deploy the FROG SPOT code to all SPOTs you intend to use with FROG (excluding
the basestation). You can simply unplug and plug in each SPOT one at a time and run the deploy
command each time to ensure all your SPOTs are running the FROG SPOT code.
Deploying FROG Code to SPOTs
Page 5
Sun SPOT Plug-in Manual
FROG
4. Using SPOTs with FROG
Before attempting to use a SPOT with FROG, ensure that the FROG code has been deployed to
the SPOT and a SPOT base station is connected to the computer that will be running FROG.
Once these two essentials are complete it is simply a matter of starting up FROG and finding
your SPOTS. Launch FROG to begin the process of connecting your SPOT.
4.1 Connecting to a SPOT
Connecting a SPOT to FROG can be done two different ways depending on what mode FROG is
in. To bring up the Device Connection and Setup Dialog in Training or Evaluation mode, choose
"Configure Device..." from the Device menu as depicted in Figure 4-1.
Figure 4-1: Configuring a Device from the Training or Evaluation Modes
To bring up the Device Connection and Setup Dialog in Recognition or Demo mode, click the
"Device" button for the appropriate user. The "Device" button is shown in Figure 4-2.
Figure 4-2: The Device configure button for Recognition and Demo modes
From either of these options a new pane will appear (see Figure 4-3). Click the discover button
to have the system search for devices available. As devices are found, the "Devices Available"
list will become populated with device names. A device can be selected from this list, and filters
to use on the device can be selected from the Filters pane on the right.
Using SPOTs with FROG
Page 6
Sun SPOT Plug-in Manual
FROG
Figure 4-3: The Device Dialog
4.2 Enabling Onboard Filters
The FROG SPOT code allows two types of onboard filters: Directorial Equivalence and Idle
State. Onboard filters are those that are processed on the SPOT itself before being transmitted to
the host (as opposed to the host doing the filtering).
Directorial Equivalence is a filter that discards acceleration vectors based on their similarity to
previous vectors. Directorial Equivalence takes a single parameter for its argument, a threshold
level. The default threshold (if you do not enter anything) is 0.2. The formula for discarding
vectors is as follows:
If the above inequality is true, the second vector is discarded. The reference vector (x1, y1, z1
above) is the last vector not eliminated by this filter.
The Idle State filter removes vectors whose magnitude is less than a specified threshold. This is
to remove accelerations that come in while the device is mostly immobile and therefore do not
contribute much to the overall gesture. Idle State takes a single parameter for its argument, a
threshold level. The default threshold (if you do not enter anything) is 1.2. The formula for
discarding vectors is as follows:
If the above inequality is true, the vector is discarded.
Using SPOTs with FROG
Page 7
Sun SPOT Plug-in Manual
FROG
Figure 4-4: Adding a Directorial Equivalence filter with a threshold of 0.2.
Filters to be used on the SPOT will be denoted in the “Filters available” list with an “(on
device)” descriptor as shown above.
If the SPOT(s) you are trying to connect to are not displayed after discover has been pressed,
ensure that the SPOT is on and FROG code is deployed on it. Once your SPOT is displayed in
the “Devices available,” highlight it and click “Connect” to start the connection. For more
information on connecting a device or information on what connected devices can do with
FROG please consult the FROG User Manual.
4.3 Performing Gestures
After being connected, a user may begin to perform gestures with the Sun SPOT. To begin the
gesture, press and hold Switch 1 on the device (see Figure 4-5). Release the switch when you
have completed that gesture. For instance, if one were trying to make a circle gesture, switch 1
should be pressed and held for the duration of moving the arm in the circle motion and released
when the SPOT came back up around to its original position.
Switch 2 is designed to reset the SPOT and therefore serves no purpose in collecting gesture data.
Use switch 2 in the event that a SPOT becomes unresponsive or sends an error message to the
host.
Using SPOTs with FROG
Page 8
Sun SPOT Plug-in Manual
FROG
Switch 1 Switch 2
Figure 4-5: A Sun SPOT with Switch 1 and Switch 2 labeled.
4.4 Errors and Malfunctions
The SPOT code for FROG is designed to report errors that may happen during its sampling,
filtering, and transmission of acceleration data. These malfunctions are reported via status LEDs
above the switches. The following table describes these status LEDs' meanings.
Error Code:
Using SPOTs with FROG
LED position:
SPOT is searching for a basestation host
1
SPOT is connected successfully
2
Basestation discovery failure
3
Accelerometer reading failure
4
Filter failure
5
Data transmission failure
6
Data receive failure
7
Watcher Thread failure
8
Page 9
Sun SPOT Plug-in Manual
FROG
5. Modifying FROG SPOT Code
Developers may wish to modify or extend FROG’s capabilities when it comes to Sun SPOTs.
This section details how FrogSpot is laid out and how one might modify it or completely rewrite
it.
5.1 Description of Classes
5.1.1 FrogSpot
FrogSpot is the main class for the code that is deployed to the SPOT. This class extends MIDlet
and as such must implement its three methods: startApp, pauseApp, and destroyApp. FrogSpot is
responsible for setting up all connections and managers (covered in the next section).
The constructor of FrogSpot (which is executed before the SPOT’s virtual machine calls
startApp) never returns until a host has connected to the SPOT. That is, the SPOT is always in a
“discoverable” state until a host has sent a connection message, which will give the SPOT an
address and port to connect to and then launch the AccelManager, FilterManager, and
ConnectionManager. After the constructor returns (meaning a connection to the host has been
established), the startApp method sets the accelerometers to use the 6G scale. This means that
instead of being limited to the default range of 2G, the SPOT accelerometers can read
accelerations as large as 6G. This is desirable because the human arm can easily whip the device
faster than 2G’s of acceleration.
5.1.2 The Managers
The three main functions the SPOT must perform have been divided into three separate
“Manager” classes. The AccelManager, the FilterManager, and the ConnectionManager are
singleton objects that are instantiated at the end of the FrogSpot constructor (after a host has
been found).
5.1.2.1 AccelManager
AccelManager contains the actions that should be taken to sample acceleration values when the
SPOT’s switch is depressed. It also manages sample rate, which can be modified on the fly by a
remote message from the host (the default sample rate is 100Hz).
Because the sleep method used by the Thread class is highly inaccurate for measuring the
intervals between acceleration samples, AccelManager makes use of the SPOT’s built-in AT91
hardware timer. Information on how to modify the timer can be found at
http://www.sunspotworld.com. AccelManager samples accelerometer values every time there is
a hardware interrupt from the timer while the SPOT’s first switch is held. After 100ms, the
Modifying the FROG SPOT Code
Page 10
Sun SPOT Plug-in Manual
FROG
AccelManager hands off its Vector of collected accelerations to the FilterManager, which will
begin filtering the data. This wait of 100ms is so that short, perhaps accidental button presses
will be ignored by the SPOT.
5.1.2.2 FilterManager
FilterManager is responsible for maintaining a chain of filters to be run on each acceleration that
comes in, discarding any acceleration samples that do not meet a filter’s criteria.
Filters are added to the FilterManager active list by the use of the addFilter method. Generally
this is done from the ConnectionManager which receives a message from the host asking for a
new filter to be added. Every filter in the active filters Vector is executed in the order they were
added for each acceleration sample that comes in. Individual filters operate just as filters on
FROG do. That is, they implement a Filter interface which contains a method, filter, that accepts
an acceleration sample as its argument and returns the filtered vector result, in this case either the
same sample untouched or null.
As they are filtered, acceleration samples are placed in a Queue that is handed off to the
ConnectionManager for sending to the host.
5.1.2.3 ConnectionManger
After being sampled and then filtered, accelerations make their way to the host by way of a
RadiostreamConnection, a convenient class defined in the SPOT API. Filters are written to the
stream in the TXThread, a private Thread used by ConnectionManager to handle all outgoing
communication. In the RXThread, ConnectionManager handles all incoming messages from the
host. Most of these messages are keep-alive signals meant to ensure that the SPOT stays
connected and to let the host notify the user reasonably quickly if the SPOT becomes
disconnected. Other messages include sample rate change, adding a filter, removing the filters,
and disconnect.
5.2 Importing to Eclipse
After following the directions in section 2.1 to install the Sun SPOT SDK, Eclipse can be used to
modify the code that is deployed to SPOTs to be used with FROG.
5.2.1 Required JARs
The following JARs are located in your SPOT SDK directory in the folder entitled "lib" and are
listed in the order in which they should be added to the build path:
transducer_device.jar, multihop_common.jar, spotlib_device.jar, spotlib_common.jar,
squawk_device.jar
Modifying the FROG SPOT Code
Page 11
Sun SPOT Plug-in Manual
FROG
5.2.2 Building and Deploying FROG SPOT Code
The purpose of adding the JARs to the build path is only to keep Eclipse from showing compile
errors and warnings. Any class files that Eclipse builds from your project will probably not be
the correct format. This should not be a problem as using the process described in section 3
builds your source files into the correct version of classes and loads them on to the SPOT for
you.
However, to be able to deploy the code, you will need to make sure that the build.xml file and
resources folder is in the root directory of your source code (not within any package folders). A
good idea would be to take these files from a Sun SPOT SDK example SPOT app or from the
FROG SPOT code itself. Inside the resources folder is a folder named meta-inf, and within that
resides the manifest.mf file. Editing this file with a text editor like Notepad will allow you to
change your application's version, name, and main class file if you desire. Again, the FROG
SPOT directory on the FROG Project CD is a good example of how you should set up your
FROG SPOT source environment.
Modifying the FROG SPOT Code
Page 12
Sun SPOT Plug-in Manual
FROG
6. Modifying the SpotPlugin Code
Developers wishing to modify the host portion of the FROG SPOT code need look no further
than the Plugin developed by Team Better Recognize. This Plugin is what enables
communication with a SPOT that has the FROG SPOT code deployed to it.
6.1 Description of Classes
6.1.1 SpotPlugin
This class implements the Plugin interface and creates Device objects that represent the
individual SPOTs found with the discover method. For more detail on what the Plugin methods
accomplish, see the Developer Manual on the FROG Project CD. SpotPlugin also sets up the
COM port to use for the basestation. For more information on how it does this, see section 6.2.2
"Required Binaries."
A typical usage scenario for SpotPlugin would be to call the discover method (probably from the
GUI’s Discover button in the Device Dialog). This method starts a Discover thread that lasts for
about 10 seconds while SPOTs in the area are pinged. After this a user may choose to connect to
a particular device which will create a SpotConnection object for that device (see next section).
From there on out, device listeners will be notified of incoming acceleration data and unexpected
disconnects.
6.1.2 SpotConnection
SpotConnection contains two threads, an RX Thread for receiving and a TX Thread for sending.
Communication with the SPOT is handled by messages sent by Radiostream (see the Sun SPOT
Developer’s guide at www.sunspotworld.com for more information). These messages include an
ALIVE message, which is sent every 3 seconds to ensure that the SPOT is still there. If the
SPOT does not reply in a satisfactory time, the host will remove the connection and alert the user
of a problem.
Another message sent between SPOT and host is an acceleration message. This message is
prefaced with an order count, which allows the host to ensure it is receiving accelerations in the
correct order. If a host receives an acceleration vector out of order, it will request the SPOT
restart sending of that gesture from the last known good acceleration message (the last message
that was in the correct order).
Additional minor messages include the ERROR message for when a problem was encountered,
prompting the host to discard the last set of data, the END_OF_GESTURE message that allows
the host to mark the end of a set of accelerations, the ADD_FILTER message that prompts the
SPOT to add a given filter, the REMOVE_FILTERS message that prompts the SPOT to remove
Modifying the SpotPlugin Code
Page 13
Sun SPOT Plug-in Manual
FROG
all of its filters, and a SAMPLE_RATE message that prompts the SPOT to change the rate at
which it samples accelerations (see section 5.1.2.1 for more information about AccelManager).
6.2 Importing to Eclipse
The source code for the SPOT Plugin can be found on the FROG Project CD. As it was
developed concurrently with FROG itself, it has become a fairly integral part of FROG. As such,
it can be found already integrated with FROG. Should you wish to remove it from FROG, the
instructions in the Developer’s Manual give details on how to add and remove Device Plugins
from the Frog class.
6.2.1 Required JARs
The following JARs are required to develop host-side SPOT code and are listed in the order in
which they must be placed in the build path:
RXTXcomm.jar*, multihop_common.jar, spotlib_host.jar, spotlib_common.jar,
squawk_common.jar, spotclient_host.jar, spotselector.jar
RXTXcomm.jar relies on a native library (.dll file on Windows machines, .so on Unix/Mac). To
set up Eclipse to use this native library, you must right click the RXTXComm.jar after being
added and then choose Properties. In the dialog box that appears, select native libraries, press
“Browse…” and then navigate to the “lib” folder of your SPOT SDK installation. See Figures 61 and 6-2 for details.
Modifying the SpotPlugin Code
Page 14
Sun SPOT Plug-in Manual
FROG
Figure 6-1: Right-clicking RXTXcomm.jar in Eclipse.
Figure 6-2: Adding the SPOT SDK lib folder to the native libraries property.
Host-side SPOT code is code that runs on a host computer with an attached Sun SPOT
Basestation via USB.
6.2.2 Required Binaries
Once Eclipse has been set up in that manner, the SPOT Plugin will attempt to auto-detect the
COM port on which your SPOT is installed. For this auto-detection to take place, the
spotfinder.exe file that comes with the SPOT SDK must be in the /bin folder at the root of your
Eclipse project (see Figure 6-3).
Modifying the SpotPlugin Code
Page 15
Sun SPOT Plug-in Manual
FROG
Figure 6-3: The spotfinder.exe in the bin folder of the Eclipse project for FROG.
If this spotfinder.exe cannot be found, the user will be prompted for the COM port to use. The
COM port number can be found in the Windows Device Manager. This can be accessed by going
to Control Panel, then System, then the Hardware tab, then clicking Device Manager. In the
Device Manager scroll down to the ports expandable and find the Sun SPOT device. It should
have a COM followed by a number next to it (see Figure 6-4).
Figure 6-4: A Sun SPOT basestation using COM6.
At this point, FROG should have all the information it needs to run with the attached basestation.
You should now be able to run FROG with a functional SPOT Plugin from Eclipse just like you
would run any application.
Modifying the SpotPlugin Code
Page 16