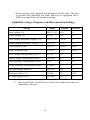
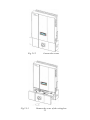
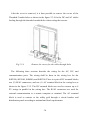
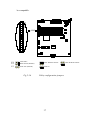
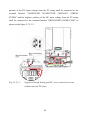
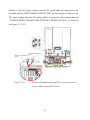
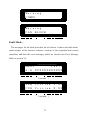
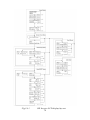
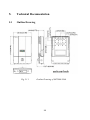
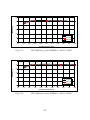
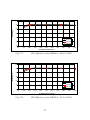
1
Owner’s Manual Silicon Energy Solar Inverter SiE2900 / SiE3840 SiE4900 / SiE5300 ZOMG-8253USYUS0 © 2011 SILICON ENERGY All rights reserved SiEV2.3 1 2 3 Safety SAVE THESE INSTRUCTIONS– This manual contains important instructions for the Silicon Energy Solar Inverter Models SiE5300, SiE4900, SiE3840 & SiE2900 that shall be followed during installation and maintenance of the Silicon Energy Solar Inverter [hereafter SiE Inverter(s)]. Safety Precautions/Safety Notes Only trained qualified electrical personnel are to perform the electrical installation, wiring, opening and repair of the SiE Inverters. Even when no external voltage is present, the SiE Inverters can still contain high voltages and the risk of electrical shock. The temperature of the heat sinks outside of the device can reach over 70°C (158°F) in normal operation (Ambient temperature rating: 55°C / 131°F). There is the risk of burn injury when these parts are touched. The following general safety precautions must be observed during all phases of operation, service, installation and repair of this device. Failure to comply with these precautions or with specific warnings elsewhere in this manual violates safety standards of design, manufacture, and intended use of the device. The manufacturer assumes no liability for the customer’s failure to comply with these requirements. 4 Safety Symbols To reduce the risk of injury and to ensure the continued safe operation of this product, the following safety instructions and warnings are marked in this manual. Warning, risk of electric shock Presents safety information to prevent injury or death to users and/or installers. Earth ground symbol ! Caution (refer to accompanying documents) Presents information to prevent damage to this product. 5 General Safety Precautions Personnel must remove all conductive jewelry or personal equipment prior to installation or service of the device, parts, connectors, and/or wiring. Trained qualified personnel are required to mount, reconfigure or repair this device. Licensed electricians are required to install permanently wired equipment. Stand on an insulated surface when working on the operating device (i.e., ensure that there is no grounding). Instructions in this manual must be precisely followed and all information on cautions or warnings must be adhered to. Use proper lifting techniques whenever handling enclosure, equipment or parts. The SiE Inverter must be provided with an equipment-grounding conductor connected according to local codes and regulations. The SiE Inverter must be provided with a DC grounding connection according to NEC and Local Electrical codes. The grounded conductor must be ungrounded and energized when a ground fault is indicated. The AC Neutral connection is only for voltage sensing and shall be neither used to carry currents nor bonded to ground inside the inverter. These precautions/warnings do not contain all measures pertinent to the safe operation of the device. If special problems arise which are not described in sufficient detail for the purposes of the buyer, contact your specialized dealer or technician. 6 Safe Installation and Operation Installation of the device must be in accordance with the safety regulations (e.g., UL1741) and all other relevant national or local regulations. Correct grounding and short circuit protection must be provided to ensure operational safety. Read all instructions and cautionary remarks in the manual before installation. Switch off the circuit breakers before installation and wirings. Avoid standing water when working on the inverter. PV arrays will be energized when exposed to light. Cover the arrays with opaque (dark) material during installation and wiring. Check both of the AC and DC connections with a digital volt meter prior to any installation or removal procedures. Attach the outer cover correctly before switching on the circuit breakers. Install the inverter out of direct sunlight. When no external voltage is present; the SiE Inverter can still contain high voltages and the risk of electrical shock. Allow at least 5 minutes for the inverter to discharge completely after disconnecting the AC and DC sources from the inverter. External heat sinks can reach high enough temperatures in normal operation to cause skin burn injury when these parts are touched. Pay attention to high temperature components. To prevent the risk of fire hazard, do not cover or obstruct the heat sink. Allow changes in your electrical system to be carried out only by qualified electricians. 7 Repair and Maintenance The SiE Inverter contains no user serviceable parts, except for the fan, the PV string fuses and the GFDI fuse. Only SILICON ENERGY trained staff is authorized to carry out internal repair and maintenance of the unit. Please return the device for repair and maintenance for faults caused by parts other than the fan and the fuses described above. For maintenance and replacement of the fuses, please refer to the section 5.4. WARNING! DO NOT make alterations or tamper with the assembly in the inverter without manufacturer’s authorization unless specified elsewhere in this Manual. This may result in injury, electric shock, or fire and void the warranty. Wiring the inverter Input/Output Terminals: Use wire size #10 AWG to #6, 90°C (194°F) Copper Wire. Reconfirm that all connections have been performed properly and all screws are properly tightened. WARNING! All electrical installation and the wiring methods shall be done in accordance with the local and National Electrical codes ANSI/NFPA 70 and should follow the important safety instructions in this manual. WARNING! Make sure that you use suitable connecting cables for both the AC and DC wiring. The cable must be adequately dimensioned and suitably inert to temperature fluctuation, UV radiation and other possible hazards. 8 Connection of the AC cable WARNING! Reconfirm that the circuit breaker to the main utility is switched OFF before connecting the power cable from the breaker to the AC connector. Connection of the DC cable ! CAUTION! Identify the different polarity of DC voltage on each PV string and connect respectively to the input terminals marked “UNGROUNDED CONDUCTOR” and “GROUNDED CONDUCTOR”. Make sure the DC voltage that PV arrays generate is equal or less than 600 VDC in any case. WARNING! Route the DC connection cables to the SiE Inverters away from any possible hazards that could damage the cables. WARNING! Hazardous voltage is still present on the device after disconnection of all PV DC inputs. Allow 5 minutes for the inverter to discharge the energy completely. WARNING! PV arrays will be energized when exposed to light. Cover the arrays with opaque (dark) materials during installation and wiring. 9 Contents 1. 2. INTRODUCTION 15 1.1 GENERAL 15 1.2 SPECIFICATIONS 17 1.3 ACCESSORIES 23 INSTALLATION 24 2.1 PLACEMENT 24 2.2 MOUNTING 25 2.3 WIRING THE INVERTER 31 2.3.1 Connection of the AC cable ............................................................38 2.3.2 Connection of the DC cable............................................................40 2.3.2.1 Connection of the DC wires for Negative Ground Arrays ..............43 2.3.2.2 Connection of the DC wires for Positive Ground Arrays ...............45 2.3.2.3 Connection of the DC wires for Negative Ground Arrays without Internal DC Fuses.........................................................................................47 2.3.2.4 Connection of the DC wires for Positive Ground Arrays without Internal DC Fuses.........................................................................................50 2.3.3 2.4 3. Connection of the Communication cable........................................53 WIRING INVERTER IN PARALLEL OPERATION 56 58 3.1 OVERVIEW 58 3.2 OPERATION FEATURE 60 3.3 LED INDICATION 62 3.4 LCD DISPLAY 64 3.5 COMMUNICATION 80 3.6 EXPLANATIONS OF ERROR MESSAGES 10 80 4. WARRANTY INFORMATION 84 5. TECHNICAL DOCUMENTATION 88 5.1 OUTLINE DRAWING 88 5.2 EFFICIENCY 90 5.3 DE-RATING OPERATION 94 5.4 MAINTENANCE 97 5.4.1 Exchange of the GFDI Fuse ...........................................................97 5.4.2 Exchange of the PV String Fuses ....................................................98 5.4.3 Factory Service.............................................................................100 5.4.3.1 Remove the Inverter......................................................................101 5.4.3.2 Re-install the Inverter ...................................................................108 6. WEATHER PROOF SHIELD (OPTIONAL) 11 115 List of Figures Fig1.1.1 Grid Connected Solar System Overview .............................................16 Fig 2.1.1 Clearances required for SiE Inverter installation ...............................25 Fig 2.2.1 Remove the bracket from the inverter..................................................26 Fig 2.2.2 Inverter mounting bracket ...................................................................27 Fig 2.2.3 Fasten the mounting bracket ...............................................................28 Fig 2.2.4 Fasten the Inverter on the mounting bracket ......................................31 Fig 2.3.1 Turn the DC/AC disconnect switch OFF .............................................32 Fig 2.3.2 Loosen the screws ................................................................................33 Fig 2.3.3 Remove the cover of the wiring box ....................................................33 Fig 2.3.4 Remove the covers for the cable through holes ...................................34 Fig 2.3.5 Wiring box front view ..........................................................................35 Fig 2.3.6 Utility configuration jumpers ..............................................................37 Fig 2.3.7 Utility configurations ..........................................................................38 Fig 2.3.1.1 AC Terminal Block for AC cable connections.................................39 Fig 2.3.2.1 SiE2900 supports only three (3) PV string fuses ..................................41 Fig 2.3.2.2 PV- terminal connection .................................................................42 Fig 2.3.2.1.1 Negative Ground Setting and DC wires connections .................44 Fig 2.3.2.1.2 DC terminal blocks for DC cable connection in Negative Ground ....................................................................................................44 Fig 2.3.2.2.1 Positive Ground Setting and DC wire connections ....................46 Fig 2.3.2.2.2 DC terminal blocks for DC cable connection in Positive Ground ....................................................................................................46 Fig 2.3.2.3.1 Negative Ground Setting and DC wires connections array without internal DC fuses ........................................................................................48 Fig 2.3.2.3.2 DC terminal blocks for DC cable connection in Negative Ground array without internal DC Fuses ...............................................................49 12 Fig 2.3.2.4.1 Positive Ground Setting and DC wires connections array without internal DC fuses ..............................................................................51 Fig 2.3.2.4.2 DC terminal blocks for DC cable connection in Positive Ground array without internal DC Fuses ...............................................................52 Fig 2.3.3.1 Positions of the communication ports and termination switch .......54 Fig 2.3.3.2 RJ-45 Pins and Signals ...................................................................54 Fig 2.3.3.3 RS-232 connection ..........................................................................55 Fig 2.3.3.4 RS-485 connection ..........................................................................56 Fig 2.4.1 Parallel configuration of inverter .......................................................57 Fig 3.3.1 Front panel of the SiE Inverter ............................................................62 Fig 3.4.1 SiE Inverter LCD display lay-out ........................................................79 Fig 5.1.1 Outline Drawing of SiE2900/3840 ......................................................88 Fig 5.1.2 Outline Drawing of SiE4900/5300 ......................................................89 Fig 5.2.1 CEC Efficiency of the SiE2900 = 96.0% (240V) .................................90 Fig 5.2.2 CEC Efficiency of the SiE2900 = 95.5% (208V) .................................90 Fig 5.2.3 CEC Efficiency of the SiE3840 = 96.0% (240V) .................................91 Fig 5.2.4 CEC Efficiency of the SiE3840 = 95.5% (208V) .................................91 Fig 5.2.5 CEC Efficiency of the SiE4900 = 96.0% (240V) .................................92 Fig 5.2.6 CEC Efficiency of the SiE4900 = 96.0% (208V) .................................92 Fig 5.2.7 CEC Efficiency of the SiE5300 = 96.0% (240V) .................................93 Fig 5.2.8 CEC Efficiency of the SiE5300 = 95.5% (208V) .................................93 Fig 5.3.1 Temperature derating curve of the SiE2900 ........................................95 Fig 5.3.2 Temperature derating curve of the SiE3840 ........................................96 Fig 5.3.3 Temperature derating curve of the SiE4900 ........................................96 Fig 5.3.4 Temperature derating curve of the SiE5300 ........................................97 Fig 5.4.1.1 Open the cap of the GFDI fuse holder............................................98 Fig 5.4.2.1 Replacement of the PV string fuses ................................................99 Fig 5.4.3.1.1 Remove the cover of the Inverter .............................................102 13 Fig 5.4.3.1.2 Fig 5.4.3.1.3 Remove the DC and AC wires ..................................................103 Keep the well-wrapped DC and AC wires stored in the wiring box .........................................................................................................................103 Fig 5.4.3.1.4 Remove the screws and nuts bonding between the inverter and wiring box ..................................................................................................104 Fig 5.4.3.1.5 Un-hang the inverter carefully.................................................105 Fig 5.4.3.1.6 Locate the cover plate in place and fasten the screws .............107 Fig 5.4.3.2.1 Re-install the cover plate and fix it on the top of the wiring box ..................................................................................................109 Fig 5.4.3.2.2 Hang the inverter onto the mounting bracket carefully ........... 110 Fig 5.4.3.2.3 Fasten the screws and nuts bonding between the inverter and the wiring box for its construction and grounding continuity ............................... 111 Fig 5.4.3.2.4 Connect the AC wirings to their correct terminals individually .... 111 Fig 5.4.3.2.5 Fasten the screws of cover of the inverter firs, then the wiring box .................................................................................................. 112 Fig 6.1 Step 1: Release the screw of the inverter cover ................................. 115 Fig 6.2 Step 2: Put the shield on the sides of the inverter. ............................. 116 Fig 6.3 Step 3: Fasten the shields with the screws. ........................................ 116 Fig 6.4 An inverter with the weather proof shield. ........................................ 117 14 1. Introduction 1.1 General We appreciate your choice of Silicon Energy Solar Inverters for your power conversion devices in your solar power system. This document contains the information you need for the installation and settings of the SiE Inverters. Therefore, it is strongly recommended to read this manual carefully before the SiE Inverter installation and settings. The Silicon Energy Solar Inverter [hereafter SiE Inverter(s)] product family is a series of grid-connected photovoltaic inverters which are designed to convert DC power generated by photovoltaic arrays to AC power that is delivered to the home loads and then fed into the utility grid with any excess power. The SiE2900, SiE3840, SiE4900, and SiE5300 are the members of the family for the North American market. The overview of the grid-tied solar energy system is shown in figure 1.1.1. SiE Inverters utilize state-of-the-art technology, reliability and ease of use and comply with the requirements of UL1741 Standard for Inverters, Converters, Controllers and Interconnection System Equipment for Use With Distributed Energy Resources. SiE Inverters also comply with the IEEE 1547 Standard for Interconnecting Distributed Resources with the Electric Power Systems; and IEEE 1547.1 Standard Conformance Test Procedures for Equipment Interconnecting Distributed Resources with Electric Power Systems; and FCC Part 15 Subpart B EMI/EMC Emissions Regulations for a Class B device. The SiE Inverter is designed to operate automatically once it is installed and commissioned correctly. When the DC input voltage generated by the photovoltaic array rises above the pre-set threshold value, the embedded 15 controller starts and goes through a system check mode and then into monitoring mode until the PV Start Voltage is reached. During this time, the SiE Inverter will not generate AC power. Once all conditions necessary for grid connection are satisfied, the SiE Inverter goes into the Grid/MPPT mode and begins feeding the AC power into the grid. When the input DC voltage falls below the minimum MPP voltage setting, the SiE Inverter will then shut itself down. The SiE Inverter will be awakened automatically should the input DC voltage rise above the pre-set threshold value. Meter Utility Grid Photovoltaic Array SiE Inverter Fig1.1.1 Grid Connected Solar System Overview 16 1.2 Specifications Specifications for SiE2900 and SiE3840 Name-Part number SiE2900 SiE3840 Grid output (AC) Grid voltage, nominal 240/208 VAC 211~264@240VAC(adjustable) * 183~228@208VAC (adjustable)* Grid voltage, operating range Grid frequency, nominal 60 Hz Grid frequency, operating range 59.3~60.5 Hz (adjustable)* Maximum output power 2900W@240VAC 2700W@208VAC 3840W@240VAC 3330W@208VAC Maximum output current 13 A 16.3 A Output over current protection 20A 20 A Maximum output fault current 15A 20 A Startup current <2A Maximum grid backfeed current 0A Waveform True sine Power factor >0.99 @ nominal power <3% Total Harmonic Distortion DC Component <0.5% Phase Split Phase or Single phase 240 Solar input (DC) Input voltage range 200~550 VDC Maximum input voltage 600 VDC PV start voltage 235 VDC (adjustable) Maximum input current 16 A Maximum input short circuit current 20 A 24A 17 Name-Part number SiE2900 SiE3840 Solar input (DC) Number of fused string inputs 3 4 Efficiency 96.7%@240VAC 96.4%@208VAC 96.0%@240VAC 95.5 %@208VAC Maximum efficiency CEC efficiency Night-time tare loss 96.7%@240VAC 96.5%@208VAC 96.0%@240VAC 95.5%@208VAC 0.5W Environmental Operating temperature range -25° ~ +55°C (-13° ~ +131°F) Storage temperature range -25° ~ +55°C (-13° ~ +131°F) Maximum full power operating ambient 55°C (131°F) 55°C (131°F) Max. 95% Relative humidity Mechanical Outdoor enclosure NEMA 3R, Rainproof Cooling Natural Input and output terminals Accept wire size of 4 to 16 mm2 (#12 to #6 AWG) Weight/Shipping weight 23 kg / 27 kg (50.7 lb / 59.5 lb) Dimensions (HxWxD) Cooling fan 732x454x175 mm (28.8x17.9x6.9 inches) Shipping dimensions (HxWxD) 840x540x275 mm (33.1 x21.3x10.8 inches) Interface Communication RS232 and RS485 (Option with wireless) Display LED/LCD Positive ground inverters Model name SiE2900-PG SiE3840-PG Certifications UL 1741, FCC Part 15 B, IEEE 1547, IEEE C62.41.2, IEEE C37.90.1 18 * Factory settings can be adjusted with the approval of the utility. This unit is provided with adjustable trip limits and may be aggregated above 30kW on a single Point of Common Coupling. Adjustable voltage, Frequency and Reconnection Settings Setting Range Default Accuracy Over-voltage (%) 108.75~110 110 ±1 Under-voltage (%) 85~90 88 ±1 Over-voltage Reconnect voltage* (%) 105.83~110 105.83 ±1 Under-voltage Reconnect voltage* (%) 85~91.67 91.67 ±1 Over-frequency (Hz) 60.4~61 60.49 ±0.02 Under-frequency (Hz) 57~59.8 59.31 ±0.02 Over-voltage clearing time (cycle) 59~120 59 ±1 Under-voltage clearing time (cycle) 119~300 119 ±1 Over-frequency clearing time (cycle) 9~12 9 ±1 Under-frequency clearing time (cycle) 9~18000 9 ±1 AC high-voltage limit (%) 100~110 109 ±1 Reconnect delay** (s) 10~600 20 ±0.01 PV start voltage (VDC) 200~600 235 ±2 * The default values are within the Range B of ANSI C84.1 ** Once a grid failure, the SiE Inverter waits 300 seconds before the next connection to the grid. 19 Measurement precision Resolution Range Accuracy Display Measurement Input voltage (VDC) 0~640V 0.1V 0.6V ±2V Input Current (IDC) 0~23000mA 100mA 23mA ±200mA Grid voltage (VAC) 0~300V 0.1V 0.6V ±1V Grid current (IAC) 0~19000mA 100mA 38mA ±200mA Grid frequency (Hz) 45~65Hz 0.1Hz 0.004Hz ±0.02Hz Output power (W) 0~5000W 1W 1W ±30W Energy yield (kWh) 0~9.99×10⁶kWh 0.1kWh 2.2×10⁻⁶kWh 1% Operating hours (h) 0~65535H 1H 1s 0.03% Specifications for SiE4900 and SiE5300 Name-Part number SiE4900 SiE5300 Grid output (AC) Grid voltage, nominal 240/208 VAC Grid voltage, operating range 211~264@240VAC(adjustable) * 183~228@208VAC (adjustable)* Grid frequency, nominal 60 Hz Grid frequency, operating range Maximum output power 59.3~60.5 Hz (adjustable)* 4900W@240VAC 5300W@240VAC 4300W@208VAC 4600W@208VAC 20.7A 22.1A Maximum output current 20 Output over current protection 30A 30A Maximum output fault current 25A 25 A SiE4900 SiE5300 Name-Part number Grid output (AC) Startup current < 2A Maximum grid backfeed current 0A Waveform True sine Power factor >0.99 @ nominal power Total Harmonic Distortion <3% DC Component Phase Input voltage range <0.5% Split Phase or Single phase 240 Solar input (DC) 200~550 VDC 200~550 VDC Maximum input voltage 600 VDC PV start voltage 235 VDC (adjustable) Maximum input current 25 A 25A Maximum input short circuit 30A current Number of fused string inputs Maximum efficiency CEC efficiency 4 Efficiency 96.6%@240VAC 96.4%@240VAC 96.4%@208VAC 96.2%@208VAC 96%@240VAC 96%@240VAC 96%@208VAC Night-time tare loss Operating temperature range Storage temperature range Maximum full power operating ambient 95.5%@208VAC 0.5W Environmental -25° ~ +55°C (-13° ~ +131°F) -25° ~ +55°C (-13° ~ +131°F) 55°C (131°F) Relative humidity 53°C (127.4°F) Max. 95% Mechanical Outdoor enclosure NEMA 3R, Rainproof 21 Cooling Cooling fan Accept wire size of 4 to 16 mm2 Input and output terminals (#12 to #6 AWG) Name-Part number SiE4900 Mechanical 28 kg / 32 kg (61.7 lb / 70.5 lb) Weight/Shipping weight Dimensions (HxWxD) 732x454x210 mm (28.8x17.9x8.3 inches) Shipping dimensions (HxWxD) Communication Display SiE5300 840x548x305 mm (33.1x21.6x12 inches) Interface RS232 and RS485 (Option with wireless) LED/LCD Positive ground inverters Model name SiE4900-PG SiE5300-PG Certifications UL 1741, FCC Part 15 B, IEEE 1547, IEEE C62.41.2, IEEE C37.90.1 * Factory settings can be adjusted with the approval of the utility. This unit is provided with adjustable trip limits and may be aggregated above 30kW on a single Point of Common Coupling. Adjustable voltage, Frequency and Reconnection Settings Setting Range Default Accuracy Over-voltage (%) 108.75~110 110 ±1 Under-voltage (%) Over-voltage Reconnect voltage* (%) 85~90 88 ±1 105.83~110 105.83 ±1 Under-voltage Reconnect voltage* (%) 85~91.67 91.67 ±1 Over-frequency (Hz) 60.4~61 60.49 ±0.02 Under-frequency (Hz) Over-voltage clearing time (cycle) 57~59.8 59.31 ±0.02 59~120 59 ±1 22 Under-voltage clearing time (cycle) Over-frequency clearing time (cycle) Under-frequency clearing time (cycle) 119~300 119 ±1 9~12 9 ±1 9~18000 9 ±1 Setting Range Default Accuracy AC high-voltage limit (%) 100~110 109 ±1 Reconnect delay** (s) 10~600 20 ±0.01 PV start voltage (VDC) 200~600 235 ±2 * The default values are within the Range B of ANSI C84.1 ** Once a grid failure, the SiE Inverter waits 300 seconds before the next connection to the grid. Measurement precision Resolution Range Accuracy Display Measurement Input voltage (VDC) 0~640V 0.1V 0.6V ±2V Input Current (IDC) 0~31000mA 100mA 31mA ±300mA Grid voltage (VAC) 0~300V 0.1V 0.6V ±1V Grid current (IAC) 0~26000mA 100mA 52mA ±250mA Grid frequency (Hz) 45~65Hz 0.1Hz 0.004Hz ±0.02Hz Output power (W) 0~7800W 1W 1W ±40W 6 -6 Energy yield (kWh) 0~9.99×10 kWh 0.1kWh 2.2×10 kWh 1% Operating hours (h) 0~65535H 1H 1s 0.03% 1.3 Accessories Operation Manual 1 pc 23 2. Installation 2.1 Placement ∙ SiE Inverters that must be vertically mounted and may be located indoors or outdoors, according to protection class Type NEMA 3R. ∙ Leave at least 50 cm (19.7 inches) of free space above and 100 cm (39.4 inches) below the inverter when installed outdoors. Allow 20 cm (7.9 inches) between inverters when installing multiple inverters for better ventilation (see figure 2.1.1). ∙ Mount the inverter on a wall that is strong enough to sustain the inverter with a 32 kg (70.5 lb) weight. ∙ Avoid mounting the inverter in a location directly exposed to sunlight and maintain the ambient temperature of the inverter within -25° and 55 °C (-13° and 131°F). Humidity shall be within 0% and 95%. WARNING! DO NOT operate the inverter where exposed to flammable, explosive environment or around combustibles like trash or unknown materials that may result in danger. Some parts of the cooling surface can reach temperatures over 70°C (158°F). WARNING! DO NOT expose the inverter to the corrosive liquids and/or gases. 24 ∙ Keep DC wiring as short as possible to minimize power loss. ∙ The mounting bracket should be fastened on a concrete or a masonry wall with the accessory anchors. Fig 2.1.1 2.2 Clearances required for SiE Inverter installation Mounting The steps listed below describe how to mount the inverter on the wall: 1. After removing the inverter from the carton, the attached mounting bracket must be removed by sliding the bracket down and away from the inverter as 25 shown in the figure 2.2.1 below. Mounting flanges Mounting slots for securing the inverter Mounting flanges 26 Fig 2.2.1 Use the bracket (figure 2.2.2) as a template to mark the location of the holes to be drilled in the wall. After drilling the holes, the mounting bracket is then held against the wall and fastened to the wall with anchors as shown in 3) .7 1 ( )/ (12.5)/(4.92) .4 (4 (7)/(2.76) (25)/(9.84) (18)/(7.08) (19)/(7.48) (7)/(2.76) (12)/(4.72) figure 2.2.3. (A minimum of three (3) screws is required) (52.5)/(20.67) 2. Remove the bracket from the inverter (40. 5 )/ (15 . 94) unit:cm/inch Fig 2.2.2 Inverter mounting bracket 27 (30)/ (1 1.81) (60)/(23.62) (30)/ (1 1.81) (100)/(39.37) ~ (170)/(66.93) unit:cm/inch The height of the anchor head < 8mm(0.314 in) Fig 2.2.3 Fasten the mounting bracket 28 3. Once the mounting bracket is attached to the wall, the inverter can be located and fastened to the mounting bracket. Slide the inverter over the mounting bracket flanges and down carefully to lock it in place. Attach the screw through the hole as shown in figure 2.2.4 below used to fasten both inverter and the wiring box together to the mounting bracket. 29 Slide the mounting pins on the inverter over the hooks on the mounting bracket. flange with mounting slots 120cm 47inch 100cm 39inch Ensure the inverter is seated properly on the mounting bracket Ground/Floor Ground/Floor 30 Fig 2.2.4 Hook the Inverter on the mounting bracket and then fasten the screw After the inverter is hung correctly on the bracket and secured with the screw, it is then possible to complete wiring the inverter. 2.3 Wiring the inverter It is necessary to remove the cover of the wiring box before wiring the inverter. First the DC/AC disconnect switch must be turned to the OFF position as shown in figure 2.3.1. Then remove the screws, two on each side of the cover; remove the cover of the wiring box, including the switch knob, as shown in the figure 2.3.2 and figure 2.3.3 below. 31 Fig 2.3.1 Turn the DC/AC disconnect switch OFF 32 Fig 2.3.2 Fig 2.3.3 Loosen the screws Remove the cover of the wiring box 33 After the cover is removed, it is then possible to remove the covers of the Threaded Conduit holes as shown in the figure 2.3.4 for the DC and AC cables feeding through the threaded conduit holes when wiring the inverter. Fig 2.3.4 Remove the covers for the cable through holes The following three sections describe the wiring for the AC, DC, and communication ports. The wiring shall be done in the wiring box for the SiE2900, SiE3840, SiE4900, and SiE5300. There is a pair of DC terminal blocks, two (2) RJ-45 connectors, and one (1) AC terminal block in the wiring box as shown in the figure 2.3.5. The DC terminal blocks are used to connect up to 4 PV strings in parallel in the wiring box. The RJ-45 connectors are used for external communication to a remote computer or terminal. The AC terminal block is used to connect to the utility grid through a circuit breaker and distribution panel according to national and local requirements. 34 1 Negative ground 1 Positvie ground PV String Fuse AC Terminal Block Ground Bar GFDI Fuse RJ45-R RJ45-L Fig 2.3.5 Wiring box front view WARNING! All electrical work shall be done in accordance with the local and with the National Electrical Code (NEC), ANSI/NFPA 70 and should follow the important safety instructions in this manual. WARNING! The National Electrical Code (NEC) states that the inverter must be connected to a dedicated circuit, and that no other outlets or devices can be connected to the same circuit. The NEC also imposes limitations on the size of the inverter and the 35 manner in which it is connected to the utility gird. WARNING! Make sure that you use suitable connecting cables for both the AC and DC wirings. The cable must be adequately dimensioned and suitably inert to temperature fluctuation, UV radiation and other possible hazards. Use #10 AWG to #6 AWG, 90°C (194°F) copper wire for all AC and DC wiring connections to the SiE Inverter. WARNING! PV arrays will be energized when exposed to light. Cover the arrays with opaque (dark) material during installation and wiring. Before wiring the SiE Inverter, it is necessary to determine the utility configuration that the inverter will be connected to. The SiE Inverter is default set for utility interconnection with neutral. However, it may be reconfigured for the utility without a neutral. The utility configuration jumper block, J210, is located on the control board as shown in the figure 2.3.6. The jumper block is used to set the SiE Inverter for connection to the commonly used utility configuration types shown in the figure 2.3.7. As shown in the figure 2.3.6, the P1 and P2 pins are used to configure the SiE Inverter for the grid types of 208 V and 240 V AC outputs with or without neutral. When the inverter is set for the utility configuration with neutral, it can automatically distinguish the utility voltage from each other and adjust the output AC voltage according the grid voltage. Note: When connecting the SiE Inverter to the utility, the voltage must 36 be compatible. P1 P2 P3 P1 P2 P3 J210 P1 P2 240V/208V With Neutral (Default) 240V Without Neutral P3 FAN Auto (Default) FAN On Fig 2.3.6 Utility configuration jumpers 37 208V Without Neutral With Neutral 120 WYE With Neutral 240 : 120 Split Phase With Neutral 240 Delta :120 Stinger 240 Neutral Neutral 0 120 0 0 24 120 12 0 12 120 24 120 Neutral 240 Without Neutral 208 Delta 240 208 Fig 2.3.7 2.3.1 8 20 8 24 20 0 24 0 Without Neutral 240 Delta Utility configurations Connection of the AC cable (see page 104 for additional info) Use the following procedure to wire the AC cables. 1. Open the Distribution panel and switch off the circuit breaker used to connect the inverter to the grid. 2. Use #10 AWG to #6 AWG, 90°C (194°F) copper wire for all AC wiring connections to the SiE Inverter. 3. Connect the cable GND to the screw of the ground bar labeled 4. Connect the cable N to the terminal labeled N of the AC terminal block. 38 . L1 wire connected to L1 terminal L2 wire connected to L2 terminal N terminal Equipment ground wire connected to ground bar Fig 2.3.1.1 5. AC Terminal Block for AC cable connections Connect the cable L1 to the terminal labeled Line1 of the AC terminal block. 6. Connect the cable L2 to the terminal labeled Line2 of the AC terminal block. 7. Tighten the screws with a torque of 1.7Nm (15.6 in-lb). 8. Reconfirm that all connections have been performed properly as described above and all screws are properly tightened. WARNING! Reconfirm that the circuit breaker to the main utility is switched OFF before connecting the power cable from the breaker to the AC terminal block. ! CAUTION! Ensure that the total impedance of the grid and the interconnected AC power cable shall be less than 1.25Ω. 39 WARNING! According to the National Electrical Code, ANSI/NFPA 70, each connection to a SiE Inverter must be installed with a dedicated double-pole circuit breaker in the main utility service panel. The breaker must be sized to handle the rated maximum output voltage and current of a SiE Inverter. Refer to Section 1.2 Specifications: Output over current protection, pages 3~6. No other appliances may be connected to the circuit breaker. 2.3.2 Connection of the DC cable The wiring box of the SiE Inverter is designed to have a pair of the DC terminal blocks which support up to four (4) independent PV strings to be connected in parallel in the wiring box and then feed into the inverter. The SiE Inverter is shipped with up to four (4) 15A, 600 VDC PV string fuses for the PV strings. For the SiE2900, it is shipped with three (3) 15A, 600 VDC PV string fuses, and therefore, the fourth pair of terminals (from left as shown in figure 2.3.2.1) shall not be used to connect to the PV string. Please refer to the section 5.4.2 for the replacement of the PV string fuses. 40 1 Negative ground 1 Positvie ground Fig 2.3.2.1 SiE2900 supports only three (3) PV string fuses CAUTION! ! According to National Electrical Code (NEC) Article 690.9, overcurrent protection may be required depending on the type and ratings of PV module configured in your system. The maximum input current is 25A for SiE4900/5300 (See Section 1.2 Specification: Maximum input current, pages 3 for SiE2900 and 3840). The maximum current allowed per string is 20A for all SiE models with string fuses. CAUTION! ! SiE Inverters are listed for no backfeed current. However, all other external source circuits and array wiring ampacity should be taken into account by system installers when determining the proper rating of PV string fuse, or a fire hazard may occur if there is short-circuit in a PV string. All 41 connections in PV system shall accord with NEC 690.9. There are two (2) terminals, labeled UNGROUNDED CONDUCTOR and GROUNDED CONDUCTOR, per PV string located in the wiring box used for the DC cable connections. The DC equipment ground cable shall be connected to the screw of the ground bar labeled in the wiring box of the SiE Inverter. All the screws shall be tightened with a torque of 1.7Nm (15.6 in-lb). Up to four (4) independent PV strings (4 pairs) can be connected to the SiE Inverter as shown in the figure 2.3.2.2. The PV strings will be connected in parallel in the wiring box. Fig 2.3.2.2 PV- terminal connection The SiE Inverter supports both negative and positive ground for PV strings connections. The JP14 and JP15 jumpers are used for the settings of the negative and positive ground. 42 CAUTION! ! PV arrays are energized when ex-posed to light. Use safe working practices when working on PV arrays. WARNING! Route the DC connection cables to the SiE Inverters away from any possible hazards that could damage the cables. WARNING! Hazardous voltage is still present on the device after disconnection of all PV DC inputs. Allow 5 minutes for the inverter to discharge the energy completely. 2.3.2.1 Connection of the DC wires for Negative Ground Arrays The SiE Inverter is shipped with a negative ground setting. It is set as shown in the figure 2.3.2.1.1. The JP14 and JP15 jumpers are placed on the lower positions to set to the negative ground and the red DC wire is connected to DCIN+ terminal, the black DC wire is connected to DCIN- terminal. In this case the positive polarity of the DC input voltage from the PV string shall be connected to the terminal labeled UNGROUNDED CONDUCTOR and the negative polarity of the DC input voltage from the PV string shall be connected to the terminal labeled GROUNDED CONDUCTOR as shown in the figure 2.3.2.1.2. 43 Fig 2.3.2.1.1 Negative Ground Setting and DC wires connections connect to PV+ connect to PV1 Negative ground GROUNDED CONDUCTOR UNGROUNDED CONDUCTOR Fig 2.3.2.1.2 1 Positvie ground UNGROUNDED CONDUCTOR GROUNDED CONDUCTOR DC terminal blocks for DC cable connection in Negative Ground 44 CAUTION! ! Identify the different polarity of DC voltage on each PV string and connect respectively to the input terminals marked “UNGROUNDED CONDUCTOR” and “GROUNDED CONDUCTOR”. Make sure the DC voltage that PV arrays generate is less than 600 VDC in any case. ∙ The “+” cable of the DC input voltage shall be connected to the terminal labeled UNGROUNDED CONDUCTOR and the “-” cable of the DC input voltage shall be connected to the terminal labeled GROUNDED CONDUCTOR. ∙ DO NOT use wire nuts to join any wires together or to make any connections anywhere in the PV system. Wire nuts are a frequent cause of unreliable connections, resistive connections, and ground faults. ∙ Connect the equipment ground cable to the screw of the ground bar labeled . ∙ Tighten the screws with a torque of 1.7Nm (15.6 in-lb). 2.3.2.2 Connection of the DC wires for Positive Ground Arrays The SiE Inverter also supports PV arrays with positive ground for some applications. As shown in the figure 2.3.2.2.1, the JP14 and JP15 jumpers are placed on the higher positions to set to the positive ground. And the red DC wire is connected to DCIN- terminal and the black DC wire is connected to DCIN+ terminal. In this case the positive polarity of the DC input voltage from the PV string shall be connected to GROUNDED CONDUCTOR terminal and the negative polarity of the DC input voltage from the PV string shall be connected 45 to UNGROUNDED CONDUCTOR terminal as shown in the figure 2.3.2.2.2. Fig 2.3.2.2.1 Positive Ground Setting and DC wire connections connect to PV+ Negative ground 1 Positvie ground 1 UNGROUNDED CONDUCTOR Fig 2.3.2.2.2 GROUNDED CONDUCTOR DC terminal blocks for DC cable connection in Positive Ground 46 CAUTION! ! The Positive Polarities of the DC input voltage from a PV string shall be correctly connected to the “GROUNDED CONDUCTOR” terminal and the Negative Polarity of the DC input voltage from a PV string shall be connected to the “UNGROUNDED CONDUCTOR” terminal. Make sure the DC voltage that PV arrays generate is less than 600 VDC in any case. ∙ The “+” cable of the DC input voltage shall be connected to the terminal labeled “GROUNDED CONDUCTOR” and the “-” cable of the DC input voltage shall be connected to the terminal labeled “UNGROUNDED CONDUCTOR”. ∙ Avoid using wire nuts to join any wires together or to make any connections anywhere in the PV system. Wire nuts are a frequent cause of unreliable connections, resistive connections, and ground faults. ∙ Connect the equipment ground cable to the screw of the ground bar labeled . ∙ Tighten the screws with a torque of 1.7Nm (15.6 in-lb). 2.3.2.3 Connection of the DC wires for Negative Ground Arrays without Internal DC Fuses SiE Inverter provides a way of PV arrays connections without internal DC fuses for negative ground when external DC fuses are used. As shown in the figure 2.3.2.3.1, the JP14 and JP15 jumpers are placed on the lower positions to set to the negative ground and the red DC wire is connected to DCIN+ terminal, the black DC wire is connected to DCIN- terminal. In this case the positive 47 polarity of the DC input voltage from the PV string shall be connected to the terminal labeled “UNGROUND CONDUCTOR (WITHOUT STRING FUSES)” and the negative polarity of the DC input voltage from the PV string shall be connected to the terminal labeled “GROUNDED CONDUCTOR” as shown in the figure 2.3.2.3.2. Fig 2.3.2.3.1 Negative Ground Setting and DC wires connections array without internal DC fuses 48 connect to PV- 1 Negative ground 1 Positvie ground UNGROUNDED CONDUCTOR GROUNDED CONDUCTOR connect to PV+ Fig 2.3.2.3.2 DC terminal blocks for DC cable connection in Negative Ground array without internal DC Fuses CAUTION! ! Identify the different polarity of DC voltage on each PV string and connect respectively to the input terminals marked “UNGROUNDED CONDUCTOR (WITHOUT STRING FUSES)” and “GROUNDED CONDUCTOR”. Make sure the DC voltage that PV arrays generate is less than 600 VDC in any case. CAUTION! ! Even though the internal DC fuses are not used, hazardous voltage is still present on the fuse holders. The fuse puller must be placed on the fuse holder to prevent the risk of electrical shock. CAUTION! ! The terminal labeled “UNGROUNDED CONDUCTOR” is not 49 used when the internal DC fuses are not used, all wires connected to this terminal must be removed. ∙ The “+” cable of the DC input voltage shall be connected to the terminal labeled UNGROUNDED CONDUCTOR (WITHOUT STRING FUSES) and the “-” cable of the DC input voltage shall be connected to the terminal labeled GROUNDED CONDUCTOR. ∙ Even though the internal DC fuses are not used, hazardous voltage is still present on the fuse holders. The fuse puller must be placed on the fuse holder to prevent the risk of electrical shock. ∙ The terminal labeled “UNGROUNDED CONDUCTOR” is not used when the internal DC fuses are not used, all wires connected to this terminal must be removed. ∙ DO NOT use wire nuts to join any wires together or to make any connections anywhere in the PV system. Wire nuts are a frequent cause of unreliable connections, resistive connections, and ground faults. ∙ Connect the equipment ground cable to the screw of the ground bar labeled . ∙ Tighten the screws with a torque of 1.7Nm (15.6 in-lb). 2.3.2.4 Connection of the DC wires for Positive Ground Arrays without Internal DC Fuses The SiE Inverter also supports positive ground for some applications without internal DC fuses when external DC fuses are used. As shown in the figure 2.3.2.4.1, the JP14 and JP15 jumpers are placed on the higher positions to set to the positive ground. And the red DC wire is connected to DCIN- terminal and the black DC wire is connected to DCIN+ terminal. In this case the positive 50 polarity of the DC input voltage from the PV string shall be connected to the terminal labeled “GROUNDED CONDUCTOR” and the negative polarity of the DC input voltage from the PV string shall be connected to the terminal labeled “UNGROUNDED CONDUCTOR (WITHOUT STRING FUSES)” as shown in the figure 2.3.2.4.2. Fig 2.3.2.4.1 Positive Ground Setting and DC wires connections array without internal DC fuses 51 connect to PV+ 1 Negative ground 1 Positvie ground UNGROUNDED CONDUCTOR GROUNDED CONDUCTOR connect to PV- Fig 2.3.2.4.2 DC terminal blocks for DC cable connection in Positive Ground array without internal DC Fuses CAUTION! ! The Positive Polarities of the DC input voltage from a PV string shall be correctly connected to the “GROUNDED CONDUCTOR” terminal and the Negative Polarity of the DC input voltage from a PV string shall be connected to the “UNGROUNDED CONDUCTOR (WITHOUT STRING FUSES)” terminal. Make sure the DC voltage that PV arrays generate is less than 600 VDC in any case. CAUTION! ! Even though the internal DC fuses are not used, hazardous voltage is still present on the fuse holders. The fuse puller must be placed on the fuse holder to prevent the risk of electrical shock. CAUTION! ! The terminal labeled “UNGROUNDED CONDUCTOR” is not 52 used when the internal DC fuses are not used, all wires connected to this terminal must be removed. ∙ The “+” cable of the DC input voltage shall be connected to the terminal labeled “GROUNDED CONDUCTOR” and the “-” cable of the DC input voltage shall be connected to the terminal labeled “UNGROUNDED CONDUCTOR (WITHOUT STRING FUSES)”. ∙ Even though the internal DC fuses are not used, hazardous voltage is still present on the fuse holders. The fuse puller must be placed on the fuse holder to prevent the risk of electrical shock. ∙ The terminal labeled “UNGROUNDED CONDUCTOR” is not used when the internal DC fuses are not used, all wires connected to this terminal must be removed. ∙ DO NOT use wire nuts to join any wires together or to make any connections anywhere in the PV system. Wire nuts are a frequent cause of unreliable connections, resistive connections, and ground faults. ∙ Connect the equipment ground cable to the screw of the ground bar labeled . ∙ Tighten the screws with a torque of 1.7Nm (15.6 in-lb). 2.3.3 Connection of the Communication cable The SiE Inverter supports two common data interface standards, RS-232 and RS-485 that will be used to communicate to the remote computer or terminal. Only one of the communication interfaces can work at a time. As shown in the figure 2.3.3.1, there are two RJ-45 connectors, RJ45-R and RJ45-L that are located on the bottom of the wiring box. The pin numbers of the RJ-45 connectors and the corresponding signals are described in the figure 2.3.3.2 53 below. If the RS485 is used as the external communication interface and the inverter is the last device within the RS485 loop, then the termination switch shall be put to ON position (shown in the figure 2.3.3.4). Users shall open the front lid of the wiring box to switch the termination switch to ON position. The termination switch is default set to OFF position. Termination ON/OFF RS232 Termination RJ45-L Fig 2.3.3.1 RJ45-R Positions of the communication ports and termination switch RJ45-L 8 1 Top view RJ45-R 8 1 Top view Pin 1 TXD (RS232) 2 RXD (RS232) 3 Not used 4 GND 5 GND 6 Not used 7 TX A (RS485) 8 RX B (RS485) Pin 1 Factory reserved 2 Factory reserved 3 5V 4 GND 5 GND 6 5V 7 TX A (RS485) 8 RX B (RS485) 54 Fig 2.3.3.2 RJ-45 Pins and Signals As shown in the figure 2.3.3.2, the RS-232 signal pins, TXD and RXD, are only on the RJ45-L. Therefore, only the RJ45-L can be used to connect to the remote PC or terminal when the RS-232 interface is selected. The cable with the part number of WABG-0918S, which is 180 cm (70.9 inches) in length, is dedicated for the communications between SiE Inverters (SiE5300, SiE4900, SiE3840 and SiE2900) and a computer. Its wire connection between RJ45 and RS-232 is shown in the figure 2.3.3.3. If RS-485 interface is selected, both RJ-45 connectors will be used for the cascaded RS-485 connections shown in the figure 2.3.3.4. DB9 Female RJ45 Pin 8 Pin 1 RJ45 DB9 Female Pin 5 Pin 5 Pin 2 Pin 1 Pin 3 Pin 2 Fig 2.3.3.3 RS-232 connection 55 Fig 2.3.3.4 2.4 RS-485 connection Wiring inverter in parallel SiE Inverters can be connected in parallel when more power is required. In the parallel configuration, each inverter shall connect to its own PV array. It is not recommended to connect one PV array to more than one inverter. This may cause the inverter to work abnormally. The figure 2.4.1 below shows the connections between inverters and PV arrays in parallel configuration. 56 Fig 2.4.1 Parallel configuration of inverter 57 3. Operation 3.1 Overview The SiE Inverter will operate automatically. Once the solar insolation is strong enough to generate DC input voltage over the pre-set threshold value, the inverter turns itself on. The inverter feeds power into the grid after input voltage over the PV start voltage and all necessary conditions are checked and fulfilled. The inverter goes into monitoring mode from the grid feeding mode if the DC input voltage is under the minimum MPP voltage. Once the DC input voltage falls below the pre-set threshold value, the inverter will shut itself down. There are five main operating modes described in detail below. System Check : When the DC input voltage goes above the minimum MPP voltage, the inverter powers up and enters the system check mode. In this operating mode, the inverter sets the initial values, runs diagnostics, and detects all parameters that will be stored for future use. This stage takes only a few seconds. Monitoring : After the system check is done, the inverter enters the monitoring mode. In this operating mode, the inverter monitors all parameters on both AC and DC sides in order to ensure that connecting to the grid/mains is safe. All conditions must be fulfilled and last for a certain period of time, then the system will enter the grid feeding mode. It takes 300 seconds to complete the monitoring mode after a 58 grid failure, otherwise it takes 20 seconds normally. If any parameter except the DC input voltage is under the threshold value, the inverter goes to Fault mode. Grid/MPPT : After the monitoring mode, the SiE Inverter confirms that all conditions necessary for feeding the power into the utility grid are fulfilled. The inverter will turn on the AC relays and start feeding the AC power to the grid. In this operating mode, the inverter continues to convert the DC power generated by the PV array to the AC power that is then fed into the grid. The inverter may stop feeding the power and go back to monitoring mode once any condition for grid feeding mode is found not satisfied/out of acceptable range. Fault : When fault(s) occurs and have been detected in the operating mode described above, the inverter will terminate the present state, stop feeding power to the grid, and then jump into the fault mode that executes a preset sequence. When the faults have been cleared for a certain period of time, the inverter will leave fault mode and enter system check mode. Some faults, like component failure, will cause the inverter go into the idle mode that will need service staff to clear the errors. Idle : Once the inverter jumps into this operating mode, the inverter has detected a malfunction of the ENS and has stopped feeding the power to the grid for safety reasons. Normally this is a failure that cannot be removed in the field. 59 It needs service personnel coming to remove the problems and put the system back to operation. 3.2 Operation Feature 1. Anti-Island: When an “island” condition is detected, the inverter will stop feeding the power to the grid and/or the load. The “island” is defined as a grid tied inverter maintaining operation and feeding power to a load that has been isolated from the utility power source. This causes an automatic shutdown of the inverter when there is an electrical disturbance on the utility grid. This is a safety feature which is primarily meant to prevent electrical shock to staff who might be working on the grid wires. 2. Unity Power Factor: The SiE Inverter intends to feed the power with a unity power factor (PF = 1) to the utility during operation. The inverter continues sensing the phase of the utility voltage, and constructs the output current waveform in phase with the utility voltage. 3. Maximum Power Point Tracking: In order to find the most efficient way of utilizing the solar energy, SiE Inverters are designed to track and absorb the maximum power from the PV array. The Maximum Power Point Tracking (MPPT) function is employed in the embedded control software to achieve this intended purpose. 60 4. GFDI Protection and Self Detection Function: All SiE Inverter series products shall have a GFDI (Ground Fault Detection Interrupter) protection and a self-detect function regarding to NEC Section 690.5. For these functions to be active, SiE Inverters must be under a sufficient DC voltage to power on the LCD on front panel and also the internal detect function. To test and verify SiE Inverter products, please follow the instructions below: A. Remove the opaque (dark) material cover on PV array. B. Turn the SiE Inverter switch on wiring box to OFF, then connect grid voltage onto SiE Inverter. C. Switch AC/DC Disconnect to “ON” to apply DC and AC voltage. If DC voltage is sufficient, 3 LED will blink at the same time. Then the green LED starts to blink and SiE Inverter will enter into a self-checking mode. D. SiE Inverter will enter to Grid / MPPT mode after 30 seconds if there is no Grid fault detected, and the Green LED will stop blinking, will remain on, and the SiE Inverter will begin to operate normally. If a Grid fault was detected, the SiE Inverter will wait for 5 minutes prior to re-start. If the LCD display does not light up, then follow instructions given on page 37 and 38 to check DC wiring type. 61 3.3 LED Indication There are three LED’s on the front panel of the SiE Inverter (SiE5300 in this example) which display the operating status of the inverter as shown in figure 3.3.1. The detailed explanations of the status and the corresponding LED indicators are described in the following table. Fig 3.3.1 Front panel of the SiE Inverter 62 LED Indication Table LED indicators Operating status Description Green Yellow Red Green Yellow Red Green Yellow Red Green Yellow Red Green Yellow Red Green Yellow Red Green Yellow Red Green Yellow Red Green Yellow Red Green Yellow Red Green Yellow Red Initialization The SiE Inverter is in initialization. System Check mode The inverter is in System Check mode. Monitor mode The inverter is in Monitoring mode. Grid/MPP mode The inverter is in Grid Feeding mode. De-rating Power de-rating is performed. Warning Warning is detected. Low Insolation The inverter is in low insolation. Fault mode The inverter is in Fault mode. Ground Fault Ground fault detected. Idle mode The inverter is in Idle mode. Night Time There is no DC power coming from PV array. System is powered off. : LED ON : LED OFF : LED ON/OFF 0.9/0.1 Sec : LED ON/OFF 0.25/0.25 Sec : DON’T CARE : LED ON/OFF 0.1/0.9Sec 63 3.4 LCD Display The SiE Inverter has a 2 x 16 LCD to show the operating status, input/output data, and error messages. As long as the DC input voltage is above the pre-set threshold value, the LCD will display the information following the process flow illustrated in the figure 3.4.1. The process flow could be the regular procedure, fault procedure or idle procedure. The regular procedure is that the system goes from power-on, system check, monitoring, and then grid feeding mode without any fault condition detected. The inverter is expected to work in the regular procedure and feed the power to the grid. During the system check and monitoring mode when a fault condition is detected, then the system will go into the fault procedure. The system will return to regular procedure once the fault condition is cleared. One obvious example is that an “island” condition is detected due to the grid failure and later the fault condition is cleared when the power comes back. If a fault occurs that does not clear on its own, then the system will enter the idle procedure which needs a service staff to clear the fault and reset the system. These three procedures are illustrated in the figure 3.4.1. The following figures explain how the display works for the regular procedure. Initial Mode : When the DC input voltage rises above the pre-set threshold value, the SiE Inverter is powered up and will show the company name and model name (SiE3840 in this example) on the LCD as shown below. 64 S I L I CON E NE RGY Si E3 8 4 0 3 seconds ↓ After 3 seconds, software versions of two embedded CPU’s, Sequential and Current controller, will be displayed on the LCD. And then the serial number of the inverter and the address for the communication port are displayed. S EQ Ve r s i o n X . XX CUR Ve r s i o n X . XX 3 seconds ↓ S / N XXXXXXXXXXXX ADDR E S S XXX 3 seconds ↓ And then three (3) seconds later, it displays the setting of the nominal grid voltage configuration. The grid type setting of 208/240 with neutral is used as the display example shown below. For the grid type setting, please refer to section 2.3 Wiring the Inverter. Gr i d L1 Ty p e 1 2 0V L2 3 seconds ↓ 65 1 2 0V If the grid type is set to 240 Vac without neutral, then the display will look as shown in the figure below. Gr i d Ty p e L1 - L2 2 4 0V 3 seconds ↓ Three (3) seconds later, the LCD will show the voltage setting for the inverter to drop the grid connection. Using the grid type of 208/240 with neutral as an example, the LCD will display the setting of the Vl-nH that is the line-to-neutral (rms) high threshold voltage setting when the inverter disconnects itself from the power grid when abnormally high line-to-neutral AC voltage is detected. Also, the setting of the clear time that is the total duration of time to disconnect the output from the AC grid is displayed. The clear time is the summation of the de-bounce time and the hardware delay time. This delay is necessary to avoid nuisance trips. After the settings of the Vl-nH and its clear time, the settings of the Vl-nL and its clear time will be displayed for three (3) seconds. Vl-nL is the line-to-neutral (rms) low threshold voltage setting at which the inverter disconnects itself from the power grid when abnormally low line-to-neutral AC voltage is detected. V l - nH C l r t XXX . XV < XXX 3 seconds ↓ 66 Cy c s V l - nL C l r t XXX . XV < XXX Cy c s 3 seconds ↓ If the grid type setting of 240 Vac without neutral is used as an example, the settings of the VacH and its clear time will be displayed. The VacH setting is the line-to-line (rms) high threshold voltage setting at which the inverter disconnects its output from the AC power grid when abnormally high line-to-line AC voltage is detected. After the setting of the VacH is displayed, the setting of the VacL will be displayed for 3 seconds. Va cH C l r XXX . XV t < XXX Cy c s 3 seconds ↓ Va cL C l r XXX . XV t < XXX Cy c s 3 seconds ↓ Then the high and low threshold settings of the AC frequency and the clear time will be shown for three (3) seconds. When the AC frequency reaches the high or low threshold setting, the inverter will disconnect its output from the AC grid. 67 F a cH C l r XX . XXH z t < XXX Cy c s 3 seconds ↓ F a cL C l r XX . XXH z t < XXX Cy c s 3 seconds ↓ Then the LCD will display the setting of the AC high voltage limit above which value, inverter will reduce the output power until the AC voltage drops within this setting. If the grid type is set to 208/240 with neutral, then the display will look as shown in the figure below. Va cH L imi t L -N XXX . XV 3 seconds ↓ Then the setting of the PV start voltage and re-connection time will be displayed. The re-connection time is the remaining delay time for the inverter to re-connect to the grid after the fault(s) is(are) cleared. Vp vS t a r t XXX . XV Re c o n n e c t 3 seconds ↓ 68 XXX s System Check Mode : After the basic information of the inverter is displayed, the system enters the System Check mode which is then indicated on the LCD. Mo d e Sy s t em Ch e c k i n g During the system checking, if the DC input voltage is not reaching the point of the PV start voltage setting, , then the following message will be shown on the LCD and the system will stay at this step. Low I n s o l a t i o n During the system checking, if the grid is not connected to the inverter, then the following message will be shown on the LCD and the system will stay at this step. Mo d e Gr i d F a u l t NA Monitoring Mode : Once the system check is done, the inverter goes into the monitoring mode. If all data needed for grid feeding is in the acceptable range, the system will keep monitoring those data for a period of time. The following information tells users that the system will go into the grid feeding mode in XXX seconds and then 69 show the measured data of the DC input voltages and the existing voltage and frequency on the grid side. Mo d e Mo n i t o r i n g Ne x t Co n n e c t XXX s 3 seconds ↓ Vp v XXX V 3 seconds ↓ Va c XXX . X F a c XX . X V Hz 3 seconds ↓ During the monitoring mode, if the DC input voltages fall under the PV start voltage setting, the system stays in this mode and shows the information as follows. The system will still keep measuring the parameters of both DC and AC and display on the LCD. Mo d e Low Mo n i t o r i n g I n s o l a t i o n 3 seconds ↓ 70 Vp v XXX V 3 seconds ↓ Va c XXX . X F a c XX . X V Hz 3 seconds ↓ Grid/MPPT Mode : After the system enters the grid feeding mode, it will show the following information in order and repeatedly until the system goes to other operating modes. The first screen shows the current operation mode. Mo d e G r i d / MP P 3 seconds ↓ Next messages are the up-to-minute data of the DC input voltages and the AC output voltage. First two messages are for the PV arrays and the other two messages are for the output power. Vpv is the incoming voltages from PV array. Wpv is the incoming power of PV array in watts. Vac, Pac, Iac, and Fac are the voltage, power, current, and frequency that the inverter feeds to the grid. 71 Vp v XXX V Wp v XXXX W 3 seconds ↓ Va c XXX . X V P a c XXXX W 3 seconds ↓ F a c XX . X Hz I a c XX . X A 3 seconds ↓ The next message shows the accumulated energy in kWh and period of time in hours for the inverter delivering the power to the grid since the inverter has been powered on and operated for today. E t o d a y XXX . X H t o d a y XX . X kWh Hr 3 seconds ↓ The next message shows the total accumulated energy in kWh and period of time in hours for the inverter delivering the power to the grid up-to-date since the inverter has been installed and operated. 72 Ea c XXXXXX . X H XXXXX kWh Hr 3 seconds ↓ Power De-Rating Message: There are five possible de-rating displays which will be shown if power de-rating is detected in grid feeding mode. Only one occurrence that causes de-rating can be detected at a time. Therefore, only one of the following messages will be displayed if a power de-rating occurs. When Temp message is presented, the power de-rating is caused by the over temperature. The Ipv message shows that the power de-rating is caused by restricting the DC input current to the maximum limit. The Iac and Pac messages illustrate the power de-rating is caused due to restriction of the maximum output AC current and power. The VacH message shows that the power de-rating is caused by the high AC voltage. Mo d e De r a t i n g T emp Mo d e De r a t i n g I p v 73 Mo d e De r a t i n g I a c Mo d e De r a t i n g P a c Mo d e De r a t i n g Va cH Warning Message : There are three possible warning messages which will be shown when situations occur in grid feeding mode. When EEPROM message is displayed, the system has encountered a failure accessing the EEPROM. For the COMM message, it represents failure of the communication function. For the FAN BLOCK message, it shows that the fan has stopped running. These warnings could be happening simultaneously. Wa r n i n g E E P R OM 74 Wa r n i n g C O MM Wa r n i n g F AN BLOCK Fault Mode : The messages for the fault procedure are as follows. It shows the fault mode, serial number of the inverter, software versions of the sequential and current controllers and then the error messages which are listed in the Error Message Table on section 3.6. Mo d e S / N F a u l t XXXXXXXXXXXX 3 seconds ↓ S EQ Ve r s i o n X . XX CUR Ve r s i o n X . XX 3 seconds ↓ 75 Mo d e e r r o r F a u l t me s s a g e 3 seconds ↓ There are several error messages that show the detailed conditions causing the system to go into the fault mode. For example, the messages shown below describe that the frequency on AC grid is too high (H) or too low (L). And after three (3) seconds, the message shows the present frequency and the frequency that caused the system to go into fault mode. Mo d e F a u l t F a cX X: H or L 3 seconds ↓ T r i p a t XX . XH z P r e s e n t XX . XH z 3 seconds ↓ The message below shows the AC voltage is too high (H) or too low (L). And then it displays the real AC voltage on the grid and voltage causing the system to go into fault mode. 76 Mo d e F a u l t Va cX X: H or L 3 seconds ↓ T r i p a t XXX . XV P r e s e n t XXX . XV 3 seconds ↓ The message below shows the PV DC voltage is too high. Mo d e F a u l t Vp vH 3 seconds ↓ T r i p a t XXX . XV P r e s e n t XXX . XV 3 seconds ↓ The following message indicates that the AC Line 1 and/or Line 2 voltage to neutral is/are too high (H) or too low (L). 77 Mo d e F a u l t Va cL1 X Va cL2 X X: H or L 3 seconds ↓ Idle Mode : The messages for idle mode are as follows. It shows the operating mode, serial number of the inverter, software versions of the sequential and current controllers and then the error messages which are listed in the Error Message Table on section 3.6. Mo d e S / N I d l e XXXXXXXXXXXX 3 seconds ↓ S EQ Ve r s i o n X . XX CUR Ve r s i o n X . XX 3 seconds ↓ Mo d e e r r o r I d l e me s s a g e 3 seconds ↓ 78 Fig 3.4.1 SiE Inverter LCD display lay-out 79 3.5 Communication There are two types of communication methods, RS-232 and RS-485 supported in the SiE Inverters that may be connected to an external computer or terminal equipped with either RS-232 and/or RS-485. Only one type of communication can be used at a time. 3.6 Explanations of Error Messages In the event of a fault, the inverter will stop feeding the AC voltage to the utility grid and display the error message on the LCD. Qualified service personnel shall do the analysis, measurement, and debug if needed according to the error message in order to resume normal conditions. It is recommended to screen out the fault condition(s) by referring to the table below. Then remove the fault condition(s) to return the inverter to a normal condition and continue to feed AC voltage to the utility. Please contact Silicon Energy or your service representative if the same error message persists. 80 Error Message Table Error Message Description GridNA No AC voltage is detected on the grid side. Drift Fac Islanding is detected. VacH The AC voltage of utility grid is over the upper limit. VacL The AC voltage of utility grid is under the lower limit. FacH The frequency of AC voltage of the utility is over the upper limit. FacL The frequency of AC voltage of the utility is under the lower limit. VpvH The DC voltage of PV array is over the upper limit. Imax_AC Over current on the AC side. InvTempMax The internal temperature of the inverter exceeded the safe operating limit. Relay Open Relay test failed. Relay Close VacL1 H The voltage between L1 and neutral is over the upper limit. VacL1 L The voltage between L1 and neutral is under the lower limit. VacL2 The voltage between L2 and neutral is over the upper limit. 81 Error Message VacL2 L Description The voltage between L2 and neutral is under the lower limit. MOV Fault,AC High voltage protection function failed in AC side. MOV Fault,DC High voltage protection function failed in DC side. GFDI A grounding fault is detected. The ground fault fuse will be blown. DCInjectCurH Over DC current injected into the AC grid is detected. VdcbusH Internal DC bus voltage is over the upper limit. Internal COMM Internal communication failed. Watchdog Internal watchdog function triggered. Idc Test The DC injection current monitoring function failed. Offset Offset check for grid monitoring failed. Temp. Sensor The internal temperature sensor failed. RAM Test Memory failed EEPROM Test EEPROM test failed System Error The system failed. Version Error The firmware version is not correct. 82 Error Message Description CPU Delta Fac Internal measurement comparison error or defective CPU Delta Vac hardware. CPU Delta GFDI CPU Delta Idc IpvH Over current on the DC side. Driver Fault Driver circuit or power device failed. CalDataError Calibration data is out of range. CalDataLoss Calibration data is lost. Ibuck Over Internal converter over current. Converter Error DC/DC hardware failed. 83 4. Warranty information Warranty Period A period of 10 years is warranted from the date of your purchase of the SiE Inverter series Products. Warranty Terms SILICON ENERGY hereby provides this written Limited Warranty covering the Products with the models SiE2900(-PG), SiE3840(-PG), SiE4900(-PG) and SiE5300(-PG), and if the Buyer discovers and notifies SILICON ENERGY in writing of any defect in material or workmanship within the applicable warranty period stated above, then SILICON ENERGY may, at its option: repair or replace the Product; or issue a credit note for the defective Product; or provide the Buyer with replacement parts for the Product. The Buyer will, at its expense, return the defective Product or parts thereof to SILICON ENERGY in accordance with the return procedure specified below. SILICON ENERGY will, at its expense, deliver the repaired or replaced Product or parts to the Buyer. Exclusion of Liability Any warranty of SILICON ENERGY will not apply if the Buyer is in default under the Purchase Order Agreement or where the Product, any part or its original label thereof is 1. Damaged by misuse, accident, negligence or failure to maintain the same as specified or required by SILICON ENERGY. 2. Damaged by external hazard or force majeure such as lightning strikes, storm, and/or fire. 84 3. Damaged by modifications, alterations or attachments thereto which are not authorized by SILICON ENERGY. 4. Transported, installed or operated contrary to this instructions of SILICON ENERGY. 5. Opened, altered, modified or disassembled in any way without SILICON ENERGY’s consent. 6. Used in combination with items, articles or materials not authorized by SILICON ENERGY. SILICON ENERGY reserves the rights to determine whether the problem exists within the Product. The Buyer may not assert any claim that the Products are not in conformity with any warranty until the Buyer has made all payments to SILICON ENERGY provided for in the Purchase Order Agreement. Product Return Procedure On-site Inspection & Repair If a Product requires warranty service, contact your merchant or SILICON ENERGY directly. After your application is received, the service will be implemented by our qualified technician in the installation field. Problem isolation processes include, 1. Qualified service technician on site with digital measurement equipment, including but not limited to digital voltmeter and current clamp meter. 2. Isolation of the inverter from the external electrical environment under the guidance of a qualified SILICON ENERGY service representative. 3. Full declaration of the environmental conditions currently in place and historically preceding the failure, including but not limited to the utility grid connection and PV generator array configuration. 85 Notice before Return (RMA Number Required) In case the Product fails to function and requires a Factory Service after diagnosis, the Product must be sent back using the proper shipping box and the packing materials with an issued RMA number required prior to return. A copy of the original purchase invoice is also required to be included in the package. In addition, product failure information should be attached with the returned Product. Please provide as much detail as possible. 1. Model number and serial number shown on the label. 2. Fault message on the panel and how it reproduces. 3. Detailed descriptions before & after the fault condition and the utility grid system connected. Factory Service 1. Replace the defective Product with a new unit if it is purchased within 90 days. 2. Replace the defective Product with a refurbished unit if it is purchased after 90 days. NOTE: All remaining warranty periods will remain effective for the replacement inverter or parts. NOTE: Unauthorized returns will not be accepted and will be returned at the shipper’s expense. NOTE: All component replacement and its service labor costs are covered by the warranty in effect. Once the warranty expires, a Product found upon inspection by SILICON ENERGY, to be in specification is subject to an evaluation fee and applicable freight charges, if any. 86 WARRANTY REGISTRATION FORM It is very important to you that you register the product. Changes in product technologies as well as new developments in software and features may make it necessary for us to notice you the related information about your inverter. Please register immediately after purchasing. Company : Product Type : City, State Zip : Serial Number(s) : Phone : Date Installed : E-mail : System Description : PV array size/type, Connection… Your Comment : 87 __ 5. Technical Documentation 5.1 Outline Drawing Fig 5.1.1 Outline Drawing of SiE2900/3840 88 Fig 5.1.2 Outline Drawing of SiE4900/5300 89 5.2 Efficiency Efficiency of the SiE Inverters 100 Efficiency, % 95 90 85 80 200 Vdc 75 250 Vdc 400 Vdc 70 0% 10% 20% 30% 40% 50% 60% 70% 80% 90% 100% % of Rated Output Power Fig 5.2.1 CEC Efficiency of the SiE2900 = 96.0% (240V) 100 Efficiency, % 95 90 85 80 200 Vdc 75 250 Vdc 400 Vdc 70 0% 10% 20% 30% 40% 50% 60% 70% 80% 90% % of Rated Output Power Fig 5.2.2 CEC Efficiency of the SiE2900 = 95.5% (208V) 90 100% 100 Efficiency, % 95 90 85 80 200 Vdc 75 250 Vdc 400 Vdc 70 0% 10% 20% 30% 40% 50% 60% 70% 80% 90% 100% % of Rated Output Power Fig 5.2.3 CEC Efficiency of the SiE3840 = 96.0% (240V) 100 Efficiency, % 95 90 85 80 200 Vdc 75 250 Vdc 400 Vdc 70 0% 10% 20% 30% 40% 50% 60% 70% 80% 90% % of Rated Output Power Fig 5.2.4 CEC Efficiency of the SiE3840 = 95.5% (208V) 91 100% 100 Efficiency, % 95 90 85 80 230 Vdc 75 275 Vdc 400 Vdc 70 0% 10% 20% 30% 40% 50% 60% 70% 80% 90% 100% % of Rated Output Power Fig 5.2.5 CEC Efficiency of the SiE4900 = 96.0% (240V) 100 Efficiency, % 95 90 85 80 230 Vdc 75 275 Vdc 400 Vdc 70 0% 10% 20% 30% 40% 50% 60% 70% 80% 90% % of Rated Output Power Fig 5.2.6 CEC Efficiency of the SiE4900 = 96.0% (208V) 92 100% 100 Efficiency, % 95 90 85 80 230 Vdc 75 275 Vdc 400 Vdc 70 0% 10% 20% 30% 40% 50% 60% 70% 80% 90% 100% % of Rated Output Power Fig 5.2.7 CEC Efficiency of the SiE5300 = 96.0% (240V) 100 Efficiency, % 95 90 85 80 230 Vdc 75 275 Vdc 400 Vdc 70 0% 10% 20% 30% 40% 50% 60% 70% 80% 90% % of Rated Output Power Fig 5.2.8 CEC Efficiency of the SiE5300 = 95.5% (208V) 93 100% 5.3 De-rating Operation The conditions when the SiE Inverter will take into account and then regulate the output and/or restrict the input power to ensure the system is in a safe operation are described in detail below. Temperature The SiE Inverter will monitor the temperature on the heat sink. Once the temperature exceeds 78°C (172.4°F) the system will reduce the output power until the temperature drops under the critical value. The SiE Inverter will shut down the power output to the grid if the temperature reaches 82°C (179.6°F). If this occurrence happens often, it is necessary to check whether the inverter is mounted at an appropriate place with good ventilation and not directly exposed to sunlight. Input DC current When the input current from the PV strings is about to exceed the maximum limit, the SiE Inverter will restrict it to the operating limit in order to prevent damage to the inverter. If this occurrence happens frequently, it is necessary to check whether the PV array is configured properly to supply the DC current within the maximum limit of the inverter. Output AC power The maximum power that the SiE Inverter feeds to the grid is limited according to the specifications listed in Section 1.2. Even though the output current does not reach the maximum current limit, the SiE Inverter will still automatically restrict the output current to keep the output power within the maximum power limit when the output voltage is too high. Output AC current The maximum current that the SiE Inverter feeds to the grid is limited 94 according to the specifications listed in Section 1.2. Even though the output power does not reach the maximum power limit, the SiE Inverter will still restrict the output current within the maximum current limit when the output voltage is too low. Output AC voltage When the inverter is connected to a grid system with long and/or undersized wire, its output voltage may be higher than the AC high threshold voltage setting. This will cause the inverter to disconnect due to these voltage deviations, instead of it being due to abnormal voltages which happened in the grid. The SiE Inverter will maintain a setting of AC high voltage which is less than the setting of high threshold voltage. Once the AC voltage reaches the AC high voltage setting, the SiE Inverter will restrict the output current to keep the AC voltage equal to or less than the AC high voltage setting so that the inverter continues to produce output power to the grid, although it is not the maximum output power. 3000 2700 Power (W) 2400 2100 375VDC-240VAC 1800 500VDC-240VAC 250VDC-240VAC 1500 375VDC-208VAC 1200 500VDC-208VAC 900 250VDC-208VAC 600 300 0 25 50 55 60 65 70 75 80 Ambient Temp(C) Fig 5.3.1 Temperature derating curve of the SiE2900 95 Power (W) 4000 3700 3400 3100 2800 2500 2200 1900 1600 1300 1000 700 400 100 -200 375VDC-240VAC 500VDC-240VAC 250VDC-240VAC 375VDC-208VAC 500VDC-208VAC 250VDC-208VAC 25 50 53 55 60 65 70 75 80 Ambient Temp(C) Fig 5.3.2 Temperature derating curve of the SiE3840 5000 4500 Power (W) 4000 3500 375VDC-240VAC 3000 500VDC-240VAC 250VDC-240VAC 2500 375VDC-208VAC 2000 500VDC-208VAC 1500 250VDC-208VAC 1000 500 0 25 50 53 55 60 65 70 75 80 Ambient Temp(C) Fig 5.3.3 Temperature derating curve of the SiE4900 96 5500 Power (W) 5000 4500 4000 3500 3000 375VDC-240VAC 500VDC-240VAC 250VDC-240VAC 2500 2000 1500 375VDC-208VAC 500VDC-208VAC 250VDC-208VAC 1000 500 0 25 50 53 55 60 65 70 75 80 Ambient Temp(C) Fig 5.3.4 Temperature derating curve of the SiE5300 5.4 Maintenance 5.4.1 Exchange of the GFDI Fuse Before replacing the fuse, turn off the DC/AC disconnect switch and the breakers and wait for at least 5 minutes for the system to discharge. As shown in the figure 5.4.1.1, turn the cap of the GFDI fuse holder counter counter-clockwise to open the cap and replace the GFDI fuse. 97 GFDI Fuse OPEN Fig 5.4.1.1 Open the cap of the GFDI fuse holder 1. Turn OFF the DC/AC disconnect switch and breakers. 2. Wait for at least 5 minutes. 3. Exchange the fuses. 4. Turn ON the DC/AC disconnect switch and breakers. WARNING! For continued protection against risk of fire, replace only with the same type and ratings of fuse (600 VDC, 1 A)! 5.4.2 Exchange of the PV String Fuses The SiE Inverter is shipped with up to four (4) 15A, 600 VDC PV string fuses for the PV strings. For the SiE2900, it is shipped with three (3) 15A, 600 VDC 98 PV string fuses. However, the size of the PV string fuse shall be determined by the electrical ratings of the PV module and by UL and National Electrical Code (NEC) requirements. The minimum size of the PV string fuse is calculated using the short circuit current rating (Isc) of the PV module. The NEC requires that the fuse be sized for a minimum of 1.56 times the Isc of the PV module used in the system. Please be sure to consult with the PV module manufacturer for appropriate PV string fuse rating. Fig 5.4.2.1 Replacement of the PV string fuses 1. Turn OFF the DC/AC disconnect switch and breakers. 2. Wait for at least 5 minutes. 3. Remove the cover of the wiring box by following the steps described in section 2.3. 99 4. Exchange the fuses as shown in the figure 5.4.2.1. 5. Isolate and repair all PV array ground faults before proceeding. 6. Put the cover of the wiring box back and fasten the screws. 7. Turn ON the DC/AC disconnect switch and breakers. WARNING! PV arrays are always energized when exposed to light therefore hazardous voltage is still present on the terminal blocks and the PV string fuse holders even the DC/AC disconnect switch is switched OFF. Please cover the PV arrays with opaque (dark) materials during PV string fuse replacement. CAUTION! ! The string fuse size must not be greater than the maximum fuse size rating of the PV module provided on the PV module manufacturer data sheet. If no maximum fuse size is indicated, please contact the PV module manufacturer. 5.4.3 Factory Service Once the product is diagnosed requiring a Factory Service, the product could be removed and sent back using the original shipping box and the packing materials. An RMA number must be generated first from the factory and a copy of the purchase invoice is also required to be included in the package. Document : There are some documents must be attached with the return 100 product. Please write as detail as possible. 1. Serial number and machine type of the inverter 2. Brief descriptions of connected system 3. Fault message on front panel or fault condition 4. Can the failure be reproduced? How to reproduce it? The following sections will describe the steps to remove and then replace the inverter with the wiring box remaining on the wall. 5.4.3.1 Remove the Inverter SiE Inverter is designed to be easily separated from the wiring box and removed from the mounting bracket. Wait for at least five (5) minutes for the system to discharge after DC/AC disconnect switch and breakers are switched OFF before opening the front cover of the inverter to disconnect the wires. Both DC and AC wires that are disconnected from the inverter must be properly wrapped with insulated material. After the inverter is removed from the mount bracket, the through holes of the wires on top of the wiring box must be covered with the cover plate that is attached on top of the wiring box to prevent the box from the water drops causing current leakages. 101 Fig 5.4.3.1.1 Remove the cover of the Inverter 102 Red wire Black wire 1 Negative ground 1 Positvie ground Fig 5.4.3.1.2 L2 wire N wire L1 wire Remove the DC and AC wires Insulating material Fig 5.4.3.1.3 Keep the well-wrapped DC and AC wires stored in the wiring box 103 Fig 5.4.3.1.4 Remove the screws and nuts bonding between the inverter and wiring box 104 Fig 5.4.3.1.5 Un-hang the inverter carefully cover plate 105 cover plate cover plate 106 Fig 5.4.3.1.6 1. Locate the cover plate in place and fasten the screws Turn the DC/AC disconnect switch to OFF position and turn off all breakers. 2. Wait for at least 5 minutes. 3. Remove the cover of the wiring box by following the steps described in section 2.3. 4. Remove the cover of the inverter as shown in the figure 5.4.3.1.1 5. Disconnect the red and black DC wires from the DCIN+ and DCINterminals and disconnect the red, black and white AC wires from the ACIN_L1, ACIN_L2 and ACIN_N terminal as shown in the figure 5.4.3.1.2. 6. All disconnected wires must be wrapped with insulated materials to prevent from the electric shock. Secure these disconnected wires inside the wiring box as shown in the figure 5.4.3.1.3. 7. Loosen the 2 screws by a cross driver and the other 2 nuts by a 7-mm 107 wrench so that the inverter can be taken apart from the wiring box as shown in the figure 5.4.3.1.4. 8. Remove the inverter from the mounting bracket as shown in the figure 5.4.3.1.5. 9. Using the cover plate that is on top of the wiring box to cover the through holes of the wires as show in the figure 5.4.3.1.6. 10. Put the front cover of the wiring box back and fasten the screws. 11. Collect the removed screws and nuts in a plastic bag and save them to re-install the inverter in the future. 12. Keep the DC/AC disconnect switch and circuit breakers in the the OFF position until the inverter is re-installed, all wires are connected correctly, and front covers are properly put back and screws are fastened. 5.4.3.2 Re-install the Inverter After re-installation of the inverter, all wires must be re-connected correctly in order for the inverter to work properly. 108 cover plate cover plate Fig 5.4.3.2.1 Re-install the cover plate and fix it on the top of the wiring box 109 Fig 5.4.3.2.2 Hang the inverter onto the mounting bracket carefully 110 Fig 5.4.3.2.3 Fasten the screws and nuts bonding between the inverter and the wiring box for its construction and grounding continuity Black wire connected to ACIN_L2 Red wire connected to ACIN_L1 1 Negative ground 1 Positvie ground Fig 5.4.3.2.4 White wire connected to ACIN_N Connect the AC wirings to their correct terminals individually 111 Fig 5.4.3.2.5 Fasten the screws of cover of the inverter first, then on the wiring box. 112 1. Turn off all DC/AC disconnect switch and breakers. 2. Remove the front cover of the wiring box by following the steps described in section 2.3. 3. Remove the cover plate used to cover the through holes of the wires and put it back to its original place as shown in the figure 5.4.3.2.1. 4. Remove the cover of the inverter and then hang it on the mounting bracket as shown in the figure 5.4.3.2.2. 5. Tighten the screws and nuts with a torque of 1.7Nm (15.6 in-lb) when performing the following items 6, 7 and 8. 6. Fasten the original 2 screws by a cross driver and the 2 nuts by a 7-mm wrench as shown in the figure 5.4.3.2.3. 7. If it is originally negative ground, then connect the RED DC wire to the terminal labeled DCIN+ and connect the BLACK DC wire to the terminal labeled DCIN- as shown in the figure 2.3.2.1.1. If it is a positive ground system, then connect the red DC wire to the DCIN- terminal and connect the black DC wire to the DCIN+ terminal as shown in the figure 2.3.2.2.1. Please refer to the section 2.3.2 for further details. 8. For the AC wire connections, the red Vac wire shall be connected to the terminal labeled ACIN_L1, black Vac wire must be connected to the ACIN_L2 terminal, and the white Vac wire must be connected to the ACIN_N terminals as shown in the figure 5.4.3.2.4. 9. Put the covers of the wiring box and inverter back and fasten the screws as shown in the figure 5.4.3.2.5. 10. Turn ON the DC/AC disconnect switch and breakers. 113 WARNING! PV arrays are always energized when exposed to light therefore hazardous voltage is still present on the terminal blocks and the PV string fuse holders even the DC/AC disconnect switch is switched OFF. Please cover the PV arrays with opaque (dark) materials during the inverter removal and absence until the inverter is hooked back and reconnected. WARNING! Hazardous voltage is still present on the device after disconnection of all PV DC inputs. Allow 5 minutes for the inverter to discharge the energy completely. WARNING! Ensure that all DC and AC switches are turned off for at least five (5) minutes before opening the front covers of the inverter and the wiring box and disconnect the DC and AC wires between them. The disconnected wires must be wrapped with an insulating material to prevent the risk electrical shock. WARNING! After the inverter is removed from the mount bracket, the through holes of the wires on top of the lower wiring box must be covered to prevent water from getting in and causing current leakage. Use the cover plate that is attached on top of the wiring box to cover these holes. WARNING! DO NOT keep any spare parts inside the wiring box. 114 6. Weather Proof Shield (Optional) Please follow these directions to install the weather proof shield to further protect the inverters installed in a harsh environments facing the threat of being damaged by severe weather. Step 1: Release eight (8) screws used to fasten the inverter cover. It is not necessary to remove the inverter cover, but be careful that it does not fall off and. drop. (Notice: Save these screws and they will be used to fasten the shields later.) Fig 6.1 Step 1: Release the screw of the inverter cover Step 2: Put the shields on the sides of the inverter and cover the air vents. The big one is used for the upper vent and the small one is for the lower. 115 Fig 6.2 Step 2: Put the shield on the sides of the inverter. Step 3: Fasten the shields with the screws from step 1. Fig 6.3 Step 3: Fasten the shields with the screws. 116 Step 4: Complete, the inverter is now more protected for installations in harsh environments. Fig 6.4 An inverter with the weather proof shield. 117 Grid type: 120 WYE with Neutral R INVERTER wiring: L1-L2-N 12 V 0 12 0V GRID wiring: R-S-N, S-T-N, or T-R-N Neutral S T Jumper: 240V/208V with Neutral Grid type: 120 WYE with Neutral R INVERTER wiring: L1-L2 12 V 20 0V 1 GRID wiring: R -S, S- T, or T- R Neutral S T Jumper: 208V without Neutral or 240V without Neutral Grid type: 240/120 Split Phase INVERTER wiring: L1-L2-N GRID wiring: L1-L2-N L1 N L2 L1 N L2 Jumper: 240V/208V with Neutral Grid type: 240Delta:120Stinger INVERTER wiring: L1-L2-N GRID wiring: L1-L2-N Jumper: 240V/208V with Neutral Grid type: 240 Delta without Neutral 240 L1 L2 24 0 24 0 INVERTER wiring: L1-L2 GRID wiring: L1-L2 Jumper:240V without Neutral 118 Grid type: 208 Delta without Neutral 208 L1 L2 8 20 20 8 INVERTER wiring: L1-L2 GRID wiring: L1-L2 Jumper:208V without Neutral 119 120 Silicon Energy LLC 3506 124th Street NE Marysville, WA 98271 USA tel: 360.618.6500 fax: 360.618.6501 www.silicon-energy.com ZOMG-8253USYUS0