1
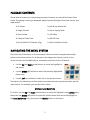
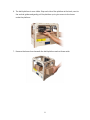
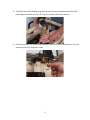
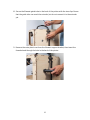
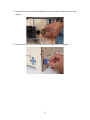
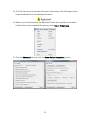
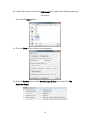
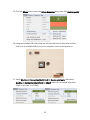
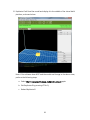
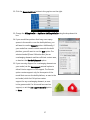
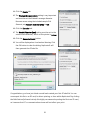
CONTENTS SAFETY WARNINGS AND GUIDELINES ....................................................................................................................................... 3 INTRODUCTION ................................................................................................................................................................................................ 4 FEATURES .............................................................................................................................................................................................................. 4 CUSTOMER SERVICE.................................................................................................................................................................................... 4 PACKAGE CONTENTS ................................................................................................................................................................................. 5 NAVIGATING THE MENU SYSTEM................................................................................................................................................... 5 UNPACKING AND SETUP ......................................................................................................................................................................... 6 FINE TUNING PLATFORM HEIGHT.................................................................................................................................................. 15 SOFTWARE INSTALLATION AND SETUP .................................................................................................................................. 17 TECHNICAL SUPPORT .............................................................................................................................................................................. 30 REGULATORY COMPLIANCE ............................................................................................................................................................. 30 Notice for FCC ......................................................................................................................................................................................... 30 Notice for Industry Canada........................................................................................................................................................... 31 SAFETY WARNINGS AND GUIDELINES The printer is very sensitive to static electricity. Always contact a grounded object before working with this device. It is recommended to wear an anti-static wrist strap when working with this device. Power off and unplug the printer from the power source prior to making repairs or alterations. The printer operates at high temperatures. Always allow the nozzle, the extruded material, and build plate to cool before touching. Some types of filament can emit a strong odor when heated. Always use this printer in well-ventilated area. Do not leave the printer unattended when in operation. Do not expose this printer to excessive vibration. Do not expose this printer to water or moisture of any kind. Do not place drinks or other containers with moisture on or near the printer. If moisture does get in or on the printer, immediately unplug it from the power outlet and allow it to fully dry before reapplying power. Do not place the printer near a heat source, such as a fireplace, heating vent, radiator, etc. The power supply for this monitor uses a NEMA 5-15 three prong, grounded plug. Do not use a "cheater" plug or otherwise bypass the grounding pin. Do not allow the power cord to be crimped, pinched, stepped on, etc. Ensure that the power cord does not present a tripping hazard. Never unplug the unit by pulling on the power cord. Always grasp the connector head. This device should only be operated by qualified adults. In the event of serious operating problem, stop using the unit immediately. 3 INTRODUCTION Thank you for purchasing this 3D printer from Monoprice! This printer features a single extruder and unheated acrylic build platform. Because the platform is unheated, it is particularly suited for printing using PLA filament, though it can print other materials, as well. You can print from a Windows® or Mac® PC using a USB connection or can print from 3D model files stored on an SD card, without the need for a PC connection of any kind. This printer is easy to setup and easy to use following the instructions in this manual and on the menu screen. FEATURES Single extrusion print head Can be upgraded with addition of dual extrusion print head Unheated acrylic built platform won't warp Well suited for printing with PLA filament Wooden frame for reduced weight Includes PLA filament for printing right out of the box Includes 4GB SD card with preinstalled sample 3D models CUSTOMER SERVICE The Monoprice Customer Service department is dedicated to ensuring that your ordering, purchasing, and delivery experience is second to none. If you have any problem with your order, please give us an opportunity to make it right. You can contact a Monoprice Customer Service representative through the Live Chat link on our website www.monoprice.com during normal business hours (Mon-Fri: 5am-7pm PT, Sat-Sun: 9am6pm PT) or via email at [email protected] 4 PACKAGE CONTENTS Please take an inventory of the package contents to ensure you have all the items listed below. If anything is missing or damaged, please contact Monoprice Customer Service for a replacement. 1x 3D Printer 1x Bolt & Hex Wrench Kit 1x Single Extruder 1x Power Supply Cable 1x Spool Holder 1x USB Cable 1x Filament Guide Tube 1x 4GB SD Card 1x Spool White PLA Filament (1 kg) 1x Quick Installation Guide NAVIGATING THE MENU SYSTEM The printer has five buttons on the front panel, which are used to navigate and modify entries in the menu system. As can be seen in the image, the buttons consist of four "arrow" buttons and a middle button, sometimes referred to as the "M" button. Use the Up and Down arrow buttons to move the highlight in the menus. Use the Middle (M) button to select the currently highlighted menu entry. Use the Left arrow button to back out to the previous menu. Throughout this manual you will be asked to navigate the menu system and select specific menu entries. For example, you may be told to select: Utilities > Level Build Plate To do this, use the Up and Down arrow buttons to move the highlight to the Utilities entry, then press the Middle (M) button to open the Utilities menu. Next move the highlight to the Level Build Plate entry, then press the Middle button to activate it. 5 UNPACKING AND SETUP Carefully read and perform the following instructions for unpacking the printer and performing the initial setup. Failure to follow these unpacking instructions could result in damage to your new printer. 1. Place the box on the floor in the middle of a clean, flat area. Carefully open the top and remove the accessories box and set it aside. 2. Slide your hands down the sides of the printer to grab the edge of the frame. Lift it out of the box and place it on your work area. 6 3. Carefully remove the bubble wrap from the printer. 4. Remove the foam packing from inside the top of the printer, then open the top of the exposed box and carefully remove the print head/extruder and set it on your work area next to the printer. 5. Remove the box from inside the printer and set it aside. 7 6. The build platform is now visible. Grip each side of the platform at the back, next to the vertical guides and gently pull the platform up to give access to the boxes under the platform. 7. Remove the boxes from beneath the build platform and set them aside. 8 8. Carefully remove the bubble wrap from around the print head/extruder. Open the parts bag and remove two (2) 3/8" long hex screws and the hex wrench. 9. Place the extruder on the extruder seat with the fan facing forward. Secure it to the seat using two 3/8" long hex screws. 9 10. Secure the filament guide tube to the back of the printer with the two clips. Ensure that the guide tube can reach the extruder, but do not connect it to the extruder yet. 11. Remove the outer plastic nut from the filament support bracket, then insert the threaded end through the hole in the back of the printer. 10 12. Screw the nut onto bracket and tighten it from both sides. Take care not to overtighten. 13. Insert the SD card into the vertical slot on the right side of the printer. 11 14. Squeeze each corner of the build platform and tighten the wingnuts to minimize the platform height. 15. Ensure that the power switch is in the OFF position (with the O side depressed). Insert the plug on the included AC power cord into the panel connector, then plug the other end into a nearby AC power outlet. Depress the I side of the power switch to turn the printer ON. 16. Press the Middle (M) button on the printer's front panel to activate the menu system, then select: Utilities >> Run Startup Script This script will take you through the process of leveling the build platform, loading filament, and starting your first print. Follow the on-screen instructions, which for your convenience are listed below. Please review all the following steps before launching the startup script so that you know what to expect at each stage in the process: 12 Run Startup Script 1. Welcome! I'm the 3D printer. Press the 'M' to get started! 2. A blinking 'M' means I'm waiting and will continue when you press the button... 3. A solid 'M' means I'm working and will update my status when I'm finished... 4. Our next steps will get me setup! First, we'll restore my build platform... 5. So it's nice and level. It's probably a bit off from shipping... 6. Find the four knobs on the bottom of the platform and tighten four or five turns. 7. I'm going to move the extruder to various points for adjustment. 8. In each position we will need to adjust two knobs at the same time. 9. Nozzles are at the right height when you can just slide a sheet of paper 10. between the nozzle and the plate. Grab a sheet of paper to assist us. 11. Adjust the front two knobs until paper just slides between nozzle and plate 12. Adjust the back two knobs until paper just slides between nozzle and plate 13. Adjust the right two knobs until paper just slides between nozzle and plate 14. Adjust the left two knobs until paper just slides between nozzle and plate 15. Check that paper just slides between nozzle and plate 16. Does my nozzle height check out? My height is good! Let's try again. (We'll try again! then back to #6) 17. Aaah, that feels much better. Let's go on and load some filament! 18. Press down on the grey rings at top of the extruders and pull the black... 19. guide tubes out. Now feed filament from the back through the tubes until it... 20. pops out in front. I'm heating up my extruder so we can load the filament... 21. This may take a few minutes. And watch out, the nozzle will get HOT! 13 22. First we'll load the right extruder. Push filament in... 23. until you feel the motor tug it in. Push for a few more seconds, then wait. 24. When filament is being extruded from the nozzle, Press M to stop extruding. 25. Did the plastic extrude from the nozzle? Yes No (OK, I'll keep my motor running. You may need to push harder...) 26. Great! I'll stop running my extruder. Press M to continue. 27. How'd it go? Ready to make something? Yes (Awesome! We'll go to the SD card menu and you can select a model!) No (We'll go to the main menu.) Congratulations, you have successfully setup your printer and have started your first 3D print! Note that the single extruder is referred to as the "Right Extruder". The following test prints are included on the SD Card. Do not use the ones labeled as for the Dual Extruder version. Test left.X3G (to be used with Dual Extruder) Cube.X3G (to be used with Dual Extruder) 42mmboxright.X3G (Single Extruder) 42mmboxleft.X3G (to be used with Dual Extruder) Test right.X3G (Single Extruder) 14 FINE TUNING PLATFORM HEIGHT Getting the platform height correct is critical to a successful print. Examine the extruded material and compare it to the following charts to determine if your build platform is a tad too high, a tad too low, or just right. You may need to make several passes at height adjustment before you are ready for a large, complicated print job. 15 16 SOFTWARE INSTALLATION AND SETUP This 3D printer, like most 3D printers, uses open source 3D printing software. We recommend that you begin your 3D printing experience by using Python 2 and ReplicatorG to create the Gcode 3D model files. Perform the following steps to install Python and ReplicatorG for Windows and to setup ReplicatorG for use with this printer: 1. Point your browser to http://www.python.org/downloads/a 2. Download the latest version of Python 2 software. At the time of this writing, the latest version of Python 2 is 2.7.10. Do not use Python 3, as the ReplicatorG software is incompatible with Python 3. 3. Locate the file you just downloaded and double-click it to launch the installer. 4. Depending on your Windows security settings, you might see a security warning. Click the Run button to continue. 17 5. Click the Next button to continue. 6. Click the Next button to accept the default install directory. 7. Click the Next button to accept the default program options. 18 8. Once the files have been copied and configuration complete, click the Finish button to complete the installation. 9. Point your browser to http://replicat.org/download 10. Download the Windows version of the software. 11. Locate the file you just downloaded and double-click it to launch the installer. 12. Depending on your Windows security settings, you might see a security warning. Click the Run button to continue. 19 13. Click the Next button to continue. 14. Regardless of whether you changed the Python install location or not, the next screen warns that "It looks like you don't have Python." We will tell ReplicatorG where to find the Python software later in these instructions. For now, click the Install button to continue. 15. The installer will unpack the installation files, then will launch the Driver Installation Wizard. Click the Next button to continue. 20 16. The wizard will begin installing a set of six (6) drivers. Depending on your Windows security settings, you may see up to six security warnings. For each one, click the Install this driver software anyway button to continue. 17. Once the drivers have finishing installing, click the Finish button to continue. 18. Click the Next button to complete the installation. 21 19. Click the Start menu in the lower left corner of the screen. Click All Programs, then locate and double-click the ReplicatorG shortcut. 20. When it runs for the first time, the ReplicatorG client will copy files to the install location. Once it has completed the process, select File >> Preferences 21. Click the Advanced tab, then click the Select Python interpreter... button. 22 22. Use the file browser to select the Python.exe file located in the following directory: c:\Python27 then click the Open button. 23. Click the Close button to save your preferences. 24. Click the Machine menu, select Machine Type (Driver) entry, then click The Replicator Single. 23 25. Click the GCode menu, select the GCode Generator entry, then click Skeinforge (50). 26. Using the included USB cable, plug one end into the back of the printer and the other into an available USB port on your computer, then turn the printer on. 27. Select Machine >> Connection (Serial Port) >> Rescan serial ports, then select Machine >> Connection (Serial Port) >> COM#, where # is a number other than COM1. In this case, it is COM10. 24 28. Click the Connect button (highlighted below, second from the right). 29. ReplicatorG will respond by changing the banner to green and displaying the printer status on the right, as shown in the image below. 30. Select File >> Examples >> 20mm_Calibration_Box.stl 25 31. ReplicatorG will load the model and display it in the middle of the virtual build platform, as shown below. Note: If the software does NOT load the model and change to the above view, perform the following steps: a. Select File >> Examples >> 20mm_Calibration_Box.stl again. b. Exit ReplicatorG by pressing CTRL+Q. c. Reload ReplicatorG. 26 32. Click the Generate GCode button in the gray box on the right. 33. Change the Slicing Profile to Replicator 2 slicing defaults using the drop down list box. 34. If your model has portions that hang over empty spaces in the model or over the build platform, you will want to use the Support option. Additionally, if your model has a small contact area with the build platform, you will want to use the Raft option. The selected model (20mm Calibration Box) has no overhanging elements and has sufficient contact area, so deselect the Use Raft/Support option. 35. If you are using Support for overhanging elements on your model, set the Use support material option to either Exterior support or Full support. The Exterior option creates support only for those parts of the model that are over the build platform, as seen in the red model, while the Full option creates support for any overhanging element, as seen in the green model. For this model we need no support, so set the Use support material option to None. 27 36. Custom Gcode allows for complex automatic printer movements and operations. By adding custom Gcode into the start or end of your file, you can alter how it prints. A comprehensive list of Gcode commands can at: http://reprap.org/wiki/G-code For now, ensure the Use default start/end gcode option is selected. 37. When enabled, the Print-O-Matic option allows you to modify specific settings. Ensure that the Use Print-O-Matic (stepper extruders only) option is selected. 38. The Object infill (%) setting determines how much material is printed inside the model. A setting of 0% would result in a completely hollow model, while 100% would result in a solid model. For most models, we recommend a value between 10% and 40%, depending on the model complexity. For this simple model, set Object infill (%) to 10%. 39. The Layer Height (mm) option determines the thickness of each printed layer. A smaller value will require more time to print, but will have a smoother appearance, while higher values will print quicker and will handle overhangs and bridges better, but will have a rougher appearance. For this model, set Layer Height (mm) to 0.27. 40. The Number of shells value determines the thickness of the exterior walls. For this model set Number of shells to 1. 41. The Feedrate (mm/s) setting determines the speed at which filament is fed into the extruder and is usually set between 30 and 100. For ABS a value of 60 is best, while for PLA a value of 100 is best. In this example we are printing PLA, so set Feedrate (mm/s) to 100. 42. The Travel Feedrate determines the speed at which the print head moves over the base and is usually set between 30 and 120. For ABS a value of 80 is best, while for PLA a value of 120 is recommended. In this example we are printing PLA, so set Travel Feedrate to 120. 43. The Print Temperature controls the nozzle temperature (°C) and is set to the melting point of the filament being used. In this example we are printing PLA, so set Print Temperature to 210. 28 44. Click the Plastic tab. 45. The Filament Diameter (mm) setting is very important and must be set the filament's average diameter. Because we are using the included sample PLA filament, set Filament Diameter (mm) to 1.75. 46. Click the Extruder tab. 47. The Nozzle Diameter (mm) setting must be set to the actual nozzle diameter, which on this printer is 0.4mm. 48. Click the Generate Gcode button. 49. You will be displayed an Acceleration Warning. Click the OK button to clear the dialog. ReplicatorG will then generate the GCode file. Congratulations, you have just sliced a model and created your first GCode file! You can now export this file to an SD card, for direct printing, or from within ReplicatorG by clicking the Build button (leftmost button). We highly recommend exporting the file to an SD card, as it ensures that PC or communications issues will not affect your print. 29 TECHNICAL SUPPORT Monoprice is pleased to provide free, live, online technical support to assist you with any questions you may have about installation, setup, troubleshooting, or product recommendations. If you ever need assistance with your new product, please come online to talk to one of our friendly and knowledgeable Tech Support Associates. Technical support is available through the online chat button on our website www.monoprice.com during regular business hours, 7 days a week. You can also get assistance through email by sending a message to [email protected] REGULATORY COMPLIANCE Notice for FCC This device complies with Part 15 of the FCC rules. Operation is subject to the following two conditions: (1) this device may not cause harmful interference, and (2) this device must accept any interference received, including interference that may cause undesired operation. Modifying the equipment without Monoprice's authorization may result in the equipment no longer complying with FCC requirements for Class B digital devices. In that event, your right to use the equipment may be limited by FCC regulations, and you may be required to correct any interference to radio or television communications at your own expense. This equipment has been tested and found to comply with the limits for a Class B digital device, pursuant to Part 15 of the FCC Rules. These limits are designed to provide reasonable protection against harmful interference in a residential installation. This equipment generates, uses and can radiate radio frequency energy and, if not installed and used in accordance with the instructions, may cause harmful interference to radio communications. However, there is no guarantee that interference will not occur in a particular installation. If this equipment does cause harmful interference to radio or television reception, which can be determined by turning the equipment off and on, the 30 user is encouraged to try to correct the interference by one or more of the following measures: Reorient or relocate the receiving antenna. Increase the separation between the equipment and receiver. Connect the equipment into an outlet on a circuit different from that to which the receiver is connected. Consult the dealer or an experienced radio/TV technician for help. Notice for Industry Canada This Class B digital apparatus complies with Canadian ICES-003. Cet appareil numérique de la classe B est conforme à la norme NMB-003 du Canada. 31