1
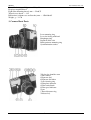
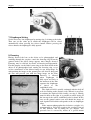
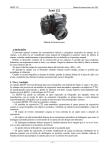
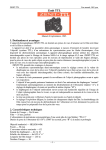
ZENIT-7
User manual, 1967 year
Zenit-7
This text is identical to the one in the Instruction manual, English version.
Attention!
The present Instruction Manual contains the brief characteristics and essential instructions on the
reflex camera ZEN1T-7 use but it cannot be used as a manual on photography.
Prior to using the camera, make thorough study of handling and operating instructions given in the
present description. Slight differencies between the text of the Manual and the construction of the
camera may occur due to ever-advancing development of the camera construction.
Do not touch the optic part surfaces with hands as it may result in damaging the coatings.
In the camera construction due to the curtain speed a full frame opening has been obtained at an
exposure of 1/125 sec. It was achieved owing to increasing the curtain spring tension.
To avoid deterioration of the shutter quality, do not keep the camera in the cocked position.
It is not allowed to cock the shutter while pressing the release button or at incomplete operation of
the camera mechanisms.
1. Purpose and Advantages
The photographic camera, type ZENIT-7, is a reflex camera of single-lens construction. The camera is
intended for use of colour or black-and-white films. In the main, this camera offers service to skilled
amateur photographers.
Instant return mirror makes it possible to continuously watch the object before and after taking
pictures excluding the exposure moment.
The picture is focused on the ground plane, whose centre has micro-prisms which increase the
focusing accuracy and the image clearness in the eyepiece.
Lens jumping diaphragm makes the process of focusing much easier giving possibility for focusing
with fully open lens.
The red mark visible in the finder field, when the shutter is not cocked, testifies that the camera is
not ready for taking pictures. When the shutter is cocked, the red mark disappears from sight.
Self-setting counter always shows the number of pictures taken. The camera permits making use of
lenses available on sale for cameras of ZENIT type with screw-type mount and with focal length from
37 to 1000 mm. The extension rings intended for reproduction works, for photographing small objects
by close-up shots at a very small distance (macro-shots) and photographing with the microscope
(micro-shots) may also be used.
2. Technical Data
Size of picture, mm — 24 by 36
Size of film, mm — 35
Number of pictures — 36
Shutter Speeds — 1 to 1/1000 sec. and “B” (by hand)
Main lens — HELIOS-44 (HELIOS-44-7)
Focal length, mm — 58
Relative aperture — 1:2
Minimum operating distance, m — 0,5
–1–
ZENIT-7
User manual, 1967 year
Size of finder image field, mm — 22 by 33
Eyepiece magnification 5x
Light filter mounting thread, mm — 52×0,75
Tripod recess thread — 1/4ʺ
Dimensions (without case and bracket) mm — 150×108×95
Weight, g — 1170
3. Camera Basic Parts
1. Lens mounting ring
2. Lever for irising with hard
3. Diaphragm ring
4. Depth-of-field scale
5. Black point on mounting ring
6. Synchronization socket
07. Eyelets for shoulder strap
08. Shot counter
09. Exposure dial
10. Exposure dial index
11. Lens focusing ring
12. Film plane indicator
13. Film rewind knob
14. Film speed indicator
15. Lens
16. Thread-bayonet ring
17. Release key
–2–
ZENIT-7
User manual, 1967 year
18. Take-up spool
19. Film rewind release button
20. Sprocket
21. Guide rails
22. Tripod nut
23. Picture gating
24. Film restrictors
25. Magazine recess
26. Magazine guide (fork)
27. Decorative mount
28. Finder eyepiece
29. Detachable bracket for flash bulb
30. Setting lever
31. Pressing table
32. Folding back cover
4. Camera Loading
Any magazine corresponding to GOST1 standards may be used with the camera.
1. Open the back cover by turning knob 13 against the direction of the arrow and pulling it upwards
as far as it goes.
2. Fix the film out end in the take-up spool and engage the spool flange by the sprocket hole. Watch
that the film is properly placed between the film guide rails and film restrictors 24.
3. Place the film magazine in its recess. When placing the magazine in the camera, see that the film
rewind knob is in the lifted position.
4. Close the camera back cover and force rewind knob 13 down, fix it in this position by turning it
in the direction of the engraved arrow.
5. Cock the camera shutter turning the setting lever up to a sensible stop.
Press the release button. To wind the film end, sunned down when loading, on the take-up spool,
repeat this procedure twice. Then the shot counter will show the number “0”.
Note: When setting the shutter, see to it that the film rewind knob spins. If the knob does not spin,
check the camera for correct loading with the film. To make the operation of the camera easier, it is
permitted to set the shutter by slight lever turns by any angle up to a sensible stop at the end of setting.
5. Film Speed Setting
Figures 40, 80, 160, 320 are engraved on the scale. They denote the film
speeds in ASA units. On the scale there are also marks and
specifying colour film used in artificial illumination and day-light
conditions. Using the guide, set up against the index a figure or a mark
corresponding to the film loaded into the camera.
6. Exposure Time Setting
Set up exposure time against the index by rotating exposure counter dial 9 in either direction.
Figures on the exposure scale specify the corresponding parts of the second, and “B” denotes handheld exposure, the duration of which is determined by button-press time.
1
GOST — terms, Cyrillic in the original, are transliterated there.
–3–
ZENIT-7
User manual, 1967 year
Exposure time may be set before and after the shutter cocking.
7. Diaphragm Setting
Set the necessary lens diaphragm by turning ring 3 relating to the index.
Thus you set the value up to which the diaphragm will be closed
automatically when pressing the release button. Before pressing the
release button, the diaphragm is fully opened.
8. Focusing
Having directed the lens at the object to be photographed and
watching through the eyepiece, rotate the focusing ring till on the
ground surface the object image appears most sharply focused.
Focusing may be effected by means of focusing micropyramids.
For this purpose set the finder centre ring on the main detail of the
object to be photographed and, turning the focusing ring, try to
receive coincidence of the blurred image in one sharp image. In
such position the image on the ground glass will also be sharp and
the lens will provide you with the sharp image on the film.
Focusing is effected
when diaphragm id
fully open and only at
the moment of the film
exposure the diaphragm
is
closed
to
the
established value.
The depth of field is usually estimated with the help of
scale 4 according to the distance scale. When it is necessary
to estimate the depth of field visually, use ring 2. Having
turned it fully to the right, it is possible to effect irising of
the iens up to the earlier established value by hand. In this
case on the ground surface you will obtain the image of
such depth of field which corresponds to the set diaphragm
value.
If the amateur photographer has defective eyesight, it is
recommended to add to the eyepiece the spectacle lens of
16 mm diameter and of fitting his eye dioptric. The
spectacle lens is screwed by means of a special mount
–4–
ZENIT-7
User manual, 1967 year
which is a part of the camera set. For fastening it on the camera screw off decorative mount 27. The
spectacle lens does not form a part of the camera set.
9. Taking Pictures
When taking pictures, set the exposure time and diaphragm, choose the picture, i. t. find the point,
where you will take pictures from, focus the lens, cock the shutter, make sure that the red mark
signalizing that the camera is not ready for taking pictures disappeared from the finder sight and press
the shutter release button.
Do not cock the shutter and do not leave it in the cocked position for a long time (above fifteen
minutes) as it badly effects the shutter speeds stability. The instant return mirror available in the
camera permits to fulfill all setting operations before cocking the shutter; the red indicator reminds that
the shutter should be cocked before taking pictures. The blocking available does not permit to press the
release button if you have forgotten to cock (or cocked not to the end) the camera shutter. When
photographing, the camera can be carried in case or without it. For carrying the camera without case
use the shoulder strap having taken it with its studs from the case.
10. Taking Pictures with Flash Bulbs
Flash bulbs may be used for taking pictures in bad light conditions.
It is possible to take pictures with flash bulbs when the exposure time
is not shorter than 1/125 sec for electronic flash and not shorter than
1/60 for a single-action miniature bulb requiring peak of the flash up to
5 msec. The exposure times longer than 1/30 are not desirable when
taking pictures with flash bulbs, as a great amount of outside light
emerges into the camera (after flash moment) and the image will be of
poor quality.
Set the lens diaphragm in accordance with the guide number of the
flash bulb. Flash bulb is mounted on bracket 29, which is a part of
complete set.
11. Camera Unloading
After 36 exposures the exposure counter dial comes to indicate “36”. If
the camera magazine possesses some more film, then while operating
further the exposure counter dial will stop operating and the dial will
show “36”.
To rewind the exposed film into the film magazine, act as follows:
1. Press film rewind knob 13 and turn it against the direction indicated by the arrow.
2. Press button 19.
3. Rotate the film rewind knob in the direction of the arrow until the decreased effort indicates that
the film end is forced out of the take-up spool.
4. Having lifted film rewind knob 13 to the mechanical limit, open the camera back cover and
remove the film magazine out of the camera.
12. Lens Replacement
The main lens is fastened with the help of 42×1 thread. Any lens with the thread of the main lens and
mechanical back focal distance of 45,5 mm can be used with the camera. Lenses with slip-on bayonet
nut and the same mechanical back focal distance can be used with the camera as well.
Besides lenses intended for this camera, you can make use of lenses specified for photographic
cameras of ZENIT type with 39×1 thread. To screw these lenses into the camera turn mounting ring 1
to the left and remove thread-bayonet ring 16 with 42×1 thread from the camera.
Put an additional ring with 39×1 thread into the camera and fasten it with ring 1.
When using the lenses intended for cameras type ZENIT, diaphragming is performed by hand since
the lenses have no instant re-opening diaphragm mechanism.
13. Taking Pictures at Close Distance
–5–
ZENIT-7
User manual, 1967 year
With the help of special device RUS (which is in the market) the ZENIT-7 photographic camera gives
possibility to make duplicates and effect macrophoto-graphy. For shooting objects placed at 0,5 m
from the film plane the lens can be moved out.
To shoot objects from closer distances (approximately from 0,3 m) use should be made of a special
ring for macrophotography which is supplied in the camera set. This ring is fastened on the outer
bayonet of thread-bayonet ring 16 of the camera and the main lens is screwed into it. During
macrophotography instant reopening diaphragm mechanism is switched off, so one should set the lens
diaphragm after focusing by means of the lever 2 for irising with hand. On finishing
macrophotography the lever should be set in initial position “A”.
If large scale of image is required, for example 1:1 scale, you can take pictures of objects at small
distances using extension rings UTZ which are in the market.
For this aim screw out thread-bayonet ring 16 and insert a ring with 39×1 thread.
The main lens can not be used in this case; that is why use should be made of any lens with 39×1
thread.
14. Storage and Maintenance
Handle the photographic camera very carefully, keep it clean, protect it from sharp mechanical jerks,
shocks, from moisture and sharp temperature changes.
Keep the photographic camera in closed case. In this case the lens should be covered with cap and
the shutter should be in released position.
Do not screw the lens out of the camera without any need, not to let dust and dirt cover the optical
details. If you keep the camera without lens, cover the opening for lens with a special cap.
Clean only the outer optical lens surfaces with a clean soft flannel or a cotton wool wad lightly
soaked in rectified alcohol, in ether (petroleum or sulfuric) or, in the last resort, in eau-de-Cologne.
When changing from cold to warm, never open the case and never take the camera out of the
camera case. Let the camera warm up gradually (within two hours) in the camera case.
As the photographic camera is a complicated optical instrument, any repair and the corresponding
adjustments should be made only by highly-skilled specialists.
http://eugigufo.net/download/photovideo/
–6–