1
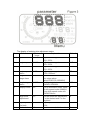
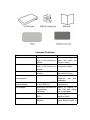
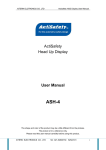
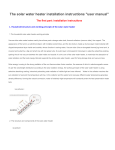
Head Up Display User Manual Product images and description only for reference purpose, so please see the subject produce. Introduction Thank you for purchasing our company's new product auto head-up display hereinafter referred to as the HUD.The product is developed for safe driving of auto. When an auto is at high speed, especially at night, if the driver lowers his head to watch meters or audio display, he will not take effective measures in time when some emergencies appear suddenly. At that critical time, HUD reflects very exquisite care by projecting the important information of meters display on front windshield in auto moving, such as speed. Not only does it helps new driver of less experience to control the speed to avoid overs peed in some speed limit road section, but also it makes the driver read the data rapidly without transforming vision and keep the best watch state Sober-mindedly. HUD offers many functions that make you experience the speed as well as the pleasure of driving. Our product is designed by applying the latest and performance stable integrated circuits, besides all indicators are up to the standard. The product is unique appearance, fluent line, ultra-thin fuselage and eye-pleasing. It also adds a sense of beauty to your car. Please read the operating instruction detailedly before you use it so that you can take advantage of all functions as possible. Main Futures Plug and play. HUD can auto adapt to vehicle type which in line with OBDII or EUOBD(On-Board Diagnostic System). Comprehensive display. HUD can display many parameters at the same time as follows, vehicle speed, engine speed, water temperature (voltage, throttle valve position, ignition advance angle, time of 100 km acceleration),fuel consumption, mileage, low fuel tips, engine failure. Diversiform display mode. Driver can chose normal display mode, highspeed display mode and automatic display mode. Free switch. Km and mile can be switched freely to meet the need of inch auto meter. Suitable size. The display area is 5.5 inches which is very clear for driver to read data. Automatic power on and off. Starting with the vehicle starting, stopping with the vehicle stopping to protect the vehicle’s battery. Moreover, we preserve the hand switch function to control the HUD. Flexible alarm mode. HUD can offer single-stage and four-stage over speed alarm modes to choose to make driving safer. Engine speed alarm. It contributes to shift gear in time to save fuel also has significance to new driver. Flexible brightness adjustment. The brightness can be adjusted automatically or manually to reach the best state which is in harmony with the environment. INSTALLATION INSTRCTIONS Preparation work 1. To know your vehicle type and brand. Choosing the vehicle type which in line with OBDII standard, you can open the engine hood and find a sticker under it. If the sticker has the letter”OBDII CERTIFIED”, it means you can install the HUD.(Figure 1) 2. To check the vehicle diagnostic socket under steering wheel, you can find vehicle’s 16pins socket. And then connecting it with OBDII line. (Figure 2) 3. To put non-slip mat in flat position in front of the vehicle, you can adjust the angle of the HUD host over it. 4. To paste the reflective film above the HUD host in order to receipt the HUD host’s data. (You can ask for the worker in authorized dealer to paste the reflective film) Some tips to paste: A: You can evenly spray water on the windshield glasses. B: Please tear the protective layer of the film, and spray some water to both sides it, then paste it on the place you want. C: Leveling out water under the film by smooth object until no water and bubble inside. D: when water evaporates, you can clean water and dust around the film. 5. To test the power, you need to turn on the HUD host and you will see vehicle’s recent voltage, and then enter into the state of researching vehicle’s computer version. After that we can say HUD is installed successfully. About HUD’s Settings Numerical value of HUD display is the same as vehicle inner computer value. However, the meter display of vehicle has errors with vehicle inner computer value, we can enter into the HUD’s setting mode to make slight modifications. Finally, the display of HUD and meter display are exactly the same. Specific steps are as follows: When HUD and vehicle are connected, we can press the button for 5 seconds to enter setting mode. Then pressing the button a time the menu adds one. You can plus or minus the parameters by dialing the button left or right. Finally we can back to display screen through pressing the button for 5 seconds or restarting the HUD. (Figure 3) The display of entering into adjustment status Menu Parameter Adjustment Explanation range 0 speed 50-100 Adjustment range is 50%-150%. 1 engine speed 50-100 Adjustment range is 50%-150%. 2 fuel 50-100 Adjustment range is 50%-150%. 3 engine speed 10-75 Adjustment range is alarm 1000-1500reel. 4 single/four 0-1 0 is a manual mode and 1is the stage alarm four-stage alarm value(60,80,100,120KM/H) 5 single stage 30-250 Setting range is alarm 30KM/H-250KM/H. 6 display mode 0-2 0 is an automatic mode: show all with speed under 80KM/H; show high-speed mode with 80KM/H above. 7 Brightness 0-2 0 is the automatic adjustment; adjustment 1 is the darkest and 2 is the brightest. 8 capacity of 0-150 Capacity of fuel tank is 0L to fuel tank 150L. 9 fuel switch 0-2 0 is the manual; 1 is the vehicle Default 107 117 100 75 0 120 0 0 50 0 10 11 input fuel emission setting 0-150 0-100 12 Start voltage 110-150 13 has sensor of fuel level; 2 is the function is closed. Fueling 0L to 150L. 0 means the vehicle has the air flow meter; 1,2,…,100 means vehicle emission is 0.1 L,0.2 L ,…,10L respectively. Set to 110---150 means 11.0v—15.0v 0 stands for off, 1 stands for on 50 16 132 Fuel 0-1 1 consumption on-off 14 Reference 10-500 10-500 is fuel consumption one 80 fuel km for 1-50 consumption 15 ECU 1-12 ECU protocol 0 * About the 14th fuel consumption explanation: Setting the reference fuel consumption is based on the Minis try of fuel consumption or car manufacturers released fuel c onsumption,such as the new Excelle's total fuel consumption is 8.7L/100km, then set in 87 is ok, calculating fuel con sumption by reference fuel consumption. * on 15 ECU protocol explanation: This function lies in understanding the car protocol class, convenient for manufacturers in automotive development compatib le program, to prevent other fault disturbance. Setting skills: 1.A quick refueling: Start the car,and toggle the dial butto n to refuel, the unit is L. 2, Generally speaking car produced after 2010 comes with air flow meter,the owner may choose 0 to see whether there is fuel consumption.If there is no fuel consumption,then set e mission . After the adjustment, press the dial switch 5 seconds turn the display interface or restart the HUD. to re Restore factory default settings: When HUD connected cars, pls donnot to start the engine, wa it for the off of HUD detection (or turn off the engine after stopping the car,HUD is off) Long-press the right key 5 seconds, then you hear a "tick" sound means it restore the factory settings. from HUD,which Clear fault codes: When HUD connected car, pls donnot start the car, put the key to "ON", waiting for HUD extinguished, long press the left button for 5 seconds, you will hear "beep" sound from HUD, which means clear faul t codes completed. Common operation settings 1. Switch the display When the car start and the interface display normally, you can dial the button to left for 5 seconds, and you will see the “functional zone 1” is flashing. Then you can dial left or right to choose what you want to display. To press the button you can enter into the “functional zone 2” by repeating the same steps. Similarly, the “functional zone 3”. Finally you can exit by pressing the button for 5 seconds. 2. Switch of alarm sound When the car starts and the interface displays normally, you can dial the button to left for 5 seconds, and you will see the icon of voice is closed. Repeating the steps, the icon will be lightened. Just circulate the steps to get what you want state. 3. Fuel quickly When the car start and the interface display normally, you can dial button to left or right to decrease or increase fuel. For example, dialing the button until the speed displays 20, that it’s to say you increase 20L oil. (Note: This function is only effective to the fuel switch is 0.) Function Instructions 1. Parameter value: show the value with the units of kilometers, miles and engine speed. 2. OBDII port: connect the car and HUD. 3. Fuel icon: flash when the fuel is not enough to drive 100km. 4. Engine failure: flash when vehicle’s engine has problems. 5. Engine speed: show the state of engine speed. 6. Engine speed icon: indicate the parameter value of engine with units of 1000r. It will flash when engine speed is alarming. 7. Speed alarm: flash when speed exceeds the preset values. 8. Rest tips: flash when drive continuously for more than 4 hours with HUD starting. 9. Sound switch: light when voice alarm is opened. 10. Fuel consumption icon: show fuel consumption is calculating. 11. Fuel parameter value: show the consumption of fuel in recent driving. 12. Dial button: multi-function switch, you can dial to left or right, you can enter into setting mode by long press. And also has the ability to decrease or increase fuel. 13. Fuel consumption per hour: show oil mass consumption per hour in driving. 14. Light sensor: sense the external light intensity and adjust the HUD’s brightness to adapt to environment automatically. 15. Fuel consumption per 100km: show the fuel consumption per 100km in driving. 16. Voltage, throttle valve, water temperature, ignition advance angle and acceleration per 100km: voltage shows the vehicle’s voltage; throttle valve shows the size of itself; water temperature shows the temperature of vehicle cooling fluid; ignition advance angle shows the angle of twist in firing, it’s also a mark of engine’s efficiency. Acceleration per 100km shows performance of the vehicle’s acceleration per 100km. 17. Seconds: show the unit of acceleration per 100km. 18. Parameter value: show parameter value of Voltage, throttle valve, water temperature, ignition advance angle and acceleration per 100km. 19. Mileage: light when the fuel only sustains 100km. 20. Reel per minute: show the unit of engine speed if you multiply the parameter value with 10. 21. Kilometer per hour: show the unit of speed. 22. Mile per hour: show the unit of speed. Packing List: Common Problems Problems No speed alarm Possible reasons The setting value is too high or the function is closed No engine speed alarm The setting value is too high or the function is closed No display after starting The switch is not opened Inaccurate display of oil No air flow sensor consumption No speed and engine Not conform to OBDII speed display or EU-OBD port No mileage Settings of fuel and fuel consumption calibration Speed is inaccurate The unit of speed is MPH Only speed and fuel Speed exceeds 80KM/H Solutions Cancelling stages of alarm and open the switch of alarm Resetting and opening the switch of alarm Opening the switch and check the plug Resetting the emissions and then calibrating Contacting with auto manufacturer Switch to manual to input fuel and adjust fuel consumption Switching the unit of speed to KM/H Entering into set and switch display mode to 1 Main Technical Indicators 1. Service conditions: Environment temperature: -400C—+800C Barometric press: 86—106 KPa Relative humidity: 10%—95% Environment voice: <=60 dB(A) 2. Alarm of sound level:> =30dB(A) 3. Work voltage: 9V~16Vdc(12Vdc/400mA) 4. Size of product: 14x85x147 (mm) 5. Weight of product: 320g