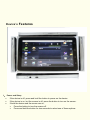
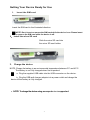
1
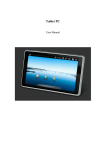
(NEOI Group SINGAPORE –Neoi Technology Turkey – Neoi Technology HONG KONG – NEOI Technology Deutschland) NeoIDesc 601 Quick User Manual – Android 2.2 For Full User Manual, see Manual stored on MID or go to http://www.neoi-technology.com/manuals/ Support [email protected] , [email protected] Or go to http://www.neoi.de ; http://ww.neoi-technology.com Neoi Technology Pte. Ltd., 9 Temasek Blvd., #19-05, Suntec Tower 2, Singapore 038989. Phone:+65-68389029 – Support Line Global: +65-65249086 [email protected] http://neoi.de Notes, Cautions, and Warnings NOTE: A NOTE indicates important information that helps you make better use of your device. CAUTION: A CAUTION indicates potential damage to hardware or loss of data if instructions are not followed. WARNING: A WARNING indicates a potential for property damage, personal injury or death. ____________________ Information in this document is subject to change without notice 2 Contents 1 For Your Safety. . . . . . . . . . . . . . . . . . . . . . . . . . . .5 2 Device’s Features. 3 Setting Up Your Device . . . . . . . . . . . . . . . . . . . . . . . . . . .6 . . . . . . . . . . . . . . . . . . . . . . . . .9 ................9 Turning On Your Device. . . . . . . . . . . . . . . . . . . . . . 11 Turning Off Your Device . . . . . . . . . . . . . . . . . . . . . 11 Turning Off the Screen. . . . . . . . . . . . . . . . . . . . . . . 11 Charging the Battery . . . . . . . . . . . . . . . . . . . . . . . . 12 Getting Your Device Ready for Use 4 Understanding Your Device . . . . . . . . . . . . . . . . . . . . . .13 Home Screen. 5 . . . . . . . . . . . . . . . . . . . . . . . . . . 17 Applications, Widgets, and Shortcuts. . . . . . . . . . . . . 21 Status Bar . . . . . . . . . . . . . . . . . . . . . . . . . . . . . 28 Adjusting Volume . . . . . . . . . . . . . . . . . . . . . . . . . 33 Using Your Device . . . . . . . . . . . . . . . . . . . . . . . . . . . 34 . . . . . . . . . . . . . . . . . . . . . . . . . . . . . . . 34 Call Log . . . . . . . . . . . . . . . . . . . . . . . . . . . 37 Contacts . . . . . . . . . . . . . . . . . . . . . . . . . . . . . . 38 Messaging. . . . . . . . . . . . . . . . . . . . . . . . . . . . 40 Input Methods . . . . . . . . . . . . . . . . . . . . . . . . . . . 45 Calling 3 6 Web Browser . . . . . . . . . . . . . . . . . . . . . 7 Settings. . . . . . . . . . . . . . . . . . . . . . . . . . 48 8 E -ma il . . . . . . . . . . . . . . . . . . . . . . . . . . 53 9 Applications . . . . . . . . . . . . . . . . . . . . . . . . 57 . . 47 Camera. . . . . . . . . Photos . . . . . . . . . . . . .. . . . . . . . . . . 59 Videos . . . . . . . . . . . .. . . . . . . . . . . . 62 Music. . . . . . . . . . . . . . . .. . . . . . . . . 63 Calendar . . . . . . . . . Alarm Clock. . . . . . . . . .. . . . . . . . . . . . 68 Calculator. . . . . . . . . . . . . . . .. . . . . . . . . . .70 Notepad . . . . . . . . . . . . . . . . . . . . . . . 71 . . . . . . . . . . . . . . 57 . . . . . . . . . . . . . 65 11 USB Connections . . . . . . . . . . . . . . . . . . . . . . 72 12 Reset . . . . . . . . . . . . . . . . . . . . . . . . . . . . . . . . .72 13 Automatic Update . . . . . . . . . . . . . . . . . . . . . .73 13 Original Accessories 14 Battery Information . . . . . . . . . . . . . . . . . . . . 75 15 Care and Maintenance 16 Important Safety Information . . . . . . . . . . . . . . . . . . . . . . . . . . . . 74 . . . . . . . . . . . . . . . . . . 76 4 . . . . . . . . . 76 For Your Safety Read these simple guidelines. Not following them may be dangerous or illegal. Read the complete user guide for further information. SWITCH ON SAFELY Do not switch the device on when wireless device use is prohibited or when it may cause interference or danger. ROAD SAFETY COMES FIRST Obey all local laws. Always keep your hands free to operate the vehicle while driving. Your first consideration while driving should be road safety. INTERFERENCE All wireless devices may be susceptible to interference, which could affect performance. SWITCH OFF IN HOSPITALS Follow any restrictions. Switch the device off near medical equipment. SWITCH OFF IN AIRCRAFT Follow any restrictions. Wireless devices can cause interference in aircraft. SWITCH OFF WHEN REFUELING Do not use the device at a refueling point. Do not use near fuel or chemicals. SWITCH OFF NEAR BLASTING Follow any restrictions. Do not use the device where blasting is in progress. QUALIFIED SERVICE Only qualified personnel may install or repair this product. ENHANCEMENTS AND BATTERIES Use only approved enhancements and batteries. Do not connect incompatible products. WATER-RESISTANCE Your device is not water-resistant. Keep it dry. MAKE BACK-UP COPIES Remember to make back-up copies or keep a written record of all important information stored in your device. CONNECT ANY OTHER DEVICE When connecting to any other device, read its user’s manual for detailed safety instructions. Do not connect incompatible products. EMERGENCY CALLS Ensure the phone function of the device is switched on and in service. Enter the emergency number, and then press the call key. Give your location. 5 Device’s Features 1 Power and Sleep • • • If the device is off, press and hold the button to power on the device. If the device is on, but the screen is off, press the button to turn on the screen. If both the device and the screen are on, > Press the button to turn the screen off. > Press and hold the button for two seconds to select one of these options: 1 • • • Silent mode: The device does not vibrate and disables all sounds except for alarms. Airplane mode: Select to disable all wireless connections. Power off: Press and hold the button for four seconds to turn off the device. 2. Reset button > If the device is on, press the button to turn off the device. 3. Headphone connector > Connects to headphones. 4. Camera lens Front / Back > > > Captures pictures and videos. Front Camera 0.3 MP for Video Conference, Back Side 5 MP for High resolution Pictures and Video 2 7. Volume adjusting button While playing media such as music tracks or video clips: Press to increase or decrease media volume by one level. Press and hold to continuously increase or decrease the media volume. • In all other situations: > Press to increase or decrease the ringer volume by one level. > Press and hold to continuously increase or decrease the ringer volume. • > > 8. Micro SD card slot > Micro SD card connector. Please pay attention to the card’s direction. 9. SIM card slot > SIM card connector Please pay attention to the card’s direction. 10. USB/charging connector • • Connects to a USB cable to transfer files to a computer. Connects to a charger to charge the device. 11. Microphone • Use for voice calls. 3 2. Reset button > If the device is on, press the button to turn off the device. 3. Headphone connector > Connects to headphones. 4. Camera lens Front / Back > > Captures pictures and videos. Front Camera 0.3 MP for Video Conference, Back Side 5 MP for High resolution Pictures and Video 4 Getting Your Device Ready for Use 1 Insert the SIM card Insert the SIM card in the illustrated direction. NOTE: Don’t insert or remove the SIM card while the device is on. Please insert or remove the SIM card while the device is off. 2 Install the micro SD card Slide the micro SD card into the micro SD card holder. 3 Charge the device NOTE: Charge the battery in an environmental temperature between 0°C and 45°C. The battery is not fully charged when first unpacked. a. Plug the supplied USB cable into the USB connector on the device. b. Plug the USB wall charger adaptor into a power outlet and charge the device till the battery is fully charged. c. NOTE: To charge the device using a computer isn’t supported. 7 Turning On Your Device NOTE: Use this device in an environmental temperature between -10°C and 45°C. 1. Press and hold the Power button to turn on your device. The operating system starts up. 2. Gently slide the Screen Unlock button from left to right to unlock the screen if it is automatically locked. NOTE: If your SIM card is locked by a Personal Identification Number (PIN), type the PIN by touching the corresponding number keys using the on-screen keypad. Touch the OK button to confirm your input. 3. The device is ready for use when the home screen is displayed. Turning off your device 1. Press and hold the Power button for two seconds and touch the Power Off option. 2. Press and hold the Power button to turn off the device. NOTE: 1. Press and hold the Power button for one second to lock the screen. 2. Press and hold the Power button for two seconds, Options menu displays: Silent Mode, Airplane Mode, and Power Off. 3. Press and hold the Power button for four seconds and power off. Turning Off the Screen If both the device and the screen are on, press the Power button to turn off the screen. NOTE: If the device is on, but the screen is off, press the Power button to turn on the screen (press and hold the Power button for one second). 11 Charging the battery Use only approved chargers, accessories and enhancements designated for this device. The use of any other types may invalidate any approval or warranty, and may be dangerous. When you disconnect the power cord of any accessory or enhancement, grasp and pull the plug, not the cord. If the battery is completely discharged, it may take thirty minutes before the charging indicator appears on the display. 12 Understanding Your Device When using the features in this device, obey all laws and respect local customs, privacy and legitimate rights of others, including copyrights. Do not switch the device on when wireless device use is prohibited or when it may cause interference or danger. Touch Screen Finger gestures: Allows you to: Touch Tap gently on the screen with your finger. Select the items on the screen including options, entries, images, and icons. Start applications. Delete. Press and hold your finger on the screen to delete. For details, Please refer to the shortcut to delete Home screen. 13 Finger Gestures: Allows you to: Touch and hold Touch and hold your finger on the screen. Move an item on the Home screen. Add shortcut to a Home screen. Press and hold an empty area on a Home screen to add shortcut to the Home screen. For details, Please refer to adding shortcut to a Home screen. Drag 1. Touch and hold your finger on an item on the screen to move the item such as images and icons. 2. keeping your finger in contact with the screen, move your fingertip to the desired location. 3. Taking your finger off the screen to drop the item in the desired location. 14 Finger gestures allow you to: Flick or swipe Move your finger in horizontal direction on the screen to scroll through Home screens, web pages, wallpapers, and so on. 15 Finger gestures allow you to: Zoom-in Move two fingers apart on the screen. Enlarge the view of an image or web page. Zoom-out Move two fingers close together on the screen. Reduce the view of an image or web page. NOTE: You can calibrate your touch screen when you are starting up your device if touching screen is not accurate. Press and hold the Volume “-” button on the upper of the device and press and hold the Power button simultaneously to turn on the device. Release the Power button when the device vibrates. Release the Volume “-” button when the “Touch Screen Calibration,Don't Touch The Screen...OK” displays on the screen. Do not touch the screen during the period. 16 Home Screen On the Home screen, clock displays time and search box is used for searching. The Home screen displays widgets, folders, and shortcuts that provide easy access to your favorite or frequently-used applications. You can also display your favorite pictures as your Home screen wallpapers. ,pop up the drawer screen, touch return to the current Home screen. NOTE: Touch the home screen Multiple Home Screens Your device supports multiple Home screens to give you more space to display widgets, shortcuts, or folders. NOTE: Device supports up to five Home screens. To navigate across the Home screens Flick the Home screens horizontally until the desired one is displayed. 17 to Navigating the Home screens There are five screens on the Home screen. To enter other screens, flick your finger horizontally to left or right on the Home screen. On the current screen press Home button to return to the Home screen. You can freely add applications, widgets, and shortcuts on each screen. For details, please refer to the Home Screen. Each screen commonly displays: Screen one displays project names you freely added such as Calendar. You can touch any day to open the Calendar. Screen two displays applications, widgets, and shortcuts you freely added. Screen three displays project names you freely added such as Clock, Quick Search Bar, and so on. Screen four and Screen five displays built-in applications and project names that you freely added. NOTE: If you carelessly deleted an application, widget or shortcut, you can continue to add the project name that you need. 18 To add a shortcut to a Home screen 1. You can add or download shortcuts of your desired applications to a home screen. Touch and hold an empty area on the Home screen, the Add to Home screen menu appears. 2. You can also touch the icon to open the drawer menu. Press and hold any function’s icon to add the function’s shortcut to the current Home screen. (For example: To add Phone, touch and hold the Phone icon to add it to the Home screen.) NOTE: For details of adding a shortcut to a Home screen, please refer to ―Applications, Widgets, and Shortcuts‖. To remove a Home screen shortcut 1. Touch and hold the shortcut that you want to remove until it magnifies and the icon ― ‖ below it appears. 2. Drag the shortcut that you want to remove into ― and drop it until the icon ‖ becomes red. The shortcut is deleted. NOTE: Cannot delete the menu functions in the tray. Tray menu function Each screen has a tray and each tray displays the frequently-used menu functions that user can conveniently use at any time. Default menu has browser, e-mail, phone, drawer function key, music, gallery and settings. 19 MENU Function On the Home screen, press the button ―MENU‖ to pop up the Options menu: Add: Add an application’s shortcut to the Home screen. Wallpaper: Customize the Home screen’s wallpaper. Search: Search the web pages and applications. Notifications: Open the notifications list of the status bar. Settings:Enter the Settings screen. Multi-task Feature The device supports multi-tasking capability, you can view your current running applications via multi-task function which is also running in the background. If you have multiple applications running in the background, you can open multiple task management interface to run your current applications. You can also click on the "end all" button to close all applications running in the background. Or you can also close a single application by clicking the "x" button in the upper right corner of the application. 20 Applications, Widgets, and Shortcuts Application – Software which allows you to perform or install. Your device is preloaded with a variety of applications. Widget – A small application which resides on the Home screen and provides quick and easy access to information. Shortcut – A link that you can put on your Home screen to provide quicker access to an application or a folder containing contacts or bookmarks. You can also add the desired applications to your Home screen. You can add items such as application icon, shortcuts, data folders, and widgets to have quicker access to information and applications. Add them as follows: 21 Steps to Add to a Home Screen NOTE: Press and hold an empty area on the home screen. The Add to the Home screen menu appears. Touch the Shortcuts Applications option, you can: Applications: 1. Scroll through the application menu to locate the desired application. 2. Touch the desired application to create the shortcut on the current Home screen. Contacts: 1. Flick through the Contacts entries to locate the desired contact. 2. Touch the desired contact entry to create the shortcut on the current Home screen. Settings: 1. Scroll through the Settings to locate the desired one. 2. Touch the desired setting to create the shortcut on the current Home screen, where you can touch the shortcut to access the setting. Bookmark: 1. Flick through the Bookmarks list to locate the desired bookmark. 2. Touch the desired bookmark to create the shortcut on the current Home screen. Music: You can add the Play All shortcut. You can also add the New added files shortcut. Messaging: Touch the desired phone number to create the shortcut on the current Home screen. You can touch the shortcut to compose and send a message to the number. Phone: Touch the desired phone number to create the shortcut on the current Home screen. You can touch the shortcut to dial the number directly. 22 To add window widgets Add widgets to display the active Home screen window or the controls of your favorite applications or web-based services, such as an analog clock, the calendar, the weather, or the music player. 1. Flick through the available applications or services to locate the desired one. 2. Touch the desired widget to add it on the Home screen. 23 To Add Folders You can create the following folders: New folder Add a folder where you can store your Home screen shortcuts. All contacts Add a shortcut to all your contacts stored in the Contacts application. Bluetooth received Enable the Bluetooth on your device to transfer data. Add the shortcut of the Bluetooth received to view the information you received by Bluetooth. Contacts with phone numbers Add a shortcut to the contacts with phone numbers. Starred contacts Add a shortcut to the contacts marked with a star. 24 Wallpapers Change the wallpaper of your Home screen. NOTE: You can also press and hold an empty area on the Home screen → Touch Wallpapers option to change your Home screen wallpaper. Select a picture stored on the device as a wall paper. 1. Flick the picture thumbnails to locate the desired picture. 2. Touch the picture to display it. 3. To cut a portion of the picture as the wallpaper, move the crop frame and drag the angles to locate the desired part. 4. Touch the Save button to set the wallpaper; Touch the Cancel button to return to previous screen. Wallpaper gallery 1. Flick the wallpaper thumbnails horizontally along the bottom of the screen to locate the desired one. 2. Touch the wallpaper’s thumbnail to display it. 3. Touch the Set Wallpaper button. Dynamic wallpaper: Select preinstalled wallpaper. 1. Flick the wallpaper thumbnails vertically along the top of the screen. 2. Touch the dynamic wallpaper’s thumbnail to display it. 3. Touch the Set Wallpaper button. 25 To open a Home screen folder 1. Touch the folder to open a black panel displaying the contents of the folder. 2. Touch the desired application shortcut to run the application. To close a Home screen folder Touch the X button on the top right corner of the folder to close the black panel. To move a Home screen shortcut into a folder 1. Touch a folder on the Home screen to open it. 2. Touch and hold a shortcut to make it movable. 3. Drag and drop the shortcut into the folder. NOTE: You can also drag items directly into a folder without opening the folder. NOTE: Widgets and folders cannot be moved into a folder. 26 To remove a Home screen shortcut from a folder 1. Touch a folder on the Home screen to view the contents. 2. Touch and hold a shortcut to make it movable. 3. Drag and drop the shortcut in the folder to an empty area on the Home screen, and touch and hold the shortcut: a. Touch and hold the shortcut that you want to delete on the Home screen until it magnifies and the icon b. Drag it to the icon below it appears.。 and drop it until the icon becomes red. The shortcut is deleted. To rename a folder 1. Touch the shortcut of a folder. 2、Touch the folder name input field to type the name using the on-screen keyboard. 27 Status Bar The status bar displays the application button, date and time, and the status and notification areas. Displays status icons to show the current state of your device, such as battery power, charging progress, alarm set, network connections, and so on. You can view the other menu icons that you have enabled such as the airplane mode, wireless mode, or Bluetooth mode, and so on. The status area may also display some of the following icons: Signal strength — strong No signal Airplane mode is enabled Roaming signal strength — strong WIFI signal strength — no signal WIFI signal strength — Very low WIFI signal strength — low WIFI signal strength — medium WIFI signal strength — strong A Wi-Fi network is found Alarm is set 28 GPRS data network is connected GPRS data network is in use 3G data network is connected 3G data network is in use HSPA data network is connected(only available for carrier-specific version) HSPA data network is in use(only available for carrier-specific version) Download in progress SD card is removed No SIM card is inserted GPS satellites function is enabled More notifications(not displayed) Connected to a computer The Bluetooth is enabled Connected to a new Bluetooth device Ongoing data synchronization 29 Battery status — 100% full Battery is higher Battery is high Battery is medium Battery is low and needs to be charged Battery is extremely low and needs to be charged immediately Battery is exhausted and needs to be charged immediately Battery is charging under the state of lower power Battery is charging under the state of low power Battery is charging under the state of medium power New message New e-mail Upcoming calendar event Silent mode is enabled Vibrate mode is enabled Call in progress Missed call It is playing music 30 Status Notifications The notification area displays notification icons to inform you of missed calls, new messages, e-mail, upcoming calendar events, and so on. Touch the notification area to view the notifications listed in arrival time order. Touch a notification to view the desired message, e-mail, or missed call record. NOTE: To View the notifications, touch the notification area from top to bottom to display information such as the notifications list, and so on. Clear status notification When there are notifications, touch and hold the status bar and flick your finger downwards on the screen to open the notification panel. Touch the Clear button on the top right corner to clear. NOTE: The Clear button hide if a USB is connected to your device. 31 To open notification panel Touch and hold the Status Bar and flick your finger downwards to open notification panel when the Status Bar displays a new notification icon. You can view more notifications by flicking your finger downwards when more than one notification appears. You can also touch a notification entry to open the information (Such as upcoming calendar event notification. You can touch the calendar event notification to view the details of calendar). To close notification panel Please perform one of the following steps: Touch and hold the control column on the bottom of the notification panel, then flick your finger upward on the screen. You can also press the Back button. 32 Adjusting volume Adjusting ringer volume can change the ringer volume for incoming calls. Adjusting media volume can change volume for notifications, music and video playbacks. You can separately adjust ringer volume and media volume. To adjust ringer volume Press the Volume Adjusting button on the upper lateral region of the device to adjust ringer volume to what you want. Ringer volume window appears, displaying volume. If the ringer volume has been lowest (in silent mode) the speaker mute icon ( ) appears on the Status Bar. If you want a quick switch to silent mode, press and hold the Power button and select the Silent mode option in the options list. To adjust media volume Press the Volume Adjusting button on the upper lateral region of the device to adjust media volume when you are playing music or video playback. Music/ video volume window appears, displaying current volume. 33 Using Your Device Calling Making Calls To make calls, touch Phone on the Home screen to open the Phone application. You can: 1. Touch Phone to type phone number and touch number. to make a call to the 2. Call a desired phone number or contacts from the call log. 3. Type the desired phone number using the on-screen dial pad. 4. Touch the Delete icon to delete the number. 5. Touch the desired phone number in a call log and touch Phone button to call. For details of using Contacts, please refer to Managing Contacts. 6. Touch to select the desired contact in Contacts to call. For details, please refer to call, e-mail, or send a message to a contact from your contacts list. 34 To dial an emergency call Even if there is no SIM card installed or the SIM card is locked, you can also enter the Phone screen to dial an emergency call. To cancel dialing Press the Back button to cancel dialing. To answer a call When you received a call from contacts, the Incoming call screen appears, displaying the caller’s icon, name, and phone number. When you received a call that is not from your contacts, the Incoming call screen displays the default icon and the phone number. To answer a call Slide the Answer Call button from left to right to answer the call. To reject a call Slide the Ignore Call button from right to left to reject an incoming call. NOTE: You can also press the MENU button to select the End Call option. 35 Call in Progress Press the MENU button during a call: Pop up Options menu, displaying Dial Pad, End Call, Hold, Mute, and Speaker. 1. Touch Dial pad to pop up the dial pad. 2. Touch End Call to end the active call. 3. Touch Hold to hold a call in progress. 4. Touch Mute to turn the microphone on or off. The Mute icon appears in the Status Bar when the microphone is muted. WARNING: Ensure that you turn off the speakerphone before you hold the device close to your ear as this could damage your hearing. 36 Call Log On the Phone screen, you can scroll through the call log to locate the missed call, incoming call, and dialed call record, displayed either as a phone number or as a contact’s name. You can choose to do the following with a call: Touch Touch and hold the name or number (for more options) to pop up options: Call, Edit number before call, Send text message, Add to contacts, and Remove from call log. To erase all calls from the call log, touch the MENU button, then touch the Clear call log. to call the number or contact. 37 Contacts To view and manage your contacts, touch the Application button Contacts. To add a contact Contacts MENU button New contact, then enter the Edit Contact screen. You can fill the items with contact’s corresponding information such as name, phone number, address, and so on. To add more items, touch the icon . When you have entered all the required information, touch the button Done and the contact is created. NOTE: 1. Touch Big-head Photos to select a photo to use as the contact’s caller’s big-head photo. 2. You can add multiple phone numbers, e-mail addresses, and so on. To view the contact Touch the icon , then touch the Contacts label to enter Contacts list screen. Your contacts are in an alphabetical displayed list. Touch the contact that you desired to view the details. Touch the label icon to enter Contacts in your favorite. On the Contacts Details screen, touch the icon to star the contact as a favorite. To import/export You can Import contacts saved on your SIM card or flash into your device. You can also export contacts saved on your device to your SIM card or flash to backup. Touch ContactsMENU buttonImport/Export to select corresponding option. 38 Searching Contacts MENU Search,enter Contacts Search screen. The search results appear below the search box if the contact’s name fully or partially matches the characters you have typed. Touch to view the contact that you want to search. To edit a contact You can edit your contact or add more details. You can also set the head portrait of a contact. Touch and hold the contact you want to edit Edit contact, or enter the Contact Details screen MENU Edit contact. Display option Touch MENU —>Display options, enable/disable displaying the contact only with a phone number。 To share your contacts You can share the E-cards with your friends by email or Bluetooth. View the Contact Details screen MENU Share。 NOTE:On this screen, you can touch the star button at the side of the contact name to save or cancel the contact as a favorite. To search Touch the icon to enter Searching screen. The search results appear below the search box if the contact’s name fully or partially matches the characters you have typed. Touch to view the contact that you want to search. To delete a contact Delete the unwanted contacts. Touch and hold the contact you want to delete Delete contact, or enter contacts Details screen. Touch MENU, then touch Delete Contact to delete the contact. NOTE:Touch and hold a added contact to pop up the contact’s Options menu: View contact, Call contact, Text contact, Add to favorite, Edit contact, and Delete contact. 39 Messaging To compose, send, and read text (SMS) messages. Touch → Messaging. The Messaging screen opens with a list of messages or message threads representing all the received, sent and draft messages. NOTE:For information about the message thread, see receiving text message. To compose and send a text message 1、On the Messaging screen, touch the New message thread. The composer screen opens. 2、In the To field ,type the mobile phone number or the contact name of the recipient. As you type a phone number or contact name, matching contacts with their mobile numbers appear below the To field. Touch a matched contact to enter the contact’s mobile number, or continue typing the desired phone number. 3、Repeat step 2 to enter more mobile numbers if you wish to send the message to multiple mobile phone users. 4、Touch the Type to compose text field to start composing your message. 5、Touch the Send button to send the text message. NOTE: To start a text conversation similar to online instant messaging, you can continue to compose and send messages to the same recipient(s). All of the sent and received messages between you and recipient(s) appear in the form of chat logs. NOTE:If you want the information saved as drafts and changes in the future, that is Saved and displayed in red Draft word. 40 Receiving text messages Depending on your notification settings, the device rings, vibrates, or displays a message briefly in the status bar as a new text or multimedia message arrives. A new message icon appears and stays in the notifications area of the status bar to remind you of a new message. NOTE:To alter notification settings for new messages, touch the Menu button on the Messaging screen, Touch Settings → Notifications. You can activate or turn off the notification settings. When the Notifications is enabled and the new message arrives, a text notification appears in the status bar. You can also select a ringtone that rings with the arrival of a new message, or letting the device vibrate to report a new message. When the Notifications is turned off and a new message arrives, no prompting message appear in the status bar. 41 To read a text message You can read your text messages as follows: Touch the notification area on the status bar where the new message icon is displayed. A list of notifications opens. Touch a new message notification to open and read the message. Touch the Messaging to open the message list, and then touch a text message or message thread to open and read it. To forward the message 1、Touch any number or name of the message list. Touch and hold the message entry to pop up the Messaging options box. NOTE: If the message you want to forward displayed in the form of chat logs, touch and hold the message entry to pop up Messaging options box. 2、Touch the Forward to forward the message. 42 To lock/ unlock a message Touch and hold the message list to pop up the Message options menu. Touch the Lock message to lock the message; Touch and hold the locked message to pop up the Message options menu. Touch the Unlock message to unlock the message. NOTE: If your message is locked and you want to delete the message, the prompting message ― Are you sure you want to delete this locked message?‖ appears. To copy, paste message text and the input methods 1. Touch and hold the message you want to copy, pop up Message options menu. Touch the Copy message text, and this message will be copied to the clipboard; 2. At the input location where you want to paste, touch and hold the input box to pop up the Edit text options menu. Touch the Paste to complete the copy operation; 3. Touch and hold the Input box to pop up the Edit text options menu. Touch the Input method, and then select the input method you need. To view message details Touch and hold the message which you want to copy in the chat log to pop up the Message options menu. Touch the View Message details to view Type, From or Received . 43 To reply a text message 1. Touch a message or message thread to open it. 2. Type your reply message into the Type to compose text field. 3. Touch Send to send your message. To delete a message or a message thread 1. In the Messaging list,touch and hold the message you want to delete to pop up Message options menu. Touch Delete message. It can delete the entire thread by this way. 2. In the recipient list, touch and hold the message within a thread you want to delete. Touch the Delete message on the Message options menu, and touch OK to confirm deletion. NOTE:To delete all messages on the message list, touch the Menu button →Delete thread. To edit message settings In the message list,touch the Menu button → Settings to change the text message settings. Follow the instructions on the screen. 44 Input methods The device provides two Chinese input methods for you to input Chinese: Google pinyin input method and the android input method. To select Google pinyin input method 1、Touch and hold the text box to pop up the Edit text menu. 2、Touch Input method. 3、Touch Google pinyin. NOTE: On the Google pinyin screen,You can also switch to English letters, Numbers and symbols panels. After selecting Google pinyin input method,it will open a capital letters keyboard for you to input Chinese. To enter Chinese letters 1. There are two ways to enter Chinese letters: a. Touch letters that compose the Chinese pinyin. For example, type DIAN to enter ―电‖. b. Touch multiple Chinese pinyin initials. These letters represent multiple Chinese characters. For example, DH can represent Dian Hua(电话). NOTE: Touch DEL to delete improper words or symbols. 2. The device will display Chinese character suggestions matching the letters that you typed. Touch the character you want. NOTE: Associated characters will appear after step 2 for you to choose. NOTE: You can press direction keys to scroll pages to choose words you want. NOTE: To switch to numbers/symbols input method,touch the ?123 button. On the Numbers screen,you can also touch ALT to enter Symbols display screen;Touch the highlighted ALT again to return Numbers display panel. NOTE: Touch the Chinese button to switch to English input method. You can switch to Chinese input method conversely. 45 Choose Android input method 1、Touch and hold the text box to pop up the Edit text menu. 2、Touch Input method. 3、Touch Android keyboard. The Android keyboard provides:Uppercase English input method, Capital letters input method and Small letters input method. You can switch in three modes. Android numbers and symbols input method 1. To open the numbers keyboard,Please touch ?123. 2. After opening the Numbers Keyboard, touch ―?123 again to choose input method below: punctuation:Input punctuations and symbols. Mathematics: Input mathematical symbols. Special: Input the website prefix, suffix or special icons. NOTE:You can choose input method you like. You can also download and install your favorite input method. To download and install an input method Operation steps is as follows: 1. Download the input software installation package to your storage card. 2. Insert your storage card into the device. 3. Select the input method you want to install in the file manager,then enable the Unknown source options, and touch Install to finish installation. NOTE: You can also activate the Unknown source option before step 3(on the Home screen —> Settings —> Applications —> Activate Unknown sources option.) 4、Return to the Home screen. Touch Settings—> Language & keyboard—> Activate the input software installation package you have installed to run. 46 Web Browser Web browser of the device allows you to view complete page on the broad screen with full colors and clear text. All the contents on the page are in your sight, and you will enjoy surfing the internet no matter in the vertical or horizontal mode display. When you are opening a webpage,touch and hold the left bottom corner to pop up the zoom-in or zoom-out icon. Touch the zoom-out icon to reduce the page and contents. Touch the zoom-in icon to enlarge the page and contents. To open the browser Enter the Drawer button to touch the icon , or touch the icon directly on the Home screen. You can also touch a website link in an email or message to open the browser. After opening the browser,It will display the last browsed page. It will display the home page if the browser is not opened. URL of the current page displays at the top of the page. To enter a web station Touch the URL input box on the top of the screen,and enter the URL,then touch the icon at the left side of the URL to enter the web station. To refresh the current page Touch the icon to refresh the current page. To stop opening a site When the page are opening,Touch the button stop opening the page. at the right side of the URL to To obtain more information of the current page Touch the MENU button on the current page,choose More. To set homepage Touch the MENU button on the current screen Settings Set home page, confirm after entering the URL. The homepage becomes the URL website you just set. 47 Settings Wireless & network Settings The device is configured with Wi-Fi, GPRS, EDGE, 3G, or HSPA network for you to obtain the super high data transmission rate through mobile networks. It will automatically connect the network using Wi-Fi if the Wi-Fi is enabled. After disconnecting the Wi-Fi,you can use GPRS、EDGE、3G and HSPA to connect. NOTE: Whether the GPRS、EDGE、3G and HSPA network connection functions is available depends on the service provider of the SIM card installed in the device. The Airplane mode Many countries ask passengers to switch off mobile phones in the aircraft. Another way to close the call function of the device is switching it to the Airplane mode. Enable the Airplane mode to turn off all the radios on the device, including call function, data service, Bluetooth and Wi-Fi. Enter Settings Wireless & network settings Airplane mode,then touch the icon to disable the Airplane mode. to enable Airplane mode. Touch the 48 icon Wireless network(WI-FI) Wi-Fi This device supports browsing the network using the local Wi-Fi network. To enable Wi-Fi Enter Settings Wireless & network settingsWi-Fi,then touch the icon switching the icon to to enable Wi-Fi. You can also enable it in the Settings Wireless & network settings Wi-Fi settings Wi-Fi. To disable Wi-Fi Enter Settings Wireless & network settings Wi-Fi,touch the icon switching it to to disable Wi-Fi. You can also disable Wi-Fi in the Settings Wireless & network settings Wi-Fi settings Wi-Fi. To connect a Wi-Fi network Enable Wi-Fi and wait for a moment. The device will search for the nearby Wi-Fi networks in range automatically. Select a Wi-Fi network to connect In the Wi-Fi settings menu. If the network marked by a lock icon,you need a password to connect it. After connecting to a Wi-Fi network,the icon appears on the status bar on the right side of the Home screen,representing the strength of the Wi-Fi signal. More white lines the icon has, much stronger the siganl is. Once select a Wi-Fi network,it will always connect the Wi-Fi network in range automatically. If there are some Wi-Fi network in range and you enable the Wi-Fi after disabling it,the device will connect to the Wi-Fi network connected last time. To add a Wi-Fi network Enter Settings Wireless & network settings Wi-Fi settingsAdd Wi-Fi network, and enter SSID of an available network. It will add the Wi-Fi network to the ―Wi-Fi network‖ list automatically after choosing the safety type. To delete a Wi-Fi network Enter Settings Wireless & network settings Wi-Fi settings,touch and hold a Wi-Fi network in the ―Wi-Fi Networks‖ list,and select Not save in the menu popped up to delete the Wi-Fi network. If you delete the Wi-Fi network connected,the Wi-Fi will be turn off automatically. If the Wi-Fi network has a password,the password will be deleted ,but the Wi-Fi network will still be in the Wi-Fi networks list. To connect a closed WI-Fi network To connect a network out of the Wi-Fi networks list,you need to know its name, password and safety type. You can connect the network after adding the Wi-Fi network. 49 It will connect the network in the WI-FI coverage area by wireless network. The icon on the status bar will indicate the strength of the connection signal. To not save a network and set a network Touch and hold a searched Wi-Fi network to set it. NOTE: Some Wi-Fi networks may request more information,such as,Customer ID, static IP address, and so on. Consult your network administrator for help. 3G network To enable 3G network Insert a 3G SIM card. Enter Settings Wireless & network settings Mobile networks Network operators,select China Unicom for WCDMA(Unicom 3G Card). The prompting message ―Already registered on the Internet‖ appears. The icon appears on the status bar on the right side of the Home screen representing that the 3G network has been connected. To use a 3G network After connecting a 3G network,you can go on line directly without Wi-Fi. The icon appears on the status bar on the right side of the Home screen representing that the 3G network is in use. Data enabled This option is active by default in the Settings Wireless & network settings Mobile networks Data enabled. If the option is disabled,the appears again when it’s enabled. icon disappears. It will Data roaming It’s a network sharing function. The option is disabled by default in the settings Wireless & network settings Mobile networks Data roaming. Click ,the prompting message ―Whether to allow data roaming? This may produce the massive expenses!‖ appears. It allows you of data roaming after confirming it. Access point’s name Namely, APN,depends on the network operator selected at starting up the 3G. Use only 2G Networks The option is disabled by default in the Settings Wireless & network settings Mobile networks Use only 2G Networks. After enabling Only use 2G network,the icon disappears. NOTE: To use 3G data on this device,you need a SIM card and data schedule. Please consult your local wireless operators for information about the SIM cards supplement, data schedule details and price. 50 Sound Set Silent mode, volume, Notification rings and the select operator sound. Display You can adjust brightness of the device according to your need. You can also select ―automatically rotate‖ function to set that the screen orientation changes automatically. You can customize the Application Zoom Setting and Screen timeout as well. Bluetooth You can connect to other compatible devices using Bluetooth wireless technology. You can communicate and listen to music using compatible Bluetooth headset. To enable Bluetooth Enter Settings Wireless & network settings Bluetooth,touch the it to to enable Bluetooth, and the of the Home screen. To disable Bluetooth icon switching icon appears on the status bar on the right side Enter Settings Wireless & network settings Bluetooth,touch the it to to disable Bluetooth,and then the right side of the Home screen. icon switching icon disappears from the status bar on the To rename the Bluetooth Enter Settings Wireless & network settings Bluetooth settingsDevice name, enter the name and click OK to finish (If the Bluetooth is disabled,you need to enabled it before renaming it). To pair Bluetooth devices Enter Settings Wireless & network settings Bluetooth settings. The device automatically searches for Bluetooth devices in range and display it in the Bluetooth devices list. Choose a device and enter the same PIN number in both sides to pair them successfully。 To connect a Bluetooth device Enter Settings Wireless & network settings Bluetooth settings. Select a paired but not connected device in the Bluetooth devices list. If you don’t want the device to display in the Bluetooth devices list, touch and hold the device and select Cancel pairing. When the device has connected to the Bluetooth device , the Bluetooth device shows as connected in the list. The icon on the status bar on the right side of the Home screen switch to (You need to enable Bluetooth to enter Bluetooth settings if the Bluetooth is disabled). To disconnect a Bluetooth device Enter Settings Wireless & network settings Bluetooth settings, select the device you want to disconnect, click ―OK‖. To disconnect a Bluetooth pairing Enter Settings Wireless & network settings Bluetooth settings, touch and hold the device you want to disconnect the pairing,select Cancel pairing. 51 Location & security Use GPS satellite Powerful global positioning system function,has been Widely used in many areas for its High precision, all-weather, high efficiency, multi-functional and easy operation, et. The GPS navigation system will According the starting point and destination you set to find out a route automatically,and search information such as Stations, hotels, ATMs and etc distinctly, making your traveling much more convenient and pleasant. Open the GPS at Settings Location & security,and do positioning cooperating with a third-party GPS software. Activated ―Use GPS satellites‖ option,operate a certain third-party GPS software For the GPS positioning,the icon will appear on the main panel status bar,which shows the GPS is searching and positioning. Applications To manage applications and the settings of newly install software. Accounts & sync Login or logout social network account,and manage other settings of synchronous and accounts. Privacy Revert the device to factory Settings, thus will remove all data in the device and restore factory default Settings. Warning: This step will delete all data in the device! SD card & tablet storage Check the available storage of memory card and memory of the device. Search You can activate or close the searchable contents of the system in the searchable project, such as networks, applications, SMS, contacts and music. Language and keyboard Set the language and area of the Operating system. You can set options of the screen keyboard and build personal dictionary.(You can build personal dictionary to add word main dictionary doesn’t contain. The keyboard will also check your personal dictionary to provide suggest vocabulary). Note:1、To build personal dictionary, you can long press when inputting words in the input box, when options menu pops up, then touch ―add dictionary‖. Or Settings →Language and keyboard →User dictionary screen →―MENU‖ →Add →enter vocabulary →―OK‖ or ―Cancel‖(Touch ―OK‖,addition success;touch ―Cancel‖,no vocabulary addition) 2、Long pressing the added vocabulary, when vocabulary option menu pops up, you can edit or delete the vocabulary your have added. Date & time Set date and time, time zone and format of date or time. About tablet Set the update ways of system software,and check network type, signal strength, battery power, network name and other device states. And check battery usage of each application, or examine device legal information and software version. 52 E-mail Enter E-mail address,choose communication protocol,Select data account [Edit wireless local area network or SIM card to connect to the E-mail network],Setting receiving server and send server address,Edit user name [username need to use the name generate itself],Edit login password and save Settings, enter the mailbox options to write and receive mails. Note:Communication protocol of mail accounts of different companies may exist differences,so choosing a wrong Communication protocol may cause you can not use email. To open E-mail applications Touch the application button on the main menu panel or tray → E-mail. Note:Exchange E-mail accounts need to set domains is not supported. 53 To Create an E-mail account Touch the ―E-mail‖ icon,enter the E-mail account setting pane. Touch the arrow symbol at the top-left corner,exit E-mail account setting panel and return to main panel. Enter the E-mail account address and the password, and click user login, it tips your account has been set up and usable, input account name and name shown in the E-mail, then touch ―finish‖, in order to be recognized by receiver. After creating an account,if you need to create another e-mail account, touch the ―MENU‖ button → add account and enter E-mail account and password(You can also switch to account list panel, press the ―+add account‖ icon at the top-left corner), after entering the e-mail account and password you can choose ―Send mails from this account default‖. Note:If the e-mail account you want to set up is not in the device e-mail database, you will be asked to manually enter the e-mail account setting, including e-mail server, protocol, etc, and so on after touching Next. Note:Touch Manual setup rather than Next to directly enter incoming and outgoing settings for the account being set up 54 To compose and send e-mail 1 Touch the Menu button → e-mail. 2 In the inbox of e-mail, touch the top-right corner Menu button→ Compose. 3、Enter the contact’s e-mail address in the To field, the panel will display matching contacts at the same time,touch to choose the contact or continue to enter the address. If need to send email to many contacts, please use English semicolon to separate the addresses. There is no limit for the number of receivers. Note:If you want to send the copy or BCC to other receivers, please press the chosen menu, and then click to display copy/BCC. 4、Enter the e-mail subject. 5、Compose your e-mail. To add attachments,please touch add attachment, and then choose the options below: Pictures. Select camera and attach photos, or select pictures to attach pictures in the storage card. Video. Select VCR and additional films,or select films to add films in the storage card. Audio. Select recorder and additional recordings, or select music and sounds to attach music file or recordings in the storage card. Location. You can attach the location information and send current location (Need to use GPS), or select location on the map. Files. Text files or Electronic tables, etc. 6、Touch Send to → send the e-mail. Note:To save the mail as a draft for modifying, touch ―save draft‖, the system will save it automatically. 55 To delete e-mail 1、On the e-mail account inbox,select the e-mail to delete,holding it ,pops up the windows menu Delete, touch and hold the e-mail you want to delete. 2、You can also open the e-mail, click the top-right ― message,confirm,the mail will be deleted. ‖icon, it will tips deleting the To delete or edit e-mail account of the device 1、Open the e-mail,press the ―MENU‖ button,switch to email accounts list panel. 2、To delete e-mail account,touch and hold the account you want to remove,and then touch the Remove account on the popup menu. When asked to confirm deletion, touch OK. 3、To edit e-mail account settings:Touch and hold the account you want to edit, press ―MENU‖, and then click Account settings to enter conventional Settings of the account.。 Selectable settings as below: Account settings You can change E-mail account Settings, such as name, email address and password and specifications. Receive and send settings Set the file size limit when receive E-mail, and check the frequency and quantity of new E-mails. You can also set to send yourself the BCC. Email notification and ring Settings Set the notification of email and select the ring settings. E-mail inspection frequency Settings Enter the optional settings of the E-mail checking frequency. 56 Applications Camera If you are using the camera for the first time, please read this part first. This camera is a combination of camera and VCR Len that can be used to shoot and share pictures and videos. This section provides information on how to turn on the camera, switch between the camera and video, photos and playback photos and video and replay the video. Startup the camera Touch the application button → Camera,the camera panel will change to lateral display automatically after turning on. Switch between Camera and Video modes 1、Touch the viewfinder screen to display camera controls on the screen,Press the shooting button to photograph. 2、For filming a video, move the small black point upwards to adjust to the filming mode;while move downwards to photograph mode.(When filming,click and to stop and save the video automatically) 57 to start, The MENU button functions If you are at the panel of camera,press ―MENU‖ to pop up button options menu: One is switch to video, touch the switch to video panel, another is switch to camera,touch to entry the photo album collections list panel to check these photo and the detail information. If you are at the panel of video, press ―MENU‖ to pop up button options menu, One to switch to camera mode, touch to switch to the camera panel, another is switch to Video list,touch to entry the video album collections list panel to check these videos and the detail information. To view the videos & photos Take a picture or filming a video,click the picture or video preview box on the top-right corner of the screen,enter the preview panel. If you have take many photos or videos, you can slide your finger leftwards or rightwards on the preview panel to check more existing photos and videos. 58 The photo gallery The unique function of software that allows you to experience images in a extraordinary way。Touch lightly, pictures in Photo Gallery will be presents clearly, you can narrow or enlarged images or slide viewing these photos With fingers. Ways to load images are very diversiform, you can sync download pictures from pc or email.。 Open the album ,you can press ―MENU‖ to entry Camera mode, video mode or view photos in sliding way, and you can change some settings according to your needs, such as: The size photos display, the Permutation order and settings when play in sliding way, for you to enjoy a better Visual experience. Multi-point touch function is supported by the photo gallery, open an image, you can touch the screen Many times to control the device. Open image panel Touch is to display all the photos, videos and files in thumbnails, or just display photos or videos take by the device. View images Click the thumbnails of horizontally slide photo list,open it,until find the photo needed. Touch the photo you want to check,and then touch the thumbnail to display the whole picture. Note:Entry the photo viewing panel,Touch ―Slideshow‖ to view all the photos in the way of sliding play. As the picture or video displays full-screen • Flick the picture to view the next or previous picture. • When a picture view is being enlarged, drag the enlarged picture across the screen until the required portion appears. 59 In the album list panel, press ―MENU‖ to show option menu:Select All, Share, Delete and More. All, Deselect Note:1、Click Select All:The whole photo gallery list was selected. 2、Click Deselect All: The selecting of the list will be cancel. Click the button to share photos to email, Bluetooth: 1、E-mail:Send photos to others via email. Read details in ―E-mail‖. 2、Bluetooth:When your Bluetooth is closed, the system will ask you whether to open it. Touch ―Turn on‖ to activate the Bluetooth device, when it is opening, touch ―Cancel‖ to return to the photo gallery panel. Touch the album. icon:Touch more details to check detail information of the photo Touch the icon and then confirm to delete a photo. 60 In the photo album tile checking panel, press ―MENU‖ button to display the options MENU: Touch ―Select all‖:The whole photo gallery list was selected. Touch ―Deselect All‖:Cancel the selecting Touch the icon to share photos to email, Bluetooth,read the introduction above for more details. Touch the icon and then confirm to delete a photo. Touch the icon:Displays options menu (detailed information, set to, pruning, rotate to left/right) 1、Touch ―Details‖, you can view the detail information of the album. 2、Touch ―Set as‖, you can set the current photo for wallpaper and contact icon. 3、Touch ―Crop‖, to shear picture needed, you can use the following methods. –Custom tailoring frame size proportion. –Drag cutting box to your desired position. –Touch any Angle of the frame to expand or decrease cutting box sizes. –Touch ―OK‖ to cut out the picture. 4、touch ―Rotate Left‖: The picture rotates to the left side. 5、touch ―Rotate Right‖: The picture rotates to the right side. You can rotate the picture to left or right for many times Note:In the photo album tile check panel, sliding the top-r button bar to combine the photos or tile the photos. 61 Videos You can enjoy videos with supported format and immerse yourself in the rich content through the high resolution screen. From high-definition movies to TV serial, or MTV will give different feelings. To open Videos: Touch Videos to open the Video screen. Touch a video thumbnail to start playback of the video. You can view the information of the video, such as the duration of the video, the size, the created time, the resolution, the frame rate, and video coding format. Touch the Arrow on the top left corner of the video to return to Video screen. To operate video: Touch the Play button Pause button to start playback of the video. Touch the to pause and touch it again to resume playback. Use the button to rewind. Use the button to fast-forward. NOTE: Touch the scrubber bar or drag the playback control bar on the scrubber bar to rewind or fast-forward the video. 62 Music Big, bright display screen of the device and the facility for users make you more freely and conveniently to select your favorite songs. You can visually and aurally enjoy it. You can connect your device to wired earphones or Bluetooth earphones. In this way there is only yourself, your favorite music and the remarkable sound effects in the world. To copy music files to your storage card: Connect your device with PC through USB cable and import music files directly. You can also copy music files such as mp3, m4a, amr, midi, ogg to your storage card using card reader, and then insert the storage card into your device. NOTE: The Music application only plays audio files save on your storage card. Before opening Music, ensure that the needed audio files have been copied to your storage card. To open Music Touch the Application button → Music. 63 Buttons introduction Touch a music file to play the music. The button is a Pause button; The button is the Play button; Touch the button to play the next song, and touch and hold to fast-forward; Touch the button to play the previous song, and touch and hold to rewind; Touch the button to enter the Playing list; Touch the button to enter the Media library music category playlist; Touch the button to search for music. Touch the button to play randomly; Touch the button to play all songs repeatedly;Touch the button to play the song repeatedly. NOTE: On the scrubber bar you can: • Touch the playback control bar to skip to any point of the song. • Drag and scroll the playback control bar forward to fast-ward the song. • Drag and scroll the playback control bar backward to rewind the song. Now playing Enter the Playing screen. If the song you downloaded has the corresponding lyric, the lyric automatically displays on the Displaying screen. If the song has not, touch the Download lyric button. System will prompt: Are you want to download lyric from Internet? Library You can download solo albums and different kinds of songs with different formats. All the music files available on your device are automatically grouped into different categories such as Artists, Albums, and songs, facilitating users to search. Playlist Display the details of the songs you downloaded, including: name, duration of the song, album, and artist information. NOTE: To add an album, artists, or songs to the playlist, you can touch and hold any song’s name in the Add to playlist menu to add it to the playlist. Search Enter the key word of the song’s name in the music search bar. While you are entering the listing appears displaying the corresponding songs. NOTE: 1. Press the volume up button or volume down button to adjust the playback volume. You can also touch the Adjusting volume icon on the top right corner of Music screen to increase or decrease the playback volume. 2. Touch Shuffle All Songs to play all songs in your library in random order. The first randomly selected song starts to play. 64 Calendar You can use the calendar on the device to schedule and manage your events, meetings, and appointments. You can make your schedule easily and display the schedule in daily, weekly, or monthly view. You can view the Month schedule. You can also view the Day schedule details. You can manage your job and home schedule at a time. To open the calendar: Touch the Application button → Calendar. To set up an event: Enter Calendar View screen, touch the button ―+‖ on the top left corner to set up a new event. 1. On any calendar view, touch the button ―+‖ on the top left corner to open the Event details screen. 2. Type the event name using the on-screen keyboard. 3. If there is a time period for the event, touch the From and To type date and time. If the event is special, for example, the birthday may last a whole day, set the From and To date and time, and then touch the All day check box. 4. Type the event location and description. 5. Set the event reminder time in Reminders, and then decide whether it is a recurring event in Repetition. 6. Touch Save icon and the event is created. NOTE: To quickly set up an event in day, week, or month view, touch and hold an empty time slot → New event. A new Event details screen opens with the selected time slot and data in the From and To fields. 65 To view the calendar: You can display the calendar in daily, weekly, monthly, or agenda view. On any view screen, touch the event that you want to view to view. To change the calendar view, touch the Menu button → Day/Week/Month/Agenda. To edit the calendar: For further information of a event, touch the Menu button on the Event Details screen, then touch the Edit event option. You can also touch the event to edit it. To delete a event The methods of deleting a event are as follows: View the event summary on the Event details screen, then touch the icon ― ‖. On the View screen, touch the MENU button More Calendar to enter My calendar screen, then confirm and all calendar events hide. If the event recurs, the screen will ask you: Would you like to delete the event, this event and subsequent events, or the event that is out of date in calendar and the subsequent events. 66 Calendar event reminders If you set a reminder for an event, the upcoming event icon appears in the notifications area of the status bar with a ringtone to remind you of the upcoming even when the reminder time arrives. NOTE: In silent mode, calendar reminds you of the upcoming event without ringtone, but with the upcoming event icon appeared in the notifications area of the status bar. To view, dismiss, or snooze a reminder: 1. Touch the notifications area of the status bar to open the notification menu. 2. Touch the upcoming event name to display the event. NOTE: If you have other pending event reminders, these events will also appear on the screen. 3. Touch Snooze all to put off all event reminders for the default time set by your calendar; Touch Dismiss all to turn off all event reminders. 67 Alarm Clock Your device can work as an alarm clock. You can set as many alarms as you require. To open the alarm clock: Touch the Application button → Alarm Clock. To add an alarm 1. On the Alarm Clock screen, touch the button ―+‖ to enter the Set Alarm screen. 2. Ringtone: Select the alarm ringtone. 3. Time: Set the alarm time. Adjust the time by touching ―+‖ or ―-‖, or touch the time filed to enter a time,then touch Done when done. 4. Vibrate: Select the check box if you want the device to vibrate when the alarm goes off. 5. Repeat: Select the days you want the alarm to ring. NOTE: If you did not select any days for the alarm, your alarm will only go off once. 6. Touch the Label to set the alarm name for a special event. To turn on the alarm that you have set: Touch the icon to enter the Set Alarm screen. Touch the icon ― ‖ to turn on the alarm that you want to set. If you have set many alarms, flick your finger upward or downward on the Set Alarm screen to scroll the time wheel and set alarm time. You can turn on more than one alarm. 68 To temporarily disable an alarm On the Alarm Clock screen, if you have set one or more alarms, touch the highlighted icon of the alarm you want to disable to temporarily disable the alarm. To delete an alarm If you have set one or more alarms, you can: 1. On the Alarm Clock screen, touch the alarm time you want to delete. 2. Touch the Menu button ― appears. ‖ on the top right corner, the indicator ―Delete alarm?‖ To change an alarm’s settings If you have set one or more alarms, touch an alarm you have set to change the alarm’s settings such as the ringer volume, alarm delay time, and so on. Alarm in Silent mode This option has a default value as that the alarm will ring when the device is in Silent mode. If you do not want that it ring when the device is in the Silent mode, clear the check box. Alarm ringer volume On the Settings screen, you can set the alarm ringer volume to your needed volume. 69 Calculator The Calculator application this device provided is simple to operate, convenient, and easy to be learned. It also has the ability of providing the corresponding troubles in time. The Calculator supports the basic mathematical operation, and also the operation of the trigonometric function, inverse trigonometric function, exponential function, logarithmic function, and so on. The Application is easy to use with strong pertinence and efficiency, stable performance. It’s adequate to be popularized in the education industry. Touch the icon to enter Calculator screen. Enter numbers and operators using the on-screen calculator. NOTE: To clear the displayed numbers, touch the CLEAR button.(There are two CLEAR buttons: Use the button button to clear all; Touch the to clear a number once or touch and hold to clear all. 70 Notepad It’s a very convenient notepad. You need only to enter one or more schedules, events to save as a notepad. You can also email your notepads to the others. You may also edit your notepad with your favorite colors. After adding more than one notepad, you can search for a particular notepad in these notepads. Notepad’s input methods Touch the icon to enter the Add Notepad screen. You can add a notepad by a note handwriting, soft keyboard input, or Picture. 1. Select the note handwriting application. You can enter the word of notepad one by one using the handwriting box. 2. Select the Soft keyboard input. Touch and hold an empty area of the Input screen to pop up the Edit text screen to customize the input method. Enter the character using system’s soft keyboard. 3、Select the Picture. You can edit at random according to your likes. To delete a notepad Open a notepad that you have edited and saved, touch the icon ― ‖ on the top right corner, the delete information appears. Confirm to delete the notepad successfully. You can also delete the contents in the notepad when you are editing it. 71 USB Connection You can use the device as a movable hard drive after it is connected to a computer by plugging the supplied USB cable into the device and the USB connector into the USB port on the computer. You can import/export large numbers of media files, games, video files, and so on. Disable the USB Debug option in the SettingsApplicationsDevelopment menu, and then the USB can be connected to a PC, and the device can transfer files with PC. If the USB Debug option is enabled, the device can not transfer files with PC, NOTE: After inserting the USB cable, a USB notification appears in the notifications area of the status bar. Touch the USB notification bar, then the status bar switch to USB debugging screen and pop up a USB dialog. Touch USB Adjust Mode to connect the device with PC. After connecting successfully, enter My Computer screen, find the portable drive, namely, the storage card that installed on your device. Copy the needed files such as music or pictures from the other drive or folder to the portable drive. To disable your USB storage device You need to disable your USB storage device when this device is connected to a computer. You can disable it both on the computer and on the device. To disable your USB storage device: 1. Touch the notifications’ field of the Status Bar to open the Notification menu. 2. Touch Disable USB storage device → Disable. NOTE: First, disable USB storage device, then pull out the USB cable. NOTE: When the device is off, Using U is not supported. After inserting USB cable, the device vibrates twice. OTG Features You can connect other portable storage devices through an OTG cable and read video/ audio files on the portable storage device. NOTE: You need an OTG cable, and you also need to connect the cable to the device you want to use. NOTE: Multiple partitions and NTFS is not supported. 72 Reset Reset:Press and hold Reset button for one second to force the device to shut down. The Reset button is under the Power button. NOTE: Forcing your device to shut down may cause data loss. Normally turn off your device Automatic Update Step 1: Ensure that this device’s Wifi or 3G network is connected Step 2: When there is a new version OS, the New OS version is available to update notification appears in the notification bar to remind you. Step 3: Slide downward the notification bar to display the update notification. Step 4: Touch the update notification, and the screen switch to corresponding screen. Step 5: User need to visit this address for corresponding upgrade file upgrade.swan and the guide using PC. Step 6: Touch Download immediately; Decompress the file and gain the upgrade file ―upgrade.swan‖; Copy the upgrade file upgrade.swan to the root directory of the T-Flash card. Step 7: Turn off the device. Insert the T-Flash card with the OS upgrade file in it. Step 8: Press and hold the Volume button ―+‖ on the upper of the device, and press and hold the Power button simultaneously. Release the Power button when the device vibrates. Release the Volume button when the upgrade progress screen appears. Step 9: Here, the device is in the state of automatic upgrade. Do not remove the T card. Step 10: When the upgrade is done, the Upgrade successfully screen appears and prompt you to restart the device. Step 11: Restart your device and the device upgrade succeed. 73 Original Accessories For availability of approved accessories, check with your dealer. Practical rules about accessories and enhancements: 1. Keep all accessories and enhancements out of the reach of small children. 2. When you disconnect the power cord of any accessory or enhancement, grasp and pull the plug, not the cord. 3. Check regularly that enhancements installed in a vehicle are mounted and are operating properly. Use only manufacturer approved batteries, chargers, and accessories and enhancements. The use of any other types may invalidate any approval or warranty, and may be dangerous. Why should use original accessories? The batteries and battery chargers are the key components of this device. They are important for ensuring the normal running of the device and your safety. Our long-term client survey and after-sale services practice indicates: The device failures in many cases are caused by the use of unqualified accessories, especially, the battery and battery charger. Using unqualified battery and charge will cause damages: 1、 Its service life is shortened and the times of the battery charging and discharging is significantly less than the times of the original battery. 2、 It will greatly shorten the service life of this device. Unstable voltage will seriously influence the normal work of the device circuits and permanently damage the device.。 3、 It will influence the performance and reliability of this device. WARNING: Use of unapproved accessories may present a risk of explosion or personal injury to customers.74 Battery Information Charging and discharging Your device is powered by a rechargeable battery. The battery can be charged and discharged hundreds of times, but it will eventually wear out. Replace the battery from the approved dealer. Use only the approved batteries, and recharge your battery only with approved charges designated for this device. Unplug the charger from the electrical plug and the device when not in use. If the battery is completely discharged, it may take thirty minutes before the charging indicator appears on the display. Never use any charger that is damaged. 75 Care and maintenance Your device is a product of superior design and craftsmanship and should be treated with care. The following suggestions will help you protect your warranty coverage. 1. Keep the device dry. Precipitation, humidity, and all types of liquids or moisture can contain minerals that will corrode electronic circuits. 2. Do not use or store the device in dusty, dirty areas. Its moving parts and electronic components can be damaged. 3. Do not store the device in hot areas. 4. Do not store the device in cold areas. When the device return to its normal temperature, moisture can form inside the device and damage electronic circuit board. 5. Do not attempt to open the device other than as instructed in this manual. 6. Do not drop, knock, or shake the device. Rough handling can break internal circuit boards and fine mechanics. 7. Do not use harsh chemicals, cleaning solvents, or strong detergents to clean the device. 8. Do not paint the device. Paint can clog the moving parts and prevent proper operation. 9. Use a soft, clean, dry cloth to clean any lenses, such as camera lenses, light sensor lenses. 10. Use charger indoors. These suggestions apply equally to your device, charger or any enhancement. If any device is not working properly, take it to the nearest authorized service facility for service. 76 Important Safety Information Medical devices Operation of any radio transmitting equipment, including wireless phones, may interfere with the functionality of inadequately protected medical devices. Consult a physician or the manufacturer of the medical device to determine if they are adequately shielded from external RF energy or if you have any questions. Switch off your device when any regulations posted in these areas instruct you to do so. Vehicle Only qualified personnel should service the device or install the device in a vehicle. Faulty installation or service may be dangerous and may invalidate any warranty that may apply to the device. Check regularly that all wireless device equipment in your vehicle is mounted and operating properly. Do not store or carry flammable liquids, gases, or explosive materials in the same compartment as the device, its parts, or enhancements. For vehicles equipped with an air bag, remember that air bags inflate with great force. Do not place objects, including installed or portable wireless equipment in the area over the air bag or in the air bag deployment area. If in-vehicle wireless equipment is improperly installed and the air bag inflates, serious injury could result. Aircraft Using your device is prohibited while flying in aircraft. Switch off your device before boarding an aircraft. The use of this device in an aircraft may be dangerous to the operation of the aircraft, disrupt the wireless telephone network, and may be illegal. Potentially explosive environments Switch off your device when in any area with a potentially explosive atmosphere, and obey all signs and instructions. 77