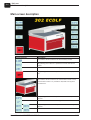
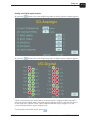
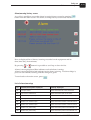
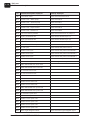
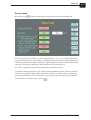
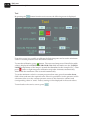
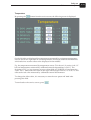
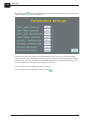
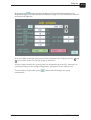
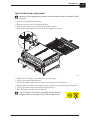
1
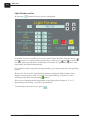
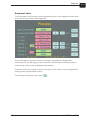
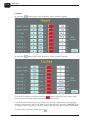
User’s Manual
CONCEPT 302 ECDLF
User's Manual
CONCEPT 302 ECDLF
Co
nc
ep
t3
02
EC
DL
F
T11408
Edition AA, September 2014
This book has part No 10076712 (GB)
0-2
#
Always read the Safety Instruction Manual part No 21741 before installing or
operating the equipment.
This manual is published by:
Glunz & Jensen Degraf S.p.A.
'Il Girasole' - Palazzo Donatello 8/03b
20084 Lacchiarella (MI)
Italy
Internet: www.degraf.glunz-jensen.com
Copyright © 2014 by Glunz & Jensen Degraf S.p.A.
User's Manual - CONCEPT 302 ECDLF
1438
Table of contents
Table of contents
Part 1: General information . . . . . . . . . . . . . . . . . . . . . . . . . . . . . . 1-1
About this manual . . . . . . . . . . . . . . . . . . . . . . . . . . . . . . . . . . . . . . . . . . . . . . . . 1-1
Intended use of this manual . . . . . . . . . . . . . . . . . . . . . . . . . . . . . . . . . . . . . . . 1-1
Reservations . . . . . . . . . . . . . . . . . . . . . . . . . . . . . . . . . . . . . . . . . . . . . . . . . . 1-1
Notes, cautions, and warnings ! . . . . . . . . . . . . . . . . . . . . . . . . . . . . . . . . . . . . . 1-1
Unintended use of the equipment. . . . . . . . . . . . . . . . . . . . . . . . . . . . . . . . . . . . 1-2
Intended use of the equipment. . . . . . . . . . . . . . . . . . . . . . . . . . . . . . . . . . . . . . 1-2
Installation . . . . . . . . . . . . . . . . . . . . . . . . . . . . . . . . . . . . . . . . . . . . . . . . . . . 1-2
Service assistance . . . . . . . . . . . . . . . . . . . . . . . . . . . . . . . . . . . . . . . . . . . . . . 1-2
Part 2: Daily use . . . . . . . . . . . . . . . . . . . . . . . . . . . . . . . . . . . . . . 2-1
General . . . . . . . . . . . . . . . . . . . . . . . . . . . . . . . . . . . . . . . . . . . . . . . . . . . . . . . . 2-1
Safety warnings . . . . . . . . . . . . . . . . . . . . . . . . . . . . . . . . . . . . . . . . . . . . . . . . . . 2-1
Initial operation of the equipment . . . . . . . . . . . . . . . . . . . . . . . . . . . . . . . . . . . . . . 2-3
Main screen description. . . . . . . . . . . . . . . . . . . . . . . . . . . . . . . . . . . . . . . . . . . . . 2-6
Exposure section . . . . . . . . . . . . . . . . . . . . . . . . . . . . . . . . . . . . . . . . . . . . . . . 2-7
Light finisher section . . . . . . . . . . . . . . . . . . . . . . . . . . . . . . . . . . . . . . . . . . . . 2-8
Dryer section . . . . . . . . . . . . . . . . . . . . . . . . . . . . . . . . . . . . . . . . . . . . . . . . . . 2-9
Equipment status . . . . . . . . . . . . . . . . . . . . . . . . . . . . . . . . . . . . . . . . . . . . . . 2-11
Counters . . . . . . . . . . . . . . . . . . . . . . . . . . . . . . . . . . . . . . . . . . . . . . . . . . 2-12
Analog and digital inputs/outputs . . . . . . . . . . . . . . . . . . . . . . . . . . . . . . . . . 2-13
Alarms and warnings . . . . . . . . . . . . . . . . . . . . . . . . . . . . . . . . . . . . . . . . . . . 2-14
Alarm . . . . . . . . . . . . . . . . . . . . . . . . . . . . . . . . . . . . . . . . . . . . . . . . . . . . 2-14
Warning . . . . . . . . . . . . . . . . . . . . . . . . . . . . . . . . . . . . . . . . . . . . . . . . . . 2-14
Alarm/warning history screen. . . . . . . . . . . . . . . . . . . . . . . . . . . . . . . . . . . . 2-15
List of alarms/warnings. . . . . . . . . . . . . . . . . . . . . . . . . . . . . . . . . . . . . . . . 2-15
Service menu. . . . . . . . . . . . . . . . . . . . . . . . . . . . . . . . . . . . . . . . . . . . . . . . . 2-17
Tool . . . . . . . . . . . . . . . . . . . . . . . . . . . . . . . . . . . . . . . . . . . . . . . . . . . . . 2-18
Temperature . . . . . . . . . . . . . . . . . . . . . . . . . . . . . . . . . . . . . . . . . . . . . . . 2-19
Data. . . . . . . . . . . . . . . . . . . . . . . . . . . . . . . . . . . . . . . . . . . . . . . . . . . . . 2-21
Jobs . . . . . . . . . . . . . . . . . . . . . . . . . . . . . . . . . . . . . . . . . . . . . . . . . . . . . . . 2-22
Part 3: Making plates. . . . . . . . . . . . . . . . . . . . . . . . . . . . . . . . . . . 3-1
Starting an exposure cycle . . . . . . . . . . . . . . . . . . . . . . . . . . . . . . . . . . . . . . . . . . . 3-1
Starting a dryer cycle . . . . . . . . . . . . . . . . . . . . . . . . . . . . . . . . . . . . . . . . . . . . . . 3-2
Starting a light finisher cycle . . . . . . . . . . . . . . . . . . . . . . . . . . . . . . . . . . . . . . . . . 3-3
1438
User's Manual - CONCEPT 302 ECDLF
0-3
0-4
Table of contents
Part 4: Maintenance . . . . . . . . . . . . . . . . . . . . . . . . . . . . . . . . . . . 4-1
General . . . . . . . . . . . . . . . . . . . . . . . . . . . . . . . . . . . . . . . . . . . . . . . . . . . . . . . . 4-1
Filling up the cooler tank . . . . . . . . . . . . . . . . . . . . . . . . . . . . . . . . . . . . . . . . . . . . 4-1
Cleaning the equipment. . . . . . . . . . . . . . . . . . . . . . . . . . . . . . . . . . . . . . . . . . . . . 4-2
Exposure lamps UV output measurement . . . . . . . . . . . . . . . . . . . . . . . . . . . . . . . . 4-2
UV lamps replacement . . . . . . . . . . . . . . . . . . . . . . . . . . . . . . . . . . . . . . . . . . . . . 4-3
General . . . . . . . . . . . . . . . . . . . . . . . . . . . . . . . . . . . . . . . . . . . . . . . . . . . . . . 4-3
Exposure lamps replacement . . . . . . . . . . . . . . . . . . . . . . . . . . . . . . . . . . . . . . . 4-4
Light finisher lamps replacement . . . . . . . . . . . . . . . . . . . . . . . . . . . . . . . . . . . . 4-5
User's Manual - CONCEPT 302 ECDLF
1438
General information
About this manual
Part 1: General information
About this manual
Intended use of this manual
This manual describes the common use procedures of the equipment. It is intended for
the daily user and should be kept with the equipment for reference at all times.
Reservations
• This manual was written and illustrated using the best possible information
available at the time of publication.
• Any differences between this manual and the equipment reflect improvements
introduced after the publication of the manual.
• Changes, technical inaccuracies and typographic errors will be corrected in
subsequent editions.
• As a part of our policy of continuous improvement, we reserve the right to alter
design and specifications without further notice.
Notes, cautions, and warnings !
Throughout the manual notes, cautions, and warnings are written in bold like the
example below:
"
Electrical installation must conform to local regulations and guidelines.
Symbol
Explanation
"
Note
The operator should observe and/or act according to the
information in order to obtain the best possible function of
the equipment.
$
Caution
The operator must observe and/or act according to the
information in order to avoid any mechanical or electrical
damage to the equipment.
#
1438
Meaning
Warning
The operator must observe and/or act according to the
information in order to avoid any personal injury.
User's Manual - CONCEPT 302 ECDLF
1-1
1-2
General information
About this manual
Unintended use of the equipment
Glunz & Jensen Degraf S.p.A. does not take any responsibility for any damage or
accidents caused by unintended use of the equipment:
• It is absolutely prohibited to make any modifications, electrical nor mechanical, of
the equipment. If however this prohibition is disregarded, Glunz & Jensen Degraf
S.p.A.'s warranty will no longer apply.
Intended use of the equipment
• This equipment is a part of a full range dedicated for the treatment of flexographic
printing plates. This range includes exposure, processor, dryer and light finisher.
• This equipment is designed to expose, dry, post-expose and light finish of
flexographic printing plate before and after the washout process.
• This equipment is designed to work with solvent and has been tested with
conventional product. Always ask your dealer before trying to change the type of
solvent. This may result in major damages and safety issues.
• This equipment has not been designed as an explosion proof equipment.
Installation
• Never install the equipment in explosive environments.
• It is the responsibility of the owner and operator/s of this equipment that the
installation is made in accordance with local regulations, and by engineers
authorized to carry out plumbing and electrical installations.
• Installation, service and repair must be performed only by Service Technicians who
are trained in servicing the equipment.
• The manufacturer cannot be held responsible for any damage caused by incorrect
installation of this equipment.
• The equipment is intended for installation in a restricted access location only.
Service assistance
• If help is needed to correct any problem with the equipment, please contact your
supplier.
User's Manual - CONCEPT 302 ECDLF
1438
Daily use
General
Part 2: Daily use
General
This equipment is designed to expose, dry, post-expose and light finish of flexographic
printing plate before and after the washout process.
The equipment is divided in the following sections:
• Exposure section - 16 lamps of 60W to ensure even exposure.
• Dryer section - 4 drawers, 2 heating resistors.
• Post exposure/light finishing section - 11 UVA lamps (60W) and 10 UVC lamps (75W).
This processor is equipped with the graphical finger touch display which ensures very
easy control.
Safety warnings
To use this equipment safely, it is necessary that operators and
maintenance people follow the safety instructions and safety cautions and
warnings specified in the manuals.
The equipment is equipped with emergency switch which allows the
operators to stop the equipment in case of emergency. This emergency
switch cut off the power supply of the entire equipment.
Make sure that the risk or the problem has been eliminated before
restoring the power on the equipment.
To release the emergency switch, turn it clockwise. The equipment has to be
restarted following the "Initial operation of the equipment" later in this manual.
For the safety of operators, the equipment is equipped with interlock
switches for the opening of the exposure cover, dryer and light finisher
drawers during operation, and for removing the rear panels of the
equipment. If any of the interlocks are not installed or closed, the
equipment or a specific section of the equipment will not operate. If an
interlock is activated during operation, the equipment or a specific section
of the equipment stops immediately the concerned section.
"
"
"
1438
The exposure section is fitted with a safety interlock to prevent user to
be exposed to UVA light radiation.
The dryer section is fitted with a safety interlock to prevent user to be
exposed to solvent fumes.
The light finisher drawer is fitted with a safety interlock to prevent
user to be exposed to UVC and UVA light radiation.
User's Manual - CONCEPT 302 ECDLF
2-1
2-2
Daily use
Safety warnings
#
UVC light radiation is dangerous for human skin and particularly the
eyes. Even a short exposure time may cause burning in the lower skin
layers and damages the eyes retina. Due to the safety systems installed,
it should never be required to check the UVC tubes by view the UVC
light directly when operating, maintaining or servicing the equipment.
However, in case of need it is mandatory to wear a welding helmet
with at least shade 6, safety clothes and gloves.
#
#
The equipment is equipped with UVA and UVC fluorescent lamps
which contain mercury. Dispose according to local, state or federal laws.
If lamps are broken, ventilate area where breakage occurred. Clean up
with mercury vacuum cleaner or other suitable means that avoid dust and
mercury vapor generation. Take usual precautions for collection of broken
glass. Use cut resistant gloves and appropriate respirator. Clean up
requires special care due to mercury droplet proliferation. Place materials
in closed containers outside the building to avoid generating dust.
Flexographic printing plates are considered articles by e.g. OSHA
(CFR1910.1200). An article does not require a Material Safety Data Sheet.
However, unexposed plates contain material that may cause skin irritation
or allergic skin reactions and sensitization in susceptible persons.
#
For handling the plates use a safety gloves.
User's Manual - CONCEPT 302 ECDLF
1438
Daily use
Initial operation of the equipment
Initial operation of the equipment
"
Make sure the room temperature is between 17 and 28°C (63 and 82°F) and
relative humidity on max. 80%.
"
Before turning the equipment on make sure that the working area around the
equipment is clean and free for easy movement.
"
Check if there are any leaks of water and all the required supplies and
connections (hoses, power cable, and exhausts).
"
Check that the emergency stop button - placed next to the control panel - is
released. If it is not, release it by turning it clockwise.
• Turn the main switch located on the rear side of the equipment on.
• If the emergency stop button is activated, then the following screen is displayed.
1438
User's Manual - CONCEPT 302 ECDLF
2-3
2-4
Daily use
Initial operation of the equipment
• When the emergency button is released the square outline is/changes to the green.
• To disarm the equipment, keep the button in the center depressed for two seconds
(countdown of two seconds will appear) and following screen will be displayed.
User's Manual - CONCEPT 302 ECDLF
1438
Daily use
Initial operation of the equipment
• To switch the equipment on, keep the "ON" button depressed for two seconds
(countdown of two seconds will appear). The main screen is then displayed.
• To switch the equipment off, press "OFF" button.
1438
User's Manual - CONCEPT 302 ECDLF
2-5
2-6
Daily use
Main screen description
Main screen description
Display overview
Description
This button allows access to the alarm history screen.
By pressing this button it is possible to access the service
menu.
This button allows access to the job/plate table.
By pressing this button it is possible to switch the equipment
off.
This button allows access to the visualization screen. From
visualization screen it is possible to set/reset hours/cycles
counters too.
By pressing this button it is possible to access the exposure
section.
This button allows access to the light finisher section.
By pressing these buttons it is possible to access the dryer 1/2
section.
These buttons allows access to the dryer 3/4 section.
User's Manual - CONCEPT 302 ECDLF
1438
Daily use
Main screen description
Exposure section
By pressing
button following screen is displayed.
From this screen it is possible to choose the plate to expose by using the arrows
and
(to move in one job/plate up and down) or the arrows
and
(to move in five
jobs/plates up and down). Afterwards back and main exposure times are loaded
automatically.
It is possible to start, stop and reset back or main exposure cycle by pressing the
corresponding button.
The
field below the "BACK EXPOSURE:" and "MAIN EXPOSURE:" indicates
whether light integrator is in use during back and/or main exposure. In the example
above, the light integrator is used for back exposure, but not for main exposure. If
field flashes after start of the exposure, it indicates recalculating of the exposure time.
Below the back and main exposure times are displayed fields "to do:" which display
remaining time of the back or main exposure. Countdown of the remaining time starts
after pressing
button.
At the bottom part of the screen are displayed the temperatures of the exposure lamps
and the exposure table (in °C or °F depending on the setting - see later in this manual)
as well as the vacuum pressure (in kPa).
It is possible to start/stop vacuum pump by pressing
To turn back to the main screen, press
1438
/
button.
.
User's Manual - CONCEPT 302 ECDLF
2-7
2-8
Daily use
Main screen description
Light finisher section
By pressing
button following screen is displayed.
From this screen it is possible to choose the plate to light finish by using the arrows
and
(to move in one job/plate up and down) or the arrows
and
(to move in
five jobs/plates up and down). Afterwards UVA and UVC light finishing times with
their delays are loaded automatically.
It is possible to start, stop and reset light finishing cycle by pressing the corresponding
button.
Below the UVA and UVC light finishing times are displayed fields "to do:" which
display remaining time of the UVA and UVC light finishing. Countdown of the
remaining time starts after pressing
button.
Here is as well displayed the temperature of the light finisher lamps (in °C or °F
depending on the setting - see later in this manual).
To turn back to the main screen, press
User's Manual - CONCEPT 302 ECDLF
.
1438
Daily use
Main screen description
Dryer section
By pressing
button following screen is displayed.
From this screen it is possible to choose the plate to expose by using the arrows
and
(to move in one job/plate up and down) or the arrows
and
(to move in five
jobs/plates up and down). Afterwards drying time is loaded automatically.
It is possible to start, stop and reset dryer 1 cycle by pressing the corresponding button.
Below the drying time is displayed field "to do:" which displays remaining time of the
back or main exposure. Countdown of the remaining time starts after pressing
button.
At the bottom part of the screen are displayed the temperature setpoint for the dryer
heaters and the actual temperature in the dryers 1/2 (in °C or °F depending on the
setting - see later in this manual).
It is possible to start the heaters by pressing
button. The button changes to
To stop it, press the button again and it will change back again.
.
To activate automatic switch off of the heating resistors in dryer 1/2 at the end of the
last cycle, press
button. The button flashes and changes to
.
To turn back to the main screen, press
"
1438
.
The same kind of information/functionality is available in the dryer 3 section.
User's Manual - CONCEPT 302 ECDLF
2-9
2-10
Daily use
Main screen description
By pressing
button following screen is displayed.
From this screen it is possible to choose the plate to expose by using the arrows
and
(to move in one job/plate up and down) or the arrows
and
(to move in five
jobs/plates up and down). Afterwards drying times is loaded automatically.
It is possible to start, stop and reset dryer 1 cycle by pressing the corresponding button.
Below the drying time is displayed field "to do:" which displays remaining time of the
back or main exposure. Countdown of the remaining time starts after pressing
button.
At the bottom part of the screen are displayed the temperature setpoint for the dryer
heaters, the actual temperature in the dryers 1/2 (in °C or °F depending on the setting see later in this manual) and the status of the heating resistors in dryer 1/2.
To turn back to the main screen, press
"
.
The same kind of information/functionality is available in the dryer 4 section.
User's Manual - CONCEPT 302 ECDLF
1438
Daily use
Main screen description
Equipment status
To see the status of all processes in the equipment, press on the equipment on the main
screen. Following screen is then displayed.
Next to the status of a process which is running or interrupted is displayed its
remaining time. For drying processes is stated as well the status of heating resistors.
In the bottom of the screen is diplayed date and time.
From this screen it is possible to access hours and cycles conters as well as digital and
analog inputs/outputs status screens.
To turn back to the main screen, press
1438
.
User's Manual - CONCEPT 302 ECDLF
2-11
2-12
Daily use
Main screen description
Counters
By pressing
button, the screen displaying hours counters appears.
By pressing
button, the screen displaying cycles counters appears.
To reset the counter of a process, press its
button. In the pop-up window enter
the user password "963" and afterwards the counter is reset.
To reset the maximum value of a process, press on it (a white button). In the pop-up
window enter the user password "963". Type required value and press "ENTER". If the
maximum value of a process counter is set to 0, the warning of the counter is disabled.
To turn back to the main screen, press
User's Manual - CONCEPT 302 ECDLF
.
1438
Daily use
Main screen description
Analog and digital inputs/outputs
By pressing
button, the screen displaying status of analog inputs/outputs appears.
By pressing
button, the screen displaying status of digital inputs/outputs appears.
These screens display the actual status of analog inputs/outputs of MAD 42 and TS
562 units and the actual status of digital inputs/outputs of ID 211 and OD 212 placed
in the electronics cabinet. Green colour indicates that the input/output is on, red
colour indicates that the input/output is off.
To turn back to the main screen, press
1438
.
User's Manual - CONCEPT 302 ECDLF
2-13
2-14
Daily use
Main screen description
Alarms and warnings
When an alarm or warning occurs, the sign is then flashing in the top of a screen and a text
message/remedy is running below the sign. Depending on the type of alarm/warning, the
corresponding sign is displayed.
Below the alarm/warning sign is running its description and remedy (if available).
Alarm
This sign indicates the alarm on the equipment. The alarm will stop the the
equipment and require an operator action. There is acoustic signal for the
alarm too. By pressing this sign, alarm/warning history screen is accessed.
For further details regarding alarm/warning history screen please refer to
the next page.
Warning
This sign indicates a warning. The warning will not stop the the equipment.
There is acoustic signal for the warning too. By pressing this sign,
alarm/warning history screen is accessed. For further details regarding
alarm/warning history screen please refer to the next page.
User's Manual - CONCEPT 302 ECDLF
1438
Daily use
Main screen description
Alarm/warning history screen
As well it is possible to access the alarm/warning history screen by pressing
button from the main screen. The alarm/warning history screen looks like below.
Here is displayed list of alarms/warnings recorded on the equipment and its
date/time (day/hour:minute).
By pressing
or
button it is possible to scroll up or down the list.
Alarm/warning displayed blue indicates resolved alarm/warning.
Alarm/warning displayed red indicates active alarm/warning. To acknowledge it,
press on active alarm/warning and this changes to green.
To turn back to the main screen, press
.
List of alarms/warnings
1438
ID
Problem/description displayed
Remedy displayed
N1
Lid open alarm
Please check the lid or the sensor S2
N2
Low level in water tank
Please check the level in the tank
N3
LF drawer open / back panel open
Please check the LF drawer of KA2 relay
N4
Low Dryer exhaust
Please check ASP1
N5
DRYER 1-2 drawers open
Please check the drawer or S4-S5 switch
N6
DRYER 3-4 drawers open
Please check the drawer or S6-S7 switch
N7
DRYER 1-2 plate ready
Please check the plate in the DRYER 1-2
N8
DRYER 3-4 plate ready
Please check the plate in the DRYER 3-4
User's Manual - CONCEPT 302 ECDLF
2-15
2-16
Daily use
Main screen description
ID
Problem/description displayed
Remedy displayed
N9
Flow sensor alarm
Please check the sensor S10
N10
Thermic fault - Water pump
Please check Q16
N11
Thermic fault - Vacuum pump
Please check Q17
N12
Thermic fault - Exhaust dryer
Please check Q18
N13
Thermic fault - Dryer blowers
Please check Q19
N14
Thermic fault - Exhaust LF
Please check Q20
N15
Low level vacuum pressure
Please check vacuum foil or pump P1
N16
Dryer 1/2 switched OFF
Please switch ON the Dryer 1/2
N17
Dryer 3/4 switched OFF
Please switch ON the Dryer 3/4
N18
BACK EXPOSURE end cycle
Please remove the plate in the Exposure
N19
MAIN EXPOSURE end cycle
Please remove the plate in the Exposure
N20
LF end cycle
Please remove the plate in the LF
N21
DRYER 1 end cycle
Please remove the plate in the DRYER 1
N22
DRYER 2 end cycle
Please remove the plate in the DRYER 2
N23
DRYER 3 end cycle
Please remove the plate in the DRYER 3
N24
DRYER 4 end cycle
Please remove the plate in the DRYER 4
N32
PLC Low Battery
Please change the battery in CPU
N33
BACK EXPOSURE max hours limit
N34
MAIN EXPOSURE max hours limit
N35
LF UVA max hours limit
N36
LF UVC max hours limit
N37
DRYER 1 max hours limit
N38
DRYER 2 max hours limit
N39
DRYER 3 max hours limit
N40
DRYER 4 max hours limit
N48
BACK EXPOSURE max cycles limit
N49
MAIN EXPOSURE max cycles limit
N50
LF UVA max cycles limit
N51
LF UVC max cycles limit
N52
DRYER 1 max cycles limit
N53
DRYER 2 max cycles limit
N54
DRYER 3 max cycles limit
N55
DRYER 4 max cycles limit
N64
Alarm Light Integrator sensor
User's Manual - CONCEPT 302 ECDLF
Please check the Light Integrator signal
1438
Daily use
Main screen description
Service menu
By pressing the
button from the main screen, the service menu is displayed.
From this screen it is possible to set the temperature in °C or °F, to enable/disable the
buzzer and length of its signalization, to enable/disable the buzzer signalization at the
end of the cycle and to enable/disable the light integrator function at the back or main
exposure. The factory settings are like displayed in the screen above.
As well it is possible enter the tool, temperature and data section.
To disable/enable protection of job plates (plate parameters) and to enter the manual
functions of exposure, light finisher and dryer section is possible only by entering the
service password. For more information on service password see the Service Manual.
To turn back to the main screen, press
1438
.
User's Manual - CONCEPT 302 ECDLF
2-17
2-18
Daily use
Main screen description
Tool
By pressing the
button from the service screen, the following screen is displayed.
From this screen it is possible to calibrate the light integrator and to set the minimum
value of vacuum pressure when the alarm will start.
To start the calibration, press
button. The exposure lamps start. Wait till the stable
value is displayed in LIGHT INTEGRATOR units field and make sure the T1 EXPO
LAMPS temperature of the lamps is around the Set value (in this example 35°C). Then
press
button or light integrator calibration stops after 4 minutes automatically.
Afterwards the maximum value is stored automatically.
To set the minimum value for vacuum pressure alarm start, press Low value alarm
field (white) and enter the required value. Here it is possible to see the pressure in kPa
(the same value as on the vacuum pressure sensor in the electronics cabinet) and
corresponding value in "units". Factory settings is like displayed in the screen above.
To turn back to the service screen, press
User's Manual - CONCEPT 302 ECDLF
.
1438
Daily use
Main screen description
Temperature
By pressing the
button from the service screen, the following screen is displayed.
On the left side are displayed the temperatures measured by equipment temperature
sensors and on the right side are real temperatures checked by external thermometers
which take into account offset value (displayed in the middle).
E.g. the temperature measured by temperature sensor T3 in dryer 1/2 section is 61.3°C
but real temperature measured by calibrated external thermometer is 59.3°C. The
deviation is 2°C, so it is necessary to press white field of T3 DRYER 1/2 and enter the
value -2.0°C. Afterwards the value on the right side changes from 61.3°C to 59.3°C and
reflects the real value measured by calibrated external thermometer.
To change the offset value, it is necessary to enter the user password "963" after
pressing this field.
To turn back to the service screen, press
1438
.
User's Manual - CONCEPT 302 ECDLF
2-19
2-20
Daily use
Main screen description
By pressing the
button from the temperature screen and entering the user password
"963", the following screen is displayed.
From this screen it is possible to set temperatures when cooling of exposure lamps,
exposure table, exposure lamps at light integrator calibration and light finisher lamps
will start. As well it is possible to set required temperature (setpoint) for drying cycles
and the temperature when the dryer blowers will start.
In the screen above are displayed factory settings.
To turn back to the temperature screen, press
User's Manual - CONCEPT 302 ECDLF
.
1438
Daily use
Main screen description
Data
By pressing the
button from the service screen, the following screen is displayed.
Here it is possible to see/set actual time and date and see the actual language.
To change the time/date, press the white field(s) and enter the new value(s).
To turn back to the service screen, press
.
By pressing the
button from this screen, the following screen informing about
equipment type, PLC and HMI program version and manufacturer address is displayed.
To turn back to the data screen, press
1438
.
User's Manual - CONCEPT 302 ECDLF
2-21
2-22
Daily use
Main screen description
Jobs
It is possible to store 40 jobs/plates with their process parameters (in fact only 38 as
first job is called burning and serves for burning the lamps and one more is the test
one).
By pressing the
button from the main screen, the job table is displayed.
Here are listed all jobs/plates. Scroll through the list is possible by using the arrows
and
(to move in one job/plate up and down) or the arrows
and
(to move in
five jobs/plates up and down).
To see/edit parameters of required job/plate, move to the required job/plate (to be
selected green) - in this example job no 3 - and press
.
To enter new job/plate, move the "empty" job/plate to the green field and press
To turn back to the main screen, press
User's Manual - CONCEPT 302 ECDLF
.
.
1438
Daily use
Main screen description
By pressing the
button from the job table, the selected job/plate parameters are
displayed. If job plate protect function is enabled (see page 2-17), it is necessary to enter the
user password "963" first.
Here is possible to edit job/plate name and its parameters. By using the arrows
it is possible to move in one job/plate up and down.
and
All jobs/plates stored in the control panel can be transferred to the PLC unit and vice
versa by pressing on the corresponding button. The button shortly flashes once.
To turn back to the job table, press
automaticaly.
1438
. Afterwards all changes are stored
User's Manual - CONCEPT 302 ECDLF
2-23
2-24
Daily use
Main screen description
User's Manual - CONCEPT 302 ECDLF
1438
Making plates
Starting an exposure cycle
Part 3: Making plates
Starting an exposure cycle
#
For handling the plates use a safety gloves.
• Open the top lid and put the plate on the cooled table to make the back or main
•
•
•
•
exposure. When doing main exposure on conventional plate, put the vacuum foil on
top of the plate (not needed for back exposure or digital plates).
Select the required plate type.
Make sure the back and main exposure times are correct.
Close the top lid.
Start the vacuum pump (if vacuum foil is in use) and check the vacuum level.
• To start an exposure, press
button.
• During the exposure process, the "to do:" field displays the remaining time for back
or main exposure. If light integrator is in use, the time of an exposure can differ as it
depends on UV intensity and light integrator calibration.
• At the end of the cycle the buzzer sounds (if this function is enabled) and remaining
time displays "0".
• Stop the vacuum pump, if it was used in the cycle.
1438
"
Prior to starting another exposure cycle (back or main), it is needed to confirm
the end of the previous cycle by pressing on the
button or to open the top
lid and to remove the plate. At this point the remaining time displays "0". The
equipment is now ready to start another exposure cycle.
"
It is possible to stop an ongoing cycle by pressing on the
"
If emergency stop button is activated during an exposure cycle, the cycle
stops. After releasing it and switching the equipment on, it is possible to
continue the cycle by pressing
button from the exposure screen.
button.
User's Manual - CONCEPT 302 ECDLF
3-1
3-2
Making plates
Starting a dryer cycle
Starting a dryer cycle
#
For handling the plates use a safety gloves.
• Start the heater from dryer screen by pressing
button.
• Wait until the temperature reaches the setpoint.
• Open the drawer, put the plate in and close the drawer.
• To start a drying process, press
button.
• During whole process the display shows remaining time for the cycle.
• At the end of the cycle the buzzer sounds (if this function is enabled) and remaining
time displays "0".
$
After the cycle end and removing the plate from the drawer, the heater and
blower does not stop automatically (only if self-off function on last plate is
active).
"
Prior to starting another dryer cycle, it is needed to confirm the end of the
previous cycle by pressing on the
button or to open the drawer and to
remove the plate. At this point the remaining time displays "0".
The equipment is now ready to start another dryer cycle.
"
It is possible to stop an ongoing cycle by pressing on the
"
If emergency stop button is activated during a dryer cycle, the cycle stops.
After releasing it and switching the equipment on, it is possible to continue
the cycle by pressing
button from the dryer screen.
User's Manual - CONCEPT 302 ECDLF
button.
1438
Making plates
Starting a light finisher cycle
Starting a light finisher cycle
#
For handling the plates use a safety gloves.
• Open the drawer and put the plate in.
• Close the drawer.
• Select the required plate type.
• Make sure the times are correct.
• To start a light finishing process, press
button from the light finisher screen.
• During whole process the display shows remaining times for UVA and UVC cycles.
Cycles will start according to their delays. If delay of cycle is set to 0, cycle starts
immediately. If delay of both cycles is set to 0, both cycles start together.
• At the end of the cycle the buzzer sounds (if this function is enabled) and remaining
time displays "0".
1438
"
Prior to starting another light finisher cycle, it is needed to confirm the end of
the previous cycle by pressing on the
button or to open the drawer and to
remove the plate. At this point the remaining time displays "0".
The equipment is now ready to start another dryer cycle.
"
It is possible to stop an ongoing cycle by pressing on the
"
If emergency stop button is activated during a light finisher cycle, the cycle
stops. After releasing it and switching the equipment on, it is possible to
continue the cycle by pressing
button from the light finisher screen.
button.
User's Manual - CONCEPT 302 ECDLF
3-3
3-4
Making plates
Starting a light finisher cycle
User's Manual - CONCEPT 302 ECDLF
1438
Maintenance
General
Part 4: Maintenance
General
Maintenance activities are listed in the Maintenance Chart delivered with the
equipment.
Filling up the cooler tank
#
This operation has to be carried out with the equipment switched off.
• Remove the cover of the cooler tank located on the rear side of the equipment.
T33258
• Prepare necessary amount of a solution based on 70% of demineralized/distilled
water, 30% of ethylene glycol and a few drops of algaecide (antifoam action).
• Fill the tank to the maximum.
• Reinstall the cover of the cooler tank.
1438
User's Manual - CONCEPT 302 ECDLF
4-1
4-2
Maintenance
Cleaning the equipment
Cleaning the equipment
• Clean the equipment covers from dust and dirt by using a clean damp cloth and
vacuum clean the openings for the main exposure fans.
T33255
Exposure lamps UV output measurement
• Open the top lid and place the sensor of a Kühnast meter on top of the exposure
•
•
•
•
table.
Close the top lid.
Run an exposure cycle. Make sure that the temperature of lamps is at least 38°C.
Repeat the UV output measurement at another eight points of the exposure table by
using a Kühnast meter. Record the data in a UVA spreadsheet with average output,
and % maximum variation.
When finished and replacement of lamps is not needed, open the top lid, remove
the sensor and close the top lid again.
User's Manual - CONCEPT 302 ECDLF
1438
Maintenance
UV lamps replacement
UV lamps replacement
General
• The tube is fragile, take a great care while unpacking, moving and installing the tube.
• Only clean tubes ensure uniform light emission. Before installation, ensure the tubes
are clean.
• Perspiration and sebaceous oil from the skin form white smudges which become
etched on the quartz surface of the tube, when the tube reaches its normal operating
temperature. The etched areas of the tubes inhibit the transmission of the desired
UV energy.
#
Make sure the equipment is turned off and disconnected from the electricity
supply, the mains supply is locked off using a padlock or similar, and then a
check made to ensure that the equipment will not run.
#
Do not handle the tubes with bare hands. Wear cut resistant gloves.
#
Always use safety glasses when handling lamps.
#
Fluorescent tubes contain small amounts of mercury. Used lamps should be
disposed according to local laws and regulation.
#
UV-C light radiation is dangerous for human skin and particularly the eyes.
Even a short exposure time may cause burnings in the lower skin layers and
damages the eyes retina. Due to the safety systems installed, it should never be
required to check the UV-C tubes by view the UV-C light directly when
operating, maintaining or servicing the equipment. However, in case of need
it is mandatory to wear a welding helmet with at least shade 6, safety clothes
and gloves.
"
Two persons are required for UV lamp replacement.
"
The UVA exposure tubes have a built-in reflector which is applied in a
semi-circle over the entire length of the tube. The reflector is recognizable by
the white no transparent colouring of the glass in the tube. The reflector is
designed to direct the light. When installing ensures that the reflection side is
correctly located (non transparent section should be directed toward the plate.
160°
"
1438
When installing new lamps a "burning" of the lamps is recommended to get
correct performance and to stabilize them. Run the lamps prior to use the
equipment (see the Service Manual).
User's Manual - CONCEPT 302 ECDLF
4-3
4-4
Maintenance
UV lamps replacement
Exposure lamps replacement
#
Make sure the equipment is turned off and the main switch is locked in "OFF"
position.
• Open the top lid of the equipment.
• Remove the lamps by turning them 90°.
• Make sure that the socket position is correct on both sides for inserting the UV
lamp. To adjust the socket correctly it is recommended to use a flat screwdriver.
• Insert the new lamp in the socket on both sides and lock it by turning 90°.
Note the little mark on the UV lamp ring which must be visible (in line with the
socket opening) when the lamp is installed correctly. Make sure that the lamps are
installed in alternate left/right position to ensure proper light distribution.
T33256
1
2
3
6
PHILLIPS
TL80W/10R
DANGER:
Ultraviolet Radiaton
Avoid Exposure
Follow Warning Notice
5
4
incorrect
90°
PHILLIPS
TL80W/10R
DANGER:
correct
Ultraviolet Radiaton
Avoid Exposure
Follow Warning Notice
• Close the top lid.
• Unlock the main switch and turn the equipment on. Burn the lamps (see the Service
Manual).
"
#
Recalibrating light integrator after changing the lamps may result in changing
the plate exposure times.
The UVA fluorescent lamps contain mercury. Dispose
them according to local, state or federal laws.
User's Manual - CONCEPT 302 ECDLF
Hg
1438
Maintenance
UV lamps replacement
Light finisher lamps replacement
#
Make sure the equipment is turned off and the main switch is locked in "OFF"
position.
• Remove the light finisher drawer.
• Remove the rear panel of the light finisher.
• Remove the locking screw of the lamps holder drawer.
• Pull out the lamps holder drawer from the equipment's front.
T33257
• Replace the UV lamps as described on previous page.
• Push in the lamps holder drawer.
• Secure the lamps holder drawer with the locking screws at the back.
• Reinstall the rear panel of the light finisher and lock it by using triangle shaped key.
• Unlock the main switch and turn the equipment on.
• Burn the lamps (see the Service Manual).
#
1438
The UVA and UVC fluorescent lamps contain mercury.
Dispose them according to local, state or federal laws.
Hg
User's Manual - CONCEPT 302 ECDLF
4-5
4-6
Maintenance
UV lamps replacement
User's Manual - CONCEPT 302 ECDLF
1438