Transcript
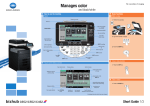
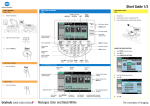
Manages color
and black/white
Basic functions
Make a copy
How to use the machine
Panel
Advanced functions
Save in user box
Change to the mode
1. Position the original(s).
1. Position the original(s).
Touch pen
2. Touch the Application tab.
3. Touch SAVE IN USER BOX
Main power indicator
TOUCH SCREEN
2. Type in the number of copies.
Power ON/OFF
Energy saving ON/OFF
Save copy settings
4. Touch USER BOX and select the desired box.
5. Touch OK.
6. Touch Document Name and enter a name for the document.
7. Touch OK (2×).
8. Press the START key.
Open Utility/
Counter screen
3. Press the START key.
Adjust brightness of
the touch screen
Zoom
1. Position the original(s).
2. Touch ZOOM in the basic screen.
Automatically reduce/enlarge
original size to paper size
Different values for
X and Y (distortion)
STOP a process
START a process
Open HELP
screen
Keep original size
User defined
zoom
(values can be
changed*)
Little bit smaller than
original size (value can
be changed*)
Input a value or a
number
CLEAR a value
1. Position the original(s).
2. Press the FAX/SCAN key on the panel.
3. Touch DIRECT INPUT.
4. Touch E-MAIL.
5. Enter the destination address.
6. Touch OK.
Touch Screen (Basic screen)
Open Job list screen
7. Press the START key.
Message display
Number of copies
Preset zoom values
Change to the functions
of the tab
Displays the result of
specified settings
Duplex
Scan to e-mail (direct input)
Proof one copy set
Switch to Enlarge display
mode
4. Touch OK.
*refer to User Manual for Copy Operations
Interrupt a copy
job
Specify panel settings
Change zoom
manually
3. Touch the desired function.
5. Press the START key.
RESET the settings
Click to login/logout
SEARCH FOR AN E-MAIL ADDRESS
1. Press the FAX/SCAN key on the panel.
1. Position the original(s).
Choose function of the
BASIC tab
2. Touch DUPLEX/COMBINE in the basic
screen.
2. Touch ADDRESS BOOK.
3. Touch SEARCH.
4. Touch DETAIL SEARCH.
3. Touch the desired function.
5. Touch NAME or ADDRESS.
4. Touch OK.
6. Input a keyword.
5. Press the START key.
Displays job details
Icons indicating
Machine/Job status
Open FINISHING
screen
Indication of
free memory
Start Separate
scan function
7. Touch OK (2×).
8. Touch CLOSE.
Activate/Deactivate automatic
rotation of the scanned image
Finishing (only with Finisher)
Load paper in tray 1
Refill
1. Position the original(s).
2. Touch FINISHING in the basic screen.
Send a fax (only with Fax option)
3. Touch the desired function.*
1. Pull out tray 1.
4. Touch OK.
2. Slide the lateral guides to fit the size of the paper.
1. Position the original(s).
3. Load the paper into tray 1 (not higher than ).
2. Press the FAX/SCAN key on the panel.
4. Close tray 1.
3. Touch DIRECT INPUT.
5. If you load special paper, change the paper selection.
4. Touch FAX.
5. Press the START key.
w/o
Finisher
with
Finisher
5. Enter the fax number.
CREATE A BOOKLET
6. Touch OK.
1. Position the original(s).
2. Touch FINISHING in the basic screen.
CHANGE THE PAPER SELECTION
3. Touch FOLD/BIND.
1. Touch PAPER in the basic screen.
4. Touch the desired function.*
2. Touch tray 1.
5. Touch OK (2×).
3. Touch CHANGE TRAY SETTINGS.
6. Press the START key.
4. Touch the desired paper selection.
7. Press the START key.
5. Touch OK (2×).
*available functions depend on machine/finisher
Quick Reference