1
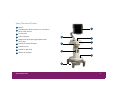
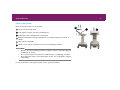
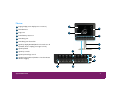
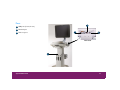
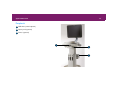
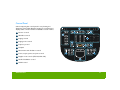
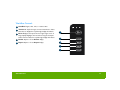
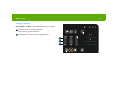
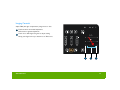
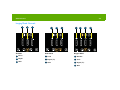
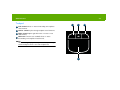
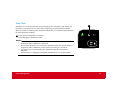
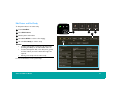
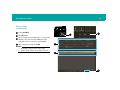
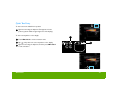
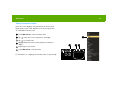
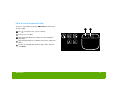
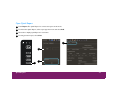
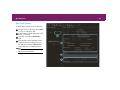
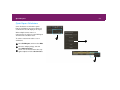
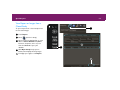
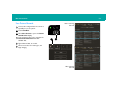
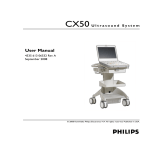
Quick Guide
Sparq Ultrasound System
English
Table of Contents
For easy reference, each section is color-coded. The color of each
section title correlates with the color band on each page in that
section.
System Overview
Sparq Ultrasound System . . . . . . . . . . . . . . . . . . . . . . . . . . . . . . 7
Moving the System . . . . . . . . . . . . . . . . . . . . . . . . . . . . . . . . . 8
Monitor . . . . . . . . . . . . . . . . . . . . . . . . . . . . . . . . . . . . . . . . . . . . . . . 9
Imaging Display Icons . . . . . . . . . . . . . . . . . . . . . . . . . . . . . 10
Transducers and Exams . . . . . . . . . . . . . . . . . . . . . . . . . . . 12
Ports . . . . . . . . . . . . . . . . . . . . . . . . . . . . . . . . . . . . . . . . . . . 13
Peripherals . . . . . . . . . . . . . . . . . . . . . . . . . . . . . . . . . . . . . . 14
Control Panel
Control Panel . . . . . . . . . . . . . . . . . . . . . . . . . . . . . . . . . . . . . 15
Function Controls . . . . . . . . . . . . . . . . . . . . . . . . . . . . . . . . . 16
Workflow Controls. . . . . . . . . . . . . . . . . . . . . . . . . . . . . . . . 17
Imaging Controls . . . . . . . . . . . . . . . . . . . . . . . . . . . . . . . . . . 18
Imaging Mode Controls . . . . . . . . . . . . . . . . . . . . . . . . . . . . 20
Frequency Control . . . . . . . . . . . . . . . . . . . . . . . . . . . . . . . . 21
Trackpad . . . . . . . . . . . . . . . . . . . . . . . . . . . . . . . . . . . . . . . . . 22
Power Management
Power Management . . . . . . . . . . . . . . . . . . . . . . . . . . . . . . . .23
Icons on Imaging Display . . . . . . . . . . . . . . . . . . . . . . . . . . .25
Battery Information . . . . . . . . . . . . . . . . . . . . . . . . . . . . . . . .26
Sleep Mode . . . . . . . . . . . . . . . . . . . . . . . . . . . . . . . . . . . . . . .27
Power Status Messages . . . . . . . . . . . . . . . . . . . . . . . . . . . . .28
Start and Edit an Exam
Start Patient Exam . . . . . . . . . . . . . . . . . . . . . . . . . . . . . . . . .29
Select Transducer and Exam . . . . . . . . . . . . . . . . . . . . . . . .30
Edit Patient and End Study . . . . . . . . . . . . . . . . . . . . . . . . . .31
Restart Study . . . . . . . . . . . . . . . . . . . . . . . . . . . . . . . . . . . . .32
Needle Guidance
Reference Lines . . . . . . . . . . . . . . . . . . . . . . . . . . . . . . . . . . .33
Needle Visualization . . . . . . . . . . . . . . . . . . . . . . . . . . . . . . .34
3
4
Basic Measurements
Single-Point Depth Measurements . . . . . . . . . . . . . . . . . . . 37
Linear Measurements . . . . . . . . . . . . . . . . . . . . . . . . . . . . . . 38
Manual Trace Measurements . . . . . . . . . . . . . . . . . . . . . . . . 39
Calculations . . . . . . . . . . . . . . . . . . . . . . . . . . . . . . . . . . . . . . 41
3-Point Simpson’s EF Calculation . . . . . . . . . . . . . . . . . . . . 42
Annnotation
Quick Text Entry . . . . . . . . . . . . . . . . . . . . . . . . . . . . . . . . . . 45
Select Annotation Labels . . . . . . . . . . . . . . . . . . . . . . . . . . . 46
Move or Erase Annotation Labels . . . . . . . . . . . . . . . . . . . 47
Quick Reports
Open Quick Report . . . . . . . . . . . . . . . . . . . . . . . . . . . . . . . 49
Edit Quick Report . . . . . . . . . . . . . . . . . . . . . . . . . . . . . . . . . 50
Edit Quick Report Measurements . . . . . . . . . . . . . . . . . . . 51
Quick Report Calculations . . . . . . . . . . . . . . . . . . . . . . . . . 52
Quick Report Content . . . . . . . . . . . . . . . . . . . . . . . . . . . . . 53
View Report or Images from a Closed Study . . . . . . . . . 54
Barcode Scanner
Barcode Scanner . . . . . . . . . . . . . . . . . . . . . . . . . . . . . . . . . .55
Scan Patient Barcode . . . . . . . . . . . . . . . . . . . . . . . . . . . . . . .56
Barcode-Scanning Error Messages . . . . . . . . . . . . . . . . . . .57
Tips
Clean the Air Filters . . . . . . . . . . . . . . . . . . . . . . . . . . . . . . .59
About This Guide
This Quick Guide provides basic information about frequently used
features of your Sparq Ultrasound System. For more information, see
the system Help, the User Manual, or visit this website:
www.philips.com/sparq
The website also includes an electronic version of the Quick Guide.
Conventions
These terms are used in this Quick Guide:
Term
Description/Action
Image/image area Ultrasound-scan area on the imaging display
Imaging display
Information displayed on the screen of the
monitor
Press
Activate a quick key on the monitor bezel
Select, deselect
Move pointer or cursor to item and tap left
trackpad control or main trackpad area to
activate or deactivate item
Tap
Activate trackpad controls or main trackpad
area
Touch
Activate control-panel functions
These numbering styles are used in this Quick Guide:
Style
2
2
2
Description
Indicates a system component or a display element
Indicates a step and the control location or system
component associated with the step shown in an
illustration
Indicates a step with no callout on an illustration
5
6
Sparq Ultrasound System
1
Monitor
2
Articulating arm: allows the monitor to extend 0.6 m
(24 in) in any direction.
3
Control panel
4
Pull-out keyboard
5
Wraparound handle with height-adjustment bar
(inner edge)
6
Transducer lock/unlock latches
7
Transducer ports
8
Transducer cable catch
9
Wheel lock and brake
1
2
5
3
4
6
7
8
9
System Overview
7
System Overview
8
Moving the System
Before moving the system to a new location:
1
Disconnect all external cables.
2
Lock together sections of monitor articulating arm.
43
Fold down monitor until parallel to control panel.
4
Release wheel brakes and ensure that cables do not interfere with free movement of
wheels.
5
Move system using handle.
6
When you are ready to reposition monitor, press articulating-arm release.
CAUTIONS
• Failure to lock the articulating arm when moving the system could result in physical
instability of the system.
• Do not roll the system over transducer cables. Doing so could damage the cables.
• Do not place any objects on the folded-down monitor. It is not designed to support
added weight.
For more information on moving the system, see the system User Manual.
2
6
3
Monitor
1
Imaging display (entire display area on monitor)
2
Thumbnail area
3
Image area
4
Power/battery status icon
5
Articulating arm
6
Articulating arm release/lock
7
Quick key display On/Off (Labels and controls are off
by default. Press to display; press again to hide.)
8
Quick key labels
9
Quick key controls
10
Quick key Next Page control
11
Quick key page indicator (Number of circles indicates
number of pages.)
1
2
3
4
5
6
11
8
9
7
System Overview
10
9
System Overview
Imaging Display Icons
The following icons may appear in the lower portion of the imaging display, above the quick key function labels.
Icon Description
Appears when Caps Lock is on
Appears when XRES imaging is on
Appears when SonoCT imaging in Target Mode is on
Appears when SonoCT imaging in Survey Mode is on
Appears when AutoSCAN is on
Appears when iSCAN is on
Appears when color iSCAN is on
Appears when system is ready to acquire an image
Appears when Review mode is active
10
Imaging Display Icons (Continued)
Icon Description
Wired network connection status (x = not connected
= connected)
Click to open DICOM setups, if DICOM is installed.
Wireless network connection status (x = not connected
Click to open DICOM Setups, if DICOM is installed.
Network packet capture status (x = enabled but not running
= connected)
= enabled and running)
Appears only when feature is enabled by a Philips service representative.
Appears when remote desktop is enabled. Green waves appear when remote user is connected.
Click to display connection status and user name.
Appears when battery power is unavailable. Power down before unplugging system.
Click for more information. (See “Icons on Imaging Display” on page 25.)
Icon indicates battery charge is low. Plug system into AC power.
Click for more information. (See “Icons on Imaging Display” on page 25.)
Appears when print job is being sent. Disappears when print job has been sent.
For more information on the icons and the features that they represent, see the system Help.
System Overview
11
System Overview
12
Transducers and Exams
1
S4-2: Cardiac, Abdomen, FAST
2
L12-4: Nerve, Musculoskeletal, Superficial, Vascular Access,
Lung, Arterial, Ocular
3
C6-2: Abdomen, FAST, Pelvic, Nerve, Spine
4
C9-4v: Pelvic, Superficial
5
X7-2t: Transesophageal Adult Echo
5
NOTE
L12-4 and C6-2 transducers have a centerline marker to
facilitate out-of-plane needle guidance.
1
2
3
4
Ports
2
1
USB ports (1 front, 4 rear)
2
Network port
3
Video-out port
1
3
Rear view
1
System Overview
13
System Overview
14
Peripherals
1
DVD drive (under keyboard)
2
Physio panel (optional)
3
Printer (optional)
1
2
3
Control Panel
Sealed, tempered glass control panel for easy cleaning and
disinfecting. The Intuitive Dynamic Interface is touch-based and
displays active controls in amber and available controls in white.
1
Function controls
2
Workflow controls
3
Imaging controls
4
Imaging mode controls
5
Frequency control
6
Trackpad
7
Measurement and calculation controls
8
Freeze, acquire, pointer, and print controls
9
Doppler mode controls (TDI, PW, CPA, CW)
10
Needle Visualization control
11
iSCAN control
Control Panel
1
10
9
2
3
5
4
7
11
8
6
15
Control Panel
16
Function Controls
1
2
3
4
5
4
System on/off: Touch to turn power on; touch
and hold for 2 seconds to turn power off.
Sleep: Touch to put system to sleep. Touch
again to awaken system.
1
Battery status: Indicates battery availability.
Simplicity Mode: Hides a set of controls that
are used less frequently (TGC, Review,
Report, Calc, Measure, ABC Label, Erase,
and Zoom).
Lock: Locks control panel for cleaning. Touch
to lock. Touch and hold for 2 seconds to unlock.
6
Setup: Displays configuration settings.
7
Help: Displays system Help.
Simplicity Mode on
Simplicity Mode off
2
5
3
6
7
Workflow Controls
1
2
3
Start/End: Begins, edits, ends, or restarts exam.
Transducer: Cycles through connected transducers. Active
transducer is displayed in top-left image display information.
Exam: Displays exam preset menu in upper right corner of
image display. Highlight exam and select using the trackpad.
Active exam is indicated in top-left image display information.
4
Review: Opens or closes Review display.
5
Report: Opens or closes Report display.
1
2
3
4
5
Control Panel
17
Control Panel
18
Imaging Controls
Focus, Depth, and Gain can be adjusted using arrows or sliders.
1
Touch arrow for incremental adjustment.
Hold arrow for greater adjustment.
2
Slide finger up or down for large range adjustment.
1
2
1
Imaging Controls
Adjust TGC (time gain compensation) using arrows or dots.
1
Touch arrow for incremental adjustment.
2
Hold arrow for greater adjustment.
Touch dot or slide finger along dots to adjust setting.
Sweep your finger from top to bottom to set TGC curve.
1
Control Panel
2
1
19
Control Panel
20
Imaging Mode Controls
1
2D Mode
2
3
1
Color Mode
2
3
1
2
Doppler Mode
Focus
1
Scale
1
Baseline
2
Depth
2
Depth (2D)
2
Scale
3
Gain
3
Gain
3
Depth (2D)
4
Gain
1
3
4
Frequency Control
1
2
1
Freq: Touch to cycle through available settings.
2
Frequency icon is near lower-left corner of image.
Current frequency range appears below the
triangle.
If Harmonics is on, current setting is circled.
3
If Harmonics is off, white section in triangle
indicates frequency.
P = Penetration
Lower frequency settings
R = Resolution
Higher frequency settings
G = General
Mid-range frequency settings
Harmonics: Turn on or off with quick key
control. On is the default setting for many exams.
3
Control Panel
21
Control Panel
Trackpad
1
Left control: Selects or enters functionality, and completes
measurements.
2
Center control: Cycles through trackpad control functions.
3
4
22
1
2
Right control: Opens right-click menu or moves to next
measurement.
Main area: Functions as a trackball, selects or enters
functionality, and completes measurements.
NOTE
When selecting a displayed item, point to the object and tap
the left trackpad control or the main trackpad area.
4
3
Power Management
The system uses either battery or AC power. Fully charged batteries provide about 2.5 hours of scanning time.
Two icons provide battery status: one on the control panel and one on the imaging display. The icon on the control panel provides battery
status whether the system is on or off. If charge is less than 12%, battery power is unavailable.
Battery Status Icon on Control Panel: System On
Battery Icon
Icon Description
Steady green
AC Power
Yes
No
Battery Status
Charge level greater than 12% and charging
Charge level greater than 12%
Steady red
Yes
No
Charge level less than 12% and charging
Charge level less than 12%
No indicator
Yes
Battery fault; “alert” icon appears on imaging display. Contact your service
representative.
CAUTION
If the battery status icon is red, turn off system before disconnecting AC power.
Power Management
23
Power Management
24
Battery Status Icon on Control Panel: System Off
The battery icon on the control panel provides battery status even if the system is off. The following indicators may be displayed when the
system is off. If charge is less than 12%, battery power is unavailable .
Battery Icon
Icon Description
Steady green
Blinking green
AC Power
Yes
No
Yes
Battery Status
Fully charged
Charge level greater than 12%
Charge level greater than 12% and charging
Red with blinking green
Yes
Charge level less than 12% and charging
No indicator
Yes
No
Battery fault. Contact your service representative.
Charge level less than 12% or battery fault
Icons on Imaging Display
The icon in the lower-right corner of the imaging
display indicates power source, battery charge status,
and alert status.
1
2
3
4
5
CAUTION
If the battery discharge icon appears, turn off the system before
disconnecting AC power. When battery power is unavailable,
disconnecting AC power without turning off the system may corrupt
files on the hard drive and render the system inoperative.
Power/battery icon.
Battery charge level icons that can appear when
using AC power.
Battery charge level icons that can appear when
using battery power.
Alert indicator. Select the icon to display more
information.
Indicates battery is completely discharged. While
this icon is displayed, use AC power only.
2
4
1
5
3
Power Management
25
Power Management
26
Battery Information
CAUTION
If the battery discharge icon appears, turn off the system before disconnecting AC power. When battery power is unavailable,
disconnecting AC power without turning off the system may corrupt files on the hard drive and render the system inoperative.
•
Batteries charge whenever system is connected to AC power.
•
Fully charged batteries provide approximately 2.5 hours of scanning time.
•
Charging from a fully discharged state to 80% capacity takes approximately 3 hours.
•
Charge the batteries whenever either battery icon is red.
•
System shuts down automatically when charge level becomes critically low. To prolong battery life, connect to AC power as soon as either
battery icon turns red.
•
If system is off for several days and unconnected to AC power, the batteries discharge. If battery icon is not visible on the control panel,
connect system to AC power to operate. When the batteries are completely discharged, it may take longer than normal to charge them.
•
If battery icon on control panel does not appear when system is connected to AC power, contact your service representative.
•
If AC power is disconnected while system is on and not in Sleep Mode, the system runs until batteries are drained.
Sleep Mode
Sleep Mode is a low-power state that conserves battery power and allows a quick startup. It is
intended for short periods of use, such as when transporting the system between locations.
1
When the system is on battery power, Sleep Mode default time-out is 60 minutes. After 60 minutes
the system shuts down completely.
1
To put system in Sleep Mode, touch Sleep.
Touch Sleep again to awaken the system.
NOTES
• When the system is in Sleep Mode and connected to AC power, the system remains in
Sleep Mode until it is awakened or turned off.
• Disconnecting AC power does not alter the Sleep Mode status. The system remains in
Sleep Mode until it is awakened, reaches the time-out setting, or is turned off.
• The system does not automatically enter Sleep Mode when disconnected from
AC power.
• For information on changing the Sleep Mode default time-out, see the system Help.
Power Management
27
Power Management
28
Power Status Messages
When battery life decreases to preset thresholds, the following warnings appear.
Warning Message
Low Battery Warning
Battery Low: The system will shutdown in 5 minutes. To prevent shut down, connect the AC power adapter.
Critical Battery Warning
Battery Critically Low: The system will shutdown in 1 minute. To prevent shut down, connect the AC power adapter.
The system is shutting down due to a low battery.
NOTE
Save and close the exam before the system shuts down.
For information on changing the battery life preset thresholds, see the system Help.
Start Patient Exam
1
2
3
Touch Start/End to begin an exam.
Select New Patient or Temporary ID to start a new
study.
For a new patient, enter patient information on the
General tab. Last name is required.
4
Select the Additional tab to enter patient history.
5
Next, select transducer and exam. See “Select
Transducer and Exam” on page 30.
NOTES
• If patient information is unavailable, use Temporary
ID to start the exam.
• For information on entering patient data using a
barcode scanner, see “Barcode Scanner” on page 55.
Start and Edit an Exam
2
1
4
3
29
Start and Edit an Exam
30
Select Transducer and Exam
1
2
3
Select Transducer, and then select a transducer icon to
activate a transducer. Only connected transducers
appear. Active transducer icon is amber.
Select Exam, and then select an exam from listed
options. If the exam you want is not shown, click Next.
Active exam is amber.
1
1
Select Save & Exit, and begin imaging.
2
2
3
Edit Patient and End Study
To edit patient data for an active study:
1
Touch Start/End.
2
Select Edit Patient.
3
Edit the patient information.
4
Select Save & Exit to return to live imaging.
5
Or, select End Study to end the study.
1
2
5
4
3
NOTES
• In studies started with a temporary ID, patient data
(including the MRN) can be edited within 24 hours.
• In studies with patient data, some data (name, gender,
and date of birth) cannot be edited after images are
acquired.
• Starting a new study ends the active study.
For more information, see the system Help.
Start and Edit an Exam
31
Start and Edit an Exam
32
Restart Study
To restart a study:
1
2
3
4
Touch Start/End.
1
Select Restart.
2
Select a study from the displayed list, or to query the
database, enter search criteria (MRN, last name,
study date, and so on) and then select Search.
After selecting the study, select OK.
3
NOTES
• Restarting a study ends the active study.
• Studies can be restarted only within 24 hours.
3
4
Reference Lines
A centerline or gridlines may help guide a needle to target anatomy.
1
2
3
4
To display the centerline, open the second page of quick key
labels, and press Ref Lines control to select Centerline. The
displayed Centerline corresponds to the centerline marker on
L12-4 and C6-2 transducers.
To display the gridlines, open the second page of quick key
labels, and press Ref Lines control to select Gridlines.
Centerline markers display at 0.5 cm intervals for depths up to
5 cm, and 1 cm intervals for depths greater than 5 cm.
Gridline squares display at 1 cm intervals for depth up to 10 cm,
and 5 cm intervals for depths greater than 10 cm.
1
2
NOTE
Reference lines are not available in cardiac 2D or cardiac Color
modes.
3
Needle Guidance
4
33
Needle Guidance
34
Needle Visualization
2
Needle Visualization enhances the presentation of the needle.
1
2
3
4
5
Touch Needle Vis to turn on enhancement.
Needle Visualization is active within the solid and dotted
amber lines.
Press the Approach quick key control to select Left
Approach or Right Approach. Needle approach is
from the corner where the solid lines meet.
Press the Shallow, Medium, or Steep quick key
control to select the needle trajectory angle. For best
results, select a needle angle perpendicular to the dotted
amber line.
Touch Needle Vis again to turn off enhancement.
(Continued on next page)
NOTE
Needle Visualization is available only with the L12-4
transducer.
Right
approach
1
1
3
3
4
4
Needle Visualization (Continued)
1
Image with Needle Visualization off
2
Same image with Needle Visualization on
3
Specular reflectors
4
Needle reverberation
Left
approach
3
CAUTION
The needle is enhanced only in the area
defined by amber lines. If the tip of the
needle extends beyond this area, it may
not be visualized.
1
Right approach
NOTE
When Needle Visualization is on, the
image may exhibit increased specular
reflectors and reverberation artifacts.
4
Needle Guidance
2
35
Needle Guidance
36
Single-Point Depth
Measurements
1
2
3
4
1
3
2
Touch Measure to activate a caliper.
Use main trackpad to position caliper at
any point on image.
Tap left trackpad to complete
measurement.
Repeat for each additional single-point
measurement.
NOTES
• Calipers are amber until the measurement is complete.
• To remove measurements, touch Erase. If a measurement is active (amber) Erase
removes only the active measurement. If measurements are complete (white) Erase
removes all measurements.
• Measurement results appear on the imaging display and continually update to reflect
adjustments, until the measurement is complete.
• Depth measurements are not imported into the report, but they are acquired with
the image.
Basic Measurements
37
Basic Measurements
Linear Measurements
1
2
3
4
5
6
7
38
1
6
2
3
6
Touch Measure.
Use main trackpad to position caliper at
beginning of measurement.
Tap
to set first caliper and activate
second caliper.
Position second caliper at end point of
measurement.
If start point needs adjustment, tap
and reposition first caliper.
To complete measurement, tap left
trackpad, or to complete measurement
and acquire image, touch Acquire.
Repeat for each additional linear
measurement.
NOTES
• Calipers are amber until the measurement is complete.
• To remove measurements, touch Erase. If a measurement is active (amber) Erase
removes only the active measurement. If measurements are complete (white) Erase
removes all measurements.
• Measurement results appear on the imaging display and continually update to reflect
adjustments, until measurement is complete.
• Linear measurements are not imported into the report, but they are acquired with
the image.
Manual Trace Measurements
1
2
3
4
5
6
7
1
7
4
7
Touch Measure.
Press Manual Trace quick key
control.
Use the main trackpad to position
cursor at start point of trace area.
Tap
to anchor cursor.
To measure area and circumference,
use main trackpad to trace region.
To measure length for a volume
calculation, tap
to activate length
cursor and use trackpad to position it.
To complete trace, tap left trackpad, or
to complete measurements and acquire
image, touch Acquire.
Basic Measurements
2
NOTES
• Calipers are amber until the measurement is complete.
• To undo the trace (amber), touch Erase. If the trace is complete (white), Erase
removes the trace and the measurements.
• Measurement results appear on the imaging display and continually update to reflect
adjustments, until measurement is complete.
• Manual trace measurements are not imported into the report, but they are acquired
with the image.
39
Basic Measurements
40
Calculations
1
2
3
Touch Calc.
Select measurement or calculation. If needed, select Main Menu
to view more choices.
Use the main trackpad to place the cursors and perform
measurements required for the calculation. Calculation results
appear on the imaging display.
Calculations and corresponding measurements are imported into
the report.
2
1
For information on completing measurements, see “Linear
Measurements” on page 38 or “Manual Trace Measurements” on
page 39.
For information on configuring the measurement and calculation lists,
see the system Help.
Basic Measurements
41
Basic Measurements
42
3-Point Simpson’s EF Calculation
1
2
3
4
Obtain apical four-chamber view. Reduce image depth to
maximize LV size within sector. Touch Freeze.
Use main trackpad to scroll cine sequence to end-diastole.
Touch Calc.
Select Main Menu (if not already selected). From the Cardiac
analysis packages, select EF Volume and Mass.
Select EDV (MOD-sp4).
6
Position amber crosshair on medial annulus and tap
to
anchor.
Position second crosshair on lateral mitral annulus and tap
to anchor. Amber border template appears, indicating active
mode.
7
Use main trackpad to place apical point in correct position.
8
Tap
to approve template. Approved template is white and
can be edited.
(Continued on next page)
5
4
3
5
6
7
3-Point Simpson’s EF Calculation
(Continued)
9
10
11
12
13
14
To edit, hover over one or more points
(points turn amber) and tap
. Use
main trackpad to drag points to new
location.
To edit additional points, tap
and
repeat step 9.
When you finish edits, tap left trackpad
to complete. Volume appears on
imaging display.
To remove the EDV template, touch
Erase.
Tap
to activate 2D cine. Use main
trackpad to scroll cine sequence to endsystole.
Tap
to return to Cardiac analysis
menu. Select ESV (MOD-sp4) and
repeat steps 5-11.
Basic Measurements
9
11
NOTES
• For greater accuracy, perform steps again for EDV MOD-sp2 and ESV MOD-sp2
measurements.
• Be careful not to foreshorten the LV.
• Use the same cardiac cycle for both diastolic and systolic volumes.
• Good visualization of endocardial borders is required for accuracy.
43
Basic Measurements
44
Quick Text Entry
1
To enter text in the default home position:
1
Type free text using the keyboard. Text appears in home
position (system default is upper-right area of the display).
To enter text anywhere on the display:
2
Touch ABC Label to enter annotation mode.
3
Tap
4
Type free text using the keyboard, and then press ABC Label
to exit annotation.
2
and position the cursor anywhere on the display.
3
4
Annotation
45
Annotation
46
Select Annotation Labels
Enter text on the display by using annotation lists, which include
labels specific to each exam. Gray lines in the menu separate lists.
To select labels from a list menu:
1
Touch ABC Label to enter annotation mode.
2
Tap
and position cursor anywhere on the display.
3
Tap
to activate menu.
4
Highlight label in list and touch left trackpad to set label on
display.
5
Repeat steps 2-4 as needed.
6
Touch ABC Label to exit annotation.
For information on configuring the annotation lists, see system Help.
4
1
4
2
Move or Erase Annotation Labels
To move or erase labels, annotation (ABC Label) must be active.
To move a label:
1
Tap
2
Position cursor on label.
3
4
5
3
1
to activate cursor (cursor is amber).
Tap left trackpad (label turns amber). Use main trackpad to
move label.
Tap left trackpad again to set label at new location. Label turns
white.
To erase an individual label, perform steps 1 and 2, and then
touch Erase.
Annotation
47
Annotation
48
Open Quick Report
1
Touch Report. The Quick Report for current exam opens in edit mode.
2
To add another Quick Report, select report type from menu and select Add.
3
Select tabs to display Quick Report for each exam.
4
To view generated report, select View.
3
4
2
1
Quick Reports
49
Quick Reports
50
Edit Quick Report
To edit findings, impressions, and comments:
1
2
3
4
If report is not in edit mode, select Edit
to enter or edit report data.
Select indications and findings using check
boxes or text entry.
If needed, enter text in Comments
field.
Enter clinician names. Manually entered
names are saved and displayed in menu
for subsequent selection. Delete List
clears entire list, not individual entries.
1
2
NOTE
Data entered in the Quick Report also
appears in the Full Report.
3
4
Edit Quick Report Measurements
Some labeled measurements are automatically included in a
Quick Report.
To add or edit measurements:
1
If report is not in edit mode, select Edit.
2
Type or edit a measurement value as needed.
The last five entries for a measurement appear in the Full
Report. A selector determines which one appears in the
generated Quick Report and Full Report. For information on
selecting the measurement value used in the reports, see the
system Help.
Quick Reports
2
51
Quick Reports
52
Quick Report Calculations
Some calculations are included in Quick
Reports. Calculations cannot be edited and
are dimmed in the edit display of the report.
When multiple entries exist for a
measurement, the selection in the Full Report
determines the calculation value.
To select a measurement value to use in
calculations:
1
2
3
1
2
Select Full Report, and then select Edit.
Select the analysis package, and then
select Measurements.
Hover over the measurement value, tap
right trackpad, and select Use In Calcs.
3
Quick Report Content
To view the generated report, select View.
Each Quick Report displays the following
information with exam-specific indications:
•
Institution name and logo (specified in
System setups)
•
Report type
•
Patient name, gender, and MRN
•
Study date
•
Referring physician
•
Indication
NOTE
Images can be added only to a Full
Report. Add images from Review.
Quick Reports
53
Quick Reports
54
View Report or Images from a
Closed Study
2
To open a report from a closed study and see
the associated images:
1
Touch Report.
2
Select
3
4
5
(Search for Study).
Select a study from displayed list, or enter
data in a Search Criteria field (MRN,
last name, study date, and so on) and
then select Search to query the
database.
Click Open Study. Study opens in
Review, which displays all study images.
3
1
To display report again, touch Report.
4
Barcode Scanner
The barcode scanner allows you to scan patient-identification
barcodes.
The barcode scanner must be purchased from and enabled by Philips.
Before use, the barcode scanner must be configured to recognize
your institution’s barcode symbology and the ultrasound system’s
data fields. For more information, see the instructions supplied with
the barcode scanner.
When you scan a barcode, the institution’s patient data populates the
ultrasound system’s Patient Identification data fields.
NOTE
If only an MRN appears in the barcode, the system searches its
database for a matching MRN. If the database contains a match,
the system populates the associated data.
Barcode Scanner
55
Barcode Scanner
56
Scan Patient Barcode
1
Connect the configured barcode scanner to
any USB port on the system.
2
Touch Start/End.
4
Select New Patient to open the Patient
Identification display.
Scan the patient’s barcode to populate the
Patient Identification fields with
available data.
5
Type additional data, as needed.
6
Select a transducer and exam type, and
begin imaging.
3
Before scanning
barcode
3
2
After scanning
barcode
Barcode-Scanning Error Messages
Warning/Error Message
Images have already been captured under a temporary id. In the current mode, the editable fields of
the temporary id will be updated with this new information. Press ‘New’ to end the in-progress
exam and start a new exam for this patient. Press ‘Cancel’ to ignore the new patient information
and continue the current exam.
Unspecified Barcode Type
Please display the Patient Identification screen and rescan the Barcode.
Unsupported Barcode Data Type
Scanning a barcode containing this type of information is not supported. If an appropriate data
entry screen exists for this information, you may manually enter the information into that screen.
Barcode Scanner
Description
Describes options for using the barcode
scanner to edit a temporary-ID study
after images have been acquired.
Appears when you scan barcode before
opening Patient Identification display.
Appears when you scan barcode data
that is not patient data.
57
Barcode Scanner
58
Clean the Air Filters
Heat damages electronic components. Dirty air filters reduce air
flow, resulting in less cooling and higher internal system
temperatures. Frequent cleaning of the air filters is important and
prolongs system life. We recommend that the filters be cleaned
every 2 to 4 weeks.
The system has two filters. Turn off the system before removing and
cleaning the filters.
To clean the filter located on the left side of the cart under the base:
1
Locate filter and slide it out.
2
Clean filter using a damp, lint-free cloth.
3
Replace filter in filter holder.
1
(Continued on next page)
Tips
59
Tips
60
Clean the Air Filters (Continued)
To clean the filter located in the front of the cart under the base:
1
Locate the cover on the system between the wheels.
2
Use the finger holes at the top and bottom to remove the cover.
3
Slide filter out.
4
Clean filter using a damp, lint-free cloth.
5
Replace filter in filter holder.
6
Replace cover on mounting posts.
1
3
2
Philips Healthcare is part of Royal Philips Electronics
www.healthcare.philips.com/ultrasound
Philips Ultrasound
22100 Bothell-Everett Highway
Bothell, WA 98021-8431
USA
© Koninklijke Philips Electronics N.V. 2011
All rights are reserved.
Reproduction or transmission in whole or in part, in any
form or by any means, electronic, mechanical or otherwise,
is prohibited without the prior written consent of the
copyright owner.
Printed in the USA
4535 616 10912 Rev B
December 2011
Scan this QR code with your
smart phone to learn more.