1
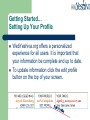
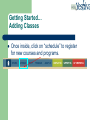
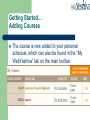
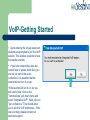
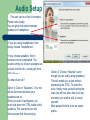
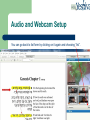
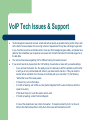
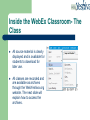
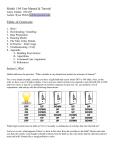
WebYeshiva.Org Student’s Guide WebYeshiva- A New Type of Learning Experience In just a few minutes, you can take advantage of this advanced, easy-to-use learning experience! Come and learn with us! Welcome to WebYeshiva.org! • Welcome to WebYeshiva.org! We are so glad that you’ve chosen to study in our dynamic, exciting online classroom. • WebYeshiva.org offers classes for students at all skill levels. To help choose classes most suitable for your learning level, consult a WebYeshiva.org representative using the contact information at the end of the manual. • We hope this user manual facilitates your usage of the WebYeshiva.org system. Please do not hesitate to contact us if you have questions or comments. Basic Requirements for the System To participate in a WebYeshiva.org class, you will need: •A computer with speakers or headphones. •A high speed internet connection (DSL, ADSL, Cable, Fiber Optics). •The minimal upload speed needed is 0.250 mb/s (sometimes written as 250 kb/s). You can check your speed with your provider, or you can do your own speed check at http://www.speedtest.net. • Before logging onto an online class at WebYeshiva.org, exit any games and other non-essential programs, including instant messaging, instant email notifications, etc. •It is especially important to log off Skype before logging in to a class, as the Skype has control of your webcam and VoIP, and can interfere with WebEx (the online classroom provider). •Recommended browsers: Explorer or Firefox for Windows, Safari for Mac. Logging in , setting up profile and choosing courses Log in Logging in Enter your email you used to sign up with on your application form, and the password you chose. Getting Started… Setting Up Your Profile WebYeshiva.org offers a personalized experience for all users. It is important that your information be complete and up to date. To update information click the edit profile button on the top of your screen. Getting Started… Setting Up Your Profile In the next slide you will see the profile page where your personal information including name, time settings and password can be seen and updated. In addition, there is space to add other important information such as educational background, personal information and photos, if you wish. The more information you provide, the better we can help you. Getting Started… Setting Up Your Profile Getting Started… Adding Classes Once inside, click on “schedule” to register for new courses and programs. You can scroll through the schedule to find a shiur of your choice Getting Started… Adding Classes You can click on “Shiurim” to see the details of the shiurim. Getting Started… Adding Courses Find the course you wish to take and click “Add This Shiur” Getting Started… Adding Courses The course is now added to your personal schedule, which can also be found in the “My WebYeshiva” tab on the main toolbar. Getting Started…Tuition • The goal of WebYeshiva.org is to enable Jews around the world to learn Torah. • Student tuition helps enable WebYeshiva.org to continue providing high quality Torah learning opportunities online by contributing to WebYeshiva.org's overall costs and infrastructure. WebYeshiva.org is a not-for-profit organization. To find out more about donating to WebYeshiva.org, please click here. • WebYeshiva.org does not always charge tuition. To find out if this Semester is FREE, please visit the tuition page at this link. • To apply for financial assistance, click here. Please be sure to include all relevant information. • If you are participating in a free trial, free class, or free semester, click here to skip the next two slides, which explain how to pay tuition. Getting Started…Tuition To pay tuition at WebYeshiva.org: Click “My WebYeshiva” Click “My Account” Click “Click to Pay” Getting Started…Tuition •Choose a payment option from the “Buy Credits” Menu. •Choose the number of credits you wish to purchase. •This will direct you to PayPal, where you can use your PayPal account or choose the option to sign in as a guest. •Remember to click “Complete your Tuition Payment” at the end of the process or you will not be registered as having paid. Building an Interactive Environment In the next slide we will review the class page. Every shiur (course) has its own home page. Teachers use this page to share sources and other material with students, post messages, as well as other forms of communications. Teachers update their course pages regularly. The archives are accessed from this page as well. The Class Page Time of the upcoming class Class Name WebYeshiva Student/Teacher Communication WebYeshiva members are encouraged to share views and opinions with the on-line community. Students and teachers communicate regularly through e-mail and other on-line mediums, creating a truly personal experience. Welcome to the WebEx Web Conference Classroom- Getting Started To enter the class, just click the button. Students can enter a class 15 minutes prior to the scheduled start time. If one tries to enter before 15 minutes, they will get an error. If that happens, just try again within the 15 minutes of class. Setting Audio & Microphone Options This should only need to be done the first time you enter a WebYeshiva session, unless you change computers, add/remove hardware or otherwise change your computer setup. The first time you enter a class, log in to WebYeshiva and enter your session as early as possible to give yourself time to set it up properly. On the upcoming pages you will see the instructions how to set up the VoIP and webcam. WebCam & Video Options It is not necessary to have a webcam to see and follow a class. While the teacher and other students will not be able to see you, you can still see them and participate fully in the class. The same is true if you don't have a microphone (however speakers or a headset are of course critical to be able to hear the class). You will still be able to hear and see the class, but you will not be able to ask questions or interact fully in the classroom using the VoIP, though you will be able to communicate using the chat box. You will find that having a webcam and microphone will enhance your experience as well as your fellow students’. VoIP-Getting Started • Upon entering the virtual classroom, students are prompted to join the VoIP session. This enables students to hear the teacher and talk. • If you have entered the class but cannot hear or speak, most likely you are not yet part of the audio conference. It is possible that the teacher did not turn it on yet. •If the teacher did turn it on, but you still cannot hear, click on the "communicate" pull down menu and select "integrated VoIP." Next, click on "join conference." This should allow you to join the VoIP conference. If this does not help, please contact our technical support. Inside the WebEx Classroom- VoIP • The first time you use Webex, students will also be automatically prompted to configure the Audio setup wizard right after joining the VoIP session as seen in the last slide. This allows students to setup their speakers and microphone. You will see a number of slides. Keep pressing “next” until you complete the setup. Here you choose your recording and hearing devices. Note, you may have a number of devices on the computer. Choose the correct one. If in doubt, click next and test the system to see if you chose the correct one If the playback doesn't emit audio, then click on “back and choose a different playback device. Do the same for the recording device Audio Setup This part can be a tiny bit complex. Please look closely. You are given the option between speakers or headphone. •If you are using headphones, then simply choose “headphones”. •If you choose speakers, then it becomes more complicated. The sound coming out of your speakers can go back into the mic, causing an echo echo echo echo echo . So what do we do? Option1) Click on “Speakers”. Your mic will be disconnected while your speakers are on. When you want to participate, you must hold down the CTRL button while speaking. This connects your mic. Some people find this annoying. Option 2) Choose “Headset” (even though you are really using speakers). This will enable you to talk without depressing the CTRL. To avoid the echo, simply mute yourself during the class (we will see soon how to do so), and when you wish to talk, un-mute yourself. Most people find this to be an easier option. Audio Setup You can rejoin the audio by going to Audio>Integrated Voice>Join Conference Please note that if during the class you have a VoIP issue and would like to redo the settings, you have to go through two steps. You cannot work on the settings while the VoIP is on, so the option for “Setup for Audio” will be grayed out. Therefore you must first click on: Audio> Integrated Voice> Leave Conference. Only after you leave the conference will you be able to click on Audio>Setup for Audio. Complete your setup and then you can rejoin the audio by going to Audio>Integrated Voice>Join Conference. Audio and Webcam Setup Its important to have your mic muted during the class so that it doesn’t cause interference. To mute or un-mute yourself, click the icon of the microphone. If you mute your microphone, then you have the option to un-mute it as well. If the teacher is the one who muted you, then only the teacher can un-mute it. If you see you cannot un-mute yourself, then “raise your hand” or chat to the teacher to un-mute you. If it doesn’t work, then you have a setting issue with your microphone and please see the previous slides to fix this. If it still doesn’t work, contact our support. Web Conference Setup You can turn the main picture on or off by clicking on the small arrow. To turn your webcam on or off, click the icon of the webcam You can see the participants in picture form instead of a list, by clicking on the list button and choosing thumbnails.On the next page you can see what it would look like. Audio and Webcam Setup You can go back to list form by clicking on it again and choosing “list”. VoIP Tech Issues & Support Technical support answers all received emails and calls as quickly as possible. During certain times, such as the start of a new semester, there is a high volume of requests and it may take a bit longer to get back to you. Feel free to send us a reminder email in case your first message has gone astray, and please have patience. We will address your request as soon as we can! Contact information for technical support is on the last slide. The most common issues regarding VoIP is difficulty hearing the teacher's sound. If you cannot hear at all, please check the VoIP settings. It seems like an issue with your audio settings. – If you can hear the teacher, but the quality is poor, the best way to tell if the problem is with him/her or with you is to try communicate with others in your class via the chat box. If they can hear the teacher without a problem, then the issue is most likely with your connection. Try the following: – Wait a little to see if the issue passes. – If it doesn’t, try to turn off all video. – It it’s still not working, exit VoIP & re-enter (Audio>Integrated VoIP> Leave Conference and then repeat to re-enter). – If that doesn’t help, try to exit the session and re-enter. – If it’s still not working, contact Technical Support. If none of the students can hear, chat to the teacher . The teacher should try to fix it on his end. Write to the WebYeshiva office to notify them of the issue with that teacher’s VoIP. Inside the WebEx Classroom- The Class •Once the class has started, students can follow along using the WebEx tools. •Teachers can share several handouts with their students at one time and comment on them. •Teachers can also use an arrow to indicate where he/she is up to. Inside the WebEx Classroom- Chat • You can communicate by using the text chat feature. Enter your chat message here and click on “send”. • You can send the chat to the entire class by choosing send to “Everyone”. • You can also choose to send a private chat to any participant or the teacher by choosing their name from the drop down menu (Be careful not to send a private chat to everyone, as it may cause discomfort.) Everyone_ Inside the WebEx Classroom- The Class • Students can raise their hands at any time in order to ask a question or to make a comment (or you can chat the request to the teacher as well). •To talk, either un-mute yourself or have the teacher do so for you, as shown in the above slides (and if you set your settings for “speakers”, depress the CRTL while talking) . Inside the WebEx Classroom- The Class All source material is clearly displayed and is available for students to download for later use. All classes are recorded and are available as archives through the WebYeshiva.org website. The next slide will explain how to access the archives. Accessing Archives Archives are usually available within 24 hours of the class. To view the archives, you must first download the WebEx player. This needs to be done only once. Many classes have the option of downloading the shiur in WebEx format or in mp4 format. Accessing WebYeshiva Archives The archive file opens easily with the WebEx Recording Player. View all of the sources, communications, and videos that took place during the actual class. You can also view free archives from select classes at www.webyeshiva.org/archives For More Information… For Technical Support… 24/6 TECH SUPPORT U.S. 1-212-920-8844 · Israel (0)3-900-3015 [email protected]