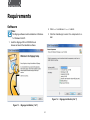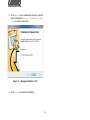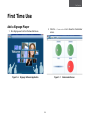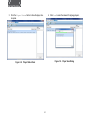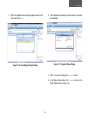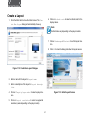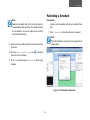
1
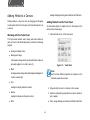
User Manual
iSignager Easy Publishing Suite
TABLE OF CONTENTS
Table of Contents
Overview
Introduction1-1
Target, Engage, Inform, Influence with iSignager Easy Publishing Suite.................................... 1-1
How Does Digital Signage Work?...................................................................................... 1-1
Features
1-2
Content Display............................................................................................................. 1-2
Design - iArtist.............................................................................................................. 1-2
Scheduling - iScheduler.................................................................................................. 1-2
Management - iCommander............................................................................................. 1-3
iSignage Software Components
1-4
iCommander....................................................................................................................... 1-4
Dashboard Panel............................................................................................................ 1-4
Player Status Panel......................................................................................................... 1-5
Player Monitor Panel....................................................................................................... 1-5
i
TABLE OF CONTENTS
Command Task Panel...................................................................................................... 1-6
Log Viewer Panel............................................................................................................ 1-6
Publish Status................................................................................................................ 1-7
iArtist................................................................................................................................. 1-7
Menu Bar Buttons............................................................................................................. 1-8
File Management and Options.......................................................................................... 1-8
Font Style and Alignment................................................................................................ 1-8
Canvas Panel...................................................................................................................... 1-9
Tools Panel.................................................................................................................... 1-9
Preview Panel...............................................................................................................1-10
Media Repository Panel..................................................................................................1-10
Playlist Panel................................................................................................................1-11
Properties Panel............................................................................................................1-11
Zoom Control Panel.......................................................................................................1-12
iScheduler.........................................................................................................................1-12
Menu Bar Icons...............................................................................................................1-13
File Management and Options.........................................................................................1-13
ii
TABLE OF CONTENTS
Calendar Panel................................................................................................................1-13
Layout Panel...................................................................................................................1-14
Template Panel................................................................................................................1-15
Preview Panel..................................................................................................................1-15
Plan Panel.......................................................................................................................1-16
Schedule Property Panel...................................................................................................1-16
Getting Started
Requirements
2-1
Software............................................................................................................................ 2-2
First Time Use
2-5
Add a Signage Player...................................................................................................... 2-5
Create a Layout............................................................................................................. 2-7
Publishing a Schedule..................................................................................................... 2-8
iii
TABLE OF CONTENTS
iCommander
Using the Dashboard
3-1
Player Management
3-2
Adding Players.................................................................................................................... 3-2
Deleting Players.................................................................................................................. 3-4
Modifying Player Properties................................................................................................... 3-4
Modifying Basic Properties.................................................................................................. 3-5
Modifying Advanced Properties........................................................................................... 3-6
Creating Groups.................................................................................................................. 3-7
Removing Groups................................................................................................................ 3-8
Monitoring Players
3-9
Task Management
3-10
Creating Commands............................................................................................................3-10
Deleting Commands............................................................................................................3-11
Log Status
3-12
Searching for Logs..............................................................................................................3-12
Publishing Status
3-14
iv
TABLE OF CONTENTS
Layouts and Templates
Creating Layouts and Templates
4-1
Creating a Canvas............................................................................................................. 4-1
Defining a Device for iArtist............................................................................................. 4-1
Working with Content........................................................................................................ 4-2
Building a Media Repository............................................................................................. 4-2
Adding Media to a Canvas............................................................................................... 4-3
Working with Media on a Canvas...................................................................................... 4-5
v
TABLE OF CONTENTS
Scheduling
Creating Plans and Schedules
5-1
Start with a Plan............................................................................................................... 5-1
What’s in a Plan?............................................................................................................ 5-1
Creating a Plan.............................................................................................................. 5-1
The Calendar Panel: iScheduler’s Canvas.............................................................................. 5-2
Working with Schedules..................................................................................................... 5-2
Creating a Schedule....................................................................................................... 5-2
Modifying Schedules....................................................................................................... 5-4
vi
Conventions
Conventions
The following conventions are used to give the users additional
information about specific procedures or content. It is important
to pay attention to these conventions as they will prevent the
users from causing damage to themselves, equipments, or the
their environments.
!
General Conventions
!
The following general conventions are used in this document.
Example:
Indicates information used to demonstrate or explain
an associated concept.
Note:
Indicates additional information that is relevant to the
current process or procedure.
Important:
Indicates information that is important to know for the
proper completion of a procedure, choice of an option,
or completing a task.
vii
WARNING!
Warning information appears before the text it references to emphasize that the content may prevent damage to the device or equipment.
CAUTION!
Cautions appear before the text it references. Caution
appear in capital letters to emphasize that the message
contains vital health and safety information.
Overview
Typographical Conventions
The following typographical conventions are used in this document.
Italics
Indicates book titles, directory names, file names, path names,
and program/process names.
Constant width
Indicates computer output shown on a computer screen, including menus, prompts, responses to input, and error messages.
Constant width bold
Indicates commands or information literally entered by a user
on the computer. Variables contained within user input are
shown in angle brackets (< >).
Bold
Indicates keyboard keys that are pressed by the user.
viii
REGULATORY
Regulatory
NOTICE
Notice
Regulatory Notice
FCC STATEMENT
The changes or modifications not expressly approved by the
party responsible for compliance could void the user’s authority
to operate the equipment.
This equipment has been tested and found to comply with the
limits for a Class A digital device, pursuant to Part 15 of FCC
Rules. These limits are designed to provide reasonable protection against harmful interference in a residential installation. This equipment generates, uses, and can radiate radio
frequency energy and, if not installed and used in accordance
with the instructions, may cause harmful interference to radio
communications. However, there is no guarantee that interference will not occur in particular installation. If this equipment
does cause harmful interference to radio or television reception, which can be determined by turning the equipment off and
on, the user is encouraged to try to correct the interference by
one or more of the following measures:
Shielded interface cables, if any, must be used in order to comply with the emission limits.
To avoid risk of explosion, only install batteries recommended
for this device. Recycle used batteries according to local government laws or guidelines.
CE NOTICE
Class A only.
●● Reorient or relocate the receiving antenna.
●● Increase the separation between the equipment and receiver.
●● Connect the equipment into an outlet on a circuit different
from that to which the receiver is connected.
●● Consult the dealer or an experienced radio/television
technician for help.
ix
Overview
Chapter 1
Introduction
Introduction
Target, Engage, Inform, Influence
with iSignager Easy Publishing Suite
In today’s fast paced business environment it’s more difficult
than ever to get your organization’s message across. With customers and potential customers bombarded by print ads, brochures, websites, emails, blogs, and social networks, how do
you grab their attention?
Impact With digital signage strategically placed, for example
where people wait in line, you can engage your audience more
easily than in environments where people are busy with multiple other tasks. Digital signage entertains and helps to make
waiting time go faster, adding to customer satisfaction.
Many organizations have discovered the value of digital signage placed strategically in retail, hotel, health care, airport,
education, restaurant, and other environments for pushing
through the noise and engaging their audience. With digital signage you can engage customers - existing and potential - at the
right place with the right information at the right time.
Time to Market Compared to printed and Web content, digital signage content is faster to create and more affordable. As
you gather more information about your customers and their
responses to your digital signage messaging you can quickly
and easily tweak, transform and create new messaging that
has even more impact better than before.
Reach Studies show that more people actually come into contact with digital signage than with the Internet, or Facebook. Even
those who know nothing about digital media or the Internet can
be reached with digital signage.
How Does Digital Signage Work?
Targeting You can place digital signage messages directly in
front of the customer at the time and place he or she is ready to
take action, such as making a purchase or catching a flight. You
can target your digital signage messages to time of day, place,
and customer need, alerting customers to promotions in a retail
environment, for example as they wait in line to pay at the register.
Influence Studies also show that people actually take action
in response to digital signage. Almost one in five respondents
said they made an unplanned purchase after seeing an item
featured on a digital signage screen. Aside from motivating pur1-1
Overview
chases, digital signage is also very effective in providing critical
information in traveling, health care, and other environments
and training in environments such as factory floors and health
care facilities.
Style Digital signage gives your business a contemporary,
cutting edge image among consumers, particularly using eyecatching technology such as video walls, which combine several digital signage displays to form a single giant display.
1-2
Features
Features
Note:
Design - iArtist
(*1, *4): Available on iS-1500, iS-1600, iS-1620, and
iS-2800
●● Multiple zone layout
■■ Video: Support MPEG-1/2/4, WMV9, VC-1 video formats
(*2, *3): Available on iS-1600, iS-1620, and iS-2800
■■ Audio: Support MPEG-1, MP3, WMA, WAV
Content Display
■■ Image: Support BMP, JPEG, PNG
●● Dynamic layout: Controlled by pre-defined schedule,
dynamically controlled by triggers through API (*1)
■■ Text: Support messages from text strings, text files
and RSS with adjustable scrolling speed
●● High resolution display: Support Full-HD to Ultra-HD
output with adjustable monitor orientation (0, 90, 180,
270) (*2)
■■ Flash: Supports Flash 8.0
■■ Clock
●● Multiple displays: Connected monitors can be configured as a clone, independent and extended large canvas
,depending on the layout design and monitor configuration, and resolution can be changed dynamically. (*3)
●● Digital: Display real-time clock with date
●● Analog: Display legacy clock with various clock
templates
●● Video wall integration: Highly integrated with QNAP
Video Wall product lines. Video wall configuration can be
controlled by iSignager players.
●● Multiple clocks: Multiple clocks can be defined
with different time zones
●● Layout templates
●● Real-time RSS from internet: Instant RSS can be delivered to the connected target displays within seconds.
■■ System pre-loaded templates make it easy and quick
1-3
Overview
■■ Player and player group listing
to start the design
●● Player management
■■ User-definable templates make the teamwork more
efficient
■■ Local network scan: Players can be easily located in
the intranet for content publishing and management
●● Playlist scheduling: Media files in the playlist can be
configured by loop counts and durations, and scheduling
can be done by the elegant drag-and-drop timeline control interface
■■ Player grouping: Players can be grouped for content
publishing and player management
■■ Time synchronization: Players can synchronize
system time with NTP server
Scheduling - iScheduler
●● Publish status: List with iSignager players’ plan transfer
status
●● Calendar view: Schedule layouts in the calendar view as
time of day and day of week
●● Schedule templates: System pre-defined usage scenarios for different vertical applications, Simply drag and drop
the schedule template to the target calendar
●● Direct publish: Scheduled plan can be published directly
to the specific iDS-Player under small scale deployments
Management - iCommander
●● Dashboard
■■ Player status summary on connections, playback status, monitor status
■■ Alerts on storage capacity, over temperature and system fan failure
1-4
iSignage
Software Components
iSignage Software Components
iCommander
A
iCommander is a administration software which provides player
management features, such as player status, network status,
player and system settings, log reports, etc. The dashboard delivers essential information for routine check, and you can find
the detailed information to maintain the whole system in just a
few steps.
B
D
Dashboard Panel
C
Building a digital signage network is usually the easy part. However, running a system successfully day after day requires constant vigilance. All of those screens and signage players need
a watchful eye just in case something goes wrong. The dashboard panel feature gives you the proactive tools that enable
you to monitor a digital signage network conveniently on your
computer.
E
Figure 1-1. Dashboard Panel
1-5
Overview
Table 1-1. Dashboard Panel
FEATURE
Player Status Panel
DESCRIPTION
A
Dashboard Button
Shows the dashboard panel
B
Online/Offline Player
Shows a list of online and offline signage
players
C
Player Error
Shows the player error status for the players
D
Player Playback Status
Shows the player playback status
E
Today’s Publish
Shows today’s publishing status
The real-time and check-in status from the player for monitoring the player health in your network by player health status
monitoring.
A
D
C
B
Figure 1-2. Player Status Panel
Table 1-2. Player Status Panel
FEATURE
1-6
DESCRIPTION
A
Player Status Button
Shows the player status panel
B
Player Status Panel
Shows a list of signage players
C
Property
Shows the basic and advanced properties of a selected signage player
D
Pin Icon
Pin the panel to occupy a specific screen
area or unpin to hide the panel
iSignage
Player Monitor Panel
Software Components
Command Task Panel
A
A summary of a player’s real time information and configuration.
A
B
B
Figure 1-4. Command Task Panel
Figure 1-3. Player Monitor Panel
Table 1-4. Command Task Panel
FEATURE
Table 1-3. Player Status Pane
FEATURE
DESCRIPTION
A
Player Monitor Button
Shows the player monitor panel
B
Player Monitor Panel
Shows a list of signage players
1-7
DESCRIPTION
A
Command Task Button
Shows the command task panel
B
Command Task Panel
Shows a list of command tasks
Overview
Log Viewer Panel
Publish Status
Provide the detailed player logs, including the system logs and
playback related information.
Arrange the player management command set, such as scheduling on/off and removing media files.
A
A
B
C
D
B
Figure 1-5. Log Viewer Panel
Figure 1-6. Publish Status Panel
Table 1-5. Log Viewer Panel
FEATURE
Table 1-6. Command Task Panel
DESCRIPTION
FEATURE
DESCRIPTION
A
Log Viewer Button
Shows the log viewer panel
A
Publish Status Button
Shows the publish status panel
B
Start/Stop Date Picker
Shows the start and stop dates for the list
of log events
B
Publish Status Panel
Shows a list of published plans and players associated with the plans.
C
Player and Level Drop- Shows signage players monitored by the
Down Lists
server and a list of possible event levels.
D
Log Viewer Panel
Shows a list of log events
1-8
iArtist
iArtist
Menu Bar Buttons
iArtist is a powerful and flexible layout design tool. End users
can use iArtist to design a multi-zone layout and define file playback sequences, timing, and transition effects. In addition, end
users can use the intuitive drag-and-drop operation to create
their own templates or layouts. The timeline view lets end users
define playlists intuitively.
File Management
A
B
C
File Management Menu Bar Buttons
Table 1-7. File Management Menu Bar Buttons
FEATURE
Figure 1-7. iArtist Components Overview
1-9
DESCRIPTION
A
New Layout
Creates a new layout on the canvas
B
Load Existing Layout
Shows the Open Layout dialog
C
Save Current Layout
Shows the Save Current Layout dialog
Overview
Font Style and Alignment
Canvas Panel
D
A
C
B
D
C
C
Figure 1-8. Font Style and Alignment Menu Bar Buttons
Table 1-8. Font Style and Alignment Menu Bar Buttons
FEATURE
DESCRIPTION
A
Font Family
Set the font family name
B
Font Style
Set the font style
C
Font Size
Set the font size
D
Character Alignment
Set the horizontal and vertical character
A
B
Figure 1-9. Canvas Panel
Table 1-9. Canvas Panel
FEATURE
1-10
DESCRIPTION
A
Canvas Area
Area on the panel where the template is
created
B
Template Area
Area on the panel where components are
added to the template
C
Rulers and Guides
Horizontal and vertical rulers with markers
to show the current mouse position
D
Pin Icon
Pin the panel to occupy a specific screen
area or unpin to hide the panel
iArtist
Tools Panel
Preview Panel
D
C
A
A
B
B
E
C
Figure 1-11. Tools Panel
Figure 1-10. Tools Panel
Table 1-11. Tools Panel
Table 1-10. Tools Panel
FEATURE
A
Show/Hide Tools
Show or hide the template media tools
B
Tool Icon
A media tool used to build templates
Pin Icon
Pin the panel to occupy a specific screen
area or unpin to hide the panel
C
FEATURE
DESCRIPTION
A
Preview Window
Preview the video and image media in the
repository
B
Video Timestamp
Shows the current and ending time of the
preview video
C
Play/Pause Button
Play or pause the preview video
D
Pin Icon
Pin the panel to occupy a specific screen
area or unpin to hide the panel
E
Frame Position Slider
View or change the current frame in the
preview window
DESCRIPTION
1-11
Overview
Media Repository Panel
Playlist Panel
B
B
A
D
C
E
A
Table 1-12. Tools Panel
Figure 1-13. Tools Panel
FEATURE
DESCRIPTION
A
Media Type Lists
Shows the available media organized by
type
B
Pin Icon
Pin the panel to occupy a specific screen
area or unpin to hide the panel
Import Media Button
Shows the file browser to select media for
the repository
Delete Media
Removes media objects from the Media
Repository
D
F
C
Figure 1-12. Tools Panel
C
D
Table 1-13. Tools Panel
FEATURE
DESCRIPTION
A
Playlist Name
Shows the names of the playlist media objects
B
Lock
Enable/disable the playlist media object to change position
C
View
View/hide the playlist media object
D
Timeline
Show the length and current timeline position of the
playlist media object
Shows media objects against the timeline and other playlists.
1-12
E
Media Object
F
Pin Icon
Note:
If several media objects are placed in one playlist, each
one can have its duration and order changed.
Pin the panel to occupy a specific screen area or unpin
to hide the panel
iArtist
Properties Panel
A
Zoom Control Panel
E
E
B
B
C
F
A
C
D
D
Figure 1-15. Zoom Control Panel
Table 1-15. Zoom Control Panel
Figure 1-14. Properties Panel
FEATURE
Table 1-14. Properties Panel
FEATURE
DESCRIPTION
A
Show/Hide
Window
DESCRIPTION
Preview Show/hide the zoom control preview window
B
Zoom Control Slider
Set the zoom control value
Layout Name
Shows the name of the current layout
C
Current Canvas
Shows the size of the current canvas
Property Category
Shows the title of a media object property
category
D
Zoomed Canvas
Shows the size of the zoomed canvas
E
Zoom Control Value
Property
Shows the name of a media object property
Shows the zoom control value as a percentage of the original size
D
Property Value
Shows the value of a media object property
F
E
Pin Icon
Pin the panel to occupy a specific screen
area or unpin to hide the panel
A
B
C
1-13
Pin Icon
Pin the panel to occupy a specific screen
area or unpin to hide the panel
Overview
iScheduler
iScheduler is a full range scheduling tool for layout playback.
This software supports hourly, daily, weekly, and monthly
based scheduling. A scheduling template is provided so that
the time-slot view and calendar lets end users easily schedule
their layout plan for different groups of players. The time-slot
view creation represents the layout and monitoring schedule.
End users can assign any kind of layout into the time slot. In
addition, the property of each time slot assigned to a layout
has a looping or time mode to determine how long you want
your advertisements to run. End users can use the calendar to
change the target time period easily.
Figure 1-16. iScheduler Components Overview
1-14
iScheduler
Menu Bar Icons
Calendar Panel
E
File Management
B
B
A
A
C
D
E
File Management and Options Menu Bar Icons
C
Table 1-16. File Management and Options Menu Bar Icons
FEATURE
DESCRIPTION
A
Create New Schedule
Creates a new schedule
Button
B
Load Button
Shows the Load Plan dialog
C
Save Button
The Save submenu saves the current
schedule.
D
Export Schedule to Lo- Exports the contents of a plan to the file
cal Disk Button
system
E
Publish
F
Figure 1-17. Calendar Panel
Shows the plan publish dialog
1-15
D
Overview
Table 1-17. Calendar Panel
FEATURE
A
Layout Panel
DESCRIPTION
Calendar Options
Shows the calendar options dialog
B
Date Setting Controls
Controls the date range of
what is shown in the calendar area
C
Calendar Area
Shows the current schedule plan
D
This Week
Sets the calendar area to show the current
week’s contents
E
Pin Icon
Pin the panel to occupy a specific screen
area or unpin to hide the panel
F
Schedule Area
Shows an individual schedule in the plan
D
A
B
C
Figure 1-18. Layout Panel
Table 1-18. Layout Panel
FEATURE
1-16
DESCRIPTION
A
Layouts
Shows a list of available layouts
B
Layout Duration
Shows the time length of a selected layout
C
Refresh Button
Refresh the list of layouts
D
Pin Icon
Pin the panel to occupy a specific screen
area or unpin to hide the panel
iScheduler
Template Panel
Preview Panel
B
B
A
A
Figure 1-20. Preview Panel
Figure 1-19. Template Panel
Table 1-20. Preview Panel
Table 1-19. Template Panel
FEATURE
A
B
Templates
Pin Icon
FEATURE
DESCRIPTION
Shows a list of available schedule templates
Pin the panel to occupy a specific screen
area or unpin to hide the panel
1-17
DESCRIPTION
A
Preview
Shows a preview of the current layout
B
Pin Icon
Pin the panel to occupy a specific screen
area or unpin to hide the panel
Overview
Plan Panel
Schedule Property Panel
D
C
2012 - 07
S M
T W T
F S
A
A
B
B
C
Figure 1-22. Schedule Property Panel
Table 1-22. Schedule Property Panel
Figure 1-21. Plan Panel
FEATURE
DESCRIPTION
A
Schedule Property
Shows the details of the current schedule
property
Table 1-21. Plan Panel
FEATURE
DESCRIPTION
A
Calendar
Shows a calendar to help to navigate the
calendar area of the calendar pane
B
Property Field Name
Shows the property field name of the current schedule plan
B
Plan Details
Shows the details of the current schedule
plan
C
Pin Icon
Pin the panel to occupy a specific screen
area or unpin to hide the panel
C
Plan Name
Shows the name of the current schedule
plan
D
Pin Icon
Pin the panel to occupy a specific screen
area or unpin to hide the panel
1-18
Getting Started
Chapter 2
Getting Started
Requirements
Software
2. Click Next to continue or Cancel to abort.
Note:
3. Click the checkbox(es) to select the components to install.
The iSignage software must be installed on a Windows
7 or Windows Vista PC.
1. Insert the iSignage CD in a CDROM drive to browse and launch the installation software.
Figure 1-2. iSignage Installation (2 of 7)
Figure 1-1. iSignage Installation (1 of 7)
2-1
Requirements
4. Click Next to continue, Back to view the previous screen
or Cancel to abort.
6. Click Next to continue, Back to view the previous screen
or Cancel to abort.
5. Enter the installation directory in the text box or browse
for a folder to install the application.
7. View the progress bar until the installation is complete.
Figure 1-4. iSignage Installation (6 of 7)
Figure 1-3. iSignage Installation (3 of 7)
2-2
Getting Started
8. Click Reboot now to automatically reboot the computer
after the installation or I want to manually reboot
later to reboot at a later time.
Figure 1-5. iSignage Installation (7 of 7)
9. Click Finish to complete the installation.
2-1
First Time Use
First Time Use
Add a Signage Player
2. Click the iCommander icon to show the iCommander
screen.
1. Run iSignage.exe from the Windows Start menu.
Figure 1-7. iCommander Screen
Figure 1-6. iSignage Software Application
2-4
Getting Started
3. Click the Player Status button to show the player status panel.
4. Click Scan to scan the network for signage players.
Figure 1-9. Player Scan Dialog
Figure 1-8. Player Status Panel
2-1
First Time Use
6. In the Register Player dialog, enter the server’s username
and password.
5. When the application finds a signage player, select one in
the list and click Add.
Figure 1-11. Register Player Dialog
Figure 1-10. Scan Signage Player Dialog
7. Click OK to save the changes or Cancel to abort.
8. In the Player Scan dialog, click Close to return to the
Player Status screen. (Figure 1-9)
2-6
Getting Started
Create a Layout
6. Click on Refresh rate to select a refresh rate for the
display device.
1. Click the iArtist tab to show the iArtist screen. The Create New Layout dialog will automatically show up.
Note:
Refresh rates vary depending on the player models.
7. Click on Landscape or Portrait to set the layout rotation.
8. Click OK to close the dialog and show the layout canvas.
Figure 1-12. Create New Layout Dialogue
2. Enter a name for the layout in Layout name.
3. Enter a description of the layout in Layout description.
4. Click on Target player model to select a player device.
Figure 1-13. iArtist Layout Canvas
5. Click on Layout resolution to select a supported
resolution (varies depending on the player model).
2-7
First Time Use
Publishing a Schedule
Note:
Prerequisite:
Media can be added directly from a the file system or
the application media repository. The media repository
is more efficient to be used to create a layout ,which is
the recommended option.
A player must be available and set up to publish schedules.
1. Click iScheduler to show the scheduler component.
Note:
When the iScheduler component is first opened the di
alog is shown.
9. Design a layout by adding media to the canvas section of
the screen.
10.Click the Save current layout icon
Save Current Layout dialog.
to show the
11.Click OK to save the layout or Cancel to abort saving
changes.
Figure 1-14. iScheduler Component
2-8
Getting Started
3. Click Switch to Weekly Repeat Mode to schedule
a weekly cycling of this plan.
2. Enter a name for the schedule plan in Plan Name.
4. Click Template to enable selecting schedule templates
and select a predefined schedule in the drop-down
5. Enter a description for this plan. This is recommended to
help in organizing your schedules.
6. Click OK to save the schedule plan or Cancel to abort
saving changes.
7. Click the Publish icon
a player.
Figure 1-15. New Plan Dialog
Note:
After switching the plan to weekly repeat mode, switch
ing back to normal mode is not allowed
2-1
to publish a schedule plan to
iCommander
Chapter 3
Using the Dashboard
Using the Dashboard
Online/Offline Players
Displays the online and offline players.
Plans History List
Displays the plans published as of the current day.
Player Playback Status
Displays the current playback status of players monitored by
the iSignage server.
Player Error
Displays the error status for players monitored by the iSignage
server.
Figure 1-1. Dashboard Panel
3-1
iCommander
Player Management
Adding Players
2. Click Scan to scan the network for signage players.
1. Click the Player Status button to show the player status panel.
Figure 1-3. Player Scan Dialog
Figure 1-2. Player Status Panel
3-2
Player Management
3. Select a signage player from the list and click Add.
4. In the Register Player dialog enter the player’s username
and password.
Note:
The default username is admin and the default pass
word is signage.
Figure 1-4. Scan Signage Player Dialog
Figure 1-5. Register Player Dialog
5. Click OK to save changes or Cancel to abort.
6. In the Player Scan dialog click Close to return to the
Player Status screen.(Figure 3.2.3)
3-3
iCommander
1. Click the Player Status button to show the player status panel.
Note:
After adding a player to the system, the initial registra
tion status is UN-REGISTERED. After several seconds,
the status should change to REGISTERED. If the status
does not change, click the refresh button. If the status still does not change, make sure the correct player
username and password have been used.
Deleting Players
Deleting a player removes a player from the iSignager server.
The player is no longer accessible for management.
Figure 1-6. Player Status Panel
Note:
The maximum number of players an iSignager server
can manage is 25.
2. Select a signage player from the list on the Player Status
panel.
3. Click Delete.
4. On the confirmation dialog, click Yes to confirm deletion,
or No to abort.
3-4
Player Management
Modifying Basic Properties
Modifying Player Properties
1. Click the Player Status button to show the player status panel.
1. Click the Basic tab of the Property panel.
Figure 1-7. Player Status Panel
2. Select a signage player from the list on the Player Status
panel.
Figure 1-8. Signage Player Basic Properties
2. Select one of the following properties to edit:
3-5
iCommander
Modifying Advanced Properties
Table 1-1. Signage Player Basic Properties
PROPERTY NAME
DESCRIPTION
Name
Name of the signage player
Group
The group that the signage player belongs to
Model
The signage player’s model name
Description
A description of the signage player
IP
Default Layout
Registration
1. Click the Advanced tab of the Property panel.
IP address of the signage player
The default layout used when a player does
not have a layout assigned to it
Registration status of the signage player
Figure 1-9. Signage Player Advanced Properties
2. Select one of the following properties to edit:
3-6
Player Management
Table 1-2. Signage Player Advanced Properties
PROPERTY NAME
DESCRIPTION
Login
ID The username for the iSignager server
Login
Password The password for the iSignager
server
Server IP
NTP
Grouping is a convenient way to manage players that serve a
single purpose , such as displaying media on a single floor of a
shopping mall.
1. Click the Player Status button to show the player status panel.
IP address of the iSignager server
The IP address of the network time protocol
(NTP)
Time Zone
The time zone of the signage player
Daylight Saving
Enable/disable daylight saving time
Heartbeat Interval
Creating Groups
A player sends a heartbeat packet to the
iCommander to inform the server that it is still
active. The default interval is 10 seconds.
Figure 1-10. Player Status Panel
3-7
iCommander
2. Click Player Group to show the Player and Group
dialog.
3. Click New Group to create a new group entry.
Figure 1-12. New Group
Figure 1-11. Player and Group Dialog
4. Click on the new group name to change the value.
5. Click Save to save the changes or Undo to abort.
3-8
Player Management
2. C lick Player Group to show the Player and Group
dialog.
Removing Groups
1. Click the Player Status button to show the player status
panel.
Figure 1-14. Player and Group Dialog
Figure 1-13. Player Status Panel
3-9
iCommander
3. Click on a group name in the Groups list.
Figure 1-15. New Group
4. Click Remove Group.
5. Click Save to save the changes or Undo to abort.
3-10
Monitoring Players
Monitoring Players
Table 1-3. Player Monitor Properties
PROPERTY NAME
1. Click the Player Monitor button to show the player
monitor panel.
DESCRIPTION
Name
The signage player
Mode
The signage player model name
Group
The group that the signage player belongs to
IP
The IP address of the signage player
A player sends a heartbeat packet to iCommander to inform the server that it is still active.
The default interval is 10 seconds.
Last Heartbeat
Note:
If iCommander has not received a heartbeat for
30 seconds, it will change the connection status
to OFFLINE.
CPU Utilization
Figure 1-16. Player Monitor Panel
2. Select a signage player in the list to view the following
properties.
System Temperature
The system temperature of the signage player
Storage Usage (MB)
The total storage amount and the amount used
by the signage player
Storage Usage (%)
The % of total storage used by the signage
player
FW Version
3-11
The % of the CPU utilized by the signage player
The signage player’s firmware version
iCommander
Task Management
2. Click New to show the new command dialog.
iCommander sends out commands to players to perform remote tasks such as rebooting, turning on or off schedules, etc.
Creating Commands
1. Click the Command Task button to show the command
task panel.
Figure 1-18. New Command Dialog
3. Select a signage player in that player list.
Figure 1-17. Command Task Panel
3-12
Task Management
4. Select a command from the Command drop-down list.
Note:
If the action type is Once, enter an Execution Date.
If the action type is Task Management, select Repeat
Type and enter an Execution Date.
6. Click Save to save the new command task or Cancel to
abort.
Note:
Figure 1-19. Command Dropdown List
The commands Reboot and Shutdown can only be
used with the Action Type ASAP.
Note:
5. Select the Action Type.
The main use of the commands Power On and Power
Off are for scheduling the player for optimal power consumption.
Note:
The command Delete out-dated content deletes outdated content on the player.
Note:
The command Delete all content deletes all plan and
media content on the player.
Figure 1-20. Action Type Radio Button List
3-13
iCommander
Deleting Commands
1. Click the Command Task button to show the command
task panel.
Figure 1-21. Command Task Panel
2. Select a command task in the task list.
3. Click Delete.
4. In the confirmation dialog, click Yes to confirm deletion,
or No to abort.
3-14
Log Status
Log Status
Searching for Logs
1. Click the Log Viewer button to show the log viewer
panel.
2. Click Start Date picker to select a starting date for the
search.
Figure 1-23. Start Date Picker
Figure 1-22. Log Viewer Panel
3-15
iCommander
3. Click End Date picker to select an ending date for the
search.
PROPERTY NAME
DESCRIPTION
There are three log event levels:
● Info: player operates normally
Level
● Warning: playback has encountered a hardware
limitation.
● Error: playback is inconsistent, and failure or
player shutdown may occur.
Level Name
Name of the log event level
There are four log event categories:
● System: Booting, rebooting or network and storage related system events
Category
● Task: Receive, run and report task status to the
iCommander
Figure 1-24. End Date Picker
4. Click the search button
● Signage: playback related information
● Publish: Report the plan transition status
to run the search.
5. View the following log event properties in the log event
list
Date
Date of the log event
Time
Time of the log event
Name
Signage player name
Group
Signage player group
IP
Event ID
Error Status
3-16
Signage player’s IP address
Log event ID
Log event error status.
Publishing Status
Publishing Status
A plan can be published to multiple players. The status of each
player linked to a plan can be seen in the rows under the plan.
Table 1-4. Publishing Status Property List
PROPERTY NAME
1. Click the Publish Task button to show the publish status panel.
DESCRIPTION
Plan Name
Schedule plan name
Description
Schedule plan description
Send Time
Sending time of publishing a schedule plan
Expire Time
A plan must finish being published before
starting being play back. The system determines when the plan expires.
Transfer Status(Progress
Bar)
Visual display of the transfer ring status
Table 1-5. Signage Player Publishing Status
PROPERTY NAME
Model Name
Signage player model name
Player Name
Signage player name
Detailed Transfer Status
Figure 1-25. Publish Status Panel
Error Status
2. View the following publishing status properties in the publishing status property list.
3-17
DESCRIPTION
Details of the transfer ring status
Status of publishing error(s)
Layouts and Templates
Chapter 4
Creating Layouts and Templates
Creating Layouts and Templates
Creating a Canvas
Creating a canvas is a two-step process that involves defining
the properties of a target device and adding the content to be
published.
Defining a Device for iArtist
It is necessary to define the properties of a device where the
layout is published in order to correctly display the content.
Setting Device Layout Properties
Set the layout properties to define the parameters that work
with the target player and monitor(s).
Figure 1-1. Create New Layout Dialog
1. Enter a name for the layout in Layout name.
2. Enter a description of the layout in Layout description.
3. Click on Target player model to select a player device.
Note:
If a specific target player model does not appear in the
drop-down list, click the link Not in List? for more
information.
4-1
Layouts and Template
Working with the Content
4. Click on Layout resolution to select a target resolution for the display device.
The canvas in iArtist shows exactly what is seen by the viewer
on the player monitor. Add video, audio, static text, banners
(dynamic text), Flash media, and RSS feeds to the canvas to
build dynamic layouts.
Note:
Only the layout resolutions that are supported for a
chosen device will be displayed in the drop-down list.
To see a complete list of resolutions, click Other resolutions.
!
There are two ways to make media objects available in the
iArtist: the media repository and the tools panels.
WARNING!
Building a Media Repository
Check with the monitor’s specification sheet to choose
a compatible resolution. Using an incompatible resolution can cause screen distortion.
The Media Repository provides an interface to the media objects accessible to the iSignager server application.
5. Click on Refresh rate to select a refresh rate for the
display device.
Importing Media to the Repository
To add a media object to the repository, follow these steps:
Note:
1. Click Import Media to show the media import dialog.
It is recommended to choose Auto from the dropdown
list.
Note:
Enable video wall output is not supported by
the iS-1500.
Figure 1-2. Import Media
4-2
Creating Layouts and Templates
2. Click on a media object in the file browser.
Removing Media from the Repository
a. To remove a media object from the repository, follow
these steps:
1. Click on a media object in the repository.
Figure 1-4. Delete Media
Figure 1-3. Media Import Dialog
Note:
The iSignage repository manages media objects and
stores the relevant information, such as codec, EXIF
and other metadata, in its database. The repository can
recognize duplicate media objects and only store one
instance.
2. Click Delete Media to display the Delete Confirmation
dialog.
3. Click Yes to confirm deletion, or No to abort.
3. Click Open to add the object to the repository.
4-3
Layouts and Template
Adding Media to a Canvas
A widget to display scrolling text content from an RSS feed.
Adding media to a layout is done by dragging and dropping
media objects from the Tools panel or the Media Repository to
a canvas.
Adding Media from the Tools Panel
To add media objects or widgets from the Tools panel to the
canvas, follow these steps:
1. Click and hold an icon in the tools panel.
Working with the Tools Panel
The Tools panel contains video, image, and audio media objects as found in the Media Repository, and also the following
widgets:
●● Analog and digital clocks
●● Background image
A transparent image which lays beneath other media objects and widgets. Its z-order is zero (0).
Figure 1-5. Tools Panel
●● Mask
Note:
An image used to overlay other media objects and widgets. Its
z-order is twenty (20).
Each tool has different properties to configure, so the
initial setup procedure varies.
●● Text
A widget to display static text content.
2. Drag and drop the icon to a location on the canvas.
●● Banner
3. Enter the configuration properties to set up the media object or widget.
A widget to display scrolling text content.
●● Video, Image, Background audio, and Adobe Flash files:
●● RSS
4-4
Creating Layouts and Templates
●● RSS
Click a media object in the file browser and click Open to
close the dialog.
Double click the widget to display the URL Editor dialog
and enter an RSS feed. Click OK to close the dialog. Refer to “Working with the Properties Panel” for an alternative method of changing the URL property.
●● Analog and digital clocks
Refer to Working with the Properties Panel to change the
date and time.
●● Background image
On the Select Background dialog, click one of the four
tabs below to configure, and click OK to close the dialog:
Adding Media from the Repository
To add media objects from the Media Repository to the canvas,
follow these steps:
■■ None: Set the background to nothing.
■■ Solid: Use the solid color picker tool to choose a color.
1. Click and hold a media object in the repository panel.
■■ MS Office: Use the MS Office color picker tool to
choose a color.
■■ Image: Set image from the media repository as the
background.
●● Mask
Figure 1-6. Tools Panel
On the Select Mask dialog, click a masking image and
click OK to close the dialog.
2. Drag and drop the media object to a location on the canvas.
●● Text, Banner
3. Click a media object in the file browser and click Open to
close the dialog.
Double click the widget to display the Text Editor dialog
and enter the custom content. Click OK to close the dialog. Refer to “Working with the Properties Panel” for an
alternative method of changing the text property.
4-5
Layouts and Template
Working with Media on a Canvas
Tools Panel or Media Repository?
The media repository and the tools panels provide essentially
the same functionality so either of them can be used to work
with the content. The media repository is more efficient to use
when working with the content that is often used. Accessing
media objects is convenient and there is a slight performance
improvement when adding the content to a canvas. The Tools
panel contains widgets as well as media objects. A widget is
not linked to a resource on a the file system, so there are no
performance issues when adding one to a canvas.
Managing a group of media objects and widgets to work together to present the content in a coherent and logical manner
requires using the preview, playlist, properties and zoom control panels.
Working with the Preview Panel
The preview panel displays the media content from video, image, audio, and Flash objects. The content is viewed in the
preview window and managed using the play button and position slider. The current and total time can be seen below the
preview window.
Working with the Properties Panel
The properties panel allows access to setting specific features
of a media object or widget. Some properties can only be set
using the properties panel while for others, an alternative editing option is provided. For example, changing the content in a
text widget can be done by opening a text editor dialog ,which
can also be accomplished by clicking on the text item in the
properties panel.
In situations where small changes are required, such as minor
changes to an object’s position, using the properties panel is a
better option.
For widgets that contain font style and text alignment proper-
4-6
Creating Layouts and Templates
ties, another option is using the “Font Style and Alignment”
toolbar. Refer to Font Style and Alignment for a more detailed
description of the toolbar.
Working with the Zoom Control
The zoom control panel allows enlarging or decreasing the size
of the editable area of a canvas. The size of the zooming area
is controlled by the zoom control slider. The zooming range is
from 25% to 500%. The specific location of the editable area in
context to the entire canvas is displayed as the red box in the
zoom control preview window.
Figure 1-7. Creating a Playlist
Working with the Playlist Panel
The playlist panel organizes media objects and widgets as separate playlists. A playlist displays a media object, or a sequence
of media objects, against the timeline and other playlists to help
in setting the sequence, duration and visibility of objects.
2. Click on a second media object and drag and drop it onto
the first media object.
3. When the Add into playlist dialog is displayed, click Yes
to add the media object to the first playlist.
A useful feature of the playlist is to manage a series of media
objects as a single entity while still allowing each object to be
configured independently within the queue.
Note:
Click No to create a new playlist.
To create a playlist with multiple media objects, follow these
steps:
1. Click on a media object or widget in the Tools panel or
Media Repository, and drag and drop the object onto the
canvas.
4-7
Layouts and Template
Figure 1-8. Add into Playlist Dialog
4. To change the duration of a media object, select the object in the playlist and drag one of its four corner handles
rightward or leftward along the timeline by the mouse.
Changing the Duration of a Media Object
5. To change other properties of a media object, select the
object in the playlist and edit the properties in the Properties panel.
4-8
Scheduling
Chapter 5
Creating Plans and Schedules
Creating Plans and Schedules
Start with a Plan
Templates
The template name used to specify a collection of predefined
and organized schedules.
A plan is a collection of schedules that define when and how
often layouts are played on the remote devices.
What’s in a Plan?
Plan Description
A description of the plan to better define its purpose to other
users.
The following items are used to create a plan.
Plan Name
The plan name is used to identify a plan for editing and when
publishing to a device.
Weekly Repeat Mode
To set the plan parameters, such as start and end time, priority,
layout list, and the day-of-week repeat frequency to automatically repeat indefinitely, enable Weekly Repeat Mode.
Note:
No calendar date set, when Weekly Repeat Mode is
enabled.
5-1
Scheduling
Creating a Plan
To create a new plan, follow these steps:
1. Click Create a New Plan button
Plan properties dialog.
2. Enter a name for the schedule plan in Plan Name.
to display the
Note:
After switching the plan to weekly repeat mode, switching
back to normal mode is not allowed
3. Click Switch to Weekly Repeat Mode to repeat the
plan schedules every week.
4. Click Template to enable selecting schedule templates.
5. Click the schedule template drop-down list to select a
schedule template.
6. Enter the description of the plan template in Plan Description.
7. Click OK to save the schedule plan or Cancel to abort
saving changes.
Figure 1-1. Plan properties Dialog
5-2
Creating Plans and Schedules
The Calendar Panel: iScheduler’s Canvas
Working with Schedules
Schedules are the main components of a plan. They contain
the layouts and the playing schedule for the layout content.
The calendar panel is the main working area for creating and
managing plan schedules. The content is added from the layout and template panels and managed with the preview, plan,
and schedule property panels. See “Calendar Panel” for the
detailed description.
Creating a Schedule
There are two ways to create a schedule: using templates provided with iScheduler, and creating them individually on the calendar panel.
Calendar Options
Creating Schedules with iScheduler Templates
To create a schedule with iScheduler’s templates, follow these steps:
Nighttime time blocks and holidays are defined in the calendar
options dialog.
1. Click on a template in the list of Template panel and drag
it to the calendar area.
Date Setting Controls
Date setting controls are used to control the current view of
the calendar area. The date range can be view. The plus and
minus (+/-) controls can be applied to set the daily time interval
by hour, half-hour, quarter-hour, etc.
This Week
Clicking on This Week icon
area to the current week.
will set the calendar viewing
Calendar Area
The calendar area displays the schedules and layouts that
make up the current plan.
Figure 1-2. Template Panel
2. On the Template to Plan dialog, define the start and end
dates using the calendar controls.
5-3
Scheduling
1. Select a time range on the calendar panel.
Figure 1-3. Template to Plan Dialog
Figure 1-4. Calendar Panel Time Range
3. Click OK to close the dialog and apply the new schedule.
2. Right click on the highlighted area to display a context menu.
Creating an Empty Schedule
If only an individual or custom schedule is required, create an
empty schedule instead of using a schedule template.
To create an empty schedule, follow these steps:
Figure 1-5. Calendar Panel Context Menu
3. Click the menu item Add Schedule to add a schedule to
the highlighted area
5-4
Creating Plans and Schedules
Modifying Schedules
The Plan Panel
The plan panel displays the plan properties such as plan name,
description, start and end date, and repetition mode.
Modifying existing schedules is necessary over time to deal
with the requirements of changing content. iScheduler provides
several tools to manage schedules. See “iScheduler” for a detailed description.
Note:
The plan start and end time are decided by the first and
last schedule.
The Layout Panel
The layout panel contains a list of layouts created with iArtist
that are available to iScheduler.
The Schedule Property Panel
The schedule property displays the currently selected schedule
properties, such as start and end dates, duration, layout name,
and repetition mode.
The Template Panel
The template panel contains a list of templates provided by
iScheduler. A template is a pre-populated schedule that occurs once or will be repeated. Using a template saves the time
required to manually create a schedule and edit the schedule
properties.
Changing Schedule Properties
To change the properties of an existing schedule, follow these
steps:
Note:
iScheduler templates can not be created by a user.
1. Right click, on a schedule area in the plan to show a context menu, or double click one schedule area to open the
Schedule Properties dialog directly.
The Preview Panel
The preview panel displays the layout currently selected in the
layout panel.
5-5
Scheduling
Figure 1-6. Schedule Area Context Menu
2. Click Property on the context menu to show the Schedule Properties dialog.
Figure 1-7. Schedule Properties Dialog
3. To change the start and end time, click the up and down
arrows at Start Time and End Time.
5-6
Creating Plans and Schedules
8. Click OK to save the new schedule properties or Cancel
to abort.
4. To change the priority setting, click the Priority drop-down
list and select Normal or High.
Note:
Note:
To change the repeat range values, Daily, Weekly or
Monthly must be selected in the Repeat section.
Setting the priority to high indicates the schedule will
take precedence over other schedules in the same
time period.
5. To change the current layout, click the drop-down list Layout List and select a new layout.
6. To change the repeat value, use one of the following
methods:
●● Click Daily and select a value from 1 day to 60 days
from the drop-down list, or
High Priority
●● Click Weekly and select the days of week using the
checkboxes. Click Reverse to unselect the checked
boxes and select the unchecked boxes.
Repeating Schedule
Figure 1-8. Repeating Schedule with High Priority
●● Click Monthly and enter a value from 1 to 31.
7. To change the repeat range, enter the start and end dates
in Start at and End at. Alternatively, use the calendar
controls to set the date values.
Note:
The default range is one week.
5-7
Scheduling
3. Click on the schedule and look at the Schedule Property
panel to view the changes.
Adding a Layout to an Empty Schedule
To add a layout to an empty schedule, follow these steps:
1. Click and hold a layout in the Layout panel.
Changing the Layout in a Schedule
To change the existing layout in a schedule, follow these steps:
1. Click and hold a layout in the Layout panel.
2. Drag and drop the layout on a schedule area of the calendar panel to display the Schedule Event dialog.
Figure 1-9. Layout Panel
3. Click Yes to replace the current layout with a new one.
2. Drag and drop the layout on a schedule area on the cal
endar panel.
Playing Multiple La youts in the Same Time Period
If more than one layout is added within a single time period
and each schedule has a normal priority, iSignager plays the
layouts by in the sequence they were added.
To add multiple layouts to the same time period, follow these
steps:
1. Click and hold a layout in the Layout panel.
Figure 1-10. Populating an Empty Schedule
5-8
Creating Plans and Schedules
2. Drag and drop the layout on a schedule area of the calendar panel to display the Schedule Event dialog.
Prioritizing Multiple Layouts played in the Same
Time Period
Setting the priorities of schedules played within the same time
period allows greater control of how and when layouts are
shown. When each schedule has a normal priority, they are
played in sequence within the time period. If one schedule is
set to high priority, only that schedule is played and the other
schedules are ignored.
3. Click No to create a new schedule with the layout in the
same time period.
To change the priority of a schedule, see “Changing Schedule
Properties”Properties”.
Figure 1-11. Multiple Layouts in the Same Time Period
4. To change the schedule properties, see “Changing
Schedule Properties”.
5. To add more layouts, repeat steps one through four.
Figure 1-12. Multiple Layouts of Different Priorities
5-9
Scheduling
Applying a Schedule Template
To apply a new iScheduler template to an existing schedule,
follow these steps:
1. Click on a template in the list of Template panel and drag
it to the calendar area.
2. In the Template to Plan dialog, define the start and end
dates using the calendar controls.
3. Click OK to close the dialog and apply the new schedule.
Figure 1-13. Calendar Option Dialog
Changing the Calendar View
Change the calendar panel view to customize the schedule
working environment. This is accomplished by using the date
setting controls.
2. Click Night to enable nighttime hours and set the start
and end values.
To customize the calendar panel view, follow these steps:
1. Click the Option
dialog.
icon to display the Calendar Option
5-10
Creating Plans and Schedules
granularity of time display on a daily basis.
Viewing Plan and Schedule Properties
To view the plan properties, either expand the Plan panel, or
use the scroll bar to scroll up and down the list. See Plan Panel
for a detailed description.
To view the schedule properties, click on a schedule and expand the Schedule Property panel. See “Schedule Property
Panel” for a detailed description.
Figure 1-14. Calendar Option Dialog
Publishing Your Work
To publish a plan to a target device, follow these steps:
3. To enter a holiday, follow these steps:
1. Click on the Publish
alog
a. Enter a holiday name and a corresponding date value.
b. Click New to add the holiday to the calendar.
2. Click on a player in the online players list.
4. Click OK to save changes, or Cancel to abort.
5. Click the Day
, Week
or Month
to display the desired date view.
6. Click Next or Previous
next or previous date range.
calendar icon
icons to navigate to the
7. Click the increase or decrease
icon to display the Publish di-
icons to adjust the
5-11
Scheduling
1. Click the Export Schedule to Local Disk
icon.
2. Locate the directory for the exported contents It is a subdirectory under the iSignage directory.
Note:
The naming convention of the directory for the exported contents is YYYY_MM_DD_HHMMSS. For example,
exporting a schedule on July 31, 2012 at 3:00:00 PM
would generate in a directory named \[iSignage
directory]\2012_07_31_150000\
3. Rename the directory as ndsimport.
Figure 1-15. Publish Dialog
4. Copy the ndsimport directory to a USB drive.
5. Insert the USB drive into a USB slot on the player.
3. Click Publish to start the publishing process.
6. The player starts to import the contents into the system.
4. Click Close to close the dialog or Cancel All Selected to abort.
Note:
It may take some time to import the content, depending
on the size of the media files.
The player will automatically start the begins playback after the
schedule and are is imported successfully.
Offline Player Content Update
An alternative apart from publishing the content to a player over
the network is to the update content offline using a USB drive.
5-12