1
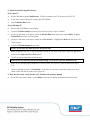
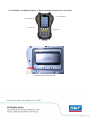
Microlog GX Series Firmware Upgrade and Module
Installation Procedure
This document details important firmware upgrade and module installation information not described in the
product user manual.
Overview
Two procedures are detailed in this document:
•
How to install additional modules to your current Microlog firmware (e.g., upgrading a GX-M to a GXS by installing the Recorder and Bump Test modules, or installing add-on modules such as RUCD or FRF).
•
How to upgrade your Microlog GX Series’ firmware.
Refer to the appropriate section for each procedure.
ActiveSync
Firmware upgrades and module installations to your Microlog are performed using Microsoft ActiveSync
synchronization software and the USB or IrDA connectors, or by using a PC card.
To download a free version of Microsoft ActiveSync, and for details on how to use ActiveSync, contact the
Microsoft Corporation via their website at www.microsoft.com. Run the ActiveSync installation program and
follow the on-screen instructions.
How to Install Additional Modules
Installing a module on the Microlog GX Series device is a two step process.
•
The module installation CD you were provided includes one or more module specific installation files that
have a .MSI filename extension. The first step is to run each .MSI file on your PC to create the module
“installers” on your local hard drive, then
•
Run these installers when there is an ActiveSync connection with the Microlog device to install the
purchased module on the Microlog.
Important!
Do not add/delete modules using Windows Explorer through ActiveSync since this will confuse the
ActiveSync program manager.
1
1. Create the module’s installer on the PC.
•
Insert the module installation CD in your PC’s CD-ROM drive. The installation program automatically
launches.
¾ If the install program does not run automatically, double click the Autorun.exe file on the
installation CD to manually launch the install program.
•
Select your language. The installation menu opens.
•
Select the Download Firmware link. A Windows Explorer window opens with the .MSI files found on your
CD. You will use these files to create the module “installers” on your PC’s hard drive.
•
Double-click on the appropriate MSI file to run it.
¾ If you have installed a previous version of the module you are installing, you are prompted to
uninstall the previous version before proceeding. Follow the onscreen prompts to uninstall the
previous module version, and then run the MSI file again.
•
Acknowledge the licensing agreement and click Next. The Instrument Configuration dialog displays,
where you select language versions to install.
•
You have the choice of creating installers for All languages, or a specific language plus English. Select the
desired language option and click Next.
¾ This language selection creates specific language versions of the module “installer” on the PC, after
which, you may select specific languages of the module to be installed on the Microlog. Note that if
you select All, you need not necessarily install all the languages on the Microlog.
•
Select Next at the Ready to Install the Application dialog to create the module’s “installer” on your PC.
•
Once the installation process is complete, select Finish.
2. Run the “installer” to install the module on the Microlog GX.
On the Microlog GX
•
Open the Setup screen and press the 0 (shift) and F1 (Extn Mgr) keys simultaneously to display the
Extension Manager.
•
Verify that a prior version of the module you are installing is not already installed.
¾ If a prior version is installed, use the arrow keys to highlight the module on the main screen and
press F2 (Select), then F1 (Uninstall). Select Yes at the confirmation. The module is removed
from the GX device.
On the PC
•
If necessary, download ActiveSync from the Microsoft website and install.
2
•
Configure ActiveSync to communicate through the USB port. To do so, in ActiveSync, select the File
menu’s Connection Settings option and enable the Allow USB connection… option.
On the Microlog GX
•
Connect the provided USB/Power splitter cable between the GX Power connector and the GX power supply
(do not connect the USB cable to the PC at this time).
•
Access the Setup module and ensure the IrDA option is Disabled.
•
Connect the provided USB / Power splitter cable’s USB cable to the PC’s USB connector.
On the host PC
•
Observe the ActiveSync application automatically start up on the PC
•
When prompted to Set up Partnership, choose No and click Next to complete the ActiveSync
communication connection.
•
Select the Windows Taskbar’s Start button and navigate to Programs / SKF / Microlog. Submenus
display for each module installer on the PC. The submenus contain an icon for each installer language.
•
Select the icon for the desired language.
.
¾ You can only install a maximum of two languages at one install (English and one other). English is
included within the Core features.
•
The ActiveSync program manager launches. When prompted, confirm installation to the default directory.
Module installation commences. After the module is copied to the Microlog GX, ActiveSync displays the
following prompt:
“Please check your mobile device screen to see if additional steps are necessary to complete this
installation.”
•
Acknowledge the prompt and wait for module installation to complete on the Microlog GX.
On the Microlog GX
•
If the module has previously been installed, the unit may prompt you to confirm that it should be reinstalled.
•
To confirm re-installation, press the right-hand Fire / Enter key. (The left-hand Fire / Enter key will cancel
the installation.)
•
Once installation has been completed, reboot the Microlog GX (hold down the 2, 7, 8, and 9 keys). The
installed module’s icon should appear on the GX’s Main Menu screen.
•
The first time you run a newly installed module you are prompted to enter the appropriate license key.
Enter the license key and the module runs.
3
Uninstalling the Module Installer from the PC
Once all modules have been installed on the GX unit, uninstall the module installers from the PC.
•
Open the Windows Control Panel.
•
Select Add or Remove Programs.
•
Select the desired module to uninstall and click Remove.
The module is removed from the PC.
¾ This can also be accomplished by running the MSI installer again and following the prompts to
uninstall.
Uninstalling a Module from the Microlog GX Using ActiveSync
•
Create an ActiveSync connection and double-click the
icon in the Windows tray to open ActiveSync.
•
From within ActiveSync, select Tools / Add/Remove Programs to start the ActiveSync Program Manager.
•
To uninstall an application from the GX device, disable the checkbox next to the application and press OK.
Do not uninstall more than one module at a time.
•
After exiting the Program Manager, wait about 10 seconds and then reboot the GX device (hold down the
2, 7, 8, 9 keys). The uninstalled module is removed.
¾ If the module is not listed on the ActiveSync list, it can be deleted from the GX device using the
Extension Manager. Refer to Step 2 under Installing Modules, above, for details.
How to Upgrade your Microlog GX’s Firmware
This procedure describes how to update the Microlog GX Series’ firmware to a new version via USB with
ActiveSync.
CAUTION! Before you start this upgrade procedure, use SKF @ptitude Analyst / Machine Analyst
software to upload any data you have collected. Once the data is uploaded, use the Clear option from
the software’s Transfer>Microlog>Status dialog to clear the ROUTEs from the Microlog GX’s memory.
Note that the prior version of the firmware must be fully functional to facilitate ActiveSync connection. If the
unit is not capable of ActiveSync connection, contact the technical support group at [email protected].
¾ Note that Microlog GX firmware may be referred to as the OS (Operating System), OS Image, or
Image.
4
Prerequisite Knowledge
Before performing this procedure, you should be familiar with:
•
How to power up a Microlog GX from AC power
•
The GX’s Setup module options
•
How to perform a Hard Reset
•
How to use GX’s keypad and buttons
This information can be found in the GX Series User Manual.
The user should also be familiar with Personal Computers (PC), the Windows® Operating System (OS) and
should know how to use Windows Explorer® to browse folders.
The following items are required to complete this procedure:
•
Flat head screwdriver
•
Paper clip
•
GX unit to be updated
•
GX AC Power Supply (provided with your GX kit)
•
GX USB/Power splitter cable - CMAC 5019 (provided with your GX kit)
•
PC running a Windows operating system
•
nk.bin file (GX firmware). This original file can be found in the FIRMWARE directory on the GX CD. If you
are updating firmware, you may have been provided a later version of the firmware that you should use.
•
CMC400Boot.exe (GX utility to load the OS Image). This file can be found in the UTIL directory on the GX
CD.
•
ActiveSync software running on the PC. This software can be downloaded from the Microsoft website:
www.microsoft.com
•
RemExec.exe (Windows application software). This file can be found in the UTIL directory on the GX CD.
Firmware Upgrade Procedure
1. Ensure the ActiveSync software is properly installed on the host PC.
•
If necessary, download ActiveSync from the Microsoft website and install.
•
Configure ActiveSync to communicate through the USB port. To do so, in ActiveSync, select the File
menu’s Connection Settings option and enable the Allow USB connection… option.
5
2. Prepare the Microlog GX for ActiveSync connection.
•
Connect the provided USB/Power splitter cable between the GX Power connector and the GX power supply
(do not connect the USB cable to the PC at this time).
•
Turn on the Microlog GX.
3. Establish the ActiveSync connection between the GX and the PC.
On the Microlog GX
•
Access the Setup module and ensure the IrDA option is Disabled.
•
Connect the provided USB / Power splitter cable’s USB cable to the PC’s USB connector.
On the host PC
•
Observe the ActiveSync application automatically start up on the PC.
•
When prompted to Set up Partnership, choose No and click Next to complete the ActiveSync
communication connection.
4. Copy the firmware and utility files to the Microlog GX
On the host PC
•
Insert the GX CD into the host PC.
•
Use Windows Explorer to locate the GX firmware file nk.bin. This file is provided in the FIRMWARE folder
on the GX CD.
•
Open the Mobile Device window by pressing the Explore button on the Microsoft ActiveSync application’s
toolbar.
•
Copy the nk.bin file to the GX’s Mobile Device\Internal Disk folder. To copy the file, right-click on the
nk.bin file in Windows Explorer and select Copy from the pop-up menu. In the Mobile Device Window,
navigate to the \Internal Disk folder, right click the background (do not click on any of the icons) and
select Paste from the pop-up menu.
¾ It is strongly recommended that ALL Route data be cleared from the GX Microlog; otherwise it is
possible that there will be insufficient internal memory available to accommodate the necessary
nk.bin file.
•
Wait for copying to complete. Verify that the nk.bin file is now present in the Mobile Device window.
•
Use Windows Explorer to locate the GX OS Image loading utility CMC400Boot.exe. This file is provided in
the UTIL directory on the GX CD.
•
Copy the CMC400Boot.exe file to the GX‘s Mobile Device folder (not into the \Internal Disk folder).
•
Wait for copying to complete. Verify the CMC400Boot.exe file is present in the Mobile Device window.
6
5. Install the new Microlog GX firmware.
On the host PC
•
Run the Windows program RemExec.exe. This file is located in the UTIL directory on the GX CD.
•
At the “Enter name of program” prompt, type CMC400Boot.
•
Click the Remote Run button.
On the Microlog GX
•
Observe the CMC400Boot screen display.
•
Press the F1, Select Image function key on the GX unit (refer to Figure 1 below).
•
Use the up and down arrow keys to locate the Internal Disk folder (where you copied nk.bin). Highlight
Internal Disk and press an Enter button.
•
Use the up and down arrow keys to locate the copied nk.bin file. Highlight the nk.bin file and press a Fire
/ Enter button.
•
Press the F2, Flash Upgrade function key.
Caution: Do not press any other key prior to the next step.
•
When prompted to confirm OS reprogramming, use the up and down arrow keys to select the Yes button,
and press the right-hand Fire / Enter button.
•
The OS reprogramming takes several minutes.
Do NOT press any other keys during the programming. Also, do NOT close the RemExec utility.
•
When the OS reprogramming completes (FLASH UPGRADE OK, Figure 1), press the F4 function key to
Exit.
•
You are prompted to perform a Hard-Reset. To perform a hard-reset, remove the battery cover, and
insert a paper clip into the master reset (Figure 2).
6. After the hard-reset, verify that the unit’s firmware was properly updated.
•
On the GX’s main menu screen, use the About function key to display the installed firmware version.
7
7. Use ActiveSync and Windows Explorer to locate and delete the nk.bin file on the GX unit.
Fire / Enter Button
Flash Upgrade OK
Function Keys
Arrow Keys
GX Keys
Location of the GX Reset Switch.
Document Part Number 32131100 (Revision A, 03-08)
8