1
Compaq COBOL
User Manual
Order Number: AA–Q2G1G–TK
November 2002
This manual provides information to help you develop Compaq COBOL
programs for the OpenVMS Alpha, OpenVMS VAX, and Compaq Tru64
UNIX platforms.
Revision/Update Information:
This manual supersedes the
Compaq COBOL User Manual,
Version 2.7 and the VAX COBOL User
Manual, Version 5.4, as well as the
online-only Compaq COBOL User
Manual, Version 2.7 and Version 5.7.
Operating System and Version: OpenVMS Alpha Version 6.2 or higher;
OpenVMS VAX Version 6.2 or higher;
Tru64 UNIX Version 5.0 or higher
Software Version:
Compaq COBOL for OpenVMS Alpha
Version 2.8;
Compaq COBOL for Tru64 UNIX
Version 2.8;
Compaq COBOL for OpenVMS VAX
Version 5.7
Compaq Computer Corporation
Houston, Texas
© 2002 Compaq Information Technologies Group, L.P.
COMPAQ, the Compaq logo, OpenVMS, POLYCENTER, Tru64, VAX, and VMS, are trademarks of
compaq Information Technologies Group, L.P. in the U.S. and/or other countries.
Motif, UNIX and X/Open are trademarks of The Open Group in the U.S. and/or other countries.
All other product names mentioned herein may be trademarks of their respective companies.
Confidential computer software. Valid license from Compaq required for possession, use, or copying.
Consistent with FAR 12.211 and 12.212, Commercial Computer Software, Computer Software
Documentation, and Technical Data for Commercial Items are licensed to the U.S. Government
under vendor’s standard commercial license.
None of Compaq, Hewlett-Packard Company ("HP") or any other direct or indirect subsidiary of HP
shall be liable for technical or editorial errors or omissions contained herein. The information in
this document is provided "as is" without warranty of any kind and is subject to change without
notice. The warranties for Compaq or HP products are set forth in the express limited warranty
statements accompanying such products. Nothing herein should be construed as constituting an
additional warranty.
ZK6297
This manual is available on CD–ROM.
This document was prepared using DECdocument, Version 3.3-1b.
Contents
Preface . . . . . . . . . . . . . . . . . . . . . . . . . . . . . . . . . . . . . . . . . . . . . . . . . . . . . . . . . . . .
xxiii
1 Developing Compaq COBOL Programs
1.1
Developing Programs on Tru64 UNIX . . . . . . . . . . . . . . . . . . . . . .
1.1.1
Creating a Compaq COBOL Program on Tru64 UNIX . . . . . . .
1.1.2
Compiling a Compaq COBOL Program on Tru64 UNIX . . . . . .
1.1.2.1
Format of the COBOL Command on Tru64 UNIX . . . . . . .
1.1.2.2
COBOL Command Flags . . . . . . . . . . . . . . . . . . . . . . . . . .
1.1.2.3
External File Handler Support . . . . . . . . . . . . . . . . . . . . .
1.1.2.4
Specifying Multiple Files and Flags . . . . . . . . . . . . . . . . . .
1.1.2.5
Compiling Multiple Files . . . . . . . . . . . . . . . . . . . . . . . . . .
1.1.2.6
Debugging a Program . . . . . . . . . . . . . . . . . . . . . . . . . . . .
1.1.2.7
Output Files: Object, Executable, Listing, and Temporary
Files . . . . . . . . . . . . . . . . . . . . . . . . . . . . . . . . . . . . . . . . . .
1.1.2.8
Naming Output Files . . . . . . . . . . . . . . . . . . . . . . . . . . . . .
1.1.2.9
Temporary Files . . . . . . . . . . . . . . . . . . . . . . . . . . . . . . . . .
1.1.2.10
Examples of the COBOL Command . . . . . . . . . . . . . . . . . .
1.1.2.11
Other Compilers . . . . . . . . . . . . . . . . . . . . . . . . . . . . . . . . .
1.1.2.12
Interpreting Messages from the Compiler . . . . . . . . . . . . .
1.1.3
Linking a Compaq COBOL Program on Tru64 UNIX . . . . . . .
1.1.3.1
Specifying Object Libraries for Linking . . . . . . . . . . . . . . .
1.1.3.2
Specifying Additional Object Libraries . . . . . . . . . . . . . . . .
1.1.3.3
Specifying Types of Object Libraries . . . . . . . . . . . . . . . . .
1.1.3.4
Creating Shared Object Libraries . . . . . . . . . . . . . . . . . . .
1.1.3.5
Shared Library Restrictions . . . . . . . . . . . . . . . . . . . . . . . .
1.1.3.6
Installing Shared Libraries . . . . . . . . . . . . . . . . . . . . . . . .
1.1.3.7
Interpreting Messages from the Linker . . . . . . . . . . . . . . .
1.1.4
Running a Compaq COBOL Program on Tru64 UNIX . . . . . . .
1.1.4.1
Accessing Command-Line Arguments . . . . . . . . . . . . . . . .
1.1.4.2
Accessing Environment Variables . . . . . . . . . . . . . . . . . . .
1.1.4.3
Errors and Switches . . . . . . . . . . . . . . . . . . . . . . . . . . . . . .
1.1.5
Program Development Stages and Tools . . . . . . . . . . . . . . . . .
1.2
Developing Programs on OpenVMS . . . . . . . . . . . . . . . . . . . . . . . .
1.2.1
Creating a Compaq COBOL Program on OpenVMS . . . . . . . .
1.2.2
Compiling a Compaq COBOL Program on OpenVMS . . . . . . .
1.2.2.1
Format of the COBOL Command on OpenVMS . . . . . . . . .
1.2.2.2
Compiling Multiple Files . . . . . . . . . . . . . . . . . . . . . . . . . .
1.2.2.3
Debugging a Program . . . . . . . . . . . . . . . . . . . . . . . . . . . .
1.2.2.4
Separately Compiled Programs (Alpha) . . . . . . . . . . . . . . .
1.2.2.5
COBOL Qualifiers . . . . . . . . . . . . . . . . . . . . . . . . . . . . . . .
1.2.2.6
Common Command-Line Errors to Avoid . . . . . . . . . . . . . .
1.2.2.7
Compiling Programs with Conditional Compilation . . . . . .
1.2.2.8
Interpreting Messages from the Compiler . . . . . . . . . . . . .
.
.
.
.
.
.
.
.
.
.
.
.
.
.
.
.
.
.
.
.
.
.
.
.
.
.
.
.
.
.
.
.
.
.
.
.
.
.
.
.
.
.
.
.
.
.
.
.
.
.
.
.
.
.
1–1
1–1
1–4
1–4
1–5
1–9
1–9
1–9
1–10
.
.
.
.
.
.
.
.
.
.
.
.
.
.
.
.
.
.
.
.
.
.
.
.
.
.
.
.
.
.
.
.
.
.
.
.
.
.
.
.
.
.
.
.
.
.
.
.
.
.
.
.
.
.
.
.
.
.
.
.
.
.
.
.
.
.
.
.
.
.
.
.
.
.
.
.
.
.
.
.
.
.
.
.
.
.
.
.
.
.
.
.
.
.
.
.
.
.
.
.
.
.
.
.
.
.
.
.
.
.
.
.
.
.
.
.
.
.
.
.
.
.
.
.
.
.
.
.
.
.
.
.
.
.
.
.
.
.
.
.
.
.
.
.
.
.
.
.
.
.
.
.
.
.
.
.
.
.
.
.
.
.
.
.
.
.
.
.
.
.
.
.
.
.
.
.
.
.
.
.
1–10
1–11
1–11
1–11
1–12
1–12
1–13
1–13
1–14
1–15
1–15
1–16
1–16
1–16
1–17
1–17
1–18
1–19
1–19
1–21
1–21
1–23
1–23
1–24
1–24
1–25
1–25
1–29
1–30
1–30
iii
1.2.2.9
Using Compiler Listing Files . . . . . . . . . . . . . . . . . . . . . . . .
1.2.3
Linking a Compaq COBOL Program . . . . . . . . . . . . . . . . . . . . . .
1.2.3.1
The LINK Command . . . . . . . . . . . . . . . . . . . . . . . . . . . . . . .
1.2.3.2
LINK Qualifiers . . . . . . . . . . . . . . . . . . . . . . . . . . . . . . . . . .
1.2.3.3
Specifying Modules Other than Compaq COBOL Modules . . .
1.2.3.4
Specifying Object Module Libraries . . . . . . . . . . . . . . . . . . . .
1.2.3.5
Creating Shareable Images . . . . . . . . . . . . . . . . . . . . . . . . . .
1.2.3.6
Interpreting Messages from the Linker . . . . . . . . . . . . . . . .
1.2.4
Running a Compaq COBOL Program . . . . . . . . . . . . . . . . . . . . .
1.2.4.1
Accessing Command-Line Arguments at Run Time (Alpha) . .
1.2.4.2
Accessing System Logicals at Run Time (Alpha) . . . . . . . . . .
1.2.4.3
Accessing Input and Output Devices at Run Time . . . . . . . . .
1.2.4.4
Debugging Environment . . . . . . . . . . . . . . . . . . . . . . . . . . . .
1.2.4.5
Interpreting Run-Time Messages . . . . . . . . . . . . . . . . . . . . .
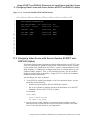
1.3
Compaq COBOL and Alpha Architecture System Resources . . . . . . .
1.3.1
Compilation Performance . . . . . . . . . . . . . . . . . . . . . . . . . . . . . . .
1.3.2
Tuning OpenVMS Alpha for Large Compaq COBOL Compiles . .
1.3.2.1
Optimizing Virtual Memory Usage . . . . . . . . . . . . . . . . . . . . .
1.3.2.2
Optimizing Physical Memory Usage . . . . . . . . . . . . . . . . . . . .
1.3.2.3
Improving Compile Performance with Separate Compilation
(OpenVMS Alpha) . . . . . . . . . . . . . . . . . . . . . . . . . . . . . . . . .
1.3.3
Choosing a Reference Format . . . . . . . . . . . . . . . . . . . . . . . . . . .
1.3.3.1
Terminal Reference Format . . . . . . . . . . . . . . . . . . . . . . . . . .
1.3.3.2
Converting Between Reference Formats . . . . . . . . . . . . . . . .
1.4
Program Run Messages . . . . . . . . . . . . . . . . . . . . . . . . . . . . . . . . . . .
1.4.1
Data Errors . . . . . . . . . . . . . . . . . . . . . . . . . . . . . . . . . . . . . . . . .
1.4.2
Program Logic Errors . . . . . . . . . . . . . . . . . . . . . . . . . . . . . . . . . .
1.4.3
Run-Time Input/Output Errors . . . . . . . . . . . . . . . . . . . . . . . . . .
1.4.4
I/O Errors and RMS (OpenVMS) . . . . . . . . . . . . . . . . . . . . . . . . .
1.5
Using Program Switches . . . . . . . . . . . . . . . . . . . . . . . . . . . . . . . . . .
1.5.1
Setting and Controlling Switches Internally . . . . . . . . . . . . . . . .
1.5.2
Setting and Controlling Switches Externally . . . . . . . . . . . . . . .
1.6
Special Information for Year 2000 Programming . . . . . . . . . . . . . . . .
.
.
.
.
.
.
.
.
.
.
.
.
.
.
.
.
.
.
.
.
.
.
.
.
.
.
.
.
.
.
.
.
.
.
.
.
.
.
.
.
.
.
.
.
.
.
.
.
.
.
.
.
.
.
.
.
.
.
.
.
.
.
.
.
.
.
.
.
.
.
.
.
.
.
.
.
1–32
1–33
1–33
1–34
1–35
1–35
1–38
1–43
1–44
1–44
1–45
1–46
1–47
1–47
1–48
1–48
1–50
1–50
1–51
.
.
.
.
.
.
.
.
.
.
.
.
.
.
.
.
.
.
.
.
.
.
.
.
.
.
.
.
.
.
.
.
.
.
.
.
.
.
.
.
.
.
.
.
.
.
.
.
.
.
.
.
1–52
1–52
1–53
1–53
1–53
1–53
1–55
1–56
1–57
1–61
1–61
1–61
1–64
.
.
.
.
.
.
.
.
.
.
.
.
.
.
.
.
.
.
.
.
.
.
.
.
.
.
.
.
.
.
.
.
.
.
.
.
.
.
.
.
.
.
.
.
.
.
.
.
.
.
.
.
.
.
.
.
.
.
.
.
.
.
.
.
2–1
2–1
2–2
2–2
2–3
2–3
2–4
2–4
2–5
2–6
2–6
2–7
2–9
2–9
2–9
2–9
2 Handling Numeric Data
2.1
2.2
2.3
2.4
2.5
2.5.1
2.5.2
2.5.3
2.5.4
2.6
2.6.1
2.6.2
2.6.3
2.6.4
2.7
2.7.1
iv
How the Compiler Stores Numeric Data
Specifying Alignment . . . . . . . . . . . . . . .
Sign Conventions . . . . . . . . . . . . . . . . . .
Invalid Values in Numeric Items . . . . . .
Evaluating Numeric Items . . . . . . . . . . .
Numeric Relation Test . . . . . . . . . . .
Numeric Sign Test . . . . . . . . . . . . . .
Numeric Class Tests . . . . . . . . . . . . .
Success/Failure Tests . . . . . . . . . . . .
Using the MOVE Statement . . . . . . . . .
Elementary Numeric Moves . . . . . . .
Elementary Numeric-Edited Moves .
Subscripted Moves . . . . . . . . . . . . . .
Common Move Errors . . . . . . . . . . .
Using the Arithmetic Statements . . . . . .
Temporary Work Items . . . . . . . . . . .
.
.
.
.
.
.
.
.
.
.
.
.
.
.
.
.
.
.
.
.
.
.
.
.
.
.
.
.
.
.
.
.
.
.
.
.
.
.
.
.
.
.
.
.
.
.
.
.
.
.
.
.
.
.
.
.
.
.
.
.
.
.
.
.
.
.
.
.
.
.
.
.
.
.
.
.
.
.
.
.
.
.
.
.
.
.
.
.
.
.
.
.
.
.
.
.
.
.
.
.
.
.
.
.
.
.
.
.
.
.
.
.
.
.
.
.
.
.
.
.
.
.
.
.
.
.
.
.
.
.
.
.
.
.
.
.
.
.
.
.
.
.
.
.
.
.
.
.
.
.
.
.
.
.
.
.
.
.
.
.
.
.
.
.
.
.
.
.
.
.
.
.
.
.
.
.
.
.
.
.
.
.
.
.
.
.
.
.
.
.
.
.
.
.
.
.
.
.
.
.
.
.
.
.
.
.
.
.
.
.
.
.
.
.
.
.
.
.
.
.
.
.
.
.
.
.
.
.
.
.
.
.
.
.
.
.
.
.
.
.
.
.
.
.
.
.
.
.
.
.
.
.
.
.
.
.
.
.
.
.
.
.
.
.
.
.
.
.
.
.
.
.
.
.
.
.
.
.
.
.
.
.
.
.
.
.
.
.
.
.
.
.
.
.
.
.
.
.
.
.
.
.
.
.
.
.
.
.
.
.
.
.
.
.
.
.
.
.
.
.
.
.
.
.
.
.
.
.
.
.
.
.
.
.
.
.
.
.
.
.
.
.
.
.
.
.
.
.
.
.
.
.
2.7.2
2.7.2.1
2.7.2.2
2.7.3
2.7.4
2.7.4.1
2.7.5
2.7.6
2.7.7
2.7.8
Standard and Native Arithmetic (Alpha) . . . . . . . . . . . . . .
Using the /MATH_INTERMEDIATE Qualifier (Alpha)
Using the /ARITHMETIC Qualifier (Alpha) . . . . . . . . .
Specifying a Truncation Qualifier . . . . . . . . . . . . . . . . . . . .
Using the ROUNDED Phrase . . . . . . . . . . . . . . . . . . . . . .
ROUNDED with REMAINDER . . . . . . . . . . . . . . . . . .
Using the SIZE ERROR Phrase . . . . . . . . . . . . . . . . . . . . .
Using the GIVING Phrase . . . . . . . . . . . . . . . . . . . . . . . . .
Multiple Operands in ADD and SUBTRACT Statements . .
Common Errors in Arithmetic Statements . . . . . . . . . . . . .
.
.
.
.
.
.
.
.
.
.
.
.
.
.
.
.
.
.
.
.
.
.
.
.
.
.
.
.
.
.
.
.
.
.
.
.
.
.
.
.
.
.
.
.
.
.
.
.
.
.
.
.
.
.
.
.
.
.
.
.
.
.
.
.
.
.
.
.
.
.
.
.
.
.
.
.
.
.
.
.
.
.
.
.
.
.
.
.
.
.
2–10
2–10
2–12
2–13
2–13
2–13
2–14
2–14
2–15
2–15
How the Compiler Stores Nonnumeric Data . . . . . . . . . . . . . . . . . . . . . . .
Data Organization . . . . . . . . . . . . . . . . . . . . . . . . . . . . . . . . . . . . . . . . . . .
Group Items . . . . . . . . . . . . . . . . . . . . . . . . . . . . . . . . . . . . . . . . . . . . .
Elementary Items . . . . . . . . . . . . . . . . . . . . . . . . . . . . . . . . . . . . . . . .
Special Characters . . . . . . . . . . . . . . . . . . . . . . . . . . . . . . . . . . . . . . . . . . .
Testing Nonnumeric Items . . . . . . . . . . . . . . . . . . . . . . . . . . . . . . . . . . . . .
Relation Tests of Nonnumeric Items . . . . . . . . . . . . . . . . . . . . . . . . . .
Classes of Data . . . . . . . . . . . . . . . . . . . . . . . . . . . . . . . . . . . . . . .
Comparison Operations . . . . . . . . . . . . . . . . . . . . . . . . . . . . . . . . .
Class Tests for Nonnumeric Items . . . . . . . . . . . . . . . . . . . . . . . . . . . .
Data Movement . . . . . . . . . . . . . . . . . . . . . . . . . . . . . . . . . . . . . . . . . . . . .
Using the MOVE Statement . . . . . . . . . . . . . . . . . . . . . . . . . . . . . . . . . . .
Group Moves . . . . . . . . . . . . . . . . . . . . . . . . . . . . . . . . . . . . . . . . . . . .
Elementary Moves . . . . . . . . . . . . . . . . . . . . . . . . . . . . . . . . . . . . . . . .
Edited Moves . . . . . . . . . . . . . . . . . . . . . . . . . . . . . . . . . . . . . . . . .
Justified Moves . . . . . . . . . . . . . . . . . . . . . . . . . . . . . . . . . . . . . . .
Multiple Receiving Items . . . . . . . . . . . . . . . . . . . . . . . . . . . . . . . . . . .
Subscripted Moves . . . . . . . . . . . . . . . . . . . . . . . . . . . . . . . . . . . . . . . .
Common Nonnumeric Item MOVE Statement Errors . . . . . . . . . . . . .
Using the MOVE CORRESPONDING Statement for Nonnumeric
Items . . . . . . . . . . . . . . . . . . . . . . . . . . . . . . . . . . . . . . . . . . . . . . . . . .
Using Reference Modification . . . . . . . . . . . . . . . . . . . . . . . . . . . . . . . .
3–1
3–2
3–2
3–2
3–3
3–3
3–3
3–4
3–5
3–5
3–6
3–7
3–7
3–7
3–9
3–9
3–10
3–10
3–11
3 Handling Nonnumeric Data
3.1
3.2
3.2.1
3.2.2
3.3
3.4
3.4.1
3.4.1.1
3.4.1.2
3.4.2
3.5
3.6
3.6.1
3.6.2
3.6.2.1
3.6.2.2
3.6.3
3.6.4
3.6.5
3.6.6
3.6.7
3–11
3–12
4 Handling Tables
4.1
Defining Tables . . . . . . . . . . . . . . . . . . . . . . . . . . . . . . .
4.1.1
Defining Fixed-Length, One-Dimensional Tables . . .
4.1.2
Defining Fixed-Length, Multidimensional Tables . . .
4.1.3
Defining Variable-Length Tables . . . . . . . . . . . . . . .
4.1.4
Storage Allocation for Tables . . . . . . . . . . . . . . . . . .
4.1.4.1
Using the SYNCHRONIZED Clause . . . . . . . . .
4.2
Initializing Values of Table Elements . . . . . . . . . . . . . . .
4.3
Accessing Table Elements . . . . . . . . . . . . . . . . . . . . . . .
4.3.1
Subscripting . . . . . . . . . . . . . . . . . . . . . . . . . . . . . . .
4.3.2
Subscripting with Literals . . . . . . . . . . . . . . . . . . . .
4.3.3
Subscripting with Data Names . . . . . . . . . . . . . . . .
4.3.4
Subscripting with Indexes . . . . . . . . . . . . . . . . . . . .
4.3.5
Relative Indexing . . . . . . . . . . . . . . . . . . . . . . . . . . .
4.3.6
Index Data Items . . . . . . . . . . . . . . . . . . . . . . . . . . .
.
.
.
.
.
.
.
.
.
.
.
.
.
.
.
.
.
.
.
.
.
.
.
.
.
.
.
.
.
.
.
.
.
.
.
.
.
.
.
.
.
.
.
.
.
.
.
.
.
.
.
.
.
.
.
.
.
.
.
.
.
.
.
.
.
.
.
.
.
.
.
.
.
.
.
.
.
.
.
.
.
.
.
.
.
.
.
.
.
.
.
.
.
.
.
.
.
.
.
.
.
.
.
.
.
.
.
.
.
.
.
.
.
.
.
.
.
.
.
.
.
.
.
.
.
.
.
.
.
.
.
.
.
.
.
.
.
.
.
.
.
.
.
.
.
.
.
.
.
.
.
.
.
.
...
...
...
...
...
...
...
...
...
...
...
...
...
...
4–1
4–1
4–4
4–5
4–6
4–7
4–10
4–12
4–12
4–13
4–14
4–14
4–15
4–16
v
.
.
.
.
.
.
.
.
.
.
.
.
.
.
.
.
.
.
.
.
.
.
.
.
4–16
4–16
4–16
4–16
4–17
4–18
5.1
Concatenating Data Using the STRING Statement . . . . . . . . . . . . . . .
5.1.1
Multiple Sending Items . . . . . . . . . . . . . . . . . . . . . . . . . . . . . . . . .
5.1.2
Using the DELIMITED BY Phrase . . . . . . . . . . . . . . . . . . . . . . . .
5.1.3
Using the POINTER Phrase . . . . . . . . . . . . . . . . . . . . . . . . . . . . .
5.1.4
Using the OVERFLOW Phrase . . . . . . . . . . . . . . . . . . . . . . . . . . .
5.1.5
Common STRING Statement Errors . . . . . . . . . . . . . . . . . . . . . . .
5.2
Separating Data Using the UNSTRING Statement . . . . . . . . . . . . . . .
5.2.1
Multiple Receiving Items . . . . . . . . . . . . . . . . . . . . . . . . . . . . . . . .
5.2.2
Controlling Moved Data Using the DELIMITED BY Phrase . . . . .
5.2.2.1
Multiple Delimiters . . . . . . . . . . . . . . . . . . . . . . . . . . . . . . . . .
5.2.3
Using the COUNT Phrase . . . . . . . . . . . . . . . . . . . . . . . . . . . . . . .
5.2.4
Saving UNSTRING Delimiters Using the DELIMITER Phrase . . .
5.2.5
Controlling UNSTRING Scanning Using the POINTER Phrase . .
5.2.6
Counting UNSTRING Receiving Items Using the TALLYING
Phrase . . . . . . . . . . . . . . . . . . . . . . . . . . . . . . . . . . . . . . . . . . . . . .
5.2.7
Exiting an UNSTRING Statement Using the OVERFLOW Phrase
5.2.8
Common UNSTRING Statement Errors . . . . . . . . . . . . . . . . . . . .
5.3
Examining and Replacing Characters Using the INSPECT Statement
5.3.1
Using the TALLYING and REPLACING Options of the INSPECT
Statement . . . . . . . . . . . . . . . . . . . . . . . . . . . . . . . . . . . . . . . . . . .
5.3.2
Restricting Data Inspection Using the BEFORE/AFTER Phrase . .
5.3.3
Implicit Redefinition . . . . . . . . . . . . . . . . . . . . . . . . . . . . . . . . . . .
5.3.4
Examining the INSPECT Operation . . . . . . . . . . . . . . . . . . . . . . .
5.3.4.1
Setting the Scanner . . . . . . . . . . . . . . . . . . . . . . . . . . . . . . . . .
5.3.4.2
Active/Inactive Arguments . . . . . . . . . . . . . . . . . . . . . . . . . . . .
5.3.4.3
Finding an Argument Match . . . . . . . . . . . . . . . . . . . . . . . . . .
5.3.5
The TALLYING Phrase . . . . . . . . . . . . . . . . . . . . . . . . . . . . . . . . .
5.3.5.1
The Tally Counter . . . . . . . . . . . . . . . . . . . . . . . . . . . . . . . . . .
5.3.5.2
The Tally Argument . . . . . . . . . . . . . . . . . . . . . . . . . . . . . . . . .
5.3.5.3
The Tally Argument List . . . . . . . . . . . . . . . . . . . . . . . . . . . . .
5.3.5.4
Interference in Tally Argument Lists . . . . . . . . . . . . . . . . . . . .
5.3.6
Using the REPLACING Phrase . . . . . . . . . . . . . . . . . . . . . . . . . . .
5.3.6.1
The Search Argument . . . . . . . . . . . . . . . . . . . . . . . . . . . . . . .
5.3.6.2
The Replacement Value . . . . . . . . . . . . . . . . . . . . . . . . . . . . . .
5.3.6.3
The Replacement Argument . . . . . . . . . . . . . . . . . . . . . . . . . . .
5.3.6.4
The Replacement Argument List . . . . . . . . . . . . . . . . . . . . . . .
5.3.6.5
Interference in Replacement Argument Lists . . . . . . . . . . . . . .
5.3.7
Using the CONVERTING Option . . . . . . . . . . . . . . . . . . . . . . . . . .
5.3.8
Common INSPECT Statement Errors . . . . . . . . . . . . . . . . . . . . . .
.
.
.
.
.
.
.
.
.
.
.
.
.
.
.
.
.
.
.
.
.
.
.
.
.
.
.
.
.
.
.
.
.
.
.
.
.
.
.
5–1
5–1
5–2
5–4
5–4
5–6
5–6
5–6
5–8
5–12
5–12
5–13
5–14
.
.
.
.
.
.
.
.
.
.
.
.
5–15
5–16
5–16
5–17
.
.
.
.
.
.
.
.
.
.
.
.
.
.
.
.
.
.
.
.
.
.
.
.
.
.
.
.
.
.
.
.
.
.
.
.
.
.
.
.
.
.
.
.
.
.
.
.
.
.
.
.
.
.
.
.
.
.
.
.
5–17
5–18
5–18
5–21
5–22
5–22
5–23
5–24
5–24
5–24
5–25
5–27
5–30
5–30
5–31
5–31
5–31
5–32
5–33
5–33
4.3.7
4.3.7.1
4.3.7.2
4.3.8
4.3.8.1
4.3.8.2
Assigning Index Values Using the SET Statement . . . . . . . . .
Assigning an Integer Index Value with a SET Statement
Incrementing an Index Value with the SET Statement . .
Identifying Table Elements Using the SEARCH Statement . .
Implementing a Sequential Search . . . . . . . . . . . . . . . . .
Implementing a Binary Search . . . . . . . . . . . . . . . . . . . .
.
.
.
.
.
.
.
.
.
.
.
.
.
.
.
.
.
.
5 Using the STRING, UNSTRING, and INSPECT Statements
vi
6 Processing Files and Records
Defining Files and Records . . . . . . . . . . . . . . . . . . . . . . . . . . . . . . .
File Organization . . . . . . . . . . . . . . . . . . . . . . . . . . . . . . . . . . . .
Record Format . . . . . . . . . . . . . . . . . . . . . . . . . . . . . . . . . . . . . .
Print-Control Records . . . . . . . . . . . . . . . . . . . . . . . . . . . . . . . .
File Design . . . . . . . . . . . . . . . . . . . . . . . . . . . . . . . . . . . . . . . . .
Identifying Files and Records from Within Your Compaq COBOL
Program . . . . . . . . . . . . . . . . . . . . . . . . . . . . . . . . . . . . . . . . . . . . . .
6.2.1
Defining a File Connector . . . . . . . . . . . . . . . . . . . . . . . . . . . . .
6.2.2
Specifying File Organization and Record Access Mode . . . . . . . .
6.3
Creating and Processing Files . . . . . . . . . . . . . . . . . . . . . . . . . . . . .
6.3.1
Opening and Closing Files . . . . . . . . . . . . . . . . . . . . . . . . . . . . .
6.3.2
File Handling for Sequential and Line Sequential (Alpha) Files
6.3.3
File Handling for Relative Files . . . . . . . . . . . . . . . . . . . . . . . . .
6.3.4
File Handling for Indexed Files . . . . . . . . . . . . . . . . . . . . . . . . .
6.4
Reading Files . . . . . . . . . . . . . . . . . . . . . . . . . . . . . . . . . . . . . . . . . .
6.4.1
Reading a Sequential or Line Sequential (Alpha) File . . . . . . . .
6.4.2
Reading a Relative File . . . . . . . . . . . . . . . . . . . . . . . . . . . . . . .
6.4.3
Reading an Indexed File . . . . . . . . . . . . . . . . . . . . . . . . . . . . . .
6.5
Updating Files . . . . . . . . . . . . . . . . . . . . . . . . . . . . . . . . . . . . . . . . .
6.5.1
Updating a Sequential File or Line Sequential (Alpha) File . . .
6.5.2
Updating a Relative File . . . . . . . . . . . . . . . . . . . . . . . . . . . . . .
6.5.2.1
Rewriting a Relative File . . . . . . . . . . . . . . . . . . . . . . . . . . .
6.5.2.2
Deleting Records from a Relative File . . . . . . . . . . . . . . . . .
6.5.3
Updating an Indexed File . . . . . . . . . . . . . . . . . . . . . . . . . . . . .
6.6
Backing Up Your Files . . . . . . . . . . . . . . . . . . . . . . . . . . . . . . . . . . .
.
.
.
.
.
.
.
.
.
.
.
.
.
.
.
.
.
.
.
.
.
.
.
.
.
6–1
6–2
6–8
6–12
6–13
.
.
.
.
.
.
.
.
.
.
.
.
.
.
.
.
.
.
.
.
.
.
.
.
.
.
.
.
.
.
.
.
.
.
.
.
.
.
.
.
.
.
.
.
.
.
.
.
.
.
.
.
.
.
.
.
.
.
.
.
.
.
.
.
.
.
.
.
.
.
.
.
.
.
.
.
.
.
.
.
.
.
.
.
.
.
.
.
.
.
.
.
.
.
.
6–14
6–14
6–20
6–25
6–25
6–26
6–29
6–32
6–37
6–37
6–38
6–41
6–49
6–49
6–51
6–51
6–54
6–56
6–61
.
.
.
.
.
.
.
.
.
.
.
.
.
.
.
.
.
.
.
.
.
.
.
.
.
.
.
.
.
.
7–1
7–2
7–3
7–3
7–5
7–8
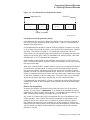
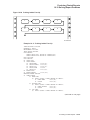
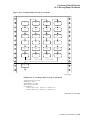
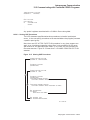
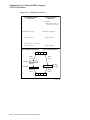
......
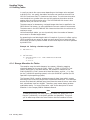
Record
......
......
......
......
......
8–1
6.1
6.1.1
6.1.2
6.1.3
6.1.4
6.2
7 Handling Input/Output Exception Conditions
7.1
7.2
7.3
7.3.1
7.3.2
7.4
Planning for the AT END Condition . . . . . . .
Planning for the Invalid Key Condition . . . . .
Using File Status Values and OpenVMS RMS
File Status Values . . . . . . . . . . . . . . . . . .
RMS Completion Codes (OpenVMS) . . . .
Using Declarative USE Procedures . . . . . . . .
...............
...............
Completion Codes
...............
...............
...............
.
.
.
.
.
.
.
.
.
.
.
.
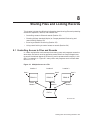
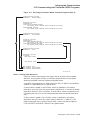
8 Sharing Files and Locking Records
8.1
8.2
8.3
8.3.1
8.3.2
8.3.3
8.3.4
8.3.5
8.3.6
8.4
8.4.1
8.4.2
8.4.3
Controlling Access to Files and Records . . . . . . . . . . . . . . . . . . . . .
Choosing X/Open Standard or Compaq Standard File Sharing and
Locking (Alpha) . . . . . . . . . . . . . . . . . . . . . . . . . . . . . . . . . . . . . . .
Ensuring Successful File Sharing . . . . . . . . . . . . . . . . . . . . . . . . .
Providing Disk Residency . . . . . . . . . . . . . . . . . . . . . . . . . . . . .
Using File Protection . . . . . . . . . . . . . . . . . . . . . . . . . . . . . . .
Determining the Intended Access Mode to a File . . . . . . . . . . .
Specifying File Access Using X/Open Standard File Sharing
(Alpha) . . . . . . . . . . . . . . . . . . . . . . . . . . . . . . . . . . . . . . . . . . .
Specifying File Access Using Compaq Standard File Sharing .
Error Handling for File Sharing . . . . . . . . . . . . . . . . . . . . . . .
Ensuring Successful Record Locking . . . . . . . . . . . . . . . . . . . . . . .
X/Open Standard Record Locking (Alpha) . . . . . . . . . . . . . . . .
Compaq Standard Record Locking . . . . . . . . . . . . . . . . . . . . .
Error Handling for Record Locking . . . . . . . . . . . . . . . . . . . . .
.
.
.
.
.
.
.
.
.
.
.
.
.
.
.
.
.
.
.
.
.
.
.
.
.
.
.
.
.
.
.
.
.
.
.
.
.
.
.
.
.
.
8–3
8–4
8–4
8–4
8–6
8–6
8–8
8–12
8–16
8–17
8–18
8–23
vii
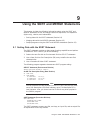
9 Using the SORT and MERGE Statements
Sorting Data with the SORT Statement . . . . . . . . . . . . . . . . . . . . . . .
File Organization Considerations for Sorting . . . . . . . . . . . . . . . . .
Specifying Sort Parameters with the ASCENDING and
DESCENDING KEY Phrases . . . . . . . . . . . . . . . . . . . . . . . . . . . . .
9.1.3
Resequencing Files with the USING and GIVING Phrases . . . . . .
9.1.4
Manipulating Data Before and After Sorting with the INPUT
PROCEDURE and OUTPUT PROCEDURE Phrases . . . . . . . . . . .
9.1.5
Maintaining the Input Order of Records Using the WITH
DUPLICATES IN ORDER Phrase . . . . . . . . . . . . . . . . . . . . . . . . .
9.1.6
Specifying Non-ASCII Collating Sequences with the COLLATING
SEQUENCE IS Alphabet-Name Phrase . . . . . . . . . . . . . . . . . . . . .
9.1.7
Multiple Sorting . . . . . . . . . . . . . . . . . . . . . . . . . . . . . . . . . . . . . . .
9.1.8
Sorting Variable-Length Records . . . . . . . . . . . . . . . . . . . . . . . . . .
9.1.9
Preventing I/O Aborts . . . . . . . . . . . . . . . . . . . . . . . . . . . . . . . . . .
9.1.10
Sorting Tables (Alpha) . . . . . . . . . . . . . . . . . . . . . . . . . . . . . . . . . .
9.1.11
Sorting at the Operating System Level . . . . . . . . . . . . . . . . . . . . .
9.2
Merging Data with the MERGE Statement . . . . . . . . . . . . . . . . . . . . .
9.3
Sample Programs Using the SORT and MERGE Statements . . . . . . .
9.1
9.1.1
9.1.2
...
...
9–1
9–2
...
...
9–3
9–3
...
9–3
...
9–6
.
.
.
.
.
.
.
.
.
.
.
.
.
.
.
.
.
.
.
.
.
.
.
.
9–7
9–7
9–8
9–9
9–9
9–9
9–10
9–10
10.1
Designing a Report . . . . . . . . . . . . . . . . . . . . . . . . . . . . . . . . . . . . . . . . . .
10.2
Components of a Report . . . . . . . . . . . . . . . . . . . . . . . . . . . . . . . . . . . . . . .
10.3
Accumulating and Reporting Totals . . . . . . . . . . . . . . . . . . . . . . . . . . . . . .
10.4
The Logical Page and the Physical Page . . . . . . . . . . . . . . . . . . . . . . . . . .
10.5
Programming a Conventional File Report . . . . . . . . . . . . . . . . . . . . . . . . .
10.5.1
Defining the Logical Page in a Conventional Report . . . . . . . . . . . . . .
10.5.2
Controlling the Spacing in a Conventional Report . . . . . . . . . . . . . . . .
10.5.3
Advancing to the Next Logical Page in a Conventional Report . . . . . .
10.5.3.1
Programming for the Page-Overflow Condition in a Conventional
Report . . . . . . . . . . . . . . . . . . . . . . . . . . . . . . . . . . . . . . . . . . . . . .
10.5.3.2
Using a Line Counter . . . . . . . . . . . . . . . . . . . . . . . . . . . . . . . . . . .
10.5.4
Printing the Conventional Report . . . . . . . . . . . . . . . . . . . . . . . . . . . .
10.5.5
A Conventional File Report Example . . . . . . . . . . . . . . . . . . . . . . . . . .
10.6
Programming a Linage-File Compaq COBOL Report . . . . . . . . . . . . . . . . .
10.6.1
Defining the Logical Page in a Linage-File Report . . . . . . . . . . . . . . . .
10.6.2
Controlling the Spacing in a Linage-File Report . . . . . . . . . . . . . . . . .
10.6.3
Using the LINAGE-COUNTER . . . . . . . . . . . . . . . . . . . . . . . . . . . . . .
10.6.4
Advancing to the Next Logical Page in a Linage-File Report . . . . . . . .
10.6.5
Programming for the End-of-Page and Page-Overflow Condition . . . . .
10.6.6
Printing a Linage-File Report . . . . . . . . . . . . . . . . . . . . . . . . . . . . . . .
10.6.7
A Linage-File Report Example . . . . . . . . . . . . . . . . . . . . . . . . . . . . . . .
10.7
Modes for Printing Reports . . . . . . . . . . . . . . . . . . . . . . . . . . . . . . . . . . . .
10.7.1
Spooling to a Mass Storage Device . . . . . . . . . . . . . . . . . . . . . . . . . . . .
10.8
Programming a Report Writer Report . . . . . . . . . . . . . . . . . . . . . . . . . . . .
10.8.1
Using the REPORT Clause in the File Section . . . . . . . . . . . . . . . . . .
10.8.2
Defining the Report Section and the Report File . . . . . . . . . . . . . . . . .
10.8.3
Defining a Report Writer Logical Page with the PAGE Clause . . . . . .
10.8.4
Describing Report Group Description Entries . . . . . . . . . . . . . . . . . . .
10.8.5
Vertical Spacing for the Logical Page . . . . . . . . . . . . . . . . . . . . . . . . . .
10.8.6
Horizontal Spacing for the Logical Page . . . . . . . . . . . . . . . . . . . . . . .
10.8.7
Assigning a Value in a Print Line . . . . . . . . . . . . . . . . . . . . . . . . . . . .
10.8.8
Defining the Source for a Print Field . . . . . . . . . . . . . . . . . . . . . . . . . .
10–1
10–1
10–4
10–5
10–6
10–6
10–7
10–7
10 Producing Printed Reports
viii
10–7
10–8
10–9
10–9
10–12
10–13
10–14
10–14
10–14
10–15
10–19
10–20
10–23
10–23
10–24
10–24
10–24
10–25
10–25
10–28
10–29
10–30
10–30
10.8.9
Specifying Multiple Reports . . . . . . . . . . . . . . . . . . . . . . . . . . . . . . . . .
10.8.10
Generating and Controlling Report Headings and Footings . . . . . . . . .
10.8.11
Defining and Incrementing Totals . . . . . . . . . . . . . . . . . . . . . . . . . . . .
10.8.11.1
Subtotaling . . . . . . . . . . . . . . . . . . . . . . . . . . . . . . . . . . . . . . . . . .
10.8.11.2
Crossfooting . . . . . . . . . . . . . . . . . . . . . . . . . . . . . . . . . . . . . . . . . .
10.8.11.3
Rolling Forward . . . . . . . . . . . . . . . . . . . . . . . . . . . . . . . . . . . . . . .
10.8.11.4
RESET Option . . . . . . . . . . . . . . . . . . . . . . . . . . . . . . . . . . . . . . . .
10.8.11.5
UPON Option . . . . . . . . . . . . . . . . . . . . . . . . . . . . . . . . . . . . . . . . .
10.8.12
Restricting Print Items . . . . . . . . . . . . . . . . . . . . . . . . . . . . . . . . . . . .
10.8.13
Processing a Report Writer Report . . . . . . . . . . . . . . . . . . . . . . . . . . . .
10.8.13.1
Initiating the Report . . . . . . . . . . . . . . . . . . . . . . . . . . . . . . . . . . .
10.8.13.2
Generating a Report Writer Report . . . . . . . . . . . . . . . . . . . . . . . .
10.8.13.3
Automatic Operations of the GENERATE Statement . . . . . . . . . .
10.8.13.4
Ending Report Writer Processing . . . . . . . . . . . . . . . . . . . . . . . . . .
10.8.13.5
Applying the USE BEFORE REPORTING Statement . . . . . . . . . .
10.8.13.6
Suppressing a Report Group . . . . . . . . . . . . . . . . . . . . . . . . . . . . .
10.8.14
Selecting a Report Writer Report Type . . . . . . . . . . . . . . . . . . . . . . . . .
10.8.14.1
Detail Reporting . . . . . . . . . . . . . . . . . . . . . . . . . . . . . . . . . . . . . . .
10.8.14.2
Summary Reporting . . . . . . . . . . . . . . . . . . . . . . . . . . . . . . . . . . . .
10.9
Report Writer Examples . . . . . . . . . . . . . . . . . . . . . . . . . . . . . . . . . . . . . . .
10.9.1
Input Data . . . . . . . . . . . . . . . . . . . . . . . . . . . . . . . . . . . . . . . . . . . . . .
10.9.2
EX1006—Detail Report Program . . . . . . . . . . . . . . . . . . . . . . . . . . . . .
10.9.3
EX1007—Detail Report Program . . . . . . . . . . . . . . . . . . . . . . . . . . . . .
10.9.4
EX1008—Detail Report Program . . . . . . . . . . . . . . . . . . . . . . . . . . . . .
10.9.5
EX1009—Detail Report Program . . . . . . . . . . . . . . . . . . . . . . . . . . . . .
10.9.6
EX1010—Summary Report Program . . . . . . . . . . . . . . . . . . . . . . . . . .
10.10 Solving Report Problems . . . . . . . . . . . . . . . . . . . . . . . . . . . . . . . . . . . . . .
10.10.1
Printing More Than One Logical Line on a Single Physical Line . . . . .
10.10.2
Group Indicating . . . . . . . . . . . . . . . . . . . . . . . . . . . . . . . . . . . . . . . . .
10.10.3
Fitting Reports on the Page . . . . . . . . . . . . . . . . . . . . . . . . . . . . . . . . .
10.10.4
Printing Totals Before Detail Lines . . . . . . . . . . . . . . . . . . . . . . . . . . .
10.10.5
Underlining Items in Your Reports . . . . . . . . . . . . . . . . . . . . . . . . . . .
10.10.6
Bolding Items in Your Reports . . . . . . . . . . . . . . . . . . . . . . . . . . . . . . .
10–31
10–31
10–33
10–33
10–34
10–34
10–35
10–35
10–36
10–37
10–37
10–38
10–38
10–39
10–40
10–41
10–41
10–41
10–42
10–42
10–42
10–43
10–48
10–56
10–64
10–73
10–82
10–82
10–87
10–88
10–88
10–89
10–89
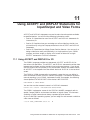
11 Using ACCEPT and DISPLAY Statements for Input/Output and
Video Forms
Using ACCEPT and DISPLAY for I/O . . . . . . . . . . . . . . . . . . . . . . . . . . . .
Designing Video Forms with ACCEPT and DISPLAY Statement
Extensions . . . . . . . . . . . . . . . . . . . . . . . . . . . . . . . . . . . . . . . . . . . . . . . .
11.2.1
Clearing a Screen Area . . . . . . . . . . . . . . . . . . . . . . . . . . . . . . . . . . . .
11.2.2
Horizontal and Vertical Positioning of the Cursor . . . . . . . . . . . . . . . .
11.2.3
Assigning Character Attributes to Your Format Entries . . . . . . . . . . .
11.2.4
Using the CONVERSION Phrase to Display Numeric Data . . . . . . . .
11.2.5
Handling Data with ACCEPT Options . . . . . . . . . . . . . . . . . . . . . . . . .
11.2.5.1
Using CONVERSION with ACCEPT Data . . . . . . . . . . . . . . . . . . .
11.2.5.2
Using ON EXCEPTION When Accepting Data with
CONVERSION . . . . . . . . . . . . . . . . . . . . . . . . . . . . . . . . . . . . . . . .
11.2.5.3
Protecting the Screen . . . . . . . . . . . . . . . . . . . . . . . . . . . . . . . . . . .
11.2.5.4
Using NO ECHO with ACCEPT Data . . . . . . . . . . . . . . . . . . . . . .
11.2.5.5
Assigning Default Values to Data Fields . . . . . . . . . . . . . . . . . . . .
11.2.6
Using Terminal Keys to Define Special Program Functions . . . . . . . . .
11.2.7
Using the EDITING Phrase . . . . . . . . . . . . . . . . . . . . . . . . . . . . . . . . .
11.1
11.2
11–1
11–3
11–4
11–5
11–8
11–9
11–12
11–13
11–13
11–13
11–15
11–17
11–20
11–28
ix
Designing Video Forms with Screen Section ACCEPT and DISPLAY
(Alpha) . . . . . . . . . . . . . . . . . . . . . . . . . . . . . . . . . . . . . . . . . . . . . . . . . . . .
11.3.1
Using Screen Section Options (Alpha) . . . . . . . . . . . . . . . . . . . . . . . . .
11.3.1.1
Comparison of Screen Section Extensions (Alpha) with Other
Extensions of ACCEPT and DISPLAY . . . . . . . . . . . . . . . . . . . . . .
11.3
11–31
11–32
11–34
12 Interprogram Communication
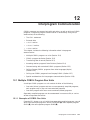
12.1
Multiple COBOL Program Run Units . . . . . . . . . . . . . . . . . . . . . . . . . . . .
12.1.1
Examples of COBOL Run Units . . . . . . . . . . . . . . . . . . . . . . . . . . . . . .
12.1.2
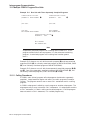
Calling Procedures . . . . . . . . . . . . . . . . . . . . . . . . . . . . . . . . . . . . . . . .
12.2
COBOL Program Attributes . . . . . . . . . . . . . . . . . . . . . . . . . . . . . . . . . . . .
12.2.1
The INITIAL Clause . . . . . . . . . . . . . . . . . . . . . . . . . . . . . . . . . . . . . .
12.2.2
The EXTERNAL Clause . . . . . . . . . . . . . . . . . . . . . . . . . . . . . . . . . . . .
12.3
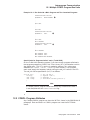
Transferring Flow of Control . . . . . . . . . . . . . . . . . . . . . . . . . . . . . . . . . . .
12.3.1
The CALL Statement . . . . . . . . . . . . . . . . . . . . . . . . . . . . . . . . . . . . . .
12.3.2
Nesting CALL Statements . . . . . . . . . . . . . . . . . . . . . . . . . . . . . . . . . .
12.3.3
The EXIT PROGRAM Statement . . . . . . . . . . . . . . . . . . . . . . . . . . . . .
12.3.4
CALL Literal Versus CALL Data Name . . . . . . . . . . . . . . . . . . . . . . . .
12.4
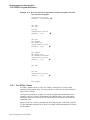
Accessing Another Program’s Data Division . . . . . . . . . . . . . . . . . . . . . . . .
12.4.1
The USING Phrase . . . . . . . . . . . . . . . . . . . . . . . . . . . . . . . . . . . . . . .
12.4.2
The Linkage Section . . . . . . . . . . . . . . . . . . . . . . . . . . . . . . . . . . . . . .
12.5
Communicating with Contained COBOL Programs . . . . . . . . . . . . . . . . .
12.5.1
The COMMON Clause . . . . . . . . . . . . . . . . . . . . . . . . . . . . . . . . . . . . .
12.5.2
The GLOBAL Clause . . . . . . . . . . . . . . . . . . . . . . . . . . . . . . . . . . . . . .
12.5.2.1
Sharing GLOBAL Data . . . . . . . . . . . . . . . . . . . . . . . . . . . . . . . . .
12.5.2.2
Sharing GLOBAL Files . . . . . . . . . . . . . . . . . . . . . . . . . . . . . . . . .
12.5.2.3
Sharing USE Procedures . . . . . . . . . . . . . . . . . . . . . . . . . . . . . . . .
12.5.2.4
Sharing Other Resources . . . . . . . . . . . . . . . . . . . . . . . . . . . . . . . .
12.6
Calling Compaq COBOL Programs from Other Languages (Alpha) . . . . . .
12.6.1
Calling COBOL Programs from C (Alpha) . . . . . . . . . . . . . . . . . . . . . .
12.7
Calling Non-COBOL Programs from Compaq COBOL . . . . . . . . . . . . . . . .
12.7.1
Calling a Fortran Program . . . . . . . . . . . . . . . . . . . . . . . . . . . . . . . . . .
12.7.2
Calling a BASIC Program . . . . . . . . . . . . . . . . . . . . . . . . . . . . . . . . . .
12.7.3
Calling a C Program . . . . . . . . . . . . . . . . . . . . . . . . . . . . . . . . . . . . . .
12.8
Special Considerations for Interprogram Communication . . . . . . . . . . . . .
12.8.1
CALL and CANCEL Arguments . . . . . . . . . . . . . . . . . . . . . . . . . . . . .
12.8.2
Calling OpenVMS Alpha Shareable Images (OpenVMS) . . . . . . . . . . .
12.8.3
Calling Tru64 UNIX Shareable Objects (Tru64 UNIX) . . . . . . . . . . . . .
12.8.4
Case Sensitivity on Tru64 UNIX . . . . . . . . . . . . . . . . . . . . . . . . . . . . .
12.8.4.1
Linker Case Sensitivity . . . . . . . . . . . . . . . . . . . . . . . . . . . . . . . . .
12.8.4.2
Calling C Programs from Compaq COBOL on Tru64 UNIX . . . . . .
12.8.4.3
Calling COBOL Programs from C on Tru64 UNIX . . . . . . . . . . . .
12.8.5
Additional Information . . . . . . . . . . . . . . . . . . . . . . . . . . . . . . . . . . . . .
12–1
12–1
12–2
12–3
12–4
12–5
12–5
12–5
12–6
12–8
12–9
12–10
12–11
12–13
12–14
12–15
12–16
12–16
12–16
12–17
12–19
12–20
12–20
12–26
12–27
12–28
12–30
12–31
12–31
12–32
12–32
12–32
12–32
12–33
12–33
12–34
13 Using Compaq COBOL in the Alpha or VAX Common Language
Environment
13.1
Routines, Procedures, and Functions . . . . . . . . . . . . . . . . . . . . . . . . . . . . .
13.2
The OpenVMS Calling Standard (OpenVMS) . . . . . . . . . . . . . . . . . . . . . .
13.2.1
Register and Stack Usage (Alpha) . . . . . . . . . . . . . . . . . . . . . . . . . . . .
13.2.2
Return of the Function Value . . . . . . . . . . . . . . . . . . . . . . . . . . . . . . . .
13.2.3
The Argument List . . . . . . . . . . . . . . . . . . . . . . . . . . . . . . . . . . . . . . . .
13.3
OpenVMS System Routines (OpenVMS) . . . . . . . . . . . . . . . . . . . . . . . . . .
x
13–1
13–2
13–2
13–3
13–3
13–3
13.3.1
OpenVMS Run-Time Library Routines . . . . . . . . . . . . . . . . . . . . . . . .
13.3.2
System Services . . . . . . . . . . . . . . . . . . . . . . . . . . . . . . . . . . . . . . . . . .
13.4
Calling Routines . . . . . . . . . . . . . . . . . . . . . . . . . . . . . . . . . . . . . . . . . . . .
13.4.1
Determining the Type of Call (OpenVMS) . . . . . . . . . . . . . . . . . . . . . .
13.4.2
Defining the Argument (OpenVMS) . . . . . . . . . . . . . . . . . . . . . . . . . . .
13.4.3
Calling the External Routine (OpenVMS) . . . . . . . . . . . . . . . . . . . . . .
13.4.4
Calling System Routines (OpenVMS) . . . . . . . . . . . . . . . . . . . . . . . . . .
13.4.4.1
System Routine Arguments (OpenVMS) . . . . . . . . . . . . . . . . . . . .
13.4.4.2
Calling a System Routine in a Function Call (OpenVMS) . . . . . . .
13.4.4.3
Calling a System Routine in a Procedure Call (OpenVMS) . . . . . .
13.4.5
Checking the Condition Value (OpenVMS) . . . . . . . . . . . . . . . . . . . . . .
13.4.5.1
Library Return Status and Condition Value Symbols
(OpenVMS) . . . . . . . . . . . . . . . . . . . . . . . . . . . . . . . . . . . . . . . . . .
13.4.6
Locating the Result (OpenVMS) . . . . . . . . . . . . . . . . . . . . . . . . . . . . . .
13.5
Establishing and Removing User Condition Handlers (OpenVMS) . . . . . .
13.6
Examples (OpenVMS) . . . . . . . . . . . . . . . . . . . . . . . . . . . . . . . . . . . . . . . .
13–4
13–4
13–5
13–5
13–6
13–7
13–8
13–8
13–11
13–13
13–13
13–15
13–15
13–15
13–19
14 Using the REFORMAT Utility
.
.
.
.
14–1
14–2
14–3
14–4
Specifying Optimization on the Compiler Command Line (Alpha) . . . . . . .
Specifying Alignment of Data for Optimum Performance (Alpha) . . . . . . .
Using COMP Data Items for Speed . . . . . . . . . . . . . . . . . . . . . . . . . . . . .
Other Ways to Improve the Performance of Operations on Numeric
Data . . . . . . . . . . . . . . . . . . . . . . . . . . . . . . . . . . . . . . . . . . . . . . . . . . . . . .
15.4.1
Mixing Scale Factors and Data Types . . . . . . . . . . . . . . . . . . . . . . . . .
15.4.2
Limiting Significant Digits . . . . . . . . . . . . . . . . . . . . . . . . . . . . . . . . . .
15.4.3
Reducing the Compexity of Arithmetic Expressions . . . . . . . . . . . . . . .
15.4.4
Selection of Data Types (OpenVMS) . . . . . . . . . . . . . . . . . . . . . . . . . . .
15.5
Choices in Procedure Division Statements . . . . . . . . . . . . . . . . . . . . . . . . .
15.5.1
Using Indexing Instead of Subscripting . . . . . . . . . . . . . . . . . . . . . . . .
15.5.2
Using SEARCH ALL Instead of SEARCH . . . . . . . . . . . . . . . . . . . . . .
15.5.3
Selecting Hypersort or SORT-32 for Sorting Tasks . . . . . . . . . . . . . . .
15.5.4
Minimizing USE Procedures with LINKAGE SECTION References
.......................................................
15.6
I/O Operations . . . . . . . . . . . . . . . . . . . . . . . . . . . . . . . . . . . . . . . . . . . . .
15.6.1
Using the APPLY Clause . . . . . . . . . . . . . . . . . . . . . . . . . . . . . . . . . .
15.6.1.1
Using the PREALLOCATION Phrase of the APPLY Clause
(OpenVMS) . . . . . . . . . . . . . . . . . . . . . . . . . . . . . . . . . . . . . . . . . .
15.6.1.2
Using the EXTENSION Phrase of the APPLY Clause
(OpenVMS) . . . . . . . . . . . . . . . . . . . . . . . . . . . . . . . . . . . . . . . . . .
15.6.1.3
Using the DEFERRED-WRITE Phrase of the APPLY Clause
(OpenVMS) . . . . . . . . . . . . . . . . . . . . . . . . . . . . . . . . . . . . . . . . . .
15.6.1.4
Using the FILL-SIZE ON Phrase of the APPLY Clause
(OpenVMS) . . . . . . . . . . . . . . . . . . . . . . . . . . . . . . . . . . . . . . . . . .
15.6.1.5
Using the WINDOW Phrase of the APPLY Clause (OpenVMS) . . .
15.6.2
Using Multiple Buffers . . . . . . . . . . . . . . . . . . . . . . . . . . . . . . . . . . . . .
15.6.3
Sharing Record Areas . . . . . . . . . . . . . . . . . . . . . . . . . . . . . . . . . . . . .
15–1
15–5
15–5
14.1
14.2
14.3
14.4
Running the REFORMAT Utility . . . .
ANSI-to-Terminal Format Conversion
Terminal-to-ANSI Format Conversion
REFORMAT Error Messages . . . . . . .
.
.
.
.
.
.
.
.
.
.
.
.
.
.
.
.
.
.
.
.
.
.
.
.
.
.
.
.
.
.
.
.
.
.
.
.
.
.
.
.
.
.
.
.
.
.
.
.
.
.
.
.
.
.
.
.
.
.
.
.
.
.
.
.
.
.
.
.
.
.
.
.
.
.
.
.
.
.
.
.
.
.
.
.
.
.
.
.
.
.
.
.
.
.
.
.
.
.
.
.
.
.
.
.
.
.
.
.
15 Optimizing Your Compaq COBOL Program
15.1
15.2
15.3
15.4
15–7
15–7
15–7
15–8
15–8
15–8
15–8
15–9
15–9
15–10
15–10
15–10
15–11
15–11
15–12
15–12
15–12
15–12
15–13
xi
15.6.4
Using COMP Unsigned Longword Integers . . .
15.7
Optimizing File Design (OpenVMS) . . . . . . . . . . . .
15.7.1
Sequential Files . . . . . . . . . . . . . . . . . . . . . . . .
15.7.2
Relative Files . . . . . . . . . . . . . . . . . . . . . . . . . .
15.7.2.1
Maximum Record Number (MRN) . . . . . . .
15.7.2.2
Cell Size . . . . . . . . . . . . . . . . . . . . . . . . . . .
15.7.2.3
Bucket Size . . . . . . . . . . . . . . . . . . . . . . . .
15.7.2.4
File Size . . . . . . . . . . . . . . . . . . . . . . . . . . .
15.7.3
Indexed Files . . . . . . . . . . . . . . . . . . . . . . . . . .
15.7.3.1
Optimizing Indexed File I/O . . . . . . . . . . . .
15.7.3.2
Calculating Key Index Levels . . . . . . . . . . .
15.7.3.3
Caching Index Roots . . . . . . . . . . . . . . . . .
15.8
Image Activation Optimization (Tru64 UNIX) . . . .
.
.
.
.
.
.
.
.
.
.
.
.
.
.
.
.
.
.
.
.
.
.
.
.
.
.
.
.
.
.
.
.
.
.
.
.
.
.
.
.
.
.
.
.
.
.
.
.
.
.
.
.
.
.
.
.
.
.
.
.
.
.
.
.
.
.
.
.
.
.
.
.
.
.
.
.
.
.
.
.
.
.
.
.
.
.
.
.
.
.
.
.
.
.
.
.
.
.
.
.
.
.
.
.
.
.
.
.
.
.
.
.
.
.
.
.
.
.
.
.
.
.
.
.
.
.
.
.
.
.
.
.
.
.
.
.
.
.
.
.
.
.
.
.
.
.
.
.
.
.
.
.
.
.
.
.
.
.
.
.
.
.
.
.
.
.
.
.
.
.
.
.
.
.
.
.
.
.
.
.
.
.
.
.
.
.
.
.
.
.
.
.
.
.
.
.
.
.
.
.
.
.
.
.
.
.
.
.
.
.
.
.
.
.
.
.
.
.
.
.
.
.
.
.
.
.
.
.
.
.
.
.
.
.
15–15
15–15
15–15
15–16
15–16
15–16
15–17
15–18
15–19
15–20
15–24
15–25
15–25
16.1
Managing Memory Granularity (Alpha) . . . . . . . . . . . . . . . . . . . . . . . . . . .
16.2
Using the VOLATILE Compiler Directive (Alpha) . . . . . . . . . . . . . . . . . . .
16.3
Aligning Data for Performance and Compatibility (Alpha) . . . . . . . . . . . . .
16.3.1
Data Boundaries (Alpha) . . . . . . . . . . . . . . . . . . . . . . . . . . . . . . . . . . .
16.3.2
Data Field Padding (Alpha) . . . . . . . . . . . . . . . . . . . . . . . . . . . . . . . . .
16.3.3
Alignment Directives, Qualifiers, and Flags (Alpha) . . . . . . . . . . . . . .
16.3.4
Specifying Alignment at Compile Time (Alpha) . . . . . . . . . . . . . . . . . .
16.4
Using Alignment Directives, Qualifiers, and Flags (Alpha) . . . . . . . . . . . .
16.4.1
Order of Alignment Operations (Alpha) . . . . . . . . . . . . . . . . . . . . . . . .
16.4.2
Nesting Alignment Directives (Alpha) . . . . . . . . . . . . . . . . . . . . . . . . .
16.4.2.1
SYNCHRONIZED Clause . . . . . . . . . . . . . . . . . . . . . . . . . . . . . . .
16.4.3
Comparing Alignment Directive Effects . . . . . . . . . . . . . . . . . . . . . . .
16–1
16–3
16–3
16–4
16–4
16–4
16–5
16–6
16–6
16–7
16–8
16–9
16 Managing Memory and Data Access
A Compiler Implementation Specifications
B Compaq COBOL on Three Platforms: Compatibility and Migration
B.1
B.2
B.3
B.3.1
B.3.2
B.3.3
B.4
B.4.1
B.4.2
B.4.2.1
B.4.2.2
B.4.2.3
B.4.2.4
B.4.2.5
B.4.2.6
B.4.2.7
B.4.2.8
B.4.3
xii
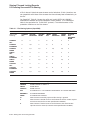
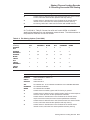
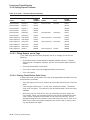
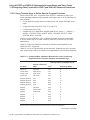
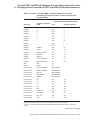
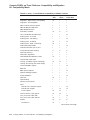
Compatibility Matrix . . . . . . . . . . . . . . . . . . . . . . . . . . . . . . . . . . . .
Differences in Extensions and Other Features . . . . . . . . . . . . . . . . .
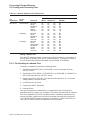
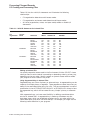
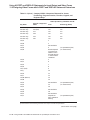
Command-Line Qualifiers (Options or Flags) . . . . . . . . . . . . . . . . . .
Qualifiers and Flags Shared by Compaq COBOL on Alpha and
VAX . . . . . . . . . . . . . . . . . . . . . . . . . . . . . . . . . . . . . . . . . . . . . .
Alpha-Specific COBOL Qualifiers and Flags . . . . . . . . . . . . . . .
Qualifiers Only on Compaq COBOL for OpenVMS VAX . . . . . .
Compaq COBOL Behavior Differences on VAX and Alpha . . . . . . .
Program Structure Messages . . . . . . . . . . . . . . . . . . . . . . . . . . .
Program Listing Differences . . . . . . . . . . . . . . . . . . . . . . . . . . .
Machine Code . . . . . . . . . . . . . . . . . . . . . . . . . . . . . . . . . . .
Module Names . . . . . . . . . . . . . . . . . . . . . . . . . . . . . . . . . . .
COPY and REPLACE Statements . . . . . . . . . . . . . . . . . . . .
Multiple COPY Statements . . . . . . . . . . . . . . . . . . . . . . . . .
COPY Insert Statement . . . . . . . . . . . . . . . . . . . . . . . . . . . .
REPLACE and COPY REPLACING Statements . . . . . . . . .
DATE COMPILED Statement . . . . . . . . . . . . . . . . . . . . . . .
Compiler Listings and Separate Compilations (OpenVMS) .
Output Formatting . . . . . . . . . . . . . . . . . . . . . . . . . . . . . . . . . . .
.....
.....
.....
.
.
.
.
.
.
.
.
.
.
.
.
.
.
.
.
.
.
.
.
.
.
.
.
.
.
.
.
.
.
.
.
.
.
.
.
.
.
.
.
.
.
.
.
.
.
.
.
.
.
.
.
.
.
.
.
.
.
.
.
.
.
.
.
.
.
.
.
.
.
.
.
.
.
.
B–1
B–3
B–4
B–4
B–6
B–7
B–9
B–9
B–10
B–10
B–10
B–10
B–11
B–12
B–13
B–14
B–14
B–15
B.4.4
Compaq COBOL Statement Differences on Alpha and VAX . . . . . . . . .
B.4.4.1
ACCEPT and DISPLAY Statements . . . . . . . . . . . . . . . . . . . . . . . .
B.4.4.2
LINAGE Clause . . . . . . . . . . . . . . . . . . . . . . . . . . . . . . . . . . . . . . .
B.4.4.3
MOVE Statement . . . . . . . . . . . . . . . . . . . . . . . . . . . . . . . . . . . . . .
B.4.4.4
SEARCH Statement . . . . . . . . . . . . . . . . . . . . . . . . . . . . . . . . . . . .
B.4.5
System Return Codes . . . . . . . . . . . . . . . . . . . . . . . . . . . . . . . . . . . . . .
B.4.6
Diagnostic Messages . . . . . . . . . . . . . . . . . . . . . . . . . . . . . . . . . . . . . .
B.4.7
Storage for Double-Precision Data Items . . . . . . . . . . . . . . . . . . . . . . .
B.4.8
File Status Values . . . . . . . . . . . . . . . . . . . . . . . . . . . . . . . . . . . . . . . .
B.4.9
RMS Special Registers (OpenVMS) . . . . . . . . . . . . . . . . . . . . . . . . . . .
B.4.10
Calling Shareable Images . . . . . . . . . . . . . . . . . . . . . . . . . . . . . . . . . .
B.4.11
Sharing Common Blocks (OpenVMS) . . . . . . . . . . . . . . . . . . . . . . . . . .
B.4.12
Arithmetic Operations . . . . . . . . . . . . . . . . . . . . . . . . . . . . . . . . . . . . .
B.5
Compaq COBOL Differences Between Releases and Across Operating
Systems . . . . . . . . . . . . . . . . . . . . . . . . . . . . . . . . . . . . . . . . . . . . . . . . . . .
B.5.1
REWRITE . . . . . . . . . . . . . . . . . . . . . . . . . . . . . . . . . . . . . . . . . . . . . .
B.5.2
File Sharing and Record Locking . . . . . . . . . . . . . . . . . . . . . . . . . . . . .
B.5.3
VFC File Format . . . . . . . . . . . . . . . . . . . . . . . . . . . . . . . . . . . . . . . . .
B.5.4
File Attribute Checking (Tru64 UNIX) . . . . . . . . . . . . . . . . . . . . . . . . .
B.5.5
Indexed Files . . . . . . . . . . . . . . . . . . . . . . . . . . . . . . . . . . . . . . . . . . . .
B.5.6
RMS Special Register References in Your Code . . . . . . . . . . . . . . . . . .
B.6
File Compatibility Across Languages and Platforms . . . . . . . . . . . . . . . . .
B.7
LIB$INITIALIZE Interaction Between C and COBOL . . . . . . . . . . . . . . . .
B.8
Reserved Words . . . . . . . . . . . . . . . . . . . . . . . . . . . . . . . . . . . . . . . . . . . . .
B.9
Debugger Support Differences . . . . . . . . . . . . . . . . . . . . . . . . . . . . . . . . .
B.10
DECset/LSE Support Differences . . . . . . . . . . . . . . . . . . . . . . . . . . . . . . . .
B.11
DBMS Support . . . . . . . . . . . . . . . . . . . . . . . . . . . . . . . . . . . . . . . . . . . . . .
B.11.1
Compiling on Tru64 UNIX . . . . . . . . . . . . . . . . . . . . . . . . . . . . . . . . . .
B.11.2
Multistream DBMS DML . . . . . . . . . . . . . . . . . . . . . . . . . . . . . . . . . . .
B–15
B–15
B–16
B–16
B–17
B–17
B–19
B–20
B–20
B–20
B–21
B–21
B–21
B–23
B–23
B–24
B–24
B–25
B–25
B–25
B–26
B–27
B–27
B–27
B–27
B–27
B–28
B–28
C Programming Productivity Tools
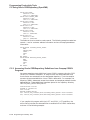
C.1
C.2
C.3
C.3.1
C.3.2
C.3.3
C.3.3.1
C.4
C.4.1
C.4.2
C.4.3
C.4.4
C.5
C.5.1
C.5.2
C.5.3
C.5.4
C.5.5
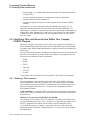
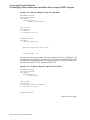
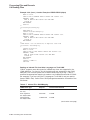
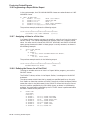
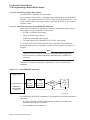
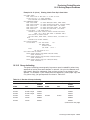
Debugging Tools for Compaq COBOL Programs . . . . . . . . . . . . . . . . . . .
Ladebug Debugger (Tru64 UNIX) . . . . . . . . . . . . . . . . . . . . . . . . . . . . . .
OpenVMS Debugger (OpenVMS) . . . . . . . . . . . . . . . . . . . . . . . . . . . . . . .
Notes on Compaq COBOL Support . . . . . . . . . . . . . . . . . . . . . . . . . .
Notes on Debugging Optimized Programs (Alpha) . . . . . . . . . . . . . . .
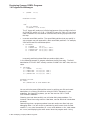
Sample Debugging Session (Alpha) . . . . . . . . . . . . . . . . . . . . . . . . . .
Separately Compiled Programs . . . . . . . . . . . . . . . . . . . . . . . . . .
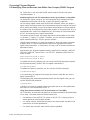
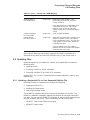
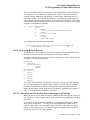
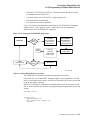
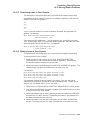
Language-Sensitive Editor (LSE) and the Source Code Analyzer (SCA)
(OpenVMS) . . . . . . . . . . . . . . . . . . . . . . . . . . . . . . . . . . . . . . . . . . . . . . .
Notes on Compaq COBOL Support . . . . . . . . . . . . . . . . . . . . . . . . . .
Preparing an SCA Library . . . . . . . . . . . . . . . . . . . . . . . . . . . . . . . . .
Starting and Terminating an LSE or an SCA Session . . . . . . . . . . . .
Compiling from Within LSE . . . . . . . . . . . . . . . . . . . . . . . . . . . . . . . .
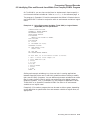
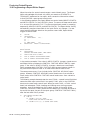
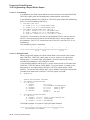
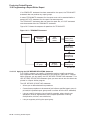
Using Oracle CDD/Repository (OpenVMS) . . . . . . . . . . . . . . . . . . . . . . . .
Creating Record and Field Definitions . . . . . . . . . . . . . . . . . . . . . . . .
Accessing Oracle CDD/Repository Definitions from Compaq COBOL
Programs . . . . . . . . . . . . . . . . . . . . . . . . . . . . . . . . . . . . . . . . . . . . . .
Recording Dependencies . . . . . . . . . . . . . . . . . . . . . . . . . . . . . . . . . . .
Data Types . . . . . . . . . . . . . . . . . . . . . . . . . . . . . . . . . . . . . . . . . . . . .
For More Information . . . . . . . . . . . . . . . . . . . . . . . . . . . . . . . . . . . .
.
.
.
.
.
.
.
C–1
C–3
C–6
C–6
C–7
C–7
C–11
.
.
.
.
.
.
.
C–11
C–12
C–13
C–13
C–14
C–14
C–15
.
.
.
.
C–16
C–17
C–19
C–21
xiii
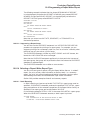
D Porting to Compaq COBOL from Other Compilers (Alpha)
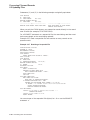
D.1
D.2
D.3
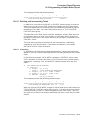
Porting Assistance . . . . . . . . . . . . . . . . . . . . . . . . . . . . . . . . . . . . . . . . . . .
Flagged Foreign Extensions . . . . . . . . . . . . . . . . . . . . . . . . . . . . . . . . . . . .
Implemented Extensions . . . . . . . . . . . . . . . . . . . . . . . . . . . . . . . . . . . . . .
D–1
D–3
D–3
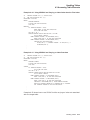
Accessing Environment Variables and Command-Line Arguments . . .
Main Program and Subprograms . . . . . . . . . . . . . . . . . . . . . . . . . . . . .
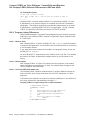
Command Procedure to Compile and Link Subprograms as Shareable
Images (OpenVMS Alpha) . . . . . . . . . . . . . . . . . . . . . . . . . . . . . . . . . .
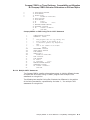
Command Procedure to Compile, Link, and Install Subprograms as
Shareable Images (OpenVMS VAX) . . . . . . . . . . . . . . . . . . . . . . . . . . .
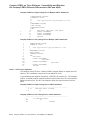
Transfer Vectors (OpenVMS VAX) . . . . . . . . . . . . . . . . . . . . . . . . . . . .
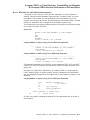
Accessing Logicals and Command-Line Arguments (Alpha) . . . . . . . . .
Using RMS Special Registers to Detect Errors (OpenVMS) . . . . . . . . .
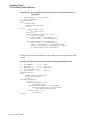
Using RMS-CURRENT Special Registers to Detect Errors
(OpenVMS) . . . . . . . . . . . . . . . . . . . . . . . . . . . . . . . . . . . . . . . . . . . . .
Success/Failure Test . . . . . . . . . . . . . . . . . . . . . . . . . . . . . . . . . . . . . . .
Item Concatenation Using Two MOVE Statements . . . . . . . . . . . . . . .
Sample Record Description Using the MOVE CORRESPONDING
Statement . . . . . . . . . . . . . . . . . . . . . . . . . . . . . . . . . . . . . . . . . . . . . .
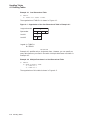
One-Dimensional Table . . . . . . . . . . . . . . . . . . . . . . . . . . . . . . . . . . . .
Multiple Data Items in a One-Dimensional Table . . . . . . . . . . . . . . . .
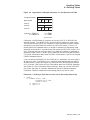
Defining a Table with an Index and an Ascending Search Key . . . . . .
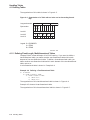
Defining a Two-Dimensional Table . . . . . . . . . . . . . . . . . . . . . . . . . . . .
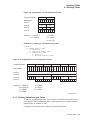
Defining a Three-Dimensional Table . . . . . . . . . . . . . . . . . . . . . . . . . .
Defining a Variable-Length Table . . . . . . . . . . . . . . . . . . . . . . . . . . . . .
Sample Record Description Defining a Table . . . . . . . . . . . . . . . . . . . .
Record Description Containing a COMP SYNC Item . . . . . . . . . . . . . .
Adding an Item Without Changing the Table Size . . . . . . . . . . . . . . . .
How Adding 3 Bytes Adds 4 Bytes to the Element Length . . . . . . . . .
Initializing Tables with the VALUE Clause . . . . . . . . . . . . . . . . . . . . .
Initializing a Table with the OCCURS Clause . . . . . . . . . . . . . . . . . . .
Initializing Mixed Usage Items . . . . . . . . . . . . . . . . . . . . . . . . . . . . . .
Initializing Alphanumeric Items . . . . . . . . . . . . . . . . . . . . . . . . . . . . .
Using a Literal Subscript to Access a Table . . . . . . . . . . . . . . . . . . . . .
Subscripting a Multidimensional Table . . . . . . . . . . . . . . . . . . . . . . . .
Subscripting with Index Name Items . . . . . . . . . . . . . . . . . . . . . . . . . .
Sample Table . . . . . . . . . . . . . . . . . . . . . . . . . . . . . . . . . . . . . . . . . . . .
A Serial Search . . . . . . . . . . . . . . . . . . . . . . . . . . . . . . . . . . . . . . . . . .
Using SEARCH and Varying an Index Other than the First Index . . .
Using SEARCH and Varying an Index Data Item . . . . . . . . . . . . . . . .
Using SEARCH and Varying an Index not Associated with the Target
Table . . . . . . . . . . . . . . . . . . . . . . . . . . . . . . . . . . . . . . . . . . . . . . . . . .
1–18
1–39
Index
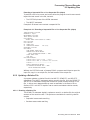
Examples
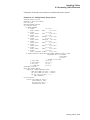
1–1
1–2
1–3
1–4
1–5
1–6
1–7
1–8
2–1
3–1
3–2
4–1
4–2
4–3
4–4
4–5
4–6
4–7
4–8
4–9
4–10
4–11
4–12
4–13
4–14
4–15
4–16
4–17
4–18
4–19
4–20
4–21
4–22
xiv
1–39
1–41
1–42
1–45
1–58
1–60
2–5
3–6
3–11
4–2
4–2
4–3
4–4
4–5
4–6
4–7
4–8
4–8
4–9
4–10
4–10
4–11
4–12
4–13
4–13
4–15
4–19
4–20
4–21
4–21
4–22
4–23
4–24
5–1
5–2
6–1
6–2
6–3
6–4
6–5
6–6
6–7
6–8
6–9
6–10
6–11
6–12
6–13
6–14
6–15
6–16
6–17
6–18
6–19
6–20
6–21
6–22
6–23
6–24
6–25
6–26
6–27
6–28
6–29
6–30
6–31
6–32
Doing a Serial Search Without Using the VARYING Phrase . . . . . . . .
A Multiple-Key, Binary Search . . . . . . . . . . . . . . . . . . . . . . . . . . . . . . .
Using the STRING Statement and Literals . . . . . . . . . . . . . . . . . . . . .
Sample Overflow Condition . . . . . . . . . . . . . . . . . . . . . . . . . . . . . . . . .
Sample Record Description . . . . . . . . . . . . . . . . . . . . . . . . . . . . . . . . .
Determining Fixed-Length Record Size . . . . . . . . . . . . . . . . . . . . . . . .
Determining Fixed-Length Record Size for Files with Multiple Record
Descriptions . . . . . . . . . . . . . . . . . . . . . . . . . . . . . . . . . . . . . . . . . . . . .
Creating Variable-Length Records with the DEPENDING ON
Phrase . . . . . . . . . . . . . . . . . . . . . . . . . . . . . . . . . . . . . . . . . . . . . . . . .
Creating Variable-Length Records with the RECORD VARYING
Phrase . . . . . . . . . . . . . . . . . . . . . . . . . . . . . . . . . . . . . . . . . . . . . . . . .
Creating Variable-Length Records and Using the OCCURS Clause
with the DEPENDING ON Phrase . . . . . . . . . . . . . . . . . . . . . . . . . . .
Defining Fixed-Length Records with Multiple Record Descriptions . . .
Defining a Disk File . . . . . . . . . . . . . . . . . . . . . . . . . . . . . . . . . . . . . . .
Defining a Magnetic Tape File (OpenVMS) . . . . . . . . . . . . . . . . . . . . .
Defining a Magnetic Tape File (Tru64 UNIX) . . . . . . . . . . . . . . . . . . .
Using Environment Variables (Tru64 UNIX) or Logical Names
(OpenVMS) for File Specification . . . . . . . . . . . . . . . . . . . . . . . . . . . . .
Using Environment Variables . . . . . . . . . . . . . . . . . . . . . . . . . . . . . . .
Specifying Sequential File Organization and Sequential Access Mode
for a Sequential File . . . . . . . . . . . . . . . . . . . . . . . . . . . . . . . . . . . . . .
Specifying Relative File Organization and Random Access Mode for a
Relative File . . . . . . . . . . . . . . . . . . . . . . . . . . . . . . . . . . . . . . . . . . . . .
Specifying Indexed File Organization and Dynamic Access Mode for
an Indexed File . . . . . . . . . . . . . . . . . . . . . . . . . . . . . . . . . . . . . . . . . .
Specifying Line Sequential File Organization with Sequential Access
Mode (Alpha) . . . . . . . . . . . . . . . . . . . . . . . . . . . . . . . . . . . . . . . . . . . .
SELECT Statements for Sequential Files with Sequential Access
Mode . . . . . . . . . . . . . . . . . . . . . . . . . . . . . . . . . . . . . . . . . . . . . . . . . .
SELECT Statements for Relative Files with Sequential and Dynamic
Access Modes . . . . . . . . . . . . . . . . . . . . . . . . . . . . . . . . . . . . . . . . . . . .
SELECT Statements for Indexed Files with Dynamic and Default
Sequential Access Modes . . . . . . . . . . . . . . . . . . . . . . . . . . . . . . . . . . .
SELECT Statements for Line Sequential Files with Sequential Access
Modes (Alpha) . . . . . . . . . . . . . . . . . . . . . . . . . . . . . . . . . . . . . . . . . . .
OPEN and CLOSE Statements . . . . . . . . . . . . . . . . . . . . . . . . . . . . . .
Creating a Sequential File . . . . . . . . . . . . . . . . . . . . . . . . . . . . . . . . . .
Creating a Line Sequential File (Alpha) . . . . . . . . . . . . . . . . . . . . . . .
Creating a Relative File in Sequential Access Mode . . . . . . . . . . . . . .
Creating a Relative File in Random Access Mode . . . . . . . . . . . . . . . .
Creating and Populating an Indexed File . . . . . . . . . . . . . . . . . . . . . .
Using Segmented Keys . . . . . . . . . . . . . . . . . . . . . . . . . . . . . . . . . . . .
Reading a Sequential File . . . . . . . . . . . . . . . . . . . . . . . . . . . . . . . . . .
Reading a Relative File Sequentially . . . . . . . . . . . . . . . . . . . . . . . . . .
Reading a Relative File Randomly . . . . . . . . . . . . . . . . . . . . . . . . . . . .
Reading a Relative File Dynamically . . . . . . . . . . . . . . . . . . . . . . . . . .
Reading an Indexed File Sequentially . . . . . . . . . . . . . . . . . . . . . . . . .
4–22
4–23
5–2
5–5
6–9
6–10
6–10
6–11
6–11
6–11
6–12
6–15
6–16
6–16
6–19
6–20
6–21
6–22
6–22
6–23
6–24
6–24
6–24
6–24
6–25
6–26
6–27
6–30
6–31
6–33
6–35
6–38
6–39
6–39
6–41
6–42
xv
6–33
6–34
6–35
6–36
6–37
6–38
6–39
6–40
6–41
6–42
6–43
6–44
7–1
7–2
7–3
7–4
7–5
7–6
7–7
7–8
8–1
8–2
8–3
8–4
8–5
8–6
8–7
9–1
9–2
9–3
9–4
9–5
9–6
9–7
9–8
9–9
9–10
9–11
9–12
10–1
10–2
10–3
10–4
xvi
Reading an Indexed File Randomly . . . . . . . . . . . . . . . . . . . . . . . .
Reading an Indexed File Dynamically . . . . . . . . . . . . . . . . . . . . . .
Reading an Indexed File Dynamically, with READ PRIOR (Alpha)
Another Example of READ PRIOR (Alpha) . . . . . . . . . . . . . . . . . .
Rewriting a Sequential File . . . . . . . . . . . . . . . . . . . . . . . . . . . . . .
Extending a Sequential File or Line Sequential File (Alpha) . . . . .
Rewriting Relative Records in Sequential Access Mode . . . . . . . . .
Rewriting Relative Records in Random Access Mode . . . . . . . . . . .
Deleting Relative Records in Sequential Access Mode . . . . . . . . . .
Deleting Relative Records in Random Access Mode . . . . . . . . . . . .
Updating an Indexed File Sequentially . . . . . . . . . . . . . . . . . . . . .
Updating an Indexed File Randomly . . . . . . . . . . . . . . . . . . . . . . .
Handling the AT END Condition . . . . . . . . . . . . . . . . . . . . . . . . . .
Handling the Invalid Key Condition . . . . . . . . . . . . . . . . . . . . . . .
Defining a File Status for a File . . . . . . . . . . . . . . . . . . . . . . . . . .
Using the File Status Value in an Exception Handling Routine . .
Referencing RMS-STS, RMS-STV, RMS-CURRENT-STS, and
RMS-CURRENT-STV Codes (OpenVMS) . . . . . . . . . . . . . . . . . . .
The Declaratives Skeleton . . . . . . . . . . . . . . . . . . . . . . . . . . . . . . .
A Declarative USE Procedure Skeleton . . . . . . . . . . . . . . . . . . . . .
Five Types of Declarative USE Procedures . . . . . . . . . . . . . . . . . .
X/Open Standard Lock Modes and Opening Files (Alpha) . . . . . . .
Program Segment for File Status Values . . . . . . . . . . . . . . . . . . . .
Program Segment for RMS-STS Values (OpenVMS) . . . . . . . . . . .
X/Open Standard Record Locking (Alpha) . . . . . . . . . . . . . . . . . . .
Automatic Record Locking (Compaq Standard) . . . . . . . . . . . . . . .
Sample Program Using Manual Record Locking (Compaq
Standard) . . . . . . . . . . . . . . . . . . . . . . . . . . . . . . . . . . . . . . . . . . . .
Program Segment for Record-Locking Exceptions . . . . . . . . . . . . .
INPUT and OUTPUT PROCEDURE Phrases . . . . . . . . . . . . . . . .
USING Phrase Replaces INPUT PROCEDURE Phrase . . . . . . . . .
Overriding the COLLATING SEQUENCE IS Phrase . . . . . . . . . . .
Using Two Sort Files . . . . . . . . . . . . . . . . . . . . . . . . . . . . . . . . . . .
The Declarative USE AFTER STANDARD ERROR PROCEDURE
Using the MERGE Statement . . . . . . . . . . . . . . . . . . . . . . . . . . . .
Sorting a File with the USING and GIVING Phrases . . . . . . . . . .
Using the USING and OUTPUT PROCEDURE Phrases . . . . . . . .
Using the INPUT PROCEDURE and OUTPUT PROCEDURE
Phrases . . . . . . . . . . . . . . . . . . . . . . . . . . . . . . . . . . . . . . . . . . . . .
Using the COLLATING SEQUENCE IS Phrase . . . . . . . . . . . . . .
Creating a New Sort Key . . . . . . . . . . . . . . . . . . . . . . . . . . . . . . . .
Merging Files . . . . . . . . . . . . . . . . . . . . . . . . . . . . . . . . . . . . . . . . .
Components of a Report . . . . . . . . . . . . . . . . . . . . . . . . . . . . . . . . .
Checking for the Page-Overflow Condition . . . . . . . . . . . . . . . . . . .
Page Advancing and Line Skipping . . . . . . . . . . . . . . . . . . . . . . . .
Checking for End-of-Page on a 28-Line Logical Page . . . . . . . . . . .
.
.
.
.
.
.
.
.
.
.
.
.
.
.
.
.
.
.
.
.
.
.
.
.
.
.
.
.
.
.
.
.
.
.
.
.
.
.
.
.
.
.
.
.
.
.
.
.
6–43
6–44
6–45
6–47
6–50
6–51
6–52
6–53
6–55
6–56
6–57
6–59
7–2
7–3
7–4
7–5
.
.
.
.
.
.
.
.
.
.
.
.
.
.
.
.
.
.
.
.
.
.
.
.
.
.
.
7–6
7–9
7–9
7–10
8–7
8–13
8–15
8–18
8–19
.
.
.
.
.
.
.
.
.
.
.
.
.
.
.
.
.
.
.
.
.
.
.
.
.
.
.
.
.
8–21
8–25
9–4
9–6
9–7
9–7
9–9
9–10
9–11
9–12
.
.
.
.
.
.
.
.
.
.
.
.
.
.
.
.
.
.
.
.
.
.
.
.
9–14
9–16
9–17
9–19
10–2
10–8
10–9
10–16
10–5
10–6
10–7
10–8
10–9
10–10
10–11
10–12
11–1
11–2
11–3
11–4
11–5
11–6
11–7
11–8
11–9
11–10
11–11
11–12
12–1
12–2
12–3
12–4
12–5
12–6
12–7
12–8
12–9
12–10
12–11
12–12
12–13
12–14
12–15
12–16
12–17
12–18
13–1
13–2
13–3
13–4
13–5
13–6
16–1
Programming a 20-Line Logical Page Defined by the LINAGE Clause
with Automatic Page Overflow . . . . . . . . . . . . . . . . . . . . . . . . . . . . . . .
Sample Program EX1006 . . . . . . . . . . . . . . . . . . . . . . . . . . . . . . . . . . .
Sample Program EX1007 . . . . . . . . . . . . . . . . . . . . . . . . . . . . . . . . . . .
Sample Program EX1008 . . . . . . . . . . . . . . . . . . . . . . . . . . . . . . . . . . .
Sample Program EX1009 . . . . . . . . . . . . . . . . . . . . . . . . . . . . . . . . . . .
Sample Program EX1010 . . . . . . . . . . . . . . . . . . . . . . . . . . . . . . . . . . .
Printing Labels Four-Up . . . . . . . . . . . . . . . . . . . . . . . . . . . . . . . . . . .
Printing Labels Four-Up in Sort Order . . . . . . . . . . . . . . . . . . . . . . . .
Erasing a Screen . . . . . . . . . . . . . . . . . . . . . . . . . . . . . . . . . . . . . . . . .
Cursor Positioning . . . . . . . . . . . . . . . . . . . . . . . . . . . . . . . . . . . . . . . .
Using PLUS for Cursor Positioning . . . . . . . . . . . . . . . . . . . . . . . . . . .
Using Character Attributes . . . . . . . . . . . . . . . . . . . . . . . . . . . . . . . . .
Using the CONVERSION Phrase . . . . . . . . . . . . . . . . . . . . . . . . . . . . .
Using the ON EXCEPTION Phrase . . . . . . . . . . . . . . . . . . . . . . . . . . .
Using the SIZE and PROTECTED Phrases . . . . . . . . . . . . . . . . . . . . .
Using the NO ECHO Phrase . . . . . . . . . . . . . . . . . . . . . . . . . . . . . . . .
Using the DEFAULT Phrase . . . . . . . . . . . . . . . . . . . . . . . . . . . . . . . .
Using the CONTROL KEY IN Phrase . . . . . . . . . . . . . . . . . . . . . . . . .
EDITING Phrase Sample Code . . . . . . . . . . . . . . . . . . . . . . . . . . . . . .
Designing a Video Form for a Daily Calendar (Alpha) . . . . . . . . . . . . .
Run Unit with Three Separately Compiled Programs . . . . . . . . . . . . .
Run Unit with a Main Program and Two Contained Programs . . . . . .
Run Unit with Three Separately Compiled Programs, One with Two
Contained Programs . . . . . . . . . . . . . . . . . . . . . . . . . . . . . . . . . . . . . .
Execution Sequence of Nested CALL Statements . . . . . . . . . . . . . . . .
Sequence of Messages Displayed When Example 12–4 Is Run . . . . . .
CALL Literal Versus CALL Data Name . . . . . . . . . . . . . . . . . . . . . . . .
Using the COMMON Clause . . . . . . . . . . . . . . . . . . . . . . . . . . . . . . . .
Calling a COBOL Program from C (Alpha) . . . . . . . . . . . . . . . . . . . . .
C Include File cobfunc.h (Alpha) . . . . . . . . . . . . . . . . . . . . . . . . . . . . .
COBOL Called Program "CALLEDFROMC" (Alpha) . . . . . . . . . . . . . .
C Program Using cobcall, cobfunc, and cobcancel (Alpha) . . . . . . . . . .
COBOL Called Program "PROGCOB" (Alpha) . . . . . . . . . . . . . . . . . . .
Calling a Fortran Program from a COBOL Program . . . . . . . . . . . . . .
Fortran Subroutine SQROOT . . . . . . . . . . . . . . . . . . . . . . . . . . . . . . . .
Calling a BASIC Program from a COBOL Program . . . . . . . . . . . . . . .
BASIC Program "APP" and Output Data . . . . . . . . . . . . . . . . . . . . . . .
C Routine to Be Called from a COBOL Program . . . . . . . . . . . . . . . . .
Calling a C Program from a COBOL Program . . . . . . . . . . . . . . . . . . .
User-Written Condition Handler . . . . . . . . . . . . . . . . . . . . . . . . . . . . .
Random Number Generator (OpenVMS) . . . . . . . . . . . . . . . . . . . . . . .
Using the SYS$SETDDIR System Service (OpenVMS) . . . . . . . . . . . .
Using $ASCTIM (OpenVMS) . . . . . . . . . . . . . . . . . . . . . . . . . . . . . . . .
Sample Run of CALLTIME (OpenVMS) . . . . . . . . . . . . . . . . . . . . . . . .
Using LIB$K_* and LIB$_* Symbols (OpenVMS) . . . . . . . . . . . . . . . .
Using *DC SET ALIGNMENT Directives . . . . . . . . . . . . . . . . . . . . . .
10–22
10–44
10–48
10–57
10–64
10–74
10–83
10–85
11–5
11–6
11–8
11–9
11–10
11–14
11–16
11–17
11–18
11–25
11–29
11–36
12–2
12–3
12–4
12–6
12–8
12–9
12–15
12–21
12–21
12–22
12–23
12–24
12–27
12–28
12–29
12–30
12–30
12–31
13–17
13–19
13–20
13–20
13–21
13–22
16–8
xvii
16–2
16–3
16–4
16–5
16–6
B–1
B–2
C–1
Using /ALIGNMENT with SYNCHRONIZED . . . . . . . . . . . . . . .
Comparing /NOALIGN, /ALIGN and /ALIGN=PADDING (Alpha)
Data Map for /NOALIGNMENT (Alpha) . . . . . . . . . . . . . . . . . . .
Data Map for /ALIGNMENT, -align (Alpha) . . . . . . . . . . . . . . . .
Data Map for /ALIGNMENT=PADDING, -align pad (Alpha) . . . .
Signed and Unsigned Differences . . . . . . . . . . . . . . . . . . . . . . . . .
Illegal Return Value Coding . . . . . . . . . . . . . . . . . . . . . . . . . . . . .
Source Code Used in the Sample Debug Sessions . . . . . . . . . . . .
.
.
.
.
.
.
.
.
.
.
.
.
.
.
.
.
.
.
.
.
.
.
.
.
.
.
.
.
.
.
.
.
16–9
16–10
16–11
16–11
16–12
B–17
B–18
C–2
.
.
.
.
.
.
.
.
.
.
.
.
1–2
1–22
4–2
4–3
.
.
.
.
.
.
.
.
.
.
.
.
.
.
.
.
.
.
.
.
.
.
.
.
.
.
.
.
.
.
.
.
.
.
.
.
.
.
.
.
.
.
.
.
.
.
.
.
.
.
.
.
.
.
.
.
.
.
.
.
.
.
.
.
.
.
.
.
.
.
.
.
.
.
.
.
.
.
.
.
.
.
.
.
.
.
.
.
.
.
4–4
4–5
4–5
4–7
4–8
4–9
4–9
4–10
4–11
4–12
5–3
5–19
5–21
5–22
5–31
6–3
6–4
6–5
6–6
6–8
8–1
8–2
8–16
10–2
10–5
10–6
10–11
10–12
10–13
10–16
Figures
1–1
1–2
4–1
4–2
4–3
4–4
4–5
4–6
4–7
4–8
4–9
4–10
4–11
4–12
5–1
5–2
5–3
5–4
5–5
6–1
6–2
6–3
6–4
6–5
8–1
8–2
8–3
10–1
10–2
10–3
10–4
10–5
10–6
10–7
xviii
Commands for Developing Compaq COBOL Programs on Tru64
UNIX . . . . . . . . . . . . . . . . . . . . . . . . . . . . . . . . . . . . . . . . . . . . . . .
DCL Commands for Developing Programs . . . . . . . . . . . . . . . . . . .
Organization of the One-Dimensional Table in Example 4–1 . . . . .
Organization of Multiple Data Items in a One-Dimensional Table .
Organization of a Table with an Index and an Ascending Search
Key . . . . . . . . . . . . . . . . . . . . . . . . . . . . . . . . . . . . . . . . . . . . . . . .
Organization of a Two-Dimensional Table . . . . . . . . . . . . . . . . . . .
Organization of a Three-Dimensional Table . . . . . . . . . . . . . . . . . .
Memory Map for Example 4–7 . . . . . . . . . . . . . . . . . . . . . . . . . . . .
Memory Map for Example 4–8 . . . . . . . . . . . . . . . . . . . . . . . . . . . .
Memory Map for Example 4–9 . . . . . . . . . . . . . . . . . . . . . . . . . . . .
Memory Map for Example 4–10 . . . . . . . . . . . . . . . . . . . . . . . . . . .
Memory Map for Example 4–11 . . . . . . . . . . . . . . . . . . . . . . . . . . .
Memory Map for Example 4–13 . . . . . . . . . . . . . . . . . . . . . . . . . . .
Memory Map for Example 4–14 . . . . . . . . . . . . . . . . . . . . . . . . . . .
Results of the STRING Operation . . . . . . . . . . . . . . . . . . . . . . . . .
Matching Delimiter Characters to Characters in a Field . . . . . . . .
Sample INSPECT Statement . . . . . . . . . . . . . . . . . . . . . . . . . . . . .
Typical REPLACING Phrase . . . . . . . . . . . . . . . . . . . . . . . . . . . . .
The Replacement Argument . . . . . . . . . . . . . . . . . . . . . . . . . . . . . .
Sequential File Organization . . . . . . . . . . . . . . . . . . . . . . . . . . . . .
A Multiple-Volume, Sequential File . . . . . . . . . . . . . . . . . . . . . . . .
Line Sequential File Organization (Alpha) . . . . . . . . . . . . . . . . . . .
Relative File Organization . . . . . . . . . . . . . . . . . . . . . . . . . . . . . . .
Indexed File Organization . . . . . . . . . . . . . . . . . . . . . . . . . . . . . . .
Multiple Access to a File . . . . . . . . . . . . . . . . . . . . . . . . . . . . . . . .
Relationship of Record Locking to File Sharing . . . . . . . . . . . . . . .
Why a Record-Already-Exists Error Occurs . . . . . . . . . . . . . . . . . .
Sample Layout Worksheet . . . . . . . . . . . . . . . . . . . . . . . . . . . . . . .
Subtotals, Crossfoot Totals, and Rolled Forward Totals . . . . . . . . .
Logical Page Area for a Conventional Report . . . . . . . . . . . . . . . . .
A 20-Line Logical Page . . . . . . . . . . . . . . . . . . . . . . . . . . . . . . . . .
A Double-Spaced Master Listing . . . . . . . . . . . . . . . . . . . . . . . . . .
Logical Page Areas for a Linage-File Report . . . . . . . . . . . . . . . . .
A 28-Line Logical Page . . . . . . . . . . . . . . . . . . . . . . . . . . . . . . . . .
10–8
10–9
10–10
10–11
10–12
10–13
10–14
10–15
10–16
10–17
10–18
10–19
10–20
10–21
11–1
11–2
11–3
11–4
11–5
11–6
11–7
11–8
11–9
11–10
11–11
11–12
11–13
11–14
11–15
12–1
12–2
12–3
12–4
12–5
12–6
12–7
15–1
15–2
A 20-Line Logical Page . . . . . . . . . . . . . . . . . . . . . . . . . . . . . . . . . . .
Presentation Order for a Logical Page . . . . . . . . . . . . . . . . . . . . . . . .
Sample Report Using All Seven Report Groups . . . . . . . . . . . . . . . . .
First GENERATE Statement . . . . . . . . . . . . . . . . . . . . . . . . . . . . . . .
Subsequent GENERATE Statements . . . . . . . . . . . . . . . . . . . . . . . . .
TERMINATE Statement . . . . . . . . . . . . . . . . . . . . . . . . . . . . . . . . . .
Sample MASTER.DAT File . . . . . . . . . . . . . . . . . . . . . . . . . . . . . . . .
EX1006.LIS Listing . . . . . . . . . . . . . . . . . . . . . . . . . . . . . . . . . . . . . .
EX1007.LIS Listing . . . . . . . . . . . . . . . . . . . . . . . . . . . . . . . . . . . . . .
EX1008.LIS Listing . . . . . . . . . . . . . . . . . . . . . . . . . . . . . . . . . . . . . .
EX1009.LIS Listing . . . . . . . . . . . . . . . . . . . . . . . . . . . . . . . . . . . . . .
EX1010.LIS Listing . . . . . . . . . . . . . . . . . . . . . . . . . . . . . . . . . . . . . .
Printing Labels Four-Up . . . . . . . . . . . . . . . . . . . . . . . . . . . . . . . . . .
Printing Labels Four-Up in Sort Order . . . . . . . . . . . . . . . . . . . . . . .
Video Form to Gather Information for a Master File Record . . . . . .
Screen After the ERASE Statement Executes . . . . . . . . . . . . . . . . . .
Positioning the Data on Line 19, Column 5 . . . . . . . . . . . . . . . . . . . .
Cursor Positioning Using the PLUS Option . . . . . . . . . . . . . . . . . . . .
Screen Display with Character Attributes . . . . . . . . . . . . . . . . . . . . .
Sample Run of Program CONVERT . . . . . . . . . . . . . . . . . . . . . . . . . .
Accepting Data with the ON EXCEPTION Option . . . . . . . . . . . . . . .
Screen Display of NUM-DATA Using the PROTECTED Option . . . . .
Accepting Data with the DEFAULT Phrase . . . . . . . . . . . . . . . . . . . .
Compaq COBOL Control Keys on the Standard VT100 Keypad and
Keyboard . . . . . . . . . . . . . . . . . . . . . . . . . . . . . . . . . . . . . . . . . . . . . .
Compaq COBOL Control Keys on a Typical VT200 or Later Keypad
and Keyboard . . . . . . . . . . . . . . . . . . . . . . . . . . . . . . . . . . . . . . . . . .
Screen Display of Program SPECIAL . . . . . . . . . . . . . . . . . . . . . . . .
Form with ACCEPT WITH EDITING Phrase . . . . . . . . . . . . . . . . . .
MENU-SCREEN Output (Alpha) . . . . . . . . . . . . . . . . . . . . . . . . . . . .
SCHEDULE-SCREEN Output (Alpha) . . . . . . . . . . . . . . . . . . . . . . .
Nesting CALL Statements . . . . . . . . . . . . . . . . . . . . . . . . . . . . . . . .
Transfer of Control Flow from a Main Program to Multiple
Subprograms . . . . . . . . . . . . . . . . . . . . . . . . . . . . . . . . . . . . . . . . . . .
Accessing Another Program’s Data Division . . . . . . . . . . . . . . . . . . . .
Defining Data Names in the Linkage Section . . . . . . . . . . . . . . . . . .
Sharing USE Procedures . . . . . . . . . . . . . . . . . . . . . . . . . . . . . . . . . .
Executing Declaratives with Contained Programs (Rule 1) . . . . . . . .
Executing Declaratives Within Contained Programs (Rule 2) . . . . . .
Sharing Record Areas . . . . . . . . . . . . . . . . . . . . . . . . . . . . . . . . . . . .
Two-Level Primary Index . . . . . . . . . . . . . . . . . . . . . . . . . . . . . . . . . .
.
.
.
.
.
.
.
.
.
.
.
.
.
.
.
.
.
.
.
.
.
.
.
10–20
10–26
10–27
10–38
10–39
10–40
10–43
10–47
10–55
10–64
10–72
10–81
10–83
10–85
11–4
11–6
11–7
11–8
11–10
11–12
11–14
11–16
11–19
.
11–24
.
.
.
.
.
.
11–24
11–28
11–31
11–41
11–41
12–6
.
.
.
.
.
.
.
.
12–9
12–11
12–14
12–17
12–18
12–19
15–14
15–19
xix
Tables
1–1
1–2
1–3
1–4
1–5
2–1
2–2
2–3
2–4
3–1
3–2
3–3
3–4
4–1
4–2
5–1
5–2
5–3
5–4
5–5
5–6
5–7
5–8
5–9
5–10
5–11
5–12
5–13
6–1
6–2
6–3
6–4
6–5
6–6
6–7
8–1
8–2
8–3
8–4
8–5
10–1
10–2
11–1
xx
Other File Name Suffixes . . . . . . . . . . . . . . . . . . . . . . . . . . . . . . . . . . .
Compaq COBOL Command Flags on Tru64 UNIX . . . . . . . . . . . . . . . .
Main Tools for Program Development and Testing . . . . . . . . . . . . . . . .
COBOL Command Qualifiers . . . . . . . . . . . . . . . . . . . . . . . . . . . . . . . .
Commonly Used LINK Qualifiers . . . . . . . . . . . . . . . . . . . . . . . . . . . .
Numeric Relational Operator Descriptions . . . . . . . . . . . . . . . . . . . . . .
Sign Tests . . . . . . . . . . . . . . . . . . . . . . . . . . . . . . . . . . . . . . . . . . . . . .
Numeric Editing . . . . . . . . . . . . . . . . . . . . . . . . . . . . . . . . . . . . . . . . .
ROUNDING . . . . . . . . . . . . . . . . . . . . . . . . . . . . . . . . . . . . . . . . . . . . .
Relational Operator Descriptions . . . . . . . . . . . . . . . . . . . . . . . . . . . . .
Nonnumeric Elementary Moves . . . . . . . . . . . . . . . . . . . . . . . . . . . . . .
Data Movement with Editing Symbols . . . . . . . . . . . . . . . . . . . . . . . . .
Data Movement with the JUSTIFIED Clause . . . . . . . . . . . . . . . . . . .
Subscripting Rules for a Multidimensional Table . . . . . . . . . . . . . . . . .
Subscripting with Data Names . . . . . . . . . . . . . . . . . . . . . . . . . . . . . .
Results of Sample Overflow Statements . . . . . . . . . . . . . . . . . . . . . . . .
Values Moved into the Receiving Items Based on the Sending Item
Value . . . . . . . . . . . . . . . . . . . . . . . . . . . . . . . . . . . . . . . . . . . . . . . . . .
Handling a Short Sending Item . . . . . . . . . . . . . . . . . . . . . . . . . . . . . .
Results of Delimiting with an Asterisk . . . . . . . . . . . . . . . . . . . . . . . .
Results of Delimiting Multiple Receiving Items . . . . . . . . . . . . . . . . . .
Results of Delimiting with Two Asterisks . . . . . . . . . . . . . . . . . . . . . .
Results of Delimiting with ALL Asterisks . . . . . . . . . . . . . . . . . . . . . .
Results of Delimiting with ALL Double Asterisks . . . . . . . . . . . . . . . .
Results of Multiple Delimiters . . . . . . . . . . . . . . . . . . . . . . . . . . . . . . .
Values Resulting from Implicit Redefinition . . . . . . . . . . . . . . . . . . . . .
Relationship Among INSPECT Argument, Delimiter, Item Value, and
Argument Active Position . . . . . . . . . . . . . . . . . . . . . . . . . . . . . . . . . .
LEADING Delimiter of the Inspection Operation . . . . . . . . . . . . . . . .
Results of the Scan with Separate Tallies . . . . . . . . . . . . . . . . . . . . . .
Compaq COBOL File Organizations—Advantages and
Disadvantages . . . . . . . . . . . . . . . . . . . . . . . . . . . . . . . . . . . . . . . . . . .
Record Format Availability . . . . . . . . . . . . . . . . . . . . . . . . . . . . . . . . .
Valid I/O Statements for Sequential Files . . . . . . . . . . . . . . . . . . . . . .
Valid I/O Statements for Line Sequential Files (Alpha) . . . . . . . . . . . .
Valid I/O Statements for Relative Files . . . . . . . . . . . . . . . . . . . . . . . .
Valid I/O Statements for Indexed Files . . . . . . . . . . . . . . . . . . . . . . . .
Indexed File—ISAM Mapping . . . . . . . . . . . . . . . . . . . . . . . . . . . . . . .
File-Sharing Options (OpenVMS) . . . . . . . . . . . . . . . . . . . . . . . . . . . . .
File-Sharing Options (Tru64 UNIX) . . . . . . . . . . . . . . . . . . . . . . . . . . .
File Status Values Used in a File-Sharing Environment . . . . . . . . . . .
RMS-STS Values Used in a File-Sharing Environment (OpenVMS) . . .
Manual Record Locking Combinations . . . . . . . . . . . . . . . . . . . . . . . . .
Report Writer Report Group Types . . . . . . . . . . . . . . . . . . . . . . . . . . .
Results of Group Indicating . . . . . . . . . . . . . . . . . . . . . . . . . . . . . . . . .
Available Character Attributes by Terminal Type . . . . . . . . . . . . . . . .
1–3
1–6
1–20
1–26
1–34
2–3
2–4
2–8
2–13
3–4
3–8
3–9
3–10
4–14
4–14
5–5
5–7
5–8
5–9
5–10
5–10
5–11
5–11
5–12
5–20
5–23
5–25
5–26
6–2
6–8
6–28
6–28
6–32
6–34
6–48
8–10
8–11
8–12
8–14
8–20
10–26
10–87
11–9
11–2
11–3
11–4
11–5
12–1
12–2
12–3
13–1
13–2
13–3
13–4
16–1
16–2
B–1
B–2
B–3
B–4
C–1
D–1
Compaq COBOL Characters Returned for Cursor Positioning,
Program Function, Function, Keypad, and Keyboard Keys . . . . . . . .
Key Functions for the EDITING Phrase . . . . . . . . . . . . . . . . . . . . . .
Character Attribute Clauses for Screen Description Formats
(Alpha) . . . . . . . . . . . . . . . . . . . . . . . . . . . . . . . . . . . . . . . . . . . . . . . .
Color Table . . . . . . . . . . . . . . . . . . . . . . . . . . . . . . . . . . . . . . . . . . . . .
Calls to COBOL Programs (Alpha) . . . . . . . . . . . . . . . . . . . . . . . . . .
C Routine Called by Statement: CALL ‘‘Job1’’ . . . . . . . . . . . . . . . . . .
C Invocation to Call COBOL PROGRAM-ID ‘‘Job2’’ . . . . . . . . . . . . . .
OpenVMS Alpha Register Usage . . . . . . . . . . . . . . . . . . . . . . . . . . . .
Run-Time Library Facilities (OpenVMS) . . . . . . . . . . . . . . . . . . . . . .
System Services (OpenVMS) . . . . . . . . . . . . . . . . . . . . . . . . . . . . . . .
COBOL Implementation of the OpenVMS Data Types (OpenVMS) . .
Boundaries for Naturally Aligned Binary Data (Alpha) . . . . . . . . . . .
Alignment and Padding Order of Precedence (Alpha) . . . . . . . . . . . .
Cross-Platform Compatibility of COBOL Features . . . . . . . . . . . . . . .
Qualifiers Shared by Compaq COBOL for OpenVMS Alpha and VAX
and Equivalent Tru64 UNIX Flags and Options . . . . . . . . . . . . . . . .
Compaq COBOL on Alpha Options Not Available on VAX . . . . . . . .
Compaq COBOL for OpenVMS VAX Specific Qualifiers . . . . . . . . . . .
Oracle CDD/Repository Data Types: Level of Support
in Compaq COBOL on OpenVMS . . . . . . . . . . . . . . . . . . . . . . . . . . . .
Recognized Foreign Reserved Words . . . . . . . . . . . . . . . . . . . . . . . . .
.
.
11–20
11–28
.
.
.
.
.
.
.
.
.
.
.
.
11–32
11–34
12–20
12–33
12–33
13–2
13–4
13–4
13–8
16–4
16–7
B–1
.
.
.
B–4
B–6
B–7
.
.
C–19
D–2
xxi
Preface
This manual provides information to help you develop Compaq COBOL programs
for the OpenVMS Alpha, OpenVMS VAX, and Tru64 UNIX platforms.
The new name Compaq COBOL, unmodified, refers to the COBOL language on
three platforms:
OpenVMS Alpha
OpenVMS VAX
Tru64 UNIX
The three product names in full are:
Compaq COBOL for OpenVMS Alpha (formerly DEC COBOL or DIGITAL
COBOL)
Compaq COBOL for OpenVMS VAX (formerly VAX COBOL or DIGITAL VAX
COBOL)
Compaq COBOL for Tru64 UNIX (formerly DEC COBOL or DIGITAL COBOL
for DIGITAL UNIX or DEC OSF/1)
Any references to the former names in product documentation or other
components should be construed as references to the Compaq COBOL names.
Intended Audience
This manual is intended for experienced applications programmers who have a
thorough understanding of the COBOL language. Some familiarity with your
operating system is also recommended. This is not a tutorial manual.
If you are a new COBOL user, you may need to read introductory COBOL
textbooks or take COBOL courses. Additional prerequisites are described at the
beginning of each chapter or appendix, if appropriate.
Document Structure
This manual is organized as follows:
•
Chapter 1 describes how to create, compile, link, and run Compaq COBOL
programs and how to develop programs at the command level.
•
Chapter 2 describes how the Compaq COBOL compiler stores, represents,
moves, and manipulates numeric data.
•
Chapter 3 describes how the Compaq COBOL compiler stores, represents,
moves, and manipulates nonnumeric data.
•
Chapter 4 describes how to define, initialize, and access tables.
•
Chapter 5 describes how to perform text manipulation using the STRING,
UNSTRING, and INSPECT statements.
xxiii
•
Chapter 6 describes I/O services provided by the operating systems, including
record management services.
•
Chapter 7 describes how to include exception handling routines in Compaq
COBOL programs.
•
Chapter 8 describes file sharing and record locking for sequential, relative,
and indexed files.
•
Chapter 9 describes how to sort and merge files using the SORT and MERGE
statements.
•
Chapter 10 describes how to produce printed reports.
•
Chapter 11 describes screen handling using the Compaq COBOL ACCEPT
and DISPLAY statements.
•
Chapter 12 describes how Compaq COBOL programs communicate with
each other or with non-COBOL programs through the CALL statement and
external data.
•
Chapter 13 describes the use of Compaq COBOL in the OpenVMS Common
Language Environment.
•
Chapter 14 describes how to use the REFORMAT utility, which converts
terminal format source programs to conventional ANSI format and converts
conventional ANSI format source programs to terminal format.
•
Chapter 15 presents guidelines for using the Compaq COBOL compiler
optimization features.
•
Chapter 16 describes how to use compile-time and run-time features to
optimize the use of system resources while also maximizing run-time
performance.
•
Appendix A contains a list of Compaq COBOL specificatons and limits on the
Tru64 UNIX and OpenVMS systems.
•
Appendix B describes compatibility and portability issues between Compaq
COBOL for OpenVMS VAX and Compaq COBOL on the Tru64 UNIX and
OpenVMS Alpha systems.
•
Appendix C describes optional programming productivity tools available on
OpenVMS systems and Tru64 UNIX systems.
•
Appendix D describes porting assistance for migrating applications between
other COBOL compilers and Compaq COBOL.
•
The Index indexes and references terms in this manual.
Associated Documents
The following documents contain additional information directly related to
various topics in this manual:
Compaq COBOL Reference Manual
This manual describes the concepts and rules of the Compaq COBOL
programming language under the supported operating systems.
xxiv
Release Notes
Consult the Compaq COBOL release notes for your installed version for late
corrections and new features.
On the OpenVMS operating systems, the release notes are in:
SYS$HELP:COBOLnnn.RELEASE_NOTES (ASCII text)
SYS$HELP:COBOLnnn_RELEASE_NOTES.PS
where nnn is the version and release number, for example, 028 for Version
2.8.
On the Tru64 UNIX operating system, the release notes are in:
/usr/lib/cmplrs/cobol/relnotes
Compaq COBOL for OpenVMS Alpha Systems Installation Guide
This manual provides information on how to install Compaq COBOL on the
OpenVMS Alpha operating system.
Compaq COBOL for OpenVMS VAX Systems Installation Guide
This manual provides information on how to install Compaq COBOL on the
OpenVMS VAX operating system.
Compaq COBOL for Tru64 UNIX Systems Installation Guide
This manual provides information on how to install Compaq COBOL on the Tru64
UNIX operating system.
Compaq COBOL DBMS Database Programming Manual
This manual provides information on using Compaq COBOL for database
programming with Oracle CODASYL DBMS on the OpenVMS Alpha and
OpenVMS VAX operating systems.
The OpenVMS Documentation Set
This set contains information about using the features of the OpenVMS Alpha
and OpenVMS VAX operating systems and their tools, including the OpenVMS
Debugger.
The DECset Documentation
This documentation contains information about using DECset.
The Tru64 UNIX Documentation Set
This set contains information about using the features of the Tru64 UNIX
operating system and its tools.
Related Documents
For additional information about OpenVMS products and services, access the
following World Wide Web address:
http://www.compaq.com/
xxv
Conventions
Convention
Meaning
Ctrl/x
A sequence such as Ctrl/x indicates that you must hold down
the key labeled Ctrl while you press another key or a pointing
device button.
♦
A diamond signals the end of a section of system-specific
information. The beginning of a system-specific section is
identified in the text or header as Alpha (meaning both
OpenVMS Alpha and Tru64 UNIX Alpha, and excluding
OpenVMS VAX); or as OpenVMS (meaning both OpenVMS
Alpha and OpenVMS VAX); or as Tru64 UNIX.
RECORD KEY IS
Underlined uppercase words are required when used in a
general format. Uppercase words not underlined are optional.
sortfile
Lowercase words used in a general format are generic terms
that indicate entries you must provide.
8 9
Braces used in a general format enclose lists from which you
must choose only one item. For example:
( SEQUENTIAL )
RANDOM
DYNAMIC
2 3
Brackets used in a general format enclose optional items from
which you can choose none or one. For example:
RECORD
ALL RECORDS
Choice indicators, vertical lines inside a set of braces, used in a
general format enclose lists from which you must choose one or
more items, using each item chosen only once. For example:
9
8
< COMMON =
: INITIAL ;
...
A horizontal ellipsis indicates that the item preceding the
ellipsis can be repeated. For example:
f switch-name g . . .
xxvi
.
.
.
A vertical ellipsis indicates that not all of the statements are
shown.
format of examples
Program examples are shown in terminal format, rather than
in ANSI standard format.
Convention
Meaning
special-character words
The following symbols, when used in a general format,
constitute required special-character words:
Plus sign ( + )
Minus sign ( - )
Single ( = ) and double ( = = ) equal signs
Less than ( < ) or greater than ( > ) symbols
Less than or equal to ( <= ) and greater than or equal to
( >= ) symbols
Period ( . )
Colon ( : )
Single ( * ) and double ( ** ) asterisks
Slash ( / )
Left parenthesis ( ( ) or right parenthesis ( ) )
quotation mark
The term quotation mark is used to refer to the double
quotation mark character (").
apostrophe
The term apostrophe is used to refer to the single quotation
mark character ( ’ ).
user input
In examples, user input (what you enter) is shown as
monospaced text.
extensions
Compaq extensions to the 1985 ANSI COBOL Standard are
color coded in blue or gray. Note that the term extension in
this manual means a Compaq extension to the ANSI COBOL
Standard. (Some of the Alpha extensions are included in the
X/Open CAE Standard for the COBOL language.)
report file
Bold type indicates a new term.
italics
Italic type indicates important information, complete titles
of manuals, or variables. Variables include generic terms
(lowercase variable elements in syntax) when referred to in
text; and information that varies in system output (error
number) and in command lines (BASIC file-name) in text.
full-file-name
This syntax term refers to the name of a file and the device
and directory, or path, in which it is located. For example:
DISK2$:[HOME.PUBLIC]FILENAME.TXT; (OpenVMS file
specification)
/disk2/home/public/filename.txt (Tru64 UNIX
file specification)
compiler option
This term refers to command-line qualifiers (OpenVMS
systems) or flags (Tru64 UNIX systems). For example:
/LIST
-list
(OpenVMS qualifier)
(Tru64 UNIX flag)
COBOL
This term refers to language information common to ANSI-85
COBOL and Compaq COBOL.
Enter
A boxed symbol indicates that you must press a key on the
terminal; for example, Enter indicates that you press the Enter
key.
Tab
This symbol indicates a nonprinting tab character.
Ctrl/x
The symbol Ctrl/x indicates that you hold down the key labeled
CTRL while you press another key, for example, Ctrl C or Ctrl O .
$
The dollar sign ( $ ) represents the OpenVMS system prompt.
xxvii
Convention
Meaning
%
The percent sign ( % ) represents the Tru64 UNIX system
prompt.
References
The following table shows certain references and their respective meanings in
this manual:
Reference
Meaning
OpenVMS
OpenVMS Alpha or OpenVMS VAX operating system
Tru64 UNIX
Tru64 UNIX operating system
DECset
DECset for OpenVMS
Tru64 UNIX was formerly known as DEC OSF/1 or as DIGITAL UNIX. Compaq
COBOL was formerly known as DIGITAL COBOL or DEC COBOL. Compaq
COBOL for OpenVMS VAX was formerly known as VAX COBOL or as DIGITAL
VAX COBOL.
Acknowledgment
COBOL is an industry language and is not the property of any company or group
of companies, or of any organization or group of organizations.
No warranty, expressed or implied, is made by any contributor or by the
CODASYL COBOL Committee as to the accuracy and functioning of the
programming system and language. Moreover, no responsibility is assumed by
any contributor, or by the committee, in connection therewith.
The authors and copyright holders of the copyrighted material used herein are
as follows: FLOW-MATIC (trademark of Unisys Corporation), Programming
for the UNIVAC (R) I and II, Data Automation Systems, copyrighted 1958,
1959, by Unisys Corporation; IBM Commercial Translator Form No. F28-8013,
copyrighted 1959 by IBM; FACT, DSI 27A5260-2760, copyrighted 1960 by
Minneapolis-Honeywell.
They have specifically authorized the use of this material, in whole or in part, in
the COBOL specifications. Such authorization extends to the reproduction and
use of COBOL specifications in programming manuals or similar publications.
How to Order Additional Documentation
Visit the following World Wide Web address for information about how to order
additional documentation:
http://www.openvms.compaq.com/doc/
xxviii
Reader’s Comments
Compaq welcomes your comments on this manual. Please send comments to
either of the following addresses:
Internet
[email protected]
Mail
Compaq Computer Corporation
OSSG Documentation Group, ZKO3-4/U08
110 Spit Brook Rd.
Nashua, NH 03062-2698
xxix
1
Developing Compaq COBOL Programs
Compaq COBOL is a family of powerful COBOL compilers produced by Compaq
Computer Corporation. Compaq COBOL operates comfortably in the Compaq
common language environment; on Alpha, it is based on GEM, which is the
highly advanced code generator and optimizer that Compaq uses in its Alpha
family of languages, which includes COBOL, C, C++, FORTRAN, BASIC, Ada,
and PASCAL. In addition to standard COBOL features, Compaq COBOL includes
extensions that make new application development efficient and effective, with
features helpful in porting legacy COBOL programs to OpenVMS Alpha and
Tru64 UNIX systems.
Developing software applications with Compaq COBOL will be a familiar process.
You set up your development environment, create your source, compile, link, and
run. A few of the specific tasks are:
•
Choosing a reference format: terminal or ANSI
•
Carefully considering Alpha architecture system resources; for example, you
might invest more system resources at compile time to get faster execution at
run time
•
Using various system-independent features for program development
1.1 Developing Programs on Tru64 UNIX
This section briefly describes the Tru64 UNIX commands (commands used at the
operating system prompt) that you use to create, compile, link, and run Compaq
COBOL programs on Tru64 UNIX systems.
1.1.1 Creating a Compaq COBOL Program on Tru64 UNIX
Use a text editor, such as vi or emacs, to create and revise your source files. For
instance, to edit the file prog1.cob using the vi editor, type:
% vi prog1.cob
Figure 1–1 shows the basic steps in Compaq COBOL program development on
Tru64 UNIX systems.
Developing Compaq COBOL Programs 1–1
Developing Compaq COBOL Programs
1.1 Developing Programs on Tru64 UNIX
Figure 1–1 Commands for Developing Compaq COBOL Programs on Tru64
UNIX
COMMANDS
ACTION
% vi prog1.cob
Use the file type of cob
to indicate the file contains
a Compaq COBOL program.
INPUT/OUTPUT FILES
prog1.cob
Create a
source program
% cobol -c prog1.cob
The cobol command
assumes no file type.
(If you use the -list flag,
the compiler creates a
listing file; if you use the
-c flag, the compiler
creates an object file.)
Compile the
source program
(prog1.o,
prog1.lis)
libraries
% cobol prog1.o
The link command
assumes no file type.
Link the
object module
% a.out
Type the output file name
to run the image.
Run the
executable
image
a.out
Note: case of file names is significant.
VM-0610A-AI
When naming a source file, choose one of the four file name extensions that the
cobol compiler recognizes as COBOL file suffixes. These suffixes are:
.cob
.COB
.cbl
.CBL
Table 1–1 shows other file name suffixes.
1–2 Developing Compaq COBOL Programs
Developing Compaq COBOL Programs
1.1 Developing Programs on Tru64 UNIX
Table 1–1 Other File Name Suffixes
Suffix
Description
.c
Identifies C language files passed to the C compiler driver cc, which performs
additional command line parsing before invoking the C language compiler.
.s
Identifies assembler files passed to
files.
.o
.a
Identifies object files passed to
cc. Compaq COBOL does not generate .s
cc, which are in turn passed to ld.
Identifies archive object libraries passed to cc, which are in turn passed to ld.
All routines in the specified object library will be searched during linking to
resolve external references. This is one method of specifying special libraries
for which the cobol command does not automatically search.
.so
Identifies shared object libraries passed to cc, which are in turn passed to ld.
All routines in the specified object library will be searched during linking to
resolve external references. This is one method of specifying special libraries
for which the cobol command does not automatically search.
The following cobol command compiles the program named prog1.cob and
automatically uses the linker ld to link the main program into an executable
program file named a.out (the name used if you do not specify a name):
% cobol prog1.cob
The cobol command automatically passes a standard default list of Tru64 UNIX
and Compaq COBOL libraries to the ld linker. If all external routines used by a
program reside in these standard libraries, additional libraries or object files are
not specified on the cobol command line.
If your path definition includes the directory containing a.out, you can run the
program by simply typing its name:
% a.out
If the executable image is not in your current directory path, specify the directory
path in addition to the file name.
The COPY Statement and Libraries
As you write a program, you can use the COPY statement in your source program
to include text from another file. With the COPY statement, separate programs
can share common source text kept in libraries, reducing development and testing
time as well as storage. The Compaq COBOL Reference Manual explains how to
use the COPY statement.
Special Considerations for Routines Named ‘‘main’’
If you have a program or routine named ‘‘main,’’ declared either in a Compaq
COBOL or other module, your application may not work correctly. The Compaq
COBOL library contains a routine named ‘‘main,’’ which initializes the run-time
environment for the CALL by data name statements, extended ACCEPT and
DISPLAY statements, and some error handling. When your application also
declares a ‘‘main,’’ your routine preempts the Compaq COBOL routine, and the
run-time initialization is not performed.
Compaq recommends that you not name a Compaq COBOL program ‘‘main.’’
If you have a C routine named ‘‘main,’’ you can work around this problem by
having the ‘‘main’’ routine directly call the Compaq COBOL initialization routine,
cob_init. The cob_init routine interface (in C) is as follows:
Developing Compaq COBOL Programs 1–3
Developing Compaq COBOL Programs
1.1 Developing Programs on Tru64 UNIX
void cob_init (
int argc,
char **argv,
char **envp
/*
/*
/*
/*
init the RTL */
argument count */
arguments */
environment variable pointers */ )
1.1.2 Compiling a Compaq COBOL Program on Tru64 UNIX
Compilation does the following for you:
•
Detects errors in your program syntax
•
Displays compiler messages on your terminal screen
•
Generates machine language instructions from valid source statements
•
Groups the instructions into an object module for the linker ld
To compile your program, use the cobol command.
The COBOL Command Driver
The cobol command invokes a compiler driver that is the actual user interface to
the Compaq COBOL compiler. It accepts a list of command flags and file names
and causes one or more processors (compiler, assembler, or linker) to process each
file.
After the Compaq COBOL compiler processes the appropriate files to create
one or more object files, the compiler driver passes a list of files, certain flags,
and other information to the cc compiler. After the cc compiler (the default
C compiler on your system) processes relevant files and information, it passes
certain information (such as .o object files) to the ld linker. The cobol command
executes each processor; if any processor returns other than normal status,
further processing is discontinued and the Compaq COBOL compiler displays a
message identifying the processor (and its returned status, in hexadecimal) before
terminating its own execution.
1.1.2.1 Format of the COBOL Command on Tru64 UNIX
The cobol command has the following format:
cobol [-flags [options]]... filename[.suffix] [filename[.suffix]]... [-flags [options]]...
-flags [options]
Indicates either special actions to be performed by the compiler or linker, or
special properties of input or output files. For details about command-line flags,
see Section 1.1.2.2. If you specify the -lstring flag (which indicates libraries to be
searched by the linker) or an object library file name, place it after the file names
and after other flags.
filename.suffix
Specifies the source files containing the program units to be compiled, where the
file name has a suffix that indicates the type of file used. The recognized COBOL
suffix characters are .cob, .COB, .cbl, and .CBL.
Note that the compiler driver checks for a valid suffix on filename. If you omit
suffix, or if it is not one of the types recognized by the cobol command, the file is
assumed to be an object file and is passed directly to the linker.
An example cobol command line would be:
% cobol -v test.cob pas.o
1–4 Developing Compaq COBOL Programs
Developing Compaq COBOL Programs
1.1 Developing Programs on Tru64 UNIX
This command specifies the following:
•
The -v flag displays the compilation and link passes with their arguments
and files, including the libraries passed to ld.
•
The file test.cob is passed to the Compaq COBOL compiler for compilation.
The resulting object file is then linked.
•
The object file pas.o is passed directly to the linker.
As an additional example, you might find that your compiler command lines are
getting rather long, as shown in the following example:
% cobol -rsv foreign_extensions -flagger high_fips -warn information zeroes.cob
To work around this, you may truncate compiler flag options (arguments) to their
shortest unambiguous form, as follows:
% cobol -rsv for -flagger high -warn info zeroes.cob
1.1.2.2 COBOL Command Flags
Flags to the cobol command affect how the compiler processes a file. The
simplest form of the cobol command is often sufficient.
If you compile parts of your program (compilation units) using multiple cobol
commands, flags that affect the execution of the program should be used
consistently for all compilations, especially if data will be shared or passed
between procedures.
For a complete list of Compaq COBOL flags, see Table 1–2. For more information
about the Compaq COBOL flags, access the reference (man) page for COBOL at
the Tru64 UNIX system prompt. For example:
% man cobol
Developing Compaq COBOL Programs 1–5
Developing Compaq COBOL Programs
1.1 Developing Programs on Tru64 UNIX
Table 1–2 Compaq COBOL Command Flags on Tru64 UNIX
Flag
Default
-align [padding]
-ansi
-arch
-arithmetic native
-arithmetic standard
-C
-c
-call_shared
-check all
-check [no]bounds
-check [no]decimal
-check [no]perform
-check none
-conditionals [selector]
-convert [no]leading_blanks
-copy
-copy_list
-cord
-cross_reference
-cross_reference alphabetical
-cross_reference declared
-D num
-display_formatted
-feedback file
-fips 74
-flagger [option]
-granularity byte,
-granularity long,
-granularity quad
-g0
-g1
-g2 or -g
-g3
-include
-K
-L
-Ldir
-list
-lstring
off
off
-arch generic
-arithmetic native
-arithmetic native
off
on
on
off
-check nobounds
-check nodecimal
-check noperform
on
off
-convert noleading_blanks
off
off
off
off
off
off
off
off
off
off
off
-granularity quad
off
on
off
off
off
off
off
off
off
off
(continued on next page)
1–6 Developing Compaq COBOL Programs
Developing Compaq COBOL Programs
1.1 Developing Programs on Tru64 UNIX
Table 1–2 (Cont.) Compaq COBOL Command Flags on Tru64 UNIX
Flag
Default
-mach or -machine_code
-map
-map alphabetical
-map declared
-math_intermediate cit3,
-math_intermediate cit4,
-math_intermediate float
-names as_is,
-names lower,
-names lowercase,
-names upper,
-names uppercase
-nationality japan,
-nationality us
-nolocking
-noobject
-non_shared
-nowarn
-O0
-O1
-O2
-O3
-O4 or -O
-o output
-p0
-p1 or -p
-relax_key_checking or -rkc
-rsv [no]200x
-rsv [no]foreign_extensions
-rsv [no]xopen
-seq or -sequence_check
-shared
-show code
-show copy
-show xref
-std or -std 85
-std [no]mia
-std [no]syntax
-std [no]v3
-std [no]xopen
off
off
off
off
-math_intermediate float
-names lowercase
-nationality us
off
off
-call_shared
off
off
off
off
off
on
a.out
on
off
off
-rsv no200x
-rsv noforeign_extensions
-rsv xopen
off
-call_shared
off
off
off
on
-std nomia
-std nosyntax
-std nov3
-std xopen
(continued on next page)
Developing Compaq COBOL Programs 1–7
Developing Compaq COBOL Programs
1.1 Developing Programs on Tru64 UNIX
Table 1–2 (Cont.) Compaq COBOL Command Flags on Tru64 UNIX
Flag
Default
-T num
-taso
-tps
-trunc
-tune
-V
-v
-w
-warn
-warn all
-warn [no]information
-warn [no]other
-warn none
-xref, -xref_stdout
off
off
off
off
-tune generic
off
off
off
-warn other
off
-warn noinformation
-warn other
off
off
Technical Notes:
1. If your program compile generates Errors (E-level diagnostics on OpenVMS),
the link phase of the two steps taken by the compiler driver will be aborted
and the object file(s) deleted. You can override this deletion by specifying the
-c flag:
% cobol -c test.cob
% cobol test.o
The Compaq COBOL compiler driver (see Section 1.1.2) controls a sequence of
operations (as required): compiling, assembling, linking. The -c flag signals
the compiler driver to break the sequence.
(For additional information, see The COBOL Command Driver description
(earlier in this chapter), Section 1.1.2.12, and the -c description under man
cobol.)
2. The -tps flag causes the Compaq COBOL compiler to use an external file
handler (produced by a third party), providing increased flexibility in cross
platform, transaction processing application development. See Section 1.1.2.3
for more information.
3. Specifying the -xref_stdout option directs the compiler to output the data
file to standard output.
4. Any copy file that contains a PROGRAM-ID or END PROGRAM statement
for a program must contain that entire program.
1–8 Developing Compaq COBOL Programs
Developing Compaq COBOL Programs
1.1 Developing Programs on Tru64 UNIX
1.1.2.3 External File Handler Support
The -tps flag allows Compaq COBOL applications to make use of ACMSxp, the
Application Control and Management System/Cross-Platform Edition.
-tps specifies that files are part of a transaction processing system, and enables
Encina Structured File System (SFS) record storage for applicable files. It is
intended to be used in conjunction with the Transarc Encina external file handler
and ACMSxp, allowing access to data in a wide variety of databases, without
the need to write code in the language of the databases. This approach provides
access to transaction processing technology, and incorporates industry standards
for data communications and distributed computing. ACMSxp conforms to the
the Multivendor Integration Architecture (MIA).
COBOL is one of the languages approved by MIA for transaction processing
(TP) client programs, customer-written presentation procedures, and processing
procedures. For database access, Structured Query Language (SQL) is the
MIA-required access language. The SQL is embedded in COBOL and C.
Refer to the ACMSxp documentation for full details. Additional information
can also be found in published Distributed Computing Environment (DCE)
documentation.
1.1.2.4 Specifying Multiple Files and Flags
The cobol command can specify multiple file names and multiple flags. Multiple
file names are delimited by spaces. If appropriate, each file name can have a
different suffix. The file name suffix could result in the following actions:
•
Calling another language compiler, such as the C compiler
•
Passing object files directly to the linker, which the linker combines with
other object files
•
Passing an object library to the linker, which the linker uses to search for
unresolved global references
When a file is not in your current working directory, specify the directory path
before the file name.
1.1.2.5 Compiling Multiple Files
An entire set of source files can be compiled and linked together using a single
cobol command:
% cobol -o calc mainprog.cob array_calc.cob calc_aver.cob
This cobol command:
•
Uses the -o flag to specify the name of the executable program as calc
•
Compiles the file array_calc.cob
•
Compiles the file calc_aver.cob
•
Compiles the file mainprog.cob, which contains the main program
•
Uses ld to link both the main program and object files into an executable
program file named calc
The files can also be compiled separately, as follows:
% cobol -c array_calc.cob
% cobol -c calc_aver.cob
% cobol -o calc mainprog.cob array_calc.o calc_aver.o
Developing Compaq COBOL Programs 1–9
Developing Compaq COBOL Programs
1.1 Developing Programs on Tru64 UNIX
In this case, the -c option prevents linking and retains the .o files. The first
command creates the file array_calc.o. The second command creates the file
calc_aver.o. The last command compiles the main program and links the object
files into the executable program named calc.
If your path definition includes the directory containing calc, you can run the
program by simply typing its name:
% calc
You can compile multiple source files by concatenating them:
% cat proga1.cob proga2.cob proga3.cob > com1.cob
% cat progb1.cob progb2.cob > com2.cob
% cobol -c com1.cob com2.cob
The resulting file names are com1.o and com2.o. The OpenVMS Alpha equivalent
to this is:
$ COBOL proga1+proga2+proga3,progb1+progb2
1.1.2.6 Debugging a Program
To debug a program using the Ladebug Debugger, compile the source files
with the -g flag to request additional symbol table information for source line
debugging in the object and executable program files. The following cobol
command also uses the -o flag to name the executable program file calc_debug:
% cobol -g -o calc_debug mainprog.cob array_calc.cob calc_aver.cob
To debug an executable program named calc_debug, type the following command:
% ladebug calc_debug
For more information on running the program within the debugger, refer to the
Ladebug Debugger Manual.
Pay attention to compiler messages. Informational and warning messages (as
well as error-level messages) do not prevent the production of an object file, which
you can link and execute. However, the messages sometimes point out otherwise
undetected logic errors, and the structure of the program might not be what you
intended.
1.1.2.7 Output Files: Object, Executable, Listing, and Temporary Files
The output produced by the cobol command includes:
•
An object file, if you specify the -c flag on the command line
•
An executable file, if you omit the -c flag
•
A listing file, if you specify the -V flag
If the environment variable TMPDIR is set, the value is used as the directory for
temporary files.
You control the production of these files by specifying the appropriate flags on
the cobol command line. Unless you specify the -c flag, the compiler generates a
single temporary object file, whether you specify one source file or multiple source
files separated by blanks. The ld linker is then invoked to link the object file into
one executable image file.
1–10 Developing Compaq COBOL Programs
Developing Compaq COBOL Programs
1.1 Developing Programs on Tru64 UNIX
The object file is in Tru64 UNIX extended coff format. The object file provides
the following information:
•
The name of the entry point. It takes this name from the program name in
the first PROGRAM-ID paragraph in the source program.
•
A list of variables that are declared in the module. The linker uses this
information when it binds two or more modules together and must resolve
references to the same names in the modules.
•
A symbol table and a source line correlation table (if you request them
with the -g flag, for debugging). A symbol table is a list of the names of all
external and internal variables within a module, with definitions of their
locations. The source line correlation table associates lines in your source file
with lines in your program. These tables are of use in debugging.
If severe errors are encountered during compilation or if you specify certain flags
such as -c, linking does not occur.
1.1.2.8 Naming Output Files
To specify a file name (other than a.out) for the executable image file, use the
-o output flag, where output specifies the file name. You can also use the mv
command to rename the file. The following command requests a file name of
prog1.out for the source file test1.cob:
% cobol -o prog1.out test1.cob
Besides specifying the name of the executable image file, you can use the -o
output flag to rename the object file if you specified the -c flag. If you specify the
-c flag and omit the -o output flag, the name of the first specified file is used with
a .o suffix substituted for the source file suffix.
1.1.2.9 Temporary Files
Temporary files created by the compiler or a preprocessor reside in the /tmp
directory and are deleted (unless the -K flag is specified). You can set the
environment variable TMPDIR to specify a directory to contain temporary files if
/tmp is not acceptable.
To view the file name and directory where each temporary file is created, use
the -v flag. To create object files in your current working directory, use the -c
flag. Any object files (.o files) that you specify on the cobol command line are
retained.
1.1.2.10 Examples of the COBOL Command
The following examples show the use of the cobol command. Each command is
followed by a description of the output files that it produces.
1.
% cobol -V aaa.cob bbb.cob ccc.cob
The Compaq COBOL source files aaa.cob, bbb.cob, and ccc.cob are compiled
into temporary object files. The temporary object files are passed to the ld
linker. The ld linker produces the executable file a.out. The -V flag causes
the compiler to create the listing files aaa.lis, bbb.lis, and ccc.lis.
Developing Compaq COBOL Programs 1–11
Developing Compaq COBOL Programs
1.1 Developing Programs on Tru64 UNIX
2.
% cobol -V *.cob
Compaq COBOL source files with file names that end with .cob are compiled
into temporary object files, which are then passed to the ld linker. The ld
linker produces the a.out file.
When the compilation completes, the cobol driver returns one of the following
status values:
0—SUCCESS
1—FAILURE
2—SUBPROCESS_FAILURE (cobol or cc)
3—SIGNAL
1.1.2.11 Other Compilers
You can compile and link multilanguage programs using a single cobol command.
The cobol command recognizes C or Assembler program files by their file
suffix characters and passes them to the cc compiler for compilation. Before
compilation, cc applies the cpp preprocessor to files that it recognizes, such as
any file with a .c suffix.
Certain flags passed to cc are passed to the ld linker.
1.1.2.12 Interpreting Messages from the Compiler
The Compaq COBOL compiler identifies syntax errors and violations of language
rules in the program. If the compiler finds any errors, it writes messages to
the stderr output file and any listing file. If you enter the cobol command
interactively, the messages are displayed on your terminal.
Compiler messages have the following format:
cobol: severity: filename, line n, message-text
[text-in-error]
--------^
The pointer (--^) indicates the exact place on the source line where the error was
found. For example, the following error message shows the format and message
text in a listing file when an END DO statement was omitted:
cobol: Severe: disp.cob, line 7: Missing period is assumed
05 VAR-1 PIC X.
--------^
The severity level is one of the following:
Severe
The compiler does not produce an object module. You must correct
the error before you can compile the program to produce an object
module.
Error
The compiler makes an assumption about what you intended and
continues. However, the compiler’s assumption may not relate to
your intention. Correct the error.
Warning
The compiler attempts to correct the error in the statement,
but you should verify that the compiler’s action is acceptable.
Otherwise, your program may produce unexpected results.
Informational
This message usually appears with other messages to inform you
of specific actions taken by the compiler. No action is necessary on
your part.
1–12 Developing Compaq COBOL Programs
Developing Compaq COBOL Programs
1.1 Developing Programs on Tru64 UNIX
Any messages issued during the compilation are inserted in the listing file. A
listing file is useful for debugging the source code. Use the -V or -list flag to
produce a listing; you may also use -cross_reference, -copy_list, -flagger,
-machine_code, -map, and/or -warn, all of which affect the contents of the listing
file.
Diagnostic messages provide information for you to determine the cause of an
error and correct it. If the compiler creates a listing file, it writes the messages to
the listing file.
1.1.3 Linking a Compaq COBOL Program on Tru64 UNIX
Once your program has compiled successfully, the system passes the resulting
object file (which has the suffix .o by default) to the linker to create an executable
image file. By default, the executable image file has the name a.out. (To change
this default, specify -o filename on the cobol command line.) This file can be run
on the Tru64 UNIX system.
The ld linker provides the following primary functions:
•
Generates appropriate information in the executable image for virtual
memory allocation
•
Resolves symbolic references among object files being linked, including
whether to search in archive or shared object libraries
•
Assigns values to relocatable global symbols
•
Performs relocation
The linker produces an executable program image with a default name of a.out.
When you enter a cobol command, the ld linker is invoked automatically unless
a compilation error occurs or you specify the -c flag on the command line.
1.1.3.1 Specifying Object Libraries for Linking
You can specify object libraries on the COBOL command line by using certain
flags or by providing the file name of the library. These object libraries are also
searched by ld for unresolved external references.
When cobol specifies certain libraries to ld, it provides a standard list of COBOL
library file names to ld. The ld linker tries to locate each of these library file
names in a standard list of library directories. That is, ld attempts to locate each
object library file name first in one directory, then in the second, and then in the
third directory on its search list of directories.
To display a list of the compilers invoked, files processed, and libraries accessed
during linking, specify the -v flag.
In addition to an object file created by the compiler, any linker flags and object
files specified on the cobol command are also passed to the ld linker. The
linker loads object files according to the order in which they are specified on the
command line. Because of this, you must specify object libraries after all source
and object files on the cobol command line.
To help identify undefined references to routines or other symbols in an object
module, consider using the nm command. For instance, in the following example
the nm command filtered by the grep command lists all undefined (U) symbols:
% cobol -c ex.cob
% nm -o ex.o | grep U
Developing Compaq COBOL Programs 1–13
Developing Compaq COBOL Programs
1.1 Developing Programs on Tru64 UNIX
If the symbol is undefined, U appears in the column before the symbol name. Any
symbols with a U in their names can also be displayed by this use of grep.
1.1.3.2 Specifying Additional Object Libraries
You can control the libraries as follows:
•
To specify additional object library file names for ld to locate, use the
-lstring flag to define an additional object library for ld to search. Thus, each
occurrence of the -lstring flag specifies an additional file name that is added
to the list of object libraries for ld to locate. The standard COBOL library file
names searched (shown in the form of the appropriate -lstring flag) are:
-lcob
-lcurses
-lFutil
-lots2
-lots
-lisam
-lsort
-lexc
-lm
For instance, the file name of -lcob is libcob.
The following example specifies the additional library libX:
% cobol simtest.cob -lX
•
In addition to the standard directories in which ld tries to locate the library
file names, you can use the -Ldir flag to specify another directory. The
-lstring flag and -Ldir flag respectively adds an object library file name
(-lstring) or directory path (-Ldir) that ld uses to locate all specified library
files. The standard ld directories are searched before directories specified by
the -Ldir flag.
The following example specifies the additional object library path
/usr/lib/mytest:
% cobol simtest.cob -L/usr/lib/mytest
•
You can indicate that ld should not search its list of standard directories at
all by specifying the -L flag. When you do so, you must specify all libraries
on the cobol command line in some form, including the directory for cobol
standard libraries. To specify all libraries, you might use the -L flag in
combination with the -Ldir flag on the same cobol command line.
•
You can specify the pathname and file name of an object library as you
would specify any file. Specifying each object library that resides in special
directories in this manner is an alternative to specifying the library using the
-lstring or -Ldir flag. This method can reduce the amount of searching the
linker must do to locate all the needed object files.
In certain cases, you may need to specify the pathname and file name instead
of using the -lstring or -Ldir flags for the linker to resolve global symbols
with shared libraries.
When processing a C source file (.c suffix) using the cobol command, you may
need to specify the appropriate C libraries using the -lstring flag.
1–14 Developing Compaq COBOL Programs
Developing Compaq COBOL Programs
1.1 Developing Programs on Tru64 UNIX
1.1.3.3 Specifying Types of Object Libraries
Certain cobol flags influence whether ld searches for an archive (.a) or shared
object (.so) library on the standard list of COBOL libraries and any additional
libraries specified using the -lstring or -Ldir flags. These flags are the following:
•
The -call_shared flag, the default, indicates that .so files are searched
before .a files. As ld attempts to resolve external symbols, it looks at the
shared library first before the corresponding archive library. References
to symbols found in a .so library are dynamically loaded into memory at
run time. References to symbols found in .a libraries are loaded into the
executable image file at link time. For instance, /usr/shlib/libc.so is
searched before /usr/lib/libc.a.
•
The -non_shared flag indicates that only .a files are searched, so the object
module created contains static references to external routines and are loaded
into the executable image at link time, not at run time. Corresponding .so
files are not searched.
The following example requests that the standard cobol .a files be searched
instead of the corresponding .so files:
% cobol -non_shared mainprog.cob rest.o
External references found in an archive library result in that routine being
included in the resulting executable program file at link time.
External references found in a shared object library result in a special link to
that library being included in the resulting executable program file, instead of the
actual routine itself. When you run the program, this link gets resolved by either
using the shared library in memory (if it already exists) or loading it into memory
from disk.
1.1.3.4 Creating Shared Object Libraries
To create a shared library, first create the .o file, such as octagon.o in the
following example:
% cobol -O3 -c octagon.cob
The file octagon.o is then used as input to the ld command to create the shared
library, named octagon.so:
% ld -shared -no_archive octagon.o \
-lcob -lcurses -lFutil -lots2 -lots -lisam -lsort -lexc -lmld -lm
A description of each ld flag follows:
•
The -shared flag is required to create a shared library.
•
The -no_archive flag indicates that ld should not search archive libraries to
resolve external names (only shared libraries).
•
The name of the object module is octagon.o. You can specify multiple .o files.
•
The -lcob and subsequent flags are the standard list of libraries that the
COBOL command would have otherwise passed to ld. When you create a
shared library, all symbols must be resolved. For more information about the
standard list of libraries used by Compaq COBOL, see Section 1.1.3.2.
Developing Compaq COBOL Programs 1–15
Developing Compaq COBOL Programs
1.1 Developing Programs on Tru64 UNIX
1.1.3.5 Shared Library Restrictions
When creating a shared library using ld, be aware of the following restrictions:
•
Programs that are installed setuid or setgid will not use any libraries that
have been installed using the inlib shell command, but only systemwide
shared libraries (for security reasons).
•
For other restrictions imposed by the operating system, refer to your
operating system documentation. If you create a shared library that contains
routines written in C, refer to your operating system documentation for any
restrictions associated with the cc command.
1.1.3.6 Installing Shared Libraries
Once the shared library is created, it must be installed before you run a program
that refers to it. The following describes how you can install a shared library for
private or systemwide use:
•
To install a private shared library, such as for testing, set the environment
variable LD_LIBRARY_PATH, as described in ld(1).
•
To install a systemwide shared library, place the shared library file in one of
the standard directory paths used by ld (see ld(1)).
For complete information on installing shared libraries, refer to your operating
system documentation.
Specifying Shared Object Libraries
When you link your program with a shared library, all symbols must be
referenced before ld searches the shared library, so you should always specify
libraries at the end of the cobol command line after all file names. Unless
you specify the -non_shared flag, shared libraries will be searched before the
corresponding archive libraries.
For instance, the following command generates an error if the file rest.o
references routines in the library libX:
% cobol -call_shared test.cob -lX rest.o
The correct order follows:
% cobol -call_shared test.cob rest.o -lX
Link errors can occur with symbols that are defined twice, as when both an
archive and shared object are specified on the same command line. In general,
specify any archive libraries after the last file name, followed by any shared
libraries at the end of the command line.
Before you reference a shared library at run time, it must be installed.
1.1.3.7 Interpreting Messages from the Linker
If the linker detects any errors while linking object modules, it displays messages
about their cause and severity. If any errors occur, the linker does not produce an
image file.
Linker messages are descriptive, and you do not normally need additional
information to determine the specific error. The general format for ld messages
follows:
ld:
message-text
1–16 Developing Compaq COBOL Programs
Developing Compaq COBOL Programs
1.1 Developing Programs on Tru64 UNIX
The message-text may be on multiple lines and is sometimes accompanied by a
cobol error.
Some common errors that occur during linking resemble the following:
•
An object module has compilation errors. This error occurs when you attempt
to link a module that had warnings or errors during compilation. Although
you can usually link compiled modules for which the compiler generated
messages, you should verify that the modules will actually produce the output
you expect.
•
The modules being linked define more than one transfer address. The linker
generates a warning if more than one main program has been defined. This
can occur, for example, when an extra END statement exists in the program.
The image file created by the linker in this case can be run; the entry point to
which control is transferred is the first one that the linker found.
•
A reference to a symbol name remains unresolved. This error occurs when
you omit required module or library names from the cobol or ld command
and the linker cannot locate the definition for a specified global symbol
reference.
If an error occurs when you link modules, you may be able to correct it by
retyping the command string and specifying the correct routines or libraries
(-lstring flag, -Ldir flag), or specify the object library or object modules on the
command line.
1.1.4 Running a Compaq COBOL Program on Tru64 UNIX
The simplest form of the run command to execute a program is to type its file
name at the operating system prompt, as follows:
% myprog.out
In addition to normal IO accesses, your Compaq COBOL programs can read
command-line arguments and access (read and write) environment variables.
1.1.4.1 Accessing Command-Line Arguments
Command-line arguments allow you to provide information to a program at
run time. Your program provides the logic to parse the command line, identify
command-line options, and act upon them. For example, you might develop a
program that will extract a given amount of data from a specified file, where both
the number of records to read and the file name are highly dynamic, changing
for each activation of your program. In this case your program would contain
code that reads a command-line argument for the number of records to read, and
a second argument for the file specification. Your program execution command
could look like the following:
% myprog 1028 powers.dat
In the preceding example the program myprog would read 1028 records from the
file powers.dat.
Multiple command-line arguments are delimited by spaces, as shown in the
preceding example. If an argument itself contains spaces, enclose that argument
in quotation marks (" ") as follows:
% myprog2 "all of this is argument 1" argument2
Developing Compaq COBOL Programs 1–17
Developing Compaq COBOL Programs
1.1 Developing Programs on Tru64 UNIX
You provide definitions for the command-line arguments with the SPECIALNAMES paragraph in your program’s Environment Division, and you include
ACCEPT and DISPLAY statements in the Procedure Division to parse the
command line and access the arguments. Detailed information about commandline argument capability is in the ACCEPT and DISPLAY sections in the Compaq
COBOL Reference Manual.
1.1.4.2 Accessing Environment Variables
You can read and write environment variables at run time through your Compaq
COBOL program.
Example 1–1 allows you to specify a file specification by putting the directory
in the value of the environment variable COBOLPATH, and the file name in a
command-line argument:
Example 1–1 Accessing Environment Variables and Command-Line Arguments
identification division.
PROGRAM-ID. MYPROG.
ENVIRONMENT DIVISION.
CONFIGURATION SECTION.
SPECIAL-NAMES.
SYSERR
IS
ENVIRONMENT-NAME
IS
ENVIRONMENT-VALUE IS
ARGUMENT-NUMBER
IS
ARGUMENT-VALUE
IS
STANDARD-ERROR
NAME-OF-ENVIRONMENT-VARIABLE
ENVIRONMENT-VARIABLE
POS-OF-COMMAND-LINE-ARGUMENT
COMMAND-LINE-ARGUMENT.
DATA DIVISION.
WORKING-STORAGE SECTION.
01 howmany-records PIC 9(5).
01 env-dir PIC x(50).
01 file-name PIC x(50).
01 file-spec PIC x(100).
PROCEDURE DIVISION.
BEGIN.
ACCEPT howmany-records FROM COMMAND-LINE-ARGUMENT
ON EXCEPTION
DISPLAY "No arguments specified"
UPON STANDARD-ERROR
END-DISPLAY
STOP RUN
END-ACCEPT.
(continued on next page)
1–18 Developing Compaq COBOL Programs
Developing Compaq COBOL Programs
1.1 Developing Programs on Tru64 UNIX
Example 1–1 (Cont.) Accessing Environment Variables and Command-Line
Arguments
DISPLAY "COBOLPATH" UPON NAME-OF-ENVIRONMENT-VARIABLE.
ACCEPT env-dir FROM ENVIRONMENT-VARIABLE
ON EXCEPTION
DISPLAY "Environment variable COBOLPATH is not set"
UPON STANDARD-ERROR
END-DISPLAY
NOT ON EXCEPTION
ACCEPT file-name FROM COMMAND-LINE-ARGUMENT
ON EXCEPTION
DISPLAY
"Attempt to read beyond end of command line"
UPON STANDARD-ERROR
END-DISPLAY
NOT ON EXCEPTION
STRING env-dir "/" file-name delimited by " " into file-spec
DISPLAY "Would have read " howmany-records " records from " file-spec
END-ACCEPT
END-ACCEPT.
This example requires that the following command has been executed to set an
environment variable:
% setenv COBOLPATH /usr/files
When you execute the following command lines:
% cobol -o myprog myprog.cob
% myprog 1028 powers.dat
The following will result:
•
howmany-records will contain ‘‘1028’’
•
env-dir will contain ‘‘/usr/files’’
•
file-name will contain ‘‘powers.dat’’
•
file-spec will contain ‘‘/usr/files/powers.dat’’
For additional information, refer to the ACCEPT and DISPLAY statements in the
Compaq COBOL Reference Manual.
1.1.4.3 Errors and Switches
See Section 1.4 for a discussion of errors that can cause incorrect or undesirable
results when you run a program.
See Section 1.5 for a discussion of controlling program execution with switches.
1.1.5 Program Development Stages and Tools
This manual primarily addresses the program development activities associated
with development and testing phases. For information about topics usually
considered during application design, specification, and maintenance, refer to
your operating system documentation, appropriate reference pages, or appropriate
commercially published documentation.
Developing Compaq COBOL Programs 1–19
Developing Compaq COBOL Programs
1.1 Developing Programs on Tru64 UNIX
Table 1–3 lists and describes some of the software tools you can use when
developing and testing a program.
Table 1–3 Main Tools for Program Development and Testing
Task or Activity
Tool and Description
Manage source files
Use RCS or sccs to manage source files. For more information,
refer to the Tru64 UNIX documentation on programming
support tools or the appropriate reference page.
Create and modify
source files
Use a text editor, such as vi, emacs, or another editor.
For more information, refer to your operating system
documentation.
Analyze source code
Use searching commands such as grep and diff. For more
information, refer to the Tru64 UNIX documentation on
programming support tools or the appropriate reference page.
Build program (compile
and link)
You can use the cobol command to create small programs,
perhaps using shell scripts, or use the make command to build
your application in an automated fashion using a makefile.
For more information on make, refer to the make(1) reference
page and the Tru64 UNIX documentation on programming
support tools.
Debug and test program
Use the Ladebug Debugger to debug your program or run it for
general testing. For more information on Ladebug Debugger,
refer to the Ladebug Debugger Manual.
Install program
Use setld and related commands such as tar. For more
information, refer to the Tru64 UNIX documentation on
programming support tools.
In addition, you might use the following shell commands at various times during
program development:
•
To view information about an object file or an object library, use the following
commands:
The file command shows the type of a file (such as which programming
language, whether it is an object library, ASCII file, and so forth).
The nm command (perhaps with the -a or -o flag) shows symbol table
information, including the identification field of each object file.
The odump command shows the contents of a file and other information.
The size command shows the size of the code and data sections.
For more information on these commands, refer to the appropriate reference
page or the Tru64 UNIX documentation on programming support tools.
•
Use the ar command to create an archive object library (-r flag), maintain
the modules in the library, list the modules in the library (-t), and perform
other functions. Use -ts to add a table of contents to the object library for
linking purposes. For more information, refer to ar(1) or the Tru64 UNIX
programmer’s documentation.
•
To create shared libraries on Tru64 UNIX systems, use ld, not the ar
command. For more information, see Section 1.1.3.4 and refer to the Tru64
UNIX programmer’s documentation.
1–20 Developing Compaq COBOL Programs
Developing Compaq COBOL Programs
1.1 Developing Programs on Tru64 UNIX
•
The strip command removes symbolic and other debugging information
to minimize image size. For additional information, refer to the strip(1)
reference page.
Note
The CALL dataname, CANCEL, and the Compaq extensions to the
ACCEPT and DISPLAY statements will not work correctly if you use the
strip command on your image.
In most instances, use the cobol command to invoke both the Compaq COBOL
compiler and the ld linker. To link one or more object files created by the Compaq
COBOL compiler, you should use the cobol command instead of the ld command,
because the cobol command automatically references the appropriate Compaq
COBOL Run-Time Libraries when it invokes ld. If the executable image is not in
your current working directory, specify the directory path in addition to the file
name.
Compilation does the following for you:
•
Detects errors in your program syntax
•
Displays compiler messages on your terminal screen
•
Generates machine language instructions from valid source statements
•
Groups the instructions into an object module for the linker
•
Launches the linker with the compiled file or files
•
Creates an executable image
You use the cobol command to compile and link your program. The cobol
command invokes the Compaq COBOL compiler driver that is the actual user
interface to the Compaq COBOL compiler. The compiler driver can accept
command options and multiple file names, and normally causes the compiler and
linker to process each file. A variety of qualifiers to the compile command are
available to specify optional processing and to specify the names of output files.
After the Compaq COBOL compiler processes the source files to create one
or more object files, the compiler driver passes a list of object files and other
information to the linker. ♦
1.2 Developing Programs on OpenVMS
You use DCL commands (commands used at the OpenVMS system prompt) to
create, compile, link, and run Compaq COBOL programs on OpenVMS systems.
1.2.1 Creating a Compaq COBOL Program on OpenVMS
To create and modify a Compaq COBOL program, you must invoke a text
editor. The default editor for OpenVMS is the Text Processing Utility (TPU).
Other editors, such as EDT or the Language-Sensitive Editor (LSE), may be
available on your system. Check with your system administrator and refer to the
OpenVMS EDT Reference Manual (this manual has been archived but is available
on the OpenVMS Documentation CD-ROM) for more information about EDT or
the Guide to Language-Sensitive Editor for additional information about LSE.
Developing Compaq COBOL Programs 1–21
Developing Compaq COBOL Programs
1.2 Developing Programs on OpenVMS
Figure 1–2 DCL Commands for Developing Programs
COMMANDS
$ EDIT/TPU PROG_1.COB
Use the file type of COB to
indicate the file contains a
Compaq COBOL program.
$ COBOL PROG_1
The COBOL Command
assumes the file type of an
input file is COB .
(if you use the /LIST
qualifier, the compiler
creates a listing file.)
$ LINK PROG_1
The LINK command assumes
the file type of an input file
is OBJ.
ACTION
INPUT/OUTPUT FILES
PROG_1.COB
Create a
source program
Compile the
source program
PROG_1.OBJ
(PROG_1.LIS)
libraries
Link the
object module
PROG_1.EXE
(PROG_1.MAP)
(If you use the /MAP qualifier,
the linker creates a map file.)
$ RUN PROG_1
The RUN command assumes
the file type of an image is
EXE.
Run the
executable
image
VM-0611A-AI
Figure 1–2 shows the basic steps in Compaq COBOL program development.
Use the text editor of your preference to create and revise your source files. For
example, the following command line invokes the TPU editor and creates the
source file PROG_1.COB:
$ EDIT PROG_1.COB
The file type .COB is used to indicate that you are creating a Compaq COBOL
program. COB is the default file type for all Compaq COBOL programs.
The COPY Statement, Dictionaries and Libraries
Including the COPY statement in your program allows separate programs to
share common source text, reducing development and testing time as well as
storage requirements. You can use the COPY statement to access modules in
libraries. The COPY statement causes the compiler to read the file or module
specified during the compilation of a program. When the compiler reaches the
end of the included text, it resumes reading from the previous input file.
By using the /INCLUDE qualifier on the COBOL command line, you can set up a
search list for files specified by the COPY statement. For more information, refer
to the Compaq COBOL Reference Manual.
1–22 Developing Compaq COBOL Programs
Developing Compaq COBOL Programs
1.2 Developing Programs on OpenVMS
You can use the COPY FROM DICTIONARY statement in your program to access
a data dictionary and copy Oracle CDD/Repository record descriptions into your
program as COBOL record descriptions. Before you can copy record descriptions
from Oracle CDD/Repository, you must create the record descriptions using the
Common Data Dictionary Language (CDDL) or Common Dictionary Operator
(CDO).
For more information about using Oracle CDD/Repository and creating and
maintaining text libraries, refer to the Compaq COBOL Reference Manual and
Using Oracle CDD/Repository on OpenVMS Systems.
1.2.2 Compiling a Compaq COBOL Program on OpenVMS
To compile your program, use the COBOL command. The Compaq COBOL
compiler performs these primary functions:
•
Detects errors in your program.
•
Displays each compiler message on your terminal screen.
•
Generates machine language instructions from valid source statements.
•
Groups these language instructions into an object module for the linker.
•
Creates an analysis file if you request it with the /ANALYSIS_DATA qualifier.
SCA uses this file to display information about program symbols and source
files.
The compiler outputs an object module that provides the following information:
•
The name of the entry point. It takes this name from the program name in
the first PROGRAM-ID paragraph in the program.
•
A list of variables that are declared in the module. The linker uses this
information when it binds two or more modules together and must resolve
references to the same names in the modules.
•
Traceback information. This information is used by the system default
condition handler when an error occurs that is not handled by the program.
The traceback information permits the default handler to display a list of the
active blocks in the order of activation; this is an aid in program debugging.
•
A symbol table and a source line correlation table, only if you request them
with the /DEBUG qualifier. A symbol table is a list of the names of all
external and internal variables within a module, with definitions of their
locations. The source line correlation table associates lines in your source file
with lines in your program. These tables are of primary help when you use
the OpenVMS Debugger.
To invoke the Compaq COBOL compiler, use the COBOL command (explained
in Section 1.2.2.1). You can specify qualifiers with the COBOL command. The
following sections discuss the COBOL command and its qualifiers.
1.2.2.1 Format of the COBOL Command on OpenVMS
The COBOL command has the following format:
COBOL [/qualifier] ... {file-spec [/qualifier] ...} ...
Developing Compaq COBOL Programs 1–23
Developing Compaq COBOL Programs
1.2 Developing Programs on OpenVMS
/qualifier
Specifies an action to be performed by the compiler on all files or specific files
listed. When a qualifier appears directly after the COBOL command, it affects
all the files listed. By contrast, when a qualifier appears after a file specification,
it affects only the file that immediately precedes it. However, when files are
concatenated, these rules do not apply.
file-spec
Specifies an input source file that contains the program or module to be compiled.
You are not required to specify a file type; the Compaq COBOL compiler assumes
the default file type COB. If you do not provide a file specification with the
COBOL command, the system prompts you for one.
1.2.2.2 Compiling Multiple Files
You can include more than one file specification on the same command line by
separating the file specifications with either a comma ( , ) or a plus sign ( + ). If
you separate the file specifications with commas, you can control which source
files are affected by each qualifier. In the following example, the Compaq COBOL
compiler creates an object file for each source file but creates only a listing file for
the source files entitled PROG_1 and PROG_3:
$ COBOL/LIST PROG_1, PROG_2/NOLIST, PROG_3
If you separate file specifications with plus signs, the Compaq COBOL compiler
concatenates each of the specified source files and creates one object file and one
listing file. In the following example, only one object file, PROG_1.OBJ, and one
listing file, PROG_1.LIS, are created. Both of these files are named after the first
source file in the list, but contain all three modules.
$ COBOL PROG_1 + PROG_2/LIST + PROG_3
Any qualifiers specified for a single file within a list of files separated with plus
signs affect all files in the list.
1.2.2.3 Debugging a Program
To effectively debug a Compaq COBOL program, you must first make symbol
and traceback information available by adding the DEBUG option to the compile
command line. You specify the /DEBUG option as follows:
$ COBOL/DEBUG myprog
$ LINK/DEBUG myprog
$ RUN/DEBUG myprog
This enables you to examine and modify variables, monitor flow of control, and
perform various other debugging techniques. See Section C.3 or type HELP
COBOL/DEBUG or HELP DEBUG for additional information.
On Alpha, when you compile a program with /DEBUG, you should also specify
/NOOPTIMIZE to expedite your debugging session. (The default is /OPTIMIZE.)
Optimization often changes the order of execution of the object code generated
for statements in a program, and it might keep values in registers and deallocate
user variables. These effects can be confusing when you use the debugger. (A
diagnostic message warns you if you compile a Compaq COBOL program with
/DEBUG without specifying anything about optimization on the command line.)
Pay attention to compiler messages. Informational and warning messages (as
well as error-level messages) do not prevent the production of an object file, which
you can link and execute. However, the messages sometimes point out otherwise
1–24 Developing Compaq COBOL Programs
Developing Compaq COBOL Programs
1.2 Developing Programs on OpenVMS
undetected logic errors, and the structure of the program might not be what you
intended.
1.2.2.4 Separately Compiled Programs (Alpha)
If a compilation unit consists of multiple separately compiled programs (SCPs),
by default the Compaq COBOL compiler produces a single object file that consists
of a single module with multiple embedded procedures. This object file can be
inserted into an object library. If your build procedure requires that the linker
extract any part of the module, the linker must extract the entire object.
If you use /SEPARATE_COMPILATION on the compile command line, Compaq
COBOL will compile multiple SCPs into a single object file that consists of a
concatenation of modules, each containing a single procedure. This object may
then be inserted into an object library from which the linker can extract just the
procedures that are specifically needed. ♦
1.2.2.5 COBOL Qualifiers
COBOL options (also known as qualifiers or flags) control the way in which the
compiler processes a file. You can process your file with the COBOL command
alone or you can select options that offer you alternatives for developing,
debugging, and documenting programs.
If you compile parts of your program (compilation units) using multiple COBOL
commands, options that affect the execution of the program should be used
consistently for all compilations, especially if data will be shared or passed
between procedures.
Table 1–4 lists the COBOL command options and their defaults. For more
information about COBOL options, invoke online help for COBOL at the system
prompt.
Note
Brackets ( [ ] ) indicate that the enclosed item is optional. If you specify
more than one option for a single qualifier, you must separate each option
with a comma and enclose the list of options in parentheses.
Developing Compaq COBOL Programs 1–25
Developing Compaq COBOL Programs
1.2 Developing Programs on OpenVMS
Table 1–4 COBOL Command Qualifiers
Qualifier
Default
Alpha
Only
/ALIGNMENT[=[NO]PADDING] or
/NOALIGNMENT
/NOALIGNMENT
X
/ANALYSIS_DATA[=file-spec] or
/NOANALYSIS_DATA
/NOANALYSIS_DATA
/ANSI_FORMAT or /NOANSI_FORMAT
/NOANSI_FORMAT
8
>
>
>
>
>
<
/ARCHITECTURE=
n
/ARITHMETIC=
>
>
>
>
>
:
GENERIC
HOST
EV4
EV5
EV56
EV6
EV67, EV68
PCA56
STANDARD
NATIVE
9
>
>
>
>
>
=
/ARCHITECTURE=GENERIC
X
>
>
>
>
>
;
o
/ARITHMETIC=NATIVE
/AUDIT or /NOAUDIT
2
/CHECK=
6
6
4
VAX
Only
X
/NOAUDIT
[NO]PERFORM
[NO]BOUNDS
[NO]DECIMAL (Alpha only)
[NO]DUPLICATES
ALL1
NONE
X
3
7
7
5,...
/NOCHECK or /CHECK=NONE
or /NOCHECK
/CONDITIONALS=(character,...) or
/NOCONDITIONALS
/NOCONDITIONALS
/CONVERT=[NO]LEADING_BLANKS or
/NOCONVERT
/NOCONVERT
/COPY_LIST or /NOCOPY_LIST
/NOCOPY_LIST
X
/CROSS_REFERENCE=
h
ALPHABETICAL1
DECLARED
i
/NOCROSS_REFERENCE
,...
or /NOCROSS_REFERENCE
1 This
is the default keyword when using the named option with no keywords.
(continued on next page)
1–26 Developing Compaq COBOL Programs
Developing Compaq COBOL Programs
1.2 Developing Programs on OpenVMS
Table 1–4 (Cont.) COBOL Command Qualifiers
Qualifier
Alpha
Only
Default
"
/DEBUG=
[NO]SYMBOLS
[NO]TRACEBACK
ALL
NONE
#
VAX
Only
/DEBUG=TRACEBACK
/DEBUG=ALL1
/DEBUG=(TRACEBACK,SYMBOLS)1
,...
or /NODEBUG
/DEPENDENCY_DATA or
/NODEPENDENCY_DATA
/NODEPENDENCY_DATA
/DESIGN or /NODESIGN
/NODESIGN
/DIAGNOSTICS[=file-spec] or
/NODIAGNOSTICS
/NODIAGNOSTICS
/DISPLAY_FORMATTED or
/NODISPLAY_FORMATTED
/NODISPLAY_FORMATTED
/FIPS=74 or /NOFIPS
/NOFIPS
2
6
6
6
/FLAGGER= 6
6
6
4
HIGH_FIPS1
INTERMEDIATE_FIPS
MINIMUM_FIPS
OBSOLETE
OPTIONAL_FIPS
REPORT_WRITER
SEGMENTATION
SEGMENTATION_1
X
X
3
7
7
7
7,...
7
7
5
/NOFLAGGER
or /NOFLAGGER
/FLOAT=D_FLOAT
X
/GRANULARITY=QUADWORD
X
/INCLUDE=file-spec or /NOINCLUDE
/NOINCLUDE
X
/INSTRUCTION_SET or
/NOINSTRUCTION_SET
/INSTRUCTION_SET=DECIMAL_
STRING
/KEEP or /NOKEEP
/NOKEEP
/FLOAT=
D_FLOAT
G_FLOAT
IEEE_FLOAT
/GRANULARITY=
1 This
BYTE
LONGWORD
QUADWORD
X
is the default keyword when using the named option with no keywords.
(continued on next page)
Developing Compaq COBOL Programs 1–27
Developing Compaq COBOL Programs
1.2 Developing Programs on OpenVMS
Table 1–4 (Cont.) COBOL Command Qualifiers
Qualifier
Default
/LIST[=filename.ext] or /NOLIST
/NOLIST
/LIST (batch)
/MACHINE_CODE or
/NOMACHINE_CODE
/NOMACHINE_CODE
h
/MAP=
Alpha
Only
VAX
Only
i
ALPHABETICAL1
DECLARED
,...
/NOMAP
or /NOMAP
CIT3
CIT4
FLOAT
/MATH_INTERMEDIATE=
8
>
<
/NAMES=
AS_IS
LOWER
LOWERCASE
UPPER
UPPERCASE
>
:
h
/NATIONALITY=
JAPAN
US
9
>
=
/MATH_INTERMEDIATE=FLOAT
X
/NAMES=LOWERCASE
X
/NATIONALITY=US
X
>
;
i
/OBJECT[=filename.ext] or /NOOBJECT
/OBJECT
/OPTIMIZE[=
/OPTIMIZE=
(LEVEL=4,TUNE=GENERIC)
8
>
>
>
>
>
>
>
>
>
>
>
>
>
>
>
>
>
>
<
>
>
>
>
>
>
>
>
>
>
>
>
>
>
>
>
>
>
:
8
>
<
LEVEL=
>
:
8
>
>
>
>
>
<
TUNE=
02
1
2
3
41
>
>
>
>
>
:
9
>
=
>
;
GENERIC1
HOST
EV4
EV5
EV56
EV6
EV67, EV68
PCA56
9
>
>
>
>
>
=
>
>
>
>
>
;
9
>
>
>
>
>
>
>
>
>
>
>
>
>
>
>
>
>
>
=
>
>
>
>
>
>
>
>
>
>
>
>
>
>
>
>
>
>
;
X
]
or /NOOPTIMIZE
1 This
is the default keyword when using the named option with no keywords.
2 /OPTIMIZE=0
is functionally equivalent to /NOOPTIMIZE.
(continued on next page)
1–28 Developing Compaq COBOL Programs
Developing Compaq COBOL Programs
1.2 Developing Programs on OpenVMS
Table 1–4 (Cont.) COBOL Command Qualifiers
Qualifier
Alpha
Only
Default
/RESERVED_WORDS=
/RESERVED_WORDS=(XOPEN,
NO200X,
NOFOREIGN_EXTENSIONS)
X
/SEPARATE_COMPILATION or
/NOSEPARATE_COMPILATION
/NOSEPARATE_COMPILATION
X
/SEQUENCE_CHECK or
/NOSEQUENCE_CHECK
/NOSEQUENCE_CHECK
/SOURCE[=filename.ext]
Source is filename.COB
[NO]200X
[NO]XOPEN
[NO]FOREIGN_EXTENSIONS
2
/STANDARD=
6
4
85
[NO]MIA
[NO]SYNTAX
[NO]V3
[NO]XOPEN (Alpha)
, ...
3
VAX
Only
X
/STANDARD=851
7,...
5
or /NOSTANDARD
/TIE or /NOTIE
/NOTIE
/TRUNCATE or /NOTRUNCATE
/NOTRUNCATE
/VFC or /NOVFC
/VFC
"
/WARNINGS=
[NO]INFORMATION
[NO]OTHER
ALL1
NONE
X
X
#
,...
/WARNINGS=OTHER
or /NOWARNINGS
1 This
is the default keyword when using the named option with no keywords.
1.2.2.6 Common Command-Line Errors to Avoid
The following are some common errors to avoid when entering COBOL command
lines:
•
Omitting /ANSI_FORMAT for programs that are in ANSI format (AREA A,
AREA B, and so forth)
•
Including contradictory options
•
Omitting a necessary qualifier, such as /LIST if you specify /MAP
•
Omitting version numbers from file specifications when you want to compile a
program that is not the latest version of a source file
Developing Compaq COBOL Programs 1–29
Developing Compaq COBOL Programs
1.2 Developing Programs on OpenVMS
•
Forgetting to use a file suffix in the file specification, or not specifying
/SOURCE when your source file suffix is not .COB or .CBL
1.2.2.7 Compiling Programs with Conditional Compilation
To debug source code that contains conditional compilation lines, you can use
either the /CONDITIONALS qualifier or the WITH DEBUGGING MODE clause.
The /CONDITIONALS qualifier is listed in Table 1–4. For more information
about the /CONDITIONALS qualifier, invoke the online help facility for
Compaq COBOL at the system prompt. For more information about the WITH
DEBUGGING MODE clause, refer to the Compaq COBOL Reference Manual.
Using the WITH DEBUGGING MODE clause as part of the SOURCECOMPUTER paragraph causes the compiler to process all conditional compilation
lines in your program as COBOL text. If you do not specify the WITH
DEBUGGING MODE clause, and if the /CONDITIONALS qualifier is not in
effect, all conditional compilation lines in your program are treated as comments.
The WITH DEBUGGING MODE clause applies to: ( 1 ) the program that specifies
it, and ( 2 ) any contained program within a program that specifies the clause.
1.2.2.8 Interpreting Messages from the Compiler
If there are errors in your source file when you compile your program, the
Compaq COBOL compiler flags these errors and displays helpful messages.
You can reference the message, locate the error, and, if necessary, correct the
error in your program.
On Alpha, the general format of compiler messages shown on your screen is as
follows:
..........................^
%COBOL-s-ident, message-text
At line number n in name ♦
On VAX, the general format of compiler messages is as follows:
%COBOL-s-ERROR nnn, (m) message-text
♦
%COBOL
The facility or program name of the Compaq COBOL compiler. This prefix
indicates that the Compaq COBOL compiler issued the message.
s
The severity of the error, represented in the following way:
F
Fatal error. The compiler does not produce an object module. You must correct the
error before you can compile the program to produce an object module.
E
Error. The compiler makes an assumption about what you intended and continues.
However, the compiler’s assumption may not relate to your intention. Correct the
error.
W
Warning. The compiler attempts to correct the error in the statement, but you
should verify that the compiler’s action is acceptable. Otherwise, your program
may produce unexpected results.
1–30 Developing Compaq COBOL Programs
Developing Compaq COBOL Programs
1.2 Developing Programs on OpenVMS
I
Informational. This message usually appears with other messages to inform you of
specific actions taken by the compiler. No action is necessary on your part. Note
that these messages are suppressed by default. You must invoke /WARN=ALL or
/WARN=INFO to enable them.
ident (Alpha)
The message identification. This is a descriptive abbreviation of the message text.
♦
nnn (VAX)
The message identification number.
m (VAX)
The message pointer number. ♦
message-text
The compiler’s message. In many cases, it consists of no more than one line of
output. A message generally provides you with enough information to determine
the cause of the error so that you can correct it.
At line number n in name (Alpha)
The integer n is the number of the line where the diagnostic occurs. The number
is relative to the beginning of the file or text library module specified by name.
On Alpha, a sample compiler message with two diagnostics looks like this in the
listing file:
12
PROCEDURE DIVISION.
13
P-NAME
14
MOVE ABC TO XYZ.
................^
%COBOL-E-NODOT, Missing period is assumed
14
MOVE ABC TO XYZ.
............................^
%COBOL-F-UNDEFSYM, Undefined name
In the sample, the first diagnostic pointer ( ^ ) points to the MOVE statement
in source line number 14, which is the closest approximation to where the error
(P-NAME is not followed by a period) occurred. The second diagnostic pointer
points to XYZ, an undefined name in source line number 14. Each diagnostic
pointer is followed by a message line that identifies, in this order:
•
The Compaq COBOL compiler generated the message
•
The severity code of the message
•
The message identification (a mnemonic of the message text)
•
The text of the message
Although most compiler messages are self-explanatory, some require additional
explanation. The online help facility for Compaq COBOL contains a list and
descriptions of these Compaq COBOL compiler messages. Use the HELP COBOL
Compiler Messages command to access this list. ♦
On OpenVMS VAX, diagnostic messages look like this example:
Developing Compaq COBOL Programs 1–31
Developing Compaq COBOL Programs
1.2 Developing Programs on OpenVMS
12
13
14
PROCEDURE DIVISION.
P-NAME
MOVE ABC TO XYZ.
1
2
%COBOL-E-ERROR 65, (1) Missing period is assumed
%COBOL-F-ERROR 349, (2) Undefined name
Here, error pointer ( 1 ) points to the approximate place where the error occurred
(P-NAME has no period). Error pointer ( 2 ) points to an undefined name in source
line number 14. The two error pointers are followed by two error message lines
that each identify, in this order:
•
That the COBOL compiler generated the error message
•
The severity code: Fatal (F), Error (E), Warning (W), or Informational (I)
•
The error message number
•
The error pointers
•
The error message ♦
To examine messages that occurred during compilation, you can search for each
occurrence of %COBOL in the compiler listing file. Section 1.2.2.9 describes
listing files.
1.2.2.9 Using Compiler Listing Files
A compiler listing file provides information that can help you debug or
document your Compaq COBOL program. It consists of the following sections:
•
Program listing
The program listing section contains the source code plus line numbers
generated by the compiler. Any diagnostics will appear in this section.
•
Storage map
The storage map section is optional (produced by the /MAP qualifier); it
contains summary information on program sections, variables, and arrays.
•
Compilation summary
The compilation summary section lists the qualifiers used with the COBOL
command and the compilation statistics.
•
Machine code
The machine code section is optional; it displays compiler-generated object
code.
To generate a listing file, specify the /LIST qualifier when you compile
your Compaq COBOL program interactively as in the following example for
PROG_1.COB:
$ COBOL/LIST PROG_1.COB
If you compile your program as a batch job, the compiler creates a listing file by
default. You can specify the /NOLIST qualifier to suppress creation of the listing
file, if that suits your purposes. (In either case, however, the listing file is not
automatically printed.) By default, the name of the listing file is the name of your
source file followed by the file type .LIS. You can include a file specification with
the /LIST qualifier to override this default.
1–32 Developing Compaq COBOL Programs
Developing Compaq COBOL Programs
1.2 Developing Programs on OpenVMS
When used with the /LIST qualifier, the following COBOL command qualifiers
supply additional information in the compiler listing file:
•
/COPY_LIST—Includes source statements specified by the COPY command.
•
/CROSS_REFERENCE—Creates a cross-reference listing of user-defined
names and references.
•
/MACHINE_CODE—Includes a list of compiler-generated machine code.
•
/MAP—Produces maps, data names, procedure names, file names, and
external references.
For a description of each qualifier’s function, invoke the online help facility for
COBOL at the system prompt as follows:
$ HELP COBOL
Compiler Listing File for a Contained Program
A contained COBOL program listing file includes two additional program
elements that provide nesting level information about the main program and
the contained program. For additional information about contained programs, see
Chapter 12, Interprogram Communication.
1.2.3 Linking a Compaq COBOL Program
After you compile a Compaq COBOL source program or module, use the LINK
command to combine your object modules into one executable image that the
OpenVMS system can execute. A source program or module cannot run until it is
linked.
When you execute the LINK command, the OpenVMS Linker performs the
following functions:
•
Resolves local and global symbolic references in the object code
•
Assigns values to the global symbolic references
•
Signals an error message for any unresolved symbolic reference
•
Allocates virtual memory space for the executable image
The LINK command produces an executable image by default. However, you
can specify qualifiers and qualifier options with the LINK command to obtain
shareable images and system images.
See Table 1–5 for a list of commonly used LINK command qualifiers. For a
complete list and for more information about the LINK qualifiers, invoke the
online help facility for the LINK command at the system prompt.
For a complete discussion of linker capabilities and for detailed descriptions
of LINK qualifiers and qualifier options, refer to the OpenVMS Linker Utility
Manual.
1.2.3.1 The LINK Command
The format of the LINK command is as follows:
LINK[/qualifier] ... {file-spec[/qualifier] ...} ...
Developing Compaq COBOL Programs 1–33
Developing Compaq COBOL Programs
1.2 Developing Programs on OpenVMS
/qualifier...
Specifies output file options when it is positioned after the LINK command.
Specifies input file options when it is positioned after file-spec.
file-spec...
Specifies the input files to be linked.
If you specify more than one input file, you must separate the input file
specifications with a plus sign ( + ) or a comma ( , ).
By default, the linker creates an output file with the name of the first input
file specified and the file type EXE. If you link multiple files, specify the file
containing the main program first. Then the name of your output file will have
the same name as your main program module.
The following command line links the object files MAINPROG.OBJ,
SUBPROG1.OBJ, and SUBPROG2.OBJ to produce one executable image called
MAINPROG.EXE:
$ LINK MAINPROG, SUBPROG1, SUBPROG2
1.2.3.2 LINK Qualifiers
LINK qualifiers allow you to control various aspects of the link operation such
as modifying linker input and output and invoking the debugging and traceback
facilities.
Table 1–5 summarizes some of the more commonly used LINK qualifiers. Refer to
the OpenVMS Linker Utility Manual for a complete list and explanations of the
LINK qualifiers or invoke the online help facility for the LINK command at the
OpenVMS prompt.
Note
Brackets ( [ ] ) indicate that the enclosed item is optional. If you specify
more than one option for a single qualifier, you must separate each option
with a comma and enclose the list of options in parentheses.
Table 1–5 Commonly Used LINK Qualifiers
Function
Qualifier
Default
Indicate that an input file
is a library file.
/LIBRARY
Not applicable.
Indicate that an input file
is a linker options file.
/OPTIONS
Not applicable.
(continued on next page)
1–34 Developing Compaq COBOL Programs
Developing Compaq COBOL Programs
1.2 Developing Programs on OpenVMS
Table 1–5 (Cont.) Commonly Used LINK Qualifiers
Function
Qualifier
Default
Request output file,
define a file specification,
and specify whether the
image is shareable.
/EXECUTABLE[=file-spec]
/SHAREABLE[=file-spec]
/EXECUTABLE=
name.EXE
Request and specify the
contents of an image map
(memory allocation) listing.
/BRIEF
/[NO]CROSS_REFERENCE
/FULL
/MAP[=file-spec] or /NOMAP
where name is the name of
the first input file.
/NOSHAREABLE
/NOCROSS_REFERENCE
/NOMAP (interactive)
/MAP=name.MAP (batch)
where name is the name of
the first input file.
Specify the amount of
debugging information.
/DEBUG[=file-spec] or /NODEBUG
/[NO]TRACEBACK
/NODEBUG
/TRACEBACK
1.2.3.3 Specifying Modules Other than Compaq COBOL Modules
When you link Compaq COBOL modules with other modules, your application
will not work correctly if a non Compaq COBOL module contains a
LIB$INITIALIZE routine that:
1. Is invoked before the Compaq COBOL LIB$INITIALIZE routine (COB_
NAME_START) and
2. Calls a Compaq COBOL program that contains CALL by data name, extended
ACCEPT, or extended DISPLAY statements.
Compaq COBOL uses the LIB$INITIALIZE routine, COB_NAME_START, to
initialize the run-time environment for the CALL by data name and extended
ACCEPT and DISPLAY statements. Therefore, the COB_NAME_START routine
must be invoked before any CALL, ACCEPT, or DISPLAY statements are
performed.
The order in which LIB$INITIALIZE routines are invoked is determined during
the link and is shown in the image map. To ensure that the Compaq COBOL
LIB$INITIALIZE routine is invoked first, change your link command to the
following:
$ LINK/EXE=name SYS$SHARE:STARLET/INCL=COB_NAME_START,your_modules...
See Appendix B for information on a problem with LIB$INITIALIZE when you
call a C program.
1.2.3.4 Specifying Object Module Libraries
Linking against object modules allows your program to access data and routines
outside of your compilation units. You can create your own object module libraries
or they can be supplied by the system.
Developing Compaq COBOL Programs 1–35
Developing Compaq COBOL Programs
1.2 Developing Programs on OpenVMS
User-Created Object Module Libraries
You can make program modules accessible to other programmers by storing them
in object module libraries. To link modules contained in an object module
library, use the /INCLUDE qualifier with the LINK command2 and specify
the modules you want to link. The following example links the subprogram
modules EGGPLANT, TOMATO, BROCCOLI, and ONION (contained in the
VEGETABLES library) with the main program module GARDEN:
$ LINK GARDEN, VEGETABLES/INCLUDE=(EGGPLANT,TOMATO,BROCCOLI,ONION)
An object module library also contains a symbol table with the names of the
global symbols in the library, and the names of the modules in which the symbols
are defined. You specify the name of the object module library containing these
symbol definitions with the /LIBRARY qualifier. When you use the /LIBRARY
qualifier during a linking operation, the linker searches the specified library for
all unresolved references found in the included modules during compilation.
The following example uses the library RACQUETS to resolve undefined symbols
in the BADMINTON, TENNIS, and RACQUETBALL libraries:
$ LINK BADMINTON, TENNIS, RACQUETBALL, RACQUETS/LIBRARY
For more information about the /INCLUDE and /LIBRARY qualifiers, invoke the
online help facility for the LINK command at the DCL prompt or refer to the
OpenVMS Linker Utility Manual.
You can define one or more of your private object module libraries as default
user libraries. The following section describes how to accomplish this using the
DEFINE command.
Defining Default User Object Module Libraries
You can define one or more of your private object module libraries as your default
user libraries using the DCL DEFINE command, as in the following example:
$ DEFINE LNK$LIBRARY DEFLIB
The linker searches default user libraries for unresolved references after it
searches modules and libraries specified in the LINK command.
In this example, LNK$LIBRARY is a logical name and DEFLIB is the name of
an object module library (having the file type OLB) that you want the linker to
search automatically in all subsequent link operations.
You can establish any object module library as a default user library by creating a
logical name for the library. The logical names you must use are LNK$LIBRARY
(as in the preceding example), LNK$LIBRARY_1, LNK$LIBRARY_2, and so on,
to LNK$LIBRARY_999. When more than one of these logical names exists when
a LINK command executes, the linker searches them in numeric order beginning
with LNK$LIBRARY.
When one or more logical names exist for default user libraries, the linker uses
the following search order to resolve references:
•
2
The process, group, and system logical name tables (in that order) are
searched for the name LNK$LIBRARY. If the logical name exists in any
of these tables and if it contains the desired reference, the search is ended.
The /INCLUDE qualifier on the LINK command is not to be confused with the /INCLUDE
qualifier on the COBOL compile command, which specifies a search list for COPY files.
1–36 Developing Compaq COBOL Programs
Developing Compaq COBOL Programs
1.2 Developing Programs on OpenVMS
•
The process, group, and system logical name tables (in that order) are
searched for the name LNK$LIBRARY_1. If the logical name exists in any of
these tables, and if it contains the desired reference, the search is ended.
This search sequence occurs for each reference that remains unresolved.
System-Supplied Object Module Libraries
All Compaq COBOL programs reference system-supplied object module
libraries when they are linked. These libraries contain routines that provide
I/O and other system functions. Additionally, you can use your own libraries to
provide application-specific object modules.
To use the contents of an object module library, you must do the following:
•
Refer to a symbol in the object module by name in your program in a CALL
statement or VALUE EXTERNAL reference.
•
Make sure that the linker can locate the library that contains the object
module by ensuring that required software is correctly installed.
•
Make sure that your default directory (or LINK/EXE directory) is valid and
that you have write privileges to it.
To specify that a linker input file is a library file, use the /LIBRARY qualifier.
This qualifier causes the linker to search for a file with the name you specify and
the default file type .OLB. If you specify a file that the linker cannot locate, a
fatal error occurs and linking terminates.
The sections that follow describe the order in which the linker searches libraries
that you specify explicitly, default user libraries, and system libraries.
For more information about object module libraries, refer to the OpenVMS Linker
Utility Manual.
Defining the Search Order for Libraries
When you specify libraries as input for the linker, you can specify as many as you
want; there is no practical limit. More than one library can contain a definition
for the same module name. The linker uses the following conventions to search
libraries specified in the command string:
•
A library is searched only for definitions that are unresolved in the previously
specified input files.
•
If you specified more than one object module library, the libraries are searched
in the order in which they are specified.
For example:
$ LINK METRIC,DEFLIB/LIBRARY,APPLIC
The library DEFLIB will be searched only for unresolved references in the object
module METRIC. It is not searched to resolve references in the object module
APPLIC. However, this command can also be entered as follows:
$ LINK METRIC,APPLIC,DEFLIB/LIBRARY
In this case, DEFLIB.OLB is searched for all references that are not resolved
between METRIC and APPLIC. After the linker has searched all libraries
specified in the command, it searches default user libraries, if any, and then
the default system libraries.
Developing Compaq COBOL Programs 1–37
Developing Compaq COBOL Programs
1.2 Developing Programs on OpenVMS
1.2.3.5 Creating Shareable Images
You can create Compaq COBOL subprograms as shareable images by using the
LINK qualifier /SHARE. A shareable image is a single copy of a subprogram
that can be shared by many users or applications. Using shareable images
provides the following benefits:
•
Saves system resources, since one physical copy of a set of procedures can be
shared by more than one application or user
•
Facilitates the linking of very large applications by allowing you to break
down the whole application into manageable segments
•
Allows you to modify one or more sections of a large application without
having to relink the entire program
The following steps describe one way to create a Compaq COBOL subprogram as
a shareable image:
1. Create the main program used to call the subprogram.
2. Create the subprogram.
3. Link the subprogram as a shareable image by using the /SHARE qualifier and
including the options file containing the symbol vector in the LINK command
as an input file. (See the sections Using Symbol Vectors with Shareable
Images (OpenVMS Alpha) and Using Transfer Vectors (OpenVMS VAX) for
information about vectors.)
4. Define a logical name to point to your shareable image.
5. Install the shareable image subprogram, using the OpenVMS Install utility
(INSTALL).
6. Link the main program with the shareable image.
Once you have completed these steps, you can run the main program to access
the subprogram installed as a shareable image.
Refer to the OpenVMS Linker Utility Manual and the Guide to Creating
OpenVMS Modular Procedures for more information about shareable images.
The following sample programs and command procedures provide an example of
how to create and link a subprogram as a shareable image, as described in the
preceding steps.
Note
Do not use the /SHARE qualifier when you link a main program. Creating
a main program as a shareable image is unsupported.
Example 1–2 shows the main program CALLER.COB and the two subprograms
(SUBSHR1.COB and SUBSHR2.COB). Only the subprograms are shareable
images.
1–38 Developing Compaq COBOL Programs
Developing Compaq COBOL Programs
1.2 Developing Programs on OpenVMS
Example 1–2 Main Program and Subprograms
* CALLER.COB
IDENTIFICATION DIVISION.
PROGRAM-ID. CALLER.
******************************************************************
* This program calls a subprogram installed as a shareable image.*
******************************************************************
PROCEDURE DIVISION.
0.
CALL "SUBSHR1"
ON EXCEPTION
DISPLAY "First CALL failed. Program aborted."
END-CALL.
STOP RUN.
END PROGRAM CALLER.
* SUBSHR1.COB
IDENTIFICATION DIVISION.
PROGRAM-ID. SUBSHR1.
******************************************************************
* This subprogram is linked as a shareable image. When it is called,*
* it calls another subprogram installed as a shareable image.
*
******************************************************************
PROCEDURE DIVISION.
0.
DISPLAY "Call to SUBSHR1 successful. Calling SUBSHR2.".
CALL "SUBSHR2"
ON EXCEPTION
DISPLAY "Second call failed. Control returned to CALLER."
END-CALL.
END PROGRAM SUBSHR1.
* SUBSHR2.COB
IDENTIFICATION DIVISION.
PROGRAM-ID. SUBSHR2.
****************************************************************
* This subprogram is linked as a shareable image and is called by *
* another shareable image.
*
****************************************************************
PROCEDURE DIVISION.
0.
DISPLAY "Call to SUBSHR2 successful!".
END PROGRAM SUBSHR2.
Example 1–3 shows a command procedure that compiles and links the sample
program and subprograms in Example 1–2 on an OpenVMS Alpha system.
(Example 1–4 shows an equivalent command procedure for OpenVMS VAX.)
Example 1–3 Command Procedure to Compile and Link Subprograms as
Shareable Images (OpenVMS Alpha)
$!
$!
$!
$!
$!
Create the main program and subprograms.
In this example CALLER.COB is the main program.
SUBSHR1.COB and SUBSHR2.COB are the subprograms to be installed
as shareable images.
(continued on next page)
Developing Compaq COBOL Programs 1–39
Developing Compaq COBOL Programs
1.2 Developing Programs on OpenVMS
Example 1–3 (Cont.) Command Procedure to Compile and Link Subprograms
as Shareable Images (OpenVMS Alpha)
$!
$!
$
$
$
$!
$!
$!
$!
$
$
Compile the main program and subprograms.
COBOL CALLER.COB
COBOL SUBSHR1.COB
COBOL SUBSHR2.COB
Create an options file containing all the universal symbols
(entry points and other data symbols) for the subprograms.
COPY SYS$INPUT OPTIONS1.OPT
DECK
SYMBOL_VECTOR=(SUBSHR1=PROCEDURE,SUBSHR2=PROCEDURE)
$ EOD
$!
$! Link the subprograms using the /SHARE qualifier to the
$! shareable library and the options file. For more information
$! on options files, refer to the OpenVMS Linker Utility Manual.
$!
$ LINK/SHARE=MYSHRLIB SUBSHR1,SUBSHR2,OPTIONS1/OPT
$!
$! Assign a logical name for the shareable images.
$!
$ ASSIGN DEVICE:[DIRECTORY]MYSHRLIB.EXE MYSHRLIB
$!
$! Create a second options file to map the main program to the
$! shareable image library.
$!
$ COPY SYS$INPUT OPTIONS2.OPT
$ DECK
MYSHRLIB/SHAREABLE
$ EOD
$!
$! Link the main program with the shareable image subprograms
$! through the options file.
$!
$ LINK CALLER,OPTIONS2/OPT
$!
$! Now you can run the main program.
Using Symbol Vectors with Shareable Images (OpenVMS Alpha)
To make symbols in the shareable image available for other modules to link
against, you must declare the symbols as universal. You declare universal
symbols by creating a symbol vector. You create a symbol vector by specifying
the SYMBOL_VECTOR=option clause in a linker options file. List all of the
symbols you want to be universal in the order in which you want them to appear
in the symbol vector.
If you use symbol vectors, you can modify the contents of shareable images and
avoid relinking user programs bound to the shareable image when you modify the
image. Once you have created the symbol vector, you can install the subprograms
using the OpenVMS Install utility (INSTALL) and link the main program to the
shareable library. Symbol vectors, if used according to the coding conventions,
can also provide upward compatibility.
For more information about symbol vectors, refer to the OpenVMS Linker Utility
Manual. ♦
1–40 Developing Compaq COBOL Programs
Developing Compaq COBOL Programs
1.2 Developing Programs on OpenVMS
Linking a Subprogram as a Shareable Image (OpenVMS VAX)
Example 1–4 shows a command procedure that compiles, links, and installs the
sample programs in Example 1–2 on OpenVMS VAX systems.
Example 1–4 Command Procedure to Compile, Link, and Install Subprograms
as Shareable Images (OpenVMS VAX)
$!
$!
$!
$!
$!
$!
$!
$
$
$
$!
$!
$!
$
$
Create the main program and subprograms to be installed as shareable
images. In this example CALLER.COB is the main program. SUBSHR1.COB
and SUBSHR2.COB are the subprograms to be installed as
shareable images.
Compile the main program and subprograms.
COBOL CALLER.COB
COBOL SUBSHR1.COB
COBOL SUBSHR2.COB
Create an options file to map the entry points of the subprograms.
COPY SYS$INPUT OPTIONS1.OPT
DECK
UNIVERSAL=SUBSHR1,SUBSHR2
$ EOD
$!
$! Link the subprograms using the /SHARE qualifier to the shareable library
$! and the options file. For more information on options files, refer to
$! the documentation on the OpenVMS Linker.
$!
$ LINK/SHARE=MYSHRLIB SUBSHR1,SUBSHR2,OPTIONS1/OPT
$!
$! Copy the shareable images to SYS$LIBRARY. To perform this
$! you must have [SYSLIB] access privileges. Alternatively,
$! you can perform the same function by doing a local assignment.
$!
$! COPY MYSHRLIB.EXE SYS$LIBRARY:*
$!
or
$ ASSIGN DEVICE:[DIRECTORY]MYSHRLIB.EXE MYSHRLIB
$!
$! Install the shareable images in a shareable library.
$! This will allow multiple users to use a single copy of the
$! shareable image.
$!
$! If you do not install the shareable library,
$! multiple users will each link to their own run-time copy of
$! the image.
$!
$! Note that to install an image in a shareable library, you must have
$! PRMGBL, SYSGBL, or CMKRNL privileges.
$!
$! Prior to installing the shareable image, check to see if there is
$! enough global symbol space.
$! MCR INSTALL
$! /GLOBAL
$! ^Z
$!
(continued on next page)
Developing Compaq COBOL Programs 1–41
Developing Compaq COBOL Programs
1.2 Developing Programs on OpenVMS
Example 1–4 (Cont.) Command Procedure to Compile, Link, and Install
Subprograms as Shareable Images (OpenVMS VAX)
$!
$!
$!
$!
$!
$!
$!
$
Also check to see if there are available global sectors and pages.
MCR SYSGEN
/GBLSE
/GBLPA
^Z
The /WRITE qualifier is required if you want to install writable PSECTS.
MCR INSTALL
device:[directory]MYSHRLIB/SHARE/WRITE
$!
$!
$!
$
$
Create a second options file to map the main program to the shareable
image library.
COPY SYS$INPUT OPTIONS2.OPT
DECK
MYSHRLIB/SHAREABLE
$ EOD
$!
$! Link the main program with the shareable image subprograms through the
$! options file.
$ LINK CALLER,OPTIONS2/OPT
$!
$! Now you can run the main program.
Using Transfer Vectors (OpenVMS VAX)
Using transfer vectors can be helpful when creating shareable images for the
following reasons:
•
They make it easy for you to modify the contents of shareable images.
•
They allow you to avoid relinking user programs bound to the shareable
image if you modify the image.
The command procedure in Example 1–5 shows how to create a transfer
vector table and how to link the main program and subprograms (shown in
Example 1–2) with the transfer vector table.
Example 1–5 Transfer Vectors (OpenVMS VAX)
$!
$! Create a transfer vector table (TRAVEC.MAR).
$ MACRO /OBJ=TRAVEC SYS$INPUT
.PSECT TRANSFER_VECTOR
;
;
; The transfer vector table is used to map entry points at
; run time to a shareable library. If you make changes to the
; shareable library, you only have to relink the library.
; You do not have to relink all the programs linked to the
; library.
(continued on next page)
1–42 Developing Compaq COBOL Programs
Developing Compaq COBOL Programs
1.2 Developing Programs on OpenVMS
Example 1–5 (Cont.) Transfer Vectors (OpenVMS VAX)
;
; This example transfer vector table maps the entry points
; of the shareable subprograms: SUBSHR1, SUBSHR2.
;
.TRANSFER SUBSHR1
.MASK
SUBSHR1
BRW
SUBSHR1+2
RET
.QUAD
.TRANSFER SUBSHR2
.MASK
SUBSHR2
BRW
SUBSHR2+2
RET
.QUAD
;
; Note that there must be an entry point for each shareable image.
; Any future additions should be made at the end of the vector.
; The order of the entries must remain intact once established.
; Do not delete any entries (even if the shareable image is deleted).
$
$ LINK/SHARE=MYSHRLIB SUBSHR1,SUBSHR2,TRAVEC
Once you have created the transfer vector table, you can install the subprograms
and link the main program to the shareable library as shown in Example 1–4.
For more information on transfer vectors, refer to the documentation on the
OpenVMS Linker. ♦
1.2.3.6 Interpreting Messages from the Linker
If the linker detects any errors while linking object modules, it displays system
messages indicating their cause and severity. If any error or fatal error conditions
occur, the linker does not produce an image file. Refer to the OpenVMS Linker
Utility Manual for complete information about the format of linker options.
Linker messages are self-explanatory; you do not usually need additional
information to determine the specific error.
Common Linking Errors to Avoid
The following are some common errors to avoid when linking COBOL programs:
•
Trying to link a module that produced warning or error messages during
compilation. Although you can usually link compiled modules for which the
compiler generated system messages, you should verify that the modules
actually produce the expected output during program execution.
•
Forgetting to specify a file type for an input file that has a file type other than
the default on the command line. The linker searches for a file that has a file
type .OBJ by default. When the linker cannot locate an object file and you
have not identified your input file with the appropriate file type, the linker
signals an error message and does not produce an image file.
•
Trying to link a nonexistent module. The linker signals an error message
if you misspell a module name on the command line or if the compilation
contains fatal messages.
•
Omitting required module or library names from the command line. The
linker cannot locate the definition for a specified global symbol reference.
Developing Compaq COBOL Programs 1–43
Developing Compaq COBOL Programs
1.2 Developing Programs on OpenVMS
Consider, for example, the following LINK command for a main program
module, OCEAN.OBJ, that calls the subprograms REEF, SHELLS, and
SEAWEED:
$ LINK OCEAN,REEF,SHELLS
If the routine SEAWEED.OBJ does not exist in the directory from which
the command is issued, an error occurs and the linker issues the following
diagnostic messages:
%LINK-W-NUDFSYMS, 1 undefined symbol
%LINK-I-UDFSYMS,
SEAWEED
%LINK-W-USEUNDEF, undefined symbol SEAWEED referenced
in psect $CODE offset %X0000000C
in module OCEAN file DEVICE$:[COBOL.EXAMPLES]PROG.OBJ;1
%LINK-W-USEUNDEF, undefined symbol SEAWEED referenced
in psect $CODE offset %X00000021
in module OCEAN file DEVICE$:[COBOL.EXAMPLES]PROG.OBJ;1
If an error occurs when you link modules, you can often correct it by
reentering the command string and specifying the correct modules or
libraries. For a complete list of linker options, refer to the OpenVMS Linker
Utility Manual. For further information on a particular linker message, refer
to the online OpenVMS Help Message utility.
1.2.4 Running a Compaq COBOL Program
After you compile and link your program, use the RUN command to execute it.
In its simplest form the RUN command has the following format:
$ RUN myprog
In the preceding example MYPROG.EXE is the file specification of the image
you want to run. If you omit the file type from the file specification, the system
automatically provides a default value. The default file type is .EXE. If you omit
a path specification, the system will expect MYPROG.EXE to be in the current
directory.
When you run your application it makes calls to the Compaq COBOL RunTime Library (RTL) installed on your system. If your application is run on a
system other than the one where the application was compiled, there are two
requirements that must be met:
•
The Compaq COBOL Run-Time Library must be installed.
•
The RTL version must match (or be higher than) the version of the RTL
on the system where the application was compiled. Otherwise, the system
displays a diagnostic message each time you run the application.
1.2.4.1 Accessing Command-Line Arguments at Run Time (Alpha)
Your Compaq COBOL programs can read command-line arguments and access
(read and write) system logicals. Command-line arguments enable you to provide
information to a program at run time. Your program provides the logic to parse
the command line, identify command-line options, and act upon them. For
example, you might develop a program named MYPROG that will extract a
given amount of data from a specified file, where both the number of records to
read and the file name are highly dynamic, changing for each activation of your
program. In this case your program would contain code that reads a commandline argument for the number of records to read and a second argument for the
file specification.
1–44 Developing Compaq COBOL Programs
Developing Compaq COBOL Programs
1.2 Developing Programs on OpenVMS
To run the program with command-line arguments, you must define it as a foreign
command, as follows:
$ MYPROG :== "$device:[dir]MYPROG.EXE"
When you use this command, you will replace device and dir with the valid
device:[dir] names where MYPROG.EXE is located. Your program execution
command could then look like the following:
$ MYPROG 1028 POWERS.DAT
In this hypothetical case, the program MYPROG would read 1,028 records from
the file POWERS.DAT.
Multiple command-line arguments are delimited by spaces, as shown in the
preceding example. If an argument itself contains spaces, enclose that argument
in quotation marks (" ") as follows:
$ myprog2 "all of this is argument 1" argument2
In this example the returned value of argument1 will be the entire string ‘‘all of
this is argument1’’, and argument2 will be simply ‘‘argument2’’.
You provide definitions for the command-line arguments with the
SPECIAL-NAMES paragraph in your program’s Environment Division, and
include ACCEPT and DISPLAY statements in the Procedure Division to parse the
command line and access the arguments. Detailed information about commandline argument capability is in the ACCEPT and DISPLAY sections in the Compaq
COBOL Reference Manual.
1.2.4.2 Accessing System Logicals at Run Time (Alpha)
You can read and write system logicals at run time through your Compaq COBOL
program.
Example 1–6 allows the user to specify a file specification by putting the directory
in the value of the logical COBOLPATH and the file name in a command-line
argument.
Example 1–6 Accessing Logicals and Command-Line Arguments (Alpha)
IDENTIFICATION DIVISION.
PROGRAM-ID. EXAMPLE.
ENVIRONMENT DIVISION.
CONFIGURATION SECTION.
SPECIAL-NAMES.
SYSERR
IS STANDARD-ERROR
ENVIRONMENT-NAME
IS NAME-OF-LOGICAL
ENVIRONMENT-VALUE IS LOGICAL-VALUE
ARGUMENT-NUMBER
IS POS-OF-COMMAND-LINE-ARGUMENT
ARGUMENT-VALUE
IS COMMAND-LINE-ARGUMENT.
DATA DIVISION.
WORKING-STORAGE SECTION.
01 howmany-records PIC 9(5).
01 env-dir PIC x(50).
01 file-name PIC x(50).
01 file-spec PIC x(100).
(continued on next page)
Developing Compaq COBOL Programs 1–45
Developing Compaq COBOL Programs
1.2 Developing Programs on OpenVMS
Example 1–6 (Cont.) Accessing Logicals and Command-Line Arguments
(Alpha)
PROCEDURE DIVISION.
BEGIN.
ACCEPT howmany-records FROM COMMAND-LINE-ARGUMENT
ON EXCEPTION
DISPLAY "No arguments specified"
UPON STANDARD-ERROR
STOP RUN
END-ACCEPT.
DISPLAY "COBOLPATH" UPON NAME-OF-LOGICAL.
ACCEPT env-dir FROM LOGICAL-VALUE
ON EXCEPTION
DISPLAY "Logical COBOLPATH is not set"
UPON STANDARD-ERROR
END-DISPLAY
NOT ON EXCEPTION
ACCEPT file-name FROM COMMAND-LINE-ARGUMENT
ON EXCEPTION
DISPLAY
"Attempt to read beyond end of command line"
UPON STANDARD-ERROR
END-DISPLAY
NOT ON EXCEPTION
STRING env-dir file-name delimited by " " into file-spec
DISPLAY "Would have read " howmany-records " records from " file-spec
END-ACCEPT
END-ACCEPT.
Example 1–6 assumes that the logical COBOLPATH is set as follows:
$ define COBOLPATH MYDEV:[MYDIR]
When you execute the following command line:
$ MYPROG 1028 powers.dat
The following will result:
•
howmany-records will contain 1028.
•
file-path will contain MYDEV:[MYDIR]
•
file-name will contain powers.dat
•
file-spec will contain MYDEF:[MYDIR]powers.dat
For additional information, refer to the ACCEPT and DISPLAY statements in the
Compaq COBOL Reference Manual. ♦
1.2.4.3 Accessing Input and Output Devices at Run Time
ACCEPT and DISPLAY statements may interact with the input and output
devices by referring to them through the environment variables COBOL_INPUT
and COBOL_OUTPUT, respectively. See Chapter 11 for more information.
1–46 Developing Compaq COBOL Programs
Developing Compaq COBOL Programs
1.2 Developing Programs on OpenVMS
1.2.4.4 Debugging Environment
Perhaps the most common qualifier added to the RUN command line is DEBUG.
The form of the RUN command with DEBUG is as follows:
RUN [/[NO]DEBUG] file-spec
In the preceding syntax format, file-spec is the name of the executable image to
be run. A typical example would be:
$ RUN /DEBUG MYPROG
In this example, MYPROG is the name of the executable image to be run. You
would specify the /DEBUG qualifier to invoke the OpenVMS Debugger if the
image was not linked with it. You cannot use /DEBUG on images linked with the
/NOTRACEBACK qualifier. If the image (in this case, MYPROG) was linked with
the /DEBUG qualifier and you do not want the debugger to prompt you, use the
/NODEBUG qualifier. The default action depends on whether or not the file was
linked with the /DEBUG qualifier.
Note
Using the /DEBUG qualifier with the RUN command does not produce
symbol table information if you did not specify the /DEBUG qualifier
when you compiled and linked your program.
The following example executes the image MYPROG.EXE without invoking the
debugger:
$ RUN MYPROG/NODEBUG
See Appendix C for more information about debugging programs.
1.2.4.5 Interpreting Run-Time Messages
During execution, an image can generate a fatal error called an exception
condition. When an exception condition occurs, the system displays a message.
Run-time messages can also be issued by the OpenVMS system or by other
utilities such as SORT. Other kinds of errors that can occur at run time include
program run errors and run-time input/output errors.
Run-time messages have the following format:
%COB-s-ident, message-text
%COB
The program name of the Compaq COBOL Run-Time Library. This prefix
indicates a run-time message.
s
The severity of the error. As with messages from the compiler and the linker, the
severity indicator can be F (Fatal), E (Error), W (Warning), or I (Informational).
ident
The message identification. This is a descriptive abbreviation of the message text.
message-text
The run-time message. This portion may contain more than one line of output. A
message generally provides you with enough information to determine the cause
of the error so that you can correct it.
Developing Compaq COBOL Programs 1–47
Developing Compaq COBOL Programs
1.2 Developing Programs on OpenVMS
The following example shows a run-time message issued for an illegal divide:
%COB-E-DIVBY-ZER, divide by zero; execution continues
Both the compiler and the OpenVMS Run-Time Library include facilities for
detecting and reporting errors. You can use the OpenVMS Debugger and the
traceback facility to help you locate errors that occur during program execution.
For a description of Compaq COBOL run-time messages, use the HELP COBOL
Run-Time Messages command.
Run-Time Messages
Faulty program logic can cause abnormal termination. If errors occur at run time,
the Run-Time Library (RTL) displays a message with the same general format as
system error messages. In addition, the system traceback facility displays a list
of the routines that were active when the error occurred.
When an error occurs, TRACEBACK produces a symbolic dump of the active call
frames. A call frame represents one execution of a routine. For each call frame,
TRACEBACK displays the following information:
1. The module name (program-id)
2. The routine name (program-id)
3. The source listing line number where the error or CALL occurred
4. Program-counter (PC) information
You can also use the OpenVMS Debugger to examine the machine code
instruction. To do this, compile and link the program using the /DEBUG qualifier.
When you run the program, you automatically enter the debugger. Once in the
debugger, you could use the EXAMINE/INSTRUCTION command to examine
the contents of the failed instruction. You could also use the debugger in screen
mode, which would indicate where the error occurred.
For more information about the OpenVMS Debugger, refer to Appendix C and the
OpenVMS Debugger Manual.
1.3 Compaq COBOL and Alpha Architecture System Resources
For many user applications, the Compaq COBOL compiler requires significantly
more system resources than Compaq COBOL for OpenVMS VAX. In fact, unless
you have adjusted your system resource parameters accordingly, the attempt
to compile may fail because of insufficient virtual memory. Also, for very large
programs (greater than 10,000 lines), you might experience extremely long
compile times. Knowing why Compaq COBOL requires more memory can help
you take actions to avoid resource problems.
1.3.1 Compilation Performance
The Alpha architecture is a RISC (reduced instruction set computer) architecture.
Many other processor architectures, including the VAX, are CISC (complex
instruction set computer) architectures. The main distinguishing characteristic of
a RISC machine is that it has few instructions and each instruction does a small
amount of work. A CISC machine generally has many instructions, most of which
perform many complicated operations in one step.
1–48 Developing Compaq COBOL Programs
Developing Compaq COBOL Programs
1.3 Compaq COBOL and Alpha Architecture System Resources
By reducing the amount of work that is done in each instruction (and by reducing
the number of instructions), the complexity of the hardware is reduced. These
hardware changes, plus others, result in an increase in the number of instructions
per second that can be completed. The result is much faster overall system
performance.
A tradeoff of RISC systems is that compilers for these architectures generally
must do a great deal more work than a corresponding compiler for a CISC
architecture. For example, the compiler must compute the best way to use all of
the functional units of the processor, and it must determine how to make the best
use of registers and on-chip data cache because reads and writes to main memory
are generally slow compared to the speed of the processor.
The code generation portion of the Compaq COBOL for OpenVMS VAX compiler
was developed for the CISC architecture of the VAX. The compiler examines one
COBOL statement at a time, determines the VAX instructions to be constructed
to execute that statement, and then moves on to the next one. Subsequently
it uses "Peephole" optimization to enhance the performance of the generated
machine code.
On the other hand, the Compaq COBOL compiler on Alpha was developed
for the Alpha RISC architecture. It is a globally optimizing compiler based
on the most recent compiler technology. It does many optimizations including
Peephole, loop unrolling, and instruction pipelining. Also, the compiler uses
mathematical graph theory to construct an internal representation of the entire
COBOL program, and it repeatedly traverses this structure at compile time, to
produce the most efficient machine code for the program. This results in very
high performance code, to the benefit of your users at run time. Although the
Compaq COBOL compiler on OpenVMS Alpha requires more resources than some
other compilers to do this additional work at compile time, this cost is offset by
better performance during the many run times that follow.
To reduce the impact on system resources at compile time, do the following:
•
Use /NOOPTIMIZE or -O0 on the compile command line when initially
developing and testing programs. The optimizer is one of the heaviest users
of system resources in the COBOL compiler and is turned on by default. Also,
the higher the optimization level, the more memory required by the compiler.
•
Check system tuning. Because the Compaq COBOL compiler often needs
a great deal of virtual memory, you may need to increase virtual memory
for developers who use the compiler. This results in decreased paging and
improvements in compile time.
•
Check program sizes. Larger amounts of system resources are used during
compilation for large monolithic source files. It is possible that your
application is already composed of several separately compiled program
units (different PROGRAM IDs not nested), but all in the same .COB. On
Alpha systems with Compaq COBOL, compilation performance improves if
you split the program units into separate (smaller) .COB files (possibly one
for each separately compiled program unit).
Note
Large arrays (tables) can have a significant impact on compile time and
resource requirements. In addition to the size of the program source, you
should also examine the amount of space allocated in your Data Division,
particularly for arrays. The number of array elements as well as the
Developing Compaq COBOL Programs 1–49
Developing Compaq COBOL Programs
1.3 Compaq COBOL and Alpha Architecture System Resources
size of the array elements is significant. This impact can be minimized
in two ways: by system tuning (as suggested in this section), which
will optimize system resources for the compile, and by using INITIALIZE
instead of VALUE in your data definitions, which will improve compilation
performance.
1.3.2 Tuning OpenVMS Alpha for Large Compaq COBOL Compiles
The recommendations that follow were determined by compiling one set of very
large Compaq COBOL modules on OpenVMS Alpha. While your results may
vary, the principles are generally applicable. For more detailed information
on OpenVMS Alpha tuning, refer to the OpenVMS System Manager’s Manual,
particularly the sections on Managing System Parameters and Managing System
Page, Swap, and Dump Files.
Note that many tuning exercises are more beneficial if you work with a relatively
quiet system, submit batch jobs, and retain the log files for later analysis.
1.3.2.1 Optimizing Virtual Memory Usage
If your system does not have enough virtual memory allocated, the compile may
fail, with the ‘‘%LIB-E-INSVIRMEM, insufficient virtual memory’’ error reported.
OpenVMS has two parameters that control the amount of virtual
memory available to a process. One is the system generation parameter
VIRTUALPAGECNT, which sets an upper bound on the number of pagelets
of virtual memory for any process in the system. The other control is the
AUTHORIZE parameter PGFLQUOTA, which determines the number of pagelets
a process can reserve in the system’s page file(s).
After an ‘‘insufficient virtual memory’’ error, you can issue the DCL command
$SHOW PROCESS/ACCOUNTING to see the ‘‘Peak virtual size’’ used by the
process (or look at the ‘‘Peak page file size’’ at the end of a batch job log file).
If the peak size is at the system generation parameter VIRTUALPAGECNT,
you will need to raise this value. If the peak size is below VIRTUALPAGECNT,
and at or above PGFLQUOTA, run AUTHORIZE to increase PGFLQUOTA for
the COBOL users. (Peak size can exceed PGFLQUOTA because some virtual
memory, such as read-only image code, is not allocated page file space.)
It is difficult to predict precisely how much virtual memory will be required
for a compilation, but a starting point for system tuning may be computed by
multiplying 250 times the size of the largest program in disk blocks (including all
COPY files referenced). Alternatively, multiply 25 times the number of lines in
the program (including all COPY files).
The resulting figure can then be used as a starting point for the system
generation parameter VIRTUALPAGECNT. Put that figure in the parameter
file SYS$SYSTEM:MODPARAMS.DAT. For example, if you estimate 370,000
pages, add the following line in MODPARAMS, run AUTOGEN and reboot:
MIN_VIRTUALPAGECNT = 400000
If the compilation now completes successfully, use the command $SHOW
PROCESS/ACCOUNTING to determine the Peak Virtual Size; if the actual
peak is significantly less than the value computed above, you can reduce
VIRTUALPAGECNT.
When modifying VIRTUALPAGECNT and PGFLQUOTA, you may also need to
increase the size of the page file.
1–50 Developing Compaq COBOL Programs
Developing Compaq COBOL Programs
1.3 Compaq COBOL and Alpha Architecture System Resources
1.3.2.2 Optimizing Physical Memory Usage
In any evaluation of your system’s physical memory, two of the questions to
consider are:
Is there enough memory on the system?
Is enough available to the process running the compilation?
More specifically:
•
If the physical memory on the system is too small, the command
$LOGOUT/FULL (which is automatically issued at the end of a batch job)
will show a high number of faults (>100,000 for a single compilation) and an
elapsed time value that greatly exceeds the Charged CPU time value, as the
system waits for disk I/Os to resolve page faults. In this situation, tuning
attempts may be of limited benefit.
•
If the physical memory on the system is adequate, but the physical memory
allotted to the process running the compilation is too small, you may still
observe a large number of faults, but elapsed time may remain closer to CPU
time. This is because OpenVMS Alpha resolves page faults from the page
caches (free list, modified list) whenever possible, avoiding the relatively slow
disk I/Os. In this situation, basic tuning may also be beneficial.
The amount of physical memory required will vary, but it should be a large
percentage of the process peak virtual size—as close to 100% as practical.
The reason is that the compiler makes multiple passes over the internal
representation of the program. A page that falls out of the working set in one
pass is probably going to be needed again on the very next pass.
The physical memory present on the system can be determined by the DCL
command $SHOW MEMORY/PHYSICAL. The physical memory used by the
compilation is reported as ‘‘Peak working set size’’ by the command SHOW
PROCESS/ACCOUNTING or at the end of a batch log file.
More physical memory can be made available to a process by minimizing the
number of competing processes on the system (for example, by compiling one
module at a time or by scheduling large compiles for off-peak time periods; late at
night is a good time in some situations).
More physical memory can also be made available to a process (if it is present
on the machine) by adjusting the system generation parameter WSMAX and
the corresponding WSEXTENT (in AUTHORIZE). Approach such adjustments
with great caution, as the system may hang if memory is oversubscribed and you
create a situation where OpenVMS Alpha effectively has no options to reclaim
memory. The following guidelines can help:
•
Set the COBOL user WSEXTENT (in AUTHORIZE or INITIALIZE/QUEUE)
to match WSMAX.
•
Keep WSQUOTA (in AUTHORIZE or INITIALIZE/QUEUE) low. Make sure
that no process or batch queue has a WSQUOTA of more than approximately
20% of physical memory. The difference between WSEXTENT and WSQUOTA
allows OpenVMS Alpha to manage memory to meet varying demands.
•
Use AUTOGEN. AUTOGEN will attempt to make a consistent set of changes
that do not interfere with each other.
By default, AUTOGEN will set the maximum working set (system generation
parameter WSMAX) to 25% of physical memory. This value is reasonable for
a workstation or multi-user system with many active processes.
Developing Compaq COBOL Programs 1–51
Developing Compaq COBOL Programs
1.3 Compaq COBOL and Alpha Architecture System Resources
WSMAX can be increased to a somewhat larger value by editing
MODPARAMS.DAT. For a system with 64 MB1 of physical memory, set
WSMAX to no more than approximately 40% of physical memory, or 52000
pagelets (1 MB = 2048 pagelets). With 128 MB or more of physical memory, a
setting of 50% of physical memory can be attempted.
The effects of physical memory on compilation time were studied for a set of
seven large modules. These modules ranged in size from approximately 1600 to
3300 disk blocks. Your results may differ, but to give a rough appreciation for the
effect of physical memory on compilation time, note that:
•
When the amount of physical memory available to the processes matched the
amount of virtual memory, the elapsed times were close to the CPU times.
•
As the physical memory was reduced, CPU times rose only slightly—
approximately 10%.
•
As the physical memory was reduced, elapsed times were elongated, at the
rate of approximately 1 hour for each 100 MB of difference between Peak
Virtual Size and the actual memory available. For example, when compiling
a program that used a Peak Virtual Size of 947760 pagelets, or 463 MB, on
a system where approximately 180 MB of physical memory was available to
user processes, the compile required approximately 3 hours more than on a
512 MB system.
Your results may differ from those shown in this section and will be strongly
affected by the speed of the devices that are used for paging.
Note that the requirements for virtual memory and physical memory can also be
reduced by breaking large modules into smaller modules.
1.3.2.3 Improving Compile Performance with Separate Compilation (OpenVMS Alpha)
The /SEPARATE_COMPILATION qualifier can improve compile-time performance
for large source files that are made up of multiple separately compiled programs
(SCPs). For programs compiled without this qualifier, the compiler engine parses
the entire compilation unit and uses system resources (sized for the total job) for
the duration of this compilation. When you use the /SEPARATE_COMPILATION
qualifier, the compilation is replaced by a smaller series of operations, and
memory structures that are needed for individual procedures are reclaimed and
recycled. See Section 1.2.2.4 for additional information. ♦
1.3.3 Choosing a Reference Format
You need to choose a reference format before you set out to write a Compaq
COBOL program, and you must be aware of the format at compile time. The
Compaq COBOL compiler accepts source code written in either terminal or ANSI
reference format. You cannot mix reference formats in the same source file.
On OpenVMS, when copying text from Oracle CDD/Repository, the Compaq
COBOL compiler translates the record descriptions into the reference format of
the source program. ♦
1
MB= megabytes
1–52 Developing Compaq COBOL Programs
Developing Compaq COBOL Programs
1.3 Compaq COBOL and Alpha Architecture System Resources
1.3.3.1 Terminal Reference Format
Compaq recommends using terminal format, a Compaq optional format, when
you create source files from interactive terminals. The compiler accepts terminal
format as the default reference format.
Terminal format eliminates the line number and identification fields of ANSI
format and allows horizontal tab characters and short lines. Terminal format
saves disk space and decreases compile time. It is easier to edit source code
written in terminal format.
The following table shows the structure and content of a terminal reference source
line: To select ANSI format, specify the -ansi flag (on Tru64 UNIX systems) or
the /ANSI_FORMAT qualifier (on OpenVMS systems) at compile time. You can
choose this format if your COBOL program is written for a compiler that uses
ANSI format.
For ANSI format, the compiler expects 80-character program lines. The following
table shows the structure and content of an ANSI reference source line:
Character Positions
Contents
1 to 6
Optional sequence numbers
7
Indicators
8 to 11
Area A
12 to 72
Area B
73 to 80
Optional Area
For more information about the two reference formats, refer to the Compaq
COBOL Reference Manual.
1.3.3.2 Converting Between Reference Formats
The REFORMAT utility allows you to convert a terminal format program to ANSI
format and vice versa. You can also use REFORMAT to match the formats of
Compaq COBOL source files and library files when their formats are not the
same. See Chapter 14 for a description of the REFORMAT utility.
1.4 Program Run Messages
Incorrect or undesirable program results are usually caused by data errors or
program logic errors. You can resolve most of these errors by desk-checking your
program and by using a debugger.
1.4.1 Data Errors
Faulty or incorrectly defined data often produce incorrect results. Data errors can
sometimes be attributed to one or more of the following actions:
•
Incorrect picture size. As shown in the following sample of a partial program,
if the picture size of a receiving data item is too small, your data may be
truncated:
Developing Compaq COBOL Programs 1–53
Developing Compaq COBOL Programs
1.4 Program Run Messages
77
COUNTER PIC S9.
.
.
.
PROCEDURE DIVISION.
.
.
.
LOOP.
ADD 1 TO COUNTER
IF COUNTER < 10 GO TO LOOP.
The IF clause will produce an infinite loop because of the one-digit size limit
of COUNTER, which is PIC S9. If COUNTER were PIC S99, or if the clause
used 9 instead of 10, the condition could be false, causing a proper exit from
the loop.
•
Incorrect record field position. The record field positions that you specify in
your program may not agree with a file’s record field positions. For example,
a file could have this record description:
01 PAY-RECORD.
03 P-NUMBER
03 P-WEEKLY-AMT
03 P-MONTHLY-AMT
03 P-YEARLY-AMT
.
.
.
PIC
PIC
PIC
PIC
X(5).
S9(5)V99 COMP-3.
S9(5)V99 COMP-3.
S9(5)V99 COMP-3.
Incorrectly positioning these fields can produce faulty data.
In the following example, a program references the file incorrectly. The field
described as P-YEARLY-AMT actually contains P-MONTHLY-AMT data, and vice
versa.
01 PAY-RECORD.
03 P-NUMBER
03 P-WEEKLY-AMT
03 P-YEARLY-AMT
03 P-MONTHLY-AMT
.
.
.
PROCEDURE DIVISION.
ADD-TOTALS.
ADD P-MONTHLY-AMT
.
.
.
PIC
PIC
PIC
PIC
X(5).
S9(5)V99 COMP-3.
S9(5)V99 COMP-3.
S9(5)V99 COMP-3.
TO TOTAL-MONTHLY-AMT.
You can minimize record field position errors by writing your file and record
descriptions in a library file and then using the COPY statement in your
programs. On OpenVMS systems, you can also use the COPY FROM
DICTIONARY statement.
Choosing your test data carefully can minimize faulty data problems. For
instance, rather than using actual or ideal data, use test files that include data
extremes.
Determining when a program produces incorrect results can often help your
debugging effort. You can do this by maintaining audit counts (such as total
master in = nnn, total transactions in = nnn, total deletions = nnn, total master
out = nnn) and displaying the audit counts when the program ends. Using
1–54 Developing Compaq COBOL Programs
Developing Compaq COBOL Programs
1.4 Program Run Messages
conditional compilation lines (see Section 1.2.2.7) in your program can also help
you to debug it.
1.4.2 Program Logic Errors
When checking your program for logic errors, first examine your program for
some of the more obvious bugs, such as the following:
•
Hidden periods. Periods inadvertently placed in a statement usually produce
unexpected results. For example:
050-DO-WEEKLY-TOTALS.
IF W-CODE = "W"
PERFORM 100-WEEKLY-SUMMARY
ADD WEEKLY-AMT TO WEEKLY-TOTALS.
GO TO 000-READ-A-MASTER.
WRITE NEW-MASTER-REC.
The period at the end of ADD WEEKLY-AMT TO WEEKLY-TOTALS
terminates the scope of the IF statement and changes the logic of
the program. Including the extra period before the GO TO statement
transforms GO TO 000-READ-A-MASTER from a conditional statement to
an unconditional statement. Because the GO TO statement is not within the
scope of the IF statement, it will always be executed. In addition, the WRITE
statement following the GO TO will never be executed.
•
Tests for equality, which can cause an infinite loop if the procedure is to be
executed until the test condition is met, for example:
* This is a test for equality
PERFORM ABC-ROUTINE UNTIL A-COUNTER = 10.
If, during execution, the program increments A-COUNTER by a value other
than 1 (2 or 1.5, for example), A-COUNTER may never equal 10, causing a
loop in ABC-ROUTINE. You can prevent this type of error by changing the
statement to something like this:
* This is a test for inequality
PERFORM ABC-ROUTINE UNTIL A-COUNTER > 9
•
Testing two floating point numbers (for example, COMP-1 and COMP-2 fields)
for equality. The calculations of your program might never produce exact
numerical equality between two floating point values.
•
Two negative test conditions combined with an OR. The object of the following
statement is to execute GO TO 200-PRINT-REPORT when TEST-FIELD
contains other than an A or B. However, the GO TO always executes because
no matter what TEST-FIELD contains, one of the conditions is always true.
IF TEST-FIELD NOT = "A" OR NOT = "B"
GO TO 200-PRINT-REPORT.
.
.
.
The following statement does not contain the logic error:
IF TEST-FIELD NOT = "A" AND NOT = "B"
GO TO 200-PRINT-REPORT.
.
.
.
Developing Compaq COBOL Programs 1–55
Developing Compaq COBOL Programs
1.4 Program Run Messages
1.4.3 Run-Time Input/Output Errors
An input/output error is a condition that causes an I/O statement to fail. These
I/O errors are detected at run time by the I/O system. Each time an I/O operation
occurs, the I/O system generates a two-character file status value. One way to
determine the nature of an I/O error is to check a file’s I/O status by using file
status data items. (Refer to the Compaq COBOL Reference Manual for a list of
file status values.) See Chapter 7, Handling Input/Output Exception Conditions
for additional information about I/O exception condition handling.
Checking a file’s I/O status within a Declarative USE procedure or in an INVALID
KEY imperative condition can help you determine the nature of an I/O error. For
example:
FD INDEXED-MASTER
ACCESS MODE IS DYNAMIC
FILE STATUS IS MASTER-STATUS
RECORD KEY IN IND-KEY.
.
.
.
WORKING-STORAGE SECTION.
01 MASTER-STATUS
PIC XX VALUE SPACES.
.
.
.
PROCEDURE DIVISION.
.
.
.
050-READ-MASTER.
READ INDEXED-MASTER
INVALID KEY PERFORM 100-CHECK-STATUS
GO TO 200-INVALID-READ.
.
.
.
100-CHECK-STATUS.
IF MASTER-STATUS = "23"
DISPLAY "RECORD NOT IN FILE".
IF MASTER-STATUS = "24"
DISPLAY "BOUNDARY VIOLATION OR RELATIVE RECORD
NUMBER TOO LARGE".
.
.
.
If your program contains a Declarative USE procedure for a file and an I/O
operation for that file fails, the I/O system performs the USE procedure, but does
not display an error message.
A Declarative USE procedure can sometimes avoid program termination. For
example, File Status 91 indicates that the file is locked by another program;
rather than terminate your program, you can perform other procedures and then
try reopening the file. If program continuation is not desirable, the Declarative
USE procedure can perform housekeeping functions, such as saving data or
displaying program-generated diagnostic messages.
If you specify an INVALID KEY phrase for a file and the I/O operation causes
an INVALID KEY condition, the I/O system performs the associated imperative
statement and no other file processing for the current statement. The Declarative
USE procedure (if any) is not performed. The INVALID KEY phrase processes
I/O errors due to invalid key conditions only.
1–56 Developing Compaq COBOL Programs
Developing Compaq COBOL Programs
1.4 Program Run Messages
If you do not specify an INVALID KEY phrase but declare a Declarative USE
procedure for the file, the I/O system performs the Declarative USE procedure
and returns control to the program.
If a severe error occurs and you do not have a Declarative Use procedure, your
program will terminate abruptly with a run-time diagnostic. For example, given
a program that looks for AFILE.DAT and that file is missing:
cobrtl: severe: file AFILE.DAT not found
In this case, program run ends because you have not handled the error with a
Declarative Use procedure.
1.4.4 I/O Errors and RMS (OpenVMS)
I/O errors are detected by the I/O system, which (for OpenVMS systems) consists
of Record Management Services (RMS) and the Run-Time Library (RTL). You can
use the RMS special registers, which contain the primary and secondary RMS
completion codes of an I/O operation, to detect errors. The RMS special registers
are as follows:
RMS-STS
RMS-STV
RMS-FILENAME
RMS-CURRENT-STS
RMS-CURRENT-STV
RMS-CURRENT-FILENAME
Refer to the Compaq COBOL Reference Manual and the OpenVMS Record
Management Services Reference Manual for more information about RMS special
registers.
Examples 1–7 and 1–8 show how you can use RMS special registers to detect
errors.
Developing Compaq COBOL Programs 1–57
Developing Compaq COBOL Programs
1.4 Program Run Messages
Example 1–7 Using RMS Special Registers to Detect Errors (OpenVMS)
IDENTIFICATION DIVISION.
PROGRAM-ID. RMSSPECREGS.
*
* This program demonstrates the use of RMS special registers to
* implement a different recovery for each of several errors with RMS files.
*
ENVIRONMENT DIVISION.
INPUT-OUTPUT SECTION.
FILE-CONTROL.
SELECT OPTIONAL EMP-FILE ASSIGN "SYS$DISK:ART.DAT".
SELECT REPORT-FILE
ASSIGN "SYS$OUTPUT".
DATA DIVISION.
FILE SECTION.
FD EMP-FILE VALUE OF ID IS VAL-OF-ID.
01 EMP-RECORD.
02 EMP-ID
PIC 9(7).
02 EMP-NAME
PIC X(15).
02 EMP-ADDRESS PIC X(30).
FD REPORT-FILE
REPORT IS RPT.
WORKING-STORAGE SECTION.
01 VAL-OF-ID
PIC X(20).
01 RMS$_EOF
PIC S9(9) COMP VALUE EXTERNAL RMS$_EOF.
01 SS$_BADFILENAME PIC S9(9) COMP VALUE EXTERNAL SS$_BADFILENAME.
01 RMS$_FNF
PIC S9(9) COMP VALUE EXTERNAL RMS$_FNF.
01 RMS$_DNF
PIC S9(9) COMP VALUE EXTERNAL RMS$_DNF.
01 RMS$_DEV
PIC S9(9) COMP VALUE EXTERNAL RMS$_DEV.
01 D-DATE
PIC 9(6).
01 EOF-SW
PIC X.
88 E-O-F VALUE "E".
88 NOT-E-O-F VALUE "N".
01 VAL-OP-SW
PIC X.
88 VALID-OP VALUE "V".
88 OP-FAILED VALUE "F".
01 OP
PIC X.
88 OP-OPEN VALUE "O".
88 OP-CLOSE VALUE "C".
88 OP-READ VALUE "R".
REPORT SECTION.
RD RPT PAGE 26 LINES HEADING 1 FIRST DETAIL 5.
01 TYPE IS PAGE HEADING.
02 LINE IS PLUS 1.
03 COLUMN 1 PIC X(16) VALUE "Emplyee File on".
03 COLUMN 18 PIC 99/99/99 SOURCE D-DATE.
02 LINE IS PLUS 2.
03 COLUMN 2 PIC X(5) VALUE "Empid".
03 COLUMN 22 PIC X(4) VALUE "Name".
03 COLUMN 43 PIC X(7) VALUE "Address".
03 COLUMN 60 PIC X(4) VALUE "Page".
03 COLUMN 70 PIC ZZ9 SOURCE PAGE-COUNTER.
01 REPORT-LINE TYPE IS DETAIL.
02 LINE IS PLUS 1.
03 COLUMN IS 1
PIC 9(7) SOURCE EMP-ID.
03 COLUMN IS 20 PIC X(15) SOURCE IS EMP-NAME.
03 COLUMN IS 42 PIC X(30) SOURCE IS EMP-ADDRESS.
PROCEDURE DIVISION.
DECLARATIVES.
USE-SECT SECTION.
USE AFTER STANDARD ERROR PROCEDURE ON EMP-FILE.
CHECK-RMS-SPECIAL-REGISTERS.
SET OP-FAILED TO TRUE.
(continued on next page)
1–58 Developing Compaq COBOL Programs
Developing Compaq COBOL Programs
1.4 Program Run Messages
Example 1–7 (Cont.) Using RMS Special Registers to Detect Errors (OpenVMS)
EVALUATE RMS-STS OF EMP-FILE TRUE
WHEN (RMS$_EOF) OP-READ
SET VALID-OP TO TRUE
SET E-O-F TO TRUE
WHEN (SS$_BADFILENAME) OP-OPEN
WHEN (RMS$_FNF) OP-OPEN
WHEN (RMS$_DNF) OP-OPEN
WHEN (RMS$_DEV) OP-OPEN
DISPLAY "File cannot be found or file spec is invalid"
DISPLAY RMS-FILENAME OF EMP-FILE
DISPLAY "Enter corrected file (control-Z to STOP RUN): "
WITH NO ADVANCING
ACCEPT VAL-OF-ID
AT END STOP RUN
END-ACCEPT
WHEN ANY OP-CLOSE
CONTINUE
WHEN ANY RMS-STS OF EMP-FILE IS SUCCESS
SET VALID-OP TO TRUE
WHEN OTHER
IF RMS-STV OF EMP-FILE NOT = ZERO
THEN
CALL "LIB$STOP" USING
BY VALUE RMS-STS OF EMP-FILE
END-IF
END-EVALUATE.
END DECLARATIVES.
MAIN-PROG SECTION.
000-DRIVER.
PERFORM 100-INITIALIZE.
PERFORM WITH TEST AFTER UNTIL E-O-F
GENERATE REPORT-LINE
READ EMP-FILE
END-PERFORM.
PERFORM 200-CLEANUP.
STOP RUN.
100-INITIALIZE.
ACCEPT D-DATE FROM DATE.
DISPLAY "Enter file spec of employee file: " WITH NO ADVANCING.
ACCEPT VAL-OF-ID.
PERFORM WITH TEST AFTER UNTIL VALID-OP
SET VALID-OP TO TRUE
SET OP-OPEN TO TRUE
OPEN INPUT EMP-FILE
IF OP-FAILED
THEN
SET OP-CLOSE TO TRUE
CLOSE EMP-FILE
END-IF
END-PERFORM.
OPEN OUTPUT REPORT-FILE.
INITIATE RPT.
SET NOT-E-O-F TO TRUE.
SET OP-READ TO TRUE.
READ EMP-FILE.
200-CLEANUP.
TERMINATE RPT.
SET OP-CLOSE TO TRUE.
CLOSE EMP-FILE REPORT-FILE.
END PROGRAM RMSSPECREGS.
(continued on next page)
Developing Compaq COBOL Programs 1–59
Developing Compaq COBOL Programs
1.4 Program Run Messages
Example 1–7 (Cont.) Using RMS Special Registers to Detect Errors (OpenVMS)
Example 1–8 Using RMS-CURRENT Special Registers to Detect Errors
(OpenVMS)
IDENTIFICATION DIVISION.
PROGRAM ID. RMS-CURRENT-SPEC-REGISTERS.
*
* This program demonstrates the use of RMS-CURRENT special registers
* to implement a single recovery for RMS file errors with multiple files.
*
ENVIRONMENT DIVISION.
INPUT-OUTPUT SECTION.
FILE-CONTROL.
SELECT FILE-1
ASSIGN TO "SYS$DISK:ART_1.DAT".
SELECT FILE-2
ASSIGN TO "SYS$DISK:ART_2.DAT".
SELECT FILE-3
ASSIGN TO "SYS$DISK:ART_3.DAT".
DATA DIVISION.
FILE SECTION.
FD
FILE-1.
01
FILE-1-REC.
02
F1-REC-FIELD
PIC 9(9).
FD
FILE-2.
01
FILE-2-REC.
02
F2-REC-FIELD
PIC 9(9).
FD
FILE-3.
01
FILE-3-REC.
02
F3-REC-FIELD
PIC 9(9).
PROCEDURE DIVISION.
DECLARATIVES.
USE-SECT SECTION.
USE AFTER STANDARD EXCEPTION PROCEDURE ON INPUT.
CHECK-RMS-CURRENT-REGISTERS.
DISPLAY "************** ERROR **************".
DISPLAY "Error on file: " RMS-CURRENT-FILENAME.
DISPLAY "Status Values:".
DISPLAY "
RMS-STS = " RMS-CURRENT-STS WITH CONVERSION.
DISPLAY "
RMS-STV = " RMS-CURRENT-STV WITH CONVERSION.
DISPLAY "***********************************".
END DECLARATIVES.
MAIN-PROG SECTION.
MAIN-PARA.
OPEN INPUT FILE-1.
OPEN INPUT FILE-2.
OPEN INPUT FILE-3.
.
.
.
CLOSE FILE-1.
CLOSE FILE-2.
CLOSE FILE-3.
STOP RUN.
♦
END-PROGRAM RMS-CURRENT-SPEC-REGISTERS.
1–60 Developing Compaq COBOL Programs
Developing Compaq COBOL Programs
1.5 Using Program Switches
1.5 Using Program Switches
You can control program execution by defining switches in your Compaq
COBOL program and setting them internally (from within the image) or
externally (from outside the image). Switches exist as the environment variable
COBOL_SWITCHES (on the Tru64 UNIX operating system) or the logical name
COB$SWITCHES (on the OpenVMS operating system).
On OpenVMS systems, switches can be defined for the image, process, group, or
system. ♦
On Tru64 UNIX systems, switches can be defined for the image or process. ♦
1.5.1 Setting and Controlling Switches Internally
To set switches from within the image, define them in the SPECIAL-NAMES
paragraph of the ENVIRONMENT DIVISION and use the SET statement in
the PROCEDURE DIVISION to specify switches ON or OFF, as in the following
example:
ENVIRONMENT DIVISION.
CONFIGURATION SECTION.
SPECIAL-NAMES.
SWITCH 10 IS MY-SWITCH
ON IS SWITCH-ON
OFF IS SWITCH-OFF.
.
.
.
PROCEDURE DIVISION.
000-SET-SWITCH.
SET MY-SWITCH TO ON.
IF SWITCH-ON
THEN
DISPLAY "Switch 10 is on".
.
.
.
To change the status of internal switches during execution, turn them on or off
from within your program. However, be aware that this information is not saved
between runs of the program.
Refer to the Compaq COBOL Reference Manual for more information about
setting internal switches.
1.5.2 Setting and Controlling Switches Externally
Switches that are set externally are handled differently on Tru64 UNIX and
OpenVMS, as described in this section.
Switches on Tru64 UNIX
On Tru64 UNIX systems, to set switches from outside the image, use the SETENV
command to change the status of program switches, as follows:
% setenv COBOL_SWITCHES "switch-list"
To remove switch settings:
% unsetenv COBOL_SWITCHES
To check switch settings, enter this command:
% printenv COBOL_SWITCHES
Shows switch settings.
Developing Compaq COBOL Programs 1–61
Developing Compaq COBOL Programs
1.5 Using Program Switches
The switch-list can contain up to 16 switches separated by commas. To set a
switch on, specify it in the switch-list. A switch is off (the default) if you do not
specify it in the switch-list.
For example:
% setenv COBOL_SWITCHES "1,5,13"
Sets switches 1, 5, and 13 ON.
% setenv COBOL_SWITCHES "9,11,16" Sets switches 9, 11, and 16 ON.
% setenv COBOL_SWITCHES " "
Sets all switches OFF.
Following is a simple program that displays a message depending on the state of
the environment variable COBOL_SWITCHES (on Tru64 UNIX systems:
IDENTIFICATION DIVISION.
PROGRAM-ID. TSW.
ENVIRONMENT DIVISION.
CONFIGURATION SECTION.
SPECIAL-NAMES.
SWITCH 12 IS SW12 ON IS SW12-ON OFF IS SW12-OFF.
PROCEDURE DIVISION.
01-S.
DISPLAY "**TEST SWITCHES**".
IF SW12-ON
DISPLAY "SWITCH 12 IS ON".
IF SW12-OFF
DISPLAY "SWITCH 12 IS OFF".
DISPLAY "**END**".
STOP RUN.
END PROGRAM TSW.
To test this program on a Tru64 UNIX system, compile and link it and then type
the following:
% setenv COBOL_SWITCHES 12
% tsw
The output is as follows:
**TEST SWITCHES**
SWITCH 12 IS ON
**END**
♦
Switches on OpenVMS
On OpenVMS systems, to set switches from outside the image or for a process,
use the DCL DEFINE or ASSIGN command to change the status of program
switches as follows:
$ DEFINE COB$SWITCHES "switch-list"
The switch-list can contain up to 16 switches separated by commas. To set a
switch ON, specify it in the switch-list. A switch is OFF (the default) if you do
not specify it in the switch-list.
For example:
$ DEFINE COB$SWITCHES "1,5,13"
Sets switches 1, 5, and 13 ON.
$ DEFINE COB$SWITCHES "9,11,16" Sets switches 9, 11, and 16 ON.
$ DEFINE COB$SWITCHES " "
1–62 Developing Compaq COBOL Programs
Sets all switches OFF.
Developing Compaq COBOL Programs
1.5 Using Program Switches
The order of evaluation for logical name assignments is image, process, group,
system. System and group assignments (including Compaq COBOL program
switch settings) continue until they are changed or deassigned. Process
assignments continue until they are changed, deassigned, or until the process
ends. Image assignments end when they are changed or when the image ends.
You should know the system and group assignments for COB$SWITCHES unless
you have defined them for your process or image. To check switch settings, enter
this command:
$ SHOW LOGICAL COB$SWITCHES
Use the DCL DEASSIGN command to remove the switch-setting logical name
from your process and reactivate the group or system logical name (if any):
$ DEASSIGN COB$SWITCHES
To change the status of external switches during execution, follow these steps:
1. Interrupt the image with a STOP (literal-string) COBOL statement. (Refer to
the Compaq COBOL Reference Manual for more information.)
2. Use the DCL DEFINE command to change switch settings.
3. Continue execution with the DCL CONTINUE command. Be sure not to force
the interrupted image to exit by entering a command that executes another
image.
For information about these DCL commands, refer to the OpenVMS DCL
Dictionary.
Following is a simple program that displays a message depending on the state of
the logical name COB$SWITCHES (on OpenVMS systems):
IDENTIFICATION DIVISION.
PROGRAM-ID. TSW.
ENVIRONMENT DIVISION.
CONFIGURATION SECTION.
SPECIAL-NAMES.
SWITCH 12 IS SW12 ON IS SW12-ON OFF IS SW12-OFF.
PROCEDURE DIVISION.
01-S.
DISPLAY "**TEST SWITCHES**".
IF SW12-ON
DISPLAY "SWITCH 12 IS ON".
IF SW12-OFF
DISPLAY "SWITCH 12 IS OFF".
DISPLAY "**END**".
STOP RUN.
END PROGRAM TSW.
On OpenVMS, to test the previous program, compile and link it and then type the
following:
$ DEFINE COB$SWITCHES 12
$ RUN TSW
The output is as follows:
**TEST SWITCHES**
SWITCH 12 IS ON
**END**
♦
Developing Compaq COBOL Programs 1–63
Developing Compaq COBOL Programs
1.6 Special Information for Year 2000 Programming
1.6 Special Information for Year 2000 Programming
Even subsequent to the turn of the millennium, there still exist potential
disruptions in previously problem-free software where there are instances of a
two-digit year field that should be a four-digit field. Programmers need to correct
all such fields, as Compaq cannot prevent problems that originate in application
code.
Two-digit year formats used in controlling fields, or as keys in indexed files,
can cause program logic to become ambiguous. It is a fundamental rule to use
four-digit years instead of two-digit years in areas where sequential operations
are driven from these values or for comparison of these values.
Compaq COBOL provides programmer access to four-digit and two-digit year
formats:
4-digit
FUNCTION CURRENT-DATE
4-digit
FUNCTION DATE-OF-INTEGER
4-digit
FUNCTION DATE-TO-YYYYMMDD
4-digit
FUNCTION DAY-OF-INTEGER
4-digit
FUNCTION DAY-TO-YYYYDDD
4-digit
FUNCTION INTEGER-OF-DATE
4-digit
FUNCTION INTEGER-OF-DAY
4-digit
FUNCTION TEST-DATE-YYYYMMDD
4-digit
FUNCTION TEST-DAY-YYYYDDD
4-digit
FUNCTION WHEN-COMPILED
4-digit
FUNCTION YEAR-TO-YYYY
2-digit
ACCEPT FROM DATE
2-digit
ACCEPT FROM DAY
4-digit
ACCEPT FROM DATE YYYYMMDD
4-digit
ACCEPT FROM DAY YYYYDDD
Compaq COBOL offers date functions that can be used in program logic that
makes decisions about year order. The full four-digit year handled by the six
functions listed should be used in internal program logic decisions that are based
on years. External displays of year information can continue to use two-digit
formats when that is appropriate.
You should check program logic in code that uses ACCEPT, to verify that
millennium transition dates are properly handled.
The use of two-digit years in applications does not automatically create a problem,
but a problem could exist. Programmers need to inspect each of their applications
for two-digit year dependencies and change any such instances to check the full
four-digit year value.
1–64 Developing Compaq COBOL Programs
2
Handling Numeric Data
Numeric data in Compaq COBOL is evaluated with respect to the algebraic
value of the operands.
This chapter describes the following topics concerning numeric data handling:
•
How the compiler stores numeric data (Section 2.1)
•
Specifying alignment (Section 2.2)
•
Sign conventions (Section 2.3)
•
Invalid values in numeric items (Section 2.4)
•
Evaluating numeric items (Section 2.5)
•
Using the MOVE statement (Section 2.6)
•
Using the arithmetic statements (Section 2.7)
2.1 How the Compiler Stores Numeric Data
Understanding how data is stored will help you in the following situations:
•
When you define data items to participate in group moves or to be the subject
of a REDEFINES clause
•
When you move a complex record consisting of several levels of subordination,
to be sure that the receiving item is large enough to prevent data truncation
•
When you need to use data storage concepts to minimize storage space,
particularly when the data file is large
The storage considerations applicable to tables are described in Chapter 4.
For each numeric data item, Compaq COBOL stores the numeric value, and a
sign (if an S appears in the PICTURE clause).
The USAGE clause of a numeric data item specifies the data’s internal format in
storage. When you do not specify a USAGE clause, the default usage is DISPLAY.
For further information about internal representations, refer to the USAGE
clause tables in the Compaq COBOL Reference Manual.
2.2 Specifying Alignment
In Compaq COBOL, all records, and elementary items with level 01 or 77,
begin at an address that is a multiple of 8 bytes (a quadword boundary). By
default, the Compaq COBOL compiler will locate a subordinate data item at
the next unassigned byte location. However, the SYNCHRONIZED clause,
the -align flag (on Tru64 UNIX), the /ALIGNMENT qualifier (on OpenVMS
Alpha), and alignment directives can be used to modify this behavior, causing
some numeric data items to be aligned on a 2-, 4-, or 8-byte boundary. You can
thus tune data alignment for optimum performance, compatibility with Compaq
Handling Numeric Data 2–1
Handling Numeric Data
2.2 Specifying Alignment
COBOL for OpenVMS VAX, or flexibility. (See Chapter 16, Managing Memory
and Data Access and Chapter 15, Optimizing Your Compaq COBOL Program in
this manual, and refer to the SYNCHRONIZED clause in the Compaq COBOL
Reference Manual for a complete discussion of alignment.)
2.3 Sign Conventions
Compaq COBOL numeric items can be signed or unsigned. Note the following
sign conventions:
•
If you store a signed result in an unsigned item, only the absolute value is
stored. Thus, unsigned items only contain the value zero or a positive value.
•
The way Compaq COBOL stores signed results in signed data items depends
on the usage and the presence or absence of the SIGN clause.
•
When an unsigned result is stored in a signed data item, the sign of the
stored result is positive.
Do not use unsigned numeric items in arithmetic operations. They usually cause
programming errors and are handled less efficiently than signed numeric items.
The following example shows how unsigned numeric items can cause errors:
DATA DIVISION
.
.
.
01 A PIC 9(5) COMP VALUE 2.
01 B PIC 9(5) COMP VALUE 5.
Then:
SUBTRACT B FROM A.
(A = 3)
SUBTRACT 1 FROM A.
(A = 2)
However:
COMPUTE A = (A - B) - 1
(A = 4)
The absence of signs for the numeric items A and B results in two different
answers after parallel arithmetic operations have been done. This occurs because
internal temporaries (required by the COMPUTE statement) are signed. Thus,
the result of (A–B) within the COMPUTE statement is –3; –3 minus 1 is –4 and
the value of A then becomes 4.
2.4 Invalid Values in Numeric Items
All Compaq COBOL arithmetic operations store valid values in their result items.
However, it is possible, through group moves or REDEFINES, to store data in
numeric items that do not conform to the data definitions of those items.
The results of arithmetic operations that use invalid data in numeric items are
undefined. You can use the -check decimal flag (on the Tru64 UNIX operating
system) or the /CHECK=DECIMAL qualifier (on the OpenVMS Alpha operating
system) to validate numeric digits when using display numeric items in a
numeric context; note that this flag or qualifier causes a program to terminate
abnormally if there is invalid data. In the case of data with blanks (typically,
records in a file), you can use the -convert leading_blanks flag (on Tru64
UNIX) or the /CONVERT qualifier (on OpenVMS Alpha) to change all blanks
to zeroes before performing the arithmetic operation. If you specify both the
-check decimal and the -convert leading_blanks flags (on Tru64 UNIX), or
2–2 Handling Numeric Data
Handling Numeric Data
2.4 Invalid Values in Numeric Items
both the /CHECK=DECIMAL and the /CONVERT qualifiers on OpenVMS Alpha,
the conversion of blanks will be done prior to the validation of the resulting
numeric digits. Note that the use of either or both of these qualifiers increases
the execution time of the program. Refer to Compaq COBOL online help (at
the OpenVMS Alpha system prompt), or man cobol (on Tru64 UNIX) for more
information.
2.5 Evaluating Numeric Items
Compaq COBOL provides several kinds of conditional expressions used for
evaluating numeric items. These conditional expressions include the following:
•
The numeric relation condition that compares the item’s contents to another
numeric value
•
The sign condition that examines the item’s sign to see if it is positive or
negative
•
The class condition that inspects the item’s digit positions for valid numeric
characters
•
The success/failure condition that checks the return status codes of COBOL
and non-COBOL procedures for success or failure conditions
The following sections explain these conditional expressions in detail.
2.5.1 Numeric Relation Test
A numeric relation test compares two numeric quantities and determines if the
specified relation between them is true. For example, the following statement
compares item FIELD1 to item FIELD2 and determines if the numeric value of
FIELD1 is greater than the numeric value of FIELD2:
IF FIELD1 > FIELD2 ...
If the relation condition is true, the program control takes the true path of the
statement.
Table 2–1 describes the relational operators.
Table 2–1 Numeric Relational Operator Descriptions
Operator
Description
IS [NOT] GREATER THAN
IS [NOT] >
The first operand is greater than (or not greater
than) the second operand.
IS [NOT] LESS THAN
IS [NOT] <
The first operand is less than (or not less than)
the second operand.
IS [NOT] EQUAL TO
IS [NOT] =
The first operand is equal to (or not equal to) the
second operand.
IS GREATER THAN OR
EQUAL TO
IS >=
The first operand is greater than or equal to the
second operand.
IS LESS THAN OR EQUAL TO
IS <=
The first operand is less than or equal to the
second operand.
Comparison of two numeric operands is valid regardless of their USAGE clauses.
Handling Numeric Data 2–3
Handling Numeric Data
2.5 Evaluating Numeric Items
The length of the literal or arithmetic expression operands (in terms of the
number of digits represented) is not significant. Zero is a unique value, regardless
of the sign.
Unsigned numeric operands are assumed to be positive for comparison. The
results of relation tests involving invalid (nonnumeric) data in a numeric item are
undefined.
2.5.2 Numeric Sign Test
The sign test compares a numeric quantity to zero and determines if it is greater
than (positive), less than (negative), or equal to zero. Both the relation test and
the sign test can perform this function. For example, consider the following
relation test:
IF FIELD1 > 0 ...
Now consider the following sign test:
IF FIELD1 POSITIVE ...
Both of these tests accomplish the same thing and always arrive at the same
result. The sign test, however, shortens the statement and makes it more obvious
that the sign is being tested.
Table 2–2 shows the sign tests and their equivalent relation tests.
Table 2–2 Sign Tests
Sign Test
Equivalent Relation Test
IF FIELD1 POSITIVE ...
IF FIELD1 > 0 ...
IF FIELD1 NOT POSITIVE ...
IF FIELD1 NOT > 0 ...
IF FIELD1 NEGATIVE ...
IF FIELD1 < 0 ...
IF FIELD1 NOT NEGATIVE ...
IF FIELD1 NOT < 0 ...
IF FIELD1 ZERO ...
IF FIELD1 = 0 ...
IF FIELD1 NOT ZERO ...
IF FIELD1 NOT = 0 ...
Sign tests do not execute faster or slower than relation tests because the compiler
substitutes the equivalent relation test for every correctly written sign test.
2.5.3 Numeric Class Tests
The class test inspects an item to determine if it contains numeric or alphabetic
data. For example, the following statement determines if FIELD1 contains
numeric data:
IF FIELD1 IS NUMERIC ...
If the item is numeric, the test condition is true, and program control takes the
true path of the statement.
Both relation and sign tests determine only if an item’s contents are within a
certain range. Therefore, certain items in newly prepared data can pass both the
relation and sign tests and still contain data preparation errors.
The NUMERIC class test checks alphanumeric or numeric DISPLAY or COMP-3
usage items for valid numeric digits. If the item being tested contains a sign
(whether carried as an overpunched character or as a separate character), the
test checks it for a valid sign value. If the character position carrying the sign
2–4 Handling Numeric Data
Handling Numeric Data
2.5 Evaluating Numeric Items
contains an invalid sign value, the NUMERIC class test rejects the item, and
program control takes the false path of the IF statement.
The ALPHABETIC class test check is not valid for an operand described as
numeric.
2.5.4 Success/Failure Tests
The success/failure condition tests the return status codes of COBOL and nonCOBOL procedures for success or failure conditions. You test status-code-id as
follows:
status-code-id IS
SUCCESS
FAILURE
You can use the SET statement to initialize or alter the status of status-code-id
(which must be a word or longword COMP integer represented by PIC 9(1 to 9)
COMP or PIC S9(1 to 9) COMP), as follows:
SET status-code-id TO
SUCCESS
FAILURE
The SET statement is typically in the called program, but the calling program
may also SET the status of status-code-id. The SUCCESS class condition is true
if status-code-id has been set to SUCCESS, otherwise it is false. The FAILURE
class condition is true if status-code-id has been set to FAILURE, otherwise it is
false. The results are unspecified if status-code is not set.
Example 2–1 shows the significant COBOL code relevant to a success/failure test.
Example 2–1 Success/Failure Test
...
PROGRAM-ID. MAIN-PROG.
...
O1 RETURN-STATUS
PIC S9(9) COMP.
...
CALL "PROG-1" GIVING RETURN-STATUS.
IF RETURN-STATUS IS FAILURE PERFORM FAILURE-ROUTINE.
...
PROGRAM-ID. PROG-1.
... .
WORKING-STORAGE SECTION.
01 RETURN-STATUS
PIC S9(9) COMP.
PROCEDURE DIVISION GIVING RETURN-STATUS.
...
IF NUM-1 = NUM-2
SET RETURN-STATUS TO SUCCESS
ELSE
SET RETURN-STATUS TO FAILURE.
...
EXIT PROGRAM.
END PROGRAM PROG-1.
END PROGRAM MAIN-PROG.
Handling Numeric Data 2–5
Handling Numeric Data
2.6 Using the MOVE Statement
2.6 Using the MOVE Statement
The MOVE statement moves the contents of one item into another item. The
following sample MOVE statement moves the contents of item FIELD1 into item
FIELD2:
MOVE FIELD1 TO FIELD2.
This section considers MOVE statements as applied to numeric and numeric
edited data items.
2.6.1 Elementary Numeric Moves
If both items of a MOVE statement are elementary items and the receiving item
is numeric, it is an elementary numeric move. The sending item can be numeric,
alphanumeric, or numeric-edited. The elementary numeric move converts the
data format of the sending item to the data format of the receiving item.
An alphanumeric sending item can be either of the following:
•
An elementary alphanumeric data item
•
Any alphanumeric literal other than the figurative constants SPACE,
QUOTE, LOW-VALUE, or HIGH-VALUE
The elementary numeric move accepts the figurative constant ZERO and
considers it to be equivalent to the numeric literal 0. It treats alphanumeric
sending items as unsigned integers of DISPLAY usage.
When the sending item is numeric-edited, de-editing is applied to establish the
unedited numeric value, which may be signed; then the unedited numeric value
is moved to the receiving field.
If necessary, the numeric move operation converts the sending item to the data
format of the receiving item and aligns the sending item’s decimal point on that of
the receiving item. Then it moves the sending item’s digits to the corresponding
receiving item’s digits.
If the sending item has more digit positions than the receiving item, the decimal
point alignment operation truncates the value of the sending item, with resulting
loss of digits.
The end truncated (high-order or low-order) depends upon the number of sending
item digit positions that find matches on each side of the receiving item’s decimal
point. If the receiving item has fewer digit positions on both sides of the decimal
point, the operation truncates both ends of the sending item. Thus, if an item
described as PIC 999V999 is moved to an item described as PIC 99V99, it loses
one digit from the left end and one from the right end.
In the execution part of the following examples, the caret ( ^ ) indicates the
assumed stored decimal point position:
01 AMOUNT1 PIC 99V99 VALUE ZEROS.
.
.
.
MOVE 123.321 TO AMOUNT1.
Before execution: 00^00
After execution: 23^32
2–6 Handling Numeric Data
Handling Numeric Data
2.6 Using the MOVE Statement
If the sending item has fewer digit positions than the receiving item, the move
operation supplies zeros for all unfilled digit positions.
01 TOTAL-AMT PIC 999V99 VALUE ZEROS.
.
.
.
MOVE 1 TO TOTAL-AMT.
Before execution:
000^00
After execution:
001^00
The following statements produce the same results:
MOVE 001.00 TO TOTAL-AMT.
MOVE "1" TO TOTAL-AMT.
Consider the following two MOVE statements and their truncating and zerofilling effects:
Statement
TOTAL-AMT After Execution
MOVE 00100 TO TOTAL-AMT
MOVE "00100" TO TOTAL-AMT
100^00
100^00
Literals with leading or trailing zeros have no advantage in space or execution
speed in Compaq COBOL, and the zeros are often lost by decimal point
alignment.
The MOVE statement’s receiving item dictates how the sign will be moved. When
the receiving item is a signed numeric item, the sign from the sending item is
placed in it. If the sending item is unsigned, and the receiving item is signed, a
positive sign is placed in the receiving item. If the sending item is signed and the
receiving item is unsigned, the absolute value of the sending item is moved to the
receiving item.
2.6.2 Elementary Numeric-Edited Moves
An elementary numeric move to a numeric-edited receiving item is considered an
elementary numeric-edited move. The sending item of an elementary numericedited move can be numeric, numeric-edited, or alphanumeric. When the sending
item is numeric-edited, de-editing is applied to establish the item’s unedited
numeric value, which may be signed; then the unedited numeric value is moved
to the receiving field. Alphanumeric sending items in numeric-edited moves are
considered unsigned DISPLAY usage integers.
A numeric-edited item PICTURE can contain 9, V, and P, but to qualify as
numeric-edited, it must also contain one or more of the following editing symbols:
Z
B
Asterisk ( * )
Period ( . )
Plus sign ( + )
Minus sign ( – )
CR
DB
Currency symbol
Slash ( / )
Comma ( , )
Zero ( 0 )
Handling Numeric Data 2–7
Handling Numeric Data
2.6 Using the MOVE Statement
For a complete description of these symbols, refer to the Compaq COBOL
Reference Manual.
The numeric-edited move operation first converts the sending item to DISPLAY
usage and aligns both items on their decimal point locations. The sending item
is truncated or zero-filled until it has the same number of digit positions on both
sides of the decimal point as the receiving item. The operation then moves the
sending item to the receiving item, following the Compaq COBOL editing rules.
The rules allow the numeric-edited move operation to perform any of the following
editing functions:
•
Replace leading zeros with either spaces or asterisks.
•
Float a currency sign and a plus or minus sign through suppressed zeros,
inserting the sign at either end of the item.
•
Insert zeros, spaces, slashes, and/or the symbols CR or DB.
•
Insert commas and a decimal point (or decimal points and a comma if
DECIMAL-POINT IS COMMA).
Table 2–3 illustrates several of these functions, which are invoked by the
statement:
MOVE FLD-B TO TOTAL-AMT.
Assume that FLD-B is described as S9999V99. Note that the caret ( ^ ) indicates
an assumed decimal point in Table 2–3. In all but two of the examples, the sign
of FLD-B is leading separate. Trailing overpunch signs (the sign of the number
encoded into the rightmost digit) are used in the other two FLD-B data examples.
Table 2–3 Numeric Editing
TOTAL-AMT
FLD-B
PICTURE String
Contents After MOVE
+0023^00
ZZZZ.99
23.00
-0023^00
ZZZZ.99
23.00
0085^9P
++++.99
-85.97
+1234^00
Z,ZZZ.99
1,234.00
+0012^34
$,$$$.99
$12.34
+0000^34
$,$$9.99
$0.34
+1234^00
$$,$$$.99
$1,234.00
+0012^34
$$9,999.99
$0,012.34
+0012^34
$$$$,$$$.99
$12.34
+0000^00
$$$,$$$.$$
0012^3M
+0012^34
+1234^56
++++.99
-12.34
$***,***.99
$*****12.34
Z,ZZZ.99+
1,234.56+
(continued on next page)
2–8 Handling Numeric Data
Handling Numeric Data
2.6 Using the MOVE Statement
Table 2–3 (Cont.) Numeric Editing
TOTAL-AMT
FLD-B
-6543^21
1 The
PICTURE String
Contents After MOVE
$,$$$,$$$.99DB
$6,543.21DB1
output includes DB if a negative value is moved.
The currency symbol ($ or other currency sign) and the editing sign control
symbols (+ and –) are the only floating symbols. To float a symbol, enter a string
of two or more occurrences of that symbol, one for each character position over
which you want the symbol to float.
2.6.3 Subscripted Moves
Any item (other than a data item that is not subordinate to an OCCURS clause)
of a MOVE statement can be subscripted, and the referenced item can be used to
subscript another name in the same statement.
For additional information, see Section 3.6.4, Subscripted Moves in Chapter 3,
Handling Nonnumeric Data.
2.6.4 Common Move Errors
Programmers most commonly make the following errors when writing MOVE
statements:
•
Placing an incorrect number of replacement characters in a numeric edited
item
•
Moving nonnumeric data into numeric items with group moves
•
Trying to float the currency sign ( $ ) or plus ( + ) insertion characters past
the decimal point to force zero values to appear as .00 instead of spaces (use
$$.99 or .99)
•
Forgetting that the currency sign ( $ ), plus sign ( + ), minus sign ( – ), CR,
or DB insertion characters require one or two additional positions on the
leftmost end that cannot be replaced by a digit (unlike the asterisk ( * )
insertion character, which can be completely replaced)
2.7 Using the Arithmetic Statements
The Compaq COBOL arithmetic statements allow programs to perform arithmetic
operations on numeric data. Large values present various problems, and COBOL
command qualifiers can help resolve or mitigate them. The following sections
discuss these topics.
2.7.1 Temporary Work Items
Compaq COBOL allows numeric items and literals with up to 31 decimal digits
on Alpha, and up to 18 decimal digits on VAX. (See Section 2.7.2 for more specific
information.) It is quite easy to construct arithmetic expressions that produce too
many digits.
Handling Numeric Data 2–9
Handling Numeric Data
2.7 Using the Arithmetic Statements
Most forms of the arithmetic statements perform their operations in temporary
work locations, then move the results to the receiving items, aligning the decimal
points and truncating or zero-filling the resultant values. The actual size of a
temporary work item (also called an intermediate result item) varies for each
statement; it is determined at compile time, based on the sizes of the operands
used by the statement and the arithmetic operation being performed. Should the
temporary work item exceed the maximum size, truncation occurs.
On Alpha systems, the maximum temporary work item size is 31 digits for
standard arithmetic and for native CIT4 arithmetic, and is 38 digits for some
operations using native float or native CIT3. ♦
On VAX systems, the situation is different. The temporary work item has two
forms, a scaled integer form and a software floating-point form. The scaled
integer form has a maximum size of 31 numeric digits for a program compiled
with the /INSTRUCTION_SET = DECIMAL_STRING or GENERIC qualifier,
and a maximum of 38 digits for /INSTRUCTION_SET = NODECIMAL_STRING.
When the compiler determines that the size of the intermediate result exceeds the
maximum scaled integer size, it uses a software floating-point intermediate item
and keeps the most significant 18 digits (for all settings of the /INSTRUCTION_
SET qualifier). ♦
Programs should not arbitrarily specify sizes significantly larger than the values
actually anticipated for the lifetime of the application. Although the generous
limits in Compaq COBOL are useful for many applications, specifying many more
digits than needed is likely to add extra processing cycles and complexity that is
wasteful.
2.7.2 Standard and Native Arithmetic (Alpha)
Compaq COBOL supports two modes of arithmetic, standard and native.
Standard arithmetic is preferable for greater precision with large values and
for compatibility with other standard implementations of COBOL. These
considerations are sometimes overridden by the need for compatibility with
earlier versions of Compaq COBOL or for compatibility with Compaq COBOL for
OpenVMS VAX, in which case native arithmetic is the appropriate mode.
Native arithmetic has three submodes: FLOAT, CIT3, and CIT4. (CIT stands for
COBOL Intermediate Temporary).
You can specify the arithmetic mode and submode with the two COBOL
command-line qualifiers /ARITHMETIC (or -arithmetic) and /MATH_
INTERMEDIATE (or -math_intermediate). The use of these qualifiers is
described in this section.
2.7.2.1 Using the /MATH_INTERMEDIATE Qualifier (Alpha)
You can specify the intermediate data type to be used when the result of an
arithmetic operation cannot be represented exactly. This data type affects the
truncation of the intermediate result and the consequent precision. It also affects
compatibility of arithmetic results with previous versions of COBOL and other
implementations of COBOL.
The three options of the /MATH_INTERMEDIATE (or -math_intermediate)
qualifier are FLOAT (the default), CIT3, and CIT4, as follows:
2–10 Handling Numeric Data
Handling Numeric Data
2.7 Using the Arithmetic Statements
FLOAT
Selects double-precision binary floating-point for the intermediate data type.
Intermediate values are truncated to the most significant 53 bits, with an 11-bit
exponent, resulting in approximately 15 decimal digits of precision. FLOAT is
the default, and it provides for compatibility with earlier versions of Compaq
COBOL, but not with Compaq COBOL for OpenVMS VAX. FLOAT has been
used since Version 1.0 of Compaq COBOL on Alpha.
CIT3
Selects Cobol Intermediate Temporary (design 3) for the intermediate data
type. Intermediate values are truncated to the most significant 18 decimal
digits, with a 2-digit exponent. CIT3 provides for increased compatibility with
Compaq COBOL for OpenVMS VAX; even with CIT3, however, there are still
some differences, which are described in Section B.4.12.
CIT4
Selects Cobol Intermediate Temporary (design 4) for the intermediate data
type. Intermediate values are truncated to the most significant 32 decimal
digits, with a 2-digit exponent. CIT4 has the greatest compatibility with the
draft ANSI Standard. CIT4 is the option of choice for greatest precision and for
conformance to future standards and compatibility with other implementations
of COBOL. CIT4 is strongly recommended for programs that use numeric items
with more than 18 digits or that have complicated expressions.
In addition to the precision difference, CIT4 arithmetic has the same differences
and restrictions as shown in Section B.4.12 for CIT3 arithmetic.
The default is /MATH_INTERMEDIATE=FLOAT (or -math_intermediate float).
If you specify /ARITHMETIC=STANDARD (discussed in Section 2.7.2.2), this will
force /MATH_INTERMEDIATE=CIT4.
Example of Different Arithmetic Results (Alpha)
The following example illustrates the different results that you can get with
FLOAT, CIT3, and CIT4:
IDENTIFICATION DIVISION.
PROGRAM-ID. MUL31.
DATA DIVISION.
WORKING-STORAGE SECTION.
01 XD PIC S9(31) VALUE 3.
01 YD PIC S9(31) VALUE 258718314234781388692555698765.
01 ZD PIC S9(31).
PROCEDURE DIVISION.
0.
MULTIPLY XD BY YD GIVING ZD
ON SIZE ERROR DISPLAY "Size error raised"
NOT ON SIZE ERROR DISPLAY ZD WITH CONVERSION.
The compiler relies on the number of digits implied by the pictures of decimal and
integer operands. Here it assumes that XD has 31 digits and YD has 31 digits.
The product could require 62 digits, which is larger than the largest fixed-point
arithmetic type available to the compiler. Depending on the intermediate data
type chosen, this program gets several different results.
MATH
----FLOAT
CIT3
CIT4
ZD
-----------------------------776154942704344283789821739008
776154942704344164000000000000
776154942704344166077667096295
Intermediate maintains
the most significant
---------------------53 bits
18 digits
32 digits
Handling Numeric Data 2–11
Handling Numeric Data
2.7 Using the Arithmetic Statements
Other Consequences of Intermediate Range Differences (Alpha)
Because each intermediate data type has a different maximum magnitude, an
arithmetic statement can raise the size error condition with one arithmetic mode
but not with another.
For example, the value +0.999 999 999 999 999 999E+99 (spaces added for
readability) is representable in any of the intermediate data types. By contrast,
the larger value +0.999 999 999 999 999 999 9E+99 cannot be represented in a
CIT3 intermediate data item. Such an operation would cause an overflow, raising
the size error condition. This value is representable, however, in a FLOAT or
CIT4 intermediate data item; the size error condition would not be raised.
The value 1.0E+99 cannot be represented in either CIT3 or CIT4 form, but is
representable in FLOAT form.
Similarly, because each intermediate data type has a different minimum
magnitude, an arithmetic statement can raise the size error condition for
underflow with one arithmetic mode but not another. (Underflow does not raise
the size error condition when FLOAT arithmetic is used.)
A literal also can be valid with one arithmetic mode but not with another,
resulting in different HIGHTRUNC and LOWTRUNC informational diagnostics.
When a literal cannot be represented in an intermediate data item, the value
used is undefined.
Arithmetic expressions in nonarithmetic statements are also affected.
Nonarithmetic statements, such as the IF statement, allow arithmetic expressions
to be used, but do not provide a mechanism like the ON SIZE ERROR phrase to
detect errors in evaluation. If such an error occurs, the behavior of the statement
is unpredictable; in the case of an IF statement, result of the comparison is
undefined.
Similar considerations apply in other contexts, such as the use of arithmetic
expressions as subscript expressions or reference-modification components.
2.7.2.2 Using the /ARITHMETIC Qualifier (Alpha)
You can specify /ARITHMETIC=NATIVE or STANDARD ( -arithmetic native
or standard) on the COBOL command line to control whether native arithmetic
or standard arithmetic is used to evaluate arithmetic operations and statements.
These options have the following effects:
NATIVE
Arithmetic operations will produce results that are reasonably compatible
with releases for Compaq COBOL for OpenVMS Alpha prior to Version 2.7
and also with Compaq COBOL for OpenVMS VAX.
STANDARD
Most common arithmetic operations will produce results that are
predictable, reasonable, and portable. In this context, portable means
that the results will be identical from implementation to implementation.
/ARITHMETIC=STANDARD forces /MATH_INTERMEDIATE=CIT4
(described in Section 2.7.2.1).
The default is /ARITHMETIC=NATIVE (-arithmetic native).
Using the OPTIONS Paragraph (Alpha)
An alternative way to specify native or standard arithmetic is to use the
OPTIONS paragraph in the Identification Division of your Compaq COBOL
program. There you can specify ARITHMETIC IS NATIVE or STANDARD. Refer
to the Compaq COBOL Reference Manual for the syntax and details. ♦
2–12 Handling Numeric Data
Handling Numeric Data
2.7 Using the Arithmetic Statements
2.7.3 Specifying a Truncation Qualifier
The -trunc flag (on Tru64 UNIX) or the /[NO]TRUNCATE qualifier (on
OpenVMS) specifies how the Compaq COBOL compiler stores values in
COMPUTATIONAL receiving items.
By default (assuming that the -trunc flag is turned off, or /NOTRUNCATE is
set), Compaq COBOL truncates values according to the Alpha hardware storage
unit (word, longword, or quadword) allocated to the receiving item.
If you specify -trunc or /TRUNCATE, the compiler truncates values according to
the number of decimal digits specified by the PICTURE clause.
2.7.4 Using the ROUNDED Phrase
Rounding is an important option that you can use with arithmetic operations.
You can use the ROUNDED phrase with any Compaq COBOL arithmetic
statement. Rounding takes place only when the ROUNDED phrase requests it,
and then only if the intermediate result has low-order digits that cannot be stored
in the result.
Compaq COBOL rounds off by adding a 5 to the leftmost truncated digit of the
absolute value of the intermediate result before it stores that result.
Table 2–4 shows several ROUNDING examples.
Table 2–4 ROUNDING
PICTURE clause
Initial Value
03 ITEMA PIC S9(5)V9999.
12345.2222
03 ITEMB PIC S9(5)V99.
54321.11
03 ITEMC PIC S9999.
1234
03 ITEMD PIC S9999P.
0
03 ITEME PIC S99V99 VALUE 9.
9.00
03 ITEMF PIC S99V99 VALUE 24.
24.00
Arithmetic Statement
Intermediate
Result
ROUNDED
Result Value
ADD ITEMA TO ITEMB ROUNDED.
066666.3322
66666.33
MULTIPLY ITEMC BY 2
GIVING ITEMD ROUNDED.
02468
DIVIDE ITEME INTO ITEMF
ROUNDED.
02.666
DIVIDE ITEME INTO ITEMF
GIVING ITEMC ROUNDED.
02.666
1 The
024701
02.67
0003
trailing 0 is implied by the P in the PICTURE clause.
2.7.4.1 ROUNDED with REMAINDER
The remainder computation uses an intermediate field that is truncated, rather
than rounded, when you use the DIVIDE statement with both the ROUNDED
and REMAINDER options.
Handling Numeric Data 2–13
Handling Numeric Data
2.7 Using the Arithmetic Statements
2.7.5 Using the SIZE ERROR Phrase
The SIZE ERROR phrase detects the loss of high-order nonzero digits in the
results of Compaq COBOL arithmetic operations. It does this by checking the
absolute value of an arithmetic result against the PICTURE character-string
of each resultant identifier. For example, if the absolute value of the result is
100.05, and the PICTURE character-string of the resultant identifier is 99V99,
the SIZE ERROR phrase detects that the high-order digit, 1, will be lost, and the
size error condition will be raised.
You can use the phrase in any Compaq COBOL arithmetic statement.
When the execution of a statement with no ON SIZE ERROR phrase results in
a size error, and native arithmetic is used, the values of all resultant identifiers
are undefined. When standard arithmetic is used, or when the same statement
includes an ON SIZE ERROR phrase, receiving items for which the size error
exists are left unaltered; the result is stored in those receiving items for which no
size error exists. The ON SIZE ERROR imperative phrase is then executed.
If the statement contains both ROUNDED and SIZE ERROR phrases, the result
is rounded before a size error check is made.
The SIZE ERROR phrase cannot be used with numeric MOVE statements. Thus,
if a program moves a numeric quantity to a smaller numeric item, it can lose
high-order digits. For example, consider the following move of an item to a
smaller item:
01 AMOUNT-A PIC S9(8)V99.
01 AMOUNT-B PIC S9(4)V99.
.
.
.
MOVE AMOUNT-A TO AMOUNT-B.
This MOVE operation always loses four of AMOUNT-A’s high-order digits.
The statement can be tailored in one of three ways, as shown in the following
example, to determine whether these digits are zero or nonzero:
1. IF AMOUNT-A NOT > 9999.99
MOVE AMOUNT-A TO AMOUNT-B
ELSE ...
2. ADD ZERO AMOUNT-A GIVING AMOUNT-B
ON SIZE ERROR ...
3. COMPUTE AMOUNT-B = AMOUNT-A
ON SIZE ERROR ...
All three alternatives allow the MOVE operation to occur only if AMOUNT-A
loses no significant digits. If the value in AMOUNT-A is too large, all three avoid
altering AMOUNT-B and take the alternate execution path.
You can also use a NOT ON SIZE ERROR phrase to branch to, or perform,
sections of code only when no size error occurs.
2.7.6 Using the GIVING Phrase
The GIVING phrase moves the intermediate result of an arithmetic operation
to a receiving item. The phrase acts exactly like a MOVE statement in which
the intermediate result serves as the sending item, and the data item following
the word GIVING serves as the receiving item. When a statement contains a
GIVING phrase, you can have a numeric-edited receiving item.
The receiving item can also have the ROUNDED phrase. If the receiving item is
also numeric-edited, rounding takes place before the editing.
2–14 Handling Numeric Data
Handling Numeric Data
2.7 Using the Arithmetic Statements
The GIVING phrase can be used with the ADD, SUBTRACT, MULTIPLY, and
DIVIDE statements. For example:
ADD A,B GIVING C.
2.7.7 Multiple Operands in ADD and SUBTRACT Statements
Both the ADD and SUBTRACT statements can contain a series of operands
preceding the word TO, FROM, or GIVING.
If there are multiple operands in either of these statements, the operands are
added together. The intermediate result of that operation becomes a single
operand to be added to or subtracted from the receiving item. In the following
examples, TEMP is an intermediate result item:
1.
2.
3.
Statement:
ADD A,B,C,D, TO E,F,G,H.
Equivalent coding:
ADD
ADD
ADD
ADD
ADD
ADD
ADD
A, B, GIVING TEMP.
TEMP, C, GIVING TEMP.
TEMP, D, GIVING TEMP.
TEMP, E, GIVING E.
TEMP, F, GIVING F.
TEMP, G, GIVING G.
TEMP, H, GIVING H.
Statement:
SUBTRACT A, B, C, FROM D.
Equivalent coding:
ADD A, B, GIVING TEMP.
ADD TEMP, C, GIVING TEMP.
SUBTRACT TEMP FROM D, GIVING D.
Statement:
ADD A,B,C,D, GIVING E.
Equivalent coding:
ADD A,B, GIVING TEMP.
ADD TEMP, C, GIVING TEMP.
ADD TEMP, D, GIVING E.
As in all Compaq COBOL statements, the commas in these statements are
optional.
2.7.8 Common Errors in Arithmetic Statements
Programmers most commonly make the following errors when using arithmetic
statements:
•
Using an alphanumeric item in an arithmetic statement. The MOVE
statement allows data movement between alphanumeric items and certain
numeric items, but arithmetic statements require that all items be numeric.
•
Writing the ADD or SUBTRACT statements without the GIVING phrase, and
attempting to put the result into a numeric-edited item.
•
Subtracting a 1 from a numeric counter that was described as an unsigned
quantity and then testing for a value less than zero.
•
Forgetting that the MULTIPLY statement, without the GIVING phrase,
stores the result back into the second operand (multiplier).
•
Performing a series of calculations that generates an intermediate result
larger than 18 digits when the final result will have 18 or fewer digits. You
can prevent this problem by interspersing divisions with multiplications or
by dropping nonsignificant digits after multiplying large numbers or numbers
with many decimal places. Also, avoid use of the COMPUTE statement to
keep from performing such calculations implicitly.
Handling Numeric Data 2–15
Handling Numeric Data
2.7 Using the Arithmetic Statements
•
Forgetting that when an arithmetic statement has multiple receiving items
you must specify the ROUNDED phrase for each receiving item you want
rounded.
•
Forgetting that the ON SIZE ERROR phrase applies to all receiving items
in an arithmetic statement containing multiple receiving items. Only those
receiving items for which a size error condition is raised are left unaltered.
The ON SIZE ERROR imperative statement is executed after all the receiving
items are processed.
•
Controlling a loop by adding to a numeric counter that was described as PIC
9, and then testing for a value of 10 or greater to exit the loop.
•
Forgetting that ROUNDING is done before the ON SIZE ERROR test.
2–16 Handling Numeric Data
3
Handling Nonnumeric Data
Nonnumeric data in Compaq COBOL is evaluated with respect to a specified
collating sequence of the operands.
The following information is in this chapter:
•
How the compiler stores nonnumeric data (Section 3.1)
•
Data organization (Section 3.2)
•
Special characters (Section 3.3)
•
Testing nonnumeric items (Section 3.4)
•
Data movement (Section 3.5)
•
Using the MOVE statement (Section 3.6)
3.1 How the Compiler Stores Nonnumeric Data
COBOL programs hold their data in items whose sizes are described in their
source programs. The size of these items is thus fixed during compilation for the
lifespan of the resulting object program.
Items in a COBOL program belong to any of the following three data classes:
•
Numeric—Can contain only numeric values.
•
Alphabetic—Can contain only A to Z (uppercase or lowercase) and space
characters.
•
Alphanumeric—Can contain the following types of values:
All alphabetic
All numeric
A mixture of alphabetic and numeric
Any character from the ASCII character set
The data description of an item specifies which class that item belongs to.
Classes are further subdivided into categories. Alphanumeric items can be
numeric edited, alphanumeric edited, or alphanumeric. Every elementary item,
except for an index data item, belongs to one of the classes and its categories.
The class of a group item is treated as alphanumeric regardless of the classes of
subordinate elementary items.
If the data description of an alphanumeric item specifies that certain editing
operations be performed on any value that is moved into it, that item is called an
alphanumeric edited item.
As you read this chapter, keep in mind the distinction between the class or
category of a data item and the actual value that the item contains.
Handling Nonnumeric Data 3–1
Handling Nonnumeric Data
3.1 How the Compiler Stores Nonnumeric Data
Sometimes the text refers to alphabetic, alphanumeric, and alphanumeric edited
data items as nonnumeric data items to distinguish them from items that are
specifically numeric.
Regardless of the class of an item, it is usually possible at run time to store an
invalid value in the item. Thus, nonnumeric ASCII characters can be placed
in an item described as numeric, and an alphabetic item can be loaded with
nonalphabetic characters. Invalid values can cause errors in output or run-time
errors.
3.2 Data Organization
A Compaq COBOL record consists of a set of data description entries that
describe record characteristics; it must have an 01 or 77 level number. A data
description entry can be either a group item or an elementary item.
All of the records used by Compaq COBOL programs (except for certain registers
and switches) must be described in the source program’s Data Division. The
compiler allocates memory space for these items (except for Linkage Section
items) and fixes their size at compilation time.
The following sections explain how the compiler sets up storage for group and
elementary data items.
3.2.1 Group Items
A group item is a data item that is followed by one or more elementary items or
other group items, all of which have higher-valued level numbers than the group
to which they are subordinate.
The size of a group item is the sum of the sizes of its subordinate elementary
items. The compiler considers all group items to be alphanumeric DISPLAY items
regardless of the class and usage of their subordinate elementary items.
3.2.2 Elementary Items
An elementary item is a data item that has no subordinate data item.
The size of an elementary item is determined by the number of symbols that
represent character positions contained in the PICTURE character-string. For
example, consider this record description:
01 TRANREC.
03 FIELD-1 PIC X(7).
03 FIELD-2 PIC S9(5)V99.
Both elementary items require seven bytes of memory; however, item FIELD-1
contains seven alphanumeric characters while item FIELD-2 contains seven
decimal digits, an operational sign, and an implied decimal point. Operations on
such items are independent of the mapping of the item into memory words (32-bit
words that hold four 8-bit bytes). An item can begin in the leftmost or rightmost
byte of a word with no effect on the function of any operation that refers to that
item. (However, the position of items in memory can have an effect on run-time
performance.)
In effect, the compiler sees memory as a continuous array of bytes, not words.
This becomes particularly important when you are defining a table using the
OCCURS clause (see Chapter 4).
3–2 Handling Nonnumeric Data
Handling Nonnumeric Data
3.2 Data Organization
In Compaq COBOL, all records, and elementary items with level 01 or 77, begin
at an address that is a multiple of 8 bytes (a quadword boundary). By default,
the Compaq COBOL compiler will locate a subordinate data item at the next
unassigned byte location.
Refer to Chapter 16, Chapter 15, and the SYNCHRONIZED clause in the
Compaq COBOL Reference Manual for a complete discussion of alignment.
3.3 Special Characters
Compaq COBOL allows you to handle any of the 128 characters of the ASCII
character set as alphanumeric data, even though many of the characters
are control characters, which usually direct input/output devices. Generally,
alphanumeric data manipulations attach no meaning to the 8th bit of an 8-bit
byte. Thus, you can move and compare these control characters in the same
manner as alphabetic and numeric characters.
Note
Some control characters have 0 in the high-order bit and are part of the
ASCII character set, while others have 1 in the high order bit and are not
part of the ASCII character set.
Although the object program can manipulate all ASCII characters, certain control
characters cannot appear in nonnumeric literals because the compiler uses them
to delimit the source text.
You can place special characters into items of the object program by defining
symbolic characters in the SPECIAL-NAMES paragraph or by using the
EXTERNAL clause. Refer to the Compaq COBOL Reference Manual for
information on these two topics.
The ASCII character set listed in the Compaq COBOL Reference Manual
indicates the decimal value for any ASCII character.
3.4 Testing Nonnumeric Items
The following sections describe the relation and class tests as they apply to
nonnumeric items.
3.4.1 Relation Tests of Nonnumeric Items
An IF statement with a relation condition can compare the value in a nonnumeric
data item with another value and use the result to alter the flow of control in the
program.
An IF statement with a relation condition compares two operands. Either of
these operands can be an identifier or a literal, but they cannot both be literals.
If the stated relation exists between the two operands, the relation condition is
true.
When coding a relational operator, leave a space before and after each reserved
word. When the reserved word NOT is present, the compiler considers it and the
next key word or relational character to be a single relational operator defining
the comparison. Table 3–1 shows the meanings of the relational operators.
Handling Nonnumeric Data 3–3
Handling Nonnumeric Data
3.4 Testing Nonnumeric Items
Table 3–1 Relational Operator Descriptions
Operator
Description
IS [NOT] GREATER THAN
IS [NOT] >
The first operand is greater than (or not greater
than) the second operand.
IS [NOT] LESS THAN
IS [NOT] <
The first operand is less than (or not less than) the
second operand.
IS [NOT] EQUAL TO
IS [NOT] =
The first operand is equal to (or not equal to) the
second operand.
IS GREATER THAN OR
EQUAL TO
IS >=
The first operand is greater than or equal to the
second operand.
IS LESS THAN OR EQUAL TO
IS <=
The first operand is less than or equal to the second
operand.
3.4.1.1 Classes of Data
Compaq COBOL allows comparison of both numeric class operands and
nonnumeric class operands; however, it handles each class of data differently.
For example, it allows a comparison of two numeric operands regardless of the
formats specified in their respective USAGE clauses, but it requires that all other
comparisons (including comparisons of any group items) be between operands
with the same usage. It compares numeric class operands with respect to their
algebraic values and nonnumeric (or numeric and nonnumeric) class operands
with respect to a specified collating sequence. (See Section 2.5.1 for numeric
comparisons.)
If only one of the operands is numeric, it must be an integer data item or an
integer literal, and it must be DISPLAY usage. In these cases, the manner
in which the compiler handles numeric operands depends on the nonnumeric
operand, as follows:
•
If the nonnumeric operand is an elementary item or a literal, the compiler
treats the numeric operand as if it had been moved into an alphanumeric
data item the same size as the numeric operand and then compared. This
causes any operational sign, whether carried as a separate character or as
an overpunched character, to be stripped from the numeric item so that it
appears to be an unsigned quantity.
In addition, if the PICTURE character-string of the numeric item contains
trailing P characters, indicating that there are assumed integer positions that
are not actually present, they are filled with zero digits. Thus, an item with
a PICTURE character-string of S9999PPP is moved to a temporary location
where it is described as 9999999. If its value is 432J (–4321), the value in
the temporary location will be 4321000. The numeric digits take part in the
comparison.
•
If the nonnumeric operand is a group item, the compiler treats the numeric
operand as if it had been moved into a group item the same size as the
numeric operand and then compared. This is equivalent to a group move.
The compiler ignores the description of the numeric item (except for length)
and, therefore, includes in its length any operational sign, whether carried as
a separate character or as an overpunched character. Overpunched characters
are never ASCII numeric digits. They are characters ranging from A to R,
left brace ( { ), or right brace ( } ). Thus, the sign and the digits, stored as
3–4 Handling Nonnumeric Data
Handling Nonnumeric Data
3.4 Testing Nonnumeric Items
ASCII bytes, take part in the comparison, and zeros are not supplied for P
characters in the PICTURE character-string.
The compiler does not accept a comparison between a noninteger numeric operand
and a nonnumeric operand. If you try to compare these two items, you receive a
diagnostic message at compile time.
3.4.1.2 Comparison Operations
If the two operands are acceptable, the compiler compares them character by
character. The compiler starts at the first byte and compares the corresponding
bytes until it either encounters a pair of unequal bytes or reaches the last byte of
the longer operand.
If the compiler encounters a pair of unequal characters, it considers their relative
position in the collating sequence. The operand with the character that is
positioned higher in the collating sequence is the greater operand.
If the operands have different lengths, the comparison proceeds as though the
shorter operand were extended on the right by sufficient ASCII spaces (decimal
32) to make both operands the same length.
If all character pairs are equal, the operands are equal.
3.4.2 Class Tests for Nonnumeric Items
An IF statement with a class condition tests the value in a nonnumeric data item
(USAGE DISPLAY only) to determine whether it contains numeric, alphabetic, or
user-defined data and uses the result to alter the flow of control in the program.
For example:
IF ITEM-1 IS NUMERIC...
IF ITEM-2 IS ALPHABETIC...
IF ITEM-3 IS NOT NUMERIC...
If the data item consists entirely of the ASCII characters 0 to 9, with or without
the operational sign, the class condition is NUMERIC. If the item consists
entirely of the ASCII characters A to Z (upper- or lowercase) and spaces, the class
condition is ALPHABETIC.
The ALPHABETIC-LOWER test is true if the operand contains any combination
of the lowercase alphabetic characters a to z, and the space. Otherwise the test is
false.
The ALPHABETIC-UPPER test is true if the operand contains any combination
of the uppercase alphabetical characters A to Z, and the space. Otherwise, the
test is false.
You can also perform a class test on a data item that you define with the CLASS
clause of the SPECIAL-NAMES paragraph.
A class test is true if the operand consists entirely of the characters listed in the
definition of the CLASS-NAME in the SPECIAL-NAMES paragraph. Otherwise,
the test is false.
When the reserved word NOT is present, the compiler considers it and the
next key word as one class condition defining the class test to be executed.
For example, NOT NUMERIC determines if an operand contains at least one
nonnumeric character.
Handling Nonnumeric Data 3–5
Handling Nonnumeric Data
3.4 Testing Nonnumeric Items
If the item being tested is described as a numeric data item, it can only be tested
as NUMERIC or NOT NUMERIC. The NUMERIC test cannot examine either of
the following:
•
An item described as alphabetic
•
A group item containing elementary items whose data descriptions indicate
the presence of operational signs
For further information on using class conditions with numeric items, refer to the
Compaq COBOL Reference Manual.
3.5 Data Movement
Three Compaq COBOL statements (MOVE, STRING, and UNSTRING) perform
most of the data movement operations required by business-oriented programs.
The MOVE statement simply moves data from one item to another. The STRING
statement concatenates a series of sending items into a single receiving item. The
UNSTRING statement disperses a single sending item into multiple receiving
items. Section 3.6 describes the MOVE statement. Chapter 5 describes STRING
and UNSTRING.
The MOVE statement handles most data movement operations on character
strings. However, it is limited in its ability to handle multiple items. For
example, it cannot, by itself, concatenate a series of sending items into a single
receiving item or disperse a single sending item into several receiving items.
Two MOVE statements will, however, bring the contents of two items together
into a third (receiving) item if the receiving item has been subdivided with
subordinate elementary items that match the two sending items in size. If other
items are to be concatenated into the third item, and they differ in size from the
first two items, then the receiving item requires additional subdivisions (through
redefinition).
Example 3–1 demonstrates item concatenation using two MOVE statements.
Example 3–1 Item Concatenation Using Two MOVE Statements
01 SEND-1
PIC X(5) VALUE "FIRST".
01 SEND-2
PIC X(6) VALUE "SECOND".
01 RECEIVE-GROUP.
05 REC-1
PIC X(5).
05 REC-2
PIC X(6).
PROCEDURE DIVISION.
A00-BEGIN.
MOVE SEND-1 TO REC-1.
MOVE SEND-2 TO REC-2.
DISPLAY RECEIVE-GROUP.
STOP RUN.
The result of the concatenation follows:
FIRSTSECOND
Two MOVE statements can also disperse the contents of one sending item to
several receiving items. The first MOVE statement moves the leftmost end of
the sending item to a receiving item; then the second MOVE statement moves
the rightmost end of the sending item to another receiving item. (The second
3–6 Handling Nonnumeric Data
Handling Nonnumeric Data
3.5 Data Movement
receiving item must first be described with the JUSTIFIED clause.) Characters
from the middle of the sending item cannot easily be moved to any receiving item
without extensive redefinitions of the sending item or a reference modification
loop (as with concatenation).
The STRING and UNSTRING statements handle concatenation and dispersion
more easily than compound moves. Reference modification handles substring
operations more easily than compound moves, STRING, or UNSTRING.
3.6 Using the MOVE Statement
The MOVE statement moves the contents of one item into another. For example:
MOVE FIELD1 TO FIELD2
MOVE CORRESPONDING FIELD1 TO FIELD2
FIELD1 is the sending item name, and FIELD2 is the receiving item name.
The first statement causes the compiler to move the contents of FIELD1 into
FIELD2. The two items need not be the same size, class, or usage; they can be
either group or elementary items. If the two items are not the same length, the
compiler aligns them on one end or the other. It also truncates or space-fills the
other end. The movement of group items and nonnumeric elementary items is
discussed in Section 3.6.1 and Section 3.6.2, respectively.
The MOVE statement alters the contents of every character position in the
receiving item.
3.6.1 Group Moves
If either the sending or receiving item is a group item, the compiler considers the
move to be a group move. It treats both the sending and receiving items as if
they were alphanumeric items.
If the sending item is a group item, and the receiving item is an elementary item,
the compiler ignores the receiving item description except for the size description,
in bytes, and any JUSTIFIED clause. It conducts no conversion or editing on the
sending item’s data.
3.6.2 Elementary Moves
If both items of a MOVE statement are elementary items, their PICTURE
character-strings control their data movement. If the receiving item was
described as numeric or numeric edited, the rules for numeric moves control the
data movement (see Section 2.6). Nonnumeric receiving items are alphanumeric,
alphanumeric edited, or alphabetic.
Table 3–2 shows the valid and invalid nonnumeric elementary moves.
Handling Nonnumeric Data 3–7
Handling Nonnumeric Data
3.6 Using the MOVE Statement
Table 3–2 Nonnumeric Elementary Moves
Receiving Item Category
Sending Item Category
Alphanumeric
Alphabetic
Alphanumeric Edited
ALPHABETIC
Valid
Valid
ALPHANUMERIC
Valid
Valid
ALPHANUMERIC EDITED
Valid
Valid
NUMERIC INTEGER
(DISPLAY ONLY)
Invalid
Valid
NUMERIC EDITED
Invalid
Valid
In all valid moves, the compiler treats the sending item as though it had been
described as PIC X(n). A JUSTIFIED clause in the sending item’s description has
no effect on the move. If the sending item’s PICTURE character-string contains
editing characters, the compiler uses them only to determine the item’s size.
In valid nonnumeric elementary moves, the receiving item controls the movement
of data. All of the following characteristics of the receiving item affect the move:
•
Its size
•
Editing characters in its description
•
The JUSTIFIED RIGHT clause in its description
The JUSTIFIED clause and editing characters are mutually exclusive.
When an item that contains no editing characters or JUSTIFIED clause in its
description is used as the receiving item of a nonnumeric elementary MOVE
statement, the compiler moves the characters starting at the leftmost position in
the item and proceeding, character by character, to the rightmost position. If the
sending item is shorter than the receiving item, the compiler fills the remaining
character positions with spaces. If the sending item is longer than the receiving
item, truncation occurs on the right.
Numeric items used in nonnumeric elementary moves must be integers in
DISPLAY format.
If the description of the numeric data item indicates the presence of an
operational sign (either as a character or an overpunched character), or if
there are P characters in its character-string, the compiler first moves the item to
a temporary location. It removes the sign and fills out any P character positions
with zero digits. It then uses the temporary value as the sending item as if it
had been described as PIC X(n). The temporary value can be shorter than the
original value if a separate sign was removed, or longer than the original value if
P character positions were filled with zeros.
If the sending item is an unsigned numeric class item with no P characters in its
character-string, the MOVE is accomplished directly from the sending item, and
a temporary item is not required.
If the numeric sending item is shorter than the receiving item, the compiler fills
the receiving item with spaces.
3–8 Handling Nonnumeric Data
Handling Nonnumeric Data
3.6 Using the MOVE Statement
3.6.2.1 Edited Moves
This section explains the following insertion editing characters:
B
Blank insertion position
0
Zero insertion position
/
Slash insertion position
When an item with an insertion editing character in its PICTURE characterstring is the receiving item of a nonnumeric elementary MOVE statement, each
receiving character position corresponding to an editing character receives the
insertion byte value. Table 3–3 illustrates the use of such symbols with the
following statement, where FIELD1 is described as PIC X(7):
MOVE FIELD1 TO FIELD2
Table 3–3 Data Movement with Editing Symbols
FIELD2
FIELD1
Character-String
Contents After MOVE
070476
XX/99/XX
07/04/76
04JUL76
99BAAAB99
04sJULs76
2351212
XXXBXXXX/XX/
235s1212/ss/
123456
0XB0XB0XB0X
01s02s03s04
Legend: s = space
Data movement always begins at the left end of the sending item and moves
only to the byte positions described as A, 9, or X in the receiving item PICTURE
character-string. When the sending item is exhausted, the compiler supplies
space characters to fill any remaining character positions (not insertion positions)
in the receiving item. If the receiving item is exhausted before the last character
is moved from the sending item, the compiler ignores the remaining sending item
characters.
Any necessary conversion of data from one form of internal representation to
another takes place during valid elementary moves, along with any editing
specified for, or de-editing implied by, the receiving data item.
3.6.2.2 Justified Moves
A JUSTIFIED RIGHT clause in the receiving item’s data description causes the
compiler to reverse its usual data movement conventions. It starts with the
rightmost characters of both items and proceeds from right to left. If the sending
item is shorter than the receiving item, the compiler fills the remaining leftmost
character positions with spaces. If the sending item is longer than the receiving
item, truncation occurs on the left. Table 3–4 illustrates various PICTURE
character-string situations for the following statement:
MOVE FIELD1 TO FIELD2
Handling Nonnumeric Data 3–9
Handling Nonnumeric Data
3.6 Using the MOVE Statement
Table 3–4 Data Movement with the JUSTIFIED Clause
FIELD2
FIELD1
PICTURE
Character-String
XXX
Contents
ABC
PICTURE
Character-String
(and JUST-Clause)
Contents After
MOVE
XX
AB
XXXXX
ABCss
XX JUST
BC
XXXXX JUST
ssABC
Legend: s = space
3.6.3 Multiple Receiving Items
If you write a MOVE statement containing more than one receiving item, the
compiler moves the same sending item value to each of the receiving items. It
has essentially the same effect as a series of separate MOVE statements, all with
the same sending item.
The receiving items need have no relationship to each other. The compiler
checks the validity of each one independently and performs an independent move
operation on each one.
Multiple receiving items on MOVE statements provide a convenient way to set
many items equal to the same value, such as during initialization code at the
beginning of a section of processing. For example:
MOVE SPACES TO LIST-LINE, EXCEPTION-LINE, NAME-FLD.
MOVE ZEROS TO EOL-FLAG, EXCEPT-FLAG, NAME-FLAG.
MOVE 1 TO COUNT-1, CHAR-PTR, CURSOR.
3.6.4 Subscripted Moves
Any item (other than a data item that is not subordinate to an OCCURS clause)
of a MOVE statement can be subscripted, and the referenced item can be used to
subscript another name in the same statement.
For example, when more than one receiving item is named in the same MOVE
statement, the order in which the compiler evaluates the subscripts affects the
results of the move. Consider the following examples:
MOVE FIELD1(FIELD2) TO FIELD2 FIELD3.
In this example, the compiler evaluates FIELD1(FIELD2) only once, before it
moves any data to the receiving items. It is as if the single MOVE statement
were replaced with the following three statements:
MOVE FIELD1(FIELD2) TO TEMP.
MOVE TEMP TO FIELD2.
MOVE TEMP TO FIELD3.
3–10 Handling Nonnumeric Data
Handling Nonnumeric Data
3.6 Using the MOVE Statement
In the following example, the compiler evaluates FIELD3(FIELD2) immediately
before moving the data into it, but after moving the data from FIELD1 to
FIELD2:
MOVE FIELD1 TO FIELD2 FIELD3(FIELD2).
Thus, it uses the newly stored value of FIELD2 as the subscript value. It is as if
the single MOVE statement were replaced with the following two statements:
MOVE FIELD1 TO FIELD2.
MOVE FIELD1 TO FIELD3(FIELD2).
3.6.5 Common Nonnumeric Item MOVE Statement Errors
The compiler considers any MOVE statement that contains a group item (whether
sending or receiving) to be a group move. If an elementary item contains editing
characters or a numeric integer, these attributes of the receiving item have no
effect on the action of a group move.
3.6.6 Using the MOVE CORRESPONDING Statement for Nonnumeric Items
The MOVE CORRESPONDING statement allows you to move multiple items
from one group item to another group item, using a single MOVE statement.
Refer to the Compaq COBOL Reference Manual for rules concerning the
CORRESPONDING phrase. When you use the CORRESPONDING phrase, the
compiler performs an independent move operation on each pair of corresponding
items from the operands and checks the validity of each. Example 3–2 shows the
use of the MOVE CORRESPONDING statement.
Example 3–2 Sample Record Description Using the MOVE CORRESPONDING
Statement
01 A-GROUP.
02 FIELD1.
03 A PIC
03 B PIC
03 C PIC
03 D PIC
03 E PIC
X.
9.
XX.
99.
XXX.
01 B-GROUP.
02 FIELD1.
03 A PIC X.
03 C PIC XX.
03 E PIC XXX.
MOVE CORRESPONDING
A-GROUP TO B-GROUP.
Equivalent MOVE statements:
MOVE A OF A-GROUP TO A OF B-GROUP.
MOVE C OF A-GROUP TO C OF B-GROUP.
MOVE E OF A-GROUP TO E OF B-GROUP.
Handling Nonnumeric Data 3–11
Handling Nonnumeric Data
3.6 Using the MOVE Statement
3.6.7 Using Reference Modification
You can use reference modification to define a subset of a data item by specifying
its leftmost character position and length. Reference modification is valid
anywhere an alphanumeric identifier is allowed unless specific rules for a general
format prohibit it. The following is an example of reference modification:
WORKING-STORAGE SECTION.
01 ITEMA PIC X(10) VALUE IS "XYZABCDEFG".
.
.
.
MOVE ITEMA(4:3) TO...
IDENTIFIER
VALUE
ITEMA (4:3)
ABC
For more information on reference modification rules, refer to the Compaq
COBOL Reference Manual.
3–12 Handling Nonnumeric Data
4
Handling Tables
A table is one or more repetitions of one element, composed of one or more data
items, stored in contiguous memory locations.
In this chapter you will find:
•
Defining tables (Section 4.1)
•
Initializing values of table elements (Section 4.2)
•
Accessing table elements (Section 4.3)
4.1 Defining Tables
You define a table by using an OCCURS clause following a data description
entry. The literal integer value you specify in the OCCURS clause determines the
number of repetitions, or occurrences, of the data description entry, thus creating
a table. Compaq COBOL allows you to define from 1- to 48-dimension tables.
After you have defined a table, you can load it with data. One way to load a table
is to use the INITIALIZE statement or the VALUE clause to assign values to the
table when you define it (see Figure 4–10).
To access data stored in tables, use subscripted or indexed procedural
instructions. In either case, you can directly access a known table element
occurrence or search for an occurrence based on some known condition.
You can define either fixed-length tables or variable-length tables, and they
may be single or multidimensional. The following sections describe how to
use the OCCURS clause and its options. For more information on tables and
subscripting, refer to the Compaq COBOL Reference Manual.
4.1.1 Defining Fixed-Length, One-Dimensional Tables
To define fixed-length tables, use Format 1 of the OCCURS clause (refer to the
Compaq COBOL Reference Manual). This format is useful when you are storing
large amounts of stable or frequently used reference data. Options allow you to
define single or multiple keys, or indexes, or both.
A definition of a one-dimensional table is shown in Example 4–1. The integer 2
in the OCCURS 2 TIMES clause determines the number of element repetitions.
For the table to have any real meaning, this integer must be equal to or greater
than 2.
Handling Tables 4–1
Handling Tables
4.1 Defining Tables
Example 4–1 One-Dimensional Table
01 TABLE-A.
05 ITEM-B PIC X OCCURS 2 TIMES.
The organization of TABLE-A is shown in Figure 4–1.
Figure 4–1 Organization of the One-Dimensional Table in Example 4–1
Longword number
Byte number
1
1
Level 01
Level 05
2
3
4
A
B
B
Legend: A = TABLE−A
B = ITEM−B
ZK−6039−GE
Example 4–1 specifies only a single data item. However, you can specify as
many data items as you need in the table. Multiple data items are shown in
Example 4–2.
Example 4–2 Multiple Data Items in a One-Dimensional Table
01 TABLE-A.
05 GROUP-B OCCURS 2 TIMES.
10 ITEMC PIC X.
10 ITEMD PIC X.
The organization of this table is shown in Figure 4–2.
4–2 Handling Tables
Handling Tables
4.1 Defining Tables
Figure 4–2 Organization of Multiple Data Items in a One-Dimensional Table
Longword number
Byte number
1
1
2
Level 01
4
A
B
Level 05
Level 10
3
C
Legend: A = TABLE−A
B = GROUP−B
B
D
C
D
C = ITEMC
D = ITEMD
ZK−6040−GE
Example 4–1 and Example 4–2 both do not use the KEY IS or INDEXED BY
optional phrases. The INDEXED BY phrase implicitly defines an index name.
This phrase must be used if any Procedure Division statements contain indexed
references to the data name that contains the OCCURS clause. The KEY IS
phrase means that repeated data is arranged in ascending or descending order
according to the values in the data items that contain the OCCURS clause. (The
KEY IS phrase does not cause the data in the table to be placed in ascending or
descending order; rather, it allows you to state how you have arranged the data.)
For further information about these OCCURS clause options, refer to the Compaq
COBOL Reference Manual.
If you use either the SEARCH or the SEARCH ALL statement, you must specify
at least one index. The SEARCH ALL statement also requires that you specify
at least one key. Specify the search key using the ASCENDING/DESCENDING
KEY IS phrase. (See Section 4.3.8 for information about the SEARCH statement
and Section 4.3.4 for information about indexing.) When you use the INDEXED
BY phrase, the index is internally defined and cannot be defined elsewhere.
Example 4–3 defines a table with an ascending search key and an index.
Example 4–3 Defining a Table with an Index and an Ascending Search Key
01 TABLE-A.
05 ELEMENTB OCCURS 5 TIMES
ASCENDING KEY IS ITEMC
INDEXED BY INDX1.
10 ITEMC PIC X.
10 ITEMD PIC X.
Handling Tables 4–3
Handling Tables
4.1 Defining Tables
The organization of this table is shown in Figure 4–3.
Figure 4–3 Organization of a Table with an Index and an Ascending Search
Key
Longword number
Byte number
1
2
3
0 0 0 0 0 0 0 0 0 1
1 2 3 4 5 6 7 8 9 0
Level 01
Level 05
Level 10
TABLE−A
B
B
B
B
B
C D C D C D C D C D
Legend: B = ELEMENTB
C = ITEMC
D = ITEMD
ZK−6041−GE
4.1.2 Defining Fixed-Length, Multidimensional Tables
Compaq COBOL allows 48 levels of OCCURS nesting. If you want to define a
two-dimensional table, you define another one-dimensional table within each
element of the one-dimensional table. To define a three-dimensional table, you
define another one-dimensional table within each element of the two-dimensional
table, and so on.
A two-dimensional table is shown in Example 4–4.
Example 4–4 Defining a Two-Dimensional Table
01 2D-TABLE-X.
05 LAYER-Y OCCURS 2 TIMES.
10 LAYER-Z OCCURS 2 TIMES.
15 CELLA PIC X.
15 CELLB PIC X.
The organization of this two-dimensional table is shown in Figure 4–4.
Example 4–5 shows a three-dimensional table.
The organization of this three-dimensional table is shown in Figure 4–5.
4–4 Handling Tables
Handling Tables
4.1 Defining Tables
Figure 4–4 Organization of a Two-Dimensional Table
Longword number
Byte number
1
2
1 2 3 4 5 6 7 8
Level 01
2D−TABLE−X
Level 05
LY
LZ
Level 10
Level 15
LY
LZ
LZ
LZ
A B A B A B A B
Legend: LY = LAYER−Y
LZ = LAYER−Z
A = CELLA
B = CELLB
ZK−6042−GE
Example 4–5 Defining a Three-Dimensional Table
01 TABLE-A.
05 LAYER-B OCCURS 2 TIMES.
10 ITEMC PIC X.
10 ITEMD PIC X OCCURS 3 TIMES.
10 ITEME OCCURS 2 TIMES.
15 CELLF PIC X.
15 CELLG PIC X OCCURS 3 TIMES.
Figure 4–5 Organization of a Three-Dimensional Table
1
Longword number
Byte number
2
3
5
6
0 0 0 0 0 0 0 0 0 1 1 1 1 1 1 1 1 1 1 2 2 2 2 2
1 2 3 4 5 6 7 8 9 0 1 2 3 4 5 6 7 8 9 0 1 2 3 4
A
Level 01
B
Level 05
Level 10
4
C D D D
E
B
E
F G G G F G G G
Level 15
Legend: A = TABLE−A
B = LAYER−B
C = ITEMC
D = ITEMD
C D D D
E
E
F G G G F G G G
E = ITEME
F = CELLF
G = CELLG
ZK−6043−GE
4.1.3 Defining Variable-Length Tables
To define a variable-length table, use Format 2 of the OCCURS clause (refer to
the Compaq COBOL Reference Manual). Options allow you to define single or
multiple keys, or indexes, or both.
Example 4–6 illustrates how to define a variable-length table.
Handling Tables 4–5
Handling Tables
4.1 Defining Tables
It uses from two to four occurrences depending on the integer value assigned
to NUM-ELEM. You specify the table’s minimum and maximum size with the
OCCURS (minimum size) TO (maximum size) clause. The minimum size value
must be equal to or greater than zero and the maximum size value must be
greater than the minimum size value. The DEPENDING ON clause is also
required when you use the TO clause.
The data-name of an elementary, unsigned integer data item is specified in the
DEPENDING ON clause. Its value specifies the current number of occurrences.
The data-name in the DEPENDING ON clause must be within the minimum to
maximum range.
Unlike fixed-length tables, you can dynamically alter the number of element
occurrences in variable-length tables.
By generating the variable-length table in Example 4–6, you are, in effect, saying:
‘‘Build a table that can contain at least two occurrences, but no more than four
occurrences, and set its present number of occurrences equal to the value specified
by NUM-ELEM.’’
Example 4–6 Defining a Variable-Length Table
01 NUM-ELEM PIC 9.
.
.
.
01 VAR-LEN-TABLE.
05 TAB-ELEM OCCURS 2 TO 4 TIMES DEPENDING ON NUM-ELEM.
10 A PIC X.
10 B PIC X.
4.1.4 Storage Allocation for Tables
The compiler maps the table elements into memory, following mapping
rules that depend on the use of COMP, COMP-1, COMP-2, POINTER, and
INDEX data items in the table element, the presence or absence of the
SYNCHRONIZED (SYNC) clause with those data items, and the -align flag
(on the Tru64 UNIX operating system) or the /ALIGNMENT qualifier (on the
OpenVMS Alpha operating system).
The Compaq COBOL compiler allocates storage for data items within records
according to the rules of the Major-Minor Equivalence technique. This technique
ensures that identically defined group items have the same structure, even when
their subordinate items are aligned. Therefore, group moves always produce
predictable results. For more information, refer to the description of record
allocation in the Compaq COBOL Reference Manual.
Note
To determine exactly how much space your tables use, specify the -map
flag (on Tru64 UNIX), or the /MAP qualifier (on OpenVMS). This gives
you an offset map of both the Data Division and the Procedure Division.
4–6 Handling Tables
Handling Tables
4.1 Defining Tables
Example 4–7 shows how to describe a sample record in a table.
Example 4–7 Sample Record Description Defining a Table
01 TABLE-A.
03 GROUP-G PIC X(5) OCCURS 5 TIMES.
Figure 4–6 shows how the table defined in Example 4–7 is mapped into
memory.
Figure 4–6 Memory Map for Example 4–7
Longword number
Byte number
1
2
4
5
7
6
0 0 0 0 0 0 0 0 0 1 1 1 1 1 1 1 1 1 1 2 2 2 2 2 2 2
1 2 3 4 5 6 7 8 9 0 1 2 3 4 5 6 7 8 9 0 1 2 3 4 5 6
TABLE−A
Level 01
Level 03
3
GROUP−G
GROUP−G
GROUP−G
GROUP−G
GROUP−G
ZK−6050−GE
Alphanumeric data items require 1 byte of storage per character. Therefore, each
occurrence of GROUP-G occupies 5 bytes. The first byte of the first element is
automatically aligned at the left record boundary and the first 5 bytes occupy all
of word 1 and part of 2. A memory longword is composed of 4 bytes. Succeeding
occurrences of GROUP-G are assigned to the next 5 adjacent bytes so that
TABLE-A is composed of five 5-byte elements for a total of 25 bytes. Each table
element, after the first, is allowed to start in any byte of a word with no regard
for word boundaries.
4.1.4.1 Using the SYNCHRONIZED Clause
By default, the Compaq COBOL compiler tries to allocate a data item at the next
unassigned byte location. However, you can align some data items on a 2-, 4-, or
8-byte boundary by using the SYNCHRONIZED clause. The compiler may then
have to skip one or more bytes before assigning a location to the next data item.
The skipped bytes, called fill bytes, are gaps between one data item and the next.
The SYNCHRONIZED clause explicitly aligns COMP, COMP-1, COMP-2,
POINTER, and INDEX data items on their natural boundaries: one-word COMP
items on 2-byte boundaries, longword items on 4-byte boundaries, and quadword
items on 8-byte boundaries. Thus the use of SYNC can have a significant effect
on the amount of memory required to store tables containing COMP and COMP
SYNC data items.
Note
The examples in this section assume compilation without the -align flag
(on Tru64 UNIX systems) or the /ALIGNMENT qualifier (on OpenVMS
Alpha systems).
Handling Tables 4–7
Handling Tables
4.1 Defining Tables
Example 4–8 Record Description Containing a COMP SYNC Item
01 A-TABLE.
03 GROUP-G OCCURS 4 TIMES.
05 ITEM1 PIC X.
05 ITEM2 PIC S9(5) COMP SYNC.
Figure 4–7 Memory Map for Example 4–8
1
Longword number
Byte number
2
3
4
Level 01
Level 03
Level 05
5
6
7
8
0 0 0 0 0 0 0 0 0 1 1 1 1 1 1 1 1 1 1 2 2 2 2 2 2 2 2 2 2 3 3 3
1 2 3 4 5 6 7 8 9 0 1 2 3 4 5 6 7 8 9 0 1 2 3 4 5 6 7 8 9 0 1 2
A−TABLE
1 f
GROUP−G
GROUP−G
GROUP−G
GROUP−G
f
f
f
f
f
2 2 2 2 1 f
f
2 2 2 2 1 f
f
2 2 2 2 1 f
f
2 2 2 2
Legend: 1 = ITEM1
2 = ITEM2
f = fill byte
ZK−6044−GE
Example 4–8 describes a table containing a COMP SYNC data item. Figure 4–7
illustrates how it is mapped into memory.
Because a 5-digit COMP SYNC item requires one longword (or 4 bytes) of storage,
ITEM2 must start on a longword boundary. This requires the addition of 3
fill bytes after ITEM1, and each GROUP-G occupies 8 bytes. In Example 4–8,
A-TABLE requires 32 bytes to store four elements of 8 bytes each.
If, in the previous example, you define ITEM2 as a COMP data item of the same
size without the SYNC clause, the storage required will be considerably less.
Although ITEM2 will still require one longword of storage, it will be aligned on
a byte boundary. No fill bytes will be needed between ITEM1 and ITEM2, and
A-TABLE will require a total of 20 bytes.
If you now add a 3-byte alphanumeric item (ITEM3) to Example 4–8 and locate it
between ITEM1 and ITEM2 (see Example 4–9), the new item occupies the space
formerly occupied by the 3 fill bytes. This adds 3 data bytes without changing the
table size, as Figure 4–8 illustrates.
Example 4–9 Adding an Item Without Changing the Table Size
01 A-TABLE.
03 GROUP-G OCCURS 4 TIMES.
05 ITEM1 PIC X.
05 ITEM3 PIC XXX.
05 ITEM2 PIC 9(5) COMP SYNC.
4–8 Handling Tables
Handling Tables
4.1 Defining Tables
Figure 4–8 Memory Map for Example 4–9
1
Longword number
2
3
4
5
7
6
8
0 0 0 0 0 0 0 0 0 1 1 1 1 1 1 1 1 1 1 2 2 2 2 2 2 2 2 2 2 3 3 3
1 2 3 4 5 6 7 8 9 0 1 2 3 4 5 6 7 8 9 0 1 2 3 4 5 6 7 8 9 0 1 2
Byte number
A−TABLE
Level 01
GROUP−G
Level 03
Level 05
GROUP−G
GROUP−G
GROUP−G
1 3 3 3 2 2 2 2 1 3 3 3 2 2 2 2 1 3 3 3 2 2 2 2 1 3 3 3 2 2 2 2
Legend: 1 = ITEM1
2 = ITEM2
3 = ITEM3
ZK−6045−GE
Example 4–10 How Adding 3 Bytes Adds 4 Bytes to the Element Length
01 A-TABLE.
03 GROUP-G OCCURS 4 TIMES.
05 ITEM1 PIC X.
05 ITEM2 PIC 9(5) COMP SYNC.
05 ITEM3 PIC XXX.
Figure 4–9 Memory Map for Example 4–10
1
Longword number
2
3
4
5
6
0 0 0 0 0 0 0 0 0 1 1 1 1 1 1 1 1 1 1 2 2 2 2 2
1 2 3 4 5 6 7 8 9 0 1 2 3 4 5 6 7 8 9 0 1 2 3 4
Byte number
Level 01
A−TABLE
GROUP−G
Level 03
Level 05
1 f
f
f
2 2 2 2 3 3 3 f
GROUP−G
1 f
f
f
2 2 2 2 3 3 3 f
...
...
...
...
...
Legend: 1 = ITEM1
2 = ITEM2
3 = ITEM3
f = fill byte
ZK−6046−GE
If, however, you place ITEM3 after ITEM2, the additional 3 bytes add their own
length plus another fill byte. The additional fill byte is added after the third
ITEM3 character to ensure that all occurrences of the table element are mapped
in an identical manner. Now, each element requires 12 bytes, and the complete
table occupies 48 bytes. This is illustrated by Example 4–10 and Figure 4–9.
Note that GROUP-G begins on a 4-byte boundary because of the way Compaq
COBOL allocates memory.
Handling Tables 4–9
Handling Tables
4.2 Initializing Values of Table Elements
4.2 Initializing Values of Table Elements
You can initialize a table that contains only DISPLAY items to any desired value
in either of the following ways:
•
You can specify a VALUE clause in the record level preceding the record
description of the item containing the OCCURS clause.
•
You can specify a VALUE clause in a record subordinate to the OCCURS
clause.
Example 4–11 and Figure 4–10 provide an example and memory map of a table
initialized using the VALUE clause.
Example 4–11 Initializing Tables with the VALUE Clause
01 A-TABLE VALUE IS "JANFEBMARAPRMAYJUNJULAUGSEPOCTNOVDEC".
03 MONTH-GROUP PIC XXX USAGE DISPLAY
OCCURS 12 TIMES.
Figure 4–10 Memory Map for Example 4–11
1
Longword number
2
7
3
0 0 0 0 0 0 0 0 0 1 1 1
1 2 3 4 5 6 7 8 9 0 1 2
Byte number
Level 01
8
9
2 2 2 2 2 3 3 3 3 3 3 3
... 5 6 7 8 9 0 1 2 3 4 5 6
A−TABLE
M
M
M
M
...
J A N F E B M A R A P R ... S E P O C T N O V D E C
M
Level 03
Byte contents
M
M
M
Legend: M = Month−Group
ZK−6047−GE
If each entry in the table has the same value, you can initialize the table as
shown in Example 4–12.
Example 4–12 Initializing a Table with the OCCURS Clause
01 A-TABLE.
03 TABLE-LEG OCCURS 5 TIMES.
05 FIRST-LEG PIC X VALUE "A".
05 SECOND-LEG PIC S9(9) COMP VALUE 5.
In this example, there are five occurrences of each table element. Each element
is initialized to the same value as follows:
•
FIRST-LEG occurs five times; each occurrence is initialized to A.
4–10 Handling Tables
Handling Tables
4.2 Initializing Values of Table Elements
•
SECOND-LEG occurs five times; each occurrence is initialized to 5.
Often a table is too long to initialize using a single literal, or it contains numeric,
alphanumeric, COMP, COMP-1, COMP-2, or COMP SYNC items that cannot be
initialized. In these situations, you can initialize individual items by redefining
the group level that precedes the level containing the OCCURS clause. Consider
the sample table descriptions illustrated in Example 4–13 and Example 4–14.
Each fill byte between ITEM1 and ITEM2 in Example 4–13 is initialized to X.
Figure 4–11 shows how this is mapped into memory.
Example 4–13 Initializing Mixed Usage Items
01 A-RECORD-ALT.
05 FILLER PIC XX VALUE "AX".
05 FILLER PIC S99 COMP VALUE 1.
05 FILLER PIC XX VALUE "BX".
05 FILLER PIC S99 COMP VALUE 2.
.
.
.
01 A-RECORD REDEFINES A-RECORD-ALT.
03 A-GROUP OCCURS 26 TIMES.
05 ITEM1 PIC X.
05 ITEM2 PIC S99 COMP SYNC.
Figure 4–11 Memory Map for Example 4–13
Longword number
Byte number
1
1
2
2
3
Level 01
4
5
6
7
8
A−RECORD
A−GROUP
Level 03
Level 05
1
f
Byte contents
A
X
binary 1
2
A−GROUP
2
1
f
B
X
binary 2
2
2
...
...
...
...
...
Legend: 1 = ITEM1
2 = ITEM2
f = fill byte
ZK−6048−GE
As shown in Example 4–14 and in Figure 4–12, each FILLER item initializes
three 10-byte table elements.
Handling Tables 4–11
Handling Tables
4.2 Initializing Values of Table Elements
Example 4–14 Initializing Alphanumeric Items
01 A-RECORD-ALT.
03 FILLER PIC X(30) VALUE IS
"AAAAAAAAAABBBBBBBBBBCCCCCCCCCC".
03 FILLER PIC X(30) VALUE IS
"DDDDDDDDDDEEEEEEEEEEFFFFFFFFFF".
.
.
.
01 A-RECORD REDEFINES A-RECORD-ALT.
03 ITEM1 PIC X(10) OCCURS 26 TIMES.
Figure 4–12 Memory Map for Example 4–14
1
Longword number
Byte number
2
4
5
6
0 0 0 0 0 0 0 0 0 1 1 1 1 1 1 1 1 1 1 2 2 2 2 2
1 2 3 4 5 6 7 8 9 0 1 2 3 4 5 6 7 8 9 0 1 2 3 4
A−RECORD
Level 01
Level 03
Byte contents at
initialization time
3
ITEM 1
ITEM 1
ITEM 1
A A A A A A A A A A B B B B B B B B B B C C C C
...
...
...
...
...
ZK−6049−GE
When redefining or initializing table elements, allow space for any fill bytes that
may be added due to synchronization. You do not have to initialize fill bytes, but
you can do so. If you initialize fill bytes to an uncommon value, you can use them
as a debugging aid in situations where a Procedure Division statement refers to
the record level preceding the OCCURS clause, or to another record redefining
that level.
You can also initialize tables at run time. To initialize tables at run time, use the
INITIALIZE statement. This statement allows you to initialize all occurrences of
a table element to the same value. For more information about the INITIALIZE
statement, refer to the Compaq COBOL Reference Manual.
Sometimes the length and format of table items are such that they are best
initialized using Procedure Division statements such as a MOVE statement to
send a value to the table.
4.3 Accessing Table Elements
Once tables have been created using the OCCURS clause, the program must have
a method of accessing the individual elements of those tables. Subscripting and
indexing are the two methods Compaq COBOL provides for accessing individual
table elements. To refer to a particular element within a table, follow the name
of that element with a subscript or index enclosed in parentheses. The following
sections describe how to identify and access table elements using subscripts and
indexes.
4.3.1 Subscripting
A subscript can be an integer literal, an arithmetic expression, a data name, or
a subscripted data name that has an integer value. The integer value represents
the desired element of the table. An integer value of 3, for example, refers to the
third element of a table.
4–12 Handling Tables
Handling Tables
4.3 Accessing Table Elements
4.3.2 Subscripting with Literals
A literal subscript is an integer value, enclosed in parentheses, that represents
the desired table element. In Example 4–15, the literal subscript ( 2 ) in the
MOVE instruction moves the contents of the second element of A-TABLE to
I-RECORD.
Example 4–15 Using a Literal Subscript to Access a Table
Table Description:
01 A-TABLE.
03 A-GROUP PIC X(5)
OCCURS 10 TIMES.
Instruction:
MOVE A-GROUP(2) TO I-RECORD.
If the table is multidimensional, follow the data name of the desired data item
with a list of subscripts, one for each OCCURS clause to which the item is
subordinate. The first subscript in the list applies to the first OCCURS clause
to which that item is subordinate. This is the most inclusive level, and is
represented by A-GROUP in Example 4–16. The second subscript applies to the
next most inclusive level and is represented by ITEM3 in the example. Finally,
the third subscript applies to the least inclusive level, represented by ITEM5.
(Note that Compaq COBOL can have 48 subscripts that follow the pattern in
Example 4–15.)
In Example 4–16, the subscripts (2,11,3) in the MOVE statements move the third
occurrence of ITEM5 in the eleventh repetition of ITEM3 in the second repetition
of A-GROUP to I-FIELD5. ITEM5(1,1,1) refers to the first occurrence of ITEM5
in the table, and ITEM5(5,20,4) refers to the last occurrence of ITEM5.
Example 4–16 Subscripting a Multidimensional Table
Table Description:
01 A-TABLE.
03 A-GROUP OCCURS 5 TIMES.
05 ITEM1
PIC X.
05 ITEM2
PIC 99 COMP OCCURS 20 TIMES.
05 ITEM3 OCCURS 20 TIMES.
07 ITEM4
PIC X.
07 ITEM5
PIC XX OCCURS 4 TIMES.
01 I-FIELD5
PIC XX.
Procedural Instruction:
MOVE ITEM5(2, 11, 3) TO I-FIELD5.
Handling Tables 4–13
Handling Tables
4.3 Accessing Table Elements
Note
Because ITEM5 is not subordinate to ITEM2, an occurrence number for
ITEM2 is not permitted in the subscript list (when referencing ITEM3,
ITEM4, or ITEM5). The ninth occurrence of ITEM2 in the fifth occurrence
of A-GROUP will be selected by ITEM2(5,9).
Table 4–1 shows the subscripting rules that apply to Example 4–16.
Table 4–1 Subscripting Rules for a Multidimensional Table
Name of Item
Number of Subscripts
Required to Refer to
the Name Item
Size of Item in Bytes
(Each Occurrence)
A-TABLE
NONE
1105
A-GROUP
ONE
221
ITEM1
ONE
1
ITEM2
TWO
2
ITEM3
TWO
9
ITEM4
TWO
1
ITEM5
THREE
2
4.3.3 Subscripting with Data Names
You can also use data names to specify subscripts. To use a data name as a
subscript, define it with COMP, COMP-1, COMP-2, COMP-3, or DISPLAY usage
and with a numeric integer value. If the data name is signed, the sign must be
positive at the time the data name is used as a subscript.
A data name that is a subscript can also be subscripted; for example, A(B(C)).
Note that for efficiency your subscripts should be S9(5) to S9(9) COMP.
The sample subscripts and data names used in Table 4–2 refer to the table
defined in Example 4–16.
Table 4–2 Subscripting with Data Names
Data Descriptions of Subscript Data Names
Procedural Instructions
01 SUB1 PIC 99 USAGE DISPLAY.
MOVE 2 TO SUB1.
01 SUB2 PIC S9(9) USAGE COMP.
MOVE 11 TO SUB2.
01 SUB3 PIC S99.
MOVE 3 TO SUB3.
MOVE ITEM5(SUB1,SUB2,SUB3) TO
I-FIELD5.
4.3.4 Subscripting with Indexes
The same rules apply for specifying indexes as for subscripts, except that the
index must be named in the INDEXED BY phrase of the OCCURS clause.
4–14 Handling Tables
Handling Tables
4.3 Accessing Table Elements
You cannot access index items as normal data items; that is, you cannot use them,
redefine them, or write them to a file. However, the SET statement can change
their values, and relation tests can examine their values. The index integer you
specify in the SET statement must be in the range of one to the integer value
in the OCCURS clause. The sample MOVE statement shown in Example 4–17
moves the contents of the third element of A-GROUP to I-FIELD.
Example 4–17 Subscripting with Index Name Items
Table Description:
01 A-TABLE.
03 A-GROUP OCCURS 5 TIMES
INDEXED BY IND-NAME.
05 ITEMC PIC X VALUE "C".
05 ITEMD PIC X VALUE "D".
01 I-FIELD
PIC X(5).
Procedural Instructions:
SET IND-NAME TO 3.
MOVE A-GROUP(IND-NAME) TO I-FIELD.
Note
Compaq COBOL initializes the value of all indexes to 1. Initializing
indexes is an extension to the ANSI COBOL standard. Users who write
COBOL programs that must adhere to standard COBOL should not rely
on this feature.
4.3.5 Relative Indexing
To perform relative indexing when referring to a table element, you follow the
index name with a plus or minus sign and an integer literal. Although it is
easy to use, relative indexing generates additional overhead each time a table
element is referenced in this way. The run-time overhead for relative indexing of
variable-length tables is significantly greater than that required for fixed-length
tables. If any of the range checks reveals an out-of-range index value, program
execution terminates, and an error message is issued. You can use the -check
flag (on Tru64 UNIX systems) or the /CHECK qualifier (on OpenVMS systems) to
check the range when you compile the program.
On Tru64 UNIX, see Chapter 1 or the cobol man page for more information about
the -check
flag. ♦
On OpenVMS, invoke the online help facility for Compaq COBOL at the
OpenVMS system prompt for more information about the /CHECK qualifier.
♦
The following sample MOVE statement moves the fourth repetition of A-GROUP
to I-FIELD:
SET IND-NAME TO 1.
MOVE A-GROUP(IND-NAME + 3) TO I-FIELD.
Handling Tables 4–15
Handling Tables
4.3 Accessing Table Elements
4.3.6 Index Data Items
Often a program requires that the value of an index be stored outside of that
item. Compaq COBOL provides the index data item to fulfill this requirement.
Index data items are stored as longword COMP items and must be declared with
a USAGE IS INDEX phrase in the item description. Index data items can be
explicitly modified only with the SET statement.
4.3.7 Assigning Index Values Using the SET Statement
You can use the SET statement to assign values to indexes associated with tables
to reference particular table elements. The following sections discuss the two
relevant SET statement formats. (All six SET statement formats are shown in
the Compaq COBOL Reference Manual.)
4.3.7.1 Assigning an Integer Index Value with a SET Statement
When you use the SET statement, the index is set to the value you specify. The
most straightforward use of the SET statement is to set an index name to an
integer literal value. This example assigns a value of 5 to IND-5:
SET IND-5 TO 5.
You can also set an index name to an integer data item. For example:
SET INDEX-A TO COUNT-1.
More than one index can be set with a single SET statement. For example:
SET TAB1-IND TAB2-IND TO 15.
Table indexes specified in INDEXED BY phrases can be displayed by using the
WITH CONVERSION option with the DISPLAY statement. Also, you can display,
move, and manipulate the value of the table index with an index data item. You
do this by setting an index data item to the present value of an index. You can,
for example, set an index data item and then display its value as shown in the
following example:
SET INDEX-ITEM TO TAB-IND.
.
.
.
DISPLAY INDEX-ITEM WITH CONVERSION.
4.3.7.2 Incrementing an Index Value with the SET Statement
You can use the SET statement with the UP BY/DOWN BY clause to
arithmetically alter the value of a index. A numeric literal is added to (UP
BY) or subtracted from (DOWN BY) a table index. For example:
SET TABLE-INDEX UP BY 12.
SET TABLE-INDEX DOWN BY 5.
4.3.8 Identifying Table Elements Using the SEARCH Statement
The SEARCH statement is used to search a table for an element that satisfies
a known condition. The statement provides for sequential and binary searches,
which are described in the following sections.
4–16 Handling Tables
Handling Tables
4.3 Accessing Table Elements
4.3.8.1 Implementing a Sequential Search
The SEARCH statement allows you to perform a sequential search of a table. The
OCCURS clause of the table description entry must contain the INDEXED BY
phrase. If more than one index is specified in the INDEXED BY phrase, the first
index is the controlling index for the table search unless you specify otherwise in
the SEARCH statement.
The search begins at the current index setting and progresses through the
table, checking each element against the conditional expression. The index is
incremented by 1 as each element is checked. If the conditional expression is
true, the associated imperative statement executes; otherwise, program control
passes to the next procedural sentence. This terminates the search, and the index
points to the current table element that satisfied the conditional expression.
If no table element is found that satisfies the conditional expression, program
control passes to the AT END exit path; otherwise, program control passes to the
next procedural sentence.
You can use the optional VARYING phrase of the SEARCH statement by
specifying any of the following:
•
VARYING index name associated with table search
•
VARYING index data item or integer data item
•
VARYING index name not associated with table search
Regardless of which method you use, the index specified in the INDEXED BY
phrase of the table being searched is incremented. This controlling index, when
compared against the allowable number of occurrences in the table, dictates the
permissible search range. When the search terminates, either successfully or
unsuccessfully, the index remains at its current setting. At this point, you can
reference the data in the table element pointed to by the index, unless the AT
END condition is true. If the AT END condition is true, and if the -check flag
(on Tru64 UNIX systems) or the /CHECK qualifier (on OpenVMS systems) has
been specified, the compiler issues a run-time error message indicating that the
subscript is out of range.
When you vary an index associated with the table being searched, the index
name can be any index you specify in the INDEXED BY phrase. It becomes the
controlling index for the search and is the only index incremented. Example 4–18
and Example 4–20 show how to vary an index other than the first index.
When you vary an index data item or an integer data item, either the index data
item or the integer data item is incremented. The first index name you specify
in the INDEXED BY phrase of the table being searched becomes the controlling
index and is also incremented. The index data item or the integer data item you
vary does not function as an index; it merely allows you to maintain an additional
pointer to elements within a table. Example 4–18 and Example 4–21 show how
to vary an index data item or an integer data item.
When you vary an index associated with a table other than the one you are
searching, the controlling index is the first index you specify in the INDEXED
BY phrase of the table you are searching. Each time the controlling index is
incremented, the index you specify in the VARYING phrase is incremented. In
this manner, you can search two tables in synchronization. Example 4–18 and
Example 4–22 show how to vary an index associated with a table other than the
one you are searching.
Handling Tables 4–17
Handling Tables
4.3 Accessing Table Elements
When you omit the VARYING phrase, the first index you specify in the INDEXED
BY phrase becomes the controlling index. Only this index is incremented during
a serial search. Example 4–18 and Example 4–23 show how to perform a serial
search without using the VARYING phrase.
4.3.8.2 Implementing a Binary Search
You can use the SEARCH statement to perform a nonsequential (binary) table
search.
To perform a binary search, you must specify an index name in the INDEXED BY
phrase and a search key in the KEY IS phrase of the OCCURS clause of the table
being searched.
A binary search depends on the ASCENDING/DESCENDING KEY attributes. If
you specify an ASCENDING KEY, the data in the table must either be stored
in ascending order or sorted in ascending order prior to the search. For a
DESCENDING KEY, data must be stored or sorted in descending order prior
to the search.
On Alpha, you can sort an entire table in preparation for a binary search. Use
the SORT statement (Format 2, a Compaq extension), described in the Compaq
COBOL Reference Manual. ♦
During a binary search, the first (or only) index you specify in the INDEXED
BY phrase of the OCCURS clause of the table being searched is the controlling
index. You do not have to initialize an index in a binary search because index
manipulation is automatic.
In addition to being generally faster than a sequential search, a binary search
allows multiple equality checks.
The following search sequence lists the capabilities of a binary search. At
program execution time, the system:
1. Examines the range of permissible index values, selects the median value,
and assigns this value to the index.
2. Checks for equality in WHEN and AND clauses.
3. Terminates the search if all equality statements are true. If you use the
imperative statement after the final equality clause, that statement executes;
otherwise, program control passes to the next procedural sentence, the search
exits, and the index retains its current value.
4. Takes the following actions if the equality test of a table element is false:
a. Executes the imperative statement associated with the AT END statement
(if present) when all table elements have been tested. If there is no AT
END statement, program control passes to the next procedural statement.
b. Determines which half of the table is to be eliminated from further
consideration. This is based on whether the key being tested was specified
as ASCENDING or DESCENDING and whether the test failed because
of a greater-than or less-than comparison. For example, if the key values
are stored in ascending order, and the median table element being tested
is greater than the value of the argument, then all key elements following
the one being tested must also be greater. Therefore, the upper half of the
table is removed from further consideration and the search continues at
the median point of the lower half.
c. Begins processing all over again at Step 1.
4–18 Handling Tables
Handling Tables
4.3 Accessing Table Elements
A useful variation of the binary search is that of specifying multiple search
keys. Multiple search keys allow you to select a specified table element from
among several elements that have duplicate low-order keys. An example is
a telephone listing where several people have the same last and first names,
but different middle initials. All specified keys must be either ascending or
descending. Example 4–24 shows how to use multiple search keys.
The table in Example 4–18 is followed by several examples (Examples 4–19, 4–20,
4–21, 4–22, and 4–23) of how to search it.
Example 4–18 Sample Table
DATA DIVISION.
WORKING-STORAGE SECTION.
01 TEMP-IND
USAGE IS INDEX.
01 FED-TAX-TABLES.
02 ALLOWANCE-DATA.
03 FILLER
PIC X(70) VALUE
"0101440
"0202880
"0304320
"0405760
"0507200
"0608640
"0710080
"0811520
"0912960
"1014400".
02 ALLOWANCE-TABLE REDEFINES ALLOWANCE-DATA.
03 FED-ALLOWANCES OCCURS 10 TIMES
ASCENDING KEY IS ALLOWANCE-NUMBER
INDEXED BY IND-1.
04 ALLOWANCE-NUMBER
PIC XX.
04 ALLOWANCE
PIC 99999.
-
02 SINGLES-DEDUCTION-DATA.
03 FILLER
PIC X(112) VALUE
"0250006700000016
"0670011500067220
"1150018300163223
"1830024000319621
"2400027900439326
"2790034600540730
"3460099999741736".
02 SINGLE-DEDUCTION-TABLE REDEFINES SINGLES-DEDUCTION-DATA.
03 SINGLES-TABLE OCCURS 7 TIMES
ASCENDING KEY IS S-MIN-RANGE S-MAX-RANGE
INDEXED BY IND-2, TEMP-INDEX.
04 S-MIN-RANGE
PIC 99999.
04 S-MAX-RANGE
PIC 99999.
04 S-TAX
PIC 9999.
04 S-PERCENT
PIC V99.
(continued on next page)
Handling Tables 4–19
Handling Tables
4.3 Accessing Table Elements
Example 4–18 (Cont.) Sample Table
-
02 MARRIED-DEDUCTION-DATA.
03 FILLER
PIC X(119) VALUE
"04800096000000017
"09600173000081620
"17300264000235617
"26400346000390325
"34600433000595328
"43300500000838932
"50000999991053336".
02 MARRIED-DEDUCTION-TABLE REDEFINES MARRIED-DEDUCTION-DATA.
03 MARRIED-TABLE OCCURS 7 TIMES
ASCENDING KEY IS M-MIN-RANGE M-MAX-RANGE
INDEXED BY IND-0, IND-3.
04 M-MIN-RANGE
PIC 99999.
04 M-MAX-RANGE
PIC 99999.
04 M-TAX
PIC 99999.
04 M-PERCENT
PIC V99.
Example 4–19 shows how to perform a serial search.
Example 4–19 A Serial Search
01 TAXABLE-INCOME PIC 9(6) VALUE 50000.
01 FED-TAX-DEDUCTION PIC 9(6).
PROCEDURE DIVISION.
BEGIN.
PERFORM SINGLE.
DISPLAY FED-TAX-DEDUCTION.
STOP RUN.
SINGLE.
IF TAXABLE-INCOME < 02500
GO TO END-FED-COMP.
SET IND-2 TO 1.
SEARCH SINGLES-TABLE AT END
GO TO TABLE-2-ERROR
WHEN TAXABLE-INCOME = S-MIN-RANGE(IND-2)
MOVE S-TAX(IND-2) TO FED-TAX-DEDUCTION
WHEN TAXABLE-INCOME < S-MAX-RANGE(IND-2)
COMPUTE FED-TAX-DEDUCTION =
S-TAX(IND-2) + (TAXABLE-INCOME - S-TAX(IND-2)) *
S-PERCENT(IND-2).
.
.
.
Example 4–20 shows how to use SEARCH while varying an index other than the
first index.
Example 4–21 shows how to use SEARCH while varying an index data item.
4–20 Handling Tables
Handling Tables
4.3 Accessing Table Elements
Example 4–20 Using SEARCH and Varying an Index Other than the First Index
01 TAXABLE-INCOME PIC 9(6) VALUE 50000.
01 FED-TAX-DEDUCTION PIC 9(6).
PROCEDURE DIVISION.
BEGIN.
PERFORM MARRIED.
DISPLAY FED-TAX-DEDUCTION.
STOP RUN.
MARRIED.
IF TAXABLE-INCOME < 04800
MOVE ZEROS TO FED-TAX-DEDUCTION
GO TO END-FED-COMP.
SET IND-3 TO 1.
SEARCH MARRIED-TABLE VARYING IND-3 AT END
GO TO TABLE-3-ERROR
WHEN TAXABLE-INCOME = M-MIN-RANGE(IND-3)
MOVE M-TAX(IND-3) TO FED-TAX-DEDUCTION
WHEN TAXABLE-INCOME < M-MAX-RANGE(IND-3)
COMPUTE FED-TAX-DEDUCTION =
M-TAX(IND-3) + (TAXABLE-INCOME - M-TAX(IND-3)) *
M-PERCENT(IND-3).
.
.
.
Example 4–21 Using SEARCH and Varying an Index Data Item
01 TAXABLE-INCOME PIC 9(6) VALUE 50000.
01 FED-TAX-DEDUCTION PIC 9(6).
PROCEDURE DIVISION.
BEGIN.
PERFORM SINGLE.
DISPLAY FED-TAX-DEDUCTION.
STOP RUN.
SINGLE.
IF TAXABLE-INCOME < 02500
GO TO END-FED-COMP.
SET IND-2 TO 1.
SEARCH SINGLES-TABLE VARYING TEMP-IND AT END
GO TO TABLE-2-ERROR
WHEN TAXABLE-INCOME = S-MIN-RANGE(IND-2)
MOVE S-TAX(IND-2) TO FED-TAX-DEDUCTION
WHEN TAXABLE-INCOME < S-MAX-RANGE(IND-2)
MOVE S-TAX(IND-2) TO FED-TAX-DEDUCTION
SUBTRACT S-MIN-RANGE(IND-2) FROM TAXABLE-INCOME
MULTIPLY TAXABLE-INCOME BY S-PERCENT(IND-2) ROUNDED
ADD TAXABLE-INCOME TO FED-TAX-DEDUCTION.
.
.
.
Example 4–22 shows how to use SEARCH while varying an index not associated
with the target table.
Handling Tables 4–21
Handling Tables
4.3 Accessing Table Elements
Example 4–22 Using SEARCH and Varying an Index not Associated with the
Target Table
01 TAXABLE-INCOME PIC 9(6) VALUE 50000.
01 FED-TAX-DEDUCTION PIC 9(6).
PROCEDURE DIVISION.
BEGIN.
PERFORM SINGLE.
DISPLAY FED-TAX-DEDUCTION.
STOP RUN.
SINGLE.
IF TAXABLE-INCOME < 02500
GO TO END-FED-COMP.
SET IND-2 TO 1.
SEARCH SINGLES-TABLE VARYING IND-0 AT END
GO TO TABLE-2-ERROR
WHEN TAXABLE-INCOME = S-MIN-RANGE(IND-2)
MOVE S-TAX(IND-2) TO FED-TAX-DEDUCTION
WHEN TAXABLE-INCOME < S-MAX-RANGE(IND-2)
MOVE S-TAX(IND-2) TO FED-TAX-DEDUCTION
SUBTRACT S-MIN-RANGE(IND-2) FROM TAXABLE-INCOME
MULTIPLY TAXABLE-INCOME BY S-PERCENT(IND-2) ROUNDED
ADD TAXABLE-INCOME TO FED-TAX-DEDUCTION.
.
.
.
Example 4–23 shows how to perform a serial search without using the VARYING
phrase.
Example 4–23 Doing a Serial Search Without Using the VARYING Phrase
01 NR-DEPENDENTS
PIC 9(2) VALUE 3.
01 GROSS-WAGE
PIC 9(6) VALUE 50000.
01 TAXABLE-INCOME
PIC 9(6) VALUE 50000.
01 FED-TAX-DEDUCTION PIC9(6).
01 MARITAL-STATUS
PIC X
VALUE "M".
PROCEDURE DIVISION.
BEGIN.
PERFORM FED-DEDUCT-COMPUTATION.
DISPLAY TAXABLE-INCOME.
STOP RUN.
FED-DEDUCT-COMPUTATION.
SET IND-1 TO 1.
SEARCH FED-ALLOWANCES AT END
GO TO TABLE-1-ERROR
WHEN ALLOWANCE-NUMBER(IND-1) = NR-DEPENDENTS
SUBTRACT ALLOWANCE(IND-1) FROM GROSS-WAGE
GIVING TAXABLE-INCOME ROUNDED.
IF MARITAL-STATUS = "M"
GO TO MARRIED.
MARRIED.
.
.
.
4–22 Handling Tables
Handling Tables
4.3 Accessing Table Elements
Example 4–24 shows how to perform a multiple-key, binary search.
Example 4–24 A Multiple-Key, Binary Search
IDENTIFICATION DIVISION.
PROGRAM-ID. MULTI-KEY-SEARCH.
DATA DIVISION.
WORKING-STORAGE SECTION.
01 DIRECTORY-TABLE.
05 NAMES-NUMBERS.
10 FILLER
PIC X(30)
VALUE "SMILEY
HAPPY
T.213-4332".
10 FILLER
PIC X(30)
VALUE "SMITH
ALAN
C.881-4987".
10 FILLER
PIC X(30)
VALUE "SMITH
CHARLES J.345-2398".
10 FILLER
PIC X(30)
VALUE "SMITH
FREDERICK 745-0223".
10 FILLER
PIC X(30)
VALUE "SMITH
HARRY
C.573-3306".
10 FILLER
PIC X(30)
VALUE "SMITH
HARRY
J.295-3485".
10 FILLER
PIC X(30)
VALUE "SMITH
LARRY
X.976-5504".
10 FILLER
PIC X(30)
VALUE "SMITHWOOD ALBERT
J.349-9927".
05 PHONE-DIRECTORY-TABLE REDEFINES NAMES-NUMBERS OCCURS 8 TIMES
ASCENDING KEY IS LAST-NAME
FIRST-NAME
MID-INIT
INDEXED BY DIR-INDX.
15 LAST-NAME
PIC X(10).
15 FIRST-NAME
PIC X(10).
15 MID-INIT
PIC XX.
15 PHONE-NUM
PIC X(8).
PROCEDURE DIVISION.
MULTI-KEY-BINARY-SEARCH.
SEARCH ALL PHONE-DIRECTORY-TABLE
WHEN LAST-NAME(DIR-INDX) = "SMITH"
AND FIRST-NAME(DIR-INDX) = "HARRY"
AND MID-INIT(DIR-INDX) = "J."
NEXT SENTENCE.
DISPLAY-RESULTS.
DISPLAY LAST-NAME(DIR-INDX)","
FIRST-NAME(DIR-INDX)
MID-INIT(DIR-INDX) " "
PHONE-NUM(DIR-INDX).
Handling Tables 4–23
5
Using the STRING, UNSTRING, and INSPECT
Statements
The STRING, UNSTRING, and INSPECT statements give your Compaq COBOL
programs the following capabilities:
•
Concatenating data using the STRING statement (Section 5.1)
•
Separating data using the UNSTRING statement (Section 5.2)
•
Examining and replacing characters using the INSPECT statement
(Section 5.3)
5.1 Concatenating Data Using the STRING Statement
The STRING statement concatenates the contents of one or more sending items
into a single receiving item.
The statement has many forms; the simplest is equivalent in function to a
nonnumeric MOVE statement. Consider the following example:
STRING FIELD1 DELIMITED BY SIZE INTO FIELD2.
If the two items are the same size, or if the sending item (FIELD1) is larger, the
statement is equivalent to the following statement:
MOVE FIELD1 TO FIELD2.
If the sending item of the string is shorter than the receiving item, the compiler
does not replace unused positions in the receiving item with spaces. Thus, the
STRING statement can leave some portion of the receiving item unchanged.
The receiving item of the string must be an elementary alphanumeric item with
no JUSTIFIED clause or editing characters in its description. Thus, the data
movement of the STRING statement always fills the receiving item with the
sending item from left to right and with no editing insertions.
5.1.1 Multiple Sending Items
The STRING statement can concatenate a series of sending items into one
receiving item. Consider the following example:
STRING FIELD1A FIELD1B FIELD1C DELIMITED BY SIZE
INTO FIELD2.
In this sample STRING statement, FIELD1A, FIELD1B, and FIELD1C are all
sending items. The compiler moves them to the receiving item (FIELD2) in the
order in which they appear in the statement, from left to right, resulting in the
concatenation of their values.
Using the STRING, UNSTRING, and INSPECT Statements 5–1
Using the STRING, UNSTRING, and INSPECT Statements
5.1 Concatenating Data Using the STRING Statement
If FIELD2 is not large enough to hold all three items, the operation stops when it
is full. If the operation stops while moving one of the sending items, the compiler
ignores the remaining characters of that item and any other sending items not
yet processed. For example, if FIELD2 is filled while it is receiving FIELD1B, the
compiler ignores the rest of FIELD1B and all of FIELD1C.
If the sending items do not fill the receiving item, the operation stops when the
last character of the last sending item (FIELD1C) is moved. It does not alter the
contents nor space-fill the remaining character positions of the receiving item.
The sending items can be nonnumeric literals and figurative constants (except for
ALL literal). Example 5–1 sets up an address label by stringing the data items
CITY, STATE, and ZIP into ADDRESS-LINE. The figurative constant SPACE and
the literal period ( . ) are used to separate the information.
Example 5–1 Using the STRING Statement and Literals
01 ADDRESS-GROUP.
03 CITY
03 STATE
03 ZIP
01 ADDRESS-LINE
.
.
.
PROCEDURE DIVISION.
BEGIN.
STRING CITY SPACE
DELIMITED BY
.
.
.
PIC
PIC
PIC
PIC
X(20).
XX.
X(5).
X(31).
STATE ". " SPACE ZIP
SIZE INTO ADDRESS-LINE.
5.1.2 Using the DELIMITED BY Phrase
Although the sending items of the STRING statement are fixed in size at
compile time, they are frequently filled with spaces. For example, if a 20character city item contains the text MAYNARD followed by 13 spaces, the
STRING statement using the DELIMITED BY SIZE phrase would move the text
(MAYNARD) and the unwanted 13 spaces (assuming the receiving item is at least
20 characters long). The DELIMITED BY phrase, written with a data name or
literal, eliminates this problem.
The delimiter can be a literal, a data item, a figurative constant, or the word
SIZE. It cannot, however, be ALL literal, because ALL literal has an indefinite
length. When the phrase contains the word SIZE, the compiler moves each
sending item in total, until it either exhausts the characters in the sending item
or fills the receiving item.
If you use the code in Example 5–1, and CITY is a 20-character item, the result
of the STRING operation might look like Figure 5–1.
5–2 Using the STRING, UNSTRING, and INSPECT Statements
Using the STRING, UNSTRING, and INSPECT Statements
5.1 Concatenating Data Using the STRING Statement
Figure 5–1 Results of the STRING Operation
AYER
MA. 01432
16 spaces
ZK−6051−GE
A more attractive and readable report can be produced by having the STRING
operation produce this line:
AYER, MA. 01432
To accomplish this, use the figurative constant SPACE as a delimiter on the
sending item:
MOVE 1 TO P.
STRING CITY DELIMITED BY SPACE
INTO ADDRESS-LINE WITH POINTER P.
STRING ", " STATE ". " ZIP
DELIMITED BY SIZE
INTO ADDRESS-LINE WITH POINTER P.
This example makes use of the POINTER phrase (see Section 5.1.3). The first
STRING statement moves data characters until it encounters a space character—
a match of the delimiter SPACE. The second STRING statement supplies the
literal, the 2-character STATE item, another literal, and the 5-character ZIP item.
The delimiter can be varied for each item within a single STRING statement by
repeating the DELIMITED BY phrase after each of the sending item names to
which it applies. Thus, the shorter STRING statement in the following example
has the same effect as the two STRING statements in the preceding example.
(Placing the operands on separate source lines has no effect on the operation of
the statement, but it improves program readability and simplifies debugging.)
STRING CITY DELIMITED BY SPACE
", " STATE ". "
ZIP DELIMITED BY SIZE
INTO ADDRESS-LINE.
The sample STRING statement cannot handle 2-word city names, such as San
Francisco, because the compiler considers the space between the two words
as a match for the delimiter SPACE. A longer delimiter, such as two or three
spaces (nonnumeric literal), can solve this problem. Only when a sequence of
characters matches the delimiter does the movement stop for that data item.
With a 2-character delimiter, the same statement can be rewritten in a simpler
form:
STRING CITY ", " STATE ". " ZIP
DELIMITED BY " " INTO ADDRESS-LINE.
Because only the CITY item contains two consecutive spaces, the delimiter’s
search of the other items will always be unsuccessful, and the effect is the same
as moving the full item (delimiting by SIZE).
Data movement under control of a data name or literal generally executes more
slowly than data movement delimited by SIZE.
Using the STRING, UNSTRING, and INSPECT Statements 5–3
Using the STRING, UNSTRING, and INSPECT Statements
5.1 Concatenating Data Using the STRING Statement
Remember, the remainder of the receiving item is not space-filled, as with a
MOVE statement. If ADDRESS-LINE is to be printed on a mailing label, for
example, the STRING statement should be preceded by the statement:
MOVE SPACES TO ADDRESS-LINE.
This statement guarantees a space-fill to the right of the concatenated result.
Alternatively, the last item concatenated by the STRING statement can be an
item previously set to SPACES. This sending item must either be moved under
control of a delimiter other than SPACE or use the value of POINTER and
reference modification.
5.1.3 Using the POINTER Phrase
Although the STRING statement normally starts scanning at the leftmost
position of the receiving item, the POINTER phrase makes it possible to start
scanning at another point within the item. The scanning, however, continues left
to right. Consider the following example:
MOVE 5 TO P.
STRING FIELD1A FIELD1B DELIMITED BY SIZE
INTO FIELD2 WITH POINTER P.
The value of P determines the starting character position in the receiving item.
In this example, the 5 in P causes the program to move the first character of
FIELD1A into character position 5 of FIELD2 (the leftmost character position of
the receiving item is character position 1), and leave positions 1 to 4 unchanged.
When the STRING operation is complete, P points to one character position
beyond the last character replaced in the receiving item. If FIELD1A and
FIELD1B are both four characters long, P contains a value of 13 (5+4+4) when
the operation is complete (assuming that FIELD2 is at least 13 characters long).
5.1.4 Using the OVERFLOW Phrase
When the SIZE option of the DELIMITED BY phrase controls the STRING
operation, and the pointer value is either known or the POINTER phrase is not
used, you can add the PICTURE sizes of sending items together at program
development time to see if the receiving item is large enough to hold the sending
items. However, if the DELIMITED BY phrase contains a literal or an identifier,
or if the pointer value is not predictable, it can be difficult to tell whether or not
the size of the receiving item will be large enough at run time. If the size of the
receiving item is not large enough, an overflow can occur.
An overflow occurs when the receiving item is full and the program is either
about to move a character from a sending item or is considering a new sending
item. Overflow can also occur if, during the initialization of the statement, the
pointer contains a value that is either less than 1 or greater than the length of
the receiving item. In this case, the program moves no data to the receiving item
and terminates the operation immediately.
The ON OVERFLOW phrase at the end of the STRING statement tests for an
overflow condition:
STRING FIELD1A FIELD1B DELIMITED BY "C"
INTO FIELD2 WITH POINTER PNTR
ON OVERFLOW GO TO 200-STRING-OVERFLOW.
5–4 Using the STRING, UNSTRING, and INSPECT Statements
Using the STRING, UNSTRING, and INSPECT Statements
5.1 Concatenating Data Using the STRING Statement
The ON OVERFLOW phrase cannot distinguish the overflow caused by a bad
initial value in the pointer from the overflow caused by a receiving item that is
too short. Only a separate test preceding the STRING statement can distinguish
between the two.
Additionally, even if an overflow condition does not exist, you can use the NOT
ON OVERFLOW phrase to branch to or execute other sections of code.
Example 5–2 illustrates the overflow condition.
Example 5–2 Sample Overflow Condition
DATA DIVISION.
.
.
.
01 FIELD1 PIC XXX VALUE "ABC".
01 FIELD2 PIC XXXX.
PROCEDURE DIVISION.
.
.
.
1.
STRING FIELD1 QUOTE DELIMITED BY SIZE INTO FIELD2
ON OVERFLOW DISPLAY "overflow at 1".
2.
STRING FIELD1 FIELD1 DELIMITED BY SIZE INTO FIELD2
ON OVERFLOW DISPLAY "overflow at 2".
3.
STRING FIELD1 FIELD1 DELIMITED BY "C" INTO FIELD2
ON OVERFLOW DISPLAY "overflow at 3".
4.
STRING FIELD1 FIELD1 FIELD1 FIELD1
DELIMITED BY "B" INTO FIELD2 ON OVERFLOW DISPLAY "overflow at 4".
5.
STRING FIELD1 FIELD1 "D" DELIMITED BY "C"
INTO FIELD2 ON OVERFLOW DISPLAY "overflow at 5".
6.
MOVE 2 TO P.
MOVE ALL QUOTES TO FIELD2.
STRING FIELD1 "AC" DELIMITED BY "C"
INTO FIELD2 WITH POINTER P ON OVERFLOW DISPLAY "overflow at 6".
The STRING statement numbers in Example 5–2 point to the line number results
shown in Table 5–1.
Table 5–1 Results of Sample Overflow Statements
Value of FIELD2 After the
STRING Operation
Overflow?
1. ABC"
No
2. ABCA
Yes
3. ABAB
No
4. AAAA
No
5. ABAB
Yes
6. "ABA
No
Using the STRING, UNSTRING, and INSPECT Statements 5–5
Using the STRING, UNSTRING, and INSPECT Statements
5.1 Concatenating Data Using the STRING Statement
5.1.5 Common STRING Statement Errors
The following are common errors made when writing STRING statements:
•
Using the word TO instead of INTO
•
Failing to include the DELIMITED BY SIZE phrase
•
Failing to initialize the pointer
•
Initializing the pointer to 0 instead of 1
•
Permitting the pointer to get out of range (negative or larger than the size of
the receiving field)
•
Failing to provide for space-filling of the receiving item when it is desirable
•
Using the pointer as a subscript without fully understanding subscript
evaluation
5.2 Separating Data Using the UNSTRING Statement
The UNSTRING statement disperses the contents of a single sending item into
one or more receiving items.
The statement has many forms; the simplest is equivalent in function to a
nonnumeric MOVE statement. Consider the following example:
UNSTRING FIELD1 INTO FIELD2.
Regardless of the relative sizes of the two items, the sample statement is
equivalent to the following MOVE statement:
MOVE FIELD1 TO FIELD2.
The sending item (FIELD1) can be either ( 1 ) a group item, or ( 2 ) an
alphanumeric or alphanumeric edited elementary item. The receiving item
(FIELD2) can be alphabetic, alphanumeric, or numeric, but it cannot specify any
type of editing.
If the receiving item is numeric, it must be DISPLAY usage. The PICTURE
character-string of a numeric receiving item can contain any of the legal numeric
description characters except P and the editing characters. The UNSTRING
statement moves the sending item to the numeric receiving item as if the sending
item had been described as an unsigned integer. It automatically truncates or
zero-fills as required.
If the receiving item is not numeric, the statement follows the rules for
elementary nonnumeric MOVE statements. It left-justifies the data in the
receiving item, truncating or space-filling as required. If the data description of
the receiving item contains a JUSTIFIED clause, the compiler right-justifies the
data, truncating or space-filling to the left as required.
5.2.1 Multiple Receiving Items
The UNSTRING statement can disperse one sending item into several receiving
items. Consider the following example of the UNSTRING statement written with
multiple receiving items:
UNSTRING FIELD1 INTO FIELD2A FIELD2B FIELD2C.
5–6 Using the STRING, UNSTRING, and INSPECT Statements
Using the STRING, UNSTRING, and INSPECT Statements
5.2 Separating Data Using the UNSTRING Statement
The compiler-generated code performs the UNSTRING operation by scanning
across FIELD1, the sending item, from left to right. When the number of
characters scanned equals the number of characters in the receiving item, the
scanned characters are moved into that item and the next group of characters is
scanned for the next receiving item.
If each of the receiving items in the preceding example (FIELD2A, FIELD2B, and
FIELD2C) is 5 characters long, and FIELD1 is 15 characters long, FIELD1 is
scanned until the number of characters scanned equals the size of FIELD2A ( 5 ).
Those first five characters are moved to FIELD2A, and scanning is resumed at
the sixth character position in FIELD1. Next, FIELD1 is scanned from character
position 6, until the number of scanned characters equals the size of FIELD2B
(five). The sixth through the tenth characters are then moved to FIELD2B,
and the scanner is set to the next (eleventh) character position in FIELD1. For
the last move in this example, characters 11 to 15 of FIELD1 are moved into
FIELD2C.
Each data movement acts as an individual MOVE statement, the sending item
of which is an alphanumeric item equal in size to the receiving item. If the
receiving item is numeric, the move operation converts the data to numeric form.
For example, consider what would happen if the items under discussion had the
data descriptions and were manipulating the values shown in Table 5–2.
Table 5–2 Values Moved into the Receiving Items Based on the Sending Item
Value
FIELD2A
PIC X(5)
FIELD2B
PIC S9(5)
LEADING
SEPARATE
FIELD2C
PIC S999V99
ABCDE1234512345
ABCDE
+12345
3450{
XXXXX0000100123
XXXXX
+00001
1230{
FIELD1
PIC X(15)
VALUE IS:
FIELD2A is an alphanumeric item. Therefore, the statement simply conducts an
elementary nonnumeric move with the first five characters.
FIELD2B, however, has a leading separate sign that is not included in its size.
Thus, the compiler moves only five numeric characters and generates a positive
sign ( + ) in the separate sign position.
FIELD2C has an implied decimal point with two character positions to the right
of it, plus an overpunched sign on the low-order digit. The sending item should
supply five numeric digits. However, because the sending item is alphanumeric,
the compiler treats it as an unsigned integer; it truncates the two high-order
digits and supplies two zero digits for the decimal positions. Furthermore, it
supplies a positive overpunch sign, making the low-order digit a +0 (ASCII { ).
There is no way to have the UNSTRING statement recognize a sign character or
a decimal point in the sending item in a single statement.
If the sending item is shorter than the sum of the sizes of the receiving items,
the compiler ignores the remaining receiving items. If the compiler reaches the
end of the sending item before it reaches the end of one of the receiving items,
it moves the scanned characters into that receiving item. It either left-justifies
and fills the remaining character positions with spaces for alphanumeric data, or
else it decimal point-aligns and zero-fills the remaining character positions for
numeric data.
Using the STRING, UNSTRING, and INSPECT Statements 5–7
Using the STRING, UNSTRING, and INSPECT Statements
5.2 Separating Data Using the UNSTRING Statement
Consider the following statement with reference to the corresponding PICTURE
character-strings and values in Table 5–3:
UNSTRING FIELD1 INTO FIELD2A FIELD2B.
FIELD2A is a 3-character alphanumeric item. It receives the first three
characters of FIELD1 (ABC) in every operation. FIELD2B, however, runs
out of characters every time before filling, as Table 5–3 illustrates.
Table 5–3 Handling a Short Sending Item
FIELD1
PIC X(6)
VALUE IS:
FIELD2B
PICTURE IS:
FIELD2B
Value After UNSTRING Operation
ABCDEF
XXXXX
DEF
S99999
0024F
ABC246
S9V999
600{
S9999 LEADING SEPARATE
+0246
5.2.2 Controlling Moved Data Using the DELIMITED BY Phrase
The size of the data to be moved can be controlled by a delimiter, rather than by
the size of the receiving item. The DELIMITED BY phrase supplies the delimiter
characters.
UNSTRING delimiters can be literals, figurative constants (including ALL
literal), or identifiers (identifiers can even be subscripted data names). This
section describes the use of these three types of delimiters. Subsequent sections
cover multiple delimiters, the COUNT phrase, and the DELIMITER phrase.
Consider the following sample UNSTRING statement with the figurative constant
SPACE as a delimiter:
UNSTRING FIELD1 DELIMITED BY SPACE
INTO FIELD2.
In this example, the compiler scans the sending item (FIELD1), searching
for a space character. If it encounters a space, it moves all of the scanned
(nonspace) characters that precede that space to the receiving item (FIELD2). If
it finds no space character, it moves the entire sending item. When the compiler
has determined the size of the sending item, it moves the contents of that item
following the rules for the MOVE statement, truncating or zero-filling as required.
Table 5–4 shows the results of the following UNSTRING operation that uses a
literal asterisk delimiter:
UNSTRING FIELD1 DELIMITED BY "*"
INTO FIELD2.
5–8 Using the STRING, UNSTRING, and INSPECT Statements
Using the STRING, UNSTRING, and INSPECT Statements
5.2 Separating Data Using the UNSTRING Statement
Table 5–4 Results of Delimiting with an Asterisk
FIELD1
PIC X(6)
VALUE IS:
ABCDEF
FIELD2
PICTURE IS:
FIELD2
Value After
UNSTRING
XXX
ABC
X(7)
ABCDEF
XXX JUSTIFIED
DEF
******
XXX
###
*ABCDE
XXX
###
A*****
XXX JUSTIFIED
##A
246***
S9999
024F
12345*
S9999 TRAILING SEPARATE
2345+
2468**
S999V9 LEADING SEPARATE
+4680
*246**
9999
0000
Legend: # = space
If the delimiter matches the first character in the sending item, the compiler
considers the size of the sending item to be zero. The operation still takes place,
however, and fills the receiving item with spaces (if it is nonnumeric) or zeros (if
it is numeric).
A delimiter can also be applied to an UNSTRING statement that has multiple
receiving items:
UNSTRING FIELD1 DELIMITED BY SPACE
INTO FIELD2A FIELD2B.
The compiler generates code that scans FIELD1 searching for a character that
matches the delimiter. If it finds a match, it moves the scanned characters
to FIELD2A and sets the scanner to the next character position to the right
of the character that matched. The compiler then resumes scanning FIELD1
for a character that matches the delimiter. If it finds a match, it moves all of
the characters between the character that first matched the delimiter and the
character that matched on the second scan, and sets the scanner to the next
character position to the right of the character that matched.
The DELIMITED BY phrase handles additional items in the same manner as it
handled FIELD2B.
Table 5–5 illustrates the results of the following delimited UNSTRING operation
into multiple receiving items:
UNSTRING FIELD1 DELIMITED BY "*"
INTO FIELD2A FIELD2B.
Using the STRING, UNSTRING, and INSPECT Statements 5–9
Using the STRING, UNSTRING, and INSPECT Statements
5.2 Separating Data Using the UNSTRING Statement
Table 5–5 Results of Delimiting Multiple Receiving Items
Values After UNSTRING Operation
FIELD1
PIC X(8)
VALUE IS:
FIELD2A
PIC X(3)
FIELD2B
PIC X(3)
ABC*DEF*
ABC
DEF
ABCDE*FG
ABC
FG#
A*B****
A##
B##
*AB*CD**
###
AB#
**ABCDEF
###
###
A*BCDEFG
A##
BCD
ABC**DEF
ABC
###
A******B
A##
###
Legend: # = space
The previous examples illustrate the limitations of a single-character delimiter.
To overcome these limitations, a delimiter of more than one character or a
delimiter preceded by the word ALL may be used.
Table 5–6 shows the results of the following UNSTRING operation using a
2-character delimiter:
UNSTRING FIELD1 DELIMITED BY "**"
INTO FIELD2A FIELD2B.
Table 5–6 Results of Delimiting with Two Asterisks
Values After UNSTRING Operation
FIELD1
PIC X(8)
VALUE IS:
FIELD2A
PIC XXX
FIELD2B
PIC XXX
JUSTIFIED
ABC**DEF
ABC
DEF
A*B*C*D*
A*B
###
AB***C*D
AB#
C*D
AB**C*D*
AB#
*D*
AB**CD**
AB#
#CD
AB***CD*
AB#
CD*
AB*****CD
AB#
###
Legend: # = space
Unlike the STRING statement, the UNSTRING statement accepts the ALL
literal as a delimiter. When the word ALL precedes the delimiter, the action of
the UNSTRING statement remains essentially the same as with one delimiter
until the scanning operation finds a match. At this point, the compiler scans
farther, looking for additional consecutive strings of characters that also match
5–10 Using the STRING, UNSTRING, and INSPECT Statements
Using the STRING, UNSTRING, and INSPECT Statements
5.2 Separating Data Using the UNSTRING Statement
the delimiter item. It considers the ALL delimiter to be one, two, three, or more
adjacent repetitions of the delimiter item. Table 5–7 shows the results of the
following UNSTRING operation using an ALL delimiter:
UNSTRING FIELD1 DELIMITED BY ALL "*"
INTO FIELD2A FIELD2B.
Table 5–7 Results of Delimiting with ALL Asterisks
Values After UNSTRING Operation
FIELD1
PIC X(8)
VALUE IS:
FIELD2A
PIC XXX
FIELD2B
PIC XXX
JUSTIFIED
ABC*DEF*
ABC
DEF
ABC**DEF
ABC
DEF
A******F
A##
##F
A*F*****
A##
##F
A*CDEFG
A##
EFG
Legend: # = space
Table 5–8 shows the results of the following UNSTRING operation that combines
ALL with a 2-character delimiter:
UNSTRING FIELD1 DELIMITED BY ALL "**"
INTO FIELD2A FIELD2B.
Table 5–8 Results of Delimiting with ALL Double Asterisks
Values After UNSTRING Operation
FIELD1
PIC X(8)
VALUE IS:
PIC XX
PIC XXX
JUSTIFIED
ABC**DEF
ABC
DEF
AB**DE**
AB#
#DE
A***D***
A##
#*D
A*******
A##
##*
Legend: # = space
In addition to unchangeable delimiters, such as literals and figurative constants,
delimiters can be designated by identifiers. Identifiers permit variable delimiting.
Consider the following sample statement:
UNSTRING FIELD1 DELIMITED BY DEL1
INTO FIELD2A FIELD2B.
The data name DEL1 must be alphanumeric; it can be either a group or an
elementary item. If the delimiter contains a subscript, the subscript may vary as
a side effect of the UNSTRING operation.
Using the STRING, UNSTRING, and INSPECT Statements 5–11
Using the STRING, UNSTRING, and INSPECT Statements
5.2 Separating Data Using the UNSTRING Statement
5.2.2.1 Multiple Delimiters
The UNSTRING statement scans a sending item, searching for a match from a
list of delimiters. This list can contain ALL delimiters and delimiters of various
sizes. Delimiters in the list must be connected by the word OR.
The following sample statement unstrings a sending item into three receiving
items. The sending item consists of three strings separated by one of the
following: ( 1 ) any number of spaces, ( 2 ) a comma followed by a single space,
( 3 ) a single comma, ( 4 ) a tab character, or ( 5 ) a carriage-return character. The
comma and space must precede the single comma in the list if the comma and
space are to be recognized.
UNSTRING FIELD1 DELIMITED BY ALL SPACE
OR ", "
OR ","
OR TAB
OR CR
INTO FIELD2A FIELD2B FIELD2C.
Table 5–9 shows the potential of this statement. The tab and carriage-return
characters represent single-character items containing the ASCII horizontal tab
and carriage-return characters.
Table 5–9 Results of Multiple Delimiters
FIELD1
PIC X(12)
FIELD2A
PIC XXX
FIELD2B
PIC 9999
FIELD2C
PIC XXX
A,0,C Return
A##
0000
C##
A Tab 456, E
A##
0456
E##
A39
A##
0003
9##
A Tab Tab B Return
A##
0000
B##
A,,C
A##
0000
C##
ABCD, 4321,Z
ABC
4321
Z##
Legend: # = space
5.2.3 Using the COUNT Phrase
The COUNT phrase keeps track of the size of the sending string and stores the
length in a user-supplied data area.
The length of a delimited sending item can vary from zero to the full length of
the item. Some programs require knowledge of this length. For example, some
data is truncated if it exceeds the size of the receiving item, so the program’s logic
requires this information.
The COUNT phrase follows the receiving item. Consider the following example:
UNSTRING FIELD1 DELIMITED BY ALL "*"
INTO FIELD2A COUNT IN COUNT2A
FIELD2B COUNT IN COUNT2B
FIELD2C.
The compiler generates code that counts the number of characters between the
leftmost position of FIELD1 and the first asterisk in FIELD1 and places the count
into COUNT2A. The delimiter is not included in the count because it is not a part
of the string. The data preceding the first asterisk is then moved into FIELD2A.
5–12 Using the STRING, UNSTRING, and INSPECT Statements
Using the STRING, UNSTRING, and INSPECT Statements
5.2 Separating Data Using the UNSTRING Statement
The compiler then counts the number of characters between the last contiguous
asterisk in the first scan and the next asterisk in the second scan, and places the
count in COUNT2B. The data between the delimiters of the second scan is moved
into FIELD2B.
The third scan begins at the first character after the last contiguous asterisk
in the second scan. Any data between the delimiters of this scan is moved to
FIELD2C.
The COUNT phrase should be used only where it is needed. In this example,
the length of the string moved to FIELD2C is not needed, so no COUNT phrase
follows it.
If the receiving item is shorter than the value placed in the count item, the code
truncates the sending string. If the number of integer positions in a numeric item
is smaller than the value placed into the count item, high-order numeric digits
have been lost. If a delimiter match is found on the first character examined, a
zero is placed in the count item.
The COUNT phrase can be used only in conjunction with the DELIMITED BY
phrase.
5.2.4 Saving UNSTRING Delimiters Using the DELIMITER Phrase
The DELIMITER phrase causes the actual character or characters that delimited
the sending item to be stored in a user-supplied data area. This phrase is most
useful when:
•
The UNSTRING statement contains a delimiter list.
•
Any one of the delimiters in the list might have delimited the item.
•
Program logic flow depends on the delimiter match found.
By using the DELIMITER and COUNT phrases, you can make the flow of
program logic dependent on both the size of the sending string and the delimiter
terminating the string.
To use the DELIMITER phrase, follow the receiving item name with the words
DELIMITER IN and an identifier. The compiler generates code that places the
delimiter character in the area named by the identifier. Consider the following
sample UNSTRING statement:
UNSTRING FIELD1 DELIMITED BY ","
OR TAB
OR ALL SPACE
OR CR
INTO FIELD2A DELIMITER IN DELIMA
FIELD2B DELIMITER IN DELIMB
FIELD2C.
After moving the first sending string to FIELD2A, the character (or characters)
that delimited that string is placed in DELIMA. In this example, DELIMA
contains either a comma, a tab, a carriage return, or any number of spaces.
Because the delimiter string is moved under the rules of the elementary
nonnumeric MOVE statement, the compiler truncates or space-fills with left
or right justification.
The second sending string is then moved to FIELD2B and its delimiting character
is placed into DELIMB.
Using the STRING, UNSTRING, and INSPECT Statements 5–13
Using the STRING, UNSTRING, and INSPECT Statements
5.2 Separating Data Using the UNSTRING Statement
When a sending string is delimited by the end of the sending item rather than by
a match on a delimiter, the delimiter string is of zero length and the DELIMITER
item is space-filled. The phrase should be used only where needed. In this
example, the character that delimits the last sending string is not needed, so no
DELIMITER phrase follows FIELD2C.
The data item named in the DELIMITER phrase must be described as an
alphanumeric item. It can contain editing characters, and it can also be a group
item.
When you use both DELIMITER and COUNT phrases, the DELIMITER phrase
must precede the COUNT phrase. Both of the data items named in these phrases
can be subscripted or indexed. If they are subscripted, the subscript can be varied
as a side effect of the UNSTRING operation.
5.2.5 Controlling UNSTRING Scanning Using the POINTER Phrase
Although the UNSTRING statement scan usually starts at the leftmost position
of the sending item, the POINTER phrase lets you control the character position
where the scan starts. Scanning, however, remains left to right.
When a sending item is to be unstrung into multiple receiving items, the choice
of delimiters and the size of subsequent receiving items depends on the size
of the first sending string and the character that delimited that string. Thus,
the program needs to move the first sending item, hold its scanning position in
the sending item, and examine the results of the operation to determine how to
handle the sending items that follow.
This is done by using an UNSTRING statement with a POINTER phrase that
fills only the first receiving item. When the first string has been moved to a
receiving item, the compiler begins the next scanning operation one character
beyond the delimiter that caused the interruption. The program examines the
new position, the receiving item, the delimiter value, and the sending string size.
It resumes the scanning operation by executing another UNSTRING statement
with the same sending item and pointer data item. In this way, the UNSTRING
statement moves one sending string at a time, with the form of each succeeding
move depending on the context of the preceding string of data.
The POINTER phrase must follow the last receiving item in the UNSTRING
statement. You are responsible for initializing the pointer before the UNSTRING
statement executes. Consider the following two UNSTRING statements with
their accompanying POINTER phrases and tests:
MOVE 1 TO PNTR.
UNSTRING FIELD1 DELIMITED BY ":"
OR TAB
OR CR
OR ALL SPACE
INTO FIELD2A DELIMITER IN DELIMA COUNT IN LSIZEA
WITH POINTER PNTR.
IF LSIZEA = 0 GO TO NO-LABEL-PROCESS.
IF DELIMA = ":"
IF PNTR > 8 GO TO BIG-LABEL-PROCESS
ELSE GO TO LABEL-PROCESS.
IF DELIMA = TAB GO TO BAD-LABEL PROCESS.
.
.
.
UNSTRING FIELD1 DELIMITED BY ... WITH POINTER PNTR.
5–14 Using the STRING, UNSTRING, and INSPECT Statements
Using the STRING, UNSTRING, and INSPECT Statements
5.2 Separating Data Using the UNSTRING Statement
PNTR contains the current position of the scanner in the sending item. The
second UNSTRING statement uses PNTR to begin scanning the additional
sending strings in FIELD1.
Because the compiler considers the leftmost character to be character position
1, the value of PNTR can be used to examine the next character. To do this,
describe the sending item as a table of characters and use PNTR as a sending
item subscript. This is shown in the following example:
01 FIELD1.
02 FIELD1-CHAR OCCURS 40 TIMES.
.
.
.
UNSTRING FIELD1
.
.
.
WITH POINTER PNTR.
IF FIELD1-CHAR(PNTR) = "X" ...
Another way to examine the next character of the sending item is to use the
UNSTRING statement to move the character to a 1-character receiving item:
UNSTRING FIELD1
.
.
.
WITH POINTER PNTR.
UNSTRING FIELD1 INTO CHAR1 WITH POINTER PNTR.
SUBTRACT 1 FROM PNTR.
IF CHAR1 = "X" ...
The program must decrement PNTR by 1 to work, because the second
UNSTRING statement increments the pointer by 1.
The program must initialize the POINTER phrase data item before the
UNSTRING statement uses it. The compiler will terminate the UNSTRING
operation if the initial value of the pointer is less than one or greater than the
length of the sending item. Such a pointer value causes an overflow condition.
Overflow conditions are discussed in Section 5.2.7.
5.2.6 Counting UNSTRING Receiving Items Using the TALLYING Phrase
The TALLYING phrase counts the number of receiving items that received data
from the sending item.
When an UNSTRING statement contains several receiving items, there are not
always as many sending strings as there are receiving items. The TALLYING
phrase provides a convenient method for keeping a count of how many receiving
items actually received strings. The following example shows how to use the
TALLYING phrase:
MOVE 0 TO RCOUNT.
UNSTRING FIELD1 DELIMITED BY ","
OR ALL SPACE
INTO FIELD2A
FIELD2B
FIELD2C
FIELD2D
FIELD2E
TALLYING IN RCOUNT.
Using the STRING, UNSTRING, and INSPECT Statements 5–15
Using the STRING, UNSTRING, and INSPECT Statements
5.2 Separating Data Using the UNSTRING Statement
If the compiler has moved only three sending strings when it reaches the end
of FIELD1, it adds 3 to RCOUNT. The first three receiving items (FIELD2A,
FIELD2B, and FIELD2C) contain data from the UNSTRING operation, but the
last two (FIELD2D and FIELD2E) do not.
The UNSTRING statement does not initialize the TALLYING data item. The
TALLYING data item always contains the sum of its initial contents plus the
number of receiving items receiving data. Thus, you might want to initialize the
tally count before each use.
You can use the POINTER and TALLYING phrases together in the same
UNSTRING statement, but the POINTER phrase must precede the TALLYING
phrase. Both phrases must follow all of the item names, the DELIMITER phrase,
and the COUNT phrase. The data items for both phrases must contain numeric
integers without editing characters or the symbol P in their PICTURE characterstrings; both data items can be either COMP or DISPLAY usage. They can be
signed or unsigned and, if they are DISPLAY usage, they can contain any desired
sign option.
5.2.7 Exiting an UNSTRING Statement Using the OVERFLOW Phrase
The OVERFLOW phrase detects the overflow condition and causes an imperative
statement to be executed when it detects the condition. An overflow condition
exists when:
•
The UNSTRING statement is about to execute and its pointer data item
contains a value less than one or greater than the size of the sending item.
The compiler generates code that executes the OVERFLOW phrase before it
moves any data, and the values of all the receiving items remain unchanged.
•
Data still remains in the sending item after the UNSTRING statement has
filled all the receiving items. The compiler executes the OVERFLOW phrase
after it has executed the UNSTRING statement. The value of each receiving
item is updated, but some data is still unmoved.
If the UNSTRING operation causes the scan to move past the rightmost position
of the sending item (thus exhausting it), the compiler does not execute the
OVERFLOW phrase.
The following set of instructions causes program control to execute the
UNSTRING statement repeatedly until it exhausts the sending item. The
TALLYING data item is a subscript that indexes the receiving item. Compare
this loop with the previous loop, which accomplishes the same thing:
MOVE 1 TO TLY PNTR.
PAR1. UNSTRING FIELD1 DELIMITED BY ","
OR CR
INTO FIELD2(TLY) WITH POINTER PNTR
TALLYING IN TLY
ON OVERFLOW GO TO PAR1.
5.2.8 Common UNSTRING Statement Errors
The most common errors made when writing UNSTRING statements are as
follows:
•
Leaving the OR connector out of a delimiter list
•
Misspelling or interchanging the words DELIMITED and DELIMITER
•
Writing the DELIMITER and COUNT phrases in the wrong order when both
are present (DELIMITER must precede COUNT)
5–16 Using the STRING, UNSTRING, and INSPECT Statements
Using the STRING, UNSTRING, and INSPECT Statements
5.2 Separating Data Using the UNSTRING Statement
•
Omitting the word INTO (or writing it as TO) before the receiving item list
•
Repeating the word INTO in the receiving item list as shown in this example:
UNSTRING FIELD1 DELIMITED BY SPACE
OR TAB
INTO FIELD2A DELIMITER IN DELIMA
INTO FIELD2B DELIMITER IN DELIMB
INTO FIELD2C DELIMITER IN DELIMC.
•
Writing the POINTER and TALLYING phrases in the wrong order (POINTER
must precede TALLYING)
•
Failing to understand the rules concerning subscript evaluation
5.3 Examining and Replacing Characters Using the INSPECT
Statement
The INSPECT statement examines the character positions in an item and counts
or replaces certain characters (or groups of characters) in that item.
Like the STRING and UNSTRING operations, INSPECT operations scan across
the item from left to right. Included in the INSPECT statement is an optional
phrase that allows scanning to begin or terminate upon detection of a delimiter
match. This feature allows scanning to begin within the item, as well as at the
leftmost position.
5.3.1 Using the TALLYING and REPLACING Options of the INSPECT Statement
The TALLYING operation, which counts certain characters in the item, and the
REPLACING operation, which replaces certain characters in the item, can be
applied either to the characters in the delimited area of the item being inspected,
or to only those characters that match a given character string or strings under
stated conditions. Consider the following sample statements, both of which cause
a scan of the complete item:
INSPECT FIELD1 TALLYING TLY FOR ALL "B".
INSPECT FIELD1 REPLACING ALL SPACE BY ZERO.
The first statement causes the compiler to scan FIELD1 looking for the character
B. Each time a B is found, TLY is incremented by 1.
The second statement causes the compiler to scan FIELD1 looking for spaces.
Each space found is replaced with a zero.
The TALLYING and REPLACING phrases support both single and multiple
arguments. For example, both of the following statements are valid:
INSPECT FIELD1 TALLYING TLY FOR ALL "A" "B" "C".
INSPECT FIELD1 REPLACING ALL "A" "B" "C" BY "D".
You can use both the TALLYING and REPLACING phrases in the same
INSPECT statement. However, when used together, the TALLYING phrase
must precede the REPLACING phrase. An INSPECT statement with both
phrases is equivalent to two separate INSPECT statements. In fact, the compiler
compiles such a statement into two distinct INSPECT statements. To simplify
debugging, write the two phrases in separate INSPECT statements.
Using the STRING, UNSTRING, and INSPECT Statements 5–17
Using the STRING, UNSTRING, and INSPECT Statements
5.3 Examining and Replacing Characters Using the INSPECT Statement
5.3.2 Restricting Data Inspection Using the BEFORE/AFTER Phrase
The BEFORE/AFTER phrase acts as a delimiter and can restrict the area of the
item being inspected.
The following sample statement counts only the zeros that precede the percent
sign ( % ) in FIELD1:
INSPECT FIELD1 TALLYING TLY
FOR ALL ZEROS BEFORE "%".
The delimiter (the percent sign in the preceding sample statement) can be a
single character, a string of characters, or any figurative constant. Furthermore,
it can be either an identifier or a literal.
•
If the delimiter is an identifier, it must be an elementary data item of
DISPLAY usage. It can be alphabetic, alphanumeric, or numeric, and it can
contain editing characters. The compiler always treats the item as if it had
been described as an alphanumeric string. It does this by implicit redefinition
of the item, as described in Section 5.3.3.
•
If the delimiter is a literal, it must be nonnumeric.
The compiler repeatedly compares the delimiter characters against an equal
number of characters in the item being inspected. If none of the characters
matches the delimiter, or if too few characters remain in the rightmost position
of the item for a full comparison, the compiler considers the comparison to be
unequal.
The examples of the INSPECT statement in Figure 5–2 illustrate the way the
delimiter character finds a match in the item being inspected. The underlined
characters indicate the portion of the item the statement inspects as a result of
the delimiters of the BEFORE and AFTER phrases. The remaining portion of the
item is ignored by the INSPECT statement.
The ellipses represent the position of the TALLYING or REPLACING phrase.
The compiler generates code that scans the item for a delimiter match before it
scans for the inspection operation (TALLYING or REPLACING), thus establishing
the limits of the operation before beginning the actual inspection. Section 5.3.4.1
further describes the separate scan.
5.3.3 Implicit Redefinition
The compiler requires that certain items referred to by the INSPECT statement
be alphanumeric items. If one of these items is described as another data class,
the compiler implicitly redefines that item so the INSPECT statement can handle
it as an alphanumeric string as follows:
•
If the item is alphabetic, alphanumeric edited, or unsigned numeric, the
item is redefined as alphanumeric. This is a compile-time operation; no data
movement occurs at run time.
•
If the item is signed numeric, the compiler generates code that first removes
the sign and then redefines the item as alphanumeric. If the sign is a
separate character, that character is ignored, essentially shortening the item,
and that character does not participate in the implicit redefinition. If the sign
is an overpunch on the leading or trailing digit, the sign value is removed and
the character is left with only the numeric value that was stored in it.
5–18 Using the STRING, UNSTRING, and INSPECT Statements
Using the STRING, UNSTRING, and INSPECT Statements
5.3 Examining and Replacing Characters Using the INSPECT Statement
Figure 5–2 Matching Delimiter Characters to Characters in a Field
Instruction
FIELD1 Value
INSPECT FIELD1...BEFORE "E".
INSPECT FIELD1...AFTER "E".
ABCDEFGHI
ABCDEFGHI
INSPECT FIELD1...BEFORE "K".
INSPECT FIELD1...AFTER "K".
ABCDEFGHI
ABCDEFGHI
INSPECT FIELD1...BEFORE "AB".
INSPECT FIELD1...AFTER "AB".
ABCDEFGHI
ABCDEFGHI
INSPECT FIELD1...BEFORE "HI".
INSPECT FIELD1...AFTER "HI".
ABCDEFGHI
ABCDEFGHI
INSPECT FIELD1...BEFORE "I".
INSPECT FIELD1...AFTER "I".
ABCDEFGHI
ABCDEFGHI
ZK−1426A−GE
The compiler alters the digit position containing the sign before beginning the
INSPECT operation and restores it to its former value after the operation. If
the sign’s digit position does not contain a valid ASCII signed numeric digit,
redefinition causes the value to change.
Table 5–10 shows these original, altered, and restored values.
The compiler never moves an implicitly redefined item from its storage position.
All redefinition occurs in place.
The position of an implied decimal point on numeric quantities does not affect
implicit redefinition.
Using the STRING, UNSTRING, and INSPECT Statements 5–19
Using the STRING, UNSTRING, and INSPECT Statements
5.3 Examining and Replacing Characters Using the INSPECT Statement
Table 5–10 Values Resulting from Implicit Redefinition
Original
Value
Altered
Value
Restored Value
} (173)
0 (60)
} (173)
A (101)
1 (61)
A (101)
B (102)
2 (62)
B (102)
C (103)
3 (63)
C (103)
D (104)
4 (64)
D (104)
E (105)
5 (65)
E (105)
F (106)
6 (66)
F (106)
G (107)
7 (67)
G (107)
H (110)
8 (70)
H (110)
I (111)
9 (71)
I (111)
{ (175)
0 (60)
{ (175)
J (112)
1 (61)
J (112)
K (113)
2 (62)
K (113)
L (114)
3 (63)
L (114)
M (115)
4 (64)
M (115)
N (116)
5 (65)
N (116)
O (117)
6 (66)
O (117)
P (120)
7 (67)
P (120)
Q (121)
8 (70)
Q (121)
R (122)
9 (71)
R (122)
0 (60)
0 (60)
} (173)
1 (61)
1 (61)
A (101)
2 (62)
2 (62)
B (102)
3 (63)
3 (63)
C (103)
4 (64)
4 (64)
D (104)
(continued on next page)
5–20 Using the STRING, UNSTRING, and INSPECT Statements
Using the STRING, UNSTRING, and INSPECT Statements
5.3 Examining and Replacing Characters Using the INSPECT Statement
Table 5–10 (Cont.) Values Resulting from Implicit Redefinition
Original
Value
Altered
Value
Restored Value
5 (65)
5 (65)
E (105)
6 (66)
6 (66)
F (106)
7 (67)
7 (67)
G (107)
8 (70)
8 (70)
H (110)
9 (71)
9 (71)
I (111)
All other
values
0 (60)
} (173)
5.3.4 Examining the INSPECT Operation
Regardless of the type of inspection (TALLYING or REPLACING), the INSPECT
statement has only one method for inspecting the characters in the item. This
section analyzes the INSPECT statement and describes this inspection method.
Figure 5–3 shows an example of the INSPECT statement. The item to be
inspected must be named (FIELD1 in our example), and the item name must be
followed by a TALLYING phrase (TALLYING TLY). The TALLY phrase must be
followed by one or more identifiers or literals ( B ). These identifiers or literals
comprise the arguments. More than one argument makes up the argument list.
Figure 5–3 Sample INSPECT Statement
INSPECT FIELD1 TALLYING TLY FOR ALL "B" BEFORE "A"
Item being
inspected
Operation
phrase
Argument
Delimiter
phrase
ZK−6052−GE
Each argument in an argument list can have other items associated with it.
Thus, each argument that is used in a TALLYING operation must have a tally
counter (such as TLY in the example) associated with it. The tally counter is
incremented each time it matches the argument with a character or group of
characters in the item being inspected.
Each argument in an argument list used in a REPLACING operation must have
a replacement item associated with it. The compiler generates code that uses the
replacement item to replace each string of characters in the item that matches
the argument. Figure 5–4 shows a typical REPLACING phrase (with $ as the
replacement item).
Using the STRING, UNSTRING, and INSPECT Statements 5–21
Using the STRING, UNSTRING, and INSPECT Statements
5.3 Examining and Replacing Characters Using the INSPECT Statement
Figure 5–4 Typical REPLACING Phrase
INSPECT FIELD1 REPLACING ALL "0" BY "$"
Replacing argument
ZK−6053−GE
Each argument in an argument list used with either a TALLYING or
REPLACING operation can have a delimiter item (BEFORE/AFTER phrase)
associated with it. If the delimiter item is not present, the argument is applied to
the entire item. If the delimiter item is present, the argument is applied only to
that portion of the item specified by the BEFORE/AFTER phrase.
5.3.4.1 Setting the Scanner
The INSPECT operation begins by setting the scanner to the leftmost character
position of the item being inspected. It remains on this character until an
argument has been matched with a character (or characters) or until all
arguments have failed to find a match at that position.
5.3.4.2 Active/Inactive Arguments
When an argument has a BEFORE/AFTER phrase associated with it, that
argument has a delimiter and may not be eligible to participate in a comparison
at every position of the scanner. Thus, each argument in the argument list has
an active/inactive status at any given setting of the scanner.
For example, an argument that has an AFTER phrase associated with it starts
the INSPECT operation in an inactive state. The delimiter of the AFTER phrase
must find a match before the argument can participate in the comparison.
When the delimiter finds a match, the compiler generates code that retains the
character position beyond the matched character string; then, when the scanner
reaches or passes this position, the argument becomes active. This is shown in
the following example:
INSPECT FIELD1 TALLYING TLY
FOR ALL "B" AFTER "X".
If FIELD1 has a value of ABABXZBA, the argument B remains inactive until the
scanner finds a match for delimiter X. Thus, argument B remains inactive while
the compiler generates code that scans character positions 1 to 5. At character
position 5, delimiter X finds a match, and because the character position beyond
the matched delimiter character is the point at which the argument becomes
active, argument B is compared for the first time at character position 6. It finds
a successful match at character position 7, causing TLY to be incremented by 1.
Table 5–11 shows an INSPECT...TALLYING statement that is scanning FIELD1,
tallying in TLY, and looking for the arguments and delimiters listed in the left
column. Assume that TLY is initialized to 0.
5–22 Using the STRING, UNSTRING, and INSPECT Statements
Using the STRING, UNSTRING, and INSPECT Statements
5.3 Examining and Replacing Characters Using the INSPECT Statement
Table 5–11 Relationship Among INSPECT Argument, Delimiter, Item Value, and
Argument Active Position
Argument and
Delimiter
FIELD1
Value
Argument
Active at
Position
Contents of
TLY After Scan
ALL
BXBXXXXBB
6
2
‘‘B’’ AFTER ‘‘XX’’
XXXXXXXX
3
0
BXBXBBBBXX
never
0
BXBXXBXXB
6
2
XXXXXXXX
3
6
BBBBBBXX
never
0
BXYBXBXX
7
0
XBXBXBXB
3
3
BBBBBBXB
never
0
XXXXBXXXX
6
0
XXXXBBXXX
6
1
XXBXXXXBX
4
1
‘‘X’’ AFTER ‘‘XX’’
‘‘B’’ AFTER ‘‘XB’’
‘‘BX’’ AFTER ‘‘XB’’
When an argument has an associated BEFORE delimiter, the inactive/active
states reverse roles: the argument is in an active state when the scanning
begins and becomes inactive at the character position that matches the delimiter.
Regardless of the presence of the BEFORE delimiter, an argument becomes
inactive when the scanner approaches the rightmost position of the item and the
remaining characters are fewer in number than the characters in the argument.
In such a case, the argument cannot possibly find a match in the item, so it
becomes inactive.
Because the BEFORE/AFTER delimiters are found on a separate scan of the item,
the compiler generates code that recognizes and sets up the delimiter boundaries
before it scans for an argument match; therefore, the same characters can be used
as arguments and delimiters in the same phrase.
5.3.4.3 Finding an Argument Match
The compiler generates code that selects arguments from the argument list
in the order in which they appear in the list. If the first one it selects is an
active argument, and the conditions stated in the INSPECT statement allow a
comparison, the compiler generates code that compares it to the character at the
scanner’s position. If the active argument does not find a match, the compiler
generates code that takes the next active argument from the list and compares
that to the same character. If none of the active arguments finds a match, the
scanner moves one position to the right and begins the inspection operation again
with the first active argument in the list. The inspection operation terminates at
the rightmost position of the item.
Using the STRING, UNSTRING, and INSPECT Statements 5–23
Using the STRING, UNSTRING, and INSPECT Statements
5.3 Examining and Replacing Characters Using the INSPECT Statement
When an active argument finds a match, the compiler ignores any remaining
arguments in the list and conducts the TALLYING or REPLACING operation
on the character. The scanner moves to a new position and the next inspection
operation begins with the first argument in the list. The INSPECT statement can
contain additional conditions, which are described later in this section; without
them, however, the argument match is allowed to take place, and inspection
continues following the match.
The compiler updates the scanner by adding the size of the matching argument to
it. This moves the scanner to the next character beyond the string of characters
that matched the argument. Thus, once an active argument matches a string of
characters, the statement does not inspect those character positions again unless
program control executes the entire statement again.
5.3.5 The TALLYING Phrase
An INSPECT statement that contains a TALLYING phrase counts the
occurrences of various character strings under certain stated conditions. It
keeps the count in a user-designated item called a tally counter.
5.3.5.1 The Tally Counter
The identifier following the word TALLYING designates the tally counter. The
identifier can be subscripted or indexed. The data item must be a numeric integer
without any editing or P characters; it can be COMP or DISPLAY usage, and it
can be signed (separate or overpunched).
Each time the tally argument matches the delimited string being inspected, the
compiler adds 1 to the tally counter.
You can initialize the tally counter to any numeric value. The INSPECT
statement does not initialize it.
5.3.5.2 The Tally Argument
The tally argument specifies a character-string (or strings) and a condition under
which that string should be compared to the delimited string being inspected.
The CHARACTERS form of the tally argument specifies that every character in
the delimited string being inspected should be considered to match an imaginary
character that serves as the tally argument. This increments the tally counter by
a value that equals the size of the delimited string. For example, the following
statement causes TLY to be incremented by the number of characters that
precede the first comma, regardless of what those characters are:
INSPECT FIELD1 TALLYING TLY FOR
CHARACTERS BEFORE ",".
The ALL and LEADING forms of the tally argument specify a particular
character-string (or strings), which can be represented by either a literal or
an identifier. The tally argument character-string can be any length; however,
each character of the argument must match a character in the delimited string
before the compiler considers the argument matched.
•
A literal character-string must be either nonnumeric or a figurative constant
(other than ALL literal). A figurative constant, such as SPACE or ZERO,
represents a single character and can be written as " " or 0 with the same
effect.
5–24 Using the STRING, UNSTRING, and INSPECT Statements
Using the STRING, UNSTRING, and INSPECT Statements
5.3 Examining and Replacing Characters Using the INSPECT Statement
•
An identifier must be an elementary item of DISPLAY usage. It can be any
data class. However, if it is not alphanumeric, the compiler performs an
implicit redefinition of the item. This redefinition is identical to the
BEFORE/AFTER delimiter redefinition discussed in Section 5.3.2.
The words ALL and LEADING supply conditions that further delimit the
inspection operation:
•
ALL specifies that every match that the search argument finds in the
delimited character string be counted in the tally counter. When a literal
follows the word ALL, it does not have the same meaning as the figurative
constant, ALL literal. The ALL literal meaning of ALL ‘‘,’’ is a string of
consecutive commas (as many as the context of the statement requires). ALL
‘‘,’’ used as a tally argument means ‘‘count each comma without regard to
adjacent characters.’’
•
LEADING specifies that only adjacent matches of the TALLY argument
at the leftmost position of the delimited character string be counted. At
the first failure to match the tally argument, the compiler terminates
counting and causes the argument to become inactive. The sample statement
INSPECT...TALLYING (scanning FIELD1, tallying in TLY, and looking for
the arguments and delimiters listed in the left column) gives the results in
Table 5–12 (if the program initializes TLY to 0).
Table 5–12 LEADING Delimiter of the Inspection Operation
Argument and Delimiter
LEADING ‘‘*’’ AFTER ‘‘0’’.
LEADING ‘‘**’’ AFTER ‘‘0’’.
FIELD1 Value
Contents of TLY After Scan
F***0**F
2
F**0F**
0
F**F**0
0
0***F**
3
F**0**F***
1
F**F0***FF
1
F**F0****F**
2
F**F**0*
0
5.3.5.3 The Tally Argument List
One INSPECT...TALLYING statement can contain more than one tally argument,
and each argument can have a separate BEFORE/AFTER phrase and tally
counter associated with it. These tally arguments with their associated tally
counters and BEFORE/AFTER phrases form an argument list. The manner in
which this list is processed affects the action of any given tally argument.
The following examples show INSPECT statements with argument lists. The text
with each example explains how that list is processed.
INSPECT FIELD1 TALLYING T FOR
ALL ","
ALL "."
ALL ";".
Using the STRING, UNSTRING, and INSPECT Statements 5–25
Using the STRING, UNSTRING, and INSPECT Statements
5.3 Examining and Replacing Characters Using the INSPECT Statement
These three tally arguments have the same tally counter, T, and are active over
the entire item being inspected. Thus, the preceding statement adds the total
number of commas, periods, and semicolons in FIELD1 to the initial value of
T. Because the TALLYING phrase supports multiple arguments and only one
counter is used, the previous statement could have been written as follows:
INSPECT FIELD1 TALLYING T FOR ALL "," "." ";".
INSPECT FIELD1
T1 FOR
T2 FOR
T3 FOR
TALLYING
ALL ","
ALL "."
ALL ";".
Each tally argument in this statement has its own tally counter and is active
over the entire item being inspected. Thus, the preceding statement adds the
total number of commas in FIELD1 to the initial value of T1, the total number of
periods to the initial value of T2, and the number of semicolons to T3.
INSPECT FIELD1
T1 FOR
T2 FOR
T3 FOR
TALLYING
ALL "," AFTER "A"
ALL "." BEFORE "B"
ALL ";".
Each tally argument in the preceding statement has its own tally counter; the
first two arguments have delimiter phrases, and the last one is active over the
entire item being inspected. Thus, the first argument is initially inactive and
becomes active only after the scanner encounters an A; the second argument
begins the scan in the active state but becomes inactive after a B has been
encountered; and the third argument is active during the entire scan of FIELD1.
Table 5–13 shows various values of FIELD1 and the contents of the three tally
counters after the scan of the previous statements. Assume that the counters are
initialized to 0 before the INSPECT statement.
Table 5–13 Results of the Scan with Separate Tallies
Contents of Tally Counters After Scan
FIELD1
Value
T1
T2
T3
A.C;D.E,F
1
2
1
A.B.C.D
0
1
0
A,B,C,D
3
0
0
A;B;C;D
0
0
3
*,B,C,D
0
0
0
The BEFORE/AFTER phrase applies only to the argument that precedes it and
delimits the item for that argument only. Each BEFORE/AFTER phrase causes a
separate scan of the item to determine the limits of the item for its corresponding
argument.
5–26 Using the STRING, UNSTRING, and INSPECT Statements
Using the STRING, UNSTRING, and INSPECT Statements
5.3 Examining and Replacing Characters Using the INSPECT Statement
5.3.5.4 Interference in Tally Argument Lists
When several tally arguments contain one or more identical characters active
at the same time, they may interfere with each other, so that when one of the
arguments finds a match, the scanner steps past any other matching characters,
preventing those characters from being considered for a match.
The following two identical tally arguments do not interfere with each other
because they are not active at the same time. The first A in FIELD1 causes the
first argument to become inactive and the second argument to become active:
MOVE 0 TO T1 T2.
INSPECT FIELD1 TALLYING
T1 FOR ALL "," BEFORE "A"
T2 FOR ALL "," AFTER "A".
However, the next identical tally arguments interfere with each other since both
are active at the same time:
INSPECT FIELD1 TALLYING
T1 FOR ALL ","
T2 FOR ALL "," AFTER "A".
For any given position of the scanner, the arguments are applied to FIELD1
in the order in which they appear in the statement. When one of them finds
a match, the scanner moves to the next position and ignores the remaining
arguments in the argument list. Each comma in FIELD1 causes T1 to be
incremented by 1 and the second argument to be ignored. Thus, T1 always
contains an accurate count of all the commas in FIELD1, and T2 is always
unchanged.
The following INSPECT statement arguments only partially interfere with each
other:
INSPECT FIELD1 TALLYING
T2 FOR ALL "," AFTER "A"
T1 FOR ALL ",".
The first argument does not become active until the scanner encounters an
A. The second argument tallies all commas that precede the A. After the A,
the first argument counts all commas and causes the second argument to be
ignored. Thus, T1 contains the number of commas that precede the first A, and
T2 contains the number of commas that follow the first A. This statement works
well as written, but it could be difficult to debug.
The following three examples show that one INSPECT statement cannot count
any character more than once. Thus, when you use the same character in more
than one argument of an argument list, consider the possibility of interference
and choose the order of the arguments carefully. The solution may require two or
more INSPECT statements. Consider the following problem:
INSPECT FIELD1 TALLYING
T1 FOR ALL "AB"
T2 FOR ALL "BC".
If FIELD1 contains ABCABC after the scan, T1 is incremented by 2, and T2 is
unaltered. The successful matching of the argument includes each B in the item.
Each match resets the scanner to the character position to the right of the B, so
that the second argument is never successfully matched. The results remain the
same even if the order of the arguments is reversed. Only separate INSPECT
statements can develop the desired counts.
Using the STRING, UNSTRING, and INSPECT Statements 5–27
Using the STRING, UNSTRING, and INSPECT Statements
5.3 Examining and Replacing Characters Using the INSPECT Statement
Sometimes you can use the interference characteristics of the INSPECT
statement to your advantage. Consider the following sample argument list:
MOVE 0 TO T4 T3 T2 T1.
INSPECT FIELD1 TALLYING
T4 FOR ALL "****"
T3 FOR ALL "***"
T2 FOR ALL "**"
T1 FOR ALL "*".
The argument list counts all of the asterisks in FIELD1 in four different tally
counters. T4 counts the number of times that four asterisks occur together; T3
counts the number of times three asterisks appear together; T2 counts double
asterisks; and T1 counts singles.
If FIELD1 contains a string of more than four consecutive asterisks, the
argument list breaks the string into groups of four and counts them in T4. It
then counts the less-than-four remainder in T3, T2, or T1.
Reversing the order of the arguments in this list causes T1 to count all of the
asterisks, and T2, T3, and T4 to remain unchanged.
When the LEADING condition is used with an argument in the argument list,
that argument becomes inactive as soon as it fails to be matched in the item
being inspected. Therefore, when two arguments in an argument list contain one
or more identical characters and one of the arguments has a LEADING condition,
the argument with the LEADING condition should appear first. Consider the
following sample statement:
MOVE 0 TO T1 T2.
INSPECT FIELD1 TALLYING
T1 FOR LEADING "*"
T2 FOR ALL "*".
T1 counts only leading asterisks in FIELD1; the occurrence of any other character
causes the first tally argument to become inactive. T2 keeps a count of any
remaining asterisks in FIELD1.
Reversing the order of the arguments in the following statement results in an
argument list that can never increment T1:
INSPECT FIELD1 TALLYING
T2 FOR ALL "*"
T1 FOR LEADING "*".
If the first character in FIELD1 is not an asterisk, neither argument can match
it, and the second argument becomes inactive. If the first character in FIELD1
is an asterisk, the first argument matches it and causes the second argument to
be ignored. The first character in FIELD1 that is not an asterisk fails to match
the first argument, and the second argument becomes inactive because it has not
found a match in any of the preceding characters.
An argument with both a LEADING condition and a BEFORE phrase can
sometimes successfully delimit the item being inspected, as in the following
example:
MOVE 0 TO T1 T2.
INSPECT FIELD1 TALLYING
T1 FOR LEADING SPACES
T2 FOR ALL " " BEFORE "."
T2 FOR ALL " " BEFORE "."
T2 FOR ALL " " BEFORE ".".
IF T2 > 0 ADD 1 TO T2.
5–28 Using the STRING, UNSTRING, and INSPECT Statements
Using the STRING, UNSTRING, and INSPECT Statements
5.3 Examining and Replacing Characters Using the INSPECT Statement
These statements count the number of words in the English statement in
FIELD1, assuming that no more than three spaces separate the words in the
sentence, that the sentence ends with a period, and that the period immediately
follows the last word. When FIELD1 has been scanned, T2 contains the number
of spaces between the words. Because a count of the spaces renders a number
that is one less than the number of words, the conditional statement adds 1 to
the count.
The first argument removes any leading spaces, counting them in a different tally
counter. This shortens FIELD1 by preventing the application of the second to the
fourth arguments until the scanner finds a nonspace character. The BEFORE
phrase on each of the other arguments causes them to become inactive when
the scanner reaches the period at the end of the sentence. Thus, the BEFORE
phrases shorten FIELD1 by making the second to the fourth arguments inactive
before the scanner reaches the rightmost position of FIELD1. If the sentence in
FIELD1 is indented with tab characters instead of spaces, a second LEADING
argument can count the tab characters. For example:
INSPECT FIELD1
T1 FOR
T1 FOR
T2 FOR
.
.
.
TALLYING
LEADING SPACES
LEADING TAB
ALL "
"
When an argument list contains a CHARACTERS argument, it should be the
last argument in the list. Because the CHARACTERS argument always matches
the item, it prevents the application of any arguments that follow in the list.
However, as the last argument in an argument list, it can count the remaining
characters in the item being inspected. Consider the following example.
MOVE 0 TO T1 T2 T3 T4 T5.
INSPECT FIELD1 TALLYING
T1 FOR LEADING SPACES
T2 FOR ALL "." BEFORE ","
T3 FOR ALL "+" BEFORE ","
T4 FOR ALL "-" BEFORE ","
T5 FOR CHARACTERS BEFORE ",".
If FIELD1 is known to contain a number in the form frequently used to input
data, it can contain a plus or minus sign, and a decimal point; furthermore,
the number can be preceded by spaces and terminated by a comma. When this
statement is compiled and executed, it delivers the following results:
•
T1 contains the number of leading spaces.
•
T2 contains the number of periods.
•
T3 contains the number of plus signs.
•
T4 contains the number of minus signs.
•
T5 contains the number of remaining characters (assumed to be numeric).
The sum of T1 to T5, plus 1, gives the character position occupied by the
terminating comma.
Using the STRING, UNSTRING, and INSPECT Statements 5–29
Using the STRING, UNSTRING, and INSPECT Statements
5.3 Examining and Replacing Characters Using the INSPECT Statement
5.3.6 Using the REPLACING Phrase
When an INSPECT statement contains a REPLACING phrase, that statement
selectively replaces characters or groups of characters in the designated item.
The REPLACING phrase names a search argument of one or more characters and
a condition under which the string can be applied to the item being inspected.
Associated with the search argument is the replacement value, which must be
the same length as the search argument. Each time the search argument finds a
match in the item being inspected, under the condition stated, the replacement
value replaces the matched characters.
A BEFORE/AFTER phrase can be used to delimit the area of the item being
inspected. A search argument applies only to the delimited area of the item.
5.3.6.1 The Search Argument
The search argument of the REPLACING phrase names a character string and a
condition under which the character string should be compared to the delimited
string being inspected.
The CHARACTERS form of the search argument specifies that every character in
the delimited string being inspected should be considered to match an imaginary
character that serves as the search argument. Thus, the replacement value
replaces each character in the delimited string. For example:
INSPECT ITEMA REPLACING CHARACTERS ...
The ALL, LEADING, and FIRST forms of the search argument specify a
particular character string, which can be represented by a literal or an identifier.
The search argument character string can be any length. However, each
character of the argument must match a character in the delimited string before
the compiler considers the argument matched. For example:
INSPECT ITEMA REPLACING ALL ...
The necessary literal and identifier characteristics are as follows:
•
A literal character string must be either nonnumeric or a figurative constant
(other than ALL literal). A figurative constant, such as SPACE or ZERO,
represents a single character and can be written as ‘‘ ’’ or ‘‘0’’ with the
same effect. Because a figurative constant represents a single character,
the replacement value must be one character long.
•
An identifier must represent an elementary item of DISPLAY usage. It can be
any class. However, if it is not alphabetic, the compiler performs an implicit
redefinition of the item. This redefinition is identical to the BEFORE/AFTER
delimiter redefinition discussed in Section 5.3.2.
The words ALL, LEADING, and FIRST supply conditions that further delimit the
inspection operation:
•
ALL specifies that each match the search argument finds in the delimited
character string is replaced by the replacement value. When a literal
follows the word ALL, it does not have the same meaning as the figurative
constant, ALL literal. The figurative constant meaning of ALL ‘‘,’’ is a string
of consecutive commas, as many as the context of the statement requires.
ALL ‘‘,’’ as a search argument of the REPLACING phrase means ‘‘replace
each comma without regard to adjacent characters.’’
5–30 Using the STRING, UNSTRING, and INSPECT Statements
Using the STRING, UNSTRING, and INSPECT Statements
5.3 Examining and Replacing Characters Using the INSPECT Statement
•
LEADING specifies that only adjacent matches of the search argument at
the leftmost position of the delimited character-string be replaced. At the
first failure to match the search argument, the compiler terminates the
replacement operation and causes the argument to become inactive.
•
FIRST specifies that only the leftmost character string that matches the
search argument be replaced. After the replacement operation, the search
argument containing this condition becomes inactive.
5.3.6.2 The Replacement Value
Whenever the search argument finds a match in the item being inspected, the
matched characters are replaced by the replacement value. The word BY followed
by an identifier or literal specifies the replacement value. For example:
INSPECT ITEMA REPLACING ALL "A" BY "X" ALL "D" BY "X".
The replacement value must always be the same size as its associated search
argument.
If the replacement value is a literal character-string, it must be either a
nonnumeric literal or a figurative constant (other than ALL literal). A figurative
constant represents as many characters as the length of the search argument
requires.
If the replacement value is an identifier, it must be an elementary item of
DISPLAY usage. It can be any class. However, if it is not alphanumeric, the
compiler conducts an implicit redefinition of the item. This redefinition is the
same as the BEFORE/AFTER redefinition discussed in Section 5.3.2.
5.3.6.3 The Replacement Argument
The replacement argument consists of the search argument (with its condition
and character-string), the replacement value, and an optional BEFORE/AFTER
phrase, as shown in Figure 5–5.
Figure 5–5 The Replacement Argument
ALL ";" BY SPACE BEFORE "."
Search Replacement BEFORE/AFTER
argument
value
phrase (optional)
ZK−6054−GE
5.3.6.4 The Replacement Argument List
One INSPECT...REPLACING statement can contain more than one replacement
argument. Several replacement arguments form an argument list, and the
manner in which the list is processed affects the action of any given replacement
argument.
The following examples show INSPECT statements with replacement argument
lists. The text following each one tells how that list will be processed.
Using the STRING, UNSTRING, and INSPECT Statements 5–31
Using the STRING, UNSTRING, and INSPECT Statements
5.3 Examining and Replacing Characters Using the INSPECT Statement
INSPECT FIELD1 REPLACING
ALL "," BY SPACE
ALL "." BY SPACE
ALL ";" BY SPACE.
The previous three replacement arguments all have the same replacement value,
SPACE, and are active over the entire item being inspected. The statement
replaces all commas, periods, and semicolons with space characters and leaves all
other characters unchanged.
INSPECT FIELD1 REPLACING
ALL "0" BY "1"
ALL "1" BY "0".
Each of these two replacement arguments has its own replacement value and is
active over the entire item being inspected. The statement exchanges zeros for 1s
and 1s for zeros. It leaves all other characters unchanged.
INSPECT FIELD1 REPLACING
ALL "0" BY "1" BEFORE SPACE
ALL "1" BY "0" BEFORE SPACE.
Note
When a search argument finds a match in the item being inspected,
the code replaces that character-string and scans to the next position
beyond the replaced characters. It ignores the remaining arguments and
applies the first argument in the list to the character-string in the new
position. Thus, it never inspects the new value that was supplied by
the replacement operation. Because of this, the search arguments can
have the same values as the replacement arguments with no chance of
interference.
The statement also exchanges zeros and 1s. Here, however, the first space in
FIELD1 causes both arguments to become inactive.
INSPECT FIELD1 REPLACING
ALL "0" BY "1" BEFORE SPACE
ALL "1" BY "0" BEFORE SPACE
CHARACTERS BY "*" BEFORE SPACE.
The first space causes the three replacement arguments to become inactive. This
argument list exchanges zeros for 1s, 1s for zeros, and asterisks for all other
characters in the delimited area. If the BEFORE phrase is removed from the
third argument, that argument will remain active across all of FIELD1. Within
the area delimited by the first space character, the third argument replaces all
characters except 1s and zeros with asterisks. Beyond this area, it replaces
all characters (including the space that delimited FIELD1 for the first two
arguments, and any zeros and 1s) with asterisks.
5.3.6.5 Interference in Replacement Argument Lists
When several search arguments, all active at the same time, contain one or more
identical characters, they can interfere with each other—and consequently affect
the replacement operation. This interference is similar to the interference that
occurs between tally arguments.
The action of a search argument is never affected by the BEFORE/AFTER
delimiters of other arguments, because the compiler scans for delimiter matches
before it scans for replacement operations.
5–32 Using the STRING, UNSTRING, and INSPECT Statements
Using the STRING, UNSTRING, and INSPECT Statements
5.3 Examining and Replacing Characters Using the INSPECT Statement
The action of a search argument is never affected by the characters of any
replacement value, because the scanner does not inspect the replaced characters
again during execution of the INSPECT statement. Interference between search
arguments, therefore, depends on the order of the arguments, the values of the
arguments, and the active/inactive status of the arguments. The discussion in
Section 5.3.5.4 about interference in tally argument lists generally applies to
replacement arguments as well.
The following rules help minimize interference in replacement argument lists:
1. Place search arguments with LEADING or FIRST conditions at the start of
the list.
2. Place any arguments with the CHARACTERS condition at the end of the list.
3. Consider the order of appearance of any search arguments that contain
identical characters.
5.3.7 Using the CONVERTING Option
When an INSPECT statement contains a CONVERTING phrase, that statement
selectively replaces characters or groups of characters in the designated item;
it executes as if it were a Format 2 INSPECT statement with a series of ALL
phrases. (Refer to the INSPECT statement formats in the Compaq COBOL
Reference Manual.)
An example of the use of the CONVERTING phrase follows:
IDENTIFICATION DIVISION.
PROGRAM-ID. PROGX.
ENVIRONMENT DIVISION.
DATA DIVISION.
WORKING-STORAGE SECTION.
01 X PIC X(28).
PROCEDURE DIVISION.
A.
MOVE "ABC*ABC*ABC ABC@ABCABC" TO X.
INSPECT X CONVERTING "ABC" TO "XYZ"
AFTER "*" BEFORE "@".
DISPLAY X.
STOP RUN.
X before INSPECT executes
X after INSPECT executes
ABC*ABC*ABC ABC@ABCABC
ABC*XYZ*XYZ XYZ@ABCABC
5.3.8 Common INSPECT Statement Errors
Programmers most commonly make the following errors when writing INSPECT
statements:
•
Leaving the FOR out of an INSPECT...TALLYING statement
•
Using the word WITH instead of BY in the REPLACING phrase
•
Failing to initialize the tally counter
•
Omitting the word ALL before the comparison character-string
Using the STRING, UNSTRING, and INSPECT Statements 5–33
6
Processing Files and Records
The Compaq COBOL I/O system offers you a wide range of record management
techniques while remaining transparent to you. You can select one of several
file organizations and access modes, each of which is suited to a particular
application. The file organizations available through Compaq COBOL are
sequential, line sequential, relative, and indexed. The access modes are
sequential, random, and dynamic.
This chapter introduces you to the following Compaq COBOL I/O features:
•
Defining files and records (Section 6.1)
•
Identifying files and records from your Compaq COBOL program (Section 6.2)
•
Creating and processing files (Section 6.3)
•
Reading files (Section 6.4)
•
Updating files (Section 6.5)
•
Backing up your files (Section 6.6)
For information about low-volume or terminal screen I/O using the ACCEPT and
DISPLAY statements, see Chapter 11 and refer to the Compaq COBOL Reference
Manual.
The operating system provides you with I/O services for handling, controlling,
and spooling your I/O needs or requests. Compaq COBOL, through the I/O
system, provides you with extensive capabilities for data storage, retrieval, and
modification.
On the OpenVMS Alpha operating system, the Compaq COBOL I/O system
consists of the Run-Time Library (RTL), which accesses Record Management
Services (RMS). (On OpenVMS VAX, COBOL-generated code accesses RMS
directly.) Refer to the OpenVMS Record Management Utilities Reference Manual
and the OpenVMS Record Management Services Reference Manual for more
information about RMS. ♦
On the Tru64 UNIX operating system, the Compaq COBOL I/O system consists
of the Run-Time Library (RTL) and facilities of Tru64 UNIX. In addition,
the facilities of a third-party ISAM package are required for any use of
ORGANIZATION INDEXED. ♦
6.1 Defining Files and Records
A file is a collection of related records. You can specify the organization and size
of a file as well as the record format and physical record size. The system creates
a file with these characteristics and stores them with the file. Any program that
accesses a file must specify the same characteristics as those that the system
stored for that file when creating it.
Processing Files and Records 6–1
Processing Files and Records
6.1 Defining Files and Records
A record is a group of related data elements. The space a record needs on
a physical device depends on the file organization, the record format, and the
number of bytes the record contains.
File organization is described in Section 6.1.1. Record format is described in
Section 6.1.2.
6.1.1 File Organization
Compaq COBOL supports the following four types of file organization:
•
SEQUENTIAL—This organization requires that records be referenced in
sequence from the first record to the last. This organization is useful for
programs that normally access each record serially. (See the Sequential File
Organization section in this chapter.)
•
LINE SEQUENTIAL (Alpha)— This organization is essentially the same as
sequential. Line sequential allows you to treat files as collections of variable
length records, with each record containing one line of printable characters.
This organization is useful for programs that access files created by text
editors and similar programs. (See the Line Sequential File Organization
(Alpha) section in this chapter.) ♦
•
RELATIVE—This organization lets you access records randomly, or
sequentially by record number values. While this organization is more flexible
than sequential organization, it is less flexible than indexed organization
because you cannot insert a record in the middle of your file unless you have
an empty cell to contain it. (See the Relative File Organization section in this
chapter.)
•
INDEXED—This organization lets you access records randomly or
sequentially, by primary and alternate key values. This is a useful way
to organize a file in which records will be added, changed, or deleted upon
demand. (See the Indexed File Organization section in this chapter.)
Note
On Tru64 UNIX, a third-party product is required for INDEXED runtime
support. Refer to the Read Before Installing . . . letter for up-to-date
details on how to obtain the INDEXED runtime support. ♦
Table 6–1 summarizes the advantages and disadvantages of these file
organizations.
Table 6–1 Compaq COBOL File Organizations—Advantages and Disadvantages
File
Organizations
Advantages
Disadvantages
Sequential
Uses disk and memory efficiently
Allows sequential access only
Provides optimal usage if the
application accesses all records
sequentially on each run
Allows records to be added only to the end of a file
(continued on next page)
6–2 Processing Files and Records
Processing Files and Records
6.1 Defining Files and Records
Table 6–1 (Cont.) Compaq COBOL File Organizations—Advantages and Disadvantages
File
Organizations
Advantages
Disadvantages
Provides the most flexible record
format
Allows READ/WRITE sharing
Allows data to be stored on
many types of media, in a
device-independent manner
Allows easy file extension
Line Sequential
(Alpha)
Most efficient storage format
Allows sequential access only
Compatible with text editors
Used for printable characters only
Open Mode I/O is not allowed
Relative
Allows sequential, random, and
dynamic access
Allows data to be stored on disk only
Provides random record deletion
and insertion
Requires that record cells be the same size
Allows READ/WRITE sharing
Indexed
Allows sequential, random, and
dynamic access
Allows data to be stored on disk only
Allows random record deletion
and insertion on the basis of a
user-supplied key
Requires more disk space
Allows READ/WRITE sharing
Uses more memory to process records
Allows variable-length records to
change length on update
Generally requires multiple disk accesses to
randomly process a record
Allows easy file extension
Sequential File Organization
Sequential input/output, in which records are written and read in sequence, is
the simplest and most common form of I/O. It can be performed on all I/O devices,
including magnetic tape, disk, terminals, and line printers.
Sequential files consist of records that are arranged in the order in which they
were written to the file. Figure 6–1 illustrates sequential file organization.
Figure 6–1 Sequential File Organization
Beginning of file
RECORD
1
RECORD
2
End of file
RECORD
3
...
RECORD
(n−1)
RECORD
n
ZK−6055−GE
Processing Files and Records 6–3
Processing Files and Records
6.1 Defining Files and Records
Sequential files always contain an end-of-file (EOF) indication. On magnetic
tapes, it is the EOF mark; on disk, it is a counter in the file header that
designates the end of the file. Compaq COBOL statements can write over the
EOF mark and, thus, extend the length of the file. Because the EOF indicates
the end of useful data, Compaq COBOL provides no method for reading beyond it,
even though the amount of space reserved for the file exceeds the amount actually
used.
Occasionally a file with sequential organization, for example, a multiple-reel
magnetic tape file, is so large that it requires more than one volume. An end-ofvolume (EOV) label marks the end of recorded information on each volume and
signals the file system to switch to a new volume. On multiple-volume files, the
EOF mark appears only once, at the end of the last record on the last volume.
Figure 6–2 depicts a multiple-volume, sequential file.
Figure 6–2 A Multiple-Volume, Sequential File
Volume 1
REC
REC
REC
...
REC
REC
REC
EOV
Volume 2
REC
REC
REC
...
REC
REC
REC
EOV
Volume 3
REC
REC
REC
...
REC
REC
REC
EOF
ZK−6056−GE
When you select the medium for your sequential file, consider the following:
•
Speed of access—Tape is significantly slower than disk. In general, most
removable media storage (magnetic, optical, and so forth) devices are slower
than your fixed disks.
•
Frequency of use—Use removable media devices to store relatively static files,
and save your fixed disk space for more dynamic files.
•
Cost—Fixed disks are generally more expensive than removable media
devices. The more frequently you plan to access the data, the easier it is to
justify maintaining the data on your fixed disks. For example, data that is
accessed daily must be kept on readily available disks; quarterly or annual
data could be offloaded to removable media.
•
Transportability—Use removable media if you need to use the file across
systems that have no common disk devices (this technique is commonly
referred to as ‘‘sneakernetting’’).
Refer to the OpenVMS I/O User’s Reference Manual or the ltf(4) manpage for
more information on magnetic tape formats.
6–4 Processing Files and Records
Processing Files and Records
6.1 Defining Files and Records
Figure 6–3 Line Sequential File Organization (Alpha)
Beginning of file
RECORD
1
RECORD
2
End of file
...
RECORD
(n−1)
RECORD
n
Record Terminators
ZK−6813A−GE
Line Sequential File Organization (Alpha)
Line sequential file structure is essentially similar to the structure of sequential
files, with the major difference being record length. Figure 6–3 illustrates line
sequential file organization.
A line sequential file consists of records of varying lengths arranged in the order
in which they were written to the file. Each record is terminated with a ‘‘newline’’
character. The newline character is a line feed record terminator (’0A’ hex).
Each record in a line sequential file should contain only printable characters and
should not be written with a WRITE statements that contains either a BEFORE
ADVANCING or AFTER ADVANCING statement.
Record length is determined by the maximum record length in the FD entry in
the FILE-CONTROL section and the number of characters in a line (not including
the record terminator).
When your Compaq COBOL program reads a line from a line sequential file that
is shorter than the record area, it reads up to the record terminator, discards
the record terminator, and pads the rest of the record with a number of spaces
necessary to equal the record’s specified length. When your program reads a line
from a line sequential file that is longer than the record area, it reads the number
of characters necessary to fill the record area. The next READ, if any, will begin
at the next printable character in the file that is not a record terminator.
Line sequential file organization is useful in reading and printing files that were
created by an editor or word processor, which typically do not write fixed-length
records. ♦
Relative File Organization
A relative file consists of fixed-size record cells and uses a key to retrieve its
records. The key, called a relative key, is an integer that specifies the record’s
storage cell or record number within the file. It is analogous to the subscript of a
table. Relative file processing is available only on disk devices.
Any record on a relative file (unlike a sequential file) can be accessed with one
READ operation. Also, relative files allow the program to read forward with
respect to the current relative key. In addition to random access by relative
key, relative files also permit you to delete and update records by relative key.
Relative files are used primarily when records must be accessed in random order
and the records can easily be associated with numbers that give the relative
positions in the file.
Processing Files and Records 6–5
Processing Files and Records
6.1 Defining Files and Records
In relative file organization, not every cell must contain a record. Although each
cell occupies one record space, a field preceding the record on the storage medium
indicates whether or not that cell contains a valid record. Thus, a file can contain
fewer records than it has cells, and the empty cells can be anywhere in the file.
The numerical order of the cells remains the same during all operations on a
relative file. However, accessing statements can move a record from one cell to
another, delete a record from a cell, insert new records into empty cells, or rewrite
existing cells.
With relative file processing, the I/O system organizes a file as a series of fixedsized record cells. Cell size is based on the size specified as the maximum
permitted length for a record in the file. The I/O system considers these cells
as successively numbered from 1 (the first) to n (the last). A cell’s relative record
number (RRN) represents its location relative to the beginning of the file.
Because cell numbers in a relative file are unique, they can be used to identify
both the cell and the record (if any) occupying that cell. Thus, record number 1
occupies the first cell in the file, record number 21 occupies the twenty-first cell,
and so forth. Figure 6–4 illustrates relative file organization.
Figure 6–4 Relative File Organization
End of file
Beginning of file
Cell no.
1
2
3
RECORD
1
EMPTY
RECORD
3
First record
written
...
999
1000
RECORD
999
EMPTY
Second record
written
ZK−6057−GE
Relative files are used like tables. Their advantage over tables is that their
size is limited to disk space rather than memory space. Also, their information
can be saved from run to run. Relative files are best for records that are easily
associated with ascending, consecutive numbers (so that the program conversion
from data to cell number is easy), such as months (record keys 1 to 12), or the 50
U.S. states (record keys 1 to 50).
Indexed File Organization
An indexed file uses primary and alternate keys in the record to retrieve the
contents of that record. Compaq COBOL allows sequential, random, and dynamic
access to records. You access each record by one of its primary or alternate keys.
Indexed file processing is available only on disk devices.
Unlike the sequential ordering of records in a sequential file or the relative
positioning of records in a relative file, the physical location of records in indexed
file organization is transparent to the program. You can add new records to an
indexed file without recreating the file. You can also delete records, making room
for new records.
6–6 Processing Files and Records
Processing Files and Records
6.1 Defining Files and Records
Indexed file organization allows you to use a key to uniquely identify a record
within the file. The location and length of the key are identical in all records.
When creating an indexed file, you must select the data items to be the keys.
Selecting such a data item indicates to the I/O system that the contents (key
value) of that data item in any record written to the file can be used by the
program to identify that record for subsequent retrieval. For more information,
refer to the Environment Division clauses RECORD KEY IS and ALTERNATE
RECORD KEY IS in the Compaq COBOL Reference Manual.
You must define at least one main key, called the primary key, for an indexed
file. You may also optionally define from 1 to 254 additional keys called alternate
keys. Each alternate key represents an additional data item in each record of the
file. You can also use the key value in any of these alternate keys as a means of
identifying the record for retrieval.
You define primary and alternate key values in the Record Description entry.
Primary and alternate key values need not be unique if you specify the WITH
DUPLICATES phrase in the file description entry (FD). When duplicate key
values are present, you can retrieve the first record written in the logical sort
order of the records with the same key value and any subsequent records using
the READ NEXT phrase. The logical sort order controls the order of sequential
processing of the record. (For more information about retrieving records with
duplicate key values, refer to the information about the READ statement in the
Compaq COBOL Reference Manual.)
When you open a file, you must specify the same number and type of keys that
were specified when the file was created. (This situation is subject to modification
by the check duplicate keys and relax key checking options, as well as a duplicate
key specification on an FD.) If the number or type of keys does not match, the
system will issue a run-time diagnostic when you try to open the file.
As your program writes records into an indexed file, the I/O system locates the
values contained in the primary and alternate keys. The I/O system builds these
values into a tree-structured table or index, which consists of a series of entries.
Each entry contains a key value copied from a record. With each key value is a
pointer to the location in the file of the record from which the value was copied.
Figure 6–5 shows the general structure of an indexed file defined with a primary
key only.
Processing Files and Records 6–7
Processing Files and Records
6.1 Defining Files and Records
Figure 6–5 Indexed File Organization
Key Definition
Primary key index (employee name)
...
ABLE
JONES
record
ABLE
...
SMITH
record
ELM AVE
...
JONES
record
MAIN ST
...
SMITH
COLT RD
ZK−6058−GE
For a more detailed explanation of indexed file structure on OpenVMS systems,
refer to the Guide to OpenVMS File Applications. ♦
For information about specifying file organization in your program, see
Section 6.2.2.
6.1.2 Record Format
Compaq COBOL provides four record format types: fixed, variable, print-control,
and stream. Table 6–2 shows the record format availability.
Table 6–2 Record Format Availability
Sequential
Line
Sequential Relative
Indexed
Disk
Tape
Fixed length
yes
yes
no
yes
yes
Variable length
yes
yes
no
yes
yes
Print control
yes
no
no
no
no
Stream
no
no
yes
no
no
The compiler determines the record format from the information that you specify
as follows:
•
Fixed record format—Use the RECORD CONTAINS clause. This is the
Compaq COBOL default.
•
Variable record format—Use the RECORD CONTAINS TO clause or the
RECORD VARYING clause.
•
Print-control (VFC on OpenVMS systems or ASCII on Tru64 UNIX systems)—
use the Procedure Division ADVANCING phrase, the Environment Division
APPLY PRINT-CONTROL or (on Tru64 UNIX) ASSIGN TO PRINTER
clauses, or the Data Division LINAGE clause, or use Report Writer
statements and phrases.
6–8 Processing Files and Records
Processing Files and Records
6.1 Defining Files and Records
•
Stream (Alpha only)—Use the FILE-CONTROL ORGANIZATION IS LINE
SEQUENTIAL clause. On OpenVMS Alpha you also get this format with
/NOVFC. ♦
If a file has more than one record description, the different record descriptions
automatically share the same record area in memory. The I/O system does not
clear this area before it executes the READ statement. Therefore, if the record
read by the latest READ statement does not fill the entire record area, the area
not overlaid by the incoming record remains unchanged.
The record format type that was specified when the file was created must be used
for all subsequent accesses to the file.
In Example 6–1, a file contains a company’s stock inventory information (part
number, supplier, quantity, price). Within this file, the information is divided into
records. All information for a single piece of stock constitutes a single record.
Example 6–1 Sample Record Description
01 PART-RECORD.
02 PART-NUMBER
02 PART-SUPPLIER
02 PART-QUANTITY
02 PART-PRICE
PIC
PIC
PIC
PIC
9999.
X(20).
99999.
S9(5)V99.
Each record in the stock file is itself divided into discrete pieces of information
referred to as elementary items (02 level items). You give each elementary item
a specific location in the record, give it a name, and define its size and type. The
part number is an elementary item in the part record, as are supplier, quantity,
and price. In this example, PART-RECORD contains four elementary items:
PART-NUMBER, PART-SUPPLIER, PART-QUANTITY, and PART-PRICE.
Fixed-Length Records
Files with a fixed-length record format contain the same size records. The
compiler generates the fixed-length format when either of the following conditions
is true:
•
The RECORD CONTAINS clause specifies a fixed number of characters.
•
The RECORD CONTAINS clause is omitted.
The compiler does not generate fixed-length format when any of the following
conditions exist:
•
The file description contains a RECORD CONTAINS TO clause or a RECORD
VARYING clause.
•
The program specifies a print-control file by referring to the file with:
The ADVANCING phrase in a WRITE statement
An APPLY PRINT-CONTROL clause in the Environment Division
A LINAGE clause in the file description
Report Writer statements and phrases
ASSIGN TO PRINTER
•
LINE SEQUENTIAL organization is specified.
Processing Files and Records 6–9
Processing Files and Records
6.1 Defining Files and Records
Fixed-length record size is determined by either the largest record description or
the record size specified by the RECORD CONTAINS clause, whichever is larger.
Example 6–2 shows how fixed-length record size is determined.
Example 6–2 Determining Fixed-Length Record Size
FD FIXED-FILE
RECORD CONTAINS 100 CHARACTERS.
01 FIXED-REC
PIC X(75).
For the file, FIXED-FILE, the RECORD CONTAINS clause specifies a record size
larger than the record description; therefore, the record size is 100 characters.
In Example 6–2, the following warning message is generated when the file
FIXED-FILE is used:
"Record contains value is greater than length of longest record."
If the multiple record descriptions are associated with the file, the size of the
largest record description is used as the size. In Example 6–3, for the file RECFILE, the FIXED-REC2 record specifies the largest record size; therefore, the
record size is 90 characters.
Example 6–3 Determining Fixed-Length Record Size for Files with Multiple
Record Descriptions
FD REC-FILE
RECORD CONTAINS 80 CHARACTERS.
01 FIXED-REC1
PIC X(75).
01 FIXED-REC2
PIC X(90).
When the file REC-FILE is used, the following warning message is generated:
"Longest record is longer than RECORD CONTAINS value longest record size used."
Variable-Length Records
Files with a variable-length record format can contain records of different length.
The compiler generates the variable-length attribute for a file when the file
description contains a RECORD VARYING clause or a RECORD CONTAINS TO
clause.
Each record is written to the file with a 32-bit integer that specifies the size of
the record. This integer is not counted in the size of the record.
Examples 6–4, 6–5, and 6–6 show you the three ways you can create a variablelength record file.
In Example 6–4, the DEPENDING ON phrase sets the OUT-REC record length.
The IN-TYPE data field determines the OUT-LENGTH field’s contents.
6–10 Processing Files and Records
Processing Files and Records
6.1 Defining Files and Records
Example 6–4 Creating Variable-Length Records with the DEPENDING ON
Phrase
FILE SECTION.
FD INFILE.
01 IN-REC.
03 IN-TYPE
PIC X.
03 REST-OF-REC PIC X(499).
FD OUTFILE
RECORD VARYING FROM 200 TO 500 CHARACTERS
DEPENDING ON OUT-LENGTH.
01 OUT-REC
PIC X(500).
WORKING-STORAGE SECTION.
01 OUT-LENGTH
PIC 999 COMP VALUE ZEROES.
Example 6–5 Creating Variable-Length Records with the RECORD VARYING
Phrase
FILE SECTION.
FD OUTFILE
RECORD VARYING FROM 200 TO 500 CHARACTERS.
01 OUT-REC-1
PIC X(200).
01 OUT-REC-2
PIC X(500).
Example 6–6 Creating Variable-Length Records and Using the OCCURS Clause
with the DEPENDING ON Phrase
.
.
.
FILE SECTION.
FD PARTS-MASTER
RECORD VARYING 118 TO 163 CHARACTERS.
01 PARTS-REC.
03 P-PART-NUM
PIC X(10).
03 P-PART-INFO
PIC X(100).
03 P-BIN-INDEX
PIC 999.
03 P-BIN-NUMBER PIC X(5)
OCCURS 1 TO 10 TIMES DEPENDING ON P-BIN-INDEX.
.
.
.
Example 6–5 shows how to create variable-length records using the RECORD
VARYING phrase.
Example 6–6 creates variable-length records by using the OCCURS clause
with the DEPENDING ON phrase in the record description. Compaq COBOL
determines record length by adding the sum of the variable record’s fixed portion
to the size of the table described by the number of table occurrences at execution
time.
In this example, the variable record’s fixed portion size is 113 characters. (This
is the sum of P-PART-NUM, P-PART-INFO, and P-BIN-INDEX.) If P-BININDEX contains a 7 at execution time, P-BIN-NUMBER will be 35 characters
long. Therefore, PARTS-REC’s length will be 148 characters; the fixed portion’s
length is 113 characters, and the table entry’s length at execution time is 35
characters.
Processing Files and Records 6–11
Processing Files and Records
6.1 Defining Files and Records
If you describe a record with both the RECORD VARYING...DEPENDING ON
phrase on data-name-1 and the OCCURS clause with the DEPENDING ON
phrase on data-name-2, Compaq COBOL specifies record length as the value of
data-name-1.
If you have multiple record-length descriptions for a file and omit either the
RECORD VARYING clause or the RECORD CONTAINS TO clause, all records
written to the file will have a fixed length equal to the length of the longest record
described for the file, as in Example 6–7.
Example 6–7 Defining Fixed-Length Records with Multiple Record Descriptions
.
.
.
FD PARTS-MASTER.
01 PARTS-REC-1 PIC X(200).
01 PARTS-REC-2 PIC X(300).
01 PARTS-REC-3 PIC X(400).
01 PARTS-REC-4 PIC X(500).
.
.
.
PROCEDURE DIVISION.
.
.
.
100-WRITE-REC-1.
MOVE IN-REC TO PARTS-REC-1.
WRITE PARTS-REC-1.
GO TO ...
200-WRITE-REC-2.
MOVE IN-REC TO PARTS-REC-2.
WRITE PARTS-REC-2.
GO TO ...
.
.
.
Writing PARTS-REC-1, PARTS-REC-2, PARTS-REC-3 or PARTS-REC-4 produces
records equal in length to the longest record, PARTS-REC-4. Note that this is not
variable-length I/O.
6.1.3 Print-Control Records
Print-control files contain record-advancing information with each record. These
files are intended for eventual printing, but are created on disk by your Compaq
COBOL program. The compiler generates print-control records when you use the
WRITE AFTER ADVANCING, the LINAGE, or the APPLY PRINT-CONTROL
clause, or if you create a Report Writer file or use ASSIGN TO PRINTER (on
Tru64 UNIX systems).
On OpenVMS Alpha, in any of the preceding cases, if you compile /NOVFC,
the compiler does not generate print-control records, but generates stream files
instead.
On OpenVMS, Compaq COBOL places explicit form-control bytes directly into the
file. You must use the /NOFEED option on the DCL PRINT command to print a
print-control file. ♦
6–12 Processing Files and Records
Processing Files and Records
6.1 Defining Files and Records
Stream (Alpha)
Stream files contain records of different length, delimited by a record terminator.
The compiler generates a stream record formatted file when you use the
ORGANIZATION IS LINE SEQUENTIAL clause in the File-Control Division.
This record format is useful for files created by text editors.
On OpenVMS Alpha, a stream file will also be generated under certain situations
if you compiled /NOVFC. See Section B.4.3 for more information. ♦
6.1.4 File Design
The difficulty of design is proportional to the complexity of the file organization.
Before you create your sequential, relative, or indexed file applications, you
should design your files based on these design considerations:
•
Record format—For relative files (see Section 6.1.2)
Relative files can contain either fixed-length records or variable-length
records. However, the I/O system calculates a cell size equal to the maximum
record size plus overhead bytes, resulting in fixed-length storage for
relative files (see the Relative File Organization section in Section 6.1.1).
Once created, relative records can be accessed sequentially, randomly, or
dynamically.
•
Storage Medium
You can access sequential, relative, and indexed files on disk. Be careful to
use a disk pack that is large enough to meet your current and future needs.
You can also access sequential files, unlike relative and indexed files, on
magnetic tape and unit record devices (for example, on printers).
•
Allocation (see Chapter 15)
On OpenVMS, you can optimize data storage at the time of file creation and
file extension. ♦
•
Bucket size—For relative files (see the Relative File Organization section in
Section 6.1.1)
You can optimize the packing of cells into buckets by ensuring that the cell
size is evenly divisible into the bucket size.
•
Maximum number of records—For relative files (see the Relative File
Organization section in Section 6.1.1)
•
Key scheme—For relative files (see the Relative File Organization section in
Section 6.1.1)
•
Speed—For indexed files (see the Indexed File Organization section in
Section 6.1.1)
You can maximize the speed with which the program processes data.
•
Space—For indexed files (see the Indexed File Organization section in
Section 6.1.1)
You can minimize file size, disk space, and memory requirements to run your
program.
•
Shared access—For indexed files (see the Indexed File Organization section in
Section 6.1.1)
Consider who is going to use the data and how they will access it.
Processing Files and Records 6–13
Processing Files and Records
6.1 Defining Files and Records
•
Ease of design—For indexed files (see the Indexed File Organization section
in Section 6.1.1)
You can minimize the amount of time spent writing the application.
•
Compiler limitations (see Appendix A)
Consider the logical and physical limits imposed by the Compaq COBOL
compiler.
On OpenVMS, for more information about file design, see Chapter 15. For
OpenVMS Alpha systems you can also refer to the Guide to OpenVMS File
Applications. ♦ Chapter 15 contains instructions on optimizing the file design for
indexed files. With indexed files, in particular, if you accept all the file defaults
instead of carefully designing your file, your application may run more slowly
than you expect.
6.2 Identifying Files and Records from Within Your Compaq
COBOL Program
Before your program can perform I/O on a file, your program must identify the
file to the operating system and specify the file’s organization and access modes.
A program must follow these steps whenever creating a new file or processing an
existing file.
You use a file description entry to define a file’s logical structure and associate the
file with a file name that is unique within the program. The program uses this
file name in the following COBOL statements:
•
OPEN
•
READ
•
START
•
UNLOCK
•
DELETE
•
CLOSE
The program uses the record name for the WRITE and REWRITE statements.
6.2.1 Defining a File Connector
You must establish a link between the file connector your program uses and
the file specification that the I/O system uses. You create this link and define
a file connector by using the SELECT statement with the ASSIGN clause and
optionally specifying the VALUE OF ID clause or by using logical names or
environment variables.
A file connector is a Compaq COBOL data structure that contains information
about a file. The file connector links a file name and its associated record area to
a physical file.
Defining a File Connector with SELECT and ASSIGN
Your program must include a SELECT statement, including an ASSIGN clause,
for every file description entry (FD) it contains. The file name you specify in the
SELECT statement must match the file name in the file description entry.
In the ASSIGN clause, you specify a nonnumeric literal or data name that
associates the file name with a file specification. This value must be a complete
file specification.
6–14 Processing Files and Records
Processing Files and Records
6.2 Identifying Files and Records from Within Your Compaq COBOL Program
Example 6–8 and Example 6–9 show the relationships between the SELECT
statement, the ASSIGN clause, and the FD entry.
In Example 6–8, because the file name specified in the FD entry is DAT-FILE,
all I/O statements in the program referring to that file or to its associated record
must use the file name DAT-FILE or the record name DAT-RECORD. The I/O
system uses the ASSIGN clause to interpret DAT-FILE as REPORT.DAT on
OpenVMS systems, and REPORT on Tru64 UNIX systems. The default directory
will be used on OpenVMS systems, and the current working directory will be
used on Tru64 UNIX systems.
Example 6–8 Defining a Disk File
ENVIRONMENT DIVISION.
INPUT-OUTPUT SECTION.
FILE-CONTROL.
SELECT DAT-FILE
ASSIGN TO "REPORT".
.
.
.
DATA DIVISION.
FILE SECTION.
FD DAT-FILE.
01 DAT-RECORD PIC X(100).
.
.
.
Note
On OpenVMS systems, if no file type is supplied, Compaq COBOL
supplies the default file extension DAT. On Tru64 UNIX systems, the
extensions dat and idx are appended, but only in the case of indexed files.
The I/O statements in Example 6–9 refer to MYFILE-PRO, which the ASSIGN
clause identifies to the operating system as MARCH.311. Additionally, the
operating system looks for the file in the current directory on the magnetic tape
mounted on MTA0: on an OpenVMS system.
Processing Files and Records 6–15
Processing Files and Records
6.2 Identifying Files and Records from Within Your Compaq COBOL Program
Example 6–9 Defining a Magnetic Tape File (OpenVMS)
ENVIRONMENT DIVISION.
INPUT-OUTPUT SECTION.
FILE-CONTROL.
SELECT MYFILE-PRO
ASSIGN TO "MTA0:MARCH.311"
.
.
.
DATA DIVISION.
FILE SECTION.
FD MYFILE-PRO.
01 DAT-RECORD PIC X(100).
.
.
.
PROCEDURE DIVISION.
A000-BEGIN.
OPEN INPUT MYFILE-PRO.
.
.
.
READ MYFILE-PRO AT END DISPLAY "end".
.
.
.
CLOSE MYFILE-PRO. ♦
Example 6–10 achieves the same result as Example 6–9, but on Tru64 UNIX. The
I/O statements in Example 6–10 refer to MYFILE-PRO, which the ASSIGN clause
identifies to the operating system as a magnetic tape file. The file is named in the
Data Division VALUE OF ID clause as MARCH.311.
Example 6–10 Defining a Magnetic Tape File (Tru64 UNIX)
ENVIRONMENT DIVISION
INPUT-OUTPUT SECTION.
FILE-CONTROL.
SELECT MYFILE-PRO
ASSIGN TO REEL.
.
.
.
DATA DIVISION.
FILE SECTION.
FD MYFILE-PRO VALUE OF ID "MARCH.311".
01 DAT-RECORD PIC X(100).
.
.
.
PROCEDURE DIVISION.
(continued on next page)
6–16 Processing Files and Records
Processing Files and Records
6.2 Identifying Files and Records from Within Your Compaq COBOL Program
Example 6–10 (Cont.) Defining a Magnetic Tape File (Tru64 UNIX)
A000-BEGIN.
OPEN INPUT MYFILE-PRO.
.
.
.
READ MYFILE-PRO AT END DISPLAY "end".
.
.
.
CLOSE MYFILE-PRO.
For each OPEN verb referring to a file assigned to magnetic tape, the user is
prompted to assign the file to a magnetic tape device. These device names are
in the form /dev/rmt0(a,l,m,h) . . . /dev/rmt31(a,l,m,h) and correspond to
special files on the system that refer to mass storage tape devices. For more
information on tape devices, refer to the mtio(7) Tru64 UNIX manual page.
As an alternative to prompting, each file assigned to a magnetic tape can have its
associated tape device defined through a shell environment variable. The name
of this environment variable is the concatenation of COBOL_TAPE_ and the base
of the file name used in the COBOL program. The value of this environment
variable is the name of the desired tape device. The environment variable needed
in Example 6–10 to assign the MARCH.311 file to tape device /dev/rmt0a is:
% setenv COBOL_TAPE_MARCH /dev/rmt0a
♦
Establishing File Names with ASSIGN and VALUE OF ID
If the file specification is subject to change, you can use a partial file specification
in the ASSIGN clause and complete it by using the optional VALUE OF ID clause
of the FD entry. In the VALUE OF ID clause, you can specify a nonnumeric
literal or an alphanumeric WORKING-STORAGE item to supplement the file
specification.
VALUE OF ID can complete a file name specified in ASSIGN TO:
ASSIGN TO "filename"
VALUE OF ID ".ext"
In the above example, OPEN would create a file with the name ‘‘filename.ext’’.
VALUE OF ID can override a file name specified in ASSIGN TO:
ASSIGN TO "oldname"
VALUE OF "newname"
In the above example, OPEN would create a file with the name ‘‘newname’’.
VALUE OF ID can be a directory/device specification and ASSIGN TO can provide
the file name, as in the following example:
ASSIGN TO "filename.dat"
VALUE OF ID "/usr/"
or
ASSIGN TO "filename"
VALUE OF ID "DISK:[DIRECTORY]"
On OpenVMS, with this code OPEN would create a file with the name
DISK:[DIRECTORY]FILENAME.DAT. ♦
Processing Files and Records 6–17
Processing Files and Records
6.2 Identifying Files and Records from Within Your Compaq COBOL Program
On Tru64 UNIX, with this code OPEN would create a file with the name
"/usr/filename.dat". ♦
Establishing Device and File Independence with Logical Names on OpenVMS
On OpenVMS, logical names let you write programs that are device and file
independent and provide a brief way to refer to frequently used files.
You can assign logical names with the ASSIGN command. When you assign a
logical name, the logical name and its equivalence name (the name of the actual
file or device) are placed in one of three logical name tables; the choice depends
on whether they are assigned for the current process, on the group level, or on a
systemwide basis. Refer to the OpenVMS DCL Dictionary for more information
on DCL and a description of logical name tables.
To translate a logical name, the system searches the three tables in this order:
( 1 ) process, ( 2 ) group, ( 3 ) system. Therefore, you can override a systemwide
logical name by defining it for your group or process.
Logical name translation is a recursive procedure: when the system translates
a logical name, it uses the equivalence name as the argument for another
logical name translation. It continues in this way until it cannot translate the
equivalence name.
Assume that your program updates monthly sales files (for example, JAN.DAT,
FEB.DAT, MAR.DAT, and so forth). Your SELECT statement could look like
either of these:
SELECT SALES-FILE ASSIGN TO "MOSLS"
SELECT SALES-FILE ASSIGN TO MOSLS
To update the January sales file, you can use this ASSIGN command to equate
the equivalence name JAN.DAT with the logical name MOSLS:
$ ASSIGN JAN.DAT MOSLS
To update the February sales file, you can use this ASSIGN command:
$ ASSIGN FEB.DAT MOSLS
In the same way, all programs that access the monthly sales file can use the
logical name MOSLS.
To disassociate the relationship between the file and the logical name, you can
use this DEASSIGN command:
$ DEASSIGN MOSLS
If MOSLS is not set as a logical name, the system uses it as a file specification
and looks for a file named MOSLS.DAT. ♦
Using Environment Variables for File Specification on Tru64 UNIX
On Tru64 UNIX, environment variables can be used as aliases for file specification
at run time. File name resolution follows these rules:
•
Use contents of the ASSIGN TO clause or VALUE OF ID clause to find a
match against an environment variable.
•
If a match is found, substitute the value of the environment variable in the
construction of the file specification.
•
If a match was not found, take the file name as specified.
6–18 Processing Files and Records
Processing Files and Records
6.2 Identifying Files and Records from Within Your Compaq COBOL Program
On Tru64 UNIX, you can also use the literal or alphanumeric item to specify a
run-time environment variable set. Refer to setenv(3) in the reference page. ♦
The program in Example 6–11 and the commands that follow it illustrate how to
use the ASSIGN TO clause in conjunction with an environment variable or logical
name.
Example 6–11 Using Environment Variables (Tru64 UNIX) or Logical Names
(OpenVMS) for File Specification
IDENTIFICATION DIVISION.
PROGRAM-ID. ENVVAR-EXAMPLE.
ENVIRONMENT DIVISION.
INPUT-OUTPUT SECTION.
FILE-CONTROL.
SELECT F-DISK ASSIGN TO "MYENV".
DATA DIVISION.
FILE SECTION.
FD F-DISK.
01 DAT-RECORD PIC X(100).
PROCEDURE DIVISION.
P0. OPEN OUTPUT F-DISK.
CLOSE F-DISK.
PE. STOP RUN.
END PROGRAM ENVVAR-EXAMPLE.
On Tru64 UNIX, set an environment variable as follows:
% cobol -o envtest envvar-example.cob
% setenv MYENV hello.dat
% envtest
% ls *.dat
hello.dat
% unsetenv MYENV
% envtest
% ls MY*
MYENV ♦
Setting environment variables at run time can help in moving applications
between OpenVMS Alpha and Tru64 UNIX platforms without having to modify
their source COBOL programs. You can define environment variables that access
files in a way similar to that in which you access files using logical names on
OpenVMS systems. Thus, in Example 6–11, the program is applicable to either
Tru64 UNIX or to OpenVMS, because MYENV can refer to an environment
variable or to a logical name.
Example 6–12 is another program that can be used on either system, depending
on the definition at system level of an environment variable or logical name, as
appropriate.
Processing Files and Records 6–19
Processing Files and Records
6.2 Identifying Files and Records from Within Your Compaq COBOL Program
Example 6–12 Using Environment Variables
IDENTIFICATION DIVISION.
PROGRAM-ID. ENVVAR-EXAMPLE2.
ENVIRONMENT DIVISION.
INPUT-OUTPUT SECTION.
FILE-CONTROL.
SELECT F-DISK ASSIGN TO "SYS$SCRATCH:envtest.dat".
DATA DIVISION.
FILE SECTION.
FD F-DISK
VALUE OF ID "SYS$DISK:".
01 DAT-RECORD PIC X(100).
PROCEDURE DIVISION.
P0. OPEN OUTPUT F-DISK.
CLOSE F-DISK.
PE. STOP RUN.
END PROGRAM ENVVAR-EXAMPLE2.
Example 6–12, on OpenVMS, would produce a file with the name
‘‘ENVTEST.DAT’’. On Tru64 UNIX, ‘‘SYS$SCRATCH:’’ has no meaning because
it is a OpenVMS logical. OpenVMS logicals are not defined on Tru64 UNIX.
However, the ‘‘SYS$SCRATCH:’’ in the ASSIGN clause can be defined as an
environment variable with the following command:
% setenv ’SYS$SCRATCH:’ ./
This would make ‘‘SYS$SCRATCH’’ point to the home directory. This can be used
for any OpenVMS logicals used in the Compaq COBOL source. When you declare
an environment variable you should be careful to match the case of what is in the
Compaq COBOL source with the setenv(3) line. ♦
6.2.2 Specifying File Organization and Record Access Mode
Your program must state—either explicitly or implicitly—a file’s organization
and record access mode before the program opens the file. The Environment
Division ORGANIZATION and ACCESS MODE clauses, if present, specify these
two characteristics.
In a Compaq COBOL program, each file is given a file name in a separate
Environment Division SELECT statement. The compiler determines the file
organization from the SELECT statement and its associated clauses.
For relative and indexed files, you must specify the ORGANIZATION IS
RELATIVE or the ORGANIZATION IS INDEXED phrase, respectively. For
sequential files you need not specify the ORGANIZATION IS SEQUENTIAL
phrase. For line sequential files (Alpha), you must explicitly declare
ORGANIZATION IS LINE SEQUENTIAL. When you omit the ORGANIZATION
IS clause the file organization is sequential.
The ASSIGN clause, in the SELECT statement, associates the file name with a
file specification. The file specification points the operating system to the file’s
physical and logical location on a specific hardware device.
The SELECT statement and the ASSIGN clause are further described in
Section 6.2.1. For further information, refer to the Compaq COBOL Reference
Manual.
Each file is further described with a file description (FD) entry in the Data
Division File Section. The FD entry is followed immediately by the file’s record
description.
6–20 Processing Files and Records
Processing Files and Records
6.2 Identifying Files and Records from Within Your Compaq COBOL Program
You can specify additional file characteristics in the Environment and Data
Divisions as follows:
•
Use the Environment Division APPLY clause to specify file characteristics
such as lock-holding, file extension factors, and preallocation factors. (See
Chapter 15.)
•
Use file description entries to specify record format and record blocking.
•
Use record description entries to specify physical record size or sizes.
Examples 6–13, 6–14, and Example 6–15 illustrate how to specify the file
organization and access mode for sequential, relative, and indexed files.
Example 6–13 Specifying Sequential File Organization and Sequential Access
Mode for a Sequential File
IDENTIFICATION DIVISION.
PROGRAM-ID. SEQ01.
ENVIRONMENT DIVISION.
INPUT-OUTPUT SECTION.
FILE-CONTROL.
SELECT MASTER-FILE ASSIGN TO "MASTER.DAT".
SELECT TRANS-FILE
ASSIGN TO "TRANS.DAT".
SELECT REPRT-FILE
ASSIGN TO "REPORT.DAT".
DATA DIVISION.
FILE SECTION.
FD MASTER-FILE.
01 MASTER-RECORD.
02 MASTER-DATA
PIC X(80).
02 MASTER-SIZE
PIC 99.
02 MASTER-TABLE
OCCURS 0 to 50 TIMES
DEPENDING ON MASTER-SIZE.
03 MASTER-YEAR PIC 99.
03 MASTER-COUNT PIC S9(5)V99.
FD TRANS-FILE.
01 TRANSACTION-RECORD
PIC X(25).
FD REPRT-FILE.
01 REPORT-LINE
PIC X(132).
Processing Files and Records 6–21
Processing Files and Records
6.2 Identifying Files and Records from Within Your Compaq COBOL Program
Example 6–14 Specifying Relative File Organization and Random Access Mode
for a Relative File
IDENTIFICATION DIVISION.
PROGRAM-ID. REL01.
ENVIRONMENT DIVISION.
INPUT-OUTPUT SECTION.
FILE-CONTROL.
SELECT FLAVORS ASSIGN TO "BRAND"
ORGANIZATION IS RELATIVE
ACCESS MODE IS RANDOM
RELATIVE KEY IS KETCHUP-MASTER-KEY.
DATA DIVISION.
FILE SECTION.
FD FLAVORS.
01 KETCHUP-MASTER
PIC X(50).
WORKING-STORAGE SECTION.
01 KETCHUP-MASTER-KEY
PIC 99.
Example 6–15 defines a dynamic access mode indexed file with one primary
key and two alternate record keys. Note that one alternate record key allows
duplicates. Any program using the identical entries in the SELECT clause as
shown in Example 6–15 can reference the DAIRY file sequentially and randomly.
Refer to the Compaq COBOL Reference Manual for information relating to the
RECORD KEY and ALTERNATE RECORD KEY clauses.
Example 6–15 Specifying Indexed File Organization and Dynamic Access Mode
for an Indexed File
IDENTIFICATION DIVISION.
PROGRAM-ID. INDEX01.
ENVIRONMENT DIVISION.
INPUT-OUTPUT SECTION.
FILE-CONTROL.
SELECT FLAVORS ASSIGN TO "DAIRY"
ORGANIZATION IS INDEXED
ACCESS MODE IS DYNAMIC
RECORD KEY IS ICE-CREAM-MASTER-KEY
ALTERNATE RECORD KEY IS ICE-CREAM-STORE-STATE
WITH DUPLICATES
ALTERNATE RECORD KEY IS ICE-CREAM-STORE-CODE.
DATA DIVISION.
FILE SECTION.
FD FLAVORS.
01 ICE-CREAM-MASTER.
02 ICE-CREAM-MASTER-KEY
PIC XXXX.
02 ICE-CREAM-MASTER-DATA.
03 ICE-CREAM-STORE-CODE
PIC XXXXX.
03 ICE-CREAM-STORE-ADDRESS PIC X(20).
03 ICE-CREAM-STORE-CITY
PIC X(20).
03 ICE-CREAM-STORE-STATE
PIC XX.
PROCEDURE DIVISION.
A00-BEGIN.
.
.
.
Example 6–16 defines a line sequential (Alpha) file.
6–22 Processing Files and Records
Processing Files and Records
6.2 Identifying Files and Records from Within Your Compaq COBOL Program
Example 6–16 Specifying Line Sequential File Organization with Sequential
Access Mode (Alpha)
IDENTIFICATION DIVISION.
PROGRAM ID. EX0616.
ENVIRONMENT DIVISION.
INOUT-OUTPUT SECTION.
FILE-CONTROL.
SELECT MUSIC ASSIGN TO "CLASSICAL"
ORGANIZATION IS LINE SEQUENTIAL.
DATA DIVISION.
FILE SECTION.
FD MUSIC.
01 OPERA
PIC X(9).
PROCEDURE DIVISION.
♦
A00-BEGIN.
.
.
.
File organization is discussed in more detail in Section 6.1.1. Record access mode
is discussed in the following section.
Record Access Mode
The methods for retrieving and storing records in a file are called record access
modes. Compaq COBOL supports the following three types of record access
modes:
•
ACCESS MODE IS SEQUENTIAL
With sequential files, sequential access mode retrieves the records in the
same sequence established by the WRITE statements that created the file.
With relative files, sequential access mode retrieves the records in the
order of ascending record key values (or relative record numbers).
With indexed files, sequential access mode retrieves records in the order
of record key values.
•
ACCESS MODE IS RANDOM—The value of the record key your program
specifies indicates the record to be accessed in Indexed and Relative files.
•
ACCESS MODE IS DYNAMIC—With relative and indexed files, dynamic
access mode allows you to switch back and forth between sequential access
mode and random access mode while reading a file by using the the NEXT
phrase on the READ statement. For more information about dynamic access
mode, refer to READ and REWRITE statements in the Compaq COBOL
Reference Manual.
When you omit the ACCESS MODE IS clause in the SELECT statement, the
access mode is sequential.
Example 6–17 shows sample SELECT statements for sequential files with
sequential access modes.
Sample SELECT statements for relative files with sequential and dynamic access
modes are shown in Example 6–18.
Processing Files and Records 6–23
Processing Files and Records
6.2 Identifying Files and Records from Within Your Compaq COBOL Program
Example 6–17 SELECT Statements for Sequential Files with Sequential Access Mode
(1)
FILE-CONTROL.
SELECT LIST-FILE
ASSIGN TO "MAIL.LIS"
ORGANIZATION IS SEQUENTIAL
ACCESS IS SEQUENTIAL.
(2)
FILE-CONTROL.
SELECT PAYROLL
ASSIGN TO "PAYROL.DAT".
Example 6–18 SELECT Statements for Relative Files with Sequential and Dynamic Access
Modes
(1)
FILE-CONTROL.
SELECT MODEL
ASSIGN TO "ACTOR.DAT"
ORGANIZATION IS RELATIVE
ACCESS MODE IS SEQUENTIAL.
(2)
FILE-CONTROL.
SELECT PARTS
ASSIGN TO "PART.DAT"
ORGANIZATION IS RELATIVE
ACCESS MODE IS DYNAMIC
RELATIVE KEY IS PART-NO.
Example 6–19 SELECT Statements for Indexed Files with Dynamic and Default Sequential
Access Modes
(1)
FILE-CONTROL.
SELECT A-GROUP
ASSIGN TO "RFCBA.PRO"
ORGANIZATION IS INDEXED
ACCESS MODE IS DYNAMIC
RECORD KEY IS WRITER
ALTERNATE RECORD KEY IS EDITOR.
(2)
FILE-CONTROL.
SELECT TEAS
ASSIGN TO "TEA"
ORGANIZATION IS INDEXED
RECORD KEY IS LEAVES.
Example 6–20 SELECT Statements for Line Sequential Files with Sequential Access Modes
(Alpha)
(1)
FILE-CONTROL.
SELECT MAMMALS
ASSIGN TO "DOLPHINS"
ORGANIZATION IS LINE SEQUENTIAL
ACCESS MODE IS SEQUENTIAL.
(2)
FILE-CONTROL.
SELECT VACATION-SPOTS
ASSIGN TO "BAHAMAS"
ORGANIZATION IS LINE SEQUENTIAL.
Sample SELECT statements for indexed files with dynamic and sequential access
modes are shown in Example 6–19.
Because the default file organization is also sequential, both the relative and
indexed examples require the ORGANIZATION IS clause.
Sample SELECT statements for line sequential files with sequential access modes
are shown in Example 6–20.
6–24 Processing Files and Records
Processing Files and Records
6.3 Creating and Processing Files
6.3 Creating and Processing Files
Creating and processing sequential, line sequential, relative, and indexed files
includes the following tasks:
1. Opening the file
2. Executing valid I/O statements
3. Closing the file
Sections 6.3.2, 6.3.3, and 6.3.4 describe the specific tasks involved in creating and
processing sequential, relative, and indexed files.
6.3.1 Opening and Closing Files
A Compaq COBOL program must open a file with an OPEN statement before any
other I/O or Report Writer statement can reference it. Files can be opened more
than once in the same program as long as they are closed before being reopened.
Sample OPEN and CLOSE statements are shown in Example 6–21.
Example 6–21 OPEN and CLOSE Statements
.
.
.
OPEN INPUT MASTER-FILE.
OPEN OUTPUT REPORT-FILE.
OPEN I-O MASTER-FILE2
TRANS-FILE
OUTPUT REPORT-FILE2.
CLOSE MASTER-FILE.
CLOSE TRANS-FILE, MASTER-FILE2
REPORT-FILE, REPORT-FILE2.
.
.
.
The OPEN statement must specify one of the following four open modes:
INPUT
OUTPUT
I-O {Not for LINE SEQUENTIAL}
EXTEND
Your choice, along with the file’s organization and access mode, determines which
I/O statements you can use. Sections 6.3.2, 6.3.3, and 6.3.4 discuss the I/O
statements for sequential, relative, and indexed files, respectively. Section 12.8.4,
Case Sensitivity on Tru64 UNIX explains the importance of attention to case.
When your program performs an OPEN statement, the following events take
place:
1. The I/O system builds a file specification by using the contents of the VALUE
OF ID clause, if any, to alter or complete the file specification in the ASSIGN
clause. Logicals and environment variables are translated.
2. The I/O system checks the file’s current status. If the file is unavailable, or
if it was closed WITH LOCK, the OPEN statement fails. (See Chapter 8 for
information on file sharing.)
Processing Files and Records 6–25
Processing Files and Records
6.3 Creating and Processing Files
3. If the file specification names an invalid device, or contains any other errors,
the I/O system generates an error message and the OPEN statement fails.
4. The I/O system takes one of the following actions if it cannot find the file:
a. If the file’s OPEN mode is OUTPUT, the file is created.
b. If the file’s OPEN mode is EXTEND, or I-O, the OPEN statement fails,
unless the file’s SELECT clause includes the OPTIONAL phrase. If the
file’s SELECT clause includes the OPTIONAL phrase, the file is created.
c. If the file’s OPEN mode is INPUT, and its SELECT clause includes the
OPTIONAL phrase, the OPEN statement is successful. The first read on
that file causes the AT END or INVALID KEY condition.
d. If none of the previous conditions is met, the OPEN fails and the
Declarative USE procedure (if any) gains control. If no Declarative
USE procedure exists, the I/O system aborts the program.
5. If the file’s OPEN mode is OUTPUT, and a file by the same name already
exists, a new version is created.
6. If the file characteristics specified by the program attempting an OPEN
operation differ from the characteristics specified when the file was created,
the OPEN statement fails.
If the file is on magnetic tape, the I/O system rewinds the tape. (To close a file
on tape without rewinding the tape, use the NO REWIND phrase.) This speeds
processing when you want to write another file beyond the end of the first file, as
in the following example:
CLOSE MASTER-FILE NO REWIND.
You can also close a file and prevent your program from opening that file again in
the same run, as in the following example:
CLOSE MASTER-FILE WITH LOCK.
6.3.2 File Handling for Sequential and Line Sequential (Alpha) Files
Creating a sequential or (on Alpha only) line sequential file involves the following:
1. Opening the file for OUTPUT or EXTEND
2. Executing valid I/O statements
3. Closing the file
By default, Compaq COBOL assumes sequential organization and sequential
access mode. (See Example 6–22.)
Example 6–22 Creating a Sequential File
IDENTIFICATION DIVISION.
PROGRAM-ID. SEQ01.
ENVIRONMENT DIVISION.
INPUT-OUTPUT SECTION.
FILE-CONTROL.
SELECT TRANS-FILE ASSIGN TO "TRANS.DAT".
(continued on next page)
6–26 Processing Files and Records
Processing Files and Records
6.3 Creating and Processing Files
Example 6–22 (Cont.) Creating a Sequential File
DATA DIVISION.
FILE SECTION.
FD TRANS-FILE.
01 TRANSACTION-RECORD
PIC X(25).
PROCEDURE DIVISION.
A000-BEGIN.
OPEN OUTPUT TRANS-FILE.
PERFORM A010-PROCESS-TRANS
UNTIL TRANSACTION-RECORD = "END".
CLOSE TRANS-FILE.
STOP RUN.
A010-PROCESS-TRANS.
DISPLAY "Enter next record - X(25)".
DISPLAY "enter END to terminate the session".
DISPLAY "-------------------------".
ACCEPT TRANSACTION-RECORD.
IF TRANSACTION-RECORD NOT = "END"
WRITE TRANSACTION-RECORD.
Example 6–23 Creating a Line Sequential File (Alpha)
IDENTIFICATION DIVISION.
PROGRAM-ID. LINESEQ01.
ENVIRONMENT DIVISION.
INPUT-OUTPUT SECTION.
FILE-CONTROL.
SELECT LINESEQ-FILE ASSIGN TO "LINESEQ.DAT".
DATA DIVISION.
FILE SECTION.
FD LINESEQ-FILE.
01 LINESEQ-RECORD
PIC X(25).
PROCEDURE DIVISION.
A000-BEGIN.
OPEN OUTPUT LINESEQ-FILE.
CLOSE LINESEQ-FILE.
STOP RUN.
By default, Compaq COBOL assumes sequential access mode when the line
sequential organization is specified. (See Example 6–23.) ♦
Statements for Sequential and Line Sequential (Alpha) File Processing
Processing a sequential file or line sequential file (Alpha) involves the following:
1. Opening the file
2. Processing the file with valid I/O statements
3. Closing the file
Table 6–3 lists the valid I/O statements for sequential files, and Table 6–4 lists
the valid I/O statements for line sequential files. Both tables illustrate the
following relationships:
•
Organization determines valid access modes.
•
Organization and access mode determine valid open modes.
Processing Files and Records 6–27
Processing Files and Records
6.3 Creating and Processing Files
•
All three (organization, access, and open mode) enable or disable I/O
statements.
Table 6–3 Valid I/O Statements for Sequential Files
Open Mode
File
Organization
Access
Mode
SEQUENTIAL SEQUENTIAL
Statement
INPUT
OUTPUT I/O
EXTEND
READ
Yes
No
Yes
No
REWRITE
No
No
Yes
No
WRITE
No
Yes
No
Yes
UNLOCK
Yes
Yes
Yes
Yes
Writing a Sequential File
Each WRITE statement appends a logical record to the end of an output file,
thereby creating an entirely new record in the file. The WRITE statement
appends records to files that are OPEN for the following modes:
•
OUTPUT—Output mode can create the following two kinds of files:
Storage files—A storage file remains on tape or disk for future reference
or processing.
Print-control files—The Data Division LINAGE clause, the Environment
Division APPLY PRINT-CONTROL clause, the Procedure Division
ADVANCING phrase (in the WRITE statement), or Report Writer
statements and phrases designates a file as a print-control file.
On OpenVMS Alpha, each record in a print-control file contains a header
that performs line spacing. On Tru64 UNIX, line spacing is done with
blank records in print-control files.
•
EXTEND—Extend mode permits new records to be added in sequence after
the last record of an existing file (see Extending a Sequential File or Line
Sequential File (Alpha) in Section 6.5.1).
Table 6–4 Valid I/O Statements for Line Sequential Files (Alpha)
Open Mode
File
Organization
Access
Mode
LINE
SEQUENTIAL
SEQUENTIAL
6–28 Processing Files and Records
Statement
INPUT
OUTPUT EXTEND
READ
Yes
No
No
WRITE
No
Yes
Yes
UNLOCK
Yes
Yes
Yes
Processing Files and Records
6.3 Creating and Processing Files
Writing a Line Sequential File (Alpha)
Each WRITE statement appends a logical record to the end of an output file,
thereby creating an entirely new record in the file. The WRITE statement
appends records to files that are OPEN for the following modes:
•
OUTPUT—Output mode creates a new file or overwrites an already existing
file.
•
EXTEND—Extend mode permits new records to be added in sequence after
the last record of an existing file (see Extending a Sequential File or Line
Sequential File (Alpha). ♦
Writing a Record
You can write records in the following two ways:
•
WRITE record-name FROM source-area
•
WRITE record-name
The first way provides easier program readability with multiple record types.
For example, statements ( 1 ) and ( 2 ) in the following example are logically
equivalent:
FILE SECTION.
FD STOCK-FILE.
01 STOCK-RECORD
PIC X(80).
WORKING-STORAGE SECTION.
01 STOCK-WORK
PIC X(80).
----------------(1)---------------WRITE STOCK-RECORD FROM STOCK-WORK.
--------------(2)--------------MOVE STOCK-WORK TO STOCK-RECORD.
WRITE STOCK-RECORD.
When you omit the FROM phrase, you process the records directly in the record
area or buffer (for example, STOCK-RECORD).
The following example writes the record PRINT-LINE to the device assigned
to that record’s file, then skips three lines. At the end of the page (as specified
by the LINAGE clause), it causes program control to transfer to HEADERROUTINE.
WRITE PRINT-LINE BEFORE ADVANCING 3 LINES
AT END-OF-PAGE PERFORM HEADER-ROUTINE.
For a WRITE FROM statement, if the destination area is shorter than the file’s
record length, the destination area is padded on the right with spaces; if longer,
the destination area is truncated on the right. This follows the rules for a group
move.
6.3.3 File Handling for Relative Files
Creating a relative file involves the following tasks:
1. Specifying ORGANIZATION IS RELATIVE in the Environment Division
SELECT clause
2. Specifying ACCESS MODE IS SEQUENTIAL (or RANDOM) in the
Environment Division SELECT clause
Each of these two access modes requires a different processing technique.
(Refer to the Creating a Relative File in Sequential Access Mode and
Creating a Relative File in Random Access Mode sections in this chapter
for information about those techniques.)
Processing Files and Records 6–29
Processing Files and Records
6.3 Creating and Processing Files
3. Opening the file for OUTPUT or I-O
4. Initializing the relative key data name for each new record
5. Executing a WRITE statement for each new relative record
6. Closing the file
Creating a Relative File in Sequential Access Mode
When your program creates a relative file in sequential access mode, the I/O
system does not use the relative key. Instead, it writes the first record in the file
at relative record number 1, the second record at relative record number 2, and
so on, until the program closes the file. If you use the RELATIVE KEY IS clause,
the compiler moves the relative record number of the record being written to
the relative key data item. Example 6–24 writes 10 records with relative record
numbers 1 to 10.
Example 6–24 Creating a Relative File in Sequential Access Mode
IDENTIFICATION DIVISION.
PROGRAM-ID. REL02.
ENVIRONMENT DIVISION.
INPUT-OUTPUT SECTION.
FILE-CONTROL.
SELECT FLAVORS ASSIGN TO "BRAND"
ORGANIZATION IS RELATIVE
ACCESS MODE IS SEQUENTIAL.
DATA DIVISION.
FILE SECTION.
FD FLAVORS.
01 KETCHUP-MASTER.
02 FILLER
PIC X(14).
02 REC-NUM
PIC 9(05).
02 FILLER
PIC X(31).
02 FILLER
PIC X(31).
WORKING-STORAGE SECTION.
01 REC-COUNT
PIC S9(5) VALUE 0.
PROCEDURE DIVISION.
A000-BEGIN.
OPEN OUTPUT FLAVORS.
PERFORM A010-WRITE 10 TIMES.
CLOSE FLAVORS.
STOP RUN.
A010-WRITE.
MOVE "Record number" TO KETCHUP-MASTER.
ADD 1 TO REC-COUNT.
MOVE REC-COUNT TO REC-NUM.
WRITE KETCHUP-MASTER
INVALID KEY DISPLAY "BAD WRITE"
STOP RUN.
Creating a Relative File in Random Access Mode
When a program creates a relative file using random access mode, the program
must place a value in the RELATIVE KEY data item before executing a WRITE
statement. Example 6–25 shows how to supply the relative key. It writes 10
records in the cells numbered: 2, 4, 6, 8, 10, 12, 14, 16, 18, and 20. Record cells
1, 3, 5, 7, 9, 11, 13, 15, 17, and 19 are also created, but contain no valid records.
6–30 Processing Files and Records
Processing Files and Records
6.3 Creating and Processing Files
Example 6–25 Creating a Relative File in Random Access Mode
IDENTIFICATION DIVISION.
PROGRAM-ID. REL03.
ENVIRONMENT DIVISION.
INPUT-OUTPUT SECTION.
FILE-CONTROL.
SELECT FLAVORS ASSIGN TO "BRAND"
ORGANIZATION IS RELATIVE
ACCESS MODE IS RANDOM
RELATIVE KEY IS KETCHUP-MASTER-KEY.
DATA DIVISION.
FILE SECTION.
FD FLAVORS.
01 KETCHUP-MASTER.
02 FILLER
PIC X(14).
02 REC-NUM
PIC 9(05).
02 FILLER
PIC X(31).
WORKING-STORAGE SECTION.
01 KETCHUP-MASTER-KEY
PIC 99.
01 REC-COUNT
PIC S9(5) VALUE 0.
PROCEDURE DIVISION.
A000-BEGIN.
OPEN OUTPUT FLAVORS.
MOVE 0 TO KETCHUP-MASTER-KEY.
PERFORM A010-CREATE-RELATIVE-FILE 10 TIMES.
DISPLAY "END OF JOB".
CLOSE FLAVORS.
STOP RUN.
A010-CREATE-RELATIVE-FILE.
ADD 2 TO KETCHUP-MASTER-KEY.
MOVE "Record number" TO KETCHUP-MASTER.
ADD 2 TO REC-COUNT.
MOVE REC-COUNT TO REC-NUM.
WRITE KETCHUP-MASTER
INVALID KEY DISPLAY "BAD WRITE"
STOP RUN.
Statements for Relative File Processing
Processing a relative file involves the following:
1. Opening the file
2. Setting the relative record number
3. Processing the file with valid I/O statements
4. Closing the file
Table 6–5 lists the valid I/O statements and illustrates the following
relationships:
•
Organization determines valid access modes.
•
Organization and access mode determine valid open modes.
•
All three (organization, access, and open mode) enable or disable I/O
statements.
Processing Files and Records 6–31
Processing Files and Records
6.3 Creating and Processing Files
Table 6–5 Valid I/O Statements for Relative Files
Open Mode
File
Organization
Access
Mode
RELATIVE
Statement
INPUT
OUTPUT I-O
EXTEND
SEQUENTIAL
DELETE
READ
REWRITE
START
WRITE
UNLOCK
No
Yes
No
Yes
No
Yes
No
No
No
No
Yes
Yes
Yes
Yes
Yes
Yes
No
Yes
No
No
No
No
Yes
Yes
RANDOM
DELETE
READ
REWRITE
WRITE
UNLOCK
No
Yes
No
No
Yes
No
No
No
Yes
Yes
Yes
Yes
Yes
Yes
Yes
No
No
No
No
No
DYNAMIC
DELETE
READ
READ NEXT
REWRITE
START
WRITE
UNLOCK
No
Yes
Yes
No
Yes
No
Yes
No
No
No
No
No
Yes
Yes
Yes
Yes
Yes
Yes
Yes
Yes
Yes
No
No
No
No
No
No
No
Writing a Relative File
Each WRITE statement places a record into a cell that contains no valid data. If
the cell does not already exist, the I/O system creates it. To change the contents
of a cell that already contains valid data, use the REWRITE statement.
6.3.4 File Handling for Indexed Files
Creating an indexed file involves the following tasks:
1. Specifying ORGANIZATION IS INDEXED in the Environment Division
SELECT clause
2. Specifying ACCESS MODE IS SEQUENTIAL (or RANDOM or DYNAMIC) in
the Environment Division SELECT clause
3. Opening the file for OUTPUT (to create and add records) or for I-O (to add,
change, delete, or extend records)
4. Initializing the key values
5. Executing a WRITE statement
6. Closing the file
One way to populate an indexed file is to sequentially write the records in
ascending order by primary key. Example 6–26 creates and populates an indexed
file from a sequential file, which has been sorted in ascending sequence on the
primary key field. Notice that the primary and alternate keys are initialized in
ICE-CREAM-MASTER when the contents of the fields in INPUT-RECORD are
read into ICE-CREAM-MASTER before the record is written.
6–32 Processing Files and Records
Processing Files and Records
6.3 Creating and Processing Files
Example 6–26 Creating and Populating an Indexed File
IDENTIFICATION DIVISION.
PROGRAM-ID. INDEX02.
ENVIRONMENT DIVISION.
INPUT-OUTPUT SECTION.
FILE-CONTROL.
SELECT INPUT-FILE ASSIGN TO "DAIRYI".
SELECT FLAVORS
ASSIGN TO "DAIRY"
ORGANIZATION IS INDEXED
ACCESS MODE IS SEQUENTIAL
RECORD KEY IS ICE-CREAM-MASTER-KEY
ALTERNATE RECORD KEY IS ICE-CREAM-STORE-STATE
WITH DUPLICATES
ALTERNATE RECORD KEY IS ICE-CREAM-STORE-CODE.
DATA DIVISION.
FILE SECTION.
FD INPUT-FILE.
01 INPUT-RECORD.
02 INPUT-RECORD-KEY
PIC 9999.
02 INPUT-RECORD-DATA
PIC X(47).
FD FLAVORS.
01 ICE-CREAM-MASTER.
02 ICE-CREAM-MASTER-KEY
PIC XXXX.
02 ICE-CREAM-MASTER-DATA.
03 ICE-CREAM-STORE-CODE
PIC XXXXX.
03 ICE-CREAM-STORE-ADDRESS PIC X(20).
03 ICE-CREAM-STORE-CITY
PIC X(20).
03 ICE-CREAM-STORE-STATE
PIC XX.
WORKING-STORAGE SECTION.
01 END-OF-FILE
PIC X.
PROCEDURE DIVISION.
A000-BEGIN.
OPEN INPUT INPUT-FILE.
OPEN OUTPUT FLAVORS.
A010-POPULATE.
PERFORM A100-READ-INPUT UNTIL END-OF-FILE = "Y".
A020-EOJ.
DISPLAY "END OF JOB".
STOP RUN.
A100-READ-INPUT.
READ INPUT-FILE INTO ICE-CREAM-MASTER
AT END MOVE "Y" TO END-OF-FILE.
IF END-OF-FILE NOT = "Y"
WRITE ICE-CREAM-MASTER INVALID KEY DISPLAY "BAD WRITE"
STOP RUN.
The program can add records to the file until it reaches the physical limitations
of its storage device. When this occurs, you should follow these steps:
1. Delete unnecessary records.
2. Back up the file.
3. Recreate the file either by using the OpenVMS Alpha CONVERT Utility to
optimize file space, or by using a Compaq COBOL program.
Statements for Indexed File Processing
Processing an indexed file involves the following:
1. Opening the file
2. Processing the file with valid I/O statements
3. Closing the file
Processing Files and Records 6–33
Processing Files and Records
6.3 Creating and Processing Files
Table 6–6 lists the valid I/O statements and illustrates the following
relationships:
•
File organization determines valid access modes.
•
File organization and access mode determine valid open modes.
•
All three (organization, access, and open mode) enable or disable I/O
statements.
Table 6–6 Valid I/O Statements for Indexed Files
Open Mode
File
Organization
Access
Mode
INDEXED
Statement
INPUT
OUTPUT I-O
EXTEND
SEQUENTIAL
DELETE
READ
REWRITE
START
WRITE
UNLOCK
No
Yes
No
Yes
No
Yes
No
No
No
No
Yes
Yes
Yes
Yes
Yes
Yes
No
Yes
No
No
No
No
Yes
Yes
RANDOM
DELETE
READ
REWRITE
WRITE
UNLOCK
No
Yes
No
No
Yes
No
No
No
Yes
Yes
Yes
Yes
Yes
Yes
Yes
No
No
No
No
No
DYNAMIC
DELETE
READ
READ NEXT
REWRITE
START
WRITE
UNLOCK
No
Yes
Yes
No
Yes
No
Yes
No
No
No
No
No
Yes
Yes
Yes
Yes
Yes
Yes
Yes
Yes
Yes
No
No
No
No
No
No
No
Writing an Indexed File
You specify sequential access mode in the Environment Division SELECT clause
when you want to write records in ascending or descending order by primary key,
depending on the sort order. Specify random or dynamic access mode to enable
your program to write records in any order.
Using Segmented Keys in Indexed Files
Segmented keys are a form of primary or alternate keys. A segmented key can be
made up of multiple pieces, or segments. These segments are data items that you
define in the record description entry for a file. They are concatenated, in order of
specification in the ALTERNATE RECORD KEY or RECORD KEY clause, to form
the segmented key, which will be treated like any "simple" primary or alternate
key.
With segmented keys, you have more flexibility in defining record description
entries for indexed files. A segmented key is made up of between one and
eight data items, which can be defined anywhere and in any order within the
record description, and which can even overlap. For example, you might use the
following record definition in your program:
6–34 Processing Files and Records
Processing Files and Records
6.3 Creating and Processing Files
01 EMPLOYEE.
02 FORENAME
02 BADGE-NO
02 DEPT
02 SURNAME
02 INITIAL
PIC
PIC
PIC
PIC
PIC
X(10).
X(6).
X(2).
X(20).
X(1).
Then the following line in your program, which specifies the segmented key name
and three of its segments:
RECORD KEY IS NAME = SURNAME FORENAME INITIAL
causes Compaq COBOL to treat name as if it were an explicitly defined group
item consisting of the following:
02 SURNAME PIC X(20).
02 FORENAME PIC X(10).
02 INITIAL PIC X(1).
You define a segmented key in either the RECORD KEY clause or the
ALTERNATE RECORD KEY clause. You use the START or READ statement
to reference a segmented key.
Each segment is a data-name of a data item in a record description entry. A
segment can be an alphanumeric or alphabetic item, a group item, or an unsigned
numeric display item. A segment can be qualified, but it cannot be a group item
containing a variable-occurrence item.
Refer to the chapters on the Data Division and the Procedure Division in the
Compaq COBOL Reference Manual for more information on segmented keys.
Example 6–27 shows how you might use segmented keys. In this example, SEGICE-CREAM-KEY is a segmented-key name. ICE-CREAM-STORE-KIND and
ICE-CREAM-STORE-ZIP are the segments. Notice that the segmented-key name
is referenced in the READ statement.
Example 6–27 Using Segmented Keys
IDENTIFICATION DIVISION.
PROGRAM-ID. MANAGER.
ENVIRONMENT DIVISION.
INPUT-OUTPUT SECTION.
FILE-CONTROL.
SELECT FLAVORS
ASSIGN TO "STORE"
ORGANIZATION IS INDEXED
ACCESS MODE IS RANDOM
RECORD KEY IS
SEG-ICE-CREAM-KEY =
ICE-CREAM-STORE-KIND,
ICE-CREAM-STORE-ZIP.
(continued on next page)
Processing Files and Records 6–35
Processing Files and Records
6.3 Creating and Processing Files
Example 6–27 (Cont.) Using Segmented Keys
DATA DIVISION.
FILE SECTION.
FD FLAVORS.
01 ICE-CREAM-MASTER.
02 ICE-CREAM-DATA.
03 ICE-CREAM-STORE-KIND
PIC XX.
03 ICE-CREAM-STORE-MANAGER PIC X(40).
03 ICE-CREAM-STORE-SIZE
PIC XX.
03 ICE-CREAM-STORE-ADDRESS PIC X(20).
03 ICE-CREAM-STORE-CITY
PIC X(20).
03 ICE-CREAM-STORE-STATE
PIC XX.
03 ICE-CREAM-STORE-ZIP
PIC XXXXX.
WORKING-STORAGE SECTION.
01 PROGRAM-STAT
PIC X.
88 OPERATOR-STOPS-IT
VALUE "1".
PROCEDURE DIVISION.
A000-BEGIN.
OPEN I-O FLAVORS.
PERFORM A020-INITIAL-PROMPT.
IF OPERATOR-STOPS-IT
PERFORM A005-TERMINATE.
PERFORM A030-RANDOM-READ.
PERFORM A025-SUBSEQUENT-PROMPTS UNTIL OPERATOR-STOPS-IT.
PERFORM A005-TERMINATE.
A005-TERMINATE.
DISPLAY "END OF JOB".
STOP RUN.
A020-INITIAL-PROMPT.
DISPLAY "Do you want to see the manager of a store?".
PERFORM A040-GET-ANS UNTIL PROGRAM-STAT = "Y" OR "y" OR "N" OR "n".
IF PROGRAM-STAT = "N" OR "n"
THEN
MOVE "1" TO PROGRAM-STAT.
A025-SUBSEQUENT-PROMPTS.
MOVE SPACE TO PROGRAM-STAT.
DISPLAY "Do you want to see the manager of another store?".
PERFORM A040-GET-ANS UNTIL PROGRAM-STAT = "Y" OR "y" OR "N" OR "n".
IF PROGRAM-STAT = "Y" OR "y"
THEN
PERFORM A030-RANDOM-READ
ELSE
MOVE "1" TO PROGRAM-STAT.
A030-RANDOM-READ.
DISPLAY "Enter store kind: ".
ACCEPT ICE-CREAM-STORE-KIND.
DISPLAY "Enter zip code: " AT LINE PLUS 2.
ACCEPT ICE-CREAM-STORE-ZIP.
PERFORM A100-READ-INPUT-BY-KEY.
A040-GET-ANS.
DISPLAY "Please answer Y or N"
ACCEPT PROGRAM-STAT.
A100-READ-INPUT-BY-KEY.
READ FLAVORS KEY IS SEG-ICE-CREAM-KEY
INVALID KEY
DISPLAY "Store does not exist - Try again"
NOT INVALID KEY
DISPLAY "The manager is: ", ICE-CREAM-STORE-MANAGER.
6–36 Processing Files and Records
Processing Files and Records
6.4 Reading Files
6.4 Reading Files
Reading sequential, line sequential, relative, and indexed files includes the
following tasks:
1. Opening the file
2. Executing a READ or START statement
Sections 6.4.1, 6.4.2, and 6.4.3 describe the specific tasks involved in reading
sequential, line sequential, relative, and indexed files.
6.4.1 Reading a Sequential or Line Sequential (Alpha) File
Reading a sequential or (on Alpha only) line sequential file involves the following:
1. Opening the file for INPUT or I/O for sequential files, or INPUT for line
sequential files (I/O is not permitted for line sequential files)
2. Executing a READ statement
Each READ statement reads a single logical record and makes its contents
available to the program in the record area. There are two ways of reading
records:
•
READ file-name INTO destination-area
•
READ file-name
Statements ( 1 ) and ( 2 ) in the following example are logically equivalent:
FILE SECTION.
FD STOCK-FILE.
01 STOCK-RECORD
PIC X(80).
WORKING-STORAGE SECTION.
01 STOCK-WORK
PIC X(80).
-------------(1)--------------READ STOCK-FILE INTO STOCK-WORK.
-------------(2)--------------READ STOCK-FILE.
MOVE STOCK-RECORD TO STOCK-WORK.
When you omit the INTO phrase, you process the records directly in the record
area or buffer (for example, STOCK-RECORD). The record is also available in the
record area if you use the INTO phrase.
In a READ INTO clause, if the destination area is shorter than the length of
the record area being read, the record is truncated on the right and a warning is
issued; if longer, the destination area is filled on the right with blanks.
If the data in the record being read is shorter than the length of the record (for
example, a variable-length record), the contents of the record beyond that data
are undefined.
Generally speaking, if the recordtype is fixed, the prolog and epilog are zero. The
exceptions to this are: for relative files there is a 1 byte record status flag prolog;
for sequential files there is a 1 byte epilog if the record length is odd.
Example 6–28 reads a sequential file and displays its contents on the terminal.
Processing Files and Records 6–37
Processing Files and Records
6.4 Reading Files
Example 6–28 Reading a Sequential File
IDENTIFICATION DIVISION.
PROGRAM-ID. SEQ02.
ENVIRONMENT DIVISION.
INPUT-OUTPUT SECTION.
FILE-CONTROL.
SELECT TRANS-FILE ASSIGN TO "TRANS".
DATA DIVISION.
FILE SECTION.
FD TRANS-FILE.
01 TRANSACTION-RECORD
PIC X(25).
PROCEDURE DIVISION.
A000-BEGIN.
OPEN INPUT TRANS-FILE.
PERFORM A100-READ-TRANS-FILE
UNTIL TRANSACTION-RECORD = "END".
CLOSE TRANS-FILE.
STOP RUN.
A100-READ-TRANS-FILE.
READ TRANS-FILE
AT END MOVE "END" TO TRANSACTION-RECORD.
IF TRANSACTION-RECORD NOT = "END"
DISPLAY TRANSACTION-RECORD.
6.4.2 Reading a Relative File
Your program can read a relative file sequentially, randomly, or dynamically. The
following three sections describe the specific tasks involved in reading a relative
file sequentially, randomly, and dynamically.
Reading a Relative File Sequentially
Reading relative records sequentially involves the following:
1. Specifying ORGANIZATION IS RELATIVE in the Environment Division
SELECT clause
2. Specifying ACCESS MODE IS SEQUENTIAL (or DYNAMIC) in the
Environment Division SELECT clause (and using the READ NEXT phrase)
3. Opening the file for INPUT or I-O
4. Reading records as you would a sequential file, or using a START statement
The READ statement makes the next logical record of an open file available to the
program. The system reads the file sequentially from either cell 1 or wherever
you START the file, up to cell n. It skips the empty cells and retrieves only valid
records. Each READ statement updates the contents of the file’s RELATIVE
KEY data item, if specified. The data item contains the relative number of the
available record. When the at end condition occurs, execution of the READ
statement is unsuccessful (see Chapter 7).
Sequential processing need not begin at the first record of a relative file. The
START statement specifies the next record to be read and positions the file
position indicator for subsequent I/O operations.
Example 6–29 reads a relative file sequentially, displaying every record on the
terminal.
6–38 Processing Files and Records
Processing Files and Records
6.4 Reading Files
Example 6–29 Reading a Relative File Sequentially
IDENTIFICATION DIVISION.
PROGRAM-ID. REL04.
ENVIRONMENT DIVISION.
INPUT-OUTPUT SECTION.
FILE-CONTROL.
SELECT FLAVORS ASSIGN TO "BRAND"
ORGANIZATION IS RELATIVE
ACCESS MODE IS SEQUENTIAL
RELATIVE KEY IS KETCHUP-MASTER-KEY.
DATA DIVISION.
FILE SECTION.
FD FLAVORS.
01 KETCHUP-MASTER
PIC X(50).
WORKING-STORAGE SECTION.
01 KETCHUP-MASTER-KEY
PIC 99.
01 END-OF-FILE
PIC X.
PROCEDURE DIVISION.
A000-BEGIN.
OPEN INPUT FLAVORS.
PERFORM A010-DISPLAY-RECORDS UNTIL END-OF-FILE = "Y".
A005-EOJ.
DISPLAY "END OF JOB".
CLOSE FLAVORS.
STOP RUN.
A010-DISPLAY-RECORDS.
READ FLAVORS AT END MOVE "Y" TO END-OF-FILE.
IF END-OF-FILE NOT = "Y" DISPLAY KETCHUP-MASTER.
Reading a Relative File Randomly
Reading relative records randomly involves the following:
1. Specifying ORGANIZATION IS RELATIVE in the Environment Division
SELECT clause
2. Specifying ACCESS MODE IS RANDOM (or DYNAMIC) in the Environment
Division SELECT clause
3. Opening the file for INPUT or I-O
4. Moving the relative record number value to the RELATIVE KEY data name
5. Reading the record from the cell identified by the relative record number
The READ statement selects a specific record from an open file and makes it
available to the program. The value of the relative key identifies the specific
record. The system reads the record identified by the RELATIVE KEY data name
clause. If the cell does not contain a valid record, the invalid key condition occurs,
and the READ operation fails (see Chapter 7).
Example 6–30 reads a relative file randomly, displaying every record on the
terminal.
Example 6–30 Reading a Relative File Randomly
(continued on next page)
Processing Files and Records 6–39
Processing Files and Records
6.4 Reading Files
Example 6–30 (Cont.) Reading a Relative File Randomly
IDENTIFICATION DIVISION.
PROGRAM-ID. REL05.
ENVIRONMENT DIVISION.
INPUT-OUTPUT SECTION.
FILE-CONTROL.
SELECT FLAVORS ASSIGN TO "BRAND"
ORGANIZATION IS RELATIVE
ACCESS MODE IS RANDOM
RELATIVE KEY IS KETCHUP-MASTER-KEY.
DATA DIVISION.
FILE SECTION.
FD FLAVORS.
01 KETCHUP-MASTER
PIC X(50).
WORKING-STORAGE SECTION.
01 KETCHUP-MASTER-KEY
PIC 99 VALUE 99.
PROCEDURE DIVISION.
A000-BEGIN.
OPEN INPUT FLAVORS.
PERFORM A100-DISPLAY-RECORD UNTIL KETCHUP-MASTER-KEY = 00.
DISPLAY "END OF JOB".
CLOSE FLAVORS.
STOP RUN.
A100-DISPLAY-RECORD.
DISPLAY "TO DISPLAY A RECORD ENTER ITS RECORD NUMBER (0 to END)".
ACCEPT KETCHUP-MASTER-KEY WITH CONVERSION.
IF KETCHUP-MASTER-KEY > 00
READ FLAVORS
INVALID KEY DISPLAY "BAD KEY"
CLOSE FLAVORS
STOP RUN
END-READ
DISPLAY KETCHUP-MASTER.
Reading a Relative File Dynamically
The READ statement has two formats so that it can select the next logical
record (sequential access) or select a specific record (random access) and make it
available to the program. In dynamic mode, the program can switch from random
access I/O statements to sequential access I/O statements in any order, without
closing and reopening files. However, you must use the READ NEXT statement
to sequentially read a relative file open in dynamic mode.
Sequential processing need not begin at the first record of a relative file. The
START statement repositions the file position indicator for subsequent I/O
operations.
A sequential read of a dynamic file is indicated by the NEXT phrase of the READ
statement. A READ NEXT statement should follow the START statement since
the READ NEXT statement reads the next record indicated by the current record
pointer. Subsequent READ NEXT statements sequentially retrieve records until
another START statement or random READ statement executes.
Example 6–31 processes a relative file containing 10 records. If the previous
program examples in this chapter have been run, each record has a unique even
number from 2 to 20 as its key. The program positions the record pointer (using
the START statement) to the cell corresponding to the value in INPUT-RECORDKEY. The program’s READ...NEXT statement retrieves the remaining valid
records in the file for display on the terminal.
6–40 Processing Files and Records
Processing Files and Records
6.4 Reading Files
Example 6–31 Reading a Relative File Dynamically
IDENTIFICATION DIVISION.
PROGRAM-ID. REL06.
ENVIRONMENT DIVISION.
INPUT-OUTPUT SECTION.
FILE-CONTROL.
SELECT FLAVORS ASSIGN TO "BRAND"
ORGANIZATION IS RELATIVE
ACCESS MODE IS DYNAMIC
RELATIVE KEY IS KETCHUP-MASTER-KEY.
DATA DIVISION.
FILE SECTION.
FD FLAVORS.
01 KETCHUP-MASTER
PIC X(50).
WORKING-STORAGE SECTION.
01 KETCHUP-MASTER-KEY
PIC 99.
01 END-OF-FILE
PIC X VALUE "N".
PROCEDURE DIVISION.
A000-BEGIN.
OPEN I-O FLAVORS.
DISPLAY "Enter number".
ACCEPT KETCHUP-MASTER-KEY.
START FLAVORS KEY = KETCHUP-MASTER-KEY
INVALID KEY DISPLAY "Bad START statement"
GO TO A005-END-OF-JOB.
PERFORM A010-DISPLAY-RECORDS UNTIL END-OF-FILE = "Y".
A005-END-OF-JOB.
DISPLAY "END OF JOB".
CLOSE FLAVORS.
STOP RUN.
A010-DISPLAY-RECORDS.
READ FLAVORS NEXT RECORD AT END MOVE "Y" TO END-OF-FILE.
IF END-OF-FILE NOT = "Y" DISPLAY KETCHUP-MASTER.
6.4.3 Reading an Indexed File
Your program can read an indexed file sequentially, randomly, or dynamically.
Reading an Indexed File Sequentially
Reading indexed records sequentially involves the following:
1. Specifying ORGANIZATION IS INDEXED in the Environment Division
SELECT clause
2. Specifying ACCESS MODE IS SEQUENTIAL in the Environment Division
SELECT clause
3. Opening the file for INPUT or I-O
4. Reading records from the beginning of the file as you would a sequential file
(using a READ...AT END statement)
The READ statement makes the next logical record of an open file available to the
program. It skips deleted records and sequentially reads and retrieves only valid
records. When the at end condition occurs, execution of the READ statement is
unsuccessful (see Chapter 7).
Example 6–32 reads an entire indexed file sequentially beginning with the first
record in the file, displaying every record on the terminal.
Processing Files and Records 6–41
Processing Files and Records
6.4 Reading Files
Example 6–32 Reading an Indexed File Sequentially
IDENTIFICATION DIVISION.
PROGRAM-ID. INDEX03.
ENVIRONMENT DIVISION.
INPUT-OUTPUT SECTION.
FILE-CONTROL.
SELECT FLAVORS
ASSIGN TO "DAIRY"
ORGANIZATION IS INDEXED
ACCESS MODE IS SEQUENTIAL
RECORD KEY IS ICE-CREAM-MASTER-KEY
ALTERNATE RECORD KEY IS ICE-CREAM-STORE-STATE
WITH DUPLICATES
ALTERNATE RECORD KEY IS ICE-CREAM-STORE-CODE.
DATA DIVISION.
FILE SECTION.
FD FLAVORS.
01 ICE-CREAM-MASTER.
02 ICE-CREAM-MASTER-KEY
PIC XXXX.
02 ICE-CREAM-MASTER-DATA.
03 ICE-CREAM-STORE-CODE
PIC XXXXX.
03 ICE-CREAM-STORE-ADDRESS PIC X(20).
03 ICE-CREAM-STORE-CITY
PIC X(20).
03 ICE-CREAM-STORE-STATE
PIC XX.
WORKING-STORAGE SECTION.
01 END-OF-FILE
PIC X.
PROCEDURE DIVISION.
A000-BEGIN.
OPEN INPUT FLAVORS.
A010-SEQUENTIAL-READ.
PERFORM A100-READ-INPUT UNTIL END-OF-FILE = "Y".
A020-EOJ.
DISPLAY "END OF JOB".
STOP RUN.
A100-READ-INPUT.
READ FLAVORS AT END MOVE "Y" TO END-OF-FILE.
IF END-OF-FILE NOT = "Y"
DISPLAY ICE-CREAM-MASTER
STOP "Type CONTINUE to display next master".
Reading an Indexed File Randomly
Reading indexed records randomly involves the following:
1. Specifying ORGANIZATION IS INDEXED in the Environment Division
SELECT clause
2. Specifying ACCESS MODE IS RANDOM in the Environment Division
SELECT clause
3. Opening the file for INPUT or I-O
4. Initializing the RECORD KEY or ALTERNATE RECORD KEY data name
before reading the record
5. Reading the record using the KEY IS clause
To read the file randomly, the program must initialize either the primary key
data name or the alternate key data name before reading the target record, and
specify that data name in the KEY IS phrase of the READ statement.
6–42 Processing Files and Records
Processing Files and Records
6.4 Reading Files
The READ statement selects a specific record from an open file and makes it
available to the program. The value of the primary or alternate key identifies
the specific record. The system randomly reads the record identified by the KEY
clause. If the I/O system does not find a valid record, the invalid key condition
occurs, and the READ statement fails (see Chapter 7).
Example 6–33 reads an indexed file randomly, displaying its contents on the
terminal.
Example 6–33 Reading an Indexed File Randomly
IDENTIFICATION DIVISION.
PROGRAM-ID. INDEX04.
ENVIRONMENT DIVISION.
INPUT-OUTPUT SECTION.
FILE-CONTROL.
SELECT FLAVORS
ASSIGN TO "DAIRY"
ORGANIZATION IS INDEXED
ACCESS MODE IS RANDOM
RECORD KEY IS ICE-CREAM-KEY.
DATA DIVISION.
FILE SECTION.
FD FLAVORS.
01 ICE-CREAM-MASTER.
02 ICE-CREAM-KEY
PIC XXXX.
02 ICE-CREAM-DATA.
03 ICE-CREAM-STORE-CODE
PIC XXXXX.
03 ICE-CREAM-STORE-ADDRESS PIC X(20).
03 ICE-CREAM-STORE-CITY
PIC X(20).
03 ICE-CREAM-STORE-STATE
PIC XX.
WORKING-STORAGE SECTION.
01 PROGRAM-STAT
PIC X.
88 OPERATOR-STOPS-IT
VALUE "1".
PROCEDURE DIVISION.
A000-BEGIN.
OPEN I-O FLAVORS.
PERFORM A020-INITIAL-PROMPT.
IF OPERATOR-STOPS-IT
PERFORM A005-TERMINATE.
PERFORM A030-RANDOM-READ.
PERFORM A025-SUBSEQUENT-PROMPTS UNTIL OPERATOR-STOPS-IT.
DISPLAY "END OF JOB".
STOP RUN.
A020-INITIAL-PROMPT.
DISPLAY "Do you want to see a store?".
PERFORM A040-GET-ANSWER UNTIL PROGRAM-STAT = "Y" OR "y" OR "N" OR "n".
IF PROGRAM-STAT = "N" OR "n"
MOVE "1" TO PROGRAM-STAT.
A025-SUBSEQUENT-PROMPTS.
MOVE SPACE TO PROGRAM-STAT.
DISPLAY "Do you want to see another store ?".
PERFORM A040-GET-ANSWER UNTIL PROGRAM-STAT = "Y" OR "y" OR "N" OR "n".
IF PROGRAM-STAT = "Y" OR "y"
PERFORM A030-RANDOM-READ
ELSE
MOVE "1" TO PROGRAM-STAT.
A030-RANDOM-READ.
DISPLAY "Enter key".
ACCEPT ICE-CREAM-KEY.
PERFORM A100-READ-INPUT-BY-KEY.
(continued on next page)
Processing Files and Records 6–43
Processing Files and Records
6.4 Reading Files
Example 6–33 (Cont.) Reading an Indexed File Randomly
A040-GET-ANSWER.
DISPLAY "Please answer Y or N"
ACCEPT PROGRAM-STAT.
A100-READ-INPUT-BY-KEY.
READ FLAVORS KEY IS ICE-CREAM-KEY
INVALID KEY DISPLAY "Record does not exist - Try again"
NOT INVALID KEY DISPLAY "The record is: ", ICE-CREAM-MASTER.
A005-TERMINATE.
DISPLAY "terminated".
Reading an Indexed File Dynamically
The READ statement has two formats, so it can select the next logical record
(sequential access) or select a specific record (random access) and make it
available to the program. In dynamic mode, the program can switch from using
random access I/O statements to sequential access I/O statements, in any order
and any number of times, without closing and reopening files. However, the
program must use the READ NEXT statement to sequentially read an indexed
file opened in dynamic mode.
Sequential processing need not begin at the first record of an indexed file. The
START statement specifies the next record to be read sequentially, selects which
key to use to determine the logical sort order, and repositions the file position
indicator for subsequent I/O operations anywhere within the file.
A sequential read of a dynamic file is indicated by the NEXT phrase of the READ
statement. A READ NEXT statement should follow the START statement since
the READ NEXT statement reads the next record indicated by the file position
indicator. Subsequent READ NEXT statements sequentially retrieve records until
another START statement or random READ statement executes.
Example 6–34 processes an indexed file containing 26 records. Each record has
a unique letter of the alphabet as its primary key. The program positions the file
to the first record whose INPUT-RECORD-KEY is equal to the specified letter of
the alphabet. The program’s READ NEXT statement sequentially retrieves the
remaining valid records in the file for display on the terminal.
Example 6–34 Reading an Indexed File Dynamically
IDENTIFICATION DIVISION.
PROGRAM-ID. INDEX05.
ENVIRONMENT DIVISION.
INPUT-OUTPUT SECTION.
FILE-CONTROL.
SELECT IND-ALPHA ASSIGN TO "ALPHA"
ORGANIZATION IS INDEXED
ACCESS MODE IS DYNAMIC
RECORD KEY IS INPUT-RECORD-KEY.
DATA DIVISION.
FILE SECTION.
FD IND-ALPHA.
01 INPUT-RECORD.
02 INPUT-RECORD-KEY
PIC X.
02 INPUT-RECORD-DATA
PIC X(50).
WORKING-STORAGE SECTION.
01 END-OF-FILE
PIC X.
(continued on next page)
6–44 Processing Files and Records
Processing Files and Records
6.4 Reading Files
Example 6–34 (Cont.) Reading an Indexed File Dynamically
PROCEDURE DIVISION.
A000-BEGIN.
OPEN I-O IND-ALPHA.
DISPLAY "Enter letter"
ACCEPT INPUT-RECORD-KEY.
START IND-ALPHA KEY = INPUT-RECORD-KEY
INVALID KEY DISPLAY "BAD START STATEMENT"
NOT INVALID KEY
PERFORM A100-GET-RECORDS THROUGH A100-GET-RECORDS-EXIT
UNTIL END-OF-FILE = "Y" END-START.
A010-END-OF-JOB.
DISPLAY "END OF JOB".
CLOSE IND-ALPHA.
STOP RUN.
A100-GET-RECORDS.
READ IND-ALPHA NEXT RECORD AT END MOVE "Y" TO END-OF-FILE.
IF END-OF-FILE NOT = "Y" DISPLAY INPUT-RECORD.
A100-GET-RECORDS-EXIT.
EXIT.
On Alpha, READ PRIOR retrieves from an Indexed file a record that logically
precedes the one made current by the previous file access operation, if such a
logically previous record exists. READ PRIOR can only be used with a file whose
organization is INDEXED and whose access mode is DYNAMIC. The file must
be opened for INPUT or I-O. Example 6–35 is an example of READ PRIOR in a
program.
Example 6–35 Reading an Indexed File Dynamically, with READ PRIOR (Alpha)
IDENTIFICATION DIVISION.
PROGRAM-ID. READ_PRIOR.
ENVIRONMENT DIVISION.
INPUT-OUTPUT SECTION.
FILE-CONTROL.
SELECT F ASSIGN TO "READPR"
ORGANIZATION IS INDEXED
ACCESS IS DYNAMIC
RECORD KEY
IS K0
ALTERNATE RECORD IS K2 DUPLICATES.
DATA DIVISION.
FILE SECTION.
FD F.
01 R.
02 K0
PIC X(3).
02 FILLER PIC X(5).
02 K2
PIC X(2).
PROCEDURE DIVISION.
P0. DISPLAY "***READ_PRIOR***".
*+
* Indexed file creation: After this load, the indexed file
* contains the following records : 0123456789, 1234567890,
* 2345678990, and 9876543291
(continued on next page)
Processing Files and Records 6–45
Processing Files and Records
6.4 Reading Files
Example 6–35 (Cont.) Reading an Indexed File Dynamically, with READ PRIOR
(Alpha)
*+
OPEN OUTPUT F.
MOVE "0123456789" TO R.
WRITE R INVALID KEY DISPLAY "?1".
MOVE "1234567890" TO R.
WRITE R INVALID KEY DISPLAY "?2".
MOVE "2345678990" TO R.
WRITE R INVALID KEY DISPLAY "?3".
MOVE "9876543291" TO R.
WRITE R INVALID KEY DISPLAY "?4".
CLOSE F.
*+
* READ PREVIOUS immediately after file open for IO
*+
OPEN I-O F.
MOVE "000" TO K0.
READ F PREVIOUS AT END GO TO P1 END-READ.
DISPLAY "?5 " R.
P1. CLOSE F.
*+
* READ PREVIOUS after file open for IO, from a middle
* record to beginning record on primary key.
*+
OPEN I-O F.
MOVE "2345678990" TO R.
READ F INVALID KEY DISPLAY "?6" GO TO P2 END-READ.
IF R NOT = "2345678990" THEN DISPLAY "?7 " R.
READ F PREVIOUS AT END DISPLAY "?8" GO TO P2 END-READ.
IF R NOT = "1234567890" THEN DISPLAY "?9 " R.
READ F PREVIOUS AT END DISPLAY "?10" GO TO P2 END-READ.
IF R NOT = "0123456789" THEN DISPLAY "?11 " R.
READ F PREVIOUS AT END GO TO P2.
DISPLAY "?12 " R.
*+
* Multiple READ PREVIOUS on a display alternate key with
* duplicates.
*+
P2. MOVE "91" TO K2.
READ F KEY K2 INVALID KEY DISPLAY "?13" GO TO P5 END-READ.
R NOT = "9876543291" THEN DISPLAY "?14 " R.
READ F PREVIOUS AT END DISPLAY "?15" GO TO P5 END-READ.
IF R NOT = "2345678990" THEN DISPLAY "?16 " R.
READ F PREVIOUS AT END DISPLAY "?17" GO TO P5 END-READ.
IF R NOT = "1234567890" THEN DISPLAY "?18 " R.
READ F PREVIOUS AT END DISPLAY "?19" GO TO P5 END-READ.
IF R NOT = "0123456789" THEN DISPLAY "?20 " R.
READ F PREVIOUS AT END GO TO P5.
DISPLAY "?21 " R.
P5. CLOSE F.
DISPLAY "***END***".
♦
STOP RUN.
Example 6–36 is another example of READ PRIOR. This example contrasts how
duplicates are handled with a DESCENDING key and with READ PRIOR. Also,
this example shows how to use START before initiating a sequence of either
READ NEXT statements or READ PRIOR statements. This example highlights
how to use START, if you switch between READ NEXT and READ PRIOR.
6–46 Processing Files and Records
Processing Files and Records
6.4 Reading Files
Example 6–36 Another Example of READ PRIOR (Alpha)
***READ_PRIOR2***
Read ascending key
a1
b2
c2
d2
e3
Read descending key
e3
b2
c2
d2
a1
Read prior
e3
d2
c2
b2
a1
***END***
IDENTIFICATION DIVISION.
PROGRAM-ID. READ_PRIOR2.
ENVIRONMENT DIVISION.
INPUT-OUTPUT SECTION.
FILE-CONTROL.
SELECT OPTIONAL F1
ASSIGN TO "READPR"
ORGANIZATION IS INDEXED
ACCESS MODE IS DYNAMIC
RECORD KEY IS K1 = W2 ASCENDING WITH DUPLICATES
ALTERNATE
RECORD KEY IS K2 = W2 DESCENDING WITH DUPLICATES.
DATA DIVISION.
FILE SECTION.
FD F1.
01 R1.
02 W1 PIC X.
02 W2 PIC X.
PROCEDURE DIVISION.
P0. DISPLAY "***READ_PRIOR2***".
*+
* Indexed file creation.
*OPEN OUTPUT F1.
MOVE "a1" TO R1.
WRITE R1 INVALID KEY DISPLAY "?a1".
MOVE "b2" TO R1.
WRITE R1 INVALID KEY DISPLAY "?b2".
MOVE "c2" TO R1.
WRITE R1 INVALID KEY DISPLAY "?c2".
MOVE "d2" TO R1.
WRITE R1 INVALID KEY DISPLAY "?d2".
MOVE "e3" TO R1.
WRITE R1 INVALID KEY DISPLAY "?e3".
CLOSE F1.
*+
* Read using ascending key.
*OPEN INPUT F1.
DISPLAY "Read ascending key".
(continued on next page)
Processing Files and Records 6–47
Processing Files and Records
6.4 Reading Files
Example 6–36 (Cont.) Another Example of READ PRIOR (Alpha)
MOVE "0" TO W2.
START F1 KEY IS GREATER THAN K1 INVALID KEY DISPLAY "?S1".
PERFORM 5 TIMES
READ F1 NEXT AT END DISPLAY "?R2" END-READ
DISPLAY R1
END-PERFORM.
CLOSE F1.
*+
* Read using descending key.
*OPEN INPUT F1.
DISPLAY "Read descending key".
MOVE "4" TO W2.
START F1 KEY IS GREATER THAN K2 INVALID KEY DISPLAY "?S2".
PERFORM 5 TIMES
READ F1 NEXT AT END DISPLAY "?R2" END-READ
DISPLAY R1
END-PERFORM.
*+
* READ PRIOR - note the difference in duplicate order from
* Read with a descending key.
*DISPLAY "Read prior".
MOVE "4" TO W2.
START F1 KEY IS LESS THAN K1 INVALID KEY DISPLAY "?S3".
PERFORM 5 TIMES
READ F1 PRIOR AT END DISPLAY "?R3" END-READ
DISPLAY R1
END-PERFORM.
CLOSE F1.
DISPLAY "***END***".
STOP RUN.
Reading an Indexed File from Other Languages on Tru64 UNIX
COBOL supports more data types for indexed keys than are supported in the
ISAM definition. For keys in any of the data types not supported in the ISAM
definition, the run-time system will translate those keys to strings. Table 6–7
specifies the appropriate mapping to create or use indexed files outside of COBOL
(for example, if you are using the C language on Tru64 UNIX and you need to
access COBOL files). Refer to the ISAM package documentation for details of the
file format.
Table 6–7 Indexed File—ISAM Mapping
COBOL Data Type
Maps To
Transformation Method
character string
PIC x(n)
CHARTYPE
None.
short signed int
PIC S9(4) COMP
INTTYPE
C-ISAM
long signed int
PIC S9(9) COMP
LONGTYPE
C-ISAM
(continued on next page)
6–48 Processing Files and Records
Processing Files and Records
6.4 Reading Files
Table 6–7 (Cont.) Indexed File—ISAM Mapping
COBOL Data Type
Maps To
Transformation Method
signed quadword
PIC S9(18) COMP
CHARTYPE
Reverse the bytes (integers: most
significant byte (msb) last; character
strings: msb first).
If the data type is not _UNSIGNED, then
complement the sign bit. This causes
negative values to sort correctly with
respect to each other, and precede positive
values.
unsigned quadword
PIC 9(18) COMP
CHARTYPE
Same as signed quadword.
packed decimal
PIC S9(n) COMP-3
CHARTYPE
(Note that sign nibble after is the only case
allowed in COBOL.) If the sign nibble is
minus, complement all bits. This will give
a sign nibble of 1 for a minus, which will
come before the plus.
Copy the nibbles so the sign nibble is
placed on the left and all the other nibbles
are shifted one to the right.
Note that any data type not directly supported by ISAM is translated to a
character string, which will sort as a character string in the correct order. ♦
6.5 Updating Files
Updating sequential, line sequential, relative, and indexed files includes the
following tasks:
1. Opening the file
2. Executing a READ or START statement
3. Executing a REWRITE and a DELETE statement
Sections 6.5.1, 6.5.2, and 6.5.3 describe how to update sequential, relative, and
indexed files.
6.5.1 Updating a Sequential File or Line Sequential (Alpha) File
Updating a record in a sequential file involves the following:
1. Opening the file for I/O
2. Reading the target record
3. Rewriting the target record
The REWRITE statement places the record just read back into the file. The
REWRITE statement completely replaces the contents of the target record with
new data. You can use the REWRITE statement for files on mass storage devices
only (for example, disk units). There are two ways of rewriting records:
•
REWRITE record-name FROM source-area
•
REWRITE record-name
Processing Files and Records 6–49
Processing Files and Records
6.5 Updating Files
Statements ( 1 ) and ( 2 ) in the following example are logically equivalent:
FILE SECTION.
FD STOCK-FILE.
01 STOCK-RECORD
PIC X(80).
WORKING-STORAGE SECTION.
01 STOCK-WORK
PIC X(80).
---------------(1)-----------------REWRITE STOCK-RECORD FROM STOCK-WORK.
--------------(2)-------------MOVE STOCK-WORK TO STOCK-RECORD.
REWRITE STOCK-RECORD.
When you omit the FROM phrase, you process the records directly in the record
area or buffer (for example, STOCK-RECORD).
For a REWRITE statement on a sequential file, the record being rewritten must
be the same length as the record being replaced.
Example 6–37 reads a sequential file and rewrites as many records as the
operator wants.
Example 6–37 Rewriting a Sequential File
IDENTIFICATION DIVISION.
PROGRAM-ID. SEQ03.
ENVIRONMENT DIVISION.
INPUT-OUTPUT SECTION.
FILE-CONTROL.
SELECT TRANS-FILE ASSIGN TO "TRANS".
DATA DIVISION.
FILE SECTION.
FD TRANS-FILE.
01 TRANSACTION-RECORD
PIC X(25).
WORKING-STORAGE SECTION.
01 ANSWER
PIC X.
PROCEDURE DIVISION.
A000-BEGIN.
OPEN I-O TRANS-FILE.
PERFORM A100-READ-TRANS-FILE
UNTIL TRANSACTION-RECORD = "END".
CLOSE TRANS-FILE.
STOP RUN.
A100-READ-TRANS-FILE.
READ TRANS-FILE AT END
MOVE "END" TO TRANSACTION-RECORD.
IF TRANSACTION-RECORD NOT = "END"
PERFORM A300-GET-ANSWER UNTIL ANSWER = "Y" OR "N"
IF ANSWER = "Y" DISPLAY "Please enter new record content"
ACCEPT TRANSACTION-RECORD
REWRITE TRANSACTION-RECORD.
A300-GET-ANSWER.
DISPLAY "Do you want to replace this record? -- "
TRANSACTION-RECORD.
DISPLAY "Please answer Y or N".
ACCEPT ANSWER.
You cannot open a line sequential file (Alpha) for I-O or use the REWRITE
statement. ♦
6–50 Processing Files and Records
Processing Files and Records
6.5 Updating Files
Extending a Sequential File or Line Sequential File (Alpha)
To position a file to its current end, and to allow the program to write new records
beyond the last record in the file, use both:
•
The EXTEND phrase of the OPEN statement
•
The WRITE statement
Example 6–38 shows how to extend a sequential file.
Example 6–38 Extending a Sequential File or Line Sequential File (Alpha)
IDENTIFICATION DIVISION.
PROGRAM-ID. SEQ04.
ENVIRONMENT DIVISION.
INPUT-OUTPUT SECTION.
FILE-CONTROL.
SELECT TRANS-FILE ASSIGN TO "TRANS".
DATA DIVISION.
FILE SECTION.
FD TRANS-FILE.
01 TRANSACTION-RECORD
PIC X(25).
PROCEDURE DIVISION.
A000-BEGIN.
OPEN EXTEND TRANS-FILE.
PERFORM A100-WRITE-RECORD
UNTIL TRANSACTION-RECORD = "END".
CLOSE TRANS-FILE.
STOP RUN.
A100-WRITE-RECORD.
DISPLAY "Enter next record - X(25)".
DISPLAY "Enter END to terminate the session".
DISPLAY "-------------------------".
ACCEPT TRANSACTION-RECORD.
IF TRANSACTION-RECORD NOT = "END"
WRITE TRANSACTION-RECORD.
Without the EXTEND mode, a Compaq COBOL program would have to open the
input file, copy it to an output file, and add records to the output file.
6.5.2 Updating a Relative File
A program updates a relative file with the WRITE, REWRITE, and DELETE
statements. The WRITE statement adds a record to the file. Only the REWRITE
and DELETE statements change the contents of records already existing in the
file. In either case, adequate backup must be available in the event of error.
Sections 6.5.2.1 and 6.5.2.2 explain how to rewrite and delete relative records,
respectively.
6.5.2.1 Rewriting a Relative File
The REWRITE statement logically replaces a record in a relative file; the original
contents of the record are lost. Two options are available for rewriting relative
records:
•
Sequential access mode rewriting
•
Random access mode rewriting
Processing Files and Records 6–51
Processing Files and Records
6.5 Updating Files
Rewriting Relative Records in Sequential Access Mode
Rewriting relative records in sequential access mode involves the following:
1. Specifying ORGANIZATION IS RELATIVE in the Environment Division
SELECT clause
2. Specifying ACCESS MODE IS SEQUENTIAL in the Environment Division
SELECT clause
3. Opening the file for I-O
4. Using a START statement and then a READ statement to read the target
record
5. Updating the record
6. Rewriting the record into its cell
Example 6–39 reads a relative record sequentially and displays the record on the
terminal. The program then passes the record to an update routine that is not
included in the example. The update routine updates the record, and passes the
updated record back to the program illustrated in Example 6–39, which displays
the updated record on the terminal and rewrites the record in the same cell.
Example 6–39 Rewriting Relative Records in Sequential Access Mode
IDENTIFICATION DIVISION.
PROGRAM-ID. REL07.
ENVIRONMENT DIVISION.
INPUT-OUTPUT SECTION.
FILE-CONTROL.
SELECT FLAVORS ASSIGN TO "BRAND"
ORGANIZATION IS RELATIVE
ACCESS MODE IS SEQUENTIAL
RELATIVE KEY IS KETCHUP-MASTER-KEY.
DATA DIVISION.
FILE SECTION.
FD FLAVORS.
01 KETCHUP-MASTER
PIC X(50).
WORKING-STORAGE SECTION.
01 KETCHUP-MASTER-KEY
PIC 99 VALUE 99.
PROCEDURE DIVISION.
A000-BEGIN.
OPEN I-O FLAVORS.
PERFORM A100-UPDATE-RECORD UNTIL KETCHUP-MASTER-KEY = 00.
A005-EOJ.
DISPLAY "END OF JOB".
CLOSE FLAVORS.
STOP RUN.
A100-UPDATE-RECORD.
DISPLAY "TO UPDATE A RECORD ENTER ITS RECORD NUMBER (ZERO to END)".
ACCEPT KETCHUP-MASTER-KEY WITH CONVERSION.
IF KETCHUP-MASTER-KEY IS NOT EQUAL TO 00
START FLAVORS KEY IS EQUAL TO KETCHUP-MASTER-KEY
INVALID KEY DISPLAY "BAD START"
STOP RUN.
(continued on next page)
6–52 Processing Files and Records
Processing Files and Records
6.5 Updating Files
Example 6–39 (Cont.) Rewriting Relative Records in Sequential Access Mode
END-START
PERFORM A200-READ-FLAVORS
DISPLAY "*********BEFORE UPDATE*********"
DISPLAY KETCHUP-MASTER
************************************************************
*
*
Update routine code here
*
************************************************************
DISPLAY "*********AFTER UPDATE*********"
DISPLAY KETCHUP-MASTER
REWRITE KETCHUP-MASTER.
A200-READ-FLAVORS.
READ FLAVORS
AT END DISPLAY "END OF FILE"
GO TO A005-EOJ.
Rewriting Relative Records in Random Access Mode
Rewriting relative records in random access mode involves the following:
1. Specifying ORGANIZATION IS RELATIVE in the Environment Division
SELECT clause
2. Specifying ACCESS MODE IS RANDOM (or DYNAMIC) in the Environment
Division SELECT clause
3. Opening the file for I-O
4. Moving the relative record number value of the record you want to read to the
RELATIVE KEY data name
5. Reading the record from the cell identified by the relative record number
6. Updating the record
7. Rewriting the record into the cell identified by the relative record number
During execution of the REWRITE statement, the I/O system randomly reads the
record identified by the RELATIVE KEY IS clause. The REWRITE statement
then places the successfully read record back into its cell in the file.
If the cell does not contain a valid record, or if the REWRITE operation is
unsuccessful, the invalid key condition occurs, and the REWRITE operation
fails (see Chapter 7).
Example 6–40 reads a relative record randomly, displays its contents on the
terminal, updates the record, displays its updated contents on the terminal, and
rewrites the record in the same cell.
Example 6–40 Rewriting Relative Records in Random Access Mode
IDENTIFICATION DIVISION.
PROGRAM-ID. REL08.
ENVIRONMENT DIVISION.
INPUT-OUTPUT SECTION.
FILE-CONTROL.
SELECT FLAVORS ASSIGN TO "BRAND"
ORGANIZATION IS RELATIVE
(continued on next page)
Processing Files and Records 6–53
Processing Files and Records
6.5 Updating Files
Example 6–40 (Cont.) Rewriting Relative Records in Random Access Mode
ACCESS MODE IS RANDOM
RELATIVE KEY IS KETCHUP-MASTER-KEY.
DATA DIVISION.
FILE SECTION.
FD FLAVORS.
01 KETCHUP-MASTER
PIC X(50).
WORKING-STORAGE SECTION.
01 KETCHUP-MASTER-KEY
PIC 99.
PROCEDURE DIVISION.
A000-BEGIN.
OPEN I-O FLAVORS.
PERFORM A100-UPDATE-RECORD UNTIL KETCHUP-MASTER-KEY = 00.
A005-EOJ.
DISPLAY "END OF JOB".
CLOSE FLAVORS.
STOP RUN.
A100-UPDATE-RECORD.
DISPLAY "TO UPDATE A RECORD ENTER ITS RECORD NUMBER".
ACCEPT KETCHUP-MASTER-KEY.
READ FLAVORS INVALID KEY DISPLAY "BAD READ"
GO TO A005-EOJ.
DISPLAY "*********BEFORE UPDATE*********".
DISPLAY KETCHUP-MASTER.
********************************************************
*
*
Update routine
*
********************************************************
DISPLAY "*********AFTER UPDATE*********".
DISPLAY KETCHUP-MASTER.
REWRITE KETCHUP-MASTER INVALID KEY DISPLAY "BAD REWRITE"
GO TO A005-EOJ.
6.5.2.2 Deleting Records from a Relative File
The DELETE statement logically removes an existing record from a relative file.
After successfully removing a record from a file, the program cannot later access
it. Two options are available for deleting relative records:
•
Sequential access mode deletion
•
Random access mode deletion
Deleting a Relative Record in Sequential Access Mode
Deleting a relative record in sequential access mode involves the following:
1. Specifying ORGANIZATION IS RELATIVE in the Environment Division
SELECT clause
2. Specifying ACCESS MODE IS SEQUENTIAL in the Environment Division
SELECT clause
3. Opening the file for I-O
4. Using a START statement to position the record pointer, or sequentially
reading the file up to the target record
5. Deleting the last read record
6–54 Processing Files and Records
Processing Files and Records
6.5 Updating Files
Example 6–41 deletes relative records in sequential access mode.
Example 6–41 Deleting Relative Records in Sequential Access Mode
IDENTIFICATION DIVISION.
PROGRAM-ID. REL09.
ENVIRONMENT DIVISION.
INPUT-OUTPUT SECTION.
FILE-CONTROL.
SELECT FLAVORS ASSIGN TO "BRAND"
ORGANIZATION IS RELATIVE
ACCESS MODE IS SEQUENTIAL
RELATIVE KEY IS KETCHUP-MASTER-KEY.
DATA DIVISION.
FILE SECTION.
FD FLAVORS.
01 KETCHUP-MASTER
PIC X(50).
WORKING-STORAGE SECTION.
01 KETCHUP-MASTER-KEY
PIC 99 VALUE 1.
PROCEDURE DIVISION.
A000-BEGIN.
OPEN I-O FLAVORS.
PERFORM A010-DELETE-RECORDS UNTIL KETCHUP-MASTER-KEY = 00.
A005-EOJ.
DISPLAY "END OF JOB".
CLOSE FLAVORS.
STOP RUN.
A010-DELETE-RECORDS.
DISPLAY "TO DELETE A RECORD ENTER ITS RECORD NUMBER".
ACCEPT KETCHUP-MASTER-KEY.
IF KETCHUP-MASTER-KEY NOT = 00 PERFORM A200-READ-FLAVORS
DELETE FLAVORS RECORD.
A200-READ-FLAVORS.
START FLAVORS
INVALID KEY DISPLAY "INVALID START"
STOP RUN.
READ FLAVORS AT END DISPLAY "FILE AT END"
GO TO A005-EOJ.
Processing Files and Records 6–55
Processing Files and Records
6.5 Updating Files
Deleting a Relative Record in Random Access Mode
Deleting a relative record in random access mode involves the following:
1. Specifing ORGANIZATION IS RELATIVE in the Environment Division
SELECT clause
2. Specifying ACCESS MODE IS RANDOM in the Environment Division
SELECT clause
3. Opening the file for I-O
4. Moving the relative record number value to the RELATIVE KEY data name
5. Deleting the record identified by the relative record number
If the file does not contain a valid record, an invalid key condition exists.
Example 6–42 deletes relative records in random access mode.
Example 6–42 Deleting Relative Records in Random Access Mode
IDENTIFICATION DIVISION.
PROGRAM-ID. REL10.
ENVIRONMENT DIVISION.
INPUT-OUTPUT SECTION.
FILE-CONTROL.
SELECT FLAVORS ASSIGN TO "BRAND"
ORGANIZATION IS RELATIVE
ACCESS MODE IS RANDOM
RELATIVE KEY IS KETCHUP-MASTER-KEY.
DATA DIVISION.
FILE SECTION.
FD FLAVORS.
01 KETCHUP-MASTER
PIC X(50).
WORKING-STORAGE SECTION.
01 KETCHUP-MASTER-KEY
PIC 99 VALUE 1.
PROCEDURE DIVISION.
A000-BEGIN.
OPEN I-O FLAVORS.
PERFORM A010-DELETE-RECORDS UNTIL KETCHUP-MASTER-KEY = 00.
A005-EOJ.
DISPLAY "END OF JOB".
CLOSE FLAVORS.
STOP RUN.
A010-DELETE-RECORDS.
DISPLAY "TO DELETE A RECORD ENTER ITS RECORD NUMBER".
ACCEPT KETCHUP-MASTER-KEY.
IF KETCHUP-MASTER-KEY NOT = 00
DELETE FLAVORS RECORD
INVALID KEY DISPLAY "INVALID DELETE"
STOP RUN.
6.5.3 Updating an Indexed File
Updating a record in an indexed file in sequential access mode involves the
following:
1. Reading the target record
2. Verifying that the record is the one you want to change
3. Changing the record
4. Rewriting or deleting the target record
6–56 Processing Files and Records
Processing Files and Records
6.5 Updating Files
A program updates an indexed file in random access mode by rewriting or
deleting the record.
Three options are available for updating indexed records:
•
Sequential access mode updating
•
Random access mode updating
•
Dynamic access mode updating
Note
A program cannot rewrite an existing record if it changes the contents
of the primary key in that record. Instead, the program must delete the
record and write a new record. Alternate key values can be changed at
any time. However, the value of alternate keys must be unique unless the
WITH DUPLICATES phrase is present.
Updating an Indexed File Sequentially
Updating indexed records in sequential acess mode involves the following:
1. Specifying ORGANIZATION IS INDEXED in the Environment Division
SELECT clause
2. Specifying ACCESS MODE IS SEQUENTIAL in Environment Division
SELECT clause
3. Opening the file for I-O
4. Reading records as you would a sequential file (use the READ statement with
the AT END phrase)
5. Rewriting or deleting records using the INVALID KEY phrase
The READ statement makes the next logical record of an open file available to the
program. It skips deleted records and sequentially reads and retrieves only valid
records. When the at end condition occurs, execution of the READ statement is
unsuccessful (see Chapter 7).
The REWRITE statement replaces the record just read, while the DELETE
statement logically removes the record just read from the file.
Example 6–43 updates an indexed file sequentially.
Example 6–43 Updating an Indexed File Sequentially
IDENTIFICATION DIVISION.
PROGRAM-ID. INDEX06.
ENVIRONMENT DIVISION.
INPUT-OUTPUT SECTION.
FILE-CONTROL.
SELECT FLAVORS
ASSIGN TO "DAIRY"
ORGANIZATION IS INDEXED
ACCESS MODE IS SEQUENTIAL
RECORD KEY IS ICE-CREAM-MASTER-KEY
ALTERNATE RECORD KEY IS ICE-CREAM-STORE-STATE
WITH DUPLICATES
ALTERNATE RECORD KEY IS ICE-CREAM-STORE-CODE.
(continued on next page)
Processing Files and Records 6–57
Processing Files and Records
6.5 Updating Files
Example 6–43 (Cont.) Updating an Indexed File Sequentially
DATA DIVISION.
FILE SECTION.
FD FLAVORS.
01 ICE-CREAM-MASTER.
02 ICE-CREAM-MASTER-KEY
02 ICE-CREAM-MASTER-DATA.
03 ICE-CREAM-STORE-CODE
03 ICE-CREAM-STORE-ADDRESS
PIC XXXX.
PIC XXXXX.
PIC X(20).
03 ICE-CREAM-STORE-CITY
PIC X(20).
03 ICE-CREAM-STORE-STATE
PIC XX.
WORKING-STORAGE SECTION.
01 END-OF-FILE
PIC X.
01 REWRITE-KEY
PIC XXXXX.
01 DELETE-KEY
PIC XX.
01 NEW-ADDRESS
PIC X(20).
PROCEDURE DIVISION.
A000-BEGIN.
OPEN I-O FLAVORS.
DISPLAY "Which store code do you want to find?".
ACCEPT REWRITE-KEY.
DISPLAY "What is its new address?".
ACCEPT NEW-ADDRESS.
DISPLAY "Which state do you want to delete?".
ACCEPT DELETE-KEY.
PERFORM A100-READ-INPUT UNTIL END-OF-FILE = "Y".
A020-EOJ.
DISPLAY "END OF JOB".
STOP RUN.
A100-READ-INPUT.
READ FLAVORS AT END MOVE "Y" TO END-OF-FILE.
IF END-OF-FILE NOT = "Y" AND
REWRITE-KEY = ICE-CREAM-STORE-CODE
PERFORM A200-REWRITE-MASTER.
IF END-OF-FILE NOT = "Y" AND
DELETE-KEY = ICE-CREAM-STORE-STATE
PERFORM A300-DELETE-MASTER.
A200-REWRITE-MASTER.
MOVE NEW-ADDRESS TO ICE-CREAM-STORE-ADDRESS.
REWRITE ICE-CREAM-MASTER
INVALID KEY DISPLAY "Bad rewrite - ABORTED"
STOP RUN.
A300-DELETE-MASTER.
DELETE FLAVORS.
Updating an Indexed File Randomly
Updating indexed records in random access mode involves the following:
1. Specifying ORGANIZATION IS INDEXED in the Environment Division
SELECT clause
2. Specifying ACCESS MODE IS RANDOM in the Environment Division
SELECT clause
3. Opening the file for I-O
4. Initializing the RECORD KEY or ALTERNATE RECORD KEY data name
5. Writing, rewriting, or deleting records using the INVALID KEY phrase
6–58 Processing Files and Records
Processing Files and Records
6.5 Updating Files
You do not need to first read a record to update or delete it. If the primary or
alternate key you specify allows duplicates, only the first occurrence of a record
with a matching value will be updated.
Example 6–44 updates an indexed file randomly.
Example 6–44 Updating an Indexed File Randomly
IDENTIFICATION DIVISION.
PROGRAM-ID. INDEX07.
ENVIRONMENT DIVISION.
INPUT-OUTPUT SECTION.
FILE-CONTROL.
SELECT FLAVORS
ASSIGN TO "DAIRY"
ORGANIZATION IS INDEXED
ACCESS MODE IS RANDOM
RECORD KEY IS ICE-CREAM-MASTER-KEY
ALTERNATE RECORD KEY IS ICE-CREAM-STORE-STATE
WITH DUPLICATES
ALTERNATE RECORD KEY IS ICE-CREAM-STORE-CODE.
DATA DIVISION.
FILE SECTION.
FD FLAVORS.
01 ICE-CREAM-MASTER.
02 ICE-CREAM-MASTER-KEY
PIC XXXX.
02 ICE-CREAM-MASTER-DATA.
03 ICE-CREAM-STORE-CODE
PIC XXXXX.
03 ICE-CREAM-STORE-ADDRESS PIC X(20).
03 ICE-CREAM-STORE-CITY
PIC X(20).
03 ICE-CREAM-STORE-STATE
PIC XX.
WORKING-STORAGE SECTION.
01 HOLD-ICE-CREAM-MASTER
PIC X(51).
01 PROGRAM-STAT
PIC X.
88 OPERATOR-STOPS-IT
VALUE "1".
88 LETS-SEE-NEXT-STORE
VALUE "2".
88 NO-MORE-DUPLICATES
VALUE "3".
PROCEDURE DIVISION.
A000-BEGIN.
OPEN I-O FLAVORS.
PERFORM A030-RANDOM-READ UNTIL OPERATOR-STOPS-IT.
A020-EOJ.
DISPLAY "END OF JOB".
STOP RUN.
A030-RANDOM-READ.
DISPLAY "Enter key".
ACCEPT ICE-CREAM-MASTER-KEY.
PERFORM A100-READ-INPUT-BY-PRIMARY-KEY
THROUGH A100-READ-INPUT-EXIT.
DISPLAY " Do you want to terminate the session?".
PERFORM A040-GET-ANSWER UNTIL PROGRAM-STAT = "Y" OR "N".
IF PROGRAM-STAT = "Y" MOVE "1" TO PROGRAM-STAT.
(continued on next page)
Processing Files and Records 6–59
Processing Files and Records
6.5 Updating Files
Example 6–44 (Cont.) Updating an Indexed File Randomly
A040-GET-ANSWER.
DISPLAY "Please answer Y or N"
ACCEPT PROGRAM-STAT.
A100-READ-INPUT-BY-PRIMARY-KEY.
READ FLAVORS KEY IS ICE-CREAM-MASTER-KEY
INVALID KEY DISPLAY "Master does not exist - Try again"
GO TO A100-READ-INPUT-EXIT.
DISPLAY ICE-CREAM-MASTER.
PERFORM A200-READ-BY-ALTERNATE-KEY UNTIL NO-MORE-DUPLICATES.
A100-READ-INPUT-EXIT.
EXIT.
A200-READ-BY-ALTERNATE-KEY.
DISPLAY "Do you want to see the next store in this state?".
PERFORM A040-GET-ANSWER UNTIL PROGRAM-STAT = "Y" OR "N".
IF PROGRAM-STAT = "Y"
MOVE "2" TO PROGRAM-STAT
READ FLAVORS KEY IS ICE-CREAM-STORE-STATE
INVALID KEY DISPLAY "No more stores in this state"
MOVE "3" TO PROGRAM-STAT.
IF LETS-SEE-NEXT-STORE AND
ICE-CREAM-STORE-STATE = "NY"
PERFORM A500-DELETE-RANDOM-RECORD.
IF LETS-SEE-NEXT-STORE AND
ICE-CREAM-STORE-STATE = "NJ"
MOVE "Monmouth" TO ICE-CREAM-STORE-CITY
PERFORM A400-REWRITE-RANDOM-RECORD.
IF LETS-SEE-NEXT-STORE AND
ICE-CREAM-STORE-STATE = "CA"
MOVE ICE-CREAM-MASTER TO HOLD-ICE-CREAM-MASTER
PERFORM A500-DELETE-RANDOM-RECORD
MOVE HOLD-ICE-CREAM-MASTER TO ICE-CREAM-MASTER
MOVE "AZ" TO ICE-CREAM-STORE-STATE
PERFORM A300-WRITE-RANDOM-RECORD.
IF PROGRAM-STAT = "N"
MOVE "3" TO PROGRAM-STAT.
A300-WRITE-RANDOM-RECORD.
WRITE ICE-CREAM-MASTER
INVALID KEY DISPLAY "Bad write - ABORTED"
STOP RUN.
A400-REWRITE-RANDOM-RECORD.
REWRITE ICE-CREAM-MASTER
INVALID KEY DISPLAY "Bad rewrite - ABORTED"
STOP RUN.
A500-DELETE-RANDOM-RECORD.
DELETE FLAVORS
INVALID KEY DISPLAY "Bad delete - ABORTED"
STOP RUN.
Updating an Indexed File Dynamically
Updating indexed records in dynamic access mode involves the following:
1. Specifying ORGANIZATION IS INDEXED in the Environment Division
SELECT clause
2. Specifying ACCESS MODE IS DYNAMIC in the Environment Division
SELECT clause
3. Opening the file for I-O
6–60 Processing Files and Records
Processing Files and Records
6.5 Updating Files
4. Reading the records sequentially (using the START statement to position
the record pointer and then using the READ...NEXT statement) or randomly
(initializing the RECORD KEY or ALTERNATE RECORD KEY data name
and then reading records in any order you want using the INVALID KEY
phrase) (See Example 6–44.)
5. Rewriting or deleting records using the INVALID KEY phrase
For indexed files with duplicate primary keys values, rewriting and deleting work
as if the file was opened in sequential access mode. You first read the record,
then update or delete the record just read.
For indexed files without duplicates allowed on the primary key, rewriting and
deleting work as if the file was opened in random access mode. Specify the value
of the primary key data item to indicate the target record, then update or delete
that record.
In dynamic access mode, the program can switch from using random access I/O
statements to sequential access I/O statements in any order without closing and
reopening files.
6.6 Backing Up Your Files
Files can become unusable if either of the following situations occur:
•
Your disk file becomes corrupted by a hardware error.
•
Your disk file becomes corrupted with bad data.
Proper backup procedures are the key to successful recovery. You should back up
your disk file at some reasonable point (daily, weekly, or monthly, depending on
file activity and value of data), and save all transactions until you create a new
backup. In this way, you can easily recreate your disk file from your last backup
file and transaction files whenever the need arises.
Processing Files and Records 6–61
7
Handling Input/Output Exception Conditions
Many types of exception conditions can occur when a program processes a file; not
all of them are errors. The three categories of exception conditions are as follows:
•
AT END condition—This is a normal condition when you access a file
sequentially. However, if your program tries to read the file any time after
having read the last logical record in the file, and there is no applicable
Declarative USE procedure or AT END phrase, the program abnormally
terminates when the next READ statement executes.
•
Invalid key condition—When you process relative and indexed files,
the invalid key condition is a normal condition if you plan for it with a
Declarative USE procedure or INVALID KEY phrase. It is an abnormal
condition that causes your program to terminate if there is no applicable
Declarative USE procedure or INVALID KEY phrase.
•
All other conditions—These can also be either normal conditions (if you plan
for them with Declarative USE procedures) or abnormal conditions that cause
your program to terminate.
Planning for exception conditions effectively increases program and programmer
efficiency. A program with exception handling routines is more flexible than
a program without them. Exception handling routines minimize operator
intervention and often reduce or eliminate the time you need to spend debugging
and rerunning your program.
This chapter introduces you to the tools you need to execute exception handling
routines for sequential, relative, and indexed files as a normal part of your
program. These tools are the AT END phrase, the INVALID KEY phrase, file
status values, RMS completion codes (on OpenVMS systems), and Declarative
USE procedures. The topics that follow explain how to use these tools in your
programs:
•
Planning for the AT END condition (Section 7.1)
•
Planning for the Invalid Key condition (Section 7.2)
•
Using file status values and OpenVMS RMS completion codes (Section 7.3)
•
Using Declarative USE procedures (Section 7.4)
7.1 Planning for the AT END Condition
Compaq COBOL provides you the option of testing for this condition with the AT
END phrase of the READ statement (for sequential, relative, and indexed files)
and the AT END phrase of the ACCEPT statement.
Handling Input/Output Exception Conditions 7–1
Handling Input/Output Exception Conditions
7.1 Planning for the AT END Condition
Programs often read sequential files from beginning to end. They can produce
reports from the information in the file or even update it. However, the program
must be able to detect the end of the file, so that it can continue normal
processing at that point. If the program does not test for this condition when it
occurs, and if no applicable Declarative USE procedure exists (see Section 7.4),
the program terminates abnormally. The program must detect when no more
data is available from the file so that it can perform its normal end-of-job
processing and then close the file.
Example 7–1 shows the use of the AT END phrase with the READ statement for
sequential, relative, and indexed files.
Example 7–1 Handling the AT END Condition
READ SEQUENTIAL-FILE AT END PERFORM A600-TOTAL-ROUTINES
PERFORM A610-VERIFY-TOTALS-ROUTINES
MOVE "Y" TO END-OF-FILE.
READ RELATIVE-FILE NEXT RECORD AT END PERFORM A700-CLEAN-UP-ROUTINES
CLOSE RELATIVE-FILE
STOP RUN.
READ INDEXED-FILE NEXT RECORD AT END DISPLAY "End of file"
DISPLAY "Do you want to continue?"
ACCEPT REPLY
PERFORM A700-CLEAN-UP-ROUTINES.
7.2 Planning for the Invalid Key Condition
The INVALID KEY clause is available for the Compaq COBOL DELETE, READ,
REWRITE, START, and WRITE statements. (It does not apply to the READ
NEXT statement.) An invalid key condition occurs whenever the I/O system
cannot complete a DELETE, READ, REWRITE, START, or WRITE statement.
When the condition occurs, execution of the statement that recognized it is
unsuccessful, and the file is not affected.
For example, relative and indexed files use keys to access (retrieve or update)
records. The program specifying random access must initialize a key before
executing a DELETE, READ, REWRITE, START, or WRITE statement. If the
key does not result in the successful execution of any one of these statements, the
invalid key condition exists. This condition is fatal to the program, if the program
does not check for the condition when it occurs and if no applicable Declarative
USE procedure exists (see Section 7.4).
The invalid key condition, although fatal if not planned for, can be to your
advantage when used properly. You can, as shown in Example 7–2, read through
an indexed file for all records with a specific duplicate key and produce a report
from the information in those records. You can also plan for an invalid key
condition on the first attempt to find a record with a specified key value that is
not present in the file. In this case, planning for the invalid key condition allows
the program to continue its normal processing. You can also plan for the AT END
condition when you have read and tested for the last of the duplicate records
in the file, or when you receive the AT END condition for a subsequent read
operation, indicating that no more records exist in the file.
7–2 Handling Input/Output Exception Conditions
Handling Input/Output Exception Conditions
7.2 Planning for the Invalid Key Condition
Example 7–2 Handling the Invalid Key Condition
.
.
.
MOVE "SMITH" TO LAST-NAME TEST-LAST-NAME.
MOVE "Y" TO ANY-MORE-DUPLICATES.
PERFORM A500-READ-DUPLICATES
UNTIL ANY-MORE-DUPLICATES = "N".
.
.
.
STOP RUN.
A500-READ-DUPLICATES.
READ INDEXED-FILE RECORD INTO HOLD-RECORD
KEY IS LAST-NAME
INVALID KEY
MOVE "N" TO ANY-MORE-DUPLICATES
DISPLAY "Name not in file!"
NOT INVALID KEY
PERFORM A510-READ-NEXT-DUPLICATES
UNTIL ANY-MORE-DUPLICATES = "N"
END-READ.
A510-READ-NEXT-DUPLICATES.
READ INDEXED-FILE NEXT RECORD
AT END MOVE "N" TO ANY-MORE-DUPLICATES
NOT AT END
PERFORM A520-VALIDATE
END-READ.
IF ANY-MORE-DUPLICATES = "Y" PERFORM A700-PRINT.
A520-VALIDATE.
IF LAST-NAME NOT EQUAL TEST-LAST-NAME
MOVE "N" TO ANY-MORE-DUPLICATES.
END READ.
A700-PRINT.
.
.
.
7.3 Using File Status Values and OpenVMS RMS Completion Codes
Your program can check for the specific cause of the failure of a file operation
by checking for specific file status values in its exception handling routines. To
obtain Compaq COBOL file status values, use the FILE STATUS clause in the
file description entry.
On OpenVMS, to access RMS completion codes, use the Compaq COBOL special
registers RMS-STS and RMS-STV, or RMS-CURRENT-STS and RMS-CURRENTSTV. ♦
7.3.1 File Status Values
The run-time execution of any Compaq COBOL file processing statement results
in a two-digit file status value that reports the success or failure of the COBOL
statement. To access this file status value, you must specify the FILE STATUS
clause in the file description entry, as shown in Example 7–3.
Handling Input/Output Exception Conditions 7–3
Handling Input/Output Exception Conditions
7.3 Using File Status Values and OpenVMS RMS Completion Codes
Example 7–3 Defining a File Status for a File
DATA DIVISION.
FILE SECTION.
FD INDEXED-FILE
FILE STATUS IS INDEXED-FILE-STATUS.
01 INDEXED-RECORD
PIC X(50).
WORKING-STORAGE SECTION.
01 INDEXED-FILE-STATUS
PIC XX.
01 ANSWER
PIC X.
The program can access this file status variable, INDEXED-FILE-STATUS,
anywhere in the Procedure Division, and depending on its value, take a specific
course of action without terminating the program. Notice that in Example 7–4 (in
paragraph A900-EXCEPTION-HANDLING-ROUTINE), the file status that was
defined in Example 7–3 is used. However, not all statements allow you to access
the file status value as part of the statement. Your program has two options:
•
Build an error recovery routine into the statement. The relative and indexed
file processing statements that allow you to do this within the INVALID KEY
phrase are DELETE, READ, REWRITE, START, and WRITE (that is, all the
record I-O verbs except READ NEXT). See Example 7–4.
•
Define a Declarative USE procedure to handle the condition. This option
is available for all file organizations and their I/O statements. (See
Example 7–6, Example 7–7, and Example 7–8.)
7–4 Handling Input/Output Exception Conditions
Handling Input/Output Exception Conditions
7.3 Using File Status Values and OpenVMS RMS Completion Codes
Example 7–4 Using the File Status Value in an Exception Handling Routine
PROCEDURE DIVISION.
A000-BEGIN.
.
.
.
DELETE INDEXED-FILE
INVALID KEY MOVE "Bad DELETE" to BAD-VERB-ID
PERFORM A900-EXCEPTION-HANDLING-ROUTINE.
.
.
.
READ INDEXED-FILE NEXT RECORD
AT END MOVE "Bad READ" TO BAD-VERB-ID
PERFORM A900-EXCEPTION-HANDLING-ROUTINE.
.
.
.
REWRITE INDEXED-RECORD
INVALID KEY MOVE "Bad REWRITE" TO BAD-VERB-ID
PERFORM A900-EXCEPTION-HANDLING-ROUTINE.
.
.
.
START INDEXED-FILE
INVALID KEY MOVE "Bad START" TO BAD-VERB-ID
PERFORM A900-EXCEPTION-HANDLING-ROUTINE.
.
.
.
WRITE INDEXED-RECORD
INVALID KEY MOVE "Bad WRITE" TO BAD-VERB-ID
PERFORM A900-EXCEPTION-HANDLING-ROUTINE.
.
.
.
A900-EXCEPTION-HANDLING-ROUTINE.
DISPLAY BAD-VERB-ID " - File Status Value = " INDEXED-FILE-STATUS.
PERFORM A905-GET-ANSWER UNTIL ANSWER = "Y" OR "N".
IF ANSWER = "N" STOP RUN.
A905-GET-ANSWER.
DISPLAY "Do you want to continue?"
DISPLAY "Please answer Y or N"
ACCEPT ANSWER.
See Soft Record Locks for information about inspecting variables with soft record
locks and Declarative USE procedures.
Each file processing statement described in the Procedure Division section of the
Compaq COBOL Reference Manual contains a specific list of file status values
in its Technical Notes section. In addition, all file status values are listed in an
appendix in the Compaq COBOL Reference Manual.
7.3.2 RMS Completion Codes (OpenVMS)
Compaq COBOL on OpenVMS checks for RMS completion codes after each file
and record operation. If the code indicates anything other than unconditional
success, Compaq COBOL maps the RMS completion code to a file status value.
However, not all RMS completion codes map to distinct file status values. Many
RMS completion codes map to File Status 30, a COBOL code for errors that have
no specific file status value.
Handling Input/Output Exception Conditions 7–5
Handling Input/Output Exception Conditions
7.3 Using File Status Values and OpenVMS RMS Completion Codes
Compaq COBOL provides the following six special exception condition registers,
four of which are shown in Example 7–5:
•
RMS-STS
•
RMS-STV
•
RMS-FILENAME
•
RMS-CURRENT-STS
•
RMS-CURRENT-STV
•
RMS-CURRENT-FILENAME
These special registers supplement the file status values already available and
allow the Compaq COBOL program to directly access RMS completion codes.
For more information on RMS completion codes, refer to the Compaq COBOL
Reference Manual and the OpenVMS Record Management Services Reference
Manual.
You do not define these special registers in your program. As special registers,
they are available whenever and wherever you need to use them in the Procedure
Division. RMS-CURRENT-STS contains the RMS completion codes for the
most recent file or record operation for any file. RMS-CURRENT-FILENAME
contains the name of the current file by which it is known to the system, which
can be the full file specification (directory, device, file name, and extension).
RMS-CURRENT-STV contains other relevant information (refer to the OpenVMS
System Messages and Recovery Procedures Reference Manual, an archived manual
that is available on the OpenVMS Documentation CD-ROM.). When you access
these three special registers, you must not qualify your reference to them.
However, if you define more than one file in the program and intend to access
RMS-STS, RMS-STV, and RMS-FILENAME, you must qualify your references
to them by using the internal COBOL program’s file name for the file that you
intend to reference.
Notice the use of the WITH CONVERSION phrase of the DISPLAY statement in
Example 7–5. This converts the PIC S9(9) COMP contents of the RMS Special
Registers from binary to decimal digits for terminal display.
Example 7–5 Referencing RMS-STS, RMS-STV, RMS-CURRENT-STS, and
RMS-CURRENT-STV Codes (OpenVMS)
.
.
.
DATA DIVISION.
FILE SECTION.
FD FILE-1.
01 RECORD-1
PIC X(50).
FD FILE-2.
01 RECORD-2
PIC X(50).
WORKING-STORAGE SECTION.
01 ANSWER
PIC X.
01 STS
PIC S9(9) COMP.
01 STV
PIC S9(9) COMP.
(continued on next page)
7–6 Handling Input/Output Exception Conditions
Handling Input/Output Exception Conditions
7.3 Using File Status Values and OpenVMS RMS Completion Codes
Example 7–5 (Cont.) Referencing RMS-STS, RMS-STV, RMS-CURRENT-STS,
and RMS-CURRENT-STV Codes (OpenVMS)
PROCEDURE DIVISION.
A000-BEGIN.
.
.
WRITE RECORD-1 INVALID KEY PERFORM A901-REPORT-FILE1-STATUS.
*
* The following PERFORM statement displays the RMS completion
* codes resulting from the above WRITE statement for FILE-1.
*
PERFORM A903-REPORT-RMS-CURRENT-STATUS.
.
.
.
WRITE RECORD-2 INVALID KEY PERFORM A902-REPORT-FILE2-STATUS.
*
* The following PERFORM statement displays the RMS completion
* codes resulting from the above WRITE statement for FILE-2.
*
PERFORM A903-REPORT-RMS-CURRENT-STATUS.
.
.
.
*
* The following PERFORM statement moves the RMS completion codes
* resulting from the above WRITE statement for FILE-2 to data
* fields that are explicitly defined within your program.
*
PERFORM A904-MOVE-RMS-STS-STV.
.
.
.
A901-REPORT-FILE1-STATUS.
*******************************************
*
DISPLAY "RMS-STS = " RMS-STS OF FILE-1 WITH CONVERSION.
DISPLAY "RMS-STV = " RMS-STV OF FILE-1 WITH CONVERSION.
DISPLAY "RMS-FILENAME = " RMS-FILENAME OF FILE-1.
*
*******************************************
PERFORM A999-GET-ANSWER UNTIL ANSWER = "Y" OR "N".
IF ANSWER = "N" STOP RUN.
A902-REPORT-FILE2-STATUS.
*******************************************
*
DISPLAY "RMS-STS = " RMS-STS OF FILE-2 WITH CONVERSION.
DISPLAY "RMS-STV = " RMS-STV OF FILE-2 WITH CONVERSION.
DISPLAY "RMS-FILENAME = " RMS-FILENAME OF FILE-2.
*
*******************************************
PERFORM A999-GET-ANSWER UNTIL ANSWER = "Y" OR "N".
IF ANSWER = "N" STOP RUN.
(continued on next page)
Handling Input/Output Exception Conditions 7–7
Handling Input/Output Exception Conditions
7.3 Using File Status Values and OpenVMS RMS Completion Codes
Example 7–5 (Cont.) Referencing RMS-STS, RMS-STV, RMS-CURRENT-STS,
and RMS-CURRENT-STV Codes (OpenVMS)
A903-REPORT-RMS-CURRENT-STATUS.
*******************************************
*
DISPLAY "RMS-CURRENT-STS = " RMS-CURRENT-STS WITH CONVERSION.
DISPLAY "RMS-CURRENT-STV = " RMS-CURRENT-STV WITH CONVERSION.
DISPLAY "RMS-CURRENT-FILENAME = " RMS-CURRENT-FILENAME.
*
*******************************************
PERFORM A999-GET-ANSWER UNTIL ANSWER = "Y" OR "N".
IF ANSWER = "N" STOP RUN.
A904-MOVE-RMS-STS-STV.
*******************************************
*
MOVE RMS-STS OF FILE-1 TO STS.
MOVE RMS-STV OF FILE-1 TO STV.
*
*******************************************
PERFORM A999-GET-ANSWER UNTIL ANSWER = "Y" OR "N".
IF ANSWER = "N" STOP RUN.
A999-GET-ANSWER.
DISPLAY "Do you want to continue?"
DISPLAY "Please answer Y or N"
ACCEPT ANSWER.
♦
7.4 Using Declarative USE Procedures
An applicable Declarative USE procedure executes whenever an I/O statement
results in an exception condition (a file status value that does not begin with
a zero ( 0 )) and the I/O statement does not contain an AT END or INVALID
KEY phrase. The AT END and INVALID KEY phrases take precedence over
a Declarative USE procedure, but only for the I/O statement that includes the
clause. For example, the AT END phrase takes effect only with File Status 10
and the INVALID KEY phrase takes effect only with File Status 23. Therefore,
you can have specific I/O statement exception condition handling for a file and
also include a Declarative USE procedure for general exception handling.
A Declarative USE procedure is a set of one or more special-purpose sections at
the beginning of the Procedure Division. As shown in Example 7–6, the key word
DECLARATIVES precedes the first of these sections, and the key words END
DECLARATIVES follow the last.
7–8 Handling Input/Output Exception Conditions
Handling Input/Output Exception Conditions
7.4 Using Declarative USE Procedures
Example 7–6 The Declaratives Skeleton
PROCEDURE DIVISION.
DECLARATIVES.
.
.
.
END DECLARATIVES.
MAIN-BODY SECTION.
BEGIN.
.
.
.
As shown in Example 7–7, a Declarative procedure consists of a section header,
followed, in order, by a USE statement and one or more paragraphs.
Example 7–7 A Declarative USE Procedure Skeleton
.
.
.
PROCEDURE DIVISION.
DECLARATIVES.
D0-00-FILE-A-PROBLEM SECTION.
USE AFTER STANDARD ERROR PROCEDURE ON FILE-A.
D0-01-FILE-A-PROBLEM.
.
.
.
D0-02-FILE-A-PROBLEM.
.
.
.
D0-03-FILE-A-PROBLEM.
.
.
.
END DECLARATIVES.
MAIN-BODY SECTION.
BEGIN.
.
.
.
Declarative USE procedures can be either ordinary or global. Ordinary
Declarative USE procedures have a limited scope; you can use them only
in programs where they are originally introduced. Global Declarative USE
procedures have a wider scope; you can use them in programs that introduce
them as well as in programs that are contained within the introducing program.
In Compaq COBOL Declarative procedures, the conditions in the USE statements
indicate when they execute. There are five conditions. One USE statement
can have only one condition; therefore, if you need all five conditions in one
program, you must use five separate USE procedures. These procedures and
their corresponding conditions are as follows:
•
File name—You can define a file name Declarative USE procedure for each
file name. This procedure takes precedence over the next four procedures. It
executes for any unsuccessful exception condition. (One USE statement can
specify multiple file names.)
Handling Input/Output Exception Conditions 7–9
Handling Input/Output Exception Conditions
7.4 Using Declarative USE Procedures
•
INPUT—You can define only one INPUT Declarative USE procedure for each
program. This procedure executes for any unsuccessful exception condition if:
( 1 ) the file is open for INPUT and ( 2 ) a file name Declarative USE procedure
does not exist for that file.
•
OUTPUT—You can define only one OUTPUT Declarative USE procedure
for each program. This procedure executes for any unsuccessful exception
condition if: ( 1 ) the file is open for OUTPUT and ( 2 ) a file name Declarative
USE procedure does not exist for that file.
•
INPUT-OUTPUT—You can define only one INPUT-OUTPUT Declarative USE
procedure for each program. This procedure executes for any unsuccessful
exception condition if: ( 1 ) the file is open for INPUT-OUTPUT (I-O) and ( 2 )
a file name Declarative USE procedure does not exist for that file.
•
EXTEND—You can define only one EXTEND Declarative USE procedure
for each program. This procedure executes for any unsuccessful exception
condition if: ( 1 ) the file is open for EXTEND and ( 2 ) a file name Declarative
USE procedure does not exist for that file.
Note that the USE statement itself does not execute; it defines the condition
that causes the Declarative procedure to execute. Refer to the Compaq COBOL
Reference Manual for more information about specifying Declarative procedures
with the USE statement.
Example 7–8 shows you how to include a USE procedure for each of the conditions
in your program. The example also contains explanatory comments for each.
Example 7–8 Five Types of Declarative USE Procedures
.
.
.
PROCEDURE DIVISION.
DECLARATIVES.
********************************************************
D1-00-FILE-A-PROBLEM SECTION.
USE AFTER STANDARD ERROR PROCEDURE ON FILE-A.
*
*
* If any file-access statement for FILE-A results in an
* error, D1-00-FILE-A-PROBLEM executes.
*
*
D1-01-FILE-A-PROBLEM.
PERFORM D9-00-REPORT-FILE-STATUS.
.
.
.
(continued on next page)
7–10 Handling Input/Output Exception Conditions
Handling Input/Output Exception Conditions
7.4 Using Declarative USE Procedures
Example 7–8 (Cont.) Five Types of Declarative USE Procedures
********************************************************
D2-00-FILE-INPUT-PROBLEM SECTION.
USE AFTER STANDARD EXCEPTION PROCEDURE ON INPUT.
*
*
* If an error occurs for any file open
* in the INPUT mode except FILE-A,
* D2-00-FILE-INPUT-PROBLEM executes.
*
*
D2-01-FILE-INPUT-PROBLEM.
PERFORM D9-00-REPORT-FILE-STATUS.
.
.
.
********************************************************
D3-00-FILE-OUTPUT-PROBLEM SECTION.
USE AFTER STANDARD EXCEPTION PROCEDURE ON OUTPUT.
*
*
* If an error occurs for any file open
* in the OUTPUT mode except FILE-A,
* D3-00-FILE-OUTPUT-PROBLEM executes.
*
*
D3-01-FILE-OUTPUT-PROBLEM.
PERFORM D9-00-REPORT-FILE-STATUS.
.
.
.
********************************************************
D4-00-FILE-I-O-PROBLEM SECTION.
USE AFTER STANDARD EXCEPTION PROCEDURE ON I-O.
*
*
* If an error occurs for any file open
* in the INPUT-OUTPUT mode except FILE-A,
* D4-00-FILE-I-O-PROBLEM executes.
*
*
*
D4-01-FILE-I-O-PROBLEM.
PERFORM D9-00-REPORT-FILE-STATUS.
.
.
.
(continued on next page)
Handling Input/Output Exception Conditions 7–11
Handling Input/Output Exception Conditions
7.4 Using Declarative USE Procedures
Example 7–8 (Cont.) Five Types of Declarative USE Procedures
********************************************************
D5-00-FILE-EXTEND-PROBLEM SECTION.
USE AFTER STANDARD EXCEPTION PROCEDURE ON EXTEND.
*
*
* If an error occurs for any file open
* in the EXTEND mode except FILE-A,
* D5-00-FILE-EXTEND-PROBLEM executes.
*
*
D5-01-FILE-EXTEND-PROBLEM.
PERFORM D9-00-REPORT-FILE-STATUS.
.
.
.
D9-00-REPORT-FILE-STATUS.
.
.
.
END DECLARATIVES.
********************************************************
A000-BEGIN SECTION.
BEGIN.
.
.
.
7–12 Handling Input/Output Exception Conditions
8
Sharing Files and Locking Records
This chapter includes the following information about sharing files and protecting
records for sequential, relative, and indexed files:
•
Controlling access to files and records (Section 8.1)
•
Choosing X/Open standard (Alpha) or Compaq standard file sharing and
record locking (Section 8.2)
•
Ensuring successful file sharing (Section 8.3)
•
Using record locking to control access to records (Section 8.4)
8.1 Controlling Access to Files and Records
In a data manipulation environment where many users and programs access the
same data, file control must be applied to protect files from nonprivileged users,
to permit the desired degree of file sharing, and to preserve data integrity in the
files. For example, in Figure 8–1 many users and programs want to access data
found in FILE-A.
Figure 8–1 Multiple Access to a File
Location 1
Location 2
User 1
Location 3
User 2
PROG−A
Access
Stream 1
PROG−A
User 3
PROG−B
Access
Stream 2
Access
Stream 3
FILE−A
ZK−6323−GE
Sharing Files and Locking Records 8–1
Sharing Files and Locking Records
8.1 Controlling Access to Files and Records
File sharing and record locking allow you to control file and record operations
when more than one access stream (the series of file and record operations
being performed by a single user, using a single file connector) is concurrently
accessing a file, as in Figure 8–1.
A Compaq COBOL program, via the I/O system, can define one or more access
streams. You create one access stream with each OPEN file-name statement. The
access stream remains active until you terminate it with the CLOSE file-name
statement or until your program terminates.
File sharing allows multiple users (or access streams) to access a single file
concurrently. The protection level of the file, set by the file owner, determines
which users can share a file.
Record locking controls simultaneous record operations in files that are
accessed concurrently. Record locking ensures that when a program is writing,
deleting, or rewriting a record in a given access stream, another access stream is
allowed to access the same record in a specified manner.
Figure 8–2 illustrates the relationship of record locking to file sharing.
Figure 8–2 Relationship of Record Locking to File Sharing
FILE SHARING
Automatic
Record Locking
Manual
Record Locking
ZK−6105−GE
File sharing is a function of the file system, while record locking is a function
of the I/O system. The file system manages file placement and the file-sharing
process, in which multiple access streams simultaneously access a file. The
I/O system manages the record-sharing process and provides access methods to
records within a file. This includes managing the record-locking process, in which
multiple access streams simultaneously access a record.
You must have successful file sharing before you can consider record locking.
In Compaq COBOL, the file operations begin with an OPEN statement and end
with a CLOSE statement. The OPEN statement initializes an access stream and
specifies the mode. The CLOSE statement terminates an access stream and can
be either explicit (stated in the program) or implicit (on program termination).
Note
The first access stream to open a file determines how other access streams
can access the file concurrently (if at all).
The record operations for Compaq COBOL that are associated with record locking
are as follows:
READ
START
8–2 Sharing Files and Locking Records
Sharing Files and Locking Records
8.1 Controlling Access to Files and Records
WRITE
REWRITE
DELETE
UNLOCK
8.2 Choosing X/Open Standard or Compaq Standard File Sharing
and Record Locking (Alpha)
On Alpha systems, Compaq COBOL offers two methods of controlling potential
conflicts of multi-user file access between simultaneously running processes:
•
Compaq standard, which is compatible with the behavior of Compaq COBOL
for OpenVMS VAX1
•
X/Open standard (Alpha), which conforms to the X/Open CAE Specification:
COBOL Language and which offers X/Open portability
Both effectively control potential conflicts of file access between simultaneously
running COBOL processes. Both offer locking for all file types: sequential,
relative, and indexed.
Note
If you choose X/Open standard file sharing and record locking for a file
connector, you must not use Compaq standard syntax anywhere in your
program for the same file connector. The two are mutually exclusive.
The Compaq COBOL compiler determines whether to apply X/Open standard
behavior or Compaq standard behavior for any file connector on the basis of
the syntax used for that file connector. The following syntax identifies X/Open
standard:
LOCK MODE (SELECT statement)
WITH LOCK (OPEN statement)
WITH [NO] LOCK (READ statement)
UNLOCK RECORDS
The following syntax identifies Compaq standard:
APPLY LOCK-HOLDING (Environment Division)
ALLOWING1
REGARDLESS1 (Procedure Division)
UNLOCK ALL
For any given file connector, any subsequent I-O locking syntax in your program
must be consistent: X/Open standard and Compaq standard file sharing/record
locking (implicit or explicit) cannot be mixed for the same file connector.
If a program includes any ambiguous semantics for I-O verbs (that is, no locking
syntax for verbs for which the two standards provide different default behavior)
and the previous code does not use Compaq or X/Open standard-specific syntax
for that file connector, the compiler determines which standard to use by applying
the specification (or default) from your compile command line, as follows:
•
1
The -std [no]xopen flag on the cobol command for the Tru64 UNIX
operating system
Some exceptions exist on Tru64 UNIX. Refer to the Compaq COBOL Reference Manual
for details.
Sharing Files and Locking Records 8–3
Sharing Files and Locking Records
8.2 Choosing X/Open Standard or Compaq Standard File Sharing and Record Locking (Alpha)
•
The /STANDARD=[NO]XOPEN qualifier on the COBOL command for the
OpenVMS Alpha operating system
If you do not specify the flag or qualifier, the default is noxopen (Compaq
standard) file sharing and record locking.
If you want X/Open file sharing and record locking and have not used the LOCK
MODE clause, therefore, you should specify /STANDARD=XOPEN or -std xopen
to ensure X/Open standard behavior in instances of conflicting default semantics.
Note, however, that the qualifier/flag comes into effect only when the explicit
syntax has not determined the usage. ♦
8.3 Ensuring Successful File Sharing
Successful file sharing requires that you:
•
•
Provide disk residency for the file.
Use the operating system file protection facility, namely the contents of
/etc/groups (on Tru64 UNIX systems) or the UIC (on OpenVMS systems).
•
Determine the intended access mode to the file (Compaq COBOL open modes).
•
Indicate the file access allowed by other streams, using X/Open standard (on
Alpha only) or Compaq standard syntax to specify file sharing.
The remainder of this section describes these requirements in more detail.
8.3.1 Providing Disk Residency
Only files that reside on a disk can be shared. In Compaq COBOL you can share
sequential, relative, and indexed files.
8.3.2 Using File Protection
By applying the appropriate file permissions at the operating system level, the
owner of a file determines how other users can access the file. An owner can
permit different types of file access for different users or groups.
Note
The following OpenVMS operating system file protection access types are
not a part of Compaq COBOL syntax.
The four types of file access are as follows:
•
READ—Permits the reading of the records in the file.
•
WRITE—Permits updating or extending the records in the file.
•
EXECUTE—Applies to on-disk volume protection and image execution and is
therefore not applicable to a Compaq COBOL program except through system
service routines.
•
DELETE—Permits deletion of the file and is therefore not applicable to a
Compaq COBOL program (since Compaq COBOL has no delete file facility)
except through system service routines.
8–4 Sharing Files and Locking Records
Sharing Files and Locking Records
8.3 Ensuring Successful File Sharing
In the OpenVMS file protection facility, four different categories of users exist
with respect to data structures and devices. A file owner determines which of the
following user categories can share the file:
•
SYSTEM—Users of the system whose group numbers are in the range 0 to
the value of the MAXSYSGROUP parameter or who have certain I/O-related
privileges
•
OWNER—Users of the system whose UIC group and member numbers are
identical to the UIC of the file owner
•
GROUP—Users of the system whose group number is identical to the group
number of the file owner
•
WORLD—All other users of the system who are not included in the previous
categories
The OpenVMS operating system applies a default protection to each newly
created file unless the owner specifically requests modified protection.
For more information on file protection, refer to the OpenVMS User’s Manual. ♦
Note
The following Tru64 UNIX operating system file access types are not a
part of Compaq COBOL syntax.
On Tru64 UNIX systems, the three types of file access are as follows:
•
Read—Permits the reading of the records in the file.
•
Write—Permits updating or extending the records in the file.
•
Execute—Applies to image execution and is therefore not applicable to a
Compaq COBOL program.
There are three categories of users:
•
User—Owner of the file
•
Group—Users in the same group as the owner
•
Others—All other users
Compaq COBOL determines the access permission for newly created files in the
following manner:
1. The default access permissions are granted:
•
User and Group are granted read and write access.
•
Others are granted read access.
2. Then the file mode creation mask of the process creating the file is taken into
account.
Additional information on file permission can be found in the Tru64 UNIX man
pages for chmod, ls, open, and umask. ♦
Sharing Files and Locking Records 8–5
Sharing Files and Locking Records
8.3 Ensuring Successful File Sharing
8.3.3 Determining the Intended Access Mode to a File
Once you establish disk residency and permission for a file, you can consider
how the stream intends to access the file. You specify this intention by using the
Compaq COBOL open and access modes.
The Compaq COBOL open modes are INPUT, OUTPUT, EXTEND, and I-O. The
Compaq COBOL access modes are SEQUENTIAL, RANDOM, and DYNAMIC.
The combination of open and access modes determines the operations intended on
the file.
You must validate your Compaq COBOL intention against the file protection
assigned by the file owner. For example, to use an OPEN INPUT clause requires
that the file owner has granted read access privileges to the file. To use an OPEN
OUTPUT or EXTEND clause requires write access privileges to the file. To use
an OPEN I-O clause requires both read and write access privileges.
The following chart shows the relationship between open and access modes and
intended Compaq COBOL operations. The word ANY indicates that all three
access methods result in the same intentions.
Open Mode
Access Mode
Intended COBOL Operations
INPUT
ANY
READ, START
OUTPUT
ANY
WRITE
I-O
SEQUENTIAL
READ, START, REWRITE, DELETE
RANDOM/DYNAMIC
READ, START, REWRITE, DELETE, WRITE
SEQUENTIAL
WRITE
EXTEND
Note
If the file protection does not permit the intended operations, file access is
not granted, even if open and access modes are compatible.
File protection and open mode access apply to both the unshared and shared
(multiple access stream) file environments. A file protection and intent check is
made when the first access stream opens a file (in the unshared file environment),
and again when the second and subsequent access streams open the file (in the
shared file environment).
After you provide disk residency, specify permission, and determine the access
mode to a file, you can specify the access allowed to other streams through filesharing and record-locking techniques. The remainder of this chapter describes
this access control.
8.3.4 Specifying File Access Using X/Open Standard File Sharing (Alpha)
X/Open standard file sharing is summarized in this section and fully described
in the Compaq COBOL Reference Manual (Environment Division and Procedure
Division chapters) and the X/Open CAE Specification: COBOL Language.
If you want a file in your COBOL program to utilize X/Open standard file sharing
(probably for purposes of portability), you should include X/Open-specific syntax
for the file in the Environment Division. Use one of the following:
LOCK MODE IS AUTOMATIC
LOCK MODE IS MANUAL
8–6 Sharing Files and Locking Records
Sharing Files and Locking Records
8.3 Ensuring Successful File Sharing
LOCK MODE IS EXCLUSIVE
You can also select X/Open file sharing by just specifying WITH LOCK on the
OPEN or READ statements. However, it is recommended that you use the LOCK
MODE clause to avoid ambiguity and maintain readability. If this is not done and
any I-O verbs rely on default behavior that might result in ambiguity, you should
compile your program with the X/Open option added to the compile command
line.
Opened files can be exclusive or shareable, as specified by the LOCK MODE
option of the SELECT clause (in the FILE-CONTROL paragraph of the
Environment Division) or the OPEN statement. However, files opened in
OUTPUT mode cannot be shared. To make a file shareable, specify one of
the following:
•
LOCK MODE IS AUTOMATIC [WITH LOCK ON RECORD]
•
LOCK MODE IS MANUAL WITH LOCK ON MULTIPLE RECORDS (allowed
only for indexed or relative files)
These forms allow other access streams to open the file.
To make the file unavailable to other processes, specify one of the following:
•
LOCK MODE IS EXCLUSIVE
•
WITH LOCK on the OPEN statement
This locks the file. Attempts by other access streams to open the file cause a file
lock condition.
If the LOCK MODE clause and WITH LOCK phrase are both omitted, the default
file sharing is as follows:
•
Opened in INPUT mode: shareable
•
Opened in I-O, EXTEND, or OUTPUT mode: exclusive
The WITH LOCK phrase overrides any LOCK MODE clause. This is useful to
create an exclusive access stream for a file declared as shareable.
You can protect a shareable file’s data by using record-locking syntax (described
in Section 8.4.1).
Example 8–1 shows the use of X/Open standard file-sharing code and the results
when files are opened.
Example 8–1 X/Open Standard Lock Modes and Opening Files (Alpha)
FILE-CONTROL.
SELECT employee-file ASSIGN TO "EMPFIL"
LOCK MANUAL LOCK ON MULTIPLE RECORDS.
SELECT master-file ASSIGN TO "MASTFIL"
LOCK AUTOMATIC.
SELECT tran-file ASSIGN TO "TRANFIL"
LOCK MODE IS EXCLUSIVE.
SELECT job-codes ASSIGN TO "JOBFIL".
.
.
.
(continued on next page)
Sharing Files and Locking Records 8–7
Sharing Files and Locking Records
8.3 Ensuring Successful File Sharing
Example 8–1 (Cont.) X/Open Standard Lock Modes and Opening Files (Alpha)
PROCEDURE-DIVISION.
BEGIN.
* The file is shareable per LOCK MODE specification:
OPEN I-O employee-file.
* The file is exclusive during this access stream, overriding the
* LOCK MODE specification:
OPEN I-O master-file WITH LOCK.
* The file is exclusive per LOCK MODE; others cannot access it:
OPEN INPUT tran-file.
* The file defaults to exclusive; others cannot access it:
OPEN EXTEND job-codes.
♦
8.3.5 Specifying File Access Using Compaq Standard File Sharing
Compaq standard file sharing is summarized in this section and fully described
in the Compaq COBOL Reference Manual (Environment Division and Procedure
Division chapters).
You use the ALLOWING clause of the OPEN statement to specify what other
access streams are allowed to access that file. The forms of OPEN ALLOWING
are as follows:
•
OPEN ALLOWING NO OTHERS—Locks the file for exclusive access.
Attempts by other access streams to access the file cause a file lock condition.
•
OPEN ALLOWING READERS—Locks the file against operations that
indicate intended write access (OPEN I-O and OPEN EXTEND). Other
streams can use the OPEN INPUT statement to view the file. No updaters
are permitted.
On Tru64 UNIX, this lock is limited for INDEXED files, as follows:
–
Any stream
If automatic record locking was requested, the file has now been
opened with manual record locking in an attempt to process
READERS.
–
First stream
If the open mode was INPUT (reader), subsequent non-exclusive
updaters will get access to the file at OPEN time, but they will not be
able to update the file at the record level.
If the mode is EXTEND, I-O, or OUTPUT (updater), the file lock
acquired will not exclude other updaters that have specified full
sharing of the file (with ALLOWING {ALL,UPDATERS,WRITERS}).
–
Subsequent stream
If the mode is EXTEND or OUTPUT (updater), access to the
file is granted instead of denied when a previous updater
stream has specified full sharing of the file (with ALLOWING
{ALL,UPDATERS,WRITERS}).
8–8 Sharing Files and Locking Records
Sharing Files and Locking Records
8.3 Ensuring Successful File Sharing
If the mode is INPUT (reader), access to the file is granted instead
of denied when a previous updater stream has specified full
(ALL/UPDATERS/WRITERS) or partial (READERS) sharing of
the file.
If the mode is I-O, access is denied as expected. ♦
•
OPEN ALLOWING WRITERS or UPDATERS or ALL—Allows access by other
streams. Other access streams can open the file in INPUT, EXTEND, and I-O
modes.
Compaq COBOL also permits a list of OPEN ALLOWING options, separated by
commas. The list results in the following equivalent ALLOWING specifications:
•
ALLOWING WRITERS, UPDATERS becomes ALLOWING ALL
•
ALLOWING READERS, UPDATERS becomes ALLOWING UPDATERS
The first access stream uses the ALLOWING clause to specify what other access
streams can do. When the second and subsequent access streams attempt to open
the file, the following checks occur:
1. The allowed options of this access stream are checked against the intended
access of the previous streams.
2. The intended access of this access stream is checked against the allowed
access of the previous streams.
For example, if the first access stream specifies the ALLOWING READERS
clause, then a subsequent access stream that opens the file ALLOWING NO
OTHERS would fail. Also, if the first access stream opens the file ALLOWING
READERS, the following access stream that opens the file ALLOWING ALL and
WITH I-O mode would fail, because the clause option and the I-O mode declare
write intent to the file.
If you do not specify an ALLOWING clause on the OPEN statement, the default
for files opened for INPUT is ALLOWING READERS, and the default for files
opened for I-O, OUTPUT, or EXTEND mode is ALLOWING NO OTHERS.
Describing Types of Access Streams
You can establish several types of access streams. For example, two programs
opening the same file represent two access streams to that file. Both programs
begin with the file open, perform record operations, and then close the file.
Combining Related File-Sharing Criteria
This section summarizes the relationships among three of the file-sharing criteria
(the first file-sharing requirement, disk residency, is not included).
The following chart shows the file protection and open mode requirements. For
example, the file protection privilege READ ( R ) permits OPEN INPUT.
File Protection
Open Mode
R
INPUT
W
OUTPUT, EXTEND
RW
I-O, INPUT, OUTPUT, EXTEND
Remember that you specify intended operations through the first access stream.
For the second and subsequent shared access to a file, you use the access
intentions (open modes) and the ALLOWING clause to determine if and how
Sharing Files and Locking Records 8–9
Sharing Files and Locking Records
8.3 Ensuring Successful File Sharing
a file is shared. Note that some streams can be locked out if their intentions are
not compatible with those of the streams that have already been allowed entry to
the file.
On OpenVMS, Table 8–1 shows the valid and invalid OPEN ALLOWING
combinations between first and subsequent access streams. (The subsequent
table is the equivalent for Tru64 UNIX systems.) The table assumes no file
protection violations on the first stream.
Table 8–1 File-Sharing Options (OpenVMS)
FIRST STREAM
SUBSEQUENT STREAM
Open mode:
Allowing:
UPDATE
ALL
UPDATE
READERS
UPDATE
NONE
INPUT INPUT
ALL
READERS
INPUT
NONE
OUTPUT
ALL
READERS
NONE
UPDATE
ALL
G
3
2
G
3
2
5
UPDATE
READERS
4
3,4
2
G
3
2
5
UPDATE
NONE
1
1,3
1,2
1
1,3
1,2
5
INPUT
ALL
G
G
2
G
G
2
5
INPUT
READERS
4
4
2
G
G
2
5
INPUT
NONE
1
1
1,2
1
1
1,2
5
OUTPUT
ALL
G
3
2
G
3
2
5
OUTPUT
READERS
4
3,4
2
G
3
2
5
OUTPUT
NONE
1
1,3
1,2
1
1,3
1,2
5
Legend
UPDATE
OPEN EXTEND or OPEN I-O
INPUT
OPEN INPUT
OUTPUT
OPEN OUTPUT
ALL
ALLOWING ALL or ALLOWING UPDATERS or ALLOWING WRITERS
READERS
ALLOWING READERS
NONE
ALLOWING NO OTHERS
G
Second stream successfully opens and file sharing is granted.
1
Second stream is denied access to the file because the first stream requires
exclusive access (the first stream specified NO OTHERS).
2
Second stream is denied access to the file because the second stream
requires exclusive access (the second stream specified NO OTHERS).
8–10 Sharing Files and Locking Records
Sharing Files and Locking Records
8.3 Ensuring Successful File Sharing
Legend
3
Second stream is denied access to the file because the first stream intends
to write, while the second stream specifies read-only sharing.
4
Second stream is denied access to the file because the second stream
intends to write, while the first stream specifies read-only sharing.
5
No sharing; second will create new file version with OPEN OUTPUT.
♦
On Tru64 UNIX, Table 8–2 shows the valid and invalid OPEN ALLOWING
combinations between first and subsequent access streams. The table assumes no
file protection violations on the first stream.
Table 8–2 File-Sharing Options (Tru64 UNIX)
FIRST STREAM
SUBSEQUENT STREAM
Open mode:
Allowing:
UPDATE
ALL
UPDATE
READERS
UPDATE
NONE
INPUT INPUT
ALL
READERS
INPUT
NONE
UPDATE
ALL
G
5
2
G
5
2
UPDATE
READERS
6
3,4
2
G
5
2
UPDATE
NONE
1
1,3
1,2
1
1,3
1,2
INPUT
ALL
G
G
2
G
G
2
INPUT
READERS
7
7
2
G
G
2
INPUT
NONE
1
1
1,2
1
1
1,2
Legend
UPDATE
OPEN EXTEND or OPEN I-O
INPUT
OPEN INPUT
OUTPUT
OPEN OUTPUT
ALL
ALLOWING ALL or ALLOWING UPDATERS or ALLOWING WRITERS
READERS
ALLOWING READERS
NONE
ALLOWING NO OTHERS
G
Second stream successfully opens and file sharing is granted.
1
Second stream is denied access to the file because the first stream requires
exclusive access (the first stream specified NO OTHERS).
2
Second stream is denied access to the file because the second stream
requires exclusive access (the second stream specified NO OTHERS).
3
Second stream is denied access to the file because the first stream intends
to write, while the second stream specifies read-only sharing.
4
Second stream is denied access to the file because the second stream
intends to write, while the first stream specifies read-only sharing.
Sharing Files and Locking Records 8–11
Sharing Files and Locking Records
8.3 Ensuring Successful File Sharing
Legend
5
No sharing; second will create new file version with OPEN OUTPUT.
6
For indexed files, when the first stream allows READERS, file lock does
not exclude updaters allowing sharing. For files other than indexed, 4
applies.
7
For indexed files, the second stream is granted access but cannot update
the file. For files other than indexed, 4 applies.
♦
In the following example, three streams illustrate some of the file-sharing rules:
STREAM 1
STREAM 2
STREAM 3
OPEN INPUT ALLOWING ALL
OPEN INPUT ALLOWING READERS
OPEN I-O ALLOWING UPDATERS
Stream 1 permits ALLOWING ALL; thus stream 2 can read the file. However,
the third stream violates the intent of the second stream, because OPEN I-O
implies a write intention that stream 2 disallows. Consequently, the third access
stream receives a file locked error.
8.3.6 Error Handling for File Sharing
This section describes error conditions, checking file operations for success or
failure, some considerations when you specify the OPEN EXTEND statement,
and related potential errors.
Error Conditions
Whether the syntax is X/Open standard (Alpha) or Compaq standard, any file
contention error results in an unsuccessful statement for which a USE procedure
will be invoked. A ‘‘file-locked’’ condition results in an I-O status code of 91.
On Alpha, it is invalid to specify both X/Open and Compaq standard file sharing
for the same file connector. Any attempts are flagged by the compiler when they
are detectable in a single compilation unit. Across compilation units, the run-time
system detects and reports such violations. This restriction is true for explicit and
implicit (default) usage. ♦
Checking File Operations
You can check the success or failure of a file open operation by using the File
Status value (or, on OpenVMS systems, the RMS-STS value in a Compaq COBOL
special register called RMS-STS).
Table 8–3 illustrates the file status values you frequently use in a file-sharing
environment.
Table 8–3 File Status Values Used in a File-Sharing Environment
File Status Value
Meaning
00
Successful operation
30
File protection violation
91
File is locked
File Status 00 indicates the completion of a successful operation.
8–12 Sharing Files and Locking Records
Sharing Files and Locking Records
8.3 Ensuring Successful File Sharing
File Status 30 might result from a violation of the file protection codes described
in Section 8.3.2. To correct this condition, the file owner must reset the protection
on the file or the directory that contains the file.
File Status 91 indicates that a previous access stream has denied access to the
file. That previous access stream opened the file with locking attributes that
conflict with the OPEN statement of the subsequent stream.
You can obtain the values that apply to file-sharing exceptions (or to successful
file-sharing operations), as shown in Example 8–2.
Example 8–2 Program Segment for File Status Values
FILE-CONTROL.
SELECT FILE-NAME ASSIGN TO "fshare.dat"
FILE STATUS IS FILE-STAT.
WORKING-STORAGE SECTION.
01 FILE-STAT PIC XX.
88 FILE-OPENED VALUES "00", "05", "07".
88 FILE-LOCKED VALUE "91".
01 RETRY-COUNT PIC 9(2).
01 MAX-RETRY
PIC 9)2) VALUE 10.
.
.
.
PROCEDURE DIVISION.
DECLARATIVES.
FILE-USE SECTION.
USE AFTER STANDARD EXCEPTION PROCEDURE ON FILE-NAME.
FILE-ERR.
* need declaratives to trap condition, but let main code process it
IF FILE-LOCKED
CONTINUE
ELSE
.
.
.
END-IF.
END DECLARATIVES.
.
.
.
OPEN-FILES.
OPEN I-O FILE-NAME.
IF NOT FILE-OPENED
PERFORM CHECK-OPEN.
.
.
.
CHECK-OPEN.
IF FILE-LOCKED
MOVE 1 to RETRY-COUNT
PERFORM RETRY-OPEN UNTIL FILE-OPENED OR
RETRY-COUNT > MAX-RETRY
IF FILE-LOCKED AND RETRY-COUNT > MAX-RETRY
DISPLAY "File busy...please try again later"
STOP RUN
END-IF
END-IF.
(continued on next page)
Sharing Files and Locking Records 8–13
Sharing Files and Locking Records
8.3 Ensuring Successful File Sharing
Example 8–2 (Cont.) Program Segment for File Status Values
* handle other possible errors here
.
.
.
RETRY-OPEN.
OPEN I-O FILE-NAME.
add 1 to RETRY-COUNT.
On OpenVMS, Table 8–4 describes RMS-STS values used in a file-sharing
environment.
Table 8–4 RMS-STS Values Used in a File-Sharing Environment (OpenVMS)
RMS-STS Value
Meaning
RMS$_DIR
Error in directory name
RMS$_DNF
Directory not found
RMS$_DNR
Device not ready or not mounted
RMS$_DUP
Duplicate key detected (DUP not set)
RMS$_ENQ
System service request failed
RMS$_EOF
End of file detected
RMS$_FLK
1
File is locked
RMS$_FNF
File not found
RMS$_FUL
Device full (insufficient space)
RMS$_KEY
Invalid record number key or key value
RMS$_KRF
Invalid key of reference for $GET/$FIND
RMS$_KSZ
Invalid key size for $GET/$FIND
RMS$_OK_RLK
Record locked but read anyway
RMS$_OK_RRL
Record locked against read but read anyway
RMS$_PRV
2
File protection violation
RMS$_RAC
Invalid record access mode
RMS$_REX
Record already exists
RMS$_RLK
Record currently locked by another stream
RMS$_RNF
Record not found
RMS$_RNL
Record not locked
RMS$_RSZ
Invalid record size
RMS$_SNE
File sharing not enabled
RMS$_SPE
File$_sharing page count exceeded
RMS$_SUC3
Successful operation
RMS$_WLK
Device currently write locked
1 Corresponds
to File Status Value of 91
2 Corresponds
to File Status Value of 30
3 Corresponds
to File Status Value of 00
8–14 Sharing Files and Locking Records
Sharing Files and Locking Records
8.3 Ensuring Successful File Sharing
You can obtain the values that apply to file-sharing exceptions (or to successful
file-sharing operations) by using the VALUE IS EXTERNAL clause, as shown in
Example 8–3:
Example 8–3 Program Segment for RMS-STS Values (OpenVMS)
WORKING-STORAGE SECTION.
01 RMS-SUC
PIC S9(9) COMP VALUE IS EXTERNAL RMS$_SUC.
01 RMS-FLK
PIC S9(9) COMP VALUE IS EXTERNAL RMS$_FLK.
.
.
.
PROCEDURE DIVISION.
DECLARATIVES.
FILE-1-ERR SECTION.
USE AFTER STANDARD EXCEPTION PROCEDURE ON FILE-1.
FILE-1-USE.
EVALUATE RMS-STS OF FILE-1
WHEN RMS-SUC
DISPLAY "successful operation"
WHEN RMS-FLK
DISPLAY "file is locked - access denied".
.
.
♦
.
Specifying the OPEN EXTEND Statement in a File-Sharing Environment
If you specify an OPEN EXTEND in a file-sharing environment, be aware that
the EXTEND results differ depending upon what file organization you use.
OPEN EXTEND with a Shared Sequential File In a shared sequential file
environment, when two concurrent access streams open the file in EXTEND
mode, and both streams issue a write to the end of the file (EOF), the additional
data will come from both streams, and the data will be inserted into the file in
the order in which it was written to the file.
OPEN EXTEND with a Shared Relative File You must use the sequential access
mode when you open a relative file in extend mode. Sequential access mode
for a relative file indicates that the record order is by ascending relative record
number.
In sequential access mode for a relative file, the RELATIVE KEY clause of the
WRITE statement is not used on record insertion; instead, the RELATIVE KEY
clause acts as a receiving field. Consequently, after the completion of a write by
the first access stream, the relative key field is set to the actual relative record
number.
Figure 8–3 illustrates why this condition occurs.
As the file operations begin, both access streams point to the end of file by setting
record 4 as the highest relative record number in the file. When access stream 1
writes to the file, record 5 is created as the next ascending relative record number
and 5 is returned as the RELATIVE KEY number.
Sharing Files and Locking Records 8–15
Sharing Files and Locking Records
8.3 Ensuring Successful File Sharing
Figure 8–3 Why a Record-Already-Exists Error Occurs
FILE A
Record 1
Record 2
Record 3
Record 4
Access Stream 1
End−of−File
Access Stream 2
Record 5/6
ZK−6060−GE
When access stream 2 writes to the file, it also tries to write the fifth record.
Record 5 already exists (inserted by the first stream), and the second access
stream gets a record-exists error. Thus, in a file-sharing environment, the second
access stream always receives a record-exists error. To gain access to the current
highest relative record number, stream 2 must close the file and reopen it.
OPEN EXTEND with a Shared Indexed File You must use the sequential file
access mode when you open an indexed file in extend mode. Sequential access
mode requires that the first additional record insertion have a prime record key
whose value is greater than the highest prime record key value in the file.
In a file-sharing environment, you should be aware of and prepared for duplicate
key errors (by using INVALID KEY and USE procedures), especially on the first
write to the file by the second access stream.
Subsequent writes should also allow for duplicate key errors, although subsequent
writes are not constrained to use keys whose values are greater than the highest
key value that existed at file open time. If you avoid duplicate key errors, you
will successfully insert all access stream records.
8.4 Ensuring Successful Record Locking
Once you meet all of the file-sharing criteria and you access a file, you can
consider two record-locking modes that control access to records in a file:
•
Automatic record locking—The system automatically releases an existing
record lock whenever a new record is accessed and acquires a record lock
whenever it reads a record in the file.
•
Manual record locking—A file connector can hold a number of record locks
simultaneously. Manual record locking is available only for relative or
indexed files.
Note
You must use the same method for record locking as for file sharing. For
any single file connector, you cannot mix the X/Open standard (Alpha)
and the Compaq standard methods.
8–16 Sharing Files and Locking Records
Sharing Files and Locking Records
8.4 Ensuring Successful Record Locking
8.4.1 X/Open Standard Record Locking (Alpha)
This section describes the X/Open standard method of specifying automatic or
manual record locking.
Specifying Automatic Record Locking (X/Open Standard) (Alpha)
You specify X/Open standard automatic record locking in the Environment
Division by using LOCK MODE IS AUTOMATIC [WITH LOCK ON RECORD] on
the SELECT statement. (The optional WITH LOCK ON RECORD clause has no
effect and is for documentation only.) Subsequently, a record lock is acquired by
the successful execution of a READ statement. (The WITH LOCK clause is not
necessary on the READ; it is implied.)
A record lock is released by one of the following events:
•
The successful execution of a subsequent I-O statement
•
Using the UNLOCK statement
•
Closing the file, implicitly or explicitly
In X/Open standard record locking, only the READ statement can acquire a lock.
You can use the WITH NO LOCK phrase of the READ statement to prevent the
acquiring of an automatic record lock.
For files opened in INPUT mode, READ and READ WITH LOCK statements do
not acquire a record lock.
Specifying Manual Record Locking (X/Open Standard) (Alpha)
You specify X/Open standard manual record locking in the Environment Division
by using LOCK MODE IS MANUAL WITH LOCK ON MULTIPLE RECORDS on
the SELECT statement. Manual record locking is available only for relative and
indexed files.
For manual record locking, a record lock is acquired by specifying the WITH
LOCK phrase on the READ statement. READ is the only operation that can
acquire a lock. The record lock is released by one of the following events:
•
Using the UNLOCK statement (any form of the UNLOCK statement unlocks
all record locks held by the current access stream; there is no singular option)
•
Closing the file, implicitly or explicitly
The WITH LOCK clause is ignored for files opened in INPUT mode. Locks are
detected but not acquired.
Example 8–4 is a partial example of using both methods of X/Open standard
record locking.
Sharing Files and Locking Records 8–17
Sharing Files and Locking Records
8.4 Ensuring Successful Record Locking
Example 8–4 X/Open Standard Record Locking (Alpha)
User 1 (Automatic Record Locking):
--------------------------------FILE-CONTROL.
SELECT FILE-1
ORGANIZATION IS RELATIVE
ASSIGN TO "SHAREDAT.DAT"
LOCK MODE AUTOMATIC.
.
.
.
PROCEDURE DIVISION.
BEGIN.
OPEN I-O FILE-1.
READ FILE-1.
.
.
.
REWRITE FILE-1-REC.
CLOSE FILE-1.
STOP RUN.
User 2 (Manual Record Locking):
-----------------------------FILE-CONTROL
SELECT FILE-1
ORGANIZATION IS RELATIVE
ASSIGN "SHAREDAT.DAT"
LOCK MODE MANUAL LOCK ON MULTIPLE RECORDS.
.
.
.
PROCEDURE DIVISION.
BEGIN.
OPEN I-O FILE-1.
.
.
.
READ FILE-1 WITH LOCK.
REWRITE FILE-1-REC.
UNLOCK FILE-1.
CLOSE FILE-1.
STOP RUN.
Note that User 2 could have employed AUTOMATIC record locking just as well.
In this case, manual and automatic locking work similarly. ♦
8.4.2 Compaq Standard Record Locking
Automatic Record Locking (Compaq Standard)
You specify automatic record locking by using the ALLOWING phrase of the
OPEN statement. The lock is applied when you access the record and released
when you deaccess the record. In automatic record locking the access stream can
have only one record locked at a time and can apply only one type of lock to the
records of the file.
8–18 Sharing Files and Locking Records
Sharing Files and Locking Records
8.4 Ensuring Successful Record Locking
You deaccess a record by using the next READ operation, a REWRITE or
a DELETE operation on the record, or by closing the file. In addition, you
can release locks applied by automatic record locking by using the UNLOCK
statement.
In automatic record-locking mode, you can release the current record lock
by using an UNLOCK RECORD statement or an UNLOCK ALL RECORDS
statement. (On Tru64 UNIX systems for indexed files only, there is no current
record lock.) However, because in automatic record locking you can lock only one
record at a time, the UNLOCK ALL RECORDS statement unnecessarily checks
all records for additional locks.
The sample program in Example 8–5 uses automatic record locking. The program
opens the file with I-O ALLOWING ALL. Another access stream in another
program also opens the file with INPUT ALLOWING ALL.
Note that two parallel access streams use the program in Example 8–5.
If the first access stream is updating records in random order, a record lock can
occur to the second stream from the READ until the REWRITE statement of the
first stream. Record locks can also occur to the first stream when the second
stream reads a record and the first stream tries to read the same record.
Example 8–5 Automatic Record Locking (Compaq Standard)
SELECT FILE-1
ORGANIZATION IS RELATIVE
ASSIGN TO "SHAREDAT.DAT"
.
.
.
PROCEDURE DIVISION.
OPEN I-O FILE-1 ALLOWING ALL.
READ FILE-1 AT END DISPLAY "end".
.
.
.
REWRITE FILE-1-REC.
CLOSE FILE-1.
STOP RUN.
When you close a file, any existing record lock is released automatically. The
UNLOCK RECORD statement releases the lock only on the current record on
OpenVMS systems, which is the last record you successfully accessed. On Tru64
UNIX systems for indexed files only, there is no current record lock.
Manual Record Locking (Compaq Standard)
You specify manual record locking by using the APPLY LOCK-HOLDING clause
(in the I-O-CONTROL paragraph), the OPEN ALLOWING statement, and the
ALLOWING clauses on the Compaq COBOL record operations (except DELETE).
Manual record locking allows greater control of locking options by permitting
users to lock multiple records in a file and by permitting different types of locking
to apply to different records.
Manual record locking applies the specified lock when you access the record and
releases the lock when you unlock the record.
Sharing Files and Locking Records 8–19
Sharing Files and Locking Records
8.4 Ensuring Successful Record Locking
When you specify manual record locking, you must use all of the following
clauses:
•
An APPLY LOCK-HOLDING clause in the I-O CONTROL paragraph
•
An OPEN ALLOWING clause at file open time
•
An ALLOWING clause on each record operation (except DELETE)2
The possible ALLOWING clauses for the record operations (that is, the READ,
WRITE, REWRITE, and START statements) are as follows:
•
ALLOWING NO OTHERS2 —Locks records for exclusive access. Others
cannot perform READ, WRITE, DELETE, or UPDATE statements. This
clause constitutes a lock for write and does not allow readers.
•
ALLOWING READERS—Locks records against WRITE, REWRITE, and
DELETE access by all streams including the stream that issues the
statement. Others can perform READ statements.
•
ALLOWING UPDATERS2 —Does not apply any locks to the records. Others
can perform READ, REWRITE, and DELETE statements. This clause
constitutes a no record lock condition. 2
However, if the file’s OPEN mode is INPUT, using the ALLOWING clause on the
record operation does not lock the record.
On Tru64 UNIX systems, for indexed files only, the WRITE, REWRITE, and
START statements do not acquire a record lock.
On Tru64 UNIX systems for indexed files only, ALLOWING READERS is treated
as ALLOWING NO OTHERS if the file is opened in I-O mode or as ALLOWING
ALL if the file is opened in INPUT mode. ♦
Table 8–5 shows the valid and invalid ALLOWING combinations for manual
record locking. The columns represent the lock held, and the rows represent the
lock requested.
Table 8–5 Manual Record Locking Combinations
Lock Held (for first stream)
I-O Attempt (for
subsequent stream)
READ
REWRITE
Updaters
Readers
No Others
Allowing Updaters
Y
Y
N
Allowing Readers
Y
Y
N
Allowing no others
Y
N
N
Allowing no others
Y
N
N
Y
N
N
DELETE
(continued on next page)
2
Some exceptions exist on Tru64 UNIX. Refer to the Compaq COBOL Reference Manual
for details.
8–20 Sharing Files and Locking Records
Sharing Files and Locking Records
8.4 Ensuring Successful Record Locking
Table 8–5 (Cont.) Manual Record Locking Combinations
Lock Held (for first stream)
I-O Attempt (for
subsequent stream)
START
WRITE
Updaters
Readers
No Others
Allowing Updaters
Y
Y
N
Allowing Readers
Y
Y
N
Allowing no others
Y
Y
N
Allowing no others
N/A
N/A
N/A
Legend: Y = Subsequent stream executes successful I-O operation
N = Subsequent stream I-O operation is unsuccessful (File Status 92)
Example 8–6 uses manual record locking. The file is opened with the ALLOWING
ALL clause. The records are read but do not become available to other access
streams because of the lock applied by the READ statement (READ...ALLOWING
NO OTHERS). When the UNLOCK is executed, the records can be read by
another access stream if that stream opens the file allowing writers.
Example 8–6 Sample Program Using Manual Record Locking (Compaq
Standard)
FILE-CONTROL.
SELECT FILE-1
ORGANIZATION IS RELATIVE
ASSIGN "SHAREDAT.DAT".
.
.
.
I-O-CONTROL.
APPLY LOCK-HOLDING ON FILE-1.
.
.
.
PROCEDURE DIVISION.
BEGIN.
OPEN I-O FILE-1 ALLOWING ALL.
.
.
.
READ FILE-1 ALLOWING NO OTHERS AT END DISPLAY "end".
.
.
.
REWRITE FILE-1-REC ALLOWING NO OTHERS.
.
.
.
UNLOCK FILE-1 ALL RECORDS.
CLOSE FILE-1.
STOP RUN.
In manual record locking, you release record locks by the UNLOCK statement or
when you close the file (either explicitly or implicitly; when you close a file, any
existing record lock is released automatically). The UNLOCK statement provides
for either releasing the lock on the current record (on OpenVMS systems with
UNLOCK RECORD) or releasing all locks currently held by the access stream on
Sharing Files and Locking Records 8–21
Sharing Files and Locking Records
8.4 Ensuring Successful Record Locking
the file (UNLOCK ALL RECORDS). (On Tru64 UNIX systems for indexed files
only, there is no current record lock.)
When you access a shared file with ACCESS MODE IS SEQUENTIAL and use
manual record locking, the UNLOCK statement can cause you to violate either of
the following statements: ( 1 ) the REWRITE statement rule that states that the
last input-output statement executed before the REWRITE must be a READ or
START statement, or ( 2 ) the DELETE statement rule that states that the last
input/output statement executed before the DELETE statement must be a READ.
You must lock the record before it can be rewritten or deleted.
Releasing Locks on Deleted Records
In automatic record locking, the DELETE operation releases the lock on the
record. In manual record-locking mode, you can delete a record using the
DELETE statement but still retain a record lock. You must use the UNLOCK
ALL RECORDS statement to release the lock on a deleted record.
If a second stream attempts to access a deleted record that retains a lock, the
second stream will receive either a ‘‘record not found’’ exception or a hard lock
condition. (See Section 8.4.3 for information on hard lock conditions.)
On OpenVMS, if another stream attempts to REWRITE a deleted record for
which there is a retained lock, the type of exception that access stream receives
depends on its file organization. If the file organization is RELATIVE, the access
stream receives the ‘‘record locked’’ status. If the file organization is INDEXED,
the access stream succeeds (receives the success status).
In relative files, the lock is on the relative cell (record) and cannot be rewritten
until the lock is released. On indexed files, the lock is on the record’s file address
(RFA) of the deleted record, so a new record (with a new RFA) can be written to
the file. ♦
Bypassing a Record Lock
When you use manual record locking, you can apply a READ REGARDLESS or
START REGARDLESS statement to bypass any record lock that exists. READ
REGARDLESS reads the record and applies no locks to the record. START
REGARDLESS positions to the record and applies no locks to the record. If the
record is currently locked by another access stream, a soft record lock condition
can be detected by a USE procedure. (See Section 8.4.3 for information on soft
record locks.)
You use READ REGARDLESS or START REGARDLESS when: ( 1 ) a record is
locked against readers because the record is about to be written, but ( 2 ) your
access program needs the existing record regardless of the possible change in its
data.
Note
You should recognize that READ REGARDLESS and START
REGARDLESS are of limited usefulness. They can only reliably tell
the user whether a record exists with a given key value. They cannot
guarantee the current contents of the data in the record. You prevent
the use of READ REGARDLESS or START REGARDLESS at the file
protection level when you prevent readers from referencing the file.
You can use READ REGARDLESS and START REGARDLESS during
sequential file access to force the File Position Indicator.
8–22 Sharing Files and Locking Records
Sharing Files and Locking Records
8.4 Ensuring Successful Record Locking
When you close a file, any existing record lock is released automatically. The
UNLOCK RECORD statement releases the lock only on the current record on
OpenVMS systems, which is the last record you successfully accessed. On Tru64
UNIX systems for indexed files only, there is no current record lock.
8.4.3 Error Handling for Record Locking
This section describes the locking error conditions and the two kinds of locks:
hard and soft.
Note
Soft record locks are available for Compaq standard record locking but
are not part of X/Open standard (Alpha). Soft record lock conditions also
do not occur on the Tru64 UNIX system for indexed files.
Any record contention error results in an unsuccessful statement for which a USE
procedure will be invoked. A ‘‘record-locked’’ condition results in an I-O status
code of 92.
Interpreting Locking Error Conditions
Two record-locking conditions (hard and soft record lock) indicate whether a
record was transferred to the record buffer. Compaq COBOL provides the success,
failure, or informational status of an I/O operation in the file status variable.
Hard Record Locks
A hard record lock condition, which causes the file status variable to be set to 92,
indicates that the record operation failed and the record was not transferred to
the buffer. A hard record lock results from a scenario such as the one shown in
the following steps, which uses Compaq standard manual record-locking mode:
1. Program A opens the file I-O ALLOWING ALL.
2. Program A reads a record ALLOWING NO OTHERS.
3. Program B opens the file I-O ALLOWING ALL.
4. Program B tries to access the same record as A.
5. Program B receives a hard record lock condition.
6. The record is not accessible to Program B.
7. Program B’s File Status variable is set to 92.
8. Program B’s USE procedure is invoked.
9. Program A continues.
The record was not available to Program B.
On Tru64 UNIX, for INDEXED files, READ with the ALLOWING UPDATERS
clause as well as any START statement will not detect a locked record. Potential
conflicts do not trigger a hard lock condition, only actual conflicts do. ♦
Sharing Files and Locking Records 8–23
Sharing Files and Locking Records
8.4 Ensuring Successful Record Locking
Soft Record Locks
Soft record locks can occur only with Compaq standard record locking. A soft
record lock condition, which causes the file status variable to be set to 90,
indicates that the record operation was successful, the record was transferred
to the buffer, and a prior access stream holds a lock on that record. A soft record
lock can be detected by a USE procedure. This condition occurs in either of the
following two situations:
•
When a record is accessed in a file that has been opened in INPUT mode,
a soft record lock condition may occur if the record has been locked by a
prior stream. This depends on the type of lock held by the first stream and
requested by the subsequent stream.
•
In the second situation, a stream attempts to access a record that has
been locked by another stream. The second stream employs a READ
REGARDLESS or START REGARDLESS statement (see Bypassing a Record
Lock), which overrides the hard record lock and allows access to the record.
The second stream sucessfully reads the record and receives a soft record
lock. (The second stream cannot update the record.)
For example, a soft record lock results from a situation such as the following,
which uses automatic record-locking mode:
1. Program A opens the file I-O ALLOWING READERS.
2. Program A reads a record.
3. Program B opens the file INPUT ALLOWING ALL.
4. Program B reads the same record.
5. Program B receives a soft record lock condition. The record is accessible to
Program B.
6. Program B’s File Status variable is set to 90.
7. On OpenVMS, Program B’s USE procedure (if any) is invoked. ♦
8. Programs A and B continue.
The record was available to Program B.
Note
A file (and thus the records in it) cannot be shared if automatic or manual
record locking is not specified by the user.
A manual record-locking environment is required in order for the REGARDLESS
and ALLOWING options to be used on a READ statement. The READ
REGARDLESS and START REGARDLESS statements should be used only
when the access program clearly needs the existing record regardless of the
possible imminent change in its data. For a full description of the OPEN, READ,
and START statements and their options, refer to the Compaq COBOL Reference
Manual.
8–24 Sharing Files and Locking Records
Sharing Files and Locking Records
8.4 Ensuring Successful Record Locking
Soft Record Locks and Declarative USE Procedures
If a soft record lock occurs, the values of the following variables for the current
file are undefined until the execution of any applicable Declarative USE procedure
is complete:
•
Record buffer
•
RELATIVE KEY
•
DEPENDING ON
These variables remain undefined if the Declarative USE procedure terminates
with an EXIT PROGRAM statement.
Hard Record Locks and File Position During Sequential Access
If a hard record lock condition occurs for a sequential READ statement, the file
position indicator is unaffected. If the application must continue reading records,
the following actions may be taken:
•
Compaq standard record locking
START or READ REGARDLESS may be used to bypass a hard record lock
(see Soft Record Locks).
•
X/Open standard record locking
For indexed and relative files, a START statement, with the appropriate KEY
clause, may be used to skip the record that is locked. On Alpha, because
X/Open START statements do not detect or acquire a record lock, some file
processing may still be possible. However, users must be aware that this is
not typical sequential file processing, as not all records will be retrieved.
Error Handling Example
Example 8–7 is an example of processing locked record conditions.
Example 8–7 Program Segment for Record-Locking Exceptions
FILE-CONTROL.
SELECT file-name ASSIGN TO "fshare.dat"
FILE STATUS IS file-stat.
WORKING-STORAGE SECTION.
01 file-stat PIC XX.
88 record-ok
VALUES "00", "02", "04".
88 record-locked VALUE "92".
01 RETRY-COUNT PIC 9(2).
01 MAX-RETRY
pic 9(2) VALUE 10.
.
.
.
PROCEDURE DIVISION.
DECLARATIVES.
FILE-USE SECTION. USE AFTER STANDARD EXCEPTION PROCEDURE ON file-name.
FILE-ERR.
* need declaratives to trap condition, but let main code process it.
* invalid key clause does not apply
(continued on next page)
Sharing Files and Locking Records 8–25
Sharing Files and Locking Records
8.4 Ensuring Successful Record Locking
Example 8–7 (Cont.) Program Segment for Record-Locking Exceptions
IF record-locked
continue
ELSE
.
.
.
END-IF.
END DECLARATIVES.
MAIN-BODY SECTION.
BEGIN.
DISPLAY "From main-body".
.
.
.
GET-RECORD.
READ file-name.
IF NOT record-ok
PERFORM check-read.
.
.
.
CHECK-READ.
IF record-locked
MOVE 1 to retry-count
PERFORM retry-read UNTIL record-ok OR
retry-count > max-retry
IF record-locked AND retry-count > max-retry
DISPLAY "Record is unavailable...enter new record to retrieve: "
WITH NO ADVANCING
ACCEPT record-id
GO TO get-record
END-IF
END-IF.
* handle other possible errors here
RETRY-READ.
READ file-name.
add 1 to retry-count.
8–26 Sharing Files and Locking Records
9
Using the SORT and MERGE Statements
This chapter includes the following information about using the SORT and
MERGE statements to sort and merge records for sequential, line sequential
(Alpha only), relative, and indexed files:
•
Sorting data with the SORT statement (Section 9.1)
•
Merging data with the MERGE statement (Section 9.2)
•
Sample programs using the SORT and MERGE statements (Section 9.3)
9.1 Sorting Data with the SORT Statement
The SORT statement provides a wide range of sorting capabilities and options.
To establish a SORT routine, you do the following:
1. Declare the sort file with an Environment Division SELECT statement.
2. Use a Data Division Sort Description (SD) entry to define the sort file’s
characteristics.
3. Use a Procedure Division SORT statement.
The following program segments demonstrate SORT program coding:
SELECT Statement (Environment Division)
SELECT SORT-FILE ASSIGN TO "SRTFIL"
An SD File Description Entry (Data Division)
SD SORT-FILE.
01 SORT-RECORD.
05 SORT-KEY1
PIC X(5).
05 SOME-DATA
PIC X(25).
05 SORT-KEY2
PIC XX.
Note
You can place the sort file anywhere in the FILE SECTION, but you must
use a Sort Description (SD) level indicator, not a File Description (FD)
level indicator. Also, you cannot use the SD file for any other purpose in
the COBOL program.
SORT Statement (Procedure Division)
SORT SORT-FILE
ASCENDING KEY S-NAME
USING NAME-FILE
GIVING NEW-FILE.
The SORT statement names a sort file, sort keys, an input file, and an output file.
An explanation of sort keys follows.
Using the SORT and MERGE Statements 9–1
Using the SORT and MERGE Statements
9.1 Sorting Data with the SORT Statement
Sorting Concepts
Records are sorted based on the data values in the sort keys. Sort keys identify
the location of a record or the ordering of data. The following example depicts
unsorted employee name and address records used for creating mailing labels:
Smith,
Joe
234 Ash St.
New Boston
NH
04356
Jones,
Bill
12 Birch St.
Gardner
MA
01430
Baker,
Tom
78 Oak St.
Ayer
MA
01510
Thomas,
Pete
555 Maple St.
Maynard
MA
01234
Morris,
Dick
21 Harris St.
Acton
ME
05670
If you sort the addresses in the previous example in ascending order using the
zip code as the sort key, the mailing labels are printed in the order shown in the
following example:
SORT KEY
Thomas,
Pete
555 Maple St.
Maynard
MA
01234
Jones,
Bill
12 Birch St.
Gardner
MA
01430
Baker,
Tom
78 Oak St.
Ayer
MA
01510
Smith,
Joe
234 Ash St.
New Boston
NH
04356
Morris,
Dick
21 Harris St.
Acton
ME
05670
Also, records can be sorted on more that one key at a time. If you need an
alphabetical listing of all employees within each state, you can sort on the state
code first (major sort key) and employee name second (minor sort key).
For example, if you sort the file in ascending order by state and last name,
the employee names and addresses appear in the order shown in the following
example:
SORT KEY
(minor)
SORT KEY
(major)
Baker,
Tom
78 Oak St.
Ayer
MA
01510
Jones,
Bill
12 Birch St.
Gardner
MA
01430
Thomas,
Pete
555 Maple St.
Maynard
MA
01234
Morris,
Dick
21 Harris St.
Acton
ME
05670
Smith,
Joe
234 Ash St.
New Boston
NH
04356
9.1.1 File Organization Considerations for Sorting
You can sort any file regardless of its organization; furthermore, the organization
of the output file can differ from that of the input file. For example, a sort can
have a sequential input file and a relative output file. In this case, the relative
key for the first record returned from the sort is 1; the second record’s relative
key is 2; and so forth. However, if an indexed file is described as output in the
GIVING or OUTPUT PROCEDURE phrases, the first sort key associated with
the ASCENDING phrase must specify the same character positions specified by
the RECORD KEY phrase for that file.
Sections 9.1.2, 9.1.3, and 9.1.4 describe the ASCENDING and DESCENDING
KEY phrases, the USING and GIVING phrases, and the INPUT PROCEDURE
and OUTPUT PROCEDURE phrases for sorting.
9–2 Using the SORT and MERGE Statements
Using the SORT and MERGE Statements
9.1 Sorting Data with the SORT Statement
9.1.2 Specifying Sort Parameters with the ASCENDING and DESCENDING KEY
Phrases
Use the Data Division ASCENDING and DESCENDING KEY phrases to specify
your sort parameters. The order of data names determines the sort hierarchy;
that is, the major sort key is the first data name entered, while the minor sort
key is the last data name entered.
In the following example, the hierarchy of the sort is SORT-KEY-1, SORT-KEY-2,
SORT-KEY-3.
SORT SORT-FILE
ASCENDING KEY SORT-KEY-1 SORT-KEY-2
DESCENDING KEY SORT-KEY-3
9.1.3 Resequencing Files with the USING and GIVING Phrases
If you only need to resequence a file, use the USING and GIVING phrases of
the SORT statement. The USING phrase opens the input file, then reads and
releases its records to the sort. The GIVING phrase opens and writes sorted
records to the output file.
Note that you cannot manipulate data with either the USING or the GIVING
phrases.
Consider this SORT statement:
SORT SORT-FILE ON ASCENDING KEY SORT-KEY-1
USING INPUT-FILE GIVING OUTPUT-FILE.
It does the following:
1. Opens INPUT-FILE
2. Reads all records in INPUT-FILE and releases them to the sort
3. Sorts the records in ascending sequence using the data in SORT-KEY-1
4. Opens the output file and writes the sorted records to OUTPUT-FILE
5. Closes all files used in the SORT statement
9.1.4 Manipulating Data Before and After Sorting with the INPUT PROCEDURE
and OUTPUT PROCEDURE Phrases
You can manipulate data before and after sorting by using the INPUT
PROCEDURE and OUTPUT PROCEDURE phrases, and sort only some of
the information in a file. For example, these phrases allow you to use only those
input records and/or input data fields you need.
The INPUT PROCEDURE phrase replaces the USING phrase when you want
to manipulate data entering the sort. The SORT statement transfers control to
the sections or paragraphs named in the INPUT PROCEDURE phrase. You then
use COBOL statements to open and read files, and manipulate the data. You use
the RELEASE statement to transfer records to the sort. After the last statement
of the input procedure executes, control is given to the sort, and the records are
subsequently sorted.
After the records are sorted, the SORT statement transfers control to the sections
or paragraphs named in the OUTPUT PROCEDURE phrase. This phrase
replaces the GIVING phrase when you want to manipulate data in the sort.
You can use COBOL statements to open files and manipulate data. You use the
Using the SORT and MERGE Statements 9–3
Using the SORT and MERGE Statements
9.1 Sorting Data with the SORT Statement
RETURN statement to transfer records from the sort. For example, you can use
the RETURN statement to retrieve the sorted records for printing a report.
Example 9–1 shows a sample sort using the INPUT and OUTPUT procedures.
Example 9–1 INPUT and OUTPUT PROCEDURE Phrases
IDENTIFICATION DIVISION.
PROGRAM-ID. EX0901.
ENVIRONMENT DIVISION.
INPUT-OUTPUT SECTION.
FILE-CONTROL.
SELECT INPUT-FILE ASSIGN TO "input.dat".
SELECT OUTPUT-FILE ASSIGN TO "output.dat".
SELECT SORT-FILE
ASSIGN TO "sort.dat".
DATA DIVISION.
FILE SECTION.
FD INPUT-FILE.
01 INPUT-RECORD
FD OUTPUT-FILE.
01 OUTPUT-RECORD
SD SORT-FILE.
01 SORT-RECORD
01 SORT-KEY-1
01 SORT-KEY-2
PIC X(100).
PIC X(100).
PIC X(100).
PIC XXX.
PIC XXX.
WORKING-STORAGE SECTION.
PROCEDURE DIVISION.
000-SORT SECTION.
010-DO-THE-SORT.
SORT SORT-FILE ON ASCENDING KEY SORT-KEY-1
ON DESCENDING KEY SORT-KEY-2
INPUT PROCEDURE IS 050-RETRIEVE-INPUT
THRU 100-DONE-INPUT
OUTPUT PROCEDURE IS 200-WRITE-OUTPUT
THRU 230-DONE-OUTPUT.
DISPLAY "END OF SORT".
STOP RUN.
050-RETRIEVE-INPUT SECTION.
060-OPEN-INPUT.
OPEN INPUT INPUT-FILE.
070-READ-INPUT.
READ INPUT-FILE AT END
CLOSE INPUT-FILE
GO TO 100-DONE-INPUT.
MOVE INPUT-RECORD TO SORT-RECORD.
(continued on next page)
9–4 Using the SORT and MERGE Statements
Using the SORT and MERGE Statements
9.1 Sorting Data with the SORT Statement
Example 9–1 (Cont.) INPUT and OUTPUT PROCEDURE Phrases
***********************************************************
* You can add, change, or delete records before sorting *
* using COBOL data manipulation
*
* techniques.
*
***********************************************************
RELEASE SORT-RECORD.
GO TO 070-READ-INPUT.
100-DONE-INPUT SECTION.
110-EXIT-INPUT.
EXIT.
200-WRITE-OUTPUT SECTION.
210-OPEN-OUTPUT.
OPEN OUTPUT OUTPUT-FILE.
220-GET-SORTED-RECORDS.
RETURN SORT-FILE AT END
CLOSE OUTPUT-FILE
GO TO 230-DONE-OUTPUT.
MOVE SORT-RECORD TO OUTPUT-RECORD.
***********************************************************
* You can add, change, or delete sorted records
*
* using COBOL data manipulation
*
* techniques.
*
***********************************************************
WRITE OUTPUT-RECORD.
GO TO 220-GET-SORTED-RECORDS.
230-DONE-OUTPUT SECTION.
240-EXIT-OUTPUT.
EXIT.
You can combine the INPUT PROCEDURE with the GIVING phrases, or the
USING with the OUTPUT PROCEDURE phrases. In Example 9–2, the USING
phrase replaces the INPUT PROCEDURE phrase used in Example 9–1.
Note
You cannot access records released to the sort-file after execution of the
SORT statement ends.
Using the SORT and MERGE Statements 9–5
Using the SORT and MERGE Statements
9.1 Sorting Data with the SORT Statement
Example 9–2 USING Phrase Replaces INPUT PROCEDURE Phrase
.
.
.
PROCEDURE DIVISION.
000-SORT SECTION.
010-DO-THE-SORT.
SORT SORT-FILE ON ASCENDING KEY SORT-KEY-1
ON DESCENDING KEY SORT-KEY-2
USING INPUT-FILE
OUTPUT PROCEDURE IS 200-WRITE-OUTPUT
THRU 230-DONE-OUTPUT.
DISPLAY "END OF SORT".
STOP RUN.
200-WRITE-OUTPUT SECTION.
210-OPEN-OUTPUT.
OPEN OUTPUT OUTPUT-FILE.
220-GET-SORTED-RECORDS.
RETURN SORT-FILE AT END
CLOSE OUTPUT-FILE
GO TO 230-DONE-OUTPUT.
MOVE SORT-RECORD TO OUTPUT-RECORD.
WRITE OUTPUT-RECORD.
GO TO 220-GET-SORTED-RECORDS.
230-DONE-OUTPUT SECTION.
240-EXIT-OUTPUT.
EXIT.
9.1.5 Maintaining the Input Order of Records Using the WITH DUPLICATES IN
ORDER Phrase
The sort orders data in the sequence specified in the ASCENDING KEY and
DESCENDING KEY phrases. However, records with duplicate sort keys may not
be written to the output file in the same sequence as they were read into it. The
WITH DUPLICATES IN ORDER phrase ensures that any records with duplicate
sort keys are in the same order in the output file as in the input file.
The following list shows the potential difference between sorting with the WITH
DUPLICATES IN ORDER phrase and sorting without it:
Input File
Sorted Without
Duplicates in Order
Record
Name
Data
Record
Name
Data
Sorted With
Duplicates in Order
Record
Name
Data
JONES ABCD
DAVIS LMNO
DAVIS LMNO
DAVIS LMNO
JONES EFGH
JONES ABCD
WHITE STUV
JONES ABCD
JONES EFGH
JONES EFGH
SMITH 1234
SMITH 1234
SMITH 1234
WHITE STUV
WHITE STUV
WHITE WXYZ
WHITE WXYZ
WHITE WXYZ
If you omit the WITH DUPLICATES IN ORDER phrase, you cannot predict
the order of records with duplicate sort keys. For example, the JONES records
might not be in the same sequence as they were in the input file, but the WHITE
records might be in the same order as in the input file.
9–6 Using the SORT and MERGE Statements
Using the SORT and MERGE Statements
9.1 Sorting Data with the SORT Statement
In contrast, the WITH DUPLICATES IN ORDER phrase guarantees that records
with duplicate sort keys remain in the same sequence as they were in the input
file.
9.1.6 Specifying Non-ASCII Collating Sequences with the COLLATING
SEQUENCE IS Alphabet-Name Phrase
This phrase lets you specify a collating sequence other than the ASCII default.
You define collating sequences in the Environment Division SPECIAL-NAMES
paragraph. A sequence specified in the COLLATING SEQUENCE IS phrase of
the SORT statement overrides a sequence specified in the Environment Division
PROGRAM COLLATING SEQUENCE IS phrase.
Example 9–3 shows the alphabet name NEWSEQUENCE overriding the
EBCDIC-CODE collating sequence.
Example 9–3 Overriding the COLLATING SEQUENCE IS Phrase
ENVIRONMENT DIVISION.
OBJECT-COMPUTER. FOO
PROGRAM COLLATING SEQUENCE IS EBCDIC-CODE.
SPECIAL-NAMES.
ALPHABET NEWSEQUENCE IS "ZYXWVUTSRQPONMLKJIHGFEDCBA"
ALPHABET EBCDIC-CODE IS EBCDIC.
.
.
.
PROCEDURE DIVISION.
000-DO-THE-SORT.
SORT SORT-FILE ON ASCENDING KEY
SORT-KEY-1
SORT-KEY-2
COLLATING SEQUENCE IS NEWSEQUENCE
USING INPUT-FILE GIVING OUTPUT-FILE.
9.1.7 Multiple Sorting
A program can contain multiple sort files, multiple SORT statements, or both
multiple sort files and multiple SORT statements. Example 9–4 uses two sort
files to produce two reports with different sort sequences.
Example 9–4 Using
.
.
.
DATA DIVISION.
FILE SECTION.
SD SORT-FILE1.
01 SORT-REC-1.
03 S1-KEY-1
03 FILLER
03 S1-KEY-2
03 FILLER
SD SORT-FILE2.
01 SORT-REC-2.
Two Sort Files
PIC
PIC
PIC
PIC
X(5).
X(40).
X(5).
X(50).
(continued on next page)
Using the SORT and MERGE Statements 9–7
Using the SORT and MERGE Statements
9.1 Sorting Data with the SORT Statement
Example 9–4 (Cont.) Using Two Sort Files
01 SORT-REC-2.
03 FILLER
PIC X(20).
03 S2-KEY-1
PIC X(10).
03 FILLER
PIC X(10).
03 S2-KEY-2
PIC X(10).
03 FILLER
PIC X(50).
.
.
.
PROCEDURE DIVISION.
000-SORT SECTION.
010-DO-FIRST-SORT.
SORT SORT-FILE1 ON ASCENDING KEY
S1-KEY-1
S1-KEY-2
WITH DUPLICATES IN ORDER
USING INPUT-FILE
OUTPUT PROCEDURE IS 050-CREATE-REPORT-1
THRU 300-DONE-REPORT-1.
020-DO-SECOND-REPORT.
SORT SORT-FILE2 ON ASCENDING KEY
S2-KEY-1
ON DESCENDING KEY
S2-KEY-2
USING INPUT-FILE
OUTPUT PROCEDURE IS 400-CREATE-REPORT-2
THRU 700-DONE-REPORT-2.
030-END-JOB.
DISPLAY "PROGRAM ENDED".
STOP RUN.
050-CREATE-REPORT-1 SECTION.
**********************************************************
*
*
*
*
* Use the RETURN statement to read the sorted records. *
*
*
*
*
**********************************************************
300-DONE-REPORT-1 SECTION.
310-EXIT-REPORT-1.
EXIT.
400-CREATE-REPORT-2 SECTION.
**********************************************************
*
*
*
*
* Use the RETURN statement to read the sorted records. *
*
*
*
*
**********************************************************
700-DONE-REPORT-2 SECTION.
710-EXIT-REPORT.
EXIT.
9.1.8 Sorting Variable-Length Records
If you specify the USING phrase and the input file contains variable-length
records, the sort-file record must not be smaller than the smallest record, nor
larger than the largest record, described in the input file.
9–8 Using the SORT and MERGE Statements
Using the SORT and MERGE Statements
9.1 Sorting Data with the SORT Statement
If you specify the GIVING phrase and the output file contains variable-length
records, the sort-file record must not be smaller than the smallest record, nor
larger than the largest record, described in the output file.
9.1.9 Preventing I/O Aborts
All I/O errors detected during a sort can cause abnormal program termination.
The Declarative USE AFTER STANDARD ERROR PROCEDURE, shown in
Example 9–5, specifies error-handling procedures should I/O errors occur.
Example 9–5 The Declarative USE AFTER STANDARD ERROR PROCEDURE
PROCEDURE DIVISION.
DECLARATIVES.
SORT-FILE SECTION.
USE AFTER STANDARD ERROR PROCEDURE ON INPUT-FILE.
SORT-ERROR.
DISPLAY "I-O TYPE ERROR WHILE SORTING".
DISPLAY "INPUT-FILE STATUS IS " INPUT-STATUS.
STOP RUN.
END DECLARATIVES.
000-SORT SECTION.
010-DO-THE-SORT.
SORT SORT-FILE ON DESCENDING KEY
S-KEY-1
WITH DUPLICATES IN ORDER
USING INPUT-FILE
GIVING OUTPUT-FILE.
DISPLAY "END OF SORT".
STOP RUN.
Note
The USE PROCEDURE phrase does not apply to Sort Description (SD)
files.
9.1.10 Sorting Tables (Alpha)
The SORT statement can be used to order the elements in a table. This is
especially useful for tables used with SEARCH ALL. The table elements are
sorted based on the keys as specified in the OCCURS for the table unless you
override them by specifying keys in the SORT statement. If no key is specified,
the table elements are the SORT keys.
For the syntax and examples of table sorting, refer to the SORT statement
description in the Procedure Division chapter of the Compaq COBOL Reference
Manual. ♦
9.1.11 Sorting at the Operating System Level
On OpenVMS an alternative to using the SORT statement within COBOL is to
sort at the operating system level, using the bundled SORT utility, which you can
access via the SORT, MERGE, and CONVERT DCL commands. ♦
Using the SORT and MERGE Statements 9–9
Using the SORT and MERGE Statements
9.1 Sorting Data with the SORT Statement
On OpenVMS Alpha, you can choose between two sorting methods: Hypersort
and SORT-32. SORT-32 is the default. Consult the DCL online help (type $HELP
SORT) for details about the two methods, which have effects on optimization and
other differences, and information about how to switch between SORT-32 and
Hypersort. If you select Hypersort at DCL level, it will be in effect for a SORT
statement within a COBOL program as well. ♦
On Tru64 UNIX, Hypersort is the sole method available. ♦
On OpenVMS VAX, SORT-32 is the sole method available. ♦
See Appendix A for the record and key size limits with SORT-32 and Hypersort.
9.2 Merging Data with the MERGE Statement
The MERGE statement combines two or more identically sequenced files and
makes their records available, in merged order, to an output procedure or to
one or more output files. Use MERGE statement phrases the same way you use
their SORT statement phrase equivalents. Note that the SORT phrases with
DUPLICATES IN ORDER INPUT PROCEDURE are not allowed with MERGE.
In Example 9–6, district sales data is merged into one regional sales file.
Example 9–6 Using the MERGE Statement
.
.
.
DATA DIVISION.
FILE SECTION.
SD MERGE-FILE.
01 MERGE-REC.
03 FILLER
PIC XX.
03 M-PRODUCT-CODE
PIC X(10).
03 FILLER
PIC X(88).
FD DISTRICT1-SALES.
01 DISTRICT1-REC
PIC X(100).
FD DISTRICT2-SALES.
01 DISTRICT2-REC
PIC X(100).
FD REGION1-SALES.
01 REGION1-REC
PIC X(100).
PROCEDURE DIVISION.
000-MERGE-FILES.
MERGE MERGE-FILE ON ASCENDING KEY M-PRODUCT-CODE
USING DISTRICT1-SALES DISTRICT2-SALES
GIVING REGION1-SALES.
STOP RUN.
9.3 Sample Programs Using the SORT and MERGE Statements
The programs in Example 9–7, Example 9–8, Example 9–9, Example 9–10,
Example 9–11, and Example 9–12 all show how to use the SORT and MERGE
statements.
Example 9–7 shows how to use the SORT statement with the USING and
GIVING phrases.
9–10 Using the SORT and MERGE Statements
Using the SORT and MERGE Statements
9.3 Sample Programs Using the SORT and MERGE Statements
Example 9–7 Sorting a File with the USING and GIVING Phrases
IDENTIFICATION DIVISION.
PROGRAM-ID.
SORTA.
*************************************************
* This program shows how to sort
*
* a file with the USING and GIVING phrases
*
* of the SORT statement. The fields to be
*
* sorted are S-KEY-1 and S-KEY-2; they
*
* contain account numbers and amounts. The
*
* sort sequence is amount within account
*
* number.
*
* Notice that OUTPUT-FILE is a relative file. *
*************************************************
ENVIRONMENT DIVISION.
CONFIGURATION SECTION.
INPUT-OUTPUT SECTION.
FILE-CONTROL.
SELECT INPUT-FILE ASSIGN TO "INPFIL".
SELECT OUTPUT-FILE ASSIGN TO "OUTFIL"
ORGANIZATION IS RELATIVE.
SELECT SORT-FILE ASSIGN TO "SRTFIL".
DATA DIVISION.
FILE SECTION.
SD SORT-FILE.
01 SORT-REC.
03 S-KEY-1.
05 S-ACCOUNT-NUM
PIC X(8).
03 FILLER
PIC X(32).
03 S-KEY-2.
05 S-AMOUNT
PIC S9(5)V99.
03 FILLER
PIC X(53).
FD INPUT-FILE
LABEL RECORDS ARE STANDARD.
01 IN-REC
PIC X(100).
FD OUTPUT-FILE
LABEL RECORDS ARE STANDARD.
01 OUT-REC
PIC X(100).
PROCEDURE DIVISION.
000-DO-THE-SORT.
SORT SORT-FILE ON ASCENDING KEY
S-KEY-1
S-KEY-2
WITH DUPLICATES IN ORDER
USING INPUT-FILE GIVING OUTPUT-FILE.
***********************************************************
* At this point, you could transfer control to another *
* section of your program and continue processing.
*
***********************************************************
DISPLAY "END OF PROGRAM SORTA".
STOP RUN.
Example 9–8 shows how to use the USING and OUTPUT PROCEDURE phrases.
Using the SORT and MERGE Statements 9–11
Using the SORT and MERGE Statements
9.3 Sample Programs Using the SORT and MERGE Statements
Example 9–8 Using the USING and OUTPUT PROCEDURE Phrases
IDENTIFICATION DIVISION.
PROGRAM-ID. SORTB.
**************************************************************
* This program shows how to sort a file
*
* with the USING and OUTPUT PROCEDURE phrases
*
* of the SORT statement. The program eliminates
*
* duplicate records by adding their amounts to the
*
* amount in the first record with the same account
*
* number. Only records with unique account numbers
*
* are written to the output file. The fields to be
*
* sorted are S-KEY-1 and S-KEY-2; they contain account
*
* numbers and amounts. The sort sequence is amount
*
* within account number.
*
* Notice that the organization of OUTPUT-FILE is indexed. *
**************************************************************
ENVIRONMENT DIVISION.
CONFIGURATION SECTION.
INPUT-OUTPUT SECTION.
FILE-CONTROL.
SELECT INPUT-FILE ASSIGN TO "INPFIL".
SELECT OUTPUT-FILE ASSIGN TO "OUTFIL"
ORGANIZATION IS INDEXED.
SELECT SORT-FILE ASSIGN TO "SRTFIL".
DATA DIVISION.
FILE SECTION.
SD SORT-FILE.
01 SORT-REC.
03 S-KEY-1.
05 S-ACCOUNT-NUM
PIC X(8).
03 FILLER
PIC X(32).
03 S-KEY-2.
05 S-AMOUNT
PIC S9(5)V99.
03 FILLER
PIC X(53).
FD INPUT-FILE
LABEL RECORDS ARE STANDARD.
01 IN-REC
PIC X(100).
FD OUTPUT-FILE
LABEL RECORDS ARE STANDARD
ACCESS MODE IS SEQUENTIAL
RECORD KEY IS OUT-KEY.
01 OUT-REC.
03 OUT-KEY
PIC X(8).
03 FILLER
PIC X(92).
WORKING-STORAGE SECTION.
01 INITIAL-SORT-READ
PIC X VALUE "Y".
01 SAVE-SORT-REC.
03 SR-ACCOUNT-NUM
PIC X(8).
03 FILLER
PIC X(32).
03 SR-AMOUNT
PIC S9(5)V99.
03 FILLER
PIC X(53).
PROCEDURE DIVISION.
000-START SECTION.
005-DO-THE-SORT.
SORT SORT-FILE ON ASCENDING KEY
S-KEY-1
S-KEY-2
(continued on next page)
9–12 Using the SORT and MERGE Statements
Using the SORT and MERGE Statements
9.3 Sample Programs Using the SORT and MERGE Statements
Example 9–8 (Cont.) Using the USING and OUTPUT PROCEDURE Phrases
USING INPUT-FILE
OUTPUT PROCEDURE IS 300-CREATE-OUTPUT-FILE
THRU 600-DONE-CREATE.
************************************************************
*
At this point, you could transfer control to another *
*
section of the program and continue processing.
*
************************************************************
DISPLAY "END OF PROGRAM SORTB".
STOP RUN.
300-CREATE-OUTPUT-FILE SECTION.
350-OPEN-OUTPUT.
OPEN OUTPUT OUTPUT-FILE.
400-READ-SORT-FILE.
RETURN SORT-FILE AT END
PERFORM 500-WRITE-THE-OUTPUT
CLOSE OUTPUT-FILE
GO TO 600-DONE-CREATE.
IF INITIAL-SORT-READ = "Y"
MOVE SORT-REC TO SAVE-SORT-REC
MOVE "N" TO INITIAL-SORT-READ
GO TO 400-READ-SORT-FILE.
450-COMPARE-ACCOUNT-NUM.
IF S-ACCOUNT-NUM = SR-ACCOUNT-NUM
ADD S-AMOUNT TO SR-AMOUNT
GO TO 400-READ-SORT-FILE.
500-WRITE-THE-OUTPUT.
MOVE SAVE-SORT-REC TO OUT-REC.
WRITE OUT-REC INVALID KEY
DISPLAY "INVALID KEY " SR-ACCOUNT-NUM " SORTB ABORTED"
CLOSE OUTPUT-FILE STOP RUN.
550-GET-A-REC.
MOVE SORT-REC TO SAVE-SORT-REC.
GO TO 400-READ-SORT-FILE.
600-DONE-CREATE SECTION.
650-EXIT-PARAGRAPH.
EXIT.
Example 9–9 shows how to use the INPUT PROCEDURE and OUTPUT
PROCEDURE phrases.
Using the SORT and MERGE Statements 9–13
Using the SORT and MERGE Statements
9.3 Sample Programs Using the SORT and MERGE Statements
Example 9–9 Using the INPUT PROCEDURE and OUTPUT PROCEDURE
Phrases
IDENTIFICATION DIVISION.
PROGRAM-ID. SORTC.
*********************************************************
* This program shows how to use the INPUT
*
* PROCEDURE and OUTPUT PROCEDURE phrases of the
*
* SORT statement. Input to the sort is two files
*
* containing the same type of data. Records with
*
* a "D" status-code are not released to the sort.
*
* The program eliminates duplicate records by
*
* adding their amounts to the amount in the first
*
* record with the same account number. Only records *
* with unique account numbers are written to
*
* the output file. The fields to be sorted are
*
* S-KEY-1 and S-KEY-2. The sort sequence is amount
*
* within account number.
*
*********************************************************
ENVIRONMENT DIVISION.
CONFIGURATION SECTION.
INPUT-OUTPUT SECTION.
FILE-CONTROL.
SELECT FIRST-FILE ASSIGN TO "FILE01".
SELECT SECOND-FILE ASSIGN TO "FILE02".
SELECT OUTPUT-FILE ASSIGN TO "OUTFIL".
SELECT SORT-FILE ASSIGN TO "SRTFIL".
DATA DIVISION.
FILE SECTION.
SD SORT-FILE.
01 SORT-REC.
03 S-KEY-1.
05 S-ACCOUNT-NUM
PIC X(8).
03 FILLER
PIC X(32).
03 S-KEY-2.
05 S-AMOUNT
PIC S9(5)V99.
03 FILLER
PIC X(53).
FD FIRST-FILE
LABEL RECORDS ARE STANDARD.
01 RECORD1.
03 FILLER
PIC X(99).
03 R1-STATUS-CODE
PIC X.
FD SECOND-FILE
LABEL RECORDS ARE STANDARD.
01 RECORD2.
03 FILLER
PIC X(99).
03 R2-STATUS-CODE
PIC X.
FD OUTPUT-FILE
LABEL RECORDS ARE STANDARD.
01 OUT-REC
PIC X(100).
WORKING-STORAGE SECTION.
01 INITIAL-SORT-READ
PIC X VALUE "Y".
01 FILE01-COUNT
PIC 9(5) VALUE ZEROES.
01 FILE02-COUNT
PIC 9(5) VALUE ZEROES.
01 SORT-COUNT
PIC 9(5) VALUE ZEROES.
01 OUTPUT-COUNT
PIC 9(5) VALUE ZEROES.
01 SAVE-SORT-REC.
03 SR-ACCOUNT-NUM
PIC X(8).
03 FILLER
PIC X(32).
03 SR-AMOUNT
PIC S9(5)V99.
03 FILLER
PIC X(53).
(continued on next page)
9–14 Using the SORT and MERGE Statements
Using the SORT and MERGE Statements
9.3 Sample Programs Using the SORT and MERGE Statements
Example 9–9 (Cont.) Using the INPUT PROCEDURE and OUTPUT
PROCEDURE Phrases
PROCEDURE DIVISION.
000-START SECTION.
005-DO-THE-SORT.
SORT SORT-FILE ON ASCENDING KEY
S-KEY-1
S-KEY-2
INPUT PROCEDURE IS 010-GET-INPUT
THRU 200-DONE-INPUT-GET
OUTPUT PROCEDURE IS 300-CREATE-OUTPUT-FILE
THRU 600-DONE-CREATE.
********************************************************
* Notice the use of DISPLAY and record counters to *
* produce sort statistics.
*
********************************************************
DISPLAY "TOTAL FIRST-FILE RECORDS IS
" FILE01-COUNT.
DISPLAY "TOTAL SECOND-FILE RECORDS IS
" FILE02-COUNT.
DISPLAY "TOTAL NUMBER OF SORTED RECORDS IS
" SORT-COUNT.
DISPLAY "TOTAL NUMBER OF OUTPUT RECORDS IS
" OUTPUT-COUNT.
************************************************************
* At this point, you could transfer control to another *
* section of the program and continue processing.
*
************************************************************
DISPLAY "END OF PROGRAM SORTC".
STOP RUN.
010-GET-INPUT SECTION.
050-OPEN-FILES.
OPEN INPUT FIRST-FILE.
100-READ-FIRST-FILE.
READ FIRST-FILE AT END
CLOSE FIRST-FILE
OPEN INPUT SECOND-FILE
GO TO 150-READ-SECOND-FILE.
ADD 1 TO FILE01-COUNT.
IF R1-STATUS-CODE = "D"
GO TO 100-READ-FIRST-FILE.
RELEASE SORT-REC FROM RECORD1.
GO TO 100-READ-FIRST-FILE.
150-READ-SECOND-FILE.
READ SECOND-FILE AT END
CLOSE SECOND-FILE
GO TO 200-DONE-INPUT-GET.
ADD 1 TO FILE02-COUNT.
IF R2-STATUS-CODE = "D"
GO TO 150-READ-SECOND-FILE.
RELEASE SORT-REC FROM RECORD2.
GO TO 150-READ-SECOND-FILE.
200-DONE-INPUT-GET SECTION.
250-EXIT-PARAGRAPH.
EXIT.
300-CREATE-OUTPUT-FILE SECTION.
350-OPEN-OUTPUT.
OPEN OUTPUT OUTPUT-FILE.
400-READ-SORT-FILE.
RETURN SORT-FILE AT END
PERFORM 500-WRITE-THE-OUTPUT
CLOSE OUTPUT-FILE
GO TO 600-DONE-CREATE.
ADD 1 TO SORT-COUNT.
IF INITIAL-SORT-READ = "Y"
MOVE SORT-REC TO SAVE-SORT-REC
(continued on next page)
Using the SORT and MERGE Statements 9–15
Using the SORT and MERGE Statements
9.3 Sample Programs Using the SORT and MERGE Statements
Example 9–9 (Cont.) Using the INPUT PROCEDURE and OUTPUT
PROCEDURE Phrases
MOVE "N" TO INITIAL-SORT-READ
GO TO 400-READ-SORT-FILE.
450-COMPARE-ACCOUNT-NUM.
IF S-ACCOUNT-NUM = SR-ACCOUNT-NUM
ADD S-AMOUNT TO SR-AMOUNT
GO TO 400-READ-SORT-FILE.
500-WRITE-THE-OUTPUT.
MOVE SAVE-SORT-REC TO OUT-REC.
WRITE OUT-REC.
ADD 1 TO OUTPUT-COUNT.
550-GET-A-REC.
MOVE SORT-REC TO SAVE-SORT-REC.
GO TO 400-READ-SORT-FILE.
600-DONE-CREATE SECTION.
650-EXIT-PARAGRAPH.
EXIT.
Example 9–10 shows how to use the COLLATING SEQUENCE IS phrase.
Example 9–10 Using the COLLATING SEQUENCE IS Phrase
IDENTIFICATION DIVISION.
PROGRAM-ID. SORTD.
**************************************************
* This program sorts a file into a non-ASCII *
* collating sequence. The collating sequence *
* is defined by the alphabet-name MYSEQUENCE *
* in the SPECIAL-NAMES paragraph of the
*
* ENVIRONMENT DIVISION.
*
* The collating sequence is:
*
*
1. The letters A to Z
*
*
2. The digits 0 to 9
*
**************************************************
ENVIRONMENT DIVISION.
CONFIGURATION SECTION.
SPECIAL-NAMES.
ALPHABET MYSEQUENCE IS
"ABCDEFGHIJKLMNOPQRSTUVWXYZ0123456789 ".
INPUT-OUTPUT SECTION.
FILE-CONTROL.
SELECT INPUT-FILE ASSIGN TO "INPFIL".
SELECT OUTPUT-FILE ASSIGN TO "OUTFIL".
SELECT SORT-FILE ASSIGN TO "SRTFIL".
DATA DIVISION.
FILE SECTION.
SD SORT-FILE.
01 SORT-REC.
03 S-KEY-1.
05 S-ACCOUNT-NAME
PIC X(23).
03 S-KEY-2.
05 S-AMOUNT
PIC S9(5)V99.
(continued on next page)
9–16 Using the SORT and MERGE Statements
Using the SORT and MERGE Statements
9.3 Sample Programs Using the SORT and MERGE Statements
Example 9–10 (Cont.) Using the COLLATING SEQUENCE IS Phrase
FD INPUT-FILE
LABEL RECORDS ARE STANDARD.
01 IN-REC
PIC X(30).
FD OUTPUT-FILE
LABEL RECORDS ARE STANDARD.
01 OUT-REC
PIC X(30).
PROCEDURE DIVISION.
000-DO-THE-SORT.
SORT SORT-FILE ON ASCENDING KEY
S-KEY-1
S-KEY-2
COLLATING SEQUENCE IS MYSEQUENCE
USING INPUT-FILE GIVING OUTPUT-FILE.
************************************************************
* At this point, you could transfer control to another *
* section of the program and continue processing.
*
************************************************************
DISPLAY "END OF PROGRAM SORTD".
STOP RUN.
Example 9–11 is an example of creating a new sort key.
Example 9–11 Creating a New Sort Key
IDENTIFICATION DIVISION.
PROGRAM-ID. SORTE.
************************************************
* This program increases the size of the
*
* variable input records by a new six*
* character field and uses this field
*
* as the sort key.
*
************************************************
ENVIRONMENT DIVISION.
CONFIGURATION SECTION.
INPUT-OUTPUT SECTION.
FILE-CONTROL.
SELECT INFILE ASSIGN TO "INFILE".
SELECT SORT-FILE ASSIGN TO "SRTFIL".
SELECT OUT-FILE ASSIGN TO "OUTFILE".
DATA DIVISION.
FILE SECTION.
FD
INFILE
RECORD VARYING FROM 100 TO 490 CHARACTERS
DEPENDING ON IN-LENGTH.
01
INREC.
03 ACCOUNT
PIC 9(5).
03 INCOME-FIRST-QUARTER
PIC 9(5)V99.
03 INCOME-SECOND-QUARTER PIC 9(5)V99.
03 INCOME-THIRD-QUARTER
PIC 9(5)V99.
(continued on next page)
Using the SORT and MERGE Statements 9–17
Using the SORT and MERGE Statements
9.3 Sample Programs Using the SORT and MERGE Statements
Example 9–11 (Cont.) Creating a New Sort Key
03 INCOME-FOURTH-QUARTER PIC 9(5)V99.
03 ORDER-COUNT
PIC 9(2).
03 ORDERS OCCURS 1 TO 7 TIMES
DEPENDING ON ORDER-COUNT.
05 ORDER-DATE
PIC 9(6).
05 FILLER
PIC X(59).
SD
SORT-FILE
RECORD VARYING FROM 106 TO 496 CHARACTERS
DEPENDING ON SORT-LENGTH.
01
SORT-REC.
03 SORT-ANNUAL-INCOME
PIC 9(6).
03 SORT-REST-OF-RECORD
PIC X(490).
FD
OUT-FILE
RECORD VARYING FROM 106 TO 496 CHARACTERS
DEPENDING ON OUT-LENGTH.
01
OUT-REC
PIC X(496).
WORKING-STORAGE SECTION.
01 IN-LENGTH
PIC 9(3) COMP.
01 SORT-LENGTH
PIC 9(3) COMP.
01 OUT-LENGTH
PIC 9(3) COMP.
PROCEDURE DIVISION.
000-START SECTION.
005-SORT-HERE.
SORT SORT-FILE
ON DESCENDING SORT-ANNUAL-INCOME
INPUT PROCEDURE 010-GET-INPUT
THRU 070-DONE-INPUT
OUTPUT PROCEDURE 100-WRITE-OUTPUT.
DISPLAY "END OF PROGRAM SORTE".
STOP RUN.
010-GET-INPUT SECTION.
020-OPEN-INPUT.
OPEN INPUT INFILE.
030-READ-INPUT.
READ INFILE AT END
CLOSE INFILE
GO TO 070-DONE-INPUT.
040-ADD-INCOME.
ADD INCOME-FIRST-QUARTER
INCOME-SECOND-QUARTER
INCOME-THIRD-QUARTER
INCOME-FOURTH-QUARTER
GIVING SORT-ANNUAL-INCOME.
050-CREATE-SORT-REC.
ADD 6 IN-LENGTH GIVING SORT-LENGTH.
MOVE INREC TO SORT-REST-OF-RECORD.
RELEASE SORT-REC.
GO TO 030-READ-INPUT.
070-DONE-INPUT SECTION.
080-EXIT.
EXIT.
100-WRITE-OUTPUT SECTION.
110-OPEN.
OPEN OUTPUT OUT-FILE.
(continued on next page)
9–18 Using the SORT and MERGE Statements
Using the SORT and MERGE Statements
9.3 Sample Programs Using the SORT and MERGE Statements
Example 9–11 (Cont.) Creating a New Sort Key
120-WRITE.
RETURN SORT-FILE AT END
CLOSE OUT-FILE
GO TO 130-DONE.
MOVE SORT-LENGTH TO OUT-LENGTH.
WRITE OUT-REC.
GO TO 120-WRITE.
130-DONE.
EXIT.
Example 9–12 merges three identically sequenced files into one file.
Example 9–12 Merging Files
IDENTIFICATION DIVISION.
PROGRAM-ID.
MERGE01.
******************************************************
* This program merges three identically sequenced *
* regional sales files into one total sales file. *
* The program adds sales amounts and writes one
*
* record for each product code.
*
******************************************************
ENVIRONMENT DIVISION.
CONFIGURATION SECTION.
INPUT-OUTPUT SECTION.
FILE-CONTROL.
SELECT REGION1-SALES ASSIGN TO "REG1SLS".
SELECT REGION2-SALES ASSIGN TO "REG2SLS".
SELECT REGION3-SALES ASSIGN TO "REG3SLS".
SELECT MERGE-FILE
ASSIGN TO "MRGFILE".
SELECT TOTAL-SALES ASSIGN TO "TOTLSLS".
DATA DIVISION.
FILE SECTION.
FD REGION1-SALES
LABEL RECORDS ARE STANDARD.
01 REGION1-RECORD
PIC X(100).
FD REGION2-SALES
LABEL RECORDS ARE STANDARD.
01 REGION2-RECORD
PIC X(100).
FD REGION3-SALES
LABEL RECORDS ARE STANDARD.
01 REGION3-RECORD
PIC X(100).
SD MERGE-FILE.
01 MERGE-REC.
03 M-REGION-CODE
PIC XX.
03 M-PRODUCT-CODE
PIC X(10).
03 M-SALES-AMT
PIC S9(7)V99.
03 FILLER
PIC X(79).
(continued on next page)
Using the SORT and MERGE Statements 9–19
Using the SORT and MERGE Statements
9.3 Sample Programs Using the SORT and MERGE Statements
Example 9–12 (Cont.) Merging Files
FD TOTAL-SALES
LABEL RECORDS ARE STANDARD.
01 TOTAL-RECORD
PIC X(100).
WORKING-STORAGE SECTION.
01 INITIAL-READ
PIC X VALUE "Y".
01 THE-COUNTERS.
03 PRODUCT-AMT
PIC S9(7)V99.
03 REGION1-AMT
PIC S9(9)V99.
03 REGION2-AMT
PIC S9(9)V99.
03 REGION3-AMT
PIC S9(9)V99.
03 TOTAL-AMT
PIC S9(11)V99.
01 SAVE-MERGE-REC.
03 S-REGION-CODE
PIC XX.
03 S-PRODUCT-CODE
PIC X(10).
03 S-SALES-AMT
PIC S9(7)V99.
03 FILLER
PIC X(79).
PROCEDURE DIVISION.
000-START SECTION.
010-MERGE-FILES.
OPEN OUTPUT TOTAL-SALES.
MERGE MERGE-FILE ON ASCENDING KEY M-PRODUCT-CODE
USING REGION1-SALES REGION2-SALES REGION3-SALES
OUTPUT PROCEDURE IS 020-BUILD-TOTAL-SALES
THRU 100-DONE-TOTAL-SALES.
DISPLAY "TOTAL SALES FOR REGION 1 " REGION1-AMT.
DISPLAY "TOTAL SALES FOR REGION 2 " REGION2-AMT.
DISPLAY "TOTAL SALES FOR REGION 3 " REGION3-AMT.
DISPLAY "TOTAL ALL SALES
" TOTAL-AMT.
CLOSE TOTAL-SALES.
DISPLAY "END OF PROGRAM MERGE01".
STOP RUN.
020-BUILD-TOTAL-SALES SECTION.
030-GET-MERGE-RECORDS.
RETURN MERGE-FILE AT END
MOVE PRODUCT-AMT TO S-SALES-AMT
WRITE TOTAL-RECORD FROM SAVE-MERGE-REC
GO TO 100-DONE-TOTAL-SALES.
IF INITIAL-READ = "Y"
MOVE "N" TO INITIAL-READ
MOVE MERGE-REC TO SAVE-MERGE-REC
PERFORM 050-TALLY-AMOUNTS
GO TO 030-GET-MERGE-RECORDS.
040-COMPARE-PRODUCT-CODE.
IF M-PRODUCT-CODE = S-PRODUCT-CODE
PERFORM 050-TALLY-AMOUNTS
GO TO 030-GET-MERGE-RECORDS.
MOVE PRODUCT-AMT TO S-SALES-AMT.
MOVE ZEROES TO PRODUCT-AMT.
WRITE TOTAL-RECORD FROM SAVE-MERGE-REC.
MOVE MERGE-REC TO SAVE-MERGE-REC.
GO TO 040-COMPARE-PRODUCT-CODE.
(continued on next page)
9–20 Using the SORT and MERGE Statements
Using the SORT and MERGE Statements
9.3 Sample Programs Using the SORT and MERGE Statements
Example 9–12 (Cont.) Merging Files
050-TALLY-AMOUNTS.
ADD M-SALES-AMT TO PRODUCT-AMT TOTAL-AMT.
IF M-REGION-CODE = "01"
ADD M-SALES-AMT TO REGION1-AMT.
IF M-REGION-CODE = "02"
ADD M-SALES-AMT TO REGION2-AMT.
IF M-REGION-CODE = "03"
ADD M-SALES-AMT TO REGION3-AMT.
100-DONE-TOTAL-SALES SECTION.
120-DONE.
EXIT.
Using the SORT and MERGE Statements 9–21
10
Producing Printed Reports
There are three Compaq COBOL programming capabilities for producing
formatted reports: conventional, linage file, and Report Writer. This chapter
presents the following topics to help you format and produce reports:
•
Designing a report (Section 10.1)
•
Components of a report (Section 10.2)
•
Methods of reporting accumulation and control totals (Section 10.3)
•
The logical page and the physical page (Section 10.4)
•
Programming a conventional file report (Section 10.5)
•
Programming a linage-file Compaq COBOL report (Section 10.6)
•
Modes for printing reports (Section 10.7)
•
Programming a Report Writer report (Section 10.8)
•
Report Writer examples (Section 10.9)
•
Solving report problems (Section 10.10)
10.1 Designing a Report
The design of a report is dictated by the data you must include in the report. If
you have a general idea of what the report is to contain, you can produce a rough
outline using a report layout worksheet.
To create the worksheet, either use an online text editor or draw a layout
worksheet like the one displayed in Figure 10–1.
The layout worksheet in Figure 10–1 has 132 characters on a line and 60 lines
on a page. When you outline your worksheet, include specifics such as page
headings, rows and columns, and column sizes.
Section 10.2 describes other report components that you must plan for when you
design a report. Note that you can use your worksheet later when you write the
Compaq COBOL program that produces the report.
10.2 Components of a Report
There are seven components of a report. Example 10–1 illustrates them.
Producing Printed Reports 10–1
Producing Printed Reports
10.2 Components of a Report
Figure 10–1 Sample Layout Worksheet
0
1
2
10
11
12
123456789 0123456789 0123456789 0123456789 0123456789 0123456789
1
2
3
4
5
1"
6
7
8
9
10
11
2"
12
13
14
15
16
17
3"
18
19
20
21
22
23
4"
24
25
26
27
28
29
5"
30
ZK−6077−GE
Example 10–1 Components of a Report
!
********************** COMPANY CONFIDENTIAL **********************
********************** COMPANY CONFIDENTIAL **********************
********************** COMPANY CONFIDENTIAL **********************
******************
*
*
* YEAR TO DATE *
* SALES REPORT *
*
*
******************
FOR INTERNAL USE ONLY
DO NOT COPY
FOR SECURITY CLEARANCE LEVELS 1, 2, AND 3
********************** COMPANY CONFIDENTIAL **********************
********************** COMPANY CONFIDENTIAL **********************
! ********************** COMPANY CONFIDENTIAL **********************
.
.
.
(continued on next page)
10–2 Producing Printed Reports
Producing Printed Reports
10.2 Components of a Report
Example 10–1 (Cont.) Components of a Report
"
04-NOVEMBER-96
Year To Date Sales Report
Page
1
Salesman Salary/Bonus Client Name
Client Address Total Sales
#
************************ JANUARY REPORT **************************
$
SMITH
$30,000.00 STREN
2742 NORTH ST. $225,000.00
JOHN
$10,000.00
TOM
MANCHESTER, NH
.
.
.
.
.
.
.
.
.
.
.
.
.
.
.
TOTAL JANUARY SALES: $ 2,000,000.00
******************************************************************
************************ FEBRUARY REPORT *************************
.
.
.
.
.
.
.
.
.
.
.
.
.
.
.
********************** COMPANY CONFIDENTIAL **********************
********************** COMPANY CONFIDENTIAL **********************
********************** COMPANY CONFIDENTIAL **********************
<<<<<<<<<<<<<<<<<<<<<<<CONTINUED ON NEXT PAGE>>>>>>>>>>>>>>>>>>>>>
.
.
.
04-NOVEMBER-96
Year To Date Sales Report
Page 1324
$
%
&
&
’
********************** COMPANY CONFIDENTIAL **********************
********************** COMPANY CONFIDENTIAL **********************
********************** COMPANY CONFIDENTIAL **********************
******************
*
*
*
END OF
*
* YEAR TO DATE *
* SALES REPORT *
*
*
******************
Total Records:
123456
Total Salesmen:
6754
Total Sales:
$123,456,789.99
Total Salaries:
$ 9,876,543.21
Total Bonus:
$ 6,789,012.34
Total Report Pages:
1324
********************** COMPANY CONFIDENTIAL **********************
********************** COMPANY CONFIDENTIAL **********************
’ ********************** COMPANY CONFIDENTIAL **********************
The numbers in the following list correspond to the circled numbers in
Example 10–1:
! Report Heading (RH)—The report heading (the lines marked with 1 and all
the lines between) consists of information printed before the main body of a
report. It can be printed on a separate page, or as the first page heading, with
the remaining page headings abbreviated to save paper. The report heading
can include information such as handling and distribution instructions. It can
also include the selection criteria, sort order, and assumptions made when
creating the report.
" Page Heading (PH)—The page heading (the line marked with 2 and the line
following) consists of information printed on the top one or more lines of every
page in the report. It usually names and dates the report, gives the report
page number, and produces a title for each column of information in the detail
line.
Producing Printed Reports 10–3
Producing Printed Reports
10.2 Components of a Report
# Control Heading (CH)—The control heading consists of one or more lines of
information identifying the beginning of a new logical area on a page.
$ Detail Lines (DL)—The detail (the lines marked with 4 and all the lines
between) consists of one or more lines of the primary data of the report.
% Control Footing (CF)—The control footing (the line marked with 5 and the
following line) consists of one or more lines of information identifying the end
of a logical area. The control footing can contain one or more totals and an
accompanying message.
& Page Footing (PF)—The page footing (the lines marked with 6 and all the
lines between) consists of one or more lines of information at the bottom of
each page.
’ Report Footing (RF)—The report footing (the lines marked with 7 and all
the lines between) consists of information printed after the main body of the
report. It can be continued on the same page of the report body, or it can be
on a separate page. It may contain information such as hash or control totals.
A report footing is a convenient place to print run-time statistics, such as the
number of records read and written for each file. It can also provide warning
messages, such as when a table is close to overflowing.
It is suggested that all reports have an END OF REPORT message or other
indicator at the end of the report, so that you can tell at a glance that you
have all the pages. (The consecutive page numbers tell if a page is missing,
but they do not indicate which page is the last.)
10.3 Accumulating and Reporting Totals
Your program can report three types of totals in the control footings and report
footings of your report:
•
Subtotals—Subtotaling is the process of summing a detail item from each
detail line. For example, in Figure 10–2, Salary, Bonus, and Total Sales are
subtotaled. To get the first salary subtotal for January on page 1 ($75,000.00),
the program must add each salesman’s salary ($30,000+$25,000+$20,000).
After printing the salary total, the program must zero the total to begin
subtotaling for the next month.
•
Crossfoot Totals—Crossfooting is the process of summing subtotals from
a common group of totals. For example, in Figure 10–2, TOTAL SALARY
EXPENSE is crossfooted by adding TOTAL SALARY and TOTAL BONUS.
To get the first TOTAL SALARY EXPENSE crossfoot total for the January
report, the program must add the salary subtotal and the bonus subtotal
before the program clears the subtotals.
•
Rolled Forward Totals—Rolling-forward is the process of summing either
subtotals or crossfoot totals. For example, in Figure 10–2, the YEAR TO
DATE TOTALS at the bottom of page 1 are rolled forward from both the
JANUARY and FEBRUARY totals. The program computes the salary
and bonus YEAR TO DATE TOTALS from the previous salary and bonus
subtotals. It computes the total salary expense figure from the previous total
salary expense crossfoot totals.
10–4 Producing Printed Reports
Producing Printed Reports
10.4 The Logical Page and the Physical Page
Figure 10–2 Subtotals, Crossfoot Totals, and Rolled Forward Totals
04−NOVEMBER−96
Year To Date Sales Report
Page
1
Salesman
Salary/Bonus
Client Name
Client Address
Total Sales
−−−−−−−−− −−−−−−−−−−−−
−−−−−−−−−−−−−
−−−−−−−−−−−−−− −−−−−−−−−−−−−
************************* JANUARY REPORT ***************************
SMITH
JOHN
$30,000.00
$10,000.00
STREN
TOM
2742 NORTH ST.
MANCHESTER, NH
LEPRO
RONALD
$25,000.00
$10,000.00
FOSTER
FRANK
967 HOOVER LANE
CAMBRIDGE, MA
$225,000.00
$195,000.00
BALLET
$20,000.00
O’BRIEN
1001 HUGE DRIVE $ 15,000.00
FRANCES
$10,000.00
PAUL
MT. SNOW, VT
−−−−−−−−−−−−−−−−−−−−−−−−−−−−−−−−−−−−−−−−−−−−−−−−−−−−−−−−−−−−−−−−−−−−−−
JANUARY TOTALS
SALARY
$ 75,000.00 Salary subtotal
BONUS
$ 30,000.00 Bonus subtotal
−−−−−−−−−−−
TOTAL SALARY EXPENSE
$105,000.00 Crossfoot total (salary + bonus)
TOTAL SALES
*************************
$435,000.00
**************************
Subtotal
FEBRUARY REPORT
SMITH
JOHN
$30,000.00
$10,000.00
STREN
TOM
2742 NORTH ST.
MANCHESTER, NH
LEPRO
RONALD
$25,000.00
$10,000.00
FOSTER
FRANK
967 HOOVER LANE
CAMBRIDGE, MA
$225,000.00
$195,000.00
BALLET
$20,000.00
O’BRIEN
1001 HUGE DRIVE $ 15,000.00
FRANCES
$10,000.00
PAUL
MT. SNOW, VT
−−−−−−−−−−−−−−−−−−−−−−−−−−−−−−−−−−−−−−−−−−−−−−−−−−−−−−−−−−−−−−−−−−−−−−
FEBRUARY TOTALS
SALARY
$ 75,000.00 Salary subtotal
BONUS
$ 30,000.00 Bonus subtotal
−−−−−−−−−−−
TOTAL SALARY EXPENSE
$105,000.00 Crossfoot total (salary + bonus)
TOTAL SALES
*************************
SALARY
BONUS
TOTAL SALARY EXPENSE
TOTAL
SALES
$435,000.00
Subtotal
YEAR TO DATE TOTALS ***********************
$150,000.00
$ 60,000.00
−−−−−−−−−−−
$210,000.00
Salary rolled forward total
Bonus rolled forward total
Crossfoot total (salary + bonus)
$870,000.00
Rolled forward total
−−−−−−−−−−−−−−−−−−−−−−− COMPANY CONFIDENTIAL −−−−−−−−−−−−−−−−−−−−−−−−−
−−−−−−−−−−−−−−−−−−−−−−− COMPANY CONFIDENTIAL −−−−−−−−−−−−−−−−−−−−−−−−−
−−−−−−−−−−−−−−−−−−−−−−− COMPANY CONFIDENTIAL −−−−−−−−−−−−−−−−−−−−−−−−−
ZK−6080−GE
10.4 The Logical Page and the Physical Page
A physical page is the paper page printed by your printer.
A logical page is conceptual, consisting of a page body and optionally a top
margin, footing, and bottom margin. Figure 10–3 and Figure 10–6 illustrate
the logical page structure for the conventional file report and linage file report,
respectively.
The number of lines on a logical page is defined by the number of lines on the
target physical page. Thus, the number of lines determines the size of the logical
page. When you design a report, you must choose those lines within the logical
page that are to be page headers (PH), control headers (CH), detail lines (DL),
control footings (CF), and page footings (PF). Once the framework of the logical
Producing Printed Reports 10–5
Producing Printed Reports
10.4 The Logical Page and the Physical Page
page is defined, your program must stay within those bounds; otherwise, the
printed report may not contain the correct information.
You can program two types of reports: a conventional file report or a linage file
report. Section 10.5 and Section 10.5.1 discuss these reports in detail.
10.5 Programming a Conventional File Report
A conventional file report is contained in a file that has sequential organization
and access mode, and that contains variable-length with fixed control records.
This type of report consists of one or more logical pages. The program that
produces the report uses ordinary syntax for writing sequential files, for
example, OPEN, WRITE...AFTER ADVANCING, and CLOSE statements. The
conventional report does not use linage or Report Writer facilities.
To program a conventional report, you should understand how to do the following:
•
Define the logical page.
•
Advance to the next logical page.
•
Program for the page-overflow condition.
•
Use a line counter.
The following sections discuss these topics in detail. Additionally, Section 10.5.5
contains an example of a Compaq COBOL program that produces a conventional
file report.
10.5.1 Defining the Logical Page in a Conventional Report
Your program specifies the format of your report. Using the report layout
worksheet you created, you can write a Compaq COBOL program that defines the
logical page area for a conventional report. Figure 10–3 shows the logical page
area for a conventional report. The conventional report logical page area consists
of the page areas discussed in Section 10.4.
Figure 10–3 Logical Page Area for a Conventional Report
Page body line numbers
Logical
Page
1
2
3
4
5
6
7
.
.
.
Page Body
ZK−6081−GE
10–6 Producing Printed Reports
Producing Printed Reports
10.5 Programming a Conventional File Report
Once you have defined the logical page, you must handle vertical spacing,
horizontal spacing, and the number of lines that appear on each page so that
you can advance to the next logical page. The following sections discuss these
subjects.
10.5.2 Controlling the Spacing in a Conventional Report
To control the horizontal spacing on a logical page, define every report item from
your report layout worksheet in the Working-Storage Section of your Compaq
COBOL program.
To control the vertical spacing on a logical page, use the WRITE statement. The
WRITE statement controls whether one or more lines are skipped before or after
your program writes a line of the report. For example, to print a line before
advancing five lines, use the following:
WRITE... BEFORE ADVANCING 5 LINES.
To print a line after advancing two lines, use the following:
WRITE... AFTER ADVANCING 2 LINES.
10.5.3 Advancing to the Next Logical Page in a Conventional Report
To advance to the next logical page and position the printer to the page heading
area, you must be able to track the number of lines that your program writes on a
page. The Compaq COBOL compiler lets you control the number of lines written
on a page with the WRITE statement.
The WRITE statement must appear in your Procedure Division and it should
contain either the AFTER ADVANCING PAGE or BEFORE ADVANCING PAGE
clause. Example 10–3 demonstrates the use of the WRITE statement with the
AFTER ADVANCING PAGE clause.
The next two sections discuss how to handle a page-overflow condition and how to
use a line counter to keep track of the number of lines your program writes on a
logical page.
10.5.3.1 Programming for the Page-Overflow Condition in a Conventional Report
A page-overflow condition occurs when your program writes more lines than the
logical page can accommodate. This normal condition lets your program know
when to execute its top-of-page routines. Top-of-page routines should contain
WRITE statements with either the AFTER ADVANCING PAGE or BEFORE
ADVANCING PAGE clause.
These statements determine when a report’s logical page is full, and when the
program prints the last line on a logical page (if you do not want to use all the
lines on a page). Example 10–2 shows two methods that check for the pageoverflow condition:
•
Paragraph A100-FIRST-REPORT-ROUTINES checks for a full page after it
writes a report line. If the page-overflow condition exists, A901-HEADERROUTINE executes.
•
Paragraph A500-SECOND-REPORT-ROUTINES checks if more than 50 lines
exist on the current logical page. If more than 50 lines exist, A902-HEADERROUTINE executes.
In either case, the AFTER ADVANCING PAGE clause in the A901-HEADERROUTINE and A902-HEADER-ROUTINE paragraphs generates the characters
needed for the printer to position itself at the top of the next page heading area.
Producing Printed Reports 10–7
Producing Printed Reports
10.5 Programming a Conventional File Report
Example 10–2 Checking for the Page-Overflow Condition
.
.
.
PROCEDURE DIVISION.
A000-BEGIN.
.
.
.
A100-FIRST-REPORT-ROUTINES.
*
* A901-HEADER-ROUTINE executes whenever the number of lines written exceeds
* the number of lines on the 66-line default logical page.
*
WRITE A-LINE1 AFTER ADVANCING 2 LINES.
ADD 2 TO REPORT1-LINE-COUNT.
IF REPORT1-LINE-COUNT > 65 PERFORM A901-HEADER-ROUTINE.
.
.
.
A500-SECOND-REPORT-ROUTINES.
*
* This routine uses only the first 50 lines of the 66-line report.
*
WRITE A-LINE2 AFTER ADVANCING 2 LINES.
ADD 2 TO REPORT2-LINE-COUNT.
IF REPORT2-LINE-COUNT IS GREATER THAN 50
PERFORM A902-HEADER-ROUTINE.
.
.
.
A901-HEADER-ROUTINE.
WRITE A-LINE1 FROM REPORT1-HEADER-LINE-1 AFTER ADVANCING PAGE.
MOVE 0 TO REPORT1-LINE-COUNT.
ADD 1 TO REPORT1-LINE-COUNT.
.
.
.
A902-HEADER-ROUTINE.
WRITE A-LINE2 FROM REPORT2-HEADER-LINE-1 AFTER ADVANCING PAGE.
MOVE 0 TO REPORT2-LINE-COUNT.
ADD 1 TO REPORT2-LINE-COUNT.
.
.
.
Although the WRITE statement allows you to check for a page-overflow condition,
you can also use a line counter that tracks the number of lines that appear on a
page. Section 10.5.3.2 describes this in more detail.
10.5.3.2 Using a Line Counter
A line counter is another method of tracking the number of lines that appear on a
page. If you define a line counter in the Working-Storage Section of your program,
each time a line is written or skipped the line counter value is incremented by
one.
Your program should contain a routine that checks the line counter value before
it writes or skips the next line. If the value is less than the limit you have set, it
writes or skips. If the value equals or exceeds the limit you have set, the program
executes header routines that allow it to advance to the next logical page.
10–8 Producing Printed Reports
Producing Printed Reports
10.5 Programming a Conventional File Report
10.5.4 Printing the Conventional Report
When you are ready to print your report, you must ensure that your system’s line
printer can accommodate the page size or form of your report. If the printer uses
a different page size or form, contact your system manager. The system manager
can change the page or form size to accommodate your report.
Section 10.7 describes the different modes for printing a report.
10.5.5 A Conventional File Report Example
Example 10–3 shows a Compaq COBOL program that produces two reports from
the same input file.
Example 10–3 Page Advancing and Line Skipping
IDENTIFICATION DIVISION.
PROGRAM-ID. REP01.
ENVIRONMENT DIVISION.
INPUT-OUTPUT SECTION.
FILE-CONTROL.
SELECT INPUT-FILE ASSIGN TO "REPIN.DAT".
SELECT FORM1-REPORT ASSIGN TO "FORM1.DAT".
SELECT FORM2-REPORT ASSIGN TO "FORM2.DAT".
DATA DIVISION.
FILE SECTION.
FD INPUT-FILE.
01 INPUT-RECORD.
02 I-NAME.
03 I-FIRST
PIC X(10).
03 I-MID
PIC X.
03 I-LAST
PIC X(15).
02 I-ADDRESS.
03 I-STREET
PIC X(20).
03 I-CITY
PIC X(15).
03 I-STATE
PIC XX.
03 I-ZIP
PIC 99999.
FD FORM1-REPORT.
01 FORM1-PRINT-LINE
PIC X(80).
FD FORM2-REPORT.
01 FORM2-PRINT-LINE
PIC X(80).
WORKING-STORAGE SECTION.
01 END-OF-FILE
PIC X
01 MAX-LINES-ON-FORM2
PIC 99
01 FORM2-LINE-COUNTER
PIC 99
01 PAGE-NO
PIC 99999
01 FORM1-LINE-3.
02
PIC X(9)
02 FORM1-LAST
PIC X(15).
01 FORM1-LINE-13.
02
PIC X(4)
02 FORM1-NAME
PIC X(26).
VALUE
VALUE
VALUE
VALUE
SPACE.
55.
00.
0.
VALUE SPACES.
VALUE SPACES.
(continued on next page)
Producing Printed Reports 10–9
Producing Printed Reports
10.5 Programming a Conventional File Report
Example 10–3 (Cont.)
01 FORM1-LINE-14.
02
02 FORM1-STREET
01 FORM1-LINE-15.
02
02 FORM1-CITY
02
02 FORM1-STATE
02
02 FORM1-ZIP
01 FORM2-HEADER-1.
02
PIC
02
PIC
02
PIC
02
PIC
02 F2H-PAGE PIC
01 FORM2-HEADER-2.
02
PIC
02
PIC
Page Advancing and Line Skipping
PIC X(4) VALUE SPACES.
PIC X(20).
PIC
PIC
PIC
PIC
PIC
PIC
X(15) VALUE
X(30) VALUE
X(10) VALUE
XXXXX VALUE
ZZZZZ.
X(4) VALUE SPACES.
X(15).
X
VALUE SPACE.
XX.
X
VALUE SPACE.
99999.
SPACES.
" PERSONNEL MASTER LISTING
SPACES.
"Page ".
".
X(15) VALUE SPACES.
X(30) VALUE "**** COMPANY CONFIDENTIAL ****".
PROCEDURE DIVISION.
A000-BEGIN.
OPEN INPUT INPUT-FILE
OUTPUT FORM1-REPORT
FORM2-REPORT.
PERFORM A900-PRINT-HEADERS-ROUTINE.
PERFORM A100-PRINT-REPORTS UNTIL END-OF-FILE = "Y".
CLOSE INPUT-FILE
FORM1-REPORT
FORM2-REPORT.
DISPLAY "END OF JOB".
STOP RUN.
A100-PRINT-REPORTS.
READ INPUT-FILE AT END MOVE "Y" TO END-OF-FILE.
IF END-OF-FILE NOT = "Y"
PERFORM A200-PRINT-REPORTS.
A200-PRINT-REPORTS.
IF FORM2-LINE-COUNTER IS GREATER THAN MAX-LINES-ON-FORM2
PERFORM A900-PRINT-HEADERS-ROUTINE.
WRITE FORM2-PRINT-LINE FROM INPUT-RECORD
AFTER ADVANCING 2 LINES.
ADD 2 TO FORM2-LINE-COUNTER.
MOVE I-LAST
TO FORM1-LAST.
WRITE FORM1-PRINT-LINE FROM FORM1-LINE-3
AFTER ADVANCING 3 LINES.
MOVE I-NAME
TO FORM1-NAME.
WRITE FORM1-PRINT-LINE FROM FORM1-LINE-13
AFTER ADVANCING 10 LINES.
MOVE I-STREET
TO FORM1-STREET.
WRITE FORM1-PRINT-LINE FROM FORM1-LINE-14.
MOVE I-CITY
TO FORM1-CITY.
MOVE I-STATE
TO FORM1-STATE.
MOVE I-ZIP
TO FORM1-ZIP.
WRITE FORM1-PRINT-LINE FROM FORM1-LINE-15.
(continued on next page)
10–10 Producing Printed Reports
Producing Printed Reports
10.5 Programming a Conventional File Report
Example 10–3 (Cont.) Page Advancing and Line Skipping
A900-PRINT-HEADERS-ROUTINE.
*
* This routine generates a form feed, writes two lines,
* skips two lines, then resets the line counter to 4 to
* indicate used lines on the current logical page.
* Line 5 on this page is the next print line.
*
ADD 1 TO PAGE-NO.
MOVE PAGE-NO TO F2H-PAGE.
WRITE FORM2-PRINT-LINE FROM FORM2-HEADER-1
AFTER ADVANCING PAGE.
WRITE FORM2-PRINT-LINE FROM FORM2-HEADER-2
BEFORE ADVANCING 2.
MOVE 4 TO FORM2-LINE-COUNTER.
The first report, Figure 10–4, is a preprinted form letter that can be inserted
into a business envelope. This report has a logical page length of 20 lines and a
width of 80 characters. Note that this report uses only the first 15 lines on the
page. Because this is a preprinted form, the program supplies only the following
information:
•
The date for line 3
•
The customer’s name for lines 3 and 13
•
The customer’s address for lines 14 and 15
Figure 10–4 A 20-Line Logical Page
Column
1
2
3
4
5
6
12345678901234567890123456789012345678901234567890123456789012
Line
1
2
3
4
5
6
7
8
9
10
11
12
13
14
15
16
17
18
19
20
Dear Mr. XXXXXXXXXXXXXXX
Date: 99−XXX−99
XXXXXXXXXXXXXXXXXXXXXXXXXXXXXXXXXXXXXXXXXXXXXXXXXXXXXXXXXXXX
X
X
X
X
X
X
Preprint message is here
X
X
X
X
XXXXXXXXXXXXXXXXXXXXXXXXXXXXXXXXXXXXXXXXXXXXXXXXXXXXXXXXXXXX
TO: XXXXXXXXXXX X XXXXXXXXXXXXXXX
XXXXXXXXXXX X XXXXXXX
XXXXXXXXXXXXXXXX XX 99999
ZK−6082−GE
Producing Printed Reports 10–11
Producing Printed Reports
10.5 Programming a Conventional File Report
The second report, Figure 10–5, is a double-spaced master listing of all input
records. While this report’s logical page is identical to the default logical page
for the system (in this case, 66 vertical lines and 132 horizontal characters), this
report uses only the first 55 lines on the page. Both reports are output to a disk
for later printing.
Figure 10–5 A Double-Spaced Master Listing
PERSONNEL MASTER LISTING
**** COMPANY CONFIDENTIAL ****
Page 1
Harold
AHuit
1234 Main Street
Southbend
VT12345
Mary
QJewitt
18673 S. 126 Avenue
Kreosote
NB87655
George
DCarport
990 North St., Apt 3 Waymouth
AL00001
Catherine
FBallet
2244 Maple St
Laconia
NH03456
Amanda
DModel
Pease AFB
Portsmouth
VT24567
Robert
RLumber
2 Wayne St.
Ackensack
NJ56243
ZK−6083−GE
10.6 Programming a Linage-File Compaq COBOL Report
A linage-file report has sequential organization and access mode, and consists of
one or more logical pages. A Compaq COBOL program that produces a linage-file
report uses the LINAGE and LINAGE-COUNTER capabilities in addition to the
facilities used for conventional reports.
In contrast to the conventional COBOL report, you can use the LINAGE clause to
do the following:
•
Define the number of lines on the logical page.
•
Divide the logical page into sections.
Additionally, a linage-file report has a LINAGE-COUNTER special register
assigned to it that monitors the number of lines written to the current logical
page.
To program a linage report, you should understand how to do the following:
•
Define the logical page with the LINAGE clause.
•
Use the LINAGE-COUNTER special register.
•
Advance to the next logical page.
•
Program for the page-overflow condition.
On OpenVMS, the linage file contains variable length with fixed control records.
All advancing information is encoded in the fixed control portion of the record. ♦
10–12 Producing Printed Reports
Producing Printed Reports
10.6 Programming a Linage-File Compaq COBOL Report
On Tru64 UNIX, the linage file contains variable length records. All advancing
information is written to the file as blank lines. ♦
The following sections discuss these topics in detail. Example 10–5 shows an
example of a linage-file program.
10.6.1 Defining the Logical Page in a Linage-File Report
Your program specifies the format of your report. Using the report layout
worksheet you created, you can write a Compaq COBOL program that defines
the logical page area and divides the page into logical page sections for a linagefile report. Figure 10–6 shows the logical page area and the four divisions of a
linage-file report.
Figure 10–6 Logical Page Areas for a Linage-File Report
Page body line numbers
*Top Margin
Logical
Page
1
2
3
4
5
6
7
8
9
10
11
12
.
.
.
.
Page Body
*Footing Area
*Bottom Margin
*Optional areas
ZK−6084−GE
To define the number of lines on a logical page and to divide it into logical page
sections, you must include the LINAGE clause as a File Description entry in your
program. The LINAGE clause lets you specify the size of the logical page’s top
and bottom margins and the line where the footing area begins in the page body.
Producing Printed Reports 10–13
Producing Printed Reports
10.6 Programming a Linage-File Compaq COBOL Report
For example, to define how many lines you want your program to skip at the
top or bottom of the logical page, use the LINAGE clause with either the LINES
AT TOP or the LINES AT BOTTOM phrase. To define a footing area within the
logical page, use the LINAGE clause with the WITH FOOTING phrase.
The LINES AT TOP phrase positions the printer on the first print line in the page
body. The LINES AT BOTTOM phrase positions the printer at the top of the next
logical page once the current page body is complete. The WITH FOOTING phrase
defines a footing area in the logical page that controls page-overflow conditions.
Additionally, you can insert specific text, such as footnotes or page numbers, on
the bottom lines of your logical page.
In addition to defining the logical page area and the number of lines that appear
on a page, you must be prepared to handle vertical spacing, horizontal spacing,
logical page advancement, and page-overflow. The following sections discuss these
topics in detail.
10.6.2 Controlling the Spacing in a Linage-File Report
To control the horizontal spacing on a logical page, define every report item from
your report layout worksheet in the Working-Storage Section of your Compaq
COBOL program.
To control the vertical spacing on a logical page, use the WRITE statement. The
WRITE statement controls whether one or more lines is skipped before or after
your program writes a line of the report. For example, to print a line before
advancing five lines, use the following:
WRITE... BEFORE ADVANCING 5 LINES.
To print a line after advancing two lines, use the following:
WRITE... AFTER ADVANCING 2 LINES.
10.6.3 Using the LINAGE-COUNTER
The LINAGE-COUNTER special register is one method of tracking the number
of lines that your program writes on a logical page. When you use the LINAGECOUNTER special register, each time a line is written or skipped, the register is
incremented by 1.
Before the program writes a new line, it checks the LINAGE-COUNTER value
to see if the current logical page can accept the new line. If the value equals the
maximum number of lines for the page body, the compiler positions the pointer on
the first print line of the next page body. The compiler automatically resets this
register to 1 each time your program begins a new logical page.
If you choose not to use the LINAGE-COUNTER register, you can advance to the
next logical page using the WRITE statement, as explained in Section 10.6.4.
10.6.4 Advancing to the Next Logical Page in a Linage-File Report
Linage-files automatically advance to the next logical page when the LINAGECOUNTER value equals the number of lines on the logical page. However,
Compaq COBOL also lets your program control logical page advancement with
the WRITE statement.
To manually advance to the next logical page from any line in the current
page body and position the printer on the first print line of the next page body,
your program must include the WRITE statement with either the BEFORE
10–14 Producing Printed Reports
Producing Printed Reports
10.6 Programming a Linage-File Compaq COBOL Report
ADVANCING PAGE clause or the AFTER ADVANCING PAGE clause. For an
example of the WRITE statement, see Section 10.6.7.
Section 10.6.5 describes how to handle a page-overflow condition.
10.6.5 Programming for the End-of-Page and Page-Overflow Condition
A page-overflow condition occurs when your program writes more lines than the
logical page can accommodate. Although the compiler automatically advances
to the next logical page when you use the LINAGE-COUNTER register, header
information is not printed, and the next line begins on the next logical page.
If you want your program to advance to the next page and print page headers on
the new page when the page is full, you should include routines in your program
that limit the number of lines on each logical page.
Example 10–4 demonstrates how to include these routines in your program using
the logical page shown in Figure 10–7.
In Figure 10–7, each detail line of the report represents a separate purchase
at the XYZ Clothing Store. Each page can contain from 1 to 18 purchase lines.
Each customer can have an unlimited number of purchases. A total of purchases
for each customer is to appear on line 25 of that customer’s last statement page.
Headers appear on the top of each page.
The input file, INPUT.DAT, consists of individual purchase records sorted
in ascending order by customer account number and purchase date. In
Example 10–4, the LINAGE clause defines a footing area so the program can
check for an end-of-page condition. When the condition is detected, the program
executes its header routine to print lines 1 to 7.
Producing Printed Reports 10–15
Producing Printed Reports
10.6 Programming a Linage-File Compaq COBOL Report
Figure 10–7 A 28-Line Logical Page
Column
1
2
3
4
5
6
12345678901234567890123456789012345678901234567890123456789012
Line
1
2
3
4
5
6
7
8
9
10
11
12
13
14
15
16
17
18
19
20
21
22
23
24
25
26
27
28
P
P
P
P
P
P
P
P
P
P
P
P
P
P
P
P
P
P
P
P
P
P
P
P
FP
FP
B
B
XYZ Clothing Store
STATEMENT OF ACCOUNT
Page: 999999999
Date: 99-XXX-99
Name: XXXXXXXXXXX X XXXXXXXXXXXXXX
Account Number: 999999999
Address: XXXXXXXXXXXXXXXXXXXXXXXXXXXXXXXXXXXXXXXXXXX
Date:
Amount
Description
-----------------------------------------------------------XXXXXXXXXXXXXXXXXXXXXXXXXXXXXXXXXXXXXXXXXXXXXXXXXXXXXXXXXXXXXX
X
X
X
X
X
X
X
X
X
X
X
X
X
X
X
X
One purchase per line
X
X
X
X
X
X
X
X
X
X
X
X
X
X
X
X
XXXXXXXXXXXXXXXXXXXXXXXXXXXXXXXXXXXXXXXXXXXXXXXXXXXXXXXXXXXXXX
Legend: T = Top margin
= none
P = Page body
= lines 01-26
F = Footing area = lines 25-26
B = Bottom margin = lines 27-28
VM-0324A-AI
Example 10–4 Checking for End-of-Page on a 28-Line Logical Page
IDENTIFICATION DIVISION.
PROGRAM-ID. REPOVF.
ENVIRONMENT DIVISION.
INPUT-OUTPUT SECTION.
FILE-CONTROL.
SELECT INPUT-FILE ASSIGN TO "INPUT.DAT".
SELECT REPORT-FILE ASSIGN TO "REPORT.DAT".
(continued on next page)
10–16 Producing Printed Reports
Producing Printed Reports
10.6 Programming a Linage-File Compaq COBOL Report
Example 10–4 (Cont.) Checking for End-of-Page on a 28-Line Logical Page
DATA DIVISION.
FILE SECTION.
FD INPUT-FILE.
01 INPUT-RECORD.
02 I-NAME.
03 I-FIRST
03 I-MID
03 I-LAST
02 I-ADDRESS.
03 I-STREET
03 I-CITY
03 I-STATE
03 I-ZIP
02 I-ACCOUNT-NUMBER
02 I-PURCHASE-DATE
02 I-PURCHASE-AMOUNT
02 I-PURCHASE-DESCRIP
FD REPORT-FILE
LINAGE IS 26 LINES
WITH FOOTING AT
LINES AT BOTTOM
01 PRINT-LINE
WORKING-STORAGE SECTION.
01 HEAD-1.
02 H1-LC
PIC 99.
02 FILLER PIC X(20)
02 FILLER PIC X(25)
02 FILLER PIC X(6)
02 H1-PAGE PIC Z(9).
01 HEAD-2.
02 H2-LC
PIC 99.
02 FILLER PIC X(20)
02 FILLER PIC X(25)
02 FILLER PIC X(6)
02 H2-DATE PIC X(9).
01 HEAD-3.
02 H3-LC
02 FILLER
02 H3-FNAME
02 FILLER
02 H3-MNAME
02 FILLER
02 H3-LNAME
02 FILLER
02 H3-NUM
01 HEAD-4.
02 H4-LC
02 FILLER
02 H4-STRT
02 FILLER
02 H4-CITY
02 FILLER
02 H4-STATE
02 FILLER
02 H4-ZIP
PIC X(10).
PIC X.
PIC X(15).
PIC
PIC
PIC
PIC
PIC
PIC
PIC
PIC
X(20).
X(15).
XX.
99999.
X(9).
XXXXXX.
S9(6)V99.
X(20).
25
2.
PIC X(80).
VALUE "XYZ Clothing Store ".
VALUE SPACES.
VALUE "Page: ".
VALUE "STATEMENT OF ACCOUNT".
VALUE SPACES.
VALUE "Date: ".
PIC
PIC
PIC
PIC
PIC
PIC
PIC
PIC
PIC
99.
X(6) VALUE
X(10).
X
VALUE
X.
X
VALUE
X(15).
X(17) VALUE
Z(9).
PIC
PIC
PIC
PIC
PIC
PIC
PIC
PIC
PIC
99.
X(9) VALUE
X(20).
X
VALUE
X(15).
X
VALUE
XX.
X
VALUE
99999.
"Name: ".
SPACE.
SPACE.
" Account Number: ".
"Address: ".
SPACE.
SPACE.
SPACE.
(continued on next page)
Producing Printed Reports 10–17
Producing Printed Reports
10.6 Programming a Linage-File Compaq COBOL Report
Example 10–4 (Cont.) Checking for End-of-Page on a 28-Line Logical Page
01 HEAD-5.
02 H5-LC
PIC 99.
02 FILLER PIC X(4) VALUE "Date".
02 FILLER PIC X(7) VALUE SPACES.
02 FILLER PIC X(6) VALUE "Amount".
02 FILLER PIC X(10) VALUE SPACES.
02 FILLER PIC X(11) VALUE "Description".
01 HEAD-6
PIC X(61) VALUE ALL "-".
01 DETAIL-LINE.
02 DET-LC PIC 99.
02 DL-DATE PIC X(9).
02 FILLER PIC X
VALUE SPACE.
02 DL-AMT PIC $ZZZ,ZZZ.99-.
02 FILLER PIC X
VALUE SPACE.
02 DL-DESC PIC X(20).
01 TOTAL-LINE.
02 TOT-LC PIC 99.
02 FILLER PIC X(25) VALUE "Total purchases to date: ".
02 TL
PIC $ZZZ,ZZZ,ZZZ.99-.
01 TOTAL-PURCHASES
PIC S9(9)V99.
01 PAGE-NUMBER
PIC S9(9).
01 HOLD-I-ACCOUNT-NUMBER PIC X(9) VALUE IS LOW-VALUES.
01 END-OF-FILE
PIC X
VALUE IS "N".
01 THESE-MANY
PIC 99
VALUE IS 1.
PROCEDURE DIVISION.
A000-BEGIN.
OPEN INPUT INPUT-FILE
OUTPUT REPORT-FILE.
DISPLAY " Enter date--DD-MMM-YY:".
ACCEPT H2-DATE.
PERFORM A100-READ-INPUT UNTIL END-OF-FILE = "Y".
A050-WRAP-UP.
CLOSE INPUT-FILE
REPORT-FILE.
DISPLAY "END-OF-JOB".
STOP RUN.
A100-READ-INPUT.
READ INPUT-FILE AT END MOVE "Y" TO END-OF-FILE
PERFORM A400-PRINT-TOTALS
MOVE HIGH-VALUES TO I-ACCOUNT-NUMBER.
DISPLAY INPUT-RECORD.
IF END-OF-FILE NOT = "Y"
AND I-ACCOUNT-NUMBER NOT = HOLD-I-ACCOUNT-NUMBER
PERFORM A200-NEW-CUSTOMER.
IF END-OF-FILE NOT = "Y"
AND I-ACCOUNT-NUMBER = HOLD-I-ACCOUNT-NUMBER
PERFORM A300-PRINT-DETAIL-LINE.
MOVE I-ACCOUNT-NUMBER TO HOLD-I-ACCOUNT-NUMBER.
A200-NEW-CUSTOMER.
IF HOLD-I-ACCOUNT-NUMBER = LOW-VALUES
PERFORM A600-SET-UP-HEADERS
PERFORM A500-PRINT-HEADERS
PERFORM A300-PRINT-DETAIL-LINE
ELSE
PERFORM A400-PRINT-TOTALS
PERFORM A600-SET-UP-HEADERS
PERFORM A500-PRINT-HEADERS
PERFORM A300-PRINT-DETAIL-LINE.
(continued on next page)
10–18 Producing Printed Reports
Producing Printed Reports
10.6 Programming a Linage-File Compaq COBOL Report
Example 10–4 (Cont.) Checking for End-of-Page on a 28-Line Logical Page
A300-PRINT-DETAIL-LINE.
MOVE I-PURCHASE-DATE
TO DL-DATE.
MOVE I-PURCHASE-AMOUNT TO DL-AMT.
MOVE I-PURCHASE-DESCRIP TO DL-DESC.
* At EOP this last detail line goes in footing area of current page
WRITE PRINT-LINE FROM DETAIL-LINE
AT END-OF-PAGE PERFORM A500-PRINT-HEADERS.
ADD I-PURCHASE-AMOUNT TO TOTAL-PURCHASES.
A400-PRINT-TOTALS.
MOVE TOTAL-PURCHASES TO TL.
* Skip to footing area
COMPUTE THESE-MANY = 25 - LINAGE-COUNTER.
WRITE PRINT-LINE FROM TOTAL-LINE AFTER ADVANCING THESE-MANY LINES.
MOVE 0 TO TOTAL-PURCHASES.
A500-PRINT-HEADERS.
ADD 1 TO PAGE-NUMBER.
MOVE PAGE-NUMBER TO H1-PAGE.
WRITE PRINT-LINE FROM HEAD-1 AFTER ADVANCING PAGE.
WRITE PRINT-LINE FROM HEAD-2.
MOVE SPACES TO PRINT-LINE.
WRITE PRINT-LINE.
WRITE PRINT-LINE FROM HEAD-3.
WRITE PRINT-LINE FROM HEAD-4.
WRITE PRINT-LINE FROM HEAD-5.
WRITE PRINT-LINE FROM HEAD-6.
A600-SET-UP-HEADERS.
MOVE I-FIRST
TO H3-FNAME.
MOVE I-MID
TO H3-MNAME.
MOVE I-LAST
TO H3-LNAME.
MOVE I-ACCOUNT-NUMBER TO H3-NUM.
MOVE I-STREET
TO H4-STRT.
MOVE I-CITY
TO H4-CITY.
MOVE I-STATE
TO H4-STATE.
MOVE I-ZIP
TO H4-ZIP.
10.6.6 Printing a Linage-File Report
The default PRINT command inserts a page ejection when a form nears the end
of a page. Therefore, when the default PRINT command refers to a linage-file
report, it can change the report’s page spacing.
On Tru64 UNIX systems, to print a linage-file report, use this command:
% lpr report-file-specification ♦
On OpenVMS systems, to print a linage-file report, use the /NOFEED qualifier
with the DCL PRINT command as follows:
$ PRINT report-file-specification/NOFEED
On OpenVMS systems, the LINAGE clause causes a Compaq COBOL report file
to be in print-file format. (See Chapter 6 for more information.) ♦
When a WRITE statement positions the file to the top of the next logical page,
the device is positioned by line spacing rather than by page ejection or form feed.
For more information on printing your report, see Section 10.7.
Producing Printed Reports 10–19
Producing Printed Reports
10.6 Programming a Linage-File Compaq COBOL Report
10.6.7 A Linage-File Report Example
Example 10–5 shows a Compaq COBOL program that produces a linage-file
report.
The LINAGE clause in the following File Description entry defines the logical
page areas shown in Figure 10–8:
FD MINIF1-REPORT
LINAGE IS 13 LINES
LINES AT TOP
LINES AT BOTTOM
2
5.
Figure 10–8 shows a 20-line logical page that includes a top margin ( T ), a page
body ( P ), and a bottom margin ( B ).
Figure 10–8 A 20-Line Logical Page
Column
1
2
3
4
5
6
12345678901234567890123456789012345678901234567890123456789012
Line
1
2
3
4
5
6
7
8
9
10
11
12
13
14
15
16
17
18
19
20
T
T
P
P
P
P
P
P
P
P
P
P
P
P
P
B
B
B
B
B
Dear Mr. XXXXXXXXXXXXXXX
Date: 99-XXX-99
XXXXXXXXXXXXXXXXXXXXXXXXXXXXXXXXXXXXXXXXXXXXXXXXXXXXXXXXXXXX
X
X
X
X
X
X
Preprint message is here
X
X
X
X
XXXXXXXXXXXXXXXXXXXXXXXXXXXXXXXXXXXXXXXXXXXXXXXXXXXXXXXXXXXX
TO: XXXXXXXXXXX X XXXXXXXXXXXXXXX
XXXXXXXXXXX X XXXXXXX
XXXXXXXXXXXXXXXX XX 99999
Legend: T = Top margin
= lines 1 and 2
P = Page body
= lines 3 through 15
F = Footing area = none
B = Bottom margin = lines 16 through 20
VM-0325A-AI
The first line to which the logical page can be positioned is the third line on
the page; this is the first print line. The page-overflow condition occurs when a
WRITE statement causes the LINAGE-COUNTER value to equal 15. Line 15 is
the last line on the page on which text can be written. The page advances to the
next logical page when a WRITE statement causes the LINAGE-COUNTER value
10–20 Producing Printed Reports
Producing Printed Reports
10.6 Programming a Linage-File Compaq COBOL Report
to exceed 15. The pointer is then positioned on the first print line of the next
logical page.
LINAGE is the sum of N (where N represents the number of lines of text) plus X
(where X represents the number of lines at the top) plus Y (where Y represents
the number of lines at the bottom). The sum total should not exceed the length of
the physical page, which is usually 66 lines.
Producing Printed Reports 10–21
Producing Printed Reports
10.6 Programming a Linage-File Compaq COBOL Report
Example 10–5 Programming a 20-Line Logical Page Defined by the LINAGE
Clause with Automatic Page Overflow
IDENTIFICATION DIVISION.
PROGRAM-ID. REPLINAG.
ENVIRONMENT DIVISION.
INPUT-OUTPUT SECTION.
FILE-CONTROL.
SELECT INPUT-FILE ASSIGN TO "REPIN.DAT".
SELECT MINIF1-REPORT ASSIGN TO "MINIF1.DAT".
DATA DIVISION.
FILE SECTION.
FD INPUT-FILE.
01 INPUT-RECORD.
02 I-NAME.
03 I-FIRST
PIC X(10).
03 I-MID
PIC X.
03 I-LAST
PIC X(15).
02 I-ADDRESS.
03 I-STREET
PIC X(20).
03 I-CITY
PIC X(15).
03 I-STATE
PIC XX.
03 I-ZIP
PIC 99999.
FD MINIF1-REPORT
LINAGE IS 13 LINES
LINES AT TOP
2
LINES AT BOTTOM 5.
01 MINIF1-PRINT-LINE
PIC X(80).
WORKING-STORAGE SECTION.
01 END-OF-FILE
PIC X
VALUE
01 LINE-UP-OK
PIC X
VALUE
01 MINIF1-LINE-3.
02 FILLER
PIC X(9) VALUE
02 MINIF1-LAST
PIC X(15).
02 FILLER
PIC X(23) VALUE
02 FILLER
PIC X(6) VALUE
02 MINIF1-DATE
PIC 99/99/99.
01 MINIF1-LINE-13.
02 FILLER
PIC X(4) VALUE
02 MINIF1-NAME
PIC X(26).
01 MINIF1-LINE-14.
02 FILLER
PIC X(4) VALUE
02 MINIF1-STREET
PIC X(20).
01 MINIF1-LINE-15.
02 FILLER
PIC X(4) VALUE
02 MINIF1-CITY
PIC X(15).
02 FILLER
PIC X
VALUE
02 MINIF1-STATE
PIC XX.
02 FILLER
PIC X
VALUE
02 MINIF1-ZIP
PIC 99999.
PROCEDURE DIVISION.
A000-BEGIN.
OPEN OUTPUT MINIF1-REPORT.
ACCEPT MINIF1-DATE FROM DATE.
PERFORM A300-FORM-LINE-UP UNTIL LINE-UP-OK = "Y".
OPEN INPUT INPUT-FILE.
PERFORM A100-READ-INPUT UNTIL END-OF-FILE = "Y".
A010-WRAP-UP.
CLOSE INPUT-FILE
MINIF1-REPORT.
DISPLAY "END OF JOB".
STOP RUN.
SPACE.
SPACE.
SPACES.
SPACES.
"Date: ".
SPACES.
SPACES.
SPACES.
SPACE.
SPACE.
(continued on next page)
10–22 Producing Printed Reports
Producing Printed Reports
10.6 Programming a Linage-File Compaq COBOL Report
Example 10–5 (Cont.) Programming a 20-Line Logical Page Defined by the
LINAGE Clause with Automatic Page Overflow
A100-READ-INPUT.
READ INPUT-FILE AT END MOVE "Y" TO END-OF-FILE.
IF END-OF-FILE NOT = "Y"
PERFORM A200-PRINT-REPORT.
A200-PRINT-REPORT.
MOVE I-LAST
TO MINIF1-LAST.
WRITE MINIF1-PRINT-LINE FROM MINIF1-LINE-3 BEFORE ADVANCING 1 LINE.
MOVE SPACES TO MINIF1-PRINT-LINE.
WRITE MINIF1-PRINT-LINE AFTER ADVANCING 9 LINES.
MOVE I-NAME
TO MINIF1-NAME.
WRITE MINIF1-PRINT-LINE FROM MINIF1-LINE-13 BEFORE ADVANCING 1 LINE.
MOVE I-STREET
TO MINIF1-STREET.
WRITE MINIF1-PRINT-LINE FROM MINIF1-LINE-14 BEFORE ADVANCING 1 LINE.
MOVE I-CITY
TO MINIF1-CITY.
MOVE I-STATE
TO MINIF1-STATE.
MOVE I-ZIP
TO MINIF1-ZIP.
WRITE MINIF1-PRINT-LINE FROM MINIF1-LINE-15 BEFORE ADVANCING 1 LINE.
A300-FORM-LINE-UP.
MOVE ALL "X" TO INPUT-RECORD.
PERFORM A200-PRINT-REPORT 3 TIMES.
DISPLAY "Is Alignment OK? (Y/N): " WITH NO ADVANCING.
ACCEPT LINE-UP-OK.
10.7 Modes for Printing Reports
Your Compaq COBOL program can spool the report to a mass storage device for
printing later. Section 10.7.1 describes this mode of printing.
10.7.1 Spooling to a Mass Storage Device
To spool your report to a mass storage device (such as a disk or magnetic tape)
for later printing, your Compaq COBOL program must include a file specification.
For example, to spool JAN28P.DAT you would include the following code in your
program:
SELECT REPORT-FILE ASSIGN TO "USER1$:JAN28P".
SELECT REPORT-FILE ASSIGN TO "/usr1$/JAN28P".
(OpenVMS)
(Tru64 UNIX)
Spooling to a mass storage device has the following advantages:
•
You can run your job at any time regardless of other printer activity and
printer status.
•
Your application program does not make immediate resource demands on the
printer.
•
You can schedule the printing based on production and shop requirements,
and print the file according to your priority needs.
•
You optimize use of the printer. Spooling results in printing the maximum
number of lines per minute.
•
You have a backup of the file.
Spooling to a mass storage device has the following disadvantages:
•
You do not see immediate results.
Producing Printed Reports 10–23
Producing Printed Reports
10.7 Modes for Printing Reports
•
It is difficult and expensive to input preprinted form numbers (for example,
check numbers) from your forms into your report file.
10.8 Programming a Report Writer Report
Report Writer allows you to describe the appearance of a report’s format. To do
this, you specify the Report Writer statements that describe the report’s contents
and control in the Report Section of the Data Division. These statements replace
many complex, detailed procedures that you would otherwise have to include in a
conventional or linage-file report.
The following sections explain how to produce a report with the Report Writer.
These sections describe how to do the following:
•
Use the REPORT clause in the FD statement of the FILE section.
•
Define the Report Section and the report description.
•
Define the Report Writer logical page.
•
Specify multiple reports.
•
Define and increment totals.
•
Process a Report Writer report.
•
Select a Report Writer type.
Detailed examples using Report Writer are documented in Section 10.9.
10.8.1 Using the REPORT Clause in the File Section
To create a report with Report Writer, you must write a report to a specific
file. That file is described by a File Description (FD) entry; however, unlike a
conventional or linage-file report, your FD entry for a Report Writer file must
contain the REPORT clause, and you must assign a name for each report in the
REPORT clause.
For instance, in the following example, the File Description on the left does not
specify Report Writer; however, the example on the right correctly shows a Report
Writer File Section entry:
FD SALES-REPORT
.
.
.
01 SALES-AREA
01 PRINT-AREA
FD SALES-REPORT
.
.
.
PIC X(133).
PIC X(133).
REPORT IS MASTER-LIST.
To completely describe the report that you specify in the REPORT clause, you
must define a Report Section in the Data Division. Section 10.8.2 describes the
Report Section.
10.8.2 Defining the Report Section and the Report File
The Report Section in the Data Division provides specific information about the
reports that are specified with the REPORT clause. Each report named in the
Data Division File Section also must be defined in the Report Section.
To define a report, use a Report Description (RD) entry followed by one or more
Report Group Description entries (01-level) in the Report Section. For example:
10–24 Producing Printed Reports
Producing Printed Reports
10.8 Programming a Report Writer Report
FILE SECTION.
FD SALES-REPORT
REPORT IS MASTER-LIST.
.
.
.
REPORT SECTION.
RD MASTER-LIST
PAGE LIMIT IS
HEADING
FIRST DETAIL
LAST DETAIL
FOOTING
66
1
13
30
50.
The RD supplies information about the format of the printed page and the
organization of the subdivisions (see Section 10.8.4).
10.8.3 Defining a Report Writer Logical Page with the PAGE Clause
To define the logical page for a Report Writer report, you use the PAGE clause.
This clause enables you to specify the number of lines on a page and the format
of that page. For example, the PAGE clause allows you to specify where the
heading, detail, and footing appear on the printed page. If you want to use
vertical formatting, you must use the PAGE clause.
The RD entry example in Section 10.8.2 contains the following PAGE clause
information:
RD Entry Line
Meaning
PAGE LIMIT IS
66
Maximum number of lines per page is 66
HEADING
1
Line number on which the first report heading (RH) or page
heading (PH) should print on each page
FIRST DETAIL
13
First line number on which a control heading (CH), detail
(DE), or control footing (CF) should print on a page
LAST DETAIL
30
Last line number on which a CH or DE can print on a page
FOOTING
50
Last line number on which a control footing (CF) can print on
a page (if specified, page footing (PF) and report footing (RF)
report groups follow the line number shown in FOOTING)
The PAGE LIMIT clause line numbers are in ascending order and must not
exceed the number specified in the PAGE LIMIT clause (in this example, 66
lines).
Section 10.8.4 describes report group entries in more detail.
10.8.4 Describing Report Group Description Entries
In a Report Writer program, report groups are the basic elements that make up
the logical page. There are seven types of report groups, which consist of one or
more report lines printed as a complete unit (for example, a page heading). Each
report line can be subdivided into data items or fields.
Table 10–1 lists the seven types of report groups:
Producing Printed Reports 10–25
Producing Printed Reports
10.8 Programming a Report Writer Report
Table 10–1 Report Writer Report Group Types
Report Group Type
Description
REPORT HEADING
Prints a title or any other information that pertains to the
entire report
PAGE HEADING
Prints a page heading and column headings
CONTROL HEADING
Prints a heading when a control break occurs
DETAIL
Prints the primary data of the report
CONTROL FOOTING
Prints totals when a control break occurs
PAGE FOOTING
Prints totals or comments at the bottom of each page
REPORT FOOTING
Prints trailer information for the report
A Report Writer program can include both printable report groups and null report
groups. Null report groups are groups that do not print but are used for control
breaks.
Figure 10–9 shows the report group presentation order found on a logical page.
You must code at least one DETAIL report group (printable or null) in your
program to produce a report. All other report groups are optional. Note that you
can code a report group by using the abbreviations shown in Figure 10–9.
Figure 10–9 Presentation Order for a Logical Page
REPORT HEADING
PAGE HEADING
CONTROL HEADING FINAL
CONTROL HEADING 1
CONTROL HEADING 2
.
.
.
DETAIL
.
.
.
CONTROL FOOTING 2
CONTROL FOOTING 1
CONTROL FOOTING FINAL
PAGE FOOTING
REPORT FOOTING
(RH)
(PH)
(CH)
(DE)
(CF)
(PF)
(RF)
ZK−6087−GE
Figure 10–10 shows a report that uses all seven of the report groups listed in the
preceding table.
10–26 Producing Printed Reports
Producing Printed Reports
10.8 Programming a Report Writer Report
Figure 10–10 Sample Report Using All Seven Report Groups
SALES REPORT
Page Heading
Detail
Lines
Report Heading
MONTH WK. SALES
JAN. REPORT
JAN. 4 10.000
JAN. 11 15.000
JAN. TOTALS 25.000
CONTINUED
Control Heading
Control Footing
Page Footing
MONTH WK. SALES
FEB. REPORT
FEB. 2 9.000
FEB. 4 11.000
FEB. TOTALS 20.000
CONTINUED
END OF REPORT
Report Footing
ZK−1551−GE
To code report groups, you use an 01-level entry to describe the physical and
logical characteristics of the report group and the Report Writer TYPE clause to
indicate the type of the report group. The TYPE clause can be preceded by a userdefined report group name. The CONTROL HEADING and FOOTING report
groups use data names that are also specified as CONTROL clause names in the
Report Description entry (see Section 10.8.10 for CONTROL clause information).
Producing Printed Reports 10–27
Producing Printed Reports
10.8 Programming a Report Writer Report
The following example shows how to use the TYPE and CONTROL clauses:
DATA DIVISION.
REPORT SECTION.
01
01
01
01
01
01
01
REPORT-HEADER TYPE IS REPORT HEADING.
PAGE-HEADER TYPE IS PAGE HEADING.
CONTROL-HEADER TYPE IS CONTROL HEADING CONTROL-NAME-1.
DETAIL-LINE TYPE IS DETAIL.
CONTROL-FOOTER TYPE IS CONTROL FOOTING CONTROL-NAME-2.
PAGE-FOOTER TYPE IS PAGE FOOTING.
REPORT-FOOTER TYPE IS REPORT FOOTING.
10.8.5 Vertical Spacing for the Logical Page
You use the LINE clause for positioning vertical lines within a report group or
for indicating vertical line space between two report groups. The LINE clause
indicates the start of an absolute print line (a specific line on a page) or where a
relative print line (an increment to the last line printed) is to print on the page.
You can use this clause with all report groups.
In the following example, the LINE clause indicates that this report group begins
on absolute line number 5 on a page. LINE IS 7 indicates that this report group
has a second line of data found on absolute line number 7. Absolute line numbers
must be specified in ascending order.
01
PAGE-HEADER TYPE IS PAGE HEADING.
02 LINE IS 5.
.
.
.
02 LINE IS 7.
In the following example the term PLUS in the LINE clause indicates that
DETAIL-LINE prints two lines after the last line of the previous report group.
If you used a CONTROL HEADING report group that ended on line 20 before
DETAIL-LINE, then DETAIL-LINE would print beginning on line 22.
01
DETAIL-LINE TYPE IS DETAIL.
02 LINE PLUS 2.
In the following example the LINE clause specifies that the REPORT FOOTING
report group prints on line 32 of the next page:
01 REPORT-FOOTER TYPE IS REPORT FOOTING.
02 LINE IS 32 ON NEXT PAGE.
You can code NEXT PAGE only for CONTROL HEADING, DETAIL, CONTROL
FOOTING, and REPORT FOOTING groups, and only in the first LINE clause in
that report group entry.
Within the report group, absolute line numbers must be in ascending order
(although not consecutive) and must precede all relative line numbers.
You can use the NEXT GROUP clause instead of the LINE clause to control line
spacing. In NEXT GROUP clause, you specify the amount of vertical line space
you want following one report group and before the next. You use this clause in
the report group that will have the space following it, as shown in the following
example:
01
CONTROL-HEADER TYPE IS CONTROL HEADING CONTROL-NAME-1
NEXT GROUP PLUS 4.
01
DETAIL-LINE TYPE IS DETAIL.
10–28 Producing Printed Reports
Producing Printed Reports
10.8 Programming a Report Writer Report
This example indicates relative line use. The report group (DETAIL) immediately
following this CONTROL HEADING report group will print on the fourth line
after the CH’s last print line.
You can also specify absolute line spacing with the NEXT GROUP clause. An
absolute line example—NEXT GROUP IS 10—places the next report group on
line 10 of the page. In addition you can use NEXT GROUP NEXT PAGE, which
causes a page-eject to occur before the NEXT GROUP report group prints.
NEXT GROUP can be coded only for REPORT HEADING, CONTROL HEADING,
DETAIL, CONTROL FOOTING, and PAGE FOOTING report groups, and only at
the 01 level.
A PAGE FOOTING report group must not specify the NEXT PAGE phrase of the
NEXT GROUP clause.
Both the LINE and NEXT GROUP clauses must adhere to the page parameters
specified in the PAGE clause in the RD entry.
In addition, the Report Writer facility keeps track of the number of lines printed
or skipped on each page by using the LINE-COUNTER, which references
a special register that the compiler generates for each Report Description
entry in the Report Section. The Report Writer facility maintains the value of
LINE-COUNTER and uses this value to determine the vertical positioning of a
report.
10.8.6 Horizontal Spacing for the Logical Page
The COLUMN NUMBER clause defines the horizontal location of items within a
report line.
You use the COLUMN NUMBER clause only at the elementary level. This clause
must appear in or be subordinate to an entry that contains a LINE NUMBER
clause. Within the description of a report line, the COLUMN NUMBER clauses
must show values in ascending column order. Column numbers must be positive
integer literals with values from 1 to the maximum number of print positions on
the printer. For example:
01
DETAIL-LINE
TYPE DETAIL
LINE PLUS 1.
02 COLUMN 1
02 COLUMN 17
02 COLUMN 28
02 COLUMN 40
02 COLUMN 97
PIC
PIC
PIC
PIC
PIC
X(15)
X(10)
XX
X(20)
$$$,$$$,$$$.99
SOURCE
SOURCE
SOURCE
SOURCE
SOURCE
LAST-NAME.
FIRST-NAME.
MIDDLE-INIT.
ADDRESS.
INVOICE-SALES.
Omitting the COLUMN clause creates a null (nonprinting) report item. Null
report items are used to accumulate totals and force control breaks as described
in Section 10.8.4.
The following example shows the use of a COLUMN NUMBER clause in a LINE
clause:
02 LINE 15 COLUMN 1 PIC X(12) VALUE "SALES TOTALS".
The previous example results in the following output:
1
2
3
4
column 1234567890123456789012345678901234567890
SALES TOTALS
Producing Printed Reports 10–29
Producing Printed Reports
10.8 Programming a Report Writer Report
In the next example, the COLUMN NUMBER clauses are subordinate to a LINE
NUMBER clause:
02 LINE
03
03
03
03
03
5 ON NEXT PAGE.
COLUMN 1 PIC X(12)
COLUMN 14 PIC 9999
COLUMN 18 PIC X
COLUMN 20 PIC X(15)
COLUMN 36 PIC $$$$,$$$.99
VALUE "(Cust-Number".
SOURCE CUST-NUM.
VALUE ")".
VALUE "TOTAL PURCHASES".
SUM TOT-PURCHS.
The previous example produces the following output:
1
2
3
4
column 1234567890123456789012345678901234567890123456
(Cust-Number 1234) TOTAL PURCHASES $1,432.99
10.8.7 Assigning a Value in a Print Line
In a Report Writer program, one way you specify a value for an item is to use the
VALUE clause. This clause designates that the data item has a constant literal
value. You often use this clause with REPORT HEADING and PAGE HEADING
report groups, because the data in these groups is usually constant, as shown in
the following example:
01
TYPE IS PAGE HEADING.
02
LINE 5.
03 COLUMN 1
PIC X(27) VALUE "CUSTOMER MASTER FILE REPORT".
03 COLUMN 40
PIC X(5) VALUE "SALES".
The previous example results in the following output:
1
2
3
4
5
column 12345678901234567890123456789012345678901234567890
CUSTOMER MASTER FILE REPORT
SALES
10.8.8 Defining the Source for a Print Field
To assign a variable value to an item in a Report Writer program, you use the
SOURCE clause.
The SOURCE clause, written in the Report Section, is analogous to the MOVE
statement.
The clause names a data item that is moved to a specified position on the print
line. Before an item that contains a SOURCE clause is printed, the Report Writer
moves the value in the field named in the SOURCE clause into the print line at
the print position specified by the COLUMN clause, as shown in the following
example. Any data editing specified by the PICTURE clause is performed before
the data is moved to the print line.
01
DETAIL-LINE
TYPE DETAIL
LINE PLUS 1.
02 COLUMN 1
02 COLUMN 17
02 COLUMN 28
02 COLUMN 35
02 COLUMN 55
02 COLUMN 75
02 COLUMN 78
10–30 Producing Printed Reports
PIC
PIC
PIC
PIC
PIC
PIC
PIC
X(15)
X(10)
XX
X(20)
X(20)
XX
99999
SOURCE
SOURCE
SOURCE
SOURCE
SOURCE
SOURCE
SOURCE
LAST-NAME.
FIRST-NAME.
MIDDLE-INIT.
ADDRESS.
CITY.
STATE.
ZIP.
Producing Printed Reports
10.8 Programming a Report Writer Report
You can also code a SOURCE clause with PAGE-COUNTER or LINE-COUNTER
as its operand, as the following example shows. PAGE-COUNTER references
a special register created by the compiler for each Report Description entry in
the Report Section. This counter automatically increments by 1 each time the
Report Writer executes a page advance. The use of PAGE-COUNTER eliminates
Procedure Division statements you normally would write to explicitly count pages,
as shown in the following example:
01
TYPE IS PAGE HEADING.
02
LINE 5.
03
COLUMN 1
PIC X(27) VALUE "CUSTOMER MASTER FILE REPORT".
03
COLUMN 52
PIC X(4) VALUE "PAGE".
03
COLUMN 57
PIC ZZZ9
SOURCE PAGE-COUNTER.
This example produces the following output:
1
2
3
4
5
6
column 123456789012345678901234567890123456789012345678901234567890
CUSTOMER MASTER FILE REPORT
PAGE
9
10.8.9 Specifying Multiple Reports
To include two or more reports in one file, you specify multiple identifiers in the
REPORTS clause and provide multiple RDs in the Report Section.
To identify the lines of two or more reports in one file, you use the CODE clause,
as shown in the following example:
FILE SECTION.
FD REPORT-FILE
REPORTS ARE REPORT1
REPORT2
REPORT3.
REPORT SECTION.
RD REPORT1...
CODE"AA".
RD
REPORT2...
CODE"BB".
RD
REPORT3...
CODE"CC".
The CODE clause specifies a 2-character nonnumeric literal that identifies each
print line as belonging to a specific report. When the CODE clause is specified,
the literal is automatically placed in the first two character positions of each
Report Writer logical record. Note that if the clause is specified for any report in
a file, it must be used for all reports in that file.
10.8.10 Generating and Controlling Report Headings and Footings
When you write a report that has control headings and/or footings, you must use
the CONTROL clause to create control levels that determine subsequent headings
and totals.
The CONTROL clause, found in the RD entry, names data items that indicate
when control breaks occur. The CONTROL clause specifies the data items in
major to minor order. You must define these CONTROL data items, or control
names, in the Data Division, and reference them in the appropriate CONTROL
HEADING and FOOTING report groups.
Producing Printed Reports 10–31
Producing Printed Reports
10.8 Programming a Report Writer Report
When the value of a control name changes, a control break occurs. The Report
Writer acknowledges this break only when you execute a GENERATE or
TERMINATE statement for the report, which causes the information related
to that CONTROL report group to be printed.
In the following example, the report defines two control totals (MONTH-CONTRL
and WEEK-CONTRL) in the CONTROL clause. The source of these control totals
is in an input file named IN-FILE. The file must be already sorted in ascending
sequence by MONTH-CONTRL and WEEK-CONTRL. The Report Writer facility
automatically monitors these fields in the input file for any changes. If a new
record contains different data than the previous record read, Report Writer
triggers a control break.
FD
01
IN-FILE.
INPUT-RECORD.
02 MONTH-CONTRL
PIC...
02 ...
02 ...
02 WEEK-CONTRL
PIC...
FD
REPORT-FILE REPORT IS SALES-REPORT.
.
.
.
REPORT SECTION.
RD
SALES-REPORT.
CONTROLS ARE MONTH-CONTRL, WEEK-CONTRL.
01
DETAIL-LINE TYPE IS DETAIL.
01
TYPE IS CONTROL FOOTING MONTH-CONTRL.
01
TYPE IS CONTROL FOOTING WEEK-CONTRL.
In the previous example, if the value in WEEK-CONTRL changes, a break occurs
and Report Writer processes the CONTROL FOOTING WEEK-CONTRL report
group. If the value in MONTH-CONTRL changes, a break occurs and Report
Writer processes both CONTROL FOOTING report groups, because a break in
any control field implies a break in all lower-order control fields as well.
The same process occurs if you include similar CONTROL HEADING report
groups. However, CONTROL HEADING control breaks occur from a break to
minor levels, while CONTROL FOOTING control breaks occur from a break to
major levels.
The following example demonstrates the use of FINAL, a special control field that
names the most major control field. You specify FINAL once, in the CONTROL
clause, as the most major control level. When you code FINAL, a FINAL control
break and subsequent FINAL headings and footings occur during program
execution: once at the beginning of the report (as part of the report group,
CONTROL HEADING FINAL), before the first detail line is printed; and once at
the end of the report (as part of the report group, CONTROL FOOTING FINAL),
after the last detail line is printed.
01
TYPE CONTROL FOOTING FINAL.
02 LINE 58.
04 COLUMN 1 PIC X(32) VALUE
"TOTAL SALES FOR YEAR-TO-DATE WAS".
04 COLUMN 45 PIC 9(6).99 SOURCE TOTAL-SALES.
10–32 Producing Printed Reports
Producing Printed Reports
10.8 Programming a Report Writer Report
This example produces the following output:
1
2
3
4
5
column 1234567890123456789012345678901234567890123456789012345
TOTAL SALES FOR YEAR-TO-DATE WAS
953208.90
10.8.11 Defining and Incrementing Totals
In addition to using either the VALUE or SOURCE clause to assign a value to a
report item, you can use the SUM clause to accumulate values of report items.
This clause establishes a sum counter that is automatically summed during the
processing of the report. You code a SUM clause only in a TYPE CONTROL
FOOTING report group.
The identifiers of the SUM clause are either elementary numeric data items not
in the Report Section or other sum counters in the Report Section that are at
the same or lower level in the control hierarchy of the report, as specified in the
CONTROL clause.
The SUM clause provides three forms of sum accumulation: subtotaling,
crossfooting, and rolling-forward. These forms are detailed in this section.
See Section 10.3 for further discussion.
10.8.11.1 Subtotaling
In subtotaling, the SUM clause references elementary numeric data items that
appear in the File or Working-Storage Sections and then generates sums of those
items.
In the following example, EACH-WEEK represents a CONTROL clause name.
COST represents a numeric data item in the File Section that indicates weekly
expenses for a company. DAY and MONTH indicate the particular day and
month.
01
TYPE CONTROL FOOTING EACH-WEEK.
02 LINE PLUS 2.
03 COLUMN 1 PIC IS X(30)
VALUE IS "TOTAL EXPENSES FOR WEEK/ENDING".
03 COLUMN 33 PIC IS X(4) SOURCE IS MONTH.
03 COLUMN 39 PIC IS X(2) SOURCE IS DAY.
03 WEEK-AMT COLUMN 45
PIC ZZ9.99 SUM COST.
This example produces the following subtotal output:
1
2
3
4
5
column 12345678901234567890123456789012345678901234567890
TOTAL EXPENSES FOR WEEK/ENDING JULY 02
799.23
When the value of EACH-WEEK changes, a control break occurs that causes this
TYPE CONTROL FOOTING report group to print. The value of the sum counter
is edited according to the PIC clause accompanying the SUM clause. Then the
sum lines are printed in the location specified by the items’ LINE and COLUMN
clauses.
Producing Printed Reports 10–33
Producing Printed Reports
10.8 Programming a Report Writer Report
10.8.11.2 Crossfooting
In crossfooting, the SUM clause adds all the sum counters in the same CONTROL
FOOTING report group and automatically creates another sum counter.
In the following example, the CONTROL FOOTING group shows both subtotaling
(SALES-1) and crossfooting (SALES-2):
01 TYPE DETAIL LINE PLUS 1.
05 COLUMN 15 PIC 999.99 SOURCE BRANCH1-SALES.
05 COLUMN 25 PIC 999.99 SOURCE BRANCH2-SALES.
01 TYPE CONTROL FOOTING BRANCH-TOTAL LINE PLUS 2.
05 SALES-1 COLUMN 15 PIC 999.99 SUM BRANCH1-SALES.
05 SALES-2 COLUMN 25 PIC 999.99 SUM BRANCH2-SALES.
05 SALES-TOT COLUMN 50 PIC 999.99 SUM SALES-1, SALES-2.
The SALES-1 sum contains the total of the BRANCH1-SALES column and the
SALES-2 sum contains the total of the BRANCH2-SALES column (both sums
are subtotals). SALES-TOT contains the sum of SALES-1 and SALES-2; it is a
crossfooting.
The crossfooting ouput is as follows:
1
2
3
4
5
6
column 123456789012345678901234567890123456789012345678901234567890
125.00
300.00
425.00
10.8.11.3 Rolling Forward
When rolling totals forward, the SUM clause adds a sum counter from a lowerlevel CONTROL FOOTING report group to a sum counter in a higher-level
footing group. The control logic and necessary control hierarchy for rolling
counters forward begins in the CONTROL clause.
In the following example, WEEK-AMT is a sum counter found in the lower-level
CONTROL FOOTING group, EACH-WEEK. This sum counter is named in the
SUM clause in the higher-level CONTROL FOOTING report group, EACHMONTH. The value of each WEEK-AMT sum is added to the higher-level counter
just before the lower-level CONTROL FOOTING group is printed.
RD
01
01
EXPENSE-FILE.
.
.
.
CONTROLS ARE EACH-MONTH, EACH-WEEK.
TYPE CONTROL FOOTING EACH-WEEK.
02 LINE PLUS 2.
03 COLUMN 1
PIC IS X(30)
VALUE IS
"TOTAL EXPENSES FOR WEEK/ENDING".
03 COLUMN 33
PIC IS X(9)
SOURCE IS MONTH.
03 COLUMN 42
PIC IS X(2)
SOURCE IS DAY.
03 WEEK-AMT
COLUMN 45
PIC ZZ9.99
SUM COST.
TYPE CONTROL FOOTING EACH-MONTH.
02 LINE PLUS 2.
03 COLUMN 10 PIC X(18) VALUE IS "TOTAL EXPENSES FOR".
03 COLUMN 29 PIC X(9) SOURCE MONTH.
03 COLUMN 50 PIC ZZ9.99 SUM WEEK-AMT.
The following output is a result of rolling the totals forward:
1
2
3
4
5
column 1234567890123456789012345678901234567890123456789012345
TOTAL EXPENSES FOR DECEMBER
379.19
10–34 Producing Printed Reports
Producing Printed Reports
10.8 Programming a Report Writer Report
10.8.11.4 RESET Option
When a CONTROL FOOTING group is printed, the SUM counter in that group
is automatically reset to zero. If you want to specify when a SUM counter is
reset to zero, use the RESET phrase. RESET names a data item in a higherlevel CONTROL FOOTING that will cause the SUM counter to be reset to zero.
RESET is used only with a SUM clause.
The following example sums SALES, resetting the counter to zero only when it
encounters a new year (YEAR). This prevents the sum from being reset to zero
when a new month causes a control break, giving a running total of the months
within the year.
RD
01
SALES-REPORT.
.
.
.
CONTROLS ARE YEAR, EACH-MONTH, EACH-WEEK.
.
.
.
TYPE CONTROL FOOTING EACH-MONTH
02 COLUMN 10 PIC ZZ9.99 SUM SALES RESET ON YEAR.
10.8.11.5 UPON Option
Another SUM option is the UPON phrase. This phrase allows selective
subtotaling for the DETAIL Report Group named in the phrase. When you
use the UPON phrase, you cannot reference the sum counter in the SUM clause.
You can use any File or Working-Storage Section elementary numeric data item.
When you code the UPON option with the SUM clause, the value of the data
items of the SUM clause will be added whenever the TYPE DETAIL report group
you name in the UPON option is generated.
WORKING-STORAGE SECTION.
.
.
.
01 WORK-AREA.
.
.
.
03 ADD-COUNTER
PIC 9
VALUE 1.
REPORT SECTION.
.
.
.
01 FIRST-DETAIL-LINE TYPE IS DETAIL LINE IS PLUS 2.
.
.
.
01 TYPE IS CONTROL FOOTING FINAL.
05 LINE IS PLUS 3.
.
.
.
05 LINE PLUS 2.
10 COLUMN 5
PIC Z(3)9 SUM ADD-COUNTER
UPON FIRST-DETAIL-LINE.
Producing Printed Reports 10–35
Producing Printed Reports
10.8 Programming a Report Writer Report
In the preceding example, the value of ADD-COUNTER is added to the
CONTROL FOOTING FINAL counter every time the FIRST-DETAIL-LINE
report group is generated.
10.8.12 Restricting Print Items
In a Report Writer program, the GROUP INDICATE clause eliminates repeated
information from report detail lines by allowing an elementary item in a DETAIL
report group to be printed only the first time after a control or page break. The
following example illustrates the use of this clause:
01 DETAIL-LINE TYPE DETAIL LINE PLUS 1.
*
05 COLUMN 1 GROUP INDICATE PIC X(6) VALUE "SALES:".
(prints only the first time after a control or page break)
*
05 COLUMN 10 PIC X(10) SOURCE BRANCH.
(prints each time)
These statements produce the following lines:
SALES:
BRANCH-A
BRANCH-B
BRANCH-C
The next two examples are nearly identical programs; the only difference is the
use of the GROUP INDICATE clause in the second example.
The following program does not contain a GROUP INDICATE clause:
01
DETAIL-LINE TYPE IS DETAIL
LINE IS PLUS 1.
02 COLUMN 1 PIC X(15)
SOURCE A-NAME.
02 COLUMN 20 PIC 9(6)
SOURCE A-REG-NO.
It produces the following output:
1
2
3
123456789012345678901234567890
Name
Registration
Number
Rolans R.
Rolans R.
Rolans R.
Vencher R.
Vencher R.
Vencher R.
Vencher R.
Anders J.
Anders J.
Anders J.
123456
123457
123458
654321
654322
654323
654324
987654
987655
987656
The following example contains a GROUP INDICATE clause:
01
10–36 Producing Printed Reports
DETAIL-LINE TYPE IS DETAIL
LINE IS PLUS 1.
02 COLUMN 1 PIC X(15)
SOURCE A-NAME
GROUP INDICATE.
02 COLUMN 20 PIC 9(6)
SOURCE A-REG-NO.
Producing Printed Reports
10.8 Programming a Report Writer Report
With the GROUP INDICATE clause, the program produces the following output:
1
2
3
123456789012345678901234567890
Name
Registration
Number
Rolans R.
Vencher R.
Anders J.
123456
123457
123458
654321
654322
654323
654324
987654
987655
987656
10.8.13 Processing a Report Writer Report
In a Report Writer program, you usually use the following five statements:
•
INITIATE
•
GENERATE
•
TERMINATE
•
USE BEFORE REPORTING
•
SUPPRESS
You must use the INITIATE, GENERATE, and TERMINATE statements. The
USE BEFORE REPORTING and the SUPPRESS statements are optional.
Before any Report Writer statement is executed, the report file must be open.
10.8.13.1 Initiating the Report
The INITIATE statement begins the report processing and is executed before
any GENERATE or TERMINATE statements. The report name used in this
statement is specified in the RD entry in the Report Section and in the REPORT
clause of the FD entry for the file to which the report is written.
INITIATE sets PAGE-COUNTER to 1, LINE-COUNTER to zero, and all SUM
counters to zero.
This program code uses the code in Section 10.8.2.
PROCEDURE DIVISION.
.
.
.
MAIN SECTION.
000-START.
OPEN INPUT CUSTOMER-FILE.
OPEN OUTPUT PRINTER-FILE.
.
.
.
INITIATE MASTER-LIST.
A second INITIATE statement for the same report must not be executed until a
TERMINATE statement for the report has been executed (see Section 10.8.13.4).
Producing Printed Reports 10–37
Producing Printed Reports
10.8 Programming a Report Writer Report
10.8.13.2 Generating a Report Writer Report
The GENERATE statement prints the report.
You can produce either detail or summary reports depending on the GENERATE
identifier. If you code the name of a DETAIL report group with GENERATE, you
create a detail report; if you code a report name with GENERATE, you create a
summary report.
10.8.13.3 Automatic Operations of the GENERATE Statement
When the first GENERATE statement is executed, the following report groups
are printed, if they are specified in the program:
•
REPORT HEADING report group
•
PAGE HEADING report group
•
CONTROL HEADING report groups
•
For detail reporting, the specified TYPE DETAIL report group
A USE BEFORE REPORTING declarative can also execute just before the
associated report group is produced, to produce a cover page for the report, for
example.
Note
Figure 10–11 and Figure 10–12 illustrate the major flow of operations,
but do not cover all possible operations associated with a GENERATE
statement.
Figure 10–11 shows the sequence of operations for the first GENERATE
statement.
Figure 10–11 First GENERATE Statement
COBOL Program
.
.
.
Procedure Division
.
GENERATE
(next sequential
instruction)
write
RH, PH,
CH FINAL
write
CH major
CH minor
DETAIL
reporting
YES
write
DETAIL
line
NO
ZK−1552−GE
For subsequent GENERATE statements in the program, the following operations
take place:
•
Any USE BEFORE REPORTING declaratives execute just before the
associated report group is produced.
•
Any specified control breaks occur.
10–38 Producing Printed Reports
Producing Printed Reports
10.8 Programming a Report Writer Report
•
CONTROL FOOTING and CONTROL HEADING report groups print after
the specified control breaks occur.
•
In a detail report, the TYPE DETAIL report groups print.
•
SUM operands are incremented.
•
Sum counters are reset as specified.
Figure 10–12 shows the sequence of operations for all GENERATE statements
except the first. See Figure 10–11 for a comparison with the sequence of
operations for the first GENERATE statement.
Figure 10–12 Subsequent GENERATE Statements
control
break?
GENERATE
YES
add SUM
sum−name(s) up
to this control
level and save
write CONTROL
FOOTINGS from
minor to this
control break level
write CH
from this
control break
level to minor
set control
to new values
NO
Reset
SUM
add all
SUM operands
NO
DETAIL
Report?
YES
Write
DETAIL line
ZK−1553−GE
10.8.13.4 Ending Report Writer Processing
The TERMINATE statement completes the processing of a report.
Like INITIATE, the TERMINATE statement report name is specified in the RD
entry in the Report Section and in the REPORT clause of the FD entry for the file
to which the report is written.
When the TERMINATE statement is executed, breaks occur for all control fields,
and all control footings are written; any page footings and report footings are also
written.
PROCEDURE DIVISION.
.
.
.
300-END-OF-FILE.
TERMINATE MASTER-LIST.
CLOSE CUSTOMER-FILE, PRINTER-FILE.
STOP RUN.
Producing Printed Reports 10–39
Producing Printed Reports
10.8 Programming a Report Writer Report
If no GENERATE statement has been executed for the report, the TERMINATE
statement does not produce any report groups.
A second TERMINATE statement for the report must not be executed before a
second INITIATE statement for the report has been executed.
The TERMINATE statement does not close the report file; a CLOSE statement
must be executed after the TERMINATE statement.
Figure 10–13 shows the sequence of operations for TERMINATE.
Figure 10–13 TERMINATE Statement
TERMINATE
add and save
all SUM
sum−names
save
control
values
write control
footing from
minor to major
set controls
to new values
reset SUM
operands up
to major level
produce
RF group
produce
PF group
produce CF
FINAL group
ZK−1554−GE
10.8.13.5 Applying the USE BEFORE REPORTING Statement
In a COBOL program, you specify a Declarative section to define procedures
that supplement the standard procedures of the program. Note that in a Report
Writer program, you can specify the USE BEFORE REPORTING statement. This
USE BEFORE REPORTING statement gives you more control over the data to be
printed in a Report Writer program.
The USE BEFORE REPORTING statement:
•
Allows you to define declarative procedures
•
Causes those procedures to be executed just before a specified report group is
printed (this specified report group name is written with the USE statement)
•
Lets you modify the data to be printed (for example, where simple sum
operations must be augmented by more complex operations involving
multiplication, division, and subtraction)
•
Lets you suppress printing the report group
10–40 Producing Printed Reports
Producing Printed Reports
10.8 Programming a Report Writer Report
The following example indicates that the phrase BEGINNING-OF-REPORT
is to be displayed just before the REPORT HEADING group named REPORTHEADER; the phrase END-OF-REPORT is to be displayed just before the
REPORT FOOTING group called REPORT-FOOTER.
PROCEDURE DIVISION.
DECLARATIVES.
BOR SECTION.
USE BEFORE REPORTING REPORT-HEADER.
BOR-A.
DISPLAY "BEGINNING-OF-REPORT".
EOR SECTION.
USE BEFORE REPORTING REPORT-FOOTER.
EOR-A.
DISPLAY "END-OF-REPORT".
END DECLARATIVES.
Note that you cannot use INITIATE, GENERATE, or TERMINATE in a
Declarative procedure.
10.8.13.6 Suppressing a Report Group
You can also use the SUPPRESS statement in a USE BEFORE REPORTING
procedure to suppress the printing of a report group. For example, you can
suppress printing of an unnecessary total line, such as a line for a monthly sales
total that has only one sale or a line of zeros.
The SUPPRESS statement nullifies any NEXT GROUP and LINE clauses, but
leaves the LINE-COUNTER value unchanged.
Note that the SUPPRESS statement applies only to that particular instance of
the report group; that group will be printed the next time unless the SUPPRESS
statement is executed again.
The SUPPRESS statement has no effect on sum counters.
10.8.14 Selecting a Report Writer Report Type
You can print two types of reports using the Report Writer feature. In a detail
report, you print primary data information as well as totals. In a summary
report, you print only control heading and footing information (such as report
data headings and totals) and exclude detail input record information.
Section 10.9 provides examples of detail and summary reports.
10.8.14.1 Detail Reporting
In detail reporting, at least one printable TYPE DETAIL report group must be
specified. A GENERATE statement produces the specified TYPE DETAIL report
group and performs all the automatic operations of the Report Writer facility as
specified in the report group entries (see Section 10.8.13.3).
In the following example, DETAIL-LINE is the name of the DETAIL report group.
When this GENERATE statement executes, a detail report is printed.
200-READ-MASTER.
READ CUSTOMER-FILE AT END MOVE HIGH-VALUES TO NAME.
IF NAME NOT = HIGH-VALUES GENERATE DETAIL-LINE.
Producing Printed Reports 10–41
Producing Printed Reports
10.8 Programming a Report Writer Report
10.8.14.2 Summary Reporting
In summary reporting, the GENERATE statement performs all of the automatic
operations of the Report Writer facility, but does not produce any TYPE DETAIL
report groups.
A report name references the name of an RD entry. If MASTER-LIST is an RD
entry, then GENERATE MASTER-LIST produces HEADING and FOOTING
report groups (in the order defined), but omits DETAIL report group lines.
10.9 Report Writer Examples
This section provides you with the input data and sample reports produced by
five Report Writer programs. Each sample report has a program summary section
that describes the Report Writer features used in that program; you can examine
the summary and output to determine the usage of Report Writer features. Note
that each sample report is followed by the program that was used to generate it.
Also, many of the report pages in Reports 2 through 5 have been compressed
into fewer pages than you would normally find. For example, a report title page
is typically found on a separate page. Whether you are producing a report for
yourself or for a customer, you must begin by designing the report.
Note
On OpenVMS, the Report Writer facility produces a report file in print-file
format. When Report Writer positions the file at the top of the next
logical page, it positions the pointer by line spacing, rather than page
ejection or form feed.
The default OpenVMS PRINT command inserts a form-feed character
when a form is within four lines of the bottom. Therefore, when the
default PRINT command refers to a Report Writer file, unexpected page
spacing can result.
The /NOFEED file qualifier of the PRINT command suppresses the
insertion of form-feed characters and prints Report Writer files correctly.
Consequently, you should use the /NOFEED qualifier when you use the
Report Writer facility to print a report on OpenVMS. ♦
10.9.1 Input Data
The data records shown in Figure 10–14 are used for the programs in this
section.
10–42 Producing Printed Reports
Producing Printed Reports
10.9 Report Writer Examples
Figure 10–14 Sample MASTER.DAT File
Abbott
Adam
Albert
Alexander
Abbott
Allan
Amos
Amico
Abbott
Ames
Alwin
Alexander
Berger
Abbott
Ames
Carter
Alexander
Carroll
Abbott
Hemingway
Cooper
Alexander
Dickens
Thoreaux
Abbott
Williams
Alexander
Ames
Dickinson
Frost
Alexander
Abbott
John
Harold
Robert
Greg
John
David
James
Art
John
Alice
Tom
Greg
Tom
John
Alice
Winston
Greg
Alice
John
Joe
Frank
Greg
Arnold
Ralph
John
Samuel
Greg
Alice
Rose
Alfred
Greg
John
B12 Pleasant Street
B980 Main Street
S100 Meadow Lane
T317 Narrows Road
B12 Pleasant Street
L10 Wonder Lane
A71 State Rd
A31 Athens Road
B12 Pleasant Street
J40 Center Road
F400 High Street
T317 Narrows Road
H700 McDonald Lane
B12 Pleasant Street
J40 Center Road
R123 Timpany Street
T317 Narrows Road
L192 Lewis Road
B12 Pleasant Street
E10 Cuba Street
J300 Mohican Avenue
T317 Narrows Road
C100 Bleak Street
H800 Emerson Street
B12 Pleasant Street
A310 England Road
T317 Narrows Road
J40 Center Road
E21 Depot Road
R123 Amherst Street
T317 Narrows Road
B12 Pleasant Street
Nashua
Nashua
Gardner
Westminster
Nashua
Merrimack
East Westminster
Nashua
Nashua
Nashua
Princeton
Westminster
Merrimack
Nashua
Nashua
Brookline
Westminster
London
Nashua
Westminster
Mohawk
East Westminster
Gardner
Walden
Nashua
Worcester
Westminster
Nashua
Amherst
Merrimack
East Westminster
Nashua
NH0310212340000001100009007012000
NH0310223410000002210089002062000
MA0142012340000003610090002062000
MA0147334160000004100007102062000
NH0310212340000001100009007012000
NH0301467800000001241010002062000
MA0147312341000006410009002062000
NH0306089000000007123407002062000
NH0310212340000001100009007012000
NH0306078900000007100000002072000
NJ1234112341000008700001703072000
MA0147334160000004100007102062000
NH0306012341000010123416002062000
NH0310212340000001100009007012000
NH0306078900000007100000002072000
NH0307823416000011234167602072000
MA0147334160000004100007102062000
NH0341611117000012167890002072000
NH0310212340000001100009007012000
MA0147312341000013876900002072000
MA0148034167000014341678002072000
MA0147334160000004100007102062000
MA0144090000000011123416702072000
MA0141641678000016000060002072000
NH0310212340000001100009007012000
MA0140012341000017789000002072000
MA0147334160000004100007102062000
NH0306078900000007100000002072000
MA0142341678000019666889002072000
NH0306012341000020111149002072000
MA0147334160000004100007102062000
NH0310212340000001100009007012000
VM-0659A-AI
10.9.2 EX1006—Detail Report Program
EX1006 uses the PAGE HEADING, DETAIL, and CONTROL FOOTING report
groups and produces a detail report—EX1006.LIS.
To get EX1006.LIS, you use the following commands:
On OpenVMS
$ COBOL EX1006
$ LINK EX1006
$ RUN EX1006
$ PRINT/NOFEED EX1006.LIS
♦
Note that the case of the command parameters is insignificant in the preceding
command example.
On Tru64 UNIX
% cobol ex1006.cob
% a.out
% lpr EX1006.LIS
♦
Note that the case of the file name, EX1006.LIS, is significant in the preceding
command example, because the file specification in the ASSIGN statement in
Example 10–6 was given in upper case. The program (EX1006) in Example 10–6
produces the output shown in Figure 10–15 (EX1006.LIS).
Producing Printed Reports 10–43
Producing Printed Reports
10.9 Report Writer Examples
Example 10–6 Sample Program EX1006
IDENTIFICATION DIVISION.
PROGRAM-ID. EX1006.
ENVIRONMENT DIVISION.
CONFIGURATION SECTION.
INPUT-OUTPUT SECTION.
FILE-CONTROL.
SELECT CUSTOMER-FILE ASSIGN TO
SELECT SORT-FILE
ASSIGN TO
SELECT SORTED-FILE ASSIGN TO
SELECT PRINTER-FILE ASSIGN TO
DATA DIVISION.
FILE SECTION.
SD
SORT-FILE.
01
SORTED-CUSTOMER-MASTER-FILE.
02 SORT-NAME
02
FD
CUSTOMER-FILE.
01
CUSTOMER-MASTER-FILE
FD
SORTED-FILE.
01
FD
CUSTOMER-MASTER-FILE.
02 NAME.
03 LAST-NAME
03 FIRST-NAME
03 MIDDLE-INIT
02 ADDRESS
02 CITY
02 STATE
02 ZIP
02 SALESMAN-NUMBER
02 INVOICE-DATA.
03 INVOICE-NUMBER
03 INVOICE-SALES
03 INVOICE-DATE.
04 INV-DAY
04 INV-MO
04 INV-YR
"MASTER.DAT".
"EX1006-SORTIN.TMP".
"EX1006-SORTOUT.TMP".
"EX1006.LIS".
PIC X(26).
PIC X(73).
PIC X(99).
PIC
PIC
PIC
PIC
PIC
PIC
PIC
PIC
X(15).
X(10).
X.
X(20).
X(20).
XX.
99999.
99999.
PIC 999999.
PIC S9(5)V99.
PIC 99.
PIC 99.
PIC 9999.
PRINTER-FILE
REPORT IS MASTER-LIST.
WORKING-STORAGE SECTION.
01
01
UNEDITED-DATE.
02 UE-YEAR
02 UE-MONTH
02 UE-DAY
02 FILLER
ONE-COUNT
PIC
PIC
PIC
PIC
PIC
9999.
99.
99.
X(6).
9 VALUE 1.
(continued on next page)
10–44 Producing Printed Reports
Producing Printed Reports
10.9 Report Writer Examples
Example 10–6 (Cont.) Sample Program EX1006
REPORT SECTION.
RD
01
MASTER-LIST
PAGE LIMIT IS 66
HEADING
1
FIRST DETAIL 13
LAST DETAIL 55
CONTROL IS FINAL.
TYPE IS PAGE HEADING.
02
LINE 5.
03
COLUMN 1
PIC X(27) VALUE "CUSTOMER MASTER FILE REPORT".
03
COLUMN 105
PIC X(4) VALUE "PAGE".
03
COLUMN 109
PIC ZZZ9
SOURCE PAGE-COUNTER.
02
LINE 7.
03
COLUMN 1
PIC X VALUE "+".
03
COLUMN 2
PIC X(110) VALUE ALL "-".
03
COLUMN 112
PIC X VALUE "+".
02
LINE 8.
03
COLUMN 1
PIC X VALUE "|".
03
COLUMN 10
PIC X(4) VALUE "NAME".
03
COLUMN 29
PIC X VALUE "|".
03
COLUMN 43
PIC X(7) VALUE "ADDRESS".
03
COLUMN 81
PIC X VALUE "|".
03
COLUMN 91
PIC X(7) VALUE "INVOICE".
03
COLUMN 112
PIC X VALUE "|".
02
03
02
LINE 9.
COLUMN 1
PIC X VALUE "|".
03
COLUMN 2
PIC X(110) VALUE ALL "-".
03
COLUMN 112
PIC X VALUE "|".
LINE 10.
03
COLUMN 1
PIC X(6) VALUE "| LAST".
03
COLUMN 16
PIC X(7) VALUE "| FIRST".
03
COLUMN 26
PIC X(4) VALUE "|MI|".
03
COLUMN 35
PIC X(6) VALUE "STREET".
03
COLUMN 48
PIC X VALUE "|".
(continued on next page)
Producing Printed Reports 10–45
Producing Printed Reports
10.9 Report Writer Examples
Example 10–6 (Cont.) Sample Program EX1006
03
COLUMN 52
PIC X(4) VALUE "CITY".
03
COLUMN 71
PIC X VALUE "|".
03
COLUMN 72
PIC X(2) VALUE "ST".
03
COLUMN 74
PIC X VALUE "|".
03
COLUMN 81
PIC X VALUE "|".
03
COLUMN 83
PIC X(4) VALUE "DATE".
03
COLUMN 90
PIC X VALUE "|".
03
COLUMN 92
PIC X(6) VALUE "NUMBER".
03
COLUMN 98
PIC X VALUE "|".
03
COLUMN 103
PIC X(6) VALUE "AMOUNT".
03
COLUMN 112
PIC X VALUE "|".
02
LINE 11.
03
COLUMN 1
PIC X VALUE "+".
03
COLUMN 2
PIC X(110) VALUE ALL "-".
03
COLUMN 112
PIC X VALUE "+".
01
DETAIL-LINE
TYPE DETAIL
LINE PLUS 1.
02
02
02
02
02
02
02
02
02
02
02
02
02
02
X(15) SOURCE LAST-NAME.
X(10) SOURCE FIRST-NAME.
XX
SOURCE MIDDLE-INIT.
X(20) SOURCE ADDRESS.
X(20) SOURCE CITY.
XX
SOURCE STATE.
99999 SOURCE ZIP.
Z9
SOURCE INV-DAY.
X
VALUE "-".
99
SOURCE INV-MO.
X
VALUE "-".
9999 SOURCE INV-YR.
9(6) SOURCE INVOICE-NUMBER.
$$$,$$$,$$$.99SOURCE INVOICE-SALES.
02 DETAIL-COUNT PIC S9(10) SOURCE ONE-COUNT.
02 INV-AMOUNT PIC S9(9)V99 SOURCE INVOICE-SALES.
01
COLUMN
COLUMN
COLUMN
COLUMN
COLUMN
COLUMN
COLUMN
COLUMN
COLUMN
COLUMN
COLUMN
COLUMN
COLUMN
COLUMN
1
17
28
30
51
72
75
81
83
84
86
87
92
99
PIC
PIC
PIC
PIC
PIC
PIC
PIC
PIC
PIC
PIC
PIC
PIC
PIC
PIC
FINAL-FOOTING TYPE IS CONTROL FOOTING FINAL
LINE PLUS 5
NEXT GROUP NEXT PAGE.
02
COLUMN 20 PIC X(17) VALUE "TOTAL RECORDS: ".
02 FDC COLUMN 40 PIC ZZZ,ZZZ,ZZ9 SUM ONE-COUNT.
02
COLUMN 75 PIC X(15) VALUE "TOTAL SALES: ".
02 FIA COLUMN 95 PIC $$$,$$$,$$$,$$$.99- SUM INVOICE-SALES.
(continued on next page)
10–46 Producing Printed Reports
Producing Printed Reports
10.9 Report Writer Examples
Example 10–6 (Cont.) Sample Program EX1006
PROCEDURE DIVISION.
000-DO-SORT.
DISPLAY "*** EX1006 ***".
SORT SORT-FILE ON ASCENDING KEY SORT-NAME
WITH DUPLICATES IN ORDER
USING CUSTOMER-FILE
GIVING SORTED-FILE.
DISPLAY "*** Created EX1006.LIS ***".
050-START.
OPEN INPUT SORTED-FILE.
OPEN OUTPUT PRINTER-FILE.
ACCEPT UNEDITED-DATE FROM DATE.
INITIATE MASTER-LIST.
PERFORM 200-READ-MASTER UNTIL NAME = HIGH-VALUES.
100-END-OF-FILE.
TERMINATE MASTER-LIST.
CLOSE SORTED-FILE, PRINTER-FILE.
STOP RUN.
200-READ-MASTER.
READ SORTED-FILE AT END MOVE HIGH-VALUES TO NAME.
IF NAME NOT = HIGH-VALUES GENERATE DETAIL-LINE.
Figure 10–15 EX1006.LIS Listing
CUSTOMER MASTER FILE REPORT
PAGE
1
+--------------------------------------------------------------------------------------------------------------+
|
NAME
|
ADDRESS
|
INVOICE
|--------------------------------------------------------------------------------------------------------------|
| LAST
| FIRST |MI|
STREET
| CITY
|ST|
| DATE | NUMBER|
AMOUNT
+--------------------------------------------------------------------------------------------------------------+
Abbott
John
B 12 Pleasant Street Nashua
NH 03102 7-01-2000 000001
$10,000.90
Abbott
John
B 12 Pleasant Street Nashua
NH 03102 7-01-2000 000001
$10,000.90
Abbott
John
B 12 Pleasant Street Nashua
NH 03102 7-01-2000 000001
$10,000.90
Abbott
John
B 12 Pleasant Street Nashua
NH 03102 7-01-2000 000001
$10,000.90
Abbott
John
B 12 Pleasant Street Nashua
NH 03102 7-01-2000 000001
$10,000.90
Abbott
John
B 12 Pleasant Street Nashua
NH 03102 7-01-2000 000001
$10,000.90
Abbott
John
B 12 Pleasant Street Nashua
NH 03102 7-01-2000 000001
$10,000.90
Adam
Harold
B 980 Main Street
Nashua
NH 03102 2-06-2000 000002
$21,008.90
Albert
Robert
S 100 Meadow Lane
Gardner
MA 01420 2-06-2000 000003
$61,009.00
Alexander
Greg
T 317 Narrows Road
Westminster
MA 01473 2-06-2000 000004
$10,000.71
Alexander
Greg
T 317 Narrows Road
Westminster
MA 01473 2-06-2000 000004
$10,000.71
Alexander
Greg
T 317 Narrows Road
Westminster
MA 01473 2-06-2000 000004
$10,000.71
Alexander
Greg
T 317 Narrows Road
East Westminster
MA 01473 2-06-2000 000004
$10,000.71
Alexander
Greg
T 317 Narrows Road
Westminster
MA 01473 2-06-2000 000004
$10,000.71
Alexander
Greg
T 317 Narrows Road
East Westminster
MA 01473 2-06-2000 000004
$10,000.71
Allan
David
L 10 Wonder Lane
Merrimack
NH 03014 2-06-2000 000001
$24,101.00
Alwin
Tom
F 400 High Street
Princeton
NJ 12341 3-07-2000 000008
$70,000.17
Ames
Alice
J 40 Center Road
Nashua
NH 03060 2-07-2000 000007
$10,000.00
Ames
Alice
J 40 Center Road
Nashua
NH 03060 2-07-2000 000007
$10,000.00
Ames
Alice
J 40 Center Road
Nashua
NH 03060 2-07-2000 000007
$10,000.00
Amico
Art
A 31 Athens Road
Nashua
NH 03060 2-06-2000 000007
$12,340.70
Amos
James
A 71 State Rd
East Westminster
MA 01473 2-06-2000 000006
$41,000.90
Berger
Tom
H 700 McDonald Lane
Merrimack
NH 03060 2-06-2000 000010
$12,341.60
Carroll
Alice
L 192 Lewis Road
London
NH 03416 2-07-2000 000012
$16,789.00
Carter
Winston
R 123 Timpany Street Brookline
NH 03078 2-07-2000 000011
$23,416.76
Cooper
Frank
J 300 Mohican Avenue Mohawk
MA 01480 2-07-2000 000014
$34,167.80
Dickens
Arnold
C 100 Bleak Street
Gardner
MA 01440 2-07-2000 000011
$12,341.67
Dickinson
Rose
E 21 Depot Road
Amherst
MA 01423 2-07-2000 000019
$66,688.90
Frost
Alfred
R 123 Amherst Street Merrimack
NH 03060 2-07-2000 000020
$11,114.90
Hemingway
Joe
E 10 Cuba Street
Westminster
MA 01473 2-07-2000 000013
$87,690.00
Thoreaux
Ralph
H 800 Emerson Street Walden
MA 01416 2-07-2000 000016
$6.00
Williams
Samuel
A 310 England Road
Worcester
MA 01400 2-07-2000 000017
$78,900.00
TOTAL RECORDS:
32
TOTAL SALES:
$732,927.86
VM-0660A-AI
Producing Printed Reports 10–47
Producing Printed Reports
10.9 Report Writer Examples
10.9.3 EX1007—Detail Report Program
Example 10–7 (EX1007) is a Report Writer program that uses the REPORT
HEADING, PAGE HEADING, DETAIL, CONTROL FOOTING, and REPORT
FOOTING report groups and produces a detail report—EX1007.LIS (shown in
Figure 10–16). The output includes both subtotals and rolling-forward totals.
Example 10–7 Sample Program EX1007
IDENTIFICATION DIVISION.
PROGRAM-ID. EX1007.
ENVIRONMENT DIVISION.
CONFIGURATION SECTION.
INPUT-OUTPUT SECTION.
FILE-CONTROL.
SELECT CUSTOMER-FILE
SELECT SORT-FILE
SELECT SORTED-FILE
SELECT PRINTER-FILE
DATA DIVISION.
FILE SECTION.
SD
01
FD
01
ASSIGN
ASSIGN
ASSIGN
ASSIGN
TO
TO
TO
TO
"MASTER.DAT".
"EX1007-SORTIN.TMP".
"EX1007-SORTOUT.TMP".
"EX1007.LIS".
SORT-FILE.
SORTED-CUSTOMER-MASTER-FILE.
02 SORT-NAME
02
PIC X(26).
PIC X(73).
CUSTOMER-FILE.
CUSTOMER-MASTER-FILE
PIC X(99).
FD
01
SORTED-FILE.
CUSTOMER-MASTER-FILE.
02 NAME.
03 LAST-NAME
03 FIRST-NAME
03 MIDDLE-INIT
02 ADDRESS
02 CITY
02 STATE
02 ZIP
02 SALESMAN-NUMBER
02 INVOICE-DATA.
03 INVOICE-NUMBER
03 INVOICE-SALES
03 INVOICE-DATE.
04 INV-DAY
04 INV-MO
04 INV-YR
FD
PRINTER-FILE
REPORT IS MASTER-LIST.
WORKING-STORAGE SECTION.
01
UNEDITED-DATE.
02 UE-YEAR
PIC 9999.
02 UE-MONTH
PIC 99.
02 UE-DAY
PIC 99.
02 FILLER
PIC X(6).
01
ONE-COUNT
PIC
PIC
PIC
PIC
PIC
PIC
PIC
PIC
X(15).
X(10).
X.
X(20).
X(20).
XX.
99999.
99999.
PIC 999999.
PIC S9(5)V99.
PIC 99.
PIC 99.
PIC 9999.
PIC 9 VALUE 1.
(continued on next page)
10–48 Producing Printed Reports
Producing Printed Reports
10.9 Report Writer Examples
Example 10–7 (Cont.) Sample Program EX1007
REPORT SECTION.
RD
01
MASTER-LIST
PAGE LIMIT IS 66
HEADING
1
FIRST DETAIL 13
LAST DETAIL 55
CONTROLS ARE FINAL
NAME.
REPORT-HEADER TYPE IS REPORT HEADING NEXT GROUP NEXT PAGE.
02
LINE 24.
03
COLUMN 45
PIC X(31) VALUE ALL "*".
02
LINE 25.
03
COLUMN 45
PIC X VALUE "*".
03
COLUMN 75
PIC X VALUE "*".
02
LINE 26.
03
COLUMN 45
PIC X(31) VALUE "*
Customer Master File
02
LINE 27.
03
COLUMN 45
PIC X VALUE "*".
03
COLUMN 75
PIC X VALUE "*".
02
LINE 28.
03
COLUMN 45
PIC X VALUE "*".
03
COLUMN 55
PIC Z9
SOURCE UE-DAY.
03
COLUMN 57
PIC X VALUE "-".
03
COLUMN 58
PIC 99
SOURCE UE-MONTH.
03
COLUMN 60
PIC X VALUE "-".
03
COLUMN 61
PIC 9999
SOURCE UE-YEAR.
03
COLUMN 75
PIC X VALUE "*".
02
LINE 29.
03
COLUMN 45
PIC X VALUE "*".
03
COLUMN 75
PIC X VALUE "*".
02
LINE 30.
03
COLUMN 45
PIC X(31) VALUE "*
Report EX1007
02
LINE 31.
03
COLUMN 45
PIC X(31) VALUE "*
Detail Report
*".
*".
*".
(continued on next page)
Producing Printed Reports 10–49
Producing Printed Reports
10.9 Report Writer Examples
Example 10–7 (Cont.) Sample Program EX1007
02
LINE 32.
03
COLUMN 45
PIC X VALUE "*".
03
COLUMN 75
PIC X VALUE "*".
02
LINE 33.
03
COLUMN 45
PIC X VALUE "*".
03
COLUMN 75
PIC X VALUE "*".
02
LINE 34.
03
COLUMN 45
PIC X VALUE "*".
03
COLUMN 75
PIC X VALUE "*".
02
LINE 35.
03
COLUMN 45
PIC X(31) VALUE ALL "*".
01
TYPE IS PAGE HEADING.
02
LINE 5.
03
COLUMN 1
PIC X(27) VALUE "CUSTOMER MASTER FILE REPORT".
03
COLUMN 105
PIC X(4) VALUE "PAGE".
03
COLUMN 109
PIC ZZZ9
SOURCE PAGE-COUNTER.
02
LINE 7.
03
COLUMN 1
PIC X VALUE "+".
03
COLUMN 2
PIC X(110) VALUE ALL "-".
03
COLUMN 112
PIC X VALUE "+".
02
LINE 8.
03
COLUMN 1
PIC X VALUE "|".
03
COLUMN 10
PIC X(4) VALUE "NAME".
03
COLUMN 29
PIC X VALUE "|".
03
COLUMN 43
PIC X(7) VALUE "ADDRESS".
03
COLUMN 81
PIC X VALUE "|".
03
COLUMN 91
PIC X(7) VALUE "INVOICE".
03
COLUMN 112
PIC X VALUE "|".
(continued on next page)
10–50 Producing Printed Reports
Producing Printed Reports
10.9 Report Writer Examples
Example 10–7 (Cont.) Sample Program EX1007
02
LINE 9.
03
COLUMN 1
PIC X VALUE "|".
03
COLUMN 2
PIC X(110) VALUE ALL "-".
03
COLUMN 112
PIC X VALUE "|".
02
LINE 10.
03
COLUMN 1
PIC X(6) VALUE "| LAST".
03
COLUMN 16
PIC X(7) VALUE "| FIRST".
03
COLUMN 26
PIC X(4) VALUE "|MI|".
03
COLUMN 35
PIC X(6) VALUE "STREET".
03
COLUMN 48
PIC X VALUE "|".
03
COLUMN 52
PIC X(4) VALUE "CITY".
03
COLUMN 71
PIC X VALUE "|".
03
COLUMN 72
PIC X(2) VALUE "ST".
03
COLUMN 74
PIC X VALUE "|".
03
COLUMN 76
PIC X(3) VALUE "ZIP".
03
COLUMN 81
PIC X VALUE "|".
03
COLUMN 83
PIC X(4) VALUE "DATE".
03
COLUMN 90
PIC X VALUE "|".
03
COLUMN 92
PIC X(6) VALUE "NUMBER".
03
COLUMN 98
PIC X VALUE "|".
03
COLUMN 103
PIC X(6) VALUE "AMOUNT".
03
COLUMN 112
PIC X VALUE "|".
02
LINE 11.
03
COLUMN 1
PIC X VALUE "+".
03
COLUMN 2
PIC X(110) VALUE ALL "-".
03
COLUMN 112
PIC X VALUE "+".
(continued on next page)
Producing Printed Reports 10–51
Producing Printed Reports
10.9 Report Writer Examples
Example 10–7 (Cont.) Sample Program EX1007
01
01
01
01
DETAIL-LINE
TYPE DETAIL
LINE PLUS 2.
02 COLUMN 1
02 COLUMN 17
02 COLUMN 28
02 COLUMN 30
02 COLUMN 51
02 COLUMN 72
02 COLUMN 75
02 COLUMN 81
02 COLUMN 83
02 COLUMN 84
02 COLUMN 86
02 COLUMN 87
02 COLUMN 92
02 COLUMN 99
PIC
PIC
PIC
PIC
PIC
PIC
PIC
PIC
PIC
PIC
PIC
PIC
PIC
PIC
X(15) SOURCE LAST-NAME.
X(10) SOURCE FIRST-NAME.
XX
SOURCE MIDDLE-INIT.
X(20) SOURCE ADDRESS.
X(20) SOURCE CITY.
XX
SOURCE STATE.
99999 SOURCE ZIP.
Z9
SOURCE INV-DAY.
X
VALUE "-".
99
SOURCE INV-MO.
X
VALUE "-".
9999 SOURCE INV-YR.
9(6) SOURCE INVOICE-NUMBER.
$$$,$$$,$$$.99SOURCE INVOICE-SALES.
02 DETAIL-COUNT PIC S9(10) SOURCE ONE-COUNT.
02 INV-AMOUNT PIC S9(9)V99 SOURCE INVOICE-SALES.
TYPE IS CONTROL FOOTING NAME
NEXT GROUP IS PLUS 2.
02
LINE IS PLUS 2.
03
COLUMN 72
PIC X(41) VALUE ALL "*".
02
LINE IS PLUS 1.
03
COLUMN 20 PIC X(17) VALUE " TOTAL RECORDS: ".
03 IDC COLUMN 40 PIC ZZZ,ZZZ,ZZ9 SUM ONE-COUNT.
03 IIA COLUMN 99 PIC $$$,$$$,$$$.99- SUM INVOICE-SALES.
02
LINE IS PLUS 1.
03
COLUMN 72
PIC X(41) VALUE ALL "*".
FINAL-FOOTING TYPE IS CONTROL FOOTING FINAL
NEXT GROUP NEXT PAGE.
02
LINE IS PLUS 2.
03
COLUMN 72
PIC X(41) VALUE ALL "*".
02
LINE IS PLUS 1.
03
COLUMN 14 PIC X(21) VALUE "GRAND TOTAL RECORDS: ".
03 FDC COLUMN 40 PIC ZZZ,ZZZ,ZZ9 SUM IDC.
03
COLUMN 72 PIC X(22) VALUE " GRAND TOTAL INVOICES:".
03 FIA COLUMN 95 PIC $,$$$,$$$,$$$.99- SUM IIA.
02
LINE IS PLUS 1.
03
COLUMN 72
PIC X(41) VALUE ALL "*".
REPORT-FOOTER TYPE IS REPORT FOOTING.
02
LINE 24 ON NEXT PAGE COLUMN 45
PIC X(31) VALUE ALL "*".
02
LINE 25.
03
COLUMN 45
PIC X VALUE "*".
03
COLUMN 75
PIC X VALUE "*".
02
LINE 26.
03
COLUMN 45
PIC X(31) VALUE "*
Customer Master File
*".
(continued on next page)
10–52 Producing Printed Reports
Producing Printed Reports
10.9 Report Writer Examples
Example 10–7 (Cont.) Sample Program EX1007
02
LINE 27.
03
COLUMN 45
PIC X VALUE "*".
03
COLUMN 75
PIC X VALUE "*".
02
LINE 28.
03
COLUMN 45
PIC X VALUE "*".
03
COLUMN 55
PIC Z9
SOURCE UE-DAY.
03
COLUMN 57
PIC X VALUE "-".
03
COLUMN 58
PIC 99
SOURCE UE-MONTH.
03
COLUMN 60
PIC X VALUE "-".
03
COLUMN 61
PIC 9999
SOURCE UE-YEAR.
03
COLUMN 75
PIC X VALUE "*".
02
LINE 29.
03
COLUMN 45
PIC X VALUE "*".
03
COLUMN 75
PIC X VALUE "*".
02
LINE 30.
03
COLUMN 45
PIC X(31) VALUE "*
End of EX1007.LIS
02
LINE 31.
03
COLUMN 45
PIC X VALUE "*".
03
COLUMN 75
PIC X VALUE "*".
02
LINE 32 COLUMN 45
PIC X(31) VALUE ALL "*".
PROCEDURE DIVISION.
DECLARATIVES.
BOR SECTION.
USE BEFORE REPORTING REPORT-HEADER.
EOR SECTION.
USE BEFORE REPORTING REPORT-FOOTER.
EOR-A.
DISPLAY "*** Created EX1007.LIS ***".
END DECLARATIVES.
MAIN SECTION.
000-DO-SORT.
SORT SORT-FILE ON ASCENDING KEY SORT-NAME
WITH DUPLICATES IN ORDER
USING CUSTOMER-FILE
GIVING SORTED-FILE.
*".
(continued on next page)
Producing Printed Reports 10–53
Producing Printed Reports
10.9 Report Writer Examples
Example 10–7 (Cont.) Sample Program EX1007
000-START.
DISPLAY "*** EX1007 ***".
DISPLAY "Enter Current Date (YYYYMMDD) :".
ACCEPT UNEDITED-DATE.
OPEN INPUT SORTED-FILE.
OPEN OUTPUT PRINTER-FILE.
INITIATE MASTER-LIST.
PERFORM 200-READ-MASTER UNTIL NAME = HIGH-VALUES.
100-END-OF-FILE.
TERMINATE MASTER-LIST.
CLOSE SORTED-FILE, PRINTER-FILE.
STOP RUN.
200-READ-MASTER.
READ SORTED-FILE AT END MOVE HIGH-VALUES TO NAME.
IF NAME NOT = HIGH-VALUES GENERATE DETAIL-LINE.
10–54 Producing Printed Reports
Producing Printed Reports
10.9 Report Writer Examples
Figure 10–16 EX1007.LIS Listing
*******************************
*
*
*
Customer Master File
*
*
*
*
11-08-2000
*
*
*
*
Report EX1007
*
*
Detail Report
*
*
*
*
*
*
*
*******************************
CUSTOMER MASTER FILE REPORT
PAGE
2
+--------------------------------------------------------------------------------------------------------------+
|
NAME
|
ADDRESS
|
INVOICE
|
|--------------------------------------------------------------------------------------------------------------|
| LAST
| FIRST
|MI|
STREET
|
CITY
|ST| ZIP | DATE
| NUMBER|
AMOUNT
|
+--------------------------------------------------------------------------------------------------------------+
Abbott
John
B 12 Pleasant Street
Nashua
NH 03102 7-01-2000 000001
$10,000.90
Abbott
John
B 12 Pleasant Street
Nashua
NH 03102 7-01-2000 000001
$10,000.90
Abbott
John
B 12 Pleasant Street
Nashua
NH 03102 7-01-2000 000001
$10,000.90
Abbott
John
B 12 Pleasant Street
Nashua
NH 03102 7-01-2000 000001
$10,000.90
Abbott
John
B 12 Pleasant Street
Nashua
NH 03102 7-01-2000 000001
$10,000.90
Abbott
John
B 12 Pleasant Street
Nashua
NH 03102 7-01-2000 000001
$10,000.90
Abbott
John
B 12 Pleasant Street
Nashua
NH 03102 7-01-2000 000001
$10,000.90
*****************************************
TOTAL RECORDS:
7
$70,006.30
*****************************************
Adam
Harold
B 980 Main Street
Nashua
NH 03102 2-06-2000 000002
$21,008.90
*****************************************
TOTAL RECORDS:
1
$21,008.90
*****************************************
Albert
Robert
S 100 Meadow Lane
Gardner
MA 01420 2-06-2000 000003
$61,009.00
*****************************************
TOTAL RECORDS:
1
$61,009.00
*****************************************
Alexander
Greg
T 317 Narrows Road
Westminster
MA 01473 2-06-2000 000004
$10,000.71
Alexander
Greg
T 317 Narrows Road
Westminster
MA 01473 2-06-2000 000004
$10,000.71
Alexander
Greg
T 317 Narrows Road
Westminster
MA 01473 2-06-2000 000004
$10,000.71
Alexander
Greg
T 317 Narrows Road
East Westminster
MA 01473 2-06-2000 000004
$10,000.71
CUSTOMER MASTER FILE REPORT
PAGE
3
+--------------------------------------------------------------------------------------------------------------+
|
NAME
|
ADDRESS
|
INVOICE
|
|--------------------------------------------------------------------------------------------------------------|
| LAST
| FIRST
|MI|
STREET
|
CITY
|ST| ZIP | DATE
| NUMBER|
AMOUNT
|
+--------------------------------------------------------------------------------------------------------------+
Alexander
Greg
T 317 Narrows Road
Westminster
MA 01473 2-06-2000 000004
$10,000.71
Alexander
Greg
T 317 Narrows Road
East Westminster
MA 01473 2-06-2000 000004
$10,000.71
*****************************************
TOTAL RECORDS:
6
$60,004.26
*****************************************
Allan
David
L 10 Wonder Lane
Merrimack
NH 03014 2-06-2000 000001
$24,101.00
*****************************************
TOTAL RECORDS:
1
$24,101.00
*****************************************
Alwin
Tom
F 400 High Street
Princeton
NJ 12341 3-07-2000 000008
$70,000.17
*****************************************
TOTAL RECORDS:
1
$70,000.17
*****************************************
Ames
Alice
J 40 Center Road
Nashua
NH 03060 2-07-2000 000007
$10,000.00
Ames
Alice
J 40 Center Road
Nashua
NH 03060 2-07-2000 000007
$10,000.00
Ames
Alice
J 40 Center Road
Nashua
NH 03060 2-07-2000 000007
$10,000.00
*****************************************
TOTAL RECORDS:
3
$30,000.00
*****************************************
Amico
Art
A 31 Athens Road
Nashua
NH 03060 2-06-2000 000007
$12,340.70
*****************************************
TOTAL RECORDS:
1
$12,340.70
*****************************************
VM-0661A-AI
(continued on next page)
Producing Printed Reports 10–55
Producing Printed Reports
10.9 Report Writer Examples
Figure 10–16 (Cont.) EX1007.LIS Listing
CUSTOMER MASTER FILE REPORT
PAGE
4
+--------------------------------------------------------------------------------------------------------------+
|
NAME
|
ADDRESS
|
INVOICE
|
|--------------------------------------------------------------------------------------------------------------|
| LAST
| FIRST
|MI|
STREET
|
CITY
|ST| ZIP | DATE
| NUMBER|
AMOUNT
|
+--------------------------------------------------------------------------------------------------------------+
Amos
James
A 71 State Rd
East Westminster
MA 01473 2-06-2000 000006
$41,000.90
*****************************************
TOTAL RECORDS:
1
$41,000.90
*****************************************
Berger
Tom
H 700 McDonald Lane
Merrimack
NH 03060 2-06-2000 000010
$12,341.60
*****************************************
TOTAL RECORDS:
1
$12,341.60
*****************************************
Carroll
Alice
L 192 Lewis Road
London
NH 03416 2-07-2000 000012
$16,789.00
*****************************************
TOTAL RECORDS:
1
$16,789.00
Carter
Winston
R 123 Timpany Street
NH 03078 2-07-2000 000011
$23,416.76
*****************************************
$23,416.76
*****************************************
Cooper
Frank
J 300 Mohican Avenue
Mohawk
MA 01480 2-07-2000 000014
$34,167.80
*****************************************
TOTAL RECORDS:
1
$34,167.80
*****************************************
Dickens
Arnold
C 100 Bleak Street
Gardner
MA 01440 2-07-2000 000011
$12,341.67
CUSTOMER MASTER FILE REPORT
PAGE
5
+--------------------------------------------------------------------------------------------------------------+
|
NAME
|
ADDRESS
|
INVOICE
|
|--------------------------------------------------------------------------------------------------------------|
| LAST
| FIRST
|MI|
STREET
|
CITY
|ST| ZIP | DATE
| NUMBER|
AMOUNT
|
+--------------------------------------------------------------------------------------------------------------+
*****************************************
TOTAL RECORDS:
1
$12,341.67
*****************************************
Dickinson
Rose
E 21 Depot Road
Amherst
MA 01423 2-07-2000 000019
$66,688.90
*****************************************
TOTAL RECORDS:
1
$66,688.90
*****************************************
Frost
Alfred
R 123 Amherst Street
Merrimack
NH 03060 2-07-2000 000020
$11,114.90
*****************************************
TOTAL RECORDS:
1
$11,114.90
*****************************************
Hemingway
Joe
E 10 Cuba Street
Westminster
MA 01473 2-07-2000 000013
$87,690.00
*****************************************
TOTAL RECORDS:
1
$87,690.00
*****************************************
Thoreaux
Ralph
H 800 Emerson Street
Walden
MA 01416 2-07-2000 000016
$6.00
*****************************************
TOTAL RECORDS:
1
$6.00
*****************************************
Williams
Samuel
A 310 England Road
Worcester
MA 01400 2-07-2000 000017
$78,900.00
*****************************************
TOTAL RECORDS:
1
$78,900.00
*****************************************
CUSTOMER MASTER FILE REPORT
PAGE
6
+--------------------------------------------------------------------------------------------------------------+
|
NAME
|
ADDRESS
|
INVOICE
|
|--------------------------------------------------------------------------------------------------------------|
| LAST
| FIRST
|MI|
STREET
|
CITY
|ST| ZIP | DATE
| NUMBER|
AMOUNT
|
+--------------------------------------------------------------------------------------------------------------+
*****************************************
GRAND TOTAL RECORDS:
32
GRAND TOTAL INVOICES:
$732,927.86
*****************************************
*******************************
*
*
*
Customer Master File
*
*
*
*
11-08-2000
*
*
*
*
End of EX1007.LIS
*
*
*
*******************************
VM-0661B-AI
TOTAL RECORDS:
Brookline
1
10.9.4 EX1008—Detail Report Program
Example 10–8 (EX1008) is a Report Writer program that uses the REPORT
HEADING, PAGE HEADING, DETAIL, CONTROL FOOTING, and REPORT
FOOTING report groups and produces a detail report—EX1008.LIS (shown in
Figure 10–17).
10–56 Producing Printed Reports
Producing Printed Reports
10.9 Report Writer Examples
Example 10–8 Sample Program EX1008
IDENTIFICATION DIVISION.
PROGRAM-ID. EX1008.
ENVIRONMENT DIVISION.
CONFIGURATION SECTION.
INPUT-OUTPUT SECTION.
FILE-CONTROL.
SELECT CUSTOMER-FILE
SELECT SORT-FILE
SELECT SORTED-FILE
SELECT PRINTER-FILE
ASSIGN
ASSIGN
ASSIGN
ASSIGN
TO
TO
TO
TO
"MASTER.DAT".
"EX1008-SORTIN.TMP".
"EX1008-SORTOUT.TMP".
"EX1008.LIS".
DATA DIVISION.
FILE SECTION.
SD
SORT-FILE.
01
SORTED-CUSTOMER-MASTER-FILE.
02 SORT-NAME
02
PIC X(26).
PIC X(73).
FD
01
PIC X(99).
CUSTOMER-FILE.
CUSTOMER-MASTER-FILE
FD
01
SORTED-FILE.
SORTED-RECORD.
02 SORTED-NAME
02 S-ADDRESS
02 S-CITY
02 S-STATE
02 S-ZIP
02 S-SALESMAN-NUMBER
02 S-INVOICE-DATA.
03 S-INVOICE-NUMBER
03 S-INVOICE-SALES
03 S-INVOICE-DATE.
04 S-INV-DAY
04 S-INV-MO
04 S-INV-YR
FD
PRINTER-FILE
REPORT IS MASTER-LIST.
WORKING-STORAGE SECTION.
01
01
01
01
01
UNEDITED-DATE.
02 UE-YEAR
PIC 9999.
02 UE-MONTH
PIC 99.
02 UE-DAY
PIC 99.
02 FILLER
PIC X(6).
ONE-COUNT
EOF
SAVE-INVOICE-SALES
CUSTOMER-MASTER-RECORD.
02 NAME.
03 LAST-NAME
03 FIRST-NAME
03 MIDDLE-INIT
02 ADDRESS
02 CITY
02 STATE
02 ZIP
02 SALESMAN-NUMBER
PIC
PIC
PIC
PIC
PIC
PIC
X(26).
X(20).
X(20).
XX.
99999.
99999.
PIC 999999.
PIC S9(5)V99.
PIC 99.
PIC 99.
PIC 9999.
PIC 9 VALUE 1.
PIC X VALUE "N".
PIC S9(9)V99 VALUE 0.
PIC
PIC
PIC
PIC
PIC
PIC
PIC
PIC
X(15).
X(10).
X.
X(20).
X(20).
XX.
99999.
99999.
(continued on next page)
Producing Printed Reports 10–57
Producing Printed Reports
10.9 Report Writer Examples
Example 10–8 (Cont.) Sample Program EX1008
02 INVOICE-DATA.
03 INVOICE-NUMBER
03 INVOICE-SALES
03 INVOICE-DATE.
04 INV-DAY
04 INV-MO
04 INV-YR
REPORT SECTION.
RD
01
PIC 999999.
PIC S9(5)V99.
PIC 99.
PIC 99.
PIC 9999.
MASTER-LIST
PAGE LIMIT IS 66
HEADING
1
FIRST DETAIL 13
LAST DETAIL 55
CONTROLS ARE FINAL.
REPORT-HEADER TYPE IS REPORT HEADING NEXT GROUP NEXT PAGE.
02
LINE 24.
03
COLUMN 45
PIC X(31) VALUE ALL "*".
02
LINE 25.
03
COLUMN 45
PIC X VALUE "*".
03
COLUMN 75
PIC X VALUE "*".
02
LINE 26.
03
COLUMN 45
PIC X(31) VALUE "*
Customer Master File
02
02
*".
LINE 27.
03
COLUMN 45
PIC X VALUE "*".
03
COLUMN 75
PIC X VALUE "*".
LINE 28.
03
COLUMN 45
PIC X VALUE "*".
03
COLUMN 55
PIC Z9
SOURCE UE-DAY.
03
COLUMN 57
PIC X VALUE "-".
03
COLUMN 58
PIC 99
SOURCE UE-MONTH.
03
COLUMN 60
PIC X VALUE "-".
03
COLUMN 61
PIC 9999
SOURCE UE-YEAR.
03
COLUMN 75
PIC X VALUE "*".
(continued on next page)
10–58 Producing Printed Reports
Producing Printed Reports
10.9 Report Writer Examples
Example 10–8 (Cont.) Sample Program EX1008
02
01
LINE 29.
03
COLUMN 45
PIC X VALUE "*".
03
COLUMN 75
PIC X VALUE "*".
02
LINE 30.
03
COLUMN 45
PIC X(31) VALUE "*
Report EX1008
*".
02
LINE 31.
03
COLUMN 45
PIC X(31) VALUE "*
Detail Report
*".
02
LINE 32.
03
COLUMN 45
PIC X VALUE "*".
03
COLUMN 75
PIC X VALUE "*".
02
LINE 33.
03
COLUMN 45
PIC X VALUE "*".
03
COLUMN 75
PIC X VALUE "*".
02
LINE 34.
03
COLUMN 45
PIC X(31) VALUE ALL "*".
TYPE IS PAGE HEADING.
02
LINE 5.
03
COLUMN 1
PIC X(27) VALUE "CUSTOMER MASTER FILE REPORT".
03
COLUMN 105
PIC X(4) VALUE "PAGE".
03
COLUMN 109
PIC ZZZ9
SOURCE PAGE-COUNTER.
02
LINE 7.
03
COLUMN 1
PIC X VALUE "+".
03
COLUMN 2
PIC X(110) VALUE ALL "-".
03
COLUMN 112
PIC X VALUE "+".
02
LINE 8.
03
COLUMN 1
PIC X VALUE "|".
03
COLUMN 10
PIC X(4) VALUE "NAME".
03
COLUMN 29
PIC X VALUE "|".
03
COLUMN 43
PIC X(7) VALUE "ADDRESS".
03
COLUMN 81
PIC X VALUE "|".
03
COLUMN 91
PIC X(7) VALUE "INVOICE".
03
COLUMN 112
PIC X VALUE "|".
(continued on next page)
Producing Printed Reports 10–59
Producing Printed Reports
10.9 Report Writer Examples
Example 10–8 (Cont.) Sample Program EX1008
02
LINE 9.
03
COLUMN 1
PIC X VALUE "|".
03
COLUMN 2
PIC X(110) VALUE ALL "-".
03
COLUMN 112
PIC X VALUE "|".
02
LINE 10.
03
COLUMN 1
PIC X(6) VALUE "| LAST".
03
COLUMN 16
PIC X(7) VALUE "| FIRST".
03
COLUMN 26
PIC X(4) VALUE "|MI|".
03
COLUMN 35
PIC X(6) VALUE "STREET".
03
COLUMN 48
PIC X VALUE "|".
03
COLUMN 52
PIC X(4) VALUE "CITY".
03
COLUMN 71
PIC X VALUE "|".
03
COLUMN 72
PIC X(2) VALUE "ST".
03
COLUMN 74
PIC X VALUE "|".
03
COLUMN 76
PIC X(3) VALUE "ZIP".
03
COLUMN 81
PIC X VALUE "|".
03
COLUMN 83
PIC X(4) VALUE "DATE".
03
COLUMN 90
PIC X VALUE "|".
03
COLUMN 92
PIC X(6) VALUE "NUMBER".
03
COLUMN 98
PIC X VALUE "|".
03
COLUMN 103
PIC X(6) VALUE "AMOUNT".
03
COLUMN 112
PIC X VALUE "|".
(continued on next page)
10–60 Producing Printed Reports
Producing Printed Reports
10.9 Report Writer Examples
Example 10–8 (Cont.) Sample Program EX1008
02
LINE 11.
03
COLUMN 1
PIC X VALUE "+".
03
COLUMN 2
PIC X(110) VALUE ALL "-".
03
COLUMN 112
PIC X VALUE "+".
01
DETAIL-LINE
TYPE DETAIL LINE IS PLUS 1.
02 COLUMN 1
PIC X(15) SOURCE LAST-NAME.
02 COLUMN 17
PIC X(10) SOURCE FIRST-NAME.
02 COLUMN 28
PIC XX
SOURCE MIDDLE-INIT.
02 COLUMN 30
PIC X(20) SOURCE ADDRESS.
02 COLUMN 51
PIC X(20) SOURCE CITY.
02 COLUMN 72
PIC XX
SOURCE STATE.
02 COLUMN 75
PIC 99999 SOURCE ZIP.
02 COLUMN 81
PIC Z9
SOURCE INV-DAY.
02 COLUMN 83
PIC X
VALUE "-".
02 COLUMN 84
PIC 99
SOURCE INV-MO.
02 COLUMN 86
PIC X
VALUE "-".
02 COLUMN 87
PIC 9999
SOURCE INV-YR.
02 COLUMN 92
PIC 9(6) SOURCE INVOICE-NUMBER.
02 COLUMN 99
PIC $$$,$$$,$$$.99SOURCE SAVE-INVOICE-SALES.
01
FINAL-FOOTING TYPE IS CONTROL FOOTING FINAL
NEXT GROUP NEXT PAGE.
02
LINE IS PLUS 2.
03
COLUMN 70
PIC X(43) VALUE ALL "*".
02
LINE IS PLUS 1.
03
COLUMN 70 PIC X(24) VALUE "* GRAND TOTAL INVOICES:".
03 FIA COLUMN 94 PIC $,$$$,$$$,$$$.99- SUM INVOICE-SALES.
03
COLUMN 111 PIC XXX VALUE " * ".
02
LINE IS PLUS 1.
03
COLUMN 70
PIC X(43) VALUE ALL "*".
01
REPORT-FOOTER TYPE IS REPORT FOOTING.
02
LINE 24 ON NEXT PAGE COLUMN 45
PIC X(31) VALUE ALL "*".
02
LINE 25.
03
COLUMN 45
PIC X VALUE "*".
03
COLUMN 75
PIC X VALUE "*".
02
LINE 26.
03
COLUMN 45
PIC X(31) VALUE "*
Customer Master File
*".
02
LINE 27.
03
COLUMN 45
PIC X VALUE "*".
03
COLUMN 75
PIC X VALUE "*".
(continued on next page)
Producing Printed Reports 10–61
Producing Printed Reports
10.9 Report Writer Examples
Example 10–8 (Cont.) Sample Program EX1008
02
LINE 28 .
03
COLUMN 45
PIC X VALUE "*".
03
COLUMN 55
PIC Z9
SOURCE UE-DAY.
03
COLUMN 57
PIC X
VALUE "-".
03
COLUMN 58
PIC 99
SOURCE UE-MONTH.
03
COLUMN 60
PIC X
VALUE "-".
03
COLUMN 61
PIC 9999
SOURCE UE-YEAR.
03
COLUMN 75
PIC X VALUE "*".
02
LINE 29.
03
COLUMN 45
PIC X VALUE "*".
03
COLUMN 75
PIC X VALUE "*".
02
LINE 30 COLUMN 45
PIC X(31) VALUE "*
End of Report EX1008
02
LINE 31.
03
COLUMN 45
PIC X VALUE "*".
03
COLUMN 75
PIC X VALUE "*".
02
LINE 32 COLUMN 45
PIC X(31) VALUE ALL "*".
PROCEDURE DIVISION.
*".
DECLARATIVES.
BOR SECTION.
USE BEFORE REPORTING REPORT-HEADER.
EOR SECTION.
USE BEFORE REPORTING REPORT-FOOTER.
EOR-A.
DISPLAY "*** Created EX1008.LIS ***".
DET SECTION.
USE BEFORE REPORTING DETAIL-LINE.
DET-A.
IF SORTED-NAME = NAME
MOVE SORTED-RECORD TO CUSTOMER-MASTER-RECORD
ADD INVOICE-SALES TO SAVE-INVOICE-SALES
SUPPRESS PRINTING.
IF NAME = SPACES SUPPRESS PRINTING.
END DECLARATIVES.
(continued on next page)
10–62 Producing Printed Reports
Producing Printed Reports
10.9 Report Writer Examples
Example 10–8 (Cont.) Sample Program EX1008
MAIN SECTION.
000-DO-SORT.
SORT SORT-FILE ON ASCENDING KEY SORT-NAME
WITH DUPLICATES IN ORDER
USING CUSTOMER-FILE
GIVING SORTED-FILE.
000-START.
DISPLAY "*** EX1008 ***".
DISPLAY "Enter Current Date (YYYYMMDD) :".
ACCEPT UNEDITED-DATE.
OPEN INPUT SORTED-FILE.
OPEN OUTPUT PRINTER-FILE.
MOVE SPACES TO NAME.
INITIATE MASTER-LIST.
PERFORM 200-READ-MASTER UNTIL EOF = "Y".
100-END-OF-FILE.
TERMINATE MASTER-LIST.
CLOSE SORTED-FILE, PRINTER-FILE.
STOP RUN.
200-READ-MASTER.
READ SORTED-FILE AT END MOVE "Y" TO EOF
MOVE HIGH-VALUES TO SORTED-NAME.
GENERATE DETAIL-LINE.
IF SORTED-NAME NOT = NAME
MOVE S-INVOICE-SALES TO SAVE-INVOICE-SALES.
IF EOF NOT = "Y"
MOVE SORTED-RECORD TO CUSTOMER-MASTER-RECORD.
Producing Printed Reports 10–63
Producing Printed Reports
10.9 Report Writer Examples
Figure 10–17 EX1008.LIS Listing
*******************************
*
*
*
Customer Master File
*
*
*
*
11-08-2000
*
*
*
*
Report EX1008
*
*
Detail Report
*
*
*
*
*
*******************************
CUSTOMER MASTER FILE REPORT
PAGE
2
+--------------------------------------------------------------------------------------------------------------+
|
NAME
|
ADDRESS
|
INVOICE
|
|--------------------------------------------------------------------------------------------------------------|
| LAST
| FIRST
|MI|
STREET
|
CITY
|ST| ZIP | DATE
| NUMBER|
AMOUNT
|
+--------------------------------------------------------------------------------------------------------------+
Abbott
John
B 12 Pleasant Street
Nashua
NH 03102 7-01-2000 000001
$70,006.30
Adam
Harold
B 980 Main Street
Nashua
NH 03102 2-06-2000 000002
$21,008.90
Albert
Robert
S 100 Meadow Lane
Gardner
MA 01420 2-06-2000 000003
$61,009.00
Alexander
Greg
T 317 Narrows Road
East Westminster
MA 01473 2-06-2000 000004
$60,004.26
Allan
David
L 10 Wonder Lane
Merrimack
NH 03014 2-06-2000 000001
$24,101.00
Alwin
Tom
F 400 High Street
Princeton
NJ 12341 3-07-2000 000008
$70,000.17
Ames
Alice
J 40 Center Road
Nashua
NH 03060 2-07-2000 000007
$30,000.00
Amico
Art
A 31 Athens Road
Nashua
NH 03060 2-06-2000 000007
$12,340.70
Amos
James
A 71 State Rd
East Westminster
MA 01473 2-06-2000 000006
$41,000.90
Berger
Tom
H 700 McDonald Lane
Merrimack
NH 03060 2-06-2000 000010
$12,341.60
Carroll
Alice
L 192 Lewis Road
London
NH 03416 2-07-2000 000012
$16,789.00
Carter
Winston
R 123 Timpany Street
Brookline
NH 03078 2-07-2000 000011
$23,416.76
Cooper
Frank
J 300 Mohican Avenue
Mohawk
MA 01480 2-07-2000 000014
$34,167.80
Dickens
Arnold
C 100 Bleak Street
Gardner
MA 01440 2-07-2000 000011
$12,341.67
Dickinson
Rose
E 21 Depot Road
Amherst
MA 01423 2-07-2000 000019
$66,688.90
Frost
Alfred
R 123 Amherst Street
Merrimack
NH 03060 2-07-2000 000020
$11,114.90
Hemingway
Joe
E 10 Cuba Street
Westminster
MA 01473 2-07-2000 000013
$87,690.00
Thoreaux
Ralph
H 800 Emerson Street
Walden
MA 01416 2-07-2000 000016
$6.00
Williams
Samuel
A 310 England Road
Worcester
MA 01400 2-07-2000 000017
$78,900.00
*******************************************
* GRAND TOTAL INVOICES:
$732,927.86 *
*******************************************
*******************************
*
*
*
Customer Master File
*
*
*
*
11-08-2000
*
*
*
*
End of Report EX1008
*
*
*
*******************************
VM-0662A-AI
10.9.5 EX1009—Detail Report Program
Example 10–9 (EX1009) is a Report Writer program that uses the REPORT
HEADING, PAGE HEADING, DETAIL, PAGE FOOTING, CONTROL FOOTING,
and REPORT FOOTING report groups. The program also uses the TYPE
DETAIL clause—GROUP INDICATE. The program produces a detail report—
EX1009.LIS (shown in Figure 10–18).
Example 10–9 Sample Program EX1009
IDENTIFICATION DIVISION.
PROGRAM-ID. EX1009.
ENVIRONMENT DIVISION.
CONFIGURATION SECTION.
INPUT-OUTPUT SECTION.
FILE-CONTROL.
SELECT CUSTOMER-FILE
SELECT SORT-FILE
SELECT SORTED-FILE
SELECT PRINTER-FILE
ASSIGN
ASSIGN
ASSIGN
ASSIGN
TO
TO
TO
TO
"MASTER.DAT".
"EX1009-SORTIN.TMP".
"EX1009-SORTOUT.TMP".
"EX1009.LIS".
(continued on next page)
10–64 Producing Printed Reports
Producing Printed Reports
10.9 Report Writer Examples
Example 10–9 (Cont.) Sample Program EX1009
DATA DIVISION.
FILE SECTION.
SD
SORT-FILE.
01
SORTED-CUSTOMER-MASTER-FILE.
02 SORT-NAME
02
FD
CUSTOMER-FILE.
01
CUSTOMER-MASTER-FILE
FD
01
SORTED-FILE.
CUSTOMER-MASTER-FILE.
02 NAME.
03 LAST-NAME
03 FIRST-NAME
03 MIDDLE-INIT
02 ADDRESS
02 CITY
02 STATE
02 ZIP
02 SALESMAN-NUMBER
02 INVOICE-DATA.
03 INVOICE-NUMBER
03 INVOICE-SALES
03 INVOICE-DATE.
04 INV-DAY
04 INV-MO
04 INV-YR
PIC X(26).
PIC X(73).
PIC X(99).
PIC
PIC
PIC
PIC
PIC
PIC
PIC
PIC
X(15).
X(10).
X.
X(20).
X(20).
XX.
99999.
99999.
PIC 999999.
PIC S9(5)V99.
PIC 99.
PIC 99.
PIC 9999.
FD
PRINTER-FILE
REPORT IS MASTER-LIST.
WORKING-STORAGE SECTION.
01
UNEDITED-DATE.
02 UE-YEAR
PIC 9999.
02 UE-MONTH
PIC 99.
02 UE-DAY
PIC 99.
02 FILLER
PIC X(6).
01
ONE-COUNT PIC 9 VALUE 1.
REPORT SECTION.
RD MASTER-LIST
PAGE LIMIT IS 66
HEADING
1
FIRST DETAIL 13
LAST DETAIL 55
FOOTING
58
CONTROLS ARE FINAL
NAME.
(continued on next page)
Producing Printed Reports 10–65
Producing Printed Reports
10.9 Report Writer Examples
Example 10–9 (Cont.) Sample Program EX1009
01
REPORT-HEADER TYPE IS REPORT HEADING NEXT GROUP NEXT PAGE.
02
LINE 24.
03
COLUMN 45
PIC X(31) VALUE ALL "*".
02
LINE 25.
03
COLUMN 45
PIC X VALUE "*".
03
COLUMN 75
PIC X VALUE "*".
02
LINE 26.
03
COLUMN 45
PIC X(31) VALUE "*
Customer Master File
02
LINE 27.
03
COLUMN 45
PIC X VALUE "*".
03
COLUMN 75
PIC X VALUE "*".
02
LINE 28.
03
COLUMN 45
PIC X VALUE "*".
03
COLUMN 55
PIC Z9
SOURCE UE-DAY.
03
COLUMN 57
PIC X VALUE "-".
03
COLUMN 58
PIC 99
SOURCE UE-MONTH.
03
COLUMN 60
PIC X VALUE "-".
03
COLUMN 61
PIC 9999
SOURCE UE-YEAR.
03
COLUMN 75
PIC X VALUE "*".
02
LINE 29.
03
COLUMN 45
PIC X VALUE "*".
03
COLUMN 75
PIC X VALUE "*".
02
LINE 30.
03
COLUMN 45
PIC X(31) VALUE "*
GROUP INDICATE
02
LINE 31.
03
COLUMN 45
PIC X(31) VALUE "*
Detail Report EX1009
02
LINE 32.
03
COLUMN 45
PIC X VALUE "*".
03
COLUMN 75
PIC X VALUE "*".
*".
*".
*".
(continued on next page)
10–66 Producing Printed Reports
Producing Printed Reports
10.9 Report Writer Examples
Example 10–9 (Cont.) Sample Program EX1009
02
01
LINE 33.
03
COLUMN 45
PIC X VALUE "*".
03
COLUMN 75
PIC X VALUE "*".
02
LINE 34.
03
COLUMN 45
PIC X(31) VALUE ALL "*".
TYPE IS PAGE HEADING.
02
LINE 5.
03
COLUMN 1
PIC X(27) VALUE "CUSTOMER MASTER FILE REPORT".
03
COLUMN 105
PIC X(4) VALUE "PAGE".
03
COLUMN 109
PIC ZZZ9
SOURCE PAGE-COUNTER.
02
LINE 7.
03
COLUMN 1
PIC X VALUE "+".
03
COLUMN 2
PIC X(110) VALUE ALL "-".
03
COLUMN 112
PIC X VALUE "+".
02
LINE 8.
03
COLUMN 1
PIC X VALUE "|".
03
COLUMN 10
PIC X(4) VALUE "NAME".
03
COLUMN 29
PIC X VALUE "|".
03
COLUMN 43
PIC X(7) VALUE "ADDRESS".
03
COLUMN 81
PIC X VALUE "|".
03
COLUMN 91
PIC X(7) VALUE "INVOICE".
03
COLUMN 112
PIC X VALUE "|".
02
LINE 9.
03
COLUMN 1
PIC X VALUE "|".
03
COLUMN 2
PIC X(110) VALUE ALL "-".
03
COLUMN 112
PIC X VALUE "|".
02
LINE 10.
03
COLUMN 1
PIC X(6) VALUE "| LAST".
03
COLUMN 16
PIC X(7) VALUE "| FIRST".
03
COLUMN 26
PIC X(4) VALUE "|MI|".
(continued on next page)
Producing Printed Reports 10–67
Producing Printed Reports
10.9 Report Writer Examples
Example 10–9 (Cont.) Sample Program EX1009
03
COLUMN 35
PIC X(6) VALUE "STREET".
03
COLUMN 48
PIC X VALUE "|".
03
COLUMN 52
PIC X(4) VALUE "CITY".
03
COLUMN 71
PIC X VALUE "|".
03
COLUMN 72
PIC X(2) VALUE "ST".
03
COLUMN 74
PIC X VALUE "|".
03
COLUMN 76
PIC X(3) VALUE "ZIP".
03
COLUMN 81
PIC X VALUE "|".
03
COLUMN 83
PIC X(4) VALUE "DATE".
03
COLUMN 90
PIC X VALUE "|".
03
COLUMN 92
PIC X(6) VALUE "NUMBER".
03
COLUMN 98
PIC X VALUE "|".
03
COLUMN 103
PIC X(6) VALUE "AMOUNT".
03
COLUMN 112
PIC X VALUE "|".
02
LINE 11.
03
COLUMN 1
PIC X VALUE "+".
03
COLUMN 2
PIC X(110) VALUE ALL "-".
03
COLUMN 112
PIC X VALUE "+".
01
DETAIL-LINE
TYPE DETAIL
LINE PLUS 1.
02 COLUMN 1
PIC X(15) SOURCE LAST-NAME
02 COLUMN 17
PIC X(10) SOURCE FIRST-NAME
02 COLUMN 28
PIC XX
SOURCE MIDDLE-INIT
02 COLUMN 30
PIC X(20) SOURCE ADDRESS.
02 COLUMN 51
PIC X(20) SOURCE CITY.
02 COLUMN 72
PIC XX
SOURCE STATE.
02 COLUMN 75
PIC 99999 SOURCE ZIP.
02 COLUMN 81
PIC Z9
SOURCE INV-DAY.
02 COLUMN 83
PIC X
VALUE "-".
02 COLUMN 84
PIC 99
SOURCE INV-MO.
02 COLUMN 86
PIC X
VALUE "-".
02 COLUMN 87
PIC 9999 SOURCE INV-YR.
02 COLUMN 92
PIC 9(6) SOURCE INVOICE-NUMBER.
02 COLUMN 99
PIC $$$,$$$,$$$.99SOURCE INVOICE-SALES.
02 DETAIL-COUNT PIC S9(10) SOURCE ONE-COUNT.
02 INV-AMOUNT PIC S9(9)V99 SOURCE INVOICE-SALES.
GROUP INDICATE.
GROUP INDICATE.
GROUP INDICATE.
(continued on next page)
10–68 Producing Printed Reports
Producing Printed Reports
10.9 Report Writer Examples
Example 10–9 (Cont.) Sample Program EX1009
01
PAGE-FOOTING TYPE IS PAGE FOOTING.
02
LINE 59.
03
COLUMN 45
PIC X(16) VALUE "C O M P A N Y
03
COLUMN 62
PIC X(25) VALUE "C O N F I D E
02
LINE 60.
03
COLUMN 45
PIC X(16) VALUE "C O M P A N Y
03
COLUMN 62
PIC X(25) VALUE "C O N F I D E
01
TYPE IS CONTROL FOOTING NAME
NEXT GROUP IS PLUS 2.
02
LINE IS PLUS 2.
03
COLUMN 73
PIC X(39) VALUE
02
LINE IS PLUS 1.
03
COLUMN 20 PIC
03 IDC COLUMN 40 PIC
03
COLUMN 73 PIC
03 IIA COLUMN 96 PIC
03
COLUMN 111 PIC
02
LINE IS PLUS 1.
03
COLUMN 73
PIC X(39) VALUE
".
N T I A L ".
".
N T I A L ".
ALL "*".
X(17) VALUE " TOTAL RECORDS: ".
ZZZ,ZZZ,ZZ9 SUM ONE-COUNT.
X(22) VALUE "* INVOICE SUB TOTAL: ".
$$$,$$$,$$$.99- SUM INVOICE-SALES.
X VALUE "*".
ALL "*".
01
FINAL-FOOTING TYPE IS CONTROL FOOTING FINAL
NEXT GROUP NEXT PAGE.
02
LINE IS PLUS 2.
03
COLUMN 70
PIC X(42) VALUE ALL "*".
02
LINE IS PLUS 1.
03
COLUMN 14 PIC X(21) VALUE "GRAND TOTAL RECORDS: ".
03 FDC COLUMN 40 PIC ZZZ,ZZZ,ZZ9 SUM IDC.
03
COLUMN 70 PIC X(24) VALUE "* GRAND TOTAL INVOICES:".
03 FIA COLUMN 94 PIC $,$$$,$$$,$$$.99- SUM IIA.
03
COLUMN 111 PIC X VALUE "*".
02
LINE IS PLUS 1.
03
COLUMN 70
PIC X(42) VALUE ALL "*".
01
REPORT-FOOTER TYPE IS REPORT FOOTING.
02
LINE 24 ON NEXT PAGE COLUMN 45
PIC X(31) VALUE ALL "*".
02
LINE 25.
03
COLUMN 45
PIC X VALUE "*".
03
COLUMN 75
PIC X VALUE "*".
02
LINE 26.
03
COLUMN 45
PIC X(31) VALUE "*
Customer Master File
02
LINE 27.
03
COLUMN 45
PIC X VALUE "*".
03
COLUMN 75
PIC X VALUE "*".
*".
(continued on next page)
Producing Printed Reports 10–69
Producing Printed Reports
10.9 Report Writer Examples
Example 10–9 (Cont.) Sample Program EX1009
02
LINE 28.
03
COLUMN 45
PIC X VALUE "*".
03
COLUMN 55
PIC Z9
SOURCE UE-DAY.
03
COLUMN 57
PIC X VALUE "-".
03
COLUMN 58
PIC 99
SOURCE UE-MONTH.
03
COLUMN 60
PIC X VALUE "-".
03
COLUMN 61
PIC 9999
SOURCE UE-YEAR.
03
COLUMN 75
PIC X VALUE "*".
02
LINE 29.
03
COLUMN 45
PIC X VALUE "*".
03
COLUMN 75
PIC X VALUE "*".
02
LINE 30 COLUMN 45
PIC X(31) VALUE "*
End of Report EX1009
02
LINE 31.
03
COLUMN 45
PIC X VALUE "*".
03
COLUMN 75
PIC X VALUE "*".
02
LINE 32 COLUMN 45
PIC X(31) VALUE ALL "*".
PROCEDURE DIVISION.
DECLARATIVES.
BOR SECTION.
USE BEFORE REPORTING REPORT-HEADER.
EOR SECTION.
USE BEFORE REPORTING REPORT-FOOTER.
EOR-A.
DISPLAY "*** Created EX1009.LIS ***".
END DECLARATIVES.
MAIN SECTION.
000-DO-SORT.
SORT SORT-FILE ON ASCENDING KEY SORT-NAME
WITH DUPLICATES IN ORDER
USING CUSTOMER-FILE
GIVING SORTED-FILE.
000-START.
DISPLAY "*** EX1009 ***".
DISPLAY "Enter Current Date (YYYYMMDD) :".
ACCEPT UNEDITED-DATE.
OPEN INPUT SORTED-FILE.
OPEN OUTPUT PRINTER-FILE.
INITIATE MASTER-LIST.
PERFORM 200-READ-MASTER UNTIL NAME = HIGH-VALUES.
*".
(continued on next page)
10–70 Producing Printed Reports
Producing Printed Reports
10.9 Report Writer Examples
Example 10–9 (Cont.) Sample Program EX1009
100-END-OF-FILE.
TERMINATE MASTER-LIST.
CLOSE SORTED-FILE, PRINTER-FILE.
STOP RUN.
200-READ-MASTER.
READ SORTED-FILE AT END MOVE HIGH-VALUES TO NAME.
IF NAME NOT = HIGH-VALUES GENERATE DETAIL-LINE.
Producing Printed Reports 10–71
Producing Printed Reports
10.9 Report Writer Examples
Figure 10–18 EX1009.LIS Listing
*******************************
*
*
*
Customer Master File
*
*
*
*
11-08-2000
*
*
*
*
GROUP INDICATE
*
*
Detail Report EX1009
*
*
*
*
*
*******************************
CUSTOMER MASTER FILE REPORT
PAGE
2
+--------------------------------------------------------------------------------------------------------------+
|
NAME
|
ADDRESS
|
INVOICE
|
|--------------------------------------------------------------------------------------------------------------|
| LAST
| FIRST
|MI|
STREET
|
CITY
|ST| ZIP | DATE
| NUMBER|
AMOUNT
|
+--------------------------------------------------------------------------------------------------------------+
Abbott
John
B 12 Pleasant Street
Nashua
NH 03102 7-01-2000 000001
$10,000.90
12 Pleasant Street
Nashua
NH 03102 7-01-2000 000001
$10,000.90
12 Pleasant Street
Nashua
NH 03102 7-01-2000 000001
$10,000.90
12 Pleasant Street
Nashua
NH 03102 7-01-2000 000001
$10,000.90
12 Pleasant Street
Nashua
NH 03102 7-01-2000 000001
$10,000.90
12 Pleasant Street
Nashua
NH 03102 7-01-2000 000001
$10,000.90
12 Pleasant Street
Nashua
NH 03102 7-01-2000 000001
$10,000.90
***************************************
TOTAL RECORDS:
7
* INVOICE SUB TOTAL:
$70,006.30 *
***************************************
Adam
Harold
B 980 Main Street
Nashua
NH 03102 2-06-2000 000002
$21,008.90
***************************************
TOTAL RECORDS:
1
* INVOICE SUB TOTAL:
$21,008.90 *
***************************************
Albert
Robert
S 100 Meadow Lane
Gardner
MA 01420 2-06-2000 000003
$61,009.00
***************************************
TOTAL RECORDS:
1
* INVOICE SUB TOTAL:
$61,009.00 *
***************************************
Alexander
Greg
T 317 Narrows Road
Westminster
MA 01473 2-06-2000 000004
$10,000.71
317 Narrows Road
Westminster
MA 01473 2-06-2000 000004
$10,000.71
317 Narrows Road
Westminster
MA 01473 2-06-2000 000004
$10,000.71
317 Narrows Road
East Westminster
MA 01473 2-06-2000 000004
$10,000.71
317 Narrows Road
Westminster
MA 01473 2-06-2000 000004
$10,000.71
317 Narrows Road
East Westminster
MA 01473 2-06-2000 000004
$10,000.71
***************************************
TOTAL RECORDS:
6
* INVOICE SUB TOTAL:
$60,004.26 *
***************************************
Allan
David
L 10 Wonder Lane
Merrimack
NH 03014 2-06-2000 000001
$24,101.00
***************************************
TOTAL RECORDS:
1
* INVOICE SUB TOTAL:
$24,101.00 *
***************************************
C O M P A N Y
C O N F I D E N T I A L
C O M P A N Y
C O N F I D E N T I A L
CUSTOMER MASTER FILE REPORT
PAGE
3
+--------------------------------------------------------------------------------------------------------------+
|
NAME
|
ADDRESS
|
INVOICE
|
|--------------------------------------------------------------------------------------------------------------|
| LAST
| FIRST
|MI|
STREET
|
CITY
|ST| ZIP | DATE
| NUMBER|
AMOUNT
|
+--------------------------------------------------------------------------------------------------------------+
Alwin
Tom
F 400 High Street
Princeton
NJ 12341 3-07-2000 000008
$70,000.17
***************************************
TOTAL RECORDS:
1
* INVOICE SUB TOTAL:
$70,000.17 *
***************************************
Ames
Alice
J 40 Center Road
Nashua
NH 03060 2-07-2000 000007
$10,000.00
40 Center Road
Nashua
NH 03060 2-07-2000 000007
$10,000.00
40 Center Road
Nashua
NH 03060 2-07-2000 000007
$10,000.00
***************************************
TOTAL RECORDS:
3
* INVOICE SUB TOTAL:
$30,000.00 *
***************************************
Amico
Art
A 31 Athens Road
Nashua
NH 03060 2-06-2000 000007
$12,340.70
***************************************
TOTAL RECORDS:
1
* INVOICE SUB TOTAL:
$12,340.70 *
***************************************
Amos
James
A 71 State Rd
East Westminster
MA 01473 2-06-2000 000006
$41,000.90
***************************************
TOTAL RECORDS:
1
* INVOICE SUB TOTAL:
$41,000.90 *
***************************************
Berger
Tom
H 700 McDonald Lane
Merrimack
NH 03060 2-06-2000 000010
$12,341.60
***************************************
TOTAL RECORDS:
1
* INVOICE SUB TOTAL:
$12,341.60 *
***************************************
Carroll
Alice
L 192 Lewis Road
London
NH 03416 2-07-2000 000012
$16,789.00
***************************************
TOTAL RECORDS:
1
* INVOICE SUB TOTAL:
$16,789.00 *
***************************************
C O M P A N Y
C O N F I D E N T I A L
C O M P A N Y
C O N F I D E N T I A L
VM-0663A-AI
(continued on next page)
10–72 Producing Printed Reports
Producing Printed Reports
10.9 Report Writer Examples
Figure 10–18 (Cont.) EX1009.LIS Listing
CUSTOMER MASTER FILE REPORT
PAGE
4
+--------------------------------------------------------------------------------------------------------------+
|
NAME
|
ADDRESS
|
INVOICE
|
|--------------------------------------------------------------------------------------------------------------|
| LAST
| FIRST
|MI|
STREET
|
CITY
|ST| ZIP | DATE
| NUMBER|
AMOUNT
|
+--------------------------------------------------------------------------------------------------------------+
Carter
Winston
R 123 Timpany Street
Brookline
NH 03078 2-07-2000 000011
$23,416.76
***************************************
TOTAL RECORDS:
1
* INVOICE SUB TOTAL:
$23,416.76 *
***************************************
Cooper
Frank
J 300 Mohican Avenue
Mohawk
MA 01480 2-07-2000 000014
$34,167.80
***************************************
TOTAL RECORDS:
1
* INVOICE SUB TOTAL:
$34,167.80 *
***************************************
Dickens
Arnold
C 100 Bleak Street
Gardner
MA 01440 2-07-2000 000011
$12,341.67
***************************************
TOTAL RECORDS:
1
* INVOICE SUB TOTAL:
$12,341.67 *
***************************************
Dickinson
Rose
E 21 Depot Road
Amherst
MA 01423 2-07-2000 000019
$66,688.90
***************************************
TOTAL RECORDS:
1
* INVOICE SUB TOTAL:
$66,688.90 *
***************************************
Frost
Alfred
R 123 Amherst Street
Merrimack
NH 03060 2-07-2000 000020
$11,114.90
***************************************
TOTAL RECORDS:
1
* INVOICE SUB TOTAL:
$11,114.90 *
***************************************
Hemingway
Joe
E 10 Cuba Street
Westminster
MA 01473 2-07-2000 000013
$87,690.00
***************************************
TOTAL RECORDS:
1
* INVOICE SUB TOTAL:
$87,690.00 *
***************************************
Thoreaux
Ralph
H 800 Emerson Street
Walden
MA 01416 2-07-2000 000016
$6.00
C O M P A N Y
C O N F I D E N T I A L
C O M P A N Y
C O N F I D E N T I A L
CUSTOMER MASTER FILE REPORT
PAGE
5
+--------------------------------------------------------------------------------------------------------------+
|
NAME
|
ADDRESS
|
INVOICE
|
|--------------------------------------------------------------------------------------------------------------|
| LAST
| FIRST
|MI|
STREET
|
CITY
|ST| ZIP | DATE
| NUMBER|
AMOUNT
|
+--------------------------------------------------------------------------------------------------------------+
***************************************
TOTAL RECORDS:
1
* INVOICE SUB TOTAL:
$6.00 *
***************************************
Williams
Samuel
A 310 England Road
Worcester
MA 01400 2-07-2000 000017
$78,900.00
***************************************
TOTAL RECORDS:
1
* INVOICE SUB TOTAL:
$78,900.00 *
***************************************
******************************************
GRAND TOTAL RECORDS:
32
* GRAND TOTAL INVOICES:
$732,927.86 *
******************************************
C O M P A N Y
C O N F I D E N T I A L
C O M P A N Y
C O N F I D E N T I A L
*******************************
*
*
*
Customer Master File
*
*
*
*
11-08-2000
*
*
*
*
End of Report EX1009
*
*
*
*******************************
VM-0663B-AI
10.9.6 EX1010—Summary Report Program
Example 10–10 (EX1010) is a Report Writer program that uses the REPORT
HEADING, PAGE HEADING, DETAIL, CONTROL FOOTING, PAGE FOOTING,
and REPORT FOOTING report groups. The program produces a summary
report—EX1010.LIS (shown in Figure 10–19)—because the GENERATE
statement specifies a report name (MASTER-LIST) rather than a DETAIL
report group.
Producing Printed Reports 10–73
Producing Printed Reports
10.9 Report Writer Examples
Example 10–10 Sample Program EX1010
IDENTIFICATION DIVISION.
PROGRAM-ID. EX1010.
ENVIRONMENT DIVISION.
CONFIGURATION SECTION.
INPUT-OUTPUT SECTION.
FILE-CONTROL.
SELECT CUSTOMER-FILE
SELECT SORT-FILE
SELECT SORTED-FILE
SELECT PRINTER-FILE
ASSIGN
ASSIGN
ASSIGN
ASSIGN
TO
TO
TO
TO
"MASTER.DAT".
"EX1010-SORTIN.TMP".
"EX1010-SORTOUT.TMP".
"EX1010.LIS".
DATA DIVISION.
FILE SECTION.
SD
SORT-FILE.
01
SORTED-CUSTOMER-MASTER-FILE.
02 SORT-NAME
02
PIC X(26).
PIC X(73).
FD
01
CUSTOMER-FILE.
CUSTOMER-MASTER-FILE
PIC X(99).
FD
01
SORTED-FILE.
CUSTOMER-MASTER-FILE.
02 NAME.
03 LAST-NAME
03 FIRST-NAME
03 MIDDLE-INIT
02 ADDRESS
02 CITY
02 STATE
02 ZIP
02 SALESMAN-NUMBER
02 INVOICE-DATA.
03 INVOICE-NUMBER
03 INVOICE-SALES
03 INVOICE-DATE.
04 INV-DAY
04 INV-MO
04 INV-YR
FD
X(15).
X(10).
X.
X(20).
X(20).
XX.
99999.
99999.
PIC 999999.
PIC S9(5)V99.
PIC 99.
PIC 99.
PIC 9999.
PRINTER-FILE
REPORT IS MASTER-LIST.
WORKING-STORAGE SECTION.
01
UNEDITED-DATE.
02 UE-YEAR
PIC
02 UE-MONTH
PIC
02 UE-DAY
PIC
02 FILLER
PIC
01
PIC
PIC
PIC
PIC
PIC
PIC
PIC
PIC
ONE-COUNT
9999.
99.
99.
X(6).
PIC 9 VALUE 1.
(continued on next page)
10–74 Producing Printed Reports
Producing Printed Reports
10.9 Report Writer Examples
Example 10–10 (Cont.) Sample Program EX1010
REPORT SECTION.
RD
MASTER-LIST
PAGE LIMIT IS 66
HEADING
1
FIRST DETAIL 13
LAST DETAIL 55
FOOTING
58
CONTROLS ARE FINAL
NAME.
01
REPORT-HEADER TYPE IS REPORT HEADING NEXT GROUP NEXT PAGE.
02
LINE 24.
03
COLUMN 45
PIC X(31) VALUE ALL "*".
02
LINE 25.
03
COLUMN 45
PIC X VALUE "*".
03
COLUMN 75
PIC X VALUE "*".
02
LINE 26.
03
COLUMN 45
PIC X(31) VALUE "*
Customer Master File
02
LINE 27.
03
COLUMN 45
PIC X VALUE "*".
03
COLUMN 75
PIC X VALUE "*".
02
LINE 28.
03
COLUMN 45
PIC X VALUE "*".
03
COLUMN 55
PIC Z9
SOURCE UE-DAY.
03
COLUMN 57
PIC X VALUE "-".
03
COLUMN 58
PIC 99
SOURCE UE-MONTH.
03
COLUMN 60
PIC X VALUE "-".
03
COLUMN 61
PIC 9999
SOURCE UE-YEAR.
03
COLUMN 75
PIC X VALUE "*".
02
LINE 29.
03
COLUMN 45
PIC X VALUE "*".
03
COLUMN 75
PIC X VALUE "*".
02
LINE 30.
03
COLUMN 45
PIC X(31) VALUE "*
Report EX1010
02
LINE 31.
03
COLUMN 45
PIC X(31) VALUE "*
Summary Report
*".
*".
*".
(continued on next page)
Producing Printed Reports 10–75
Producing Printed Reports
10.9 Report Writer Examples
Example 10–10 (Cont.) Sample Program EX1010
02
LINE 32.
03
COLUMN 45
PIC X VALUE "*".
03
COLUMN 75
PIC X VALUE "*".
02
LINE 33.
03
COLUMN 45
PIC X VALUE "*".
03
COLUMN 75
PIC X VALUE "*".
02
LINE 34.
03
COLUMN 45
PIC X(31) VALUE ALL "*".
01
TYPE IS PAGE HEADING.
02
LINE 5.
03
COLUMN 1
PIC X(27) VALUE "CUSTOMER MASTER FILE REPORT".
03
COLUMN 105
PIC X(4) VALUE "PAGE".
03
COLUMN 109
PIC ZZZ9
SOURCE PAGE-COUNTER.
02
LINE 7.
03
COLUMN 1
PIC X VALUE "+".
03
COLUMN 2
PIC X(110) VALUE ALL "-".
03
COLUMN 112
PIC X VALUE "+".
02
LINE 8.
03
COLUMN 1
PIC X VALUE "|".
03
COLUMN 10
PIC X(4) VALUE "NAME".
03
COLUMN 29
PIC X VALUE "|".
03
COLUMN 43
PIC X(7) VALUE "ADDRESS".
03
COLUMN 81
PIC X VALUE "|".
03
COLUMN 91
PIC X(7) VALUE "INVOICE".
03
COLUMN 112
PIC X VALUE "|".
(continued on next page)
10–76 Producing Printed Reports
Producing Printed Reports
10.9 Report Writer Examples
Example 10–10 (Cont.) Sample Program EX1010
02
LINE 9.
03
COLUMN 1
PIC X VALUE "|".
03
COLUMN 2
PIC X(110) VALUE ALL "-".
03
COLUMN 112
PIC X VALUE "|".
02
LINE 10.
03
COLUMN 1
PIC X(6) VALUE "| LAST".
03
COLUMN 16
PIC X(7) VALUE "| FIRST".
03
COLUMN 26
PIC X(4) VALUE "|MI|".
03
COLUMN 35
PIC X(6) VALUE "STREET".
03
COLUMN 48
PIC X VALUE "|".
03
COLUMN 52
PIC X(4) VALUE "CITY".
03
COLUMN 71
PIC X VALUE "|".
03
COLUMN 72
PIC X(2) VALUE "ST".
03
COLUMN 74
PIC X VALUE "|".
03
COLUMN 76
PIC X(3) VALUE "ZIP".
03
COLUMN 81
PIC X VALUE "|".
03
COLUMN 83
PIC X(4) VALUE "DATE".
03
COLUMN 90
PIC X VALUE "|".
03
COLUMN 92
PIC X(6) VALUE "NUMBER".
03
COLUMN 98
PIC X VALUE "|".
03
COLUMN 103
PIC X(6) VALUE "AMOUNT".
03
COLUMN 112
PIC X VALUE "|".
02
LINE 11.
03
COLUMN 1
PIC X VALUE "+".
03
COLUMN 2
PIC X(110) VALUE ALL "-".
03
COLUMN 112
PIC X VALUE "+".
(continued on next page)
Producing Printed Reports 10–77
Producing Printed Reports
10.9 Report Writer Examples
Example 10–10 (Cont.) Sample Program EX1010
01
01
01
DETAIL-LINE
TYPE DETAIL
LINE PLUS 1.
02 COLUMN 1
02 COLUMN 17
02 COLUMN 28
02 COLUMN 30
02 COLUMN 51
02 COLUMN 72
02 COLUMN 75
02 COLUMN 81
02 COLUMN 83
02 COLUMN 84
02 COLUMN 86
02 COLUMN 87
02 COLUMN 92
02 COLUMN 99
PIC
PIC
PIC
PIC
PIC
PIC
PIC
PIC
PIC
PIC
PIC
PIC
PIC
PIC
X(15) SOURCE LAST-NAME
GROUP INDICATE.
X(10) SOURCE FIRST-NAME
GROUP INDICATE.
XX
SOURCE MIDDLE-INIT
GROUP INDICATE.
X(20) SOURCE ADDRESS.
X(20) SOURCE CITY.
XX
SOURCE STATE.
99999 SOURCE ZIP.
Z9
SOURCE INV-DAY.
X
VALUE "-".
99
SOURCE INV-MO.
X
VALUE "-".
9999 SOURCE INV-YR.
9(6) SOURCE INVOICE-NUMBER.
$$$,$$$,$$$.99SOURCE INVOICE-SALES.
02 DETAIL-COUNT PIC S9(10) SOURCE ONE-COUNT.
02 INV-AMOUNT PIC S9(9)V99 SOURCE INVOICE-SALES.
TYPE IS CONTROL FOOTING NAME
NEXT GROUP IS PLUS 2.
02
LINE IS PLUS 2.
03
COLUMN 73
PIC X(39) VALUE ALL "*".
02
LINE IS PLUS 1.
03
COLUMN 20 PIC X(17) VALUE " TOTAL RECORDS: ".
03 IDC COLUMN 40 PIC ZZZ,ZZZ,ZZ9 SUM ONE-COUNT.
03
COLUMN 73 PIC X(22) VALUE "* INVOICE SUB TOTAL: ".
03 IIA COLUMN 96 PIC $$$,$$$,$$$.99- SUM INVOICE-SALES.
03
COLUMN 111 PIC X VALUE "*".
02
LINE IS PLUS 1.
03
COLUMN 73
PIC X(39) VALUE ALL "*".
FINAL-FOOTING TYPE IS CONTROL FOOTING FINAL
NEXT GROUP NEXT PAGE.
02
LINE IS PLUS 2.
03
COLUMN 70
PIC X(42) VALUE ALL "*".
02
LINE IS PLUS 1.
03
COLUMN 14 PIC X(21) VALUE "GRAND TOTAL RECORDS: ".
03 FDC COLUMN 40 PIC ZZZ,ZZZ,ZZ9 SUM IDC.
03
COLUMN 70 PIC X(24) VALUE "* GRAND TOTAL INVOICES:".
03 FIA COLUMN 94 PIC $,$$$,$$$,$$$.99- SUM IIA.
03
COLUMN 111 PIC X VALUE "*".
02
LINE IS PLUS 1.
03
COLUMN 70
PIC X(42) VALUE ALL "*".
(continued on next page)
10–78 Producing Printed Reports
Producing Printed Reports
10.9 Report Writer Examples
Example 10–10 (Cont.) Sample Program EX1010
01
REPORT-FOOTER TYPE IS REPORT FOOTING.
02
LINE 24 ON NEXT PAGE COLUMN 45
PIC X(31) VALUE ALL "*".
02
LINE 25.
03
COLUMN 45
PIC X VALUE "*".
03
COLUMN 75
PIC X VALUE "*".
02
LINE 26.
03
COLUMN 45
PIC X(31) VALUE "*
Customer Master File
02
LINE 27.
03
COLUMN 45
PIC X VALUE "*".
03
COLUMN 75
PIC X VALUE "*".
02
LINE 28.
03
COLUMN 45
PIC X VALUE "*".
03
COLUMN 55
PIC Z9
SOURCE UE-DAY.
03
COLUMN 57
PIC X VALUE "-".
03
COLUMN 58
PIC 99
SOURCE UE-MONTH.
03
COLUMN 60
PIC X VALUE "-".
03
COLUMN 61
PIC 9999
SOURCE UE-YEAR.
03
COLUMN 75
PIC X VALUE "*".
02
LINE 29.
03
COLUMN 45
PIC X VALUE "*".
03
COLUMN 75
PIC X VALUE "*".
02
LINE 30 COLUMN 45
PIC X(31) VALUE "*
End of Report EX1010
02
LINE 31.
03
COLUMN 45
PIC X VALUE "*".
03
COLUMN 75
PIC X VALUE "*".
02
LINE 32 COLUMN 45
PIC X(31) VALUE ALL "*".
01
PAGE-FOOTING TYPE IS PAGE FOOTING.
02
LINE 59.
03
COLUMN 45
PIC X(16) VALUE "C O M P A N Y
03
COLUMN 62
PIC X(25) VALUE "C O N F I D E
02
LINE 60.
03
COLUMN 45
PIC X(16) VALUE "C O M P A N Y
03
COLUMN 62
PIC X(25) VALUE "C O N F I D E
*".
*".
".
N T I A L ".
".
N T I A L ".
(continued on next page)
Producing Printed Reports 10–79
Producing Printed Reports
10.9 Report Writer Examples
Example 10–10 (Cont.) Sample Program EX1010
PROCEDURE DIVISION.
DECLARATIVES.
BOR SECTION.
USE BEFORE REPORTING REPORT-HEADER.
EOR SECTION.
USE BEFORE REPORTING REPORT-FOOTER.
EOR-A.
DISPLAY "*** Created EX1010.LIS ***".
END DECLARATIVES.
MAIN SECTION.
000-DO-SORT.
SORT SORT-FILE ON ASCENDING KEY SORT-NAME
WITH DUPLICATES IN ORDER
USING CUSTOMER-FILE
GIVING SORTED-FILE.
000-START.
DISPLAY "*** EX1010 ***".
DISPLAY "Enter Current Date (YYYYMMDD) :".
ACCEPT UNEDITED-DATE.
OPEN INPUT SORTED-FILE.
OPEN OUTPUT PRINTER-FILE.
INITIATE MASTER-LIST.
PERFORM 200-READ-MASTER UNTIL NAME = HIGH-VALUES.
100-END-OF-FILE.
TERMINATE MASTER-LIST.
CLOSE SORTED-FILE, PRINTER-FILE.
STOP RUN.
200-READ-MASTER.
READ SORTED-FILE AT END MOVE HIGH-VALUES TO NAME.
IF NAME NOT = HIGH-VALUES GENERATE MASTER-LIST.
10–80 Producing Printed Reports
Producing Printed Reports
10.9 Report Writer Examples
Figure 10–19 EX1010.LIS Listing
*******************************
*
*
*
Customer Master File
*
*
*
*
11-08-2000
*
*
*
*
Report EX1010
*
*
Summary Report
*
*
*
*
*
*******************************
CUSTOMER MASTER FILE REPORT
PAGE
2
+--------------------------------------------------------------------------------------------------------------+
|
NAME
|
ADDRESS
|
INVOICE
|
|--------------------------------------------------------------------------------------------------------------|
| LAST
| FIRST
|MI|
STREET
|
CITY
|ST| ZIP | DATE
| NUMBER|
AMOUNT
|
+--------------------------------------------------------------------------------------------------------------+
***************************************
TOTAL RECORDS:
7
* INVOICE SUB TOTAL:
$70,006.30 *
***************************************
***************************************
TOTAL RECORDS:
1
* INVOICE SUB TOTAL:
$21,008.90 *
***************************************
***************************************
TOTAL RECORDS:
1
* INVOICE SUB TOTAL:
$61,009.00 *
***************************************
***************************************
TOTAL RECORDS:
6
* INVOICE SUB TOTAL:
$60,004.26 *
***************************************
***************************************
TOTAL RECORDS:
1
* INVOICE SUB TOTAL:
$24,101.00 *
***************************************
***************************************
TOTAL RECORDS:
1
* INVOICE SUB TOTAL:
$70,000.17 *
***************************************
***************************************
TOTAL RECORDS:
3
* INVOICE SUB TOTAL:
$30,000.00 *
***************************************
***************************************
TOTAL RECORDS:
1
* INVOICE SUB TOTAL:
$12,340.70 *
***************************************
C O M P A N Y
C O N F I D E N T I A L
C O M P A N Y
C O N F I D E N T I A L
CUSTOMER MASTER FILE REPORT
PAGE
3
+--------------------------------------------------------------------------------------------------------------+
|
NAME
|
ADDRESS
|
INVOICE
|
|--------------------------------------------------------------------------------------------------------------|
| LAST
| FIRST
|MI|
STREET
|
CITY
|ST| ZIP | DATE
| NUMBER|
AMOUNT
|
+--------------------------------------------------------------------------------------------------------------+
***************************************
TOTAL RECORDS:
1
* INVOICE SUB TOTAL:
$41,000.90 *
***************************************
***************************************
TOTAL RECORDS:
1
* INVOICE SUB TOTAL:
$12,341.60 *
***************************************
***************************************
TOTAL RECORDS:
1
* INVOICE SUB TOTAL:
$16,789.00 *
***************************************
***************************************
TOTAL RECORDS:
1
* INVOICE SUB TOTAL:
$23,416.76 *
***************************************
***************************************
TOTAL RECORDS:
1
* INVOICE SUB TOTAL:
$34,167.80 *
***************************************
***************************************
TOTAL RECORDS:
1
* INVOICE SUB TOTAL:
$12,341.67 *
***************************************
***************************************
TOTAL RECORDS:
1
* INVOICE SUB TOTAL:
$66,688.90 *
***************************************
***************************************
TOTAL RECORDS:
1
* INVOICE SUB TOTAL:
$11,114.90 *
***************************************
C O M P A N Y
C O N F I D E N T I A L
C O M P A N Y
C O N F I D E N T I A L
VM-0664A-AI
(continued on next page)
Producing Printed Reports 10–81
Producing Printed Reports
10.9 Report Writer Examples
Figure 10–19 (Cont.) EX1010.LIS Listing
CUSTOMER MASTER FILE REPORT
PAGE
4
+--------------------------------------------------------------------------------------------------------------+
|
NAME
|
ADDRESS
|
INVOICE
|
|--------------------------------------------------------------------------------------------------------------|
| LAST
| FIRST
|MI|
STREET
|
CITY
|ST| ZIP | DATE
| NUMBER|
AMOUNT
|
+--------------------------------------------------------------------------------------------------------------+
***************************************
TOTAL RECORDS:
1
* INVOICE SUB TOTAL:
$87,690.00 *
***************************************
***************************************
TOTAL RECORDS:
1
* INVOICE SUB TOTAL:
$6.00 *
***************************************
***************************************
TOTAL RECORDS:
1
* INVOICE SUB TOTAL:
$78,900.00 *
***************************************
******************************************
GRAND TOTAL RECORDS:
32
* GRAND TOTAL INVOICES:
$732,927.86 *
******************************************
C O M P A N Y
C O N F I D E N T I A L
C O M P A N Y
C O N F I D E N T I A L
*******************************
*
*
*
Customer Master File
*
*
*
*
11-08-2000
*
*
*
*
End of Report EX1010
*
*
*
*******************************
VM-0664B-AI
10.10 Solving Report Problems
Several variations to the basic report format are discussed in the next sections.
10.10.1 Printing More Than One Logical Line on a Single Physical Line
When your report has only a few columns, you can print several logical lines
on one physical line. If you were to print names and addresses on four-up
self-sticking multilabel forms, you would print the form left to right and top
to bottom, as shown in Figure 10–20 and Example 10–11. To print four-up
self-sticking labels, you must format each logical line with four input records.
However, if the columns must be sorted by column, the task becomes more
difficult. The last line at the end of the first column is continued at the top of the
second column of the same page, indented to the right, and so forth, as shown
in Figure 10–21 and Example 10–12. Example 10–12 defines a table containing
all data to appear on the page. It reads the input records, stores the data in the
table as it is to appear on the page, prints the contents of the table and then fills
spaces. When it reaches the end of file, the remaining entries in the table are
automatically blank. You can extend this technique to print any number of logical
lines on a single physical line.
10–82 Producing Printed Reports
Producing Printed Reports
10.10 Solving Report Problems
Figure 10–20 Printing Labels Four-Up
1
2
3
4
5
6
7
8
ZK−6088−GE
Example 10–11 Printing Labels Four-Up
IDENTIFICATION DIVISION.
PROGRAM-ID. REP02.
ENVIRONMENT DIVISION.
INPUT-OUTPUT SECTION.
FILE-CONTROL.
SELECT INPUT-FILE ASSIGN TO "LABELS.DAT".
SELECT REPORT-FILE ASSIGN TO "LABELS.REP".
DATA DIVISION.
FILE SECTION.
FD INPUT-FILE.
01 INPUT-RECORD.
02 INPUT-NAME
PIC X(20).
02 INPUT-ADDRESS PIC X(15).
02 INPUT-CITY
PIC X(10).
02 INPUT-STATE
PIC XX.
02 INPUT-ZIP
PIC 99999.
FD REPORT-FILE.
01 REPORT-RECORD
PIC X(132).
WORKING-STORAGE SECTION.
01 LABELS-TABLE.
03 NAME-LINE.
05 LINE-1 OCCURS 4 TIMES INDEXED BY INDEX-1.
07 LABEL-NAME
PIC X(20).
07 FILLER
PIC X(10).
03 ADDRESS-LINE.
05 LINE-2 OCCURS 4 TIMES INDEXED BY INDEX-2.
07 LABEL-ADDRESS
PIC X(15).
07 FILLER
PIC X(15).
03 CSZ-LINE.
05 LINE-3 OCCURS 4 TIMES INDEXED BY INDEX-3.
(continued on next page)
Producing Printed Reports 10–83
Producing Printed Reports
10.10 Solving Report Problems
Example 10–11 (Cont.) Printing Labels Four-Up
07
07
07
07
07
07
LABEL-CITY
FILLER
LABEL-STATE
FILLER
LABEL-ZIP
FILLER
PIC
PIC
PIC
PIC
PIC
PIC
PIC
X(10).
XXXX.
XX.
XXXX.
99999.
XXXXX.
X.
01 END-OF-FILE
PROCEDURE DIVISION.
A000-BEGIN.
OPEN INPUT INPUT-FILE
OUTPUT REPORT-FILE.
MOVE SPACES TO LABELS-TABLE.
SET INDEX-1, INDEX-2, INDEX-3 TO 1.
PERFORM A100-READ-INPUT UNTIL END-OF-FILE = "Y".
A050-WRAP-UP.
IF LABEL-NAME(1) IS NOT EQUAL TO SPACES
PERFORM A300-PRINT-FOUR-LABELS.
A050-END-OF-JOB.
CLOSE INPUT-FILE
REPORT-FILE.
DISPLAY "END OF JOB".
STOP RUN.
*
A100-READ-INPUT.
READ INPUT-FILE AT END MOVE "Y" TO END-OF-FILE.
IF END-OF-FILE = "Y" NEXT SENTENCE
ELSE PERFORM A200-GENERATE-TABLE.
*
A200-GENERATE-TABLE.
MOVE INPUT-NAME
TO LABEL-NAME(INDEX-1)
MOVE INPUT-ADDRESS TO LABEL-ADDRESS(INDEX-2)
MOVE INPUT-CITY
TO LABEL-CITY(INDEX-3)
MOVE INPUT-STATE
TO LABEL-STATE(INDEX-3)
MOVE INPUT-ZIP
TO LABEL-ZIP(INDEX-3)
IF INDEX-1 = 4 PERFORM A300-PRINT-FOUR-LABELS
ELSE
SET INDEX-1, INDEX-2, INDEX-3 UP BY 1.
*
A300-PRINT-FOUR-LABELS.
WRITE REPORT-RECORD FROM NAME-LINE AFTER ADVANCING 3.
WRITE REPORT-RECORD FROM ADDRESS-LINE AFTER ADVANCING 1.
WRITE REPORT-RECORD FROM CSZ-LINE AFTER ADVANCING 1.
MOVE SPACES TO LABELS-TABLE.
SET INDEX-1, INDEX-2, INDEX-3 TO 1.
10–84 Producing Printed Reports
Producing Printed Reports
10.10 Solving Report Problems
Figure 10–21 Printing Labels Four-Up in Sort Order
1
7
13
19
2
8
14
20
3
9
15
21
4
10
16
22
5
11
17
23
6
12
18
24
1
ZK−1556−GE
Example 10–12 Printing Labels Four-Up in Sort Order
IDENTIFICATION DIVISION.
PROGRAM-ID. REP03.
ENVIRONMENT DIVISION.
INPUT-OUTPUT SECTION.
FILE-CONTROL.
SELECT INPUT-FILE ASSIGN TO "LABELS.DAT".
SELECT REPORT-FILE ASSIGN TO "LABELS.REP".
(continued on next page)
Producing Printed Reports 10–85
Producing Printed Reports
10.10 Solving Report Problems
Example 10–12 (Cont.) Printing Labels Four-Up in Sort Order
DATA DIVISION.
FILE SECTION.
FD INPUT-FILE.
01 INPUT-RECORD.
02 INPUT-NAME
PIC X(20).
02 INPUT-ADDRESS PIC X(15).
02 INPUT-CITY
PIC X(10).
02 INPUT-STATE
PIC XX.
02 INPUT-ZIP
PIC 99999.
FD REPORT-FILE.
01 REPORT-RECORD
PIC X(132).
WORKING-STORAGE SECTION.
01 LABELS-TABLE.
03 FOUR-UP OCCURS 6 TIMES INDEXED BY ROW-INDEX.
04 NAME-LINE.
05 LINE-1 OCCURS 4 TIMES INDEXED BY NAME-INDEX.
07 LABEL-NAME
PIC X(20).
07 FILLER
PIC X(10).
04 ADDRESS-LINE.
05 LINE-2 OCCURS 4 TIMES INDEXED BY ADDRESS-INDEX.
07 LABEL-ADDRESS
PIC X(15).
07 FILLER
PIC X(15).
04 CSZ-LINE.
05 LINE-3 OCCURS 4 TIMES INDEXED BY CSZ-INDEX.
07 LABEL-CITY
PIC X(10).
07 FILLER
PIC XXXX.
07 LABEL-STATE
PIC XX.
07 FILLER
PIC XXXX.
07 LABEL-ZIP
PIC 99999.
07 FILLER
PIC XXXXX.
01 END-OF-FILE
PIC X.
PROCEDURE DIVISION.
A000-BEGIN.
OPEN INPUT INPUT-FILE
OUTPUT REPORT-FILE.
MOVE SPACES TO LABELS-TABLE.
SET ROW-INDEX, NAME-INDEX, ADDRESS-INDEX, CSZ-INDEX TO 1.
PERFORM A100-READ-INPUT UNTIL END-OF-FILE = "Y".
A050-WRAP-UP.
IF LABEL-NAME(1, 1) IS NOT EQUAL TO SPACES
PERFORM A300-PRINT-PAGE-OF-LABELS VARYING ROW-INDEX
FROM 1 BY 1 UNTIL ROW-INDEX IS GREATER THAN 6.
A050-END-OF-JOB.
CLOSE INPUT-FILE
REPORT-FILE.
DISPLAY "END OF JOB".
STOP RUN.
(continued on next page)
10–86 Producing Printed Reports
Producing Printed Reports
10.10 Solving Report Problems
Example 10–12 (Cont.) Printing Labels Four-Up in Sort Order
A100-READ-INPUT.
READ INPUT-FILE AT END MOVE "Y" TO END-OF-FILE.
IF END-OF-FILE = "Y" NEXT SENTENCE
ELSE PERFORM A200-GENERATE-LABELS.
A200-GENERATE-LABELS.
MOVE INPUT-NAME
TO LABEL-NAME(ROW-INDEX, NAME-INDEX)
MOVE INPUT-ADDRESS TO LABEL-ADDRESS(ROW-INDEX, ADDRESS-INDEX)
MOVE INPUT-CITY
TO LABEL-CITY(ROW-INDEX, CSZ-INDEX)
MOVE INPUT-STATE
TO LABEL-STATE(ROW-INDEX, CSZ-INDEX)
MOVE INPUT-ZIP
TO LABEL-ZIP(ROW-INDEX, CSZ-INDEX)
IF ROW-INDEX = 6 AND NAME-INDEX = 4
PERFORM A300-PRINT-PAGE-OF-LABELS VARYING ROW-INDEX
FROM 1 BY 1 UNTIL ROW-INDEX IS GREATER THAN 6
MOVE SPACES TO LABELS-TABLE
SET ROW-INDEX, NAME-INDEX, ADDRESS-INDEX, CSZ-INDEX TO 1
ELSE
PERFORM A210-UPDATE-INDEXES.
A210-UPDATE-INDEXES.
IF ROW-INDEX = 6 SET ROW-INDEX
TO 1
SET NAME-INDEX
ADDRESS-INDEX
CSZ-INDEX UP BY 1
ELSE
SET ROW-INDEX UP BY 1.
A300-PRINT-PAGE-OF-LABELS.
WRITE REPORT-RECORD FROM NAME-LINE(ROW-INDEX)
AFTER ADVANCING 3.
WRITE REPORT-RECORD FROM ADDRESS-LINE(ROW-INDEX)
AFTER ADVANCING 1.
WRITE REPORT-RECORD FROM CSZ-LINE(ROW-INDEX)
AFTER ADVANCING 1.
10.10.2 Group Indicating
The group indicating process greatly improves a report’s readability where long
sequences of entries have some element in common. You print the element once,
then leave it blank for subsequent lines, as long as there is no change in that
element. For example, if your sample file’s sort sequence is State (major key) and
City (minor key), you get sequences like those in Table 10–2.
Table 10–2 Results of Group Indicating
Without Group Indicating
With Group Indicating
STATE
CITY
STORE
NUMBER
STATE
CITY
Arizona
Grand Canyon
111111
Arizona
Grand Canyon
Arizona
Grand Canyon
123456
123456
Arizona
Grand Canyon
222222
222222
Arizona
Tucson
333333
Arizona
Tucson
444444
444444
Arizona
Tucson
555555
555555
Arizona
Tucson
STORE
NUMBER
111111
333333
(continued on next page)
Producing Printed Reports 10–87
Producing Printed Reports
10.10 Solving Report Problems
Table 10–2 (Cont.) Results of Group Indicating
Without Group Indicating
With Group Indicating
STATE
CITY
STORE
NUMBER
STATE
CITY
STORE
NUMBER
Massachusetts
Maynard
111111
Massachusetts
Maynard
111111
Massachusetts
Maynard
222222
222222
Massachusetts
Maynard
333333
333333
Massachusetts
Maynard
444444
444444
Massachusetts
Tewksbury
111111
Massachusetts
Tewksbury
222222
New Hampshire
Manchester
111111
New Hampshire
Manchester
222222
New Hampshire
Merrimack
333333
New Hampshire
Merrimack
444444
New Hampshire
Merrimack
555555
New Hampshire
Nashua
666666
Massachusetts
Tewksbury
111111
222222
New Hampshire
Manchester
111111
222222
New Hampshire
Merrimack
333333
444444
555555
New Hampshire
Nashua
666666
10.10.3 Fitting Reports on the Page
If you need more columns than physically can fit on a page, you can do the
following:
•
Eliminate as many unused spaces as possible between columns. Columns
should not be run together; however, you can use one blank space instead of
several.
•
Eliminate nonessential information.
•
Print two or more lines with staggered headers and columns.
•
Print two reports.
10.10.4 Printing Totals Before Detail Lines
A report that must include totals at the top of the page before the detail lines has
three solutions as follows:
•
Store the logical print lines in a table, total the table, and then print from the
table.
•
Pass through the file twice. The first time, compute the totals. The second
time, print the report. This method is slow and complicated if there are many
subtotals.
•
Write the lines into a file with a sort key containing the report, page, and
line number. When your program writes the last line and computes the total,
have it assign a page and line number to the total line’s sort key. Use an
appropriate page and line number to cause the total line to sort in front of its
detail lines. After the program completes, sort the file, read it, drop the sort
key, and produce the report.
10–88 Producing Printed Reports
Producing Printed Reports
10.10 Solving Report Problems
10.10.5 Underlining Items in Your Reports
The examples in this section apply only to printers that support overprinting.
Sometimes you must underline a column of numbers to denote a total and also
underline the total to highlight it:
1234
1122
---2356
====
To print a single underline, use the underscore character and suppress line
spacing. For example:
WRITE PRINT-LINE FROM SINGLE-UNDERLINE-TOTAL
BEFORE ADVANCING 0 LINES.
This overprints the underscore ( _ ) on the previous line, underlining the item:
1122. Use the equal sign ( = ) to simulate double underlines. Note that you must
write the equal signs on the next line. For example:
WRITE PRINT-LINE FROM DOUBLE-UNDERLINE-TOTAL
AFTER ADVANCING 1 LINE.
10.10.6 Bolding Items in Your Reports
The examples in this section apply only to printers that support overprinting.
To bold an entire line in a report:
1. Write the line as many times as you want, specifying the BEFORE
ADVANCING 0 LINES phrase (three times is sufficient). This darkens
the line but does not advance to the next line.
2. Write the line one last time without the BEFORE ADVANCING phrase. This
overprints the line again and advances to the next print line.
For example:
WRITE
WRITE
WRITE
WRITE
PRINT-LINE
PRINT-LINE
PRINT-LINE
PRINT-LINE
FROM
FROM
FROM
FROM
TOTAL-LINE BEFORE ADVANCING 0 LINES.
TOTAL-LINE BEFORE ADVANCING 0 LINES.
TOTAL-LINE BEFORE ADVANCING 0 LINES.
TOTAL-LINE.
This example produces a darker image in the report. You can use similar
statements for characters and words, as well as complete lines. To bold only a
word or only a character within a line, you must:
1. Write the print line and specify the BEFORE ADVANCING 0 LINES phrase.
2. Use reference modification to create a skeleton line containing only the items
in the print line you want bolded.
3. Write the skeleton line as many times as you want and specify the BEFORE
ADVANCING 0 LINES phrase. This darkens the items in the skeleton line
but does not advance to the next line.
4. Write the skeleton line one last time without the BEFORE ADVANCING
phrase. This overprints the line again and advances to the next print line.
Producing Printed Reports 10–89
Producing Printed Reports
10.10 Solving Report Problems
For example:
WRITE PRINT-LINE FROM TOTAL-LINE BEFORE ADVANCING
*
* Move spaces over the items in the source print line
* that are not to be bolded
*
MOVE SPACES TO ...
WRITE PRINT-LINE FROM TOTAL-LINE BEFORE ADVANCING
WRITE PRINT-LINE FROM TOTAL-LINE BEFORE ADVANCING
WRITE PRINT-LINE FROM TOTAL-LINE.
10–90 Producing Printed Reports
0 LINES.
(TOTAL-LINE)
0 LINES.
0 LINES.
11
Using ACCEPT and DISPLAY Statements for
Input/Output and Video Forms
ACCEPT and DISPLAY statements are used to make low-volume data available
to specified devices. You will find the following information useful:
•
Section 11.1 describes the use of the ACCEPT and DISPLAY statements for
interactive I/O.
•
Section 11.2 explains how you can design an online video form similar to a
printed form by using the Compaq extensions to the ACCEPT and DISPLAY
statements.
•
Section 11.3 describes the X/Open Screen Section features. You can use it to
design video forms easily and efficiently in a single section of your COBOL
program, and then accept or display a full screen of data with a single
ACCEPT statement or DISPLAY statement.
11.1 Using ACCEPT and DISPLAY for I/O
The COBOL language provides two statements, ACCEPT and DISPLAY, for
low-volume I/O operations. The ACCEPT and DISPLAY statements transfer data
between your program and the standard input and output devices. If you do not
use the FROM or UPON phrases, or an environment variable, the default device
for ACCEPT is the keyboard and the default device for DISPLAY is the terminal
screen.
The FROM or UPON phrases refer to mnemonic names that you can define in
the Environment Division SPECIAL-NAMES paragraph. You define a mnemonic
name by equating it to a COBOL implementor name; for example, the following
clause equates STATUS-REPORT to the device LINE-PRINTER:
LINE-PRINTER IS STATUS-REPORT
You can then use the mnemonic name in a DISPLAY statement:
DISPLAY "File contains " REC-COUNT UPON STATUS-REPORT.
The COBOL implementor names in the SPECIAL-NAMES paragraph refer to
special Compaq COBOL environment variables or logical names. Environment
variables or logical names do not always represent physical devices.
On the Tru64 UNIX operating system, you can assign an environment variable to
a file name as follows:
% setenv COBOL_LINEPRINTER status.lis
♦
Using ACCEPT and DISPLAY Statements for Input/Output and Video Forms 11–1
Using ACCEPT and DISPLAY Statements for Input/Output and Video Forms
11.1 Using ACCEPT and DISPLAY for I/O
On OpenVMS, you can assign a logical name to a file specification using the
ASSIGN command (or the DEFINE command, with the arguments in reverse
order):
$ ASSIGN [ALLSTATUS]STATUS.LIS COB$LINEPRINTER
♦
If you use an environment variable or a logical name, you must define it
appropriately for the ACCEPT or DISPLAY statement to succeed.
On OpenVMS, when you run an application, if input and output are both directed
to terminals, they must be directed to the same terminal. If input and output
are directed to different terminals, the output terminal is used and the input
terminal is ignored. ♦
For more information on the logical names or environment variables and the
mnemonic names, refer to the SPECIAL-NAMES section in the Environment
Division chapter in the Compaq COBOL Reference Manual.
ACCEPT Statement
On OpenVMS, the ACCEPT statement transfers data from the input device to a
data item. If you do not use the FROM phrase, the system uses the logical name
COB$INPUT if it is defined, otherwise SYS$INPUT. If you use the FROM phrase,
it uses the logical name associated with the mnemonic-name in the FROM clause.
♦
On Tru64 UNIX, the ACCEPT statement transfers data from the input device to a
data item. If you do not use the FROM phrase, the system uses the environment
variable COBOL_INPUT if it is defined, or stdin if COBOL_INPUT is not
otherwise defined. If you use the FROM phrase, the system uses the environment
variable associated with the mnemonic-name in the FROM clause. ♦
The following example illustrates the FROM phrase used in conjunction with
ACCEPT:
SPECIAL-NAMES.
CARD-READER IS WHATS-THE-NAME
.
.
.
PROCEDURE DIVISION.
.
.
.
ACCEPT PARAMETER-AREA FROM WHATS-THE-NAME.
DISPLAY Statement
On OpenVMS, the DISPLAY statement transfers the contents of data items and
literals to the output device. If you do not use the UPON phrase, the system
uses the logical name COB$OUTPUT if it is defined, or SYS$OUTPUT if it is not
defined. If you use the UPON phrase, the system uses the logical name associated
with the mnemonic-name in the FROM clause. ♦
On Tru64 UNIX, the DISPLAY statement transfers the contents of data items
and literals to the output device. If you do not use the UPON phrase, the system
uses the environment variable COBOL_OUTPUT if it is defined, or stdout if it
is not defined. If you use the UPON phrase, the system uses the environment
variable associated with the mnemonic-name in the UPON clause.
11–2 Using ACCEPT and DISPLAY Statements for Input/Output and Video Forms
Using ACCEPT and DISPLAY Statements for Input/Output and Video Forms
11.1 Using ACCEPT and DISPLAY for I/O
The following example illustrates the UPON phrase used in conjunction with
DISPLAY:
SPECIAL-NAMES.
LINE-PRINTER IS ERROR-LOG
.
.
.
PROCEDURE DIVISION.
.
.
.
DISPLAY ERROR-COUNT, " phase 2 errors, ", ERROR-MSG UPON ERROR-LOG.
11.2 Designing Video Forms with ACCEPT and DISPLAY Statement
Extensions
The extended Compaq COBOL options to the ACCEPT and DISPLAY statements
provide video forms features. You can develop video forms on VT100 and later
series terminals and faithful emulators and write your application without regard
to the type of terminal on which the application will eventually run. You can also
run your forms application in the terminal emulator window of a workstation. 1
Using the extended forms of the ACCEPT and DISPLAY statements, you can
design video forms to:
•
Make data entry applications, menu selections, and special control keys easier
to use.
•
Clarify the input expected from an operator.
•
Improve the appearance of an application’s terminal dialog.
Figure 11–1 is a sample form created by a Compaq COBOL program. It is for
entry of employee information into a master file. This program prompts the user
to type in data. Then the program writes it to the master file and displays a new
form.
Note
The final appearance of screens depends upon the setting of your system
display setup properties (for example, dark on light, or light on dark).
The following figures are representative only.
For information on differences between the Compaq COBOL and the Compaq
COBOL for OpenVMS VAX implementations of screen management, see
Appendix B. For complete reference information on the ACCEPT and DISPLAY
statements, including syntax, refer to the Compaq COBOL Reference Manual.
1
Compaq COBOL does not provide mouse or split screen support.
Using ACCEPT and DISPLAY Statements for Input/Output and Video Forms 11–3
Using ACCEPT and DISPLAY Statements for Input/Output and Video Forms
11.2 Designing Video Forms with ACCEPT and DISPLAY Statement Extensions
Figure 11–1 Video Form to Gather Information for a Master File Record
1
2
3
4
5
6
7
8
12345678901234567890123456789012345678901234567890123456789012345678901234567890
1
2
3
4
5
6
7
8
9
10
11
12
13
14
15
16
17
18
19
20
21
22
23
24
*******PERSONNEL MASTER FILE DATA INPUT FORM****
Employee Number:____________
Wage Class:______
Employee Name:___________________________________
Employee Address:________________________________
Employee Phone No.:______________________________
Department:______________________________________
Supervisor Name:_________________________________
Supervisor Phone No.:____________________________
Current Salary:$_________________________________
Date Hired:__/__/__
Next Review Date:__/__/__
ZK−6089−GE
Designing Your Form with ACCEPT and DISPLAY Options
When you design a video form, you can use the ACCEPT and DISPLAY options to
do the following:
•
Erase specific parts or the entire screen.
•
Use relative and absolute cursor positioning.
•
Specify video attributes of data to be displayed and accepted.
•
Convert data to appropriate usage when accepting or displaying data.
•
Handle error conditions when accepting and displaying data.
•
Provide screen protection by limiting the number of characters typed on the
terminal when accepting data.
•
Accept data without echoing.
•
Specify default values for ACCEPT statements.
•
Define and handle special control keys for ACCEPT statements.
•
Allow field editing.
The remainder of this chapter describes these topics.
11.2.1 Clearing a Screen Area
To clear part or all of your screen before you accept or display data, you can use
one of the following ERASE options of the ACCEPT and DISPLAY statements:
•
ERASE SCREEN—Erase the entire screen before accepting or displaying
data at the specified or implied cursor position.
11–4 Using ACCEPT and DISPLAY Statements for Input/Output and Video Forms
Using ACCEPT and DISPLAY Statements for Input/Output and Video Forms
11.2 Designing Video Forms with ACCEPT and DISPLAY Statement Extensions
•
ERASE LINE—Erase the entire specified line before accepting or displaying
data at the specified or implied cursor position.
•
ERASE TO END OF SCREEN—Erase from the specified or implied cursor
position to the end of the screen before accepting or displaying data at the
specified cursor position.
•
ERASE TO END OF LINE—Erase from the specified or implied cursor
position to the end of the line before accepting or displaying data at the
specified cursor position.
These options all work with either absolute or relative cursor positioning. (See
Section 11.2.2.)
Note
On OpenVMS, for any application that displays or accepts information
from a terminal, use the SET TERMINAL/NOBROADCAST command
before you start the application. This command prevents broadcast
messages (such as notifications of new mail) from interrupting the screen
displays. ♦
In Example 11–1, an introductory message is first displayed on the screen (along
with a prompt to the user). Then the ERASE SCREEN option causes the entire
screen to be erased before "Employee number:" is displayed. Figure 11–2 shows
how the screen looks after the ERASE statement executes.
Example 11–1 Erasing a Screen
IDENTIFICATION DIVISION.
PROGRAM-ID. ERASEIT.
DATA DIVISION.
WORKING-STORAGE SECTION.
01 ANY-CHAR
PIC X.
PROCEDURE DIVISION.
A00-BEGIN.
DISPLAY "EMPLOYEE ACCESS SYSTEM" LINE 8 COLUMN 30.
DISPLAY "Type any character to begin." LINE 20 COLUMN 10.
ACCEPT ANY-CHAR.
A10-EN-SCREEN.
DISPLAY "Employee number:" LINE 4 COLUMN 4 ERASE SCREEN.
DISPLAY " " LINE 23 COLUMN 1.
STOP RUN.
11.2.2 Horizontal and Vertical Positioning of the Cursor
To position data items at a specified line and column, use the LINE NUMBER
and COLUMN NUMBER phrases. You can use these phrases with both the
ACCEPT and DISPLAY statements. You can use literals or numeric data items
to specify line and column numbers.
Using ACCEPT and DISPLAY Statements for Input/Output and Video Forms 11–5
Using ACCEPT and DISPLAY Statements for Input/Output and Video Forms
11.2 Designing Video Forms with ACCEPT and DISPLAY Statement Extensions
Figure 11–2 Screen After the ERASE Statement Executes
1
2
3
4
5
6
7
8
12345678901234567890123456789012345678901234567890123456789012345678901234567890
1
2
3
4
5
6
7
8
9
10
11
12
13
14
15
16
17
18
19
20
21
22
23
24
Employee number:
ZK−6091−GE
Example 11–2 Cursor Positioning
IDENTIFICATION DIVISION.
PROGRAM-ID. LOCATE.
ENVIRONMENT DIVISION.
DATA DIVISION.
WORKING-STORAGE SECTION.
01 COL-NUM
PIC 99
PROCEDURE DIVISION.
A00-OUT-PARA.
DISPLAY "Employee name:"
VALUE 4.
LINE 19
COLUMN COL-NUM
ERASE SCREEN.
DISPLAY " " LINE 24
COLUMN 1.
STOP RUN.
Note
The default initial cursor position is in the upper left corner of the screen.
Compaq COBOL moves the cursor to this initial position just prior to
the execution of the first ACCEPT or DISPLAY statement. This is true
regardless of the format of the statement, unless you specify the cursor
position.
In Example 11–2 and in Figure 11–3, "Employee name:" is displayed on line 19
starting in column 4.
11–6 Using ACCEPT and DISPLAY Statements for Input/Output and Video Forms
Using ACCEPT and DISPLAY Statements for Input/Output and Video Forms
11.2 Designing Video Forms with ACCEPT and DISPLAY Statement Extensions
Figure 11–3 Positioning the Data on Line 19, Column 5
1
2
3
4
5
6
7
8
12345678901234567890123456789012345678901234567890123456789012345678901234567890
1
2
3
4
5
6
7
8
9
10
11
12
13
14
15
16
17
18
19
20
21
22
23
24
Employee name:
ZK−6092−GE
If you use LINE, but not COLUMN, data is accepted or displayed at column 1 of
the specified line position.
If you use COLUMN, but not LINE, data is accepted or displayed at the current
line and specified column position.
If you do not use either phrase, data is accepted or displayed at the position
specified by the rules for Format 1 ACCEPT and DISPLAY in the Compaq
COBOL Reference Manual.
Note
The presence of either or both the LINE and COLUMN phrases implies
NO ADVANCING.
You can use the PLUS option with the LINE or COLUMN phrases for relative
cursor positioning. The PLUS option eliminates the need for counting lines or
columns. Cursor positioning is relative to where the cursor is after the previous
ACCEPT or DISPLAY. If you use the PLUS option without an integer, PLUS 1 is
implied.
To get predictable results from your relative cursor positioning statements, do
not:
•
Cause a display line to wrap around to the next line.
•
Accept data into unprotected fields.
•
Go beyond the top or bottom of the screen.
•
Mix displays of double-high characters and relative cursor positioning.
Using ACCEPT and DISPLAY Statements for Input/Output and Video Forms 11–7
Using ACCEPT and DISPLAY Statements for Input/Output and Video Forms
11.2 Designing Video Forms with ACCEPT and DISPLAY Statement Extensions
In Example 11–3, the PLUS phrase is used twice to show relative positioning,
once with an integer, and once without. Figure 11–4 shows the results.
Example 11–3 Using PLUS for Cursor Positioning
IDENTIFICATION DIVISION.
PROGRAM-ID. LINEPLUS.
PROCEDURE DIVISION.
A00-BEGIN.
DISPLAY "Positioning Test"
"Changing Test"
"Adding Test"
DISPLAY " " LINE 23 COLUMN
STOP RUN.
LINE 10
COLUMN 20 ERASE SCREEN
LINE PLUS 5 COLUMN PLUS 26
LINE PLUS
COLUMN PLUS 14.
1.
Note
If you use the LINE PLUS phrase so relative positioning goes beyond the
bottom of the screen, your form scrolls with each such display.
Figure 11–4 Cursor Positioning Using the PLUS Option
1
2
3
4
5
6
7
8
12345678901234567890123456789012345678901234567890123456789012345678901234567890
1
2
3
4
5
6
7
8
9
10
11
12
13
14
15
16
17
18
19
20
21
22
23
24
Positioning Test
Changing Test
Adding Test
ZK−6120−GE
11.2.3 Assigning Character Attributes to Your Format Entries
Depending on your terminal type, you can use one or more of the character
attributes in Table 11–1 to highlight your screen data. Example 11–4 shows the
use of these attributes in a program segment. Figure 11–5 shows the results of
the program segment in Example 11–4.
11–8 Using ACCEPT and DISPLAY Statements for Input/Output and Video Forms
Using ACCEPT and DISPLAY Statements for Input/Output and Video Forms
11.2 Designing Video Forms with ACCEPT and DISPLAY Statement Extensions
Table 11–1 Available Character Attributes by Terminal Type
Character Attribute
VT500, VT400, VT300,
VT200, and VT100 with
Advanced Video Option
VT100 Without Advanced Video
Option
BELL
Available
Available
UNDERLINED
Underlines
the text
Available
Not Available
BOLD
Available
Not Available
BLINKING
Blinks the
text
Available
Not Available
REVERSED
Changes the
text’s
foreground &
background
colors
Available
Not Available
Sounds the
terminal bell
Intensifies
the text
Example 11–4 Using Character Attributes
IDENTIFICATION DIVISION.
PROGRAM-ID. CHARATTR.
PROCEDURE DIVISION.
A00-BEGIN.
DISPLAY "Employee No:" UNDERLINED LINE 5 COLUMN 5 ERASE SCREEN.
DISPLAY "Employee wage class:" BOLD LINE 5 COLUMN 25.
DISPLAY "NAME" BLINKING LINE PLUS 6 COLUMN 6.
DISPLAY "SALARY: $" REVERSED LINE PLUS 6 COLUMN 24.
DISPLAY " " LINE 23 COLUMN 1.
11.2.4 Using the CONVERSION Phrase to Display Numeric Data
Use the CONVERSION phrase to convert the value of a numeric data item for
display. It causes the value to appear on the screen as follows:
•
In DISPLAY usage
•
With a decimal point (if needed) or comma (if DECIMAL-POINT IS COMMA)
•
Edited (if needed)
•
With a sign (if needed)
Thus, the values of non-DISPLAY data items can be converted to a readable
form. The size of the displayed field is determined by the PICTURE clause of
the displayed item. Example 11–5 and Figure 11–6 show how to display different
types of data with the CONVERSION phrase.
Using ACCEPT and DISPLAY Statements for Input/Output and Video Forms 11–9
Using ACCEPT and DISPLAY Statements for Input/Output and Video Forms
11.2 Designing Video Forms with ACCEPT and DISPLAY Statement Extensions
Figure 11–5 Screen Display with Character Attributes
1
2
3
4
5
6
7
8
12345678901234567890123456789012345678901234567890123456789012345678901234567890
1
2
3
4
5
6
7
8
9
10
11
12
13
14
15
16
17
18
19
20
21
22
23
24
Employee No.:
Employee wage class:
NAME
SALARY: $
ZK−6093−GE
Example 11–5 Using the CONVERSION Phrase
IDENTIFICATION DIVISION.
PROGRAM-ID. CONVERT.
ENVIRONMENT DIVISION.
DATA DIVISION.
WORKING-STORAGE SECTION.
01 DATA1A
PIC X(10).
01 DATA1B
PIC X(10) JUST.
01 DATA2
PIC +++++9999.99.
01 DATA3
PIC S9(2)V9(2) COMP.
01 DATA4
PIC S9(3)V9(3) COMP.
01 DATA5
PIC S9(6)V9(6) COMP.
01 DATA6
PIC S9(4)V9(4) COMP-3.
01 DATA7
PIC S9(1)V9(7) SIGN LEADING SEPARATE.
PROCEDURE DIVISION.
CONVERT-CHECK SECTION.
P1.
DISPLAY "to begin... press your carriage Return key"
LINE 1 COLUMN 1 ERASE SCREEN
BELL UNDERLINED REVERSED.
ACCEPT DATA1A.
(continued on next page)
11–10 Using ACCEPT and DISPLAY Statements for Input/Output and Video Forms
Using ACCEPT and DISPLAY Statements for Input/Output and Video Forms
11.2 Designing Video Forms with ACCEPT and DISPLAY Statement Extensions
Example 11–5 (Cont.) Using the CONVERSION Phrase
DISPLAY "X(10) Test" LINE 8 ERASE LINE.
ACCEPT DATA1A WITH CONVERSION PROTECTED REVERSED
LINE 8 COLUMN 50.
DISPLAY DATA1A REVERSED WITH CONVERSION
LINE 8 COLUMN 65.
DISPLAY "X(10) JUSTIFIED Test" LINE 10 ERASE LINE.
ACCEPT DATA1B WITH CONVERSION PROTECTED REVERSED
LINE 10 COLUMN 50.
DISPLAY DATA1B REVERSED WITH CONVERSION
LINE 10 COLUMN 65.
P2.
DISPLAY "Num edited Test (+++++9999.99):" LINE 12 ERASE LINE.
ACCEPT DATA2 PROTECTED REVERSED WITH CONVERSION
LINE 12 COLUMN 50.
DISPLAY DATA2 REVERSED WITH CONVERSION
LINE 12 COLUMN 65.
P3.
DISPLAY "Num COMP Test S9(2)V9(2):" LINE 14 ERASE LINE.
ACCEPT DATA3 PROTECTED REVERSED WITH CONVERSION
LINE 14 COLUMN 50.
DISPLAY DATA3 REVERSED WITH CONVERSION LINE 14 COLUMN 65.
P4.
DISPLAY "Num COMP Test S9(3)V9(3):" LINE 16 ERASE LINE.
ACCEPT DATA4 PROTECTED REVERSED WITH CONVERSION
LINE 16 COLUMN 50.
DISPLAY DATA4 REVERSED WITH CONVERSION
LINE 16 COLUMN 65.
P5.
DISPLAY "Num COMP Test S9(6)V9(6):" LINE 18 ERASE LINE.
ACCEPT DATA5 PROTECTED REVERSED WITH CONVERSION
LINE 18 COLUMN 50.
DISPLAY DATA5 REVERSED WITH CONVERSION
LINE 18 COLUMN 65.
P6.
DISPLAY "Num COMP-3 Test S9(4)V9(4):" LINE 20 ERASE LINE.
ACCEPT DATA6 PROTECTED REVERSED WITH CONVERSION
LINE 20 COLUMN 50.
DISPLAY DATA6 REVERSED WITH CONVERSION
LINE 20 COLUMN 65.
P7.
DISPLAY "Num DISPLAY Test S9(1)V9(7)Sign Lead Sep:"
LINE 22 ERASE LINE.
ACCEPT DATA7 PROTECTED REVERSED WITH CONVERSION
LINE 22 COLUMN 50.
DISPLAY DATA7 REVERSED WITH CONVERSION
LINE 22 COLUMN 65.
P8.
DISPLAY "To end...type END"
LINE PLUS COLUMN 1 ERASE LINE
BELL UNDERLINED REVERSED.
ACCEPT DATA1A.
IF DATA1A = "END" STOP RUN.
GO TO P1.
Using ACCEPT and DISPLAY Statements for Input/Output and Video Forms 11–11
Using ACCEPT and DISPLAY Statements for Input/Output and Video Forms
11.2 Designing Video Forms with ACCEPT and DISPLAY Statement Extensions
Figure 11–6 Sample Run of Program CONVERT
1
2
3
4
5
6
7
8
12345678901234567890123456789012345678901234567890123456789012345678901234567890
to begin...
begin... press
press your
your carriage
carriage return
return key
key
1 to
2
3
4
5
6
7
8 X(10) Test
9
10 X(10) JUSTIFIED Test
11
12 Num edited Test (+++++9999.99):
13
14 Num COMP Test S9(2)V9(2):
15
16 Num COMP Test S9(3)V9(3):
17
18 Num COMP Test S9(6)V9(6):
19
20 Num COMP−3 Test S9(4)V9(4):
21
22 Num DISPLAY Test S9(1)V9(7)Sign Lead Sep:
ENDEND
23 To end...type END
24
abcdef
abcdef
1234567.8
89.98−
+103.6
65432.100009
1234.1234
6.0729375−
abcdef
abcdef
+1234567.80
−89.98
103.600
65432.100009
1234.1234
−6.0729375
ZK−6094−GE
Note that, in addition to the items illustrated in Figure 11–6, you can also display
the following:
•
COMP-1 and COMP-2 data items
•
On OpenVMS, RMS registers (RMS-STS, RMS-STV, RMS-FILENAME,
RMS-CURRENT-STS, RMS-CURRENT-STV, RMS-CURRENT-FILENAME) ♦
•
LINAGE-COUNTER register
•
RETURN-CODE special register
•
RWCS registers (PAGE-COUNTER, LINE-COUNTER)
•
VALUE EXTERNAL data items
•
POINTER VALUE REFERENCE data items
The /DISPLAY_FORMATTED command-line qualifier is an alternative way
to display numeric data without specifying the CONVERSION phrase. It
accomplishes the same result, converting any nonprinting values for display. (The
default is /NODISPLAY_FORMATTED.)
11.2.5 Handling Data with ACCEPT Options
The ACCEPT options CONVERSION, ON EXCEPTION, PROTECTED, SIZE, NO
ECHO, and DEFAULT are described in the following sections.
11–12 Using ACCEPT and DISPLAY Statements for Input/Output and Video Forms
Using ACCEPT and DISPLAY Statements for Input/Output and Video Forms
11.2 Designing Video Forms with ACCEPT and DISPLAY Statement Extensions
11.2.5.1 Using CONVERSION with ACCEPT Data
When you use the CONVERSION phrase with an ACCEPT numeric operand
(other than floating point), Compaq COBOL converts the data entered on the
form to a trailing-signed decimal field. Editing is performed when specified by
destination. The data is then moved from the screen to your program using
standard MOVE statement rules.
When you use the CONVERSION phrase with an ACCEPT numeric floatingpoint operand, Compaq COBOL converts input data to floating-point (COMP-1 or
COMP-2 as appropriate). The converted result is then moved to the destination
as if moving a numeric literal equivalent to the input data with the MOVE
statement.
When an ACCEPT operand is not numeric, the CONVERSION phrase moves the
input characters as an alphanumeric string, using standard MOVE statement
rules. This lets you accept data into an alphanumeric-edited or JUSTIFIED field.
If you use the CONVERSION phrase while accepting numeric data, you can also
use the ON EXCEPTION phrase to control data entry errors.
If you do not use the CONVERSION phrase, data is transferred to the destination
item according to Format 1 ACCEPT statement rules.
11.2.5.2 Using ON EXCEPTION When Accepting Data with CONVERSION
If you enter illegal numeric data or exceed the PICTURE description (if not
protected) of the ACCEPT data (with an overflow to either the left or right of
the decimal point), the imperative statement associated with ON EXCEPTION
executes, and the destination field does not change.
Example 11–6 (and Figure 11–7) show how the ON EXCEPTION phrase executes
if you enter an alphanumeric or a numeric item out of the valid range. The
statements following ON EXCEPTION prompt you to try again.
If you do not use ON EXCEPTION and a conversion error occurs:
•
The field on the screen is filled with spaces.
•
The terminal bell rings and the terminal automatically reprompts you for the
data results.
A DISPLAY statement within an ACCEPT [NOT] ON EXCEPTION statement
must be terminated, with, for example, END-DISPLAY.
11.2.5.3 Protecting the Screen
You can use the PROTECTED phrase in an ACCEPT statement to limit the
number of characters that can be entered. This phrase prevents overwriting or
deleting parts of the screen. For more information about using the PROTECTED
phrase, refer to the ACCEPT statement in the Compaq COBOL Reference
Manual.
If you use this phrase, and you try to
input field or delete past the left edge
and the screen cursor does not move.
by pressing a legal terminator key, or
type past the rightmost position of the
of the input field, the terminal bell sounds
You can accept the data on the screen
you can delete the data by pressing the
Using ACCEPT and DISPLAY Statements for Input/Output and Video Forms 11–13
Using ACCEPT and DISPLAY Statements for Input/Output and Video Forms
11.2 Designing Video Forms with ACCEPT and DISPLAY Statement Extensions
Example 11–6 Using the ON EXCEPTION Phrase
IDENTIFICATION DIVISION.
PROGRAM-ID. ONEXC.
ENVIRONMENT DIVISION.
DATA DIVISION.
WORKING-STORAGE SECTION.
01 NUM-DATA PIC S9(3)V9(3) COMP-3.
PROCEDURE DIVISION.
A00-BEGIN.
DISPLAY "Enter any number in this range: -999.999 to +999.999"
LINE 10 COLUMN 1
ERASE SCREEN.
ACCEPT NUM-DATA WITH CONVERSION LINE 15 COLUMN 16
ON EXCEPTION
DISPLAY "Valid range is: -999.999 to +999.999"
LINE 20 REVERSED WITH BELL ERASE TO END OF SCREEN
DISPLAY
"PLEASE try again... press your carriage return key to continue"
LINE PLUS REVERSED
ACCEPT NUM-DATA
GO TO A00-BEGIN.
STOP RUN.
Figure 11–7 Accepting Data with the ON EXCEPTION Option
1
2
3
4
5
6
7
8
12345678901234567890123456789012345678901234567890123456789012345678901234567890
1
2
3
4
5
6
7
8
9
10
11
12
13
14
15
16
17
18
19
20
21
22
23
24
Enter any number in this range: −999.999 to +999.999
1234.567−
Valid range is: −999.999 to +999.999
PLEASE try again... press your carriage return key to continue
ZK−6095−GE
DELETE key. If you specify PROTECTED WITH AUTOTERMINATE, the
ACCEPT operation terminates when the maximum number of characters has
been entered unless a terminator has been entered prior to this point. For more
information on legal terminator keys, refer to the CONTROL KEY phrase of the
ACCEPT statement in the Compaq COBOL Reference Manual.
11–14 Using ACCEPT and DISPLAY Statements for Input/Output and Video Forms
Using ACCEPT and DISPLAY Statements for Input/Output and Video Forms
11.2 Designing Video Forms with ACCEPT and DISPLAY Statement Extensions
You can also use the REVERSED, BOLD, BLINKING, or UNDERLINED
attributes with the PROTECTED phrase. Using these attributes lets you see
the size of the input field on the screen before you enter data. The characters you
enter also echo the specified attribute.
You can specify the NO BLANK and FILLER phrases with the PROTECTED
phrase. The NO BLANK phrase specifies that the protected input field is not to
be filled with spaces until after the first character is entered. The FILLER phrase
initializes each character position of the input field with the filler character
specified.
When you use the FILLER phrase with the NO BLANK phrase, the input field is
filled with the filler character only after you have entered the first character.
The PROTECTED SIZE phrase sets the size of the input field on the screen
and allows you to change the size of the input field from the size indicated by
the PICTURE phrase of the destination item. Example 11–7 and Figure 11–8
show how to use the SIZE phrase with the PROTECTED phrase. When the
example specifies SIZE 3, any attempt to enter more than three characters
makes the terminal bell ring. When the example specifies SIZE 10, the ACCEPT
statement includes the ON EXCEPTION phrase to warn you whenever you enter
a number that will result in truncation at either end of the assumed decimal
point. Figure 11–8 shows such an example in which the operator entered a 10digit number, exceeding the storage capacity of the data item NUM-DATA on the
left side of the assumed decimal point.
Note
The SIZE phrase controls only the number of characters you can enter;
it does not alter any other PICTURE clause requirements. Truncation,
space or zero filling, and decimal point alignment occur according to
MOVE statement rules only if CONVERSION is specified.
When you do not use the PROTECTED phrase, the amount of data transferred
is determined according to the ACCEPT statement rules. (Refer to the Compaq
COBOL Reference Manual.)
11.2.5.4 Using NO ECHO with ACCEPT Data
By default, the characters you type at the terminal are displayed on the screen.
Example 11–8 shows how you can use the NO ECHO phrase to prevent the
input field from being displayed; thus, the NO ECHO phrase allows you to keep
passwords and other information confidential.
Using ACCEPT and DISPLAY Statements for Input/Output and Video Forms 11–15
Using ACCEPT and DISPLAY Statements for Input/Output and Video Forms
11.2 Designing Video Forms with ACCEPT and DISPLAY Statement Extensions
Example 11–7 Using the SIZE and PROTECTED Phrases
IDENTIFICATION DIVISION.
PROGRAM-ID. PROTECT.
ENVIRONMENT DIVISION.
DATA DIVISION.
WORKING-STORAGE SECTION.
01 NUM-DATA PIC S9(9)V9(9) COMP-3.
PROCEDURE DIVISION.
A00-BEGIN.
DISPLAY "Enter data item (NUM-DATA) but SIZE = 3:"
LINE 1 COLUMN 14
UNDERLINED
ERASE SCREEN.
PERFORM ACCEPT-THREE 5 TIMES.
DISPLAY "Same data item (NUM-DATA) BUT SIZE = 10:" LINE PLUS 3
COLUMN 14
UNDERLINED.
PERFORM ACCEPT-TEN 5 TIMES.
STOP RUN.
ACCEPT-THREE.
ACCEPT NUM-DATA WITH CONVERSION PROTECTED SIZE 3
LINE PLUS COLUMN 14.
ACCEPT-TEN.
ACCEPT NUM-DATA WITH CONVERSION PROTECTED SIZE 10
LINE PLUS COLUMN 14
ON EXCEPTION
DISPLAY "TOO MANY NUMBERS--try this one again!!!"
COLUMN PLUS
REVERSED
GO TO ACCEPT-TEN.
Figure 11–8 Screen Display of NUM-DATA Using the PROTECTED Option
1
2
3
4
5
6
7
8
12345678901234567890123456789012345678901234567890123456789012345678901234567890
1
2
3
4
5
6
7
8
9
10
11
12
13
14
15
16
17
18
19
20
21
22
23
24
Enter data item (NUM−DATA) but SIZE = 3:
1
999
1.1
.12
.99
Same data item (NUM−DATA) BUT SIZE = 10:
1234567890 TOO MANY NUMBERS−−try this one again!!!
123456789
123456789.
1.23456789
.123456789
12345.6789
ZK−6109−GE
11–16 Using ACCEPT and DISPLAY Statements for Input/Output and Video Forms
Using ACCEPT and DISPLAY Statements for Input/Output and Video Forms
11.2 Designing Video Forms with ACCEPT and DISPLAY Statement Extensions
Example 11–8 Using the NO ECHO Phrase
IDENTIFICATION DIVISION.
PROGRAM-ID. NOSHOW.
ENVIRONMENT DIVISION.
DATA DIVISION.
WORKING-STORAGE SECTION.
01 PASSWORD PIC X(25).
PROCEDURE DIVISION.
A00-BEGIN.
DISPLAY "ENTER YOUR PASSWORD: " LINE 5 COLUMN 10
ERASE SCREEN.
ACCEPT PASSWORD WITH NO ECHO.
STOP RUN.
11.2.5.5 Assigning Default Values to Data Fields
Use the DEFAULT phrase to assign a value to an ACCEPT data item whenever:
•
The program requires a value, and the operator does not have a value for the
data item.
•
There is a high probability that the default value is identical in most of the
records, as where a constant (such as a state’s abbreviation) is used in a
mailing list.
When you use the DEFAULT phrase, the program executes as if the default
value had been typed in when you press Return. However, the value is not
automatically displayed on the screen.
You can also use the CURRENT VALUE phrase with the DEFAULT phrase to
specify that the default input value is the initial value of the ACCEPT destination
item.
Example 11–9 and Figure 11–9 show how to use the DEFAULT phrase to
specify default input values. (The value must be an alphanumeric data name,
a nonnumeric literal, or figurative constant.) The example uses the "TO-BESUPPLIED" abbreviations "[TBS]" and " ***[TBS]****" and +00.00 as the default
values for three data items in the program.
Using ACCEPT and DISPLAY Statements for Input/Output and Video Forms 11–17
Using ACCEPT and DISPLAY Statements for Input/Output and Video Forms
11.2 Designing Video Forms with ACCEPT and DISPLAY Statement Extensions
Example 11–9 Using the DEFAULT Phrase
IDENTIFICATION DIVISION.
PROGRAM-ID. TRYDEF.
ENVIRONMENT DIVISION.
DATA DIVISION.
WORKING-STORAGE SECTION.
01 DATA1A
PIC 9(12).
01 NAME1A
PIC XXXXX.
01 PRICEA
PIC S99V99.
01 DATA123.
02 NAME1B PIC XXXXX.
02
PIC XX VALUE SPACES.
02 DATA1B PIC XXXXXXXXXXXX.
02
PIC XXX VALUE SPACES.
02 PRICEB PIC $99.99-.
01 NAME-DEFAULT PIC XXXXX VALUE "[TBS]".
01 COL-NUM
PIC 99
VALUE 10.
PROCEDURE DIVISION.
A00-DEFAULT-TEST.
DISPLAY "*********PLEASE ENTER THE FOLLOWING INFORMATION*********"
LINE 5 COLUMN 15
REVERSED BLINKING
ERASE SCREEN.
DISPLAY "********************************************************"
LINE 7 COLUMN 15.
DISPLAY " Part
Part
Part
---------STORED AS-----------"
LINE 9 COLUMN 15.
DISPLAY " Name
Number
Price
Name
Number
Price"
LINE 10 COLUMN 15.
DISPLAY "Defaults --->[TBS] ***[TBS]**** +00.00"
LINE 11 COLUMN 2.
DISPLAY "----- ------------ ------"
LINE 12 COLUMN 15.
DISPLAY "********************************************************"
LINE 20 COLUMN 15.
DISPLAY "5. " REVERSED BLINKING LINE 18 COLUMN COL-NUM.
DISPLAY "4. " REVERSED BLINKING LINE 17 COLUMN COL-NUM.
DISPLAY "3. " REVERSED BLINKING LINE 16 COLUMN COL-NUM.
DISPLAY "2. " REVERSED BLINKING LINE 15 COLUMN COL-NUM.
DISPLAY "1. " REVERSED BLINKING LINE 14 COLUMN COL-NUM.
DISPLAY " " LINE 13 COLUMN 15.
PERFORM A05-GET-DATA 5 TIMES.
DISPLAY " " LINE 22 COLUMN 1.
STOP RUN.
(continued on next page)
11–18 Using ACCEPT and DISPLAY Statements for Input/Output and Video Forms
Using ACCEPT and DISPLAY Statements for Input/Output and Video Forms
11.2 Designing Video Forms with ACCEPT and DISPLAY Statement Extensions
Example 11–9 (Cont.) Using the DEFAULT Phrase
A05-GET-DATA.
ACCEPT NAME1A
PROTECTED
DEFAULT NAME-DEFAULT
LINE PLUS COLUMN 15 ERASE TO END OF LINE.
ACCEPT DATA1A
PROTECTED
DEFAULT "***[TBS]****"
COLUMN 21.
ACCEPT PRICEA
PROTECTED
WITH CONVERSION
DEFAULT ZERO
COLUMN 34.
MOVE NAME1A TO NAME1B.
MOVE DATA1A TO DATA1B.
MOVE PRICEA TO PRICEB.
DISPLAY DATA123 REVERSED COLUMN 44.
Figure 11–9 Accepting Data with the DEFAULT Phrase
1
2
3
4
5
6
7
8
12345678901234567890123456789012345678901234567890123456789012345678901234567890
1
2
3
4
5
6
7
8
9
10
11
12
13
14
15
16
17
18
19
20
21
22
23
24
*********PLEASE
*********PLEASE ENTER
ENTER THE
THE FOLLOWING
FOLLOWING INFORMATION*********
INFORMATION*********
********************************************************
Part
Part
Part
Name
Number
Price
Defaults −−−>[TBS] ***[TBS]**** +00.00
−−−−− −−−−−−−−−−−− −−−−−−
1.
1.
2.
2.
3.
3.
4.
4.
5.
5.
Bolt
000000000001 0.08
2
.02
Nut
29.95
Screw 11111111
Washr 123456789012 1
−−−−−−−−−STORED AS−−−−−−−−−−
Name
Number
Price
Bolt
[TBS]
Nut
Nut
Screw
Screw
Washr
Washr
000000000001
2
***[TBS]****
***[TBS]****
11111111
11111111
123456789012
123456789012
$00.08
$00.02
$29.95
$29.95
$00.00
$00.00
$01.00
$01.00
*********************************************************
ZK−6097−GE
Using ACCEPT and DISPLAY Statements for Input/Output and Video Forms 11–19
Using ACCEPT and DISPLAY Statements for Input/Output and Video Forms
11.2 Designing Video Forms with ACCEPT and DISPLAY Statement Extensions
11.2.6 Using Terminal Keys to Define Special Program Functions
Use the CONTROL KEY IN phrase of the ACCEPT statement to tailor your
screen-handling programs to give special meanings to any or all of these keys on
your terminal:
•
Cursor positioning keys (up arrow, down arrow, left arrow, and right arrow
keys)
•
Program function keys (PF1, PF2, PF3, and PF4)
•
Function keys (F6 to F20)
•
Keypad keys (if in application keypad mode) 0 to 9, minus ( – ), comma ( , ),
period ( . ), ENTER, FIND, INSERT HERE, REMOVE, SELECT, PREV
SCREEN, NEXT SCREEN
You can use the CONTROL KEY IN phrase to accept data and to terminate
it with a control key or to allow a user to press only a control key (for menu
applications).
Table 11–2 lists the characters returned to the data name specified in the
CONTROL KEY IN phrase.
Table 11–2 is for VT100 and later series terminals. Depending on your terminal
type, certain keys listed in this table are not applicable to your terminal keyboard.
Table 11–2 Compaq COBOL Characters Returned for Cursor Positioning,
Program Function, Function, Keypad, and Keyboard Keys
Characters Returned in the Data
Name Specified by CONTROL KEY IN
Key Name
Keypad or Keyboard
Name
First1
Remaining (Notes)
Cursor up
up arrow
CSI
A
Cursor down
down arrow
CSI
B
Cursor right
right arrow
CSI
C
Cursor left
left arrow
CSI
D
Program function
PF1
SS3
P
Program function
PF2
SS3
Q
Program function
PF3
SS3
R
Program function
PF4
SS3
S
Keypad
left blank
SS3
P
Keypad
center blank
SS3
Q
Keypad
right blank
SS3
R
Keypad
0
SS3
p
Keypad
1
SS3
q
Keypad
2
SS3
r
Keypad
3
SS3
s
1 The
CSI and SS3 characters are shown for your information only. You need not check for their
presence because the remaining characters are unique and need no qualification.
(continued on next page)
11–20 Using ACCEPT and DISPLAY Statements for Input/Output and Video Forms
Using ACCEPT and DISPLAY Statements for Input/Output and Video Forms
11.2 Designing Video Forms with ACCEPT and DISPLAY Statement Extensions
Table 11–2 (Cont.) Compaq COBOL Characters Returned for Cursor
Positioning, Program Function, Function, Keypad, and
Keyboard Keys
Characters Returned in the Data
Name Specified by CONTROL KEY IN
Key Name
Keypad or Keyboard
Name
First1
Remaining (Notes)
Keypad
4
SS3
t
Keypad
5
SS3
u
Keypad
6
SS3
v
Keypad
7
SS3
w
Keypad
8
SS3
x
Keypad
9
SS3
y
Keypad
-
SS3
m
Keypad
,
SS3
l
Keypad
.
SS3
n
Keypad
ENTER
SS3
M
Keypad
FIND
CSI
1~
Keypad
INSERT HERE
CSI
2~
Keypad
REMOVE
CSI
3~
Keypad
SELECT
CSI
4~
Keypad
PREV SCREEN
CSI
5~
Keypad
NEXT SCREEN
CSI
6~
Tab
Tab
9
Return
Return
13
Function key
HOLD SCREEN
Not Available
Function key
PRINT SCREEN
Not Available
Function key
SET-UP
Not Available
Function key
DATA/TALK
Not Available
Function key
BREAK
Not Available
Function key
F6
Function key
Function key
2
CSI
17~
F7
CSI
18~
F8
CSI
19~
Function key
F9
CSI
20~
Function key
F10
CSI
21~
Function key
F11 (ESC)
CSI
23~
Function key
F12 (BS)
CSI
24~
Function key
F13 (LF)
CSI
25~
Function key
F14
CSI
26~
1 The
CSI and SS3 characters are shown for your information only. You need not check for their
presence because the remaining characters are unique and need no qualification.
2 For
F6, you must have specified $ SET TERMINAL/NOLINE_EDITING before running your
program.
(continued on next page)
Using ACCEPT and DISPLAY Statements for Input/Output and Video Forms 11–21
Using ACCEPT and DISPLAY Statements for Input/Output and Video Forms
11.2 Designing Video Forms with ACCEPT and DISPLAY Statement Extensions
Table 11–2 (Cont.) Compaq COBOL Characters Returned for Cursor
Positioning, Program Function, Function, Keypad, and
Keyboard Keys
Characters Returned in the Data
Name Specified by CONTROL KEY IN
Key Name
Keypad or Keyboard
Name
First1
Remaining (Notes)
Function key
F15 (HELP)
CSI
28~
Function key
F16 (DO)
CSI
29~
Function key
F17
CSI
31~
Function key
F18
CSI
32~
Function key
F19
CSI
33~
Function key
F20
CSI
34~
Ctrl/A
1
Ctrl/B
2
Ctrl/C
Not Available
Ctrl/D
4
(on OpenVMS Alpha)
Ctrl/D
Results depend
on presence or
absence of the
AT END phrase
in the ACCEPT
statement
(on Tru64 UNIX)
Ctrl/E
5
Ctrl/F
6
Ctrl/G
7
Ctrl/H
8
Ctrl/I (Tab)
9
Ctrl/J
10
Ctrl/K
11
Ctrl/L
12
Ctrl/M (Return)
13
Ctrl/N
14
Ctrl/O
Not Available
(on OpenVMS Alpha)
Ctrl/O
15
(on Tru64 UNIX)
Ctrl/P
16
Ctrl/Q
Not Available
Ctrl/R
18
Ctrl/S
Not Available
Ctrl/T
Depends on
SET CONTROL
Setting
(on OpenVMS Alpha)
1 The
CSI and SS3 characters are shown for your information only. You need not check for their
presence because the remaining characters are unique and need no qualification.
(continued on next page)
11–22 Using ACCEPT and DISPLAY Statements for Input/Output and Video Forms
Using ACCEPT and DISPLAY Statements for Input/Output and Video Forms
11.2 Designing Video Forms with ACCEPT and DISPLAY Statement Extensions
Table 11–2 (Cont.) Compaq COBOL Characters Returned for Cursor
Positioning, Program Function, Function, Keypad, and
Keyboard Keys
Characters Returned in the Data
Name Specified by CONTROL KEY IN
Keypad or Keyboard
Name
First1
Remaining (Notes)
Ctrl/T
20
(on Tru64 UNIX)
Ctrl/U
21
Ctrl/V
22
Ctrl/W
23
Ctrl/X
24
Ctrl/Y
Not Available
(on OpenVMS Alpha)
Ctrl/Y
25
(on Tru64 UNIX)
Ctrl/Z
Results depend
on presence or
absence of the
AT END phrase
in the ACCEPT
statement
(on OpenVMS Alpha)
Ctrl/Z
Not Available
(on Tru64 UNIX)
Key Name
1 The
CSI and SS3 characters are shown for your information only. You need not check for their
presence because the remaining characters are unique and need no qualification.
The definition and value of the CSI and SS3 characters used in Table 11–2 follow:
01
01
01
01
SS3X
SS3 REDEFINES SS3X
CSIX
CSI REDEFINES CSIX
PIC
PIC
PIC
PIC
9999 COMP VALUE 143.
X.
9999 COMP VALUE 155.
X.
Figure 11–10 and Figure 11–11 show the Compaq COBOL control keys for various
terminals. The shaded keys correspond to the keypad names in Table 11–2, which
lists the characters returned to the application program.
Note
In Figure 11–11, your keyboard may differ slightly, but the Compaq
COBOL control keys are as pictured.
Example 11–10 shows you how to use the CONTROL KEY phrase to handle
arrow keys, program function keys, keypad keys, Ctrl/Z, Tab, and Return.
When you use this phrase, you allow program function keys and arrow keys, as
well as Return and Tab keys, to terminate input. This phrase also permits you to
use those keys to move the cursor and to make menu selections without typing
any data on the screen.
Using ACCEPT and DISPLAY Statements for Input/Output and Video Forms 11–23
Using ACCEPT and DISPLAY Statements for Input/Output and Video Forms
11.2 Designing Video Forms with ACCEPT and DISPLAY Statement Extensions
Figure 11–10 Compaq COBOL Control Keys on the Standard VT100 Keypad
and Keyboard
ONLINE
LOCAL KBD LOCKED
L1
L2
L3
L4
SET CLEAR CLEAR ALL
SET UP
TRANSMIT RECEIVE
80 132
TAB
TABS
LINE LOCAL A B TOGGLE 1 0 SPEED
SPEED COLUMNS RESET
Tab
Ctrl
Return
PF1
PF2
PF3
7
8
9
4
5
6
1
2
3
PF4
ENTER
Z
0
ZK−6099−GE
Figure 11–11 Compaq COBOL Control Keys on a Typical VT200 or Later
Keypad and Keyboard
Hold
Screen
Set−up
F6
(Cancel)
Break
F7
F8
F10
(Exit)
F9
F2
(BS)
F11
F13
(LF)
F4−
Hold Screen Lock
(INS/OVS)
Compose
Help
~
‘
!
1
@
2
Q
Tab
Ctrl
Shift
#
3
W
A
Lock
>
<
E
S
Z
$
4
R
D
X
%
5
T
F
C
^
6
Y
G
V
&
7
U
H
B
(
9
*
8
I
J
N
O
K
M
_
−
)
0
:
;
L
,
,
.
.
+
=
{
[
P
}
]
"
’
?
/
Return
Wait
F17
F18
F19
F20
Do
Find
Insert
Here
Re−
Move
PF1
Select
Select
Prev
Screen
Next
Screen
7
|
\
Shift
Compose
Character
PF2
PF3
8
9
4
5
6
1
2
3
PF4
−
,
Enter
0
ZK−1684−GE
Note
To activate the auxiliary keypad, your program must execute DISPLAY
ESC ‘‘=’’. You must also define ESC as the escape character. Refer to
Example 11–10.
In Example 11–10, the terminator key codes are displayed on the screen.
11–24 Using ACCEPT and DISPLAY Statements for Input/Output and Video Forms
Using ACCEPT and DISPLAY Statements for Input/Output and Video Forms
11.2 Designing Video Forms with ACCEPT and DISPLAY Statement Extensions
Example 11–10 Using the CONTROL KEY IN Phrase
IDENTIFICATION DIVISION.
PROGRAM-ID. SPECIAL.
ENVIRONMENT DIVISION.
CONFIGURATION SECTION.
SPECIAL-NAMES.
SYMBOLIC CHARACTERS
CR-VAL CSI-VAL Ctrl-Z-VAL SS3-VAL TAB-VAL ESC
ARE 14
156
27
144
10
28.
DATA DIVISION.
WORKING-STORAGE SECTION.
*
*
The code returned will be the same regardless of
*
terminal type.
*
01 CONTROL-KEY.
02 FIRST-CHAR-CONTROL-KEY PIC X.
88 CR
VALUE CR-VAL.
88 CSI
VALUE CSI-VAL.
88 Ctrl-Z
VALUE Ctrl-Z-VAL.
88 SS3
VALUE SS3-VAL.
88 TAB
VALUE TAB-VAL.
02 REMAINING-CHAR-CONTROL-KEY PIC XXXX.
88 UP-ARROW
VALUE "A".
88 DOWN-ARROW
VALUE "B".
88 RIGHT-ARROW
VALUE "C".
88 LEFT-ARROW
VALUE "D".
88 PF1
VALUE "P".
88 PF2
VALUE "Q".
88 PF3
VALUE "R".
88 PF4
VALUE "S".
88 AUX0
VALUE "p".
88 AUX1
VALUE "q".
88 AUX2
VALUE "r".
88 AUX3
VALUE "s".
88 AUX4
VALUE "t".
88 AUX5
VALUE "u".
88 AUX6
VALUE "v".
88 AUX7
VALUE "w".
88 AUX8
VALUE "x".
88 AUX9
VALUE "y".
88 AUXMINUS
VALUE "m".
88 AUXCOMMA
VALUE "l".
88 AUXPERIOD
VALUE "n".
88 AUXENTER
VALUE "M".
PROCEDURE DIVISION.
P0.
*
* DISPLAY ESC "=" puts you in alternate keypad mode
*
DISPLAY ESC "=".
DISPLAY " " ERASE SCREEN.
P1.
DISPLAY "Press a directional arrow, PF, Return, Tab, "
LINE 3 COLUMN 4.
DISPLAY "or auxiliary keypad key (Ctrl/Z stops loop)"
LINE 4 COLUMN 4.
ACCEPT CONTROL KEY IN CONTROL-KEY AT END GO TO P2.
(continued on next page)
Using ACCEPT and DISPLAY Statements for Input/Output and Video Forms 11–25
Using ACCEPT and DISPLAY Statements for Input/Output and Video Forms
11.2 Designing Video Forms with ACCEPT and DISPLAY Statement Extensions
Example 11–10 (Cont.) Using the CONTROL KEY IN Phrase
IF
IF
IF
IF
IF
IF
IF
IF
IF
IF
IF
IF
IF
IF
IF
IF
IF
IF
IF
IF
IF
IF
IF
IF
CR DISPLAY "RETURN" LINE 10 COLUMN 5 ERASE LINE GO TO P1.
TAB DISPLAY "\TAB" LINE 10 COLUMN 5 ERASE LINE GO TO P1.
PF1 DISPLAY "PF1" LINE 10 COLUMN 5 ERASE LINE GO TO P1.
PF2 DISPLAY "PF2" LINE 10 COLUMN 5 ERASE LINE GO TO P1.
PF3 DISPLAY "PF3" LINE 10 COLUMN 5 ERASE LINE GO TO P1.
PF4 DISPLAY "PF4" LINE 10 COLUMN 5 ERASE LINE GO TO P1.
UP-ARROW DISPLAY "UP-ARROW" LINE 10 COLUMN 5 ERASE LINE
GO TO P1.
DOWN-ARROW DISPLAY "DOWN-ARROW" LINE 10 COLUMN 5
ERASE LINE GO TO P1.
LEFT-ARROW DISPLAY "LEFT-ARROW" LINE 10 COLUMN 5
ERASE LINE GO TO P1.
RIGHT-ARROW DISPLAY "RIGHT-ARROW" LINE 10 COLUMN 5
ERASE LINE GO TO P1.
AUX0 DISPLAY "AUXILIARY KEYPAD 0" LINE 10 COLUMN 5
ERASE LINE GO TO P1.
AUX1 DISPLAY "AUXILIARY KEYPAD 1" LINE 10 COLUMN 5
ERASE LINE GO TO P1.
AUX2 DISPLAY "AUXILIARY KEYPAD 2" LINE 10 COLUMN 5
ERASE LINE GO TO P1.
AUX3 DISPLAY "AUXILIARY KEYPAD 3" LINE 10 COLUMN 5
ERASE LINE GO TO P1.
AUX4 DISPLAY "AUXILIARY KEYPAD 4" LINE 10 COLUMN 5
ERASE LINE GO TO P1.
AUX5 DISPLAY "AUXILIARY KEYPAD 5" LINE 10 COLUMN 5
ERASE LINE GO TO P1.
AUX6 DISPLAY "AUXILIARY KEYPAD 6" LINE 10 COLUMN 5
ERASE LINE GO TO P1.
AUX7 DISPLAY "AUXILIARY KEYPAD 7" LINE 10 COLUMN 5
ERASE LINE GO TO P1.
AUX8 DISPLAY "AUXILIARY KEYPAD 8" LINE 10 COLUMN 5
ERASE LINE GO TO P1.
AUX9 DISPLAY "AUXILIARY KEYPAD 9" LINE 10 COLUMN 5
ERASE LINE GO TO P1.
AUXMINUS DISPLAY "AUXILIARY KEYPAD -" LINE 10 COLUMN 5
ERASE LINE GO TO P1.
AUXCOMMA DISPLAY "AUXILIARY KEYPAD ," LINE 10 COLUMN 5
ERASE LINE GO TO P1.
AUXPERIOD DISPLAY "AUXILIARY KEYPAD ." LINE 10 COLUMN 5
ERASE LINE GO TO P1.
AUXENTER DISPLAY "AUXILIARY KEYPAD ENTER" LINE 10 COLUMN 5
ERASE LINE GO TO P1.
(continued on next page)
11–26 Using ACCEPT and DISPLAY Statements for Input/Output and Video Forms
Using ACCEPT and DISPLAY Statements for Input/Output and Video Forms
11.2 Designing Video Forms with ACCEPT and DISPLAY Statement Extensions
Example 11–10 (Cont.) Using the CONTROL KEY IN Phrase
DISPLAY "Not an allowable control key -"
"press the Return key to continue"
LINE 10 COLUMN 5
WITH BELL ERASE LINE.
ACCEPT CONTROL-KEY.
GO TO P1.
P2.
DISPLAY "Press the Return key to end this job"
LINE 11 COLUMN 5 ERASE LINE.
ACCEPT CONTROL KEY IN CONTROL-KEY LINE 12 COLUMN 5 ERASE LINE.
IF NOT CR GO TO P0
ELSE
DISPLAY "END OF JOB" LINE 13 COLUMN 35
BOLD BLINKING REVERSED BELL
ERASE SCREEN.
P3.
* DISPLAY ESC ">" WITH NO puts you out of alternate keypad mode
*
DISPLAY ESC ">" WITH NO.
STOP RUN.
Figure 11–12 shows a sample run of the program in Example 11–10 using the
right arrow terminal key.
To expand upon Example 11–10, you can, for example, accept data in addition
to specifying the CONTROL KEY phrase. This enables you to accept data and
determine what to do next based on the data. You can use the CONTROL KEY
phrase to move the cursor around on the screen or take a specific course of
action.
Using ACCEPT and DISPLAY Statements for Input/Output and Video Forms 11–27
Using ACCEPT and DISPLAY Statements for Input/Output and Video Forms
11.2 Designing Video Forms with ACCEPT and DISPLAY Statement Extensions
Figure 11–12 Screen Display of Program SPECIAL
1
2
3
4
5
6
7
8
12345678901234567890123456789012345678901234567890123456789012345678901234567890
1
2
3
4
5
6
7
8
9
10
11
12
13
14
15
16
17
18
19
20
21
22
23
24
Press a directional arrow, PF, RETURN, TAB,
or auxiliary keypad key (CTRL/Z stops loop)
RIGHT−ARROW
ZK−6100−GE
11.2.7 Using the EDITING Phrase
Specifying the EDITING phrase of the ACCEPT statement enables field editing.
Table 11–3 briefly describes the keys that the EDITING phrase enables. Refer to
the ACCEPT section of the Compaq COBOL Reference Manual for a complete list
of field editing keys.
Table 11–3 Key Functions for the EDITING Phrase
Key
Function
Description
Left arrow
Move-left
Moves the cursor one space to the left. If the
cursor is at the first character position of the
field, the terminal bell rings.
Right arrow
Move-right
Moves the cursor one space to the right. If
the cursor is one space beyond the rightmost
character position of the field, the terminal bell
rings.
F12 (BS)
Beginning-of-field
Positions the cursor to the first character
position of the field.
Ctrl/E
End-of-field
Moves the cursor one position beyond the
rightmost character position in the field.
Ctrl/U
Erase-field
Erases the entire field and moves the cursor to
the first character position of the field.
F14
Switch-mode
Switches the editing mode between insert and
overstrike.
Example 11–11 shows the sample code that produces the form in Figure 11–13.
(The Current Value field is provided for example purposes only.)
11–28 Using ACCEPT and DISPLAY Statements for Input/Output and Video Forms
Using ACCEPT and DISPLAY Statements for Input/Output and Video Forms
11.2 Designing Video Forms with ACCEPT and DISPLAY Statement Extensions
Example 11–11 EDITING Phrase Sample Code
.
.
.
PROCEDURE DIVISION.
A1000-BEGIN.
OPEN I-O EMP-FILE.
.
.
.
B1000-MODIFY.
DISPLAY "MODIFY EMPLOYEE INFORMATION FORM" ERASE SCREEN
AT LINE 2
COLUMN 8.
DISPLAY "Enter Employee Number : " AT LINE PLUS 2 COLUMN 8.
ACCEPT EMP-KEY
FROM LINE 4 COLUMN 32
PROTECTED WITH EDITING REVERSED
DEFAULT IS CURRENT
AT END
STOP RUN.
.
.
.
B2000-DISPLAY.
MOVE EMP-REC TO OUT-REC.
DISPLAY
DISPLAY
DISPLAY
DISPLAY
DISPLAY
DISPLAY
DISPLAY
DISPLAY
DISPLAY
DISPLAY
DISPLAY
DISPLAY
"Date of Hire : "
MON-IN
"-"
DAY-IN
"-"
YR-IN
"Current Value :"
MON-NUM
"-"
DAY-NUM
"-"
YR-NUM
AT LINE PLUS 2
AT
AT
AT
AT
AT
AT COLUMN 38.
AT
AT
AT
AT
AT
COLUMN
COLUMN
COLUMN
COLUMN
COLUMN
COLUMN
8.
24.
26.
27.
29.
30.
COLUMN
COLUMN
COLUMN
COLUMN
COLUMN
54.
56.
57.
59.
60.
DISPLAY
DISPLAY
DISPLAY
DISPLAY
"Department :"
AT LINE PLUS 2 COLUMN 8.
DEPT-IN
AT
COLUMN 21.
"Current Value :" AT COLUMN 38.
DEPT-NUM
AT
COLUMN PLUS.
DISPLAY
DISPLAY
DISPLAY
DISPLAY
"First Name :"
F-NAME-IN
"Current Value :" AT
F-NAME
AT LINE PLUS 2 COLUMN 8.
AT
COLUMN 21.
COLUMN 38.
AT
COLUMN PLUS.
DISPLAY
DISPLAY
DISPLAY
DISPLAY
"Last Name :"
L-NAME-IN
"Current Value :" AT
L-NAME
AT LINE PLUS 2 COLUMN 8.
AT
COLUMN 20.
COLUMN 38.
AT
COLUMN PLUS.
ACCEPT MON-NUM
FROM LINE 6 COLUMN 24
PROTECTED WITH EDITING REVERSED
DEFAULT IS CURRENT
AT END
STOP RUN.
DISPLAY MON-NUM
AT LINE 6
COLUMN 54.
(continued on next page)
Using ACCEPT and DISPLAY Statements for Input/Output and Video Forms 11–29
Using ACCEPT and DISPLAY Statements for Input/Output and Video Forms
11.2 Designing Video Forms with ACCEPT and DISPLAY Statement Extensions
Example 11–11 (Cont.) EDITING Phrase Sample Code
ACCEPT DAY-NUM
FROM LINE 6 COLUMN 27
PROTECTED WITH EDITING REVERSED
DEFAULT IS CURRENT
AT END
STOP RUN.
DISPLAY DAY-NUM
AT LINE 6
COLUMN 57.
ACCEPT YR-NUM
FROM LINE 6 COLUMN 30
PROTECTED WITH EDITING REVERSED
DEFAULT IS CURRENT
AT END
STOP RUN.
DISPLAY YR-NUM
AT LINE 6
COLUMN 60.
ACCEPT DEPT-NUM
FROM LINE 8 COLUMN 21
PROTECTED WITH EDITING REVERSED
DEFAULT IS CURRENT
AT END
STOP RUN.
DISPLAY DEPT-NUM
AT LINE 8
COLUMN 54.
ACCEPT F-NAME
FROM LINE 10 COLUMN 21
PROTECTED WITH EDITING REVERSED
DEFAULT IS CURRENT
AT END
STOP RUN.
DISPLAY F-NAME
AT LINE 10
COLUMN 54.
ACCEPT L-NAME
FROM LINE 12 COLUMN 20
PROTECTED WITH EDITING REVERSED
DEFAULT IS CURRENT
AT END
STOP RUN.
DISPLAY L-NAME
.
.
.
AT LINE 12
COLUMN 54.
Because the ACCEPT statements in Example 11–11 contain EDITING phrases,
a person using the form in Figure 11–13 can use any of the keys listed in
Table 11–3 for field editing purposes to make corrections or modifications.
11–30 Using ACCEPT and DISPLAY Statements for Input/Output and Video Forms
Using ACCEPT and DISPLAY Statements for Input/Output and Video Forms
11.3 Designing Video Forms with Screen Section ACCEPT and DISPLAY (Alpha)
Figure 11–13 Form with ACCEPT WITH EDITING Phrase
1
2
3
4
5
6
7
8
12345678901234567890123456789012345678901234567890123456789012345678901234567890
1
2
3
4
5
6
7
8
9
10
11
12
13
14
15
16
17
18
19
20
21
22
23
24
MODIFY EMPLOYEE INFORMATION FORM
Enter Employee Number : 1221
Current Value : 1221
Date of Hire :
Current Value : 11−22−88
11−22−88
Department : UB40
Current Value : UB40
First Name : HENRY
Current Value : HENRY
Last Name : JAMES
Current Value : JAMES
ZK−1516A−GE
11.3 Designing Video Forms with Screen Section ACCEPT and
DISPLAY (Alpha)
The Screen Section feature provides an efficient alternative to the ACCEPT and
DISPLAY extensions for designing video forms. Screen Section, which is based
on the X/Open CAE Specification for COBOL, is also a Compaq extension to the
ANSI Standard. It enables you to design video forms in a single section of your
Compaq COBOL program. Then, in the Procedure Division, you can accept or
display an entire screen of data with a single ACCEPT or DISPLAY statement,
instead of multiple statements.
You can design your form as follows:
1. In the SPECIAL-NAMES paragraph in the Environment Division, you can
optionally do the following:
•
Specify the cursor position with the CURSOR IS option.
•
Set up an indicator to discover the cause of termination of an ACCEPT
statement, with the CRT STATUS IS option.
For example:
SPECIAL-NAMES.
CURSOR IS CURSOR-POSITION
CRT STATUS IS CRT-STATUS.
2. You can use the Screen Section in the Data Division to define a screen
description entry to describe each input and output item within the video
form. Do this for each screen in your application.
Using ACCEPT and DISPLAY Statements for Input/Output and Video Forms 11–31
Using ACCEPT and DISPLAY Statements for Input/Output and Video Forms
11.3 Designing Video Forms with Screen Section ACCEPT and DISPLAY (Alpha)
For example:
SCREEN SECTION.
01 MENU-SCREEN BLANK SCREEN FOREGROUND-COLOR 7 BACKGROUND-COLOR 1.
02 MENU-SCREEN-2.
03 TITLE-BAR
FOREGROUND-COLOR 7 BACKGROUND-COLOR 4.
04 LINE 1 PIC X(80) FROM EMPTY-LINE.
04 LINE 1 COLUMN 32 VALUE "Daily Calendar".
See Section 11.3.1 for a description of the options available in the Screen
Section.
3. Then you use the ACCEPT and DISPLAY statements in the Procedure
Division with the screen description entries described in the Screen Section to
accept or display each entire screen or part of the screen. During a DISPLAY,
all output and update screen items are displayed. During an ACCEPT, all
input and update screen items are accepted.
For example:
DISPLAY MENU-SCREEN.
.
.
.
ACCEPT MENU-SCREEN.
11.3.1 Using Screen Section Options (Alpha)
You design your screens with screen description entries in the Screen Section
of the Data Division of your program. Three formats are available for a screen
description entry (and are completely defined in the Data Division chapter of the
Compaq COBOL Reference Manual):
•
Format 1 — A group screen item
•
Format 2 — An elementary output screen item with a literal value; it includes
the VALUE clause
•
Format 3 — An elementary output, input, or update screen item; it includes
the PICTURE clause
Table 11–4 shows the optional clauses you can use in a screen description entry
to specify character attributes, the formats to which they apply, and a summary
of their functions. (They are completely described in the Data Division chapter of
the Compaq COBOL Reference Manual.)
Table 11–4 Character Attribute Clauses for Screen Description Formats (Alpha)
Clause
Formats
Function
AUTO
1,3
Moves the cursor to the next field when the last
character of a field is entered.
BACKGROUNDCOLOR
1, 2, 3
Specifies by number (in the range 0–7) the screen
item’s background color (see the color list that follows).
BELL
2, 3
Sounds the audio tone on the workstation or terminal.
BLANK LINE
2, 3
Clears the line before displaying the screen item.
(continued on next page)
11–32 Using ACCEPT and DISPLAY Statements for Input/Output and Video Forms
Using ACCEPT and DISPLAY Statements for Input/Output and Video Forms
11.3 Designing Video Forms with Screen Section ACCEPT and DISPLAY (Alpha)
Table 11–4 (Cont.) Character Attribute Clauses for Screen Description Formats
(Alpha)
Clause
Formats
Function
BLANK SCREEN
1, 2, 3
Clears the screen before displaying the screen item.
BLANK WHEN
ZERO[ES]
3
Replaces zeros with spaces when a screen item’s value
is zero.
BLINK
2, 3
Causes the displayed item to blink.
COLUMN
NUMBER
2, 3
Specifies the horizontal position of an item on the
screen.
ERASE EOL
2, 3
Clears the line from the cursor position to the end.
ERASE EOS
2, 3
Clears the screen from the cursor position to the end.
FOREGROUNDCOLOR
1, 2, 3
Specifies by number (in range 0–7) the screen item’s
foreground color. See the color list that follows.
FULL
1, 3
Specifies that a screen item must either be left
completely empty or be entirely filled with data.
HIGHLIGHT
2, 3
Specifies that the field is to appear on the screen with
the highest intensity.
JUSTIFIED
RIGHT
3
Specifies nonstandard data positioning. This can cause
truncation of the leftmost characters if the sending
item is too large. Otherwise, this aligns the data at the
rightmost character position.
LINE NUMBER
2, 3
Specifies the vertical position of an item on the screen.
LOWLIGHT
2, 3
Specifies that the field is to appear on the screen with
the lowest intensity. If only two levels of intensity are
available, LOWLIGHT is the same as normal.
REQUIRED
1, 3
Specifies that at least one character must be entered in
the input or update field.
REVERSEVIDEO
2, 3
Specifies that the foreground and background colors be
exchanged.
SECURE
1, 3
Specifies that no characters are displayed when the
input field is entered.
SIGN LEADING
[SEPARATE]
1, 3
Specifies the existence of a sign character as the
leading character in the field. The SEPARATE option
is always in effect if the screen item has an ’S’ in the
PICTURE clause. Therefore, for a screen item, the sign
character never shares its position with a digit.
SIGN TRAILING
[SEPARATE]
1, 3
Specifies the existence of a sign character as the
trailing character in the field. The SEPARATE option
is always in effect if the screen item has an ’S’ in the
PICTURE clause. Therefore, for a screen item, the sign
character never shares its position with a digit.
UNDERLINE
2, 3
Specifies that each character of the field is to be
underlined when displayed.
USAGE DISPLAY
1, 3
Specifies the internal format of a data item as
DISPLAY (the default).
When you specify the foreground and background colors for a screen item, you
use numbers in the range 0–7, which represent specific colors as described in
Using ACCEPT and DISPLAY Statements for Input/Output and Video Forms 11–33
Using ACCEPT and DISPLAY Statements for Input/Output and Video Forms
11.3 Designing Video Forms with Screen Section ACCEPT and DISPLAY (Alpha)
Table 11–5. Note that these colors are supported only on terminals that support
ANSI Standard color sequences.1
Table 11–5 Color Table
Color
Color Value
Color
Color Value
Black
0
Red
4
Blue
1
Magenta
5
Green
2
Yellow/Brown
6
Cyan
3
White
7
11.3.1.1 Comparison of Screen Section Extensions (Alpha) with Other Extensions of ACCEPT
and DISPLAY
This section points out some of the major differences and similarities between the
Screen Section and non-Screen Section extensions to help you determine which to
use.
Similarities
There are significant similarities between the Screen Section feature and that of
the non-Screen Section screen formats, as follows:
•
You can clear part or all of your screen as you DISPLAY a screen. Each
output screen item within a screen description entry can specify an ERASE
option.
•
With all formats, if you do not specify the initial cursor position, by default it
will be at the upper left corner of the screen — screen coordinates (1,1), first
line, first column.
•
Each screen item within a screen description entry can specify a line and
column position. If the line and column are not specified for a screen item,
then the screen item begins immediately following the previous screen item.
Regardless of whether you display or accept the entire screen or only part of
the screen, the positioning of each screen item remains the same.
•
If you display escape or control sequences within a screen description entry,
you need to use absolute cursor positioning to get predictable results.
In a number of cases, a clause that you can use in the Screen Section of the
Data Division, in the screen description entry, accomplishes the same purpose
as a clause in the Procedure Division’s ACCEPT or DISPLAY statement (in a
non-Screen Section extended format). The difference is in the clauses’ names
(not interchangeable) and where you use them: in the Data Division’s Screen
Section, or in the Procedure Division with the ACCEPT or DISPLAY statement.
The following table shows these clauses:
Screen Section Clause
ACCEPT or DISPLAY Clause with Equivalent Effect
AUTO
AUTOTERMINATE
BLANK LINE
ERASE LINE
1
This does not include the VT100, VT200, VT300, VT400, and VT500 series terminals.
On workstations that emulate these terminal types, this restriction may not apply.
11–34 Using ACCEPT and DISPLAY Statements for Input/Output and Video Forms
Using ACCEPT and DISPLAY Statements for Input/Output and Video Forms
11.3 Designing Video Forms with Screen Section ACCEPT and DISPLAY (Alpha)
Screen Section Clause
ACCEPT or DISPLAY Clause with Equivalent Effect
BLANK SCREEN
ERASE SCREEN
BLINK
WITH BLINKING
ERASE EOL
ERASE TO END OF LINE
ERASE EOS
ERASE TO END OF SCREEN
HIGHLIGHT
BOLD
REVERSE-VIDEO
REVERSED
SECURE
WITH NO ECHO
UNDERLINE
UNDERLINED
Differences
There are also significant differences between the Screen Section (Alpha) and the
non-Screen Section screen formats. With the Screen Section:
•
You can define screen items that wrap onto multiple lines. The editing of
these fields during an ACCEPT operation differs from that of the other
extended formats of ACCEPT.
•
The use of editing keys during an ACCEPT is always allowed.
•
The size of each field (for an elementary screen item) is defined by the
PICTURE or VALUE clause.
•
Conversion is always performed during an ACCEPT; as the operator leaves
each field, Compaq COBOL performs field validation and conversion and
displays the resulting value.
•
The screen does not scroll during a Screen Section ACCEPT or DISPLAY. Any
fields that are positioned beyond the edge of the screen are truncated.
•
In addition to the line and column position for each screen item, you can also
specify a line and column position for the ACCEPT and DISPLAY statements.
By default, this position is at (1,1), so your screen item positions are offset
from the upper left corner of the screen. However, if you specify new starting
screen coordinates with the LINE and COLUMN options of the ACCEPT
or DISPLAY statement, you thereby resize the screen. Then any LINE and
COLUMN options specified in the screen description entry are positioned for
the resized screen coordinates.
For example, if you picture the usual terminal screen as follows:
+---------------+
|
|
|
|
|
|
|
|
|
|
+---------------+
the LINE and COLUMN values specified in the ACCEPT or DISPLAY
statement might resize the screen as shown in the following interior box:
Using ACCEPT and DISPLAY Statements for Input/Output and Video Forms 11–35
Using ACCEPT and DISPLAY Statements for Input/Output and Video Forms
11.3 Designing Video Forms with Screen Section ACCEPT and DISPLAY (Alpha)
+---------------+
|
|
| +-----------+
| |
|
| |
|
| |
|
+---+-----------+
It can be useful to specify LINE and COLUMN in both your screen description
entry and in your ACCEPT or DISPLAY statement. For example, in your
screen description entry, you could create a legend box, and then specify with
the DISPLAY statement’s LINE and COLUMN options the starting screen
coordinates of (1,60) to display the legend in the upper right corner of the
screen (starting in the 60th column of the first line). Elsewhere, you could
display the legend box, using the same screen description entry, at a different
position on the screen, by choosing different LINE and COLUMN options with
the DISPLAY statement.
•
The default value for an update screen item is the current value of the FROM
or USING data item. The default value for an input screen item is spaces or
zero, depending on the data type of the screen item.
If the operator terminates the ACCEPT before entering a value for each field,
the default value remains in the untouched screen items.
•
To catch any function keys that the operator presses, use the CRT STATUS
option. All control sequences are captured and processed by Compaq COBOL
and not returned to the application.
Refer to Section 11.2, and also the Compaq COBOL Reference Manual Data
Division chapter’s section on Screen Description and clauses, for details on these
features.
In Example 11–12 (Alpha only), a video form is designed for a daily calendar.
With it you can display appointments, schedule new appointments, cancel
appointments, and print appointments.
Example 11–12 Designing a Video Form for a Daily Calendar (Alpha)
IDENTIFICATION DIVISION.
PROGRAM-ID. MENU.
ENVIRONMENT DIVISION.
CONFIGURATION SECTION.
*
*
*
The SPECIAL-NAMES paragraph that follows provides for the
capturing of the F10 function key and for positioning of the
cursor.
SPECIAL-NAMES.
SYMBOLIC CHARACTERS
FKEY-10-VAL
ARE 11
CURSOR IS CURSOR-POSITION
CRT STATUS IS CRT-STATUS.
(continued on next page)
11–36 Using ACCEPT and DISPLAY Statements for Input/Output and Video Forms
Using ACCEPT and DISPLAY Statements for Input/Output and Video Forms
11.3 Designing Video Forms with Screen Section ACCEPT and DISPLAY (Alpha)
Example 11–12 (Cont.) Designing a Video Form for a Daily Calendar (Alpha)
DATA DIVISION.
WORKING-STORAGE SECTION.
*
*
CURSOR-LINE specifies the line and CURSOR-COL specifies the
column of the cursor position.
01 CURSOR-POSITION.
02 CURSOR-LINE
02 CURSOR-COL
*
*
*
Normal termination of the ACCEPT statement will result in a value
of ’0’ in KEY1. When the user presses F10, the value in KEY1 will
be ’1’ and FKEY-10 will be true.
01 CRT-STATUS.
03 KEY1
03 KEY2
88 FKEY-10
03 filler
*
*
*
01
01
01
01
01
01
01
01
01
01
*
*
*
*
PIC 99.
PIC 99.
PIC X.
PIC X.
VALUE FKEY-10-VAL.
PIC X.
The following data items are for a "Daily Calendar." It shows
the day’s appointments and allows appointments to be made,
canceled, and printed.
ACCEPT-ITEM1
APPT-NAME
APPT-DAY
APPT-MONTH
APPT-YEAR
APPT-HOUR
APPT-MINUTE
APPT-MERIDIEM
APPT-VERIFY
EMPTY-LINE
PIC
PIC
PIC
PIC
PIC
PIC
PIC
PIC
PIC
PIC
X.
X(160).
XX.
XX.
XX.
XX.
XX.
XX.
X.
X(80).
The SCREEN SECTION designs the Daily Calendar, with a menu
screen from which the user selects an option: to show
appointments, schedule an appointment, cancel an appointment,
and print the appointments.
SCREEN SECTION.
01 MENU-SCREEN BLANK SCREEN FOREGROUND-COLOR 7 BACKGROUND-COLOR 1.
02 MENU-SCREEN-2.
03 TITLE-BAR
FOREGROUND-COLOR 7 BACKGROUND-COLOR 4.
04 LINE 1 PIC X(80) FROM EMPTY-LINE.
04 LINE 1 COLUMN 32 VALUE "Daily Calendar".
03 LINE 7 COLUMN 26
PIC X TO ACCEPT-ITEM1.
03 VALUE " Show appointments for a day ".
03 LINE 9 COLUMN 26
PIC X TO ACCEPT-ITEM1.
03 VALUE " Schedule an appointment ".
03 LINE 11 COLUMN 26
PIC X TO ACCEPT-ITEM1.
03 VALUE " Cancel an appointment ".
03 LINE 13 COLUMN 26
PIC X TO ACCEPT-ITEM1.
03 VALUE " Print your appointments ".
(continued on next page)
Using ACCEPT and DISPLAY Statements for Input/Output and Video Forms 11–37
Using ACCEPT and DISPLAY Statements for Input/Output and Video Forms
11.3 Designing Video Forms with Screen Section ACCEPT and DISPLAY (Alpha)
Example 11–12 (Cont.) Designing a Video Form for a Daily Calendar (Alpha)
03 HELP-TEXT
FOREGROUND-COLOR 6 BACKGROUND-COLOR 0.
04 LINE 19 COLUMN 12
VALUE
" Use the arrow keys to move the cursor among menu items. ".
04 LINE 20 COLUMN 12
VALUE
" Press <Return> when the cursor is at the desired item. ".
04 LINE 21 COLUMN 12
VALUE
" Press <F10> to exit.
".
01 SCHEDULE-SCREEN BLANK SCREEN.
02 TITLE-BAR
FOREGROUND-COLOR 7 BACKGROUND-COLOR 4.
03 LINE 1 PIC X(80) FROM EMPTY-LINE.
03 LINE 1 COLUMN 30 VALUE "Schedule Appointment".
02 FIELDS-TEXT
FOREGROUND-COLOR 7 BACKGROUND-COLOR 1.
03 LINE 5 VALUE " Description of Appointment: ".
03 LINE PLUS 4 VALUE " Date of Appointment (DD/MM/YY): ".
03 COLUMN PLUS 5 VALUE "/ /".
03 LINE PLUS 2 VALUE " Time of Appointment (HH:MM mm): ".
03 COLUMN PLUS 5 VALUE ":".
02 FIELDS-INPUT
FOREGROUND-COLOR 7 BACKGROUND-COLOR 0 AUTO.
03 LINE 6 PIC X(160) TO APPT-NAME.
03 LINE 9 COLUMN 36 PIC XX USING APPT-DAY.
03 LINE 9 COLUMN 39 PIC XX USING APPT-MONTH.
03 LINE 9 COLUMN 42 PIC XX USING APPT-YEAR.
03 LINE 11 COLUMN 36 PIC XX USING APPT-HOUR.
03 LINE 11 COLUMN 39 PIC XX USING APPT-MINUTE.
03 LINE 11 COLUMN 42 PIC XX USING APPT-MERIDIEM.
02 HELP-TEXT
FOREGROUND-COLOR 6 BACKGROUND-COLOR 0.
03 LINE 16 COLUMN 18
VALUE " Use Cursor Keys to move within the fields. ".
03 LINE 17 COLUMN 18
VALUE " Press <Tab> to enter next field.
".
03 LINE 18 COLUMN 18
VALUE " Press <Return> when finished.
".
01 VERIFY-SUBSCREEN FOREGROUND-COLOR 7 BACKGROUND-COLOR 1.
02 LINE 16 COLUMN 1 ERASE EOS.
02 LINE 17 COLUMN 25 VALUE " Is this entry correct? (Y/N): ".
02 PIC X USING APPT-VERIFY AUTO.
PROCEDURE DIVISION.
P0.
DISPLAY MENU-SCREEN.
*
*
The cursor position is not within an item on the screen, so the
first item in the menu will be accepted first.
MOVE 0 TO CURSOR-LINE, CURSOR-COL.
(continued on next page)
11–38 Using ACCEPT and DISPLAY Statements for Input/Output and Video Forms
Using ACCEPT and DISPLAY Statements for Input/Output and Video Forms
11.3 Designing Video Forms with Screen Section ACCEPT and DISPLAY (Alpha)
Example 11–12 (Cont.) Designing a Video Form for a Daily Calendar (Alpha)
* The user moves the cursor with the arrow keys to the
* desired menu item (to show, schedule, cancel, or print
* appointments) and selects the item by pressing <Return>.
* If the user wishes to exit without selecting an option,
* the user can press the F10 function key.
ACCEPT MENU-SCREEN.
IF KEY1 EQUAL "0"
PERFORM OPTION_CHOSEN
ELSE IF KEY1 EQUAL "1" AND FKEY-10
DISPLAY "You pressed the F10 key; exiting..." LINE 22.
STOP RUN.
OPTION_CHOSEN.
*
*
*
*
For brevity, the sample program includes complete code
for the "Schedule Appointment" screen only. A complete
program for a calendar would also include code for
displaying, canceling, and printing the day’s appointments.
IF CURSOR-LINE = 7
DISPLAY "You selected Show Appointments" LINE 22.
IF CURSOR-LINE = 9
MOVE "01" TO APPT-DAY
MOVE "01" TO APPT-MONTH
MOVE "94" TO APPT-YEAR
MOVE "12" TO APPT-HOUR
MOVE "00" TO APPT-MINUTE
MOVE "AM" TO APPT-MERIDIEM
DISPLAY SCHEDULE-SCREEN
*
*
The user types the description, date, and time of the
appointment.
ACCEPT SCHEDULE-SCREEN
MOVE "Y" TO APPT-VERIFY
DISPLAY VERIFY-SUBSCREEN
*
*
The user is asked, "Is this entry correct?" Answer is
Y or N.
ACCEPT VERIFY-SUBSCREEN.
IF CURSOR-LINE = 11
DISPLAY "You selected Cancel Appointments" LINE 22.
IF CURSOR-LINE = 13
DISPLAY "You selected Print Appointments" LINE 22.
END PROGRAM MENU.
Using ACCEPT and DISPLAY Statements for Input/Output and Video Forms 11–39
Using ACCEPT and DISPLAY Statements for Input/Output and Video Forms
11.3 Designing Video Forms with Screen Section ACCEPT and DISPLAY (Alpha)
In Figures 11–14 and 11–15, the output from the sample program is shown.
11–40 Using ACCEPT and DISPLAY Statements for Input/Output and Video Forms
Using ACCEPT and DISPLAY Statements for Input/Output and Video Forms
11.3 Designing Video Forms with Screen Section ACCEPT and DISPLAY (Alpha)
Figure 11–14 MENU-SCREEN Output (Alpha)
+------------------------------------------------------------------------------+
|
Daily Calendar
|
|
|
|
|
|
|
|
|
|
|
|
Show appointments for a day
|
|
|
|
Schedule an appointment
|
|
|
|
Cancel an appointment
|
|
|
|
Print your appointments
|
|
|
|
|
|
|
|
|
|
|
|
Use the arrow keys to move the cursor among menu items.
|
|
Press <Return> when the cursor is at the desired item.
|
|
Press <F10> to exit.
|
|
|
|
|
|
|
|
|
+------------------------------------------------------------------------------+
Figure 11–15 SCHEDULE-SCREEN Output (Alpha)
+------------------------------------------------------------------------------+
|
Schedule Appointment
|
|
|
|
|
|
|
| Description of Appointment:
|
|Meeting with Bill and Susan
|
|
|
|
|
| Date of Appointment (DD/MM/YY): 01/03/94
|
|
|
| Time of Appointment (HH:MM mm): 11:00 AM
|
|
|
|
|
|
|
|
|
|
Use Cursor Keys to move within the fields.
|
|
Press <Tab> to enter next field.
|
|
Press <Return> when finished.
|
|
|
|
|
|
|
|
|
|
|
|
|
+------------------------------------------------------------------------------+
Using ACCEPT and DISPLAY Statements for Input/Output and Video Forms 11–41
12
Interprogram Communication
COBOL programs can communicate with each other, as well as with non-COBOL
programs. Program-to-program communication is conducted by using one (or
combinations) of the following:
•
The CALL statement
•
External data
•
cobcall routine
•
cobcancel routine
•
cobfunc routine
This chapter includes the following information about interprogram
communication:
•
Multiple COBOL program run units (Section 12.1)
•
COBOL program attributes (Section 12.2)
•
Transferring flow of control (Section 12.3)
•
Accessing another program’s Data Division (Section 12.4)
•
Communicating with contained COBOL programs (Section 12.5)
•
Calling Compaq COBOL programs from other languages (Alpha)
(Section 12.6)
•
Calling non-COBOL programs from Compaq COBOL (Section 12.7)
•
Special considerations for interprogram communication (Section 12.8)
12.1 Multiple COBOL Program Run Units
A multiple COBOL program run unit consists of either of the following:
•
One main (driver) program and one or more separately compiled programs;
each program may or may not have contained programs
•
One main program with one or more contained (nested) programs
Separately compiled programs can be concatenated in one source file, or can be
written as separate source files.
12.1.1 Examples of COBOL Run Units
Example 12–1 shows a run unit with three separately compiled programs, none of
which have contained programs. MAIN-PROGRAM (!) calls separate program
SUB1 ("), that calls separate program SUB2 (#).
Interprogram Communication 12–1
Interprogram Communication
12.1 Multiple COBOL Program Run Units
Example 12–1 Run Unit with Three Separately Compiled Programs
IDENTIFICATION DIVISION.
PROGRAM-ID. MAIN-PROGRAM. !
.
.
.
CALL SUB1.
.
.
.
IDENTIFICATION DIVISION.
PROGRAM-ID. SUB1.
"
.
.
.
CALL SUB2.
.
.
.
STOP RUN.
END PROGRAM MAIN-PROGRAM
EXIT PROGRAM.
END PROGRAM SUB1.
IDENTIFICATION DIVISION.
#
PROGRAM-ID. SUB2.
.
.
.
EXIT PROGRAM.
END PROGRAM SUB2.
Note
A separately compiled program has a nesting level number of 1. If this
program contains other source programs, it is the outermost containing
program. A contained program has a nesting level number greater
than 1.
Example 12–2 shows a run unit with one main program ($) and two contained
programs (SUB1 (%) is a directly contained program of MAIN-PROGRAM; SUB2
(&) is an indirectly contained program of MAIN-PROGRAM).
Example 12–3 shows a run unit with three separately compiled programs (’, +>,
and +?). One of the separately compiled programs, MAIN-PROGRAM (’), has
two directly contained programs, SUB1 and SUB2 (( and )).
12.1.2 Calling Procedures
A COBOL main (driver) program calls subprograms (contained or separately
compiled). Image execution begins and ends in the main program’s Procedure
Division. The program contains one or more CALL statements and is a calling
program.
A COBOL subprogram is called by a main program or another subprogram. The
subprogram may or may not contain CALL statements. If a subprogram contains
a CALL statement, it is both a calling and a called program. If the subprogram
does not contain a CALL statement, it is a called program only.
12–2 Interprogram Communication
Interprogram Communication
12.1 Multiple COBOL Program Run Units
Example 12–2 Run Unit with a Main Program and Two Contained Programs
IDENTIFICATION DIVISION.
PROGRAM-ID. MAIN-PROGRAM. $
.
.
.
CALL SUB1.
.
.
.
STOP RUN.
IDENTIFICATION DIVISION.
PROGRAM-ID. SUB1.
%
.
.
.
CALL SUB2.
EXIT PROGRAM.
IDENTIFICATION DIVISION.
&
PROGRAM-ID. SUB2.
.
.
.
EXIT PROGRAM.
END PROGRAM SUB2.
END PROGRAM SUB1.
END PROGRAM MAIN-PROGRAM.
Special Code for Programs Called ‘‘main’’ (Tru64 UNIX)
On the Tru64 UNIX operating system, if you have a main program called main,
that program preempts a COBOL Run-Time Library (RTL) initialization routine
also called main. This RTL routine is needed to make a CALL data-name
statement (or cobfunc, cobcall, cobcancel) work correctly. Your program
main must supply the necessary code by calling the cob_init routine in the RTL.
The cob_init routine specification (in C) is as follows:
void cob_init (
int argc,
char **argv,
char **envp
)
/*
/*
/*
/*
init the RTL */
argument count */
arguments */
environment variable pointers */
Note
A Compaq COBOL program called MAIN will only interfere with main if
it was compiled with the -names lowercase flag.
♦
12.2 COBOL Program Attributes
Any Compaq COBOL program can have the INITIAL clause in the PROGRAM-ID
paragraph. Data and files in a COBOL program can have the EXTERNAL
clause.
Interprogram Communication 12–3
Interprogram Communication
12.2 COBOL Program Attributes
Example 12–3 Run Unit with Three Separately Compiled Programs, One with
Two Contained Programs
IDENTIFICATION DIVISION.
PROGRAM-ID. MAIN-PROGRAM. ’
.
.
.
CALL SUB1.
CALL SUB2.
.
STOP RUN.
IDENTIFICATION DIVISION.
PROGRAM-ID. SUB1.
(
.
.
.
CALL SUB3.
EXIT PROGRAM.
END PROGRAM SUB1.
IDENTIFICATION DIVISION.
)
PROGRAM-ID. SUB2.
.
.
.
EXIT PROGRAM.
END PROGRAM SUB2.
END PROGRAM MAIN-PROGRAM.
IDENTIFICATION DIVISION.
PROGRAM-ID. SUB3.
+>
.
.
.
CALL SUB4.
.
.
.
STOP RUN.
IDENTIFICATION DIVISION.
PROGRAM-ID. SUB4.
+?
.
.
.
EXIT PROGRAM.
12.2.1 The INITIAL Clause
A COBOL program with an INITIAL clause is returned to its initial state
whenever that program exits. This ensures that it will be in its initial state the
next time it is called.
During this initialization process, all internal program data whose description
contains a VALUE clause is initialized to that defined value. Any item whose
description does not include a VALUE clause will be initialized, and contain an
undefined value.
When an INITIAL clause is present and when the program is called, an implicit
CLOSE statement executes for all files in the open mode associated with internal
file connectors.
12–4 Interprogram Communication
Interprogram Communication
12.2 COBOL Program Attributes
When an INITIAL clause is not present, the status of the files and internal
program data are the same as when the called program was exited.
The initial attribute is attained by specifying the INITIAL clause in the program’s
PROGRAM-ID paragraph. For example:
IDENTIFICATION DIVISION.
PROGRAM-ID. TEST-PROG INITIAL.
12.2.2 The EXTERNAL Clause
Storage of data can be external or internal to the program in which the data
is declared. A file connector can also be external or internal to the program in
which it is defined.
External data or files can be referenced by every program in a run unit that
describes that data or those files as external.
The EXTERNAL clause indicates that data or a file is external. This clause is
specified only in File Description entries in the FILE SECTION or in Record
Description entries in the WORKING-STORAGE Section. The EXTERNAL clause
is one method of sharing data between programs. For example, in the following
Working-Storage Section entry, the data items in RECORD-1 are available to
any program in the image that also describes RECORD-1 and its data items as
EXTERNAL:
01 RECORD-1 EXTERNAL.
03 ITEMA PIC X.
03 ITEMB PIC X(20).
03 ITEMC PIC 99.
Note
EXTERNAL files and data must be described identically in all programs
in which they are defined.
12.3 Transferring Flow of Control
You control a multiple program run unit sequence by executing the following:
•
A controlling CALL statement in the calling program (main or subprogram)
•
An EXIT PROGRAM statement in the called subprogram
Contained COBOL programs have additional communication mechanisms that
are explained in Section 12.5.
12.3.1 The CALL Statement
A CALL statement transfers the run unit’s flow of control from the calling
program to the beginning of the called subprogram’s Procedure Division. Refer to
the Compaq COBOL Reference Manual for the CALL statement format.
The first time the called subprogram gains the flow of control, it is in its initial
state. Thereafter, each time it is called its state is the same as the last exit from
that program, except when: ( 1 ) the called program has the INITIAL clause, or
( 2 ) the calling program cancels the called program.
Interprogram Communication 12–5
Interprogram Communication
12.3 Transferring Flow of Control
Note
A program cannot cancel itself nor can any program cancel the program
that called it.
In COBOL programs, to call a routine named SPECIALROUTINE from an
overlying COBOL program you might use:
MOVE "SPECIALROUTINE" TO ROUTINE-NAME.
CALL ROUTINE-NAME.
If you need to call SPECIALROUTINE from a program in another language, use
cobcall or cobfunc.
12.3.2 Nesting CALL Statements
A called subprogram can itself transfer control flow after receiving control from
a main program or another subprogram. This technique is known as CALL
statement nesting. For example, Figure 12–1 shows a nested image that executes
a series of three CALL statements from three separate programs.
Figure 12–1 Nesting CALL Statements
MAINPROG calls SUB,
SUB then calls SUBA
SUBA then calls SUBB
1
2
SUB
MAINPROG
6
3
SUBA
5
SUBB
4
ZK−1475−GE
The MAINPROG, SUB1, and SUB2 programs in Example 12–4 illustrate their
execution sequence by displaying a series of 12 messages on the default output
device. Image execution begins in MAINPROG with message number 1. It ends
in MAINPROG with message number 12. The image’s message sequence is
shown following the program listings.
Example 12–4 Execution Sequence of Nested CALL Statements
IDENTIFICATION DIVISION.
*
* MAINPROG is a calling program only
*
PROGRAM-ID. MAINPROG.
ENVIRONMENT DIVISION.
DATA DIVISION.
PROCEDURE DIVISION.
(continued on next page)
12–6 Interprogram Communication
Interprogram Communication
12.3 Transferring Flow of Control
Example 12–4 (Cont.) Execution Sequence of Nested CALL Statements
BEGIN.
DISPLAY " 1. MAINPROG has control first.
DISPLAY " 2. MAINPROG transfers control to SUB1
DISPLAY "
upon executing the following CALL.
CALL "SUB1"
DISPLAY "11. MAINPROG has control last.
DISPLAY "12. MAINPROG terminates the entire image upon
DISPLAY "
execution of the STOP RUN statement.
STOP RUN.
IDENTIFICATION DIVISION.
*
* SUB1 is both a called and calling subprogram
*
*
It is called by MAINPROG
*
*
It then calls SUB2
PROGRAM-ID. SUB1.
ENVIRONMENT DIVISION.
DATA DIVISION.
PROCEDURE DIVISION.
BEGIN.
DISPLAY " 3.
This is the entry point to SUB1.
DISPLAY " 4. SUB1 now has control.
DISPLAY " 5. SUB1 transfers control to SUB2.
CALL "SUB2"
DISPLAY " 9. SUB1 regains control
DISPLAY "10.
after executing the following
DISPLAY "
EXIT PROGRAM statement.
EXIT PROGRAM.
IDENTIFICATION DIVISION.
*
* SUB2 is called subprogram only
*
*
It is called by SUB1
*
PROGRAM-ID. SUB2.
ENVIRONMENT DIVISION.
DATA DIVISION.
PROCEDURE DIVISION.
BEGIN.
DISPLAY " 6.
This is the entry point to SUB2.
DISPLAY " 7. SUB2 now has control.
DISPLAY " 8. SUB2 returns control to SUB1
DISPLAY "
after executing the following
DISPLAY "
EXIT PROGRAM statement.
EXIT PROGRAM.
END PROGRAM SUB2.
END PROGRAM SUB1.
END PROGRAM MAINPROG.
".
".
".
".
".
".
".
".
".
".
".
".
".
".
".
".
".
Example 12–5 shows the messages printed to the default output device when the
programs in Example 12–4 are run.
Interprogram Communication 12–7
Interprogram Communication
12.3 Transferring Flow of Control
Example 12–5 Sequence of Messages Displayed When Example 12–4 Is Run
1. MAINPROG has control first.
2. MAINPROG transfers control to SUB1
upon executing the following CALL.
3.
This is the entry point to SUB1.
4. SUB1 now has control.
5. SUB1 transfers control to SUB2.
6.
This is the entry point to SUB2.
7. SUB2 now has control.
8. SUB2 returns control to SUB1
after executing the following
EXIT PROGRAM statement.
9. SUB1 regains control
10.
after executing the following
EXIT PROGRAM statement.
11. MAINPROG has control last.
12. MAINPROG terminates the entire image upon
execution of the STOP RUN statement.
12.3.3 The EXIT PROGRAM Statement
To return control to the calling program, the called subprogram executes an EXIT
PROGRAM statement.
You can include more than one EXIT PROGRAM statement in a subprogram.
However, if it appears in a consecutive sequence of imperative statements, the
EXIT PROGRAM statement must appear as the last statement of the sequence.
For example:
IF A = B DISPLAY "A equals B", EXIT PROGRAM.
READ INPUT-FILE
AT END DISPLAY "End of input file"
PERFORM END-OF-FILE-ROUTINE
EXIT PROGRAM.
If you do not include an EXIT PROGRAM statement in a subprogram, the
compiler generates one at the end of the program.
On executing an EXIT PROGRAM statement in a called subprogram, control
returns to the statement following the calling program’s CALL statement or the
first imperative statement in a NOT ON EXCEPTION clause specified for that
CALL statement.
On executing an EXIT PROGRAM statement in a main program, the EXIT
PROGRAM is ignored and control continues with the next statement.
Figure 12–2 shows how control is passed between programs.
12–8 Interprogram Communication
Interprogram Communication
12.3 Transferring Flow of Control
Figure 12–2 Transfer of Control Flow from a Main Program to Multiple Subprograms
Sharing Execution Control
from a Main Program to Multiple Subprograms
IDENTIFICATION DIVISION. IDENTIFICATION DIVISION. IDENTIFICATION DIVISION. IDENTIFICATION DIVISION.
PROGRAM−ID. MAINPROG.
PROGRAM−ID. SUB.
PROGRAM−ID. SUBA.
PROGRAM−ID. SUBB.
ENVIRONMENT DIVISION.
ENVIRONMENT DIVISION.
ENVIRONMENT DIVISION.
ENVIRONMENT DIVISION.
DATA DIVISION.
DATA DIVISION.
DATA DIVISION.
DATA DIVISION.
PROCEDURE DIVISION.
PROCEDURE DIVISION.
PROCEDURE DIVISION.
PROCEDURE DIVISION.
BEGIN.
1
BEGIN.
3
BEGIN.
5
4
2
CALL "SUBA".
CALL "SUB".
EXIT PROGRAM.
STOP RUN.
10
6
7
.
.
.
CALL "SUBB".
9
BEGIN.
EXIT PROGRAM.
8
EXIT PROGRAM.
ZK−1474−GE
12.3.4 CALL Literal Versus CALL Data Name
CALL data name requires that all modules be specified to link the run unit. In
Example 12–6 with 3 files (C1.COB, C2.COB, and C3.COB), there is no link-time
reference to C3, but the C3 module must be explicitly included in the link of the
run unit so that the C3 reference can be dynamically resolved at run-time.
Example 12–6 CALL Literal Versus CALL Data Name
IDENTIFICATION DIVISION.
PROGRAM-ID. C1.
ENVIRONMENT DIVISION.
DATA DIVISION.
WORKING-STORAGE SECTION.
01 W1 PIC XX VALUE "C3".
PROCEDURE DIVISION.
P0. DISPLAY "***C1***".
CALL "C2".
CALL W1.
STOP RUN.
IDENTIFICATION DIVISION.
PROGRAM-ID. C2.
ENVIRONMENT DIVISION.
DATA DIVISION.
PROCEDURE DIVISION.
P0. DISPLAY "***C2***".
EXIT PROGRAM.
IDENTIFICATION DIVISION.
PROGRAM-ID. C3.
ENVIRONMENT DIVISION.
DATA DIVISION.
PROCEDURE DIVISION.
P0. DISPLAY "***C3***".
EXIT PROGRAM.
Interprogram Communication 12–9
Interprogram Communication
12.3 Transferring Flow of Control
Results for OpenVMS:
$ cobol c1,c2,c3
$ link c1
%LINK-W-NUDFSYMS, 1 undefined symbol:
%LINK-I-UDFSYM, C2
$ link c1,c2
$ run c1
***C1***
***C2***
%COB-F-CALL_FAILED, call failed to find program C3
$ link c1,c2,c3
$ run c1
***C1***
***C2***
***C3***
Results for Tru64 UNIX:
csh> cobol c1.cob
ld:
Unresolved:
c2
cobol: Severe: Failed while trying to link.
csh> cobol c1.cob c2.cob
c1.cob:
c2.cob:
csh> a.out
***C1***
***C2***
cobrtl: severe: call failed to find program C3
csh> cobol c1.cob c2.cob c3.cob
c1.cob:
c2.cob:
c3.cob:
csh> a.out
***C1***
***C2***
***C3***
12.4 Accessing Another Program’s Data Division
In a multiple COBOL program run unit, a called subprogram can access some of
its calling program’s Data Division. The calling program controls how much of it
will be accessible to the called subprogram in the following ways:
•
The USING phrase in both the CALL statement and the Procedure Division
header (see Section 12.4.1)
•
The Linkage Section (see Section 12.4.2)
•
The EXTERNAL clause (see Section 12.2.2)
•
The GLOBAL clause (see Section 12.5.2)
12–10 Interprogram Communication
Interprogram Communication
12.4 Accessing Another Program’s Data Division
12.4.1 The USING Phrase
To access a calling program’s Data Division, use a CALL statement in the calling
program and a Procedure Division USING phrase in the called program. The
USING phrases of both the CALL statement and the Procedure Division header
must contain an equal number of data names. (See Figure 12–3.)
Figure 12–3 Accessing Another Program’s Data Division
IDENTIFICATION DIVISION.
IDENTIFICATION DIVISION.
PROGRAM−ID. MAINPROG.
PROGRAM−ID. SUB.
ENVIRONMENT DIVISION.
ENVIRONMENT DIVISION.
DATA DIVISION.
DATA DIVISION.
WORKING−STORAGE SECTION.
LINKAGE SECTION.
01
01
01
01
01
01
01
01
A
B
C
D
PICTURE
PICTURE
PICTURE
PICTURE
X.
9.
XX.
99.
PROCEDURE DIVISION.
START−UP.
1
2
.
.
.
CALL "SUB" USING A, B, C, D.
.
.
4
.
STOP RUN.
PART
AMOUNT
COST
COLOR
PICTURE
PICTURE
PICTURE
PICTURE
X.
9.
99.
XX.
PROCEDURE DIVISION USING PART,
AMOUNT,
COLOR,
SUB−START−UP.
.
COST.
.
3
.
.
.
.
EXIT PROGRAM.
ZK−1731−GE
In Figure 12–3, when execution control transfers to SUB, it can access the four
data items in the calling program by referring to the data names in its Procedure
Division USING phrase. For example, the data names correspond as follows:
Data Name in
MAINPROG
(Calling Program)
Corresponding Data Name in SUB
(Called Subprogram)
A
PART
B
AMOUNT
C
COLOR
D
COST
The CALL statement can make data available to the called program by the
following argument-passing mechanisms:
•
REFERENCE—The address of (pointer to) the argument (arg) is passed to
the calling program. This is the default mechanism.
Interprogram Communication 12–11
Interprogram Communication
12.4 Accessing Another Program’s Data Division
•
CONTENT—The address of a copy of the contents of arg is passed to the
called program. Note that since a copy of the data is passed, the called
program cannot change the original calling program data.
•
VALUE—The value of arg is passed to the called program. If arg is a data
name, its description in the Data Division can be as follows: ( a ) COMP usage
with no scaling positions (the PICTURE clause can specify no more than nine
digits) and ( b ) COMP-1 usage.
•
On OpenVMS, DESCRIPTOR—The address of (pointer to) the data item’s
descriptor is passed to the called program. ♦
(Note that BY DESCRIPTOR is not supported by Tru64 UNIX. Refer to the
Compaq COBOL Reference Manual, the CALL statement.)
•
OMITTED—A value equivalent to BY VALUE 0 is passed to the called
program. Note that OMITTED does not change the default mechanism.
Note
A called COBOL subprogram must have arguments passed to it using
BY REFERENCE, which is the default, or BY CONTENT. BY VALUE,
OMITTED, and BY DESCRIPTOR are Compaq extensions and will not
work as expected if passed to a COBOL program. These argumentpassing mechanisms are necessary when calling Run-Time Library
Routines and system service routines as described in Chapter 13.
The mechanism for each argument in the CALL statement USING phrase
must be the same as the mechanism for each argument in the called program’s
parameter list.
If the BY REFERENCE phrase is either specified or implied for a parameter,
the called program references the same storage area for the data item as the
calling program. This mechanism ensures that the contents of the parameter in
the calling program are always identical to the contents of the parameter in the
called program.
If the BY CONTENT phrase is either specified or implied for a parameter, only
the initial value of the parameter is made available to the called program.
The called program references a separate storage area for the data item. This
mechanism ensures that the called program cannot change the contents of the
parameter in the calling program’s USING phrase. However, the called program
can change the value of the data item referenced by the corresponding data name
in the called program’s Procedure Division header.
Once a mechanism is established in a CALL statement, successive arguments
default to the established mechanism until a new mechanism is used. For
example:
CALL "TESTPRO" USING ITEM-A
BY VALUE ITEM-B
Note that ITEM-A is passed using the BY REFERENCE phrase and that ITEM-B
is passed using the BY VALUE phrase.
If the OMITTED phrase is specified for a parameter, the established call
mechanism does not change.
12–12 Interprogram Communication
Interprogram Communication
12.4 Accessing Another Program’s Data Division
One other mechanism of the CALL verb is the ability to use a GIVING phrase in
the CALL statement. This allows the subprogram to return a value through the
data item in the GIVING phrase. For example:
CALL "FUNCTION" USING ITEMA ITEMB
GIVING ITEMC.
Values can also be returned through the BY REFERENCE parameter in the
USING phrase. However, the GIVING phrase uses the return value by immediate
value mechanism. Use of this mechanism requires that the GIVING result
(ITEMC) be an elementary integer numeric data item with COMP, COMP-1, or
COMP-2 usage and no scaling positions.
The RETURN-CODE special register provides an alternative mechanism for
returning a value from a called program to the calling program.
The order in which USING identifiers appear in both calling and called programs
determines the correspondence of single sets of data available to the called
subprogram. The correspondence is by position, not by name.
12.4.2 The Linkage Section
You must define each data name from the Procedure Division header’s USING
data name list in the called subprogram’s Linkage Section. For example:
LINKAGE SECTION.
01
01
01
01
01
PART
AMOUNT
INVOICE
COLOR
COST
PICTURE...
PICTURE...
PICTURE...
PICTURE...
PICTURE...
PROCEDURE DIVISION USING PART, AMOUNT, COLOR, COST.
Of those data items you define in the Linkage Section, only those named in the
calling program’s Procedure Division header’s USING phrase are accessible to
the called program. In the previous example, INVOICE is not accessible from the
called program.
When a subprogram references a data name from the Procedure Division header’s
USING data name list, the subprogram processes it according to the definition in
its Linkage Section.
A called program’s Procedure Division can reference data names in its Linkage
Section only if it references one of the following:
•
Any data item named in the Procedure Division USING data-name-list
•
A data item that is subordinate to a Linkage Section data item in the
Procedure Division USING data-name-list
•
Any other association with a data item in the Procedure Division USING
data-name-list; for example, index-name, redefinition, and so on
In Figure 12–4, SUB is called by MAINPROG. Because MAINPROG names
FILE-RECORD and WORK-RECORD in its CALL ‘‘SUB’’ USING statement,
SUB can reference these data names just as if they were in its own Data
Division. However, SUB accesses these two data items with its own data names,
F-RECORD and W-RECORD.
Interprogram Communication 12–13
Interprogram Communication
12.5 Communicating with Contained COBOL Programs
Figure 12–4 Defining Data Names in the Linkage Section
IDENTIFICATION DIVISION.
IDENTIFICATION DIVISION.
PROGRAM−ID. MAINPROG.
PROGRAM−ID. SUB.
ENVIRONMENT DIVISION.
ENVIRONMENT DIVISION.
DATA DIVISION.
DATA DIVISION.
FILE SECTION.
FILE SECTION.
01 FILE−RECORD PICTURE ...
WORKING−STORAGE SECTION.
WORKING−STORAGE SECTION.
01 WORK−RECORD PICTURE ...
LINKAGE SECTION.
01 F−RECORD PICTURE ...
01 W−RECORD PICTURE ...
PROCEDURE DIVISION.
1
BEGIN.
CALL "SUB" USING FILE−RECORD
WORK−RECORD.
STOP RUN.
PROCEDURE DIVISION USING F−RECORD
W−RECORD.
BEGIN.
.
3
2
.
.
EXIT PROGRAM.
4
ZK−1477−GE
12.5 Communicating with Contained COBOL Programs
A contained COBOL program is a subprogram nested in another COBOL program
(the containing program). The complete source of the contained program is found
within the containing program. A contained program can also be a containing
program.
A COBOL containing/contained program provides you with program and data
attributes that noncontained COBOL programs do not have. These attributes,
described in the next several sections, often allow you to more easily share and
more conveniently access COBOL data items and other program resources.
This COBOL programming and data structuring capability encourages modular
programming. In modular programming, you divide the solution of a large data
processing problem into individual parts (the contained programs) that can be
developed relatively independently.
Consequently, the use of the COBOL containing/contained block structure as
a modular programming design can increase program efficiency and assist in
program modification and maintainability.
The contained program uses all calling procedures described in Sections 12.3
and 12.4. However, when a contained program includes the COMMON clause (a
program attribute) and the GLOBAL clause (a data and file trait), the additional
rules described in the following sections apply.
12–14 Interprogram Communication
Interprogram Communication
12.5 Communicating with Contained COBOL Programs
12.5.1 The COMMON Clause
The COMMON clause is a program attribute that can be applied to a directly
contained program. The COMMON clause is a means of overriding normal
scoping rules for program names, namely that a program that does not possess
the common attribute and that is directly contained within another program can
be referenced only by statements included in that containing program. For more
information on Scope of Names rules, refer to the Compaq COBOL Reference
Manual.
The common attribute is attained by specifying the COMMON clause in a
program’s Identification Division. A program that possesses the common attribute
can be referenced by statements included in that containing program and by any
programs directly or indirectly contained in that containing program, except the
program possessing the common attribute and any programs contained within it.
Example 12–7 shows a run unit that has a COBOL program (PROG-MAIN)
(!) with three contained programs (", #, and $); one of which ((") has the
COMMON clause. The example indicates which programs can call the common
program.
Example 12–7 Using the COMMON Clause
IDENTIFICATION DIVISION.
PROGRAM-ID. PROG-MAIN. !
.
.
.
CALL PROG-NAME-B
.
.
.
IDENTIFICATION DIVISION.
PROGRAM-ID. PROG-NAME-B IS COMMON PROGRAM. "
.
.
.
IDENTIFICATION DIVISION.
PROGRAM-ID. PROG-NAME-D. #
.
.
.
.
.
END PROGRAM PROG-NAME-D.
END PROGRAM PROG-NAME-B.
IDENTIFICATION DIVISION.
PROGRAM-ID. PROG-NAME-C. $
.
CALL PROG-NAME-B
.
.
END PROGRAM PROG-NAME-C.
END PROGRAM PROG-MAIN.
PROG-NAME-B (") and PROG-NAME-C ($) are directly contained in PROGMAIN (!); PROG-NAME-D (#) is indirectly contained in PROG-MAIN.
Interprogram Communication 12–15
Interprogram Communication
12.5 Communicating with Contained COBOL Programs
PROG-MAIN (!) can call PROG-NAME-B (") because PROG-MAIN directly
contains PROG-NAME-B. PROG-NAME-B (") can call PROG-NAME-D (#)
because PROG-NAME-B directly contains PROG-NAME-D.
PROG-NAME-C ($) can call PROG-NAME-B (") because:
•
PROG-NAME-C is not contained in PROG-NAME-B
•
PROG-NAME-B has the common attribute
•
PROG-NAME-C is contained by PROG-MAIN
However, PROG-NAME-D (#) cannot call PROG-NAME-B (") because PROGNAME-D (#) is contained within PROG-NAME-B ("). Similarly, PROG-NAME-D
(#) cannot call PROG-NAME-C ($) because PROG-NAME-C ($) is not visible
to PROG-NAME-D (#). If PROG-NAME-C ($) was made COMMON it could
call PROG-NAME-D (#). Additionally, PROG-NAME-C ($) cannot call PROGNAME-D (#) because PROG-NAME-C ($) is outside the scope of PROG-NAME-B
(").
12.5.2 The GLOBAL Clause
Data and files can be described as either global or local. A local name can be
referenced only by the program that declares it. A global name is declared in
only one program but can be referenced by both that program and any program
contained in the program that declares the global name.
Some names are always global, other names are always local, and some names
are either local or global depending on specifications in the program that declares
the names. For more information on Scope of Names rules, refer to the Compaq
COBOL Reference Manual.
12.5.2.1 Sharing GLOBAL Data
A data name is global if the GLOBAL clause is specified in the Data Description
entry by which the data name is declared or in another entry to which that
Data Description entry is subordinate. If a program is contained within another
program, both programs may reference data possessing the global attribute. The
following example shows the Working-Storage Section of a containing program
MAINPROG. Any contained program in MAINPROG, as well as program
MAINPROG, can reference that data (unless the contained program declares
other data with the same name).
WORKING-STORAGE SECTION.
01
CUSTOMER-FILE-STATUS
01
REPLY
01
ACC-NUM
PIC XX
PIC X(10)
PIC 9(18)
GLOBAL.
GLOBAL.
GLOBAL.
12.5.2.2 Sharing GLOBAL Files
A file connector is global if the GLOBAL clause is specified in the File Description
entry for that file connector. If a program is contained within another program,
both programs may reference a file possessing the global attribute. The following
example shows a file (CUSTOMER-FILE) with the GLOBAL clause in a
containing program MAINPROG. Any contained program in MAINPROG, as
well as program MAINPROG, can reference that file.
12–16 Interprogram Communication
Interprogram Communication
12.5 Communicating with Contained COBOL Programs
IDENTIFICATION DIVISION.
PROGRAM-ID. MAINPROG.
.
.
.
DATA DIVISION.
FILE SECTION.
FD
CUSTOMER-FILE
GLOBAL
.
.
.
Any special registers associated with a GLOBAL file are also global.
12.5.2.3 Sharing USE Procedures
The USE statement specifies declarative procedures to handle input/output
errors. It also can specify procedures to be executed before the program processes
a specific report group.
More than one USE AFTER EXCEPTION procedure in any given program can
apply to an input/output operation when there is one procedure for file name
and another for the applicable open mode. In this case, only the procedure for
file name executes. Figure 12–5 shows that FILE-NAME-PROBLEM SECTION
executes.
Figure 12–5 Sharing USE Procedures
1
2
IDENTIFICATION DIVISION.
PROGRAM−ID. MAIN−PROGRAM.
.
.
.
PROCEDURE DIVISION.
DECLARATIVES.
.
.
.
IDENTIFICATION DIVISION.
PROGRAM−ID SUB1.
.
.
.
PROCEDURE DIVISION.
DECLARATIVES.
FILE−NAME−PROBLEM SECTION.
USE AFTER STANDARD ERROR PROCEDURE ON FILE−NAME.
.
.
.
FILE−INPUT−PROBLEM SECTION.
USE AFTER STANDARD ERROR PROCEDURE ON INPUT.
.
.
.
END DECLARATIVES.
000−BEGIN.
OPEN INPUT FILE−NAME.
.
.
.
END PROGRAM SUB1
END PROGRAM MAIN−PROGRAM.
ZK−1429A−GE
Interprogram Communication 12–17
Interprogram Communication
12.5 Communicating with Contained COBOL Programs
At run time, two special precedence rules apply for the selection of a declarative
when programs are contained in other programs. In applying these two rules,
only the first qualifying declarative is selected for execution. The order of
precedence for the selection of a declarative follows:
Rule 1 —The declarative that executes first is the declarative within the
program containing the statement that caused the qualifying condition. In
Figure 12–6, FILE-NAME-PROBLEM procedure executes.
Figure 12–6 Executing Declaratives with Contained Programs (Rule 1)
1
2
3
IDENTIFICATION DIVISION.
PROGRAM−ID. MAIN−PROGRAM.
.
.
.
IDENTIFICATION DIVISION.
PROGRAM−ID. SUB1.
.
.
.
IDENTIFICATION DIVISION.
PROGRAM−ID. USE−PROGRAM.
.
.
.
PROCEDURE DIVISION.
DECLARATIVES.
FILE−NAME−PROBLEM SECTION.
USE AFTER STANDARD ERROR PROCEDURE ON FILEA.
OPEN INPUT FILEA.
.
.
.
END PROGRAM USE−PROGRAM.
END PROGRAM SUB1.
END PROGRAM MAIN−PROGRAM.
ZK−1428A−GE
Rule 2 —If a declarative is not found using Rule 1, the Run-Time System
searches all programs directly or indirectly containing that program for a
global use procedure. This search continues until the Run-Time System
either: ( 1 ) finds an applicable USE GLOBAL declarative, or ( 2 ) finds the
outermost containing program. Either condition terminates the search; the
second condition terminates both the search and the run unit.
Figure 12–7 shows applicable USE GLOBAL declaratives found in a containing
program before the outermost containing program. Note that the first OPEN goes
to the mode-specific procedure in the USE-PROGRAM rather than the file-specific
procedure in the MAINPROG-PROGRAM.
For information on the negative effect of USE procedures that reference
LINKAGE SECTION items on compiler optimization, see Section 15.5.4.
12–18 Interprogram Communication
Interprogram Communication
12.5 Communicating with Contained COBOL Programs
Figure 12–7 Executing Declaratives Within Contained Programs (Rule 2)
1
2
3
IDENTIFICATION DIVISION.
PROGRAM−ID. MAIN−PROGRAM.
.
.
.
PROCEDURE DIVISION.
DECLARATIVES.
FILEA−OUTPUT−PROBLEM SECTION.
USE GLOBAL AFTER STANDARD
FILEB−PROBLEM SECTION.
USE GLOBAL AFTER STANDARD
.
.
.
IDENTIFICATION DIVISION.
PROGRAM−ID. USE−PROGRAM.
.
.
.
PROCEDURE DIVISION.
DECLARATIVES.
FILEA−NAME−PROBLEM SECTION.
USE GLOBAL AFTER STANDARD
FILEB−INPUT−PROBLEM SECTION.
USE GLOBAL AFTER STANDARD
.
.
.
IDENTIFICATION DIVISION.
PROGRAM−ID. SUB2.
.
.
.
PROCEDURE DIVISION.
000−BEGIN.
OPEN INPUT FILEB.
.
.
.
OPEN OUTPUT FILEA.
.
.
.
END PROGRAM SUB2.
END PROGRAM USE−PROGRAM.
END PROGRAM MAIN−PROGRAM.
ERROR PROCEDURE ON OUTPUT.
ERROR PROCEDURE ON FILEB.
ERROR PROCEDURE ON FILEA.
ERROR PROCEDURE ON INPUT.
ZK−1427A−GE
12.5.2.4 Sharing Other Resources
Condition names, record names, and report names can also have the global
attribute. Any program directly or indirectly contained within the program
declaring the global name can reference the global name.
A condition name declared in a Data Description entry is global if the conditionvariable it is associated with is a global name.
A record name is global if the GLOBAL clause is specified in the Record
Description entry by which the record name is declared, or in the case of Record
Description entries in the File Section, if the GLOBAL clause is specified in the
File Description entry for the file name associated with the Record Description
entry.
A report name is global if the GLOBAL clause is specified in the Report
Description entry by which the report name is declared. In addition, if the
Report Description entry contains the GLOBAL clause, the special registers
LINE-COUNTER and PAGE-COUNTER are global names.
Interprogram Communication 12–19
Interprogram Communication
12.5 Communicating with Contained COBOL Programs
Because you cannot specify a Configuration Section for a program contained
within another program, the following types of user-defined words are always
global; that is, they are always accessible from within a contained program:
•
Alphabet-name
•
Class-name
•
Condition-name
•
Mnemonic-name
•
Symbolic-character
These user-defined words can be referenced by statements and entries either in
the program that contains the Configuration Section or any program contained in
that program.
12.6 Calling Compaq COBOL Programs from Other Languages
(Alpha)
The CALL and CANCEL verbs allow you to call and cancel Compaq COBOL
programs (including routines and separately compiled program units) from within
a Compaq COBOL program. The cobcall, cobcancel, and cobfunc RTL calls
allow you to call and cancel those programs from programs written in other
languages.
When you use cobcall, cobcancel, and cobfunc, the same considerations and
results will be in effect as if you had used the CALL and CANCEL statements
(see Section 12.1.2 and Section 12.3).
If you need both a CANCEL (to reinitialize data) and a CALL, you can code it
with a single cobfunc call. cobfunc is essentially a jacket that calls cobcancel
and cobcall.
Table 12–1 shows these calls and their basic differences.
Table 12–1 Calls to COBOL Programs (Alpha)
RTL Call
Function
cobcall
cobcancel
cobfunc
Calls a COBOL program. Program variables remain in their last state.
Cancels a COBOL program. Program variables are reset.
Calls a COBOL program then cancels it. Program variables are reset on
exit.
12.6.1 Calling COBOL Programs from C (Alpha)
Using cobfunc.h as shown in Example 12–9, the C code in Example 12–8
demonstrates a program that calls a COBOL program with three arguments.
In this example the COBOL program, CALLEDFROMC, expects two strings and
an integer.
Example 12–9 could be used as an #include file for the cobfunc, cobcall, and
cobcancel functions.
12–20 Interprogram Communication
Interprogram Communication
12.6 Calling Compaq COBOL Programs from Other Languages (Alpha)
Example 12–8 Calling a COBOL Program from C (Alpha)
#include <stdio.h>
#include "cobfunc.h"
extern int calledfromc();
main(int argc, char **argv)
{
char *arg1="arg1_string";
char *arg2="1234";
int arg3 = 16587;
int func_result;
char *arglist[10];
#ifdef __osf__
cob_init(argc, argv, NULL);
#endif
arglist[0] = arg1;
arglist[1] = arg2;
arglist[2] = (char *) &arg3;
func_result = cobfunc ("calledfromc", 3, arglist);
}
Example 12–9 C Include File cobfunc.h (Alpha)
void cobcancel ( /* CANCEL the named COBOL routine */
char *name
);
int cobcall (
char *name,
int argc,
char **argv
);
/*
/*
/*
/*
Call a COBOL program from a C routine */
READ: name of the program */
READ: how many arguments */
READ: array of pointers to the arguments */
int cobfunc (
char *name,
int argc,
char **argv
);
/*
/*
/*
/*
Call a COBOL program from a C routine, then CANCEL it */
name of the program */
how many arguments */
array of pointers to the arguments */
#ifdef __osf__
void cob_init (
int argc,
char **argv,
char **envp
);
#endif
/*
/*
/*
/*
init the RTL */
argument count */
arguments */
environment variable pointers */
Note that argv[0] is the first argument to pass and argv[n-1] is the nth. The
maximum number of arguments supported is 254. ♦
For Tru64 UNIX programs, if the main routine is written in C, it must call
cob_init. (See Section 12.1.2, Calling Procedures.) The Compaq COBOL program
expects its arguments by reference. ♦
Interprogram Communication 12–21
Interprogram Communication
12.6 Calling Compaq COBOL Programs from Other Languages (Alpha)
Example 12–10 COBOL Called Program "CALLEDFROMC" (Alpha)
IDENTIFICATION DIVISION.
PROGRAM-ID. CALLEDFROMC.
DATA DIVISION.
WORKING-STORAGE SECTION.
01 TEST-RESET PIC X(10) VALUE "OFF".
01 RETVAL PIC 9(5) COMP VALUE 357.
LINKAGE SECTION.
01 ARG1 PIC X(10).
01 ARG2 PIC 9(4).
01 ARG3 PIC 9(5) COMP.
PROCEDURE DIVISION USING ARG1 ARG2 ARG3 GIVING RETVAL.
P0.
DISPLAY "In CALLEDFROMC".
DISPLAY "test-reset is: " TEST-RESET
MOVE "on" TO TEST-RESET.
DISPLAY "arg1=" ARG1.
DISPLAY "arg1=" ARG1 ", arg2=" ARG2 ", arg3=" ARG3 WITH CONVERSION.
END PROGRAM CALLEDFROMC.
Values Returned by cobcall and cobfunc (Alpha)
The RTL calls cobcall and cobfunc can return a signed integer value from
the GIVING clause of the COBOL program whose value is a longword integer
(for example, PIC S9(9) COMP). The results of returning other values from the
program called by cobcall or cobfunc are undefined.
Consider this example of the use of cobcall/cobfunc/cobcancel in a C program
that uses cobcall, cobfunc, and cobcancel to call or cancel another COBOL
program. Following is progc.c, the C program that calls the COBOL program:
12–22 Interprogram Communication
Interprogram Communication
12.6 Calling Compaq COBOL Programs from Other Languages (Alpha)
Example 12–11 C Program Using cobcall, cobfunc, and cobcancel (Alpha)
/* File:
#include
#include
#include
progc.c */
"stdlib.h"
"stdio.h"
"string.h"
/* printf */
/* strlen */
#define NUMARGS 4
void
int
int
/* up to 254 allowed */
cobcancel(char *name);
cobcall (char *name, int argc, char **argv);
cobfunc (char *name, int argc, char **argv);
void display(char *s, int r, int a);
extern int progcob();
/* COBOL returns int */
void mainx(){
int retval = 0;
/* progcob returns int */
char *a_list[NUMARGS];
/* progcob needs 4 args */
int arg1 = 1, arg2 = 2, arg3 = 3, arg4 = 4;
a_list[0]
a_list[1]
a_list[2]
a_list[3]
=
=
=
=
(char
(char
(char
(char
*)
*)
*)
*)
&arg1;
&arg2;
&arg3;
&arg4;
/*
/*
/*
/*
address
address
address
address
of
of
of
of
1st
2nd
3rd
4th
arg
arg
arg
arg
*/
*/
*/
*/
display("[0] All the initialized values", retval, arg1);
retval = cobcall("progcob", NUMARGS, a_list);
display("[1] After calling cobcall:", retval, arg1);
retval = cobfunc("progcob", NUMARGS, a_list);
display("[2] After calling cobfunc:", retval, arg1);
retval = cobcall("progcob", NUMARGS, a_list);
display("[3] After calling cobcall again:", retval, arg1);
cobcancel("progcob");
display("[4] After calling cobcancel:", retval, arg1);
retval = cobcall("progcob", NUMARGS, a_list);
display("[5] After calling cobcall again:", retval, arg1);
}
void display(char *s, int r, int a){
unsigned int i = 0;
printf("\n%s\n", s);
for (i = 0; i < strlen(s); i++) printf("=");
printf("\n retval = %d", r);
printf("\n arg1 = %d", a);
printf("\n");
}
Following is progcob.cob, the COBOL program that is called by the C program:
Interprogram Communication 12–23
Interprogram Communication
12.6 Calling Compaq COBOL Programs from Other Languages (Alpha)
Example 12–12 COBOL Called Program "PROGCOB" (Alpha)
identification division.
* File progcob.cob
**************************************************************
* The C program calls this COBOL program with four arguments:
*
arg1, arg2, arg3, arg4.
*
* This program performs:
*
arg1, myVal get the value of arg1 + arg2 + arg3 + arg4
*
* When cobfunc or cobcancel is called the values in
* working-storage are reset to their initial values.
*
* retVal: to demonstrate the value returned by this program.
* myVal : to demonstrate cobcancel in the C program
* arg1 : to demonstrate cobcall and cobfunc in the C program.
**************************************************************
program-id. progcob.
data division.
working-storage section.
01 retVal pic 9(9) comp value 987654321.
01 myVal pic 9(9) comp value 0.
linkage section.
01 arg1 pic 9(9) comp value 0.
01 arg2 pic 9(9) comp value 0.
01 arg3 pic 9(9) comp value 0.
01 arg4 pic 9(9) comp value 0.
procedure division using
arg1 arg2 arg3 arg4 giving retVal.
p0.
display " +------------------- From COBOL --------------------".
display " | myVal = " myVal with conversion.
display " | arg1 = " arg1 with conversion.
display " | arg2 = " arg2 with conversion.
display " | arg3 = " arg3 with conversion.
display " | arg4 = " arg4 with conversion.
display " | retVal = " retVal with conversion.
add arg1 arg2 arg3 arg4 giving arg1 myVal.
display " + After ’add arg1 arg2 arg3 arg4 giving arg1 myVal’:".
display " | myVal = " myVal with conversion.
display " | arg1 = " arg1 with conversion.
display " | arg2 = " arg2 with conversion.
display " | arg3 = " arg3 with conversion.
display " | arg4 = " arg4 with conversion.
display " | retVal = " retVal with conversion.
display " +---------------------------------------------------".
Note that the C program progc.c does not have a function called main. The
function name "main" has to be renamed, because the COBOL RTL already
contains a symbol called main. To resolve this, progc.c is called from a dummy
COBOL program called progmain.cob. On Tru64 UNIX, if a COBOL routine is
not the main program, you need to call cob_init.
Here is progmain.cob:
identification division.
* file progmain.cob
program-id. progmain.
procedure division.
s1.
call "mainx".
stop run.
end program progmain.
12–24 Interprogram Communication
Interprogram Communication
12.6 Calling Compaq COBOL Programs from Other Languages (Alpha)
The return value from the COBOL program is an int. Therefore, it is customary
to use the int data type for the variables in C and COBOL programs that are
passed back and forth. For example, retval, arg1, arg2, arg3, and arg4 are
declared as int and pic(9) in the C and COBOL programs, respectively.
Here are the commands to compile, link, and run on different platforms:
[OpenVMS] $
$
$
$
cobol PROGMAIN.COB, PROGCOB.COB
cc PROGC.C
link PROGMAIN.OBJ +PROGCOB.OBJ +PROGC.OBJ
run PROGMAIN.EXE
[UNIX] % cobol progmain.cob progcob.cob progc.c
% a.out
(*)
(*)
The order of listing at (*) is fundamental. Here is a sample run:
[0] All the initialized values
==============================
retval = 0
arg1 = 1
+------------------- From COBOL -------------------| myVal =
0
| arg1 =
1
| arg2 =
2
| arg3 =
3
| arg4 =
4
| retVal = 987654321
+ After ’add arg1 arg2 arg3 arg4 giving arg1 myVal’:
| myVal =
10
| arg1 =
10
| arg2 =
2
| arg3 =
3
| arg4 =
4
| retVal = 987654321
+--------------------------------------------------[1] After calling cobcall:
==========================
retval = 987654321
arg1 = 10
+------------------- From COBOL -------------------| myVal =
10
| arg1 =
10
| arg2 =
2
| arg3 =
3
| arg4 =
4
| retVal = 987654321
+ After ’add arg1 arg2 arg3 arg4 giving arg1 myVal’:
| myVal =
19
| arg1 =
19
| arg2 =
2
| arg3 =
3
| arg4 =
4
| retVal = 987654321
+---------------------------------------------------
Interprogram Communication 12–25
Interprogram Communication
12.6 Calling Compaq COBOL Programs from Other Languages (Alpha)
[2] After calling cobfunc:
==========================
retval = 987654321
arg1 = 19
+------------------- From COBOL -------------------| myVal =
0
| arg1 =
19
| arg2 =
2
| arg3 =
3
| arg4 =
4
| retVal = 987654321
+ After ’add arg1 arg2 arg3 arg4 giving arg1 myVal’:
| myVal =
28
| arg1 =
28
| arg2 =
2
| arg3 =
3
| arg4 =
4
| retVal = 987654321
+--------------------------------------------------[3] After calling cobcall again:
================================
retval = 987654321
arg1 = 28
[4] After calling cobcancel:
============================
retval = 987654321
arg1 = 28
+------------------- From COBOL -------------------| myVal =
0
| arg1 =
28
| arg2 =
2
| arg3 =
3
| arg4 =
4
| retVal = 987654321
+ After ’add arg1 arg2 arg3 arg4 giving arg1 myVal’:
| myVal =
37
| arg1 =
37
| arg2 =
2
| arg3 =
3
| arg4 =
4
| retVal = 987654321
+--------------------------------------------------[5] After calling cobcall again:
================================
retval = 987654321
♦
arg1 = 37
12.7 Calling Non-COBOL Programs from Compaq COBOL
Because the Compaq COBOL compiler is part of a common language
environment, a Compaq COBOL program can call a procedure written in
another language available in this environment. This communication among
high-level languages exists because these languages adhere to the OpenVMS
Calling Standard or the Tru64 UNIX Calling Standard for Alpha Systems, as
applicable, when generating a call to a procedure. Section 13.2 briefly describes
the OpenVMS calling standard.
On OpenVMS Alpha, for more information, refer to the material on calling system
routines in the OpenVMS Programming Concepts Manual, the OpenVMS RTL
Library (LIB$) Manual, and the OpenVMS System Services Reference Manual. ♦
12–26 Interprogram Communication
Interprogram Communication
12.7 Calling Non-COBOL Programs from Compaq COBOL
12.7.1 Calling a Fortran Program
Calling a procedure written in Fortran allows you to take advantage of features of
that language. Example 12–13 demonstrates how to call a non-COBOL program
in the run unit.
Example 12–13 Calling a Fortran Program from a COBOL Program
IDENTIFICATION DIVISION.
PROGRAM-ID. GETROOT.
****************************************************
* This program accepts a value from the terminal, *
* calls the Fortran subroutine SQROOT, and passes *
* the value as a character string. Program
*
* SQROOT returns the square root of the value.
*
****************************************************
DATA DIVISION.
WORKING-STORAGE SECTION.
01 INPUT-NUMBER.
03 INTEGER
PIC 9(5).
03 DEC-POINT
PIC X(1).
03 DECIMAL
PIC 9(8).
01 WORK-NUMBER.
03 INTEGER
PIC 9(5).
03 DECIMAL
PIC 9(8).
01 WORK-NUMBER-A REDEFINES WORK-NUMBER PIC 9(5)V9(8).
01 DISPLAY-NUMBER
PIC ZZ,ZZ9.9999.
PROCEDURE DIVISION.
STARTER SECTION.
SBEGIN.
MOVE SPACES TO INPUT-NUMBER.
DISPLAY "Enter number (with decimal point): "
NO ADVANCING.
ACCEPT INPUT-NUMBER.
IF INPUT-NUMBER = SPACES
GO TO ENDJOB.
CALL "SQROOT" USING BY DESCRIPTOR INPUT-NUMBER.
IF INPUT-NUMBER = ALL "*"
DISPLAY "** INVALID ARGUMENT FOR SQUARE ROOT"
ELSE
DISPLAY "The square root is: " INPUT-NUMBER
INSPECT INPUT-NUMBER
REPLACING ALL " " BY "0"
MOVE CORRESPONDING INPUT-NUMBER TO WORK-NUMBER
WORK-NUMBER-A TO DISPLAY-NUMBER
DISPLAY DISPLAY-NUMBER.
GO TO SBEGIN.
ENDJOB.
STOP RUN.
Example 12–14 shows the Fortran program SQROOT called by the program in
Example 12–13 and sample output from the programs’ execution.
The SQROOT subroutine accepts a 14-character string and decodes it into a
real variable (DECODE is analogous to an internal READ). It then calls the
SQRT function in the statement that encodes the result into the 14-character
argument.
Interprogram Communication 12–27
Interprogram Communication
12.7 Calling Non-COBOL Programs from Compaq COBOL
Example 12–14 Fortran Subroutine SQROOT
10
999
20
SUBROUTINE SQROOT(ARG)
CHARACTER*14 ARG
DECODE(14,10,ARG,ERR=20)VAL
FORMAT(F12.6)
IF(VAL.LT.0.)GO TO 20
ENCODE(14,10,ARG)SQRT(VAL)
RETURN
ARG=’**************’
GO TO 999
END
Sample Run of GETROOT (OpenVMS)
$ RUN GETROOT Return
Enter number (with decimal point): 25. Return
The square root is:
5.000000
5.0000
Enter number (with decimal point): )HELLO Return
** INVALID ARGUMENT FOR SQUARE ROOT
Enter number (with decimal point): 1000000. Return
The square root is: 1000.000000
1,000.0000
Enter number (with decimal point): 2. Return
The square root is:
1.414214
1.4142
Enter number (with decimal point): Return
$
♦
12.7.2 Calling a BASIC Program
The rich, yet easily accessed features of BASIC make that language a natural
environment for development of short routines to be called from COBOL.
Example 12–15 shows one example of a Compaq COBOL program that calls
a BASIC program.
12–28 Interprogram Communication
Interprogram Communication
12.7 Calling Non-COBOL Programs from Compaq COBOL
Example 12–15 Calling a BASIC Program from a COBOL Program
IDENTIFICATION DIVISION.
PROGRAM-ID.
APPL.
******************************************************
* This COBOL program accepts credit application
*
* information and passes this information to a BASIC *
* program that performs a credit analysis. Notice
*
* that the data passed to the BASIC program is in
*
* the standard binary format.
*
******************************************************
DATA DIVISION.
WORKING-STORAGE SECTION.
01 APPLICATION-NUMBER PIC 999.
01 C-APPLICATION-NUMBER PIC 9(3) COMP.
01 ANNUAL-SALARY
PIC 9(5).
01 C-ANNUAL-SALARY
PIC 9(5) COMP.
01 MORTGAGE-RENT
PIC 999.
01 C-MORTGAGE-RENT
PIC 9(3) COMP.
01 YEARS-EMPLOYED
PIC 99.
01 C-YEARS-EMPLOYED
PIC 9(2) COMP.
01 YEARS-AT-ADDRESS
PIC 99.
01 C-YEARS-AT-ADDRESS PIC 9(2) COMP.
PROCEDURE DIVISION.
010-BEGIN.
DISPLAY "Enter 3 digit application number".
ACCEPT APPLICATION-NUMBER.
IF APPLICATION-NUMBER = 999
DISPLAY "All applicants processed" STOP RUN.
MOVE APPLICATION-NUMBER TO C-APPLICATION-NUMBER.
DISPLAY "Enter 5 digit annual salary".
ACCEPT ANNUAL-SALARY.
MOVE ANNUAL-SALARY TO C-ANNUAL-SALARY.
DISPLAY "Enter 3 digit mortgage/rent".
ACCEPT MORTGAGE-RENT.
MOVE MORTGAGE-RENT TO C-MORTGAGE-RENT.
DISPLAY "Enter 2 digit years employed by current employer".
ACCEPT YEARS-EMPLOYED.
MOVE YEARS-EMPLOYED TO C-YEARS-EMPLOYED.
DISPLAY "Enter 2 digit years at present address".
ACCEPT YEARS-AT-ADDRESS.
MOVE YEARS-AT-ADDRESS TO C-YEARS-AT-ADDRESS.
CALL "APP" USING BY REFERENCE C-APPLICATION-NUMBER
C-ANNUAL-SALARY C-MORTGAGE-RENT
C-YEARS-EMPLOYED C-YEARS-AT-ADDRESS.
GO TO 010-BEGIN.
Example 12–16 shows the BASIC program APP called in Example 12–15, and sample output
from the program’s execution.
Interprogram Communication 12–29
Interprogram Communication
12.7 Calling Non-COBOL Programs from Compaq COBOL
Example 12–16 BASIC Program "APP" and Output Data
10 SUB APP (A%,B%,C%,D%,E%)
40 IF A% = 999 THEN 999
50 IF B% => 26000 THEN 800
60 IF B% => 18000 THEN 600
70 IF B% > 15000 THEN 500
80 IF B% => 10000 THEN 400
90 GO TO 700
400 IF E% < 4 THEN 800
410 IF D% < 2 THEN 800
420 GO TO 800
500 IF E% < 4 THEN 700
510 GO TO 800
600 LET X% = B% / 12
650 IF C% => X%/4 THEN 670
660 GO TO 800
670 IF E% => 4 THEN 800
700 PRINT TAB(1);"APPLICANT NUMBER ";A%; " REJECTED"
710 GO TO 999
800 PRINT TAB(1);"APPLICANT NUMBER ";A%;" ACCEPTED"
999 SUBEND
Sample Run of APPL
$ RUN APPL
Enter 3 digit application number
376 Return
Enter 5 digit annual salary
35000 Return
Enter 3 digit mortgage/rent
461 Return
Enter 2 digit years employed by current employer
03 Return
Enter 2 digit years at present address
05 Return
APPLICANT NUMBER 376 ACCEPTED
Enter 3 digit application number
999 Return
All applicants processed
12.7.3 Calling a C Program
Calling a program or routine that is written in C allows you to take advantage of
features of that language. Example 12–17 features a C routine that can be called
from a COBOL program.
Example 12–17 has two global external variables, _ _Argc and **_ _Argv. Note
that **_ _Argv[ ] has an extra level of indirection; it is a pointer to a pointer to an
array.
Example 12–17 C Routine to Be Called from a COBOL Program
/* crtn - c function to test use of argc and argv in c routines
* called from Compaq COBOL */
#include "cobfunc.h"
#include <stdio.h>
(continued on next page)
12–30 Interprogram Communication
Interprogram Communication
12.7 Calling Non-COBOL Programs from Compaq COBOL
Example 12–17 (Cont.) C Routine to Be Called from a COBOL Program
extern int _ _Argc;
extern char **_ _Argv[];
#define argc _ _Argc
#define argv (*_ _Argv)
void crtn()
{
int i;
i = 0;
for (i = 0; i < argc; i++) {
printf("argv[%d] = %s\n", i, argv[i]);
}
}
Example 12–18 is a representation of how you can call a C program from your
Compaq COBOL application. In this case, the C routine crtn (in Example 12–17)
is called.
Example 12–18 Calling a C Program from a COBOL Program
IDENTIFICATION DIVISION.
PROGRAM-ID. CTEST.
DATA DIVISION.
WORKING-STORAGE SECTION.
.
.
.
PROCEDURE DIVISION.
MAIN SECTION.
A001-MAIN.
.
.
.
CALL "crtn".
EXIT PROGRAM.
END PROGRAM CTEST.
For information on handling LIB$INITIALIZE when calling a C program, see
Appendix B.
12.8 Special Considerations for Interprogram Communication
Certain situations require special consideration when your programs will
communicate with other programs.
12.8.1 CALL and CANCEL Arguments
The CALL verb with a data item and the CANCEL verb with either a literal
or a data item are implemented by a Run-Time Library routine that finds the
appropriate program.
Interprogram Communication 12–31
Interprogram Communication
12.8 Special Considerations for Interprogram Communication
On Tru64 UNIX, these language features are implemented using nlist. Because
of this implementation, the following items will not work on stripped images (for
additional information on the strip command, refer to strip(1)):
•
CALL data item
•
CANCEL statement
•
cobcall routine
•
cobcancel routine
•
cobfunc routine ♦
On OpenVMS, these features are implemented by depositing information in
compiler generated psects. ♦
12.8.2 Calling OpenVMS Alpha Shareable Images (OpenVMS)
When calling a subprogram installed as a shareable image, the program name
specified in the CALL statement can be either a literal or a data-name. The same
is true for the CANCEL verb. For more information on shareable images refer to
Compaq COBOL online help file and the OpenVMS Linker Utility Manual. ♦
12.8.3 Calling Tru64 UNIX Shareable Objects (Tru64 UNIX)
When you call a subprogram contained in a shared object, the program name
specified in the CALL statement must be a literal. The CANCEL verb cannot be
applied to programs in shared objects. For more information on shared objects,
refer to the Tru64 UNIX programming documentation.
12.8.4 Case Sensitivity on Tru64 UNIX
One difference between Tru64 UNIX and OpenVMS Alpha is case sensitivity.
From program code creation, to your application internal operations, you must
maintain an awareness of this issue when you consider porting COBOL source
code between the platforms.
12.8.4.1 Linker Case Sensitivity
The linker on Tru64 UNIX is case sensitive. ‘‘JOB1’’ is not the same routine as
‘‘job1’’. However, COBOL is defined as a case insensitive language: CALL ‘‘job1’’
should invoke a routine whose PROGRAM-ID is JOB1. This is not true of case
sensitive languages, such as C. The names option flag increases the flexibility of
the Compaq COBOL compiler in communicating with case sensitive languages.
The names option has three values:
•
lower—Forces all external data names, PROGRAM-ID names, and CALL
literals to be lowercase. This is the default.
•
upper—Forces all external data names, PROGRAM-ID names, and CALL
literals to be uppercase.
•
as_is—The case of literals used in CALL literals is taken as is. This is
useful when you are calling subroutines with mixed case (for example,
GetStatusRoutine). Data items defined with EXTERNAL will be treated
as lowercase. PROGRAM-ID names will be treated as uppercase.
The names option flag does not apply to the CANCEL verb or to the CALL verb
used with a data item. These language features are meaningful only when both
the calling program and the called program are Compaq COBOL programs.
12–32 Interprogram Communication
Interprogram Communication
12.8 Special Considerations for Interprogram Communication
12.8.4.2 Calling C Programs from Compaq COBOL on Tru64 UNIX
Because lowercase is the names option default, the names upper option is only
required to call C functions whose names contain uppercase letters, as described
in Table 12–2.
Table 12–2 C Routine Called by Statement: CALL ‘‘Job1’’
FLAG,
option
Routine Called
-names lowercase
job1( )
{}
/names=lower
-names uppercase
JOB1( )
{}
/names=upper
-names as_is
Job1( )
{}
/names=as_is
For example, a Compaq COBOL program must be compiled with the names upper
option to be able to call a C program named JOB1.
12.8.4.3 Calling COBOL Programs from C on Tru64 UNIX
The lower and upper options to the -names flag and /names= option apply to the
PROGRAM-ID as well as to the literals used with CALL literal. This makes it
possible for C programs to call Compaq COBOL programs with either lowercase
or uppercase names, as described in Table 12–3.
Table 12–3 C Invocation to Call COBOL PROGRAM-ID ‘‘Job2’’
FLAG,
option
Routine Called
-names lowercase
job2( );
/names=lower
-names uppercase
JOB2( );
/names=upper
-names as_is
not possible
/names=as_is
The lower(case) and upper(case) options to the -names flag and /names= option
preserve the semantics of calls among Compaq COBOL programs. However, the
as_is option does not preserve these semantics. For example, the following code
fragment will have different behavior if compiled with as_is.
PROGRAM ID JOB1.
CALL "Job2."
END-PROGRAM JOB1.
PROGRAM ID JOB2.
END-PROGRAM JOB2.
With the lower(case) and upper(case) options on the -names flag and /names=
option, the program JOB2 will be called by JOB1. However, with the as_is option,
the linker will look to resolve a call to ‘‘Job2’’—which in this case is just as
different as if it were named job3, WORLD99, or any other routine name other
than JOB2. ♦
Interprogram Communication 12–33
Interprogram Communication
12.8 Special Considerations for Interprogram Communication
12.8.5 Additional Information
On OpenVMS, for more detailed information on system services and Run-Time
Library routines, refer to the following manuals in the OpenVMS documentation
set:
•
Material on calling system routines in the OpenVMS Programming Concepts
Manual
•
OpenVMS RTL Library (LIB$) Manual
•
OpenVMS System Services Reference Manual
The following OpenVMS documentation mentioned in this chapter may also be of
interest:
•
OpenVMS Calling Standard
•
Guide to Creating OpenVMS Modular Procedures ♦
For more detailed information on programming in the Tru64 UNIX environment,
refer to the following manuals in the Tru64 UNIX documentation set:
•
Programmer’s Guide
•
Assembly Language Programmer’s Guide
•
The Calling Standard
Refer to also the following:
•
The man pages for information on system service routines in Tru64 UNIX.
•
Reading an Indexed File from Other Languages on Tru64 UNIX section in
Chapter 6 of this manual
•
Compaq COBOL Reference Manual, CALL and CANCEL sections ♦
12–34 Interprogram Communication
13
Using Compaq COBOL in the Alpha or VAX
Common Language Environment
The Compaq COBOL compiler is part of the common language environment. This
environment defines certain calling procedures and guidelines that allow you to
call programs written in different languages or prewritten system routines from
Compaq COBOL. You can call the following routine types from Compaq COBOL:
•
Subprograms written in other languages supported by Alpha or VAX
•
Run-Time Library routines
•
OpenVMS system services
•
Tru64 UNIX library routines
On Tru64 UNIX, your Compaq COBOL programs can also call routines written in
other languages, including system services routines on Tru64 UNIX. These calls
must conform to the Tru64 UNIX Calling Standard for Alpha Systems.
For information on Tru64 UNIX, refer to the Tru64 UNIX operating system
documentation. Alternatively, use the man -k command to search through the
man pages for topics. For example, to find all routines containing the string
‘‘curses,’’ enter the following command:
% man -k curses
The operating system will display information similar to the following:
curses (3)
curses_intro (3)
restartterm (3)
- Library that controls cursor movement and windowing
- Introduction to the curses routines which optimizes
terminal screen handling and updating
- Restart terminal for curses application
♦
13.1 Routines, Procedures, and Functions
The terms routine, procedure, and function are used throughout this chapter.
A routine is a closed, ordered set of instructions that performs one or more
specific tasks. Every routine has an entry point (the routine name) and optionally
an argument list. Procedures and functions are specific types of routines: a
procedure is a routine that does not return a value, whereas a function is a
routine that returns a value by assigning that value to the function’s identifier.
In COBOL, routines are also referred to as subprograms and called programs.
System routines are prewritten operating system routines that perform common
tasks, such as finding the square root of a number or allocating virtual memory.
You can call any system routine from your program, provided that COBOL
supports the data structures required to call the routine. The system routines
used most often are Run-Time Library routines and system services.
Using Compaq COBOL in the Alpha or VAX Common Language Environment 13–1
Using Compaq COBOL in the Alpha or VAX Common Language Environment
13.1 Routines, Procedures, and Functions
For more information on system routines on OpenVMS Alpha, refer to the
OpenVMS RTL Library (LIB$) Manual and the OpenVMS System Services
Reference Manual. ♦
13.2 The OpenVMS Calling Standard (OpenVMS)
The OpenVMS Calling Standard and OpenVMS Programming Interfaces: Calling
a System Routine (an archived manual still available on the documentation
CD-ROM) describe the concepts used by all OpenVMS Alpha and VAX languages
for invoking routines and passing data between them. The following attributes
are specified by the OpenVMS Calling Standard:
•
Register usage
•
Stack usage
•
Function value return
•
Argument list
The following sections discuss these attributes in more detail. The OpenVMS
Calling Standard also defines such attributes as the calling sequence,
the argument data types and descriptor formats, condition handling, and
stack unwinding. These attributes are discussed in detail in the OpenVMS
Programming Concepts Manual.
13.2.1 Register and Stack Usage (Alpha)
The OpenVMS Alpha architecture provides 32 general purpose integer registers
(R0-R31) and 32 floating-point registers (F0-F31), each 64 bits in length. The
OpenVMS Programming Interfaces: Calling a System Routine defines the use of
these registers, as listed in Table 13–1.
Table 13–1 OpenVMS Alpha Register Usage
Register
Use
R0
Function value return register (see also F0, F1)
R1
Conventional scratch register
R2-R15
Conventional saved registers
R16-R21
Argument registers, one register per argument, additional arguments
are placed on the stack
R22-R24
Conventional scratch registers
R25
Argument information (AI); contains argument count and argument
type
R26
Return address (RA) register
R27
Procedure value (PV) register
R28
Volatile scratch register
R29
Frame pointer (FP)
R30
Stack pointer (SP)
R31
Read As Zero/Sink (RZ) register
PC
Program counter
(continued on next page)
13–2 Using Compaq COBOL in the Alpha or VAX Common Language Environment
Using Compaq COBOL in the Alpha or VAX Common Language Environment
13.2 The OpenVMS Calling Standard (OpenVMS)
Table 13–1 (Cont.) OpenVMS Alpha Register Usage
Register
Use
F0,F1
Function value return registers for floating-point values (F1 is used if
floating-point data exceeds 8 bytes)
F2-F9
Conventional saved registers for floating-point values
F10-F15
Conventional scratch registers for floating-point values
F16-F21
Argument registers for floating-point values (one per argument,
additional arguments are placed on the stack)
F22-F30
Conventional scratch registers
F31
Read As Zero/Sink (RZ) register
A stack is a LIFO (last-in/first-out) temporary storage area that the system
allocates for every user process. The system keeps information about each
routine call in the current image on the call stack. Then, each time you call a
routine, the system creates a structure on the stack, defined as a stack frame
and further discussed in the OpenVMS Calling Standard and the OpenVMS
Programming Interfaces: Calling a System Routine.
13.2.2 Return of the Function Value
A function is a routine that returns a single value to the calling routine. The
function value represents the return value that is assigned to the function’s
identifier during execution. According to the OpenVMS Calling Standard, a
function value may be returned as either an actual value or a condition value
that indicates success or failure.
13.2.3 The Argument List
You can use an argument list to pass information to a routine and receive results.
For Alpha systems, the OpenVMS Calling Standard defines a data structure
called an argument list as an argument item sequence, consisting of the first
six arguments occupying six integer and six floating-point registers (R16-R21
and F16-F21), with additional argument placed on the stack. The argument
information is contained in R25 (AI register). The stack pointer is contained in
R30.
For detailed information, refer to the OpenVMS Calling Standard.
13.3 OpenVMS System Routines (OpenVMS)
System routines are OpenVMS routines that perform common tasks, such as
finding the square root of a number or allocating virtual memory. You can call
any system routine from your program, provided that Compaq COBOL supports
the data structures required to call the routine.
The system routines used most often are OpenVMS Run-Time Library routines
and system services. System routines are documented in detail in the OpenVMS
RTL Library (LIB$) Manual and the OpenVMS System Services Reference
Manual.
Using Compaq COBOL in the Alpha or VAX Common Language Environment 13–3
Using Compaq COBOL in the Alpha or VAX Common Language Environment
13.3 OpenVMS System Routines (OpenVMS)
13.3.1 OpenVMS Run-Time Library Routines
The OpenVMS Run-Time Library provides commonly used routines that perform
a wide variety of functions. These routines are grouped according to the types of
tasks they perform, and each group has a prefix that identifies those routines as
members of a particular OpenVMS Run-Time Library facility. Table 13–2 lists
all the language-independent Run-Time Library facility prefixes and the types of
tasks each facility performs.
Table 13–2 Run-Time Library Facilities (OpenVMS)
Facility Prefix
Types of Tasks Performed
CVT$
Library routines that handle floating-point data conversion
DTK$
DECtalk routines that are used to control a Compaq DECtalk device
LIB$
Library routines that:
Obtain records from devices
Manipulate strings
Convert data types for I/O
Allocate resources
Obtain system information
Signal exceptions
Establish condition handlers
Enable detection of hardware exceptions
Process cross-reference data
MTH$
Mathematics routines that perform arithmetic, algebraic, and
trigonometric calculations
OTS$
General-purpose routines that perform tasks such as data type
conversions as part of a compiler’s generated code
PPL$
Parallel processing routines that help you implement concurrent
programs on single-CPU and multiprocessor systems
SMG$
Screen management routines that are used in designing, composing,
and keeping track of complex images on a video screen
STR$
String manipulation routines that perform such tasks as searching for
substrings, concatenating strings, and prefixing and appending strings
13.3.2 System Services
System services are prewritten system routines that perform a variety of tasks,
such as controlling processes, communicating among processes, and coordinating
I/O.
Unlike the Run-Time Library routines, which are divided into groups by facility,
all system services share the same facility prefix (SYS$ on OpenVMS or SYS_ on
Tru64 UNIX). However, these services are logically divided into groups that
perform similar tasks. Table 13–3 describes these groups.
Table 13–3 System Services (OpenVMS)
Group
Types of Tasks Performed
AST
Allows processes to control the handling of asynchronous system
traps
Change Mode
Changes the access mode of particular routines
(continued on next page)
13–4 Using Compaq COBOL in the Alpha or VAX Common Language Environment
Using Compaq COBOL in the Alpha or VAX Common Language Environment
13.3 OpenVMS System Routines (OpenVMS)
Table 13–3 (Cont.) System Services (OpenVMS)
Group
Types of Tasks Performed
Condition Handling
Designates condition handlers for special purposes
Event Flag
Clears, sets, reads, and waits for event flags, and associates with
event flag clusters
Information
Returns information about the system, queues, jobs, processes,
locks, and devices
Input/Output
Performs I/O directly, without going through RMS
Lock Management
Enables processes to coordinate access to shareable system
resources
Logical Names
Provides methods of accessing and maintaining pairs of characterstring logical names and equivalence names
Memory
Management
Increases or decreases available virtual memory, controls paging
and swapping, and creates and accesses shareable files of code or
data
Process Control
Creates, deletes, and controls execution of processes
Security
Enhances the security of OpenVMS systems
Timer and Time
Conversion
Schedules events and obtains and formats binary time values
13.4 Calling Routines
The basic steps for calling routines are the same whether you are calling a routine
(subprogram) written in COBOL, a routine written in some other language, a
system service, or a Run-Time Library routine. There are five steps required to
call any system routine:
1. Determining the type of call
2. Defining the arguments
3. Calling the routine or service
4. Checking the condition value, if applicable
5. Locating the result
The following sections outline the steps for calling non-COBOL routines.
13.4.1 Determining the Type of Call (OpenVMS)
Before you call an external routine, you must first determine whether the call
should be a procedure call or a function call. In COBOL, a routine that does not
return a value should be called as a procedure call. A routine that returns a
value should be called as a function call. Thus, a function call returns one of the
following:
•
A function value (a COMP integer, COMP-1, or COMP-2 number). For
example, on OpenVMS the call LIB$INDEX returns an integer value.
•
A return status, which is a longword (PIC 9(5) to 9(9) USAGE IS COMP)
condition value that indicates the program has either successfully executed or
failed. For example, on OpenVMS, LIB$GET_INPUT returns a return status.
Using Compaq COBOL in the Alpha or VAX Common Language Environment 13–5
Using Compaq COBOL in the Alpha or VAX Common Language Environment
13.4 Calling Routines
Although you can call most system routines as a procedure call, it is
recommended that you do so only when the system routine does not return a
value. By checking the condition value, you can avoid errors.
The OpenVMS documentation on system services and Run-Time Library routines
contains descriptions of each system routine and a description of the condition
values returned. For example, the RETURNS section for the system routine
LIB$STAT_TIMER follows:
RETURNS
OpenVMS
usage:
type:
access:
mechanism:
cond_value
longword (unsigned)
write only
by value
Because LIB$STAT_TIMER returns a value, it should be called as a function. If
a system routine contains the following description under the RETURNS section,
you should call the system routine as a procedure call:
RETURNS
None.
13.4.2 Defining the Argument (OpenVMS)
Most system routines have one or more arguments. These arguments are used
to pass information to the system routine and to obtain information from it.
Arguments can be either required or optional, and each argument has the
following characteristics:
•
Access type (read, write, modify...)
•
Data type (floating point, longword...)
•
Passing mechanisms (by value, by reference, by descriptor...)
•
Argument form (scalar, array, string... )
To determine which arguments are required by a routine, check the format
description of the routine in the OpenVMS documentation on system services or
Run-Time Library routines. For example, the format for LIB$STAT_TIMER is as
follows:
LIB$STAT_TIMER code ,value-argument [,handle-address]
The handle-address argument appears in square brackets ( [ ] ), indicating that it
is an optional argument. Hence, when you call the system routine LIB$STAT_
TIMER, only the first two arguments are required.
13–6 Using Compaq COBOL in the Alpha or VAX Common Language Environment
Using Compaq COBOL in the Alpha or VAX Common Language Environment
13.4 Calling Routines
Once you have determined which arguments you need, read the argument
description for information on how to call that system routine. For example, the
system routine LIB$STAT_TIMER provides the following description of the code
argument:
code
OpenVMS
Usage:
type:
access:
mechanism:
longword_signed
longword integer (signed)
read only
by reference
Code that specifies the statistic to be returned. The code
argument contains the address of a signed longword
integer that is this code. It must be an integer from 1 to 5.
After you check the argument description, refer to Table 13–4 for the COBOL
equivalent of the argument description. For example, the code argument
description lists the OpenVMS usage entry longword_signed. To define the
code argument, use the COBOL equivalent of longword_signed:
01 LWS
PIC S9(9) COMP.
Follow the same procedure for the value argument. The description of value
contains the following information:
valueargument
OpenVMS
Usage:
type:
access:
mechanism:
user_arg
longword (unsigned)
write only
by reference
The statistic returned by LIB$STAT_TIMER. The value-argument
argument contains the address of a longword or quadword
that is this statistic. All statistics are longword integers
except elapsed time, which is a quadword.
For the value-argument argument, the OpenVMS usage, user_arg, indicates that
the data type returned by the routine is dependent on other factors. In this case,
the data type returned is dependent upon which statistic you want to return. For
example, if the statistic you want to return is code 5, page fault count, you must
use a signed longword integer. Refer to Table 13–4 to find the following definition
for a longword_signed:
01 LWS
PIC S9(9) COMP.
Regardless of which Run-Time Library routine or system service you call, you
can find the definition statements for the arguments in the OpenVMS usage in
Table 13–4.
13.4.3 Calling the External Routine (OpenVMS)
Once you have decided which routine you want to call, you can access the routine
using the CALL statement. You set up the call to the routine or service the
same way you set up any call in COBOL. To determine the syntax of the CALL
statement for a function call or a procedure call, refer to the Compaq COBOL
Reference Manual, and see the examples in this chapter.
Using Compaq COBOL in the Alpha or VAX Common Language Environment 13–7
Using Compaq COBOL in the Alpha or VAX Common Language Environment
13.4 Calling Routines
Remember, you must specify the name of the routine being called and all
parameters required for that routine. Make sure the data types and passing
mechanisms for the parameters you are passing coincide with those defined in
the routine.
13.4.4 Calling System Routines (OpenVMS)
The basic steps for calling system routines are the same as those for calling
any routine. However, when calling system routines, you need to provide some
additional information discussed in the following sections.
13.4.4.1 System Routine Arguments (OpenVMS)
All OpenVMS system routine arguments are described in terms of the following
information:
•
OpenVMS usage
•
Data type
•
Type of access allowed
•
Passing mechanism
OpenVMS usages are data structures layered on the standard OpenVMS data
types. For example, the OpenVMS usage mask_longword signifies an unsigned
longword integer used as a bit mask, and the OpenVMS usage floating_point
represents any OpenVMS floating-point data type. Table 13–4 lists the OpenVMS
usages and the COBOL statements you need to implement them.
Table 13–4 COBOL Implementation of the OpenVMS Data Types (OpenVMS)
OpenVMS Data Type
COBOL Definition
access_bit_names
NA . . . PIC X(128).1
access_mode
NA . . . PIC X.1
access_mode is usually passed BY VALUE
as PIC 9(9) COMP.
address
USAGE POINTER.
address_range
01 ADDRESS-RANGE.
02 BEGINNING-ADDRESS USAGE POINTER.
02 ENDING-ADDRESS USAGE POINTER.
arg_list
NA . . . Constructed by the compiler as a result of using the COBOL CALL
statement. An argument list may be created as follows, but may not be
referenced by the COBOL CALL statement.
01 ARG-LIST.
02 ARG-COUNT PIC S9(9) COMP.
02 ARG-BY-VALUE PIC S9(9) COMP.
02 ARG-BY-REFERENCE USAGE POINTER
02 VALUE REFERENCE ARG-NAME.
. . . continue as needed
ast_procedure
01 AST-PROC PIC 9(9) COMP.2
1 Most
OpenVMS data types not directly supported in COBOL can be represented as an alphanumeric data item of
a certain number of bytes. While COBOL does not interpret the data type, it may be used to pass objects from one
language to another.
2 Although
unsigned computational data structures are not directly supported in COBOL, you may substitute the signed
equivalent provided you do not exceed the range of the signed data structure.
(continued on next page)
13–8 Using Compaq COBOL in the Alpha or VAX Common Language Environment
Using Compaq COBOL in the Alpha or VAX Common Language Environment
13.4 Calling Routines
Table 13–4 (Cont.) COBOL Implementation of the OpenVMS Data Types (OpenVMS)
OpenVMS Data Type
COBOL Definition
boolean
01 BOOLEAN-VALUE PIC 9(9) COMP.2
byte_signed
NA . . . PIC X.1
byte_unsigned
NA . . . PIC X.1
channel
01 CHANNEL PIC 9(4) COMP.2
char_string
01 CHAR-STRING PIC X to PIC X(268435455).
complex_number
NA . . . PIC X(n) where n is length.1
cond_value
01 COND-VALUE PIC 9(9) COMP.2
context
01 CONTEXT PIC 9(9) COMP.2
date_time
NA . . . PIC X(8).1
device_name
01 DEVICE-NAME PIC X(n) where n is length.
d_floating
01 D-FLOAT USAGE COMP-2.
(when /FLOAT=D_FLOAT)
ef_cluster_name
01 CLUSTER-NAME PIC X(n) where n is length.
ef_number
01 EF-NO PIC 9(9) COMP.2
exit_handler_block
NA . . . PIC X(n) where n is length.1
fab
NA . . . Too complex for general COBOL use. Most of a FAB structure can be
described by a lengthy COBOL record description, but such a FAB cannot then
be referenced by a COBOL I-O statement. It is much simpler to do the
I-O completely within COBOL, and let the COBOL compiler generate the FAB
structure, or do the I-O in another language.
file_protection
01 FILE-PROT PIC 9(4) COMP.2
function_code
01 FUNCTION-CODE.
02 MAJOR-FUNCTION PIC 9(4) COMP.2
02 SUB-FUNCTION PIC 9(4) COMP.2
f_floating
01 F-FLOAT USAGE COMP-1.
(when /FLOAT=D_FLOAT or /FLOAT=G_FLOAT)
g_floating
01 G-FLOAT USAGE COMP-2.
(when /FLOAT=G_FLOAT)
identifier
01 ID PIC 9(9) COMP.2
io_status_block
01 IOSB.
02 COND-VAL PIC 9(4) COMP.2
02 BYTE-CNT PIC 9(4) COMP.2
02 DEV-INFO PIC 9(9) COMP.2
item_list_2
01 ITEM-LIST-TWO.
02 ITEM-LIST OCCURS n TIMES.
04 COMP-LENGTH PIC S9(4) COMP.
04 ITEM-CODE PIC S9(4) COMP.
04 COMP-ADDRESS PIC S9(9) COMP.
02 TERMINATOR PIC S9(9) COMP VALUE 0.
1 Most OpenVMS data types not directly supported in COBOL can be represented as an alphanumeric data item of
a certain number of bytes. While COBOL does not interpret the data type, it may be used to pass objects from one
language to another.
2 Although unsigned computational data structures are not directly supported in COBOL, you may substitute the signed
equivalent provided you do not exceed the range of the signed data structure.
(continued on next page)
Using Compaq COBOL in the Alpha or VAX Common Language Environment 13–9
Using Compaq COBOL in the Alpha or VAX Common Language Environment
13.4 Calling Routines
Table 13–4 (Cont.) COBOL Implementation of the OpenVMS Data Types (OpenVMS)
OpenVMS Data Type
COBOL Definition
item_list_3
01 ITEM-LIST-3.
02 ITEM-LIST OCCURS n TIMES.
04 BUF-LEN PIC S9(4) COMP.
04 ITEM-CODE PIC S9(4) COMP.
04 BUFFER-ADDRESS PIC S9(9) COMP.
04 LENGTH-ADDRESS PIC S9(9) COMP.
02 TERMINATOR PIC S9(9) COMP VALUE 0.
item_list_pair
01 ITEM-LIST-PAIR.
02 ITEM-LIST OCCURS n TIMES.
04 ITEM-CODE PIC S9(9) COMP.
04 ITEM-VALUE PIC S9(9) COMP.
02 TERMINATOR PIC S9(9) COMP VALUE 0.
item_quota_list
NA
lock_id
01 LOCK-ID PIC 9(9) COMP.2
lock_status_block
NA
lock_value_block
NA
logical_name
01 LOG-NAME PIC X TO X(255).
longword_signed
01 LWS PIC S9(9) COMP.
longword_unsigned
01 LWU PIC 9(9) COMP.2
mask_byte
NA . . . PIC X.1
mask_longword
01 MLW PIC 9(9) COMP.2
mask_quadword
01 MQW PIC 9(18) COMP.2
mask_word
01 MW PIC 9(4) COMP.2
null_arg
CALL . . . USING OMITTED or
PIC S9(9) COMP VALUE 0
passed USING BY VALUE.
octaword_signed
NA
octaword_unsigned
NA
page_protection
01 PAGE-PROT PIC 9(9) COMP.2
procedure
01 ENTRY-MASK PIC 9(9) COMP.2
process_id
01 PID PIC 9(9) COMP.2
process_name
01 PROCESS-NAME PIC X TO X(15).
quadword_signed
01 QWS PIC S9(18) COMP.
quadword_unsigned
01 QWU PIC 9(18) COMP.2
rights_holder
01 RIGHTS-HOLDER.
02 RIGHTS-ID PIC 9(9) COMP.2
02 ACCESS-RIGHTS PIC 9(9) COMP.2
rights_id
01 RIGHTS-ID PIC 9(9) COMP.2
1 Most
OpenVMS data types not directly supported in COBOL can be represented as an alphanumeric data item of
a certain number of bytes. While COBOL does not interpret the data type, it may be used to pass objects from one
language to another.
2 Although
unsigned computational data structures are not directly supported in COBOL, you may substitute the signed
equivalent provided you do not exceed the range of the signed data structure.
(continued on next page)
13–10 Using Compaq COBOL in the Alpha or VAX Common Language Environment
Using Compaq COBOL in the Alpha or VAX Common Language Environment
13.4 Calling Routines
Table 13–4 (Cont.) COBOL Implementation of the OpenVMS Data Types (OpenVMS)
OpenVMS Data Type
COBOL Definition
rab
NA . . . Too complex for general COBOL use. Most of a RAB structure can
be described by a lengthy COBOL record description, but such a RAB cannot
then be referenced by a COBOL I-O statement. It is much simpler to do the
I-O completely within COBOL, and let the COBOL compiler generate the RAB
structure, or do the I-O in another language.
section_id
01 SECTION-ID PIC 9(18) COMP.2
section_name
01 SECTION-NAME PIC X to X(43).
system_access_id
01 SECTION-ACCESS-ID PIC 9(18) COMP.2
s_floating
01 S-FLOAT USAGE COMP-1.
(when /FLOAT=IEEE_FLOAT)
time_name
01 TIME-NAME PIC X(n) where n is the length.
t_floating
01 T-FLOAT USAGE COMP-2.
(when /FLOAT=IEEE_FLOAT )
uic
01 UIC PIC 9(9) COMP.2
user_arg
01 USER-ARG PIC 9(9) COMP.2
varying_arg
Dependent upon application.
vector_byte_signed
NA . . .
3
vector_byte_unsigned
NA . . .
3
vector_longword_signed
NA . . .
3
vector_longword_
unsigned
NA . . .
3
vector_quadword_signed
NA . . .
3
vector_quadword_
unsigned
NA . . .
3
vector_word_signed
NA . . .
3
vector_word_unsigned
NA . . .
3
word_signed
01 WS PIC S9(4) COMP.
word_unsigned
01 WS PIC 9(4) COMP.2
2 Although unsigned computational data structures are not directly supported in COBOL, you may substitute the signed
equivalent provided you do not exceed the range of the signed data structure.
3 COBOL
does not permit the passing of variable-length data structures.
13.4.4.2 Calling a System Routine in a Function Call (OpenVMS)
In the following example, LIB$STAT_TIMER returns a condition value called
RET-STATUS. To call this system routine, use the FORMAT of the function
call described in the OpenVMS documentation on system services or Run-Time
Library routines. In this case, the format is as follows:
01 ARG-CODE PIC S9(9) COMP.
01 ARG-VALUE PIC S9(9) COMP.
01 RET-STATUS PIC S9(9) COMP.
.
.
.
CALL "LIB$STAT_TIMER"
USING BY REFERENCE ARG-CODE, ARG-VALUE
GIVING RET-STATUS.
Using Compaq COBOL in the Alpha or VAX Common Language Environment 13–11
Using Compaq COBOL in the Alpha or VAX Common Language Environment
13.4 Calling Routines
As stated earlier, this example does not pass a value for the optional handleaddress argument.
The FORMAT will describe optional arguments in one of two ways:
[,optional-argument]
or
,[optional-argument]
If the comma appears outside of the brackets, you must pass a zero by value or
use the OMITTED phrase to indicate the place of the omitted argument.
If the comma appears inside the brackets, you can omit the argument as long as
it is the last argument in the list.
For example, look at the optional arguments of a hypothetical routine,
LIB$EXAMPLE_ROUTINE:
LIB$EXAMPLE_ROUTINE arg1 [,arg2] [,arg3] [,arg4]
You can omit the optional arguments without using a placeholder:
CALL "LIB$EXAMPLE_ROUTINE"
USING ARG1
GIVING RET-STATUS.
However, if you omit an optional argument in the middle of the argument list,
you must insert a placeholder:
CALL "LIB$EXAMPLE_ROUTINE"
USING ARG1, OMITTED, ARG3
GIVING RET-STATUS.
In general, Run-Time Library routines use the [,optional-argument] format, while
system services use the ,[optional-argument] format.
In passing arguments to the procedure, you must define the passing mechanism
required if it is not the default. The default passing mechanism for all COBOL
data types is BY REFERENCE.
The passing mechanism required for a system routine argument is indicated in
the argument description. The passing mechanisms allowed in system routines
are those listed in the OpenVMS Calling Standard.
If the passing mechanism expected by the routine or service differs from the
default mechanism in COBOL, you must override the default. To force an
argument to be passed by a specific mechanism, refer to the following list:
•
If the argument is described as ‘‘the address of,’’ use BY REFERENCE, which
is the default.
•
If the argument is described as ‘‘the value of,’’ use BY VALUE.
•
If the argument is described as ‘‘address of descriptor,’’ use BY DESCRIPTOR.
Note
If a routine requires a passing mechanism that is not supported by
COBOL, calling that routine from COBOL is not possible.
13–12 Using Compaq COBOL in the Alpha or VAX Common Language Environment
Using Compaq COBOL in the Alpha or VAX Common Language Environment
13.4 Calling Routines
Even when you use the default passing mechanism, you can include the passing
mechanism that is used. For example, to call LIB$STAT_TIMER, you can use
either of the following definitions:
CALL "LIB$STAT_TIMER"
USING ARG-CODE, ARG-VALUE
GIVING RET-STATUS.
CALL "LIB$STAT_TIMER"
USING BY REFERENCE ARG-CODE, ARG-VALUE
GIVING RET-STATUS.
13.4.4.3 Calling a System Routine in a Procedure Call (OpenVMS)
If the routine or service you are calling does not return a function value or
condition value, you can call the system routine as a procedure. The same rules
apply to optional arguments; you must follow the calling sequence presented
in the FORMAT section of the OpenVMS documentation on system services or
Run-Time Library routines.
One system routine that does not return a condition value or function value is the
Run-Time Library routine LIB$SIGNAL. LIB$SIGNAL should always be called
as a procedure, as shown in the following example:
01 ARG-VALUE PIC S9(5) COMP VALUE 90.
.
.
.
CALL "LIB$SIGNAL" USING BY VALUE ARG-VALUE.
13.4.5 Checking the Condition Value (OpenVMS)
Many system routines return a condition value that indicates success or failure;
this value can be either returned or signaled. In general, system routines return
a condition value with the following exceptions:
•
The system routine returns a function value.
•
The CONDITION VALUES RETURNED is None.
•
There is no CONDITION VALUES RETURNED description, but rather a
CONDITION VALUES SIGNALED description. (Success conditions are not
signaled.)
•
The call to the routine was made as a procedure call.
If any of these conditions apply, there is no condition value to check.
If there is a condition value, you must check this value to make sure that it
indicates successful completion. All success condition values are listed in the
CONDITION VALUES RETURNED description.
Condition values indicating success always appear first in the list of condition
values for a particular routine, and success codes always have odd values. A
success code common to many system routines is the condition value SS$_
NORMAL, which indicates that the routine completed normally and successfully.
You can reference the condition values symbolically in your COBOL program by
specifying them in the EXTERNAL phrase of the VALUE IS clause. Symbolic
names specified in VALUE IS EXTERNAL become link-time constants; that is,
the evaluation of the symbolic name is deferred until link time because it is
known only at link time.
Using Compaq COBOL in the Alpha or VAX Common Language Environment 13–13
Using Compaq COBOL in the Alpha or VAX Common Language Environment
13.4 Calling Routines
For example:
01 SS$_NORMAL PIC S9(5) COMP VALUE EXTERNAL SS$_NORMAL
.
.
.
CALL "LIB$STAT_TIMER" USING ARG-CODE, ARG-VALUE GIVING RET-STATUS.
IF RET-STATUS NOT EQUAL SS$_NORMAL...
Because all success codes have odd values, you can check a return status for any
success code. For example, you can cause execution to continue only if a success
code is returned by including the following statement in your program:
IF RET-STATUS IS SUCCESS ...
Sometimes several success condition values are possible. You may only want to
continue execution on specific success codes.
For example, the $SETEF system service returns one of two success values:
SS$_WASSET or SS$_WASCLR. If you want to continue only when the success
code SS$_WASSET is returned, you can check for this condition value as follows
and branch accordingly:
IF RET-STATUS EQUAL SS$_WASSET ...
or
EVALUATE RET-STATUS
WHEN SS$_WASSET ...
If the condition value returned is not a success condition, then the routine did not
complete normally, and the information it should have returned may be missing,
incomplete, or incorrect.
You can also check for specific error conditions as follows:
WORKING-STORAGE SECTION.
01 USER-LINE
PIC X(30).
01 PROMPT-STR
PIC X(16) VALUE IS "Type Your Name".
01 OUT-LEN
PIC S9(4) USAGE IS COMP.
01 COND-VALUE
PIC S9(9) USAGE IS COMP.
88 LIB$_INPSTRTRU VALUE IS EXTERNAL LIB$_INPSTRTRU.
.
.
.
PROCEDURE DIVISION.
P0.
CALL "LIB$GET_INPUT" USING BY DESCRIPTOR USER-LINE PROMPT-STR
BY REFERENCE OUT-LEN
GIVING COND-VALUE.
EVALUATE TRUE
WHEN LIB$_INPSTRTRU
DISPLAY "User name too long"
WHEN COND-VALUE IS FAILURE
DISPLAY "More serious error".
.
.
.
13–14 Using Compaq COBOL in the Alpha or VAX Common Language Environment
Using Compaq COBOL in the Alpha or VAX Common Language Environment
13.4 Calling Routines
13.4.5.1 Library Return Status and Condition Value Symbols (OpenVMS)
Library return status and condition value symbols have the following general
form:
fac$_abcmnoxyz
where:
fac
is a 2- or 3-letter facility symbol (LIB, MTH, STR, OTS, BAS, COB, FOR, SS).
abc
are the first 3 letters of the first word of the associated message.
mno
are the first 3 letters of the next word.
xyz
are the first 3 letters of the third word, if any.
Articles and prepositions are not considered significant words in this format. If
a significant word is only two letters long, an underscore character is used to fill
out the third space. The OpenVMS normal or success code is used to indicate
successful completion. Some examples of this code are as follows:
RETURN Status
Meaning
LIB$_INSVIRMEM
Insufficient virtual memory
FOR$_NO_SUCDEV
No such device
MTH$_FLOOVEMAT
Floating overflow in Math Library procedure
BAS$_SUBOUTRAN
Subscript out of range
13.4.6 Locating the Result (OpenVMS)
Once you have defined the arguments, called the procedure, and checked the
condition value, you are ready to locate the result. To find out where the result is
returned, look at the description of the system routine you are calling.
For example, in the following call to MTH$ACOS the result is written into the
variable COS:
01 ARG-CODE PIC S9(9) COMP VALUE 1.
01 COS
COMP1 VALUE 0.
.
.
.
CALL "MTH$ACOS" USING BY REFERENCE ARG-CODE GIVING COS.
This result is described in the OpenVMS documentation on system services and
Run-Time Library routines, under the description of the system routine.
13.5 Establishing and Removing User Condition Handlers
(OpenVMS)
To establish a user condition handler, call the LIB$ESTABLISH routine.
The form of the call is as follows:
CALL LIB$ESTABLISH USING BY VALUE new-handler GIVING old-handler
Using Compaq COBOL in the Alpha or VAX Common Language Environment 13–15
Using Compaq COBOL in the Alpha or VAX Common Language Environment
13.5 Establishing and Removing User Condition Handlers (OpenVMS)
new-handler
Specifies the name of the routine to be set up as a condition handler.
old-handler
Receives the address of the previously established condition handler.
The GIVING phrase is optional.
LIB$ESTABLISH moves the address of the condition-handling routine into the
appropriate process context and returns the address of a previously established
condition handler.
The handler itself could be a user-written routine, or a library routine. The
following example shows how a call to establish a user-written handler might be
coded:
01 HANDLER
PIC S9(9) COMP VALUE EXTERNAL HANDLER_ROUT.
01 OLD-HANDLER PIC S9(9) COMP.
.
.
.
CALL "LIB$ESTABLISH" USING BY VALUE HANDLER GIVING OLD-HANDLER.
In the preceding example, HANDLER_ROUT is the name of a program that is
established as the condition handler for the program unit containing these source
statements. A program unit can remove an established condition handler in two
ways:
•
Issue another LIB$ESTABLISH call which specifies a different handler.
•
Issue the LIB$REVERT call.
The LIB$REVERT call has no arguments:
CALL "LIB$REVERT".
This call removes the condition handler established in the current program unit.
Note that the LIB$ESTABLISH and LIB$REVERT routines only affect user
condition handlers, not the default Compaq COBOL condition handler. When
an exception occurs, the user condition handler, if one exists, is executed first,
followed by the Compaq COBOL condition handler, if the user condition handler
could not handle the exception.
When a program unit returns to its caller, the condition handler associated with
that program unit is automatically removed (the program unit’s stack frame,
which contains the condition handler address, is removed from the stack).
Example 13–1 illustrates a user written condition handling routine that
determines the reason for a system service failure. The example handler handles
only one type of exception, system service failures. All other exceptions are
resignalled, allowing them to be handled by the system default handlers. This
handler is useful because the system traceback handler indicates only that a
system service failure occurred, not which specific error caused the failure.
LIB$ESTABLISH is used by the main program, SSCOND, to establish the user
written condition handler, SSHAND. System service failure mode is enabled so
that errors in system service calls will initiate a search for a condition handler.
13–16 Using Compaq COBOL in the Alpha or VAX Common Language Environment
Using Compaq COBOL in the Alpha or VAX Common Language Environment
13.5 Establishing and Removing User Condition Handlers (OpenVMS)
The condition handler is written as a subprogram that returns a result. The
result indicates whether or not the condition handler handled the exception.
Note that space must be allocated in the LINKAGE SECTION for the signal and
mechanism arrays. The mechanism array always contains five elements, but the
signal array varies according to the number of additional arguments.
When an exception occurs, the user condition handler is invoked first. The
handler checks the error condition to determine if it is one that it can handle
(the LIB$MATCH_COND routine would be useful here if the routine wanted to
check for one of a collection of conditions). If the exception is not handled by
this condition handler, then the default COBOL condition handler is invoked. If
the default COBOL condition handler does not handle the exception, then the
exception is handled by the operating system.
Example 13–1 User-Written Condition Handler
IDENTIFICATION DIVISION.
PROGRAM-ID.
SSCOND.
DATA DIVISION.
WORKING-STORAGE SECTION.
01
SSHANDA
PIC S9(9) COMP VALUE EXTERNAL SSHAND.
PROCEDURE DIVISION.
BEGIN.
*
*
Establish condition handler
CALL "LIB$ESTABLISH" USING BY VALUE SSHANDA.
*
*
Enable system service failure mode
CALL "SYS$SETSFM" USING BY VALUE 1.
*
*
Generate a bad system service call
CALL "SYS$QIOW" USING BY VALUE 0 0 0 0
0 0 0 0
0 0 0 0.
STOP RUN.
END PROGRAM SSCOND.
IDENTIFICATION DIVISION.
*
PROGRAM-ID.
SSHAND.
*
*
This routine is to be used as a condition handler
*
for system service failures.
*
*
If this routine does not remedy the exception condition, it will
*
return with a value of SS$_RESIGNAL. If the routine does remedy
*
the exception condition, then it should return with a value of
*
SS$_CONTINUE.
*
DATA DIVISION.
(continued on next page)
Using Compaq COBOL in the Alpha or VAX Common Language Environment 13–17
Using Compaq COBOL in the Alpha or VAX Common Language Environment
13.5 Establishing and Removing User Condition Handlers (OpenVMS)
Example 13–1 (Cont.) User-Written Condition Handler
WORKING-STORAGE SECTION.
01
SS_HAND
PIC
01
SS$_SSFAIL
PIC
01
SS$_RESIGNAL
PIC
01
MSGLEN
PIC
01
MSGID
PIC
01
ERRMSG
PIC
01
STAT
PIC
S9(9) COMP.
S9(9) COMP VALUE EXTERNAL SS$_SSFAIL.
S9(9) COMP VALUE EXTERNAL SS$_RESIGNAL.
S9(4) COMP.
S9(9) COMP.
X(80).
S9(9) COMP.
LINKAGE SECTION.
01
SIGNAL_ARRAY.
03
SIGNAL_ARGS
03
SIGNAL
01
PIC 9(9) COMP.
OCCURS 4 TO 10 TIMES
DEPENDING ON SIGNAL_ARGS.
05 SIGNAL_VALUE PIC S9(9) COMP.
MECHANISM_ARRAY.
03
MECH_ARGS
OCCURS 5 TIMES.
05 MECH
PIC 9(9) COMP.
PROCEDURE DIVISION USING SIGNAL_ARRAY MECHANISM_ARRAY
GIVING SS_HAND.
BEGIN.
*
*
Initialize the return result
*
MOVE SS$_RESIGNAL TO SS_HAND.
IF SIGNAL_VALUE(1) NOT EQUAL SS$_SSFAIL
THEN
MOVE SS$_RESIGNAL TO SS_HAND
ELSE
*
*
*
Disable system service failure mode
CALL "SYS$SETSFM" USING BY VALUE 0
MOVE SIGNAL(2) TO MSGID
CALL "SYS$GETMSG" USING BY VALUE MSGID
BY REFERENCE MSGLEN
BY DESCRIPTOR ERRMSG
BY VALUE 0 0
GIVING STAT
IF STAT IS FAILURE
THEN
CALL "LIB$STOP" USING BY VALUE STAT
END-IF
DISPLAY "System service call failed with error:"
DISPLAY ERRMSG(1:MSGLEN)
*
*
*
*
*
*
*
*
This is where the handler would perform
corrective measures
.
.
.
MOVE SS$_CONTINUE TO SS_HAND
END-IF.
EXIT PROGRAM.
END PROGRAM SSHAND.
13–18 Using Compaq COBOL in the Alpha or VAX Common Language Environment
Using Compaq COBOL in the Alpha or VAX Common Language Environment
13.5 Establishing and Removing User Condition Handlers (OpenVMS)
To run this example program:
$ COBOL SSCOND
$ LINK SSCOND
$ RUN SSCOND
System service call failed with error:
%SYSTEM-F-IVCHAN, invalid I/O channel
%SYSTEM-F-SSFAIL, system service failure exception, status=0000013C,
PC=8005FA40, PS=0000001B
%TRACE-F-TRACEBACK, symbolic stack dump follows
Image Name Module Name
Routine Name
Line Number rel PC
0 8005FA40
SSCOND
SSCOND
SSCOND
21 000000CC
SSCOND
0 00020470
0 870C8170
0 849708F0
abs PC
8005FA40
000300CC
00030470
870C8170
849708F0
For more information about condition handling, including LIB$ESTABLISH and
LIB$REVERT, refer to the OpenVMS RTL Library (LIB$) Manual. ♦
13.6 Examples (OpenVMS)
This section provides examples that demonstrate how to call system routines
from COBOL programs.
Example 13–2 shows a procedure call and gives a sample run of the program
RUNTIME. It calls MTH$RANDOM, a random number generator from the RunTime Library, and generates 10 random numbers. To obtain different random
sequences on separate runs, change the value of data item SEED for each run.
Example 13–2 Random Number Generator (OpenVMS)
IDENTIFICATION DIVISION.
PROGRAM-ID. RUNTIME.
*****************************************************
* This program calls MTH$RANDOM, a random number *
* generator from the Run-Time Library.
*
*****************************************************
DATA DIVISION.
WORKING-STORAGE SECTION.
01 SEED PIC 9(5) COMP VALUE 967.
01 A-NUM COMP-1.
01 C-NUM PIC Z(5).
PROCEDURE DIVISION.
GET-RANDOM-NO.
PERFORM 10 TIMES
CALL "MTH$RANDOM" USING SEED GIVING A-NUM
MULTIPLY A-NUM BY 100 GIVING C-NUM
DISPLAY "Random Number is " C-NUM
END-PERFORM.
Example 13–3 shows a program fragment that calls the SYS$SETDDIR system
service.
Example 13–4 calls the System Service routine $ASCTIM.
Using Compaq COBOL in the Alpha or VAX Common Language Environment 13–19
Using Compaq COBOL in the Alpha or VAX Common Language Environment
13.6 Examples (OpenVMS)
Example 13–3 Using the SYS$SETDDIR System Service (OpenVMS)
01 DIRECTORY PIC X(24) VALUE "[MYACCOUNT.SUBDIRECTORY]".
01 STAT PIC S9(9) COMP.
.
.
.
CALL "SYS$SETDDIR" USING BY DESCRIPTOR DIRECTORY
OMITTED
OMITTED
GIVING STAT.
Example 13–4 Using $ASCTIM (OpenVMS)
IDENTIFICATION DIVISION.
PROGRAM-ID. CALLTIME.
****************************************************
* This program calls the system service routine *
* $ASCTIM which converts binary time to an ASCII *
* string representation.
*
****************************************************
DATA DIVISION.
WORKING-STORAGE SECTION.
01 TIMLEN
PIC 9999 COMP VALUE 0.
01 D-TIMLEN
PIC 9999 VALUE 0.
01 TIMBUF
PIC X(24) VALUE SPACES.
01 RETURN-VALUE
PIC S9(9) COMP VALUE 999999999.
PROCEDURE DIVISION.
000-GET-TIME.
DISPLAY "CALL SYS$ASCTIM".
CALL "SYS$ASCTIM" USING BY REFERENCE TIMLEN
BY DESCRIPTOR TIMBUF
OMITTED
GIVING RETURN-VALUE.
IF RETURN-VALUE IS SUCCESS
THEN
DISPLAY "DATE/TIME " TIMBUF
MOVE TIMLEN TO D-TIMLEN
DISPLAY "LENGTH OF RETURNED = " D-TIMLEN
ELSE
DISPLAY "ERROR".
STOP RUN.
Example 13–5 shows output from a sample run of the CALLTIME program.
13–20 Using Compaq COBOL in the Alpha or VAX Common Language Environment
Using Compaq COBOL in the Alpha or VAX Common Language Environment
13.6 Examples (OpenVMS)
Example 13–5 Sample Run of CALLTIME (OpenVMS)
CALL SYS$ASCTIM
DATE/TIME 11-AUG-2000 09:34:33.45
LENGTH OF RETURNED = 0023
The following example shows how to call the procedure that enables and disables
detection of floating-point underflow (LIB$FLT_UNDER) from a COBOL program.
The format of the LIB$FLT_UNDER procedure is explained in the OpenVMS
RTL Library (LIB$) Manual.
WORKING-STORAGE SECTION.
01 NEW-SET
PIC S9(9) USAGE IS COMP.
01 OLD-SET
PIC S9(9) USAGE IS COMP.
.
.
.
PROCEDURE DIVISION.
.
.
.
P0.
MOVE 1 TO NEW-SET.
CALL "LIB$FLT_UNDER" USING NEW-SET GIVING OLD-SET.
The following example shows how to call the procedure that finds the first clear
bit in a given bit field (LIB$FFC). This procedure returns a COMP longword
condition value, represented in the example as RETURN-STATUS.
WORKING-STORAGE SECTION.
01 START-POS
PIC S9(9) USAGE IS COMP VALUE
01 SIZ
PIC S9(9) USAGE IS COMP VALUE
01 BITS
PIC S9(9) USAGE IS COMP VALUE
01 POS
PIC S9(9) USAGE IS COMP VALUE
01 RETURN-STATUS PIC S9(9) USAGE IS COMP.
.
.
.
PROCEDURE DIVISION.
.
.
.
CALL "LIB$FFC" USING START-POS,
SIZ,
BITS,
POS
GIVING RETURN-STATUS.
0.
32.
0.
0.
IF RETURN-STATUS IS FAILURE
THEN GO TO error-proc.
Example 13–6 uses LIB$SET_SYMBOL to set a value for a DCL symbol and
shows the use of LIB$K_* symbols for arguments and LIB$_* symbols for return
status values.
Using Compaq COBOL in the Alpha or VAX Common Language Environment 13–21
Using Compaq COBOL in the Alpha or VAX Common Language Environment
13.6 Examples (OpenVMS)
Example 13–6 Using LIB$K_* and LIB$_* Symbols (OpenVMS)
identification division.
program-id. SETSYM.
environment division.
data division.
working-storage section.
01 LOCAL-SYM pic S9(9) comp value external LIB$K_CLI_LOCAL_SYM.
01 GLOBAL-SYM pic S9(9) comp value external LIB$K_CLI_GLOBAL_SYM.
01 COND-VAL pic S9(9) comp.
88 COND-NORMAL
value external SS$_NORMAL.
88 COND-AMBSYMDEF
value external LIB$_AMBSYMDEF.
procedure division.
1.
call "LIB$SET_SYMBOL" using
by descriptor "XSET*SYM"
by descriptor "Test1A"
by reference LOCAL-SYM
giving
COND-VAL.
if
COND-AMBSYMDEF display "Ambiguous"
else if COND-NORMAL
display "OK"
else
display "Not OK".
2.
call "LIB$SET_SYMBOL" using
by descriptor "XSETS"
by descriptor "Test1B"
by reference LOCAL-SYM
giving
COND-VAL.
if
COND-AMBSYMDEF display "Ambiguous"
else if COND-NORMAL
display "OK"
else
display "Not OK".
3.
call "LIB$SET_SYMBOL" using
by descriptor "XSETS"
by descriptor "Test1C"
by reference GLOBAL-SYM
giving
COND-VAL.
if
COND-AMBSYMDEF display "Ambiguous"
else if COND-NORMAL
display "OK"
else
display "Not OK".
9.
stop run.
This uses the following macro, libdef.mar:
.TITLE libdef
$HLPDEF GLOBAL ; case sensitive!
.END
The program is compiled, linked, and run, as follows:
$ cobol setsym
$ macro libdef
$ link setsym,libdef
$ run setsym
OK
Ambiguous
OK
$ show symbol xset*
XSETS == "Test1C"
XSET*SYM = "Test1A"
13–22 Using Compaq COBOL in the Alpha or VAX Common Language Environment
14
Using the REFORMAT Utility
The REFORMAT Utility converts source programs between terminal format and
conventional ANSI format. Consider the two formats and their characteristics:
•
Terminal format eliminates the line-number and identification fields of ANSI
format and allows horizontal tab characters and short lines. It saves disk
space and decreases compile time.
•
Conventional ANSI format produces source programs compatible with the
reference format as defined in the ANSI-85 COBOL Standard.
The Compaq COBOL Reference Manual describes both formats in detail.
On OpenVMS, REFORMAT is installed by the Compaq COBOL installation
procedure (if you answered "yes" to the query during installation), and is placed
in the following location:
SYS$SYSTEM:REFORMAT.EXE ♦
This chapter provides the following information about using the REFORMAT
utility:
•
Running the REFORMAT utility (Section 14.1)
•
ANSI-to-terminal format conversion (Section 14.2)
•
Terminal-to-ANSI format conversion (Section 14.3)
•
REFORMAT error messages (Section 14.4)
14.1 Running the REFORMAT Utility
On OpenVMS, you can define REFORMAT as a foreign command as follows:
$ REFORMAT :== "$SYS$SYSTEM:REFORMAT.EXE"
Then you would type the following command:
$ reformat ♦
On Tru64 UNIX, type the following:
% reformat ♦
The following example shows a typical session using the REFORMAT Utility (the
command line prompt is omitted):
Using the REFORMAT Utility 14–1
Using the REFORMAT Utility
14.1 Running the REFORMAT Utility
REFORMAT
REFORMAT
REFORMAT
REFORMAT
REFORMAT
REFORMAT
REFORMAT
REFORMAT
REFORMAT
REFORMAT
REFORMAT
REFORMAT
REFORMAT
REFORMAT
REFORMAT
REFORMAT
-
Enter Y for ANSI-to-terminal conversion, or
Enter N (default) for terminal-to-ANSI conversion.
Enter ^Z to exit.
ANSI-to-terminal format conversion mode [ Y / [N] ]? n
Terminal-to-ANSI format selected
Terminal-format input file spec : myprog.cob
ANSI-format output file spec: myprog2.cob
Columns 73 to 80:
42 Terminal source code records converted to ANSI format
Enter Y for ANSI-to-terminal conversion, or
Enter N (default) for terminal-to-ANSI conversion.
Enter ^Z to exit.
ANSI-to-terminal format conversion mode [ Y / [N] ]? ^Z
In the preceding example, the following events took place:
1. The user typed n in response to the first prompt, indicating a desire to
convert a file from Terminal to ANSI format (the user could have simply
pressed Return, as the default direction is Terminal-to-ANSI).
2. The user typed myprog.cob in response to the prompt for an input file spec.
3. The user typed myprog2.cob in response to the prompt for an output file spec.
4. The program next prompted for an identification entry in columns 73 to 80,
and the user simply pressed Return.
5. Ending that dialog, the program reported that it converted 42 source code
records.
6. The program then repeated the original prompts, to which the user replied
with a Ctrl/Z.
The Ctrl/Z ends this reformatting session.
14.2 ANSI-to-Terminal Format Conversion
REFORMAT converts each ANSI format source line to terminal format by:
•
Removing the 6-character sequence field in the first six character positions of
the ANSI format line
•
Moving any continuation symbol ( - ) or comment symbols ( * or / ) from
character position 7 into character position 1
•
Moving the conditional compilation character (if any) from the ANSI format
indicator area into character position 2 and inserting a backslash character
( \ ) into character position 1 of the terminal format line
•
Removing the identification entry field in character positions 73 to 80 of the
ANSI format line
•
Removing insignificant trailing spaces before character position 73 of the
ANSI format line
•
Replacing every form-feed record with a line containing a slash ( / ) in
character position 1
14–2 Using the REFORMAT Utility
Using the REFORMAT Utility
14.2 ANSI-to-Terminal Format Conversion
•
Placing the converted code in positions 1 to the end of the line, thereby
creating a terminal format line
Note
When you convert programs that contain continued nonnumeric literals
you should examine those literals to see if they require any changes. (This
should occur only when going from ANSI format to terminal format.)
14.3 Terminal-to-ANSI Format Conversion
REFORMAT converts each terminal format source line to ANSI format by:
•
Placing a 6-character line number (000010) in the first six character positions
of the first line and increasing it by 000010 for each subsequent line.
•
Moving any continuation symbol ( - ), or the comment symbols ( * or / ) from
character position 1 into character position 7.
•
Removing the backslash character ( \ ), if any, from character position 1 in
terminal format and moving the following conditional compilation character
into character position 7 of the ANSI format line.
•
Replacing horizontal tabs with space characters at every eighth character
position, starting at character position 5 and ending at the end of the line.
•
Moving spaces into remaining character positions after the last character of
code and before character position 73.
•
Expanding a terminal line with more than 65 characters into two or more
ANSI format lines and right-justifying these lines at character position 72.
•
Placing either identification characters (if supplied at program initialization)
or spaces into character positions 73 to 80.
•
Right-justifying (at position 72) the first line of a continued nonnumeric
literal. This ensures that the literal remains the same length as it was in the
default format.
•
Replacing every form-feed record with a line containing a slash ( / ) in position
7 and space characters in positions 8 to 72.
•
Placing the converted code in character positions 8 to 72, thereby creating one
or more ANSI format lines.
Note that it is possible to construct a terminal format line that converts to an
invalid ANSI formatted line. Consider the case of a conditional compilation line
with a long nonnumeric literal:
\A
01
ART
PIC X(80) VALUE "A ... A".
This statement cannot be reformatted to a valid ANSI statement. The literal is
80 characters long, which indicates that the literal must be continued on the next
line by placing a continuation symbol ( - ) in the indicator area. The line is also
a conditional compilation line, which indicates that the A is to be placed in the
indicator area. Clearly both characters cannot be placed in the indicator area.
Compaq COBOL continues the conditional compilation line by placing the A in
the indicator area. This means the program remains valid if conditionals are not
used in the compilation because the lines become comment lines. If conditionals
are used, you must locate and correct these invalid lines. The reformat program
Using the REFORMAT Utility 14–3
Using the REFORMAT Utility
14.3 Terminal-to-ANSI Format Conversion
is a text processor and does not perform the level of checking required by lines
such as these. You detect this error during a compile operation.
14.4 REFORMAT Error Messages
If any of your responses to the prompts are incorrect, REFORMAT displays
error messages. It replaces the parentheses and the parenthetical text with the
appropriate format type you specified.
REFORMAT - Error in opening (ANSI or terminal) format input file:
REFORMAT (ANSI or terminal) format input file spec:
The system could not open the input file; either the file is not on the specified
device or you typed the file name incorrectly.
The default device is SYS$DISK on OpenVMS systems; it is stdin on Tru64
UNIX systems.
To continue processing, examine the input file specification and type a corrected
version. To process another file, type a new input file specification. To end
execution, type Ctrl/Z (on OpenVMS systems) or CTRL/D (on Tru64 UNIX
systems).
REFORMAT - Error in opening (ANSI or terminal) format output file:
REFORMAT - (ANSI or terminal) format output file spec:
The system could not open the output file. An incorrectly typed file specification
usually causes this error.
The default device is SYS$DISK on OpenVMS systems; it is ./ on Tru64 UNIX
systems.
To continue, examine the output file specification and type a corrected version. To
end execution, type Ctrl/Z (on OpenVMS systems) or CTRL/D (on Tru64 UNIX
systems).
REFORMAT - (ANSI or terminal) format input file is empty
REFORMAT (ANSI or terminal) format input file spec:
The system opened an empty input file. To continue, type a new input file
specification. To end execution, type Ctrl/Z (on OpenVMS systems) or CTRL/D (on
Tru64 UNIX systems).
REFORMAT - Error in reading (ANSI or terminal) format input file
REFORMAT - Reformating aborted
REFORMAT - n (ANSI or terminal) COBOL source records converted to
(ANSI or terminal) format
REFORMAT - ANSI-to-terminal format conversion mode [ Y or N ]?
REFORMAT failed to read a record from the input file. This error ends the
conversion process. REFORMAT closes both files and displays the number of
converted input records.
You can convert another file, or you can end the session by typing Ctrl/Z (on
OpenVMS systems) or CTRL/D (on Tru64 UNIX systems).
REFORMAT - Error in writing (ANSI or terminal) format output file
REFORMAT - Reformatting aborted
REFORMAT - n (ANSI or terminal) COBOL source records converted to
(ANSI or terminal) format
REFORMAT - ANSI-to-terminal format conversion mode [ Y or N ]?
REFORMAT failed in an attempt to write an output record. It ends execution
and closes both files.
14–4 Using the REFORMAT Utility
Using the REFORMAT Utility
14.4 REFORMAT Error Messages
To process another file, type a new input file specification and continue the
prompting message sequence. To end execution, type Ctrl/Z (on OpenVMS
systems) or CTRL/D (on Tru64 UNIX systems).
Using the REFORMAT Utility 14–5
15
Optimizing Your Compaq COBOL Program
You can specify optimization and data alignment on the COBOL compiler
command line to improve run-time performance. You can also decrease processing
time and save storage space by writing programs that take advantage of compiler
optimizations.
The information that you find here contains guidelines only, not rules. Follow
those suggestions that fit your needs.
This chapter provides the following information about optimizing your Compaq
COBOL programs on the OpenVMS and Tru64 UNIX operating systems:
•
Specifying optimization on the compiler command line (Alpha) (Section 15.1)
•
Specifying alignment of data for optimum performance (Alpha) (Section 15.2)
•
Using COMP data items for speed (Section 15.3)
•
Other ways to improve the performance of operations on numeric data
(Section 15.4)
•
Choices in Procedure Division statements (Section 15.5)
•
I/O operations (Section 15.6)
•
Optimizing file design (Section 15.7)
•
Optimizing image activation (Section 15.8)
15.1 Specifying Optimization on the Compiler Command Line
(Alpha)
The Compaq COBOL compiler is a highly optimizing compiler. Full optimization
is the default with the COBOL compiler command and usually results in
improved run-time performance. You can specify the desired level of optimization
by adding a value to the optimize option. The various formats are provided here
to illustrate the similarity in processes across the supported platforms.
On OpenVMS Alpha systems, the /OPTIMIZE qualifier has the following forms:
/OPTIMIZE[=LEVEL=n]
/OPTIMIZE=TUNE=keyword
or
/NOOPTIMIZE
♦
On Tru64 UNIX systems, the -O flag and the -tune flag specify optimization. The
-O flag has the following form:
-On
Optimizing Your Compaq COBOL Program 15–1
Optimizing Your Compaq COBOL Program
15.1 Specifying Optimization on the Compiler Command Line (Alpha)
The -tune flag has the following form:
-tune keyword
♦
The -tune flag is the equivalent of the /OPTIMIZE=TUNE qualifier.
On both systems, n is a number ranging from 0 to 4, specifying the level of
optimization. In brief, these levels mean the following:
•
Level 0—Has the same effect as /NOOPTIMIZE. All optimizations are turned
off, and the compiler does not check for unassigned variables.
•
Level 1—Enables local optimizations, including instruction scheduling and
recognition of common subexpressions.
•
Level 2—Enables all level 1 optimizations, and adds some global
optimizations (such as split lifetime analysis, code motion, strength reduction
and test replacement, and code scheduling).
•
Level 3—Enables all level 2 optimizations, and adds more global
optimizations (such as decimal shadowing, integer multiplication and
division expansion, using shifts, loop unrolling, and code replication to
eliminate branches). All optimizations are turned on.
•
Level 4—Is identical to level 3 for COBOL. This is the default if you specify
optimize with no value, or if you compile without specifying any form of the
optimize option on the command line.
/OPTIMIZE=TUNE=keyword (or -tune keyword specifies the kind of optimized
code to be generated, allowing you to tune optimization to the specific Alpha
hardware. The keyword can be any of the following:
•
GENERIC—Generates and schedules code that will execute well for both
generations (EV4 and EV5 and later) of Alpha processors. This is the default.
This provides generally efficient code for those cases where both processor
generations are likely to be used.
•
HOST—Generates and schedules code optimized for the processor generation
in use on the system being used for compilation.
•
EV4—Generates and schedules code optimized for the 21064, 21064A, 21066,
and 21068 implementations of the Alpha chip.
•
EV5—Generates and schedules code optimized for the 21164 implementation
of the Alpha chip. This processor generation is faster than EV4.
•
EV56—Generates code for some 21164 chip implementations that use the
byte and word manipulation instruction extensions of the Alpha architecture.
Programs compiled with the EV56 keyword might incur run-time emulation
overhead on EV4 and EV5 processors, but will still run correctly on OpenVMS
Version 7.1 (or later) systems.
•
EV6—Generates and schedules code for the 21264 chip implementation
that uses the following extensions to the base Alpha instruction set: BWX
(Byte/Word manipulation) and MAX (Multimedia) instructions, square root
and FIX (Floating-point convert) instructions.
•
EV67—Generates and schedules code for the 21264A chip implementation
that uses the following extensions to the base Alpha instruction set: BWX
(Byte/Word manipulation) and MAX (Multimedia) instructions, square root
and FIX (Floating-point convert) instructions, and CIX (Count) instructions.
15–2 Optimizing Your Compaq COBOL Program
Optimizing Your Compaq COBOL Program
15.1 Specifying Optimization on the Compiler Command Line (Alpha)
•
EV68—Generates and schedules code that uses the following extensions to
the base Alpha instruction set: BWX (Byte/Word manipulation) and MAX
(Multimedia) instructions, square root and FIX (Floating-point convert)
instructions, and CIX (Count) instructions.
•
PCA56—Generates code for the 21164PC chip implementation that uses
the byte and word manipulation instruction extensions and multimedia
instruction extensions of the Alpha architecture.
Programs compiled with the PCA56 keyword might incur run-time emulation
overhead on EV4, EV5, and EV56 processors, but will still run correctly on
OpenVMS Version 7.1 (or later) systems.
/ARCHITECTURE Qualifier
The /ARCHITECTURE=option qualifier (or -arch option on Tru64 UNIX)
determines the type of Alpha chip code that will be generated for a particular
program.
The /ARCHITECTURE qualifier uses the same options (keywords) as the
/OPTIMIZE=TUNE qualifier, and their definitions are similar. However, their
effects are not identical. The /OPTIMIZE=TUNE qualifier is primarily used by
certain higher-level optimizations for instruction scheduling purposes, while the
/ARCHITECTURE qualifier determines the type of code instructions generated
for the program unit being compiled.
OpenVMS Version 7.1 and subsequent releases provide an operating system
kernel that includes an instruction emulator. This emulator allows new
instructions, not implemented on the host processor chip, to execute and produce
correct results. All Alpha processors implement a core set of instructions. Certain
Alpha processor versions include additional instruction extensions. Applications
using emulated instructions will run correctly, but might incur significant
software emulation overhead at run time.
The following /ARCHITECTURE options are supported:
•
GENERIC—Generates code that is appropriate for all Alpha processor
generations. This is the default.
Programs compiled with the GENERIC option run all implementations of the
Alpha architecture without any instruction emulation overhead.
•
HOST—Generates code for the processor generation in use on the system
being used for compilation.
Programs compiled with this option on other implementations of the Alpha
architecture may encounter instruction emulation overhead.
•
EV4—Generates code for the 21064, 21064A, 21066, and 21068
implementations of the Alpha architecture.
Programs compiled with the EV4 option run without instruction emulation
overhead on all Alpha processors.
•
EV5—Generates code for some 21164 chip implementations of the Alpha
architecture that use only the base set of Alpha instructions (no extensions).
Programs compiled with the EV5 option run without instruction emulation
overhead on all Alpha processors.
•
EV56—Generates code for some 21164 chip implementations that use the byte
and word manipulation instruction extensions of the Alpha architecture.
Optimizing Your Compaq COBOL Program 15–3
Optimizing Your Compaq COBOL Program
15.1 Specifying Optimization on the Compiler Command Line (Alpha)
Programs compiled with the EV56 option may incur emulation overhead on
EV4 and EV5 processors, but will still run correctly on OpenVMS Version 7.1
(or later) systems.
•
EV6—Generates code for the 21264 chip implementation that uses the
following extensions to the base Alpha instruction set: BWX (Byte/Word
manipulation) and MAX (Multimedia) instructions, square root and FIX
(Floating-point convert) instructions.
Programs compiled with the EV6 option may incur emulation overhead
on EV4, EV5, EV56, and PCA56 processors, but will still run correctly on
OpenVMS Version 7.1 (or later) systems.
•
EV67—Generates code for the 21264A chip implementation that uses the
following extensions to the base Alpha instruction set: BWX (Byte/Word
manipulation) and MAX (Multimedia) instructions, square root and FIX
(Floating-point convert) instructions, and CIX (Count) instructions.
Programs compiled with the EV67 option may incur emulation overhead on
EV4, EV5, EV56, EV6, and PCA56 processors, but will still run correctly on
OpenVMS Version 7.1 (or later) systems.
•
EV68—Generates code that uses the following extensions to the base Alpha
instruction set: BWX (Byte/Word manipulation) and MAX (Multimedia)
instructions, square root and FIX (Floating-point convert) instructions, and
CIX (Count) instructions.
Programs compiled with the EV68 option may incur emulation overhead on
EV4, EV5, EV56, EV6, EV7, and PCA56 processors, but will still run correctly
on OpenVMS Version 7.1 (or later) systems.
•
PCA56—Generates code for the 21164PC chip implementation that uses
the byte and word manipulation instruction extensions and multimedia
instruction extensions of the Alpha architecture.
Programs compiled with the PCA56 option may incur emulation overhead on
EV4, EV5, and EV56 processors, but still run correctly on OpenVMS Version
7.1 (or later) systems.
Note
If a program contains declarations of non-EXTERNAL variables that are
not referenced in the program, the Compaq COBOL compiler does not
allocate those variables. These variables are not affected by /OPTIMIZE;
they simply are not allocated. This feature improves both resource usage
and run-time performance, and allows the use of site ‘‘copybooks’’ that
have numerous standardized variables. Only those copybook variables
that are referenced will be allocated within a given program.
Optimization and Debugging
You should disable optimization when you compile a program for debugging.
Optimizations can cause unexpected and confusing behavior in a debugging
session by changing the order of machine code. When you turn optimization off, a
debugging session is expedited and simplified because the machine code is put in
the same order as the lines in your source program.
15–4 Optimizing Your Compaq COBOL Program
Optimizing Your Compaq COBOL Program
15.1 Specifying Optimization on the Compiler Command Line (Alpha)
On the Tru64 UNIX operating system, full optimization, corresponding to the -O4
or -O flag, is the default unless you specify the -g flag on the command line for
debugging. The -g flag disables optimization entirely, and displays this message:
cobol: Warning: . . . File not optimized; use -g3 if both
♦
optimization and debugging wanted
On OpenVMS Alpha systems, in general, specify /NOOPTIMIZE if you specify
/DEBUG when you compile a program. If you specify /DEBUG but omit any
form of the /OPTIMIZE qualifier on the command line, the compiler issues the
following informational message:
%COBOL-I-DEBUGOPT, /NOOPTIMIZE is recommended with /DEBUG
Unlike other informational messages, which are turned off by default, this
message is issued even if /WARNINGS=NOINFORMATION is in effect. You can
turn it off by specifying any form of the /OPTIMIZE qualifier.
If you need to debug optimized code, refer to the OpenVMS Debugger Manual. ♦
Other Effects of Optimization
An effect of optimization is larger object modules and longer compile times. These
potential disadvantages are typically outweighed by faster run times.
To speed compilations during program development, you may want to compile
with the noobject option when you want to check syntax.
When checking for correct execution, you may want to compile initially with
no optimization, and later with optimization when the program is executing
correctly.
If your program is not executing correctly and you suspect an optimization-related
problem, try compiling it with no optimization or with level 2 optimization. The
latter is a compromise that can often help, because it turns off some of the more
aggressive optimizations, such as decimal shadowing.
15.2 Specifying Alignment of Data for Optimum Performance
(Alpha)
Proper alignment of numeric data items within record structures can make
run-time performance significantly faster. See Chapter 16 for information on data
alignment specified on the compiler command line, and information on compiler
directives that specify alignment. Refer to the Compaq COBOL Reference Manual
for information on the SYNCHRONIZED clause, which is also used to specify
alignment. ♦
15.3 Using COMP Data Items for Speed
Large, compute-intensive applications can often run faster if arithmetic data
items are USAGE COMP.3 As you write COBOL code, maximize your use of
COMP for arithmetic operands. COMP data items typically run faster for
arithmetic operations than PACKED-DECIMAL (COMP-3) or DISPLAY data
items. In general, the following guidelines hold true:
3
Following are some reasons: COMP data items can be manipulated by direct and
natural use of the Alpha instruction set. Manipulation of decimal types requires longer
sequences of instructions, most of which are implemented as Compaq COBOL Run-Time
Library routines. While floating point is also a natural Alpha data type, it does not
support the full 18-digit precision allowed in COBOL. For more information, refer to the
Compaq COBOL Reference Manual.
Optimizing Your Compaq COBOL Program 15–5
Optimizing Your Compaq COBOL Program
15.3 Using COMP Data Items for Speed
•
When the data item is part of an arithmetic operation, specify USAGE IS
COMP.
•
When the data item is used as a subscript, specify USAGE IS INDEX.
For existing COBOL programs, you should consider converting numeric data
items to COMP if an application is compute-bound and time-critical and you
would like to improve execution speed. Some factors in the decision whether to
convert are discussed in this section.
Precision Not Reduced by Conversion to COMP
The data types usually employed for COBOL data items are summarized below:
Usage
Data Type
COMP, BINARY,
COMP-5, COMP-X
Binary
COMP-1
F-Float (compiled with /FLOAT=D_FLOAT
or /FLOAT=G_FLOAT)
S-Float (compiled with /FLOAT=IEEE_FLOAT)
COMP-2
D-Float (compiled with /FLOAT=D_FLOAT)
G-Float (compiled with /FLOAT=G_FLOAT)
T-Float (compiled with /FLOAT=IEEE_FLOAT)
COMP-3,
PACKED-DECIMAL
Packed-decimal
DISPLAY
Text or decimal
On Tru64 UNIX systems, the F_FLOAT, D_FLOAT and G_FLOAT data types are
not supported. ♦
Operations on COMP-1 and COMP-2 data items are fast. However, it is not
recommended that you convert data items to COMP-1 or COMP-2, because you
could lose precision. Floating-point numbers are approximations using a scientific
notation relative to powers of two. A COMP-1 operand gives approximately 7
decimal digits of precision, a COMP-2 approximately 15; either often represents a
value less precisely than the other data types, which are fixed point.
The semantics of COMP (BINARY, COMP-5, COMP-X), COMP-3 (PACKEDDECIMAL), and DISPLAY operands are the same: each can be scaled (except
for COMP-5 and COMP-X) and signed, and can hold up to 18 decimal digits.
Therefore, converting existing programs from COMP-3 or DISPLAY to COMP
will yield results that are no less accurate or precise. The only effect on operands
is the method of storage; and the primary effect on operations is improved
performance.
Because changing the data type changes the way data is stored, you may not be
able to change the data type of items that participate in a REDEFINES or that
are elements of file record structures.
Tools That Can Help You Decide Whether to Convert a Program
Compaq does not recommend a massive conversion of all source programs to
use COMP operands. Most existing COBOL programs perform very well, and
conversions of old programs can be expensive. The following tools can help you
decide which programs would run significantly faster if converted, and to discover
program interdependencies:
15–6 Optimizing Your Compaq COBOL Program
Optimizing Your Compaq COBOL Program
15.3 Using COMP Data Items for Speed
PCA
On OpenVMS, the Performance and Coverage Analyzer (PCA) can target specific
areas of programs that require large amounts of CPU time. If 80 percent of the
processing time is used by 20 percent of the COBOL routines, you may benefit
from converting only these routines to use COMP.
SCA and LSE
The Source Code Analyzer (SCA) can help discover program interdependencies
as you contemplate changes. For example, if it is proposed that an item declared
COMP-3 be changed, SCA can quickly and easily find all the references to that
item.
If SCA is used in conjunction with the Language-Sensitive Editor (LSE), LSE can
bring up buffers in your editing session with each of the references.
Oracle CDD/Repository
The Common Data Dictionary can store data definitions and dependency
information, which can then be maintained from one centralized location. ♦
prof, pixie
On Tru64 UNIX, these performance analysis tools can be used to identify
programs (prof) or sections of programs (pixie) that require large amounts
of CPU time. If 80 percent of the processing time is used by 20 percent of the
COBOL routines, you may benefit from converting only these routines to use
COMP. ♦
15.4 Other Ways to Improve the Performance of Operations on
Numeric Data
In addition to using COMP data items whenever possible for arithmetic
operations in programs, there are other ways to improve performance through the
choice of numeric data types, as discussed in this section.
15.4.1 Mixing Scale Factors and Data Types
Scaling is the process of aligning decimal points for numeric data items. Where
possible, avoid mixing different scale-factors and data types in arithmetic
operations.
In general, type conversions can be minimized by using operands of the same
usage. Scaling operations can be minimized by using compatible scale factors
according to the operation. For example, for add and subtract, all operands
should have the same number of fractional digits; for multiply, the number of
fractional digits in the result should be the same as the sum of the number of
fractional digits in the other two operands.
15.4.2 Limiting Significant Digits
In general, the fewer significant digits in an item, the better the performance
(except as described in Section 15.4.1). For example, for a numeric data item to
contain a number from 1 to 999, declare it as PIC 9(3), not PIC 9(10). This will
also save storage.
Optimizing Your Compaq COBOL Program 15–7
Optimizing Your Compaq COBOL Program
15.4 Other Ways to Improve the Performance of Operations on Numeric Data
15.4.3 Reducing the Compexity of Arithmetic Expressions
When the compiler evaluates an arithmetic expression, it must create
intermediate data items to store the cumulative results of the successive
arithmetic operations in the expression. Such intermediate data items have
PICTUREs large enough to hold the largest and smallest possible intermediate
resulting values for the particular arithmetic operation and the data items upon
which it operates. In general, the more complex the arithmetic expression, the
larger each successive intermediate data item’s PICTURE grows. In particular, if
a divide or exponentiation operation is not the last or only arithmetic operation
in the expression, the corresponding intermediate data item and subsequent
intermediate data items will have very large PICTUREs, which will adversely
affect performance.
If you can break complex arithmetic expressions into two or more simpler
expressions, performance can be greatly improved. Try to break expressions
to make any divide or exponentiation operation the last operation in the
subexpression. Store the results of each subexpression in data items you declare,
and ensure that such data items have PICTUREs just sufficient to hold the
expected partial results.
15.4.4 Selection of Data Types (OpenVMS)
The Alpha architecture provides a full set of arithmetic operations for G-FLOAT.
When your program operates upon G-FLOAT data items, the arithmetic
operations are carried out at maximum native speed and with full precision.
When D-FLOAT data types are encountered in your program source the Compaq
COBOL compiler must perform a conversion to G-FLOAT. Similarly, data
returned from an arithmetic operation must be converted from G-FLOAT to your
declared data type.
While these operations are actually transparent to you, there is a cost in both
performance and accuracy, as some data can be lost in the two conversions.
Wherever you have the luxury of choice, Compaq suggests you use G-FLOAT data
types in your programs. ♦
15.5 Choices in Procedure Division Statements
Some Procedure Division statements make better use of the Compaq COBOL
compiler than others. This section describes these statements and shows how to
use them.
15.5.1 Using Indexing Instead of Subscripting
Using index names for table handling is generally more efficient than using
PACKED-DECIMAL or numeric DISPLAY subscripts, since the compiler
declares index names as binary data items. Subscript data items described
in the Working-Storage Section as binary items are as efficient as index items.
Indexing also provides more flexibility in table-handling operations, since it
allows you to use the SEARCH statement for sequential and binary searches.
The following two examples are equally efficient:
15–8 Optimizing Your Compaq COBOL Program
Optimizing Your Compaq COBOL Program
15.5 Choices in Procedure Division Statements
Example 1
WORKING-STORAGE SECTION.
01 TABLE-SIZE.
03 FILLER
PIC X(300).
01 THE-TABLE REDEFINES TABLE-SIZE.
03 TABLE-ENTRY OCCURS 30 TIMES PIC X(10).
01 SUB1
PIC S9(5) BINARY VALUE ZEROES.
Example 2
WORKING-STORAGE SECTION.
01 TABLE-SIZE.
03 FILLER
PIC X(300).
01 THE-TABLE REDEFINES TABLE-SIZE.
03 TABLE-ENTRY OCCURS 30 TIMES PIC X(10)
INDEXED BY IND-1.
15.5.2 Using SEARCH ALL Instead of SEARCH
When performing table look-up operations, SEARCH ALL, a binary search
operation, is usually faster than SEARCH, a sequential search operation.
However, SEARCH ALL requires the table to be in ascending or descending order
by search key, while SEARCH imposes no restrictions on table organization. Also,
with SEARCH ALL there should be unique key values in the table. Before using
SEARCH ALL, you must pre-sort the table. If the table is not sorted, SEARCH
ALL often gives incorrect results.
The SORT statement (Format 2, which is a Compaq extension) can be used to
sort an entire table. This is particularly useful in connection with SEARCH ALL.
Refer to the SORT statement description in the Procedure Division chapter of the
Compaq COBOL Reference Manual for the syntax and examples.
A binary search (SEARCH ALL) determines a table’s size, finds the median
table entry, and searches the table in sections, by using compare processes. A
sequential search (SEARCH) manipulates the contents of an index to search
the table sequentially. Section 4.3.8 contains examples of binary and sequential
table-handling operations.
SEARCH ALL is supported for the EBCDIC as well as the ASCII collating
sequence, on both VAX and Alpha.
15.5.3 Selecting Hypersort or SORT-32 for Sorting Tasks
Hypersort is a high-performance sorting tool. COBOL has Hypersort on both
Alpha platforms: OpenVMS and Tru64 UNIX.
On Tru64 UNIX, Hypersort is the only method. ♦
On OpenVMS Alpha, a different sorting method, SORT-32, is the default, but
you can choose Hypersort instead for both sorting within COBOL and sorting at
the DCL level. Refer to the DCL online help (type $HELP SORT) for details on
the differences between the two sorting methods and instructions for switching
between methods. ♦
On OpenVMS VAX, only SORT-32 is available. ♦
Optimizing Your Compaq COBOL Program 15–9
Optimizing Your Compaq COBOL Program
15.5 Choices in Procedure Division Statements
15.5.4 Minimizing USE Procedures with LINKAGE SECTION References
Compaq COBOL can perform certain optimizations if a program unit does
not contain USE procedures that reference LINKAGE SECTION items. Note
that USE procedures implicitly reference the following variables for any files
associated with the USE procedures:
FILE STATUS
DEPENDING ON
RELATIVE KEY
LINAGE-COUNTER
Record buffer
If you need to reference LINKAGE SECTION items in a USE procedure, try
to limit the size of the program unit containing that USE procedure. Compaq
COBOL will be able to perform more aggressive optimizations on all the other
program units that do not contain the LINKAGE SECTION references in any
USE procedures.
15.6 I/O Operations
Compaq COBOL provides methods of controlling actions taken by the I/O system
during I/O operations. You have the choice of accepting the defaults the I/O
system provides or using these optional methods to make your program more
efficient.
The Compaq COBOL language elements that can specify alternatives to the I/O
system defaults are as follows:
•
The APPLY clause in the I-O-CONTROL paragraph
•
The RESERVE n AREAS clause in the FILE-CONTROL paragraph
•
The SAME RECORD AREA clause in the I-O-CONTROL paragraph
•
The BLOCK CONTAINS clause in the FD entry
On OpenVMS, for additional information on the RMS terms and concepts
included in this section, refer to the OpenVMS Record Management Utilities
Reference Manual and the OpenVMS Record Management Services Reference
Manual.
15.6.1 Using the APPLY Clause
On OpenVMS, the APPLY clause in the I-O-CONTROL paragraph of the
Environment Division provides phrases that you can use to improve I/O
processing. ♦
On Tru64 UNIX systems, many elements of the I-O-CONTROL paragraph are for
documentation only (accepted and ignored by the compiler), including the phrases
described in this section. ♦
For complete information on the APPLY clause and its phrases, refer to the I-OCONTROL section of the Environment Division chapter in the Compaq COBOL
Reference Manual.
15–10 Optimizing Your Compaq COBOL Program
Optimizing Your Compaq COBOL Program
15.6 I/O Operations
15.6.1.1 Using the PREALLOCATION Phrase of the APPLY Clause (OpenVMS)
By default, the system does not preallocate disk blocks. As a result, files
can require multiple extensions of disk blocks. Although file extension is
transparent to your program, it can reduce performance. To avoid a degradation
in performance, use the APPLY PREALLOCATION clause to preallocate disk
blocks.
Specifying APPLY PREALLOCATION preallocates noncontiguous disk blocks.
When you specify the CONTIGUOUS-BEST-TRY phrase, the I/O system makes
up to three attempts to allocate as many contiguous disk blocks as it can; it then
preallocates remaining blocks noncontiguously. The CONTIGUOUS-BEST-TRY
phrase minimizes disk space fragmentation and gives better system throughput
than CONTIGUOUS.
The APPLY CONTIGUOUS (physically adjacent) clause makes one attempt
at contiguous preallocation; if it fails, the OPEN operation fails. Use APPLY
CONTIGUOUS if you require contiguous physical space on disk.
Contiguous files can reduce or eliminate window turning. When you access a
file, the file system maps virtual block numbers to logical block numbers. This
map is a window to the file. It contains one pointer for each file extent. The file
system cannot map a large noncontiguous file: the file system may have to turn
the window to access records in another extent. However, a contiguous file is one
extent. It needs one map pointer only, and window turning does not take place
after you open the file.
The following statements create a file (after OPEN/WRITE) and preallocate 150
contiguous blocks:
ENVIRONMENT DIVISION.
FILE-CONTROL.
SELECT A-FILE ASSIGN TO "MYFILE".
.
.
.
I-0-CONTROL.
APPLY CONTIGUOUS PREALLOCATION 150 ON A-FILE.
.
.
.
15.6.1.2 Using the EXTENSION Phrase of the APPLY Clause (OpenVMS)
The format of APPLY EXTENSION is as follows:
APPLY EXTENSION extend-amt ON { file-name } ...
The APPLY EXTENSION clause is another way to reduce I/O allocation and
extension time. Adding records to a file whose current extent is full causes
the file system to extend the file by one disk cluster. (A disk cluster is a set of
contiguous blocks; its size is determined when you initialize the volume with
the DCL INITIALIZE command or when the volume is mounted with the DCL
MOUNT qualifier: /EXTENSION=n.)
You can override the default extension by specifying the number of blocks in the
APPLY EXTENSION clause. The APPLY EXTENSION integer becomes a file
attribute stored with the file.
Optimizing Your Compaq COBOL Program 15–11
Optimizing Your Compaq COBOL Program
15.6 I/O Operations
15.6.1.3 Using the DEFERRED-WRITE Phrase of the APPLY Clause (OpenVMS)
The format of APPLY DEFERRED-WRITE is as follows:
APPLY DEFERRED-WRITE ON { file-name } ...
Each WRITE or REWRITE statement can cause an I/O operation. The APPLY
DEFERRED-WRITE clause permits writes to a file only when the buffer is full.
Reducing the number of WRITE operations reduces file access time. However,
the APPLY DEFERRED-WRITE clause can affect file integrity: records in the
I/O buffer are not written to the file if the system crashes or the program aborts.
DEFERRED-WRITE is very useful on write-shared files.
15.6.1.4 Using the FILL-SIZE ON Phrase of the APPLY Clause (OpenVMS)
The format of APPLY FILL-SIZE is as follows:
APPLY FILL-SIZE ON { file-name } ...
Use the APPLY FILL-SIZE clause to populate (load) the file and force the Compaq
COBOL compiler to write records into the bucket area not reserved by the fill
number. Routine record insertion uses the fill space, thereby reducing bucket
splitting and the resulting overhead.
Do not use the APPLY FILL-SIZE clause for routine record insertion; it prohibits
the use of bucket fill space and creates unnecessary buckets.
15.6.1.5 Using the WINDOW Phrase of the APPLY Clause (OpenVMS)
The format of APPLY WINDOW is as follows:
APPLY WINDOW ON { file-name } ...
Window size is the number of file mapping pointers stored in memory. A large
window improves I/O because the system spends less time remapping the file.
When a disk is initialized, the default window size is set by specifying the
/WINDOW qualifier. You can override this qualifier with the APPLY WINDOW
clause. However, avoid specifying too large a window size. Window size is part of
the system’s pool space, and a large window size could affect system performance.
♦
15.6.2 Using Multiple Buffers
Multibuffering can increase the speed of I/O operations by reducing the number
of file accesses. When a program accesses a record already in the I/O buffer, the
system moves the record to the current record area without executing an I/O
operation.
You can specify multiple buffering by using the RESERVE clause in the SELECT
statement of the Environment Division. The RESERVE clause specification
overrides the system default. (The system default is usually set by means of the
DCL SET RMS_DEFAULT command.) The following example reserves six areas
for FILE-A:
SELECT FILE-A ASSIGN TO "FILE-A"
RESERVE 6 AREAS.
You can specify up to 127 areas in the RESERVE clause. In general, specifying
from 2 to 10 areas is best.
15–12 Optimizing Your Compaq COBOL Program
Optimizing Your Compaq COBOL Program
15.6 I/O Operations
15.6.3 Sharing Record Areas
The compiler allocates unique storage space in the Data Division for each file’s
current record area. Transferring records between files requires an intermediate
buffer area and adds to a program’s processing requirements.
To reduce address space and processing overhead, files can share current record
areas. Specify the SAME RECORD AREA clause in the I-O-CONTROL paragraph
of the Environment Division. Records need not be the same size, nor must the
maximum size of each current record area be the same.
Figure 15–1 shows the effect of current record area sharing in a program that
reads records from one file and writes them to another. However, it also shows
a drawback: current record area sharing is equivalent to implicit redefinition.
The records do not exist separately. Therefore, if the program changes a record
defined for the output file, the input file record is no longer available.
Optimizing Your Compaq COBOL Program 15–13
Optimizing Your Compaq COBOL Program
15.6 I/O Operations
Figure 15–1 Sharing Record Areas
Program with Shared
Record Area
Program Without Shared
Record Area
I−O−CONTROL.
SAME RECORD AREA FOR
INP−FILE OUT−FILE.
PROCEDURE DIVISION.
.
.
.
READ INP−FILE ...
.
.
.
MOVE INP−REC TO OUT−REC.
WRITE OUT−REC ...
Process Without Shared Areas
.
.
.
PROCEDURE DIVISION.
.
.
.
READ INP−FILE ...
.
.
.
WRITE OUT−REC ...
Process with Shared Areas
INP−FILE buffer
READ
(move)
READ
(move)
INP−REC
MOVE
INP−REC
OUT−REC
OUT−REC
WRITE
(move)
WRITE
(move)
OUT−FILE buffer
ZK−1539−GE
15–14 Optimizing Your Compaq COBOL Program
Optimizing Your Compaq COBOL Program
15.6 I/O Operations
15.6.4 Using COMP Unsigned Longword Integers
The compiler generates the most efficient code to process the following clauses
if a COMP unsigned longword integer (that is, PIC 9(9) COMP) is used in those
cases where a variable is needed:
RELATIVE KEY
DEPENDING ON
LINAGE IS
WITH FOOTING AT
LINES AT TOP
LINES AT BOTTOM
ADVANCING LINES
15.7 Optimizing File Design (OpenVMS)
This section provides information on how to optimize the following file types:
•
Sequential
•
Relative
•
Indexed
For a full discussion of file types, see Chapter 6.
15.7.1 Sequential Files
Sequential files have the simplest structure and the fewest options for definition,
population, and handling. You can reduce the number of disk accesses by
minimizing record length.
With a sequential disk file, you can use multiblocking to access a buffer area
larger than the default. Because the system transfers disk data in 512-byte
blocks, a blocking factor with a multiple of 512 bytes improves I/O access time.
In the following example, the multiblock count (four) causes reads and writes to
FILE-A to access a buffer area of four physical blocks:
FILE SECTION.
FD FILE-A
BLOCK CONTAINS 2048 CHARACTERS
.
.
.
If you do not want to calculate the buffer size, but want to specify the number
of records in each buffer, use the BLOCK CONTAINS n RECORDS clause. The
following example specifies a buffer large enough to hold 15 records:
BLOCK CONTAINS 15 RECORDS
When using the BLOCK CONTAINS n RECORDS clause for sequential files on
disk, RMS calculates the buffer size by using the maximum record unit size and
rounding up to a multiple of 512 bytes. Consequently, the buffer could hold more
records than you specify.
In the following example, the BLOCK CONTAINS clause specifies five records.
RMS calculates the block size as eight records, or 512 bytes.
Optimizing Your Compaq COBOL Program 15–15
Optimizing Your Compaq COBOL Program
15.7 Optimizing File Design (OpenVMS)
FILE SECTION.
FD FILE-A
BLOCK CONTAINS 5 RECORDS.
01 FILE-A-REC
PIC X(64).
.
.
.
By contrast, for magnetic tape, the program code entirely controls blocking.
Hence, efficiency of the program and the file depends on the programmer’s care
with magnetic-tape blocking.
15.7.2 Relative Files
I/O optimization of a relative file depends on four concepts:
•
Maximum record number—The highest numbered record written to a relative
file.
•
Cell size—The unit of disk space needed to store a record unit size (record
unit size = record + record overhead).
•
Bucket size—The number of blocks read or written in one I/O operation
(equivalent to buffer size). A bucket contains from 1 to 63 physical blocks.
•
File size—The number of blocks used to preallocate the file.
15.7.2.1 Maximum Record Number (MRN)
If you create a relative file with a Compaq COBOL program, the system sets the
maximum record number (MRN) to 0, allowing the file to expand to any size.
If you create a relative file with the CREATE/FDL Utility, select a realistic MRN,
since an attempt to insert a record with a number higher than the MRN will
fail.
15.7.2.2 Cell Size
The system calculates cell size. (However, you can specify a different cell size
when you create the file by using the RECORD CONTAINS clause in the file
description.) You cannot write records larger than the specified cell size.
Avoid selecting a cell size larger than necessary since this wastes disk space. To
optimize the packing of cells into buckets, cell size should be evenly divisible into
bucket size.
The system calculates cell size using these formulas:
Fixed-length records:
cell size = 1 + record size
Variable-length records:
cell size = 3 + record size
For fixed-length records, the overhead byte is a record deletion indicator.
Variable-length records use two additional overhead bytes to indicate record
length. The following example calculates a cell size of 101 for fixed-length records:
FD
A-FILE
RECORD CONTAINS 100 CHARACTERS
.
.
.
15–16 Optimizing Your Compaq COBOL Program
Optimizing Your Compaq COBOL Program
15.7 Optimizing File Design (OpenVMS)
15.7.2.3 Bucket Size
A bucket’s size is from 1 to 63 blocks. A large bucket improves sequential access
to a relative file. You can prevent wasted space between the last cell and the end
of a bucket by specifying a bucket size that is a multiple of cell size.
If you omit the BLOCK CONTAINS clause, the system calculates a bucket size
large enough to hold at least one cell or 512 bytes, whichever is larger (that
is, large enough to hold a record and its overhead bytes). Records cannot cross
bucket boundaries, although they can cross block boundaries.
Use the BLOCK CONTAINS n CHARACTERS clause of the file description to set
your own bucket size (in bytes per bucket). Consider the following example:
FILE-CONTROL.
SELECT A-FILE
ORGANIZATION IS RELATIVE.
.
.
.
DATA DIVISION.
FILE SECTION.
FD A-FILE
RECORD CONTAINS 60 CHARACTERS
BLOCK CONTAINS 1536 CHARACTERS
.
.
.
In the preceding example, the bucket size is 3 blocks. Each bucket contains:
25 records (25 x 60)
= 1500 bytes
1 overhead byte per record (1 x 25)
=
25 bytes
11 bytes of wasted space
=
11 bytes
TOTAL
= 1536 bytes
If you use the BLOCK CONTAINS CHARACTERS clause and specify a value
that is not a multiple of 512, the I/O system rounds the value to the next higher
multiple of 512.
In the following example, the BLOCK CONTAINS clause specifies one record per
bucket. Because the cell needs only 61 bytes, there are 451 wasted bytes in each
bucket.
FILE-CONTROL.
SELECT B-FILE
ORGANIZATION IS RELATIVE.
.
.
.
DATA DIVISION.
FILE SECTION.
FD A-FILE
RECORD CONTAINS 60 CHARACTERS
BLOCK CONTAINS 1 RECORD.
.
.
.
Optimizing Your Compaq COBOL Program 15–17
Optimizing Your Compaq COBOL Program
15.7 Optimizing File Design (OpenVMS)
To improve I/O access time: ( 1 ) specify a small bucket size, and ( 2 ) use the
BLOCK CONTAINS n RECORDS clause to specify the number of records (cells)
in each bucket. This example creates buckets that contain eight records.
FD
A-FILE
RECORD CONTAINS 60 CHARACTERS
BLOCK CONTAINS 8 RECORDS.
.
.
.
In the preceding example, the bucket size is one 512-byte block. Each bucket
contains:
8 records (8 x 60)
= 480 bytes
1 overhead byte per record (1 x 8)
=
24 bytes of wasted space
= 24 bytes
TOTAL
8 bytes
= 512 bytes
15.7.2.4 File Size
Calculating a file’s size helps you determine its space requirements. A file’s size
is a function of its bucket size. When you create a relative file, use the following
calculations to determine the number of blocks that you need, rounding up the
result in each case:
511 + (number of buckets 3 bytes per bucket)
f ile size (in blocks) =
512
number of buckets =
number of records in the f ile
number of cells per bucket
Assume that you want to create a relative file able to hold 3,000 records. The
records are 255 bytes long (plus 1 byte per record for overhead), with 4 cells to a
bucket (BLOCK CONTAINS 4 RECORDS). To determine file size:
1. Calculate the number of buckets:
750 =
3000
4
2. Calculate bucket size (see Section 15.7.2.3)
4 3 (1 + 255)
2=
512
3. Calculate bytes per bucket = (bucket size * number of bytes in a block):
1024 = 2 3 512
4. Calculate file size:
1500 =
511 + (750 3 1024)
512
f ile size = 1500 physical blocks
To allocate the 1500 calculated blocks to populate the entire file, use the APPLY
CONTIGUOUS-BEST-TRY PREALLOCATION clause; otherwise, allocate fewer
blocks.
Before writing a record to a relative file, the I/O system must have formatted
all buckets up to and including the bucket to contain the record. Each time
bucket reformatting occurs, response time suffers. Therefore, writing the highestnumbered record first forces formatting of the entire file only once. However,
this technique can waste disk space if the file is only partially loaded and not
preallocated.
15–18 Optimizing Your Compaq COBOL Program
Optimizing Your Compaq COBOL Program
15.7 Optimizing File Design (OpenVMS)
15.7.3 Indexed Files
An indexed file contains data records and pointers to facilitate record access.
All data records and record pointers are stored in buckets. A bucket contains
an integral number of contiguous, 512-byte blocks. The number of blocks is the
bucket size.
Every indexed file must have a primary key, a field in the record description
that contains a value for each record. When the I/O system writes records to the
indexed file, it collates them according to increasing primary key value in a series
of chained buckets. Thus, you can access the records sequentially by specifying
ACCESS SEQUENTIAL.
As the I/O system writes records, it builds and maintains a tree-like structure of
key-value and location pointers. The highest level of the index is a single bucket,
called the root bucket. The I/O system scans one bucket at each level until it
reaches the bottom, or data level. In a primary key index, this level contains
actual data records. Buckets in each higher level, called index levels, contain
index records. Successive levels of an index file are numbered. The data level
is level zero. The number of levels above level zero is called the index depth.
Figure 15–2 shows a 2-level primary index.
Figure 15–2 Two-Level Primary Index
ROOT
LEVEL 2
LEVEL 1
LEVEL 0
BUCKET
ZK−1540−GE
An index is also built for each alternate key that you define for the file. Like
the primary index, alternate key indexes are contained in the file. The collating
and chaining done for primary keys are also done for alternate keys. However,
alternate keys do not contain data records at the data level; instead, they contain
pointers, or secondary index data records (SIDRs), to data records in the data
level of the primary index.
Each random access request begins by comparing a key value to the root bucket’s
entries. It seeks the first root bucket entry whose key value equals or exceeds the
value of the access request key. (This search is always successful, because the
root bucket’s highest key value is the highest possible value that the key field can
contain.) Once that key value is located, the bucket pointer is used to bring the
target bucket on the next lower level into memory. This process is repeated for
each level of the index.
One bucket is searched at each level of the index until a target bucket is reached
at the data level. The data record’s location is then determined so that a record
can be retrieved or a new record written.
Optimizing Your Compaq COBOL Program 15–19
Optimizing Your Compaq COBOL Program
15.7 Optimizing File Design (OpenVMS)
A data level bucket may not be large enough to contain a new record. In this
case, the I/O system inserts a new bucket in the chain, moving enough records
from the old bucket to preserve the key value sequence. This is known as a
bucket split.
Data bucket splits can cause index bucket splits.
15.7.3.1 Optimizing Indexed File I/O
I/O optimization of an indexed file depends on five concepts:
•
Records—The size and format of the data records can affect the disk space
used by the file.
•
Keys—The number of keys and existence of duplicate key values can affect
disk space and processing time.
•
Buckets—Bucket size can affect disk space and processing time. Index depth
and file activity can affect bucket size.
•
Index depth—The depth of the index can affect bucket size and processing
time.
•
File size—The length of files affects space and access time.
Records
Variable-length records can save file space: you need write only the primary
record key data item (plus alternate keys, if any) for each record. In contrast,
fixed-length records require that all records be equal in length.
For example, assume that you are designing an employee master file. A variablelength record file lets you write a long record for a senior employee with a large
amount of historical data, and a short record for a new employee with less
historical data.
In the following example of a variable-length record description, integer 10 of the
RECORD VARYING clause represents the length of the primary record key, while
integer 80 describes the length of the longest record in A-FILE:
FILE-CONTROL.
SELECT A-FILE ASSIGN TO "AMAST"
ORGANIZATION IS INDEXED.
DATA DIVISION.
FILE SECTION.
FD A-FILE
ACCESS MODE IS DYNAMIC
RECORD KEY IS A-KEY
RECORD VARYING FROM 10 TO 80 CHARACTERS.
01 A-REC.
03 A-KEY
PIC X(10).
03 A-REST-OF-REC PIC X(70).
.
.
.
Buckets must contain enough room for record insertion, or bucket splitting
occurs. The I/O system handles it by creating a new data bucket for the split,
moving some records from the original to the new bucket, and putting the pointer
to the new bucket into the lowest-level index bucket. If the lowest-level index
bucket overflows, the I/O system splits it in similar fashion, on up to the top level
(root level).
In an indexed file, the I/O system also maintains chains of forward pointers
through the buckets.
15–20 Optimizing Your Compaq COBOL Program
Optimizing Your Compaq COBOL Program
15.7 Optimizing File Design (OpenVMS)
For each record moved, a 7-byte pointer to the new record location remains in the
original bucket. Thus, bucket splits can accumulate overhead and possibly reduce
usable space so much that the original bucket can no longer receive records.
Record deletions can also accumulate storage overhead. However, most of the
space is available for reuse.
There are several ways to minimize overhead accumulation. First, determine
or estimate the frequency of certain operations. For example, if you expect to
add or delete 100 records of a 100,000-record file, your database is stable enough
to allow some wasted space for record additions and deletions. However, if you
expect frequent additions and deletions, try to:
•
Choose a bucket size that allows for overhead accumulation, if possible. Avoid
bucket sizes that are an exact or near multiple of your record size. See the
Bucket Size section below.
•
Optimize record insertion by using the RMS DEFINE Utility (refer to the
OpenVMS Record Management Utilities Reference Manual) to define the file
with fill numbers; use the APPLY FILL-SIZE clause when loading the file.
Alternate Keys
Each alternate key requires the creation and maintenance of a separate index
structure. The more keys you define, the longer each WRITE, REWRITE, and
DELETE operation takes. (The throughput of READ operations is not affected by
multiple keys.)
If your application requires alternate keys, you can minimize I/O processing
time if you avoid duplicate alternate keys. Duplicate keys can create long record
pointer arrays, which fill bucket space and increase access time.
Bucket Size
Bucket size selection can influence indexed file performance.
To the system, bucket size is an integral number of physical blocks, each 512
bytes long. Thus, a bucket size of 1 specifies a 512-byte bucket, while a bucket
size of 2 specifies a 1024-byte bucket, and so on.
The Compaq COBOL compiler passes bucket size values to the I/O system based
on what you specify in the BLOCK CONTAINS clause. In this case, you express
bucket size in terms of records or characters.
If you specify block size in records, the bucket can contain more records than you
specify, but never fewer. For example, assume that your file contains fixed-length,
100-byte records, and you want each bucket to contain five records, as follows:
BLOCK CONTAINS 5 RECORDS
This appears to define a bucket as a 512-byte block, containing five records of 100
bytes each. However, the compiler adds I/O system record and bucket overhead to
each bucket, as follows:
Bucket overhead
= 15 bytes per bucket
Record overhead
= 7 bytes per record (fixed-length)
9 bytes per record (variable-length)
Thus, in this example, the bucket size calculation is:
Bucket overhead
= 15 bytes
Optimizing Your Compaq COBOL Program 15–21
Optimizing Your Compaq COBOL Program
15.7 Optimizing File Design (OpenVMS)
Total record space is (100 + 7) * 5
TOTAL
= 535 bytes
(Record size is 100 bytes, record
overhead is 7 bytes for each of 5
records)
= 550 bytes
Because blocks are 512 bytes long, and buckets are always an integral number of
blocks, the smallest bucket size possible (the system default) in this case is two
blocks. The system, however, puts in as many records as fit into each bucket.
Thus, the bucket actually contains nine records, not five.
The CHARACTERS option of the BLOCK CONTAINS clause lets you specify
bucket size more directly. For example:
BLOCK CONTAINS 2048 CHARACTERS
This specifies a bucket size of four 512-byte blocks. The number of characters in
a bucket is always a multiple of 512. If not, the I/O system rounds it to the next
higher multiple of 512.
Index Depth
The length of data records, key fields, and buckets in the file determines
the depth of the index. Index depth, in turn, determines the number of disk
accesses needed to retrieve a record. The smaller the index depth, the better the
performance. In general, an index depth of 3 or 4 gives satisfactory performance.
If your calculated index depth is greater than 4, you should consider redesigning
the file.
You can optimize your file’s index depth after you have determined file, record,
and key size. Calculating index depth is an iterative process, with bucket size as
the variable. Keep in mind that the highest level (root level) can contain only one
bucket.
If much data is added over time to an indexed file, you should reorganize the file
periodically to restore its indexes to their optimal levels.
Following is detailed information on calculating file size, and an example of index
depth calculation:
File Size
When you calculate file size:
•
Every bucket in an indexed file contains 15 bytes of overhead.
•
Every bucket in an indexed file contains records. Only record type and size
differ.
•
Data records are only in level 0 buckets of the primary index.
•
Index records are in level 1 and higher-numbered buckets.
•
If you use alternate keys, secondary index data records (SIDRs) are only in
level 0 buckets of alternate indexes.
Use these calculations to determine data and index record size:
•
Data records:
F ixed 0 length record size = actual record size + 7
V ariable 0 length record size = actual record size + 9
15–22 Optimizing Your Compaq COBOL Program
Optimizing Your Compaq COBOL Program
15.7 Optimizing File Design (OpenVMS)
•
Index records:
Record size = key size + 3
If a file has more than 65,536 blocks, the 3-byte index record overhead could
increase to 5 bytes.
Use these calculations to determine SIDR record length: