1
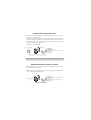
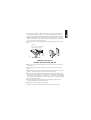
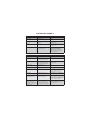
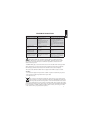
50 meter wireless phone line
User Manual
2
DEAR CUSTOMER
We would like to thank you for purchasing our Wireless Phone Jack and/or an
additional Extension unit. We hope you will enjoy it.
The Wireless Phone Jack is a wireless and cable free extension of the phone
socket or VoIP adapter for an ordinary phone, modem, fax or satellite/cable set
top box with integrated modem.
Please read the following thoroughly and observe the operating instructions and
information provided.
Please visit our website for additional information: www.wireless-phonejack.com
Conformity of the Wireless Phone Jack to EU directives is confirmed by the CE
symbol. Hereby, we declare that the Wireless Phone Jack and/or extra Extension
units are in compliance with the essential requirements and other relevant
provisions of Directive 1999/5/EC.
Copyright ©. All rights reserved. All forms of copying or reproduction of the
product or its associated user manual are strictly prohibited.
This product is manufactured for RTX Products HK Ltd.
4
UNPACKING
Carefully remove units from the packaging. If there is any visible damage
DO NOT attempt to operate the Wireless Phone Jack. Contact your dealer
or shipping carrier immediately.
BOX CONTENTS:
Indicator light
Phone socket
Phone line
1) One Base unit
Indicator light
2) One Extension unit
Switch
Phone socket
3) One phone line cord
4) This user manual
NOTE: Please read and follow carefully the instructions.
5
BASE UNIT INSTALLATION
1) Connect the enclosed phone line cord to the Base unit and connect the other
end to the phone wall socket.*
2) If you have a phone connected to the wall socket, unplug it and connect it to
the Base unit instead (remove plug adapter before connecting to the Base unit).
3) Connect the Base unit to a power outlet and switch power on. The light on top of
the Base unit should now glow green.
The Base unit is now installed.
3)
Phone wall socket
Power outlet
1)
2)
Phone, dial-up modem, fax
*NOTE: Works also as a wireless extension to a VoIP Terminal Adapter
EXTENSION UNIT INSTALLATION
The Extension unit can be connected to either a normal phone, dial-up modem,
fax or satellite/cable set top box.
1) Plug the phone line cord from your phone, dial-up modem, fax or satellite/cable
set top box into the Extension unit.
1)
Power supply plug
6
Phone, dial-up modem, fax or
satellite/cable set top box
2) 2A: Connection of phone. Turn the switch to “S”-position for Speech (voice).
2B: Connection of dial-up modem , fax or satellite/cable set top box. Turn the
switch to “C”-position for Computer (dial-up modem, fax or satellite/cable set top box).
3) Plug the Extension unit into a power outlet and switch the power on. The light
on top of the Extension unit will after a short period glow green (if the switch
is on C) or yellow (if the switch is on S).
The Extension unit is now installed and your Wireless Phone Jack is now ready
for use.
Computer
(dial-up modem, fax or satellite/
cable set top box)
2B)
2A)
Speech
(Phone)
2)
3)
Extension unit
INSTALLATION OF
EXTRA EXTENSION UNITS
1) Make sure the existing Wireless Phone Jack system (base and extension unit)
is powered on.
2) Unplug any cords attached to the Base unit (these will be connected again
later).
3) Plug the extra Extension unit into a power outlet near the Base unit and switch
power on. This will activate a red light on the Extension unit.
4) Plug one end of the supplied phone line cord into the Base unit and the other
end into the extra Extension unit. A red light will be activated before changing
to either green (if the switch is turned over to C = computer for dial-up modem,
fax or set top box) or yellow (if the switch is turned over to S = speech for phone).
This can take up to a minute.
5) Once the light changes on the Extension unit, unplug the phone line cord
between the Base unit and the Extension unit.
6) Replug the cords which you have unplugged.
Go to page 4 Extension unit installation to finish the installation process.
7
OPERATING MODES
BASE UNIT
Light shows
This means
Suggested fix
Steady Green
Base unit is ready
No Extension units are in use
None
Normal operation
Flashing Green
One or more Extension units
are in use
None
Normal operation
No Light
No power to
Base unit
Check that the Base unit is properly
connected to a power outlet and that
the power is on
Fast flashing Green
The base unit is open for DECT
handset registrations
The DECT handset registration mode
is open after two power on-off
operations. To terminate the
registration mode, either register
a DECT handset or turn the base
power off and then on.
Light shows
This means
Suggested fix
Steady Green
Extension unit in computer/Data
(“C”) is registered and in range
of Base unit and ready for use
None
Normal operation
Steady Yellow
Extension unit in Speech/voice
(“S”) is registered and in range
of Base unit and ready for use
None
Normal operation
Flashing Green
Extension unit in use
(C mode)
None
Normal operation
Flashing Yellow
Extension unit in use
(S mode)
None
Normal operation
No Light
No power to Extension unit
Check that the Extension unit is
properly connected to a power
outlet and that the power is on
Steady Red
Extension unit is ready to be
registered to a Base unit
See Installation of extra Extension
units
Flashing Red to Yellow or
Flashing Red to Green
Extension unit is registered but
not locked to Base unit
Check that Base unit is powered up.
If it is, the Extension unit may be out
of range of Base unit. Relocate either
the Extension unit or the Base unit to
bring the units closer together
Fast flash of Red for 5
seconds followed by
Steady Red (occurring after
an attempt to register an
Extension unit)
Four Extension units are already
registered to the Base unit
(the max possible) – this fifth
Extension unit cannot be added
Install an additional Base unit and
register the fifth Extension unit to
the new Base unit
EXTENSION UNIT
8
TROUBLESHOOTING
Problem
No dialing tone available
Possible cause
– Base unit power not on
– Cables not correctly
connected
– The Extension unit may not
be registered to the base
– The Extension unit is out
of reach
Solution
– Check all power and cable connections. If in doubt please refer to the
user manual. Check that the
Extension unit switch is correctly
set to either S or C
– Relocate the Extension unit within
signal reach of the Base unit (max
50m)
My dial-up modem/
set top box/fax is not
working
The Extension unit switch
has not been set to modem
functionality
Make sure that the Extension unit
switch is set to C
Short “hissing” sound
heard on phone attached
to the Extension unit
when first picked up
The Extension unit
switch has not been
set properly
Make sure that the
Extension unit switch
is set to S
The extra extension unit is
The extra extension unit
is blinking before starting already registered to another
phone jack
a registration procedure
Turn power on-off, 5 times in a row
until the light is continuously red.
Hereafter continue extra extension
extension unit installation
The lightning flash with arrowhead symbol within an equilateral triangle is
LQWHQGHGWRDOHUWWKHXVHUWRWKHSUHVHQFHRIXQLQVXODWHG³GDQJHURXVYROWDJH´ZLWKLQ
WKHSURGXFW¶VHQFORVXUHWKDWPD\EHRIVXIILFLHQWPDJQLWXGHWRFRQVWLWXWHDULVNRI
HOHFWULFVKRFNWRSHUVRQV
“Caution” 0DLQSOXJLVXVHGDVGLVFRQQHFWGHYLFHDQGLWVKRXOGUHPDLQUHDGLO\RSHUDEOH
GXULQJLQWHQGHGXVH,QRUGHUWRGLVFRQQHFWWKHDSSDUDWXVIURPWKHPDLQVFRPSOHWHO\
WKHPDLQVSOXJVKRXOGEHGLVFRQQHFWHGIURPWKHPDLQVVRFNHWRXWOHWFRPSOHWHO\
7KHVRFNHWRXWOHWVKDOOEHLQVWDOOHGQHDUWKHHTXLSPHQWDQGVKDOOEHHDVLO\DFFHVVLEOH
Warning:
ă'RQRWXVHWKLVHTXLSPHQWLQSODFHVZKHUHYRODWLOHRUH[SORVLYHPDWHULDOVPD\EHSUHVHQW
ă7KLVHTXLSPHQWZLOOEHLQRSHUDEOHLIPDLQVSRZHUIDLOV
ă)RULQGRRUXVHRQO\
The crossed-out wheeled bin symbol that can be found on your product means
WKDWWKHSURGXFWLVFRYHUHGE\WKH(XURSHDQ'LUHFWLYH(&DQGLWLQGLFDWHV
WKDWWKLVSURGXFWVKRXOGQRWEHGLVSRVHGRIYLDWKHQRUPDOKRXVHKROGZDVWHVWUHDP
7RSUHYHQWSRVVLEOHKDUPWRWKHHQYLURQPHQWRUKXPDQKHDOWKSOHDVHVHSDUDWHWKLVSURGXFW
IURPRWKHUZDVWHVWUHDPVWRHQVXUHWKDWLWFDQEHUHF\FOHGLQDQHQYLURQPHQWDOO\VRXQGPDQQHU
)RUPRUHGHWDLOVRQDYDLODEOHFROOHFWLRQIDFLOLWLHVSOHDVHFRQWDFW\RXUORFDOJRYHUQRIILFH
RUWKHUHWDLOHUZKHUH\RXSXUFKDVHGWKLVSURGXFW
9