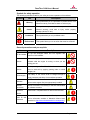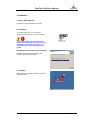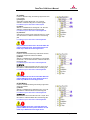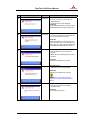
1
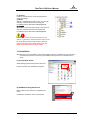
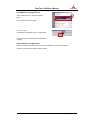
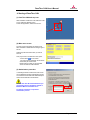
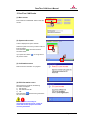
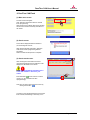
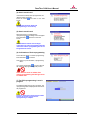
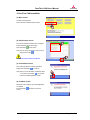
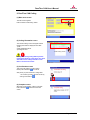
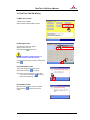
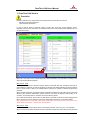
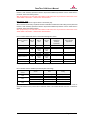
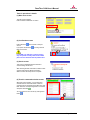
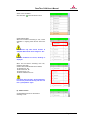
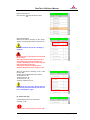
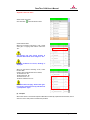
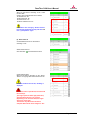
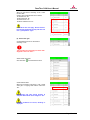
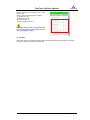
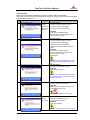
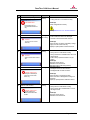
PassThru CAN
Programming of Emission Related Control Units
With PassThru Programming System – SAE J2534 Compliant
User’s Manual
<Ver 1.6>
PassThru CAN User’s Manual
Foreword
This manual explains operating procedures and other related information for PassThru
CAN software. The user is required to read this manual carefully and to follow the
described procedure for appropriate software usage.
Page 2 of 46
PassThru CAN User’s Manual
Table of Contents
1. Overview ............................................................................................................. 6
2. Installation .......................................................................................................... 7
2. Support file Installation ..................................................................................... 8
3. Uninstallation ................................................................................................... 10
4. Starting of PassThru CAN ............................................................................... 12
5. PassThru CAN Reader .................................................................................... 13
6. PassThru CAN Flash ....................................................................................... 14
7. Erase DTCs ....................................................................................................... 17
8. PassThru CAN Immobilizer ............................................................................ 18
9. PassThru CAN Coding .................................................................................... 19
10. PassThru CAN VIN Writing ........................................................................... 20
11. PassThru CAN Teach-in ................................................................................ 21
11. Error List ......................................................................................................... 37
Page 3 of 46
PassThru CAN User’s Manual
Symbols for safety operation
The following symbols are used for your safety and correct operation of the software.
Symbol
Title
Warning
Description
This symbol alerts you to a procedure or practice which, if not
followed correctly, could lead to death or serious injury.
This symbol alerts you to a procedure or practice which, if not
Caution
followed correctly, could lead to injury and/or property
damage (vehicle, PC etc.).
Prohibition
Enforcement
This symbol alerts you to a prohibited action.
This symbol alerts you to an action that must be enforced.
General precautions and pre-requisite
Items
PC and cables
Description
Do not use damaged cables and PCs together with
PassThru CAN software.
Unless clearly specified and required, do not operate the
Vehicle
software while the engine is running or when you are
driving your car.
While operating the PassThru CAN software the vehicle
Vehicle
must be held still by applying parking brake or wheel
wedges, etc.
Power supply
Software
The battery of the vehicle shall be charged enough to
supply necessary electricity for the software operation.
PassThru CAN software and related files (i.e. flash data
file and other support files) are appropriately installed.
Internet
Internet connection is necessary for web-site authorization
connection
for software execution.
PassThru
Valid J2534-1 compliant PassThru device must be used.
device
User ID and
password
The user has the valid subscription ID and password for
service information website of Mitsubishi Motors North
America Inc.(http://www.mitsubishitechinfo.com/epacarb/)
Page 4 of 46
PassThru CAN User’s Manual
Abbreviations
ECU
: Electrical Control Unit
DTC
: Diagnostic Trouble Code
PCM
: Power train Control Module
CAN
: Control Area Network
VIN
: Vehicle Identification Number
TC-SST
: Twin Clutch-Sportronic Shift Transmission
Page 5 of 46
PassThru CAN User’s Manual
1. Overview
1.1 Function overview
PassThru CAN software has the following functions.
Function name
Reader
Flash
Erase DTCs
Immobilizer
Variant Coding
VIN Writing
Teach in
Description
This function allows the user to retrieve information from an ECU of the
vehicle. This information is necessary to search correct files such as flash
reprogramming data file, coding data and other files for the target vehicle.
This function allows the user to reprogram ECU with updated software
program.
This function allows the user to deletes the diagnostic trouble codes.
This function allows the user to re-register Immobilizer Key Code into PCM in
its replacement.
This function allows the user to writes coding data (information on vehicle
equipment) into PCM
This function allows the user to write VIN into PCM.
This function allows the user to execute TC-SST [*] re-learn process that is
necessary in case of the following service.
1. Mechatronic assembly part replacement
2. Clutch assembly part replacement.
As for the details of the above service, refer to related TSB and instruction on
website.
Note) This function is executable for vehicles equipped with TC-SST only.
* TC-SST is abbreviation of “Twin Clutch-Sportronic Shift Transmission” and is
equipped for some high performance Mitsubishi vehicles.
1.2 Main menu screen
The buttons for the above functions are located on the main menu screen as follows.
Please refer to the related part in the following section for instruction on how you can operate
each function.
Page 6 of 46
PassThru CAN User’s Manual
2. Installation
(1) Pass CAN Installer file
Put PassThru CAN installer file into any folder.
(2) Installation
You can find “Setup.exe” icon in installer file.
Choose and double click the icon to start installation.
Please make sure that PassThru CAN is NOT
already installed. When PassThru CAN is already
installed, Setup.exe detects and moves on to
uninstallation process and the software will be
deleted.
(3) Installation procedure is now in progress
Installation process automatically starts and its
progress is displayed with blue area.
(5) Complete
When installation is complete, “PassThru CAN” icon is
created on desktop.
Page 7 of 46
PassThru CAN User’s Manual
2. Support file Installation
In order to execute the PassThru CAN software function, support files related with each
function need to be installed.
(1) Activation of PassThru CAN software
“ptc32.dll” needs to be installed in the following location.
Local Disk\ProgramFiles\PassThruCAN\System\Common
PassThru CAN software only activates “Reader” by
default and you need to install ptc32.dll to activates
other functionality.
(2)Flash
In order to execute Flash, the following support files need
to be installed.
(i) CBF file
CBF file is a database file for Flash with “.cbf” as its file
extension. Install the CBF file in the following path
Local Disk\Program Files\PassThruCAN\DiagDB\CBF
(ii) Flpart file
Flpart file is a vehicle specific information file with “.flpart”
as its file extension. Install the Flpart file in the following
path
Local Disk\Program Files\PassThruCAN\DiagDB\XML
Only one Flpart must exist in the folder. When the
previous Flpart file exists, please delete the file and
install only 1 Flpart file for the target vehicle.
(iii) CFF file
CFF file is a flash data file with “.cff” as its file extension.
Install CFF file in the following path.
Local Disk\Program Files\PassThruCAN\RpgData\CFF
(3) Erase DTC
“ClearDiagCANID.ini” is setting file for Erase DTC and
needs to be installed in the following path.
Local Disk\Program Files\PassThruCAN\Ini
Page 8 of 46
PassThru CAN User’s Manual
(4) Coding
In order to execute Coding, the following support files need
to be installed.
(i) Coding file
Coding file is Coding data file with “.kon” as its file
extension. Install the Coding file in the following path
Local Disk\Program Files\PassThruCAN\CdgData
(ii) CBF file
CBF file is a database file for Coding with “.cbf” as its file
extension. Install the CBF file in the following path
Local Disk\Program Files\PassThruCAN\DiagDB\CBF
(iii) VCPart file
VCPart file is a vehicle specific information file with “.vcpart”
as its file extension. Install the VCPart file in the following
path
Local Disk\Program Files\PassThruCAN\DiagDB\XML
Only one VCPart file must exist in the folder. When the
previous VCPart file exists, please delete the file and
install only 1 VCPart file for the target vehicle.
(5) Immobilizer
In order to execute Immobilizer key code transfer function,
the following support files need to be installed
(i) CBF file
CBF file is a database file for Immobilizer key code transfer
function with “.cbf” as its file extension. Install the CBF file in
the following path
Local Disk\Program Files\PassThruCAN\DiagDB\CBF
(ii) IMPart file
IMPart file is a vehicle information file with “.impart” as its
file extension. Install the IMPart file in the following path
Local Disk\Program Files\PassThruCAN\DiagDB\XML
Only one IMPart file must exist in the folder. When the
previous IMPart file exists, please delete the file and
install only 1 IMPart file for the target vehicle.
(6) VIN Writing
In order to execute VIN Writing, the following support files
need to be installed
(i) CBF file
CBF file is a database file for VIN Writing with “.cbf” as its
file extension. Install the CBF file in the following path
Local Disk\Program Files\PassThruCAN\DiagDB\CBF
(ii) VWPart file
VWPart file is a vehicle information file with “.vwpart” as its
file extension. Install the VWPart file in the following path
Local Disk\Program Files\PassThruCAN\DiagDB\XML
Only one VWPart must exist in the folder. When the
previous VWPart file exists, please delete the file and
install only 1 VWPart file for the target vehicle.
Page 9 of 46
PassThru CAN User’s Manual
(7) Teach-in
In order to execute Teach-in, the following support files
need to be installed
(i) CBF file
CBF file is a database file for Teach-in with “.cbf” as its file
extension. Install the CBF file in the following path
Local Disk\Program Files\PassThruCAN\DiagDB\CBF
(ii) TIPart file
TIPart file is a vehicle information file with “.tipart” as its file
extension. Install the TIPart file in the following path
Local Disk\Program Files\PassThruCAN\DiagDB\XML
Only one TIPart file must exist in the folder. The file
name is “TI_Info.tipart” and file with other name can not
be recognized by PassThruCAN software. When the
previous TIPart file exists, please delete the file and
install only 1 TIPart file for the target vehicle.
3. Uninstallation
Note) PassThru CAN is uninstalled in 2 steps. Main software program is uninstalled from the system menu
of “Windows Control Panel” and Library is uninstalled from the system menu of “Windows Control
Panel”.
(1) Control Panel Screen
Select [Settings]-[Control Panel] from the Start menu.
Choose and double click “Add/Remove programs”
(2) Add/Remove Programs Screen
Select “PassThru CAN” and press “Change/Remove”
button.
Uninstallation of “PassThru CAN” is implemented.
Page 10 of 46
PassThru CAN User’s Manual
(3) Add/Remove Programs Screen
Select “CGDPTMC Library” and press “Remove”
button.
The confirmation screen will appear.
Click “Yes” button.
Uninstallation of “CGDPTMC Library” is implemented.
All the procedure to uninstall PassThru CAN software is
complete.
(4) Uninstallation of support files
Support files that are installed manually remain after uninstallation of PassThru CAN software.
Uninstall manually those files together with their folders.
Page 11 of 46
PassThru CAN User’s Manual
4. Starting of PassThru CAN
(1) PassThru CAN desk top icon
After installation of PassThru CAN, PassThru CAN
icon is created on desktop screen.
To start the application, double-click the icon.
(2) Main menu screen
The main screen will appear and functions are
either activated or deactivated according to type or
service.
Select and press the active button you want to
execute.
Note) If you want to exit PassThru CAN, press
“cancel” button
on the screen.
The version of the application will be shown
at the lower part in the screen.
Please make sure that you see the latest
version of PassThru CAN software.
(3) Authorization procedure
In executing PassThru CAN function, this screen
may be displayed requiring authorization process.
You need to fill in the blank with valid subscription
User ID and Password for authorization.
Use the same User ID and Password that you
purchased at service information website of
Mitsubishi Motors North America Inc.
An internet connection is required for
authorization process
Page 12 of 46
PassThru CAN User’s Manual
5. PassThru CAN Reader
(1) Menu screen
Press “PassThru CAN Reader” button to start the
function.
(2) System select screen.
A table is displayed for system selection.
Select the system from which you want to read-out
ECU information.
Press OK button
and read-out of ECU
information starts.
If you press return button
the previous screen.
, you will go back to
(3) Confirmation screen
Read-out of ECU information is in progress.
(4) ECU information screen
When read-out is successful, the following
information is displayed.
1) ECU Part No.
2) ECU Software Part No.
3) VIN
Press OK button
and the screen goes back to
the main menu screen.
ECU information is necessary for
reprogramming data file search, Coding file
search and for other purpose. Record the
necessary information.
Page 13 of 46
PassThru CAN User’s Manual
6. PassThru CAN Flash
(1) Main menu screen
The main screen will appear.
Click “PassThru CAN Flash” button to execute
ECU reprogramming.
After execution, the software starts communication
with an ECU to retrieve necessary information of
the vehicle.
(2) Search screen
This screen is displayed while the software is
communicating with an ECU.
.
After retrieving the ECU information, PassThru
CAN checks it with reprogramming data file
information.
Wait for a while until the process is complete.
(3) Search result screen
After checking ECU information and correct
reprogramming data file is found, PassThru CAN
displays the result data on this screen.
Check the reprogramming information on the
screen and confirm it is correct for your
vehicle.
on the screen to continue
Press OK button
(move on to “(6) Confirmation of flash
reprogramming”)
Note) You can also go back to the first screen by
.
clicking return button
According to the reprogrammed level of the target
ECU on board, the following 2 cases may occur.
Page 14 of 46
PassThru CAN User’s Manual
(4) Search result Case 1
If the PCM has already been reprogrammed, this
dialogue screen will appear.
Press OK button
and return to the main
screen.
The ECU has the latest update and
reprogramming is not necessary.
(5) Search result Case 2
When the vehicle is not applied to the
reprogramming data, this dialog screen will appear.
Press OK button
and return to the main
screen.
The information read-out from the target
vehicle does not match reprogramming data file
information and the reprogramming file can not
be applied to the vehicle.
(6) Confirmation of flash reprogramming
This screen will appear to confirm reprogramming.
Press OK button
to continue.
Note) Once you press the button, reprogramming
starts.
.
If you press cancel button
, you will go back to
the “Automatic Reprogramming (CAN)” screen.
Some Vehicles turns on radiator fans
during reprogramming. DO NOT get closer
to radiator fans.
(7) The ECU reprogramming is now in
progress
The PCM reprogramming is now in progress. The
reprogramming status is displayed as blue area of
the progress bar.
Please be careful not to disconnect the cables
between PC and the vehicle until the
reprogramming is complete.
Page 15 of 46
PassThru CAN User’s Manual
(8) Complete screen 1
When this screen appears, Reprogramming is
complete.
Confirm ECU information after reprogramming.
Press OK button
.
(9) Complete screen 2
Follow the screen instruction to complete the
reprogramming procedure.
Press OK button
screen.
and return to the main
To complete flash reprogramming, turn OFF
IG-switch and then turn it ON.
Go back to the main menu screen and execute
Erase DTCs function.
(10) Post process
After finishing reprogramming, it is recommended
that you will check whether the ECU stores DTC or
not with your own scan tool. If any DTCs exist,
please clear them.
If you want to reprogram another ECU
successively, please exit and restart PassThru
CAN, otherwise an error message will appear.
Page 16 of 46
PassThru CAN User’s Manual
7. Erase DTCs
(1) Main menu screen
Press “Erase DTCs” button.
(2) Confirmation screen
This screen will appear to confirm erasing.
Please press OK button
to continue.
Note) Once you press the button, erasing starts.
If you press cancel button
, you go back
to the main screen.
(3) Erasing DTC screen
DTC erasing is now in progress.
The process may take more than a few
minutes for some vehicles and wait until it
is complete.
(4) Complete screen
When this screen appears, DTC Erasing is
complete.
Press OK button
and return to the main
screen.
Page 17 of 46
PassThru CAN User’s Manual
8. PassThru CAN Immobilizer
(1) Menu screen
The main screen appears.
Press “PassThru CAN Immobilizer” button.
(2) Vehicle select screen
The “vehicle information table screen” will appear.
Please select the correct vehicle type.
Press OK button
on the screen.
Note) You can also go back to the main screen by
clicking return button
.
Choose the correct vehicle from the list.
(3) Confirmation screen
This screen will appear to confirm registration.
Please press OK button
to continue.
Note) Once you press the button, registration starts.
If you press cancel button
, you go back
to the “Key Code Registration” screen.
(4) Complete screen
When this screen appears, Key Code Registration
is complete.
Press OK button
and return to the main
screen.
Page 18 of 46
PassThru CAN User’s Manual
9. PassThru CAN Coding
(1) Main menu screen
The main screen appears.
Press “PassThru CAN Coding” button.
(2) Coding information screen
The “Variant Coding” screen will appear and the
following information is displayed in the table.
1) VIN
2) ECU Hardware Part No.
3) Coding file name
“confirm coding” screen
Writing of the wrong coding data may lead to
inappropriate behavior of the vehicle. So, check
and confirm if the coding information in the
table is correct for the vehicle.
(3) Confirmation screen
This screen will appear to confirm coding.
Please press OK button
to continue.
Note) Once you press the button, coding starts.
You can also go back to the main screen by
clicking cancel button
.
(4) Complete screen
When this screen appears, coding is complete.
Press OK button
and return to the main
screen.
Page 19 of 46
PassThru CAN User’s Manual
10. PassThru CAN VIN Writing
(1) Main menu screen
The main screen appears.
Press “PassThru CAN VIN Writing” button.
(2) VIN input screen
The “VIN Input” screen will appear.
Please input the new VIN.
Press OK button
on the screen.
In case of new ECU, the VIN information in
Current VIN field is filled with asterisk.
You can go back to the first screen by clicking return
.
button
(3) Confirmation screen
This screen will appear to confirm writing.
Please press OK button
to continue.
Note) Once you press the button, writing starts.
If you press cancel button
, you will go
back to the “VIN Writing” screen.
(4) Complete screen
When this screen appears, writing is complete.
Press OK button
and return to the main
screen.
Page 20 of 46
PassThru CAN User’s Manual
11. PassThru CAN Teach-in
Precaution
PassThru CAN Teach-in is required when the following service is performed to TC-SST unit.
Mechatronic assembly replacement
Clutch assembly replacement
In order to execute Teach-in procedure correctly, TC-SST ECU must have correct diagnostic version.
Diagnostic version can be confirmed on the following screen (refer to the procedure below regarding how you
can get to the screen.)
Red-circle in the above screen indicates diagnostic version information of TC-SST ECU. According to this
value, the following difference applies.
[Diag Version : 0000]
This version of TC-SST ECU does NOT support Teach-in functionality and when mechatronic assembly or
clutch assembly is replaced, you need to reprogram TC-SST ECU with related calibration file first to enable the
ECU to support Teach-in. Refer to the related TSB and instruction on website for detailed reprogramming
procedure.
When mechatronic assembly is replaced, PassThru CAN Flash and PassThru CAN Coding must be performed.
Whereas clutch assembly replacement requires PassThru CAN Flash but PassThru CAN Coding is not
necessary. For the actual Teach-in procedure, refer to the following section.
As for 2008 Lancer Evolution with TC-SST unit, after Teach-in executed, TC-SST ECU must be reprogrammed
back to the previous level of calibration. Refer to the related TSB and instruction on website for details.
After reprogramming of TC-SST ECU with PassThru CAN Flash, DTC may be stored in other ECUs on the
vehicle. Refer to the section “7. Erase DTCs” and clear DTCs.
[Diag Version : 0001]
This version of TC-SST ECU supports Teach-in functionality. However, “Reset clutch gain” is not supported.
When mechatronic assembly is replaced, PassThru CAN Flash and PassThru CAN Coding must be performed.
Page 21 of 46
PassThru CAN User’s Manual
However, clutch assembly replacement doesn’t require these additional procedures. For the actual Teach-in
procedure, refer to the following section.
After reprogramming of TC-SST ECU with PassThru CAN Flash, DTC may be stored in other ECUs on the
vehicle. Refer to the section “7. Erase DTCs” and clear DTCs.
[Diag Version : 0002]
This version of TC-SST ECU supports Teach-in functionality fully.
When mechatronic assembly is replaced, PassThru CAN Flash and PassThru CAN Coding must be performed.
However, clutch assembly replacement doesn’t require these additional procedures. For the actual Teach-in
procedure, refer to the following section.
After reprogramming of TC-SST ECU with PassThru CAN Flash, DTC may be stored in other ECUs on the
vehicle. Refer to the section “7. Erase DTCs” and clear DTCs.
Here is a matrix related with Teach-in commands and Diagnostic version.
Teach-in sequence for
Teach-in sequence for
Teach-in commend
Diag Ver
Diag Ver
Diag Ver
Mechatronic
Clutch assembly
name
0000
0001
0002
assembly
replacement
replacement
Plausibility check
n/a
available
available
1
-
Shift fork Teach-In
n/a
-
n/a
available
available
but not
used
available
2
Line pressure Test
available
available
but not
used
available
-
-
4
2
available
available
but not
used
available
5
3
-
-
3
1
available
6
4
Stroke Teach-In
n/a
Boost Teach-In
n/a
Interlock Teach-In
n/a
Clutch Ventilation
n/a
available
available
but not
used
available
Reset clutch gain
n/a
n/a
Note) Line pressure Test and Interlock Teach-In are not used during the procedure.
Here is another matrix for additional procedures (flash and coding).
Diagnostic
Version
0000
0001
0002
Service
Flash
Coding
Mechatronic assembly
Required[*]
Required
Clutch assembly
Required
Unnecessary
Mechatronic assembly
Required
Required
Clutch assembly
Unnecessary
Unnecessary
Mechatronic assembly
Required
Required
Clutch assembly
Unnecessary
Unnecessary
[*]As for 2008 Lancer Evolution with TC-SST unit, After Teach-in executed, TC-SST ECU must be
reprogrammed back to the previous level of calibration. Refer to the related TSB and instruction on website for
details.
Page 22 of 46
PassThru CAN User’s Manual
Teach-in procedure in details
(1) Main menu screen
The main screen appears.
Press “PassThru CAN Teach-in” button.
(2) Confirmation screen
Press OK button
when vehicle is ready for
service.
If you press cancel button
, you will go back to
Main menu screen.
In case MIL is on and DTC is output, Teach-in
may not operate correctly. Refer to the related
part of service manual and fix the problem first.
(3) Search screen
This screen is displayed while the software is
communicating with an ECU.
.
After retrieving the ECU information, PassThru CAN
checks it with Teach-in data file information.
Wait for a while until the process is complete.
(4) Teach-in command selection screen
When this screen appears, you can select and
execute Teach-in command. Result of Teach-in
command can be checked from the data in the right
table. Select the corresponding Teach-in command
and press OK button
.
You can go back to menu screen by clicking return
button
.
Page 23 of 46
PassThru CAN User’s Manual
(5) Confirmation screen
Press OK button
screen.
and return to the main
If you press cancel button
, you will go back to
“(4) Teach-in command selection screen”.
(6) Executed screen
and return to “(4) Teach-in
Press OK button
command selection screen”.
Repeat the above (4) to (6) to execute necessary
Teach-in commands that are required for related
service. Refer to the following part for detailed
Teach-in procedure.
Procedure for mechatronic assembly replacement
(1) Preparation
With the PC and PassThru device connected to the vehicle, put the vehicle into the condition below
•Engine
: Idling
•Shift lever position : P range
•Brake pedal
: Depressed
•Parking brake
: Pulled
•Transmission fluid temperature
: 40°C to 80°C (104°F to 176°F)
Please make sure the vehicle is in the above condition.
Otherwise Teach-in procedure will not start correctly.
(2) Plausibility check
Start the PassThruCAN Teach-in.
Confirm datalist value of “No 100 Teach-in
executing” is “No”.
Page 24 of 46
PassThru CAN User’s Manual
Select “Plausibility check”.
Click OK
button and execute.
Check Data list status.
While “No 100 Teach-in executing” is “Yes”,
“Plausibility check” is ongoing. Wait until the value
turns “No”.
If vehicle conditions are not met, "Pending" is
displayed.
When “No 100 Teach-in executing” turns “No”,
Check the other data.
Check if value of data list items are as follows,
101 Normal End : Yes
102 Abnormal End : No
103 Timeout error : No
104 Abort conditions error :No
If the above does not apply, “Plausibility check”
has not been performed correctly and start over
from “(1) Preparation”.
Page 25 of 46
PassThru CAN User’s Manual
(3) Shift fork Teach-In
Confirm datalist value of “No 100 Teach-in
executing” is “No”.
Select “Shift fork Teach-In”.
Click OK
button and execute the function.
Check Data list status.
While “No 100 Teach-in executing” is “Yes”, “Shift
fork Teach-In” is ongoing. Wait until the value turns
“No”.
The function may take several minutes to
complete. Wait until the value changes to “No”.
If vehicle conditions are not met, "Pending" is
displayed.
When “No 100 Teach-in executing” turns “No”,
Check the other data.
Check if value of data list items are as follows,
101 Normal End : Yes
102 Abnormal End : No
103 Timeout error : No
104 Abort conditions error :No
If the above does not apply, “Shift fork Teach-In”
has not been performed correctly and start over
from “(1) Preparation” again.
(4) Turn IG switch to LOCK (OFF) position.
Turn IG switch to LOCK or OFF position and reset
TC-SST ECU.
Page 26 of 46
PassThru CAN User’s Manual
An error dialog is displayed.
Click OK button
and screen moves back to the
main screen
Displaying the error dialog is normal
processing of the PassThru CAN software.
Put the vehicle into the condition below again
•Engine: Idling
•Shift lever position: P range
•Brake pedal: Depressed
•Parking brake: Pulled
•Transmission fluid temperature: 40°C to 80°C (104°F to 176°F)
Please make sure the vehicle is in the above condition.
Otherwise Teach-in procedure will not be continued correctly.
Press “PassThru CAN Teach-in” button.
(5) Clutch Ventilation
Confirm datalist value of “No 100 Teach-in
executing” is “No”.
Page 27 of 46
PassThru CAN User’s Manual
Select “Clutch Ventilation”.
Click OK button
and execute the function.
Check Data list status.
While “No 100 Teach-in executing” is “Yes”, “Clutch
Ventilation” is ongoing. Wait until the value turns
“No”.
The function may take several minutes to
complete. Wait until the value changes to “No”.
If vehicle conditions are not met, "Pending" is
displayed.
When “No 100 Teach-in executing” turns “No”,
Check the other data.
Check if value of data list items are as follows,
101 Normal End : Yes
102 Abnormal End : No
103 Timeout error : No
104 Abort conditions error :No
If the above does not apply, “Clutch Ventilation”
has not been performed correctly and start over
from “(1) Preparation” again.
(6) Stroke Teach-In
Confirm datalist value of “No 100 Teach-in
executing” is “No”.
Page 28 of 46
PassThru CAN User’s Manual
Select “Stroke Teach-In”.
Click OK button
and execute the function.
Check Data list status.
While “No 100 Teach-in executing” is “Yes”, “Stroke
Teach-In” is ongoing. Wait until the value turns “No”.
The function may take several minutes to
complete. Wait until the value changes to “No”.
If vehicle conditions are not met, "Pending" is
displayed.
When “No 100 Teach-in executing” is “No”, Check
the other data.
Check if value of data list items are as follows,
101 Normal End : Yes
102 Abnormal End : No
103 Timeout error : No
104 Abort conditions error :No
If the above does not apply, “Stroke Teach-In”
has not been performed correctly and start from
“(1) Preparation” again.
(7) Boost Teach-In
Confirm datalist value of “No 100 Teach-in
executing” is “No”.
Page 29 of 46
PassThru CAN User’s Manual
Select “Boost Teach-In”.
Click OK button
and execute the function.
Check Data list status.
While “No 100 Teach-in executing” is “Yes”, “Boost
Teach-In” is ongoing. Wait until the value turns “No”.
If vehicle conditions are not met, "Pending" is
displayed.
While the function is operational, be careful with
the followings.
•The engine speed could be high (4,000 r/min)
several times when the Boost Teach-In is in
progress. (Depending on the transaxle state, the
engine speed may not be high.)
The function may take several minutes to
complete. Wait until the value changes to “No”.
When “No 100 Teach-in executing” is “No”, Check
the other data.
Check if value of data list items are as follows,
101 Normal End : Yes
102 Abnormal End : No
103 Timeout error : No
104 Abort conditions error :No
If the above does not apply, “Boost Teach-In”
has not been performed correctly and start over
from “(1) Preparation” again.
(8) Reset clutch gain
Confirm datalist value of “No 100 Teach-in
executing” is “No”.
This procedure is unnecessary for vehicle with
Page 30 of 46
PassThru CAN User’s Manual
diagnostic version of “0001”.
Select “Reset clutch gain”.
Click OK button
and execute the function.
Check Data list status.
While “No 100 Teach-in executing” is “Yes”, “Reset
clutch gain” is ongoing. Wait until the value turns
“No”.
The function may take several minutes to
complete. Wait until the value changes to “No”.
If vehicle conditions are not met, "Pending" is
displayed.
When “No 100 Teach-in executing” is “No”, Check
the other data.
Check if value of data list items are as follows,
101 Normal End : Yes
102 Abnormal End : No
103 Timeout error : No
104 Abort conditions error :No
If the above does not apply, “Reset clutch gain”
has not been performed correctly and start from
“(1) Preparation” again.
(9) Complete
When all the Teach-in commands required for Mechatronic assembly replacement are executed, turn IG
switch to LOCK or OFF position and finish the procedure.
Page 31 of 46
PassThru CAN User’s Manual
Procedure for clutch assembly replacement
(1) Preparation
With the PC and PassThru device connected to the vehicle, put the vehicle into the condition below
•Engine: Idling
•Shift lever position: P range
•Brake pedal: Depressed
•Parking brake: Pulled
•Transmission fluid temperature: 40°C to 80°C (104°F to 176°F)
Please make sure the vehicle is in the above condition.
Otherwise Teach-in procedure will not start correctly.
(2) Clutch Ventilation
Confirm datalist value of “No 100 Teach-in
executing” is “No”.
Select “Clutch Ventilation”.
Click OK button
and execute the function.
Check Data list status.
While “No 100 Teach-in executing” is “Yes”, “Clutch
Ventilation” is ongoing. Wait until the value turns
“No”.
The function may take several minutes to
complete. Wait until the value changes to “No”.
If vehicle conditions are not met, "Pending" is
displayed.
Page 32 of 46
PassThru CAN User’s Manual
When “No 100 Teach-in executing” is “No”, Check
the other data.
Check if value of data list items are as follows,
101 Normal End : Yes
102 Abnormal End : No
103 Timeout error : No
104 Abort conditions error :No
If the above does not apply, “Clutch Ventilation”
has not been performed correctly and start over
from “(1) Preparation” again.
(3) Stroke Teach-In
Confirm datalist value of “No 100 Teach-in
executing” is “No”.
Select “Stroke Teach-In”.
Click OK button
and execute the function.
Check Data list status.
While “No 100 Teach-in executing” is “Yes”, “Stroke
Teach-In” is ongoing. Wait until the value turns “No”.
The function may take several minutes to
complete. Wait until the value changes to “No”.
If vehicle conditions are not met, "Pending" is
displayed.
Page 33 of 46
PassThru CAN User’s Manual
When “No 100 Teach-in executing” is “No”, Check
the other data.
Check if value of data list items are as follows,
101 Normal End : Yes
102 Abnormal End : No
103 Timeout error : No
104 Abort conditions error :No
If the above does not apply, “Stroke Teach-In”
has not been performed correctly and start over
from “(1) Preparation” again.
(4) Boost Teach-In
Confirm datalist value of “No 100 Teach-in
executing” is “No”.
Select “Boost Teach-In”.
Click OK button
and execute the function.
Check Data list status.
While “No 100 Teach-in executing” is “Yes”, “Boost
Teach-In” is ongoing. Wait until the value turns “No”.
If vehicle conditions are not met, "Pending" is
displayed.
While the function is operational, be careful with
the followings.
•The engine speed could be high (4,000 r/min)
when the Boost Teach-In is in progress.
(Depending on the transaxle state, the engine
speed may not be high.)
The function may take several minutes to
complete. Wait until the value changes to “No”.
Page 34 of 46
PassThru CAN User’s Manual
When “No 100 Teach-in executing” is “No”, Check
the other data.
Check if value of data list items are as follows,
101 Normal End : Yes
102 Abnormal End : No
103 Timeout error : No
104 Abort conditions error :No
If the above does not apply, “Boost Teach-In”
has not been performed correctly and start over
from “(1) Preparation” again.
(5) Reset clutch gain
Confirm datalist value of “No 100 Teach-in
executing” is “No”.
This procedure is unnecessary for vehicle with
diagnostic version of “0001”.
Select “Reset clutch gain”.
Click OK button
and execute the function.
Check Data list status.
While “No 100 Teach-in executing” is “Yes”, “Reset
clutch gain” is ongoing. Wait until the value turns
“No”.
The function may take several minutes to
complete. Wait until the value changes to “No”.
If vehicle conditions are not met, "Pending" is
displayed.
Page 35 of 46
PassThru CAN User’s Manual
When “No 100 Teach-in executing” is “No”, Check
the other data.
Check if value of data list items are as follows,
101 Normal End : Yes
102 Abnormal End : No
103 Timeout error : No
104 Abort conditions error :No
If the above does not apply, “Clutch Ventilation”
has not been performed correctly and start over
from “(1) Preparation” again.
(6) Complete
When all the Teach-in commands required for Clutch assembly replacement are executed, turn IG switch
to LOCK or OFF position and finish the procedure.
Page 36 of 46
PassThru CAN User’s Manual
11. Error List
When an error message is displayed, check the following table for information.
Note) If error reoccurs even after trying the described procedure for remedy, please contact with "MITSUBISHI
MOTORS NORTH AMERICA, Inc”.
No.
Error dialog
Communication error
Function
Flash
Coding
Immobilizer
VIN writing
Teach-in
Cause/Remedy
<Possible Cause>
‧ IG SW is not ON or battery is too low.
‧ Harness and ECU are damaged.
‧ Harness is not connected correctly.
<Remedy>
Check IG SW and battery voltage.
Check harness and ECU damage and fix.
Connect harness correctly.
1’
2
Communication error
File search error (FlPart file error)
Reader
Flash
<Possible Cause>
‧ IG SW is not ON or battery is too low.
‧ Harness and ECU are damaged.
‧ Harness is not connected correctly.
‧ CBF file can not be found in the specified
folder.
<Remedy>
Check IG SW and battery voltage.
Check harness and ECU damage and fix.
Connect harness correctly.
Install CBF file
When CBF file is not installed correctly, this
error dialog is also displayed(Reader function
only)
<Possible Cause>
‧ FlPart file is not installed correctly.
<Remedy>
Install FlPart file correctly.
FlPart file is an information file that has “.flpart”
as an extention and is necessary to execute
PassThru CAN Flash.
3
File search error (FlPart file error)
Flash
<Possible Cause>
‧ Multiple FlPart files are installed.
<Remedy>
Delete unnecessary FlPart file and only one
correct FlPart file must exist.
Be careful not to delete correct FlPart file.
4
File search error(CBF file error)
Flash
Coding
VIN writing
<Possible Cause>
‧ CBF file is not installed correctly.
‧ Wrong CBF file is installed.
<Remedy>
Install correct CBF file
CBF file is a database file that has “.cbf” as an
Page 37 of 46
PassThru CAN User’s Manual
extention and is necessary to execute
PassThru CAN Flash.
No.
5
Error dialog
File search error (CFF file error)
Function
Flash
Cause/Remedy
<Possible Cause>
‧ CFF file is not installed correctly
<Remedy>
Install CFF file correctly.
CFF file is a reprogramming data file that has
“.cff” as an extension.
6
Reprogramming Error
Flash
<Possible cause>
‧ Harness is disconnected while reprogramming
‧ Battery is too low.
‧ PassThru device is not working correctly
<Remedy>
Check harness and battery.
Check and fix PassThru device.
Restart reprogramming process from the
beginning.
7
File open error (FlPart file)
Flash
<Possible cause>
‧ Damaged FlPart file
<Remedy>
Reinstall FlPart file and retry.
8
File search error (VCPart file)
Coding
<Possible cause>
‧ VCPart file is not installed correctly.
<Remedy>
Reinstall VCPart file correctly.
9
File search error (VCPart file)
File search error
Multiple VCPart files were found.
Delete unnecessary VCPart file
and retry .
Coding
VCPart file is an information file that has
“.vcpart” as an extention and is necessary to
execute PassThru CAN Coding
<Possible cause>
‧ Multiple VCPart files are installed.
<Remedy>
Delete unnecessary VCPart file
Only one VCPart file is to be installed in the
specified location.
Page 38 of 46
PassThru CAN User’s Manual
Page 39 of 46
PassThru CAN User’s Manual
No.
10
Error dialog
File search error (Coding data file)
Function
Coding
Cause/Remedy
<Possible cause>
‧ Coding data file is not installed correctly.
<Remedy>
Install coding data file correctly
File search error
Coding data file was not
found. Reinstall data file and
retry.
Coding data file has “.kon” as its file extension.
11
VIN error
Coding
VIN writing
<Possible cause>
‧ PCM or PassThru device are damaged.
‧ Harness is disconnected while read-out.
<Remedy>
Check harness connection and battery voltage
supply from the vehicle and retry.
Repair(or replace) PCM or PassThru device.
12
VIN error
Coding
13
Part No.read out error
Coding
<Possible cause>
‧ Wrong vehicle is selected for Coding.
‧ Wrong VCPart file is installed and is not for the
target vehicle.
‧ PCM is newly replaced and VIN is not yet
written.
<Remedy>
Apply the correct vehicle.
Reinstall correct VCPart file.
Write VIN (refer to VIN writing section)
<Possible cause>
‧ Damaged harness or disconnection
‧ Damaged PCM or PassThru device
Part No. read out error
<Remedy>
Check harness is connected correctly.
Check if harness is damaged.and change it if
necessary.
Repair (or replace) PCM or PassThru device
Reading out of hardware part
number was not successful.
Please retry.
14
Part No. read out error
Part No. read out error
Read-out hardware part
number didn’t match VCPart
file data.
Coding
<Possible cause>
‧ Wrong vehicle is selected for Coding.
‧ Wrong VCPart file is installed and it is not for
the target vehicle.
d
<Remedy>
Apply the correct vehicle.
Reinstall correct VCPart file.
Page 40 of 46
PassThru CAN User’s Manual
No.
15
Error dialog
CRC error
Function
Coding
Coding
<Possible cause>
‧ The coding data may have been written
wrongfully due to bad communication between
vehicle and PC.
<Remedy>
Check harness PassThru device, and battery
voltage of the vehicle.
Coding
<Possible cause>
‧ Target ECU doesn’t support variant coding
function.
CRC error
CRC error occurred. Please
reinstall coding data file and retry.
16
Coding data mismatch
Coding data mismatch
Written coding data didn’t
match coding data file. Please
retry.
17
Coding error
Cause/Remedy
<Possible cause>
‧ Coding file may be damaged and its data is
changed.
<Remedy>
Reinstall the correct coding data file and retry.
Coding error
<Remedy>
Check if the vehicle is compatible with variant
coding functionality.
Target ECU doesn’t support
variant coding function.
18
NRC $XX (Other error in coding)
Coding
NRC $XX
<Remedy>
Retry coding from the beginning.
If the same error occurs, write down the NRC
code in “XX” field of the error dialog and contact
Mitsubishi Motors North America Inc.
Error occurred during variant
coding.
19
File open error (VCPart file error)
File open error
Error caused for parsing
VCPart file.
<Possible cause>
‧ This error is resulted from other causes that
are not described in this error list..
Coding
<Possible cause>
‧ VCPart file may have been damaged while
installation and information in the file can not
be read out correctly.
<Remedy>
Reinstall VCPart file and retry.
Page 41 of 46
PassThru CAN User’s Manual
No.
20
21
Error dialog
File search error (IMPart file error)
File search error (CBF error)
Function
Immobilizer
Immobilizer
Cause/Remedy
<Possible cause>
‧ IMPart file is not correctly installed.
<Remedy>
Reinstall IMPart file and retry.Check if correct
IMPart file is installed in specified location and
retry.
IMPart file is an information file that is
necessary to execute PassThru CAN
Immobilzer.
<Possible cause>
‧ CBF file is not correctly installed.
<Remedy>
Reinstall correct CBF file and retry.
22
Error(NRC$XX)(Registration error)
Immobilizer
<Possible cause>
‧ This error is resulted from other causes that
are not described in this error list.
<Remedy>
Restart Immobilizer from the beginning.
If the same error occurs, write down the NRC
code in “XX” field of the error dialog and contact
Mitsubishi Motors North America Inc.
23
24
Timeout error
Unknown Key Code
Immobilizer
Immobilizer
<Possible cause>
‧ There has not been response from the ECU
within certain period of time.
‧ Poor data communication(damaged harness
or PassThru device)
‧ ECU may be busy doing other processing.
<Remedy>
Retry if error recurrs.
Check ECU, harness and PassThru device and
repair (replace) them if necessary.
<Possible cause>
‧ Immobilizer ECU could not recognize the key
code.
‧ Key code may not be correctly registered in
Immoibilizer ECU.
<Remedy>
Check if key code is correctly registered in
Immobilizer ECU.
Page 42 of 46
PassThru CAN User’s Manual
No.
Error dialog
Function
Cause/Remedy
25
Internal error
Immobilizer
<Possible cause>
‧ This error is caused by internal error of
Immobilizer ECU.
‧ Immobilizer ECU may be damaged.
<Remedy>
Check if Immobilizer ECU is working correctly.
Restart registration from beginning and retry.
26
Error Code $XX (Other error)
Immobilizer
<Possible cause>
‧ This error is resulted from other causes that
are not described in this error list.
<Remedy>
Restart Immobilizer from the beginning and
retry. If the same error occurs, write down the
NRC code in “XX” field of the error dialog and
contact Mitsubishi Motors North America Inc.
27
File open error (IMPart file)
Immobilizer
<Possible cause>
‧ Data in IMPart file can not be read out
correctly.
‧ IMPart file may be damaged and its content
changed.
<Remedy>
Reinstall correct IMPart file, and retry.
28
File search error (VWPart file)
VIN Writing
<Possible cause>
‧ VWPart file is not correctly installed.
<Remedy>
Reinstall correct VWPart file, and retry.
VWPart file is an information file that is
necessary to execute PassThru CAN VIN
Writing.
29
CHECKDIGIT error
VIN Writing
<Possible cause>
‧ Input VIN is not valid and checkdigit
verification failed.
<Remedy>
Input correct VIN and retry..
Page 43 of 46
PassThru CAN User’s Manual
No.
30
Error dialog
VIN Writing error (VIN unmatched)
Function
Cause/Remedy
VIN Writing
<Possible cause>
‧ Input VIN was written wrongfully and does not
match written VIN.
‧ Disconnection of harness while VIN writing.
‧ ECU malfunction
<Remedy>
Check harness, PassThru device and ECU and
try VIN writing from the beginning.
31
VIN Writing error
VIN Writing
<Possible cause>
‧ ECU of the target vehicle does not support VIN
writing function.
<Remedy>
Check if correct vehicle is applied for VIN
Writing.
32
NRC $XX (Other error)
VIN Writing
<Possible cause>
‧ This error resulted from other causes that are
not described in this error list..
<Remedy>
Restart VIN Writing from the beginning and
retry. If the same error occurs, write down the
NRC code in “XX” field of the error dialog and
contact Mitsubishi Motors North America Inc.
33
File open error
VIN Writing
<Possible cause>
‧ VWPart file is damaged and information in the
file could not be read-out.
<Remedy>
Reinstall correct VWPart file, and retry.
34
File search error
Teach-in
<Possible cause>.
‧ “TI_Info.tipart” file is not found in the specified
folder.
‧ C¥Program Files¥PassThruCAN¥DiagDB¥XML
<Remedy>
Copy the downloaded “TI_Info.tipart” file in the
correct folder.
Page 44 of 46
PassThru CAN User’s Manual
No.
35
Error dialog
File search error
Function
Teach-in
Cause/Remedy
<Possible cause>.
‧ CBF file is not found in the specified folder.
‧ C¥Program Files¥PassThruCAN¥DiagDB¥CBF
<Remedy>
Copy the downloaded CBF file in the correct
folder.
36
Data file error
Teach-in
<Possible cause>
‧ Diagnostic version read-out from the vehicle is
not included in the “TI_Info.tipart” file.
<Remedy>
‧ Check the vehicle if the vehicle is equipped
with TC-SST.
37
Data file error
Teach-in
<Possible cause>
‧ “TI_Info.tipart” file is corrupted or invalid.
<Remedy>
‧ Download and reinstall “TI_Info.tipart” file.
38
NRC $XX (Other error)
Teach-in
<Possible cause>
‧ This error resulted from other causes that are
not described in this error list.
<Remedy>
‧ Restart Teach-in from the beginning and retry.
If the same error occurs, write down the NRC
code in “XX” field of the error dialog and
contact Mitsubishi Motors North America Inc.
Page 45 of 46