1
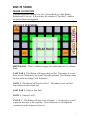
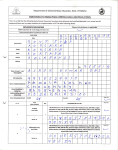
Preset: apC-CL1 v1.0.9
NOTE: There are 2 versions of this Preset.
apC-CL1 is the default version.
apC-CL1[0db] is identical except that all the Volume-related controls max
out at 0db.
SETTINGS
MT PLAYER SETTINGS
LIVE SETTINGS
GENERAL OVERVIEW
CLIP LAUNCH BUTTON MODES
DEFAULT MODE
MODE OVERVIEW
NAVIGATION MODE
MODE OVERVIEW
GENERAL FUNCTIONS
MIDI FUNCTIONS
USER ASSIGNMENTS
DRUM MODE
MODE OVERVIEW
DEFAULT SUB-MODE
16 LEVELS SUB-MODE
NOTES
USER MODE
MODE OVERVIEW
MT PLAYER
MAIN WINDOW
RIGHT-CLICK MENU
TROUBLESHOOTING
SUPPORT
SETTINGS
If you have trouble completing any of the settings listed here, please make
sure to refer to the Troubleshooting section.
MT PLAYER SETTINGS
The first time you use your APC40 in MT Player, you may be prompted to
setup the APC40’s ports. For both prompts, you should select your APC40.
However, if you bypass those prompts, you can access the settings by rightclicking on MT Player and selecting MIDI Settings.
1.
2.
3.
4.
5.
6.
From the Port Name menu, select “IN: APC40 Input”.
From the MIDI In port menu, select your APC40 and click OK.
Go back into MIDI Settings.
From the Port Name menu, select “OUT: APC40 Output”.
From the MIDI Out port menu, select your APC40 and click OK.
Click the Restart button.
You can learn more about MT Player in the MT Player section.
LIVE SETTINGS
The following settings will be found in Preferences on the MIDI/Sync tab.
IMPORTANT NOTE: When you first install MT Player, Live will
automatically turn on its Track switches. Before completing the steps
below, turn off all the Track switches related to MT Player.
1. Turn off all of the
Track/Sync/Remote
switches related to
your APC40 and
deselect it as a
Control Surface.
2. Deactivate the
Track switches for
From MT Player
2 and 3.
3. Select APC40 as a
Control Surface.
1
4. Select From MT Player 1 as the Input and To MT Player 1 as the
Output.
5. Select MackieControl as a Control Surface.
6. Select From MT Player 2 as the Input and To MT Player 2 as the
Output.
7. Select APC40-DR as a Control Surface. This will be listed at the
bottom of the Control Surface drop-down menu.
8. Select From MT Player 1 as the Input.
9. Activate the Track and Remote switches for From MT Player 1.
10. Activate the Remote switch for APC40 Output (To MT Player 1).
NOTE: For the most part, the order in which you set up the Control
Surfaces doesn’t matter. However, the APC40 entry needs to be above the
APC40-DR entry.
Also, it is recommended that you launch MT Player, select a Preset and then
launch Live. If Live is already running when you select or Restart a Preset,
it is recommended that you enter, then exit MIDI mapping mode after
selecting the Preset to re-initialize.
GENERAL OVERVIEW
This Preset offers 4 Modes for the APC40’s Clip Launch Buttons. These
Modes can be switched between by holding down Shift and using the first 4
Clip Stop Buttons. Also, when Shift is depressed, the first 4 Clip Stop
Button LEDs will indicate the currently selected Mode.
NOTE: All of the APC40’s other controls perform their default function in
every Mode with the following exceptions:
MUTE/SOLO BUTTONS – These Buttons provide dual functionality.
Press them relatively quickly and they will toggle. Hold them down and
they become momentary switches.
DEVICE ON/OFF BUTTON – This Button provides dual functionality
like the Mute Buttons described above.
SHIFT+NUDGE +/- – Session = Increase/decrease Global Quantization
value. Arrange = Increase/decrease Grid size.
2
SHIFT+TAP – Session = Toggle Global Quantization on/off. Arrange =
Toggle Grid On/Off
SHIFT+CUE LEVEL – Session = Scene select. Arrange = Scroll.
SHIFT+PLAY – Launch the currently selected Clip.
SHIFT+STOP – Undo.
SHIFT+REC – Clip record. Use this to record perfectly cut Clips (Audio or
MIDI) at the current Global Quantization value. For example, if Global
Quantization is set to 2 bars, this will record a perfect 2-bar clip. This
function is intended for the creation of new Clips and will not work if MIDI
Overdub is turned on.
SHIFT+STOP ALL – This is User Assignable to Live menu functions.
Please see User Assignments.
FADERS – The Faders perform their default function. However, pressing
Shift will Mute the Faders so that they can be repositioned. This is sort of a
manual Takeover mode so, when using it, Takeover mode in Live should be
set to None.
CLIP LAUNCH BUTTON MODES
DEFAULT MODE
MODE OVERVIEW
In this Mode, the Clip Launch Buttons perform their default function.
3
NAVIGATION MODE
MODE OVERVIEW
This Mode provides a variety of controls for navigating Live sets,
launching/recording Clips/Scenes as well as general-purpose editing. This
Mode uses both MIDI functions (outlined in white) and keystrokes/general
functions.
GENERAL FUNCTIONS
COPY/PASTE/DUPE/DEL/UNDO/REDO – Standard editing shortcuts.
USER 1 – 8 – These Buttons are User Assignable to Live menu functions.
Each Button can be assigned a Default function and a Shifted function.
Please see User Assignments.
PLUS/PG UP – Plus/page up keystrokes.
MINUS/PG DN – Minus/page down keystrokes.
KEY UP/DOWN/LEFT/RIGHT – Arrow keystrokes.
ENTER/ESCAPE – Enter/escape keystrokes.
LOAD CLIP – Load selected Clip(s) from browser onto selected Clip
Slot(s).
4
SHIFT/CTRL/WIN/CMD/ALT – Modifier keystrokes. These can be used
to modify the function of the Arrow keystrokes as well as mouse
movements/clicks.
FOCUS CONTROLS – These 3 controls move Live’s focus to different
areas so that you can navigate/control them with the keystrokes explained
above.
MAIN FOCUS – Puts the focus on Live’s main window.
FIX – Puts the focus back on the main element in Live’s main window.
DETAIL FOCUS – Puts the focus on Clip View or Track View.
BRWSR FOCUS – Puts the focus on Live’s Browser.
MIDI FUNCTIONS
SSN/ARNG – Toggle between Session and Arrange Views.
CLIP/TRACK – Toggle between Clip and Track Views.
BRWSR I/O – Show/hide the Browser.
TGL BRWSR/PREV – Toggle to the next/previous browser in Live 8
(these buttons have no function in Live 9). This requires some additional
setup as explained in User Assignments.
MCU UP/DOWN/LEFT/RIGHT – These are multi-functional cursor
Buttons. When in Session View, these will navigate. When in Arrange
View, these with either navigate or zoom. The behavior is dictated by the
Clip Launch button.
PREV L/NEXT L – Jump to the Previous/Next Locator.
CLIP LNCH – When in Session View, this will launch the currently
selected Clip. When in Arrange View, this will toggle the behavior of the
MCU cursor Buttons. When off, the cursor Buttons will navigate. When on,
the cursor Buttons will zoom.
SCN LNCH – In Session View, this will launch the currently selected
Scene.
TEMPO UP/DOWN – Increase/decrease Tempo by 1-BPM.
5
USER ASSIGNMENTS
WINDOWS:
In order to use Tgl Browser/Prev and/or User 1 – 8, you will need to
download and install Live Menu Keys:
http://beatwise.proboards.com/index.cgi?board=freesoft&action=display&thread=1131
Live Menu Keys will automatically configure Tgl Browser/Prev for you. To
configure User 1 – 8, double-click the Live Menu Keys icon to open its
configuration window and click the Add HotKey button. Press one of the
User Buttons or Shift+one of the User Buttons to assign the HotKey. After
the HotKey, you’ll list the menu item the HotKey should trigger.
OS X:
You can configure Tgl Browser/Prev and User Buttons 1 – 8 by using a
utility built into the OS.
To configure User Buttons 1 – 8, go to System Preferences – Keyboard &
Mouse and click on the Keyboard Shortcuts tab. Scroll down to Application
Keyboard Shortcuts and click the Plus button to add a new shortcut. The
Application for all the shortcuts should be Live.
Type the Menu Title exactly as it appears in Live’s menu. Assign the
Keyboard Shortcut by pressing one of the User Buttons or Shift+one the
User Buttons.
To configure Tgl Browser/Prev, you will need to set up 6 additional
shortcuts. The Keyboard Shortcut and Menu Titles are as follows:
Ctrl+Alt+F1 = Live Devices
Ctrl+Alt+F2 = Plug-In Devices
Ctrl+Alt+F3 = Files 1
Ctrl+Alt+F4 = Files 2
Ctrl+Alt+F5 = Files 3
Ctrl+Alt+F6 = Hot-Swap
NOTE: The names above are shown in English. If you are using a different language in Live, the names
will be different. You can see these names by going to View – Browser.
NOTE: For OS X users, once you’ve made all your assignments, you’ll
need to close and restart Live for them to take effect.
6
DRUM MODE
MODE OVERVIEW
This Mode provides control over Live’s Drum Rack via 2 Sub-Modes;
Default and 16 Levels. It also utilizes the concept of “Last Pad”, which is
the last pad that was triggered.
DEFAULT SUB-MODE
DRUM RACK – These 16 Buttons trigger the visible pads in Live’s Drum
Rack.
LAST PAD 1– This Button will trigger the Last Pad. This makes it so you
have at least 2 Buttons to use to play fast rolls and such. This Button cannot
be used while recording Cycle Sequences.
LOCK 1– This Button will lock Last Pad 1. This makes it so Last Pad 1
stays locked on the current pad.
LAST PAD 2– Same as Last Pad 1.
LOCK 2– Same as Lock 1.
CYCLE 1 – This Button will play Cycle Sequence 1. On first press, it will
output the first note in the sequence. On second press, it will output the
second note in the sequence and so on.
7
REC 1 – This will enable Record mode for Cycle Sequence 1. You can
record up to 8 steps using the 16 Drum Rack Buttons. Press Cycle 1 to end
recording. While recording, the Clip Stop Buttons show how many steps
you've recorded. This is replace-style recording so, if you exceed 8 steps,
the previous 8 steps will be deleted.
CYCLE 2 – Same as Cycle 1.
REC 2 – Same as Rec 1.
VELOCITY LEVEL – These 4 Buttons set the velocity level of the Drum
Rack/Last Pad 1+2/Cycle 1+2 Buttons. The 4 available velocities (from top
to bottom) are 127, 107, 87 and 67.
16 LEVELS – Switch to 16 Levels Sub-Mode.
16 LEVELS SUB-MODE
DRUM RACK – Same as in Default Sub-Mode.
16 LEVELS – The Last Pad will be assigned to all 16 of these Buttons.
LOCK – This will lock the 16 Levels Buttons so that they stay locked on
the current pad.
VELO – Toggles 16 Levels of velocity. When on, the 16 Level Buttons will
control the velocity of the Last Pad.
8
PITCH – Toggles 16 Levels of pitch. When on, the 16 Level Buttons will
control the pitch of the ALL Pads.
DEF MODE – Switch to Default Sub-Mode.
NOTES
The velocity functions described on the previous page will have no effect if
the velocity sensitivity (Vel) is turned off (set to 0.0%) in the Simplers
within your Drum Rack. Here’s an example of a compatible velocity
setting:
You can adjust the velocity setting for each Simpler in your Drum Rack or
create a default preset that includes the velocity setting of your choosing.
USER MODE
MODE OVERVIEW
In this Mode, the Clip Launch Buttons are user assignable in Live via MIDI
mapping mode.
NOTE: In order to avoid conflicts with the APC’s default functions, it is
recommended that you set up any other controllers you might be using to
operate on MIDI channels 9 – 16.
9
MT PLAYER
MAIN WINDOW
The drop-down menu in the center of the window is used for selecting
Presets (if multiple Presets are available). The last selected Preset will be
selected the next time you launch Player.
The Restart button will restart a Preset and restore all of its default settings.
The ? button will bring up the manual for the selected Preset.
The IN and OUT indicators will light up to indicate MIDI activity. These
are used for troubleshooting purposes.
RIGHT-CLICK MENU
MIDI Settings will bring up the MIDI Port Chooser window.
Rescan MIDI devices will rescan MIDI devices on your system. This is
useful in situations where your APC40 is not detected properly.
Toggle Stats Display will show/hide event history. This is used for
troubleshooting purposes.
10
TROUBLESHOOTING
1. Why don’t I see APC40-DR listed under Live’s Control Surface dropdown menu?
WINDOWS: On Windows, the APC40-DR script will have gotten installed
during install of apC. If it’s not showing up, please try reinstalling the apC
installer. No need to uninstall first.
OS X: On OS X, you are prompted to manually transfer the script during
install. If you skipped that step or need to retransfer the script for some
other reason, you can find it along with transfer instructions in:
(your name)/Bome’s Midi Translator/Player.
2. When I try to complete the MT Player Settings steps, I get an error
message when I select the APC40’s ports.
Please close Live, MT Player and any other MIDI applications. Then
relaunch MT Player and you’ll be able to complete the settings steps.
3. In the demo video I saw from you, you were using some functions that I
don’t have. Where are they?
Presets evolve over time in regard to refinements and new functionality. In
some cases, it’s necessary to reposition existing controls to make way for
new functions. We try to keep rearrangements to a minimum and any
rearrangements will always be covered in the Preset’s manual.
4. I have multiple copies of MT Player ports listed, which should I use?
You should try to use the listings that start with “From” or “To”. For
example, you shouldn’t use “3-From MT Player 1”, you should use “From
MT Player 1”. In some cases, you will not have listings that start with
“From” or “To”.
11
SUPPORT
Email:
[email protected]
Forum:
Beatwise Network
Videos:
Stray's YouTube Channel
Copyright 2013 nativeKONTROL. All rights reserved.
This document, as well as the software described in it, is provided under license and may be used or copied only in accordance with
the terms of this license. The content of this document is furnished for informational use only, is subject to change without notice, and
should not be construed as a commitment by nativeKONTROL. Every effort has been made to ensure that the information in this
document is accurate. nativeKONTROL assumes no responsibility or liability for any errors or inaccuracies that may appear in this
document.
All product and company names mentioned in this document, as well as the software it describes, are trademarks or registered
trademarks of their respective owners. This software is solely endorsed and supported by nativeKONTROL
12