1
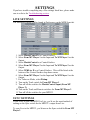
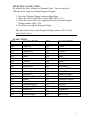
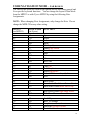
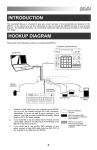
Preset: NPKLive II v1.0.4
NOTE: There are 2 versions of this Preset.
NPKLive II is the default version.
NPKLive II[0db] is identical except that the Faders max out at 0db.
SETTINGS
LIVE SETTINGS
SYNC SETTINGS
MT PLAYER SETTINGS
MPD32 SETTINGS
USING OTHER MPD32 PRESETS
GLOBAL CONTROLS
TOP BUTTONS
TRANSPORT BUTTONS
CONTROL BANKS
TRACK CONTROL - CONTROL BANK A
PAN MODE
SEND MODE
DEVICE MODE
MASTER CONTROL – CONTROL BANK B
PAD BANKS
TRACK MODE – PAD BANK A
DRUM RACK MODE – PAD BANK B
SCALE MODE – PAD BANK C
SELECTING SCALE TYPES
SCALE TYPES
USER/NAVIGATION MODE – PAD BANK D
DEFAULT LAYOUT
MT PLAYER
MAIN WINDOW
RIGHT-CLICK MENU
TROUBLESHOOTING
SUPPORT
SETTINGS
If you have trouble completing any of the settings listed here, please make
sure to refer to the Troubleshooting section.
LIVE SETTINGS
The following settings will be found in Preferences on the MIDI/Sync tab.
1. Select MackieControl as a Control Surface.
2. Select From MT Player 1 as the Input and To MT Player 1 as the
Output.
3. Select MackieControl as a Control Surface.
4. Select From MT Player 2 as the Input and To MT Player 2 as the
Output.
5. Select NPKLive II as a Control Surface. This will be listed at the
bottom of the Control Surface drop-down menu.
6. Select From MT Player 1 as the Input and To MT Player 1 as the
Output.
7. For Takeover Mode, select Pickup.
8. Turn on the Track switch for From MT Player 1.
9. Turn off all the switches for MackieControl Input (From MT
Player 2).
10. Turn on the Track and Remote switches for From MT Player 3.
11. Turn off all the switches for your MPD32.
SYNC SETTINGS
If you’d like to sync the MPD32 to Live, you’d use the usual method of
turning on the Sync switch for the MPD32’s output from Live.
To sync Live to the MPD32, you’d turn on the Sync switch for From MT
Player 3.
1
MT PLAYER SETTINGS
The first time you use the MPD32 in MT Player, you will need to setup the
MPD32’s ports. You are prompted to do this as soon as a Preset is selected
in MT Player. However, if you bypass those prompts, you can access the
settings by right-clicking on MT Player and selecting MIDI Settings.
1. From the Port Name menu, select “IN: MPD32”.
2. From the MIDI In port menu, select your MPD32’s first port and click
OK.
3. Click the Restart button.
You can learn more about MT Player in the MT Player section.
NOTE: It is recommended that you launch MT Player, select a Preset and
then launch Live. If Live is already running when you select or Restart a
Preset, it is recommended that you enter, then exit MIDI mapping mode
after selecting the Preset to re-initialize.
MPD32 SETTINGS
You need to have the NPK II preset loaded on your MPD32 in order to use
NPKLive II. You are prompted to transfer and save this preset to your
MPD32 during install.
If you skip that step and/or overwrite the NPK II preset, you can retransfer it
using Vyzex MPD32. The Vyzex preset (*.sqs file) can be found in:
On Windows, My Documents\Bome’s Midi Translator\Player.
On OS X, (your name)\Bome’s Midi Translator\Player.
You also need to have your MPD32 set to Common Channel 1A. You can
check/change this in the MPD32’s Global menu.
USING OTHER MPD32 PRESETS
You can use other MPD32 presets while NPKLive II is running. However,
your other presets should not use:
- Any MIDI messages on MIDI Channel 16A.
- CCs 26-27 or 115-119 on any MIDI Channel.
2
GLOBAL CONTROLS
The following controls are global meaning they’re the same in every Mode.
TOP BUTTONS
SHIFT – Shifts the function of other controls. Shifted functions are shown
in Red in this manual.
PAN – Selects Pan Mode for the Knobs.
RTN – Selects/deselects the Return Bank.
SEND – Selects Send Mode for the Knobs.
DEVICE – Selects Device Mode for the Knobs.
DETAIL – Switch between Clip/Track Views.
SSN/ARNG – Switch between Session and Arrangement Views.
SCN LNC – Launch the currently selected Scene.
STOP ALL– Stop all Clips.
SCN -/SCN + – Move down/up 1 Scene. These will scroll if you hold them
down.
BPM +/BPM - – Decrease/Increase Tempo by 1 BPM. These will scroll if
you hold them down.
NOTE: If you have a Footswitch connected to FS1 it will launch the
currently selected Clip. A Footswitch connected to FS2 will launch the
currently selected Scene.
TRANSPORT BUTTONS
3
TR LEFT/TR RIGHT – Move left/right one Track.
BANK DN/UP – Move to the previous/next Bank. These work differently
depending on which Mode you’re in. See Track Control for more info.
STOP – Stop.
UNDO – Undo.
PLAY – Start playback.
CLIP LNCH – Launch the currently selected Clip.
RECORD – Toggle Arrangement Record.
CLIP REC – Use this to record perfectly cut Clips (Audio or MIDI) at the
current Global Quantization value. For example, if Global Quantization is
set to 2 bars, this will record a perfect 2-bar clip. This function is intended
for the creation of new Clips, so Overdub should be turned off when using it.
CONTROL BANKS
This setup uses Control Banks A and B.
Control Bank A sets up the Knobs for Track Control (see below).
Control Bank B sets up the Knobs for Master Control.
Control Bank C has no function.
TRACK CONTROL - CONTROL BANK A
The Faders and Knobs in Control Bank A are collectively called Track
Controls. For the most part, these allow you to control 8 Tracks at a time.
This grouping of 8 Tracks is called a Bank and you can control an unlimited
number of Banks. The Track Controls can also be used for controlling 8
Return Tracks (called the Return Bank).
The Track Controls offer different functionality depending on which Mode
you’re in. However, the Faders always control Volume for the 8 Tracks in
the selected Bank.
NOTE: The Track Control Faders and Knobs include an internal Takeover
feature (separate from Live’s Takover Mode), which eliminates parameter
4
jumps when moving between Banks/Modes. If the MPD32’s physical
controls differ from Live’s associated virtual controls, Takeover kicks in
until the physical control meets the value of the virtual control. Please note
though, if you are using other controllers and/or your mouse to adjust
parameters, you will need to move between Banks or Modes after making
your adjustments so that Takeover can readjust for these changes.
PAN MODE
KNOBS 1 – 8 – Pan Tracks 1 – 8 of the selected Bank.
BANK DN/UP – Move to the previous/next Bank of 8 Tracks.
SEND MODE
KNOBS 1 – 8 – Control Sends A – H of the selected Track.
BANK DN/UP – Move to the previous/next Bank of 8 Tracks.
DEVICE MODE
KNOBS 1 – 8 – Control parameters of the selected Device.
BANK DN/UP – If the selected Device has more than 8 parameters, these
will let you move between Banks of 8 parameters.
MASTER CONTROL – CONTROL BANK B
SCENE – Scene Up/Down.
TRACK – Track Left/Right.
UP/DN – Up/Down keystrokes.
LEFT/RIGHT – Left/Right keystrokes.
+/- – Plus/Minus keystrokes.
5
FOCUS – This will move the focus between Live’s 3 primary focuses so
that you can navigate the selected focus. To accomplish this, the Knob is
split into 3 zones:
Zone 1 – Knob value 0-42 = Main focus
Zone 2 – Knob value 43-85 = Detail focus
Zone 3 – Knob value 86-127 = Browser focus
TEMPO – Adjusts Tempo in 1 BPM increments.
MASTER– Adjusts Master Level.
NOTE: With the exception of Master and Focus, the Knobs in this Mode
are very sensitive when turned slowly and less sensitive when turned
quickly.
PAD BANKS
This setup uses Pad Banks A – D.
Pad Bank A – Track Mode (see below)
Pad Bank B – Drum Rack Mode
Pad Bank C – Scale Mode
Pad Bank D – User/Navigation Mode
TRACK MODE – PAD BANK A
6
MUTE 1 – 8 – Mute/Unmute Tracks 1 – 8 of the selected Bank. If you
press the Pads quickly, they will toggle. If you hold them down, they will
function as momentary switches.
SOLO 1 – 8 – Solo/Unsolo Tracks 1 – 8 of the selected Bank.
LNCH 1 – 8 – Launch Tracks 1 – 8 of the selected Bank.
ARM 1 – 8 – Arm Tracks 1 – 8 of the selected Bank.
DRUM RACK MODE – PAD BANK B
This Mode includes 2 Cycle Sequencers. These allow you to record
sequences up to 8 steps long and then play them back.
CYCLE 1 – This Pad will play Cycle Sequence 1. On first press, it will
output the first note in the sequence. On second press, it will output the
second note in the sequence and so on.
REC 1 – This will enable Record mode for Cycle Sequence 1. Press Cycle
1 to end recording. You can use Drum Rack Pads 1 – 12 for recording
sequences. This is replace-style recording so, if you exceed 8 steps, the
previous 8 steps will be deleted.
7
CYCLE 2 – Same as Cycle 1.
REC 2 – Same as Rec 1.
LAST PAD – These 2 Pads will trigger the Last Pad. This makes it so you
have 3 Pads to use to play fast rolls and such. These Pads cannot be used
while recording Cycle Sequences.
DRUM RACK PADS 1 – 12 – Control the first 12 visible Pads in the Drum
Rack.
SCALE MODE – PAD BANK C
ROOT DOWN/UP – Move the Root Note of the Scale down or up by 1
Semitone.
OCTAVE UP/DOWN – Move the Scale down or up by 1 Octave.
SCALE PADS 1 – 12 – Play the selected Scale. Applying pressure
(aftertouch) to the Pads will control the Mod Wheel.
8
SELECTING SCALE TYPES
By default, the Pads will play a Chromatic Scale. You can switch to
different Scale Types by sending Program Changes.
1. Press the Program Change button and then Enter.
2. Move the cursor to the left to set the MIDI CH to 16A.
3. Move the cursor back to the right and select the desired Program
Change number (000 - 039).
4. Press Enter to send the Program Change.
The chart below shows what Program Change numbers (PC#) select
which Scale Types.
SCALE TYPES
PC#
SCALE TYPE
PC#
SCALE TYPE
000
001
002
003
004
005
006
007
008
009
010
011
012
013
014
015
016
017
018
019
Algerian
Arabian B
Augmented
Balinese
Blues
Byzantine
Chinese
Chromatic (default)
Diminished
Dorian
8-Tone Spanish
Enigmatic
Harmonic Minor
Hindu
Hirajoshi
HungarianGypsy
Hungarian Major
Japanese B
Javanese
Jewish Magen
020
021
022
023
024
025
026
027
028
029
030
031
032
033
034
035
036
037
038
039
Kumoi
Locrian
Locrian 2
Lydian
Major
Melodic Minor
Minor
Mixolydian
Neopolitan
Octatonic HW
Oriental B
Pentatonic Major
Pentatonic Minor
Pentatonic Neutral
Persian
Phrygian
Purvi
Roumanian
Todi
Whole Tone
9
USER/NAVIGATION MODE – PAD BANK D
The Pads in this Mode are used for navigation and for accessing general and
Live-specific keyboard functions. You can change the layout of this Mode
from the MPD32 or with Vyzex MPD32 by using the following Note
Assignments.
NOTE: When changing Note Assignments, only change the Note. Do not
change the MIDI CH or any other setting.
NOTE #
(on MPD32)
NOTE NAME
(in Vyzex)
FUNCTION
48
49
50
51
52
53
54
55
56
57
58
C2
C#2
D2
D#2
E2
F2
F#2
G2
G#2
A2
A#2
Up
Down
Left
Right
Plus/Page Up
Minus/Page Down
Enter/Escape
Shift
Ctrl
Alt
Win/Cmd
59
60
61
62
63
B2
C3
C#3
D3
D#3
Copy/Cut
Paste/Duplicate
Delete/Backspace
Select All/Remove Stop (Split)
Save
64
65
66
E3
F3
F#3
Insert Scene
Insert Audio Track/Insert Return Track
Insert MIDI Track/Insert MIDI Clip
67
68
G3
G#3
Hide-Show Detail/Hide-Show Mixer
Hide-Show Browser/Focus Browser
69
70
71
72
73
A3
A#3
B3
C4
C#4
Load Clip
Back To Arrange
Loop/Set (or delete) Locator
Punch In/Previous Locator
Punch Out/Next Locator
10
DEFAULT LAYOUT
The following map shows the default layout of User/Navigation Mode. As
mentioned in the previous section, you can alter this layout to better suit
your needs.
MT PLAYER
MAIN WINDOW
The drop-down menu in the center of the window is used for selecting
Presets (if multiple Presets are available). The last selected Preset will be
selected the next time you launch Player.
11
The Restart button will restart a Preset and restore all of its default settings.
The ? button will bring up the manual for the selected Preset.
The IN and OUT indicators will light up to indicate MIDI activity. These
are used for troubleshooting purposes.
RIGHT-CLICK MENU
MIDI Settings will bring up the MIDI Port Chooser window.
Rescan MIDI devices will rescan MIDI devices on your system. This is
useful in situations where your MPD32 is not detected properly.
Toggle Stats Display will show/hide event history. This is used for
troubleshooting purposes.
TROUBLESHOOTING
1. Why don’t I see NPKLive II listed under Live’s Control Surface dropdown menu?
WINDOWS: On Windows, the NPKLive II script will have gotten installed
during install of NPKLive II. If it’s not showing up, please try reinstalling
NPKLive II. No need to uninstall first.
OS X: On OS X, you are prompted to manually transfer the script during
install. If you skipped that step or need to retransfer the script for some
other reason, you can find it along with transfer instructions in:
(your name)/Bome’s Midi Translator/Player.
2. When I try to complete the MT Player Settings steps, I get an error
message when I select the MPD32’s port.
Please close Live, MT Player and any other MIDI applications. Then
relaunch MT Player and you’ll be able to complete the settings steps.
12
3. In the demo video I saw from you, you were using some functions that I
don’t have. Where are they?
Presets evolve over time in regard to refinements and new functionality. In
some cases, it’s necessary to reposition existing controls to make way for
new functions. We try to keep rearrangements to a minimum and any
rearrangements will always be covered in the Preset’s manual.
4. I have multiple copies of MT Player ports listed, which should I use?
You should try to use the listings that start with “From” or “To”. For
example, you shouldn’t use “3-From MT Player 1”, you should use “From
MT Player 1”. In some cases, you will not have listings that start with
“From” or “To”.
SUPPORT
Email:
[email protected]
Forum:
Beatwise Network
Videos:
Stray's YouTube Channel
Copyright 2013 nativeKONTROL. All rights reserved.
This document, as well as the software described in it, is provided under license and may be used or copied only in accordance with
the terms of this license. The content of this document is furnished for informational use only, is subject to change without notice, and
should not be construed as a commitment by nativeKONTROL. Every effort has been made to ensure that the information in this
document is accurate. nativeKONTROL assumes no responsibility or liability for any errors or inaccuracies that may appear in this
document.
All product and company names mentioned in this document, as well as the software it describes, are trademarks or registered
trademarks of their respective owners. This software is solely endorsed and supported by nativeKONTROL
13