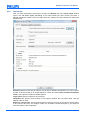
1
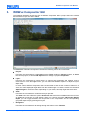
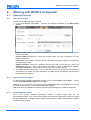
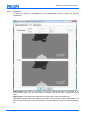
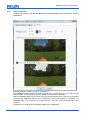
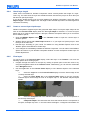
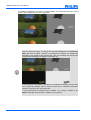
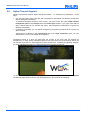
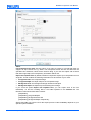
WOWvx Compositor 2.4 BLBX-3S022/00 BLBX-3S022/01 BLBX-3S022/02 User Manual Philips 3D Solutions WOWvx Compositor User Manual Document Information Info Content Title WOWvx Compositor User Manual Date – 12NC March 28, 2008 – 9922 159 13 04 1 Security The attached material and the information contained herein are proprietary to Philips 3D Solutions. Copying, reproduction, adaptation, modification or dissemination in whole or part is not permitted without written permission from Philips 3D Solutions. Contact address Philips 3D Solutions High Tech Campus 27 5656 AE Eindhoven The Netherlands E-mail: [email protected] Website: www.philips.com/3dsolutions © Koninklijke Philips Electronics N.V. All rights reserved. Reproduction in whole or parts is prohibited without the prior written consent of the copyright owner. The information presented in this document does not form part of any quotation or contract, is believed to be accurate and reliable and may be changed without notice. No liability will be accepted by the publisher for any consequence of its use. Publication thereof does not convey nor imply any licence under patent- or other industrial or intellectual property rights. Adobe and Photoshop are either registered trademarks or trademarks of Adobe Systems Incorporated in the United States and or other countries. Microsoft, Windows, Windows XP, and Windows Vista are either registered trademarks or trademarks of Microsoft Corporation in the United States and or other countries. 2 ©2008 Koninklijke Philips Electronics N.V. WOWvx Compositor User Manual Table of Contents 1. 2. Introduction .......................................................................................................................... 5 1.1. WOWvx content creation suite: WOWvx Compositor....................................... 5 1.2. 2D-plus-Depth format and Declipse in WOWvx Compositor ........................... 6 1.2.1. 2D-plus-Depth format ............................................................................................. 6 1.2.2. Declipse technology................................................................................................ 7 1.3. 3D Compositions with WOWvx Compositor .................................................... 10 1.4. About this manual .............................................................................................. 11 Installation .......................................................................................................................... 12 2.1. System Requirements ........................................................................................ 12 2.2. Setup and installation CD .................................................................................. 13 2.3. Updates................................................................................................................ 15 2.4. Deinstallation ...................................................................................................... 16 3. WOWvx Compositor GUI ................................................................................................... 17 4. Working with WOWvx Compositor................................................................................... 19 4.1. Opening Projects ................................................................................................ 19 4.1.1. Open a new poject ................................................................................................ 19 4.1.2. Open an existing project ....................................................................................... 19 4.1.3. Project folder structure.......................................................................................... 19 4.1.4. Project properties.................................................................................................. 20 4.2. Timeline ............................................................................................................... 21 4.2.1. Understand the Timeline....................................................................................... 21 4.2.2. Navigate the Timeline ........................................................................................... 22 4.2.3. Customize the Timeline ........................................................................................ 23 4.3. Adding Layers ..................................................................................................... 24 4.3.1. Supported input formats ....................................................................................... 24 4.3.2. Selection window .................................................................................................. 25 4.3.3. General tab ........................................................................................................... 29 4.3.4. Resolution tab ....................................................................................................... 33 4.3.5. Depth tab .............................................................................................................. 35 4.3.6. Chroma Key tab .................................................................................................... 37 4.4. Working with layers ............................................................................................ 38 4.4.1. Change layer properties ....................................................................................... 38 4.4.2. Change layer order ............................................................................................... 38 4.4.3. Fine-tune the timing of layers ............................................................................... 38 4.4.4. Check layer length ................................................................................................ 39 4.4.5. Create or correct layer depth maps ...................................................................... 39 4.4.6. View layers............................................................................................................ 39 4.4.7. Use logos as layers .............................................................................................. 41 4.5. Alpha Channel Support ...................................................................................... 42 4.6. 3D Export ............................................................................................................. 44 ©2008 Koninklijke Philips Electronics N.V. 3 WOWvx Compositor User Manual 5. 4 Use Cases and examples .................................................................................................. 49 5.1. Compose a video with a logo ............................................................................ 49 5.1.1. Start new project for your video composition........................................................ 49 5.1.2. Insert first layer – Landscape................................................................................ 50 5.1.3. Insert next layer – Butterfly ................................................................................... 53 5.1.4. Adjust the composition.......................................................................................... 55 6. 5.1.5. Add and adjust the logo ........................................................................................ 58 Troubleshooting ................................................................................................................. 60 7. List of Shortcuts................................................................................................................. 61 8. Index .................................................................................................................................... 63 ©2008 Koninklijke Philips Electronics N.V. WOWvx Compositor User Manual 1. Introduction 1.1. WOWvx content creation suite: WOWvx Compositor Until recently, the world has enjoyed a rich variety of 2D video. In the last few years, a number of companies, among them Philips 3D Solutions, have introduced auto-stereoscopic 3D displays – displays that do not require viewers to wear special 3D glasses. These displays offer 3D experiences that are more realistic, and lively, and that have a high impact on the viewer. With WOWvx, Philips has developed a suite of technologies for its 3D Display systems that offers the possibility to create content for an exciting 3D viewing experience. The 3D video format used in Philips 3D Display systems is called 2D-plus-Depth: to the original video content, a depth map is added that provides 3D information through greyscale images; the lighter the objects are in the greyscale depth map the further in the foreground they will appear in the 3D result. The 2D-plus-Depth format combines video content and depth map in a way that offers flexibility and compatibility with existing production equipment and compression tools. Content in the 2D-plus-Depth format can be created amongst others from 3D computer graphics, and stereo video content, by upgrading existing 2D content to the 2D-plus-Depth format or by combining layers from diverse input files to a 2D-plus-Depth result. All these tasks are supported and simplified by the WOWvx Content Creation suite: the WOWvx BlueBox server at the heart with the tools WOWvx Compositor and WOWvx Spacer on client machines. WOWvx Compositor is the central tool to create compositions with depth information from a diversity of video streams – as e.g. 2D data without depth information, computer generated 3D content, or 2D-plus-Depth content. In WOWvx Compositor, the various forms of input are loaded as layers; their depth in relation to each other can be adjusted and fine-tuned. Additionally, WOWvx Compositor also offers an easyto-use link to WOWvx Spacer; thus you can add layers without depth information, process them with Spacer and immediately find the result in your WOWvx Compositor project. Finally, WOWvx Compositor combines all layers to a 3D composition by exporting them into a video with depth information. This manual explains how you can use WOWvx Compositor to insert and adjust layers for your composition and to combine them to a video with depth information. ©2008 Koninklijke Philips Electronics N.V. 5 WOWvx Compositor User Manual 1.2. 2D-plus-Depth format and Declipse in WOWvx Compositor 1.2.1. 2D-plus-Depth format There are several ways in which 3D content can be stored and transmitted. WOWvx Compositor supports the 2D-plus-Depth format: this format stores a greyscale representation of an image side-by-side with the 'real' image: With the greyscale representation – the so-called depth map – a depth value is assigned to every pixel of the 2D content. These depth values – in shades of grey – are used to render a 3D representation on the 3D display. In the actual 3D experience, the lighter an area is in the depth map, the nearer it seems to the viewer. In the example above, the balloon is in the very front, the grass and trees appear to be further to the back while the blue sky seems to be furthest away from the viewer. A great advantage of this format is that it is compatible with various display devices, regardless of the technology used. 6 ©2008 Koninklijke Philips Electronics N.V. WOWvx Compositor User Manual 1.2.2. Declipse technology One of the central WOWvx technologies is Declipse. It deals with the natural viewing phenomenon that you perceive slightly different sections of the background when you change your viewpoint. Consider the illustration below: there is a green box in the foreground hiding two smaller boxes in yellow and blue: When you look at the green box from a central viewpoint, the two smaller boxes behind it are completely hidden. When you shift your position slightly to the left, the yellow box comes into view from behind the green box. Similarly, shifting the viewpoint to the right makes appear the blue box. For a realistic 3D viewing experience – like the one enabled by the 2D-plus-Depth format and the WOWvx displays – you quite naturally expect a similar "look-behind" effect in a composition with background and foreground layers. However, this effect is only possible if the display receives information on what is actually behind a foreground object. In other words, it needs to know what is 'hidden' by the object in the foreground. Without this information you will get effects like the following: ©2008 Koninklijke Philips Electronics N.V. 7 WOWvx Compositor User Manual This is what you expect in a natural viewing experience: the background is complete in all areas. This is what happens when no information is provided about the hidden parts of the background: as soon as the viewpoint shifts, the background representation shows gaps in the form of 'smearings'. The WOWvx Declipse technology addresses this deficiency. It adds an extra layer of 2D-plusDepth data to the final composition; this extra layer contains the information about those objects/areas that were hidden by the foreground. The Declipse technology uses this information to fill in the correct pixels in the hidden areas; thus the hidden objects can be reproduced. Declipse is an integral part of WOWvx Compositor: for each frame of your composition, WOWvx Compositor not only provides the image and depth map of the composed frame but also the corresponding background information. A file exported by WOWvx Compositor has the following format: 8 ©2008 Koninklijke Philips Electronics N.V. WOWvx Compositor User Manual The upper left quadrant shows the composed image, in the upper right quadrant you find the corresponding depth map; the background image is only needed for the area in which the logo is placed, therefore the two remaining quadrants only show the required clipping of the background and its depth map. For another illustration of the effect consider a simple example: In your composition, a text logo is placed on a checkerboard background. In the resulting 3D composition, you expect the checkerboard pattern to remain uninterrupted – no matter from what viewing angle you look at the display. In other words: the checkerboard sections hidden by the letters of the logo should appear correctly when you change your viewing position. What happens without Declipse is shown in the upper part of the next illustration: The lack of background information for the area behind the W is compensated with a workaround called 'pixel-repetition' – i.e. the display, having no information for continuing the checkerboard, will show a repetition of the pixels directly bordering the W. This results in blue, purple, green and white bars on either side of the W as soon as you move your viewpoint to the left or right. Viewpoint moved to left Central viewpoint Viewpoint moved to right WOWvx Compositor Result without Declipse WOWvx Compositor Result with Declipse The second part of the illustrations shows the advantage of WOWvx Compositor's Declipse feature: no matter whether you move your position to the left or to the right, the checkerboard pattern is correctly continued. The natural viewing experience remains undisturbed. Declipse is a feature that is basically invisible to you during your workflow. However, WOWvx Compositor offers a special layer view that displays the four quadrants of the Declipse information – composed image, depth map for composition, background image and depth map for background. Refer to Chapter 4.4.6 on page 39 for more information. ©2008 Koninklijke Philips Electronics N.V. 9 WOWvx Compositor User Manual 1.3. 3D Compositions with WOWvx Compositor Creating 3D compositions with WOWvx Compositor is only partly comparable to 2D compositing: while in both cases several layers are combined to create a new video, the layers are composed in a fundamentally different way: in a 2D composition the order of the input layers determines how these layers appear in the final creation, i.e. the top layer is rendered on top of the other layers. In contrast, WOWvx Compositor renders the objects of your project according to their depth value. The smaller the depth value of an object, the more it is placed to the front in the final composition. For the composition, each pixel is treated individually and without taking into account what layer it belongs to; thus, objects from the same layer can be in the foreground of one area and in the background of another area of the resulting composition. On the basis of the depth value, WOWvx Compositor automatically decides which objects to put in the background and which objects to show in the foreground of the composition. For correct background effects in the final composition you can define transparent areas in the foreground objects to let background objects „show through“. Another possibility is to make the foreground layer smaller than the background layer. The following sample is a composition of two layers, a Pinocchio scene in one layer and a circle of stars on a transparent background in a second layer. The frame in the illustration shows how the star circle moves around Pinnochio’s head – the depth values in both layers create this illusion: The effect of the depth value on the final composition becomes even more obvious with the next illustration of the same composition: while the stars layer is unchanged, the depth values of the Pinnochio layer have been modified and the complete layer is moved more to the foreground of the composition. One result is that the center star disappears behind Pinnochio’s head. The layer order in your project only matters when two objects that lie on top of each other have the same depth value; in such a case, the object of the first layer in the list wins the conflict. While the number of layers you use for your composition is arbitrary, the WOWvx Compositor result always consists of two layers: one layer contains the composite video and its depth map, the other layer contains the corresponding background and its depth map. The background information is necessary for the „look behind“ effect, i.e. the Declipse feature"> described in Chapter 1.2.2 on page 7. To view the composition as well as its depth map and its background information use the Composite Depth tab of WOWvx Compositor’s Current Frame display. The viewing options are described in Chapter 4.4.6 on page 39. 10 ©2008 Koninklijke Philips Electronics N.V. WOWvx Compositor User Manual 1.4. About this manual Documentation conventions This manual uses the following writing conventions: Specially marked info boxes contain additional information on the program's processes and the consequences of specific settings. References to menu entries, buttons, commands, window text etc. are in bold font, e.g.: "Choose the command New… from the menu Project to start a new project." The symbol > is used to connect a chain of commands and menu names, as e.g.: "Choose the command Project > New… to start a new project." The program's main functions and commands are available as buttons, as menu entries and as right-click menu entries. To maintain readability, not all of these options are described in detail for all processes, alternatives are only pointed out. Documentation structure In this manual you find the following information on WOWvx Compositor: Chapter 2 "Installation" provides information on the system requirements for WOWvx Compositor, on the installation steps and on update and deinstallation procedures. Chapter 3 "WOWvx Compositor GUI" gives a detailed description and explanation of the WOWvx Compositor's GUI and its functionalities. Chapter 4 "Working with WOWvx Compositor" deals with typical workflows as e.g. opening projects, making use of the WOWvx Compositor Timeline, preparing layers for an outstanding 3D result, and rendering the final 2D-plus-Depth video. Chapter 5 "Use Cases and examples" is a turorial for WOWvx Compositor. Chapter 6 “Troubleshooting” offers you solutions for known problem cases and specific tips for difficult use cases. Chapter 7 "List of Shortcuts", finally, gives an overview of the various keyboard shortcuts you can use instead of selecting commands or clicking buttons. ©2008 Koninklijke Philips Electronics N.V. 11 WOWvx Compositor User Manual 2. Installation 2.1. System Requirements Before you start the installation of WOWvx Compositor make sure that your system fulfills all requirements for a smooth operation. Hardware Microsoft Windows compatible PC Pentium 4 processor or higher RAM: Minimum 1GB, recommended: 2GB Hard disk minimum: 80 GB Ethernet connectivity Recommended: WOWvx 3D autostereoscopic display for 3D preview. Philips 3D Solutions has successfully tested the following NVIDIA video adapters on Windows XP and on Windows Vista: * Geforce: 7600 GT – 8600GT * FX: Quadro 1400 (Windows XP only!) Philips 3D Solutions has successfully tested the following ATI video adapters: * Radeon X1650 (Windows XP only!) 3D Display Firmware Version must be 1.0 B7 or above, otherwise download the latest firmware from www.philips.com/3dsolutions. Software Windows XP Service Pack 2 or Windows Vista Various Audio and Video Codecs, depending on your input material Recommended: Windows Media Player 11 Recommended: image editor with layer support, e.g. Adobe Photoshop The Installation CD contains a registry fix for Adobe Photoshop versions including CS2. The fix is not needed for Adobe Photoshop CS3. Bluebox The WOWvx Content Creation Suite is a client-server-based system with at least one WOWvx BlueBox server and one WOWvx client. To work with WOWvx Compositor, you need access to a WOWvx BlueBox server. For more information on the WOWvx BlueBox and its configuration please refer to the WOWvx BlueBox Configuration Manual. 12 ©2008 Koninklijke Philips Electronics N.V. WOWvx Compositor User Manual 2.2. Setup and installation CD To install WOWvx Compositor follow these steps: 1. Insert the WOWvx installation CD and open the folder WOWvxCompositor. 2. Start the setup by double-clicking the file setup.exe. The missing software components window opens: 3. Click Install to accept the installation of the missing software components – in this example IPP 5.1. The installation process is started, and its progress is visualized by progress bars. The window to confirm the installation of WOWvx Compositor opens: 4. Click Install to start the installation of WOWvx Compositor. When the installation is complete the WOWvx BlueBox selection window opens: ©2008 Koninklijke Philips Electronics N.V. 13 WOWvx Compositor User Manual Alternatively to selecting a BlueBox from the list, you can click Use a custom BlueBox and then insert the information for the BlueBox you want to use: 5. Click OK to confirm your BlueBox selection. The WOWvx Compositor GUI opens und you can start a new project. For details on starting projects refer to Chapter 4.1 on page 19. 14 ©2008 Koninklijke Philips Electronics N.V. WOWvx Compositor User Manual 2.3. Updates Philips 3D Solutions regularly offers bug fixes or updates for WOWvx Compositor and WOWvx BlueBox. If an internet connection is available, WOWvx Compositor automatically checks for updates after program start and – if necessary – asks you to install the software. It is recommended to accept updates and always work with the latest version of the software. If you declined an update and later decide to install it, proceed as follows for Windows Vista: 1. Open the Windows start menu and go to Control Panel > Programs > Programs and Features. 2. Right-click into the header of the program list, select More… from the context menu, check the option Update Info Link and then click OK. 3. The program list now contains the Update Info Link column. Here you find the Internet address for the WOWvx Compositor update. Type the address into the Address field of your Internet Explorer and press Enter. 4. The WOWvx server is searched for the update and the installation starts automatically. For Windows XP, the steps are the following: 1. Open the Windows start menu and go to Control Panel > Add or Remove Programs 2. Select WOWvx Compositor and click Click here for support information 3. In the Support Info window, click the link after Product Updates 4. The latest update is installed automatically. ©2008 Koninklijke Philips Electronics N.V. 15 WOWvx Compositor User Manual 2.4. Deinstallation Windows Vista To remove WOWvx Compositor or to restore a former version of the software, open the Windows Vista start menu, go to Control Panel > Uninstall a program and choose WOWvx Compositor from the program list. Windows XP Under Windows XP, open the Windows start menu and use the respective functionality in Control Panel > Add or Remove Programs. 16 ©2008 Koninklijke Philips Electronics N.V. WOWvx Compositor User Manual 3. WOWvx Compositor GUI The following illustration shows the GUI of WOWvx Compositor after a project has been created and at least one layer has been added: The menu bar of WOWvx Compositor contains the following menus and commands: Project: Find here the commands to create New projects, Open existing or Recent projects, to Close the current project, to start the 3D Export and to change a project's Properties. Layer: Find here the commands to insert layers, to change their properties and settings, and to remove them. From the Layer menu, you can also start WOWvx Spacer to adjust a layer's depth map. In some cases, WOWvx Compositor has not been able to find out the number of frames in a video; the value displayed might differ from the actual length. If in doubt, choose the command Adjust length to check the value. Depending on your video, this step might take some time. View: Find here the commands to customize the layer preview. The View menu also offers the option 3D Preview which becomes available when the PC has an additional connection to a 3D display. When you choose the option 3D Preview Shows Depth, you can toggle between the 3D preview of the composition and its corresponding greyscale depth map by pressing the key D. Navigation: Find here the commands for browsing through the frames in the Timeline. ©2008 Koninklijke Philips Electronics N.V. 17 WOWvx Compositor User Manual Help: This menu contains the command for the Online Help as well as access to the program's version information and – with Show Log Folder… – to WOWvx Compositor's program logs. In the upper part of the GUI window there is a tool bar with buttons for the most important projectrelated commands. Underneath you find the Current Frame display. The frame belongs to the layer currently selected in the Timeline described below. The Current Frame display features four tabs: Layer: This tab shows the frame that corresponds to the currently selected layer and the position of the red bar in the Timeline. Layer Depth: This tab shows the current frame as well as its depth map side by side. You might have to scroll to the right or adjust the zoom level to see the depth map. Composite: This tab shows the frame that results from the composition of all layers. Composite Depth: This tab shows the frame that results from the composition of all layers, its depth map and – in the two bottom rectangles – information on the declipse calculation. This view is recommendable for advanced users who want to improve the declipse effect in their composition. The lower part of the GUI, the Timeline, lists all layers in the project; its toolbar offers commands to add new layers, to change a layer's properties and settings, to remove a layer and to change the order of existing layers. Additionally, you can click a button to open WOWvx Spacer and create or change a layer's depth map. The toolbar commands are also available via the Timeline context menu. Each layer or its corresponding audio channel can be deactivated by clicking the Visible button or the Audio Source button respectively. The vertical red bar in the Timeline defines the position of the currently selected frame; the horizontal blue bar shows the length of the layer while the horizontal orange bar shows the length of the whole composition. To zoom the Timeline scale you can use the slider on the left. This function is helpful e.g. when you want to find the position of a very short layer. In the status bar, you find information on the current frame's number, the total number of frames in the selected layer and the name of the currently selected BlueBox. When you hover over an area of the Current Frame display, the status bar also shows you the respective RGB and Alpha values – in the example above the values for the orange balloon. 18 ©2008 Koninklijke Philips Electronics N.V. WOWvx Compositor User Manual 4. Working with WOWvx Compositor 4.1. Opening Projects 4.1.1. Open a new poject To open a new project proceed as follows: 1. In the menu Project select New…. and fill in the required information in the New Project window: Project name: Enter a name for your project. This name will be used for the project environment folder. Project location: Browse for or enter the location where you want to generate your new project environment. Frame rate: Select a frame rate from the list. This frame rate will be applied to all layers that you add to your project. Output resolution: Select the resolution that will be used for the final 3D result. The Predefined resolution – 960 x 540 or 800 x 600 pixels – refers to the WOWvx displays. Checking Custom offers you the option to enter your own resolution settings. 2. Click OK to open the new project. You can now add layers to your project and combine them according to your needs. For more information on adding layers and working with them refer to Chapter 4.3 on page 24. 4.1.2. Open an existing project To open an existing WOWvx Compositor project, go to the menu Project, select Open…, browse for your file [Projectname].xcmproj and click OK. Alternatively, you can either choose the project from the Recent list in the Project menu or dragand-drop the project file into the WOWvx Compositor window. With the shortcut key Ctrl+R you load the project that was last opened in WOWvx Compositor. 4.1.3. Project folder structure For a new project, WOWvx Compositor creates a project folder with the file [projectname].xcmproj. If you open WOWvx Spacer from WOWvx Compositor to create or change a layer's depth map, a complete Spacer project environment is created underneath the WOWvx Compositor project folder. ©2008 Koninklijke Philips Electronics N.V. 19 WOWvx Compositor User Manual 4.1.4. Project properties You open the Project Properties window via the command Project > Properties…: Project name and Project location are mere information fields and cannot be changed. Frame rate: Adjust the frame rate to match the requirements of your project's layers. Output resolution: Select the resolution that will be used for the final 3D result. The resolution options 960 x 540 and 800 x 600 pixels refer to the WOWvx displays. Checking Custom offers you the option to enter your own resolution settings. WOWvx Compositor does not support frame rate conversion. In case a layer's frame rate differs from the project's frame rate, consider the following: the layer's frame rate is mapped 1:1 onto the project's frame rate, which will slow-down or speed up the layer. such a 'mismatched' layer's audio channel will not be used by WOWvx Compositor You will receive a warning whenever a layer with a mismatched frame rate is added. 20 ©2008 Koninklijke Philips Electronics N.V. WOWvx Compositor User Manual 4.2. Timeline 4.2.1. Understand the Timeline The Timeline area of the GUI offers convenient options for working with the various layers of your project: Timeline toolbar: The buttons offer you important functions for adding layers, changing layer properties and settings and for re-ordering layers. Refer to Chapter 4.3 on page 24 for detailed information on these functions. Additionally, you find here buttons for the convenient navigation through a layer as well as for customizing the Timeline for your specific working processes. Refer to the following chapters for more details. All relevant commands of the toolbar are also available when you right-click the Timeline area. Time scale: Underneath the toolbar you find the project's timeline. Zoom in or out on the time scale with the slider on the left. The horizontal orange bar signifies the timeline of the complete project. The vertical red bar marks the current point in the timeline of the selected layer. Layer list: Underneath the time scale you find the list of all layers that you have added to the project: You can activate/deactivate each layer or its audio channel by clicking the Visible button the Audio Source button respectively. The layer name is specified when a layer is added. You can change it via the Layer Properties . The layer name is followed by a horizontal blue bar that signifies start, end, and duration of the layer. Short layers that are repeated until the end of a composition are symbolized by a dimmed blue bar. The order of layers is important when two layers have the same depth value. In such a case, that layer is displayed that is higher up in the layer list. The same is true if only selected areas of two layers have the same depth value. Refer to Chapter 4.4.2 on page 38 for more information. ©2008 Koninklijke Philips Electronics N.V. or 21 WOWvx Compositor User Manual 4.2.2. Navigate the Timeline WOWvx Compositor comes with standard navigation buttons to easily browse through the Timeline of each layer. Click to go to the first frame of the work area (orange bar). Click to jump back one second. Click to jump back one frame. In the [SMPTE] field, set the specific SMPTE code of the frame you want to go to and then press Enter. Click Click this to jump forward one frame. to jump forward one second. Click to go to the last frame of the work area (orange bar). Alternatively to clicking the buttons, you can choose the commands from the Navigation menu or use the shortcuts. Furthermore, you can move the vertical red bar on the time scale or click a specific point in the horizontal blue bar to go through the layer's frames. 22 ©2008 Koninklijke Philips Electronics N.V. WOWvx Compositor User Manual 4.2.3. Customize the Timeline The layers you add can be of significantly differing length, some of them only covering one or two frames. It is therefore possible that the time scale needs to be larger for a very short layer while it is more convenient to check a long layer in a reduced time scale. WOWvx Compositor offers this functionality via the slider in the Timeline. The following example shows that navigating through the first layer is no problem on the rather small scale. The second layer, however, is a one-frame logo and as such barely visible: For an easier access of the second layer's frame, just move the slider and enlarge the time scale: ©2008 Koninklijke Philips Electronics N.V. 23 WOWvx Compositor User Manual 4.3. Adding Layers 4.3.1. Supported input formats 2D or stereo video: MPEG (mpeg, mpg, m1v, mp2, mpa, mpe, ifo, vob) Windows Media (asf, wm, wma, wmv, wmd) AVI (avi) Image Sequence (jpeg, jpg, tiff, tif, png, bmp, gif, wmp, tga, gif) Quick Time (mov, dv) 3D video: WOWvx 3D file (v3d, s3d, b3d) WOWvx Spacer project: *.xsproj file Quicktime support: WOWvx Compositor allows Quicktime input i.e. *.mov and *.dv files under the following conditions: Quicktime 7.x must be installed– the program is free of charge DirectShowFilter for Quicktime must be installed, as e.g: http://www.medialooks.com/products/directshow_filters/quicktime_filter.html The DirectShowFilter is a commercial tool, a trial version is available In some cases, WOWvx Compositor cannot navigate through a Quicktime video i.e. the search through the video is not possible, In such cases, we recommend the following solution: 1. Open the respective video in WOWvx Compositor as 2D Video. 2. Directly after opening click 3. Export the video as Image sequence: In the Advanced tab, check the option Export into separate files and then Foreground color. For more information on the Export function refer to Chapter 4.6 on page 44. 4. The resulting files can be loaded into WOWvx Compositor as image sequence and navigating is now possible. 24 If your video is not played correctly by the Quicktime player, WOWvxCompositor will not be able to show it correctly. ©2008 Koninklijke Philips Electronics N.V. WOWvx Compositor User Manual 4.3.2. Selection window After you have created or opened a project you can add layers to this project. In the menu Layer select Insert. Alternatively, you can click the Insert Layer button in the Timeline toolbar. The Insert Layer selection window opens: 2D Video: Select this option to open a 2D video in one of the supported formats. Refer to Chapter 4.3.1 on page 24 for more information on supported formats. A 2D video comes without a depth map. In WOWvx Compositor, such a video has the default project depth. However, WOWvx Compositor offers a link to WOWvx Spacer, the depth tool: with one click you open such a video in Spacer where you can add and adjust a depth map. 3D Video: When your input is a 3D video consider the following to decide which option to choose: 3D Video – No declipse No declipse – 1 File Select this option to open a 3D video exported by WOWvx Spacer. Such a video comes with a depth map that can be adjusted via the Depth tab described in Chapter 4.3.5 on page 35. You can also use the link to WOWvx Spacer to change the depth map of your video. No declipse – 2 Files Select this option to open 2 files of a 3D video that has been exported by WOWvx Compositor with the option Export into separate files. As input you will need the files [OutputName] and [OutputName]_foregroundDepth or [OutputName]_backgroundColor and [OutputName]_backgroundDepth respectively. Refer to Chapter 44 on page 4.6. on how to export a video into separate files. ©2008 Koninklijke Philips Electronics N.V. 25 WOWvx Compositor User Manual 3D Video – Declipse Select this option to open a 3D video that contains Declipse information. Depending on how you exported such a video, you may have the video, depth, and Declipse information in one single file, in two files or in 4 files. For more information on Declipse refer to Chapter 1.2.2 on page 7; how to export a video into separate files is explained in Chapter 44 on page 4.6. 26 ©2008 Koninklijke Philips Electronics N.V. WOWvx Compositor User Manual When you use input videos with Declipse information – i.e. files exported either by WOWvx Compositor or via the 3D Studio Max plugin – note the following: Such a video’s background and foreground information are inserted as two separate layers. The layer resulting from the foreground information shows the foreground objects on a transparent background. This transparency is automatically inserted by WOWvx Compositor. WOWvx Compositor in a way restores the foreground and the background layer – this means that what you will see as newly inserted layers is not what you might expect from your input. Consider the following example: your input file has the following Foreground color/depth (two upper images) and Background color/depth: The resulting layer with the foreground information shows the stars circle on a transparent background with a depth map for the complete composition: The layer with the background information shows that the complete background, i.e. the Pinnochio scene has been restored: Declipse – 1 File In most cases, a single-file 3D video with Declipse information is an export product of WOWvx Compositor. It contains the composition and its depth map – Foreground color and depth – as well as the necessary background information with its respective depth map – Background color and depth – all in one file. ©2008 Koninklijke Philips Electronics N.V. 27 WOWvx Compositor User Manual Declipse – 2 Files When your 3D video with Declipse information comes in two files, one file contains the Foreground color and depth, the other file contains the Background color and depth. Such a file output is possible when you have created content with the 3D Studio Max plugin: the plugin can create a *.b3d image sequence of the background and another sequence of the foreground. Declipse – 4 Files When your 3D video with Declipse information comes in four files, each item of the information – Foreground color, Foreground depth, Background color and Background depth – is stored in a single file. WOWvx Spacer Project Select this option to open a WOWvx Spacer project file. When you have made your selection, click OK to open the Insert Layer window with the tabs General, Resolution, Depth, and Chroma Key. Refer to the following sections for information on how to adjust the settings for the layer that is being added. 28 ©2008 Koninklijke Philips Electronics N.V. WOWvx Compositor User Manual 4.3.3. General tab After you have selected the input layer's format, the General tab of the Insert Layer window opens. This tab differs slightly depending on the input format you have chosen. Find here a general description based on the 2D Video input file; specifics for other formats are discussed subsequently. Input file: Browse for the file you want to use as layer in WOWvx Compositor. This can be either a video or the first image of an image sequence. Check the option Input contains transparent areas if your input file contains an alpha channel. Layer name: Specify a name for the new layer. Destination In: Specify where exactly in the project's timeline the new layer starts. Use the SMPTE code as value. Source In / Source Out: These values mark the beginning and end of the video's section that is to be used for this layer. The settings enable you to define in detail what part of your input file becomes visible in the composition. ©2008 Koninklijke Philips Electronics N.V. 29 WOWvx Compositor User Manual When layer ends: The options define the layer's behavior after it has reached its end: No action: after the layer has come to an end it remains invisible until the end of the work area; the work area is symbolized by the horizontal orange bar in the Timeline. Repeat last frame: the layer's last frame is repeated until the project's master layer has ended. Loop layer: the complete layer is repeated until the project's master layer has ended. Video and Audio: These sections inform you about the video and audio properties of your input file. If you open an image sequence, the number in the specified image file determines the default value for Destination In: the sample input003.bmp automatically receives the timeline position 0:00:00:03 – unless you specify a different value in the Destination In field. Loop layer: if you have specified values for Source In and Source Out– see Chapter 4.4.3 on page 38 for more information – the option Loop layer only repeats the section between Source In and Source Out. 3D Video – No Declipse, 2 files If you choose this input option you have to specify two files in the General tab: Color file: Browse for the 3D video file you want to use as layer in WOWvx Compositor. This can be either a video or the first image of an image sequence. Check the option Input contains transparent areas if your input file contains an alpha channel. Depth file: Browse for the file that contains the depth information for your 3D video and enter the path and name in this field. 3D Video – Declipse, 2 files If you choose this input option you have to specify two files in the General tab: 30 ©2008 Koninklijke Philips Electronics N.V. WOWvx Compositor User Manual Foreground – Input file: Browse for the WOWvx 3D video that contains both the Foreground color and depth information. Check the option Input contains transparent areas if your input file contains an alpha channel. Background – Input file: Enter here the file that contains the video’s Background color and depth information that is needed for the Declipse feature. The result in your project is that two layers are inserted; one layer reflects the Foreground input file, the other layer reflects the Background input file. 3D videos – Declipse, 4 files If you choose this input option you have to specify four files in the General tab: Foreground Color file: Browse for the 3D video that contains the Foreground color information – i.e. the actual video frames. Check the option Input contains transparent areas if your input file contains an alpha channel. Depth file: Browse for the file that contains the Foreground’s depth information – i.e. the depth map for the actual video. Background Color file: Enter here the file that contains the video’s Background color information needed for the Declipse feature. Depth file: Enter here the file that contains the Background depth information needed for the Declipse feature. ©2008 Koninklijke Philips Electronics N.V. 31 WOWvx Compositor User Manual The result in your project is that two layers are inserted; one layer results from the Foreground color and depth files, the other layer results from the Background color and depth files. Both – Declipse-2 files and Declipse-4 files – can be the result of exporting a video into separate files. For more information on exporting videos to separate files refer to Chapter 4.6 on page 44. For more information on Declipse refer to Chapter 1.2.2 on page 7. 32 ©2008 Koninklijke Philips Electronics N.V. WOWvx Compositor User Manual 4.3.4. Resolution tab To adjust the settings in the Resolution tab of the Insert Layer window consider the following explanations: File Resolution: Find here the resolution of the original video Input Resolution: These are the values with which the input video is opened in WOWvx Compositor. By default, the Pixel aspect ratio (PAR) is read from the original video if possible. Otherwise, Square pixels (1.0) is assumed as value. Use the drop-down list to change the value. Crop: With the Crop options you define how many pixels are cut off the sides of your input video. With the option Use aspect ratio, the specified aspect ratio determines what can be cut off. The slider offers you to move between the extremes of cutting off information – Crop – and of adjusting the complete information and thus risking Black Bars. Check the result in the preview on the right: your selection is the image in the red rectangle. ©2008 Koninklijke Philips Electronics N.V. 33 WOWvx Compositor User Manual If you select Custom, you can crop the input without taking care of a specific aspect ratio. For both options, you can watch the result in the preview thumbnail on the right. Resize: With the Resize options, you can change the input video to fit your display. The option Do not resize crop selection takes over the resolution that results from cropping while Use project resolution fits the crop selection into the project's resolution. Custom finally lets you specify your own resolution. Your limit here is defined by the project's resolution that is automatically the maximum resolution. Position: Define the position of your layer with view to the project resolution. This is especially helpful for placing logos. To place the layer either click the arrow buttons or enter values to define the distance form the Left and the Top border. Click Default to discard your changes and go back to the default settings for Crop, Resize, PAR, and Position. 34 When positioning your layer consider the fact that on a 3D display around 16 pixels on the left and right are only visible when you shift your viewpoint to the left or right. ©2008 Koninklijke Philips Electronics N.V. WOWvx Compositor User Manual 4.3.5. Depth tab To adjust the settings in the Depth tab of the Insert Layer window consider the following explanations: Default depth: This option is not visible in the above example because it only applies to 2D videos without depth map. The value defines the depth value that is used as default on such a video. Adjust depth: These options are applied on the depth map of a 3D-plus-Depth input. With Offset, all depth values are shifted by that value. If your layer has a depth range between 20 and 100, the whole depth range will be shifted to a range between 40 and 120 with an Offset of 20. ©2008 Koninklijke Philips Electronics N.V. 35 WOWvx Compositor User Manual With Factor, the depth values are multiplied by the specified value. If you apply a Factor of 1.5 to a depth range between e.g. 20 and 100, the resulting range is between 30 and 150. The Preview shows you the effect of your changes. The changes are applied to the whole layer! 36 ©2008 Koninklijke Philips Electronics N.V. WOWvx Compositor User Manual 4.3.6. Chroma Key tab To adjust the settings in the Chroma Key tab of the Insert Layer window consider the following explanations: Use these settings to specify a color for transparency Check Apply to color and then either set a specific color in RGB values or pick a color from the preview image. The specified color will be treated as transparent for this layer. With the Tolerance slider you can adjust how precisely the selected color value has to be applied. The higher the Tolerance value the more neighboring colors will be treated as transparent. The Tolerance value can be chosen from a range between 1 and 100 – with 100 representing a 50% tolerance. The effect of your settings are immediately displayed in the Preview. ©2008 Koninklijke Philips Electronics N.V. 37 WOWvx Compositor User Manual 4.4. Working with layers 4.4.1. Change layer properties To change the properties of a layer either double-click the layer or click the Layer properties button in the Timeline toolbar. This opens the Layer Properties window with the various settings you already know from adding layers. For details on the available properties settings refer to Chapters 4.3.3 to 4.3.6. 4.4.2. Change layer order The order of layers in the layer list is important for the final composition: in case of identical depth values, the layer that is highest up in the list wins the conflict. If the identical depth value applies to parts of the higher-up layer only, just these parts win the conflict – thus creating remarkable effects. Select the specific layer and click the Move Up position in the list. 4.4.3. and Move Down buttons to change its Fine-tune the timing of layers For the exact timing of layers, WOWvx Compositor offers the options Destination In, Source In, and Source Out. In relation to the composition's timeline, Destination In defines at what point in time the current layer is started. If you want to use only a section of the layer use Source In to mark the start and Source Out to mark the end of that section. The following graphic illustrates the interrelation of Destination In, Source In and Source Out: You can set the options in the Layer Properties window as described in Chapter 4.4.1 on page 38. Alternatively, you can use the Timeline's buttons and red bar to specify the settings: 38 Place the red bar on the position for Destination In and click code for the start of your layer. Place the red bar on the position for Source In and click to define the start of that section in your input that will actually be used in your composition. All input frames before this time will be ignored. Place the red bar on the position for Source Out and click to define the end of that section in your input that will actually be used in your composition. All input frames time will be ignored. to define the exact SMPTE ©2008 Koninklijke Philips Electronics N.V. WOWvx Compositor User Manual 4.4.4. Check layer length Under some circumstances, WOWvx Compositor cannot correctly define the length of a layer. This is e.g. the case when the layer has a different frame rate than the project or when the input file does not specify its length. If your layer's length seems to be incorrectly displayed in WOWvx Compositor, select the option Adjust length… from the Layer menu: the length of the selected layer will be checked again and corrected if necessary. 4.4.5. Create or correct layer depth maps WOWvx Compositor supports layers with greyscale depth maps. The layers' depth maps can be seen in the Current Frame display when the tab Layer Depth is selected. To correct a layer's depth map or to create a depth map for a 2D layer, WOWvx Compositor offers you a convenient link to WOWvx Spacer: 1. Click the WOWvx Spacer button in the Timeline toolbar to open the current layer in WOWvx Spacer. 2. WOWvx Spacer opens with a New Project window or – if your layer is a Spacer project – with the layer in the main GUI. 3. Edit the layer according to your needs. For details on using WOWvx Spacer refer to the WOWvx Spacer User Manual or Online Help. 4. Your changes are immediately available in WOWvx Compositor. You can either close WOWvx Spacer and return to your WOWvx Compositor window or leave the Spacer window open for further adjustments. 4.4.6. View layers To view a layer in the Current Frame display, select the layer in the Timeline. You have the following options when viewing layers: navigate through the frames of the layer by clicking a specific point in the time scale or by using the navigation buttons in the Timeline toolbar. Alternatively, you can use the commands of the Navigation menu. use the Layer tabs in the Current Frame display to see different aspects of the selected layer: select the Layer tab in the Current Frame display to see the frame image of the currently selected layer. select the Layer Depth tab in the Current Frame display to see the currently selected layer's frame image as well as its depth map i.e. the WOWvx 2D-plus-Depth format: select the Composite tab in the Current Frame display to see the composition of all currently active layers. Composite Depth: This tab shows the frame that results from the composition of all layers, its depth map and – in the two bottom rectangles – background information for ©2008 Koninklijke Philips Electronics N.V. 39 WOWvx Compositor User Manual the declipse calculation. This view is recommendable for advanced users who want to improve the declipse effect in their composition: When you export your video, it is exactly the information displayed in the Composite Depth view that is stored. However, for performance reasons the background information is only stored for the critical areas. Thus, the quadrant view above looks as follows when exported to a WOWvx Compositor file: For the background information required for the declipse functionality, only the area that is behind the WOWvx logo is stored. All the rest is redundant information because no other layer is in the foreground. For more information on Declipse refer to Chapter 1.2 on page 6. Details on the Export functionality are described in Chapter 4.6 on page 44. 40 ©2008 Koninklijke Philips Electronics N.V. WOWvx Compositor User Manual 4.4.7. Use logos as layers When working with logos in WOWvx Compositor consider the following: any still image, image sequence or video can be used as a logo; logos typically contain transparent regions and are smaller than the background video. you can use the Resolution tab of the Layer Properties window to determine the position of your logo. Please note that on the left and right of your composition about 16 pixels will be lost – do not place your logo in an extreme corner position otherwise parts of it might get cut off. in most compositions, your logo needs to be visible for longer than just one frame. To solve this problem, choose the option Repeat last frame in the General tab of the Insert Layer window; it will then be visible for the remainder of the composition. you could also use an external tool to create a 'real' image sequence that repeats the logo in every frame. In such a case, the options Destination In, Source In, and Source Out offer you better possibilities to time the appearance / disappearance of the logo. ©2008 Koninklijke Philips Electronics N.V. 41 WOWvx Compositor User Manual 4.5. Alpha Channel Support WOWvx Compositor supports alpha channel information – i.e. transparency information – in two ways: you can load layers from input files with transparency information into WOWvx Compositor without losing this information. To preserve the alpha channel in such a layer, you have to click the option Input contains transparent areas in the General tab of the Insert layer window. If you open a file with an alpha channel and do not activate this option, the transparency information is ignored by WOWvx Compositor. in WOWvx Compositor, you can define transparency for those input files that do not have an alpha channel. Transparency is defined in the Chroma Key tab of the Layer Properties. Here, you can define which color is to be treated as transparent. Transparent areas in a layer are filled with the content of the layer that lies behind the transparency. In other words, transparent areas of one layer serve as a hole through which you can see the layer that is in the background of the current layer. Consider the following example: you have a landscape image in the background and a logo in the foreground: To remove the white rectangle of the logo, open the Chroma Key tab of the Layer Properties window and define white to be the color for transparency. The result is the following: 42 ©2008 Koninklijke Philips Electronics N.V. WOWvx Compositor User Manual If no content is behind the transparent area, the 3D display screen's default color – orange – will shine through; in your WOWvx Compositor working area, a checkerboard pattern appears. Alpha channel and Export function Alpha channel support in WOWvx Compositor's Export function depends on the format you choose for exporting your composition: Case 1: Your export format does not support alpha – as e.g. WMV or BMP If you export a composition with transparent areas to a format that does not support transparency, the transparent areas by default are overlaid on a black background. For the overlaying – also called alpha-blending – the Advanced tab of the Export dialog offers you the option to select a different color than black: you can either enter specific RGB values or select a color from the color palette. Case 2: Your export format supports alpha – as e.g. AVI or PNG When you choose an export format that supports transparency, the information about transparent areas is also available in the exported video. Note, however, that videos with alpha channel – as e.g. AVI – are currently not playble on 3D displays. For reasons of further processing you might want to fill the transparent areas; this is possible with the respective option in the Advanced tab of the Export dialog. If you select this option, transparent areas are filled with the specified color and the exported file no longer contains transparency information. ©2008 Koninklijke Philips Electronics N.V. 43 WOWvx Compositor User Manual 4.6. 3D Export Once you have completed your composition you can export the result into a 3D video or image sequence. Supported output formats are: Windows Media Video AVI Image Sequence: WOWvx 3D image (b3d), Bitmap (bmp), gif, jpg, jpeg, png, tif, tiff, Windows Media Photo (wmp), Targa (tga) Export to video 1. Click to open the Export window. 2. Adjust the settings in the General tab: Format: Select Windows Media Video or AVI for exporting a video file. For exporting an image sequence see the section below. Output Location: Specify where the output file is to be stored. By default, your project environment is used. Export Range: With these options you can define the frames for export. You can either export All frames or select a frame range. For the second option, you specify the first and the last frame number of the range. 3. Adjust the settings in the Advanced tab: 44 ©2008 Koninklijke Philips Electronics N.V. WOWvx Compositor User Manual Video: Fill transparent areas with: Use this option if you want to export to a format that does not support an alpha channel as e.g. WMV. The transparent areas will then be filled with the specified color. Otherwise, black will be used for filling. If you click this option with a format that does support alpha, the transparency information will be lost. Export into separate files: By default, WOWvx Compositor exports your compositon into one single file. This file contains the following information for each frame of your video: Foreground color: the composed image Foreground depth: the depth map for the composed image Background color: the background image needed for Declipse Background depth: the depth map for the background image If you check the option Export into separate files, you can export each of the four individually. You find the resulting files in the folder specified in the General tab. The filenames reflect which information is stored: [OutputName] [OutputName]_foregroundDepth [OutputName]_backgroundColor and [OutputName]_backgroundDepth respectively. Specify the Codec you want to use for the export process. Codec availability depends on your specific system installation. ©2008 Koninklijke Philips Electronics N.V. 45 WOWvx Compositor User Manual In addition, you can define the Quality of the export result. With reduced quality, the export speed is increased. Audio: If an audio channel is available, it can be included in the export file by checking Use audio from layer. Alternatively, you can include a separate audio file. Audio Codec and Quality can also be defined. With reduced quality, the export speed is increased. 4. Click OK to start the export. Depending on the size of your file this might take some time. If a layer is set to Repeat last frame or Loop layer, its audio channel cannot be included in the export. In case of varying length in audio and video file, the following applies: Audio longer than video: To fill the gap empty frames are added to the video file; these frames are completely transparent; in formats that do not support an alpha channel, they are filled with the color defined by the Advanced tab's option Fill transparent areas with. If no color has been defined, the fill color is black. Video longer than audio: The frames following the end of the audio file are silent. Export to AVI 1. When exporting to AVI the list of codecs is restricted to "uncompressed" and "lagarith lossless" (if installed), even if other codecs are installed. With high resolution video material, most media players are not able to play these video files in real time. The resulting video playback could be too slow and no longer synchronous with the audio channel. Furthermore, video frames could be dropped. For these reasons, export to AVI should only be chosen if further processing of the material is intended, not for playback. 2. Input material that contains more than two audio channels or has more than 16bits per sample will be formated to stereo and 16 bits per sample when exporting to AVI. 3. When you export a video into AVI with the Lagarith lossless codec, exporting the alpha channel is disabled by default. To enable it, press the Configure button in the Export dialog and and select RGBA from the Mode list. In the Export dialog also make sure that the option Enable Null Frames is disabled. 46 ©2008 Koninklijke Philips Electronics N.V. WOWvx Compositor User Manual Export to image sequence 1. Click the Export button to open the Export window. 2. Adjust the settings in the General tab: Format: Select here Image Sequence to make the other options visible. Output Location: Specify where the output file is to be stored. By default, your project environment is used. Sequence Name: Specify the name of the output sequence. With this name, all exported image file names will start. Start frame number: Specify the frame with which the export sequence starts. Type: Specify the image type. By default, WOWvx Compositor offers the b3d format. which in a 3D player is automatically opened in 3D format. You also have the choice of various other image formats as well. Opening these will display the original image side by side with a greyscale depth map. Example: The example shows you how the file names in the resulting image sequence are composed; the file number created by WOWvx Compositor is added to the newly specified Sequence Name. Export Range: You have the choice of exporting either the whole image sequence or a specified number of frames. 3. If your image sequence contains transparent areas, the Advanced tab is available for adjustments: ©2008 Koninklijke Philips Electronics N.V. 47 WOWvx Compositor User Manual Fill transparent areas with: Use this option if you want to export to a format that does not support an alpha channel as e.g. BMP. The transparent areas will then be filled with the specified color. Otherwise, black will be used for filling. If you click this option with a format that does support alpha, the transparency information will be lost. 4. Click OK to start the export. Depending on the size of your file, this might take some time. 48 ©2008 Koninklijke Philips Electronics N.V. WOWvx Compositor User Manual 5. Use Cases and examples 5.1. Compose a video with a logo The following sections guide you through the process of creating a composed video that shows a butterfly on a landscape background with the WOWvx logo displayed in one corner. You find all sample files on your WOWvx installation CD in Examples\Compositor_Tutorial. 5.1.1. Start new project for your video composition From WOWvx Compositor’s File menu, choose the command New to open the New Project dialog: Specify the Project name and location for the sample project, and then click OK. The project described in this chapter is called VideoWithLogo. ©2008 Koninklijke Philips Electronics N.V. 49 WOWvx Compositor User Manual 5.1.2. Insert first layer – Landscape 1. Click the Insert layer button to open the layer selection window: The sample layer Landscape comes as Color and Depth image file without Declipse information; thus the correct option here is No Declipse, 2 Files. 2. In the General tab of the Insert new layer window browse for the files Landscape_Color.png and Landscape_Depth.png 50 ©2008 Koninklijke Philips Electronics N.V. WOWvx Compositor User Manual Layer name: The layer will appear as Landscape in the sample project. When layer ends: The option Loop layer ensures that the image is visible during the complete length of the composition. 3. When you click OK, the layer Landscape is displayed: ©2008 Koninklijke Philips Electronics N.V. 51 WOWvx Compositor User Manual 52 ©2008 Koninklijke Philips Electronics N.V. WOWvx Compositor User Manual 5.1.3. Insert next layer – Butterfly The next step is to add the video with the butterfly: 1. Click the Insert layer button to open the layer selection window. The Butterfly video comes in two files, Butterfly_Color.wmv and Butterfly_Depth.wmv, without Declipse information; thus, again the option No Declipse, 2 Files is the correct one. 2. In the Insert new layer window select the Butterfly_Color.wmv and Butterfly_Depth.wmv video and name the layer Butterfly. When selecting the video you are prompted for a framerate change to 29,97 fps: This is the newly inserted video’s framerate, so accept the change and click Yes. 3. The newly inserted layer Butterfly shows a butterfly flying on a black background: ©2008 Koninklijke Philips Electronics N.V. 53 WOWvx Compositor User Manual 54 ©2008 Koninklijke Philips Electronics N.V. WOWvx Compositor User Manual 5.1.4. Adjust the composition To create a video of the butterfly flying on the landscape background you have to adjust the layer Butterfly: 1. Select the layer, click the Layer properties button and go to the Chroma Key tab: 2. Click Apply to color; select the black background and then click OK. When you switch to the Composite tab of the Current frame view you will see the butterfly on the background of the landscape: ©2008 Koninklijke Philips Electronics N.V. 55 WOWvx Compositor User Manual 3. Switching to Composite Depth also shows how the elements of your composition are distributed with view to depth: 56 ©2008 Koninklijke Philips Electronics N.V. WOWvx Compositor User Manual The hills of the landscape are slightly modulated and the butterfly is in the very front of the composition: ©2008 Koninklijke Philips Electronics N.V. 57 WOWvx Compositor User Manual 5.1.5. Add and adjust the logo You can now add the logo to the video composition. The following instructions show how to place the logo in the top left corner of the video: 1. Click the Insert layer button to open the layer selection window. The logo is a simple BMP file, thus, choose the option 2D Video. 2. In the General tab of the Insert new layer window * browse for the file WOWvx_logo.bmp * name the layer Logo * choose the option Loop layer for When layer ends. 3. In the Resolution tab, adjust size and position of the logo: 58 ©2008 Koninklijke Philips Electronics N.V. WOWvx Compositor User Manual Use the Custom option for Resize and specify 300 pixels for Width. Additionally, click the top left corner for Position to place the logo there. 4. In the Chroma Key tab, click Apply to color and select the white background. Once you click OK the Composite view changes accordingly: Your video composition is now ready for export! ©2008 Koninklijke Philips Electronics N.V. 59 WOWvx Compositor User Manual 6. Troubleshooting Problem Possible Reason/Solution The VC 80 runtime installation Manually re-install the VC 80 runtime; you find the appropriate failed. file on your installation CD. WMV movies with WMV 9 Check whether the Windows Media Player 11 is installed. Advanced Profile codec do not If you intend to support older player versions, we recommend play. to use WMV9 and WMA9.2 during encoding There are memory problems This is a known problem with WMV files and readers. Instead when working with WMV files. of closing and opening projects you should from time to time close and open WOWvx Compositor. After Export to a format that does not support transparency, the video shows incorrect renderings in areas that used to have transparency In the Export > Advanced tab, click the option Fill transparent areas with to avoid such incorrect renderings. Refer to Chapter 4.5 on page 42 for more information. In special cases, it is not possible to use black as default fill color for all transparent areas. If you export your video to a format that does not support transparency it is recommendable to select a color to fill transparent areas. My mpeg codec does not work It is a known issue that some mpeg codecs do not work with properly with WOWvx WOWvx Compositor. One solution is to use the Elecard Compositor decoder from www.elecard.com. I am working with Windows Vista and have problems running the WOWvx setup – the installation of DirectX crashes. The standard installation of Windows Vista contains version 10 of DirectX, the WOWvx software, however, also needs an installation of DirectX version 9. To solve the problem: 1. Go to the Microsoft Download http://www.microsoft.com/downloads. Center site 2. Get the latest DirectX version. This will install the latest version as well as the previous ones i.e. version 9 will be available, too. 3. Finally, restart the WOWvx setup. 60 ©2008 Koninklijke Philips Electronics N.V. WOWvx Compositor User Manual 7. List of Shortcuts Shortcut Functionality Ctrl + N New project Ctrl + O Open existing project Ctrl + R Open most recent project Ctrl + F4 Close project, leave WOWvx Compositor open Ctrl + E Start 3D export Ctrl + Shift + Enter Project properties V Make layer visible Insert Insert layer P Edit layer properties Delete Remove layer S Open layer in WOWvx Spacer U Move layer up J Move layer down Ctrl + Shift + D Set Destination In Ctrl + Shift + I Set Source In Ctrl + Shift + O Set Source Out Ctrl + + Zoom in layer view Ctrl + - Zoom out layer view Ctrl + Shift + W Zoom to window size Ctrl + Shift + A Zoom to original size (100%) D Toggle between depth map and image in 3D preview Ctrl + Home First frame of the work area (orange bar) Ctrl + Page Up Previous frame page in Timeline Ctrl + Up Previous second Ctrl + Left Previous frame Ctrl + Right Next frame Ctrl + Down Next second Ctrl + Page Down Next frame page in Timeline Ctrl + End Last frame of the work area (orange bar) ©2008 Koninklijke Philips Electronics N.V. 61 WOWvx Compositor User Manual 62 Ctrl + G Go to frame Up Previous layer in list Down Next layer in list F1 Help contents ©2008 Koninklijke Philips Electronics N.V. WOWvx Compositor User Manual 8. Index 3 3D export · 44 A Add 2D video · 25 layers · 24 layers - chroma tab · 37 layers - depth tab · 35 layers - general tab · 29 layers - resolution tab · 33 Spacer project · 25 WOWvx 3D video · 25 Alpha channel support · 42 export · 43 AVI export · 46 B BlueBox · 12 C Change layer order · 38 layer properties · 38 Check layer length · 39 Create layer depth map · 39 Current Frame display · 17 D Deinstallation · 16 Display · 12 E Export alpha channel support · 43 AVI · 46 image sequence · 47 video · 44 ©2008 Koninklijke Philips Electronics N.V. F Fine-tune timing of layers · 38 G Graphical user interface description · 17 H Hardware requirements · 12 I Image editor · 12 Image sequence export · 47 export file name · 47 Input formats · 24 Installation · 12 CD · 13 updates · 15 Introduction · 5, 13 2D-plus-Depth format · 6 declipse technology · 6 documentation conventions · 11 L Layers · 24, 38 add · 24 add 2D video · 25 add Spacer project · 25 add WOWvx 3D video · 25 change order · 38 change properties · 38 check length · 39 chroma tab · 37 depth map · 39 depth tab · 35 fine-tune timing · 38 general tab · 29 input format · 24 resolution tab · 33 use logo · 41 views · 39 work with · 38 Logos · 41 63 WOWvx Compositor User Manual M Menu bar · 17 O Open existing project · 19 new project · 19 project · 19 P Player · 12 Preview · 12 Project folder structure · 19 Project properties · 20 Projects · 19 S Setup · 13 Shortcut keys · 61 Software requirements · 12 Status bar · 17 System requirements · 12 BlueBox · 12 hardware · 12 software · 12 T customize · 23 description · 21 navigation · 22 Troubleshooting · 60 U Updates · 15 Use cases · 49 video with logo · 49 Use logo as layer · 41 V Video export · 44 View layers · 39 W Windows XP 64bit · 13 Workflows · 19 3D export · 44 alpha channel support · 42 customize timeline · 23 layers · 24, 38 open a new project · 19 open an existing project · 19 open projects · 19 Timeline · 21 timeline navigation · 22 WOWvx content creation suite · 5 WOWvx Spacer open from WOWvx Compositor · 39 Timeline · 17, 21 64 ©2008 Koninklijke Philips Electronics N.V.