1
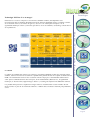
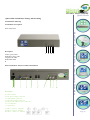
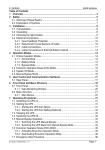
XLV Box
Serveur IPTV
Gestion de IPTV simple et professionnelle basée sur les
meilleures technologies du marché en terme
d'encodage et de diffusion.
( Internet , réseau local, ADSL, mobile ,Satellite. )
XLV Box une solution particulièrement compétitive
de TV sur IP, compatible avec les principaux
fournisseurs de Set Top Boxes vidéos IP,
et permettant la distribution multiflux, multicanaux.
www.distriac.com
IPTV
Qu’est-ce que l’IPTV?
Vbox XLV - TV Gateway Family - Receiver Streamer Technology
L’IPTV rassemble deux univers: la technologie IP et la télévision. Une symbiose révolutionnaire entre deux
spécialisations très différentes. A l’heure où il n’existait encore que la télévision analogique, les notions d’IP
et de TV ne se rencontraient jamais. La télévision traditionnelle utilisait un réseau coaxial pour le transfert de
signaux TV analogiques. La résolution limitée de la télévision analogique a motivé la recherche d’une
meilleure alternative.
Page 1
L’IPTV rassemble deux univers: la technologie IP et la télévision. Une symbiose révolutionnaire entre deux
spécialisations très différentes. A l’heure où il n’existait encore que la télévision analogique, les notions d’IP
et de TV ne se rencontraient jamais. La télévision traditionnelle utilisait un réseau coaxial pour le transfert de
signaux TV analogiques. La résolution limitée de la télévision analogique a motivé la recherche d’une
meilleure alternative.
Au début des années ’90, la télévision numérique fait son entrée sur le marché. Cette numérisation a conduit
à la diffusion des signaux TV sur un réseau internet, comme n’importe quelle autre donnée numérique. La
convergence de ces deux univers a mis en route une interactivité illimitée et ouvert des possibilités inenvisageables avec la télévision analogique.
On peut voir l’IPTV comme un ensemble de services multimédia, tels que télévision, vidéo, audio,
données,... gérés de manière à répondre aux exigences les plus élevées en matière de service, d’interactivité,
de sécurité et de fiabilité.
L’IPTV offre aussi un éventail d'autres possibilités avec un logiciel supplémentaire pour les concrétiser.
Ce logiciel est également appelé ‘middleware’. Le middleware est une interface utilisateur basée sur un
browser. Ce middleware donne accès aux services IPTV via un PC ou une set-top box avec web browser.
Ce logiciel est entièrement personnalisable.
Ce middleware permet d’accéder à différentes application multimédia et services interactifs tels que télévision HD live, radio, caméra / DVD, messaging, EPG (Electronic Program Guide), VOD /MOD (Video On
Demand / Music On Demand), RSS, ... Bref: les possibilités sont infinies!
IPTV
L’IPTV En résumé
L’IPTV est donc est un système qui permet d’envoyer vers plusieurs récepteurs un contenu vidéo au travers
des réseaux IP (ethernet) et au travers des réseaux ADSL.
L’avantage de cette technologie est que l’on peut réutiliser le câblage en place pour utiliser l’IPTV et que
l’on peut dès lors mutualiser les services sur un seul câble (bureautique, internet, vidéo et TV, surveillance,
visio, communication en entreprises et téléphone).
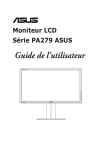
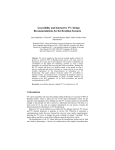
Son Schéma de principe à droite vous donne un apperçu général:
2- Dès l’entrée de la SOURCE la vidéo est automatiquement convertie en IP et dirigée vers un SWITCH
réseau RJ45.
3- Le SWITCH envoie la vidéo IP vers les différents postes de réception répertoriés ; Télévision IP, set top
boxe de réception IP + Télévision et ordinateur. A ce stade on est dans une diffusion en IPTV.
4- Pour un meilleur confort d’utilisation on peut intégrer dans le réseau un serveur logiciel « middleware »
qui depuis le centre du système où il est placé, va gérer le passage des flux vidéos et de l’information et va
gérer les autorisations de réceptions. Le middleware apporte la gestion de l’information en Vidéo à la
Demande.
5- (VOD), magnétoscope numérique dont le contenu est géré à distance et non pas sur le poste de réception.
Ainsi que le contrôle de la facturation des contenus vidéo en VOD lorsque c’est demandé.
Les contenus les plus fréquents pour le système IPTV sont : La TV, la VOD, les cours et l’éducation, la communication de l’information, l’affichage dynamique.
Distriac International s’adresse essentiellement au segment ‘hospitality’ (hôtels, hôpitaux, banques, entreprises, ...). Les systèmes de communication pour les secteurs tels ceux-là nécessitent une solution sur
mesure.
On observe depuis quelques temps un rapprochement clair entre les technologies TV et PC.
Regarder la télévision sur son PC n’est plus une nouveauté depuis longtemps.
L’offre de services multimédia et de communication avancés à la TV et sur PC, par contre, constitue une
nouvelle tendance. Cette symbiose technologique exige une nouvelle approche !
Afin de gérer cette évolution, nous avons besoin de vastes systèmes de communication interactifs.
La mise en place d’un tel système exige une expertise de haut vol et un savoir-faire étendu.
Et c’est précisément cette valeur ajoutée que Distriac International veut vous apporter!
Vbox XLV - TV Gateway Family - Receiver Streamer Technology
1- La SOURCE vidéo entre dans le réseau sous forme de :TNT, Satellite, Câble, caméra vidéo ou
Magnéto/DVD.
Page 2
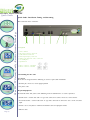
XLV Box
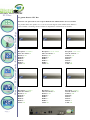
La gamme Distriac XLV Box
XLV Box: Une passerelle TV, un récepteur DVB-S2/T/C (MPEG2&4) & un serveur IPTV
Vbox XLV - TV Gateway Family - Receiver Streamer Technology
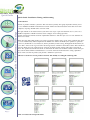
Les produits XLV sont capables de recevoir la télévision digitale (DTV) MPEG 2/4 & Données
(IP over DVB) et streaming sur IP, 6 modéles de disponibles en fonction de vos besoins:
Page 3
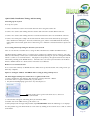
Référence: DIS 3330/4
Référence: DIS 3330/40
Réception: 2 Sat & 2 TNT
Nbre de Canaux: 32
Données: OK
DVB-S2: 2
DVB-S: DVB-T: 2
DVB-C: CAM: OK
Réception: 2 Sat & 2 C
Nbre de Canaux: 32
Données: OK
DVB-S2: 2
DVB-S: DVB-T: DVB-C: 2
CAM: OK
Référence: DIS 3330/2S
Référence: DIS 3340/2T
Référence: DIS 3350/2C
Réception: 4 Satellites
Nbre de Canaux: 32
Données: OK
DVB-S2: 3
DVB-S: 1
DVB-T: DVB-C: CAM: OK
Réception: 2 Satellites
Nbre de Canaux: 16
Données: OK
DVB-S2: 2
DVB-S: DVB-T: DVB-C: CAM: OK
Réception: 2 TNT
Nbre de Canaux: 16
Données: OK
DVB-S2: DVB-S: DVB-T: 2
DVB-C: CAM: OK
Référence: DIS 3330/50
Réception: 2 Câbles
Nbre de Canaux: 16
Données: OK
DVB-S2: DVB-S: DVB-T: DVB-C: 2
CAM: OK
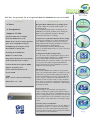
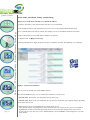
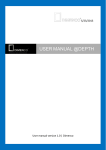
XLV Box
XLV Box : Une passerelle TV, un récepteur DVB-S2/T/C (MPEG2&4) & un serveur IPTV
* 4 Tuners
Points Forts
* 4 Transpondeurs
Système Satellite TV économique
Passerelle MPEG 2&4 vers IP
Diffuse en live sur IP les chaines gratuites
grâce aux 4 transpondeurs intégrés.
Démultiplexage de transport stream
Déscrambleur et filtrage PID
Streaming IP en MPEG 2&4
Multicast et Unicast UDP
Intégration facile dans un réseau existant
(nouveau PC dans le parc en place)
Contrôle distant par navigateur HTML
Supporte les données SAP
(Service Announcement Protocol)
Serveur IGMP
SNMP
(pour « remote control & monitoring »)
Boitier Rack : 19” - 1,5 U
Réception DTV (MPEG 2/4) et streaming sur IP.
Le XLV combine la réception satellite (DTV) et le
streaming sur IP.
C'est la solution parfaite pour le streaming des TV
SD&HD sur réseaux IP, incluant: la TV d'entreprise,
Business TV, signalétique digitale et affichage
dynamique, éducation et e-learning.
Capacités de réception des Données (Data Casting)
Le XLV-4 vous propose la réception des données IP
par le DVB et les transfère au travers du réseau IP.
Indépendamment du transfert des données, la vidéo et
l'audio sont transmises simultanément.
Cette fonctionnalité améliore l'utilisation XLV
pour les communications internes et externes au réseau
IP d'une structure.
Configuration du Réseau Plug & Play
Avec une suite avancée d'applications intégrées, XLV
est facilement Intégré dans diverses configurations de
réseau. DHCP, DNS et WINS automatisent
l'administration du réseau local. Tandis le que NAT rend
l'accès passerelle transparent pour l'administrateur.
Utiliser la fonction de gestion SNMP du réseau afin
d'optimiser votre Réseau LAN.
Interface Web
Une interface HTML facile à utiliser rend le paramétrage et la gestion du XLV intuitive et simple. Accédez
à l'interface de gestion du XLV depuis un navigateur
internet pour paramétrer les tâches, (nouveau PC dans
le parc en place) configurer la connexion satellite, et
contrôler le trafic réseau.Une aide en ligne est fournie
pour chaque écran.Aucune connaissance LINUX n'est
nécessaire pour utiliser les Commandes et fonctionnalités du logiciel XLV.
Protection Pare-feu
Utilisez l'adresse de translation réseau incorporée
(NAT) et le filtrage des paquets pour ajouter la protection pare-feu à votre réseau. Les produits XLV peuvent
gérer les configurations de pare-feu pour les trafics unicast vers/depuis votre réseau local pour sécuriser votre
réseau contre le trafic indésirable et les attaques dangereuses.
Systèmes d'Accès Conditionnel
Ces options vous permettent de recevoir des données et
émissions TV cryptées. Le système nécessite l'utilisation d'une carte à puce pour laquelle un profil unique
est intégré afin de s'assurer que les utilisateurs autorisés
seuls peuvent accéder aux données.
Vbox XLV - TV Gateway Family - Receiver Streamer Technology
* Supporte 2 CAMs
Vue d’ensemble
Page 4
XLV Box
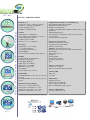
XLV Box : SPECIFICATIONS
Vbox XLV - TV Gateway Family - Receiver Streamer Technology
RF Tuner X 4
Connecteur externe : 2 X F type, femelle
Fréquences : 950 MHz à 2150 MHz
Niveau du signal d'entrée :
-25 dBm à -65 dBm nominal
Page 5
LNB x 2
Alimentation et commutation :
Alim : Voltage séléctionnable 13V ou 18V
Courant Max LNB : 400 mA
Contrôle signal : 22 kHz
DiSeqC: 1.0, 1.1, 1.2 supportés
Protection
Symbol Rates: 1.5 - 45 Msps
(1 – 45 Msps optionnel
Processing Transport Stream :
jusqu'à 40Mbps
Code externe Reed-Solomon (204,188)T=8
DVB-S2
Support Format de Transmission :
K=7,R=12,2/3,3/4,5/6,7,8
LDPC/BCH (DVB-S2)
8PSK: SR = 10–30 MSps
QPSK: SR = 10–30 MSps
Roll Off: 0.2, 0.25, 0.35.
Pilot On/Off
Spectral Non-inversé / Inversé
DVB-S2 FEC
LDPC/BCH QPSK 1⁄2, 3/5, 2/3, 3⁄4 , 4/5, 5/6,
8/9, 9/10
LDPC/BCH 8PSK 3/5, 2/3, 3⁄4, 4/5, 5/6, 8/9,
Et 9/10
Dimensions/caractéristiques
Taille (L x l x h):292x53x237 mm
Température en utilisation : 0 – 40°C
Température de stockage : -10 – 85°C
Humidité en utilisation : 10% - 90%
Manipulation des Données et Démultiplexage
Encapsulation Multi-Protocol (MPE)
Datagram and section packing
Filtrage Unicast/multicast
-25 dBm à -65 dBm nominal Multicast address filters :128
PID Filters:
UDP/TCP/IP protocols
Alimentation et commutation : Tables privées PSI/TCP
(private tables)
LLC SNAP/null encapsulation
Formats de Sortie Stream
Standard: Transport Stream (TS)
32 programmes in TS/UDP/IP
Annonce utilisant SAP
Optionel : Elementary Stream –ES
Elementary Stream packetisés (Packetized Elementary
Stream-PES)
Program Stream –PS
Sous-titres
Streaming RTP
Sauvegarde sur fichier
Streaming depuis fichier
EPG
Interface réseaux LAN
Connecteur: 1x RJ-45
Débit : 10/100/1000 Auto-négociation
Témoins LED
Power On
Led LAN
Alimentation
Adaptateur 12v CC
Power input: 100-240 VAC
Power frequency: 50-60 Hz
Power Consumption: 60 W (typical)
Normes & Régulations
CE, FCC- Part 15 Class B
Avantages
Technologie XLV Box “Les Avantages”
Dans tous les secteurs les entreprises recherchent des solutions rentables, afin d'optimiser leurs
investissements dans les produits d'infrastructures IP qui délivrent aujourd'hui un large éventail de contenu :
de la télévision en direct, des vidéos enregistrées, des services de vidéos pour l'entreprise et de la
signalisation numérique enrichie (rich media) qui sont les clés de la rentabilité, de l'avantage concurrentiel et
de la productivité.
La gamme des produits XLV permet la réception et le streaming(la diffusion en flux) des émissions vidéos
satellites, câbles et TNT sur les réseaux IP. Les produits XLV permettent aussi la réception des données IP sur
DVB et la retransmission au travers des réseaux IP en même temps que les transmissions audio/vidéo en
cours -pour la communication TV inter-entreprise, la TV institutionnelle (Business TV), la signalisation
numérique, le divertissement, l'apprentissage à distance (e-learning) ou simplement la diffusion de données.
Les produits XLV peuvent très rapidement s'intégrer dans les environnements réseaux existants. Ils sont
faciles à utiliser et peuvent être maintenus à distance et offrent un des meilleurs rendement prix/performance
actuel.
Vbox XLV - TV Gateway Family - Receiver Streamer Technology
La solution
Page 6
Quick Guide
Quick Guide: Installation, Tuning, and Streaming
1. Introduction
Vbox XLV - TV Gateway Family - Receiver Streamer Technology
Distriac is proud to introduce you to the XLV TV Gateway family. This group of products allows you to
receive DVB-S2 and DVB-T transmitted television channels and data broadcasts and to share them with
Computer, Lap-Top, IP-STB connected to the LAN.
Page 7
This Quick Guide is intended to instruct you on the basic steps required to install the device, tune it to a
DVB-S transponder or DVB-T channel, and to configure the streaming operation.
Further instructions and more detailed explanations about these and other processes are to be found in the
XLV Users Guide.
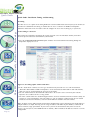
Note: The XLV individual products vary with regard to the number of free-to-air (FTA) channels that can be
received simultaneously from transponders for DVB-S and channels for DVB-T, the optional reception of
restricted (conditional-access) broadcasts, and the possibility of data casting. Throughout this document, the
term XLV will be used in general when discussing features common to all members of the XLV- DVB- TV
Gateway family. Specific products will be explicitly mentioned when dealing with features particular to
them. The captions used in this document are taken from the XLV-3330 and XLV-330/40 version of the product, which allows unlimited simultaneous access to TV channels and includes data casting capabilities.
Please make sure that the product you purchase conforms to your needs.
This user is useful for various products from the XLV Family according the following table
Table 1: Products list and specifications
DIS 3330/4
XLV Box Réception: 4 Satellites
LNB x 2
Alimentation et commutation :
Alim : Voltage séléctionnable 13V ou 18V
Courant Max LNB : 400 mA
Contrôle signal : 22 kHz
DiSeqC: 1.0, 1.1, 1.2 supportés
Protection
Symbol Rates: 1.5 - 45 Msps
(1 – 45 Msps optionnel
Processing Transport Stream :
jusqu'à 40Mbps
Code externe Reed-Solomon (204,188)T=8
DVB-S2
Support Format de Transmission :
K=7,R=12,2/3,3/4,5/6,7,8
LDPC/BCH (DVB-S2)
8PSK: SR = 10–30 MSps
QPSK: SR = 10–30 MSps
Roll Off: 0.2, 0.25, 0.35.
Pilot On/Off
Spectral Non-inversé / Inversé
DVB-S2 FEC
LDPC/BCH QPSK 1⁄2, 3/5, 2/3, 3⁄4 , 4/5, 5/6,
8/9, 9/10
LDPC/BCH 8PSK 3/5, 2/3, 3⁄4, 4/5, 5/6, 8/9,
Et 9/10
Dimensions/caractéristiques
Taille (L x l x h):292x53x237 mm
Température en utilisation : 0 – 40°C
Température de stockage : -10 – 85°C
Humidité en utilisation : 10% - 90%
Manipulation des Données et Démultiplexage
Encapsulation Multi-Protocol (MPE)
Datagram and section packing
Filtrage Unicast/multicast
-25 dBm à -65 dBm nominal Multicast address
filters :128
PID Filters:
UDP/TCP/IP protocols
Alimentation et commutation : Tables privées
PSI/TCP (private tables)
LLC SNAP/null encapsulation
Formats de Sortie Stream
Standard: Transport Stream (TS)
32 programmes in TS/UDP/IP
Annonce utilisant SAP
Optionel : Elementary Stream –ES
Elementary Stream packetisés (Packetized
Elementary Stream-PES)
Program Stream –PS
Sous-titres
Streaming RTP
Sauvegarde sur fichier
Streaming depuis fichier
EPG
Interface réseaux LAN
Connecteur: 1x RJ-45
Débit : 10/100/1000 Auto-négociation
Témoins LED
Power On
Led LAN
Vbox XLV - TV Gateway Family - Receiver Streamer Technology
RF Tuner X 4
Connecteur externe : 2 X F type, femelle
Fréquences : 950 MHz à 2150 MHz
Niveau du signal d'entrée :
-25 dBm à -65 dBm nominal
Alimentation
Adaptateur 12v CC
Power input: 100-240 VAC
Power frequency: 50-60 Hz
Power Consumption: 60 W (typical)
Normes & Régulations
CE, FCC- Part 15 Class B
Page 8
Vbox XLV - TV Gateway Family - Receiver Streamer Technology
DIS 3330/40
Page 9
XLV Box Réception: 2 Sat & 2 TNT
RF Tuner X 4
Connecteur externe : 2 X F type, femelle
Fréquences : 950 MHz à 2150 MHz
Niveau du signal d'entrée :
-25 dBm à -65 dBm nominal
LNB x 2
Alimentation et commutation :
Alim : Voltage séléctionnable 13V ou 18V
Courant Max LNB : 400 mA
Contrôle signal : 22 kHz
DiSeqC: 1.0, 1.1, 1.2 supportés
Protection
Symbol Rates: 1.5 - 45 Msps
(1 – 45 Msps optionnel
Processing Transport Stream :
jusqu'à 40Mbps
Code externe Reed-Solomon (204,188)T=8
DVB-S2
Support Format de Transmission :
K=7,R=12,2/3,3/4,5/6,7,8
LDPC/BCH (DVB-S2)
8PSK: SR = 10–30 MSps
QPSK: SR = 10–30 MSps
Roll Off: 0.2, 0.25, 0.35.
Pilot On/Off
Spectral Non-inversé / Inversé
DVB-S2 FEC
LDPC/BCH QPSK 1⁄2, 3/5, 2/3, 3⁄4 , 4/5, 5/6,
8/9, 9/10
LDPC/BCH 8PSK 3/5, 2/3, 3⁄4, 4/5, 5/6, 8/9,
Et 9/10
Dimensions/caractéristiques
Taille (L x l x h):292x53x237 mm
Température en utilisation : 0 – 40°C
Température de stockage : -10 – 85°C
Humidité en utilisation : 10% - 90%
Manipulation des Données et Démultiplexage
Encapsulation Multi-Protocol (MPE)
Datagram and section packing
Filtrage Unicast/multicast
-25 dBm à -65 dBm nominal Multicast address
filters :128
PID Filters:
UDP/TCP/IP protocols
Alimentation et commutation : Tables privées
PSI/TCP (private tables)
LLC SNAP/null encapsulation
Formats de Sortie Stream
Standard: Transport Stream (TS)
32 programmes in TS/UDP/IP
Annonce utilisant SAP
Optionel : Elementary Stream –ES
Elementary Stream packetisés (Packetized
Elementary Stream-PES)
Program Stream –PS
Sous-titres
Streaming RTP
Sauvegarde sur fichier
Streaming depuis fichier
EPG
Interface réseaux LAN
Connecteur: 1x RJ-45
Débit : 10/100/1000 Auto-négociation
Témoins LED
Power On
Led LAN
Alimentation
Adaptateur 12v CC
Power input: 100-240 VAC
Power frequency: 50-60 Hz
Power Consumption: 60 W (typical)
Normes & Régulations
CE, FCC- Part 15 Class B
DIS 3330/50
XLV Box Réception: 2 Sat & 2 C
LNB x 2
Alimentation et commutation :
Alim : Voltage séléctionnable 13V ou 18V
Courant Max LNB : 400 mA
Contrôle signal : 22 kHz
DiSeqC: 1.0, 1.1, 1.2 supportés
Protection
Symbol Rates: 1.5 - 45 Msps
(1 – 45 Msps optionnel
Processing Transport Stream :
jusqu'à 40Mbps
Code externe Reed-Solomon (204,188)T=8
DVB-S2
Support Format de Transmission :
K=7,R=12,2/3,3/4,5/6,7,8
LDPC/BCH (DVB-S2)
8PSK: SR = 10–30 MSps
QPSK: SR = 10–30 MSps
Roll Off: 0.2, 0.25, 0.35.
Pilot On/Off
Spectral Non-inversé / Inversé
DVB-S2 FEC
LDPC/BCH QPSK 1⁄2, 3/5, 2/3, 3⁄4 , 4/5, 5/6,
8/9, 9/10
LDPC/BCH 8PSK 3/5, 2/3, 3⁄4, 4/5, 5/6, 8/9,
Et 9/10
Dimensions/caractéristiques
Taille (L x l x h):292x53x237 mm
Température en utilisation : 0 – 40°C
Température de stockage : -10 – 85°C
Humidité en utilisation : 10% - 90%
Manipulation des Données et Démultiplexage
Encapsulation Multi-Protocol (MPE)
Datagram and section packing
Filtrage Unicast/multicast
-25 dBm à -65 dBm nominal Multicast address
filters :128
PID Filters:
UDP/TCP/IP protocols
Alimentation et commutation : Tables privées
PSI/TCP (private tables)
LLC SNAP/null encapsulation
Formats de Sortie Stream
Standard: Transport Stream (TS)
32 programmes in TS/UDP/IP
Annonce utilisant SAP
Optionel : Elementary Stream –ES
Elementary Stream packetisés (Packetized
Elementary Stream-PES)
Program Stream –PS
Sous-titres
Streaming RTP
Sauvegarde sur fichier
Streaming depuis fichier
EPG
Interface réseaux LAN
Connecteur: 1x RJ-45
Débit : 10/100/1000 Auto-négociation
Témoins LED
Power On
Led LAN
Vbox XLV - TV Gateway Family - Receiver Streamer Technology
RF Tuner X 4
Connecteur externe : 2 X F type, femelle
Fréquences : 950 MHz à 2150 MHz
Niveau du signal d'entrée :
-25 dBm à -65 dBm nominal
Alimentation
Adaptateur 12v CC
Power input: 100-240 VAC
Power frequency: 50-60 Hz
Power Consumption: 60 W (typical)
Normes & Régulations
CE, FCC- Part 15 Class B
Page 10
Vbox XLV - TV Gateway Family - Receiver Streamer Technology
DIS 3330/2S
Page 11
XLV Box Réception: 2 Satellites
RF Tuner X 4
Connecteur externe : 2 X F type, femelle
Fréquences : 950 MHz à 2150 MHz
Niveau du signal d'entrée :
-25 dBm à -65 dBm nominal
LNB x 2
Alimentation et commutation :
Alim : Voltage séléctionnable 13V ou 18V
Courant Max LNB : 400 mA
Contrôle signal : 22 kHz
DiSeqC: 1.0, 1.1, 1.2 supportés
Protection
Symbol Rates: 1.5 - 45 Msps
(1 – 45 Msps optionnel
Processing Transport Stream :
jusqu'à 40Mbps
Code externe Reed-Solomon (204,188)T=8
DVB-S2
Support Format de Transmission :
K=7,R=12,2/3,3/4,5/6,7,8
LDPC/BCH (DVB-S2)
8PSK: SR = 10–30 MSps
QPSK: SR = 10–30 MSps
Roll Off: 0.2, 0.25, 0.35.
Pilot On/Off
Spectral Non-inversé / Inversé
DVB-S2 FEC
LDPC/BCH QPSK 1⁄2, 3/5, 2/3, 3⁄4 , 4/5, 5/6,
8/9, 9/10
LDPC/BCH 8PSK 3/5, 2/3, 3⁄4, 4/5, 5/6, 8/9,
Et 9/10
Dimensions/caractéristiques
Taille (L x l x h):292x53x237 mm
Température en utilisation : 0 – 40°C
Température de stockage : -10 – 85°C
Humidité en utilisation : 10% - 90%
Manipulation des Données et Démultiplexage
Encapsulation Multi-Protocol (MPE)
Datagram and section packing
Filtrage Unicast/multicast
-25 dBm à -65 dBm nominal Multicast address
filters :128
PID Filters:
UDP/TCP/IP protocols
Alimentation et commutation : Tables privées
PSI/TCP (private tables)
LLC SNAP/null encapsulation
Formats de Sortie Stream
Standard: Transport Stream (TS)
32 programmes in TS/UDP/IP
Annonce utilisant SAP
Optionel : Elementary Stream –ES
Elementary Stream packetisés (Packetized
Elementary Stream-PES)
Program Stream –PS
Sous-titres
Streaming RTP
Sauvegarde sur fichier
Streaming depuis fichier
EPG
Interface réseaux LAN
Connecteur: 1x RJ-45
Débit : 10/100/1000 Auto-négociation
Témoins LED
Power On
Led LAN
Alimentation
Adaptateur 12v CC
Power input: 100-240 VAC
Power frequency: 50-60 Hz
Power Consumption: 60 W (typical)
Normes & Régulations
CE, FCC- Part 15 Class B
DIS 3340/2T
XLV Box Réception: 2 TNT
LNB x 2
Alimentation et commutation :
Alim : Voltage séléctionnable 13V ou 18V
Courant Max LNB : 400 mA
Contrôle signal : 22 kHz
DiSeqC: 1.0, 1.1, 1.2 supportés
Protection
Symbol Rates: 1.5 - 45 Msps
(1 – 45 Msps optionnel
Processing Transport Stream :
jusqu'à 40Mbps
Code externe Reed-Solomon (204,188)T=8
DVB-S2
Support Format de Transmission :
K=7,R=12,2/3,3/4,5/6,7,8
LDPC/BCH (DVB-S2)
8PSK: SR = 10–30 MSps
QPSK: SR = 10–30 MSps
Roll Off: 0.2, 0.25, 0.35.
Pilot On/Off
Spectral Non-inversé / Inversé
DVB-S2 FEC
LDPC/BCH QPSK 1⁄2, 3/5, 2/3, 3⁄4 , 4/5, 5/6,
8/9, 9/10
LDPC/BCH 8PSK 3/5, 2/3, 3⁄4, 4/5, 5/6, 8/9,
Et 9/10
Dimensions/caractéristiques
Taille (L x l x h):292x53x237 mm
Température en utilisation : 0 – 40°C
Température de stockage : -10 – 85°C
Humidité en utilisation : 10% - 90%
Manipulation des Données et Démultiplexage
Encapsulation Multi-Protocol (MPE)
Datagram and section packing
Filtrage Unicast/multicast
-25 dBm à -65 dBm nominal Multicast address
filters :128
PID Filters:
UDP/TCP/IP protocols
Alimentation et commutation : Tables privées
PSI/TCP (private tables)
LLC SNAP/null encapsulation
Formats de Sortie Stream
Standard: Transport Stream (TS)
32 programmes in TS/UDP/IP
Annonce utilisant SAP
Optionel : Elementary Stream –ES
Elementary Stream packetisés (Packetized
Elementary Stream-PES)
Program Stream –PS
Sous-titres
Streaming RTP
Sauvegarde sur fichier
Streaming depuis fichier
EPG
Interface réseaux LAN
Connecteur: 1x RJ-45
Débit : 10/100/1000 Auto-négociation
Témoins LED
Power On
Led LAN
Vbox XLV - TV Gateway Family - Receiver Streamer Technology
RF Tuner X 4
Connecteur externe : 2 X F type, femelle
Fréquences : 950 MHz à 2150 MHz
Niveau du signal d'entrée :
-25 dBm à -65 dBm nominal
Alimentation
Adaptateur 12v CC
Power input: 100-240 VAC
Power frequency: 50-60 Hz
Power Consumption: 60 W (typical)
Normes & Régulations
CE, FCC- Part 15 Class B
Page 12
Vbox XLV - TV Gateway Family - Receiver Streamer Technology
DIS 3350/2C
Page 13
XLV Box Réception: 2 Câbles
RF Tuner X 4
Connecteur externe : 2 X F type, femelle
Fréquences : 950 MHz à 2150 MHz
Niveau du signal d'entrée :
-25 dBm à -65 dBm nominal
LNB x 2
Alimentation et commutation :
Alim : Voltage séléctionnable 13V ou 18V
Courant Max LNB : 400 mA
Contrôle signal : 22 kHz
DiSeqC: 1.0, 1.1, 1.2 supportés
Protection
Symbol Rates: 1.5 - 45 Msps
(1 – 45 Msps optionnel
Processing Transport Stream :
jusqu'à 40Mbps
Code externe Reed-Solomon (204,188)T=8
DVB-S2
Support Format de Transmission :
K=7,R=12,2/3,3/4,5/6,7,8
LDPC/BCH (DVB-S2)
8PSK: SR = 10–30 MSps
QPSK: SR = 10–30 MSps
Roll Off: 0.2, 0.25, 0.35.
Pilot On/Off
Spectral Non-inversé / Inversé
DVB-S2 FEC
LDPC/BCH QPSK 1⁄2, 3/5, 2/3, 3⁄4 , 4/5, 5/6,
8/9, 9/10
LDPC/BCH 8PSK 3/5, 2/3, 3⁄4, 4/5, 5/6, 8/9,
Et 9/10
Dimensions/caractéristiques
Taille (L x l x h):292x53x237 mm
Température en utilisation : 0 – 40°C
Température de stockage : -10 – 85°C
Humidité en utilisation : 10% - 90%
Manipulation des Données et Démultiplexage
Encapsulation Multi-Protocol (MPE)
Datagram and section packing
Filtrage Unicast/multicast
-25 dBm à -65 dBm nominal Multicast address
filters :128
PID Filters:
UDP/TCP/IP protocols
Alimentation et commutation : Tables privées
PSI/TCP (private tables)
LLC SNAP/null encapsulation
Formats de Sortie Stream
Standard: Transport Stream (TS)
32 programmes in TS/UDP/IP
Annonce utilisant SAP
Optionel : Elementary Stream –ES
Elementary Stream packetisés (Packetized
Elementary Stream-PES)
Program Stream –PS
Sous-titres
Streaming RTP
Sauvegarde sur fichier
Streaming depuis fichier
EPG
Interface réseaux LAN
Connecteur: 1x RJ-45
Débit : 10/100/1000 Auto-négociation
Témoins LED
Power On
Led LAN
Alimentation
Adaptateur 12v CC
Power input: 100-240 VAC
Power frequency: 50-60 Hz
Power Consumption: 60 W (typical)
Normes & Régulations
CE, FCC- Part 15 Class B
Quick Guide
Quick Guide: Installation, Tuning, and Streaming
2. Installation and Setup
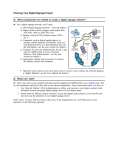
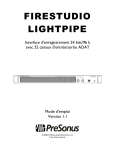
2.1 Hardware Description
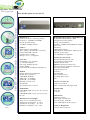
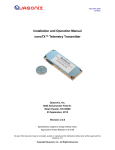
XLV- Front Panel
1
1 Tuner power LED
2 Hardware power LED
3 Signal Lock LED
4 Hard Disk LED
5
2 34 5
XLV-3330/40: Rear Panel- 2 Satellite and 2 DVB-T
1 2
3
Description
4
1 - Power button
2 - DC power adapter connector
3 - CRT monitor connector
4 - DVI input display connector
5 - RJ45 1 Gb (Ethernet cable) connector
6 - 4 x USB ports
7 - Optional CI
8 - RF-1 = Tuner-1 : DVB-S2
9 - RF-2 = Tuner-2 : DVB-S
10 - RF-3 = Tuner 3+4 : DVB-T
5
6
7
8
9
10
Vbox XLV - TV Gateway Family - Receiver Streamer Technology
Description
Page 14
Quick Guide
Quick Guide: Installation, Tuning, and Streaming
Vbox XLV - TV Gateway Family - Receiver Streamer Technology
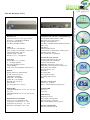
XLV-3330 Rear Panel- 4 Satellite
1 2
3
4
5
6
7
8
9
Description
1 - Power button
2 - DC power adapter connector
3 - CRT monitor connector
4 - DVI input display connector
5 - RJ45 1 Gb (Ethernet cable) connector
6 - 4 x USB ports
7 - Optional CI
8 - RF-1 = Tuner-1 : DVB-S2
9 - RF-2 = Tuner-2 : DVB-S
2.2. Installing the XLV Unit
Accessories
XLV- units are shipped with the following accessories required for installation:
* Stand to place the device on an upright position
* AC power cable
Required Equipment
To install the XLV- unit you need the following items in addition to the accessories provided:
* Satellite dish + coaxial cable with F type male connector to connect the device to the satellite
* Terrestrial antenna + coaxial cable with F type male connector to connect the device to the terrestrial
input
* Interface device: Keyboard + monitor and monitor cable or Laptop(PC station)
Page 15
* Ethernet cable
Quick Guide: Installation, Tuning, and Streaming
Quick Guide
2.2 Setting Up the System
To set up the system:
1. Connect the Ethernet cable to the network and to the units designated connector.
3. Connect the coaxial cable running from the terrestrial antenna to the units terrestrial RF-In connector.
4. Connect the 12-DC power adapter to the unit and to the mains. Turn on the XLV unit by pressing the
Power button on its front panel. The Power LED turns green, and the LAN LED blinks intermittently
until it links to the network, upon which it also turns green. Follow the instructions below to operate the
device.
2.3 Accessing and Incorporating the XLV into your Network
There are two interfaces available for accessing the XLV: Menu Interface Toolkit or HTML interface.
The Menu Interface Toolkit can be accessed directly or remotely in a number of ways; however, since this
softwares functionality is limited, the recommended method for operating the system is through the HTML
interface (remote access via Web browser). For purposes of expediency, this Quick Guide focuses only on
instructions pertaining to the HTML interface. All modes of access to the system and of use of the Menu
Interface Toolkit software are detailed in the in the XLV Users Manual.
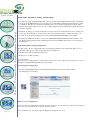
Remote Access via Web browser
To access the XLV remotely via HTML unterface follow the steps discribed below. The setting Can be performed by 2 Options:
Option 1- Setting IP- Address with DHCP and Accessing by using UPnP protocol.
The XLV Support UPnP protocol and can be recognized on the LAN
1. Connect an Ethernet cable from the XLV unit to the existing LAN with a Router
2. The XLV will be recognize automatically by your Router
3. On your PC-Desktop/Laptop go to Start-> my network places->
Click on this icon to get the Icons of the device connected
to your Network
Vbox XLV - TV Gateway Family - Receiver Streamer Technology
2. Connect the coaxial cable running from the satellite dish to the units satellite RF-In connector.
3. A list of Icons will appear and among them you will find a VBox
4. Double click on the VBox Icon to get the Web access.
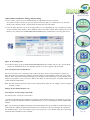
5. When prompted for the login and password, input webadmin for both. The following screen displays
It is also possible to get the XLV IP-adress via the router by looking at the list of the devices that are connect
to the Router
Page 16
Quick Guide
Quick Guide: Installation, Tuning, and Streaming
Option 2- access the XLV unit and set via default IP address
1. Connect an Ethernet cable from the XLV unit direct to your PCstation.
Vbox XLV - TV Gateway Family - Receiver Streamer Technology
2. The default IP address of the XLT Ethernet card is 172.16.1.1 and Subnet Mask 255.255.255.0.
4. Use a like IP address for your PC station, for example 172.16.1.2 and Subnet mask 255. 255.255.0
5. Open a Web browser such as MS Internet Explorer on your PC.
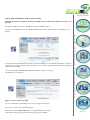
6 . Input the URL as http://172.16.1.1.
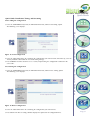
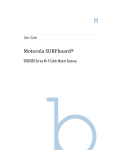
7. When prompted for the login and password, input webadmin for both. The following screen displays.
Figure 1: System Network Status
This screen is the default entry to the HTML interface.
Note that all HTML interface screens include three different levels of action:
* MAJOR TABS: Refer to the row of optionsat the top of the page.
* MINOR TABS: Refers to the row of options directly under the major tabs. These options change depending
on the major tab selected.
Page 17
* Options: Refers to the list of options on the left side of the screen.
These options change depending on the major and minor tabs selected. In all cases, the selected option is
highlighted by means of a blue box appearing behind it. Please note that changes made to the system
become effective only after you click a command button (such as SUBMIT), and not upon mere selection
of the option..
Quick Guide: Installation, Tuning, and Streaming
Quick Guide
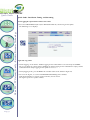
Changing the Ethernet configuration using the HTML Interface and Incorporating the XLV into your
Network
To change the Ethernet interface configuration using the HTML interface:
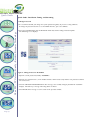
1. Select the SYSTEM major tab, the NETWORK minor tab, and the Update option. The following screen
displays.
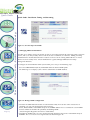
3. Click the CHANGE NETWORK SETTINGS button to validate the changes.
The following screen displays
Figure 2. Activate Network Settings
Vbox XLV - TV Gateway Family - Receiver Streamer Technology
2. If your local network administrator instructs you to use DHCP, select the DHCP radio button. If you have
been assigned a confeger DHCP or static IP address: select the Static or DHCP radio button and input the IP
address and subnet mask.
4. Select Immediately radio button to activate the changes immediately.
5. Click the Activate Network Setting button.
Now you are ready to STEP TWO and access XLV through your network
(if the XLV will not appear restart the unit by push the power button)
Page 18
Quick Guide
Quick Guide: Installation, Tuning, and Streaming
a. Change Password
Vbox XLV - TV Gateway Family - Receiver Streamer Technology
1. It is recommended that you change the system password regularly to prevent security problems.
To change the password used to access the HTML interface, proceed as follows:
Page 19
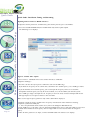
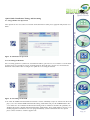
2. Select the SYSTEM major tab, the MANAGE minor tab, and the Change Password option.
The following screen displays.
Figure 4: Change Password - Webadmin
3. Input the current password (initially webadmin).
4. Input the new password twice, in the middle and lower form fields. Verify that the new password contains
4 to 8 characters.
5. Click the CHANGE PASSWORD button. The message Successfully changed password for webadmin
displays. Alternatively, a message indicating failure is shown.
6. Click BACK on the message screen to return to the previous window.
Quick Guide: Installation, Tuning, and Streaming
Quick Guide
2.5 Adding a View-Only User
You can define one additional user account with viewing-only capabilities. This user account has its own
name and password, enabling one additional user to log into the system and read the systems settings.
To define this account:
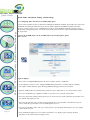
Figure 5: Change Password Webadmin or View-Only User
3. To change the password of the view-only user, select the User radio button and enter the requested
information. Click the Change Password button. A screen reporting success or failure of the change action
displays.
4. Click Back to return to the previous screen.
5. To delete the view-only user from the system, click the Delete User: User button.
You will return to the screen shown in Figure 5.
3. DVB Configuration
Proper operation of the system requires it to be configured as per your DVB-S and DVB-T providers
instructions. To achieve a DVB-S&T connection, the device must be tuned to specific channels using the
information supplied by your DVB-S & T provider. You can tune the device using the physical Channel
Number or its Center frequency number. Follow the instructions below to configure the devices tuner in the
manner most convenient to you.
3.1 Configuring the Satellite Tuner
This section describes the parameters you need to input to achieve a satellite connection.
Note: Tuner 1 and Tuner 2 allow you to receive two DVB-S and only Tuner 1 allows you to receive DVBS2
Vbox XLV - TV Gateway Family - Receiver Streamer Technology
1. Select the SYSTEM major tab, the MANAGE minor tab, and the Change Password option. The screen
shown in Figure displays.
2. Under the Add View User heading, enter the view-only users name and password in the relevant form
fields. Click the ADD USER button. The Change Password screen changes as follows.
(Note that it now enables password modification for both webadmin and view-only user).
Page 20
Quick Guide
Quick Guide: Installation, Tuning, and Streaming
Inputting Tuner Parameters (HTML Interface)
To input the satellite parameters as informed by your satellite provider, proceed as follows:
Vbox XLV - TV Gateway Family - Receiver Streamer Technology
1. Select the TUNER MAJOR TAB, the TUNER minor tab, and the Update option.
The following screen displays.
Figure 6: Satellite Tuner Update
2. Select Tuner 1 DVBS/S2 in the Selected Tuner Interfaces combo-box
3.Input the LNB type. -
* The XLV can tune directly frequencies within the 9.50 to 21.50 GHz range.
If you know the frequency on the coaxial cable, also known as L-band frequency, select LNB types None.
* If you do not know the L-band frequency, you need to input the frequency of the selected satellite
transponder and the frequency used by the local oscillator (L.O.) of the LNB in your antenna system.
Select LNB type Single and input the L.O. frequency in the Low field, or Dual and input both the low
and high frequencies. Frequencies must be entered in GHz.
Note: Use the high frequency parameter only when a dual LNB is employed.
Page 21
4. Input the satellite frequency in GHz in the Frequency field under the Tuner Parameters heading.
5. Input the symbol rate in KSym/s.
3. Select the polarization of the satellite feed (either Vertical/Right or Horizontal/Left).
4. If the LNB type is set to None, you can control the 22 KHz switch. Select Off- Low LNB to set the local
oscillator of the LNB to its low frequency and On- High LNB to set the local oscillator to its high frequency.
5. After all of the parameters are input, click the UPDATE button. The Status screen displays.
Quick Guide: Installation, Tuning, and Streaming
6. Ensure that the signal and data are locked and that the signal strength is within the acceptable range.
The signal strength indicates the strength of the signal being received as a relative percentage of the total
range of the XLV receiver. The background color is green if the signal strength is within the acceptable range
of 22% to 88% and yellow if it is outside of this range.
* When the XLV is locked onto the satellite transponder at the current frequency, the signal lock bar is green
and states Lock. Otherwise, the bar displayed is yellow with the text Not Locked.
Note: To maintain connection to an existing PID in case you change the tuner parameters, you should update
the PID data in the appropriate section in the SATELLITE/TUNER/Update screen above. Follow the
instructions for updating PIDs in the XLV
Vbox XLV - TV Gateway Family - Receiver Streamer Technology
Figure 7: Satellite Tuner Status, Locked
Quick Guide
Page 22
Quick Guide
Quick Guide: Installation, Tuning, and Streaming
Vbox XLV - TV Gateway Family - Receiver Streamer Technology
3.3. Configuring Tuner Parameters for DVB-S2 Reception
Certain video and audio streams are broadcasted through the DVB-S2 standard, which makes use of the latest
modulation and coding methods in order to provide enhanced HDTV- and MPEG-4-quality broadcasts.
The tuner requires a more specific configuration in order to stream DVB-S2 broadcasts into your system.
To input this configuration, please check with your satellite provider for the required information and follow
the steps below.
1. Select the TUNER major tab, the TUNER minor tab, and the Update option.
The screen in
Figure 5 displays.
2. Select Tuner 1 DVBS/DVBS2 option in the Selected Tuner Interface combo-box.
3. At the Options section, select the ’Display DVBS2 Tuning Parameters’ checkbox and press APPLY.
The Update window displays again, showing additional tuning parameters to be defined.
4. Input the LNB parameters and initial tuner parameters as per instructions 2 - 6 in the previous section.
5. Select the modulation type ('QPSK' or ’8PSK’) as per your service provider’s instructions.
6. Select the pilot mode to allow pilot frequencies to be used. If you are unsure about this specification, leave
the default ’Off’ option selected.
7. Select the roll-off value to be used for signal attenuation as per your provider’s instructions. If you are
unsure about this specification, leave the default option selected.
Page 23
8. Select the Viterbi Rate (FEC) value as per your provider’s specifications. Alternatively, leave the default
’Auto’ option selected.
9. Press UPDATE to apply the selected values. The Status screen displays again, showing all input
parameters in the Current Tuner Settings section.
Quick Guide: Installation, Tuning, and Streaming
Quick Guide
Configuring the Terrestrial Tuner
This section describes the parameters you need to input to achieve a terrestrial connection. To achieve a
DVB-T connection, the device must be tuned to specific channels using the information supplied by your
DVB-T provider. You can tune the device using the physical Channel Number or its Center frequency number. Follow the instructions below to configure the devices tuner in the manner most convenient to you.
Tuning by Physical (RF) Channel Number
1. Select the Tuner major tab, the TUNER minor tab, and the Update option. The screen on Figure 8 displays.
2. Select the Display Tune by Channel Number box under the Options heading and click APPLY.
The following screen displays.
Figure 8. Tuning by Channel Number
3.Select the desired RF channel number from the Channel Number drop-down nu and press UPDATE.
The Status screen displays, specifying the channel number in the Current Tuner Settings sections
Vbox XLV - TV Gateway Family - Receiver Streamer Technology
Note: Tuner 3 and Tuner 4 allow you to receive two DVB-T
Page 24
Vbox XLV - TV Gateway Family - Receiver Streamer Technology
Quick Guide
Page 25
Quick Guide: Installation, Tuning, and Streaming
Figure 9. DVB-T Tuner Status, Locked
3. Ensure that you have signal and data locks and that the signal strength is within the acceptable range of
22% to 88%. (If you do not achieve Locked status, check the connection of the coaxial cable to the
device and verify you entered the correct parameters. If the problem persists, contact your DVB-T
provider or your antenna installer).
Editing Channel Numbers
The RF channel number used by the XLV for tuning purposes corresponds by default to the bands center
frequency. However, in certain cases, broadcasting channels are located at a frequency slightly different than
the center frequency. If you know the exact position of the channel in the band, you can edit the RF channel
number in the device so that it corresponds to the correct frequency position. Follow the instructions below
to edit the RF channel number.
1. Select the Tuner major tab, the TUNER minor tab, and the Update option. The screen on Figure 8 displays.
Click Edit Channels List button. The following screen (partial view) displays.
Figure 10. Edit Channels.
Quick Guide: Installation, Tuning, and Streaming
Quick Guide
4. Enter the exact frequency for the desired channel at the corresponding ‘Frequency field.
5. If you know the required frequency modulation, select it at the Modulation drop-down list; otherwise,
select the Auto option.
6. Click the corresponding UPDATE button. The Edit Channel screen displays the input values.
7. To restore frequency and modulation values to their original configuration, click the RESET button under
the Restore Default Table heading. The Edit Channel screen displays the original values for each channel.
1. Select the Tuner major tab, the TUNER minor tab, and the Update option. The following screen displays.
Figure 10: Tuning by Frequency
2. Input the center frequency of the desired channel as supplied by your DVB-T service provider, in KHz.
3. Enter or select the information for the other parameters (bandwidth, modulation type, code rate, guard
interval, and transmission mode) in the corresponding form fields, as per your service providers
instructions. Choose Auto where available if you wish the device to configure these parameters
automatically.
4. Click the UPDATE button. The Status screen displays.
Vbox XLV - TV Gateway Family - Receiver Streamer Technology
Tuning by Center Frequency
Page 26
Quick Guide
Quick Guide: Installation, Tuning, and Streaming
Streaming
Vbox XLV - TV Gateway Family - Receiver Streamer Technology
The XLV devices are capable of streaming DVB-S/T video and audio broadcasts into your system for unicast
or multicast redistribution. Streaming is enabled after the device is tuned to an DVB-S/T transponder.
Follow the instructions in the next sub-sections to configure the device for streaming as per your needs.
Page 27
4.1 Streaming to a Network
After tuning the transponder and locking the signal, you must select the individual channel you wish to
stream to specific broadcasts destinations in your network.
1.Select the STREAMING/PROGRAMS/Update window. A list of all stations broadcasting through the
transponder displays on screen.
Figure 11: Streaming Update with Locked Tuner
5. In the ’Audio Track’ column, select the type of audio stream you wish to receive with the broadcast.
(Remember that DVB-S & DVB-T transponders can stream broadcasts from both TV and radio stations;
make sure you are streaming from the desired type of station).
6. The ’IP’ column shows the destination IP address where the stream is to be sent inside your network.
Input the correct address of the receiving station
7. The ’Port’ column shows the conduit through which the stream is transmitted into the network. Usually, all
streams are set to go through the same port. However, you can configure a different port for each station
broadcasted to the same IP address, so as to transmit different stations to that same address.
Note: To allow viewing different brodcasted stations simultaneously, ensure that unique pairs of IP addresses
and port numbers are input. You may pair one single IP address with different port numbers, or different IP
adresses with one single port number. If you set the system to stream broadcasts only when at least one
listener is present (that is, if the IGMP function is enabled), different multicast IP addresses must be set in the
configuration
Quick Guide: Installation, Tuning, and Streaming
Quick Guide
8. In the ’Action’ column’ press the START button corresponding to the desired station.
The Update window refreshes, the selected station’s name turns blue, the ’Audio Track’, ’IP’ and ’Port’
fields become dimmed, and the ’Action’ button becomes blue and reads STOP.
Figure 12. Streaming status
10. To stop streaming, go to the STREAMING/PROGRAMS/Update window and press the relevant STOP
button. The information for the corresponding station reverts to its original color and status.
4.1.2 Viewing Streamed TV Broadcasts
For users to be able to view streaming media, an IP media player must be loaded onto their computer stations. Media players run from basic playback to highly advanced, professionallevel audio and video editing
software. Some of the most common media players are Videolan’s VLC Media Player (www.videolan.com)
and Elecard’s products (www.elecard.com). Distriac Int. offers its own media player, the VBTV. Consult your
vendor for further information.
Note: The XLV Streamer forwards video streams in SAP protocol. Make sure to configure your media player
for SAP reception
Manage the the MANAGE minor tab
4.2 Setting the Streamers Operation Mode
The XLV streamer can operate in one modes:
Vbox XLV - TV Gateway Family - Receiver Streamer Technology
9. Select the Status option to review the streaming status. A screen displaying the selected parameters and the
current streaming status displays. (When IGMP is enabled, the Status column shows Waiting for streams
that have been started at the STREAMING/PROGRAMS/Update window but are not being listened to).
* Streaming and DataCasting in addition to streaming video and audio broadcasts, the XLV device also supports the reception of DVB-S/T-transmitted data IP PIDs; this is executed through the DVB-S-T/PID/Update
window.
Note: The Streaming and DataCasting mode of operation supports only up to 8 PIDs in all. When operating
in this mode, the quantity of audio/video broadcasts to be streamed is reduced according to the quantity of
data IP PIDs being received. For example, if you set the system to receive 2 IP PIDs, only up to 3 broadcasts
with audio and video PIDs become available.
Page 28
Vbox XLV - TV Gateway Family - Receiver Streamer Technology
Quick Guide
Quick Guide: Installation, Tuning, and Streaming
Figure 13: Streamer Operation Mode
4.3 Managing Multicast Distribution
The XLV device allows you decide whether streams are to be forwarded into the LAN only when at least one
listener (that is, an entity actually connected to the stream) is identified, or at all times. Making streaming
conditional to the identification of listeners leads to a better use of the existing bandwidth since it ensures
that the stream is actually in use. Stream distribution is regulated through IGMP (Internet Group
Management Protocol).
To configure stream distribution within your network, proceed as per the following steps:
1. Select the STREAMING major tab, MANAGE minor tab and the IGMP option.
The following screen displays (notice that the default status is IGMP disabled).
Figure 14: Manage IGMP Configuration
Page 29
2. To enable the IGMP function and have streams forwarded only if at least one connected suscriber is
identified, select the ’Stream Programs Only if Listener
Exists (Enable IGMP)’ radio button and press the SUBMIT button. The screen shows the current IGMP
status as "Enabled" and offers the possibility of disabling IGMP
(Stream Programs Regardless of Listeners radio button).
3. To disable the IGMP again, select the Stream Programs Regardless of Listeners radio button and press
SUBMIT. The screen reverts to its original status as shown in Figure 22.
Quick Guide: Installation, Tuning, and Streaming
Quick Guide
4.3. Using Channel List Operations
These options are the newest ones. For details clarification how it works please apply for Full product User
Guide.
4.3.1 Streaming On Demand
Once streaming parameters (audio track, destination IP address, port) have been set and there is no intention
to change them, it is possible to activate streaming from the IP media player used to view the broadcasts.
Follow the instructions below to configure the option to set streaming on demand:
Vbox XLV - TV Gateway Family - Receiver Streamer Technology
Figure 15. Channels List Operation
Figure 16: Streaming On Demand
2. To enable the IGMP On Demand function and have streams continually ready to be started at the IP media
player, select the ’Enable IGMP OnDemand Streaming’ radio button and press the SUBMIT button. The
screen shows the current Enable On-Demand Streaming status as "Enabled" and offers the possibility of
disabling this feature (Disable OnDemand Streaming radio button). These option allows to user to receive
random programs list without to start each program manually. (To full clarification how these option
please contact to Dsitriac customer support team.
Page 30
Quick Guide
Quick Guide: Installation, Tuning, and Streaming
Vbox XLV - TV Gateway Family - Receiver Streamer Technology
3. To enable the VbTV On Demand function, select the ’Enable VbTV OnDemand Streaming’ radio button
and press the SUBMIT button. The screen shows the current Enable VbTVOn-Demand Streaming status
as "Enabled" and offers the possibility of disabling this feature (Disable OnDemand Streaming radio
button). These option allows to user to receive random programs list on VBOX VbTV appliocation and to
watch the programs.
4. To initiate streaming, go to the IP media player and select the desired station from the list, activating it as
per the specific media players features. Please note that when OnDemand is enabled, no changes can
be made to the streaming configuration set in the STREAMING/PROGRAMS/Update window.
3. To disable the OnDemand feature, return to the STREAMING/PROGRAMS/OnDemand window, select
the Disable OnDemand Streaming radio button and click the SUBMIT button. The screen returns to its
original form.
4.4 Working with Streaming Configurations
The XLV invokes the last configuration when streaming again from the same transponder. However, it is
recommended that you save your configuration in files for future use.
Configurations include the following parameters:
* Broadcast selected for streaming
* Operation mode
The system saves configurations in .ini files. These files are placed in a ’pub’ directory, and can be accessed
through the SYSTEM/MANAGE/Manage Files window.
4.4.1 Saving the Configuration
4. Select the STREAMING major tab, the MANAGE minor tab, and the Save Config. option.
The following screen displays.
Figure 17. Save Configuration
Select the ’New File’ radio button and input the name of the new file. Alternatively, if files have already been
saved, select the radio button of the file you wish to overwrite.
Page 31
6. Press SAVE. A new entry for the input configuration file appears on screen.
Quick Guide: Installation, Tuning, and Streaming
Quick Guide
4.4.2 Loading the Configuration
7. Select the STREAMING major tab, the MANAGE minor tab, and the Load Config. option.
The following screen displays.
8. Select the radio button of the file containing the configuration you wish to invoke. Alternatively, select the
’Factory Defaults’ radio button to clear all streaming settings.
9. Press SUBMIT. The XLV Streamer service restarts, implementing the configuration contained in the
selected file.
4.4.3 Deleting the Configuration
1. Select the STREAMING major tab, the MANAGE minor tab, and the Delete Config. option.
The following screen displays.
Vbox XLV - TV Gateway Family - Receiver Streamer Technology
Figure 18: Load Configuration
Figure 19. Delete Configuration
2. Select the radio button of the file containing the configuration you wish to delete.
3. Press Submit. The Delete Config. Window displays the updated list of configuration files.
Page 32
Quick Guide
Quick Guide: Installation, Tuning, and Streaming
4.4.4 Logging the Operation Parameters into a File
Vbox XLV - TV Gateway Family - Receiver Streamer Technology
1. Select the STREAMING major tab, the MANAGE minor tab, and the Log to File option.
The following screen displays.
Page 33
Figure 20: Log to File
2. To start logging, check that the ’Enable Logging to File’ radio button is selected and press SUBMIT.
The screen shows the current status as Enabled, the Start Logging to File radio button is empty, and the
radio button of the Stop Logging to File option is selected.
3. To stop logging to file, press SUBMIT. The window returns to the format in Figure 20.
4. To review the log file, access the SYSTEM/MANAGE/Manage Files window.
Look for the XLVService.log file in the list of files, and click on it.
The log file opens in a separate window.
Note
Note :
................................................................................................................................................................................
................................................................................................................................................................................
................................................................................................................................................................................
................................................................................................................................................................................
................................................................................................................................................................................
................................................................................................................................................................................
................................................................................................................................................................................
................................................................................................................................................................................
................................................................................................................................................................................
................................................................................................................................................................................
................................................................................................................................................................................
................................................................................................................................................................................
................................................................................................................................................................................
................................................................................................................................................................................
................................................................................................................................................................................
................................................................................................................................................................................
................................................................................................................................................................................
................................................................................................................................................................................
................................................................................................................................................................................
................................................................................................................................................................................
Vbox XLV - TV Gateway Family - Receiver Streamer Technology
................................................................................................................................................................................
Page 34
XLV Box
Serveur IPTV
Gestion de IPTV simple et professionnelle basée sur les
meilleures technologies du marché en terme
d'encodage et de diffusion.
( Internet , réseau local, ADSL, mobile ,Satellite. )
XLV Box une solution particulièrement compétitive
de TV sur IP, compatible avec les principaux
fournisseurs de Set Top Boxes vidéos IP,
et permettant la distribution multiflux, multicanaux.
www.distriac.com