1
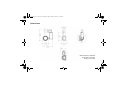
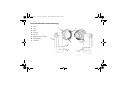
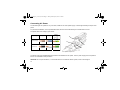
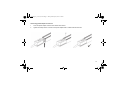
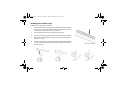
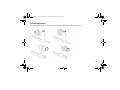
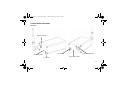
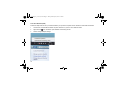
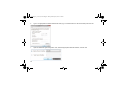
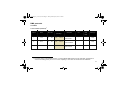
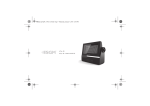
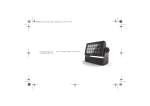
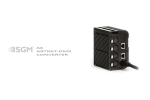
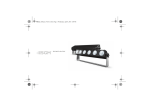
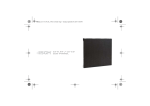
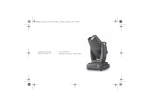
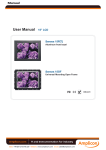
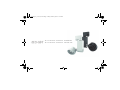
Manual_R-2_170x113,3.book Page 1 Friday, February 20, 2015 4:14 PM R‐2 RAIL LIGHT RGBW R‐2 RAIL LIGHT WHITE Manual_R-2_170x113,3.book Page 2 Friday, February 20, 2015 4:14 PM Dimensions Measurements in millimetres and inches (in brackets). Drawing not to scale. 2 Manual_R-2_170x113,3.book Page 3 Friday, February 20, 2015 4:14 PM R‐2 RAIL LIGHT USER MANUAL © 2015 SGM®. Information subject to change without notice. SGM and all affiliated companies disclaim liability for any injury, damage, direct or indirect loss, consequential or economic loss or any other loss occasioned by the use of, inability to use or reliance on the information contained in this manual. The SGM logo, the SGM name and all other trademarks in this document pertaining to services or products by SGM or its affiliates and subsidiaries are trademarks owned or licensed by SGM or its affiliates or subsidiaries. The original edition of this document is in English. All other language editions are translations of the original edition. This edition applies to firmware version 1.00 or later. 3 Manual_R-2_170x113,3.book Page 4 Friday, February 20, 2015 4:14 PM Contents Dimensions ........................................................................................................................2 Safety information ..............................................................................................................6 Overview ............................................................................................................................9 Parts identification and terminology .................................................................................10 Preparing for installation ..................................................................................................11 Connecting AC Power ......................................................................................................12 Connecting power adaptor to track rail .......................................................................................................................... 13 Installing the R-2 Rail Light ..............................................................................................14 Pan/Tilt adjustment ..........................................................................................................15 Connecting to a wireless DMX control device ..................................................................16 Lumen Radio transmitter ..................................................................................................17 Local Area Network (LAN) ............................................................................................................................................. 18 USB dongle.................................................................................................................................................................... 21 4 Manual_R-2_170x113,3.book Page 5 Friday, February 20, 2015 4:14 PM SGM Rail Light Configuration ...........................................................................................22 Overview........................................................................................................................................................................ 22 Interaction with R-2 Rail Light........................................................................................................................................ 23 DMX Control .................................................................................................................................................................. 24 Service .............................................................................................................................25 Upgrading the firmware ................................................................................................................................................. 25 Cleaning......................................................................................................................................................................... 26 DMX protocols ..................................................................................................................27 R-2 RGBW..................................................................................................................................................................... 27 R-2 White (3000K/4000K).............................................................................................................................................. 28 Fixtures and accessories .................................................................................................29 Included items................................................................................................................................................................ 29 Ordering information ...................................................................................................................................................... 29 User’s notes .....................................................................................................................31 5 Manual_R-2_170x113,3.book Page 6 Friday, February 20, 2015 4:14 PM Safety information WARNING! Read the safety precautions in this section before unpacking, installing, powering or operating this product. The R-2 Rail Light is an LED luminaire intended for professional use only. It is not suitable for household use. Impropre a l’usage domestique. Review the following safety precautions carefully before installing or operating the fixture. This fixture must be installed in accordance with the applicable installation code by a person familiar with the construction and operation of the fixture and the hazards involved. Ce produit doit être installé selon le code d’installation pertinent, par une personne qui connaît bien le produit et son fonctionnement ainsi que les risques inhérent. Preventing electric shock WARNING! Risk of electric shock. • Always power off/unplug the fixture before removing any covers. • Ensure that the power is turned off when connecting the fixture to the AC mains supply. • Ensure that the fixture is electrically connected to earth (ground). • Do not apply power if the fixture is in any way damaged. • Do not immerse the fixture in water or liquid. 6 Manual_R-2_170x113,3.book Page 7 Friday, February 20, 2015 4:14 PM Preventing burns and fire WARNING! Take measures to prevent burns and fire. • Install in a location that prevents accidental contact with the fixture. • Install only in a well-ventilated space. • Install at least 0.3 m (12 in.) away from objects to be illuminated. • Install only in accordance with applicable building codes. • Do not paint, cover or modify the fixture. • Keep all flammable materials away from the fixture. • Allow the fixture to cool for 15 minutes after operation, before touching it. CAUTION: Exterior surface temperature after 5 min. operation = 45 °C (113 °F). Steady state = 70 °C (158 °F). 7 Manual_R-2_170x113,3.book Page 8 Friday, February 20, 2015 4:14 PM Avoid personal injury WARNING! Take measure to prevent personal injury. • Do not look directly at the light source from close range. • Take precautions to prevent injury due to falls when working at height. • For permanent installation, ensure that the fixture is securely fastened to a load-bearing surface with suitable corrosionresistant hardware. 8 Manual_R-2_170x113,3.book Page 9 Friday, February 20, 2015 4:14 PM Overview The R-2 LED Rail Light concept gives the user full control and offers a unique and personal experience; whether it is installed in a museum, an exhibition, a center, a hall, a trade show, a club or a shop or any other application you could think of. It is possible to control your complete light setup from a distance via wireless DMX from LumenRadio. An automatically programmed schedule or alterations can all be done manually, providing endless possibilities and opening up many new opportunities to create dynamic and vibrant environments. The track adapter system enables retrofitting of your entire setup in the most commonly used tracks available on the market today. This can be done in a few easy steps, as it is unnecessary to pull new cables etc. The R-2 series is available in both black and white housings, so that they blend into your existing installations. The R-2 RGBW features a 13° lens and the R-2 White features a 25° lens as standard. This manual covers installation, use and maintenance of the R-2 Rail Light. All documentation is also available from the SGM web-site: http://www.sgmlight.com 9 Manual_R-2_170x113,3.book Page 10 Friday, February 20, 2015 4:14 PM Parts identification and terminology A Head B Lens C Base D Lens cap E Pin hole F Rotational phase selector G Track adapter H Twist lock A B C D E F G 10 H Manual_R-2_170x113,3.book Page 11 Friday, February 20, 2015 4:14 PM Preparing for installation Unpack the fixture and inspect it to ensure that it has not been damaged during transport. The R-2 Rail Light is shipped with: • User manual • Pin key tool (for pin hole) When selecting a location for the fixture, ensure that: • It is situated away from public thoroughfares and protected from contact with people. • It has adequate ventilation. 11 Manual_R-2_170x113,3.book Page 12 Friday, February 20, 2015 4:14 PM Connecting AC Power The R-2 Rail Light can operate on any 100–240V, 50/60 Hz AC mains power supply. It draws approximately 0.2 amps at full power. For permanent installation, have a qualified electrician wire the mains cable directly to a suitable branch circuit. The power cable color coding is given below. Country or Region Phase (L) Neutral (N) (brown) (blue) Protective earth/ground N European Union (EU) (green & yellow) L1 L3 USA & Canada (black) (white) L2 (green) Track rail power adaptor The fixture must be grounded/earthed and be able to be isolated from AC power. The AC power supply must incorporate a fuse or circuit breaker for fault protection. CAUTION: Do not open the fixture, or connect the fixture to an electrical dimmer system, as this can damage it. 12 Manual_R-2_170x113,3.book Page 13 Friday, February 20, 2015 4:14 PM Connecting power adaptor to track rail 1 Press the power adaptor into the track rail like shown below. 2 Tighten the Phillips screw on the bit of the power adaptor that is visible inside the track rail. 13 Manual_R-2_170x113,3.book Page 14 Friday, February 20, 2015 4:14 PM Installing the R-2 Rail Light To attach the R-2 Rail Light to a track rail: 1 Insert the fixture with the polarity groove opposite the polarity ridge on the track rail. NOTE: Make sure the rotational phase selector is set to ‘OFF’ before you insert the fixture in the track rail. 2 Push the fixture into the track rail until it snaps into place. 3 Turn the twist locking mechanism to secure the fixture to the track rail. 4 Choose the appropriate power circuit by turning the rotational phase selector (1, 2, or 3). 5 To remove the fixture from the track rail, set the rotational phase selector to ‘OFF’, reverse the twist locking mechanism, and pull the fixture out from the track rail. Polarity ridge (highlighted) 1 2 14 3 4 Manual_R-2_170x113,3.book Page 15 Friday, February 20, 2015 4:14 PM Pan/Tilt adjustment To adjust pan/tilt (330° / 270°), simply rotate the head/body of the fixture to the desired position: 15 Manual_R-2_170x113,3.book Page 16 Friday, February 20, 2015 4:14 PM Connecting to a wireless DMX control device The R-2 Rail Light is controllable using a wireless Lumen Radio transmitter (DMX or DMX/RDM) and SGM’s Rail Light Configuration Tool (downloadable from www.sgmlight.com). You can set up the Lumen radio transmitter in the following ways: • Local Area Network LAN • USB dongle (SGM USB uploader cable) See detailed setup instructions on the following pages. 16 Manual_R-2_170x113,3.book Page 17 Friday, February 20, 2015 4:14 PM Lumen Radio transmitter Overview Wireless antenna 5-pin XLR DMX input Power input Link status diode Link button Power status diode 17 Manual_R-2_170x113,3.book Page 18 Friday, February 20, 2015 4:14 PM Local Area Network (LAN) Follow the steps below to set up a network between your personal computer and the wireless Lumen Radio transmitter: 1 Connect the Lumen Radio transmitter to power and link it to your PC via an ethernet cable. 2 Right-click the 3 Select ‘Change adapter settings’ 18 icon and select ‘Open Network and Sharing Center’ Manual_R-2_170x113,3.book Page 19 Friday, February 20, 2015 4:14 PM 4 Select ‘Local Area Connection’ 5 Select ‘Internet Protocol Version 4 (TCP/IPv4)‘ and click ‘Properties‘ 19 Manual_R-2_170x113,3.book Page 20 Friday, February 20, 2015 4:14 PM 6 Type in an appropriate IP address and Subnet mask (e.g. 2.0.0.88 and 255.0.0.0 as shown below) and click ‘OK’. 7 Open the SGM Rail Light Configuration Tool, select the appropriate ethernet interface, and click ‘OK’ 20 Manual_R-2_170x113,3.book Page 21 Friday, February 20, 2015 4:14 PM USB dongle Follow the steps below to set up a network between your personal computer and the wireless Lumen Radio transmitter: 1 Connect the Lumen Radio transmitter to power and link it to your PC via a USB dongle (SGM uploader cable) 2 Open the SGM Rail Light Configuration Tool, select the appropriate serial interface, and click ‘OK’ 21 Manual_R-2_170x113,3.book Page 22 Friday, February 20, 2015 4:14 PM SGM Rail Light Configuration Overview Set Address Assign DMX addresses to individual fixtures. Max. 512 channels for R-2 White and max. 128 for RGBW (it is possible to assign several fixtures to one address). Up Click to scroll up. Down Click to scroll down. Send Click to send DMX address to fixture. Clear Click to stop fixtures from flashing when assigning DMX addresses. Unlink Disconnects fixture from Lumen Radio transmitter (DMX address is still assigned). Exit 22 Click to exit program. Manual_R-2_170x113,3.book Page 23 Friday, February 20, 2015 4:14 PM Interaction with R-2 Rail Light To establish connection between the wireless Lumen Radio transmitter and the R-2 Rail Light fixture(s), connect both to power and click the ‘Link’ button on the wireless transmitter When you have set your DMX address and you click ‘Send’, all active R-2 Rail Light fixtures will start flashing. To assign the chosen DMX address to a specific fixture, use the key pin tool and click the pin hole on the base of the fixture (see parts identification on page 10 for more details). The fixture will stop flashing and is now assigned to the chosen DMX address. To assign more fixtures to the same DMX address, simply click the pin hole on the desired number of fixtures. To stop the remaining fixtures from flashing, click ‘Clear’. If you want to assign a new DMX address to a pre-assigned fixture, simply overwrite it by clicking ‘Send’ and assign it to a new DMX address. Click ‘Unlink’ to unlink a fixture from an assigned DMX address. The fixture will still have the assigned DMX address, but it will not be active until you click the ‘Link’ button on the wireless Lumen Radio transmitter. 23 Manual_R-2_170x113,3.book Page 24 Friday, February 20, 2015 4:14 PM DMX Control Offset Click ‘Up’ / ‘Down’ or type in value to change offset. Adjustment sliders Adjust sliders to control light output. and intensity 24 Zero Set all sliders to 0. Full Set all sliders to 255. Manual_R-2_170x113,3.book Page 25 Friday, February 20, 2015 4:14 PM Service There are no user-serviceable components in the fixture. Do not open the R-2 Rail Light, as doing so is likely to damage the fixture. Consult your SGM dealer if the fixture operates abnormally, is defective or otherwise in need of service or repair. Upgrading the firmware We recommend that you keep your fixture’s firmware up-to-date. Visit http://www.sgmlight.com to download the latest firmware. Open SGM’s Rail Light Configuration Tool and select ‘Update firmware’ to upload the latest firmware. Select file Click and browse to select file. Upload Click to upload file. Force upload Click to force upload. If you upload software and one or more fixtures fail, and you have to try and upload the software again, the fixtures that have already adopted the initial software update will ignore the upload. Clicking Force upload forces these fixtures to accept the repeated software upload. 25 Manual_R-2_170x113,3.book Page 26 Friday, February 20, 2015 4:14 PM NOTE: To perform firmware updates, you need a Windows-based personal computer and a SGM USB 5-Pin-XLR upload cable (available from your SGM distributor). Cleaning To maintain optimal performance, regular cleaning is essential. Cleaning schedules will vary depending on the operating environment, and the installation should therefore be checked at frequent intervals within the first few weeks of operation to see whether cleaning is necessary. This procedure will allow you to assess cleaning requirements in your particular situation. If in doubt, consult your SGM dealer for a suitable maintenance schedule. Clean the R-2 Rail Light using a soft cloth dampened with a solution of water and a mild detergent. Do not use products that contain solvents, abrasives or caustic agents for cleaning, as they can cause damage to both hardware, cables and connectors. 26 Manual_R-2_170x113,3.book Page 27 Friday, February 20, 2015 4:14 PM DMX protocols R-2 RGBW 3 Channel Mode (Standard)1 Channel Name DMX value DMX percentage 1 Red 0 255 0,0% 100,0% 2 Green 0 255 0,0% 100,0% 3 Blue 0 255 0,0% 100,0% Default Description Info DMX Fader type value No RED > Maximum RED No GREEN > Maximum GREEN No BLUE > Maximum BLUE - - Fade - - Fade - - Fade 1. To ensure uniform color between products, 3 Channel Mode RGB features full color calibration (irrespective of current color setting) when you mix 2 or 3 colors. Adjusting 1 color does not activate full color calibration. 27 Manual_R-2_170x113,3.book Page 28 Friday, February 20, 2015 4:14 PM R-2 White (3000K/4000K) 1 Channel Mode (Standard) Channel 1 28 Name White DMX value 0 255 DMX percentage 0,0% 100,0% Default Description Info DMX Fader type value No Light > Maximum Light - - Fade Manual_R-2_170x113,3.book Page 29 Friday, February 20, 2015 4:14 PM Fixtures and accessories Included items User manual Pin key tool Ordering information R-2 RGBW, white coating, 13° ...................................................................................................................Order no: 84010103 R-2 RGBW, black coating, 13° ...................................................................................................................Order no: 84010104 R-2 W, 3000K, white coating, 25°...............................................................................................................Order no: 84010101 R-2 W, 3000K, black coating, 25°...............................................................................................................Order no: 84010102 R-2 W, 4000K, white coating, 25°...............................................................................................................Order no: 84010109 R-2 W, 4000K, black coating, 25°............................................................................................................... Order no: 84010110 Lumen Radio transmitter DMX ...................................................................................................................Order no: 80070229 Lumen Radio transmitter DMX/RDM ..........................................................................................................Order no: 80070230 SGM USB uploader cable .......................................................................................................................... Order no: 83062011 29 Manual_R-2_170x113,3.book Page 30 Friday, February 20, 2015 4:14 PM APPROVALS AND CERTIFICATIONS Conforms to................................................................. 1999/5/EC: R&TTE Directive (EN301489-1, EN301489-3, EN300328) Conforms to..................................................... 2006/95/EC: Low Voltage Directive (EN 60598-1, EN 60598-2-17, EN 62471) Conforms to.................................................................................................................................2011/65/EU: RoHS2 Directive RoHS The information in this document is subject to change without notice 30 Manual_R-2_170x113,3.book Page 31 Friday, February 20, 2015 4:14 PM User’s notes 31 Manual_R-2_170x113,3.book Page 32 Friday, February 20, 2015 4:14 PM SGM A /S · Sommer vej 23 · 8210 Aarhus V · Denmark Tel +45 70 20 74 00 · [email protected] · www.sgmlight.com