1
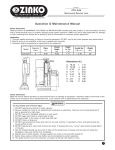
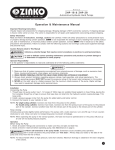
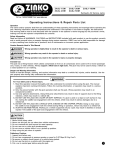
MODELS
ZSJ-15A3 & ZSJ-15A6
1-1/2 Ton Aluminum Racing Car Service Jacks
Toll Free: 1-800-579-8088 Web: www.zinko.com
Operating Instructions & Repair Parts List
Operation
The owner and/or operator shall have an understanding of these operating instructions and warnings before operating
the jack. Warning information shall be emphasized and understood. If the operator is not fluent in English, the instructions
and warning shall be read to and discussed with the operator in the operator's native language by the purchaser/owner,
making sure that the operator comprehends its contents.
Assembly Instructions
How to Assemble Complete Jack
Please take note before assembly of jack. After receiving the package, please check to make sure all accessories are
included and complete.
How to Put Pumping Handle Into Handle Socket
The pumping handle comes as a two-piece handle, which is included in the master shipping carton.
1. Remove hex head bolt of handle socket and put pump handle into the handle socket hole.
2. Connect with universal joint of release valve and tighten the bolt.
Operator Responsibility
It is the operator's responsibility to read and understand all of the following safety statements:
1.
2.
3.
4.
5.
6.
7.
8.
9.
This is designed for lifting vehicles and not for any other purpose.
The vehicle owner's manual should be consulted prior to jacking up of a vehicle.
Jack MUST BE USED ON SOLID, LEVEL GROUND. The wheels of the vehicle must be in a parallel position.
NO PERSON SHOULD REMAIN IN A VEHICLE THAT IS BEING JACKED UP.
When lifting a vehicle, be sure to place the center of the jack saddle right on the axle.
After lifting a vehicle, BE SURE TO PLACE SAFETY STANDS UNDER THE AXLES.
NO PERSON SHOULD BE UNDER A VEHICLE THAT IS SUPPORTED ONLY BY A JACK.
NEVER MOVE THE JACK WHILE IT IS SUPPORTING A VEHICLE.
When lowering a vehicle, make sure nobody is near or under the vehicle. Slowly lower vehicle with special
attention to the position of the jack saddle.
10. Safety valve is factory adjusted and no further adjustment is required.
11. While not in use, always keep the handle straight up and locked so that it won't fall.
12. Fully release hand brake before lifting vehicle.
Operating Instructions
Please clear up the air inside before starting operation of the jack.
1. Open the release valve by pumping.
2. Lower lifting arm to the lowest point and put the jack in the proper position, close the release valve by turning
clockwise, then pump. The car will raise up.
3. Release valve will be opened by turning handle counterclockwise and lifting arm will be lowered to the lowest position.
4. If necessary to add more hydraulic oil into the reservoir, use a Phillips head screwdriver to release bolt #62.
Use Esso SAE 10 hydraulic oil or equivalent.
To raise jack:
Close Release Valve
close
open
To lower jack:
Open Release Valve
Oil filler screw
Zinko Hydraulic Jack
Models: ZSJ-15A3 & ZSJ-15A6
1. USE THE JACK FOR LOADING UNDER RATED CAPACITY ONLY. Do not overload, otherwise a dangerous
situation may arise.
2. The jack should be used for lifting the car to change the tires only. SUPPORT A LOAD WITH JACK STANDS
ONCE THE LOAD HAS BEEN LIFTED. STAY CLEAR OF LIFTED LOADS.
3. Center the load on the jack saddle. Off center loads can damage the seals causing jack failure.
4. LIFT ONLY DEAD WEIGHT.
5. JACK IS TO BE USED BY PROFESSIONAL PERSONNEL ONLY. To prevent dangerous situations that may occur,
use by non-professional personnel is not recommended, especially children.
Filling/Bleeding the Hydraulic Oil
Tools required: #3 Phillips head screwdriver
8 mm Allen socket
#10 hydraulic oil
Instructions
_
Fill plug is the #3 Phillips head screw to the left of the pump piston on the back of the jack reservoir.
_
Bleed check the 8mm Allen socket plug on the top of reservoir to the left of the valve adjustment shaft.
1. Clean around both plugs.
2. Stand and support the jack on its nose.
3. Remove Phillips screw and fill reservoir to the top with hydraulic jack oil (#10). Then replace Phillips screw and lower
jack to the ground.
4. "Crack" the 8mm plug on the top.
5. Use the lower half of the jack handle to close the bleed valve, then pump the jack slowly. The pad should move up
slowly and oil should come out around the 8mm plug.
6. If the oil has air bubbles, open the 8mm plug a tiny bit more and continue to pump the jack SLOWLY for several
strokes. If you are still getting air, close the 8mm plug, stand jack on its nose again and top off oil through fill plug.
Repeat until air bubbles cease, then close both plugs.
7. Lower jack all the way, then pump pad up to the top while counting the strokes. If it takes 6 strokes to reach the top
(3 strokes for ZSJ-15A3), the oil is full and the air has been bled out.
8. Use for a few weeks and the recheck for air by repeating the full process.
NOTE: If you try to repair pieces inside 8mm plug hole, they are VERY easy to damage or lose. BE CAREFUL.
Maintenance and Cares
CHECK POINTS
CHECK ITEM
Arm
Functional condition - pump the jack to its full
lifting height with no load. Then check for
smooth action of the lift arm.
Lubricate pin and functional portions.
Replace distorted or damaged parts.
Front Wheel
Functional condition.
Lubricate functional portion.
Replace damaged or worn-out parts.
Rear Wheel
Functional condition.
Lubricate functional portion.
Replace damaged or worn-out parts.
Tighten loose bolts securely.
Power Unit
Proper oil level.
Oil leakage.
Supply oil if necessary (replace oil in the
reservoir at least once a year).
Replace packing.
Functional condition and loose.
Lubricate pin and functional portions.
Tighten loose bolts securely.
Replace damaged parts.
Handle
REMARKS
NOTE: 1) Oil for functional portion: lubricating oil.
2) Oil for jack: bearing oil TSO VG 10. Never use brake fluid or any other high viscosity or volatile oil.
Zinko Hydraulic Jack
Models: ZSJ-15A Series Parts Breakdown
Part No.
9040015A-01
9040015A-02
9040015A-03
9040015A-04
9040015A RV
9040015A-06
9040015A-07
9040015A-08
9040015A-09
9040015A-10
9040015A-11
9040015A-12
9040015A-13
9040015A-14
9040015A-15
9040015A-16
9040015A-17
9040015A-18
9040015A-19
9040015A-20
9040015A-21
9040015A-22
9040015A-23
9040015A-24
Description
Aluminum Base
Oil Cover
Piston Cylinder
Piston
Release Valve Assy
O-Ring P9
Steel Ball 8mm
C-Ring S20
Piston Cover
Piston Ext. Spring
*Back Seal P22
*O-Ring P22
Screw (H)
H-Spring
Brass Wash
Steel Ball 8mm
L-Spring
Steel Ball 5.5mm
Oil Screw
Lock Screw
Oil Net
*O-Ring G55
Saddle Base Axis (Long)
Hydraulic Cylinder
Part No.
9040015A-25
9040015A-26
9040015A-27
9040015A-28
9040015A-29
9040015A-30
9040015A-31
9040015A-32
9040015A-33
9040015A-34
9040015A-35
9040015A-36
9040015A-37
9040015A-38
9040015A-39
9040015A-40
9040015A-41
9040015A-42
9040015A-43
9040015A-44
9040015A-45
9040015A-46
9040015A-47
9040015A-48
Description
C-Ring S16
*O-Ring P30
*Back Seal P30
Left Frame
Bush
*O-Ring P12
Cylinder
Aluminum Bar (A6 only)
Handle (2 pc)
Spring Pin 5 (Long)
Handle Gear Base
Handle Base Screw
Handle Base
Piston Roll Wheel
Spring Pin 8
Handle Base Axis
Pull Rod Axis
Raise Arm's Axis
Turn Spring (Right)
Turn Spring (Left)
Screw M10-25
Rear Wheel Saddle
Rear Wheel Assy
Screw M6-8
Part No.
9040015A-49
9040015A-50
9040015A-51
9040015A-52
9040015A-53
9040015A-54
9040015A-55
9040015A-56
9040015A-57
9040015A-58
9040015A-59
9040015A-60
9040015A-61
9040015A-62
9040015A-63
9040015A-64
9040015A-65
9040015A-66
9040015A-67
9040015A-68
9040015A-69
9040015A-70
9040015A RP
9040015A DTS
Description
Screw Bush M6-8
Handle Bar
Screw M8-25
Washer 8-12
Washer 3/8
Link Rod Axis
Link Rod
Right Frame
C-Ring S19
Pull Rod
Cylinder Axis
Front Caster Wheel
Front Wheel Axis
Raise Arm
Link Rod Washer
Saddle Base
Nylon Washer
Saddle
Holder Axis
Saddle Base Axle
Screw Side H Bar
Saddle Rubber Pad
*Repair Parts Kit
Dirt Track Stabilizer
(optional)
Zinko Hydraulic Jack
Models: ZSJ 15A Series
REV 070308
Installing Dirt Track Stabilizer
The dirt track stabilizer is an optional plate that attaches to ZINKO models ZSJ-10A & ZSJ-15A series aluminum racing
car service jacks, and is intended for use on non-paved surfaces. It is made of aluminum and applicable to the jacks
shipped after May 1, 2000. The plate is not included with the jack and must be ordered separately.
P/N for ordering: 9040010A-DTS (ZSJ-10A)
9040015A-DTS (ZSJ-15A3 & ZSJ-15A6)
Weight: 5 lbs.
Assembly Tool and Part
1 - 5mm hex wrench and one drawing instruction.
2 - Bolts and washers.
Assembly Instructions
1. Remove plate and bolts from the shipping box.
2. Place the plate beneath the jack as the drawing direction.
3. Line up the pre-drilled holes on both the plate and the jack.
4. Screw in with hex bolts and washers by using the hex wrench provided.
NOTE: Use only the bolts provided to fit the threads.
Other bolts may damage the threads on the jack.
Disassembly for Storage
To remove the plate from the jack, unscrew
the bolts by using the hex wrench. Store the
plate and bolts, washers, and hex wrench in
the original shipping box.
Troubleshooting
PROBLEM
Jack Will Not Lift
Jack Lifts Only Part Way
POSSIBLE CAUSE
SOLUTION
1) Release valve not properly closed.
2) No oil in the system.
3) Delivery valve and/or bypass valve
malfunctioning (valve ball not properly seated.
4) Packing worn out or defective.
1) Tigthten securely.
2) Fill to prescribed level.
3) Clean to remove dirt or foreign matter and
replace oil.
4) Replace packing.
1) Oil level low or too high.
1) Fill or take excessive oil out.
1) Either of the following valves not
1) Inspect valves. Clean and adjust seat
Jack Lifts, But Will Not Hold functioning: a) suction valve, b) delivery valve,
surface.
Load
c) release valve, d) bypass valve.
2) Replace packing
2) Packing worn out or defective.
Jack Will Not Lower
Poor Lifting
Jack Will Not Lower
Completely
1) Release valve not opening.
1) Pump packing defective or valves
malfunctioning.
2) Dirty oil.
3) Air in hydraulic system.
1) Piston rod bent or marred.
2) Jack spring damaged.
3) Linksection warped or deformed due to
possible overloading.
1) Clean and adjust release valve.
1) Replace packing and/or clean valves.
2) Replace oil.
3) Purge air from system.
1) Replace piston rod.
2) Replace spring.
3) Replace the damaged parts.
If the above procedures do not correct the problem, contact your nearest ZINKO service facility. When submitting any jack or
equipment to be repaired, be sure to state the nature of the problem and indicate whether an estimate of the repair cost is needed.
(909)989-9526
(909)989-1724