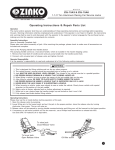
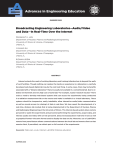
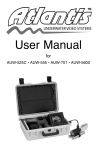
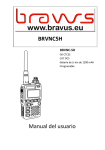
1
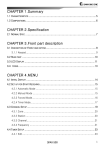
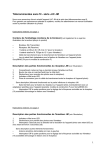
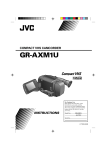
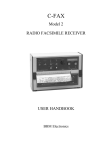
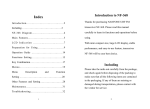
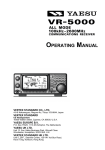
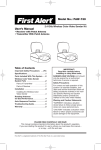
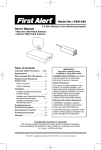
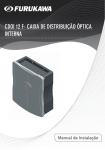
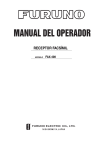
C-FAX
Model 3
RADIO FACSIMILE RECEIVER
USER HANDBOOK
BHM Electronics
CONTENTS
Introduction
3
Unpacking
3
Mounting
4
Connecting Power and Aerial
4
Connecting an External Receiver
5
Loading Paper
6
The Controls
7
Using the C-Fax
8
Sample Weather Maps
10
Weather Map Abbreviations
11
Detailed Description of the Controls
12
Care of the C-Fax
14
Trouble Shooting
15
Replacing the Fuse
15
Specifications
16
Wiring Connections
17
Frequency List
18
2
Introduction
The C-Fax radio facsimile receiver has been designed as an easy to use, reasonably priced
unit with low operating costs.
The materials and finishes used ensure durability and long life, and the small size enables
fitting in areas where space is at a premium.
The C-Fax uses standard fax paper as used in telephone fax machines. This paper is
generally available from any office supply shop or stationer.
Information contained in the weather maps received can be analysed to give useful insight
into the weather trends for your particular part of the world. This makes it a valuable tool for
those to whom the elements are important in their lifestyle or occupation. Useful books on
the interpretation of these maps are available through most larger book stores. After a little
practice you will find that quite reliable predictions can be made as to future weather
conditions.
Unpacking
Remove the unit from the packing and check that the following is included:
1 x C-Fax radio facsimile printer
1 x wall mounting bracket, fixed to rear of C-Fax
2 x rolls of thermal paper, 216mm by 30m
1 x power lead, 2m long with 4 pin plug
2 x spare fuses (2 amps)
1 x coaxial aerial lead, 2m long with BNC plug (internal receiver model only)
or
1 x audio lead, 2m long, 3.5mm to 3.5mm plug (external receiver model only)
1 x user handbook
1 x New Zealand and Australian weather fax schedule
3
Mounting the C-Fax
The C-Fax may be left free standing or wall mounted on the supplied bracket. To fix the
C-Fax to a wall, remove the mounting bracket from the rear of the C-Fax by taking out the
two screws holding it at the bottom. Screw the bracket to the wall, slide the C-Fax back onto
the bracket and replace the two bottom screws.
Connecting Power
Plug the power lead into the round 4 pin socket on the panel on the right side of the C-Fax.
The other end of the lead is connected to the power source, red wire to positive, black wire
to negative. The C-Fax can operate on a direct current (DC) voltage of from 12 to 15 volts
only.
Caution!
THE C-FAX MUST NOT BE CONNECTED DIRECTLY TO A 24V
SUPPLY. To run it on 24V DC a voltage reducer must be used.
The power lead from the C-Fax must not be connected directly to the
mains power supply (110V or 230V AC). For use with the mains
supply a suitable power supply must be used which can supply 12V
DC at 2 amps.
Connecting an Aerial (for an internal receiver)
The aerial lead plugs into the BNC socket on the side panel. At the other end the center
conductor of the coaxial cable should be connected to an outside wire aerial. This should
consist of a length of wire approximately 10 metres long (30 feet). The wire should run
horizontally and be supported at each end by insulators, with a lead taken from one end to
the C-Fax. The aerial is not critical, try any existing high frequency aerial first.
Caution!
Never connect the C-Fax to an aerial used by a radio transmitter.
Severe damage could occur to the receiver in the C-Fax.
The outside shield on the end of the aerial cable can be connected to an earth, such as the
hull of a metal boat or a metal rod driven into the ground as close as practical to the C-Fax.
This earthing is not absolutely necessary but can be of help in reducing interference on the
printed pictures.
4
Using an External Receiver
An external receiver may be used with the C-Fax and is required if your model has no
internal receiver. It must be a crystal controlled or synthesised SSB (single side band) type,
with LSB (lower side band) mode.
Connection should be made from either the speaker output or line level output of the
external receiver to the audio socket on the side panel of the C-Fax. This input will accept a
wide range of signal levels from 1V to 5V RMS. Putting a plug into the external receiver
socket automatically overrides the internal receiver, if present.
Switch the external receiver to LSB and tune it to 1.9 kHz above the listed frequency. For
example, to listen to a channel transmitting on 9459 kHz tune the receiver to 9460.9 kHz.
5
Loading Paper
The C-Fax uses standard telephone fax machine paper, 216mm wide. The recommended
paper length is 30m, longer rolls may not fit.
To load a roll of paper into the C-Fax, open the two catches located each side on the front.
Pull the lower edge of the catch away from the C-Fax and then unhook the upper edge. The
lower section of the case will then open down. Remove the empty roll by pushing it to the
right against the spring and then pulling it up and out.
Insert a new roll of paper by pushing the right end against the spring and then pushing the
left end down. Make sure the outside surface of the paper roll is against the print head, as
shown in the illustration below. This is the side of the paper that the C-Fax prints on. Pull
the end of the paper up and out the front before closing the door.
To close the paper compartment, push the cover closed until both parts of the catches
interlock. Then hook the lower catch over the upper part and push the lower catch down
until it clicks into place.
6
The Controls
2 3 4 5 6 7 8
9
10
1
11
12
13
14
Brief Description of the Controls
1
2
3
4
5
6
7
8
9
10
11
12
13
14
Audio On/Off/Picture Align
Up - received signal audible
Centre - no audio
Down - hold down to manually align picture
Align Indicator - used for manual align
Fast Paper Feed
Paper Out Indicator
Stop/Auto/Start
Up - receiver only, no printing
Centre - automatic start/print/stop
Down - continuous printing
Run Indicator - printer is operating
Power On/Off
Data Indicator - printing signal
Channel Display (internal receiver model only)
Channel Selection Buttons (internal receiver model only)
Fuse
Power Input Socket
External Receiver Input
Aerial Input Socket (internal receiver model only)
7
Using the C-Fax
Switching On
Make sure power plug and aerial connections have been made and that a roll of paper is
properly inserted in the C-Fax, as described on pages 4 to 7.
Move the power switch (number 7 in the picture on the previous page) down. If your C-Fax
has an internal receiver the channel display (9) should show the current channel number,
location and frequency the C-Fax is listening to.
for example:
3 Auckland
ZKLF 13550.5kHz
This indicates that the receiver is set to channel 3, which transmits from Auckland on a
frequency of 13550.5 kHz (kilohertz) using the call sign ZKLF.
Selecting a Channel
To change the channel use the two channel selection buttons (10) to move up or down the
list. Refer to the frequency list starting on page 18 to find the channel number of a station
transmitting near you, then change to this channel. If you are using an external receiver you
must manually enter a frequency into your receiver.
The yellow data light (8) should be on or flickering. This indicates a signal is present.
If it is not already on, turn on the audio by switching the Audio switch (1) up. You should be
able to hear the received signal.
If you hear a continuous tone, this is generally a resting tone, a signal many stations send
between maps. If you can hear a signal quickly changing between two tones then a picture is
being sent. Try all the different frequencies for your local station to find the signal which
sounds loudest and has the least static in it.
Printing a Picture
Set the Start switch (5) to the middle position for automatic stop and start.
When a picture is sent it is preceded by a start signal, telling the receiver to start printing.
This is heard as a tone lasting from 5 to 10 seconds. Next the transmitting station sends the
alignment signal which synchronises the picture being sent with that being printed. This
usually sounds as two tones, a very short tone and a longer half second tone, repeated for 30
seconds. Following this is the actual picture, which is two tones alternating randomly, one
tone represents the white parts of the picture, the other tone is used for the black parts. The
8
picture generally takes about 15 minutes to send. Finally the stop signal is sent. This is 5
seconds of alternating tones followed by 10 seconds of a steady tone.
You may turn off the audio by putting the Audio switch (1) back to the middle position. It is
only required for determining the signal quality of a channel.
While the C-Fax is left on Automatic it will start and stop printing whenever a picture is
received. You will generally not need to do anything else.
If for some reason the C-Fax misses the stop signal, for example if the radio signal becomes
very noisy or fades, it will continue to print even after the picture has finished. A built in
timer will automatically stop the C-Fax printing after about 40 minutes if it hasn't had a stop
signal, minimising paper wastage.
Useful Hints
If you switch on the C-Fax and the start tone has passed and a picture is being printed,
switch the Stop/Auto/Start switch down to start the printer, then back to Auto. Let it print for
about 10 seconds then fast feed the paper out a little to see where the edge of the picture is
positioned. Manual alignment can now be carried out as described on page 11.
If the printer is started after the start tone but during the phasing pulse period (during the
first 10 seconds or so) it will automatically align the picture.
Before tearing off the paper fast feed out about 5cm so as not to leave any of the printout
inside the C-Fax.
Tearing off the paper is best done in a downwards direction against the edge of the metal
strip.
9
Sample Weather Maps
Australia Significant Weather Prognosis
Australia Mean Sea Level Prognosis
Darwin Tropics Significant Weather Prognosis
Example of a noisy signal
10
Indian Ocean Mean Sea Level Prognosis
Weather Map Abbreviations
.
These are some of the common abbreviations you will see on weather maps
Map areas
ASIA
IO
NPAC
NREG
NZ
SPC
SWP
TNZ
50°N to 50°S, 100°E to 180°
Indian Ocean
50°N to 50°S, 160°E to 110°W
Equator to 50°S, 140°E to 140°W
New Zealand
South Pacific (Australia to South America)
South West Pacific (Australia to Tahiti)
Tasman Sea and New Zealand
Map Types
ANAL
FCST
MAR WX
NEPHANAL
PROG
SIG WX
TEMP
Analysis
Forecast
Significant Marine Weather
Nephanalysis (analysis of cloud information taken from satellite
pictures)
Prognosis
Significant Aviation Weather
Temperatures
MSL
700MB
500MB
250MB
Mean Sea Level
Height of 700 millibar pressure level (10000 feet)
Height of 500 millibar pressure level (18400 feet)
Height of 250 millibar pressure level (34000 feet)
Levels
Time
GMT
Greenwich Mean Time
UTC
Coordinated Universal Time
(H+number) Number is number of hours ahead for forecast
11
Detailed Description of the Controls
Numbers in brackets refer to the picture on page 6
Audio On/Align switch (1) and Align light (2)
When this switch is placed in the up position then audio from the receiver can be heard. This
can be used to listen to the quality of the radio reception on any of the channels. Placing the
switch back in the center position turns off the sound.
If a map printout is started manually or if the synchronising signal at the beginning of a
transmission is missed the picture may be out of alignment. This shows up as a picture
starting part way along the paper instead of at the left side.
To manually align a picture:
Look at the picture being printed
Find the normal left hand edge of the picture
Note where this is on the 0-7 scale on the front panel
Hold down the align switch (3)
Count the number of flashes of the align light (4)
When this is equal to the number on the scale release the align switch promptly
The rest of the picture should be correctly aligned
In the sample map below you would need to hold the align switch for 4 flashes of the align
light to realign the left edge.
0 | 1 | 2 | 3 | 4 | 5 | 6 | 7 |
Fast Paper Feed switch (3)
This switch is used to feed the paper out at a faster than normal rate. This allows a
completed map to be cleared from the C-Fax printer before tearing it off.
It is also useful for the manual align procedure described above, by feeding out some of the
picture so it is possible to check the alignment sooner.
Paper Out indicator light (4)
When the end of the paper roll is reached this red light will flash to indicate the C-Fax is out
of paper, and the C-Fax will stop printing. There is normally a warning stripe printed on
most types of paper near the end which shows during the last metre or two to warn that the
paper is running out.
12
Note: Some brands of paper are glued to the center core, in this case the paper out
light will not operate as the paper remains in the print area. If you find this
happening try changing the roll within a few maps of the warning stripe appearing.
Stop/Auto/Start switch (5) and Run light (6)
In the up position the printer is off. Only the receiver is working. The green run light is off.
In the centre position the printer automatically starts and stops printing pictures using the
received start and stop signals. The run light is on during printing.
In the down position the printer starts and prints continuously. The run light remains on. If
you have missed the start signal of a picture moving the switch down will start the picture
printing. Moving the switch back to Auto lets the picture print until the normal stop signal is
received. Starting a picture manually normally requires it to be manually aligned on the
paper, see the Align section on the previous page.
Power switch (7)
In the up position the C-Fax is turned off. In the down position the C-Fax is turned on. The
channel display back lighting turns on and the last used channel is shown.
Data light (8)
The yellow data light turns on when a signal is received. It will normally flicker when a
picture is being sent.
13
Care of the C-Fax
There are no parts to be lubricated.
When a new roll of paper is fitted remove any paper scraps or dust from the paper
compartment. At this time also check and clean the rubber pressure roller if necessary. The
roller should only be cleaned with alcohol.
If a printed picture has vertical light stripes through it the most likely cause is dirt on the
print head. If this problem appears open the paper compartment and check the print head,
which is mounted on a horizontal metal bar at the top of the paper compartment. Near the
top of the print head (about 5mm above the line of black rubber) is a thin black line, this is
the thermal print line. Dirt on this print line causes the reduced print density. This should be
gently wiped clean with alcohol (methylated spirits or isopropyl alcohol) on a clean lint free
cloth or paper tissue.
Avoid excessive cleaning of the print head or the use of abrasive substances.
Print Line
This problem can be kept to a minimum by taking care when fitting paper rolls that the
outside layer of paper is clean and by not touching the print head.
Some brands of thermal paper leave behind a white chalky residue. If this builds up it can
cause printing problems. The easiest way to remove it is to run the edge of a finger nail
along the print line and scrape it clean. If the problem reoccurs we suggest trying a different
brand of paper.
14
Trouble Shooting
Unit is dead - no lights
Check Power switch is on (down)
Power lead is connected
Fuse on side panel is intact
Power polarity, red wire of lead is positive, black is negative
Voltage to the C-Fax is correct, between 12 and 15V
If all these check ok, or if the fuse fails again after replacement, seek technical
assistance.
No Printing
Check Paper Out light is not flashing, if it is replace the paper
Paper is fitted correctly
Run switch is in Auto or Start position
Replacing the Fuse
The fuse on the side panel can be removed for checking or replacement by unscrewing the
cap anticlockwise.
This fuse protects some very expensive components inside the C-Fax. It must only be
replaced with one of the same rating. The warranty is void if a heavier fuse is used.
The fuse is the standard small size, 20 x 5mm, 2A current rating.
15
Specifications
RECORDING SYSTEM
Printing by static thermal head on thermal paper
RECORDING PAPER
High sensitivity thermosensitive
INDEX OF COOPERATION
576
SCANNING SPEED
120 lines per minute
RESOLUTION
8 dots/mm
START AND STOP
Automatic or manual
PHASING
Automatic or manual
DATA TONES
White 1500Hz Black 2300Hz
RECEIVING SYSTEM
Double conversion superheterodyne
NUMBER OF CHANNELS
up to 203 pre-programmed
FREQUENCY RANGE
50kHz to 30MHz
RECEPTION MODE
F4
RECEIVE IF FREQUENCY
45MHz & 455kHz
BFO FREQUENCY
453.1 kHz
SENSITIVITY
2 microvolts for useable copy
DIMENSIONS
322mm wide x 250mm high x 95mm deep
WEIGHT
Approx. 4kg
MOUNTING POSITIONS
Vertical or horizontal, free standing or on
bracket supplied
POWER SUPPLY
12 to 15V DC
POWER CONSUMPTION
12W when printing
OPTIONS
230V AC to 12V DC Power Supply
NOTE:
All effort will be made to supply the equipment as per the
specifications, however we reserve the right to change any
of the above details without notice.
16
Wiring Connections
Power
Supplied via a 4 pin round line socket, standard threaded locking collar.
Side Panel Power
+
3
2
4
1
-
pin 1 unused
pin 2 negative (black)
pin 3 positive (red)
pin 4 unused
Power supply 12 to 15V DC at 1.5A, 12W maximum
Audio In
Standard 3.5mm mono audio plug for external receiver.
Center is signal, outside is signal return.
Level:100mV to 3V RMS
17
Frequency list for the C-Fax
Channel
1 Auckland
2 Auckland
3 Auckland
4 Auckland
5 Melbourne
6 Melbourne
7 Melbourne
8 Melbourne
9 Melbourne
10 Darwin
11 Darwin
12 Darwin
13 Darwin
14 Darwin
15 Casey
16 Casey
17 Bangkok
18 Bangkok
19 New Delhi
20 New Delhi
21 St Denis
22 St Denis
23 Tai-pei
24 Tai-pei
25 Tai-pei
26 Tai-pei
27 Tai-pei
28 Tai-pei CNA
29 Tai-pei CNA
30 Tai-pei CNA
31 Tai-pei CNA
32 Tai-pei CNA
33 Tai-pei CNA
34 Hong Kong
35 Beijing
36 Beijing
37 Beijing
38 Beijing
39 Beijing
40 Beijing
41 Beijing NMEFC
42 Beijing NMEFC
43 Beijing NMEFC
44 Shanghai
45 Shanghai
46 Shanghai
47 Shanghai
48 Shanghai
49 Kyodo News S.
50 Kyodo News S.
51 Kyodo News J.
52 Kyodo News J.
53 Kyodo News J.
54 Kyodo News J.
55 Kyodo News J.
56 Kyodo News J.
57 ChuoFisheries
58 Tokyo JMH
59 Tokyo JMH
60 Tokyo JMH
Frequency
5807.0
9459.0
13550.5
16340.1
2628.0
5100.0
11030.0
13920.0
20469.0
5755.0
7535.0
10555.0
15615.0
18060.0
7470.0
11455.0
7396.8
17520.0
7403.0
14840.0
8176.0
16335.0
4616.0
5250.0
8140.0
13900.0
18560.0
9430.0
13766.0
14685.0
15878.0
19680.0
22850.0
16904.0
5526.9
8121.9
10116.9
14366.9
16025.9
18236.9
8461.9
12831.9
16903.9
3241.0
5100.0
7420.0
11420.0
18940.0
16035.0
17430.0
4316.0
8467.5
12745.5
16971.0
17069.6
22542.0
16907.5
3622.5
7305.0
9970.0
kHz
kHz
kHz
kHz
kHz
kHz
kHz
kHz
kHz
kHz
kHz
kHz
kHz
kHz
kHz
kHz
kHz
kHz
kHz
kHz
kHz
kHz
kHz
kHz
kHz
kHz
kHz
kHz
kHz
kHz
kHz
kHz
kHz
kHz
kHz
kHz
kHz
kHz
kHz
kHz
kHz
kHz
kHz
kHz
kHz
kHz
kHz
kHz
kHz
kHz
kHz
kHz
kHz
kHz
kHz
kHz
kHz
kHz
kHz
kHz
Call
sign
ZKLF
ZKLF
ZKLF
ZKLF
AXM31
AXM32
AXM34
AXM35
AXM37
AXI32
AXI33
AXI34
AXI35
AXI36
VLM
VLM
HSW64
HSW61
ATP57
ATV65
FZR81
FZS63
BMB
BMB
BMB
BMB
BMB
3MA34
3MA26
3MA25
3MA24
3MA23
3MA36
BAF6
BAF36
BAF4
BAF8
BAF9
BAF33
3SD
3SD
3SD
BDF
BDF
BDF
BDF
BDF
9VF252
9VF252
JJC
JJC
JJC
JJC
JJC
JJC
JFA
JMH
JMH2
JMH3
18
Location/Country
Auckland,New Zealand
Melbourne,Australia
Darwin,Australia
Casey,Antarctica
Bangkok,Thailand
New Delhi,India
Saint Denis,Reunion
Tai-pei,Taiwan
Central News Agency
Tai-pei,Taiwan
Hong Kong
Beijing,China
Shanghai,China
Kyodo News,Singapore
Kyodo News,Japan
Chuo Fisheries,Japan
Tokyo,Japan
61 Tokyo JMH
62 Tokyo JMH
63 Tokyo JMH
64 Tokyo Radio
65 Tokyo Radio
66 Tokyo Radio
67 Tokyo Radio
68 Tokyo Radio
69 Tokyo Radio
70 Seoul
71 Seoul
72 Seoul
73 Seoul
74 Seoul
75 Kodiak
76 Kodiak
77 Kodiak
78 Kodiak
79 Iqaluit
80 Iqaluit
81 Inuvik
82 Vancouver
83 Vancouver
84 Vancouver
85 Vancouvr
86 Honolulu
87 Honolulu
88 Honolulu
89 Honolulu
90 Pt. Reyes
91 Pt. Reyes
92 Pt. Reyes
93 Pt. Reyes
94 Pt. Reyes
95 Valparaiso
96 Valparaiso
97 Valparaiso
98 Marambio
99 Marambio
100 Marambio
101 P. Belgrano
102 P. Belgrano
103 RioDeJaneiro
104 RioDeJaneiro
105 New Orleans
106 New Orleans
107 New Orleans
108 Elkhorn
109 Elkhorn
110 Elkhorn
111 Elkhorn
112 Elkhorn
113 Boston
114 Boston
115 Boston
116 Boston
117 Halifax
118 Halifax
119 Halifax
120 Halifax
121 Charlottetwn
122 Charlottetwn
123 Maritime Air
124 Maritime Air
125 Maritime Air
13597.0
18220.0
23522.9
4316.0
8467.5
12745.5
16971.0
17069.5
22542.0
5835.0
5857.5
7433.5
9165.0
13570.0
2054.0
4298.0
8459.0
12412.5
3253.0
7710.0
8457.8
2754.5
4268.0
6456.0
12753.0
9982.5
11090.0
16135.0
23331.5
4346.0
8682.0
12730.0
17151.2
22527.0
4228.0
8677.2
17144.4
2401.0
4807.0
9951.0
5705.0
12764.0
12665.0
16978.0
4317.9
8503.9
12789.9
3232.0
5908.0
6906.0
11122.0
19327.0
4235.0
6340.5
9110.0
12750.0
4271.0
6496.4
10536.0
13510.0
4616.0
6915.1
4618.0
6917.0
7710.0
kHz
kHz
kHz
kHz
kHz
kHz
kHz
kHz
kHz
kHz
kHz
kHz
kHz
kHz
kHz
kHz
kHz
kHz
kHz
kHz
kHz
kHz
kHz
kHz
kHz
kHz
kHz
kHz
kHz
kHz
kHz
kHz
kHz
kHz
kHz
kHz
kHz
kHz
kHz
kHz
kHz
kHz
kHz
kHz
kHz
kHz
kHz
kHz
kHz
kHz
kHz
kHz
kHz
kHz
kHz
kHz
kHz
kHz
kHz
kHz
kHz
kHz
kHz
kHz
kHz
JMH4
JMH5
JMH6
JJC
JJC
JJC
JJC
JJC
JJC
HLL2
HLL2
HLL2
HLL2
HLL2
NOJ
NOJ
NOJ
NOJ
VFF/VFR
VFF/VFR
VFA
CKN
CKN
CKN
CKN
KVM70
KVM70
KVM70
KVM70
NMC
NMC
NMC
NMC
NMC
CBV
CBV
CBV
LSB
LSB
LSB
LOR
LOR
PWZ33
PWZ33
NMG
NMG
NMG
AFS
AFS
AFS
AFS
AFS
NMF
NMF
NMF
NMF
CFH
CFH
CFH
CFH
XL1763
XL1763
CZW
CZW
CZW
19
Tokyo Radio,Japan
Seoul,South Korea
Kodiak,Alaska,USA
Iqaluit & Resolute
Canada
Inuvik,Canada
Vancouver,Canada
Honolulu,Hawaii
Pt.Reyes,California,USA
Valparaiso Radio,Chile
Marambio,Argentina
Puerto Belgrano,Argentina
Rio de Janeiro,Brazil
New Orleans,Louisiana,USA
USAF Elkhorn,USA
Boston,Massachusetts,USA
Halifax,Nova Scotia,Canada
Charlottetown Radio,Canada
Maritime Air Group,Canada
126
127
128
129
130
131
132
133
134
135
136
137
138
139
140
141
142
143
144
145
146
147
148
149
150
151
152
153
154
155
156
157
158
159
160
161
162
163
164
165
166
167
168
169
170
171
172
173
174
175
176
177
178
179
180
181
182
183
184
185
186
187
188
189
190
Maritime Air
Bracknell
Bracknell
Bracknell
Bracknell
Bracknell
Northwood
Northwood
Northwood
Northwood
Hamburg
Hamburg
Hamburg
Skamlebaek
Skamlebaek
Skamlebaek
Skamlebaek
Rota
Rota
Rota
Rota
Rota
Rome
Rome
Rome
Athens
Athens
Ankara
Ankara
Cairo
Cairo
Moscow
Moscow
Moscow
Moscow
Moscow
Moscow
Moscow
Murmansk
Murmansk
Murmansk
Murmansk
Arkhangelsk
Arkhangelsk
Arkhangelsk
Khabarovsk
Tashkent 1
Tashkent 1
Tashkent 1
Tashkent 1
Tashkent 1
Tashkent 1
Tashkent 2
Tashkent 2
Tashkent 2
Tashkent 2
Tashkent 2
Dakar
Dakar
Dakar
Cape Naval
Cape Naval
Cape Naval
Cape Naval
Nairobi
14626.0
2618.5
4610.0
8040.0
14436.0
18261.0
2618.5
4610.0
8040.0
11086.5
3855.0
7880.0
13882.5
5850.0
9360.0
13855.0
17510.0
7595.2
9045.0
9050.2
10542.0
15790.0
4777.5
8146.6
13597.4
4481.0
8105.0
3377.4
6790.0
4526.0
10123.0
3830.0
5008.0
6987.0
7695.0
10980.0
11617.0
12961.0
5336.0
6445.5
7908.8
10130.0
3657.0
5347.0
7762.0
3250.0
3690.0
4365.0
5890.0
7570.0
9340.0
14982.5
3280.0
5285.0
8083.0
9150.0
13947.0
4790.5
13667.5
19750.0
4014.0
7508.0
13538.0
18238.0
9043.0
kHz
kHz
kHz
kHz
kHz
kHz
kHz
kHz
kHz
kHz
kHz
kHz
kHz
kHz
kHz
kHz
kHz
kHz
kHz
kHz
kHz
kHz
kHz
kHz
kHz
kHz
kHz
kHz
kHz
kHz
kHz
kHz
kHz
kHz
kHz
kHz
kHz
kHz
kHz
kHz
kHz
kHz
kHz
kHz
kHz
kHz
kHz
kHz
kHz
kHz
kHz
kHz
kHz
kHz
kHz
kHz
kHz
kHz
kHz
kHz
kHz
kHz
kHz
kHz
kHz
CZW
GFE25
GFA22
GFA23
GFE23
GFE24
GYA
GYA
GYA
GYA
DDH3
DDK3
DDK6
OXT
OXT
OXT
OXT
AOK
AOK
AOK
AOK
AOK
IMB51
IMB55
IMB56
SVJ4
SVJ4
YMA20
YMA20
SUU36
SUU2
Bracknell,United Kingdom
Northwood,United Kingdom
Hamburg/Pinneburg,Germany
Skamlebaek,Denmark
US Navy,Rota,Spain
Rome,Italy
Athens,Greece
Ankara,Turkey
Cairo,Egypt
Moscow,Russia
RCC76
RDD78
RBW41
RBW48
RVZ73
RSW71
RGH77
RBX70
RBV70
RPJ78
RBV78
RBX72
RCH72
RBV76
RBX70
RBX71
RIJ75
RCH73
ROM5
6VU23
6VU73
6VU79
ZSJ
ZSJ
ZSJ
ZSJ
5YE1
20
Murmansk,Russia
Arkhangelsk,Russia
Khabarovsk,Russia
Tashkent,Uzbekistan
Tashkent,Uzbekistan
Dakar,Senegal
Cape Naval,South Africa
Nairobi,Kenya
191
192
193
194
195
196
197
198
199
200
Nairobi
Nairobi
Nairobi
Nairobi
Nairobi
Test 1750kHz
Test 3.5MHz
Test 7.0MHz
Test 14.0MHz
Test 28.0MHz
12315.0
15525.0
16315.0
17365.0
22867.0
1750.0
3500.0
7000.0
14000.0
28000.0
kHz
kHz
kHz
kHz
kHz
kHz
kHz
kHz
kHz
kHz
5YE2
5YE9
5YE6
5YE3
5YE7
test
test
test
test
test
Receiver test frequencies
21
Manufactured by
BHM Electronics
Invercargill
New Zealand
Postal Address: PO Box 787, Invercargill
Delivery: 287 Dee Street, Invercargill
Phone: 0-3-218 3495
Fax: 0-3-218 3494
International Phone: +64 3 218 3495
International Fax: +64 3 218 3494
E-mail: [email protected]
Web: bhmelectronics.co.nz
22