1
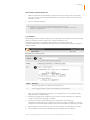
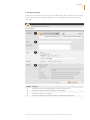
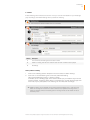
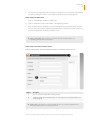
User Manual Online meetings made simple www.ntrglobal.com/ntrmeeting NTRmeeting 2 Table of contents NTRmeeting Account5 1. Registration............................................................................................................................... 5 2. Login.......................................................................................................................................... 5 3. Settings...................................................................................................................................... 6 NTRmeeting Meetings in general 7 1. NTRmeeting meeting types....................................................................................................... 7 1.1 Meeting type “Private”....................................................................................................... 7 1.2 Meeting type ‘Public’......................................................................................................... 7 1.3 Permanent meeting rooms............................................................................................... 7 2. Access and linking to a meeting................................................................................................ 8 NTRmeeting Administration 9 1. My NTRmeeting......................................................................................................................... 9 1.1 Planned meeting...................................................................................................................... 9 1.2 Quick links............................................................................................................................... 9 1.3 Connectivity test...................................................................................................................... 9 How to start the connectivity test......................................................................................... 10 2. My Meetings............................................................................................................................ 11 2.1 Manage meetings.................................................................................................................. 11 2.2 Meeting details...................................................................................................................... 12 2.2.1 Change meeting data......................................................................................................... 13 2.2.2 List of participants............................................................................................................... 13 How to create a new participant without using the address book........................................ 14 How to process existing participants................................................................................... 14 How to delete a participant from the list.............................................................................. 15 2.2.3 Invitations........................................................................................................................... 15 2.2.4 Upload presentations and files........................................................................................... 16 How to upload presentations/files to the server................................................................... 16 How to delete a presentation/file from the server................................................................ 17 2.2.5 Ending a meeting................................................................................................................ 17 2.2.6 Deleting a meeting.............................................................................................................. 17 2.3 Set up a new meeting............................................................................................................ 18 How to set up a new meeting.............................................................................................. 19 How to set up a permanent meeting room.......................................................................... 19 How to set up a meeting with several moderators............................................................... 19 2.4 Archive................................................................................................................................... 20 Valid from January 2009. Subject to change without notice. For more information visit www.ntrglobal.com/ntrmeeting NTRmeeting 3 How to publish a meeting.................................................................................................... 20 2.5 Address book......................................................................................................................... 21 How to import your contact data from an address book application.................................... 21 How to export your address book........................................................................................ 22 How to set up a new contact / change a contact................................................................. 22 3. Settings........................................................................................................................................ NTRmeeting web meeting display 23 1. Menu bar................................................................................................................................. 24 1.1 Meeting status....................................................................................................................... 24 1.2 Camera and microphone....................................................................................................... 24 1.3 Menu point “Meeting”............................................................................................................. 25 1.4 Menu point “Tools”................................................................................................................. 25 1.4.1 Recording........................................................................................................................... 25 How to start a recording...................................................................................................... 26 1.4.2 Voting................................................................................................................................. 26 How to start a new survey........................................................................................................... 27 How to publish a survey...................................................................................................... 27 How to start a saved survey or / restart* voting . ................................................................ 27 1.5 Menu point “Settings”............................................................................................................ 27 2. Symbols bar............................................................................................................................. 28 2.1 Connection speed.................................................................................................................. 28 2.3 Meeting time.......................................................................................................................... 29 3. List of participants.................................................................................................................... 29 How to change the lobby status of several participants...................................................... 30 3.2 Invite new participants........................................................................................................... 30 3.3 Feedback............................................................................................................................... 31 4. Files......................................................................................................................................... 32 How to make new files available for upload........................................................................ 32 5. Presentation display area........................................................................................................ 33 5.1 Presentations......................................................................................................................... 33 How to use the whiteboard.................................................................................................. 34 5.1.2 Pointer................................................................................................................................ 34 5.1.3 PDF export......................................................................................................................... 34 How to use NTRmeeting screen-sharing............................................................................. 35 5.3 Chat....................................................................................................................................... 36 How to write to selected participants................................................................................... 36 6. Permanently visible chat.......................................................................................................... 36 7. Footer menu............................................................................................................................ 37 7.1 Switching the presentation display area................................................................................ 37 7.2 Messages.............................................................................................................................. 37 7.3 Co-browsing.............................................................................................................................. How to use NTRmeeting co-browsing..................................................................................... Valid from January 2009. Subject to change without notice. For more information visit www.ntrglobal.com/ntrmeeting NTRmeeting 4 Help with problem cases 38 1. Technical requirements........................................................................................................... 38 1.1 Requirements for an NTRmeeting web meeting .................................................................. 38 2. Problems with the account...................................................................................................... 38 2.1 I do not receive a confirmation e-mail after registration......................................................... 38 2.2 I forgot the password to my account...................................................................................... 39 How to create a new password........................................................................................... 39 3. Connection problems............................................................................................................... 39 3.1 The connection is disrupted after a certain period of time..................................................... 39 3.2 I receive a warning message about my connection settings................................................ 39 4. Audio problems........................................................................................................................ 39 4.1 I hear an echo of my voice, or of another participant, in the meeting................................... 39 4.2 Audio transfer is delayed....................................................................................................... 40 Valid from January 2009. Subject to change without notice. For more information visit www.ntrglobal.com/ntrmeeting NTRmeeting 5 Chapter I NTRmeeting Account To be able to host web meetings with NTRmeeting you need an NTRmeeting Account. The steps to get an account and log in to NTRmeeting are described in this chapter. 1. Registration Registration with NTRmeeting is needed to be able to host NTRmeeting web meetings. After registration you have access to a personal NTRmeeting Account which allows managing the meetings and other configurations. How to register with NTRmeeting 1 Go to the NTRmeeting website at www.NTRmeeting.com. Click on “Free Trial“. 2 Complete the displayed form and then click on “Create an account”. 3 You will then receive an e-mail from NTRmeeting. Click on the link in this e-mail. 4 Enter a secure password for your NTRmeeting Account (minimum of 6 digits, including numbers and letters). Then click on “Save”. 2. Login How to log in to your account 1 Go to the NTRmeeting website at www.NTRmeeting.com and click on “NTRmeeting login”. Number Description 1 Click on “NTRmeeting Login” and enter your e-mail and password. 2 To join a meeting just enter the meeting number. Valid from January 2009. Subject to change without notice. For more information visit www.ntrglobal.com/ntrmeeting NTRmeeting 6 2 Enter your e-mail address and password in the respective fields. 3 Click on “Login”. You are now logged in and are taken to your personal “My NTRmeeting” page. 3. Settings After registering and logging in on www.NTRmeeting.com you can configure your account or make changes to your data and/or password. Number 1 Description Change your contact data, such as telephone number and e-mail address How to change your settings 1 Click on the “Settings” tab. 2 Select which settings you want to make. 3 Make the changes. 4 Click on “Save”. Valid from January 2009. Subject to change without notice. For more information visit www.ntrglobal.com/ntrmeeting NTRmeeting 7 Chapter lI NTRmeeting Meetings in general 1. NTRmeeting meeting types The various NTRmeeting meeting types differ in terms of the number of participants and in the manner in which these participants join the meeting. 1.1 Meeting type “Private” In the meeting type “Private” you create a list of participants in which each participant receives a permanent participant ID and a password. The participant can only join the meeting with this ID and password. He can also use the link in his invitation e-mail, which already contains his ID and password. In addition to the list of participants, you can also invite a participant directly from the meeting (see “Invite new participant”). 1.2 Meeting type ‘Public’ Meetings of the meeting type “Public” don’t require passwords or participant names. You can also create a list of participants prior to the start of the meeting and send invitations with a link to the meeting to the participants. In addition, you can invite a participant directly from the meeting console when a meeting is in progress (see “Invite new participant”). The meeting type “Public” is specifically designed for the demands and requirements of a webinar (e.g. e-learning or training session) and is suitable for hosting meetings with several hundred participants. 1.3 Permanent meeting rooms Meetings can be created for duration of up to 24 hours. Permanent meeting rooms, however, are characterized by the fact that they have no defined end. Any meeting can be set up in a permanent meeting room by checking the “Permanent” checkbox when creating the meeting (see “How to set up a permanent meeting room”). Valid from January 2009. Subject to change without notice. For more information visit www.ntrglobal.com/ntrmeeting NTRmeeting 8 2. Access and linking to a meeting A participant can join your meeting directly via a link in the invitation e-mail. If you do not send out invitations or if you are hosting a public meeting or webinar, participants can also log in via the landing page of your meeting (see illustration). Number Description 1 Meeting ID 2 Depending on the type of meeting the participants must enter their names and password, if necessary 3 Connection test A link to the landing page of your meeting is set up as follows: meetings held on the European NTRmeeting server: https://eu1.NTRmeeting.com/checkin/jc/ + meeting number meetings held on the American NTRmeeting server: https://us1.NTRmeeting.com/checkin/jc/ + meeting number Valid from January 2009. Subject to change without notice. For more information visit www.ntrglobal.com/ntrmeeting NTRmeeting 9 Chapter III NTRmeeting Administration After successfully logging in on www.NTRmeeting.com (see “Login”) you are taken to your personal NTRmeeting Account pages. In addition to an overview of all planned, running and past meetings, you will find here options for the setting up of meetings and for changes to your settings (see “Settings”). 1. My NTRmeeting The “My NTRmeeting” starting page appears as soon as you have logged in on www.NTRmeeting.com. It displays your next planned meeting and offers additional quick links – a host of useful links to the most used actions. 1.1 Planned meeting If you already have a meeting planned or in progress, this meeting with all its essential information and organising possibilities will appear directly beneath your name. This meeting display is identical to the display in “My meetings”. More precise information is therefore available in the relevant sub-chapter in this manual (see “Manage meetings”). If no meeting is active or in planning, you have the possibility to set up a new meeting by clicking on the “Create meeting” button (see “Set up new meeting”) 1.2 Quick links To make working with NTRmeeting easier, the start page offers a host of links, also called quick links, which will take you to useful and regularly visited pages of your account. The following links are listed: Create new meeting (see “Set up new meeting”) Manage meetings overview (see “Manage meetings”) Manage personal account (see “Settings”) Test connection (see “Connectivity test”) Address book (see “Address book”) 1.3 Connectivity test The NTRmeeting connectivity test does not test the general upload or download speed, but the maximum bandwidth with which NTRmeeting can be used. It checks the waveform of the connection between your workplace and the NTRmeeting server as well as the quality of the connection. Valid from January 2009. Subject to change without notice. For more information visit www.ntrglobal.com/ntrmeeting NTRmeeting 10 How to start the connectivity test 1 Click on the “Test connection” quick link 2 Click on “Start connectivity test” in the popup 3 Select “Details” if you would like to receive more details about the progress of the connectivity test. Close “Details” with the cross top right. NTRmeeting sets very low minimum requirements with regard to your Internet speed and already functions at a low bandwidth. Make nevertheless sure that the following requirements are complied with: ÎÎ Firewall: In many firewall configurations, communication between the workplace and the NTRmeeting conference server is conducted via an “HTTP proxy”, which can lead to a delay in the audio and video transfer. By activation of the 1935 TCP port for outgoing connections (from Intranet to the Internet), NTRmeeting can exchange data substantially faster. In specific cases, firewalls, furthermore, can disrupt the NTRmeeting connection after a certain data volume has been exceeded. In this case inform your system administrator. “From server” requires a speed of at least 120Kbps, multiplied with the number of participants taking part per video/audio. “To server” requires a speed of at least 120Kbps. “Answering time” should lie below 200ms (0.2 seconds). Valid from January 2009. Subject to change without notice. For more information visit www.ntrglobal.com/ntrmeeting NTRmeeting 11 2. My Meetings You can obtain overviews about upcoming and archived meetings and about your invitations to other meetings under the “My Meetings” tab. In addition, you can set up new meetings, organise upcoming meetings or view material from past meetings. You also have access to your address book. 2.1 Manage meetings Under “Manage meetings” you have insight into all upcoming meetings, and meetings already in progress or paused in your account. You can also organise those meetings here. That means you can change settings such as point of time, meeting type and title, but also make files available for a meeting or expand or cut back the list of participants. Number Description 1 The icon gives information about the type and condition of the meeting. 2 The description can be faded in and out. 3 Meeting actions contain quick links to sub-points of the “Meeting details” Every meeting is displayed as a separate box in the overview. The illustration above shows such a meeting presentation, in which you obtain the most important data on your meeting and can also adjust some settings. In general the presentation offers the following advantages: Quick view of the meeting type (see “NTRmeeting meeting types”) and meeting status (‘pending’, started’, stopped’, ‘paused’) by means of the icons. Systematic presentation of meeting data: ‘date’, ‘meeting number’ and ‘title’. Fade-in and fade-out description of the meeting, in order to keep an overview even in case of a long description. Direct joining of the meeting possible by means of the “Join meeting” button. Quick organising of the meeting by means of the quick link in the “Meeting actions” dropdown menu. Comprehensive view of meeting details by means of clicking the “Meeting details” button. Valid from January 2009. Subject to change without notice. For more information visit www.ntrglobal.com/ntrmeeting NTRmeeting 12 2.2 Meeting details With one click on the “Meeting details” button you are taken to the details page of your meeting. Apart from listing all details, you can also process it by means of one click on the relevant button. Number Description 1 Join the meeting or change the settings, such as date, title and description. 2 Process the list of participants of your meeting and send invitations to your participants 3 Finish the meeting in order to archive it. 4 Delete the complete meeting including all uploads. The links on the “Meeting details” page are very similar to the quick links of the “Meeting actions” dropdown menu (see “Manage meetings”), connecting you to the same pages. The following modifications are possible on the details page: Process meeting data by clicking on “Modify meeting”. Add or remove participants by clicking on “Participant list”. Send invitations to all participants by clicking on “Send invitations now”. Make files for a meeting available by clicking on “Upload”. End and archive a meeting by clicking on “Finish meeting”. Delete a meeting and all the files made available as well as all recordings by clicking on “Delete meeting”. Valid from January 2009. Subject to change without notice. For more information visit www.ntrglobal.com/ntrmeeting NTRmeeting 13 2.2.1 Change meeting data You can change your meeting data, even after you have already set up the meeting. Click on the “Modify meeting” button for that purpose. You will then be taken to the same page on which you also set up a meeting. Please check the relevant sub-chapter for more detailed information (see “Set up new meeting”). ÎÎ Please take note: The meeting type cannot be changed retroactively. The selected meeting type at the setting up of the meeting is binding. 2.2.2 List of participants Click on the “Participant list” button to process the list of participants for your meeting. You can add participants from your address book, create new participants directly, process existing participants or remove existing participants from the list. Number Description 1 Open the address book and invite your contacts 2 Mark who should receive moderator rights 3 Process your participants 4 Directly add new participants 5 Process your invitations Valid from January 2009. Subject to change without notice. For more information visit www.ntrglobal.com/ntrmeeting NTRmeeting 14 How to add contacts from the address book to the list of participants 1 Click on “Show address book” via the list of participants. 2 Select the contacts for your meeting from the displayed list by marking each name on the left with a tick mark. You can also select all contacts by inserting a tick mark next to the column descriptor “Name”. 3 Click on “Add as participant”. The marked contacts are immediately added to the list of participants.Hide the address book again by clicking on “Hide address book”. How to create a new participant without using the address book 1 Click on “Add new participant” below the list of participants. The following window will appear: Number Description 1 Enter Participants’ contact data. The fields with a dot are mandatory fields and must be completed. 2 This option enables you to import a participant immediately into your address book as permanent contact. 2 Enter the information for your participant. All fields with a dot are mandatory fields and must be completed. If these fields are not filled in, the participant cannot be saved. 3 Indicate with a tick mark whether the new participant should also be added to the address book. 4 Click on “Save”. How to process existing participants 1 Click on the process symbol to the right of the participant that you want to process. 2 The same window will appear with which you also create new participants. Make the changes here. 3 Then click on “Save”. Valid from January 2009. Subject to change without notice. For more information visit www.ntrglobal.com/ntrmeeting NTRmeeting 15 How to delete a participant from the list 1 Mark the participant to be deleted by placing a tick mark on the left next to the respective name. You can also mark all participants by inserting a tick mark next to the column descriptor “Name”. 2 Click on “Remove selected”. ÎÎ Please take note: By removing an address book contact from the list of participants, it only affects the list itself. The address book is not affected. The contact remains in the address book. 2.2.3 Invitations NTRmeeting provides a default invitation to your meetings, which already contains all essential data such as date, title and invitation link, to make it possible for your participants to easily join the meeting. With the aid of the invitation editor this standard invitation can be adapted to individual needs. Take the following steps to modify the default invitation: Number Description 1 Select the language of the invitation to be processed here. 2 You can adapt the whole invitation text according to your requirements. 1 Open your list of participants by clicking on the “Participant list” on the meeting details page. Select the “Invitation editor”. 2 Select the language of the invitation that you want to process and mark the “Customize invitation e-mail for this language” checkbox. 3 Change the invitation text according to your requirements. For example, to integrate the meeting title in the invitation text, insert the variable <<NAME>> in the relevant place. A list of all available variables can be accessed below the processing window. 4 After completion of the processing, click on “Save changes” and afterwards on “Close”. 5 The invitations are sent from the details page by clicking on “Send invitations”. Valid from January 2009. Subject to change without notice. For more information visit www.ntrglobal.com/ntrmeeting NTRmeeting 16 ÎÎ Language: Your participants will receive invitations in the language that you have determined for them (see “How to create new participants”). Therefore, if you want to personalize the invitation for participants with different languages you should edit the template of each language. 2.2.4 Upload presentations and files You can, even prior to the start of your meeting, upload presentations and files to the conference. Presentations appear in the presentation window of the meeting display after you have joined the meeting (see “Presentations”). NTRmeeting offers you the possibility to integrate many different presentation media. Among others videos, images, PDF documents, MS Word, PowerPoint and Excel files, OpenDocument files and OpenOffice.org documents. Files serve, contrary to the presentations, merely as downloads during the meeting in progress. You cannot present files on the presentation display of your meeting. It is also possible to upload files to the server during the course of a meeting (see “Files”). How to upload presentations/files to the server Numbers Description 1 Load the presentation/file onto your computer by means of one click. 2 Show your presentation in the lobby 3 Here you will see a list of all files, which every participant in your meeting can download. Valid from January 2009. Subject to change without notice. For more information visit www.ntrglobal.com/ntrmeeting NTRmeeting 17 6 Click on “Upload” on the meeting details page. You are taken to the next page. 7 Decide whether you want to upload a presentation for your meeting, or a file, which can be downloaded by all participants. Click on the relevant “Upload” button. 8 Click on “Browse” in the window that appears. Select the file that you want to upload and click on “OK”. 9 You will see a turning wheel while your file is being uploaded to the server. Parallel to that you can upload other files by clicking on “Upload more”. 10 After all files have been uploaded successfully, the window can be closed by clicking on “Close”. 11 Presentations can be displayed in the lobby if required. Mark the relevant document with a tick mark under “Lobby” for this purpose. How to delete a presentation/file from the server 1 Check all presentations/files to be deleted with tick marks to the left of the respective file names. You can also select all documents by ticking off the checkbox to the left next to column descriptor “File name”. 2 Click on “Delete”. 2.2.5 Ending a meeting A meeting is ended by clicking on the “Finish meeting” button on the meeting details page. You and all other participants can no longer join the meeting after it has been ended. Files, which have been uploaded to the meeting, are not lost, nor are recordings. The meeting is archived when it is ended. You can find all archived meetings under “Archive” in the “My meetings” tab (see “Archive”). 2.2.6 Deleting a meeting A meeting is ended by clicking on the “Delete meeting” button on the meeting details page. Subsequently, the meeting can neither be joined nor can files or recordings of the meeting be viewed. By deleting the meeting, it is irrevocably removed from the database. You then do not have further access to the meeting, not even via the archive. ÎÎ Warning notice: Your meeting is irrevocably deleted by clicking on the “Delete meeting” button. From that moment you have no more access to the meeting, its files or recordings. Valid from January 2009. Subject to change without notice. For more information visit www.ntrglobal.com/ntrmeeting NTRmeeting 18 2.3 Set up a new meeting Switch to the “Create meeting” menu point in the “My meeting” tab or use the “Set up meeting” quick link on the “My NTRmeeting” page to set up a new meeting. You are then taken to the next page. Numbers Description 1 Determine the type of meeting by simply clicking on the required type. 2 Enter a title and optionally also a description for your meeting. 3 Determine the date for your meeting 4 Define other settings, for example the creation of a permanent meeting room. Valid from January 2009. Subject to change without notice. For more information visit www.ntrglobal.com/ntrmeeting NTRmeeting 19 How to set up a new meeting 1 Select a meeting type (see “NTRmeeting meeting types”). The meeting type cannot be changed after the meeting has been set up! 2 Give the meeting a new title. The meeting title, in addition to the meeting number, serves as identification of your meeting and should therefore be as specific as possible. It is also faded in during a meeting. 3 Give a description of the meeting if necessary. This description is optional, but it offers you the possibility to inform your participants more closely about the meeting taking place. 4 Specify the date and point of time when the meeting should take place. With the aid of the calendar symbol you will reach the calendar view where you can easily select a day. Alternatively you can also start the meeting shortly after it has been set up. Tick off “Start immediately” for that purpose. 5 Determine the duration of the meeting. The maximum duration depends on the NTRmeeting package that you use. 6 Click on “Select options” to carry out other settings. Here you can also set up a permanent meeting room, among others. 7 Finally click on “Create meeting”. ÎÎ Changes: You can make changes to all the settings of your meeting at a later stage. The meeting type is excluded from this action. The meeting type selected at the setting up of the meeting is binding How to set up a permanent meeting room 1 Follow points 1 to 5 of the above instruction “How to set up a new meeting”. 2 Leave the “Duration” field unprocessed. 3 Click on “Select options” and subsequently tick off the “Permanent” checkbox. 4 Click on “Set up meeting”. How to set up a meeting with several moderators 1 Set up a new meeting based on the instructions “How to set up a new meeting”. 2 Click on the list of participants on the meeting details page of your meeting. 3 Add all persons, to whom you want to extend moderator rights, to the list and tick off the ”Moderator” checkbox on the list in each case. Valid from January 2009. Subject to change without notice. For more information visit www.ntrglobal.com/ntrmeeting NTRmeeting 20 2.4 Archive Ended meetings are moved to the archive. Here you can still view details on your meetings, play recordings, download meeting files or publish the meeting. Number Description 1 The archive lists all meetings that have been ended 2 Publish a meeting that has been ended in order to make it visible for other people 3 Recordings How to publish a meeting 1 Click on the “Meeting actions” dropdown menu and select “Publish meeting”. 2 From now on use the following link to view the published meeting: https://www.NTRmeeting.com/c/ + meeting number It will take you to a landing page, which can be called up by all visitors if they know the meeting number. Therefore, please keep in mind that this is a public landing page, from which not only the participants in the meeting can view files and recordings. ÎÎ Delete: A meeting can be deleted via the meeting actions dropdown menu. That action will delete the meeting from the archive as well as from the list of published meetings. When a meeting is deleted, all files and recordings of the meeting are lost and its details cannot be viewed any more. Valid from January 2009. Subject to change without notice. For more information visit www.ntrglobal.com/ntrmeeting NTRmeeting 21 2.5 Address book The address book is used to manage your contacts. You can add contacts from the address book directly to the list of participants of a meeting and vice versa you can also insert the contact data of a participant being set up in the address book. Furthermore, it is possible to export your address book or import data from other address books (e.g. from MS Outlook). That makes it possible to manage your contacts centrally. You can access your address book by means of the “Address book – view” menu point under “My meetings”. A simplified version of the address book is also accessible in the list of participants of a meeting (see “List of participants”). Numbers Use the search function to find a contact quickñy 1 Use the search function to find a contact quicly 2 Process existing contacts 3 Create new contacts 4 Import your contact data from an address book application (e.g. MS Outlook) How to import your contact data from an address book application 1 Click on “Import/Export” below the address list. 2 Click on the “Browse” (Windows) or “Select file” (Mac) button under “CVS import” in the appearing window. 3 Go into the directory, in which the CSV file is located and select it. You can only import CSV files. How to export a CSV file from your address book application is described in the respective help function of the application. Valid from January 2009. Subject to change without notice. For more information visit www.ntrglobal.com/ntrmeeting NTRmeeting 22 4 You will see a turning wheel while the import is in progress. You can however still close the window by clicking on “Close”. The process is then continued in the background. How to export your address book 1 Click on “Import/Export” below the address list. 2 Click on “Download” under “CSV export” in the appearing window. 3 Enter a save location if necessary. You will find a CVS file in the directory after the export. You can now import it into the address book application. Please go to the help function of the relevant application for more information on this. ÎÎ Existing contact data: When a CSV file is imported, identical contacts already in the NTRmeeting address book are overwritten. How to set up a new contact / change a contact Click on “New contact” below the address book list. The following window opens: Number Description 1 The “X“ closes the window without saving the files. 2 Complete at least all the mandatory fields. You will recognise the mandatory fields by the small orange dot. ÎÎ Delete: Deleting of contacts can not be reversed. As soon as a contact is deleted from the NTRmeeting address book it is irrevocably removed. Valid from January 2009. Subject to change without notice. For more information visit www.ntrglobal.com/ntrmeeting NTRmeeting 23 Chapter IV NTRmeeting web meeting display You join your meeting by means of the “Join meeting” button or on the landing page. You and your participants reach the landing page by means of a composite link (see “Access and linking to a meeting”) or alternatively via the link in the invitation e-mail. However, for the participants to be able to join in, you as a moderator have to start the meeting by clicking on the top left button “Start meeting”. Number Description 1 Menu bar 2 Symbols bar 3 Presentation display area for presentations, screen-saving and display controls. 4 The list of participants appears depending on the type of meeting. 5 Chat (optional) 6 Files, which can be downloaded during the meeting 7 Footer menu Valid from January 2009. Subject to change without notice. For more information visit www.ntrglobal.com/ntrmeeting NTRmeeting 24 The meeting display adjusts to your settings at the setting up of the meeting. This way the appearance of the meeting, for example, depends on the meeting type and partly also on the other options that you determine for the meeting (e.g. “Always blend in chat”). 1. Menu bar The menu bar is used to make the settings for the meeting or to use other services of the NTRmeeting web meeting. Among others also the “Recordings” feature. 1.1 Meeting status If you join a web meeting as moderator, you must first start it before you can bring participants in from the lobby and hold presentations. Click on the “Start meeting” button for this purpose. You can also pause your meeting at any time after you have started it. Simply click on the same button during the duration. It will now have the description “Pause meeting”. 1.2 Camera and microphone Two buttons exist in the menu bar for quick access to the switching on and off function of your camera and microphone. You can change the status of your camera by clicking on it. ÎÎ Please take note that the camera and, if necessary, also the microphone can be automatically switched to inactive in case of a bad Internet connection. That way NTRmeeting ensures that you can continue to attend the meeting as a passive participant, without being subjected to being completely cut off. The buttons therefore also serve as indication of possible inactivity of your components. Valid from January 2009. Subject to change without notice. For more information visit www.ntrglobal.com/ntrmeeting NTRmeeting 25 1.3 Menu point “Meeting” By means of the “Meeting” menu point you can control all settings, which pertain specifically to the current meeting. Apart from processing the status of the meeting (start, pause, end), it also pertains to closing the meeting room to prevent other participants from entering the meeting room. Number Description 1 For further information about the meeting, you and your participants can open a dialogue field. “About this meeting” menu point opens a dialogue window with all the important information on the meeting, including the meeting description. You can leave the meeting by means of the “Logout” menu entry. As a participant, this action will not cause the meeting to end or pause. However, as a moderator, logging out will leave the meeting paused. 1.4 Menu point “Tools” You will find useful additional functions for your NTRmeeting meeting under the “Tools” menu point. Apart from the possibility to switch all participants to silent here, you also have access to the “Recording” function. 1.4.1 Recording The “Recording” tool makes it possible for you to record all or a part of your meeting. With it all activities, such as video and audio of the meeting, are recorded. Valid from January 2009. Subject to change without notice. For more information visit www.ntrglobal.com/ntrmeeting NTRmeeting 26 How to start a recording 1 Click on “Start recording” under the “Tools” menu point. 2 Furnish the recording with a title and description, if necessary. 3 Click on “Start recording”. Recordings are only possible at a meeting in progress. Therefore make sure in advance that the meeting has already started. During the recording a pulsating icon ( ) in the symbols bar shows the recording status. You can start any number of recordings for your meeting. It is however not possible to make several recordings at the same time. End a recording by accessing the same menu entry by means of which you have started it. You will find the final recordings again in the archive after the meeting has ended. 1.4.2 Voting Voting makes it possible for you to getto gauge the opinions of your participants, quickly and easily. You can start initiate and store any an unlimited number of surveys in anyfor any kind of meeting and view them the results during the meeting again and again. You determine control the publication of the results of a voting survey yourself. Valid from January 2009. Subject to change without notice. For more information visit www.ntrglobal.com/ntrmeeting NTRmeeting 27 How to start a new survey 1 Go to “Voting” under the “Tools” menu point and then to “New voting”. 2 Enter the title and question of the survey in the appearing window that appears. 3 Determine Increase or decrease the number of possible answers options to your question by means of clicking on the “Add answer” or “Remove answer” buttons. 4 Now eType innter the possible answers options. If you want your participants should have simultaneousto have multiple answer options, then mark the “Allow multiple answers” checkbox. 5 Click on “Start voting” to start the survey immediately or click on “Save voting” to save the survey for later activation via the “Tools” menu point. How to publish a survey 1 As moderator you will see a live preview of the results while the voting is in progress. Click on “Stop voting” in this window when you want to end the survey. You may end the voting before all Not all participants need to have voted for ithave voted. 2 When you cClick on “Publish voting results,”. From now on the participants can see the same results that you have in front of youyou are viewing. How to start a saved survey or / restart* voting 1 Go to “Voting” under the “Tools” menu point and click on the survey that you want to (re) start. 2 Click on “Start voting” or “Restart voting” in the appearing window that appears. ÎÎ *Restart: Please keep in mind that the old previous survey results will be overwritten when a survey is restarted. In the process, the overwritten results are permanently deleted and can no longer be viewed. 1.5 Menu point “Settings” Under the “Settings” menu point you can adjust the settings for your webcam, microphone and Internet connection. Valid from January 2009. Subject to change without notice. For more information visit www.ntrglobal.com/ntrmeeting NTRmeeting 28 The settings for the webcam and microphone include the general settings of Adobe Flash Player. In case of faulty functioning of the webcam or microphone, please check if the correct device has been selected in these settings. ÎÎ Connection settings: In case of a very slow Internet connection, NTRmeeting automatically regulates the connection so that you can continue taking part in the meeting. If this measure is taken you will receive a warning notice, which allows you to also regulate the connection speed by yourself. We recommend that you always accept the new automatic setting. ÎÎ If the poor connection only occurs intermittently or temporarily, you can again manually adjust your Internet connection by clicking on “Connection settings” via the “Settings” menu point. For that purpose, select your Internet connection in the dropdown menu from “Modem, ISDN, DSL 1, DSL 2, LAN”. 2. Symbols bar You can receive quick information on the settings for your meeting by means of the symbols bar. The information is displayed in symbol format. When you hold the mouse over a symbol, further information is faded in. 2.1 Connection speed The current status of your connection speed can be accessed by means of a symbol, which changes colour according to the connection. When you hold the mouse over the symbol, the current ping and up- and downstream of your connection is displayed. These data provide information about the possible adjustment of the connection speed (see “Connection settings”). 2.2 Meeting information You can obtain useful notices and tips via the information symbol. Switch between different notices by clicking on the arrow symbol in the orange notice field. If no notices are available, the information symbol appears in grey. Valid from January 2009. Subject to change without notice. For more information visit www.ntrglobal.com/ntrmeeting NTRmeeting 29 2.3 Meeting time At the far right end of the symbols bar there is a clock. When you hold the mouse over it, the meeting start time and date are displayed. 3. List of participants You can see who is currently in the meeting by means of the list of participants. The list offers options for controlling the participants. It offers the possibility to bring other participants into the meeting and makes the opinion of participants visible by means of a feedback function. Furthermore, the list of participants provides you with information about the status of a person (participant or moderator). Number Description 1 Moderators are recognized by a small star 3 Invite participants. 4 Receive feedback from your participants 3.1 Options Click on the small arrow to the right next to your name or name of a participant to fade in other options. The options in the list of participants differ strongly according to the type and status of a participant. Valid from January 2009. Subject to change without notice. For more information visit www.ntrglobal.com/ntrmeeting NTRmeeting 30 Number Description 1 Options for participants when seen by the moderator. 2 Options for myself. You can change your status in your options menu, which will be shown to the other participants (“Online”, “Away”, “Busy”). With the options menu of participants other than yourself you can activate any participant as moderator, and send or bring the participant to the lobby or from the lobby into the meeting. How to change the lobby status of several participants 1. Mark several participants in the list, by holding down the Ctrl button on the keyboard while clicking on the respective participant with the mouse. You can also mark all participants by clicking on “Select all” at the end of the list of participants. 2. After making a selection, a field with the options “Bring selected into meeting” and “Send selected to the lobby” appears at the end of the list of participants. Click on the required option. 3.2 Invite new participants You can invite participants via e-mail while the meeting is in progress. How to invite new participants via e-mail 1 Click on the “Invite participants” button at the bottom end of the list of participants. 2 A popup window opens. Complete at least all the mandatory fields. You will recognise the mandatory fields by an orange dot in front of the field ( ). 3 Click on “Invite”. Thereupon an invitation e-mail is sent to the e-mail address specified by you. This invitation e-mail contains a link to the meeting. Valid from January 2009. Subject to change without notice. For more information visit www.ntrglobal.com/ntrmeeting NTRmeeting 31 Number Description 1 Complete at least all the mandatory fields 2 Predefine additional options ÎÎ Multiple invitations are not possible: Please note that you can send only one invitation to one e-mail address. If you have already sent invitations to an address “[email protected]” at the set up of the meeting, then you cannot send another invitation to “[email protected]”, neither from the meeting details nor from the meeting itself once it is in progress. 3.3 Feedback With the aid of the feedback function, you can receive feedback from your participants on your topics or meeting management quickly and easily. Your participants have a choice of six different messages: - I am fine - Question - Disagree - Go faster - Agree - Slow down If a participant selects an opinion, a corresponding icon appears next to his name. Your participants can use the feedback function permanently, if the list of participants is visible to you. Valid from January 2009. Subject to change without notice. For more information visit www.ntrglobal.com/ntrmeeting NTRmeeting 32 4. Files You can make files available when a meeting is set up, which can be downloaded by everybody while the meeting is in progress (see “Upload presentations and files”). These files appear in the meeting display on the left-hand side. You and your participants can open and download them here. As a moderator, you can also delete them. How to download a file / How to open a file 1 Click on the file you want to download/open. 2 The select “Download file”, or “Open file”. 3 Select a destination folder if necessary when downloading. The file is then transferred to your computer. How to make new files available for upload 1 Click on “Upload” to upload a new file. 2 Click on “Search” (Windows) or “Select file” (Mac) in the appearing popup and select the file that you want to upload. 3 Click on “Upload”. The upload time will depend on the size of the file. The file will appear in the file list after the upload has finished. Valid from January 2009. Subject to change without notice. For more information visit www.ntrglobal.com/ntrmeeting NTRmeeting 33 5. Presentation display area The main part of the web meeting takes place on the presentation display area. Here you can present your concepts, discuss drawings, explain programs or access contents on other computers. Switch between the various presentation areas by clicking on the buttons in the footer. Numbers Decsription 1 Change the view of the presentation display by using the full display screen or the complete contents of a window 2 Switch between the different areas in the footer 3 Export the display space as PDF 4 The functions change depending on the file type. 5.1 Presentations Under “Presentation” you present the files, which you have uploaded under “Presentations” on the server when the meeting was set up (see “Upload presentations and files”). This includes photos, videos, PDF files, MS Office documents, OpenDocument files and OpenOffice.org documents. Naturally you can also make new files available while the meeting is in progress. A functions bar offers useful functions via the display space on which the presentations are held. This changes depending on the type of presentation and differs for example at video and PDF presentations. Valid from January 2009. Subject to change without notice. For more information visit www.ntrglobal.com/ntrmeeting NTRmeeting 34 5.1.1 Whiteboard The whiteboard serves as medium for drawings and comments on the display space. You can use an empty display space as basis for drawings, but also process documents with drawing and text tools. Number Description 1 Some tools have adjustment options. Keep the mouse pressed for a view 2 Change the line and fill-in colour of elements How to use the whiteboard 1 Click on “Board” in the functions bar, if you want to process an existing document. Otherwise click on “Select and upload” and select the “Add whiteboard” in order to draw on a white background. 2 A toolbar appears on the left-hand side of the display space. Select a tool here to work with. 3 Many tools offer further setting options and possibilities. These tools can be identified by the small triangle in the bottom right-hand corner. Keep the mouse pressed in to see the other settings. 4 Process existing elements by checking them and then perform the changes, such as colour and size adjustments. ÎÎ Delete elements: You can delete all elements in the display space by means of the recycle bin tool. Use the eraser to delete single elements. 5.1.2 Pointer With the pointer, your participants can recognise where the mouse is on the display space. Mark the “Pointer” button and a mouse pointer with your name and individual colour will appear on the display screen of your participants. 5.1.3 PDF export You and your participants can export documents on the display space as PDF files, Elements created with the aid of the whiteboard are also exported. Consequently you can also export an empty display space, on which drawn elements are located. To export the display space, click on the “PDF” button and select a destination folder. 5.2 Screen-sharing Valid from January 2009. Subject to change without notice. For more information visit www.ntrglobal.com/ntrmeeting NTRmeeting 35 You can present your whole display screen or only individual windows to your participants with NTRmeeting web meetings. With NTRmeeting screen-sharing you can also present running applications. How to use NTRmeeting screen-sharing 1 Click on the “Screen-sharing” button in the footer. 2 Click on the “Share” button in the presentation display area. 3 If you have already downloaded the screen-sharing client, continue with step 5. Otherwise click on “Download screen-sharing client”. Select a destination folder for the file and perform the download. 4 Start the program NTRmeeting.exe (Windows), or NTRmeetingDarwin (Mac). Subsequently the NTRmeeting icon will appear in the symbols bar (Windows), or in the dock (Mac). 5 By means of a click on the NTRmeeting icon in the top right of the window the respective window for the screen-sharing can be activated (only possible in Windows), or wait until the whole screen is released (Mac). Valid from January 2009. Subject to change without notice. For more information visit www.ntrglobal.com/ntrmeeting NTRmeeting 36 5.3 Chat You can make conversation with your participants in chat, even when no microphone is active. Thereby the participants are represented by name. This way the chat function remains clear even in the case of a large number of participants. Numbers Description 1 Enter to whom the message should be sent 2 Format your text In addition to text formatting, NTRmeeting chat also offers the possibility to write messages to specific participants only. How to write to selected participants 1 Click on the “Say” dropdown menu on the right-hand side and select “Whisper”. 2 Select the person, who should receive the message, in the next dropdown menu. 3 Enter your message in the text field. 4 Click on send or alternatively press the ENTER button. The message is now sent to the selected participant. 6. Permanently visible chat Alternatively, you can also blend chat in permanently. It then appears below the presentation display area. Activate the additional option “Always show chat” (see “How to set up a new meeting”) for this option when the meeting is set up. Permanent chat has the same way of functioning as standard chat (see “Chat”). It can also be maximised if needed. Number Description 1 Maximize your chat window here 2 As moderator you can predefine that only moderators can use the chat function. ÎÎ Please note that if you decide to activate the “Always show chat” option once the meeting has started, you must refresh the browser content for the functionality to be activated (each participant must do the same). Valid from January 2009. Subject to change without notice. For more information visit www.ntrglobal.com/ntrmeeting NTRmeeting 37 7. Footer menu Switch between the different presentations possibilities in the footer menu. The footer also contains the activation of the “Messages” and “Co-browsing” functions. 7.1 Switching the presentation display area 1. Use the buttons on the right-hand side of the footer menu to switch between the presentation options “Presentation”, “Screen-sharing” and “Chat”. 2. As moderator you can switch between the presentation options at will. The participants do not have access to this function. 7.2 Messages You can open a message window while the meeting is in progress, which then appears over the presentation display area and can be moved around and placed at will. Number Description 1 Every message in the moderators’ chat has the options “Answer privately”, “Mark”, “Copy to clipboard” and “Delete”. 2 These messages are sent to all participants. As moderator you have the possibility to carry out a moderator chat. This is normally only visible to the moderators. You can however also adjust it to be visible to all participants by placing a tick mark at “Chat visible to all users”. Alternatively you can, as moderator, also send messages to all participants. How to send a message to all participants 1 Click on the “Message to all participants” button in the message window. 2 Enter the message in the appearing text field. 3 Click on “Send”. A small popup, which contains your message, now opens in the meeting display. Valid from January 2009. Subject to change without notice. For more information visit www.ntrglobal.com/ntrmeeting NTRmeeting 38 Chapter V Help with problem cases While using NTRmeeting some problems might occur. To solve problem cases, follow the instructions in the respective sub-chapters. 1. Technical requirements NTRmeeting does not require the installation of any additional software. A variety of hardware and software is nevertheless needed for its comprehensive use. This chapter provides you with an overview of the required components. 1.1 Requirements for an NTRmeeting web meeting To host an NTRmeeting web meeting or to participate in a web meeting, you will need an Internet-ready computer and browser with the Adobe Flash plug-in. Following is a list of needed and useful software and hardware for your NTRmeeting web meeting. a PC with one of the following operating systems: Windows, Linux or a BSD system, Mac OSX. an Internet browser with the latest Adobe Flash plug-in. Furthermore, as moderator your browser must accept cookies. An external or built-in microphone and speaker to enable communication between participants. A headset can be used as an alternative. Without a microphone and speaker, communication is only possible via the chat option! A web cam or built-in iSight for participation per video (optional). 2. Problems with the account The sub-topics following now deal with problems in the registering and login on www.NTRmeeting.com. 2.1 I do not receive a confirmation e-mail after registration After registration, NTRmeeting sends you an automatically generated e-mail. This e-mail contains an activation link, on which you must click to activate your account. If this confirmation does not take place, your request is deleted within 24 hours. If you did not receive a confirmation e-mail: Check the Spam folder of your e-mail account. In certain circumstances it can happen that the confirmation e-mail is considered junk mail and automatically moved to the Spam folder. Reregister. If you have not received a confirmation e-mail after a certain time, please register again. Please check that your e-mail address has been entered correctly. Valid from January 2009. Subject to change without notice. For more information visit www.ntrglobal.com/ntrmeeting NTRmeeting 39 2.2 I forgot the password to my account If you have forgotten your password for access to your NTRmeeting account, you can create a new one. How to create a new password 1 Go to www.NTRmeeting.com and click on “NTRmeeting login” top right. 2 Click on the “Forgot your password?” link. 3 Enter the e-mail address, on which your account was registered, into the entry field. Then click on “Start password reset”. 4 If the e-mail address, which you have entered in step 3, corresponds to the e-mail address of your account, then NTRmeeting will send an automatically generated e-mail to your Inbox. 5 Click on the link in the e-mail. 6 Subsequently create a new password and click on “Create password”. 3. Connection problems To be able to host web meetings or joint a meeting, your Internet connection must comply with the minimum requirements (see “Connectivity test”). Even after complying with the requirements, it is still possible that the following problems occur: 3.1 The connection is disrupted after a certain period of time In some rare cases, firewalls (“Stateful Packet Inspection”) can disrupt the NTRmeeting connection after a certain data volume has been exceeded. In this case inform your system administrator. 3.2 I receive a warning message about my connection settings If your Internet connection does not comply with the pre-settings of NTRmeeting web meetings, you will receive a warning message, which will inform you about the automatic adjustment of the connection setting. By means of this adjustment NTRmeeting guarantees that you can always take part in a NTRmeeting meeting at optimal level (see “Connection settings” for further information). 4. Audio problems The following problems may occur in an NTRmeeting meeting during audio transfer. 4.1 I hear an echo of my voice, or of another participant, in the meeting An echo occurs if your voice is fed back. This happens when a participant uses a loudspeaker and the audio signal is picked up by the microphone without software for suppressing the echo. Follow the following suggestions to solve the problem: Make sure that you and your participants use a headset or at least earpieces instead of loudspeakers. Valid from January 2009. Subject to change without notice. For more information visit www.ntrglobal.com/ntrmeeting NTRmeeting 40 Request the participant, whose computer causes the echo, to join the meeting telephonically. Use professional conference hardware that supports automatic echo suppression. 4.2 Audio transfer is delayed In many firewall configurations, communication between the workplace and the NTRmeeting conference server is conducted via an “HTTP proxy”. Depending on the Internet bandwidth and the speed of the proxy server, audio and video can be delayed in this kind of data exchange. Speak to your systems administrator if the delay (“Latency”) amounts to more than 200 milliseconds (0.2 seconds). By activation of the 1935 TCP port for outgoing connections (from Intranet to the Internet), NTRmeeting can exchange data substantially faster. Valid from January 2009. Subject to change without notice. For more information visit www.ntrglobal.com/ntrmeeting NTRmeeting 41 How to’s NTRmeeting Account5 How to register with NTRmeeting.................................................................................................. 5 How to log in to your account........................................................................................................ 5 How to change your settings......................................................................................................... 6 NTRmeeting Administration 9 How to start the connectivity test................................................................................................. 10 How to create a new participant without using the address book................................................ 14 How to process existing participants........................................................................................... 14 How to delete a participant from the list...................................................................................... 15 How to upload presentations/files to the server........................................................................... 16 How to delete a presentation/file from the server........................................................................ 17 How to set up a new meeting...................................................................................................... 19 How to set up a permanent meeting room.................................................................................. 19 How to set up a meeting with several moderators....................................................................... 19 How to publish a meeting............................................................................................................ 20 How to import your contact data from an address book application............................................ 21 How to export your address book................................................................................................ 22 How to set up a new contact / change a contact......................................................................... 22 NTRmeeting web meeting display 23 How to start a recording.............................................................................................................. 26 How to publish a survey.............................................................................................................. 27 How to start a saved survey or / restart* voting . ........................................................................ 27 How to change the lobby status of several participants.............................................................. 30 How to make new files available for upload................................................................................ 32 How to use the whiteboard.......................................................................................................... 34 How to use NTRmeeting screen-sharing..................................................................................... 35 How to write to selected participants........................................................................................... 36 How to use NTRmeeting co-browsing............................................................................................. Help with problem cases 38 How to create a new password................................................................................................... 39 Valid from January 2009. Subject to change without notice. For more information visit www.ntrglobal.com/ntrmeeting NTRmeeting 42 This document is a user guide for NTRmeeting, and it contains information which is the prop erty of Net Transmit & Receive, S.L. (hereinafter referred to as “NTR”), a global company with registered corporate offices in Josep Pla, 2 – Edificio B3, 1ª Planta, Barcelona, and 4849 Alpha Road, suite 200, Dallas, TX 75244. The contents of this guide are property of NTR or its suppliers and is protected by both national and international intellectual and industrial property laws. The contents of this guide cannot be copied, distributed, photocopied, reproduced, translated or summarized, completely or partially, without the previous written authorization of NTR. Although the information contained in this manual has been reviewed as carefully and precisely as possible, it may contain inaccuracies, typographical errors or may not be entirely up-to-date at the time of your usage. NTR reserves the right to modify the contents of this guide at its discretion, at any time, unilaterally and without previous notice. All NTR trademarks, distinguishing signs and logos that appear in this guide are owned by NTR and are properly registered. Similarly, NTR informs you that the trade names of other products, services and companies appearing in this document may also be registered trademarks. © 2009 Net Transmit & Receive, S.L Valid from January 2009. Subject to change without notice. For more information visit www.ntrglobal.com/ntrmeeting