1
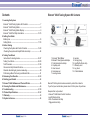
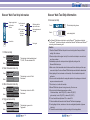
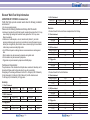
2012-05-01
Dear ElementʰMulti glucose and cholesterol measuring system Owner
Thank you for choosing ElementʰMulti glucose and cholesterol measuring system. This instruction for use includes important information you
need to know about ElementʰMulti glucose and cholesterol measuring
system. Please read it carefully.
Our goal for ElementʰMulti glucose and cholesterol measuring system
is attributed to provide the best quality healthcare products coupled with
superior customer service.
Intended For Use
ElementʰMulti glucose and cholesterol measuring system is intended for
self testing and for outside the body (in vitro diagnostic use only).
Elementʰ Multi is used to test glucose, total cholesterol, LDL-cholesterol
(often called bad cholesterol), triglycerides and HDL-cholesterol (often
called good cholesterol).
Additionally, ElementʰMulti glucose test is plasma-calibrated to allow
comparison of results with the laboratory method.
This meter is available in two types of strips: one type of strips measures
glucose level by the method of electrochemistry and the others measure
cholesterols by the spectroscopy method.
• 03 •
Test Principle
How to use Instructions For Use
ElementʰMulti glucose and cholesterol measuring system has two kinds of test
principle according to test items: one for blood glucose and the others for
cholesterols.
This guide includes all the information you need to use Elementʰ Multi for selftesting. For additional information and specific information for each individual
test, please make sure you read the strip instructions for use included with the
test strips.
Cholesterol test result is based on a reading reflection of density. When the blood
is applied, the color is changed in the test area through an enzyme reaction.
The meter records this color change and converts the measurement signal to the
displayed results by using the data previously entered by the code. The deeper
color is, the higher level is.
If you need our help or have some questions, please contact the local representative. Customer Service assistance is available 09:00 AM - 06:00 PM, Mondaythrough Friday.
Glucose in the blood sample will react to the electrodes in the glucose test strip,
generating an electrical current that will stimulate a chemical reaction. This
reaction is measured by ElementʰMulti meter and displayed as your blood
glucose result.
For questions or assistance with Elementʰ Multi call :
infopia Customer Service
Hours : 09:00 AM - 06:00 PM
Monday - Friday
Tel. +82-31-460-0300
Fax. +82-31-460-0401
Email : [email protected]
• 04 •
• 05 •
Elementʰ Multi Testing System Kit Contents
Contents
1. Learning the System
Elementʰ Multi Testing System Kit Contents ---------------------------- 7
Elementʰ Multi Testing Meter ----------------------------------------------- 8
Elementʰ Multi Testing Meter Display ------------------------------------- 9
Elementʰ Multi Test Strip Information --------------------------------10-15
2. Setting Your Meter
Battery Use ---------------------------------------------------------------------16
Setting Mode ---------------------------------------------------------------17-18
3. Before Testing
Checking the System with Control Solution -------------------------19-23
Checking the system with LipidProfile check strip --------------------24
4. Testing Your Blood
Instructions for lancing device ------------------------------------------25-27
Testing Your Blood---------------------------------------------------------28-30
Test Procedure -------------------------------------------------------------31-38
Glucose test strip Discard Function----------------------------------------39
Alternate site testing at glucose measuring------------------------------40
Performing a Blood Test using an Alternate Site------------------------41
5. Reviewing Your Results ------------------------------------------------42-43
6. Deleting your Results ------------------------------------------------------44
7. Elementʰ Multi Software and Thermal Printer-----------------------45
8. Cleaning Your Meter and Maintenance----------------------------------46
9. Troubleshooting -- -------------------------------------------------------47-50
10. Product Specifications------------------------------------------------50-52
11. Warranty -----------------------------------------------------------------------53
12. Symbol reference -----------------------------------------------------------54
• 06 •
10T
5T
meter
Element glucose strip
Lancing Device
1>,
Lancet
1. Elementʰ Multi Meter
2. Elementʰ blood glucose test strips
3. Total cholesterol test strip
4. Capillary rods
5. User manual
6. Quick manual
7. Lancing device
Total cholesterol strip
Carrying Case
8. Lancets
9. Carrying bag
10. LipidProfile Check strip
11. Warranty card
12. Log book
13. 2 AAA batteries
Elementʰ Multi system has been sealed to protect the contents.
If you find your seal broken, please return it to the place of purchase.
Required but not provided
- Elementʰ Multi Brand Control Solutions
- LipidProfile test strip
- HDL-Cholesterol test strip
- Triglyceride test strip
• 07 •
ElementʰMulti Testing Meter Display
ElementʰMulti Testing Meter
Glucose Test Strip Port
lnsert the glucose test strip
Glucose test Strip Ejector
Strip discard function by pushing toward outside
LCD Screen
Display measurement level of glucose, TC, HDL, TG and
Cacluated LDL including time and message
Up (▲) button
Button for memory mode and choice of function in each
mode.
Down (▼) button
Button for choice of function in each mode & Printer
operation button.
Mode ( ) button
Setting mode, Cholesterol measurement mode, On and
Off button & RFID mode.
RFID (
) Printing part
Part for placing the RFID-tag on the strip bottle
cholesterol Testing part
cholesterol test strip inserting part
Buzzer sound print part
Printing part for warning sound, fixed sound and buzzer
sound
Battery Cover
Purpose for Battery replacement and fixed cover
Blood Glucose
Total cholesterol
Triglyceride
HDL-cholesterol
LDL-cholesterol
Blood insertion for glucose test
Blood insertion for cholesterol test
Serum
Sample blood
Displaying code number of Test Strips
Low batteries
Alarm
Testing unit
Temperature & date of test
Hour & Date of test
Average Test Results(only for glucose)
Control Solution Symbol
Caution
1. Do not use Elementʰ Multi meter in a dry environment, especially if synthetic
materials are present. Synthetic clothes, carpets, etc., may cause damaging static
discharges in a dry environment.
2. Do not use Elementʰ Multi meter near cellular or cordless telephones, walkie talkies,
garage door openers, radio transmitters, or other electronic or electrical equipment
that are sources of electromagnetic radiation, as these may interfere with the proper
operation of the meter.
• 08 •
Day & Month
Year
• 09 •
ElementʰMulti Test Strip Information
ElementʰMulti Test Strip Information
5. Glucose test strip
Target to apply blood
Confirmation
Window
Total Cholesterol
test area
Ribs that guide the
strip into the meter
HDL-Cholesterol
test area
Triglyceride
test area
Blood application and
Test area
Lipid
Contact Bar
Part to grab
Front -
This test strip is for glucose.
Back -
color-coding label
The ElementʰMulti glucose test strip is equal to Element<5 blood glucose test strip.
The Element<5glucose test strip can used with an ElementʰMulti meter and Element<5
meter for glucose measuring test.
Caution
1. Profile test strip
Front -
Lipid
This test strip in black enables to test
TC, HDL, TG and calculated LDL.
Back -
2. Total Cholesterol test strip
Front -
Lipid
This test strip in red is for Total
Cholesterol.
Back -
3. HDL-Cholesterol test strip
Front -
Lipid
This test strip in blue is for HDLCholesterol.
Back -
4. Triglyceride test strip
Front Back -
Lipid
This test strip in green is for
Triglyceride.
• 10 •
1. Store the ElementʰMulti test strip vials in a cool and dry place. Keep out of direct
sunlight. Do not freeze.
2. Store test strips in their original vial only. Do not mix the test strips in new vials or in
any other container.
3. Immediately replace the vial cap and close tightly after picking out the
ElementʰMulti test strips.
4. Make a note of the discard date which is three months from the date you first open
a new vial of strips. Do not use ElementʰMulti test strips and vial after the discard date.
5. Avoid getting dirt, food, and water on the test strip. Do not handle test strips with
wet hands.
6. Do not use the test strips after the expiry date printed on the package or vial since it
may cause inaccurate results.
7. Do not bend, cut, or alter the test strip.
8. ElementʰMulti test strips are for single use only. Do not re-use.
9. Do not test at the following temperature condition:
- Cholesterol strips : below 18℃(64℉) or above 30℃(86℉).
- glucose strip : below 10℃(50℉) or above 40℃(104℉)
10. Do not test with humidity below 10% or above 90%.
11. Refer to additional information in the ElementʰMulti test strip package.
12. Avoid getting dirt, food, and water on the color-coding label (backside of glucose
test strip).
13. Discard the used test strips carefully according to the local regulations.
• 11 •
ElementʰMulti Test Strip Information
LIMITATIONS OF SYSTEM for cholesterol test
Profile Test Strips provide accurate results when the following constraints
are observed:
• Do not use neonate samples
Please note the following interferences that may affect the results:
• Extremes in hematocrit may affect test results. Hematocrit levels less than 30 % may
cause falsely high reading and hematocrit levels greater than 55 % may cause
falsely low reading.
• Interferences: Acetaminophen, uric acid, ascorbic acid (vitamin C), and other
reducing substances (when occurring in normal blood or normal therapeutic concentrations) do not significantly affect results. However, abnormally high concentrations
in blood may cause inaccurately high results.
• Only EDTA and Heparin containing tubes are recommended as an anticoagulant
tube.
• Total cholesterol may be decreased by dopamine and gentisic acid.
• HDL-cholesterol may be decreased by dopamine.
• Triglyceride may be decreased by dopamine and Methyldopa.
Performance Characteristics:
The performance of the cholesterol test strip has been evaluated in laboratory and in
clinical tests (Please refer to strip instructions for use for more details).
Testing Range: The test range of Elementʰ Multi is 100 ~ 400 mg/dL (2.59-10.36mmol/L)
for total cholesterol, 25~80mg/dL (0.65-2.08mmol/L) for HDL-cholesterol and
70~600 mg/dL (0.80-6.86mmol/L) for Triglyceride.
Accuracy
1-4. LDL-Cholesterol
Sample Type
Capillary
Regression line
Y=0.9257x+8.4998
slope
0.9257
R2
0.8815
y-interceptor
8.4998
Precision
- Precision Results for Human Serum samples tested for 20 days.
2-1. Total cholesterol
Mean Conc (mg/dL)
SD (mg/dL)
CV (%)
178.6
8.4
4.7
271.5
10.4
3.8
49.8
3.0
5.9
25.2
1.6
6.3
120.8
5.3
4.4
267.4
10.2
3.8
2-2. HDL-cholesterol
Mean Conc (mg/dL)
SD (mg/dL)
CV (%)
2-3. Triglyceride
Mean Conc (mg/dL)
SD (mg/dL)
CV (%)
- Precision Results for Control Solutions.
2-1. Total cholesterol
Mean Conc (mg/dL)
SD (mg/dL)
CV (%)
150.3
2.2
1.5
250.6
3.6
1.4
60.1
2.1
3.5
30.0
1.4
4.7
120.5
2.9
2.4
250.5
2.8
1.4
1-1. Total Cholesterol
Sample Type
Capillary
slope
0.9871
y-interceptor
2.2856
R2
0.9842
Regression line
Y=0.9732x+1.4038
slope
0.9732
y-interceptor
1.4038
R2
0.9656
Regression line
Y=0.9975x+1.3080
slope
0.9975
y-interceptor
1.3080
R2
0.9816
Regression line
Y=0.9871x+2.2856
1-2. HDL-Cholesterol
Sample Type
Capillary
1-3. Triglyceride
Sample Type
Capillary
• 12 •
2-2. HDL-cholesterol
Mean Conc (mg/dL)
SD (mg/dL)
CV (%)
2-3. Triglyceride
Mean Conc (mg/dL)
SD (mg/dL)
CV (%)
• 13 •
ElementʰMulti Test Strip Information
LIMITATIONS OF SYSTEM for glucose test
The ElementʰMulti Glucose Test Strips provide accurate results when
the following constraints are observed:
• Do not use neonate samples.
• Inaccurate results may occur when in shock, hypotensive, hyperglycemic, or
hyperosmolar state with or without ketosis.
• Glucose test strips used above altitudes of 10,000 feet will have an effect on
test results.
Please note the following interferences that may affect test results:
• ElementʰMulti Glucose test strip results can be used with hematocrit
levels in the range of 20% to 60%. If the hematocrit range is out of the
range(20%~60%), then the test results may be lower or higher than actual
value.
• Interferences: Acetaminophen, Uric and, Ascorbic acid (Vitamin C), and other
reducing substances when occurring in normal blood or normal therapeutic
concentrations do not significantly affect results. However, abnormally high
concentrations may cause inaccurately high results.
• Lipemic samples; Cholesterol up to 500 mg/dL or triglyceride up to 3000mg/dl
do not significantly affect the results. Values beyond these levels should be
interpreted with caution.
• Blood samples that contain a high concentration of dissolved oxygen may
lower the test result.
• EDTA containing tube is recommended as an anticoagulant tube.
Performance Characteristics:
Accuracy:
The accuracy results obtained with the ElementʰMulti glucose and cholesterol
measuring system were compared to glucose results obtained with the Hitachi
meter 747, a laboratory instrument. Glucose levels were measured on 160
patients at three different clinical centers.
System accuracy results for glucose concentration <75 mg/dL (4.2 mmol/L)
Within ± 5mg/dL
(within ± 0.28 mmol/L)
Within ± 10mg/dL
(within ± 0.56 mmol/L)
Within ± 15mg/dL
(within ± 0.83 mmol/L)
20/28(71%)
26/28 (93%)
28/28 (100 %)
System accuracy results for glucose concentration ≥ 75 mg/dL(4.2 mmol/L)
Within ± 5mg/dL
Within ± 10mg/dL
Within ± 15mg/dL
Within ± 20mg/dL
76/132(58%)
111/132(84%)
128/132 (97%)
132/132(100%)
Precision:
Precision Results for venous blood samples.
Mean (mg/dL)
40
81
135
233
350
CV (%)
3.7
2.7
3.1
3.3
1.8
Precision Results for control solutions.
Mean (mg/dL)
47
106
307
CV (%)
3.3
3.1
3.1
The performance of the glucose test strips has been evaluated in laboratory and
in clinical tests (Please refer to strip instructions for use for more details).
Measurement Range: The measurement range of the ElementʰMulti Glucose
Testing is 10 to 600 mg/dL (0.6-33.3mmol/L).
• 14 •
• 15 •
Setting Your Meter
Setting Your Meter
Battery Use
Setting Mode
The ElementʰMulti requires two(2) AAA 1.5 volt alkaline batteries.
It is recommended to set your ElementʰMulti meter properly before using.
When to replace the batteries:
The meter will give you an indication on the display that the batteries need to be
changed. When the battery icon is displayed, please change the batteries to high
quality alkaline batteries. It is recommended to keep a spare set of batteries on
hand. To extend battery life, remove the test strip as soon as a result is displayed.
The meter enters setting mode with a beep sound
by pressing the mode (
) button for 3 or more
seconds in the stand-by status. Press Mode ( )
button for the next step.
How to install /replace the batteries:
1. Open the battery cover on the back of the ElementʰMulti.
2. Remove old batteries from the compartment and safely discard.
3. Insert the new batteries into the battery compartment as marked on the
inside compartment.
4.Close the battery cover. To make sure the batteries were installed
correctly, push either one of the two buttons on the front of the meter to turn
the ElementʰMulti on.
By pressing Up( ▲) or Down ( ▼ ) button, adjust
year and press Mode ( ) button.
<Follow Action>
1. Check your meter with the control solution.
2. Perform your test again.
By pressing UP( ▲) or Down ( ▼ ) button, adjust
date, month and time, and then press Mode (
)
button.
Caution
Caution
Remove both batteries from the battery compartment and dispose of them according to
your institution's guidelines.
Make sure that the date and time are set properly to enable your data to be stored and
downloaded properly.
• 16 •
• 17 •
Checking the system with control solution
Setting Your Meter
Quality control by control solution
By pressing Up(▲) or
Down(▼) button, select testing
unit and press Mode ( )
button.
By pressing Up(▲) or Down(▼
) button, select temperature
unit and press Mode ( )
button.
By pressing Up(▲) or Down(▼) button, select average
date and press Mode ( ) button.
Note : This average date is applied to glucose
testing only.
Control testing, also known as quality control testing, is used to ensure all the
parts of the test system are working properly together and the test results are
accurate and reliable within the limits of the system. Contact customer support of
local representative.
The users should follow their facility's policies on when controls should be tested
(for example: with each new test strip lot; monthly as a continued check on
storage conditions;whenever issues (storage,operator,or other) are identified or
there are questions about the results).
The control solution should be used
• Whenever you suspect the meter or test strip is not functioning properly.
• If your blood glucose test results are not consistent with your symptoms or if
you think they are not accurate.
• If you have dropped the meter
• For quality control at the point of care
• For teaching or learning the system
By pressing Up(▲) or Down(▼) button, select Alarm
ON/OFF and press Mode (
) button.
If you select Alarm ON, you can set the time by pressing
Up(▲) or Down(▼) button, and press Mode (
)
button(you can set 2 alarms).
By Pressing ▲▼, select print ON/OFF and press
Mode(
). If you select ‘ON’ and press Mode(
)
button to active it. If you select print, this setting mode is
completed.
• 18 •
Note:
The Elementʰ Multi Control Solutions are sold separately.
The TC(Level 1, Level 2), TG(Level 1, Level 2) and HDL (Level 1, Level 2) control
solutions can be obtained.
• 19 •
Checking the system with control solution
Caution
Please check the expiry date on the instructions for use provided with each
control solution.
Total Cholesterol strip or profile test strip in Total Cholesterol test area should
be used only Total Cholesterol control level 1, level 2. HDL Cholesterol strip
or profile test strip in HDL Cholesterol test area should be used only HDL
Cholesterol control level 1, level 2.
Triglyceride strip or profile test strip in triglyceride test area should be used
only triglyceride control level 1, level 2.
Glucose test strip should be used only glucose control solution Low, Normal
and High.
It is recommended that the control solution is stored at room temperature
before testing.
3. Check the code number on the display of the meter with
that on the strip vial.
4. Press Up( ▲ ) button and the meter displays the symbol of
control solution(
).
5. In 5 seconds the symbol of sample blood is blinking.
6. Place a drop of solution on a clean and
dry surface (for example: the lid of your
test strip vial).
• Profile test
Testing procedure
1. Insert the test strip and press mode(
Checking the system with control solution
) button.
7. Apply the prepared control solution to the
test strip by using capillary rod.
2. Place the RFID-tag on the strip vial to the
area of the RFID symbol (
) on the meter.
8. Apply the control solution to the test area.
Caution : If you want to test all three test items (TC, HDL
and TG), please collect the control solution with
each capillary rod.
9. The test results will be displayed in 2 minutes.
Caution
The radiation of RFID (
) recognition is within 2cm.
The meter will revert back to stand-by status if there is no operation within 5 seconds.
• 20 •
Caution : Whenever you change the test strip vial,
Please follow the code recognition procedure.
• 21 •
Checking the system with control solution
Checking the system with control solution
• Glucose test
6. Results appear in 3 seconds. Compare the
result to the range printed on the test strip vial,
the results should fall within that range.
Testing procedure
1. Shake the control solution before use.
st
2. Discard the 1 drop of control solution, this will
eliminate any residue.
3. Place a drop of control solution on a clean and dry
surface(ex. The lid of the test strip vial).
4. Insert a test strip into the port firmly and press
Up(▲) button. The symbol of control solution
(
) will appear on the display of meter. This
will allow you to differentiate between a control
solution test and an actual blood test for future
reference.
5. Apply the test strip to the control solution.
• 22 •
Testing tips:
• Please make a test after reading the instructions for use of control solution
thoroughly.
• Keep clean of the test area on the meter.
• Keep test strips and control solutions in proper condition according to the
instructions for use provided, such as expiry date, storage condition and so
forth.
• Before testing, make sure that the test strips and the meter for lipid profile
are at the temperature of 18-30℃(64-86℉) and those for glucose at
10-40℃(50-104℉).
Caution
If your control solution tset result is out of range, please follow the next steps before
contacting customer support:
• Check the expiry dates on all the products you are using.
• Try another control solution test.
• If this tset result is out of range, try another control solution test with a new unopened
vial of strips.
• After following the appropriate steps and the control solution tset result is out of range,
do not perform a test. Please contact the infopia customer service at +82-31-460-0300
or [email protected].
• The control solution range is not the recommended range for your test.
• Discard the used control solution and the test strips carefully according to the local
regulations.
• 23 •
Checking the system with LipidProfile check strip
INSTRUCTIONS FOR LANCING DEVICE
Check your Elementʰ Multi meter with LipidProfile check-strip
PRECAUTIONS
When your meter has a problem.
Before first use.
When the test rusults of ElementʰMulti are higher or lower than your symtoms.
Caution
LipidProfile check strip test is no substitute for control solution test.
Insert LipidProfile check-strip and press and
buttons at same time over 3 seconds. Checkmode will be operated.
If your meter is working properly, “ooo” will be
displayed.
• Never use a lancet that has been used by someone else. This could lead to
contamination.
• If the lancing device is to be used by another person, the unit must be properly
disinfected and a new tip and lancet must be used.
• Do not leave the lancet in the device after use.
• A new lancet must only be placed into the lancing device directly before testing.
• This device has many small parts and could be a choking hazard for children if
swallowed.
• In the case of hospital use, hospitals need to consult their own infection control
protocols in order to avoid any contamination.
• Always dispose of the used lancet in a biohazard garbage container.
COMPONENTS
ȵ
Clear Tip
If your meter or check strip has a problem, “Err”
will be displayed. Please contact your local
representative, if “Err” persists.
Caution
To get the accurate result, the meter should be checked in room temperature(23~250C).
Keep the LipidProfile check-strip out of dirict sunlight for accurate test.
• 24 •
Ejection System
ȵ
ȴ
Depth Indicator/Adjustable Tip
ƌ
ȵ
ȶ
Release Button
Lancet Holder
• 25 •
Sliding Barrel
HOW TO USE
6. Hold the tip firmly in one hand then pull out the
sliding barrel with the other hand. This will cock the
lancing device.
Wash your hands carefully with warm water to increase the circulation of the
blood into the fingers.
Dry hands thoroughly until the finger to be pricked is completely dry. Please read
the following steps with corresponding illustrations to understand how to use the
lancing device.
Click
1. Unscrew the tip of the lancing device by turning it
counter-clockwise while holding the base firmly.
2. With two fingers, pull out the lancet carrier and hold
it in place.
3. While holding the lancet carrier, insert a new sterile
lancet into the bottom of lancet carrier.
4. Twist the cap of the lancet off.
5. Put the tip of the lancing device back on and turn it
clockwise.
• 26 •
7. Place the lancing device in place. Hold the lancing
device firmly against the side of the finger, with the
cap resting on the finger. (The harder it is pressed,
the deeper the puncture is.) Press the release button
to take a sample.
8. Unscrew the tip of the lancing device by turning it
counter-clockwise.
9. Push the lancet ejector forward with the thumb and
simultaneously pull out the sliding barrel to dispose
of the used lancet in a proper biohazard container.
RECOMMENDED AVAILABLE LANCETS
Some general sterilized lancets are BD-Ultra Fine, Cleanlet Fine, E-Z Ject, G-P
Lite, Microlet, Monolet, One Touch, Soft Touch, Therasense, Ultra TLC and Unilet
GP, Gentlet.
Note: Some less known lancets may not work properly with the lancing device
due to their dimensions.
Please, contact your supplier to make sure you are using proper lancets.
• 27 •
Testing Your Blood - Preparation
Blood testing
Testing Your Blood
Caution
A strip instructions for use is included with each box of test strips.
Please read the strip instructions for use along with this section completely and
carefully before testing.
Testing supplies
To perform a blood test you need:
• ElementʰMulti meter
• Test strips
• Sterile lancet
• Capillary rod
• Lancing device
You may get an inaccurate result if the blood sample is not completely fill in a single
action.
Venouse whole blood and serum process for Profile test
For venous whole blood and serum, acceptable anti-coagulants are
EDTA, heparin and these samples may be stored at 4℃~20℃(39℉
~68℉) for three days.
Please follow the procedure below.
1. Allow blood sample to reach room temperature.
2. Anti-coagulated blood should be mixed well prior to testing.
3. Remove the stopper from the holder and collect the sample by using pipette.
Optional method
- Take out a drop of blood sample on a clean container.
- Apply your blood sample to the Elementʰ Multi Profile strip and do not take off capillary
rod until you get the beep sound. The test will automatically start.
4. Apply the sample to the test strip.
Caution
1) To reduce the chance of infection.
• The lancing device and sterile lancets should NOT be shared with others.
• Always use a new, sterile lancet.
• Lancets are for single use only.
• Avoid getting hand lotion, oils, dirt, or debris in or on the lancets and the lancing
device.
2) Do not operate the meter in direct sunlight.
3) Practice using the lancing device and become accustomed with its use.
Wash your hands with warm and clean water with soap. Dry your hands completely
before testing.
• 28 •
Caution :
Do not freeze the samples, but store at4ŭinstead and test quickly.
Please test freshly collected samples. If the samples are not fresh, LPL(lipoprotein
lipase) or LCAT(lecithin cholesterol acyltransferase) may affect the form of lipoprotein.
• 29 •
Testing Your Blood
Test Procedure
Capillary blood process
1. Test for profile strips
Caution
You may get an inaccurate result if the blood sample is not completely fill in a single
action.
Insert a profile test strip and press mode
(
)button.
1. Cholesterol test
When you collect the sample, please use the capillary rod provided with the test
strip package. Make sure enough sample has been collected to the capillary rod.
Apply your blood sample to the Profile strip and do not take off capillary rod until
you get the beep sound. The test will be started automatically.
[ Correct ]
[Incorrect ]
Caution
If blood is stained outside the sample area, carefully wipe the stain out with a tissue.
Do not allow the wiping tissue to touch the open end of the sample area of the collecting leg.
Place RFID-tag on the strip vial to the area of the
RFID symbol (
)on the meter.
Make sure the code number matches the code
on the strip vial
2. Glucose test
Place your fingertip to the top edge of glucose test
strip and do not take off until you get the beep
sound.The test will be started automatically.
Correct
Completely Filled
Applying Blood
Correct
Incorrect
Poorly filled
The meter displays the code number and the
testing symbols (
,
,
)
together. In 5 seconds the meter automatically
enters into testing mode.
Please apply the sample to the total cholesterol
test area of test strip until you hear beep sound.
Then, the symbol,
disappears.
Incorrect
• 30 •
• 31 •
Test Procedure
Test Procedure
2. Test for each single item
Please apply the sample to the HDL-cholestrol
test area of test strip until you hear beep sound.
Then, the symbol,
disappears.
Please apply the sample to the triglyceride test
area of test strip until you hear beep sound.
Then, the symbol,
disappears.
The meter displays
, blinking in
order, which means it is under test.
Total cholesterol is displayed with 3 times
of buzzing sound.
In the case of calculated LDL-cholesterol, if
density of triglyceride is over 350mg/dL, it can't
be measured.
1) Total Cholesterol test
Insert a total cholesterol test strip and press
mode (
)button.
Place the RFID-tag on the strip vial to the area of
the RFID symbol (
)on the meter.
Make sure code number matches the code on
the strip vial.
The meter displays the code number and the
testing symbols (
) together.
In 5 seconds the meter automatically enters into
testing mode.
The symbol of blood is blinking.
In order to check each test item, please press up or down button. You can
check out each result of Total Cholesterol, HDL-Cholesterol and Triglyceride.
• 32 •
• 33 •
Test Procedure
Test Procedure
The meter displays
, blinking in order,
which means it is currently undergoing tests.
When the test is completed (in 2 minutes), the
meter displays the test result of
with the
symbol.
The symbol of blood is blinking.
Please apply the sample to the test area of
test strip until you hear beep sound.
2) HDL-Cholesterol test
Insert a HDL-Cholesterol test strip and press
mode (
)button.
The meter displays
, blinking in
order, which means it is under test.
Place the RFID-tag on the strip bottle to the area
of the RFID symbol (
)on the meter.
Make sure code number matches the code on
the strip vial.
The meter displays the code number and the
testing symbols (
) together. In 5 seconds the
meter automatically enters into testing mode.
• 34 •
When the test is completed (in about 2 minutes),
the meter displays the test result of
with
the symbol.
• 35 •
Test Procedure
Test Procedure
3) Triglyceride test
Insert a triglyceride test strip and press mode
(
) button.
The meter displays
, blinking in
order, which means it is under test.
Place the RFID-tag on the strip bottle to the area
of the RFID symbol (
) on the meter.
When the test is completed (in about 2 minutes), the
meter displays the test result of
with the symbol.
Make sure code number matches the code on
the strip vial.
The meter displays the code number and the
testing symbols (
) together. In 5 seconds the
meter automatically enters into testing mode.
The symbol of blood is blinking.
Please apply the sample to the test area of
test strip until you hear beep sound.
• 36 •
• 37 •
Glucose test strip Discard Function
Test Procedure
3.Test for glucose
Firmly insert the glucose test glucose test strip into the test port
ʰ
of Element Multi meter and then the power will automatically
turn on with the code number, temperature and time.
Make sure code number on display of the meter correspond
with that on the tset strip vial. The color coding label of the back
on the test strip automatically indicates the code number in this
system.
The symbol of blood is blinking.
1. After checking your test result, turn the meter upside down and slide the
ejector button twice forward to remove the test strip from the meter.
2. Discard the used strip and lancet to a proper place, according to the local
regulation.
Once the sample is applied, the meter displays
3, 2, 1 in order.
Then, the meter completes the test with the test result.
Caution
1. If the code is not displayed after 3 seconds, pull the test strip out of the port and restart
the procedure from the beginning.
2. If the codes on the display and that on the test vial do not match, try another new strip.
If the mismatch persists, please contact your local representative for help.
3. If the meter does not power on, pull the test strip out of the port and re-insert the test strip.
4. Avoid testing under direct sunlight for more accurate test result.
5. If you apply your sample too early, error message will appear on the display(refer to
page 47)
• 38 •
Caution
1. If you push the discard button forward too much, it may be damaged.
2. Do not give strong impact to meter.
• 39 •
Alternate site testing at glucose measuring
Note : This alternate site testing is applied to glucose testing only.
Performing a Blood Test using an Alternate site
Important :
We recommend that you test on your fingertip if you are testing for hypoglycemia (low blood glucose) or if you have a history of reoccurring hypoglycemia.
Upper Arm
Forearm
Dorsal Hand
Ventral Palm
Fingertips
Thigh
Calf
Important Information About Using Alternate Sites Testing :
- Alternate sites where you can test are dorsal hand, ventral palm, upper arm,
forearm, calf, and thigh.
- Under certain conditions, blood glucose test results obtained using samples
taken from your alternate sites may differ significantly from fingertip samples
- The conditions in which these differences are more likely to occur are when your
blood glucose is changing rapidly such as following a meal, as insulin dose, or
associated with physical exercise.
- When blood glucose is changing rapidly, fingertip samples show these changes
more quickly than alternate sites samples.
- When your blood glucose is falling, testing with a fingertip sample may identify
a hypoglycemic (low blood glucose) level sooner than a test with a alternate
sites sample.
- Use alternate sites samples only for testing prior to or more than two hours after
meal, insulin doses, or physical exercise.
- Testing performed within two hours after meals, insulin doses, or physical
exercise or whenever you feel that your glucose levels may be changing rapidly
should be done from the fingertip.
- You should also use fingertip testing whenever you have a concern about
hypoglycemia (insulin reactions) such as when driving a car, particularly if you
suffer from hypoglycemic unawareness (lack of symptom to indicate as insulin
reaction), as forearm testing may fail to detect hypoglycemia.
• 40 •
To ensure accurate results when lancing your forearm, upper arm, hand, thigh,
or calf, wash the test site with soap and water.
Make sure there is no cream or lotion on the test site.
Thoroughly dry your hands and test site.
- Consult your healthcare professional(doctor) before you begin using the
alternate site
Caution
- To ensure accurate results when lancing your arm (Upper arm or forearm), leg (calf or
thigh) or palm (ventral palm or dorsal hand), wash your hand and test site with soap
and water.
- To receive accurate test results, 0.3֡ minimum sample volume is required at least .
• 41 •
Reviewing Your Results
Reviewing Your Results
Every test result is stored with its date and time of test.
Profile test results
The meter stores 200 memories regardless of test items.
When the test results is over the capacity memory, the recent test result will
replace with the oldest test result.
Press Mode (
) button.
Press Up(▲) or Down(▼) button for reviewing
the rest result.
When there is no memory in the meter,
will be dispiayed.
Glucose Test results
Press Mode (
) button.
How to enter into Memory Mode
In order to enter into Memory mode, please press Up(▲) button at standby
mode. By using Up(▲) or Down(▼) button you can recall cholesterol and
glucose test results. Press the mode button after you select between profile and
glucose test results you would like to review.
• 42 •
Press Up(▲) button and the meter displays the
average data and the symbol (
) you had set
previously. Please press ▲ or ▼ button for
reviewing.
• 43 •
ElementʰMulti Software and Thermal Printer
Deleting Your Results
Deleting individual test result
To delete any individual test result in the memory press
▲ or ▼ button for 3 or more seconds, while the test
result to delete is displayed. Then,
is blinking.
After the third beep sound, the test result is deleted. If
the print is set “ON”, press ▼ button in 3 or more
seconds can be print memory results.
The ElementʰMulti results can be transmitted to a personal computer.
ElementʰMulti software and an interface cable are required for transmitting results of ElementʰMulti profile and glucose measurement system
to a personal computer. The software is available free of charge from
http://www.infopia21.com.
Interface(PC)cable and Thermal printer can be bought from your local
distributor.
Deleting all test results
To delete all results press ▲ and ▼ button at the same
time for 3 or more seconds, while any test result is
displayed. Then,
is displayed and
is blinking.
After the third beep sound all test results are deleted.
Printing Your Results
The meter connects the interface cable to your PC or Printer.
‘Con’ on the LCD display
Printing test results
Press ▼ button in 3 or more seconds can be print
memory results. (If the print is set “ON”)
If ElementʰMulti connected interface cable to your
PC(software is running). ‘PC’ on the LCD display
The deleted test results can’t be recovered. Please be careful in deleting the test results.
If ElementʰMulti connected interface cable to your
Printer(Printer power On). ‘Ptr’ on the LCD display
Caution
• 44 •
• 45 •
Cleaning Your Meter and Maintenance
Troubleshooting
Message
Meter
Your meter does not require special maintenance or cleaning. Avoid getting dirt,
dust, blood, control solution, or liquids on the meter, the test port or data port.
Your meter operation temperature is 18~30℃(64~86ºF) for cholesterol and
10~40℃(50~104ºF) for glucose.
It is recommended that you store the meter in its carrying case after each use.
A cloth dampened with water and mild detergent can be used to wipe down the
outside of the meter.Your ElementʰMulti meter is a precision instrument.
Please handle it with care.
1) Do not disassemble or modify the meter.
2) Do not place the meter in places with high humidity.
3) Do not place the meter in polluted or dusty areas.
4) Do not expose the meter to impact, shock, vibration, inclination, etc. and keep
it in a safe place.
5) Do not place the meter with chemical products or with gases.
6) Keep it away from direct sunlight.
7) Close the vial, immediately after taking out the test strip for the test.
8) Keep the test strip away from children.
9) Keep the lancing device clean by using alcohol or soap and water.
10) The meter should be cleaned with soft cloth or paper tissue, in case of dirt.
Probable cause
Action required
This message appears
when the hardware
defects.
Ex) The Flash ROM
write/read func-tion
does not work.
Oxidization voltage is
out of range, etc.
Reboot the meter by placing the
batteries again when no test strip is
inserted.
Please contact your local representative or customer support when the
problem persists.
This message appears
when test strip may be
contaminated or reused.
(Only for Blood glucose
measurement)
Please insert a new test strip
and perform your test again.
This message appears
when the blood is not
enough (Only for Blood
glucose measurement)
Please insert a new test strip and apply
the sufficient sample blood.
This message appears
when strip signals
without any Blood or
Control solution or
other sample applying.
(Only for Blood glucose
measurement)
Please insert a new test strip
and perform your test again.
Lancing Device:
Clean the lancing device and caps with soap and luke warm water. To disinfect
the lancing device, prepare a disinfectant solution of one part household bleach
to 10 parts water. Dampen a cloth with this solution and wipe the lancing device
thoroughly. Soak only the cap for at least 30 minutes in the disinfectant solution.
Do not soak the lancing device in liquid. Rinse the lancing device and cap with
water and dry thoroughly. Properly discard the used lancet.
• 46 •
• 47 •
Troubleshooting
Troubleshooting
Message
Probable cause
Action required
Message
Probable cause
Action required
The test result is lower
than the following.
Glucose : less than
20mg/dL
TC : less than 100mg/dL
TG : less than 70mg/dL
HDL : less than 25mg/dL
Please retest with a new test strip.
If the problem persists, please contact
your local representative or customer
support.
This message appears
when blood sample is
input before the symbol
for blood blinks.
(Only for Blood glucose
measurement)
Please wait for the meter displays the
icon blinking before applying your blood
sample.
This message appears
when the color bar of
the strip is dirty or not
good or there is too
much light.
Please insert a new test strip and
perform your test again.
Avoid testing under direct sunlight.
Cholesterol : The
ambient temperature is
over 86ȓ(30ŭ).
Glucose : The ambient
temperature is over
104ȓ(40ŭ)
Place the meter at the temperature
between 64~86ȓ(18~30ŭ) for cholesterol
test and 50~104ȓ(10~40ŭ) for glucose
test for more than 10 minutes and test
again.
This message appears
when Elementʰ Multi
cholesterol test strip is
removed during testing.
Test again with a new test strip and
make sure the test strip to be inserted
into the right port of each item. Do not
move the test strip from the meter during
the test.(If strip isn’t removed, it says
that your TC Result may be over
600mg/dL)
Cholesterol : The
ambient temperature is
less than 64ȓ(18ŭ)
Glucose : The ambient
temperature is less than
50ȓ(10ŭ)
Place the meter at the temperature
between 64~86ȓ(18~30ŭ) for cholesterol
test and 50~104ȓ(10~40ŭ) for glucose
test for more than 10 minutes and test
again.
Problem with transmit
of PC or Printer.
Check your connection port of
PC/printer and reconnection. If the
problem is still unsolved, Please contact
your local representative or customer
support.
This message appears
when test strip may be
contaminated, reused
or not inserted.
Please insert a new test strip of cholesterol
and perform your test again.
The test result is higher
than the following.
Glucose : more than
600mg/dL
TC : more than 400mg/dL
TG : more than 600mg/dL
HDL : more than 80mg/dL
Please retest with a new test strip.
If the problem persists, please contact
your local representative or customer
support.
This message appears Please recognize the code and retest
with 3 times of beep (refer to page 23)
sound with ‘CODE’ and
‘Er’ on the display are
none memory code
and/or unrecognized strip
used.
• 48 •
• 49 •
Troubleshooting for Inconsistent or unexpected test
results
Product Specification
If you continue to get unexpected results, check your system with control
solution.
If you experience symptoms that are not consistent with your glucose and
cholesterol results, Please make sure you have followed all instructions in this
instructions for use. Then, contact infopia Customer Service. Never ignore
symptoms or make significant changes to the control program.
Product Specification
Devision
Content
Sample type
Capillary whole blood, Venous blood,
Serum
Testing types
Total cholesterol
HDL-cholesterol
Triglyceride
LDL-cholesterol Calculated
Testing method
Enzymatic-colorimetric method
Testing range
Total cholesterol : 100~400mg/dL,
Triglyceride :70~600mg/dL,
HDL-cholesterol : 25~80mg/dL
Testing time
2 minutes
Calibration
Plasma - Equivalent
Sample volume
5㎕
Operating humidity
10 ~ 90 %
Operating temperature
18~30ºC(64~86ºF)
Storage temperature
2 ~ 30ºC(36 ~ 86ºF)
Hct range
30 ~ 55%
ʰ
Element Multi
Cholresterol
Test
• 50 •
ʰ
Element Multi
glucose test
Devision
Content
Sample type
Capillary whole blood
Testing Types
Glucose
Test range
10~600 mg/dL
Sample volume
0.3 ㎕
Testing time
3sec
Calibration
Plasma - Equivalent
Operating humidity
10 ~ 90 %
Operating temperature
10~40ºC(50~104ºF)
Storage temperature
2 ~ 30ºC(36 ~ 86ºF)
Hct range
20 ~ 60%
Standard supported
ISO/IEC 15693
Nominal Read/write range
< 2cm
Antenna
Integrated
Frequency
13.56 MHz
RFID
• 51 •
Warranty
Product Specification
Devision
Content
Measuring principle
Electrochemical, Spectroscopy
Storage memory
200 measurement data
Operation temperature
Cholesterol : 18 ~ 30℃(64~86℉)
Glucose : 10~40℃(50~104℉)
Operation humidity
10 ~ 90%
Display type
LCD
Size(W*D*H)
61 x 109 x 23 (mm)
Weight
77.5g (including battery) ± 1g
Power supply
DC (AAA) 1.5V x 2
Battery life time
Running over 1,000 times
PC port
For cable connection between
PC and meter
Manufacturer's warranty:
infopia Co., Ltd., warrants to the original purchaser that this instrument will be free
from defects in workmanship for 3 years from the date of original purchase.
Limitations of warranty:
This warranty is subject to the following exceptions and limitations:
1. infopia Co., Ltd. shall not be required to replace any unit which are damaged
or malfunction due to abuse, accidents, alteration, neglect, misuse, maintenance by someone other than infopia Co., Ltd., or failure to operate in
accordance with the instructions.
2. infopia Co., Ltd. reserves the right to make changes in design without
obligation to incorporate such changes into previously manufactured
instruments.
3. infopia Co., Ltd. has no knowledge of the performance of the instrument
when the test strip is altered or modified in any manner.
For warranty service :
Purchaser must contact the local representative for assistance and/or
instructions for obtaining service of this instrument.
Important:
Speak to the infopia Co., Ltd. local representative before returning your instrument for
any reason. She/he will give you the information needed to resolve your problem
correctly and efficiently.
• 52 •
• 53 •
Symbol Reference
Symbol
SN
Description
Serial number
Consult operating instructions
Used By
This product fulfills the requirements of Directive
98/79/EC on in vitro diagnostic medical devices
Caution, consult accompanying documents
For In Vitro Diagnostic Use
Batch code
Catalogue Number
Temperature limitation
Do not re-use
Date of Manufacture
Keep away from sunlight
Separate collection for waste electrical and
electrorinic equipment
Self-Testing Used
Manufacturer
Authorized representative in the European Community
• 54 •
• 55 •