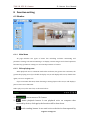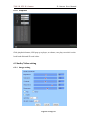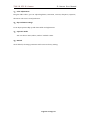
1
IP Camera User Manual Name:High definition Infrared PTZ IP Camera Version:V4.4 Applicable equipment version:V7.4.4.1.1-20140424 and later This documents can be used for 720P IR PTZ IP Camera. Page 1 on Page 43 720P IR PTZ IP Camera IP Camera User Manual Statement This manual may exsit in some technical details description inaccurate or printing errors, if you can not solve the problem as this manual when using,pls contact our technical department to inquire relevant operation method. The contents of this manual will update at any time, without prior notice. Attention Installation environment Away from high temperature pyrogen and environment; avoid direct sunlight. In order to ensure the normal heat dissipation, you should avoid poorly ventilated places, pay attention to waterproof, moistureproof, lightning protection. If you want to install outdoors, you should install waterproof casing to fix the camera in it. The machine should be installed horizontally or wall hanging, avoid installed in place of violent vibration, don’t put other devices on it. To avoid electric shock and fire Please don’t use wet hand to touch the power and camera. Don’t splash liquid on the camera,, to aviod the machine of internal short circuit or fire. Do not put other devices on the camera directly. If non professional person, please don’t open camera shell to avoid damage and electric shock. Shipping The packing with shock resistance design and test, to make sure camera will not be damaged accidentally, so please use original packing and carton during shipping. Please don’t move camera in extremely hot and cold place, to avoid machine condensation, affect the lifetime. It is strictly prohibited to move the machine with electricity, otherwise the mainboard will damage. Page 2 on Page 43 720P IR PTZ IP Camera IP Camera User Manual Content 1 2 3 4 5 6 Product introduction.................................................................................................................5 Function introduction............................................................................................................... 6 Apperance and Description...................................................................................................... 7 Equipment installation..............................................................................................................8 4.1 Operating environment.............................................................................................8 4.2 Equipment installation............................................................................................. 9 Network setting......................................................................................................................... 9 5.1 Use installation guide to configurate IP Camera.................................................... 9 5.2 access to ip camera..................................................................................................11 5.3 Configuration manufacturer’s DDNS to access the camera.................................13 5.3.1 Port forwarding............................................................................................... 13 5.3.2 DDNS.................................................................................................................14 5.3.3 Manufacturers domain name visit.................................................................15 5.3.4 Third party dynamic domain name visit.......................................................16 5.4 Mobile Access...........................................................................................................16 5.5 Mobile phone software visit................................................................................... 16 5.6 WIFI Setting............................................................................................................. 16 5.7 VLC Streaming media player monitoring.............................................................. 18 Function setting....................................................................................................................... 21 6.1 Monitor..................................................................................................................... 21 6.1.1 Main Menu........................................................................................................21 6.1.2 Video playing zone.......................................................................................... 21 6.1.3 Monitoring....................................................................................................... 22 6.1.4 Multi-Device Window...................................................................................... 22 6.1.5 Browser SD card............................................................................................... 22 6.1.6 Capture............................................................................................................. 22 6.1.7 Record...............................................................................................................22 6.1.8 Playback............................................................................................................ 23 6.2 Audio/Video setting................................................................................................ 23 6.2.1 Image setting....................................................................................................23 6.2.2 Video setting.................................................................................................... 25 6.2.3 Audio setting....................................................................................................27 6.3 Network setting....................................................................................................... 28 6.3.1 Network parameter setting............................................................................ 28 6.3.2 Wireless setting............................................................................................... 29 6.3.3 remote access setting......................................................................................30 6.3.4 platform setting............................................................................................... 31 6.3.5 ONVIF setting...................................................................................................32 6.3.6 P2P setting.........................................................................................................32 6.4 Alarm setting............................................................................................................33 6.4.1 External alarm................................................................................................. 33 6.4.2 Motion detection............................................................................................. 34 Page 3 on Page 43 720P IR PTZ IP Camera 7 IP Camera User Manual 6.4.3 Alarm Linkage..................................................................................................34 6.4.4 Alarm time........................................................................................................35 6.5 Advance setting........................................................................................................36 6.5.1 User management........................................................................................... 36 6.5.2 Timing capture.................................................................................................36 6.5.3 Timing record.................................................................................................. 37 6.5.4 Email................................................................................................................. 37 6.5.5 FTP setting....................................................................................................... 38 6.5.6 PTZ setting....................................................................................................... 38 6.6 System setting..........................................................................................................39 6.6.1 Time setting..................................................................................................... 39 6.6.2 Initial setting....................................................................................................40 6.6.3 Equipment information.................................................................................. 41 FAQ............................................................................................................................................ 42 Page 4 on Page 43 720P IR PTZ IP Camera IP Camera User Manual 1 Product introduction IP Camera is a product based on embedded web server. It has multi-function image effect. It is an indepent installation monotoring system, built-in CPU and web serrver, transmit high quality image through internet. IP Camera can view images and control by web browser on PC or notebook remotely through LAN or internet. No matter in wired or wireless network environment, simple insatallation and interactive web broswer makes IP Camera works well. With multi alarm tools, it also can inform users take action when abnormal conditions. Usually used in stores, shops, schools, factories, families, and other places. IP Cameras can support mobile phone remote view and control PTZ. Before installation, pls check if all is complete. If the packing bad, please contact dealers. Except a IP Camera, the packing should contain: 1pc 5V power adaptor 1pc CD Note 1: Before opening the package, please read the manual carefully, and make sure all goods are the same as listed in manual, checking if the bottom code labels on machine is good. Note 2: If need machine with wifi function, please choose model with /w. It has built-in wifi module, and equip with antenna. Page 5 on Page 43 720P IR PTZ IP Camera IP Camera User Manual 2 Function introduction 32 bits processor and megapixel professional video decoding chip With H.264 Main Profile and Baseline profile compression, the image is more clearly and stream is more smaller, easy to transmit on internet and save storage space. support three streams viewing at the same time support remote view and PTZ control on mobile phone support 12 users at the same time (each stream 4 users) support external microphone, also can connect external audio collection devices(such as audio pick-up) at the same time, to realize audio collection, monitoring live voice remotely; support external speaker, transmit voice to Live remotely, to realize two-way talkback(tail line support required). Built-in web server that support IE browse and parameter setting, making one port to transmit all data, to facilitate users to network setting support 802.11b/g/n protocal, can be built-in wifi module, forming a wireless monitoring environment flexibly. support ONVIF protocal support P2P, entirely plug and play support UPNP, port mapping on Router automatically support 8 preset and self-checking centered Support MAX 32G TF Card, realizing timing capture, timing video, alarm picture and alarm record support 4 zones motion detection, and alarm linkage call preset Save on-site alarm record by SD Card,Email,FTP support 3 levels user permission setting Page 6 on Page 43 720P IR PTZ IP Camera IP Camera User Manual support remote upgrading 3 Apperance and Description Front panel Back panel Note: Different model with different port, please subject to entity. Page 7 on Page 43 720P IR PTZ IP Camera 1. IP Camera User Manual Power interface Connecting external power adaptor, requires 5V. 2. Wifi antenna Used for installing wifi antenna 3. Network interface (LAN) The interface is a 10/100M adaptive Ethernet interface, through this interface can be connected to all kinds of network devices, such as hubs, routers, switches, and so on. 4. Audio Input For external microphone or linear audio input signals, such as audio pick-up signals. If connect linear audio signal input, you should choose linear input in the aucio setting. 5. Audio output Output audio signal, using for external sound play devices, such as headphones, stereo. 6. TF Card interface Through this interface insert TF Card. 7. Network indicator light When indicator ligh flash slowly, it shows network is wired mode. When indicator light flash quickly, it shows network is wireless mode. 8. TF Card indicator light When camera with TF Card, the light is on; without TF Card, light is off. Note: Different model with different port, please subject to entity. 4 Equipment installation 4.1Operating environment Operating system: Windows 2000/2003/XP/vista/7 Network protocal: TCP/IP Page 8 on Page 43 720P IR PTZ IP Camera IP Camera User Manual PC Client: P4/128M RAM/40GHD/ video card support convergent divergent, Dirict X8.0 or above 4.2Equipment installation 1. Connect the IP Camera into your network or use crossed net cable connected to PC directly 2. Connect DC5V power supply 3. If network connect normally, within 5 seconds, the lamp(orange) in network interface will light up, data indicator lamp(green) will flash, then IP Camera connection finished physically. 5 Network setting Network connection diagram 5.1Use installation guide to configurate IP Camera 1) Connect the IP Camera to network or PC through net cable, then start the camera with electricity, as shown in the above. Note: If the IP Camera connect to PC directly, you should use manual allocation IP address of PC, and the IP address of Camera must in the same network segment as PC that can access to the Camera. 2) Upon IP Camera started, find “search tool”from CD and install, after finished, click Page 9 on Page 43 720P IR PTZ IP Camera IP Camera User Manual shortcut “search tool”on destop, as shown in below: 3) Click “Next”, popup below image: 4) select the device, then click “Next”, see below interface: Page 10 on Page 43 720P IR PTZ IP Camera 5) IP Camera User Manual Set up parameter, then click “Next”,after see below image, click “finish”to exit installation guide. 5.2access to ip camera 1) Please enter into http://192.168.1.88 on IE, then type in user name: admin, password: admin, as shown in below: Page 11 on Page 43 720P IR PTZ IP Camera IP Camera User Manual 2) click “confirm”, then you can see below: 3)click “PC view”, as shown below: Page 12 on Page 43 720P IR PTZ IP Camera IP Camera User Manual 4)click “download Active X”, popup below image, then click “run”(please don’t use “thunder”, using IE browswer) 5 ) After Active X installation finished, click “real-time view”, then you can see below interface: 5.3Configuration manufacturer’s DDNS to access the camera 5.3.1 Port forwarding If visit IP Camera from WAN, you must do port forwarding on the router. Take Netgear router for example. Page 13 on Page 43 720P IR PTZ IP Camera IP Camera User Manual Operation Steps: After login the interface of the router,choose “Port Forwarding”; Choose “Add custom Service” ; Input IP camera port; Input IP camera IP address,click “Apply”(the http port and ip address should be the same as figure 4 which set by you own). Note: Different router has different settings for port-forwarding; please kindly follow your router guide to do the port-forwarding. After the port-forwarding is done, you could view the IP Camera from WAN now. 5.3.2 DDNS Manufacturer's Domain name: Device manufacturer has established a DDNS, and allotted a dynamic domain name to every device, the domain name has been integrated into devices when producing. For example, enter domain name , the browser will Page 14 on Page 43 720P IR PTZ IP Camera IP Camera User Manual connect the device and display the IP address. Note: dynamic domain name by manufacturer manufacturer provides the user name and password Third Part Domain Name: User can also use third part DDNS, such as www.dyndns.com User must apply a free domain name from this website and fill the info into the below blanks (Figure 12) and save the settings. Then the domain name can be used. 5.3.3 Manufacturers domain name visit The router configuration parameters and camera parameters, in the browser to enter your user demo. Hipcam. org directly to the camera, such as manufacturers with user name: 99 a1234b, the domain name for 99 a1234b. Hipcam. Org Note: use the manufacturer domain name visit camera, doesn't need an HTTP port, input domain name only can access Page 15 on Page 43 720P IR PTZ IP Camera IP Camera User Manual 5.3.4 Third party dynamic domain name visit The product also can support third party ddns, such as oray Note: The third party DDNS realizes the function by analytical methods, after inputting the DDNS in browser, the characters would not change, if the port is not 80,need to add a colon and port behind the DDNS such as: http://demo.dyndns.org:1024 5.4Mobile Access In the mobile phone browser input domain name: http://viewipcam.dyndns.org/mobile.html 或 http://viewipcam.dyndns.org/wap.wml If the camera HTTP port is changed, please input: http://viewipcam.dyndns.org:端口/mobile.html 或 http://viewipcam.dyndns.org:端口 /wap.wml 5.5Mobile phone software visit 1.support android 、IPhone system 2.Go to the【App Store】for IPhone, search “hi player” Note: it is recommended that in "video parameters" page code of the time flow rate for 64 K code modify the following, frame rate set to 8 frames the following, if set too large, mobile phone decoding slow, can lead to phone the image to see a delay 5.6WIFI Setting 1. Through the local area network configuration IP Camera network parameters, makes a pc can access IP Camera; 2. Configuration wireless parameters of the wireless router 3. Configuration wireless parameters of the IP Camera Page 16 on Page 43 720P IR PTZ IP Camera IP Camera User Manual Note: if the router to wireless set not set password, it does not need to enter the password and click "check" Pop-up is shown below, says WIFI is set correctly, click on the "application" save Settings, if tip connection, please enter a password, and then click on the "check" Disconnect IP Camera after, power off to restart IP Camera, Can use WIFI connection Note: after open WIFI function, if need to use wired connection way, must first network cameras connected to the Internet, and then to the web in cameras electric start, or network cameras into the wireless connection to state Page 17 on Page 43 720P IR PTZ IP Camera IP Camera User Manual 5.7VLC Streaming media player monitoring This camera supports RTSP streaming, here you can view the camera using VLC player. For example: IP: 192.168.1.88 RTSP Port number: 554 Here I can enter one of the following URLs in the VLC. First stream:rtsp://192.168.1.88/11 Second stream:rtsp://192.168.1.88/12 TCP: 1.Open VLC Player, click “media”--- “open newtork streaming”, or press combination key “Ctrl+N”, as shown in below: 2.Inputting URL Address: RTSP://IP:port/11(first stream) RTSP://IP:port/12(second stream), RTSP://IP:port/12(third stream) (the port is RTSP Port, default is 554, can be omitted) Page 18 on Page 43 720P IR PTZ IP Camera IP Camera User Manual Note: RTSP using TCP connection need to type in “ :rtsp-tcp ”(do not include “”) in editing options. UDP: 1.Open VLC Player, click “media”--- “open newtork streaming”, or press combination key “Ctrl+N”, as shown in below: 2.Inputting URL Address: RTSP://IP:port/11(first stream) Page 19 on Page 43 RTSP://IP:port/12(second 720P IR PTZ IP Camera IP Camera User Manual stream), RTSP://IP:port/12(third stream) (the port is RTSP Port, default is 554, can be omitted) If you need RTSP monitoring by public network, you should mapping below ports: TCP UDP 554 RTSP port 554 RTSP port 6600 UDP port 6602 Audio port Page 20 on Page 43 720P IR PTZ IP Camera IP Camera User Manual 6 Function setting 6.1Monitor 6.1.1 Main Menu All page includes two types of menu bar: including real-time monitoring and parameter setting; real-time monitoring is to display camera images and related opertions function keys; parameter setting is to set related parameter of camera. 6.1.2 Video playing zone Video playback area is consistent with video resolution, the greater the resolution, the greater the playing area. If you double click play area, it will display full screen, double click again, recover to original size. If you set motion detection, when detecting a moving object is this area, it will display a pane to warn users abnormal. Under play area, it has statu bar, as shown in below: 1) 2) :Current status of IP Camera : Audio playback button: It can playback voice on computer that captured by device, click again, the function will be shut down. 3) : Audio sending button: It can send voice to the device that captured by Page 21 on Page 43 720P IR PTZ IP Camera IP Camera User Manual computer, click again; the function will be shut down. 4) File saving location setting: you may set the location for recording and capturing, the default location is D:/record 6.1.3 Monitoring You can set window monitoring size as requirement, divided into 3 kinds: first stream: 720P (1280*720); second stream: VGA (640*352); third stream: QVGA(320*176). You also can choose first stream, second stream, and third stream monitoring image. 6.1.4 Multi-Device Window The firmware inside the camera supports up to maximum of 9 cameras being monitoring at the same time. You can add other cameras in multi-device setting 6.1.5 Browser SD card If you insert the SD card, click on the SD card button in the pop-up page will list the contents of the SD card, as shown; 6.1.6 Capture Click the capture button, it will save the current playing images as pictures to seting path. 6.1.7 Record Click Video button, it will record the video stream and audio stream to setting path of local computer. When recording, the statu bar in video playback area will show it is redording. Click record button again, it stops recording. Page 22 on Page 43 720P IR PTZ IP Camera IP Camera User Manual 6.1.8 Playback Click playback button, Will pop up a player, as shown, can play recorded on the local hard disk and SD card video. 6.2Audio/Video setting 6.2.1 Image setting Page 23 on Page 43 720P IR PTZ IP Camera IP Camera User Manual 1) Color adjustment Drag the slider above, you can adjust brightness, saturation, contrast, sharpness, exposure, then meet each user’s visual preference. 2) Flip and mirror image It can adjust pictures flip up and down & left and right mirror. 3) exposure mode You can choose “Auto, indoor, outdoor”. Default is Auto. 4) Default Click “default”, the image parameter will restore to factory setting. Page 24 on Page 43 720P IR PTZ IP Camera IP Camera User Manual 6.2.2 Video setting 1. Video coding setting: Main profile and baseline adjustable, default is main profile 2. stream definition adjustment The equipment support first stream: 720P (1280*720) and Q720P (640*352), second stream: Q720P (640*352), QQ720P (320*176); the greater the resolution, image is clearer, but also greater stream, and greater network bandwidth. Default stream: first stream: 2048Kpbs; second stream: 512Kbps; Page 25 on Page 43 720P IR PTZ IP Camera IP Camera User Manual Max frame rate adjustment Setting maximum transmission speed per second, in the limited network bandwidth, we suggest lower bit rate and frame rate. 3. main frame interval Set up the interval between two I frame, if larger interval, it may cause the slow response when open image for the first time. 4. stream control method Stream control has two mode, namely: fixed stream(CBR), variable stream(VBR). When choose fixed stream, video encoder will coding at the speed in stream setting; When in variable stream, video encoding will coding compatible with image quality, based on stream setting speed, but not entirely at this speed. 5. OSD character superposition setting Through this option setting, you can load device name and time into video screen. Page 26 on Page 43 720P IR PTZ IP Camera IP Camera User Manual 6.2.3 Audio setting 1) Collecting audio: choose “open” means add audio signal when coding, choose “close” means do not add audio signal when coding. You can choose whether open audio collection for first stream, second stream and third stream separately. 2) Audio format: G711 and G726 are optional 3) Input options: You can define input volume and output volume, range: 1-100; Microphone input: default is 31 for input, 79 for output Linear input: Default is 15 for input, 79 for output Page 27 on Page 43 720P IR PTZ IP Camera IP Camera User Manual 6.3Network setting 6.3.1 Network parameter setting 1) LAN setting Equipment factory default IP address to automatically obtain IP ;By the automatic assignment of IP router 2) Http port IP Address identify a device in network, this device can run multi network program, each network program use network port to transmit data, so data transmit can be said to carried out between port and port. The port setting in this page is to set web server program using which port to transmit data. When do port mapping, it need to consistent with this port(factory default port is 80). 3) RTSP port Page 28 on Page 43 720P IR PTZ IP Camera IP Camera User Manual IP Camera support RTSP protocol, you can play by VLC and other tools directly. 4) RTSP permissions check When using RTSP Connection, if choose open, you need to input login user name and password; if choose close, you don’t need to input camera’s user name and password, then can enter into camera. 6.3.2 Wireless setting The interface of enable WIFI setting as below, users can click “search”, then it popup a page, displaying all WIFI network can be found, select a network, all parameters will fill into the parameter column(for example: SSID, encryption algorithm, etc.) automatically, users only need to fill in password and confirm password. After the configuration, you can click “check”, to test whether the configuration is correct. Note: Before configurate WIFI network, please check whether this device with built-in WIFI module, otherwise it can’t use wireless network. Page 29 on Page 43 720P IR PTZ IP Camera IP Camera User Manual 6.3.3 remote access setting 5) Show Internet IP address Click the “Show” button as above Figure , it will show you another new page displaying the WAN IP address when it is connected to the Internet. 6) Dynamic domain names settings Please refer to the content of the 5.3.2 DDNS. 7) UPNP UPNP stands for universal plug and play, if you started UPNP, once the IP camera was connected into the LAN, it will communicate with the router of the LAN. It will request the router to open a port to forward its own port. User doesn’t need to log in the router to set the port forwarding. Page 30 on Page 43 720P IR PTZ IP Camera IP Camera User Manual Note: users in the use of the function, need to confirm a router also is enabled UPNP; Because many router model, not necessarily can very good support UPNP, testing and supporting the router is very good with, or suggest not start the function. At present test and TP-LINK router cooperate good. 6.3.4 platform setting As shown in below, after open platform setting, you need to input “login ID”, “password”, “server address” (login ID, password, server address are provided by platform service provider) Note: When the camera connected with platform server, “connection statu” will show “online”, otherwise it is “offline”. Page 31 on Page 43 720P IR PTZ IP Camera IP Camera User Manual 6.3.5 ONVIF setting ONVIF switch: default is open Port: default is 8080 Permission: default is not verify (It depends on back end equipment. Mainly considering some back end equipments do not support permission verify) Time zone setting: prohibit (not belong to back end equipment change camera time) Image parameter setting: prohibit (not belong to back end equipment change image parameter) 6.3.6 P2P setting It can obtain P2P platform related parameters: equipment serial number (Note: The serial number of each equipment is unique, cannot repeated ) Page 32 on Page 43 720P IR PTZ IP Camera IP Camera User Manual 6.4Alarm setting 6.4.1 External alarm If the port has an external alarm detector, you can tick “external alarm input”, which enabled external alarm, as shown in below. If the alarmer is a normally open switch alarm, please choose “normally open”; if the alarmer is normally closed switch alarmer, please choose “normally closed”. Page 33 on Page 43 720P IR PTZ IP Camera IP Camera User Manual 6.4.2 Motion detection If you want to monitor a zone fixed, when the zone has exception, it enables alarm, you can choose motion detection function. Settings like below. The equipment can support 4 zones setting, you can enable it through tick the option box at the bottom of page. When enable a zone, the zone box will display on the screen, and list zone number, moving mouse to this zone box, you can drag the box to any position; also can move mouse to red box at the bottom right corner, drag it to change the size. After setting, click apply, motion detection will take effect. 6.4.3 Alarm Linkage When alarm triggered, the equipment will alarm with many ways, as shown in below picture: send alarm and pictures to email send captured pictures to assigned FTP server Page 34 on Page 43 720P IR PTZ IP Camera IP Camera User Manual send video recording to assigned FTP server relay output capture a picture, then save to TF Card Recording a video for 15 seconds, then save to TF card (including 1-3 seconds warning before video) linkage Preset: after the alarm, call preset alarm capture quanity, setting as required (1-3 pieces) 6.4.4 Alarm time The equipment will trigger alarm only after detected alarm in protection period. So you need to select which time to set protection carefully. Note: When setting time, please adjust system time firstly. Page 35 on Page 43 720P IR PTZ IP Camera IP Camera User Manual 6.5Advance setting 6.5.1 User management The system set 3 levels user permission, user name: admin/user/guest. Admin has highest authority, can do any setting. User can only operate PTZ, browse video, PC Client recording and image capture, etc, but can not do setting. Guest can only browse video, can not do any operation on equipment. When leaving factory, the default password of these 3 users are “admin”, “user”, “guest” separately. Please modify password for the first time using, to prevent unauthorized users to log in. 6.5.2 Timing capture Choosing “save image to SD Card” or “save images to FTP server”, at a regular interval (can be set like above picture), the device will capture images saving to SD Card. Page 36 on Page 43 720P IR PTZ IP Camera IP Camera User Manual 6.5.3 Timing record Video file duration: can set video file duration, default is 600 seconds. Open video: can choose whether open video to TF Card Stream: can set recording stream recording time: set timing recording time as required 6.5.4 Email The items in above picture is mandatory fields need to fill in. If the filled content is not qualified, the setting will not be successful. After writing completed, click Apply firstly, then Page 37 on Page 43 720P IR PTZ IP Camera IP Camera User Manual testing, it will reminder testing successfully when finished. Note: 1. The server of sending email should support POP3 protocol. In order to strengthen security and reduce spam, many mail server closed this protocol at present. So users need to check if the server support POP3 before choose mail server, otherwise the mail cannot send successfully. 2. For some mail server using SSL certificate, it must enable SSL option, then can send email successfully. 6.5.5 FTP setting Note: If using FTP function, you need to apply the user name and password from FTP Server firstly, and apply a certain storage space at the same time, also asking the user have anthority to write and build sub-directory to storage space. s 6.5.6 PTZ setting Page 38 on Page 43 720P IR PTZ IP Camera IP Camera User Manual Cruise laps: can set the cruise laps, default is 1 PTZ Speed: fast, medium, slow adjustable, default is fast self-checking centered: when power on, it is self-checking, after completed, PTZ will in center; default is off 6.6System setting 6.6.1 Time setting As shown in the above, please assign time zone firstly, it is synchronization as PC or NTP server. Page 39 on Page 43 720P IR PTZ IP Camera IP Camera User Manual 6.6.2 Initial setting click restart button, the device will restart. If setted preset, PTZ will rotate to preset position. click factory default, all settings will recover to factory default setting , and restart click save button, all current setting of system will preserved. In recovery column, choose all saved setting file, click ok, it can recover all setting. In update column, choose the firmware need to be updated, and click ok, then you can upgrade the device through network, after upgrade, the system will recover to factory default. The upgrade need a long time, please be patient, until pop up a dialog to show upgrade successfully. Page 40 on Page 43 720P IR PTZ IP Camera 6.6.3 IP Camera User Manual Equipment information If using wired connection, the network connection statu is wired connection; if using wireless connection, the network connection statu will show wireless connection. If you have inserted TF Card, TF status bar will have prompt, and indicates how many space left. Clicking “browse TF Card”, “format TF Card in FAT32”, “stop TF Card”, it will realize the TF Card contents browsering, format TF Card and stop TF Card. Note: The system supports Max 32G TF Card. Before using, please “using FAT32 to format TF Card” firstly. In bulk order, please test if the TF Card compatible with the system firstly. Page 41 on Page 43 720P IR PTZ IP Camera IP Camera User Manual 7 FAQ How to do if forgot login password? Solution: There is a “RESET” button in the back panel of IP Camera or connection wire, in the condition of power on, please press this button for more than 5 seconds, then all parameters recover to default value (factory default). Both user name and password are admin before leave factory. How to do if there is no video image in IE browser? Possible reason: not installed plugin Solution: When access to IP Camera on IE browser for the first time, you must install plugin. Installation method: Access the IP Camera address, click “download ActiveX”, choose “run” or “save” from popup dialog to download. After download completed, it will install ActiveX automatically, when installation finished, video image will display. How to do if can not access IP Camera through IE browser? Possible reason 1: network impassable Solution: Connect PC to network, testing whether internet work normally, to exclude cable fault and network failure caused by PC virus, until it can use PC ping each other successfully. Possible reason 2: IP address is occupied by other equipment. Solution: Disconnect the IP Camera with network, then connect IP Camera and PC separately, resetting IP Address according to appropriate recommendation. Possible reason 3: IP address are located in different subnet. Solution: check the server’s IP Address, address of subnet mask and gateway setting. Possible reason 4: MAC address in the network is conflict with MAC number of IP camera. Possible reason 5: web port is wrong Solution: web port is occupied by other devices. Opening IP Camera quick installation guide, change the port. How to do if no voice? Possible reason 1: disconnect audio input Solution: Please check the audio connection. Page 42 on Page 43 720P IR PTZ IP Camera IP Camera User Manual Possible reason 2: The audio option do not enable on IP Camera. Solution: Please check audio parameter of IP Camera, enabled monitoring function. Thank you for using the IP Camera. Because of different model or system software upgrade, there may be a little difference in apperance and function with this manual, please feel free to contact us. Sorry for the Inconvenience of not informing you these changes in time. END Page 43 on Page 43