1
Install Guide
1.7.2
Monday, April 27, 2015
Table of Contents
Table of Contents
Requirements
.NET Analysis
MySQL Database
CodeDx Configuration
Understanding the AppData Directory
Configuration Files
License File
Log Configuration File
Code Dx Properties File
Database Connection Config
Active Directory Configuration
Git Related Configuration
Analysis Behavior
Remember-Me Config
JVM Configuration
Java 7 and earlier
Java 8
Installation
First Startup
Reinstallation
Code Dx Install Guide
2
3
3
4
5
5
6
6
6
6
7
7
8
8
9
9
9
10
10
10
12
2
Install Guide
Requirements
1. The Java Runtime Environment version 7 or later installed on the server
machine.
2. A Java servlet container. Code Dx has been tested with Jetty and Tomcat.
3. An installation of MySQL to house the Code Dx data.
4. A copy of Code Dx. This will generally be a.zip file containing codedx.war, this
guide, and a few other files.
5. For .NET analysis, the .NET runtime is required, and it is strongly
recommended to install FxCop and CAT.NET. See the .NET Analysis section
for additional information.
6. Dependency Check periodically updates its database of vulnerabilities. If
Code Dx is installed in an environment without a connection to the internet,
this update will not succeed.
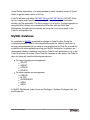
.NET Analysis
In order to run the bundled .NET tools supported by Code Dx, the.NET runtime is
required. It is recommended that the latest version of .NET be installed.
Code Dx is capable of running multiple .NET analysis tools on your codebase.
FxCop and CAT.NET are two of the supported tools and are developed and
distributed by Microsoft. The end-user license agreements for these products forbid
their redistribution, therefore, Secure Decisions is unable to legally bundle these
tools. So in order for Code Dx to run these tools on your behalf, you must install
them separately. Code Dx will then automatically discover their location and run
them.
Depending on the version of FxCop you plan to use, it will either be bundled with
Visual Studio (as Code Analysis) or in the Windows SDK. For the best results,
install Visual Studio 2012 or 2013 Premium. This will give you the latest rules
available. Code Dx will automatically discover the location of the latest version of
FxCop installed on your machine. If you would like to provide a specific location, set
the fxcop.path property in the Code Dx configuration file. Code Dx supports versions
10, 11, and 12 of FxCop. Since FxCop 10, Microsoft has stopped shipping a standalone version of FxCop and instead ships it as part of Visual Studio. Despite the
Code Dx Install Guide
3
Visual Studio dependency, it is recommended to install the latest version of Visual
Studio to get the latest version of FxCop.
Code Dx will work with either CAT.NET 32-bit or CAT.NET 64-bit. CAT.NET 32-bit
has an installer and Code Dx will automatically look in the default installation
directory for this application. The 64-bit version is in a zip file. The best approach to
using the 64-bit version is to overwrite the 32-bit files with the 64-bit files.
Alternatively, the path can be manually set using the cat.net.path property in the
Code Dx configuration file.
MySQL Database
An installation of MySQL is required for storage of Code Dx data. During the
installation process, Code Dx will automatically create the tables it needs so it is
strongly recommended that you setup a new schema just for Code Dx to avoid any
contention with other applications using your MySQL installation. In addition, we
recommend creating a database user just for Code Dx with permissions only to the
Code Dx schema you create. Since Code Dx manages its own tables, the Code Dx
user you setup will need the following permissions:
For record storage and management:
SELECT
INSERT
UPDATE
DELETE
For table creation and management:
CREATE
ALTER
REFERENCES
INDEX
DROP
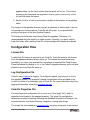
In MySQL Workbench, under Users and Privileges > Schema Privileges (tab), you
should see this:
Code Dx Install Guide
4
It is recommended that the configuration be tweaked after installation, as some of
the default settings may not be optimal. For instance, for improved performance,
use of the InnoDB engine is recommended. MyISAM was the default engine for
versions of MySQL prior to 5.5.5. There are other options that may be beneficial to
tweak (e.g., innodb_buffer_pool_size). Since MySQL tuning is beyond the scope of this
guide, we recommend consulting outside sources. A good place to start may be
InnoDB performance optimization basics.
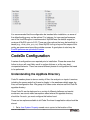
CodeDx Configuration
A series of configurations are required prior to installation. Please be aware that
failure to do so will most likely result in runtime failures, or at the very least,
unexpected behavior. There are several different pieces of configuration that need
to be performed.
Understanding the AppData Directory
Code Dx needs a place to store a variety of files: the analysis run inputs it receives
including the source code that it uses to display in the weakness details page; log
files; and configuration files. We group all of these under what we call the Code Dx
appdata directory.
Since Code Dx can be deployed on a variety of different platforms and servlet
containers, we cannot make assumptions about where this appdata directory
should be. As such, you must configure this before-hand.
There are two options available to tell Code Dx where its application data should be
stored:
1. Set a Java System Property named codedx.appdata to the location of the
Code Dx Install Guide
5
appdata folder, for the Java runtime that the server will run on. This is done
by passing the command line argument -Dcodedx.appdata="path/to/config" to the
java call that starts the server.
2. Set the CODEDX_APPDATA environment variable to the location of the appdata
folder.
The location of the appdata directory may be an absolute or relative path. If you do
not provide one of these options, Code Dx will fail to start. If you provide both,
priority will be given to the Java System Property.
This folder should be kept intact during Code Dx upgrades. Therefore, it is
recommended that it be stored in a stable location. Normally, you won’t need to
touch this folder after installing Code Dx, unless configuration tweaks are desired.
Configuration Files
License File
A valid Code Dx license is required to run Code Dx. Code Dx looks for the license
file in the appdata directory when it starts up. The license file should have been
provided to you when you received the instructions to download the Code Dx files.
Place the license file (ending in .lic) in the Code Dx appdata directory and it will take
effect the next time Code Dx starts up.
Log Configuration File
Code Dx uses Logback for logging. To configure Logback, add a logback.xml file to
the appdata directory. An example Logback configuration will be provided in the
sampleConfig folder of a distribution copy of Code Dx. For more information about the
logging configuration, consult the Logback manual.
Code Dx Properties File
The most important configuration file is codedx.props ("the 'props' file"), which is
expected to be located in the appdata directory. The 'props' file configuration
determines a variety of settings including the database connection information, the
analysis behavior, and Active Directory integration, among other things.
The 'props' file is formatted as a .properties file, using key-value pairs to set various
Code Dx Install Guide
6
configuration fields. An example 'props' file is provided in the sampleConfig directory
of a distribution copy of Code Dx.
Database Connection Config
As mentioned earlier, Code Dx requires a MySQL database for storage. Once
MySQL is installed and configured as prescribed, you need to configure Code Dx
with the approproate connection information. The following properties are used to
configure Code Dx database connections:
swa.db.url
- The JDBC URL of the database Code Dx will be communicating
with
- The name of the JDBC driver class to use for the connection
swa.db.datasource - The name of the JDBC datasource class that will be used
for the connection
swa.db.user - The username that will be used to access the database
swa.db.password - The password that will be used to access the database
swa.db.driver
For instance, to configure Code Dx to communicate with a MySQL database
running on the same machine as the Code Dx server, with a username of
"database_username" and password of "database_password" use the following
configuration:
swa.db.url = jdbc:mysql://localhost/codedx
swa.db.driver = com.mysql.jdbc.Driver
swa.db.user = database_username
swa.db.password = database_password
swa.db.datasource = com.mysql.jdbc.jdbc2.optional.MysqlDataSource
Active Directory Configuration
Code Dx allows you to create and delete new users that are only known to the
Code Dx system. You may, however, want to let users use the same credentials as
they do for your organization. To facilitate this, you must set up an Actve Directory
configuration in the properties file using the shiro.activedirectory.realm ,
shiro.activedirectory.url , and shiro.activedirectory.searchbase properties shown in this
example:
shiro.activedirectory.realm = org.apache.shiro.realm.activedirectory.ActiveDirectoryRealm
shiro.activedirectory.url = ldap://172.17.17.8:389/
shiro.activedirectory.searchbase = dc=avi,dc=com
Code Dx Install Guide
7
Git Related Configuration
Code Dx allows you to configure each project to automatically use source from a git
repository as input for each analysis. When configuring a connection to a git
repository, Code Dx will, by default, disallow the usage of “local” URLs (i.e., URLs
that point to a file in Code Dx’s own file system). This is enforced as a security
measure to prevent system information exposure via the validation user interface.
Although it is strongly recommended that this setting be left disabled, in the
exceptional cases where it is necessary to use local git repositories, set the
git.config.allow-local-urls property to true.
Analysis Behavior
Various settings allow you to affect Code Dx's behavior regarding the analysis runs
it conducts.
1. By default, Code Dx will store the last 5 copies of your analyses per project.
To change that behavior you should change the value of the swa.storage.numanalysis-runs-to-keep property in the properties file.
2. For the analyses that are stored, Code Dx will, by default, maintain a copy of
the raw inputs it received for processing. While these inputs are not used by
Code Dx once it finishes the analysis process, they are kept around for
archival purposes. If storage space is an issue, the swa.storage.keep-raw-inputs
can be set to false to prevent Code Dx from storing the raw inputs.
3. Code Dx bundles various static analyzers that run independently during the
analysis process. Each of these tools requires a memory budget during its
own analysis. The memory requirements vary based on the sizes of the
codebases the analyzers are checking. The memory budget for each of these
tools is configurable in the properties file; each of the following settings
specify the number of megabytes allotted to their respective tools. In general,
the static analyzers will require more memory in order to analyze larger
projects.
determines the maximum heap size for java-based
tools. Default is 1024 (1GB).
ruby.tools.maxmemory determines the maximum heap size for Ruby-based
tools, which are run with Java via JRuby. Default is 1024 (1GB).
python.tools.maxmemory determines the maximum heap size for Pythonjava.tools.maxmemory
Code Dx Install Guide
8
based tools, which are run with Java via Jython. Default is 1024 (1GB).
cat.net.maxmemory determines the maximum allowed memory usage for
CAT.NET. Default is 2048 (2GB).
Changing any of the analysis behavior properties can be done at any time after the
initial installation, however, you will still need to restart the server in order to reload
the properties.
Remember-Me Config
As a user convenience, Code Dx can optionally remember users' logged-in state on
trusted devices. Although support for this feature is turned on by default, this can be
changed to one of three levels via the swa.user.rememberme field in the properties file.
The supported configuration values are:
- Code Dx will remember any user who logs in. Once logged in, users will
not need to log in via the login form even after their session expires. They will
be remembered by a special cookie, until that cookie expires. The rememberMe
cookie does not contain the user’s password in any way, shape, or form.
username-only - Code Dx will remember the username of any user who logs in.
This is used to auto-fill the username field of the login form. Users are
remembered by a cookie, until that cookie expires. This cookie simply
contains the user’s name.
off - Code Dx will not remember anything about a user once that user’s
session expires or if they log off.
full
Note: for full and username-only modes, users can opt-out of being remembered by
Code Dx by unchecking the “remember me” checkbox in the login form.
JVM Configuration
For CodeDx to run properly, the servlet container needs to be started with the
correct options. This is generally most easily done by modifying the value of the
SERVER_OPTS environment variable to include the correct arguments.
Java 7 and earlier
We recommend increasing the amount of space allocated for PermGen to at least
256mb by including -XX:MaxPermSize=256m as an argument when you start your
Code Dx Install Guide
9
server.
Java 8
Java 8 doesn't allocate specific PermGen space, instead using any available
system memory for its "metaspace," which means that there's no need to enlarge
the PermGen space if you're running CodeDx with Java 8.
Installation
Once configuration is ready, installation should be relatively straight-forward.
Deploying the codedx.war file to your servlet container is the next step. This varies
from one application server to the next as well at the configuration and deployment
options enabled on your server. Please refer to your servlet container user manual
for instructions on deploying war packages.
First Startup
Once Code Dx is deployed, if configured properly, you should be able to navigate
to the deployment URL (e.g., https://myservletcontainer/codedx/) and see the installation
screen.
Code Dx Install Guide
10
You will need to set the username and password for the admin user.Please be
mindful of your selection for these settings since once set, there is no way to
recover this information if forgotten or lost. You will, however, be able to
change the admin user password when needed from within Code Dx.
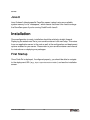
After reviewing the configuration and entering the desired admin user credentials,
press the "Install" button. You should see a message saying that the "installation
process has started", with a blue background. Once it's finished you should see
this:
Code Dx Install Guide
11
Reinstallation
If you need to reinstall Code Dx you can perform the following steps. However,
please be mindful that this is a destructive process that will result in data loss.
Please only do so when the data managed by Code Dx is not intended to be
preserved.
When Code Dx was first installed, it created a variety of files and folders in the
appdata folder. Here are the contents of an example config folder after installation:
In short, to reinstall, simply make any changes you want to thecodedx.props file,
delete the .installation file and the following directories: analysis-files; bundled-tools.
Finally, restart your servlet container and, using your browser, navigate to the
Code Dx deployment URL. From there, Code Dx will show you the installation page
and will proceed to install Code Dx again.
Code Dx Install Guide
12