1
System2
®
Pacific Pride Multiple Network Version
Operator’s Manual
FSC Version 24.66G
©2002 OPW Fuel Management Systems
Manual M041-24.66G
OPW Fuel Management Systems System and Replacement Parts Warranty Statement
Effective September 1, 2002
System and Replacement Parts Warranty
OPW Fuel Management Systems warrants that all OPW Tank Gauge and Petro Vend Fuel Control systems
supplied by OPW Fuel Management Systems to the Original Purchaser will be free from defects in material
and/or workmanship under normal use and service for a period of 12 months from the date of installation or 15
months from the date of shipment. Additionally, OPW Fuel Management Systems warrants that all upgrades
and replacement parts (new and remanufactured) supplied by OPW Fuel Management Systems will be free
from defects in material and workmanship under normal use and service for a period of 90 days from the date
of installation or for the remainder of the system’s original warranty, whichever is greater, as set forth in the
first sentence of this statement. The foregoing warranties will not extend to goods subjected to misuse,
neglect, accident, or improper installation or maintenance or which have been altered or repaired by anyone
other than OPW Fuel Management Systems or its authorized representative.
The buyer’s acceptance of delivery of the goods constitutes acceptance of the foregoing warranties and
remedies, and all conditions and limitations thereof.
If a claim is made within the warranted time period that any equipment and/or remanufactured part is defective
in material or workmanship under normal use and service, such equipment and/or remanufactured part shall be
returned to OPW Fuel Management Systems, freight prepaid. If such equipment or remanufactured part is
found by OPW Fuel Management Systems in its sole judgment, to be defective in material or workmanship
under normal use and service, OPW Fuel Management Systems, shall, at its sole option, repair or replace such
equipment and/or remanufactured part (excluding, in all instances, fuses, ink cartridges, batteries, other
consumable items, etc.)
The warranties, as set forth above, are made expressly in lieu of all other warranties, either expressed or
implied, including, without limitation, warranties of merchantability and fitness for any particular purpose and
of all other obligations or liabilities on OPW Fuel Management Systems part. Further, OPW Fuel
Management Systems neither assumes, nor authorizes any other person to assume for it, any other liability in
connection with the sale of the systems, or any new/replacement part that has been subject to any damage from
any act of nature or any force majeure.
The term “Original Purchaser” as used in these warranties shall be deemed to mean the authorized OPW Fuel
Management Systems distributor to which the system or any new/replacement part was originally sold. These
warranties may be assigned by the original purchaser to any of its customers who purchase any OPW Fuel
Management Systems systems or new/replacement parts.
The sole liability of OPW Fuel Management Systems, for any breach of warranty, shall be as set forth above.
OPW Fuel Management Systems does not warrant against damage caused by accident, abuse, faulty or
improper installation or operation. In no event shall manufacturer’s liability on any claim for damages arising
out of the manufacture, sale, delivery or use of the goods exceed the original purchase price of the goods. In
no event shall OPW Fuel Management Systems be liable for any direct, indirect, incidental or consequential
damage or loss of product.
System2 Pacific Pride for Multiple Networks
i
Contents
Meet System2! ..................................................... 1
Introduction .............................................................................................. 1
Features ................................................................................................... 1
Network Compatibility .......................................... 3
Determining System2 Software Version .................................................. 3
Card Acceptance...................................................................................... 3
Card Authorization Method ...................................................................... 4
Card Disposition ....................................................................................... 4
Hardware Installation ............................................ 5
Safety Codes............................................................................................ 5
Petro Vend Data Sheet ............................................................................ 5
Site Wiring ................................................................................................ 6
Wiring Considerations ........................................................................................ 6
FSC Power Conduit ...........................................................................................6
Petro-Net Wiring.................................................................................................6
Petro-Net Junction Box ...................................................................................... 7
Fuel Site Controller .................................................................................. 7
FSC Specifications............................................................................................. 8
FSC Baud Rate .................................................................................................. 8
FSC-to-Pacific Pride/Smartlock Connections..................................................... 9
Overall FSC Connections.................................................................................10
Visanet Equipment ................................................................................. 11
SmartLock-MultiDesq Equipment........................................................... 11
3/ 7/ 01
:
ii
System2 Pacific Pride for Multiple Networks
SmartLock WTI Connections ................................................................. 11
WTI Box Baud Rate ............................................................................... 12
Connecting Fueling Components to the FSC......................................... 12
Connecting Peripherals to the FSC........................................................ 13
Modem .............................................................................................................13
Bank Card Retrofits..........................................................................................13
Universal Pump Controller Option.......................................................... 13
Sample Sites .......................................................................................... 13
Configuring the FSC ........................................... 19
FSC DIP Switches.................................................................................. 19
Positions 1 and 2: Display Type.......................................................................20
Positions 6 and 7: Baud Rate...........................................................................20
FSC Port LEDs....................................................................................... 21
System Start-Up ................................................. 23
Cold-Starting the FSC ............................................................................ 23
VisaNet Host Settings ........................................ 25
Host Functions ....................................................................................... 25
Merchant Info ..................................................................................................25
Host Configuration ...........................................................................................26
Valid Host Cards ..............................................................................................26
Perform a Credit...............................................................................................26
Receipt Layout ....................................................................................... 27
Batches .................................................................................................. 28
Visanet Journal Printout ......................................................................... 28
Configuring the FSC for the Pacific Pride Network
31
:
3/ 7/ 01
System2 Pacific Pride for Multiple Networks
iii
Introduction ............................................................................................ 31
Step-By-Step Configuration ................................................................... 31
FSC Software Overview ..................................... 49
System Access Commands ............................... 53
Open/Close ............................................................................................ 53
Hello/Bye ................................................................................................ 53
Call ......................................................................................................... 53
System Time and Date Commands ................... 55
Time Commands .................................................................................... 55
Time Change (Daylight Savings) Commands ........................................ 55
Date Commands .................................................................................... 55
System ON/OFF Commands ................................................................. 56
Light ON/OFF Time Commands ............................................................ 56
System Devices Commands .............................. 57
C/OPT Commands ................................................................................. 57
Show Current C/OPT Status ............................................................................58
Configure C/OPT..............................................................................................58
Install C/OPT....................................................................................................59
Remove C/OPT................................................................................................59
PCT Commands..................................................................................... 59
Configure PCT .................................................................................................59
Install PCT........................................................................................................60
Remove PCT....................................................................................................60
PCT Position Commands ....................................................................... 60
Required Entries ..............................................................................................60
Optional Entries................................................................................................61
3/ 7/ 01
:
iv
System2 Pacific Pride for Multiple Networks
Set Pump On.......................................................................................... 62
Program ................................................................................................. 62
Customer Messages Commands
..................... 63
Receipts ................................................................................................. 63
About Receipts.................................................................................................63
Programming the Receipt Body .......................................................................64
Programming Receipt Headers and Trailers....................................................65
Sample Receipts .................................................................................... 65
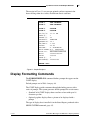
Display Formatting Commands .............................................................. 67
Graphic Display Overview................................................................................70
Graphics Display Command Syntax ................................................................71
Graphics Display Picture Selection ..................................................................71
Graphics Display Text Position ........................................................................71
Graphics Display Font Selection ......................................................................72
Time of Day in a Graphics Display...................................................................73
Inverting the Graphics Screen..........................................................................73
Clearing the Graphics Screen ..........................................................................73
Cleaning the Screen.........................................................................................73
Sample Graphic Display Prompts ....................................................................74
Graphics Display Typestyles and Position Codes............................................78
Graphic Display Control Codes........................................................................80
Graphic Display Examples ...............................................................................82
System Parameters Commands ........................ 85
System ................................................................................................... 85
Site ID .................................................................................................... 86
Fuel Types ............................................................................................. 86
Fueling Units .......................................................................................... 88
Passwords.............................................................................................. 88
Language .............................................................................................. 89
Bypass ................................................................................................... 90
Echo ....................................................................................................... 90
Bonus Points .......................................................................................... 90
:
3/ 7/ 01
System2 Pacific Pride for Multiple Networks
v
RAM ....................................................................................................... 90
Version ................................................................................................... 91
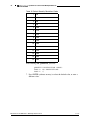
Restrictions Commands ..................................... 93
Pump Restrictions .................................................................................. 93
Quantity Restrictions .............................................................................. 93
Security .................................................................................................. 95
Card Commands ................................................ 97
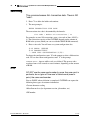
Set Card ................................................................................................. 97
Set Card/Transaction Buffer Size.....................................................................97
Set Keyboard Access Type..............................................................................99
Validating or Invalidating Cards .....................................................................100
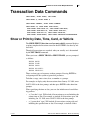
Transaction Data Commands ........................... 103
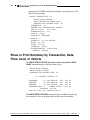
Show or Print by Date, Time, Card, or Vehicle
................................. 103
Show or Print Summary by Transaction, Date, Time, Card, or Vehicle 104
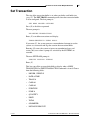
Set Transaction .................................................................................... 105
Visanet Transaction Commands .......................................................... 106
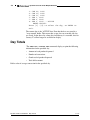
System Totals Commands ............................... 107
Showing or Printing Total Transactions by Date, Time, Card, or Vehicle ..
107
Showing or Printing Summary of Total Transactions by Date, Time, Card,
or Vehicle ............................................................................................... 107
Midnight Totals ..................................................................................... 107
Day Totals ............................................................................................ 108
Dollar value of average transaction for the specified day. ................... 108
3/ 7/ 01
:
vi
System2 Pacific Pride for Multiple Networks
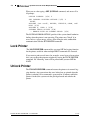
Journal Printer Commands ............................... 109
Set, Show or Print Journal Printer Configuration ............................... 109
Lock Printer .......................................................................................... 110
Unlock Printer....................................................................................... 110
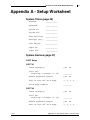
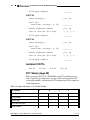
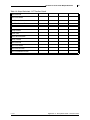
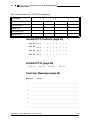
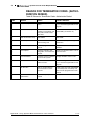
Appendix A - Setup Worksheet ........................ 113
Appendix B - RAM Level vs. Transaction Capacity
125
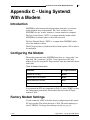
Appendix C - Using System2 With a Modem ... 127
Introduction .......................................................................................... 127
Configuring the Modem ........................................................................ 127
Factory Modem Settings ...................................................................... 127
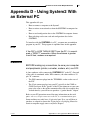
Appendix D - Using System2 With an External PC
129
Connecting System2 to the PC ............................................................ 130
Data Formats ....................................................................................... 131
Data Field Structure .......................................................................................131
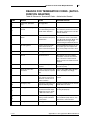
REASON FOR TERMINATION CODES (AUTHORIZATION GRANTED) ...135
REASON FOR TERMINATION CODES (AUTHORIZATION DENIED) .......136
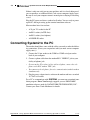
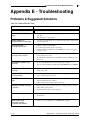
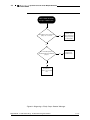
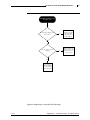
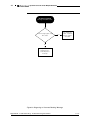
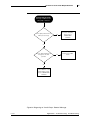
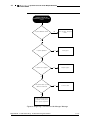
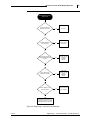
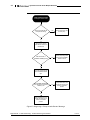
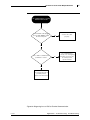
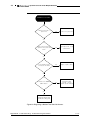
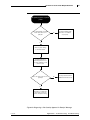
Appendix E - Troubleshooting .......................... 137
Problems & Suggested Solutions......................................................... 137
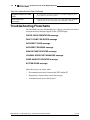
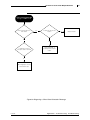
Troubleshooting Flowcharts ................................................................. 138
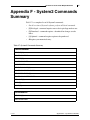
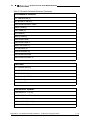
Appendix F - System2 Commands Summary .. 149
:
3/ 7/ 01
System2 Pacific Pride for Multiple Networks
vii
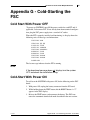
Appendix G - Cold-Starting the FSC ................ 157
Cold Start With Power OFF.................................................................. 157
Cold-Start With Power ON ................................................................... 157
3/ 7/ 01
:
viii
:
System2 Pacific Pride for Multiple Networks
3/ 7/ 01
System2 for Pacific Pride Multiple Networks
1
Meet System2!
Introduction
The Petro Vend SYSTEM2 is a flexible, powerful tool for fuel management
that is easy to program and even easier to use. The SYSTEM2 gives you
security, accountability and control.
A typical System2 installation consists of:
•
The FSC (Fuel Site Controller). This is where the software described in
this manual resides.
•
One or more C/OPTs (Commercial/Outdoor Payment Terminals). See
the C/OPT User Manual for more information.
•
One or more PCTs (Pump Control Terminals). See the PCT User Manual for more information.
Your components will vary depending upon which version of System2 you
have.
Features
3/ 7/ 01
•
Superior Fuel Site Control
•
Programmed for Pacific Pride products right out of the box
•
Maximum Configuration Flexibility
•
On-site or remote access
•
Automatic daily pump totals
•
On-demand Pump, Product and Shift Total
•
Optical Card Lockout
•
Programmable Open/Close system times
•
Multiple password options
•
Self-test and diagnostic functions.
M e e t S y s t em 2 ! : I n t r o d u ct i o n
2
System2 for Pacific Pride Multiple Networks
C/OPT? FIT?
Pacific Pride System2’s use Petro Vend’s Commercial/Outdoor Payment Terminals (C/OPT) as the fueling terminal.
System2 software also recognizes Petro Vend’s Fuel Island
Terminal (FIT). To the FSC, the two devices are essentially
identical.
In this manual, anywhere you see "FIT," "C/OPT" can be
assumed.
M e et S ys t e m2 ! : F e a tu re s
3/ 7/ 01
System2 for Pacific Pride Multiple Networks
3
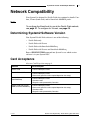
Network Compatibility
Your System2 is designed for Pacific Pride sites equipped to handle Comdata, Visanet (bank cards) and/or SmartLock MultiDesq cards.
Note
To configure the SmartLock for use in the Pacific Pride network,
see page 31. To configure for Visanet, see page 25.
Determining System2 Software Version
Your System2 Pacific Pride software is one of the following:
•
Pacific Pride only
•
Pacific Pride with Visanet
•
Pacific Pride with SmartLock-MultiDesq
•
Pacific Pride with Visanet and SmartLock-MultiDesq
Enter a SHOW SYSTEM command into System2 to see which version
software is in your System2 FSC.
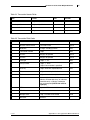
Card Acceptance
Also see Card Disposition on page 4.
Software
Cards Accepted
Pacific Pride
- Pacific Pride optical cards
Pacific Pride with Visanet
- Pacific Pride optical cards
- Bank cards (specific cards accepted depend on site setup)
Pacific Pride with SmartLock/MultiDesq
- Pacific Pride optical cards
- Comdata cards
- Magnetic cards processed by Comdata
Pacific Pride with Visanet
AND SmartLock/MultiDesq
- Pacific Pride optical cards
- Bank cards (specific cards accepted depend on site setup)
- Comdata cards
- Magnetic cards processed by Comdata
3/ 7/ 01
N e t w o rk C o m p at i b i l i t y : D e t e r m i n i n g S y s te m 2 S o f t -
4
System2 for Pacific Pride Multiple Networks
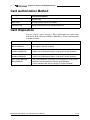
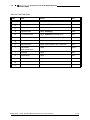
Card Authorization Method
Card Type
Authorization Method
Pacific Pride optical card
System2 FSC
Bank cards
Through System2 FSC dial-up modem
Comdata cards
SmartLock/MultiDesq dial-up modem/satellite link
Card Disposition
Also see Card Acceptance on page 3. This is what happens to various cards
with Pacific Pride software enabled for MultiDesq, Visanet, both networks
or neither network.
Software
Card Disposition
Visanet and MultiDesq
BOTH DISABLED
- Valid Pacific Pride/Amerinet optical cards via Fuel Site Controller
- All magnetic cards not accepted
Visanet ENABLED
MultiDesq DISABLED
- Only cards enabled in Visanet Host Card Configuration go to Visanet
- Valid Pacific Pride/Amerinet optical cards go to Fuel Site Controller.
Visanet DISABLED
MultiDesq ENABLED
- Magnetic cards processed by Comdata are sent to MultiDesq
- Valid Pacific Pride/Amerinet optical cards go to Fuel Site Controller
Both Visanet AND MultiDesq ENABLED
- Only cards enabled in Visanet Host Card Configuration go to Visanet
- Magnetic cards processed by Comdata go to MultiDesq
- Pacific Pride/Amerinet optical cards go to Fuel Site Controller
N et w o r k C o m p a t i b i l i ty : C a rd A u t h o r i z a t i o n M e t h o d
3/ 7/ 01
System2 for Pacific Pride Multiple Networks
5
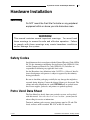
Hardware Installation
Warning
Do NOT mount the Fuel Site Controller or any peripheral
equipment within or above your site hazardous area.
WARNING!
This manual contains several important warnings. You must heed
these warnings to ensure the safe and effective operation. Failure
to comply with these warnings may create hazardous conditions
and/or damage the system.
Safety Codes
Installation must be in accordance with the National Electrical Code (NFPA
No.70), the Automotive and Marine Service Station Code (NFPA No. 30A)
and the Compressed Natural Gas Code (NFPA No. 52). Installers are
responsible for following any applicable local codes.
See the Hazardous Area definitions in the C/OPT User’s Manual. Installation to listed pumps or dispensers is subject to approval by the authority
having jurisdiction.
Be sure to check the packaging carefully for any damage that might have
occurred during shipping. Contact the shipper if damage is discovered. The
cabinet and most components for each SYSTEM2 unit are packed in one
box. Power supplies, pedestals, and printers are packed separately.
Petro Vend Data Sheet
The Data Sheet lists details about your particular system, and is packed
with this manual. Store this sheet in a secure location - you may need it
when calling for service or information.
Terminals, modems and accessory journal printers must be UL and CSA
listed, and have an EIA-standard RS-232C or RS-422 interface.
3/ 7/ 01
H a rd wa re Ins t a lla t i on : S af e t y C o d e s
6
System2 for Pacific Pride Multiple Networks
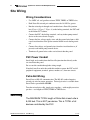
Site Wiring
Wiring Considerations
•
Use ONLY oil- and gasoline-resistant TFFN, THHN, or THWN wire.
•
Each Petro-Net twisted pair conductor must be 18 AWG or greater
•
Run the twisted-pair through steel conduit from a Petro-Net junction
box (Figure 6, Figure 7, Figure 8) to the fueling terminals, the FSC and/
or the indoor PCT cabinet.
•
Connect the FSC, the fueling terminals, and any indoor pump control
device to the same electrical supply.
•
Connect the line voltage supply wires and the ground wire from a dedicated circuit breaker to the power terminal block in each fueling terminal.
•
Connect line voltage and ground wires from the circuit breaker to (if
present) each indoor pump control device.
•
Terminate all ground wires at the service/circuit breaker panel.
FSC Power Conduit
Install rigid steel conduit from the Petro-Net junction box directly to the
site circuit breaker panel.
Do not run this conduit through the wiring trough.
If needed, install an outlet box with this conduit to power the FSC and all
peripheral equipment (terminal, printer, modem, etc.) from one circuit.
Petro-Net Wiring
Petro-Net uses RS-485 communication. The RS-485 standard requires
twisted pair wire for proper operation. Twisted pair wire is available from
Petro Vend as part number 12-1029.
To make twisted-pair cable, simply twist together -- with roughly ten twists
per foot -- two lengths of TFFN, THHN or THWN wire.
Warning
The MAXIMUM TOTAL length of Petro-Net at each site is
5,000 feet. This is NOT per device. This is TOTAL of all
devices controlled by the FSC.
H ar d w ar e I n st a l l a t i o n : S i t e W i r i n g
3/ 7/ 01
System2 for Pacific Pride Multiple Networks
7
Example
A site contains two C/OPTs, a remote pump controller and a
junction box. Each fueling terminal is 1,000 feet from the junction box. The pump control is 100 feet from the junction box.
The TOTAL length of Petro-Net in this example is 2,100 feet.
Petro-Net Junction Box
Install the Petro-Net junction box within three feet of the FSC.
Warning
NEVER run Petro-Net wiring in the same trough as pump
power wiring!
•
Connect Petro-Net to pins #1 (LEFT) and #2 (RIGHT) of the junction
box cover (pins 3 and 4 are not used).
•
Screw the cover to the junction box
•
Connect the twisted-pair to the Petro-Net terminals in the fueling terminals and, if applicable, the indoor PCT(s).
Caution
Be sure that the left terminal of each device is not crossed
to the right terminal of another device.
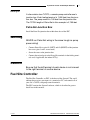
Fuel Site Controller
The Fuel Site Controller, or FSC, is the heart of the System2. The small
tabletop box receives your input via a terminal or PC, and controls all of
your site’s C/OPTs, and pump control terminals.
The FSC contains the System2 software, which is described in greater
detail later in this manual.
3/ 7/ 01
H a rd wa re In st a lla t i o n : F u el S i t e C o n t ro lle r
8
System2 for Pacific Pride Multiple Networks
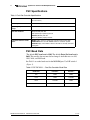
FSC Specifications
Table 1: Fuel Site Controller Specifications
Dimensions
2" H x 10" W x 11" D
(5 x 25 x 28 cm)
Power Requirements
110-120 VAC, 50/60 Hz (220-240 VAC, 50/60 Hz) 50W max
Operating Temperature
Range
32(F to +122(F (0(C to +50(C)
Rear Port Protocols
PN (Petro-Net): RS-485
CAP (Terminal): Proprietary protocol
MODEM (Modem): RS-232
AUX 1-3 (Auxiliary Inputs): RS-232
Front Panel Controls & Indicators
RESET button. Press to "warm-start" system (retains config. data)
FUNCTION button. Use with RESET button to "cold-start" system
STATUS display. The number of devices the FSC is currently communicating with.
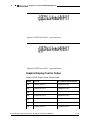
FSC Baud Rate
The default FSC baud rate is 1200. The default Petro-Net baud rate is
9600. This usually does not need to be changed. Available rates are 300,
1200, 2400, and 9600 baud.
See Table 2 to set the baud rate for the MODEM port. Use DIP switch 1
(Figure 1).
Table 2: FSC DIP SW 1 -- Fuel Site Controller Baud Rate
Baud Rate
Position 6
Position 7
300
OPEN
OPEN
1200
OPEN
CLOSED
2400
CLOSED
OPEN
9600
CLOSED
CLOSED
H ar d w ar e I n st a l l a t i o n : F u e l S i t e C o n t r o l l e r
3/ 7/ 01
System2 for Pacific Pride Multiple Networks
9
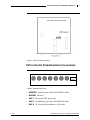
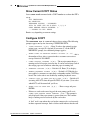
Figure 1: FSC DIP Switch Location
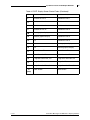
FSC-to-Pacific Pride/Smartlock Connections
Printer
Modem AUX 1
AUX 2
AUX 3 Terminal Petro Net
Power
Figure 2: System2 FSC Ports
3/ 7/ 01
•
PRINTER - Journal printer with 1444-R5/PTR-R5 cable.
•
MODEM - Not used.
•
AUX 1 - For internal UPC option only.
•
AUX 2 - To MultiDesq port with 1444-R5/PTR R5 cable.
•
AUX 3 - To Visanet dial-up modem via 1456 cable.
H a rd wa re In st a lla t i o n : F u el S i t e C o n t ro lle r
10
System2 for Pacific Pride Multiple Networks
•
TERMINAL - To SmartLock WTI box, port 1, with 1444-R5/PTR-R5
cable and null modem adaptor.
•
PETRONET - To PetroNet junction box with 1443 cable.
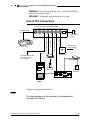
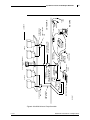
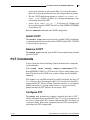
Overall FSC Connections
Petro Vend System2 Fuel Site Controller
Printer Modem AUX 1 AUX 2 AUX 3 Terminal Petro Net
1444-R5/PTR-R5
cable
1453 cable
1444-R5/PTR-R5 cable
Journal Printer
1456 cable
1444-R5/PTR-R5 cable
Plug-in power
supply
Twisted-pair to
pump controller
Petro-Net
Junction Box
1444-R5/PTR-R5 cable
to existing console or
hose controller.
Visanet Modem
MultiTech Modem
Dedicated
phone line
Dedicated
phone line
WTI Box
MultiDesq
system
Figure 3: Petro Vend FSC Connections
Note
For other equipment at the site refer to that equipment’s
instructions for details.
H ar d w ar e I n st a l l a t i o n : F u e l S i t e C o n t r o l l e r
3/ 7/ 01
System2 for Pacific Pride Multiple Networks
11
Visanet Equipment
External dial-up modem and a dedicated phone line are required.
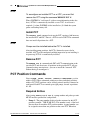
SmartLock-MultiDesq Equipment
SmartLock equipment includes the MultiDesq PC unit and the WTI box
(see Figure 4 on page 11).
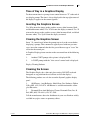
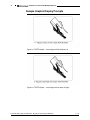
Plug the DIN end of the supplied 1444-R5 cable into the System2 FSC
AUX 2 port (Figure 2).
Plug the other end of the cable into the MultiDesq port.
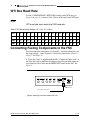
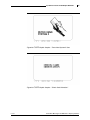
SmartLock WTI Connections
PORT 1
PORT 2
PORT 3
PORT 4
CONTROL
PORT
CODE
1
0
OPTIONS
Power
SETUP
Figure 4: WTI Box Ports and Controls
The WTI box is a kind of switch that lets both the System2 FSC and the
networking hardware use the same modem.
3/ 7/ 01
•
PORT 1 - To FSC TERMINAL port with PTR-R5 cable and null
modem adaptor.
•
PORT 2 - Not used.
•
PORT 3 - Not used.
•
PORT 4 - To MultiDesq. See MultiDesq instructions.
•
CONTROL PORT - To MultiTech modem with the serial cable supplied with the WTI box.
•
SETUP DIP SWITCHES - Set baud rate.
H a r d w a r e I n s t a l l a t i o n : V i sa n et E q u i p m e n t
12
System2 for Pacific Pride Multiple Networks
WTI Box Baud Rate
Use the "CODE/OPTIONS" SETUP DIP switches on the WTI box (see
Figure 4 on page 11) to choose 1200, 2400 or 9600 baud for the WTI ports.
Note
WTI baud rate must match the FSC baud rate.
Table 3: WTI Baud Switch Settings ("U" = Up, "D" = Down)
Baud
1
2
3
4
5
6
7
8
9
10
11
12
13
14
15
16
17
18
1200
U
D
D
U
U
D
D
U
U
U
D
D
U
U
U
D
U
U
2400
U
D
D
U
U
D
D
U
D
D
U
D
U
U
U
D
U
U
9600
U
D
D
U
U
D
D
U
D
U
U
D
U
U
U
D
U
U
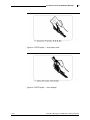
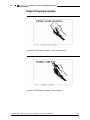
Connecting Fueling Components to the FSC
Petro-Net from other components of a System2 -- the fueling terminals, and
the pump control -- comes together at a Petro-Net junction box (Figure 6,
Figure 7, and Figure 8).
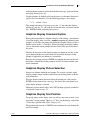
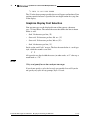
A "Petro-Net Cable" is supplied with the FSC. Connect the "loose ends" of
the Petro-Net cable to the Petro-Net junction box. Plug the DIN connector
end of the Petro-Net Cable into the PETRO NET socket on the FSC. See
Figure 5.
DIN connector
To Petro-Net Junction Box
Figure 5: Attaching Petro-Net Cable to the FSC
H ar d w ar e I n st a l l a t i o n : W T I B o x B au d R a t e
3/ 7/ 01
System2 for Pacific Pride Multiple Networks
13
Connecting Peripherals to the FSC
Note
Your PC must be running terminal emulation software for you to
communicate with the System2 via computer.
Modem
To communicate with the FSC remotely via telephone lines, you need the
Pacific Pride-supplied modem and the WTI box that is shipped with Comdata components.
Connect the modem to the WTI box by plugging one end of the RS-232 25pin cable into the CONTROL port of the WTI box.
Connect the FSC to the WTI box: Attach the 6-pin end of a 1444-R5/PTRR5 cable to the TERMINAL socket of the FSC. Attach the other end of the
cable to a null modem adaptor. Connect the adaptor to WTI PORT 1.
After establishing connection with the modem, issue a CTRL Y 1 command
to activate WTI PORT 1 and communication with the FSC.
Bank Card Retrofits
Optional hardware and software is available to let SYSTEM2 accept bank
cards such as VISA and Master Card.
To communicate with the bank computer (for transaction approval, data
downloads, etc.), the FSC connects to a network modem, which is connected to a seperate, dedicated telephone line. For these types of installations, connect the interface device to the AUX3 socket on the FSC.
Universal Pump Controller Option
With optional Universal Pump Control (UPC) software, the FSC can authorize fueling transactions via a pump control console like those used in a self
service station.
Note
Pumps controlled by a UPC/console do not require a Petro
Vend PCT.
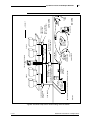
Sample Sites
The three illustrations in this section show typical sites for the three types of
pump control that can be installed for SYSTEM2:
3/ 7/ 01
H a r d w a r e I n st a l l a t i o n : Co n n ec t i n g P er i p h e ra l s t o
14
System2 for Pacific Pride Multiple Networks
•
Pump controller inside the C/OPT pedestal
•
Pump controller in an indoor cabinet
•
No pump controller -- FSC has UPC software and pump control console
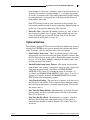
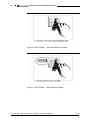
Figure 6 shows a site where the pump control PC board, and associated
pump relays, are in the C/OPT enclosure and pedestal.
The C/OPT can be no further than 5,000 feet from the Fuel Site Controller. Power the C/OPT and FSC from the same circuit breaker.
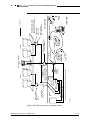
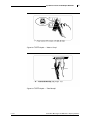
Figure 7 shows a site installation where the pump control board and pump
relays are in a separate, indoor cabinet.
Warning
If power is run with pulser wires, THE PULSER WIRES
MUST BE SHIELDED. If non-shielded pulser wire is used,
it must be in its own metallic conduit.
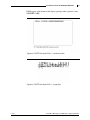
Figure 8 shows an installation with a pump console driven by Petro Vend
UPC pump control software. With this software, the FSC can authorize
fueling transactions via a pump control console (such as used in a self service station). Pumps controlled by the FSC/UPC and a console do not
require separate pump control circuitry.
Warning
Shielded cable is not vapor-tight! For seal-offs, strip the
cable jacket so about three inches of non-jacketed cable
extends past each seal-off. Place the stripped section in
the seal-off area. Be careful not to damage the shield wire!
H ar d w ar e I n st a l l a t i o n : S am p l e S i t e s
3/ 7/ 01
3/ 7/ 01
WIRING
TROUGH
CIRCUIT
BREAKER
PERIPHERAL
POWER
OUTLETS
39699836
PUMPS
115VAC
POWER PACK
FUEL SITE
CONTROLLER
PETRO-NET
JUNCTION BOX
JOURNAL
PRINTER
WTI BOX
TO ADDITIONAL FUEL
ISLAND TERMINALS
PUMP CONTROL
& PULSER
FUEL ISLAND TERMINAL
(FIT)
PETRO-NET
JUNCTION BOX
FUEL ISLAND TERMINAL
POWER & PETRO-NET
NOTE: DO NOT PLACE PETRO-NET WIRING IN TROUGH!
PUMP POWER
PUMP JUNCTION
BOX (UNDER
PUMP)
PUMPS
MULTIDESQ
PHONE
LINE
INDOORS
MODEM
OUTDOORS
PUMP JUNCTION
BOX (UNDER PUMP)
PUMP POWER
AND PULSER
= CONDUIT
System2 for Pacific Pride Multiple Networks
15
Figure 6: Site With Pump Control Inside Fueling Terminal Cabinet
H a r d w a r e I n s ta l l a t i o n : S a m p l e S i t e s
H ar d w ar e I n st a l l a t i o n : S am p l e S i t e s
WIRE
TROUGH
39699835
NOTE: DO NOT PLACE PETRO-NET WIRING IN TROUGH!
POWER & PETRO-NET
PERIPHERAL
POWER
OUTLETS
PETRO-NET
JUNCTION BOX
FUEL ISLAND TERMINAL
POWER & PETRO-NET
CIRCUIT
BREAKER
PUMP POWER & PULSER
INDOOR
PCT
PUMP POWER
AND PULSER
PUMP JUNCTION
BOX (UNDER
PUMP)
PUMPS
115VAC
POWER PACK
FUEL SITE
CONTROLLER
PUMPS
JOURNAL
PRINTER
= CONDUIT
IF POWER CABLE IS RUN
WITH PULSER, PULSER
CABLE MUST BE SHIELDED.
MULTIDESQ
PHONE
LINE
INDOORS
MODEM
OUTDOORS
PUMP JUNCTION
BOX (UNDER PUMP)
PUMP POWER
AND PULSER
WTI BOX
TO ADDITIONAL FUEL
ISLAND TERMINALS
PETRO-NET
JUNCTION BOX
FUEL ISLAND TERMINAL
(FIT)
16
System2 for Pacific Pride Multiple Networks
Figure 7: Site With Pump Control in Separate Cabinet
3/ 7/ 01
3/ 7/ 01
WIRING
TROUGH
39699837
PERSONALITY
CABLE
PERIPHERAL
POWER OUTLETS
115VAC
POWER PACK
FUEL SITE
CONTROLLER
PUMPS
JOURNAL
PRINTER
WTI BOX
TO ADDITIONAL FUEL
ISLAND TERMINALS
PETRO-NET
JUNCTION BOX
FUEL ISLAND TERMINAL
(FIT)
PETRO-NET
JUNCTION BOX
FUEL ISLAND TERMINAL
POWER & PETRO-NET
CIRCUIT
BREAKER
EXISTING CONSOLE
PUMP POWER
AND PULSER
PUMP JUNCTION
BOX
PUMPS
MULTIDESQ
PHONE
LINE
INDOORS
MODEM
OUTDOORS
PUMP JUNCTION
BOX
PUMP POWER
AND PULSER
= CONDUIT
System2 for Pacific Pride Multiple Networks
17
Figure 8: Site With Universal Pump Controller
H a r d w a r e I n s ta l l a t i o n : S a m p l e S i t e s
18
System2 for Pacific Pride Multiple Networks
H ar d w ar e I n st a l l a t i o n : S am p l e S i t e s
3/ 7/ 01
System2 for Pacific Pride Multiple Networks
19
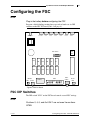
Configuring the FSC
Note
Plug in the battery before configuring the FSC.
Program a default fueling terminal message and set baud rate via DIP
switches on the FSC PC board (Table 2 on page 8).
AC Input
P etro-N et
Term
A U X3
AU X 2
A U X1
M odem
U 24
PAL
D IP Sw itch
U 45
U 30
U 29
U 28
U9
U7
U 46
U 27
U 26
U 25
U 10
U8
R ESET
LED S w itch
Battery
LED s
G reen
Printer
TEST
Sw itch
S tatus
LED
R ed
Figure 9: FSC PC Board
FSC DIP Switches
The DIP switch "SW1" on the FSC board controls several FSC settings.
Note
Positions 3, 4, 5, and 8 of SW 1 are not used. Leave them
OPEN.
3/ 7/ 01
C o n f i g u r i n g t h e F S C : F S C D I P S w i t ch e s
20
System2 for Pacific Pride Multiple Networks
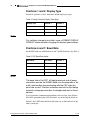
Positions 1 and 2: Display Type
Switch #1, positions 1 and 2, determine default display messages.
Table 4: Fueling Terminal Display Type Setup
Display Type
SW POS 1
SW POS 2
2 x 16
OPEN
OPEN
1 x 40
OPEN
CLOSED
Graphical
CLOSED
OPEN
Note
For a display change to be visible, issue a FORMAT DISPLAY
DEFAULT command after changing the display type switches.
Positions 6 and 7: Baud Rate
Set the FSC baud rate with Positions 6 and 7 of DIP Switch #1. See Table 5.
Table 5: FSC Baud Rate Setup
Baud Rate
SW1 POS 6
SW POS 7
300
OPEN
OPEN
1200
OPEN
CLOSED
2400
CLOSED
OPEN
9600
CLOSED
CLOSED
Note
The baud rate of the FSC, all fueling terminals and all pump
controllers must be the SAME! Make sure the computer or terminal (and modem) communicating with the FSC uses this
baud rate as well. See the instruction manuals for the fueling
terminals and pump controllers to change baud rate for those
devices.
If you experience communication problems with very long runs of PetroNet cable (approaching the 5,000 foot limit), try decreasing the baud rate.
Switch 1 does NOT affect the Petro-Net baud rate, or the baud rate of any
other system port.
C o n f i g u r i n g t h e F S C : F S C D I P S w i tc h es
3/ 7/ 01
System2 for Pacific Pride Multiple Networks
21
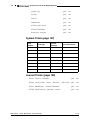
FSC Port LEDs
Sixteen LEDs on the FSC board show the current state of each FSC port, as
shown in Table 6.
Table 6: FSC Port Indicator LEDs
3/ 7/ 01
LED Function
LED Color
LED Label
PRINTER port transmitting
Red
CR32
PRINTER port receiving
Green
CR37
MODEM port transmitting
Red
CR80
MODEM port receiving
Green
CR85
AUX1 port transmitting
Red
CR35
AUX1 port receiving
Green
CR40
AUX2 port transmitting
Red
CR41
AUX2 port receiving
Green
CR39
AUX3 port transmitting
Red
CR36
AUX3 port receiving
Green
CR38
TERMINAL port transmitting
Red
CR81
TERMINAL port receiving
Green
CR86
PETRO-NET port transmitting
Red
CR23
PETRO-NET port receiving
Green
CR22
PETRO-NET port TX enabled
Yellow
CR24
RESET
Yellow
CR31
C o n fi g u r i n g t h e F S C : F S C P o r t L E D s
22
System2 for Pacific Pride Multiple Networks
Configuring the FSC: FSC Port LEDs
3/ 7/ 01
System2 for Pacific Pride Multiple Networks
23
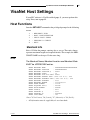
System Start-Up
To power up the system, apply power to all fueling terminals and, if applicable, each remote pump controller. Make sure the FSC power supply is
plugged into an AC socket.
Note
Do not apply power to your pumps yet.
Cold-Starting the FSC
1. With power ON, unplug the battery connector from the FSC PC board.
2. Press and hold the FSC TEST button, then press (do not hold) the
RESET button.
•
A "C" appears in the FSC display.
3. Release the TEST button, and reconnect the battery.
The FSC now enters the communication default mode described in the next
section.
When the system is cold-started, it "installs" (establishes a communication
link with) the first fueling terminal and the first two pump positions in the
pump controller.
Note
The FSC downloads default (pre programmed) values for messages, fuel types, pump numbers, and several other settings.
The front-panel STATUS display sequences for about 45 seconds. During
this time, the FSC counts the number of fueling terminals and indoor pump
controllers installed and communicating with the FSC via Petro-Net. The
resulting number is displayed as two numbers flashed in sequence.
Example
If eight fueling terminals are connected and operational, the
single-digit LED display shows "0", quickly followed with "8".
After a pause, the sequence repeats.
The blinking decimal point in the STATUS display indicates that Petro-Net
is active.
3/ 7/ 01
S ys t e m S ta r t -U p : C o l d - S t a rt i n g t h e F S C
24
System2 for Pacific Pride Multiple Networks
S y st e m S t a rt - U p : C o l d - S ta r t i n g t h e F S C
3/ 7/ 01
System2 for Pacific Pride Multiple Networks
25
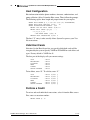
VisaNet Host Settings
If your FSC software is VisaNet-enabled (page 3), you must perform this
setup. If not, turn to page 31.
Host Functions
Issue the SET HOST command at the privileged prompt for the following
screen:
1
2
3
4
X
-
MERCHANT INFO
HOST CONFIGURATION
VALID HOST CARDS
PERFORM A CREDIT
EXIT
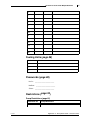
Merchant Info
Select 1. Follow the prompts, entering data as you go. The entries shown
represent maximum lengths and required formats. For example, the MERCHANT NAME can be up to 25 characters long.
Note
The Merchant Name, Merchant Location and Merchant State
MUST be UPPERCASE entries.
ENTER
ENTER
ENTER
ENTER
ENTER
ENTER
ENTER
ENTER
ENTER
ENTER
ENTER
ENTER
ENTER
ENTER
ENTER
ENTER
MERCHANT NAME
: XXXXXXXXXXXXXXXXXXXXXXXXX
MERCHANT LOCATION
: XXXXXXXXXXXXX
MERCHANT LOCATION #
: 00001
MERCHANT STATE
: IL
MERCHANT CITY ZIP CODE: 00001
MERCHANT COUNTRY CODE ('840' for U.S.): 840
MERCHANT CURRENCY CODE ('840' for U.S.): 840
MERCHANT CATEGORY
: 5999
MERCHANT NUMBER
: 999999999911
AGENT NUMBER
: 111111
ACQUIRER BIN #
: 401205
CHAIN NUMBER
: 000000
STORE #
: 0011
TERMINAL #
: 9911
TERMINAL ID
: 00000001
TIME ZONE*
: 706
*Enter 705 for Eastern, 706 (Central), 707 (Mountain) or 708 (Pacific).
•
3/ 7/ 01
All information must be supplied by the merchant bank.
V i sa N e t H o st S e t t i n g s: H o s t F u n c t i o n s
26
System2 for Pacific Pride Multiple Networks
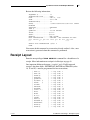
Host Configuration
Host information includes phone numbers, time-outs, authorizations, and
pump validation. Select 2 from the Host screen. Then, follow the prompts.
The following replies show length and proper format for your replies.
ENTER HOST PHONE #: 9,1-999-999-9999 (“9," for outside line)
ENTER HOST AUTH TIME-OUT (secs): 60
ENTER AUTHORIZATION AMOUNT: $50
ENTER LIST OF VALID PUMPS (Y/N)? Y
ENTER VALID PUMPS (p1,p2, ...)
->1,2,3,5,9,12
--ANY MORE PUMPS (Y/N)? N
ENABLE HOST PROCESSING (Y/N)? Y
The final “Y” entry is what actually allows System2 to process your VisaNet transactions.
Valid Host Cards
Selection 3 in the Host Screen lets you specify which bank cards will be
recognized by the system. Specify VALID or INVALID for each of the card
types. Factory default is VALID for all.
The first part of the display tells you current settings:
VISA
MASTERCARD
DISCOVER
AMEX
DINERS
CARTE BLANCHE
-VALID
-VALID
-VALID
-VALID
-VALID
-VALID
To invalidate, enter “N.” To validate, enter “Y.”
VISA
MASTERCARD
DISCOVER
AMEX
DINERS
CARTE BLANCHE
-VALID
-VALID
-VALID
-VALID
-VALID
-VALID
(Y/N)?
(Y/N)?
(Y/N)?
(Y/N)?
(Y/N)?
(Y/N)?
y
y
y
y
y
y
Perform a Credit
To review and credit individual transactions, select 4 from the Host screen.
First, enter a transaction number:
ENTER TRANS #: 19
V i s a Ne t H o s t S e t ti n g s : H o s t F u n c t i o n s
3/ 7/ 01
System2 for Pacific Pride Multiple Networks
27
Review the following information:
SEQUENCE #............. 19
TRANSACTION TYPE....... HOST
DATE................... JAN 31, 1999
TIME................... 02:10 AM
TRANSACTION #.......... 19
CARD#................... 3904567890123456=99011234 CARTE
BLANCHE
FUELTYPE............... UNLEADED
PUMP #................. 1
QUANTITY............... 55.555 GALLON
PRICE..................$1.116
TOTAL..................$62.00
RECEIPT................ NOT ISSUED
HOST TRANSACTION....... OFFLINE - NOT CAPTURED BY HOST
BATCH
001
RETRIEVAL
ACI
N
AUTH
6
RESP
APPROV
ADRS
0
MKT
VALID
TRACE
000000
NTWK
CREDIT THIS TRANSACTION (Y/N)? Y
DONE
You cannot do this command to a transaction already credited. Also, a new
transaction is generated when this command is performed.
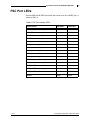
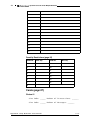
Receipt Layout
Enter the non-privileged SHOW RECEIPT command for a breakdown of a
receipt. More information on receipts is in Receipts on page 63.
One important difference between a “regular” and a VisaNet network
receipt is that three fields - RETRIEVAL, BATCH# and TRACE# (codes
18, 19 and 20) - must be programmed for host transactions.
|
|
|
|
|
|
|
|
|
|
|
|
|
|
|
|
|
|
|
|
3/ 7/ 01
CARD #:
CARD #2:
TRANS #:
PRODUCT:
QUANTITY:
PR/UNIT: $
TOTAL:
$
DRIVER:
VEHICLE:
ACCOUNT:
SITE I.D.:
MISC:
ODOM:
M.P.G.:
LPHKM:
PUMP #:
ACCOUNT #:
RETRIEVAL:
BATCH #:
TRACE #:
|
|
|
|
|
|
|
|
|
|
|
|
|
|
|
|
|
|
|
|
<--rcp
<--rcp
<--rcp
<--rcp
<--rcp
<--rcp
<--rcp
<--rcp
<--rcp
<--rcp
<--rcp
<--rcp
<--rcp
<--rcp
<--rcp
<--rcp
<--rcp
<--rcp
<--rcp
<--rcp
code:
code:
code:
code:
code:
code:
code:
code:
code:
code:
code:
code:
code:
code:
code:
code:
code:
code:
code:
code:
1
2
3
4
5
6
7
8
9
10
11
12
13
14
15
16
17
18
19
20
V i s aN e t H o s t S et t i n g s : Re c ei p t L a y o u t
28
System2 for Pacific Pride Multiple Networks
Batches
A 'batch' is a transaction grouping. A batch can be closed in one of the following ways:
•
A certain number of transactions has completed
•
A new batch is opened
•
The site manager decides to manually close out a batch.
When a batch closes, the System2 FSC calls the host and downloads the
transactions belonging to that batch.
Set batch conditions as follows. You must be in Privileged mode.
p>SET BATCH
ENTER MAX # of TRANSACTIONS PER BATCH: 50
ENTER TIME TO OPEN NEW BATCH: 12:00 AM
FORCE BATCH STATUS TO 'CLOSED' (Y/N)? N
Use SHOW BATCH to view batch summaries. Here’s a sample batch:
p>SHOW BATCH
-MAX # of TRANSACTIONS PER BATCH: 100
-TIME TO OPEN NEW BATCH: 12:00 AM
BATCH
BATCH
BATCH
NO
NUMBER: 1 ** CLOSED -SENT TO HOST **
DATE: JUL 8, 1999
NUMBER OF TRANSACTIONS: 5
TOTAL: $55.23
CREDITS
BATCH
BATCH
BATCH
NO
NUMBER: 2 ** CLOSED -SENT TO HOST **
DATE: JUL 9, 1999
NUMBER OF TRANSACTIONS: 23
TOTAL: $255.17
CREDITS
BATCH
BATCH
BATCH
NO
NUMBER: 3 ** CLOSED (not sent to host) **
DATE: JUL 14, 1997
NUMBER OF TRANSACTIONS: 17
TOTAL: $207.33
CREDITS
BATCH
BATCH
BATCH
NO
NUMBER: 1 ** NOT CLOSED **
DATE: JUL 15, 1997
NUMBER OF TRANSACTIONS: 12
TOTAL: $132.47
CREDITS
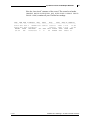
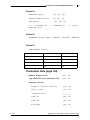
Visanet Journal Printout
The following is output on your journal printer when System2 prints VisaNet transactions. For more journal printer information see Journal Printer
Commands on page 109.
V i s a Ne t H o s t S e t ti n g s : B at c h e s
3/ 7/ 01
System2 for Pacific Pride Multiple Networks
29
Note the “two-tiered” structure of the record. The second row header
(AMOUNT BATCH RETRIEVAL ACT AUTH RESP APPROV VALID
TRACE NTWK) contains all your VisaNet host settings.
DATE TIME TRN# T IDENTITY VEH#
CARD#
MISC
ODOM
PMP# PR QUANTITY
------ ---- ---- - --------- ----- ------- --------- ------- ---- -- --------062797 0123 1234 I
DRIVER 35363 3334353 39393939
12345 1-2 10
12.347
072797 0123 1234 I 123456789
39393939
12345 1-2 10
12.347
AMOUNT
BATCH
RETRIEVAL
ACI AUTH RESP APPROV VALID TRACE NTWK
$16.04
002
1234567890
Y
A
RR
APPROV VVVV
000333 N
3/ 7/ 01
V i s aN e t H o s t S et t i n g s : V i sa n et Jo u r n a l P ri n t o u t
30
System2 for Pacific Pride Multiple Networks
V i s a Ne t H o s t S e t ti n g s : V i s a n e t J o u r n a l P r i n t o u t
3/ 7/ 01
Visanet-Compatible System2
31
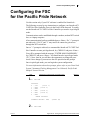
Configuring the FSC
for the Pacific Pride Network
Use this section only if your FSC software is enabled for SmartLock. .
The following are step by step instructions to configure your SmartLock™
C/OPT Fuel Site Controller for use in the Pacific Pride network. To configure the SmartLock™ C/OPT Fuel Site Controller you must be in privileged
mode.
Communications can be established through a modem, modem/WTI switch
box, or a laptop computer.
After communication has been established press <Enter>. If a ">" prompt is
not achieved a "Ctrl-Y" and "1" may need to be entered to gain access
through the WTI switch box.
Once a ">" prompt is achieved, to command the SmartLock™ C/OPT Fuel
Site Controller to enter privileged mode, key "HELLO" and press <Enter>.
You will be prompted with the message, "ENTER MAIN PASSWORD:"
key "HELLO" and press <Enter>. You should now be in privileged mode
("P>"). Note: later on you will have the opportunity to change the passwords. Once changed, you must use the new password at this prompt.
Once in privileged mode, you can begin the system configuration.
For more information about these prompts, please refer to your Petro Vend
System 2 Automated Fueling Management User's Manual, Pacific Pride
Multiple Network Version.
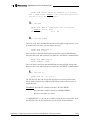
STEP
SmartLock™ C/OPT Fuel Site Controller Prompt
Response
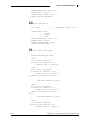
1 P> SET RAM
OPTIONS:
0 – STD
(level 1)
1 – EMA
(level 2)
2 – EMB
3 – EMC
(level 3)
4 – EMD
(level 4)
5 – EME
ENTER OPTION:3
CURRENT OPTION:
EMC
(LEVEL #3)
2 P> SET TIME
4 / 2 5/ 0 2
Ap p e nd i x H - C on f i g ur i n g th e F S C fo r th e P a ci f i c P r i d e
32
System2 Automated Fuel Management
ENTER TIME (XX:XX AM/PM):As prompted or in military
time in HHMM format. EXAMPLE: 3:47 in the afternoon can be
entered as "3:47 PM" or as "1547".
3 P> SET DATE
ENTER DATE (MMM DD, YYYY):Enter date as prompted.
EXAMPLE: OCT 15, 2001
OCT 15, 2001
03:47 PM
4 P> SET TIME CHANGE
This is to set the dates standard time advances to daylight savings and vice versa.
If you don't have the dates, you may bypass this step.)
ENTER DATE WHEN TIME IS
MOVED BACK 1 HOUR:
This is the date in the Fall that daylight savings time reverts to standard time.
Enter the date in the same format as you did in the "SET DATE" command above.
ENTER DATE WHEN TIME IS
MOVED FORWARD 1 HOUR:
This is the date in the Spring that standard time becomes daylight savings time.
Enter the date in the same format as you did in the "SET DATE" command above.
5 P> SET SITE ID
ENTER SITE ID
(12 chars):
The Site ID is the Site code specifically assigned to each site in a letter from
Pacific Pride. Each site has a different code. Please contact the site owner to
obtain this code.
EXAMPLES: Site code W7 would be entered as "W7.PAC.PRIDE".
Site code ADG would be entered as "ADGPAC.PRIDE".
Be sure to use upper case letters.
*** IMPORTANT *** Be sure to record the site ID you have entered here in the
Site ID field in the site file maintenance of your Pacific Pride Controller.
A pp e nd i x H - C o n fi g u r i n g th e F S C f o r th e P ac i fi c P r i d e N e tw o r k: C l ea ni n g t he R ea de r
4/25/02
Visanet-Compatible System2
33
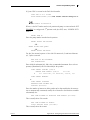
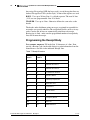
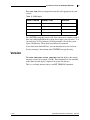
6 P> SET QUANT RESTR
QUANTITY RESTRICTION CODES:
Values represent dollars) OR (values represent quantities)
CODE
CODE
CODE
CODE
CODE
CODE
CODE
CODE
CODE
CODE
CODE
CODE
CODE
CODE
CODE
CODE
0 :
NO RESTRICTIONS
1 : $20
2 : $30
3 : $50
4 : $250
5 : $450
6 : $120
7 : $140
8 : $160
9 : $180
10 : $200
11 : $220
12 : $240
13 : $260
14 : $280
15 : $300
QTY RESTRICTION VALUE OPTIONS (Y/N)?Y
- USE VALUES AS $ (Y/N)?N
VALUES ARE QUANTITIES
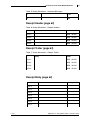
7 P> SET FUELING UNITS
ENTER FUELING UNIT
1 :GALLON
ENTER FUELING UNIT
2 :QUART
ENTER FUELING UNIT
3 :EACH
8 P> SET FUELTYPE 1
1 : UNLEADED
- - - - PRICE PER GALLON 1.000
FUELING UNIT CODES:
1 : GALLON
2 : QUART
3 : EACH
ENTER FUELING UNIT CODE (1-3)1
CHANGE PRICE (Y/N)?N
CHANGE PRODUCT NAME (Y/N)?Y
ENTER FUELTYPE 1UNL L-SUB
4 / 2 5/ 0 2
Ap p e nd i x H - C on f i g ur i n g th e F S C fo r th e P a ci f i c P r i d e
34
System2 Automated Fuel Management
9 P> SET FUELTYPE 2
2 : PREMIUM
- - - - PRICE PER GALLON 1.000
FUELING UNIT CODES
1 : GALLON
2 : QUART
3 : EACH
ENTER FUELING UNIT CODE (1-3)1
CHANGE PRICE (Y/N)?N
CHANGE PRODUCT NAME (Y/N)?Y
ENTER FUELTYPE 2NO LEAD
10P>SET FUELTYPE 3
3 : REGULAR
- - - - PRICE PER GALLON 1.000
FUELING UNIT CODES:
1 : GALLON
2 : QUART
3 : EACH
ENTER FUELING UNIT CODE (1-3)1
CHANGE PRICE (Y/N)?N
CHANGE PRODUCT NAME (Y/N)?Y
ENTER FUELTYPE 3DIESEL
11P>SET FUELTYPE 4
4 : MRKD FUEL
- - - - PRICE PER GALLON 1.000
FUELING UNIT CODES:
1 : GALLON
2 : QUART
3 : EACH
ENTER FUELING UNIT CODE (1-3)1
CHANGE PRICE (Y/N)?N
CHANGE PRODUCT NAME (Y/N)?Y
ENTER FUELTYPE 4:PREMIUM
12P>SET FUELTYPE 5
5 : DIESEL
- - - - PRICE PER GALLON 1.000
FUELING UNIT CODES:
1 : GALLON
A pp e nd i x H - C o n fi g u r i n g th e F S C f o r th e P ac i fi c P r i d e N e tw o r k: C l ea ni n g t he R ea de r
4/25/02
Visanet-Compatible System2
2 : QUART
3 : EACH
ENTER FUELING UNIT CODE (1-3)2
CHANGE PRICE (Y/N)?N
CHANGE PRODUCT NAME (Y/N)?Y
ENTER FUELTYPE 5OILS
13P>SET FUELTYPE 6
6 : #2 DIESEL
- - - - PRICE PER GALLON 1.000
FUELING UNIT CODES:
1 : GALLON
2 : QUART
3 : EACH
ENTER FUELING UNIT CODE (1-3)1
CHANGE PRICE (Y/N)?N
CHANGE PRODUCT NAME (Y/N)?Y
ENTER FUELTYPE 6MISC.
14P>SET FUELTYPE 7
7 : GASOHOL
- - - - PRICE PER GALLON 1.000
FUELING UNIT CODES:
1 : GALLON
2 : QUART
3 : EACH
ENTER FUELING UNIT CODE (1-3)1
CHANGE PRICE (Y/N)?N
CHANGE PRODUCT NAME (Y/N)?Y
ENTER FUELTYPE 7AVIATION
15P>SET FUELTYPE 11
11 : LUBE OIL
- - - - PRICE PER GALLON 1.000
FUELING UNIT CODES:
1 : GALLON
2 : QUART
3 : EACH
ENTER FUELING UNIT CODE (1-3)1
CHANGE PRICE (Y/N)?N
CHANGE PRODUCT NAME (Y/N)?Y
ENTER FUELTYPE 11ALT DIESEL
4 / 2 5/ 0 2
Ap p e nd i x H - C on f i g ur i n g th e F S C fo r th e P a ci f i c P r i d e
35
36
System2 Automated Fuel Management
16P>SET FUELTYPE 12
12 : LUBE OIL2
- - - - PRICE PER GALLON 1.000
FUELING UNIT CODES:
1 : GALLON
2 : QUART
3 : EACH
ENTER FUELING UNIT CODE (1-3)1
CHANGE PRICE (Y/N)?N
CHANGE PRODUCT NAME (Y/N)?Y
ENTER FUELTYPE 12MID-GRADE
17P>SET FUELTYPE 16
16 : AIR
- - - - PRICE PER GALLON 1.000
FUELING UNIT CODES:
1 : GALLON
2 : QUART
3 : EACH
ENTER FUELING UNIT CODE (1-3)3
CHANGE PRICE (Y/N)?N
CHANGE PRODUCT NAME (Y/N)?Y
ENTER FUELTYPE 16FREE
18P>SET FUELTYPE 17
17 : EXTRA
- - - - PRICE PER GALLON 1.000
FUELING UNIT CODES:
1 : GALLON
2 : QUART
3 : EACH
ENTER FUELING UNIT CODE (1-3)1
CHANGE PRICE (Y/N)?N
CHANGE PRODUCT NAME (Y/N)?Y
ENTER FUELTYPE 17OFF DIESEL
19P>SET FUELTYPE 18
18 : EXTRA
- - - - PRICE PER GALLON 1.000
FUELING UNIT CODES:
1 : GALLON
2 : QUART
3 : EACH
A pp e nd i x H - C o n fi g u r i n g th e F S C f o r th e P ac i fi c P r i d e N e tw o r k: C l ea ni n g t he R ea de r
4/25/02
Visanet-Compatible System2
37
ENTER FUELING UNIT CODE (1-3)1
CHANGE PRICE (Y/N)?N
CHANGE PRODUCT NAME (Y/N)?Y
ENTER FUELTYPE 18PROPANE
20P>SET FUELTYPE 19
19 : EXTRA
- - - - PRICE PER GALLON 1.000
FUELING UNIT CODES:
1 : GALLON
2 : QUART
3 : EACH
ENTER FUELING UNIT CODE (1-3)1
CHANGE PRICE (Y/N)?N
CHANGE PRODUCT NAME (Y/N)?Y
ENTER FUELTYPE 19CNG
21P>SET PROD RESTR TABLE
PRODUCT RESTRICTION CODES:
-
◊17
CODE 0
LIST OF VALID PRODUCTS:
NO ACCESS TO PRODUCTS 17-32
-- SPECIFY CODE 0 (Y/N/X)?N
CODE 1
LIST OF VALID PRODUCTS:
NO ACCESS TO PRODUCTS 17-32
-- SPECIFY CODE 1 (Y/N/X)?Y
ENTER VALID PRODUCTS (17-31)
- ANY MORE PRODUCTS (Y/N)?N
CODE 2
LIST OF VALID PRODUCTS:
- NO ACCESS TO PRODUCTS 17-32
-- SPECIFY CODE 2 (Y/N/X)?Y
ENTER VALID PRODUCTS (17-32)
Æ 18
- ANY MORE PRODUCTS (Y/N)?N
-
4 / 2 5/ 0 2
CODE 3
LIST OF VALID PRODUCTS
NO ACCESS TO PRODUCTS 17-32
-- SPECIFY CODE 3 (Y/N/X)?Y
Ap p e nd i x H - C on f i g ur i n g th e F S C fo r th e P a ci f i c P r i d e
38
System2 Automated Fuel Management
ENTER VALID PRODUCTS (17-32)
Æ 19
- ANY MORE PRODUCTS (Y/N)?N
-
CODE 4
LIST OF VALID PRODUCTS
NO ACCESS TO PRODUCTS 17-32
-- SPECIFY CODE 4 (Y/N/X)?X
22P>SET JOURNAL
OFFICE JOURNAL (Y/N)? Y
JOURNAL ERROR OPTION (Y/N)? Y
- ENABLE AUTH ON JOURNAL ERROR (Y/N)? N
23P>SET PASSWORD
ENTER MAIN PASSWORD:\
Enter five (5) letters and numbers in any combination. EXAMPLE: "12345"
"ABC12" "5334D", etc.
ENTER MODEM PASSWORD:enter the SAME password as above.
*** IMPORTANT *** Be sure to record the password you have entered here in
the password field in the site file maintenance of your Pacific Pride Controller.
The following steps must be repeated for each pump you have connected to the
SmartLock™ C/OPT Fuel Site Controller. Here you define the pump number,
product, time outs, etc for each pump. There can be up to four PCT's (Pump Control Terminal), each with a maximum of eight pumps. If you make a mistake, you
can cancel by entering Ctrl-C (control C). If you wish to modify a configuration
for a PCT and Position, merely pressing <Enter> will repeat the entries you have
already made previously for that PCT and Position.
24P>CONFIG
PCT x
...where x is the PCT number.
IS THIS A U.P.C. (Y/N)?N if not a UPC;
Y if this is a UPC configuration. If you answer Y to the above question the following displays will also need to be answered.
IS THIS AN INTERNAL PROGRAM (Y/N)?Y
if your UPC is internal to the Fuel Site Controller.
A pp e nd i x H - C o n fi g u r i n g th e F S C f o r th e P ac i fi c P r i d e N e tw o r k: C l ea ni n g t he R ea de r
4/25/02
Visanet-Compatible System2
39
N if your UPC is external to the Fuel Site Controller.
DOES THIS U.P.C. ALLOW
HOSE RESTRICTIONS (Y/N)?The answer should always be Y.
25P>CONFIG PCT x POS n
Where x is the PCT number and n is the position the pump is connected at the PCT.
EXAMPLE: to configure the 5th position on the first PCT, enter, "CONFIG PCT 1
POS 5".
ENTER PUMP #:
Enter the pump number attached to this position.
ENTER PULSES PER GALLON:
- OR –
ENTER PULSES PER QUART:
- OR –
ENTER PULSES PER EACH:
For fuel, the normal response is 10 or 100. For motor oil (5) and miscellaneous
(6), 1 pulse is normal.
MAX FUEL TO BE DISPENSED
PER TRANSACTION
Enter 9999 for unlimited fuel. 300 is the recommended maximum. Set to a lower
quantity if mandated by the Fire Marshall for the product.
PUMP SENTRY OPTIONS (Y/N)?Y
ENABLE PUMP SENTRY (Y/N)?Y
for fuel
N
for restrooms, oil machines, scales, etc.
PUMP SENTRY ENABLED
or
PUMP SENTRY DISABLED
MAXIMUM TIME ALLOWED FOR
FUELING (minutes):
Enter the number of minutes to allow product to be dispensed before the transaction is automatically terminated, usually 10 to 20 minutes. Oil machines would be
substantially less.
MAX TIME ALLOWED TO RETRIEVE PUMP HANDLE (seconds):
This is usually 60 to 120 seconds.
MAX TIME ALLOWED TO DETECT
FIRST FUELING PULSE (seconds):
This is usually 60 to 90 seconds.
4 / 2 5/ 0 2
Ap p e nd i x H - C on f i g ur i n g th e F S C fo r th e P a ci f i c P r i d e
40
System2 Automated Fuel Management
MAX TIME ALLOWED BETWEEN
FUELING PULSES (seconds):usually 60 seconds.
IF YOU ANSWERED YES TO #24 CONFIGURE BELOW AS HOSES 1-4
ENTER FUELTYPE CODE #:enter the product category:
1 = UNL L-SUB
2 = NO LEAD
3 = DIESEL
4 = PREMIUM
5 = OILS
6 = MISC.
7 = AVIATION
11 = ALT DIESEL
12 = MID-GRADE
16 = FREE PRODUCTS
17 = OFF ROAD DIESEL
18 = PROPANE
19 = CNG
ENTER TANK #:enter tank # (1-9)
CLEAR PUMP TOTALS (Y/N)?Y
- - CLEARED
ENTER TOTALIZER VALUE:
Enter the current totalizer value.
26P>INSTALL PCT x POS n
Where x is the PCT number and n is the position the pump is connected at the PCT
selected at the beginning of this step.
OKAY
NOW REPEAT THIS STEP FOR EACH ADDITIONAL PUMP.
27P>INSTALL PCT 1
OKAY
28P>INSTALL PCT 2 (if you configured a 2
nd
PCT)
OKAY
A pp e nd i x H - C o n fi g u r i n g th e F S C f o r th e P ac i fi c P r i d e N e tw o r k: C l ea ni n g t he R ea de r
4/25/02
Visanet-Compatible System2
29P>INSTALL PCT 3 (if you configured a 3
rd
PCT)
th
PCT)
41
OKAY
30P>INSTALL PCT 4 (if you configured a 4
OKAY
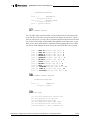
31P>CONFIG FIT n
Where n is the Fuel Island Terminal (reader) number installed. Repeat this command for each FIT installed.
ISSUE RECEIPTS (Y/N)?Y
- ENTER LIMIT TO RECEIVE RECEIPTS IN DAYS:1
- CLEAR RECEIPT COUNTER (Y/N)?Y
SPECIFY PCTs TO SHUTOFF ON E-STOP (Y/N)?N
CHANGE FIT ACCESS TO PUMPS (Y/N)?N
FIT INSTALLED
FIT INFO:
RECEIPTS:
0
1 DAY LIMIT TO RECEIVE RECEIPT
KEYBOARD ACCESS - - DISABLED
PCTs TO SHUT OFF ON E-STOP: 1, 2, 3, 4
CARD READER ERROR COUNTER:
0
COMMUNICATION ERROR COUNTER:
0
ACCESS TO ALL PUMPS
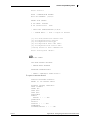
32P>INSTALL
FIT 1
33P>INSTALL FIT 2 (if you configured a 2
nd
FIT)
34P>INSTALL FIT 3 (if you configured a 3
rd
FIT)
35P>INSTALL FIT 4 (if you configured a 4
th
FIT)
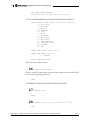
36P>FORMAT RECEIPT HEADER
4 / 2 5/ 0 2
Ap p e nd i x H - C on f i g ur i n g th e F S C fo r th e P a ci f i c P r i d e
42
System2 Automated Fuel Management
12345678901234567890
|
line 1 ->
WELCOME TO
- red print (Y/N)?Y
line 2 ->
PACIFIC PRIDE
- red print (Y/N)?Y
line 3 ->press <Enter>
|
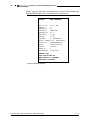
37P>FORMAT RECEIPT
You can define what transaction data is to be printed on the receipt and in what
order. The first 10 character positions of a line are filled in by you. Press <Enter>,
then you will specify a receipt code to print data from the transaction on the same
line. Listed is an example of information that should be included on your receipt.
Refer to your Petro Vend System 2 Automated Fueling Management User's Manual, Pacific Pride Multiple Network Version for other fields that can be printed.
Line
Line
Line
Line
Line
Line
Line
Line
Line
Line
Line
Line
1: CARD #1:receipt code (#,-): 1
2: CARD #2:receipt code (#,-): 2
3: TRANS #:receipt code (#,-): 3
4: PRODUCT:receipt code (#,-): 4
5: QUANTITY:receipt code (#,-): 5
6: PR/UNIT:receipt code (#,-): 6
7: TOTAL:receipt code (#,-): 7
8: DRIVER:receipt code (#,-): 8
9: MISC.:receipt code (#,-): 12
10: ODOMETER:receipt code (#,-): 13
11: PUMP #:receipt code (#,-): 16
12: ACCOUNT#:receipt code (#,-): 17
38P>FORMAT RECEIPT TRAILER
12345678901234567890
|
line 1 ->
THANK YOU
- red print (Y/N)?Y
|
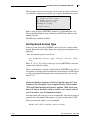
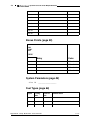
39P>SET CARD
[1] Set card/transaction buffer size
[2] Set keyboard entry options
[3] Set keyboard access type
[4] Set expiration date code table
[5] Set keyboard card control data
[return] Return to main command line
A pp e nd i x H - C o n fi g u r i n g th e F S C f o r th e P ac i fi c P r i d e N e tw o r k: C l ea ni n g t he R ea de r
4/25/02
Visanet-Compatible System2
43
Enter choice:1
NOTE : TRANSACTION BUFFER
WILL BE CLEARED!! (Y/N)?Y
ENTER SIZE CODE80
# OF CARDS: xxxxxxx
# OF transactions: 2000
- SAVE THIS CONFIGURATION (Y/N)?Y
- - PLEASE WAIT - - wait a couple of minutes
[1] Set card/transaction buffer size
[2] Set keyboard entry options
[3] Set keyboard access type
[4] Set expiration date code table
[5] Set keyboard card control data
[return] Return to main command line
Enter choice:press <Enter>
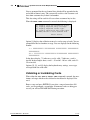
40P>SET TRANS
SET WRAP AROUND OPTIONSY
- ENABLE WRAP AROUNDN
REDEFINE TRANSACTION?Y
- TRANS = UNAUTHZ'D USERS ALSO? Y
To capture transaction denials
SPECIFY DISPLAYED FIELDS?Y
ENTER 'Y' TO DISPLAY FIELD:
ACCOUNT, DRIVER, VEHICLE?Y
DATE & TIME?Y
TRANS #?Y
CARD #1?Y
CARD #2?Y
FUELTYPE?Y
PUMP?Y
HOSE?N < - - - NO!
QUANTITY?Y
PRICE?Y
TOTAL?N < - - - NO!
ODOMETER?Y
DISTANCE/UNIT?N < - - - NO!
4 / 2 5/ 0 2
Ap p e nd i x H - C on f i g ur i n g th e F S C fo r th e P a ci f i c P r i d e
44
System2 Automated Fuel Management
MISCELLANEOUS?Y
RECEIPT STATUS?N < - - - NO!
ACCOUNT #?N < - - - NO!
HOST AUTHORIZATION #?Y
- COMPUTER FORMAT CHECK DATA IN HEADER?Y
ALL DISPLAYS ARE 2 LINES WITH A MAXIMUM 40 CHARACTERS PER LINE
INCLUDING SPACES.
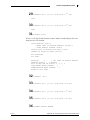
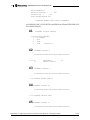
41
P>FORMAT DISPLAY DEFAULT
DISPLAY TYPE OPTIONS:
0 – NO CHANGE
1 – 2x16
2 – 1X40
3 – 2X40
(Graphics)3
42 P>FORMAT DISPLAY 8
1234567890123456789012345678901234567890
|
|^0^Z^B
^J
WELCOME^F
PACIFIC PRIDE^T
TO
43 P>FORMAT DISPLAY 9
1234567890123456789012345678901234567890
|
|^3^Z^LINSERT DRIVER CARD^T
44P>FORMAT DISPLAY 24
1234567890123456789012345678901234567890
|
|^3^Z^LINSERT VEHICLE CARD
45P>FORMAT DISPLAY 27
1234567890123456789012345678901234567890
A pp e nd i x H - C o n fi g u r i n g th e F S C f o r th e P ac i fi c P r i d e N e tw o r k: C l ea ni n g t he R ea de r
4/25/02
Visanet-Compatible System2
45
|
|^5^Z^KENTER^LSECURITY #:
46 P>FORMAT DISPLAY 31
1234567890123456789012345678901234567890
|
|^Z^KRE-ENTER^LSECURITY #:
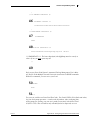
47
P>DOWNLOAD
OKAY
48P>SH TR CARDS=ALL CF
0000/000000000/abcdefghikmp/02press <Enter>
*** IMPORTANT *** The letters displayed (abcdefghikmp) must be exactly as
shown. If not, you must repeat step 40.
//
49
Refer to your Petro Vend System 2 Automated Fueling Management User's Manual, Pacific Pride Multiple Network Version for instructions on SHOW commands.
With these commands, you can review your work.
50P>BYE
BYE!
51.
Test your site with the two Petro Vend Test Cards: Test Card #1 PIN # 8539 (black-and-white)
lets you check pump operation -- it works with all products. After confirming that
all the pumps are working, test your site’s product restrictions with tan Test Card
#2 (PIN # 5525). This card allows only unleaded fuel to be dispensed, use it to
4 / 2 5/ 0 2
Ap p e nd i x H - C on f i g ur i n g th e F S C fo r th e P a ci f i c P r i d e
46
System2 Automated Fuel Management
confirm a restricted card does NOT activate a premium or diesel pump. Use the
Petro Vend Test Card or one of your own restricted cards.
If you have any questions regarding your SmartLock™ C/OPT Fuel Site
Controller Petro Vend equipment please call the Trendar help desk at (800)
755-5540 and ask for a Tech Rep 2.
A pp e nd i x H - C o n fi g u r i n g th e F S C f o r th e P ac i fi c P r i d e N e tw o r k: C l ea ni n g t he R ea de r
4/25/02
System2 for Pacific Pride Multiple Networks
49
FSC Software Overview
At power-up, System2 is in non-privileged mode. Enter commands using
the following guidelines.
Note
If menus are ON, turn them OFF by typing SET MENU at the
p> prompt, then answering NO.
SHOW. Displays information from a SYSTEM2 data base on the screen of
your terminal or PC. This command does not require privileged status.
PRINT. Sends data to your external journal printer to make a hard copy.
Most (but not all) information can be printed, including all setup data
(cards, fuel types, prices, etc.) and all transaction information (time, date,
amount, price, cost, etc.). This command does not require privileged status.
SET (FORMAT and CONFIGURE work similarly). These commands are
used to enter or change the setup data. These commands are privileged.
Note that after a FORMAT or CONFIGURE command is used, one of the
DOWNLOAD commands must be entered.
Other commands are listed below:
INSTALL/REMOVE - These commands activate and deactivate a pump
control device. Privileged commands.
CLEAR - There are several CLEAR commands, which erase transactions
from the system data base. Privileged command.
3/ 7/ 01
•
To enter privileged mode, either type HELLO at the ">" prompt, then
enter the privileged password.
•
System Access
•
System Times
•
System Devices
•
Customer Messages
•
System Parameters
•
Restrictions
•
Cards/Accounts
•
Transaction Data
•
System Totals
•
Journal Printer
F S C S o f t w a r e O v er v i e w : S t e p - B y- S t e p C o n f i g u ra -
50
System2 for Pacific Pride Multiple Networks
Visanet Host Commands
•
•
•
•
Merchant information
Host configuration
Valid host cards
Perform a credit
System Access Commands
•
•
•
•
•
OPEN
CLOSE
CALL
HELLO
BYE
Open or close the system, open a modem connection, change passwords. To
access the system using a PC and/or a modem, Appendix D - Using System2 With
an External PC on page 129.
System Times Commands (Show/Print/Set)
•
•
•
•
•
TIME
TIME CHANGE
DATE
SYSTEM ON TIME
LIGHT ON TIME
Use System Times commands to set real time and date, daylight savings
time day, time to turn the keyboard lighting ON or OFF, and time to open
and close the site.
System Devices Commands (Show/Print/Install/Remove/Configure/Download)
•
C/OPT #
•
•
•
•
PCT #
PCT #/POSITION #
PUMP #
PROGRAM
The System Devices commands (page 57) lets you program the C/OPTs, the
pump controls and the optional UPC (Universal Pump Controller)-equipped
pump control.
•
C/OPTs. The Commercial/Outdoor Payment Terminals include the
card/key reader(s), keyboard, display and optional /receipt printer.
•
PCTs. Pump Control Terminals are either in the C/OPT pedestal or in a
separate cabinet. Each PCT defines up to eight pumps. See the Petro
Vend PCT User Guide (Petro Vend manual # M47-00.01) for more
details.
•
UPC. The UPC can emulate up to four PCTs for operation with a selfservice console. The option lets your system connect to a site console,
F S C S o f tw a re O ve r vi ew : S t ep - By - S t e p C o n f i g u r a t i o n
3/13/01
System2 for Pacific Pride Multiple Networks
51
which provides simultaneous unattended and self service fueling. For
complete details on UPC operation, refer to the appropriate Petro Vend
UPC Operator Guide.
Customer Messages Commands (Show/Print/Format)
•
•
•
•
•
•
•
•
RECEIPT BODY
RECEIPT HEADER
RECEIPT TRAILER
RECEIPT BONUS POINTS
DISPLAY (#...)
KEYBOARD (#...)
MESSAGES
DATE
The Customer Messages commands (page 63) lets you define receipt formats and
bonus points, display or edit prompts and keyboard responses, create personalized customer messages, change the date/time format.
System Parameters Commands (Show/Print/Set)
•
•
•
•
•
•
•
•
•
•
•
•
SYSTEM
SITE ID
FUELTYPE (#...)
FUELING UNITS
LANGUAGE
PASSWORD
BYPASS
MENU (ALWAYS OFF)
ECHO
BONUS POINTS
RAM
VERSIONS
Current Configuration, this site ID, fuel types and units of measure, passwords,
bypassing, programming system to issue bonus points for loyalty programs, and
defining the amount of RAM in your FSC.
Restrictions Commands (Show/Print/Set)
•
•
•
PUMP RESTRICTIONS
QUANTITY RESTRICTIONS
SECURITY
Show, print or set PUMP RESTRICTIONS, QUANTITY RESTRICTIONS and
SECURITY features like PINs.
Cards Commands (Show/Print/Set/Validate/Invalidate/insert/
Edit/Delete)
•
CARD
Show, print, set, validate or invalidate cards and ISO numbers.
3/ 7/ 01
F S C S o f t w a r e O v er v i e w : S t e p - B y- S t e p C o n f i g u ra -
52
System2 for Pacific Pride Multiple Networks
Transaction Data Commands (Show/Print/Set/Clear.)
•
•
•
•
TRANS DATE TIME CARD ACCOUNT VEHICLE
TRANS DATE TIME CARD ACCOUNT VEHICLE SUMMARY
TRANS
TRANS DATE #... SEQUENCE #...
Manipulate individual transactions by date, time, card number,or vehicle
System Totals (Show/Print/Set/Clear)
•
•
•
•
•
•
•
•
•
TRANS DATE TIME CARD ACCOUNT VEHICLE
TRANS DATE TIME CARD ACCOUNT VEHICLE SUMMARY
MIDNIGHT
DAY
SHIFT
PUMP #... TOTALS
PCT #... TOTALS
FUELTYPE (#...) TOTALS
TANK (#...)
Summarize monetary and quantity figures by transaction, day, shift, till midnight, by pump totals, PCT totals, fuel types, tank.
Journal Printer (Show/Print/Set/Lock/Unlock)
•
JOURNAL PRINTER
Define or lock or unlock the journal printer attached to your FSC.
F S C S o f tw a re O ve r vi ew : S t ep - By - S t e p C o n f i g u r a t i o n
3/ 7/ 01
System2 for Pacific Pride Multiple Networks
53
System Access Commands
OPEN
CLOSE
HELLO
BYE
CALL
PASSTHRU
Open/Close
The OPEN and CLOSE commands give immediate access to pumps. Both
commands are privileged, requiring the main password.
When a CLOSE command is issued, all activities in progress (pumping,
printing a receipt, etc.) complete normally but no new activities are allowed
to begin.
Hello/Bye
HELLO is used to access the privileged mode. You'll be prompted for the
system password (see page 88) -- the factory-set password is HELLO).
BYE exits the privileged mode.
You MUST enter main password to enter Privileged mode. To return to
Normal mode from the command line p> prompt, type BYE.
Call
The CALL command creates a virtual link between the TERMINAL port
and the MODEM port on the FSC.
Before executing the CALL command, connect a modem and terminal (see
Appendix C - Using System2 With a Modem on page 127) to the MODEM
and TERM ports, respectively. After executing CALL, use a terminal connected to the FSCTERM port to issue dial-out commands directly to the
modem.
To break the connection, type BYE.
3/ 7/ 01
S y s t em A c ce s s C o m m a n d s: O p e n / C l o s e
54
System2 for Pacific Pride Multiple Networks
S y st e m A cc e s s Co m ma n d s : C a l l
3/ 7/ 01
System2 for Pacific Pride Multiple Networks
55
System Time and Date Commands
SHOW
SHOW
SHOW
SHOW
SHOW
TIME, SET TIME, PRINT TIME
TIME CHANGE, SET TIME CHANGE, PRINT TIME CHANGE
DATE, SET DATE, PRINT DATE
SYS TIME, SET SYS TIME, TIME ADJ
LIGHT, SET LIGHT
Time Commands
The SHOW TIME or SET TIME command displays or sets the current time
of day. The SET TIME command changes time as follows:
1. SET TIME (ENTER)
2. TIME (ENTER)
3. Enter the time in the format HH:MM AM or PM. For example,
12:57 PM. If PM is not specified, AM is assumed.
4. Press (ENTER) to complete the entry; this sets seconds to zero. The new
time and current (or default) date are displayed.
•
Press (ENTER) to leave the current time unchanged.
Time Change (Daylight Savings) Commands
The SHOW TIME CHANGE command displays change dates in the system.
The SET TIME CHANGE command changes the dates as follows:
1. After issuing the command you are prompted:
ENTER DATE WHEN TIME IS MOVED BACK 1 HOUR:
2. Enter the "move-back" date in the format MMM DD YYYY (the year
must be four digits). Press (ENTER). The following prompt appears:
ENTER DATE WHEN TIME IS MOVED AHEAD 1 HOUR:
3. Enter the "move ahead" date in the same way.
•
The change occurs at 2:00 AM on the date specified.
Date Commands
The SHOW DATE or SET DATE command displays or sets the current date
within the system's memory. After issuing the command you are prompted
to enter a date: ENTER DATE (MMM DD, YYYY):
1. Enter the date in the indicated format (for example, type FEB 11, 2000
for February 11th, 2000.
2. Press (ENTER) to complete the entry; the new date is now displayed.
•
3/ 7/ 01
Press (ENTER) with no entry to leave the current date unchanged.
S y st e m T i m e an d D a t e Co m m an d s : T i m e C o m m a n d s
56
System2 for Pacific Pride Multiple Networks
System ON/OFF Commands
The SHOW SYS TIME and SET SYS TIME commands display or set the
time the system goes ON and OFF, and the time during which "transactions
in progress" are allowed (the "receipts only" time).
SET SYS TIME command lets you set the following four options (time for
the first three is entered in the same format as for System Time - hh:mm).
•
SYSTEM ON TIME - When SYSTEM2 goes active. When the system
is on, it displays messages, and accepts card insertions or keypad
entries.
•
SYSTEM OFF TIME - specifies when the system goes inactive. No
new transactions are allowed to begin, but any in progress are allowed
to finish.
•
RECEIPTS ONLY TIME - When system allows no new transactions,
but does allow "just completed" customers to get their receipts. This
time would typically precede the `SYSTEM OFF TIME' by several
minutes.
For example, a gas station that dispenses fuel from 9:00 AM until 7:00 PM
would have the `SYSTEM ON TIME' set to 9:00 AM, the `SYSTEM OFF
TIME' set to 7:10 PM and the `RECEIPTS ONLY TIME' set to 7:00 PM.
TIME ADJ allows a software adjustment to the internal time clock. In the
event of a noticeable time drift, a number of seconds can be added to or
subtracted from each day, until a proper hardware adjustment can be made.
Light ON/OFF Time Commands
The SET LIGHT command lets you set the SYSTEM2 to turn the "pocket"
lights in the C/OPT ON and OFF at designated times.After selecting this
option, the following prompts appear:
ENTER LIGHT ON TIME:
ENTER LIGHT OFF TIME:
Enter time in the same format as that for SYSTEM ON TIME.
S y st e m T i me a n d D a te C o m m a n d s: S y s t em O N / O F F C o mm a n d s
3/ 7/ 01
System2 for Pacific Pride Multiple Networks
57
System Devices Commands
SHOW FIT#, PRINT FIT#, INSTALL FIT#, REMOVE FIT#, CONFIGURE
FIT#
SHOW PCT, PRINT PCT, INSTALL PCT, REMOVE PCT, CONFIGURE PCT
SET PUMP ON
DOWNLOAD
DOWNLOAD FIT (#..)
DOWNLOAD PCT (#..)
This section describes the System Devices commands by explaining each of
the available options: FIT (C/OPT) #, PCT #, PCT #/Position #, Pump #
and Program.
Commands applicable to each option are described in each section.
C/OPT Commands
The SHOW, PRINT, INSTALL, REMOVE and CONFIGURE FIT # commands let you view, configure, install or remove C/OPTs, and determine if
the receipt printer will issue receipts, whether the keyboard is enabled or
disabled, which PCTs to shut off when the emergency stop button is
pressed, and reset the card reader error counter.
The C/OPT number is set with a DIP switch on the PV-269 board - refer to
the C/OPT User’s Manual to set the number.
3/ 7/ 01
S y st e m De v i c e s C o m m a n d s: C / O P T C o m m a n d s
58
System2 for Pacific Pride Multiple Networks
Show Current C/OPT Status
Issue a SHOW FIT # command with a C/OPT number to see how that FIT is
set up:
FIT INSTALLED
NO RECEIPTS
KEYBOARD ACCESS - DISABLED
PCTs TO SHUT OFF ON E-STOP: 1,2,3,4
CARD READER ERROR COUNTER: 0
-- ACCESS TO ALL PUMPS
Entries vary depending on current settings.
Configure C/OPT
The CONFIGURE FIT # command changes these settings.The following
prompts appear one by one after using CONFIGURE FIT #:
•
ISSUE RECEIPTS (Y/N)? - Enter Y to have the optional receipt
printer issue a receipt (N is default).If you enter (Y) to the ISSUE
RECEIPTS? prompt, two additional prompts appear...
•
ENTER LIMIT TO RECEIVE RECEIPT IN DAYS (0..99) - this is
the number of days after a transaction that a customer can receive a
receipt. Default is NO LIMIT.
•
CLEAR RECEIPT COUNTER (Y/N)? - The receipt counter keeps a
running total of all receipts issued to date. It can be used to keep track of
the receipt paper and to indicate when the paper is running low.
•
KEYBOARD OPTIONS (Y/N)? - Default is N. Enter (Y) to display:
•
ENABLE KEYBOARD ACCESS (Y/N)? - Default is N. With this fea-
ture enabled, a customer can enter their card number on the C/OPT keyboard. The card reader is not disabled by enabling keyboard access.
•
SPECIFY PCTs TO SHUT OFF ON E-STOP (Y/N)? - Default is N
(meaning ALL PCTs shut off upon E-STOP). If you enter (Y) to select
which PCTs will be turned off, you'll see:
•
ENTER PCTs TO SHUT OFF (#,#.) - Enter a range and press
ENTER.
•
If there are card reader errors logged, the next prompt you'll see is:
CLEAR CARD READER ERROR COUNTER (Y/N)? This prompt is
only displayed if the error counter is greater than zero. This counter
keeps a running total of bad reads by the card reader.
A “bad” read is one where the card reader cannot read a card correctly
in three sequential attempts. Such a failure could indicate that the card
S y st e m D ev i c e s Co m m an d s : C/ O P T C o m m a n d s
3/ 7/ 01
System2 for Pacific Pride Multiple Networks
59
reader needs cleaning or replacement. Enter (Y) to clear the counter.
Enter (N) to keep the counter the same and to display the next prompt.
•
The last C/OPT configuration prompt is: CHANGE FIT ACCESS TO
PUMPS (Y/N)? Default is N. Enter (Y) to change which pumps can be
activated by the specified FIT.
•
ENTER VALID PUMPS (p1, p2,..) If you enter (N), all pumps will
be accessible from this C/OPT. You will see ALL PUMPS ACCESSED
if you choose (N).
Enter the DOWNLOAD command after C/OPT configuration.
Install C/OPT
The INSTALL FIT# command activates the specified C/OPT, establishing
a communication link between the installed C/OPT and the FSC. C/OPT #1
is auto-installed on power-up.
Remove C/OPT
The REMOVE FIT# command stops the FSC from communicating with the
specified C/OPT.
PCT Commands
If your system uses Petro Vend Pump Control Terminals these commands
set the controllers.
You can SHOW, PRINT, INSTALL, REMOVE, or CONFIGURE a PCT#.
Each SYSTEM2 C/OPT has a PCT board (PV-268) to control pump operations. This board, in the C/OPT or in a remote cabinet, must be uniquely
numbered.
PCT number is set with DIP switch #5 on each PV-268 board. See the PCT
User’s Manual (Petro Vend manual # M47-00.01) for details. If the FSC is
equipped with UPC (Universal Pump Controller) software, it can authorize
fueling transactions via a pump control console (a self service station).
Pumps controlled by UPC software do not require a PCT.
Configure PCT
The CONFIG PCT # command (a number is required) first asks if a UPC
will be substituted for the specified PCT. Press (Y) or (N) as appropriate. If
yes, you are asked if the UPC is internal (built into the FSC) or external (in
a separate cabinet). Refer to the appropriate System2 UPC manual before
proceeding with UPC configuration.
3/ 7/ 01
S ys t e m D e v i c es C o m m a n d s : P C T C o m m a n d s
60
System2 for Pacific Pride Multiple Networks
Note
To reconfigure an installed PCT as a UPC, you must first
remove the PCT using the command REMOVE PCT #!
When SYSTEM2 is "cold started" (with no setup information in the data
base), PCT #1 is automatically installed as not a UPC. A cold start is
required: (1) when SYSTEM2 is first installed or (2) if both the system
power and backup battery fail.
Install PCT
The INSTALL PCT # command activates the PCT, creating a link between
the installed PCT and FSC. There is a PCT for each C/OPT. This command
does not install all positions for a PCT.
Note
Pumps must be installed before the PCT is installed.
After installing pump positions, the PCT(s) themselves must also be
installed. A PCT can be configured and kept inoperative by not installing it.
At power-up, PCT #1 is automatically installed.
Remove PCT
The REMOVE PCT # command ends FSC-to-PCT communication to the
specified PCT and deactivates all positions in the specified PCT. All programmed settings remain intact - you can re-install the "removed" PCT
without having to reconfigure it.
PCT Position Commands
You can SHOW, PRINT, INSTALL, REMOVE, or CONFIGURE a position
within a PCT#. These commands configure or show individual positions
within a PCT. PCT positions can be viewed, printed, installed, removed or
configured. Each PCT can control up to eight pumps, located at positions
#1 - #8.
Required Entries
After issuing CONFIG PCT # POS #, a pump number and pulses per unit
MUST must be specified for each position:
•
Pump # - The pump number displayed to the customer for this PCT
position (example: `USE PUMP #12'). This number is only a label and
does not have to match the PCT position number. A pump number can
be assigned to more than one position on the same PCT. When that
S y st e m D ev i c e s Co m m an d s : P C T P o si ti o n Co m ma n d s
3/ 7/ 01
System2 for Pacific Pride Multiple Networks
61
pump number is selected by a customer, all the associated positions are
activated. For example, say pump number "2" is assigned to positions
#1 and #2. A customer with a large saddle-tank could speed his fueling
by putting Position 1's pump into one of the tanks and the Position 2
pump into the other tank.
Each PCT position records its own transaction; in this example, two
transactions would be recorded (one for each pump). Multiple pump use
in this way is not possible when using UPC software.
•
Pulses Per Unit - Specifies the number of pulses per "unit" of fuel. A
unit is typically gallons, litres or quarts. The prompted unit is the one
related to the fuel type just entered. Default value is 100. For more
information on fueling units, see page 88.
Optional Entries
The following optional PCT items have defaults that should work for most
systems. Press ENTER to skip past an optional item and enter the default
value. To change a default, enter your new value at the prompt.
3/ 7/ 01
•
Max Fuel Per Transaction - This is maximum quantity of fuel to be
dispensed for any transaction using this pump. Default is 10 units. Max
Fuel Per Transaction is not the same as Quantity Restriction (described
on page 93) or the Daily/ Monthly Allocations described in the Cards/
Accounts section of this manual.
•
Enable/Disable Pump Sentry Feature - This option deactivates the
pump if three "zero quantity" transactions appear in a row, a sign of possible pump or pulser trouble. You’ll first see PUMP SENTRY
OPTIONS (Y/N)?. Enter (Y) to enable the sentry. If you enter (Y),
you’ll next see ENABLE PUMP SENTRY (Y/N)?; press (Y) or (N) as
appropriate. Default is disabled. A PREMATURE BUSY error does
NOT increment the Pump Sentry counter.
•
Max Time For Fueling - The time limit, in minutes, given the user to
fuel. Default is five minutes. Time is measured from when the pump is
first activated to when power is removed from the pump. To deactivate
this feature, enter 0.
•
Max Time For Pump Handle - Maximum time, in seconds, allowed
between pump activation and handle retrieval. Default is 60 seconds.
Enter "0" to deactivate.
•
Max Time For First Pulse - Maximum time, in seconds, allowed to
detect the first fueling pulse from handle retrieval. Pump power is
removed when the time is reached. Default is 60 seconds. Enter 0 to
deactivate.
S y s t em D e v i c es C o m m a n d s: P C T P o s i t i o n C o m -
62
System2 for Pacific Pride Multiple Networks
•
Max Time Between Pulses - Maximum time, in seconds, allowed
between fueling pulses. Pump power is removed when this time is
reached. Default is 60 seconds. To deactivate, enter 0.
•
Fuel type Code # - A number from 1 to 16 that represents the type of
fuel this position will dispense (see page 86 for a list of default fuel
types).
•
Tank # - The tank number from which product will be drawn. A PCT
position with the same fuel type as the tank from which product is
drawn must be defined. Default tank number is the position number.
•
Clear Pump Totals - Whether or not to clear running pump totals;
default is no.
•
Totalizer Value - Set a number to match the totalizer counter on the
pump face; tracks the amount of fuel actually dispensed by the pump
and as seen by SYSTEM2. Default is "0". For UPC-equipped systems,
the last four prompts are repeated for up to four hoses.
You must enter the DOWNLOAD command after configuring a PCT.
These commands activate or deactivate the specified PCT position.
Set Pump On
This command lets you turn a pump on from the terminal or PC. You are
prompted for the following customer information:
CARD #1
VEHICLE NAME
CARD #2
ACCOUNT NAME
ACCOUNT #
ODOMETER
DRIVER NAME
MISCELLANEOUS
No card validation is done. Customer data is accepted “as-is” and becomes
part of the record.
Transaction termination is recorded as `MANAGER ACTIVATED'. If
pump is never activated, a `MANAGER ACTIVATED' transaction is generated, but the pump number is recorded as `0'.
Program
The SHOW, PRINT, INSTALL, REMOVE and CONFIGURE PROGRAM
commands are used with UPC-equipped systems only. Refer to your UPC
documentation for more information.
S y st e m D ev i c e s Co m m an d s : S e t P u m p O n
3/ 7/ 01
System2 for Pacific Pride Multiple Networks
63
Customer Messages Commands
SHOW RECEIPT, PRINT RECEIPT, FORMAT RECEIPT
SHOW RECEIPT HEADER, PRINT RECEIPT HEADER, FORMAT RECEIPT
HEADER
SHOW RECEIPT TRAILER, PRINT RECEIPT TRAILER, FORMAT RECEIPT
TRAILER
SHOW RECEIPT BONUS POINTS, PRINT RECEIPT BONUS POINTS, SET
RECEIPT BONUS POINTS
SHOW DISPLAY #, PRINT DISPLAY #, FORMAT DISPLAY #
SHOW KEYBOARD #, PRINT KEYBOARD #, FORMAT KEYBOARD #
SHOW MESSAGES, PRINT MESSAGES, FORMAT MESSAGES
SHOW DATE, PRINT DATE, FORMAT DATE
This section explains how to format printed receipts (body, header, trailer,
and bonus points), how to set up messages and prompts on the various types
of C/OPT displays, and how to change the response from a keyboard input
(for example, "(Y)" or "N").
Display and Receipt Languages. C/OPT messages and receipt data appear
in either French or English. On optical cards, the language selection is
coded in the card. Magnetic cards require the customer to choose a language at the start of the transaction. at the beginning of transaction.
Language for receipt is the same as for transaction. It is saved in the transaction record therefore there are two types of receipt - english and french.
Receipts
About Receipts
There are four parts to a receipt:
•
•PRE-PRINTED header
•
•Header
•
•Body
•
•Trailer
HEADERS - Take five lines: The two top lines (Lines 1 and 2) are blank,
and act as a separator. Lines 3 and 4 are the pre-printed header itself. The
5th header line is the spacer between the pre-printed area and the body of
3/ 7/ 01
C u st o m e r M es s a g e s C o m m a n d s: R e ce i p t s
64
System2 for Pacific Pride Multiple Networks
the receipt. For typeface ONE (the larger style), two of the top four lines are
defined. For typeface TWO (smaller style), all four of the top lines are used.
BODY - Uses up to 20 lines.Line 1 is a blank separator. The next 18 lines
(2-19) are user-programmable. Line 20 is blank.
TRAILER - Uses up to 4 lines. Otherwise follows the same rules as the
header.
The header and trailer/bonus points messages are printed in expanded format unless you specify otherwise.The receipt body fields can be set in any
order. Current date & time are automatically printed on each receipt.
Receipt size is fixed - make sure the programmed number of receipt body
lines will fit onto the receipt.
Programming the Receipt Body
Enter FORMAT RECEIPT. Fill in the first 10 characters of a line. Next,
specify a Receipt Code (in the table below) to print information from the
transaction or card file on the indicated Receipt Line.
Table 7: Receipt Structure
Receipt
Line #
Receipt
Code #
Information Printed
1
--
Blank
2
1
Number Of Card 1
3
2
Number Of Card 2
4
3
Transaction Number
5
4
Product Name
6
5
Quantity Dispensed
7
6
Price Per Unit
8
7
Total Price
9
8
Driver Name
10
9
Vehicle Name
11
10
Company Name
12
11
Site I.D.
13
12
Miscellaneous
C u s to m er M e s s ag es C o m m a n d s: R e ce i p t s
3/ 7/ 01
System2 for Pacific Pride Multiple Networks
65
Table 7: Receipt Structure (Continued)
14
13
Current Odometer Reading
15
14
Miles Per Gallon (MPG)
16
15
Litres Per 100 Kilometers
17
16
Pump Number
18
17
Not used.
19
--
Blank
20
--
Blank
After issuing a command, you'll see:
ENTER (Show, Delete, Insert, eXit, Line #):
Select a function by entering the capitalized letter; for example, to exit,
press the (X) key and then the ENTER key. Each function is described
below:
•
Show - Displays the current receipt body
•
Delete - Removes a line from the receipt body
•
Insert - Inserts another line into the body
•
eXit - Ends this function
•
Line # - This is a prompt for a valid line number to edit. The label and
code items can be modified.
Programming Receipt Headers and Trailers
The Receipt Header is the message printed at the top of the receipt. You
can show, print, or format a header.
To format a header, enter up to 4 lines. Each line can contain up to 11
characters. You can specify red or black print for each line. If you don't
need all 4 lines, press ENTER to skip lines.
The receipt trailer programs a message to print at the end of each receipt.
The format is the same as for the header.
Sample Receipts
Figure 10 shows a receipt that uses one of the pre-printed header lines
(typeface one), and all four footer lines (also typeface one). Note how the
3/ 7/ 01
C u s t o m e r M es s ag e s C o m m a n d s: S a m p l e R e ce i p t s
66
System2 for Pacific Pride Multiple Networks
header "gives up" three lines so that the footer can grow. Note also how the
body has shifted upwards to accommodate the larger footer.
LINE 1
PRE-PRINTED
05/10/96 11:11 AM
CARD #:
1
TRANS #: 12
PRODUCT: PREMIUM
QUANTITY: 10.7
PR/UNIT: 1.199
TOTAL:
12.83
DRIVER:
T. ROBINSON
ACCT. NAME:K.O. TRUCKING
SITE ID: XXXXXXXXXXXX
MISC:
123456789012
ODOM:
130445
PUMP #:
6
ACCOUNT#: 123456789
THANK YOU
FOR STOPPING AT
THE WORLD'S LARGEST
FUELING STATION
Figure 10: Sample Receipt 1
C u s to m er M e s s ag es C o m m a n d s: S a m p l e R e c ei p t s
3/ 7/ 01
System2 for Pacific Pride Multiple Networks
67
The receipt in Figure 11 uses two pre-printeds and two customs in the
hearer leaving room for a trailer, of which one line is used here.
LINE 1
LINE 2
PRE-PRINTED
PRE-PRINTED
LINE 3
LINE 4
CUSTOM
CUSTOM
05/09/96 11:11 AM
CARD #:
1
TRANS #: 12
PRODUCT: PREMIUM
QUANTITY: 10.7
PR/UNIT: 1.199
TOTAL:
12.83
DRIVER:
T. ROBINSON
ACCT.NAME:K.O. TRUCKING
SITE ID: XXXXXXXXXXXXX
MISC:
123456789012
ODOM:
139750
PUMP #:
6
ACCOUNT#: 123456789
THANK YOU!
Figure 11: Sample Receipt 3
Display Formatting Commands
The FORMAT DISPLAY # command defines prompts that appear on the
C/OPT display.
Default prompts are in Table 8 on page 68.
The C/OPT display guides customers through the fueling process with a
series of prompts. The system generates default prompts for certain events.
•
Standard 2x16 C/OPT display shows two lines of text with up to 16
characters per line.
•
Optional graphics display allows a picture to be displayed with a
prompt.
The type of display that is installed is in the Status Report, produced with a
SHOW SYSTEM command (page 85).
3/ 7/ 01
C u s t o m e r M es s ag e s C o mm a n d s : D i s p l ay F o r m at -
68
System2 for Pacific Pride Multiple Networks
Table 8: Default Display Prompts
1
SYSTEM OUT OF SERVICE
2
READING CARD
3
REMOVE CARD
4
INCORRECT READING
5
CHECK CARD ORIENTATION
6
INSERT CARD FOR RECEIPT
7
INSERT CARD FOR RECEIPT
8
PETRO VEND SYSTEM2
9
INSERT CARD
10
SYSTEM CLOSED
11
PLEASE WAIT
12
PRINTING RECEIPT
13
TAKE RECEIPT
14
PRINTER ERROR
15
ISSUE RECEIPT?
16
ENTER PUMP NO:
17
IN USE, RE-ENTER
18
INVALID, RE-ENTER
19
PUMP HANDLE? RE-ENTER
20
FAULTY PUMP, RE-ENTER
21
UNAUTHORIZED, RE-ENTER
22
RESTRICTED, RE-ENTER
23
USE PUMP
24
INSERT 2ND CARD
25
INCORRECT CARD
26
ENTER CARD #
C u s to m er M e s s ag es C o m m a n d s: D i s p l ay F o rm a t t i n g C o m m a n d s
3/ 7/ 01
System2 for Pacific Pride Multiple Networks
69
Table 8: Default Display Prompts (Continued)
3/ 7/ 01
27
ENTER PIN:
28
ENTER ODOM:
29
ENTER MISC:
30
ENTER 2ND CARD:
31
RE-ENTER PIN
32
RE-ENTER ODOM:
33
Blank
34
Blank
35
NOT IN CARD FILE
36
CARD EXPIRED
37
CARD RECORD EXPIRED
38
CARD INVALIDATED
39
3 BAD PIN ENTRIES
40
ALLOCATION EXCEEDED
41
Blank
42
Blank
43
ACCOUNT EXPIRED
44
ACCOUNT INVALIDATED
45
ACCOUNT #s DO NOT MATCH
46
ACCOUNT RECORD NOT FOUND
47
Blank
48
JOURNAL ERR - GET MANAGER
49
SYSTEM BUSY - BUFFER FULL
50
Blank
51
Blank
52
Blank
C u s t o m e r M es s ag e s C o mm a n d s : D i s p l ay F o r m at -
70
System2 for Pacific Pride Multiple Networks
Punctuation: In addition to numbers and letters, you may include most
characters such as `!', `?' and `$' in the C/OPT display prompts.
Note
You MUST issue a DOWNLOAD command after altering a prompt,
in order for it to be visible.
Beep. Add the `}' (right curly bracket) character to any C/OPT prompt to
have an audible tone to sound at the C/OPT when the prompt is displayed.
The curly bracket itself does not appear.
Prompts #6 and #7 alternately display when prompting for a receipt. Messages #8 and #9 alternately display while waiting for a customer to activate
the system (if #8 and #9 are six characters less then maximum, the current
time is also shown.If changing the default message, remember that only the
text is changed, not any function. For example, `INSERT CARD' can be
changed to `PUT IN CARD' but not to `ENTER CURRENT TIME'.
Enter a FORMAT DISPLAY command, then enter the number of the C/OPT
prompt (Table 8) you want to edit. After entering the prompt number, the
current prompt and two vertical lines appear. These lines work in the same
way as the lines in the 2x16 display.
The lines encase the maximum length of the message; messages must fit
between the lines - two rows, each with up to 16 characters. Upper and
lower case letters can be used.
Graphic Display Overview
If your system has the optional Graphics Display, pictures and text (in multiple styles) can be placed on one or more lines of the display. The current
time can also be displayed with any prompt.
Up to 80 characters can be displayed. To combine pictures with text, you
add "control characters" (on a computer, CTRL characters display as ^) to
text prompts. In addition to defining pictures, these characters also allow
you to:
•
Position text on the display
•
Select a text style
•
Show the current time
•
Clear the picture from the display.
Sample graphic pictures begin on page 74.
Sample fonts and several examples of prompts with pictures and a list of
control characters begin in Graphics Display Typestyles and Position Codes
on page 78. The graphics codes described in this section can also be added
C u s to m er M e s s ag es C o m m a n d s: D i s p l ay F o rm a t t i n g C o m m a n d s
3/ 7/ 01
System2 for Pacific Pride Multiple Networks
71
to the keyboard responses and to the individual messages generated by the
messaging feature (page 85).
Graphic prompts are limited to 80 text characters, each control character is
equal to two text characters. Use the following prompt as an example:
`^1^Z
ENTER CARD
This prompt consumes 18 characters: two for `^1' (the code that displays
picture #1), two for `^Z', (the code that selects the font), and twelve for the
text ENTER CARD (including three spaces).
Graphics Display Command Syntax
Editing the text portion of a Graphics Display is like editing a standard one
or two line display. After you issue a FORMAT DISPLAY # command, enter
prompt # to edit. The text prompt for editing the Graphics Display is like a
double version of the 1 x 40 display. When specifying the display number,
you are shown the current prompt and two vertical lines spaced 40 characters apart.
The first 40 characters of the display prompt are shown on one line, in the
space underneath the two vertical lines; the second 40 characters of the
prompt (if applicable) are shown on a second line.
Enter the new prompt and press ENTER to complete the entry for the first
line. Enter a second line for the prompt if desired. To format another, reenter the command.
Graphics Display Picture Selection
Pictures are defined within the text prompt. To associate a picture with a
display prompt, simply add the control character for that picture to the display prompt text.
Place the picture control character before the prompt text. Only one pix
ENTER can be connected to a message. You can tie the same picture to as
many display prompts as desired.
Numerous picture control codes, and C/OPT prompts typically attached to
each picture, begin on page 74.
Graphics Display Text Position
To specify where on the display your text will go, insert one or more "position codes" in your prompt. There are 12 "lines" on the display; each of the
12 lines has a position code (Table 9 on page 80).
The position code must be a CAPITAL letter and must be placed before the
text. For example:
3/ 7/ 01
C u s t o m e r M es s ag e s C o mm a n d s : D i s p l ay F o r m at -
72
System2 for Pacific Pride Multiple Networks
^C THIS IS ON LINE THREE
The ^C in the above prompt specifies the text will appear on line three. If no
position control character is specified, the text begins on the first (top) line
of the display.
Graphics Display Font Selection
Your text messages can be displayed in one of the typesets (shown on
page 79) listed below. The control character that defines the font is shown
below as well:
•
Serif, 20 characters per line (^Z)
•
Sans-serif, 20 characters per line, Std. set (^Y)
•
Sans-serif, 20 characters per line, Intl set (^X)
•
Serif, 40 characters per line (^V).
Serifs are the small "tails" on type. The first character below is a serif typestyle, while the second is sans-serif:
T T
All typestyles use fixed-width characters (in other words, an "l" takes up as
much room as a "W".
Note
Only one typestyle can be used per message.
If you do not specify a style, the last style you specified is used. If you do
not specify any styles for any prompts, Style 1 is used.
C u s to m er M e s s ag es C o m m a n d s: D i s p l ay F o rm a t t i n g C o m m a n d s
3/ 7/ 01
System2 for Pacific Pride Multiple Networks
73
Time of Day in a Graphics Display
To show current time in a prompt, insert control character `^T' at the end of
any display prompt. The time is always displayed in the top right corner of
the display. It appears in the current typeface.
Inverting the Graphics Screen
Use ^M to invert the image on the graphics screen (white becomes black,
and black becomes white). Use ^N to restore the display to normal. Use ^P
to invert the image on the graphics screen (white becomes black, and black
becomes white). Use ^Q to restore the display to normal.
Clearing the Graphics Screen
Insert `^0' (control zero) before the prompt text to clear the screen before
displaying a prompt. This command is typically used with two-part messages; insert the command after the first part of the message to "erase" the
screen for the second part.
A Graphics Display picture remains on the screen until one of the following
occurs:
1.
Another C/OPT prompt with a picture is displayed OR...
2.
A C/OPT prompt with the "clear screen" control code is displayed.
Display Cleaning Products
Cleaning the Screen
The Graphics Display has a thin anti-glare coating. DO NOT use harsh
detergents or any petroleum-based solvents to clean the display!
The following products are safe for use on the System2 graphics display
panel:
1.
AR Kleener - Anti-Reflective. Shield Lens Care Products, Golden
Valley, MN. (612) 542-8276. AR Kleener is available nationwide at Sunglass Hut stores.
2.
Diamond Glaze Anti-Reflective Cleaner. Diamond Glaze, Inc. St.
Paul, MN (800) 322-6644. (612) 227-5560
Call the manufacturers above for distributors in your area. Both are widely
available in eyeglass stores or optometry clinics.
3/ 7/ 01
C u s t o m e r M es s ag e s C o mm a n d s : D i s p l ay F o r m at -
74
System2 for Pacific Pride Multiple Networks
Sample Graphic Display Prompts
Figure 12: C/OPT Graphic -- Insert Magcard With Stripe to Left
Figure 13: C/OPT Graphic -- Insert Magcard with Stripe to Right"
C u s to m er M e s s ag es C o m m a n d s: D i s p l ay F o rm a t t i n g C o m m a n d s
3/ 7/ 01
System2 for Pacific Pride Multiple Networks
75
Figure 14: C/OPT Graphic -- "Insert Optical Card"
Figure 15: C/OPT Graphic -- "Insert ChipKey"
3/ 7/ 01
C u s t o m e r M es s ag e s C o mm a n d s : D i s p l ay F o r m at -
76
System2 for Pacific Pride Multiple Networks
Figure 16: C/OPT Graphic -- "Enter Card Number on Keypad"
Figure 17: C/OPT Graphic -- "Enter Odometer Reading"
C u s to m er M e s s ag es C o m m a n d s: D i s p l ay F o rm a t t i n g C o m m a n d s
3/ 7/ 01
System2 for Pacific Pride Multiple Networks
77
Figure 18: C/OPT Graphic -- "Select a Pump"
Figure 19: C/OPT Graphic -- "Take Receipt"
3/ 7/ 01
C u s t o m e r M es s ag e s C o mm a n d s : D i s p l ay F o r m at -
78
System2 for Pacific Pride Multiple Networks
Figure 20: C/OPT Graphic -- "Please Wait"
Figure 21: C/OPT Graphic -- PV Logo
Graphics Display Typestyles and Position
Codes
The following screens show the available typestyles, with their matching
control code. Up to 12 lines of text can be displayed for each typestyle.
Position control codes specify where on the display the line of text appears;
codes apply to all typestyles. For example, to have the prompt INSERT
C u s to m er M e s s ag es C o m m a n d s: D i s p l ay F o rm a t t i n g C o m m a n d s
3/ 7/ 01
System2 for Pacific Pride Multiple Networks
79
CARD appear at the bottom of the display (perhaps under a picture), enter:
^LINSERT CARD.
Figure 22: C/OPT Font Style CTRL V -- Small Sans-Serif
Figure 23: C/OPT Font Style CTRL Y -- Large Serif
3/ 7/ 01
C u s t o m e r M es s ag e s C o mm a n d s : D i s p l ay F o r m at -
80
System2 for Pacific Pride Multiple Networks
Figure 24: C/OPT Font CTRL Z -- Large Sans Serif
Figure 25: C/OPT Font CTRL X - Large International
Graphic Display Control Codes
Table 9: C/OPT Display Screen Control Codes
CODE
FIT 1.01
FIT 1.02A or over and C/OPT
^A
Position on Line 1
Position on Line 1
^B
Position on Line 2
Position on Line 2
^C
Position on Line 3
Position on Line 3
^D
Position on Line 4
Position on Line 4
^E
Position on Line 5
Position on Line 5
^F
Position on Line 6
Position on Line 6
^G
Position on Line 7
Position on Line 7
C u s to m er M e s s ag es C o m m a n d s: D i s p l ay F o rm a t t i n g C o m m a n d s
3/ 7/ 01
System2 for Pacific Pride Multiple Networks
81
Table 9: C/OPT Display Screen Control Codes (Continued)
3/ 7/ 01
^H
Position on Line 8
Position on Line 8
^I
Position on Line 9
Position on Line 9
^J
Position on Line 10
Position on Line 10
^K
Position on Line 11
Position on Line 11
^L
Position on Line 12
Position on Line 12
^M
Invert graphics display
Position on Line 13
^N
Restore graphics display
Position on Line 14
^O
n/a
Position on Line 15
^P
n/a
Invert graphics display
^Q
n/a
Restore graphics display
^T
Insert Current Time
Insert Current Time
^V
Small Sans-Serif Font
Small Sans-Serif Font
^X
Large Sans-Serif Font, Int'l
Large Sans-Serif Font, Int'l
^Y
Large Serif Font
Large Serif Font
^Z
Large Sans-Serif Font, Std.
Large Sans-Serif Font, Std.
^0
(zero)
Clear Screen
Clear Screen
C u s t o m e r M es s ag e s C o mm a n d s : D i s p l ay F o r m at -
82
System2 for Pacific Pride Multiple Networks
Graphic Display Examples
Figure 26: C/OPT Graphic Sample -- "Petro Vend System2"
Figure 27: C/OPT Graphic Sample -- "Insert ChipKey"
C u s to m er M e s s ag es C o m m a n d s: D i s p l ay F o rm a t t i n g C o m m a n d s
3/ 7/ 01
System2 for Pacific Pride Multiple Networks
83
Figure 28: C/OPT Graphic Sample -- "Petro Vend System2" Sans
Figure 29: C/OPT Graphic Sample -- "Check Card Orientation"
3/ 7/ 01
C u s t o m e r M es s ag e s C o mm a n d s : D i s p l ay F o r m at -
84
System2 for Pacific Pride Multiple Networks
C u s to m er M e s s ag es C o m m a n d s: D i s p l ay F o rm a t t i n g C o m m a n d s
3/ 7/ 01
System2 for Pacific Pride Multiple Networks
85
System Parameters Commands
SHOW SYSTEM, PRINT SYSTEM
SHOW SITE, PRINT SITE, SET SITE
SHOW FUELTYPE, PRINT FUELTYPE, SET FUELTYPE
SHOW FUELING UNITS, PRINT FUELING UNITS, SET FUELING UNITS
SET PASSWORD
SET LANGUAGE
SHOW BYPASS, PRINT BYPASS, SET BYPASS
SET MENU (always OFF)
SET ECHO
SHOW BONUS POINTS, PRINT BONUS POINTS, SET BONUS POINTS
SET RAM
SHOW VERSION, PRINT VERSION
System
The SHOW SYSTEM or PRINT SYSTEM commands displays the following
current system information (this is a read-only function; SET SYSTEM is
not applicable):
•
FSC Software Version - for example, 24.63B.
•
Checksums - Results of an FSC program check.
•
Display Type (page 70):
• 2 X 16: 2 lines with 16 characters each
• 1 X 40: 1 line with 40 characters
• Graphics: 320 x 200 pixels
3/ 7/ 01
•
Date and Time - As set with System Times (page 55).
•
System State - ON, OFF or RECEIPTS ONLY (page 56).
•
Installed C/OPTs - as set with System Devices (page 57).
•
Status of each C/OPT - RUNNING or DOWN
•
Number of receipts issued to date per C/OPT
•
Receipt Printer Errors - paper jams, outs, etc.
S y st e m P a ra m e te r s C o m m a n d s: S y s t em
86
System2 for Pacific Pride Multiple Networks
•
Installed PCTs - as set with System Devices (page 59).
•
Installed Positions - as set with System Devices (page 60).
•
Pump Sentry Alarm - a position number in parentheses shows a pump
automatically put out of service by the system.
•
Low Tanks - Tanks that are below their programmed low levels.
•
Power Failures - Dates and times of the last four power failures.
•
Battery Condition - The condition of the backup battery in the FSC.
Site ID
Use the SET SITE command to enter a 12-character code to give a site a
unique name. The system defaults a site "name" of "XXXXXXXXXXXX". This
code can be printed on receipts, and is used during backup and restore operations with an external computer.
Your site ID must be EXACTLY 12 characters long. It can contain spaces,
though the first character cannot be a space.
Fuel Types
Fuel units (gallons, litres, etc.), prices, and names can be set for up to 16
different products. Each product is assigned a code number, which you
assign during PCT configuration. Fuel type data can be assigned individually to each pump or hose.
The following are the system default names for the 16 products. Each product has a default "price-per-unit" of $1.00. The "unit" default is gallons; this
can be changed using the SET FUELING UNITS command (page 88).
Table 10: Default Products and Codes
CODE
DEFAULT PRODUCT
1
Unleaded
2
Premium
3
Regular
4
Marked Fuel
5
#1 Diesel
6
#2 Diesel
7
Gasohol
8
Alcohol
9
Propane
S y st e m P a ra m e t er s C o m m an d s : S i t e I D
3/ 7/ 01
System2 for Pacific Pride Multiple Networks
87
Table 10: Default Products and Codes
10
LPG
11
Lubeoil 1
12
Lubeoil 2
13
Trans Oil
14
Coolant
15
Water
16
Air
To change a fuel type:
1. Issue the SET FUELTYPE # command, where `#' is the code number
(1-16). The first prompt is:
ENTER FUELING UNIT CODE (1-3):
A fueling unit (gallon, litre, quart) must be specified with the SET FUELING UNITS command (next section). Default code is "1". The default for
code 1 is GALLON.
2. The next prompt is:
CHANGE PRICE (Y/N)?
To keep the price the same, press ENTER. If you want to change price per
unit, enter (Y) to display the next prompt:
ENTER PRICE PER GALLON
Default price is $1.00 per unit. Price can be specified to a tenth of a cent; for
example, `$1.059'. A price of `$0.000' can be specified for non-retail sites.
Note
The current fuel price is recorded for every transaction. Changing the fuel price does not affect completed transactions.
3. The next prompt is:
CHANGE PRODUCT NAME (Y/N)?
To keep the name the same. press ENTER. To change it, press (Y) to display the next prompt:
ENTER FUELTYPE 1:
Names can be up to ten characters long. Type a name, and press ENTER.
Change other fuel type codes as desired.
3/ 7/ 01
S y s t em P a r am e t er s C o m m an d s : F u e l T yp e s
88
System2 for Pacific Pride Multiple Networks
Fueling Units
Three different unit-of-measure labels can be connected to product types
(previous section). All are simply labels - no conversion is done.
The default labels, and their "Fueling Unit Codes", are:
(1) gallon
(2) liter
(3) quart
The numbers 1, 2, or 3 are entered in the FUELING UNIT CODES prompt
during a SET FUELTYPES procedure (page 86).
To change the default labels, enter SET FUELING UNITS. You are
prompted for each of the three labels (to keep one the same, just press
ENTER. Maximum length of each label is 10 characters.
ENTER FUELING UNIT 1:
ENTER FUELING UNIT 2:
ENTER FUELING UNIT 3:
Passwords
There are three modes of operation for SYSTEM2: Normal, Privileged and
Restricted.
Note
Only normal or restricted mode can be enabled at one time.
When you see a `$' prompt, the restricted mode is enabled and
the SHOW password (page 88) must be entered to proceed.
•
Normal - Most SHOW and PRINT commands can be executed in Normal mode. The screen prompt is >. The normal mode is the default
mode. This mode does not have to be enabled. No password is required.
In this mode, you can print and display all system, card and transaction
data.
•
Privileged - Most SET or FORMAT commands require privileged
access. The screen prompt is p>.Enable and disable Privileged mode
with SET PASSWORD. To safeguard SYSTEM2 data from unauthorized viewing, you may enable the restricted mode. When this mode is
enabled, the "show" password must be entered before any information
can be displayed or printed and before the privileged mode can be
accessed.
To configure SYSTEM2, the system must be in the privileged mode.
See System Access Commands on page 53.
•
Restricted - This mode, signified by a $screen prompt, requires a password be entered for any screen display to be visible. Enable and disable
S y st e m P a ra m e t er s C o m m an d s : F u el i n g Un i t s
3/ 7/ 01
System2 for Pacific Pride Multiple Networks
89
Restricted mode with SET PASSWORD. When the restricted mode is
enabled, no commands will be accepted and no characters will be echoed to the screen until the show password is entered.
Your unit comes from the factory with all passwords set as HELLO, and the
Restricted mode OFF.
Note
Passwords do not have to be changed, or the Restricted mode
enabled, in order for SYSTEM2 to operate. SET PASSWORD
is also used to change the Modem password (page 127)..
To change any or all passwords:
1. Enter SET PASSWORD. The system prompts you first for the Privileged-mode password.
2. Enter up to six characters for the main password (or press ENTERENTER to retain the old password).Entries are case-INsensitive. The
system next prompts you for a Modem password.
3. Enter a new Modem password, or press ENTER to retain the old password and move to the next prompt.
4. Enable or disable the Restricted mode via the following prompt.
`SHOW' PASSWORD OPTIONS (Y/N)?
5. If you don't want to use the Restricted mode (it is disabled by default),
press ENTER to skip. If you press (Y):
ENABLE SHOW PASSWORD (Y/N)?
6. Press (Y) or (N) as appropriate. If you enter (Y), you are prompted to
enter a new show password.
Language
This feature allows SYSTEM2 to be "bi-lingual" to a certain degree - to display or print in two languages.
Use SET LANGUAGE to turn the Dual Language ON or OFF. A Language
Type is programmed into each card record. When the card is read, the C/
OPT display language changes to the programmed language. Receipts also
print out in the specified language.
To program bilingual cards, use SET CARD (page 97). The display prompts
are listed in Table 8 on page 68. Receipts are explained in Receipts on page
63.
Certain prompts cannot be defined for a second language - prompts #2, 3, 4,
5, 6, 7, 8, 9, 24, 25, 26 and 35 (page 68) are displayed before a card or key
3/ 7/ 01
S y st e m P a ra m e te r s C o m m a n d s: L an g u a g e
90
System2 for Pacific Pride Multiple Networks
has been read, these prompts should not be programmed for a second language.
Bypass
The BYPASS command defines which customer entries will be required
before the customer can fuel. Choose from the following entries:
•
PIN
•
Miscellaneous
•
Odometer
The selected entry can be prompted as follows:
•
Disabled for ALL cards
•
Enabled for ALL cards
•
Determined by the card information.
Echo
During programming, the FSC sends back (echos) every character it
receives from the terminal if echo is enabled. Echo must be ON in order for
you to see the characters as you type them into the terminal.
Echo is typically disabled with the SET ECHO command only when interfacing to an external computer. Also see Appendix D - Using System2 With
an External PC on page 129.
Bonus Points
The SET BONUS POINTS command allows you to specify a "coupon"
value (based on the amount of fuel dispensed) to be printed on each receipt.
A Bonus Points message can also be specified.
For example, bonus points can be awarded to customers as credit toward
using a local car wash facility.
To print bonus points on a receipt, see Customer Messages Commands on
page 63.
RAM
Initially configuring your SYSTEM2 requires you define the size of the
system memory with the SET RAM command. The card file and transaction
records are stored in RAM chips on the FSC board. The number of RAM
chips on your FSC board depends on the amount of RAM you ordered.
S y st e m P a ra m e t er s C o m m an d s : B yp as s
3/ 7/ 01
System2 for Pacific Pride Multiple Networks
91
Enter SET RAM. You are prompted to enter the code appropriate for your
system:
Table 11: RAM Levels
CODE TO ENTER
MEMORY LEVEL
RAM SIZE
0
1 (Standard)
256 Kb
1
2 (Optional)
512 Kb
2
3 (Optional)
1 Mb
3
4 (Optional)
2 Mb
Press ENTER to keep the current code. You cannot enter a memory code if
there isn't sufficient RAM in the system (for example, you can't enter "2" if
you only have 512 K of memory). Privileged mode is lost if the system
rejects a RAM entry. Then, the password must be reentered.
If you don't know the RAM size, you can determine it by trial and error.
Start by entering 3 and continue until SYSTEM2 accepts the entry.
Version
The SHOW VERSION or PRINT VERSION command displays the current
software version (for example, 22.01B). This information is also included
in the Show System display (Option A in System Parameters).
This is a read-only function: there is no SET VERSION command.
3/ 7/ 01
S y st e m P a ra m et e r s C o m m a n d s: V e r si o n
92
System2 for Pacific Pride Multiple Networks
S y st e m P a ra m e t er s C o m m an d s : V e rs i o n
3/ 7/ 01
System2 for Pacific Pride Multiple Networks
93
Restrictions Commands
SHOW PUMP, PRINT PUMP, SET PUMP
SHOW QUANTITY, PRINT QUANTITY, SET QUANTITYS
SHOW SEC, PRINT SEC, SET SEC
Pump Restrictions
The SET PUMP command defines codes for up to 15 sets of pump restrictions.
Use the following pump configuration as an example:
•
Leaded fuel is dispensed from pump 1, and cannot be used in newer
trucks
•
Unleaded fuel from pump 2, and can be used in either new or old trucks
•
Premium fuel from pumps 3 and 4, and should not be available to any
trucks.
Enter pump #1 as valid for CODE 1, and pumps #1 and #2 as valid for
CODE 2. Do not assign pumps 3 or 4 - pumps not entered as valid are automatically assumed invalid.
Now use Codes 1 and 2 to configure the vehicle card files for the trucks;
other codes could be created to include the premium fuel pumps as
required. The default for all codes is ALL VALID.
Code 0 is no restrictions. In the example above, code 0 could be specified
for vehicles that would have access to all four pumps.
Pumps must be installed to be valid (page 60).
Quantity Restrictions
Fifteen Quantity Restriction codes can be defined with the SET QUANTITY
command. Restrictions can be by sale amount or by volume (gallons, litres
or quarts).
The Quantity Restriction codes specify how much product a customer can
dispense. Quantity Restriction is often set to match a vehicle's tank size.
Sale defaults are as follows (Code 0 turns OFF the function):
Table 12: Default Quantity Restriction Codes
CODE
0
3/ 7/ 01
PRICE RESTRICTION
No restriction
Re s t ri c t i o n s Co m m an d s : P u m p R e st r i c t i o n s
94
System2 for Pacific Pride Multiple Networks
Table 12: Default Quantity Restriction Codes
1
$20
2
$40
3
$60
4
$80
5
$100
6
$120
7
$140
8
$160
9
$180
10
$200
11
$220
12
$240
13
$260
14
$280
15
$300
After entering SET QUANTITY, you'll see:
QUANTITY RESTRICTION CODES:
CODE 0: NO RESTRICTIONS
CODE 1: $
7. Press ENTER (without an entry) to select the default value, or enter a
different value.
R es t ri ct i o n s C o m m a n d s : Q u a n t i t y R es t ri ct i o n s
3/ 7/ 01
System2 for Pacific Pride Multiple Networks
95
8. After the last entry, you are prompted with:
QTY RESTRICTION VALUE OPTIONS (Y/N)
If you press (Y), you are prompted:
USE VALUES AS $(Y/N)?
Press (Y) to use the values as dollars or (N) to use the values as quantities.
Enteredquantity values represent gallons, litres or quarts, depending on the
quantity units. See page 88 for Fueling Units information.
Security
Each system has a "security table" built into the software. The security table
is made up of ten 2-digit hexadecimal numbers (in two rows of five) used
by the INSERT CARD and COPY CARD # commands for automatic PIN
number generation. The default values are the same for every SYSTEM2 you MUST set new values with this command in order to generate unique
PIN numbers for your system.
After entering the SET SEC command, you are prompted with the current
value of ROW 1 (the system defaults are shown):
ROW 1: 01 23 45 67 89
1. Enter five 2-digit hex numbers, pressing the ENTER key after each.
Hex numbers include the decimal numbers 0 to 9 and the letters A to F.
The entries should be as random as possible.
2. After the fifth entry, you are prompted for the second row (ROW 2) in
the same way as the first. Again, enter five different 2-digit hex numbers.
3. After entering the last digit in row 2, you are prompted with:
SECURITY CODE: 00
The Security Code (default is 00) gives an additional degree of randomness.
Changing this code generates different PINs from the same security table.
Enter any two-digit hex number (except `00') for this code.
Note
Record your Security Table numbers on the worksheet (Appendix A)! If you are reconfiguring your system, or wish to generate
PIN numbers to match another SYSTEM2, the row and security
code numbers must match your original entries!
3/ 7/ 01
R e s tr i c t i o n s C o m m a n d s : S e c u r i t y
96
System2 for Pacific Pride Multiple Networks
R es t ri ct i o n s C o m m a n d s : S e c u r i t y
3/ 7/ 01
System2 for Pacific Pride Multiple Networks
97
Card Commands
SHOW CARD, PRINT CARD, SET CARD, VAL CARD, INVAL CARD
Set Card
Enter the SET CARD command to display the following:
[1] Set card/transaction buffer size.
[2] Set keyboard entry options.
[3] Set keyboard access type.
[4] Set keyboard card control data.
[RETURN] Return to main command line
Enter choice:
Set Card/Transaction Buffer Size
This option splits the transaction buffer into two or three sections.
1. Press (1).
TRANSACTION BUFFER WILL BE CLEARED (Y/N)?
3/ 7/ 01
C ar d C o m m a n d s: S e t C ar d
98
System2 for Pacific Pride Multiple Networks
Warning
This command erases ALL transaction data. There is NO
"undo".
2. Enter `Y' to delete the buffer and continue.
3. The next prompt is:
ENTER TRANSACTION SIZE CODE
The transaction size code is determined by the formula:
size code = Number of transactions / 25
For example, to store 100 transactions, enter a size code of four (100/25 =
4). The transaction capacity of the SYSTEM2 depends on the amount of
RAM in the system (which you can see with the SHOW RAM command).
4. Enter a size code. You will now see system configuration data:
# OF CARDS: ######
# OF TRANSACTIONS:
-- SAVE THIS CONFIGURATION (Y/N)?
To change the configuration, enter `N' at the prompt to select a different size
code. To save the current configuration, enter `Y' at the prompt.
PLEASE WAIT! Appears while cards are validated. This process takes
anywhere from a few seconds to several minutes, depending on the amount
of RAM.
Note
DO NOT use the same card number for more than one card; in
particular, do not give a Driver and a Vehicle card (used in
pairs) the same card number.
You see DONE! when validation is completed. SYSTEM2 can request the
following three types of customer information:
•Current odometer reading
•Miscellaneous data (for department section, job number, etc.)
•PIN number.
C ar d C o mm a n d s : S et C a rd
3/ 7/ 01
System2 for Pacific Pride Multiple Networks
99
These prompts can be set for all cards, for no cards, or only for cards that
are coded for a keyboard entry. Select [2] to display the following screen:
Keyboard entry options:
[1] Disable for all cards
[2] Enable for all cards
[3] Determined by card
[RETURN] No change
Odometer entry:
Enter a value and press [RETURN]. Default is [3] Determined by card.
Next is the Miscellaneous entry and then for the PIN entry. Enter a code
number for each.
The PIN entry cannot be disabled.
Set Keyboard Access Type
In lieu of a card or key, the SYSTEM2 can be accessed via entries on the
keypad. Keyboard Access Type defines the card type that a keyboard access
duplicates.
After selecting this option, you will see:
Set keyboard access type (Single, Driver, Vehicle):
Enter `S', `D', or `V' to select a card type, or press [RETURN] to enter the
current value. Default is Single.
When a card number is entered via the keyboard, SYSTEM2 uses code 15
for quantity and pump restriction.Odometer, miscellaneous and PIN entries
are always prompted if keyboard entries are determined by card (see Section 12.2.2).
Note
Keyboard Access numbers should not be the same as Card
Numbers! For example, if you assigned Driver Card number
1000 and Vehicle Keyboard Access number 1000, both numbers will always be either valid or invalid - you cannot lock out
only the card or only the keyboard access.
After three bad card reads, the system can optionally allow the customer to
enter his own card number. This option is set with a switch in the C/OPT.
When you select this choice, you are prompted:
ENTER THE CARD CONTROL DATA STRING
3/ 7/ 01
C ar d C o m m a n d s: S e t C ar d
100
System2 for Pacific Pride Multiple Networks
You are prompted for the card control data which will be appended to the
end of the customer's entry. The system will use this as the customer card
data when customers key in their card number.
This data string will be used for all cases where customers key in data.
When the SHOW CARD command is entered, the following is displayed:
[1] Display card (in)validation status.
[2] Display keyboard entry settings.
[3] Display keyboard access type.
[4] Display expiration date code table.
[RETURN] Return to main command line.
Enter choice:
Option [1] displays the validation status of a card or range of cards. You are
prompted for the card number or range. Data are displayed in the following
manner.
1-> VVVVVVVVVV VVVVVVVVVV VVVVVVVVVV VVVVVVVVVV
VVVVVVVVVV
51-> IIIIIIIIIV VVVVVVVVVV VVVVVVVVVV VVVVVVVVVV
VVVVVVVVVV
In the above display, `V' indicates a card is valid; `I' indicates a card is
invalid. In the example above, cards 1 - 50 and 60 - 100 are valid; cards 51 59 are invalid.
Options [2], [3], and [4] display the keyboard entry settings, access type,
and expiration date code table.
Validating or Invalidating Cards
When either the VAL CARD or INVAL CARD command is entered, the maximum card range which can be validated or invalidated is displayed. Proceed:
Enter a range and press ENTER. If you select a range of more than 100
cards, you are prompted a second time. If numerous cards are being processed, you will see PLEASE WAIT during execution.
C ar d C o mm a n d s : S et C a rd
3/ 7/ 01
System2 for Pacific Pride Multiple Networks
101
You will see DONE when the process is finished. A sample sequence
appears below:
p> VALIDATE CARD
p> VALIDATE CARD
Maximum card range: 1-208112
Enter card # or card range to be validated,
Press [RETURN] to exit.
Card (range):
33333
Card (range): 33333 DONE!
Validated card(s): 33333
Card (range):
1-10000
Validated card(s): 1-10000 (Y/N)?
Y
Validated card(s): 1-10000 (Y/N)? PLEASE WAIT!
Validated card(s): 1-10000 (Y/N)? DONE!
Validated card(s): 1-10000
Card (range):
[ENTER]
p>
3/ 7/ 01
C ar d C o m m a n d s: S e t C ar d
102
System2 for Pacific Pride Multiple Networks
Notes:
C ar d C o mm a n d s : S et C a rd
3/ 7/ 01
System2 for Pacific Pride Multiple Networks
103
Transaction Data Commands
SHOW TRANS, PRINT TRANS, SET TRANS
SHOW TRANS #, PRINT TRANS #
SHOW TRANS SUMMARY, PRINT TRANS SUMMARY
SHOW TRANS CF, SHOW TRANS CARD=LOCAL,
SHOW TRANS CARD=LOCAL CF, SHOW TRANS CARD=HOST,
SHOW TRANS CARD=HOST CF, SHOW TRANS CARD=ALL,
SHOW TRANS CARD=ALL CF, SHOW TRANS BATCH=XX,
SHOW TRANS TRACE=XXXXX, SHOW TRANS RETRIEVAL=XXXXXXXXXXXX
Show or Print by Date, Time, Card, or Vehicle
The SHOW/PRINT [date time card account vehicle] command displays
or prints completed transactions stored in the SYSTEM2 data base by one
data field.
Though all transactions are recorded, what you actually see is determined
by the SET TRANS command.
When you issue a SHOW TRANS or PRINT TRANS, you are prompted
as follows:
ENTER
ENTER
ENTER
ENTER
ENTER
DATE:
TIME:
CARD:
ACCOUNT:
VEHICLE:
There are four types of responses to these prompts. Pressing ENTER at
each prompt tells the system to ignore that parameter.
To define a range, enter a time, date, or number at a prompt.
For example, to display only the transactions from January 22, 2000, enter
JAN 22 2000 at the date prompt, and then press ENTER at the other four
prompts.
When specifying the time or date, you can also include one of two following prefixes:
3/ 7/ 01
•
< ("less than" sign). Will include all transactions up to and including the
current time or date. For example, to include all transactions up to and
including Jan. 22, 2000, enter <JAN 22 2000 at the date prompt.
•
> ("greater than" sign). Will include all transactions starting with and
including the specified time or date. For example, to include all that
T ra n s a c ti o n D a t a C o mm a n d s : S h o w o r P ri n t b y
104
System2 for Pacific Pride Multiple Networks
occurred after 5:00 PM (and before midnight), you would enter >5:00
PM at the time prompt.
>PRINT TRANSACTION 161
-ALLOW WRAP AROUND
-SAVE UNAUTHZ'D USERS ALSO
-TRANSACTION BUFFER SIZE: 25
SEQUENCE #: 123
REASON FOR TERMINATION: NORMAL
FEB 22, 2000
07:11 PM
TRANSACTION #: 123
CARD #: 20001
FUELTYPE: UNLEADED
PUMP #: 3
QUANTITY: 25.000 GALLON
PRICE: $1.000
TOTAL: $25.00
ODOMETER: 66555
MISCELLANEOUS: 1234567890
--RECEIPT ISSUED
Show or Print Summary by Transaction, Date,
Time, Card, or Vehicle
The SHOW/PRINT TRANS [date time card account vehicle] SUMMARY command displays only the product totals.
-ALLOW WRAP AROUND
-SAVE AUTHZ'D USERS
-TRANSACTION BUFFER SIZE: 25
*** PRODUCT TOTALS ***
UNLEADED
: 46.080 GALLON TOT: $46.08
PREMIUM
: 35.840 GALLON TOT: $35.84
REGULAR
: 34.900 GALLON TOT: $34.90
TRANSACTIONS: 9
GRAND TOTAL: $116.82
AVERAGE: $12.98
Show or Print by Transaction #
The SHOW/PRINT TRANS# command is quick method of displaying
transaction data. You are prompted only for the transaction number.
T r an s ac t i o n D at a C o m m a n d s: S h o w o r P r i n t S u m m ar y b y T r a n s a ct i o n , D a t e, T i m e , C a r d , o r V eh i c l e
3/
System2 for Pacific Pride Multiple Networks
105
Set Transaction
The size of the transaction buffer is set when you define card buffer size
(page 97). The SET TRANS command specifies how the transaction buffer
is to be configured. The first prompt is:
SET WRAP AROUND OPTIONS?
Press (N) to disable wraparound.
The next prompt is:
RE-DEFINE TRANSACTION?
Enter (Y) to redefine transactions and display:
TRANS=UNAUTHZ'D USERS ALSO?
If you enter (Y), the system processes an unauthorized attempt to use the
system as a transaction and logs the event in the transaction buffer.
Entering (N) causes the system to ignore any unauthorized users and
events; only cases where a pump was activated by the SYSTEM2 are
recorded.
The next SET TRANS prompt is:
SPECIFY DISPLAY FIELDS?
Enter (Y)
This lets you tell the system which fields to display when a SHOW
TRANSACTION or PRINT TRANSACTION command is issued. Choose
from the following fields:
3/ 7/ 01
•
DRIVER, VEHICLE
•
DATE & TIME
•
TRANS #
•
CARD #1
•
CARD #2
•
FUELTYPE
•
PUMP #
•
QUANTITY
•
PRICE
•
TOTAL
•
ODOMETER
•
DISTANCE PER UNIT
T r an sa c t i o n Da t a Co m m an d s : S et T ra n s a ct i o n
106
System2 for Pacific Pride Multiple Networks
•
MISCELLANEOUS
•
RECEIPT STATUS
•
HOST AUTHORIZATION
There must be at least one transaction recorded in your system in order to
show all the selected data fields. The last SET TRANS option (displayed
after the account number prompt) is:
COMPUTER FORMAT CHECK DATA IN HEADER?
When transferring data to an external system in the computer format
(Appendix D - Using System2 With an External PC on page 129), an
optional data check can be prefixed to the transaction header to provide
greater data integrity. The data check includes: (1) the number of records
and (2) the sum of the quantities for records.
Press (Y) to enable or (N) to disable the data check.
Visanet Transaction Commands
SHOW TRANS (shows only local Hollerith card transactions)
SHOW TRANS CF
SHOW TRANS CARD=LOCAL
SHOW TRANS CARD=LOCAL CF
SHOW TRANS CARD=HOST (Shows only Visanet- and Comdata-processed card transactions)
SHOW TRANS CARD=HOST CF
SHOW TRANS CARD=ALL (Shows both local and host card transactions)
SHOW TRANS CARD=ALL CF
SHOW TRANS BATCH=XX (Where “XX” is batch number, shows
host cards by batch number)
SHOW TRANS TRACE=XXXXX (Where “XXXXX” is trace number,
shows host cards by trace number)
SHOW TRANS RETREIVAL= XXXXXXXXXXXX (Where
“XXXXXXXXXXXX” is the retrieval number, shows cards by retrieval
number)
T r an s ac t i o n D at a C o m m a n d s: V i sa n e t T r a n s a ct i o n C o m m a n d s
3/ 7/ 01
System2 for Pacific Pride Multiple Networks
107
System Totals Commands
SHOW TRANS TOTAL, PRINT TRANS TOTAL
SHOW MIDNIGHT, PRINT MIDNIGHT
SHOW DAY, PRINT DAY
Note
Although "Account" may appear in some screens, this software
does not support accounts.
Showing or Printing Total Transactions by Date,
Time, Card, or Vehicle
The SHOW TRANS TOTALS or PRINT TRANS TOTALS commands let you
print and show the completed transactions that stored in the SYSTEM2 data
base. This function is similar to the SHOW/PRINT TRANS command
explained in the Transaction Data section (page 103).
Showing or Printing Summary of Total Transactions by Date, Time, Card, or Vehicle
This command displays only product totals, without listing all the transactions. This function is very similar to the SHOW/PRINT TRANS SUMMARY command in the Transaction Data section (page 103).
Midnight Totals
The MIDNIGHT commands summarize totals for a day. The following
data is logged in the SYSTEM2 journal at 12:00 AM - midnight:
•
Daily transaction totals for each POS position of each PCT
•
Daily product totals
•
Daily transaction records
On the Midnight screen, when a POS position is installed, the pump number is indicated next to the POS number. If one or more of the eight POS
positions is not installed, the position is indicated with an `X'.
Use SHOW MIDNIGHT to display the data for any of the preceding eight
days. When you enter the command, you are prompted to specify which
day. For example,
1: JAN 27, 2000
2: JAN 28, 2000
3/ 7/ 01
S y st e m T o t a l s C o m m an d s : S h o w i n g o r P ri n t i n g T o -
108
System2 for Pacific Pride Multiple Networks
3:
4:
5:
6:
7:
8:
JAN 29, 2000
JAN 30, 2000
JAN 31, 2000
FEB 1, 2000
FEB 2, 2000
FEB 3, 2000 -- ACTIVE
ENTER CHOICE:
Enter [1] -[8] to select the day, or ENTER to
exit.
The current date is the `ACTIVE' date. Note that the data are stored in a
"wrap-around" buffer. This means that as new data are recorded, old data
are erased. In the above list, when data for February 4 is recorded, data for
January 27 will no longer be available for display.
Day Totals
The SHOW DAY or PRINT DAY commands display or print the following
information for the specified day:
•
Amount of each product dispensed
•
Number of transactions
•
Grand total of product dispensed
•
Total dollar amount
Dollar value of average transaction for the specified day.
S y st e m T o t al s C o mm a n d s : D a y T o ta l s
3/ 7/ 01
System2 for Pacific Pride Multiple Networks
109
Journal Printer Commands
SHOW JOURNAL, PRINT JOURNAL, SET JOURNAL
LOCK PRINTER, UNLOCK PRINTER
Set, Show or Print Journal Printer Configuration
Connect your journal printer to the PRINTER port on the back of the FSC
to make a hard copy of all transaction data, providing added protection
against data loss.
The printer records the transaction, pump and product numbers, the date
and time, the first card number, the product quantity and dollar total.
The SHOW JOURNAL and PRINT JOURNAL commands display current printer configuration.
Use the privileged SET JOURNAL command to specify the system will
operate with an external printer. If so, you can also specify which of the following items will be printed:
3/ 7/ 01
•
Driver or Vehicle names. Odometer entry. Miscellaneous entry.
•
Second card if used.
J o u r n a l P r i n te r C o m m an d s : S et , S h o w o r P r i n t
110
System2 for Pacific Pride Multiple Networks
What you see after typing a SET JOURNAL command, and answer Y to
all prompts:
OFFICE JOURNAL (Y/N) Y
SET JOURNAL PRINTER OPTIONS (Y/N) Y
PRINT:
ACCOUNT (not used), DRIVER, VEHICLE, ODOM, and
MISC (Y/N)
ACCOUNT #, CARD 2 (Y/N)
JOURNAL ERROR OPTION (Y/N)
-- ENABLE AUTH ON JOURNAL ERROR (Y/N)
The JOURNAL ERROR OPTION specifies if the system should authorize
fueling when the printer is not operating. The printer may "block" if an
error, such as a paper outage, occurs. After fixing the error, unblock the
communication with the SET PRINTER command.
Lock Printer
The LOCK PRINTER command lets you turn OFF the logging function
for the printer, useful for when multiple PRINT commands are executed.
If you want to print several items (for example, several types of transaction
data) you can keep the printouts together by issuing the LOCK PRINTER
command. No "incoming" items will be printed until you turn OFF the
LOCK.
Unlock Printer
The UNLOCK PRINTER command returns the printer to its normal logging function. Any transactions that were locked out are printed when the
printer is unlocked. If no command is generated for 10 minutes while the
printer is locked, the system exits the privileged mode and unlocks the
printer.
Jo u r n a l P r i n te r C o m m a n d s : L o ck P r i n te r
3/ 7/ 01
System2 for Pacific Pride Multiple Networks
111
Appendices
3/ 7/ 01
J o u rn a l P r i n te r C o m m an d s : U n l o c k P r i n t e r
112
System2 for Pacific Pride Multiple Networks
Jo u r n a l P r i n te r C o m m a n d s : U n l o ck P r i n te r
3/ 7/ 01
System2 for Pacific Pride Multiple Networks
113
Appendix A - Setup Worksheet
System Times (page 55)
Forward:
___________
Backward:
___________
System On:
___________
System Off:
___________
Time Shifting:
___________
Receipts Only:
___________
Time Adjust:
___________
Light On:
___________
Light Off:
___________
System Devices (page 57)
C/OPT Setup
C/OPT #1
Issue receipts?
yes
no
Limit for
receiving a receipt (0..99)
________
Enable keyboard access?
yes
PCTs to shut off on E-stop
1, 2, 3, 4
Valid pump numbers
________
no
C/OPT #2
3/ 7/ 01
Issue receipts?
yes
no
Limit for
receiving a receipt (0..99)
________
Enable keyboard access?
yes
PCTs to shut off on E-stop
1, 2, 3, 4
no
A p p en d i x A - S e t u p W o r k sh ee t : U n l o ck P r i n t e r
114
System2 for Pacific Pride Multiple Networks
Valid pump numbers
________
C/OPT #3
Issue receipts?
yes
no
Limit for
receiving a receipt (0..99)
________
Enable keyboard access?
yes
PCTs to shut off on E-stop
1, 2, 3, 4
Valid pump numbers
________
no
C/OPT #4
Issue receipts?
yes
no
Limit for
receiving a receipt (0..99)
________
Enable keyboard access?
yes
PCTs to shut off on E-stop
1, 2, 3, 4
Valid pump numbers
________
no
Installed C/OPTs
FIT #1
FIT #2
FIT #3
FIT #4
PCT Setup (page 59)
There are up to four PCTs in a SYSTEM2, each PCT controlling 8 positions. Copy this page and the next as needed. Circle the appropriate PCT
and position numbers. Note that most PCT configurations do not require all
of this information.
Table 13: Setup Worksheet - PCT Position Details
PCT Number
1
2
3
4
POSITION NUMBER
1
2
3
4
Pump Number
Pulses / Unit
Max Fuel/Transaction
Sentry Feature
A p p e n d i x A - S e t u p W o r k sh e et : U n l o ck P r i n te r
3/ 7/ 01
System2 for Pacific Pride Multiple Networks
115
Table 13: Setup Worksheet - PCT Position Details
Max Time Fuel
Max Time Handle
Max Time 1st Pulse
Max Time Between Pulses
POSITION NUMBER
5
6
7
8
Pump Number
Pulse / Unit
Max Fuel/Transaction
Sentry Feature
Max Time Fuel
Max Time Handle
Max Time 1st Pulse
Max Time between Pulses
3/ 7/ 01
A p p en d i x A - S e t u p W o r k sh ee t : U n l o ck P r i n t e r
116
System2 for Pacific Pride Multiple Networks
Table 14: Setup Worksheet -- PCT/Position Numbering
PCT Number
1
2
3
4
POSITION NUMBER
1/5
2/6
3/7
4/8
Fuel type Code #
Fueling Tank
Clear Pump Totals
Totalizer Value
Installed PCT Positions (page 60)
PCT #1 POS #
1
2
3
4
5
6
7
8
PCT #2 POS #
1
2
3
4
5
6
7
8
PCT #3 POS #
1
2
3
4
5
6
7
8
PCT #4 POS #
1
2
3
4
5
6
7
8
Installed PCTs (page 59)
PCT #1
PCT #2
PCT #3
PCT #4
Customer Messages (page 63)
Message #
Prompt
1
_______________________________________________________________________
2
_______________________________________________________________________
3
_______________________________________________________________________
4
_______________________________________________________________________
5
_______________________________________________________________________
6
_______________________________________________________________________
7
_______________________________________________________________________
A p p e n d i x A - S e t u p W o r k sh e et : U n l o ck P r i n te r
3/ 7/ 01
System2 for Pacific Pride Multiple Networks
3/ 7/ 01
117
8
_______________________________________________________________________
9
_______________________________________________________________________
10
_______________________________________________________________
11
________________________________________________________________
12
________________________________________________________________
13
________________________________________________________________
14
________________________________________________________________
15
________________________________________________________________
16
________________________________________________________________
17
________________________________________________________________
18
________________________________________________________________
19
________________________________________________________________
20
________________________________________________________________
21
________________________________________________________________
22
________________________________________________________________
23
________________________________________________________________
24
________________________________________________________________
25
________________________________________________________________
26
________________________________________________________________
27
________________________________________________________________
28
________________________________________________________________
29
________________________________________________________________
30
________________________________________________________________
31
________________________________________________________________
A p p en d i x A - S e t u p W o r k sh ee t : U n l o ck P r i n t e r
118
System2 for Pacific Pride Multiple Networks
32
________________________________________________________________
33
________________________________________________________________
34
________________________________________________________________
35
________________________________________________________________
36
________________________________________________________________
37
________________________________________________________________
38
________________________________________________________________
39
________________________________________________________________
40
________________________________________________________________
41
________________________________________________________________
42
________________________________________________________________
43
________________________________________________________________
44
________________________________________________________________
45
________________________________________________________________
46
________________________________________________________________
47
________________________________________________________________
48
________________________________________________________________
49
________________________________________________________________
50
________________________________________________________________
51
________________________________________________________________
52
________________________________________________________________
Keyboard Messages (page 85)
Table 15: Setup Worksheet -- Keyboard Messages
Key
Message
A p p e n d i x A - S e t u p W o r k sh e et : U n l o ck P r i n te r
Default
Function
3/ 7/ 01
System2 for Pacific Pride Multiple Networks
119
Table 15: Setup Worksheet -- Keyboard Messages
1
YES
2
NO
Receipt Header (page 63)
Table 16: Setup Worksheet -- Receipt Headers
Entry
Color
Line 1:
RED
BLACK
Line 2:
RED
BLACK
Line 3:
RED
BLACK
Line 4:
RED
BLACK
Receipt Trailer (page 63)
Table 17: Setup Worksheet -- Receipt Trailers
Entry
Color
Line 1:
RED
BLACK
Line 2:
RED
BLACK
Line 3:
RED
BLACK
Line 4:
RED
BLACK
Receipt Body (page 63)
Entry
Receipt Code
Line 1:
Line 2:
Line 3:
Line 4:
Line 5:
Line 6:
Line 7:
3/ 7/ 01
A p p en d i x A - S e t u p W o r k sh ee t : U n l o ck P r i n t e r
120
System2 for Pacific Pride Multiple Networks
Line 8:
Line 9:
Line 10:
Line 11:
Line 12:
Line 13:
Line 14:
Line 15:
Bonus Points (page 90)
ONE
POINT
PER
_______
CENTS
Entry
Color
Line 1:
RED
BLACK
Line 2:
RED
BLACK
Line 3:
RED
BLACK
Line 4:
RED
BLACK
System Parameters (page 85)
Site ID
_________________
Fuel Types (page 86)
Type #
Fueling
Unit
Price Per
Unit
Product Name
1
2
3
A p p e n d i x A - S e t u p W o r k sh e et : U n l o ck P r i n te r
3/ 7/ 01
System2 for Pacific Pride Multiple Networks
121
4
5
6
7
8
9
10
11
12
13
14
15
16
Fueling Units (page 88)
Code #
Label
1
2
3
Passwords (page 88)
Main: __________________
Modem: __________________
Show: __________________
Restrictions (page 93)
Pump Restrictions (page 93)
Restriction No.
Pumps Restricted:
1
3/ 7/ 01
A p p en d i x A - S e t u p W o r k sh ee t : U n l o ck P r i n t e r
122
System2 for Pacific Pride Multiple Networks
2
3
4
5
6
7
8
9
10
11
12
13
14
15
Quantity Restrictions (page 93)
Code No.
Max. Qty.
Code No.
1
9
2
10
3
11
4
12
5
13
6
14
7
15
Max. Qty
8
Cards (page 97)
Choice #1
Size Code: _____ Number of Transactions: ______
Size Code: _____ Number of Messages: ______
A p p e n d i x A - S e t u p W o r k sh e et : U n l o ck P r i n te r
3/ 7/ 01
System2 for Pacific Pride Multiple Networks
123
Choice #2
Odometer Entry:
[1] [2] [3]*
Miscellaneous Entry:
[1] [2] [3]
PIN Entry:
[1]
* 1 = DISABLE all
[2] [3]
2 = ENABLE all
3 = Deter-
mine by Card
Choice #3
Keyboard Access Type:
SINGLE
DRIVER
VEHICLE
Choice #4
Code Number Dates:
1:
6:
11:
2:
7:
12:
3:
8:
13:
4:
9:
14:
5:
10:
15:
Transaction Data (page 103)
Enable Wraparound
yes
no
Log Unauthorized Transactions
yes
no
Display fields
Account, Driver, Vehicle
yes
no
Date & Time
yes
no
Transaction #
3/ 7/ 01
________
Card #1
yes
no
Card #2
yes
no
Fueltype
yes
no
A p p en d i x A - S e t u p W o r k sh ee t : U n l o ck P r i n t e r
124
System2 for Pacific Pride Multiple Networks
Quantity
yes
no
Price
yes
no
Total
yes
no
Odometer
yes
no
Miles per unit
yes
no
Miscellaneous
yes
no
Receipt Status
yes
no
System Totals (page 107)
Tank
Number
Fuel type
Current
Quantity
Low Level Alert at
1
2
3
4
5
6
7
8
Journal Printer (page 109)
Print card 2 number
yes
no
Print card name (acct, driver, vehicle) yes
no
Print odometer, miscellaneous
yes
no
Allow fueling on journal error
yes
no
A p p e n d i x A - S e t u p W o r k sh e et : U n l o ck P r i n te r
3/ 7/ 01
System2 for Pacific Pride Multiple Networks
125
Appendix B - RAM Level vs. Transaction Capacity
Table 18 shows the maximum number of transactions and cards or keys
available with the standard and optional levels of RAM in your System 2.
The memory level is displayed or set with the SHOW RAM or SET RAM
commands (page 90) in System Parameters.
Table 18: RAM Quantity vs. Transaction/Card-Key Capacity
MEMORY SIZE
Level 1
(256 Kb)
Level 2
(512 Kb)
Level 3
(1 Mb)
Level 4
(2 Mb)
3/ 7/ 01
NUMBER OF
TRANSACTIONS
APPROX. # OF CARDS/
KEYS
100
1,500,000
1000
130,000
1000
2,300,000
1500
1,600,000
2000
860,000
1000
6,400,000
2500
4,100,000
5000
340,000
1000
14,800,000
5000
8,700,000
10,000
1,100,000
A p p en d i x B - RA M L e v el v s . T ra n s a c ti o n
126
System2 for Pacific Pride Multiple Networks
Notes:
A p p e n d i x B - R AM L e v el vs . T ra n sa c t i o n Ca p ac i t y : Un l o c k P r i n t e r
3/ 7/ 01
System2 for Pacific Pride Multiple Networks
127
Appendix C - Using System2
With a Modem
Introduction
SYSTEM2 can be interrogated and programmed remotely over conventional telephone lines using modems. The "local" modem is at the
SYSTEM2 site; the "remote" modem is a remote terminal or computer.
The Data Carrier Detect ("DCD") is an output from the modem which
SYSTEM2 uses to know when a call has been received.
The Data Terminal Ready ("DTR") is an output from SYSTEM2 which
allows the modem to answer.
The PC Logic modem (available from Petro Vend) requires a PC in order to
be configured.
Configuring the Modem
The modem connected to the SYSTEM2 must have an "answer only" configuration. The "parameters" in Table 19 are required for ANY local
modem. If you are using the PC Logic modem, enter the commands shown
in the table.
Table 19: Modem Commands
Parameter
PC Logic Command
Answers on 1st Ring
ATS0=1
Monitors Data Carrier Detect
AT&C1
Result codes NOT returned
ATQ1
Resets when Data Terminal Ready is turned OFF
AT&D2
If you entered the PC Logic commands in Table 19, enter `AT&W' to store
the configuration permanently. The default baud rate for the PC Logic
modem is 2400.
Factory Modem Settings
Use the command `AT&F' to load the factory configuration for the remote
PC Logic modem. The default baud rate is 2400. The initial modem password is `HELLO'. To change the modem password, see page 88.
3/ 7/ 01
A p p e n d i x C - Us i n g S y st e m 2 W i t h a
128
System2 for Pacific Pride Multiple Networks
A p p e n d i x C - U si n g S ys t e m 2 W i t h a M o d e m : F a c t o r y M o d e m S e t t i n g s
3/ 7/ 01
System2 for Pacific Pride Multiple Networks
129
Appendix D - Using System2 With
an External PC
This appendix tells you:
•
How to connect a computer to the System2
•
How to retrieve transaction data from the SYSTEM2 in computer format
•
How to send configuration data to the SYSTEM2 in computer format
•
How to backup and restore card and configuration data for the
SYSTEM2.
To interface with the SYSTEM2 via a PC, you must run an emulation
program in your PC. This program is explained later in this appendix.
Note
If the FSC is LESS THAN 50 FEET from the PC, it is considered a "DIRECT" connection. When the distance is greater
than 50 feet, modems are required.
Caution
BEFORE making any connections, be sure your computer
and peripherals (printer, converter, modem, etc.) are OFF.
A four-conductor cable connects the SYSTEM2 FSC to the PC. One end
of the cable is terminated with a DIN connector, the other end has a 25pin "D" connector.
•
The DIN connector plugs into the TERMINAL socket on the rear of
the FSC
•
The 25-pin connector plugs into your PC, typically in the COM1 or
COM2 serial port. If the "gender" of the 25-pin connector on your computer is the same as that of the communication cable (for example, they
are both female), you will have to purchase a "gender-bender" adaptor.
Refer to your PC instruction manual for more information on the serial
ports - not every 25-pin connector on the PC is a communications port.
Some machines may only have a 9-pin serial port. If so, you will have to
purchase an adaptor to convert the 25 pin plug to a 9-pin plug. Most electronic or computer supply stores carry these adapters.
3/ 7/ 01
Ap p e n d i x D - U s i n g S y st e m 2 W i t h a n E xt e r n a l
130
System2 for Pacific Pride Multiple Networks
If there is only one serial port on your machine, and it is already being used,
you can purchase an additional Serial Card at most computer supply stores.
Be sure to read your computer owner's manual prior to buying or installing
a card.
Plug the PC power cord into a standard wall socket. You are ready to power
up the PC and begin setting up the terminal emulation software.
Most modems have four sockets:
•
A 25-pin "D" socket for the PC
•
An RJ11 socket (for TEL line)
•
An RJ11 socket (for telephone)
•
A POWER IN socket
Connecting System2 to the PC
The modem should have come with the cables you need to make the following connections. (If not, you can purchase what you need at most computer
supply stores.)
1. Connect the 25-pin socket to the COM1 or COM2 serial port on the
back of your computer.
2. Connect a phone cable from the modem RJ11 "LINE IN" jack to your
facility telephone jack.
•
If you want the PC to share its line with a telephone, connect the telephone to the RJ11 modem "TEL" jack.
•
You cannot use the telephone (for voice communication) and the modem
simultaneously.
3. Plug the power adapter into its socket on the modem and into a standard
115 VAC wall socket.
For a PC to communicate with SYSTEM2, you must run a terminal emulation program. Petro Vend strongly suggests you use PROCOMM®
emulation software, made by DATASTORM TECHNOLOGIES, INC.
Contact your Petro Vend distributor for details.
A p p e n d i x D - U si n g S ys t e m 2 W i t h an E x t er n a l P C : C o n n e ct i n g S ys t e m2 t o t h e P C
3/ 7/ 01
System2 for Pacific Pride Multiple Networks
131
Read the Terminal Emulation software manual. For your PC use the values
in Table 20 (refer to the System2 Installation Manual for instructions on
changing these settings):
Table 20: PC Communication Settings
•
Baud Rate
Must match SYSTEM2
Data bits
7
COMM Port
An available serial port.
Parity
EVEN
Stop bits
1
If you are using direct connection, you will need to set the software to
"go local". If you are using a modem, you will need to set its program
switches.
You will also need to enter the telephone number of the SYSTEM2 site.
Data Formats
This data format is meant to be read by people, and includes a header with
configuration data and labels for each included field. In the display format, the transmission of transaction records can be cued from the keyboard.
Formatted data eliminates these labels, substituting data checks, field codes
and field separators. This format is meant to transfer transaction data to a
computer data base.The Field Codes are described on page 134.
To pace the data stream, the transmission of each transaction record must be
cued by a specific computer response.
Data Field Structure
To retrieve transaction data in the computer format, append the prefix
`SHOW' and the suffix `CF' to one of the following commands.
TRANSACTIONS
TRANSACTION ###
TRANSACTIONS WHERE
TRANSACTIONS WHERE
TRANSACTIONS WHERE
TRANSACTIONS WHERE
TRANSACTIONS WHERE
TRANSACTIONS WHERE
3/ 7/ 01
DATE
DATE
DATE
TIME
TIME
TIME
=
<
>
=
<
>
mmm dd, yyyy
mmm dd, yyyy
mmm dd, yyyy
hh:mm am/pm
hh:mm am/pm
hh:mm am/pm
Ap p e n d i x D - U s i n g S y st e m 2 W i t h a n E xt e r n a l
132
System2 for Pacific Pride Multiple Networks
TRANSACTIONS WHERE CARD = #
TRANSACTIONS WHERE VEHICLE = #
The following command will call up transaction 123 in computer format:
SHOW TRANSACTIONS 123 CF
Search commands can be combined with `AND' in the computer format.
For example:
SH TRANS WH DAT=JAN 1,2000 AND WH TIM>5:00 PM CF
Transaction functions are explained in more detail on page 103.
When data is requested from SYSTEM2 in the computer format,
SYSTEM2 first transmits the transaction header and the first transaction.
This header always includes:
•
Codes to indicate which transaction fields will be included in the transmitted record(s)
•
a 2-digit checksum and a carriage return
•
a line feed (`|CR|LF|').
The SYSTEM2 will send records each time it receives `|CR|LF|' up to
the last record. At the last record, the system sends `//|CR|LF|'. If the
computer session is terminated by the computer with an `X', SYSTEM2
sends `\\|CR|LF|'.
SH TRANS 123CF|CR|LF|
abcdefghijklmno/07|CR|LF|
123/I/TRUXCO---/SMITH----/VAN1-----/
02221989/0711/0123/20001--------------/
60001--------------/03/03/0025000/00100/
000002500/0066555/105/1234567890/1/1234/
11/|CR|LF|
|CR|LF|
//|CR|LF|
A p p e n d i x D - U si n g S ys t e m 2 W i t h an E x t er n a l P C : D a ta F o r m at s
3/ 7/ 01
System2 for Pacific Pride Multiple Networks
133
Table 21: Transaction Header Fields
Item
Format
Pad
Inclusion
Number of transactions
4 digits, left justified
zero
optional
Sum of quantities
9 digits, left justified
zero
optional
Transaction field codes
0 - 15 characters
none
always
Checksum
2 digits
none
always
Table 22: Transaction Field Codes
Code
Field
Format
Pad
a
Driver or vehicle name
9 characters each
space
b
Date/time
8/4 digits: mmddyyyy/hhmm
zero
c
Transaction number
4 digits
zero
d
Card #1
19 digits, left justified
space
e
Card #2
19 digits, left justified
space
f
Fuel type
2 digits: 1 - 16
zero
g
Pump number
2 digits: 1 - 99 or
3 digits if hose number is specified
zero
h
Quantity
7 digits: ####.###, implied decimal
zero
i
Price
5 digits: ##.###, implied decimal
zero
j
Total
9 digits: #######.##, implied decimal
zero
k
Odometer
1 char, 6 digits: X######; `?' in 1st location
indicates unreasonable entry, `0' indicates
reasonable entry; all blanks if odometer
entry not prompted (NOTE: Not valid for
ChipKeys).
zero
l
MPG
3 spaces: MPG not available
zero
m
Miscellaneous
10 digits
space
n
Receipt status
1 digit: 1=issued; 0=not issued
none
o
Not used.
Not used.
--
3/ 7/ 01
Ap p e n d i x D - U s i n g S y st e m 2 W i t h a n E xt e r n a l
134
System2 for Pacific Pride Multiple Networks
Table 23: Card Field Codes
Code
Field
Format
Pad
a
Card Number
19 digits, left-justified
space
b
Record Type
8 bytes (see RECORD TYPE table, below)
none
c
Not used.
Not used.
--
d
Expiration Date
8 digits: mmddyyyy
none
e
Fuel Totals to Date
8 digits: ######.## (implied decimal)
zero
f
Fuel Totals for Today
8 digits: ######.## (implied decimal)
zero
g
Monthly Allocation
6 digits: ###### (dollars only, no decimal)
zero
h
Daily Allocation
6 digits: ###### (dollars only, no decimal)
zero
i
PIN Number
(card records only)
6 digits
space
j
Odometer
6 digits
zero
k
Reasonability
2 digits
zero
l
Product Restriction
2 digits
zero
m
Quantity Restriction
2 digits
zero
n
Driver or Vehicle Name
9 characters
space
A p p e n d i x D - U si n g S ys t e m 2 W i t h an E x t er n a l P C : D a ta F o r m at s
3/ 7/ 01
System2 for Pacific Pride Multiple Networks
135
REASON FOR TERMINATION CODES (AUTHORIZATION GRANTED)
Table 24: Reason for Termination Codes - Authorization Granted
Code
Reason
Cause
C
Pump error, premature
busy
No suggestions
Pump error --reset quantity
exceed
Pulses being received without current being sensed or
handle switch detection.
Check PV268 DIP switch #6 for correct selection (current sense or handle switch). Check current: s/b 100
mA AC minimum.
No `PUMP HANDLE
BUSY'
No current sense or handle
switch detection after pump
authorization.
Check PV268 DIP switch #6 for correct selection. Check current draw:
s/b 100 mA AC minimum. Make sure
handle timeout is long enough.
Check wiring to PV270 relay board.
No fueling pulses
Current sensed or handle
switch detected, but no
pulses received from pulser.
Check PV268 DIP switch #1 for correct pulser type. Check pulser wiring. Check pump's First Pulse timer.
Pump currently active
No suggestions
Normal
Good transaction.
May appear even for incomplete
transaction if current sense threshold is too close to actual current
draw. Contact Petro Vend Technical
Support.
Quantity limit exceeded
Card, account or pump limit
reached.
Check programming for card,
account or pump
Total transaction time
exceeded
Pump is programmed to dispense fuel only for a specific
time.
Check "MAX TIME FOR FUELING"
value, and adjust accordingly.
Pulser error
Only in flowswitch applications. Pulses not received
within five seconds of flow
switch activation.
Check pulser. Possible faulty flow
switch.
Emergency stop
Emergency stop button was
depressed during fueling.
If button was NOT pressed, check ESTOP button for short.
Missing pulse detected
Current sensed, pulses
received, then fueler stops
pumping. As long as pump
is ON, Pulse Timer runs.
Lengthen the Pulse Timer duration,
or hang the pump up.
Communication errors
Power interruption during
fueling caused termination
of transaction.
Check power source. Are noise filters installed in pump motors, solenoid valves, and contactors?
Manager activated
No suggestions
D
E
F
G
Possible Solution
I
J
K
L
M
N
O
01
Z
3/ 7/ 01
Ap p e n d i x D - U s i n g S y st e m 2 W i t h a n E xt e r n a l
136
System2 for Pacific Pride Multiple Networks
REASON FOR TERMINATION CODES (AUTHORIZATION DENIED)
Table 25: Reason for Termination Codes - Authorization Denied
Code
Reason
Cause
Possible Solution
Bad PIN entry
Wrong PIN entered three
times.
Verify PIN assigned to card is correct.
If yes, check the keypad with FIT test
program.
Bad odometer entry
Fueler's card is set for
odometer reasonability, and
entry falls outside acceptable limits.
Re-enter odometer value. Change
reasonability (see Section 11).
Bad miscellaneous entry
NOT USED
NOT USED
User entry timeout
Fueler did not enter data
after inserting card.
Operator error, or possible keypad
malfunction.
Card # not in positive file
Card not programmed in
system.
Program the card into the system
database.
Card expired
Card has expiration date
assigned to it. This date has
passed.
Assign new expiration date to card, or
issue new card.
Card invalidated
Card has not been validated
for use in this system.
Change validation status of card.
Three bad PIN entries
Fueler has entered incorrect
PIN three times.
Verify PIN assigned to card is correct.
If yes, check the keypad with FIT test
program.
No allocation
Daily or monthly limit has
been reached on card or
account.
If daily, fueler must wait until midnight
to reset daily totals. If monthly, new
limits must be programmed or totals
cleared.
Visa transaction failed
authorization
Various -- may be phone-line
related.
Retry card.
b
c
d
e
f
g
i
j
k
u
A p p e n d i x D - U si n g S ys t e m 2 W i t h an E x t er n a l P C : D a ta F o r m at s
3/ 7/ 01
System2 for Pacific Pride Multiple Networks
137
Appendix E - Troubleshooting
Problems & Suggested Solutions
Table 26: Problem/Solution Table
PROBLEM
POSSIBLE SOLUTION
No C/OPT display messages
•
Adjust "display viewing angle" potentiometer (on top of the display PC board).
`FAULTY PUMP' C/OPT message
•
Three "zero-quantity" transactions -- reinstall pump with INSTALL PCT POS
(page 60)
Bad pump pulser -- replace pulser
•
`RESET QUANTITY
EXCEEDED' C/OPT message
•
•Current sensor/pump handle selector switch in wrong position: change Switch
#1 on PV-268 board.
`SYSTEM DOWN'
message at one C/OPT
•
C/OPT not installed: install C/OPT
•
•
Petro-Net wiring problem: check, repair wiring
Possible C/OPT board malfunction: run COMM test to check board; replace
board if necessary.
`SYSTEM DOWN'
message at ALL C/OPTs
•
Possible C/OPT board malfunction(s): run COMM test for each FIT board;
replace board(s) if necessary.
•Possible FSC board malfunction; if all C/OPT board pass COMM test, replace
FSC board.
•
`INCORRECT CARD' C/OPT
message
•
•
Incorrect network number encoded on card(s); replace card(s).
•Incorrect network number programmed in C/OPT EPROM: replace EPROM.
CARD INVALIDATED C/OPT
message
•
This card number was invalidated; to validate, see Validating or Invalidating
Cards on page 100.
UNAUTHORIZED, RE-ENTER
C/OPT message
•
The card used is not good for that product on that pump. Card user should
choose a different pump or product.
`SYSTEM FULL' C/OPT message
•
•
•
Printer error: clear error.
Transaction buffer filled: clear buffer.
Buffer wraparound not enabled: enable wraparound.
`MEMORY ERROR' message
at terminal
•
•
•
Expanded memory failure: battery switch not on during system power failure.
Battery failure: replace battery.
Expanded Memory failure: replace FSC board.
Pulser not counting pulses
•
Active/passive pulser selector switch set incorrectly: change Switch #1 on
PV-268 board
Newly programmed
messages or pump
parameters not working
•
Changes were not downloaded: use `DOWNLOAD command.
3/ 7/ 01
A p p en d i x E - T r o u b l e sh o o t i n g : P r o b l em s & S u g -
138
System2 for Pacific Pride Multiple Networks
Table 26: Problem/Solution Table (Continued)
JOURNAL ERROR GET MANAGER
•
The journal printer is unable to print becuase it is offline, unplugged, out of
paper, jammed or otherwise inoperable.
Printer not printing
transactions
•
Communications blocked due to printer error: unblock with `SET JOURNAL'
command; printer locked: unlock printer with `UNLOCK' command.
Troubleshooting Flowcharts
The flowcharts on page 140 through page 148 give you advice on what to
do when the these messages appear on the C/OPT display:
CHECK CARD ORIENTATION message
FAULTY PUMP? RE-ENTER message
INCORRECT CARD message
INCORRECT READING message
INVALID PUMP, RE-ENTER message
JOURNAL ERROR GET MANAGER message
PUMP HANDLE? RE-ENTER message
SYSTEM DOWN message
Other charts give you advice when:
•
No communication occurs between the FSC and the PC
•
No quantity is shown on the transaction receipts
•
A modem doesn't answer the System2
A p p e n d i x E - T ro u b l es h o o t i n g : T r o u b l e sh o o ti n g F l o w c h a rt s
3/13/01
System2 for Pacific Pride Multiple Networks
139
CHECK CARD ORIENTATION
message on C/OPT screen
Does message appear for
ALL cards?
Yes
Is reader an optical card
reader?
Yes
Replace reader.
No
No
Is magstripe oriented
correctly as card is inserted?
Clean card reader. If
problem persists, replace
reader.
No
Orient magstripe correctly
and re-insert card.
Figure 30: Diagnosing a "Check Card Orientation" Message
3/ 13 / 0 1
A p p e n d i x E - T r o u b l e s h o o t i n g : T ro u b l es h o o t i n g
140
System2 for Pacific Pride Multiple Networks
FAULTY PUMP RE-ENTER
message on C/OPT screen
Did Pump Sentry feature put
pump out of service?
Yes
Re-install PCT
position, check
pulser and pulser
wiring from pump
to card system.
Yes
Replace the
PV268 board.
No
Does PetroNet jumper on
PV268 board match PV269's
jumper?
No
Set jumpers to
same correct baud
rate.
Figure 31: Diagnosing a "Faulty Pump - Reenter" Message
A p p e n d i x E - T ro u b l es h o o t i n g : T r o u b l e sh o o ti n g F l o w c h a rt s
3/ 7/ 01
System2 for Pacific Pride Multiple Networks
141
INCORRECT CARD message
on C/OPT screen
Does message appear using
ALL cards?
Yes
Check network
number of system
and cards. Both
must have the
same number.
Yes
Make sure that one
card is a driver card
and the other is a
vehicle card.
No
Are you using a two-card
system?
No
Isolate problem to
reader, PV269 and
the cable between
reader and PV269.
Figure 32: Diagnosing an "Incorrect Card" Message
3/ 7/ 01
A p p e n d i x E - T r o u b l e s h o o t i n g : T ro u b l es h o o t i n g
142
System2 for Pacific Pride Multiple Networks
INCORRECT READING
message on C/OPT screen
Does message appear using
ALL cards?
Yes
Try cleaning the
reader. If problem
persists, replace
the reader.
No
Inspect card for
warping, wear or
cracks. Replace if
necessary.
Figure 33: Diagnosing an "Incorrect Reading" Message
A p p e n d i x E - T ro u b l es h o o t i n g : T r o u b l e sh o o ti n g F l o w c h a rt s
3/ 7/ 01
System2 for Pacific Pride Multiple Networks
143
INVALID PUMP RE-ENTER
message on C/OPT screen
after pump is selected
Is the pump valid for the C/
OPT you are using?
No
Reconfigure C/OPT for
access to that pump.
Then, issue a
DOWNLOAD
command.
No
Replace the C/OPT
board.
Yes
Has the pump number been
changed for the PCT
position?
Yes
Reconfigure the PCT
position with the correct
pump number. Then,
issue a DOWNLOAD
command.
Figure 34: Diagnosing an "Invalid Pump - Reenter" Message
3/ 7/ 01
A p p e n d i x E - T r o u b l e s h o o t i n g : T ro u b l es h o o t i n g
144
System2 for Pacific Pride Multiple Networks
JOURNAL ERROR GET
MANAGER message on C/OPT
screen
Is printer ON and online?
No
Turn on printer, and place
online.
Yes
Clear paper.
Yes
Replace paper.
Yes
Connect cable.
Yes
Is printer jammed?
No
Is printer out of paper?
No
Is the printer data or power
cable disconnected?
No
Swap printer with known
good unit. If new printer
works, replace old printer.
Figure 35: Diagnosing a "Journal Error Get Manager" Message
A p p e n d i x E - T ro u b l es h o o t i n g : T r o u b l e sh o o ti n g F l o w c h a rt s
3/ 7/ 01
System2 for Pacific Pride Multiple Networks
145
SYSTEM DOWN message on
C/OPT screen
Is PetroNet cable OK
between FIT and FSC?
No
Fix wiring.
No
Connect cables
as needed.
No
Set jumpers
correctly, see the
System2
Installation
Manual.
No
Set switches
correctly, see the
System2
Installation
Manual.
No
Issue an INSTALL
FIT command.
Yes
Is PetroNet plugged into
FSC and J-box?
Yes
Are PetroNet jumpers on
PV268 and 269 boards set
correctly?
Yes
Are FIT address DIP
switches set correctly?
Yes
Was an INSTALL FIT
command issued?
Yes
If problem persists, isolate it by
swapping PV270 and/or PV268
boards with known good boards.
Figure 36: Diagnosing a "System Down" Message
3/ 20 / 0 1
A p p e n d i x E - T r o u b l e s h o o t i n g : T ro u b l es h o o t i n g
146
System2 for Pacific Pride Multiple Networks
PUMP HANDLE RE-ENTER
message on C/OPT screen
Was pump handle left ON
from previous fueling?
Yes
Turn the pump OFF, then
re-select pump.
Yes
Check pump wiring at the
PV270 board CURRENT
SENSE contacts.
Yes
CORRECT OPERATION.
Swap PV268 and/or 270
boards with known good
boards to isolate the
problem.
No
Place pump in manual
mode with DIP switches on
PV268 board.
With handle OFF, is
CURRENT SENSE light ON?
No
Turn pump handle ON, then
watch CURRENT SENSE
light.
Does CURRENT SENSE light
come ON after pump finishes
RESET cycle?
No
Swap PV268 and/or 270
boards with known good
boards to isolate the
problem.
Figure 37: Diagnosing a "Pump Handle-Reenter" Message
A p p e n d i x E - T ro u b l es h o o t i n g : T r o u b l e sh o o ti n g F l o w c h a rt s
3/20/01
System2 for Pacific Pride Multiple Networks
147
No communication occuring
between FSC and PC
Is the terminal cable plugged
into the FSC TERM port and
the PC serial port?
No
Connect the cable
properly.
No
Set communication
correctly, see "Configuring
the FSC" section in this
book and your PC
operator manual.
Yes
Are software communication
parameters correct?
Yes
Try using another PC. If
problem persists,
replace the FSC board.
Figure 38: Diagnosing Loss of FSC-to-Terminal Communication
3/ 7/ 01
A p p e n d i x E - T r o u b l e s h o o t i n g : T ro u b l es h o o t i n g
148
System2 for Pacific Pride Multiple Networks
Modem does not answer
Is modem connected to a
phone line?
No
Connect to a phone line.
No
Repair phone line, or use
a different line.
No
Repair or replace cable.
No
Configure modem
correctly -- see the
modem operator manual.
Yes
Place a call to verify line
operation. Does phone line
work?
Yes
Is the modem properly
connected to the FSC?
Yes
Is modem set to ANSWER
ONLY mode?
Yes
Swap FSC and modem
with known working units.
Figure 39: Diagnosing a Modem That Does Not Answer
A p p e n d i x E - T ro u b l es h o o t i n g : T r o u b l e sh o o ti n g F l o w c h a rt s
3/ 7/ 01
System2 for Pacific Pride Multiple Networks
149
No quantity appears on journal
printer
Does PULSE LED on PV268
board flash while fuel is
pumped?
No
Confirm PULSER TYPE
DIP switch on PV268 is
set properly.
No
Isolate problem between
PV268 and PV270 boards.
Yes
Remove pulser wiring
from PV270 board.
Activate pump, then
manually jumper across
the pulser terminals on the
PV270 board.
Does the transaction show a
quantity?
Yes
Problem is not within the
card system. Check the
pulser, and pulser wiring.
Figure 40: Diagnosing a "No Quantity Appears On Receipt" Message
3/ 13 / 0 1
A p p e n d i x E - T r o u b l e s h o o t i n g : T ro u b l es h o o t i n g
150
System2 for Pacific Pride Multiple Networks
A p p e n d i x E - T ro u b l es h o o t i n g : T r o u b l e sh o o ti n g F l o w c h a rt s
3/ 7/ 01
System2 for Pacific Pride Multiple Networks
151
Appendix F - System2 Commands
Summary
Table 27 is a complete list of all System2 commands.
•
Not all versions of System2 software perform all listed commands.
•
[P]Privileged - command requires user to be in privilege mode to use.
•
[D]Download – command requires a download for changes to take
effect.
•
[O]Optional - command requires option to be purchased.
•
#Requires your numerical entry.
Table 27: System2 Commands Summary
TIME MANAGEMENT
SET TIME [P]
PRINT/SHOW TIME
SET DATE [P]
PRINT/SHOW DATE
FORMAT DATE
SET TIME CHANGE [P]
PRINT/SHOW TIME CHANGE
SET SYSTEM TIMES [P]
PRINT/SHOW SYSTEM TIMES
SET LIGHT [P]
OPEN [P]
CLOSE [P]
SYSTEM MEMORY
SET RAM [P]
PRINT/SHOW RAM
3/ 7/ 01
A p p en d i x F - S y st e m 2 Co m m an d s
152
System2 for Pacific Pride Multiple Networks
Table 27: System2 Commands Summary (Continued)
PROGRAMMABLE DATABASE
SET CARD BUFFER [P]
SET SECURITY TABLE [P]
PRINT/SHOW SECURITY TABLE
INSERT CARD [P]
COPY CARD [P]
EDIT CARD [P]
DELETE CARD [P]
PRINT/SHOW CARD
PRINT/SHOW CARD “#”
INSERT ACCOUNT [P]
EDIT ACCOUNT [P]
DELETE ACCOUNT [P]
PRINT/SHOW ACCOUNT
PRINT/SHOW ACCOUNT “#”
FUEL/TANKS
SET FUELING UNITS [P]
PRINT/SHOW FUELING UNITS
SET FUELTYPE “#” [P]
PRINT/SHOW FUELTYPE
SET TANK “#” [P]
PRINT/SHOW TANK
PUMP CONTROL TERMINAL
CONFIGURE PCT “#” [P, D]
CONFIGURE PCT “#” POS “#” [P, D]
INSTALL PCT “#” [P]
INSTALL PCT “#” POS “#” [P]
REMOVE PCT “#” [P]
A p p e n d i x F - S ys t e m2 C o mm a n d s S u m m a ry : T r o u b l e s h o o t i n g F l o w c h a r ts
3/ 7/ 01
System2 for Pacific Pride Multiple Networks
153
Table 27: System2 Commands Summary (Continued)
REMOVE PCT “#” POS “#” [P]
REMOVE PUMP “#”
PRINT/SHOW PCT “#”
CONFIGURE PUMP #
PRINT/SHOW PUMP “#”
INSTALL PROGRAM [P]
REMOVE PROGRAM [P]
COMMERCIAL/OUTDOOR PAYMENT TERMINAL
CONFIGURE C/OPT “#” [P, D]
INSTALL C/OPT “#” [P]
REMOVE C/OPT “#” [P]
PRINT/SHOW C/OPT “#”
OUTDOOR PAYMENT TERMINAL
CONFIGURE OPT “#” [P, D]
INSTALL OPT “#” [P]
REMOVE OPT “#” [P]
PRINT/SHOW OPT“#”
MESSAGES
FORMAT DISPLAY “#” [P, D]
FORMAT DISPLAY DEFAULT [P, D]
PRINT/SHOW DISPLAY
PRINT/SHOW DISPLAY “#”
FORMAT KEYBOARD “#” [P, D]
PRINT/SHOW KEYBOARD
PRINT/SHOW KEYBOARD “#”
3/ 7/ 01
A p p en d i x F - S y st e m 2 Co m m an d s
154
System2 for Pacific Pride Multiple Networks
Table 27: System2 Commands Summary (Continued)
RECEIPT PRINTER
FORMAT RECEIPT HEADER [P, D]
PRINT/SHOW RECEIPT HEADER
FORMAT RECEIPT TRAILER [P, D]
PRINT/SHOW RECEIPT TRAILER
FORMAT RECEIPT BODY [P, D]
SET BONUS POINTS [P, D]
PRINT/SHOW BONUS POINTS
FORMAT RECEIPT BONUS POINTS [P, D]
PRINT/SHOW RECEIPT BONUS POINTS
TRANSACTION BUFFER
SET TRANSACTION [P]
PRINT/SHOW TRANSACTION
PRINT SHOW TRANSACTION “#”
JOURNAL PRINTER
SET JOURNAL PRINTER [P]
PRINT/SHOW JOURNAL PRINTER
LOCK JOURNAL
UNLOCK JOURNAL
RESTRICTIONS
SET PUMP RESTRICTION [P]
PRINT/SHOW PUMP RESTRICTION
SET QUANTITY [P]
PRINT/SHOW QUANTITY
A p p e n d i x F - S ys t e m2 C o mm a n d s S u m m a ry : T r o u b l e s h o o t i n g F l o w c h a r ts
3/ 7/ 01
System2 for Pacific Pride Multiple Networks
155
Table 27: System2 Commands Summary (Continued)
ODOMETER REASONABILITY
SET REASONABILTY [P]
PRINT SHOW REASONABILITY
SITE ID
SET SITE ID [P]
PRINT/SHOW SITE ID
PASSWORD
SET PASSWORD [P]
PRINT/SHOW PASSWORD
DUAL LANGUAGE
SET LANGUAGE [P]
PRINT/SHOW LANGUAGE
PUMP/FUEL REPORTS
PRINT/SHOW FUELTYPE “#” TOTALS
PRINT/SHOW PUMP “#” TOTALS
CLEAR PUMP “#” TOTALS
PRINT/SHOW PCT “#” TOTALS
CLEAR PCT “#” TOTALS
PRINT/SHOW TANK
PRINT/SHOW MIDNIGHT TOTALS
CARD/ACCOUNT REPORTS
PRINT/SHOW <validity> <source><category> CARD <range>
PRINT/SHOW ACCOUNT
PRINT/SHOW ACCOUNT “#”
3/ 7/ 01
A p p en d i x F - S y st e m 2 Co m m an d s
156
System2 for Pacific Pride Multiple Networks
Table 27: System2 Commands Summary (Continued)
PRINT/SHOW CARD ACCOUNT “#”
PRINT/SHOW CARD SUMMARY
TRANSACTION REPORTS
PRINT/SHOW TRANSACTION
PRINT/SHOW TRANSACTION “#”
PRINT/SHOW TRANSACTION SUMMARY
PRINT SHOW DAY
PRINT/SHOW DAY <mmm dd,yyyy>
CLEAR TRANSACTION <mmm dd,yyyy> SEQUENCE <#> [P]
CLEAR TRANSACTION [P]
SHOW TRANSACTION CF
TRANSACTION SEARCHES
PRINT/SHOW TRANSACTION WHERE DATE = <mmm dd,yyyy>
PRINT/SHOW TRANSACTION WHERE DATE < <mmm dd,yyyy>
PRINT/SHOW TRANSACTION WHERE DATE > <mmm dd,yyyy>
PRINT/SHOW TRANSACTION WHERE TIME = <hh:mm am/pm>
PRINT/SHOW TRANSACTION WHERE TIME < <hh:mm am/pm>
PRINT/SHOW TRANSACTION WHERE TIME > <hh:mm am/pm>
PRINT/SHOW TRANSACTION WHERE CARD = <#>
PRINT/SHOW TRANSACTION WHERE VEHICLE = <#>
PRINT/SHOW TRANSACTION WHERE ACCOUNT = <#>
SHIFT
SHIFT [P]
PRINT/SHOW SHIFT
MODEM/PASSTHRU PORT
CALL [P]
A p p e n d i x F - S ys t e m2 C o mm a n d s S u m m a ry : T r o u b l e s h o o t i n g F l o w c h a r ts
3/ 7/ 01
System2 for Pacific Pride Multiple Networks
157
Table 27: System2 Commands Summary (Continued)
PASSTHROUGH [P]
INTEFACING TO EXTERNAL COMPUTER
COMPUTER (TEST) <command> [P]
ECHO [P]
BACKUP “#” [P]
RESTORE [P]
UPDATE <site id(/fields)(/checksum)> [P]
SYSBACKUP [P]
SYSRESTORE <####> [P]
PUNCHCODE
PUNCHCODE [P,O]
TROUBLESHOOTING
TEST [P] Warning – AUTHORIZED USE ONLY – may erase system configuration!
REPORT PACKAGE
REPORT [P,O]
NETWORKS
SET NETWORK [P]
SET HOST [P]
SET BATCH [P]
SET FLEET [P]
SET GASCARD [P]
FLEETLINK
INSTALL VIT “#” [P, D]
3/ 7/ 01
A p p en d i x F - S y st e m 2 Co m m an d s
158
System2 for Pacific Pride Multiple Networks
Table 27: System2 Commands Summary (Continued)
INSTALL VIT “#” POS “#” [P, D]
REMOVE VIT “#” [P, D]
REMOVE VIT “#” POS “#” [P, D]
PRINT/SHOW VIT “#” POS “#” [P, D]
INSERT VIU [P]
A p p e n d i x F - S ys t e m2 C o mm a n d s S u m m a ry : T r o u b l e s h o o t i n g F l o w c h a r ts
3/ 7/ 01
System2 for Pacific Pride Multiple Networks
159
Appendix G - Cold-Starting the
FSC
Cold Start With Power OFF
To power up SYSTEM2, turn ON the power switch for each FIT and, if
applicable, each remote PCT. If not already done from terminal configuration, plug the FSC power supply into a standard AC socket.
When the FIT is properly installed and functioning, its display shows the
following series of messages and information:
TESTING RAM
VERSION ##.##
DISPLAY TYPE
RECEIPT LENGTH
TESTING READERS
READER1 TYPE
READER2 TYPE
TESTING EPROM
TESTING EPROM
DOWNLOAD ...
The last message indicates that the FIT is running
Note
If the download message does not display, turn the system
OFF and check the installation wiring.
Cold-Start With Power ON
To cold-start the SYSTEM2 with power ON, do the following on the FSC
board:
1. With power ON, unplug the battery connector from the PC board.
2. While holding down the TEST button, hit the RESET button. A "C"
appears in the FSC display.
3. Release the TEST button, and reconnect the battery. The FSC now
enters the communication default mode described in the next section.
3/ 7/ 01
A p p en d i x G - C o l d - S t ar t i n g t h e F S C : C o l d S t a rt
160
System2 for Pacific Pride Multiple Networks
A p p e n d i x G - Co l d - S t a rt i n g t h e F S C : Co l d - S t a r t W i t h P o w er O N
3/ 7/ 01
System2 Pacific Pride for Multiple Networks
161
Index
B
Batching transactions, 28
Battery, 9, 86
Baud Rate
FSC, 8
Bonus Points, 90
BYPASS command, 90
C
Card Error Counter, 57
Cards
Authorization method for, 4
Compatibility of, 3
Codes, Installation, 5
Cold start, 23, 157
Commands
DISPLAY #, 67
LOCK PRINTER, 110
PRINT TRANS, 103
SET JOURNAL, 109
SET SITE, 86
SET TRANS, 105
SHOW DAY, 108
SHOW TRANS, 103
Credit Card retrofits, 13
Crediting a Network Transaction,
26
Customer Messages menu, 63
D
Data format, 131
Data sheet, 5
DAY commands, 108
DISPLAY # command, 67
Dual Language, 89
E
Echoing characters, 90
Error messages, 137
External device connection, 5
F
FIT
Setting, 57
FIT Display
Optional, 70
Flowcharts
3/ 7/ 01
Troubleshooting, 138
FSC
Battery, 9
Baud rate, 8
Configuring, 19
DIP switches, 19
Network connections on, 10
Rear panel, 13
Fueling Units, 61, 88
Fueltype number, 62
N
G
Network
In your version, 3
Receipt layout, 27
Gallon/liter conversion, 61
Graphics Display
Cleaning, 73
Display/Typestyle codes, 78
Features, 70
Picture selection, 71
Text styles, 72
Merchant info for Visanet, 25
Merchant information, 25
Midnight totals, 107
Modems, 13, 127
Local, 127
Remote, 127
MultiDesq, 3, 11
P
Hose Totals, clearing, 62
Host
Transactions, 103
PC Logic modem, 127
PCT
Configuration, 59
PIN Numbers, 95
Printer
Journal, 109
Privileged mode, 88
Pulse Per Unit, 61
Pump restrictions, 93
Pump Sentry, 61
I
Q
Invalidating cards, 100
Quantity transaction field, 133
J
R
Journal Printer menu, 109
Receipt counter, 58
Receipts
Body, 64
Defined, 63
Header, 65
Network, 27, 28
Trailer, 65
Restricted mode, 88
H
L
LOCK/UNLOCK command, 110
M
MANAGER ACTIVATED
termination, 62
Max Time
Between pulses, 62
First pulse, 61
Fueling, 61
Menus
Customer Messages, 63
Journal Printer, 109
System Devices, 57
System Parameters, 85
S
Sealoff area, 14
SET PUMP command, 93
SHOW CARD command, 100
SHOW TRANS command, 103
Site ID, 86
SmartLock
Configuring, 31
Equipment, 11
Index
162
System2 Pacific Pride for Multiple Networks
WTI connections, 11
System Access menu, 50
System Devices menu, 57
System Parameters menu, 85
System Times menu, 50
T
Tank number, 62
Termination codes, 135
Time of Day
In graphics display, 73
Time Set
Current, 55
Drift adjust, 56
I n d ex
Host settings, 25
Journal printout for, 28
Transaction commands for, 106
Receipts only, 56
System ON, 56
Trace command, 106
Troubleshooting, 137
U
UPC
with PCT, 59
V
W
Wiring
Inter-component, 12
WTI
Baud rate, 12
Connections on, 11
Validating cards, 100
Visanet, 1
3/ 7/ 01
OPW Fuel Management Systems
6900 Santa Fe Drive
Hodgkins, IL 60525
708-485-4200