1
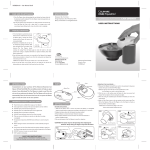
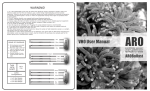
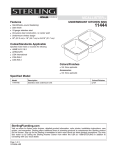
Clamp 4W
Clamp 8W
Owner’s Manual
1
CONTENTS
TABLE OF CONTENTS
Important Safety Instructions
3-4
Parts—Exploded View & Identification
Clamp 4
Clamp 8
5
6
Introduction
Clamp 4
Clamp 8
7-8
9-10
Getting Started
Mounting Clamp
Power Up Clamp
11
12
Warranty Information
14-16
2
To guard against injury, basic safety precautions should be observed
including the following:
READ ALL SAFETY INSTRUCTIONS BEFORE USE.
WARNING
To avoid electric shock, special care should be taken since water is
employed in the use of aquarium equipment. For each of the following situations, do not attempt to repair yourself. Return the appliance
to an authorized service facility for service or discard the appliance.
•
•
•
•
•
•
•
If the appliance falls into water, DO NOT reach for it! First unplug
it an then retrieve it. If the electrical components of the appliance
get wet, unplug the appliance immediately
Carefully examine the appliance after installation. It should not
be plugged in if there is water on parts not intended to be wet.
Do not operate any appliance if it has a damaged cord or plug, or
if it is malfunctioning or if it is dropped or damaged in any manner.
To avoid the possibility of the appliance plug or receptacle getting
wet, position aquarium to one side
of a wall mounted receptacle to
prevent water from dripping onto
the receptacle plug. A “Drip Loop”
should be arranged by the user for
EACH cord connecting an aquarium appliance to a receptacle. The
“Drip Loop” is that part of the cord
below the level of the receptacle or
the connector if an extension cord
Drip Loop
is used. This “Drip Loop” prevents
water travelling along the cord and
coming in contact with the receptacle. If the plug or the receptacle do get wet DO NOT unplug the cord. Disconnect the fuse to
the circuit breaker that supplies power to the appliance. Then
unplug and examine for the presence of water in the receptacle.
Close supervision is necessary when any appliance is used by or
near children.
To avoid injury, do not contact moving parts or hot parts such as
heaters, reflectors, lamps bulbs and etc.
Always unplug an appliance from the outlet when not in use, before putting on or taking off parts, and before cleaning. Never
yank the cord to pull plug from outlet. Grasp the plug and pull to
disconnect.
3
IMPORTANT SAFETY
INSTRUCTIONS
WARNING
IMPORTANT SAFETY
INSTRUCTIONS
•
Do not use an appliance for other than intended use. The use
of attachments not recommended or sold by the appliance
manufacturer may case an unsafe condition.
Do not install or store the appliance where it will be exposed to
the weather or to temperatures below freezing.
Make sure an appliance mounted on a tank is securely installed
before operating it.
Read and observe all the important notices on the appliance.
This appliance has a polarized plug (one blade is wider than
the other). As a safety feature, this plug will fit in a polarized
outlet only one way. If the plug does not fit fully in the outlet,
reverse the plug. If it still does not fit, contact a qualified electrician. Never use with an extension cord unless plug can be fully
inserted. Do not attempt to defeat this safety feature.
This appliance is intended FOR HOUSEHOLD USE ONLY.
If an extension cord is necessary, a cord with a proper rating
should be used.
•
•
•
•
•
•
CLEANING
•
•
•
•
It is important to keep the Skkye Light Clamp clean.
Always unplug the Clamp before performing maintenance or
cleaning.
Wipe exposed surfaces carefully with a damp cloth to remove
any dust or mineral deposits which may collect over time.
Make sure hands are dry before re-plugging into an approved
electrical outlet
4
PARTS
Exploded View
Clamp 4
5
4
3
2
1
#
Description
Black
Color
Item
Code
White
Color
Item
Code
1
2 x 0.5W / 4 x 0.5W Moonlight Driver
610005
2
Clamp Mounting Screws
610003
3
Clamp Mounting Bracket
4
3 x 1W Daylight Driver
5
Clamp Light arm - 4W
610002
610001 610004
610007
610008 5
PARTS
Exploded View
Clamp 8
5
4
2
3
1
#
Description
Black
Color
Item
Code
White
Color
Item
Code
1
2 x 0.5W / 4 x 0.5W Moonlight Driver
610005
2
Clamp Mounting Screws
610003
3
Clamp Mounting Bracket
4
6 x 1W Daylight Driver
5
Clamp Light arm - 8W
610002
610001 610006
610010 610009
6
Clamp 4
The new stylishly slim aluminum fixture has a low 3mm thickness
and an intense light output. The perfect choice for any rimless
aquarium with a thickness of 9mm or less and offered in both 10K
purified white daylight and 14K daylight. Includes (3) high brightness 1 watt daylights and (2) 0.5 watt moonlight LEDs in a space
saving form factor for pure minimalism. Each arm has a power cord
channel and independent cords for timer usage.
SPECS—Clamp
MODEL
LIGHT CYCLE
LED WATTS
COLOR
CURRENT
4
6101 White
6102 Black
DAYLIGHT
MOONLIGHT
DAYLIGHT
MOONLIGHT
3 x 1 Watt
2 x 0.5 Watt
3 x 1 Watt
2 x 0.5 Watt
10K
456nm
14K
456nm
350 mA
60 mA
350 mA
60 mA
7
INTRODUCTION
Skkye Light LED series set the new standard for ultra-modern design in high brightness LED green technology. Reward your mini
Ecosystem with mesmerizing glitter lines while consuming a fraction
of the energy cost and minimal carbon emissions into our environment.
INTRODUCTION
Clamp 4
Features:
2 Light Cycles
•
•
Daylight 3 x 1 Watt .
Moonlight 2 x 0.5 Watt .
Independent Power Cords
•
Each with Quick Disconnects
Aluminum Alloy Arm
•
3mm thickness
Mounting Bracket
•
Fits on Rimless Aquariums—9mm or less
8
INTRODUCTION
Clamp 8
The new stylishly slim aluminum fixture has a low 3mm thickness
and an intense light output. The perfect choice for any rimless
aquarium with a thickness of 9mm or less and offered in both 10K
purified white daylight and 14K daylight. Includes (6) high brightness 1 watt daylights and (4) 0.5 watt moonlight LEDs in a space
saving form factor for pure minimalism. Each arm has a power cord
channel and independent cords for timer usage.
SPECS—Clamp
MODEL
LIGHT CYCLE
LED WATTS
COLOR
CURRENT
8
6103 White
6104 Black
DAYLIGHT
MOONLIGHT
DAYLIGHT
MOOLIGHT
6 x 1 Watt
4 x 0.5 Watt
6 x 1 Watt
4 x 0.5 Watt
10K
456nm
14K
456nm
350 mA
60 mA
350 mA
60 mA
9
INTRODUCTION
Clamp 8
Features:
2 Light Cycles
•
•
Daylight 6 x 1 Watt .
Moonlight 4 x 0.5 Watt
Independent Power Cords
•
Each with Quick Disconnects
Aluminum Alloy Arm
•
3mm thickness
Mounting Bracket
•
Fits on Rimless Aquariums—9mm or less
10
Rimless Tank Mounting
•
•
•
•
•
Place Clamp Mounting
bracket back wall of aquarium.
Fits a thickness of 9mm or
less
Slide the Clamp Light Arm
through the opening on the
bracket.
The Clamp Light Arm will be
on the back of the rear wall.
Adjust the height of the
Clamp Arm to your desired
position.
Insert the mounting screws
in the mounting bracket and
tighten.
11
GETTING STARTED
MOUNTING SKYYE LIGHT CLAMP
GETTING STARTED
POWERING UP SKKYE LIGHT CLAMP
•
•
Clamp 4W and Clamp 8W comes with 2 Drivers—Daylight
and moonlight.
Plug each male prong from the Clamp to the matching
Driver.
•
Plug the
Moonlight Driver
into a approved
household timer
•
Plug the Daylight
Driver into a approved household
timer
2 x 0.5W / 4 x 0.5W
Moonlight Driver
3 x 1W
or
6 x 1W
Daylight Driver
12
LIMITED WARRANTY
WARRANTY INFORMATION
LIMITED 1 YEAR WARRANTY—
CLAMP 4W & CLAMP 8W
This CLAMP has a 1 YEAR limited warranty.. The CLAMP
warranted to the original purchaser against defective material
and workmanship for 1 YEAR from the date of original purchase. This warranty is valid only under the following conditions: additions, modifications, or changes made to the product
by the purchaser and not by the manufacturer shall void this
warranty. Damages brought on by abuse, misapplication, or
mishandling also voids this warranty.
This warranty is limited to the repair or replacement of the product at the discretion of the manufacturer. This warranty does
not cover personal injury, property loss, including livestock or
damage (direct, incidental, or consequential) arising out of use
of this product. This warranty gives you specific rights and you
may also have other rights, which may vary from state to state.
The Product Registration Card must be filled out completely
and returned within (14) days from the date of purchase. Failure to do so will void this warranty. A proof of purchase from
an authorized dealer must be provided when making a warranty claim.
For Warranty Claim please contact our Customer Care Department.
A RMA # must be issued before sending any product back to
Innovative Marine. Products sent back to Innovative Marine
without a RMA# will be not be accepted. Service on products
will not extend the original warranty period.
Email: [email protected]
13
OWNER’S PRODUCT
INFORMATION
PRODUCT INFORMATION
MODEL #
CLAMP
SERIAL #
DATE OF
PURCHASE
Please keep your receipt in a safe place to ensure you have this information.
14
WWW.INNOVATIVE-MARINE.COM
A Division of
15