1
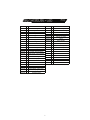
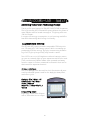
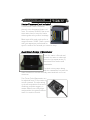
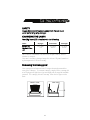
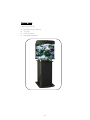
TRANSWORLD AQUATIC ENTERPRISES INC.
TABLE OF CONTENTS
Important Safety Instructions
3—5
28 Gallon Nano Cube LED PARTS PAGE
6—7
Introduction
8—11
Getting Started
12
Lighting
13
Maintenance Procedures
14-15
Specifications
16-17
Maintenance Log
18-19
Maintenance Notes
20-21
2
WARNING
To guard against injury, basic safety precautions should be observed, including the following:
READ ALL SAFETY INSTRUCTIONS BEFORE USE.
DANGER
To avoid possible electric shock, special care should be taken
since water is employed in the use of aquarium equipment. For
each of the following situations, do not attempt to repair yourself: return the appliance to an authorized service facility for service or discard the appliance.
A. If the appliance falls into water, DON’T reach for it! First unplug it and then retrieve it. If the electrical components of the
appliance get wet, unplug the appliance immediately.
B. Carefully examine the appliance after installation. It should
not be plugged in if there is water on parts not intended to be
wet.
C. Do not operate any appliance if it has a damaged cord or
plug, or if it is malfunctioning or if it is dropped or damaged in
any manner.
D. To avoid the possibility of the appliance
plug or receptacle getting wet, position
aquarium stand and tank to one side of a wall
mounted receptacle to prevent water from
dripping onto the receptacle or plug. A “drip
loop”, shown in the Figure at the right should
be arranged by the user for each cord connecting an aquarium appliance to a receptacle. The ”drip loop” is that part of the cord below the level of the receptacle or the connector if an extension cord is used, to prevent
water travel along the cord and coming in contact with the receptacle. (Continued on pg 4)
3
D. (Continued from pg 3)
If the plug or the receptacle do get wet, DON’T unplug the
cord. Disconnect the fuse to the circuit breaker that supplies
power to the appliance. Then unplug and examine for the presence of water in the receptacle.
E. Close supervision is necessary when any appliance is used by
or near children.
F. To avoid injury, do not contact moving parts or hot parts
such as heaters, reflectors, lamp bulbs, and etc.
G. Always unplug an appliance from the outlet when not in
use, before putting on or taking off parts, and before cleaning.
Never yank the cord to pull plug from the outlet. Grasp the plug
and pull to disconnect
H. Do not use an appliance for other than intended use. The
use of attachments not recommended or sold by the appliance
manufacturer may cause an unsafe condition.
I. Do not install or store the appliance where it will be exposed
to the weather or to temperatures below freezing.
J. Make sure an appliance mounted on a tank is securely installed before operating it.
K. Read and observe all the important notices on the appliance.
L. This Appliance has a polarized plug (one blade is wider than
the other). As a safety feature, this plug will fit in a polarized outlet only one way. If the plug does not fit fully in the outlet, reverse the plug. If it still does not fit, contact a qualified electrician.
Never use with an extension cord unless plug can be fully inserted. Do not attempt to defeat this safety feature.
M. This appliance is intended FOR HOUSEHOLD USE ONLY.
Do not use or mount this appliance in such a way that the top
vents are restricted or blocked. These vents are necessary to
avoid over-heating and insure safe operating temperature.
4
O. Make sure that the appliance is set on a level surface to pre-
vent undue stress on the aquarium tank from stress and leaks. It
is not recommended that this appliance is set upon coffee tables, end tables, T.V. stands, or night stands unless the structure
has been properly tested to within the weight limits of the
aquarium.
CLEANING
It is important to keep this hood appliance clean. Always unplug the appliance before performing maintenance or cleaning of the exterior of this hood. Wipe exposed surfaces carefully with a damp terrycloth to remove any dust or mineral
deposits which may collect over time. Make sure all surfaces
are dry before re-plugging into an electrical outlet. To prevent
scratching the aquarium, use a damp terrycloth when cleaning. Never use algae scrapers, scouring pads, razor blades,
glass cleaner or other such abrasives.
SERVICING
In order to assure proper electrical connections and polarity,
replacement parts and servicing should be performed only by a
qualified electrician.
OPERATION
Please carefully read the entire “Owner’s Manual” for proper
operation procedures before proceeding with turning on this
appliance and adding livestock such as fish, corals, and invertebrates.
SAVE THESE INSTRUCTIONS
5
PARTS EXPLODED VIEW & IDENTIFICATION
6
PART
#
MT-601- 1
Name
Feeding Lid
MT-601- 2
MT-601- 3
Feeding Lid—Bracket
Canopy
MT-601- 27
Quartz Glass—O-Ring
MT-601- 28
Splash Guard—O-Ring
MT-601- 4
Moonlight—Cord
MT-601- 29
Splash Guard
MT-601- 5
Daylight—Cord
MT-601- 30
Canopy Leg Stand
MT-601- 6
Dawn/Dusk—Cord
MT-601- 31
Hinge
MT-601- 7
Current Regulator—Heatsink
MT-601- 32
Return Nozzle
MT-601- 8
Current Regulator PCB
MT-601- 33
Return Elbow
MT-601- 9
3 Watt—Dawn/Dusk LEDs
MT-601- 34
Pump Hose
MT-601- 11
Thermal Protector
MT-601- 35
Accela Pump
MT-601- 12
Cooling Fan
MT-601- 36
Tank Body
MT-601- 13
Moon Light—Transformer
MT-601- 14
Daylight—Remote Ballast
MT-601- 15
MT-601- 16
Dawn/Dusk—Internal Ballast
Aluminum Heatsink
MT-601- 17
1 Watt—Moonlight LEDs
MT-601- 18
3 Watt—Daylight LEDs
MT-601- 19
Aluminum Reflector
MT-601- 20
Quartz Glass
MT-601- 21
Ocean Pulse Wavemaker
MT-601- 22
Filter Basket + Handle
MT-601- 23
Filter Basket—Sliding Door
MT-601- 24
Sponge
MT-601- 25
Activated Carbon
PART
#
MT-601- 26
7
Name
Ceramic Rings
Delivering Tomorrow’s Technology Today!
Thank you for purchasing the 28g LED NANOCUBE Aquarium.
Our high intensity LED illumination system delivers the power of
metal halides and the broad coverage of T5 lighting with over
10x the lifespan.
It requires less energy consumption, is cool running and offers
beautiful shimmering while being eco-friendly.
ILLUMINATION SYSTEM
Our 89 watt LED system provides comparable PAR output to
our 150 watt HQI—14K canopy system, while consuming approximately 40% less energy. Enjoy the mesmerizing shimmering of all 3 light cycles generally only found in nature.
Since LEDs turn on to full brightness without having to warm
up, you can instantly light up your aquariums without the wait.
These revolutionary diodes radiate heat upwards and away
from the water to reduce unwanted heat transfer that can be
detrimental for aquarium livestock.
24 Hour Light Cycle
Our new canopy offers around the clock illumination all powered by individual power cords for the daylight, dawn/dusk,
and moon cycles.
Daylight—25 x 3 Watt—14K
Dawn/Dusk—4 x 3 Watt—
Actinic / 466 nm
Moon—2 x 1 Watt—Nite-Vu /
456nm
Long Lasting Lamps
Impressive 50,000 hour lifespan
with a 30% reduction in output.
8
CRYSTAL CLEAR CURVED GLASS
All Nano-Cube Aquariums offer panoramic viewing with
smooth rounded corners for maximum viewing and enjoyment.
INTEGRATED 3 STAGE FILTRATION
Our comprehensive 3 Stage Filtration system keep aquariums
sparkling clean and is discreetly hidden
behind a false wall to provide an uncluttered and professional look and feel.
All media is conveniently placed inside our
transparent Removal Filter Media Basket
for quick and easy filter changes. The filter
media basket also incorporates a handle
and a sliding door for added convenience.
Can also be converted into an “In tank
Refugium” to grow Chaetomorpha.
For more information check
FILTRATION LAYOUT
1 - 3 STAGE FILTER
* Mechanical Sponge
* Activated Carbon Bag
* Biological Ceramics Bag
3
1
2
2 - AUXILLARY COLUMN
4
3 - HEATER COLUMN
(Heater Not Included)
4
4 - RETURN PUMPS
9
3 STAGE FILTER
Mechanical Filtration:
Filter Sponge traps free floating particulate matter and debris.
Chemical Filtration:
Activated Carbon bag removes dissolved organics and odor.
Biological Filtration:
Ceramic Ring bag provides internal/external surface area for
housing beneficial bacteria to oxidize harmful ammonia and
nitrite that accumulate in the aquarium from fish wastes, overfeeding, and normal biological processes.
* Note: Ceramic Ring bag can be removed if using this NanoCube as a mini-reef aquarium. Maintaining an average of 1lb
per gallon of live rock will create a live biological filtration system as well as denitrification system ultimately creating a balanced biotope.
Submersible Pumps:
Included with flexible hose and elbow connector.
(2) Accela SP1-1000 Pumps
Rated at 266 gph
Ocean Pulse Duo—Wavemaker
(2) Directional flow nozzles
10
Heater Placement (not included)
A submersible heater should be
placed in the designated heater column. This column ALWAYS has a constant water level to keep the heater
submerged and to prevent breakage.
Most tropical fish and corals prefer a
range between 74-80F. Please consult
with your aquarium professional for
specific needs of the animals you intend to keep.
Dual Return Pumps + Wavemaker
Once the water is filtered and
heated, the water is redirected
back into the aquarium via (2)
directional flow nozzles and
wavemaker.
The dual return pumps along
with the wavemaker recreate the
natural turbulent currents normally associated with reef environments.
The Ocean Pulse Wavemaker can
be adjusted from 10 Seconds to 6
minute intervals. This alternating
cycle will keep detritus from accumulating, provides oxygen, removes waste from coral polyps
and provides the optimal environment for corals to flourish.
11
HANDLING PRECAUTIONS
Never attempt to move a full or partially full Nano-Cube.
Never lift by grabbing the aquarium frame
Never use cleaners that contain ammonia to clean the glass surfaces. Always lift and carry the Nano-Cube from underneath
giving support to the bottom at all times.
CHOOSING A LOCATION
A. With a Nano-Cube Stand
1. Find a leveled surface and place Nano-Cube on top of
stand before filling with water. Make sure that no part of the
tank is overhanging the stand.
B. Without a Nano-Cube Stand
1. Find a leveled surface that can support the weight of
the tank, water, and livestock. An average aquarium can weigh
10lbs per gallon once filled with water, rock, gravel, and other
accessories.
2. Do not place in direct sunlight to prevent excessive
algae growth and higher water temperatures.
FILLING THE TANK
Always dechlorinate tap water before adding into the aquarium. Always fill with room temperature water.
Rinse Activated Carbon which is located in the rear filter compartment under the sink for 30 seconds or until water runs
clear.
Fill the main body of the Nano-Cube until water flows through
the overflow grill into the rear filter chamber. Once the rear filter
chamber is full, plug pumps into the Ocean Pulse Wavemaker.
Adjust the dial on the wavemaker to create the alternating ON/
OFF cycles for the pumps. Plug the wavemaker power cord into
an approved electrical outlet with a fuse or circuit breaker.
Once pumps are on, water will flow from the rear filter chamber through the directional flow nozzles into the main body of
the Nano-Cube. Adjust accordingly to desired flow position.
12
1
2
3
1
TURNING ON YOUR LIGHTING SYSTEM (Nite Lite)
Your Nano-Cube is installed (2) Nite-Vu LED’s that simulate nocturnal cycles with very dim blue light (nightlights) that casts sparkling
rays that shimmer for a more natural light cycle commonly found in
nature.
A. Connect the single male prong cable from the canopy to the
small block transformer. We recommend always keeping this
plugged into an electrical outlet without a timer.
B. The Nite-Vu LED lighting is very dim not to disturb the night cycles of fish but just bright enough to watch their nocturnal behaviors. The Nite-Vu LED lighting is best seen when surrounding light
is turned off in the room.
2
TURNING ON YOUR LIGHTING SYSTEM (Daytime)
Your Nano-Cube is installed with 25 individual 3 watt LEDs in the
center of the reflector with14K (color temperature) for daytime illumination
A. Connect the 5 prong cable from the canopy to the larger remote ballast. Align the notched groove and insert. Twist coupling
until tight.
B. Plug into a household timer for 6-8 hours of a day. Fans will simultaneously start to keep the hood at proper operating temperatures.
3
TURNING ON YOUR LIGHTING SYSTEM (Dawn/Dusk)
Your Nano-Cube is installed with (4) individual 3 watt LEDs in the
four corners of the canopy to simulate a sunrise/sunset effect.
A. Plug the power cord from the canopy into a household timer.
B. We recommend that the timer be set to turn on 2 hours before
the daylight starts and stay on 2 hours after the daylight turns off.
13
Regular maintenance is the key to a successful thriving aquarium. Maintaining an aquarium can be very easy with a regular
cleaning schedule. Changing filter media is fast and easy with
our Removal Filter Media Basket.
Simply, lift up on the handle and the water will drain out from
the bottom. Take to the sink and slide open the door for a convenient filter change.
WATER CHANGES
A. Water changes should be carried out on monthly to bimonthly schedule depending on how much bio-load is kept.
B. 25% water changes with gravel vacuuming is essential to
keep dissolved organic carbons to a minimum.
REPLACING THE FILTER SPONGE (Chamber1)
A. Filter Sponge should be changed on a monthly basis to remove trapped debris and free floating particulate matter.
REPLACING
THE ACTIVATED CARBON (Chamber2)
A. Activated Carbon adsorbs dissolved pollutants and removes
the yellow discoloration of water and associated odors.
B. Replace Activated Carbon Bag on a monthly basis.
CERAMIC RINGS
(Chamber 3 / Bottom Level)
A. Biological media should not be removed as it houses the
beneficial nitrifying bacteria for removal of ammonia and nitrite.
B. This media does not need to be changed.
14
SAFETY
Always disconnect the power supply from the wall outlet
when performing lamp changes
CHANGING THE LAMPS
Your 28g Nano-LED is installed with the following:
Model
MT-601-LED
28g Nano-Cube
LED
Daylight
Dawn/Dusk
Moonlight
25x3 Watt
14K
4x3 Watt
466nm
2x1 Watt
456nm
LEDs have a remarkable 50,000 hour lifespan with a 30% reduction in output.
You won’t need to change lamps for at least 10 years based on
a photoperiod of 10 hours a day.
Removing the Canopy Lid
Your canopy lid is fastened into 2 hinges located towards the
rear of the canopy. To remove canopy, simply lift the canopy lid
at a 90 degree angle from the tank and pull canopy lid towards
yourself. The canopy lid will “unsnap” from the hinges on the
tank.
SIDE VIEW
FRONT VIEW
15
28g NANOCUBE LED- SPECS
Product Name—28g Nano Cube LED
Item No: MT-601-LED
Tank Volume: 28 gallons
Glass Thickness: 6mm
Accela Pumps: (2) x 266 gph/ 16 watt each
Cooling Fans: (4) 3000 rpm/ Ball Bearing Type
Tank Dims: 18” x 22” x 22” high
Optional Stand: 18”x 22”x 32” high
Lighting Type: Light Emitting Diodes
Thermally Protected
Warranty: 1 Year parts and labor
Customer Service Information
For additional information or technical assistance please call us
at (877) 374-9981, M-F from 9AM-5PM (Pacific Standard Time).
16
Optional Stand:
18” x 22” x32”
Item Code: MTS-60
• Ventilated Side Cabinets
• 32” high
• Chiller Storage
• Hardware Included
17
DATE
MAINTENANCE
18
DATE
MAINTENANCE
19
20
21
WWW.JBJLIGHTING.COM
3730 West Century Blvd, Suite 3
Inglewood CA 90303
Phone: 877-374-9981
Fax: 310-672-7261
E-mail: [email protected]
22
TRANSWORLD