1
ATL:
Atlas Transformation Language
User Manual
- version 0.2 -
January 2005
by
ATLAS group
LINA & INRIA
Nantes
- working draft -
Content
1
Introduction ........................................................................................................................ 1
1.1
The ATL Language .................................................................................................... 1
2
Programming an ATL Module........................................................................................... 1
2.1
Preparation ................................................................................................................. 1
2.2
Header Section ........................................................................................................... 2
2.3
Import Section ............................................................................................................ 2
2.4
Helpers ....................................................................................................................... 3
2.5
Rules........................................................................................................................... 4
2.6
ATL Advanced Features ............................................................................................ 5
2.6.1
Rules with Multiple Instantiations ..................................................................... 5
2.6.2
Queries and the Generation of Text ................................................................... 5
3
The ATL IDE for Eclipse................................................................................................... 6
3.1
Installing the ATL IDE for Eclipse ............................................................................ 6
3.2
Basic Features ............................................................................................................ 6
3.2.1
Perspectives ........................................................................................................ 6
3.2.2
Navigator ............................................................................................................ 7
3.2.3
Editors ................................................................................................................ 7
3.2.4
Outline................................................................................................................ 7
3.2.5
Console............................................................................................................... 8
3.3
Creating an ATL Project ............................................................................................ 8
3.4
Compilation................................................................................................................ 9
3.5
Setting up a Launch Configuration ............................................................................ 9
3.6
Running an ATL Launch Configuration .................................................................. 10
3.7
Debugging an ATL Module ..................................................................................... 10
3.8
Log File .................................................................................................................... 10
I
Example Code .....................................................................................................................I
II Figures ................................................................................................................................II
III
References .................................................................................................................... III
ATL User Manual
1 Introduction
1.1 The ATL Language
ATL, the Atlas Transformation Language, is the ATLAS INRIA & LINA research group
answer to the OMG MOF [5]/QVT RFP [6]. It is a model transformation language specified
both as a metamodel and as a textual concrete syntax. It is a hybrid of declarative and
imperative. The preferred style of transformation writing is declarative, which means simple
mappings can be expressed simply. However, imperative constructs are provided so that some
mappings too complex to be declaratively handled can still be specified. An ATL
transformation program is composed of rules that define how source model elements are
matched and navigated to create and initialize the elements of the target models.
2 Programming an ATL Module
An ATL module file has the header section, the imports section, as well as helpers and rules.
For an ATL module only the header section is mandatory. The ATL module is stored in a file
with the extension .atl.
Please note:
- To navigate from an element to its attribute, write the name of the element, then
“.” and the name of the attribute.
- If an identifier (variable name, metamodel name, model element name, etc.) is in
conflict with a keyword, it has to be marked with apostrophes.
- The ATL parser is case sensitive. This concerns the file names as much as the
source code itself.
- Comments are marked with double dashes ”--”.
2.1 Preparation
Before an ATL program can be written you must have the target and the source metamodels.
For the scope of this manual, the Book to Publication transformation example (see Figure 1
for the Book metamodel and Figure 2 for the Publication metamodel) is used to illustrate
ATL. Ecore models can be defined with KM3 [2].
Book
+title
:String
* + chapters
Chapter
+nbPages :Integer
+title :String
+author :String
Figure 1 The Book metamodel
The Book metamodel contains the class Book which contains a set of Chapters. Books and
Chapters have titles. Additionally, Chapters have a number of pages, nbPages, and author.
Page 1
ATL User Manual
Publication
+title :String
+nbPages :Integer
+authors :String
Figure 2 The Publication metamodel
The metamodel Publication consists of the class Publication which has a title, a number of
pages, nbPages, and authors. The attribute authors is a String that contains the names of
authors separated with the word and.
In the following it will be shown step by step how to program an ATL module that transforms
Book models into Publication models. An ATL module begins with the header section and
ends with the rules section.
2.2 Header Section
The header section defines the names of the transformation module and the variables of the
source and target metamodels.
The following ATL source code represents the header of the Book2Publication.atl file, thus
the ATL header for the transformation from Book to Publication:
module Book2Publication;
create OUT : Publication from IN : Book;
The keyword module defines the module name.
The keyword create introduces the target models declaration.
The keywords from introduces the source models declaration.
Please note:
- The ATL file name (here: Book2Publication.atl) has to correspond to the module
name (here: Book2Publication) and must end with the extension .atl. The same
applies to the project configuration. When using the ATL IDE for Eclipse, the
module (here: Book2Publication.atl), the metamodel variable names (here: IN and
OUT) and metamodel variable names (here: Publication and Book) have to
correspond to the launch configuration (see paragraph 3.4).
2.3 Import Section
The import section declares what libraries have to be imported. For instance, to import the
strings library, one would write:
uses strings;
The keyword uses declares the libraries that have to be imported. There can be several import
declarations.
Please note:
- Do not declare imports that are not necessary.
- The string.atl library contains many useful functions for Strings but is not
necessary for the Book to Publication example.
- The launch configuration (see paragraph 3.4) must indicate where the imports are
to be found. Otherwise imports cannot be uploaded.
Page 2
ATL User Manual
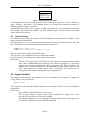
2.4 Helpers
Helpers can be used to define (global) variables and functions. Helper functions are OCL
expressions. They can call each other (recursion is possible) or they can be called from within
rules (see section 2.5). In general, they serve to define repetitive pieces of code in one place.
A helper function has the following structure:
- It starts with the keyword helper and ends with a semicolon. In between is an
OCL expression.
- The notion of the term context is similar to OCL and it may be compared to an
input parameter of a method. A context variable is specified with the help of the
ATL path expression metamodel!element and is accessible via the self variable. If
no context is specified, the module itself it taken as context.
- The function name is introduced with def : and is followed by brackets.
- The return type is between a colon and an equals sign that serves as starting point
for the function implementation.
- The function finishes with a semicolon.
For the Book to Publication example, a getAuthor function has to be implemented. Its task is
to iterate over the different Chapters of Book in order to build a String containing all Authors’
names. The word and separates the Authors’ names:
helper context Book!Book def : getAuthors() : String =
self.chapters->collect(e | e.author)->
asSet()->
iterate(authorName; acc : String = '' |
acc +
if acc = ''
then authorName
else ' and ' + authorName
endif)
;
The context variable self is instance of the class Book!Book. The collect method gets all
author attributes of all Chapters. The asSet method eliminates all doublets by converting the
sequence to a set. The iterate operation is well known from OCL and iterates over a
Collection while accumulating data. In this case it iterates over the author attributes of all
Chapters of a Book and collects the Authors’ names. The variable authorName references the
Author’s name of the current iteration. The variable acc severs to accumulate all
authorNames. The if expression returns an instance of String containing the authorName if
acc is empty. Otherwise, it concatenates ‘and’ with the authorName. The getAuthors function
returns the result of the last iteration containing the concatenation of all Authors’ names.
Please note:
- Each function must have a name and a return type definition. There may be
functions with the same name but a different context.
- If the context is not otherwise specified, implicitly the module itself is taken as
context.
- If the helper has no context defined, the helper has to be called with
“thisModule.”.
Page 3
ATL User Manual
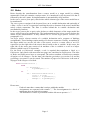
2.5 Rules
Rules describe the transformation from a source model to a target model by relating
metamodels. Each rule contains a unique name. It is introduced by the keyword rule that is
followed by the rule’s name. Its implementation is surrounded by curly brackets.
In the source pattern (from part), rules declare which element type of the source model has to
be transformed.
The source pattern consists of the keyword from, an in variable declaration and optionally of
a filter. A filter is an OCL expression restricting the rule to elements of the source model that
satisfy certain constraints. The filter is written behind the in variable declaration and
surrounded by brackets.
In the target pattern (the to part), rules declare to which element(s) of the target model the
source pattern has to be transformed to. The implementation of the target pattern declares the
details of the transformation. It may contain one or several target pattern elements (see
paragraph 2.6.1).
An target pattern element consists of a variable declaration and a sequence of bindings
(assignments). These bindings consist mainly of left arrow constructs. Usually, an attribute of
the target model out (on the left side of the arrow) receives a return value of an OCL
expression (on the right side of the arrow) that is based on the in variable. In this sense, the
right side of the arrow may consist of an attribute of the in variable or a call to a helper
function (which is an OCL expression).
For the Book to Publication example, a rule is required that transforms a Book to a
Publication. Only Books with more than two pages are considered as Publications. The titles
of Books and Publications have to correspond. The authors attribute of Publication contains
all authors of all Chapters. For the latter, the function getAuthors (see section 2.4) and the
getNbPages (see annex I) can be reused. The number of pages of a Publication is the sum of
all pages of the Chapters of a Book.
rule Book2Publication {
from
b : Book!Book (
b.getNbPages() > 2
)
to
out : Publication!Publication (
title <- b.title,
authors <- b.getAuthors(),
nbPages <- b.getNbPages()
)
}
Please note:
- Each rule must have a name that is unique within the module.
- Assignments are separated with comma ”,”. The last assignment in a block of
statements does not end with a comma.
- The attribution of values is performed with the left arrow operator “<-”.
Page 4
ATL User Manual
2.6 ATL Advanced Features
The advanced features will be explained using new examples that are (will be) described in
“ATL by Examples” because the Book2Publication example is too simple for this purpose.
2.6.1 Rules with Multiple Instantiations
If for one source pattern (the from part of a rule) several target pattern elements (the to part
of a rule) have to be instantiated we speak of multiple instantiations. Multiple instantiations
are defined using several target pattern elements in one and the same rule.
In the Class to Relational transformation there is a rule that for each Class a Table has to be
created. Additionally, each Table has to have a key set containing at least one key. In this
example the key is a Column with the name objectID. However, Classes of the source
metamodel do not have persistent identifiers (surrogates) such as keys. In this sense, for each
Class not just a Table but also a key Column has to be instantiated. Consequently, for the
Class2Table rule two target pattern elements are needed, namely out for the creation of the
Table instance and new_key for the creation of the key. Please note, that the key attribute of
Table which is a set of Columns can be initialized with new_key which is a Column.
rule Class2Table {
from
c : Class!Class
to
out : Relational!Table (
name <- c.name,
key <- Set {new_key}
-- further value attributions
),
new_key : Relational!Column (
name <- 'objectId'
-- further value attributions
)
}
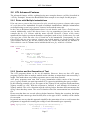
2.6.2 Queries and the Generation of Text
The ATL programs shown so far are all modules. However, there are also ATL query
programs. Queries allow to analyse models and to calculate an output that is not necessarily a
model. This makes them very handy to generate text or code from a model.
ALT query programs must start with a query instantiation which consist of the keyword
query, a query variable, an equal sign and an OCL expression initializing the query variable.
In the following example you see an extract of the XQuery2Code program which transforms
XQuery models to code. With the allInstances function it runs through all elements of
XQuery models. The collect function calls the toString helper functions and concatenates the
String values that they return. The writeTo function writes the concatenation into a dedicated
file.
Please note that there are several toString helper functions. During the execution, the helper
function with the context type that fits best (here: to the type of the e variable) will be chosen
for execution.
In general one can say that this approach simplifies the generation of text or code because the
programmer is supported in treating the coding of each metamodel types separately.
query XQuery2Code = XQuery!XQueryProgram.allInstances()->
collect(e | e.toString().
writeTo('C:/test.xquery'));
Page 5
ATL User Manual
helper context XQuery!XQueryProgram def: toString() : String =
self.expressions->iterate(e; acc : String = '' |
acc + e.toString() + '\n'
);
helper context XQuery!ReturnXPath def: toString() : String =
'{' + self.value + '}';
helper context XQuery!BooleanExp def: toString() : String =
self.value;
3 The ATL IDE for Eclipse
Eclipse is an open universal tool platform for software development and in particular for the
construction of IDEs, integrated development environments. It has been chosen to build the
ATL IDE [1] with.
3.1 Installing the ATL IDE for Eclipse
For the installation of the ATL IDE for Eclipse, please consult the ATL installation
instructions in [3].
3.2 Basic Features
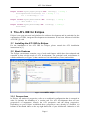
The Eclipse environment contains a set of tools and features which have been adapted and
extended to best suit the needs of ATL development. The principal work environment is
called workbench (see Figure 3) that contains several subwindows (views) and toolkits.
Figure 3 ATL IDE for Eclipse
3.2.1 Perspectives
In Eclipse, the notion of perspective refers to a workbench configuration that is arranged in
order to optimise the handling of a certain task. For ATL development there are two
perspectives of importance, namely the ATL perspective and the debug perspective.
Depending on your Eclipse workbench these perspectives may already be available via
buttons in the thumb index on the top right hand side of your workbench. Otherwise a left
Page 6
ATL User Manual
mouse click on the perspective icon (displaying a window with subwindows and a yellow
cross, accessible on the top right hand side of your workbench) leads you to a context menu
from which Other and then ATL (for the ATL development) or Debug (for the ATL execution
in debug mode) can be chosen to obtain the corresponding perspective. If ATL is not within
the selectable perspectives, the ATL plugin has not been successfully installed (please
reinstall, see paragraph 3.1).
Please note:
- Only the perspectives ATL or debug should be used for developing projects with
ATL or KM3.
3.2.2 Navigator
The Eclipse navigator shows you the files of your workbench. With a right mouse click on a
file you obtain a context menu showing you possible actions, e.g. the possibility to open a file
in a text editor, to display an ATL file with the ATL editor, to debug or run an ATL file or to
import the Ecore model from a KM3 file.
3.2.3 Editors
Eclipse facilitates the development of powerful source editors. Concerning the ATL
development, an ATL editor has been implemented that performs syntax highlighting, runtime
parsing, compilation and error detection. Modifications of the ATL file that lead to a
syntactically correct ATL program will immediately trigger the compilation and thus the
generation of a new assembler file (at latest when the file is saved). An assembler file has the
extension .asm and contains the compiled code of the corresponding ATL file.
Please note:
- For the display of ATL files the ATL editor is recommended.
3.2.4 Outline
The Eclipse outline view gives an overview over the structural elements of the active file in
the Eclipse editor with which it is to be synchronized. In this sense the ATL editor is in
permanent communication with the outline view. Adding the code for a new structural
element such as a rule or a helper context function in the ATL editor will automatically lead
to a corresponding addition in the outline view (at latest when the file is saved). Furthermore,
the cursors in the ATL editor and the outline view will always point to the same structural
element (see Figure 4). If the cursor is moved in one (meaning the ADT editor or the outline),
the other will replace its cursor correspondingly.
In the outline view it is possible to set breakpoints for debugging that are marked in the ATL
editor with green points.
Page 7
ATL User Manual
Figure 4 Synchronized Cursors of Outline and ATL Editor
3.2.5 Console
The Eclipse console shows the output of programs that have been triggered form subordinate
runtime workbenches. This is a helpful feature for debugging ATL programs that make use of
the output <- feature. For the creation a subordinate runtime workbench, use the right mouse
button to pop up the context menu and choose Run in the submenu Run. In the run
configuration view select Run-Time Workbench and click the New button. Then select the
newly created instance and trigger the subordinate runtime workbench with the button Run.
As a consequence, the standard output of programs running in the subordinate runtime
workbench will be displayed in the console of the original workbench.
3.3 Creating an ATL Project
An ATL project is created with the following actions:
- In the Eclipse File menu choose the item New.
- In the appearing view choose ATL Project within the ATL folder and click on Next.
- Give the project a sensible name (by concatenating the source model name, the
character 2 and the target model name, e.g. XSLT2XQuery) and push the Finish
button.
Eclipse creates for each project a new folder with the project name. This folder can be opened
with a double click. At the beginning it contains but a .project file that the ATL programmer
may ignore. However, for the basic transformation scenario you need an ATL program in the
form of an .atl file that should bear the same name as the project itself, the source and the
target metamodels in EMF [4] or MDR [8], formatted in XMI [5]. For testing the
transformation at least one source model should be available. For the development of ATL
programs, the ATL editor is recommended (see paragraph 3.2.3).
The creation of an empty file is performed with the following steps:
- Choose the item New in the Eclipse File menu or in the Navigator context menu.
- Select the item File.
Page 8
ATL User Manual
-
In the appearing view enter the file name and the intended extension (e.g. xmi, .atl
or .km3).
Make sure that the correct project folder is marked.
Push the Finish button.
3.4 Compilation
In the Eclipse environment the compilation of an ATL program to an ASM bytecode file is
automatically done in the background (e.g. when saving the ATL program).
3.5 Setting up a Launch Configuration
The ATL debug and run environment can be set up once you have created the ATL file and
the corresponding metamodel and model files. To obtain the launch configuration view you
can use the context menu in the navigator:
- A right mouse click in the navigator view opens the context menu.
- In the context menu choose Run... in the submenu of Run or choose Debug... in the
submenu of Debug.
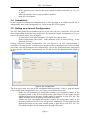
Having reached the launch configuration view (see Figure 5), an ATL transformation is
created by selecting the ATL Transformation instance in the configuration tree at the left hand
side of the view and pushing the New button below. Give to the configuration the same name
as to its project, choose the corresponding .atl file and specify the metametamodel (EMF or
MOF).
Figure 5 ATL Configuration
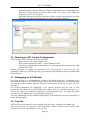
The next step to take is to specify the metamodels and the models. To do so, pick the Model
Choice panel in the configuration view (see Figure 6) and follow these steps:
- Define the IN metamodel(s) and model variables by writing their names in the
designated fields of the IN box add press the Add button. For the model and the
metamodel names use the same variable name as specified in your ATL file. The
added variables will be displayed in the path editor table.
- Define the OUT metamodel and model variables by writing their names in the
designated fields of the OUT box add press the Add button. For the model and the
metamodel names use the same variable name as specified in your ATL file. For
The added variables will be displayed in the path editor table.
Page 9
ATL User Manual
-
-
In the path editor select the different variables and attribute the corresponding files.
Push the Set path button and specify their name. If the path is not within the
workspace, use Set external path.
Define the libraries used in the Libs panel. Please use the corresponding .asm files
and make sure that the naming import section of your ATL program.
Figure 6 ATL Model Configuration
3.6 Running an ATL Launch Configuration
ATL programs can be launched from the navigator:
- Right mouse click in the navigator view.
- In the context menu choose Run... in the submenu of Run.
- Choose the configuration needed and run it by pressing the Run button on the right
bottom of the view.
Another possibility to trigger the execution of an ATL program is to use the run icon
(depicting a white play forward sign on a green background) displayed in the bar underneath
the main menu.
3.7 Debugging an ATL Module
For debug actions it is recommended to switch to the debug perspective. Additional to the
editor and the outline, it contains the debug window that displays the processes (terminated or
not) and the control window that lists all chosen breakpoints and debug variables of ATL
programs.
An essential instrument for debugging is the partial execution step by step or with
breakpoints. The latter are set with a right mouse button click on a structural element (e.g. a
rule) in the outline view and then selecting the “add breakpoint” item. To trigger the partial
execution use the debug feature by clicking the debug icon.
You may additionally use the standard output display described in the previous paragraph as a
means for debugging.
3.8 Log File
ADT log files are contained in your workspace log file (your_workspace/.metadata/.log).
You can access the error log file via the Help menu. Choose About Eclipse Platform, then
Configuration Details and finally View Error Log.
Page 10
ATL User Manual
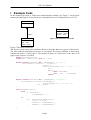
I Example Code
In this manual, the Book to Publication transformation example (see Figure 7 for the Book
metamodel and Figure 8 for the Publication metamodel) serves to illustrate the use of ATL.
Book
+title
:String
Publication
+title :String
+nbPages :Integer
+authors :String
* + chapters
Figure 8 The Publication metamodel
Chapter
+nbPages :Integer
+title :String
+author :String
Figure 7 The Book metamodel
The Book to Publication code transforms Books with mode than two pages to Publications.
The titles of Books and Publications have to correspond. The authors attribute of Publication
contains all authors of all Chapters. The number of pages of a Publication is the sum of all
pages of the Chapters of a Book.
module Book2Publication;
create OUT : Publication from IN : Book;
helper context Book!Book def : getAuthors() : String =
self.chapters->collect(e | e.author)->
asSet()->
iterate(authorName; acc : String = '' |
acc +
if acc = ''
then authorName
else ' and ' + authorName
endif)
;
helper context Book!Book def : getNbPages() : Integer =
self.chapters->collect(f|f.nbPages)->
iterate(pages; acc : Integer = 0 |
acc + pages)
;
rule Book2Publication {
from
b : Book!Book (
b.getNbPages() > 2
)
to
out : Publication!Publication (
title <- b.title,
authors <- b.getAuthors(),
nbPages <- b.getNbPages()
)
}
Page I
ATL User Manual
II Figures
Figure 1 The Book metamodel................................................................................................... 1
Figure 2 The Publication metamodel ......................................................................................... 2
Figure 3 ATL IDE for Eclipse.................................................................................................... 6
Figure 4 Synchronized Cursors of Outline and ATL Editor ...................................................... 8
Figure 5 ATL Configuration ...................................................................................................... 9
Figure 6 ATL Model Configuration......................................................................................... 10
Figure 7 The Book metamodel....................................................................................................I
Figure 8 The Publication metamodel ..........................................................................................I
Page II
ATL User Manual
III References
[1] Allilaire, F., Idrissi, T. ADT: Eclipse Development Tools for ATL. EWMDA-2, Kent, September 2004
[2] ATLAS group, INRIA & LINA, KM3: Kernel MetaMetaModel Manual. 2004
[3] ATLAS group, Installation of ADT from source. 2004
http://www.sciences.univ-nantes.fr/lina/atl/www/papers/ATL/ATL_Documentation/ADTInstallation.pdf
[4] IBM, Eclipse project, EMF – Documentation. http://www.eclipse.org/emf/
[5] OMG/MOF Meta Object Facility (MOF). Version 1.4. formal/2002-04-03, 2002
[6] Object Management Group: OMG/RFP/QVT MOF 2.0 Query/Views/Transformations RFP. October 2002
[7] OMG/XMI XML Model Interchange (XMI) OMG Document AD/98-10-05, October 1998.
http://www.omg.org
[8] SUN, netBeans project, MDR - Metadata Repository. http://mdr.netbeans.org/
Page III