1
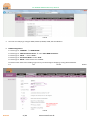
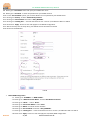
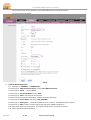
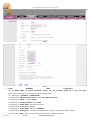
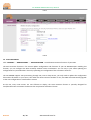
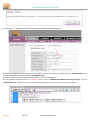
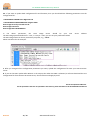
OT-4020VW GEPON ONU Entry Manual Introduction This Manual is the quick start manual for OT-4020VW GEPON ONU. It shows you how to start configuring the OT-4020VW to your demands. It shows you how to configure DHCP, STATIC IP, PPPOE, VLAN, VoIP and Wireless AP functions. Content Startup Process ----------------------------------------------------------------------------------------------------------------------1, 2 PPPOE Configuration ---------------------------------------------------------------------------------------------------------------2, 3 DHCP Configuration ----------------------------------------------------------------------------------------------------------------3, 4 STATIC IP Configuration -----------------------------------------------------------------------------------------------------------4, 5 VLAN Bridging Configuration ----------------------------------------------------------------------------------------------------5, 6 VoIP Configuration -----------------------------------------------------------------------------------------------------------------6, 7 Wireless AP Configuration -------------------------------------------------------------------------------------------------------7, 8, 9 Auto Provision ----------------------------------------------------------------------------------------------------------------------9, 10, 11, 12 Startup Process: 1. Connecting your OT-4020VW to a GEPON OLT with a PLC Fiber Splitter, in which, the OLT has been connected to Internet. 2. Connecting your OT-4020VW to your PC through its Ethernet LAN interfaces. 3. After boot up, please log in the OT-4020VW’s WEB GUI at http://192.168.86.1 3.1. The default user name is ‘ admin ‘ 3.2. The default password is ‘ admin ‘ 3.3. Please see Fig-01 below: FIG-01 4. After entering ‘admin’ in both USERNAME and PASSWORD column, please click ‘OK’ or presss ‘Enter’ to log in. OverTek 1 / 14 www.overtek.com.br OT-4020VW GEPON ONU Entry Manual FIG-02 5. Then we are ready to go configure DHCP, STATIC IP, PPPOE, VLAN, VoIP and Wireless. 6. PPPOE Configuration: 6.1. Please go to ‘ INTERNET ‘ ‘ WAN CONFIG ‘ 6.2. Please go to ‘ WAN Connection Name ‘ select ‘New WAN Connection’ 6.3. Please go to ‘ Mode ‘ -> select ‘ Route ‘ 6.4. Please go to ‘Connection Mode’ select ‘IPV4’ 6.5. Please go to ‘PPPOE ‘ and check the box of PPPOE 6.6. Please check the first box reading ‘Pppoe Proxy Or Mixed Pppoe Bridging/routing Mode Disabled’ 6.7. See FIG-03 FIG-03 OverTek 2 / 14 www.overtek.com.br Below: OT-4020VW GEPON ONU Entry Manual 6.8. Please go to ‘User Name ‘ blank and input your PPPOE User name 6.9. Please go to ‘ Password ‘ to enter the password for your PPPOE account 6.10. For the ‘Service Name’ option, you can leave blank if it’s not specified in your PPPOE Server. 6.11. Please go to ‘Dial-up ’ select ‘Automatically Connect’ 6.12. Please go to ‘Service Mode’ and select ‘ VoIP_INTERNET ’ 6.13. Please go to ‘ Binding Port ’ – check all the boxes for Port 1 to Port 4, and Wireless SSID 1 to SSID 4 6.14. Please click ‘ Apply ’ button to save and apply the new PPPOE configuration. 6.15. After these steps are correctly done, your PPPOE session should be connected. 6.16. Please see FIG-04 Below: FIG-04 7. DHCP WAN Configuration 7.1. . Please go to ‘ INTERNET ‘ ‘ WAN CONFIG ‘ 7.2. Please go to ‘ WAN Connection Name ‘ select ‘New WAN Connection’ 7.3. Please go to ‘ Mode ‘ -> select ‘ Route ‘ 7.4. Please go to ‘Connection Mode’ select ‘IPV4’ 7.5. Please go to ‘DHCP ‘ and check the box of DHCP 7.6. Please go to ‘Service Mode’ and select ‘ VoIP_INTERNET ’ 7.7. Please go to ‘ Binding Port ’ – check all the boxes for Port 1 to Port 4, and Wireless SSID 1 to SSID 4 7.8. Please click ‘ Apply ’ button to save and apply the new DHCP WAN configuration. OverTek 3 / 14 www.overtek.com.br OT-4020VW GEPON ONU Entry Manual 7.9. After these steps are correctly done, your DHCP WAN session should be connected. 7.10. Please see FIG-05 below: FIG-05 8. STATIC IP WAN Configuration 8.1. . Please go to ‘ INTERNET ‘ ‘ WAN CONFIG ‘ 8.2. Please go to ‘ WAN Connection Name ‘ select ‘New WAN Connection’ 8.3. Please go to ‘ Mode ‘ -> select ‘ Route ‘ 8.4. Please go to ‘Connection Mode’ select ‘IPV4’ 8.5. Please go to ‘Static ‘ and check the box of Static 8.6. Please enter the Static IP, Subnet Mask, Gateway and DNS information 8.7. Please go to ‘Service Mode’ and select ‘ VoIP_INTERNET ’ 8.8. Please go to ‘ Binding Port ’ – check all the boxes for Port 1 to Port 4, and Wireless SSID 1 to SSID 4 8.9. Please click ‘ Apply ’ button to save and apply the new Static IP WAN configuration. 8.10. After these steps are correctly done, your STATIC IP WAN session should be connected. 8.11. Please see FIG-06 and FIG-07 below: OverTek 4 / 14 www.overtek.com.br OT-4020VW GEPON ONU Entry Manual FIG-06 FIG-07 9. VLAN BRIDGING WAN Configuration. For all DHCP, STATIC IP, PPPOE connection modes, you can configure VLAN IDs as you may wish. Below is the example for you to configure VLAN ID on Bridge mode. 9.1. . Please go to ‘ INTERNET ‘ ‘ WAN CONFIG ‘ 9.2. Please go to ‘ WAN Connection Name ‘ select ‘New WAN Connection’ 9.3. Please go to ‘ Mode ‘ -> select ‘ Bridge’ 9.4. Please go to ‘Connection Mode’ select ‘IPV4’ 9.5. Please go to ‘Enable VLAN ‘ and check the box of it. 9.6. Please enter the IEEE802.1Q VLAN ID. 9.7. Please go to ‘Service Mode’ and select ‘ INTERNET ’ 9.8. Please go to ‘ Binding Port ’ – check all the boxes for Port 1 to Port 4, and Wireless SSID 1 to SSID 4 9.9. Please click ‘ Apply ’ button to save and apply the new Static IP WAN configuration. OverTek 5 / 14 www.overtek.com.br OT-4020VW GEPON ONU Entry Manual 9.10. After these steps are correctly done, your IEEE802.1Q VLAN Bridging WAN session should be connected. 9.11. Please see FIG-08 below: FIG-08 10. VOIP Configuration. 10.1. Please go to ‘APPLICATION’ ‘ VOIP CONFIG ‘ to configure new VoIP parameters. 10.2. Go to ‘Binding Port For VoIP’ and select the right WAN interface for your VoIP configuration. 10.3. Go to ‘ Country’ and select the right country for your VoIP configuration. 10.4. Go to ‘SIP Port’ to configure the right port for your VoIP sessions. 10.5. Check the box for ’Enable Primary SIP Proxy’ and configure the right SIP Server and SIP port. 10.6. Check the box for ‘Enable Primary SIP Registration’ and configure the right SIP Server and SIP port. 10.7. Go to the SIP account column, configuring the right Account NO., Phone Number, Authentication ID and password. 10.8. After done, please click on ‘Apply’ button to save and apply your new VoIP Configuration. Your VoIP session should be connected after this step done. 10.9. Please see below for FIG-09 example: OverTek 6 / 14 www.overtek.com.br OT-4020VW GEPON ONU Entry Manual FIG-09 11. Wireless AP Configuration 11.1. Please go to ‘ INTERNET’ – ‘ WLAN CONFIG ‘ to configure Wireless AP parameters 11.2. Go to ‘Enable WLAN ‘ and check the box for it. 11.3. Go to ‘ SSID ‘ to set the name of your Wireless AP. 11.4. Click on ‘Apply’ button to save and apply your new Wireless AP configurations. 11.5. Click on ‘Advanced’ button to configure your Wireless AP security profiles and authentication methods. 11.6. Go to ‘ Choose SSID ‘ to select the SSID that you want to enable Wireless Security for. 11.7. Go to ‘WiFi Authentication’ to set your Wireless Authentication method. 11.8. Go to ‘WPA Preshared Key ‘ to set the password of your Wireless AP. 11.9. Go to ‘ WPA Encryption’ to set your Wireless Security Encryption method. 11.10. See below for FIG-10, FIG-11 and FIG-12 for the examples: OverTek 7 / 14 www.overtek.com.br OT-4020VW GEPON ONU Entry Manual FIG-10 OverTek 8 / 14 www.overtek.com.br OT-4020VW GEPON ONU Entry Manual OverTek 9 / 14 www.overtek.com.br OT-4020VW GEPON ONU Entry Manual FIG-11 FIG-12 12. AUTO PROVISION Click ‘ INTERNET ‘ – ‘REMOTE MGMT ‘ – ‘AUTO PROVISION ‘ to enable Auto Provision function of your ONU. The Auto Provision function is for remote update configuration and firmware of your OT-4020VW ONU. Enabling this function, you can configure the ONU remotely without human involvement. You can stay in your office updating the configuration for your Subscribers’ device by uploading new configuration files or firmware at Server. The OT-4020VW support auto provisioning through FTP, TFTP or http servers, you only need to update the configuration files and the firmware on your server, then when the Auto Provision condition is met, the ONU will automatically upgrade to the new configuration or new firmware version. As the FTP, TFTP, HTTP servers are cost effective to deploy, the Auto Provision function is specially designed for small/medium ISPs to maintain the devices that are placed at Subscriber’s house. OverTek 10 / 14 www.overtek.com.br OT-4020VW GEPON ONU Entry Manual Current Config Version: Indicate the current version number of the configuration file. You do not need to configure this option as the configuration file versions are updated automatically. Service Name: This is the Auto Provision Server address. You must fill this address in order to enable device know where to get the updated configuration file. User Name: This is the user name for your Auto Provision Server Password: This is the password for your Auto Provision Server Config File Name: This is the configuration file name, it’s named using the MAC address of the ONU. You can leave this blank. Config Encryt Key: The OT-4020VW ONU support AES Encryption. You can encrypt the configuration file with AES and upload it onto the Auto Provision Server. You should fill the Encryption key in the ONU so the ONU can decrypt the configuration file. Protocol Type: You can set Auto Provision server type to FTP, TFTP or HTTP Update Interval Time: This is the Auto provision interval time, the ONU can be set to auto download the configuration file within the interval set in this blank. The minimum time interval is 1 hour, the max time interval can be 1440 hours. Update Mode: Disabled: It means the Auto Provision function is disabled in the ONU; Update After Reboot: Set to ‘Update After Reboot’, the ONU will auto download the configuration file from the server when it’s booting up. Update at time interval: Set to ‘ Update at time interval’, the ONU will auto download the configuration file from the server within the time interval set. Note: ‘Update after reboot ‘ and ‘ Update at time interval ‘ work simultaneously. If you set the Auto Provision mode to ‘ Update at time interval’, the ONU will auto download the configuration file when it’s rebooted. Apply: Click ‘Apply’ button to save and take new settings into effect. 12.1. Configuration Example for Auto Provision A. Click ‘ INTERNET ‘ – ‘REMOTE MGMT ‘ – ‘AUTO PROVISION ‘ to configure the right Auto Provision paramters. After done, click ‘Apply’ to save and activate Auto Provision function. B. Enter into http://192.168.86.1/backupsettings.html , click ‘Backup Setting ‘ button to download the configuration file to your local folder. OverTek 11 / 14 www.overtek.com.br OT-4020VW GEPON ONU Entry Manual C. Go to ‘Status’ – ‘Device Info’ Page to find out the MAC address of OT-4020VW ONU. D. Name the Configuration file in the format ‘mac address +.cfg’. In this example, the MAC address is 001fa491c20e. So the correct configuration file name should be ‘001fa491c20e.cfg’. E. Edit the configuration file using any html file editors, such as Dream Weaver. E.1. To upgrade configuration file, it is mandatory that you add ‘ <<GEPON ONU CONFIG FILE>>Digests:3.123 ‘ into the ‘001fa491c20e.cfg’ configuration file to enable Auto Provisioning work correctly. See below for the example: OverTek 12 / 14 www.overtek.com.br OT-4020VW GEPON ONU Entry Manual E.2. If you want to update both configuration file and firmware, then you should add the following parameters into the configuration file: <<GEPON ONU CONFIG FILE>>Digests:3.123 <<AUTOUPDATE CONFIG MODULE>>Digests:1008 Auto Image Server:ftp.overtek.com.br Auto Image Protocol:2 Auto Image Name:OT4020VW.w In the above parameters, the Auto Image Server should be your own The Auto Image protocol definition: 1 =FTP, 2 = TFTP, 4 = HTTP, you can set your preferred method. The Auto Image name can be any name that you prefer, e.g, ‘ 123.w ‘. Please see below for the example: server address F. After you changed all the configuration parameters you want, upload this configuration file onto your Auto Provision server. G. If you set the ONU ‘Update After Reboot’ in the step A, then when the ONU is rebooted, it will auto download the new configuration file from the Auto Provision Server, then checksum and apply by itself. End of The Quick Start Manual. For the parameters that are not specified in this manual, please find them in the OT-4020VW User Manual OverTek 13 / 14 www.overtek.com.br OT-4020VW GEPON ONU Entry Manual Copyright Notice: No part of this document may be reproduced, transmitted, transcribed, stored in a retrieval system, or translated into any language, in any form or by any means, electronic, mechanical, magnetic, optical, chemical, manual or otherwise without the prior written permission of OverTek. Disclaimer Notice: No license is granted, implied or otherwise, under any patent or patent rights of OverTek. OverTek, makes no warranties, implied or otherwise, in regard to this document and to the products described in this document. The information provided by this document is believed to be accurate and reliable to the publication date of this document. However, OverTek assumes no responsibility for any errors in this document. Furthermore, OverTek, assumes no responsibility for the use or misuse of the information in this document and for any patent infringements that may arise from the use of this document. The information and product specifications within this document are subject to change at any time, without notice and without obligation to notify any person of such change. OverTek www.overtek.com.br OverTek 14 / 14 www.overtek.com.br