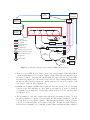
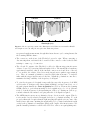
1
McLeod Research Group
University of Colorado
Department of Electrical, Computer,
and Energy Engineering
Scanning Optical Frequency-Domain Reflectometer
System Documentation
Author: Eric D. Moore
Document version 0.1
May 30, 2012
This material is based upon work supported by the National Science Foundation under
Grant # IIP-1059286 to the American Society for Engineering Education.
Contents
1 Introduction
5
2 Hardware
5
2.1
The Agilent 81680A Tunable Laser . . . . . . . . . . . . . . . . . . . . . . . .
5
2.2
The OFDR Fiber Optic Network . . . . . . . . . . . . . . . . . . . . . . . . .
7
2.3
Signal Detection and Acquisition . . . . . . . . . . . . . . . . . . . . . . . . .
10
2.4
The Seruga Seiki Stage System . . . . . . . . . . . . . . . . . . . . . . . . . .
12
2.5
The Control Computer . . . . . . . . . . . . . . . . . . . . . . . . . . . . . . .
12
3 Software
3.1
3.2
13
Usage . . . . . . . . . . . . . . . . . . . . . . . . . . . . . . . . . . . . . . . .
16
3.1.1
System Configuration . . . . . . . . . . . . . . . . . . . . . . . . . . .
16
3.1.2
Performing Swept-Wavelength Measurements . . . . . . . . . . . . . .
18
3.1.3
Displaying OFDR Data . . . . . . . . . . . . . . . . . . . . . . . . . .
19
3.1.4
Peak Selection and Measurements . . . . . . . . . . . . . . . . . . . .
20
3.1.5
Motion Control
. . . . . . . . . . . . . . . . . . . . . . . . . . . . . .
23
3.1.6
Peak Optimization . . . . . . . . . . . . . . . . . . . . . . . . . . . . .
27
3.1.7
Sample Perpendicularization . . . . . . . . . . . . . . . . . . . . . . .
28
3.1.8
Scanning OFDR Measurements . . . . . . . . . . . . . . . . . . . . . .
29
3.1.9
Saving Data . . . . . . . . . . . . . . . . . . . . . . . . . . . . . . . . .
31
3.1.10 Saving and Loading System Configuration . . . . . . . . . . . . . . . .
33
SubVI Listing . . . . . . . . . . . . . . . . . . . . . . . . . . . . . . . . . . . .
34
Agilent Cycle Number.vi . . . . . . . . . . . . . . . . . . . . . . . . . . . . . .
35
Agilent Laser On-Off.vi . . . . . . . . . . . . . . . . . . . . . . . . . . . . . .
36
Agilent Power.vi . . . . . . . . . . . . . . . . . . . . . . . . . . . . . . . . . .
37
Agilent Query Sweep State.vi . . . . . . . . . . . . . . . . . . . . . . . . . . .
38
Agilent Start Wavelength.vi . . . . . . . . . . . . . . . . . . . . . . . . . . . .
39
Agilent Startup Sequence.vi . . . . . . . . . . . . . . . . . . . . . . . . . . . .
40
Agilent Stop Wavelength.vi . . . . . . . . . . . . . . . . . . . . . . . . . . . .
41
1
Agilent Sweep Actions.vi . . . . . . . . . . . . . . . . . . . . . . . . . . . . . .
42
Agilent Sweep Mode.vi . . . . . . . . . . . . . . . . . . . . . . . . . . . . . . .
43
Agilent Sweep Speed.vi . . . . . . . . . . . . . . . . . . . . . . . . . . . . . . .
44
baseband2.vi . . . . . . . . . . . . . . . . . . . . . . . . . . . . . . . . . . . .
45
Buffer Points.vi . . . . . . . . . . . . . . . . . . . . . . . . . . . . . . . . . . .
46
Calculate Tilt.vi . . . . . . . . . . . . . . . . . . . . . . . . . . . . . . . . . .
48
Check Instruments.vi . . . . . . . . . . . . . . . . . . . . . . . . . . . . . . . .
50
Confocal Plot Data.vi . . . . . . . . . . . . . . . . . . . . . . . . . . . . . . .
51
DAQ Config v3.vi . . . . . . . . . . . . . . . . . . . . . . . . . . . . . . . . . .
52
DAQ Read.vi . . . . . . . . . . . . . . . . . . . . . . . . . . . . . . . . . . . .
54
DriveOpticalSwitch.vi . . . . . . . . . . . . . . . . . . . . . . . . . . . . . . .
55
Edit Hardware Parameters.vi . . . . . . . . . . . . . . . . . . . . . . . . . . .
56
Edit Stage Limits.vi . . . . . . . . . . . . . . . . . . . . . . . . . . . . . . . .
57
Enqueue Config States.vi . . . . . . . . . . . . . . . . . . . . . . . . . . . . .
59
Enqueue Tilt Measurement.vi . . . . . . . . . . . . . . . . . . . . . . . . . . .
60
Fourier Interpolation.vi . . . . . . . . . . . . . . . . . . . . . . . . . . . . . .
61
Generate X-Axis.vi . . . . . . . . . . . . . . . . . . . . . . . . . . . . . . . . .
62
Get Channel Assignments.vi . . . . . . . . . . . . . . . . . . . . . . . . . . . .
63
Handle Peak Array.vi . . . . . . . . . . . . . . . . . . . . . . . . . . . . . . . .
64
Load Configuration.vi . . . . . . . . . . . . . . . . . . . . . . . . . . . . . . .
65
Load OFDR Config.vi . . . . . . . . . . . . . . . . . . . . . . . . . . . . . . .
66
Log Manager.vi . . . . . . . . . . . . . . . . . . . . . . . . . . . . . . . . . . .
67
Measurement Options Dialog.vi . . . . . . . . . . . . . . . . . . . . . . . . . .
68
Move SS Stage.vi . . . . . . . . . . . . . . . . . . . . . . . . . . . . . . . . . .
69
OFDR Global.vi . . . . . . . . . . . . . . . . . . . . . . . . . . . . . . . . . .
70
OFDR Plot Data.vi . . . . . . . . . . . . . . . . . . . . . . . . . . . . . . . .
72
Peak Amplitudes2.vi . . . . . . . . . . . . . . . . . . . . . . . . . . . . . . . .
73
Peak Optimizer.vi . . . . . . . . . . . . . . . . . . . . . . . . . . . . . . . . .
75
Precision Ranging2.vi . . . . . . . . . . . . . . . . . . . . . . . . . . . . . . .
76
Queue Manager (Comm).vi . . . . . . . . . . . . . . . . . . . . . . . . . . . .
78
2
Queue Manager (Proc).vi . . . . . . . . . . . . . . . . . . . . . . . . . . . . .
79
Register User.vi . . . . . . . . . . . . . . . . . . . . . . . . . . . . . . . . . . .
80
Resample.vi . . . . . . . . . . . . . . . . . . . . . . . . . . . . . . . . . . . . .
81
Save Configuration.vi . . . . . . . . . . . . . . . . . . . . . . . . . . . . . . . .
83
Save OFDR Config.vi . . . . . . . . . . . . . . . . . . . . . . . . . . . . . . .
84
Save Options Dialog.vi . . . . . . . . . . . . . . . . . . . . . . . . . . . . . . .
85
Save Scan Data Dialog.vi . . . . . . . . . . . . . . . . . . . . . . . . . . . . .
86
Scan Manager.vi . . . . . . . . . . . . . . . . . . . . . . . . . . . . . . . . . .
87
Set Postion Label.vi . . . . . . . . . . . . . . . . . . . . . . . . . . . . . . . .
88
Signal Levels.vi . . . . . . . . . . . . . . . . . . . . . . . . . . . . . . . . . . .
89
Smoothing Filter.vi . . . . . . . . . . . . . . . . . . . . . . . . . . . . . . . . .
90
SS Drive Axis.vi . . . . . . . . . . . . . . . . . . . . . . . . . . . . . . . . . .
91
SS Go To Position.vi . . . . . . . . . . . . . . . . . . . . . . . . . . . . . . . .
92
SS Monitor.vi . . . . . . . . . . . . . . . . . . . . . . . . . . . . . . . . . . . .
93
SS Query Acceleration.vi
. . . . . . . . . . . . . . . . . . . . . . . . . . . . .
94
SS Query Distance.vi . . . . . . . . . . . . . . . . . . . . . . . . . . . . . . . .
95
SS Query Drive Speed.vi . . . . . . . . . . . . . . . . . . . . . . . . . . . . . .
96
SS Query Position.vi . . . . . . . . . . . . . . . . . . . . . . . . . . . . . . . .
97
SS Query Software Limit.vi . . . . . . . . . . . . . . . . . . . . . . . . . . . .
98
SS Query Start Up Speed.vi . . . . . . . . . . . . . . . . . . . . . . . . . . . .
99
SS Query Status.vi . . . . . . . . . . . . . . . . . . . . . . . . . . . . . . . . . 100
SS Select Axis.vi . . . . . . . . . . . . . . . . . . . . . . . . . . . . . . . . . . 101
SS Set Acceleration.vi . . . . . . . . . . . . . . . . . . . . . . . . . . . . . . . 102
SS Set Distance.vi . . . . . . . . . . . . . . . . . . . . . . . . . . . . . . . . . 103
SS Set Drive Speed.vi . . . . . . . . . . . . . . . . . . . . . . . . . . . . . . . 104
SS Set Position Value.vi . . . . . . . . . . . . . . . . . . . . . . . . . . . . . . 105
SS Set Remote Mode.vi . . . . . . . . . . . . . . . . . . . . . . . . . . . . . . 106
SS Set Software Limit.vi . . . . . . . . . . . . . . . . . . . . . . . . . . . . . . 107
SS Set Start Up Speed.vi . . . . . . . . . . . . . . . . . . . . . . . . . . . . . 108
SS Stop.vi . . . . . . . . . . . . . . . . . . . . . . . . . . . . . . . . . . . . . . 109
3
SS Toggle Motor Power.vi . . . . . . . . . . . . . . . . . . . . . . . . . . . . . 110
SS Toggle Software Limits.vi . . . . . . . . . . . . . . . . . . . . . . . . . . . 111
Stage Settings Dialog.vi . . . . . . . . . . . . . . . . . . . . . . . . . . . . . . 112
Sweep Agilent Laser 2.vi . . . . . . . . . . . . . . . . . . . . . . . . . . . . . . 114
Sweep Mgr Q Cleanup.vi . . . . . . . . . . . . . . . . . . . . . . . . . . . . . . 115
Update End WL.vi . . . . . . . . . . . . . . . . . . . . . . . . . . . . . . . . . 116
Update Scan Data.vi . . . . . . . . . . . . . . . . . . . . . . . . . . . . . . . . 117
Wavelength Range.vi . . . . . . . . . . . . . . . . . . . . . . . . . . . . . . . . 119
WL vs Time.vi . . . . . . . . . . . . . . . . . . . . . . . . . . . . . . . . . . . 120
4
1
Introduction
This document is intended to be a user’s guide for the Scanning Optical Frequency Domain Reflectometer (OFDR) located in the McLeod Labs in the Department of Electrical,
Computer, and Energy Engineering at the University of Colorado at Boulder. As such, no
theoretical background on the physics underlying the OFDR is provided here, since that information is available elsewhere1 Rather, this document provides an overview of the hardware
configuration and a guide to the use of the system control software.
2
Hardware
The hardware layout of the Scanning OFDR is illustrated in Fig. 1. The main components
of the system are:
• A tunable laser source (specifically, an Agilent 81680A tunable laser source).
• A fiber optic network, the central feature of which is a fiber interferometer.
• Means for detecting and digitizing the optical signals output by the fiber optic network.
• A set of precision motion stages for positioning and positional scanning of test samples.
• A personal computer running the Scanning OFDR software application for controlling
system hardware and performing data processing tasks.
This section will provide a series of “hardware notes,” roughly organized according to this
bulleted list of subsystems. These notes are meant to record as many “things you should
know” regarding the current hardware configuration for both users of the system and for
system maintenance and modification in the future.
2.1
The Agilent 81680A Tunable Laser
• When the laser is rebooted, it starts in a locked state. The code to unlock the laser is
1234.
• The laser has two optical outputs. Output 1 is a “low noise” output while Output 2 is
the “high power” output. Always use Output 2 for the OFDR.
• The optical outputs on the laser take FC-APC connectors. These connectors have
an angle-polished ferrule and generally have a green boot. Do not plug FC-PC (flat
polished) connectors into the laser!
1
see Eric D. Moore, “Advances in Swept-Wavelength Interferometry for Precision Measurements,” Ph.D.
Dissertation, University of Colorado at Boulder, 2011 and the references therein. In particular, Ch. 2 provides
an introduction to OFDR, Ch. 4 covers precision ranging measurements using OFDR, and Ch. 6 discusses
calibrated reflectivity measurements using scanning OFDR.
5
Seruga Seiki
D120 Motion
Controller
HP
Tower PC
Agilent
81680A
Tunable Laser
DAQ
PC0
“LabSnacks” Enclosure
90
HP
Polarization
Controller
10
In
Aux
HCN
A
B
Out
Trigger
Interferometer
Optical fiber
Harware commands
Clock signals
Digital trigger signal
Data signals
PCI/MXI interface
3dB Coupler (except as noted)
Frequency
Clock
PC2
HCN
HCN Cell
PC1
Aux
Switch
PBS
S
Manual polarization controller
AR coated FC/PC connector
P
OFDR
Interferometer
Photodetector
Probe 1
Stage
Stack 1
Fiber delay line
Probe 2
Stage
Stack 2
Probe 3
Figure 1: A schematic diagram of the Scanning OFDR system hardware.
• There is a green LED labeled “Active” near each optical output. When this light is
off, an internal shutter is closed and no light is output. When disconnecting fiber from
the laser, be sure to deactivate the output using the button directly above the LED.
Reactivate the output once a fiber has been reconnected. The Scanning OFDR software
should generally remotely activate the output when needed, but it is possible to run
into errors because the laser output is off.
• Running the Scanning OFDR software puts the laser into Remote mode. Pressing
buttons on the laser will have no effect until it is returned to local mode, which is
accomplished by pressing the bottom softkey, which is labeled “Local” when the laser
is in Remote mode.
• The polarization of the laser output varies when the wavelength is swept. To keep
the laser polarization constant over wavelength, the HP 8169A polarization controller
is being used as a broadband polarizer. This instrument includes a linear polarizer
followed by a half waveplate and a quarter waveplate. Because the light output by
the laser is not guaranteed to be linearly polarized after traveling through a length of
6
55
50
50
Tuning rate (nm/s)
Tuning rate (nm/s)
55
45
40
35
30
25
0
40
80
120
160
200
45
40
35
30
25
220.0
240
Time (ms)
221.0
222.0
223.0
224.0
225.0
Time (ms)
Figure 2: Measured tuning rate for the Agilent 81680A tunable laser for a wavelength scan
from 1520 nm to 1530 nm (left) and a 5 ms portion of the same scan showing the fine structure
of the tuning rate variations (right). The nominal wavelength tuning rate setting was 40 nm/s.
single mode fiber, a manual polarization controller (PC0) is included inline between the
laser and the HP 8169A. This manual polarization controller and the orientation of the
polarizer in the HP 8169A should be adjusted to maximize the optical power output
through the HP 8169A.
• The laser has three possible tuning rate settings for wavelength sweeps: 0.5 nm/s, 5
nm/s, and 40 nm/s. The Scanning OFDR software always uses the 40 nm/s setting
because faster wavelength sweeps allow less environmental noise to couple into the
measurement. This tuning rate setting is a nominal value. The actual tuning rate
varies rapidly during a sweep. See Fig. 2 for plots of the measured tuning rate for a
representative sweep.
2.2
The OFDR Fiber Optic Network
• The network is constructed using Corning SMF28 fiber. Use this or an equivalent fiber
for any modifications.
• Fiber networks consists of three branches that are broken out by the fiber subsystem
housed in the red Thorlabs box. One branch is the main OFDR interferometer. A second branch contain a H13 CN gas cell, which is a NIST-traceable wavelength reference
over the range of 1525–1565 nm. The third branch is a fiber Mach-Zehnder interferometer, often called the trigger interferometer, which provides a frequency clock signal for
triggering data acquisition tasks.
• The gas cell is a dBm Optics model WA-1528- 1562 100 Torr H13 CN wavelength reference. Its absorption spectrum is shown in Fig. 3. Table 1 lists the wavelengths of
the absorption lines. The primary function of the gas cell is for calibrating the relative delay between paths in fiber interferometers. In particular, the OFDR relies on
accurate calibration of the trigger interferometer delay (often referred to as simply the
trigger delay). The gas cell may also be used for improving the wavelength accuracy of
7
Transmission (a.u.)
R Branch
P Branch
0 1
20
20
7
8
1530
1535
1540
1545
1550
Wavelength (nm)
1555
1560
Figure 3: The absorption spectrum of the dBm Optics model WA-1528- 1562 100Torr H13CN
wavelength reference showing the absorption line numbering scheme.
swept-wavelength measurements, though this feature has not yet been implemented in
the Scanning OFDR software.
• The connectors on the front of the Thorlabs box tend to spin. When connecting or
disconnecting them, reach inside the box and hold the connector on the back side while
twisting to ensure a good connection.
• The ‘A’ and ‘B’ outputs of the Thorlabs box allow for different trigger interferometer
delays to be used by connecting different lengths of fiber. The internal fiber lengths are
approximately matched; that is, if the internal connectors at A and B are connected
to one another, the relative delay between the interferometer paths is approximately
zero. There is a manual polarization controller (PC2) that is meant to be included
inline with the trigger interferometer delay line. Adjust the polarization controller to
maximize the fringe visibility of the frequency clock signal.
• To view the frequency clock signal, temporarily disconnect the frequency clock BNC
cable from the clock input on the data acquisition (DAQ) board and connect it to one of
the analog input channels (see Data Acquisition notes below. Then use the Scanning
OFDR software to perform an internally clocked acquisition (see Sec. 3.1.2). Alternatively, look at the frequency clock signal using an oscilloscope. If using an oscilloscope,
remember that the laser must be sweeping when the clock signal is acquired.
• The OFDR interferometer uses polarization diverse detection at the output. This detection method avoids reduction in signal levels due to polarization fading. To work
properly, this method requires that the light traveling through the reference arm of the
interferometer (the arm containing the switch in Fig. 1) be polarized such that it is split
evenly by the polarization beam splitter (PBS) at the output of the interferometer. Adjust the manual polarization controller labeled PC1 to achieve an equal splitting ratio.
8
Table 1: Absorption line wavelengths for the dBm Optics model WA-1528-1562 100 Torr
H13 CN wavelength reference. Accuracy is ±0.3 pm except for wavelengths marked with an
asterisk (*), which are known to ±0.6 pm.
Line no.
R Branch
Wavelength (nm)
25
24
23
22
21
20
19
18
17
16
15
14
13
12
11
10
9
8
7
6
5
4
3
2
1
0
1528.0541
1528.4862*
1528.9271
1529.3762
1529.8376*
1530.3061
1530.7856
1531.2764*
1531.7738
1532.2825
1532.8024*
1533.3291
1533.8671
1534.4159*
1534.9723
1535.5401*
1536.1170*
1536.7034*
1537.2997*
1537.9069
1538.5224*
1539.1494
1539.7855
1540.4314
1541.0872
1541.7529
Line no.
1
2
3
4
5
6
7
8
9
10
11
12
13
14
15
16
17
18
19
20
21
22
23
24
25
9
P Branch
Wavelength (nm)
1543.1148*
1543.8094
1544.5147
1545.2314*
1545.9563*
1546.6902
1547.4354
1548.1904
1548.9554*
1549.7302*
1550.5149*
1551.3106
1552.1157
1552.9308
1553.7560
1554.5892*
1555.4346*
1556.2919
1557.1573
1558.0329
1558.9185
1559.8143
1560.7185*
1561.6344*
1562.5625
Figure 4: Diagram and drive signal configuration for the E-Tek fiber optic switch.
This can be done by observing the S and P channel outputs directly using a scope, or
by using the S Mean and P Mean indicators in the Scanning OFDR Software (see
Sec. 3.1.2). Remove any strong reflectors from the test arm of the interferometer during
this process.
• The E-Tek fiber optic switch in the reference arm allows the reference arm to be opened,
partially mitigating coherent effects when performing confocal scans. The switch is
driven by a 5V pulse on the ctr0 and ctr1 outputs of the PCI-6115 DAQ board. The
pinout for the switch is shown in Fig. 4. The switch is not mounted in a PCB, so the
physical connection to the switch is made via test clips. The switch pins are fragile
and the switch is expensive to replace, so the switch pins are run through a header
(Digi-Key part number A100205-ND).
• The OFDR interferometer uses a three-coupler geometry with a transmissive reference
arm and a reflective test arm. Currently the test arm has three probe paths, each
with a different delay allowing their contributions to be separated from one another
in the OFDR time domain data sets. Two probes have antireflection-coated FC-PC
connectors at their output. The third is a bare fiber that may be spliced to a device
under test.
2.3
Signal Detection and Acquisition
• The optical signals on the S, P, Aux, and Frequency Clock channels are currently detected using Thorlabs PDA10CS amplified photodetectors. The HCN signal is detected
using an older, roughly equivalent model. These detectors have adjustable gain, and
their bandwidth varies inversely with the gain setting. The gain settings and associated
bandwidths are summarized in Table 2
• Two different DAQ boards are available for use: a PCI-6115 and a PXIe-4492, both
manufactured by National Instruments. The PCI-6115 resides inside the HP worksta10
Table 2: Gain settings and bandwidths for the Thorlabs PDA10CS Photodetectors.
Gain Setting (dB)
Bandwidth (MHz)
0
10
20
30
40
50
60
70
17
8.5
1.9
0.775
0.320
0.090
0.033
0.012
Table 3: Comparison of the PCI-6115 and PXIe-4492 DAQ boards.
Feature
PCI-6115
PXIe-4492
ADC resolution
Maximum sampling rate
Input voltage range
Number of analog inputs
Number of gain settings
Number of counters
Number of digital I/O lines
Supports external clock
Supports OFDR fiber optic switch control
Supports confocal scanning
12 bits
10 MS/s
±42 V
4
8
2
8
Yes
Yes
Yes
24 bits
204.8 kS/s
±10 V
8
2
0
0
No
No
No
tion and is accessed by the BNC-2110 connector block. The PXIe-4492 resides in the
PXIe-1073 chassis. Only the PCI-6115 supports all of the features of the Scanning
OFDR software, and this DAQ board must always remain connected and functional.
The PXIe-4492 enables higher-precision ranging measurements because it uses a 24bit analog-to-digital converter (ADC), whereas the PCI-6115 uses a 12-bit ADC. The
PXIe-4492 has other significant limitations, however, and does not support all of the
system features of the Scanning OFDR software application. The most important limitations to note are that the PXIe-4492 does not support use of an external clock and
its maximum sampling rate is a factor of 50 smaller than that of the PCI-6115. Table 3
summarizes the relevant differences between the two DAQ boards.
• Both DAQ boards receive a start trigger signal from the laser (the “Trigger Out”
connector on the back of the Agilent 81680A). The current hardware configuration has
this trigger signal wired to pin PFI6 on the PCI-6115 DAQ board, though it can be
wired to any available PFI pin2 . The PXIe-4492 must receive the start trigger signal on
pin PFI0 because it is the only pin on the board other than the analog input channels.
The name of pin where the start trigger signal is applied is stored in the Scanning
2
PFI0 on the PCI-6115 is the external analog clock pin, so it is not available for the start trigger signal.
11
OFDR software under the global variable Start Trig Pin.
2.4
The Seruga Seiki Stage System
• The minimum incremental linear motion for the Seruga Seiki stages is approximately
40 nm. This unit is referred to as one “tick”. The settings and positions of the linear
stages are all communicated through the Seruga Seiki D120 motion controller in units
of ticks.
• The minimum incremental rotational motion for the Seruga Seiki stages is approximately 1.6 millidegrees. This unit is also referred to as a tick in the context of rotational
motion.
• Communication with the Seruga Seiki D120 motion controller takes place via GPIB,
but the D120 does not respond to the standard *IDN? query. See the D120 Series
Stepping Motor Controller Instruction Manual for a complete listing of accepted GPIB
commands.
• For confocal scanning with the Scanning OFDR, data is acquired as a function of stage
position. This is accomplished using either the “CW pulse signal” or the “CCW pulse
signal” as an external clock for triggering data acquisition during motion. These signals
are accessed from the Monitor Output on the back of the D120 controller. The connector
for the Monitor Output is apparently obsolete, and the closest Digi-Key part number is
not compatible3 As a result, there is a custom connector made from a modified DX40M20P connector that interfaces to the Monitor Output. This connection isn’t as secure
as it should be, so exercise care to make sure the connection is maintained.
• When the D120 applies power to the stage axes, the knobs on the stage stack become
locked. Axis power must be turned off before the knobs can be turned. It is best
to avoid turning the knobs, and instead drive the stages using the Scanning OFDR
software (see Stage Software Limits in Sec. 3.1.5). Alternatively, use the “Handy
Terminal” connected to the D120 controller to drive the stages.
• See the D120 Series Stepping Motor Controller Instruction Manual for instructions on
how to use the Handy Terminal and for further information about the Seruga Seiki
stages.
2.5
The Control Computer
This computer is currently an HP xw4600 workstation with an Intel Core2 Duo E8400 3.00
GHz CPU and 6.0 GB of RAM. Presumably this computer will be replaced with an upgraded
model at some point. A full-length PCI slot is required to accommodate the PCI-6115 DAQ
board. The MXI interface to the PXIe-1073 chassis requires a PCI Express x1 slot. The
Scanning OFDR software is written in the 64-bit version of LabVIEW 2011.
3
The mating connector type is specified as DX40-20P in the D120 Series Stepping Motor Controller Instruction Manual, and Digi-Key carries a DX40M-20P, which doesn’t quite fit.
12
Figure 5: The graphical user interface for the Scanning OFDR system software.
3
Software
The Scanning OFDR system software is written in National Instruments LabVIEW 2011. As
of this writing, the most recent version of main user interface and source code framework is
found in the file Scanning OFDR 2.2.vi. This software application provides all user interface,
hardware control, and data processing functions to perform a variety of measurement tasks.
A screen capture of the main user interface is shown in Fig. 5. A listing of the controls found
on the front panel of the user interface appears in Table 4.
Table 4: Alphabetical list of user interface controls for the Scanning OFDR software, with
descriptions.
LVClass
Name
Description
Digital
#Sweeps
Enum
Active Axis
Specifies the currently active Seruga Seiki stage axis.
Enum
Active Stack
Specifies the currently active Seruga Seiki stage stack.
Specifies the number of wavelength sweeps to be performed when the Sweep button is pressed or at each
location of a scan.
13
Table 4: User interface control descriptions, continued.
LVClass
Name
Description
Boolean
Autosave Raw
Data
Toggle saving of raw OFDR data during scanning. When
turned on, a dialog window prompts the user to specify a
data directory and file name prefix for saved data. Caution: saving raw data can produce extremely large
amounts of data. Be aware of available disk space, and
save a single raw data file before beginning to determine
wheter or not the available disk space will be adequate.
Digital
Aux Mean
Indicates the mean raw data value on the Aux channel.
Boolean
Averaging
Toggle averaging of wavelength sweep data on and off.
*Not yet implemented.*
Enum
Averaging Domain
Specifies whether averaging of multiple wavelength sweeps
should be performed in the time domain or the frequency
domain. *Not yet implemented*
Digital
Clock Freq (Hz)
Specifies the clock frequency when the Internal option
is selected for Clock Source. For the PCI-6115 DAQ
board, the maximum clock frequency is 10 MHz. For the
PXIe-4492 DAQ board, the maximum clock frequency is
204.8 kHz.
Enum
Clock Source
Specifies the clock source for data acquisition during
wavelength sweeps. Internal uses the internal clock on
board the data acquisition board. External uses the analog signal applied to PFI0 on the data acquisition board.
Under normal usage, this signal should be signal output
by the trigger interferometer in the OFDR optical network. The PXIe-4492 DAQ board does not support external clocking, so the Internal option must be used with
this board. The PCI-6115 DAQ board supports both internal and external clocking.
Boolean
Continuous
Digital
Data Buffer Size
This indicator displays the number of data points to be
acquired for a wavelength sweep based on current sweep
parameter settings.
Array
Drive Speed
OFDRConfig: This is an OFDR configuration parameter
stored in configuration files.
Digital
Endpoints
The number of data points neglected at each end of the
filtered data set when performing curve fitting during precision ranging data processing. Should be changed by
selecting System→Measurement Options.
Digital
EndWLnum
Specifies the end wavelength for wavelength sweeps.
Ring
EndWLring
Specifies the end wavelength for wavelength sweeps.
Boolean
EXIT
Enables or disables continuous wavelength sweeping.
Exit the Scaning OFDR software application
14
Table 4: User interface control descriptions, continued.
LVClass
Name
Description
String
Filename Root
Filename root for saving raw OFDR data during scanning
Digital
Filter Size
(Pts)
The number of data points used for precision ranging data processing. Should be changed by selecting
System→Measurement Options.
XYGraph
Graph Main
Digital
Laser Power (mW)
Digital
P Mean
Indicates the mean raw data value on the P channel.
During ordinary operation, polarization controller PC1
should be adjusted so that S Mean and P Mean are
equal.
Digital
Peak Area Pts
The number of data points used for calculating peak
amplitude values.
Should be changed by selecting
System→Measurement Options.
Array
Peak Array
the Peak Selection and Measurements array, this array is used to specify peaks used for measurements and
to display measurements associated with those peaks.
Enum
Plot Selection
Specifies the quantity to be displayed in the main plot
area. Note this parameter is not stored in configuration
files. The reason is because its allowable values depend on
what type of measurement was most recently performed
(wavelength sweep or confocal scan) and loading a configuration file does not affect the raw data in memory.
Array
Position
Indicates the current position for each axis of the Seruga
Seiki stage stack specified by Active Stack. Positions
are in terms of “ticks” where 1 tick is approximately equal
to 40 nm.
Boolean
Recalculate
Recalculate the amplitude and precision ranging measurement values in the Peak Selection and Measurements
array. Perform this recalculation after modifying peak locations within the array.
Digital
S Mean
Indicates the mean raw data value on the S channel.
During ordinary operation, polarization controller PC1
should be adjusted so that S Mean and P Mean are
equal.
Boolean
ShiftLimits
Indicates whether or not the software limits of the active stage axis should be shifted when the zero location
is changed. This control is disabled; toggle this option
using the menu option System→Shift Limits with Zero.
Digital
Start Wavelength
Specifies the starting wavelength for wavelength sweeps.
Main plot area for displaying measurement results.
Specifies the laser output power.
15
Table 4: User interface control descriptions, continued.
LVClass
Name
Array
Step
Indicates and specifies the current step sizes for each axis
of the Seruga Seiki stage stack specified by Active Stack.
Units are ”ticks” where 1 tick is approximately equal to
40 nm.
TabControl
SupPlotsTab
Supplemental Plots Tab. Allows the user to display the
various supplemental plots or the Status Log. Add additional pages to this tab control for custom data processing.
Boolean
Sweep
Initiates a laser wavelength sweep and data acquisition.
Digital
Sweep Buffer
(nm)
Sweep buffer for HCN wavelength calibration (not yet implemented).
Boolean
Update Cursor
List
Click to update the cursor lists in the Peak Selection
and Measurements array to match the cursor legend
for the main graph.
Boolean
Use 2^n
Indicates whether or not to contrain data set sizes to be
a power of two. This control is disabled; toggle this feature using the menu option System→Use 2ˆn Point Scan
Range.
String
User
Displays the user logged in to the system. To change the
user, select File→Change User.
Enum
Window
Specifies the window function to be applied to raw frequency domain data prior to applying the Fourier transform when calculating OFDR time domain data.
3.1
3.1.1
Description
Usage
System Configuration
Upon starting the Scanning OFDR system software, a dialog box will request registration of
your user name. Users who have registered with the system previously will find their names
in the drop-down list. If your name is not in the list, type your name and click OK.
Before performing measurements, make sure that the current hardware state is accurately
represented in the software settings. To edit hardware parameters, select System→System
Parameters. This brings up the Edit Hardware Parameters dialog window, shown in Fig. 6.
For most general usage scenarios these parameters will not change. If values do not correctly
reflect the current harware configuration, however, the system will not function.
DAQ Board Two data acquisition boards are currently available: the PCI-6115, which
16
Figure 6: The Edit Hardware Parameters dialog window.
resides inside the HP workstation and is accessed by the BNC-2110 connector block,
and the PXIe-4492, which resides in the PXIe-1073 chassis. Generally, the PCI-6115
should be used. The PXIe-4492 does not support all system features.
Laser GPIB Address This value should be 19, unless changed on the Agilent 8164A mainframe.
Stage GPIB Address This value should be 7, unless changed on the Seruga Seiki D120
motion controller.
Trigger Delay (ns) This value is the relative delay between the two arms of the trigger
interferometer in the OFDR optical network. If the current trigger interferometer delay
is not known, measure the delay using Calibrate Interferometer v2.vi.
Trigger Hysteresis (V) This is the hysteresis value when using an external analog clock
signal for data acquisition. A rule of thumb is that the hysteresis level should be about
one quarter to one half of the amplitude of the analog clock signal. See “Level Triggering
with Hysteresis” on page 13-5 of the National Instruments DAQ S Series User Manual
for mor information.
Channel Assignment This lists the available analog input channels for the selected DAQ
Board.
17
Signal Name Assigns device-independent signal names to the various analog input channels.
Data processing functions in the Scanning OFDR software look for signals named S, P,
HCN, and Aux. Signal names must be unique for each analog input channel.
Input Coupling Selects AC or DC coupling for each analog input channel. In general, all
channels should be DC coupled. The S and P channels may be AC coupled to increase
the signal-to-noise ratio for small amplitude reflectors, but this approach must be used
with caution, especially with regard to balancing the polarization-diverse detection
channels.
High Limit (V) Set the highest expected voltage to be measured on each analog input
channel. Note this level is used to select an available gain setting on the selected DAQ
Board and is not a firm fixed limit.
Low Limit (V) Set the lowest expected voltage to be measured on each analog input channel. Note this level is used to select an available gain setting on the selected DAQ
Board and is not a firm fixed limit.
Once all parameters have been set, click OK to accept the changes and close the dialog
window, or click Cancel to discard all changes. Note if the PXIe-4492 DAQ board is selected,
there are eight analog input channels, but only four are displayed at a time. Use the scroll
bar to display the rest.
3.1.2
Performing Swept-Wavelength Measurements
A swept-wavelength measurement consists of sweeping the wavelength of the Agilent 81680A
laser source, digitizing and acquiring the output signals from OFDR system fiber optic network, and optionally performing data processing tasks on the resulting data. The controls
for performing basic swept-wavelength measurements are located in the upper left corner of
the user interface in the area labeled Swept Wavelength Acquisition. To perform a basic
swept-wavelength measurement, use the following procedure:
1. Set the Start Wavelength and End Wavelength for the sweep. The available wavelength range for the Agilent 81680A tunable laser is 1460 to 1580 nm.
2. Set the Laser Power. Typical values for the laser power are 3 to 4 mW. Note that
when changing the laser power, be sure to ensure that the resulting raw data does not
saturate any of the analog input channels are the DAQ board. Changing the laser
power may also require a change in the Trigger Hysteresis.
3. Choose a Clock Source. Choices are External or Internal. Internal uses the clock
internal to the DAQ board. External uses the external clock signal supplied by the
Trigger Interferometer on PFI0 of the PCI-6115 DAQ board. Use of the External clock
option with the PXIe-4492 DAQ board will result in an error because the PXIe-4492
DAQ board does not support external clocking.
18
4. If Clock Source is set to Internal, then set the desired Clock Freq (Hz). When
using the PCI-6115 DAQ board, the maximum clock frequency is 10 MHz. When using
the PXIe-4492, the maximum clock frequency is 204.8 kHz. If Clock Source is set to
External, the value of Clock Freq (Hz) is ignored.
5. Select the desired Number of Sweeps. This is the number of consecutive wavelength
sweeps that will be performed when the Sweep button is clicked.
6. Click the Sweep button to perform the wavelength sweep and acquire data.
7. After sweeping, note the values of the S Mean and P Mean indicators. These values
should be approximately equal (within 5%). If this is not the case, adjust the polarization controller PC1 while performing additional sweeps to equalize these values. This
process ensures that the polarization-diverse detection channels are balanced.4
Continuous Sweeping To continuously sweep and acquire data, click the Continuous
checkbox. When the Continuous checkbox is checked, the Sweep button will remain depressed after clicking and the laser will continuously sweep and acquire data To stop continuous sweeping, click the the Sweep button again (it’s label changes to Sweeping while data
acquisition is in progress) or uncheck the Continuous checkbox.
3.1.3
Displaying OFDR Data
Once data has been acquired, it will be automatically displayed in the main graph area of
user interface. The type of data displayed in graph depends on the value of Plot Selection,
located directly above the graph. After data has been acquired, change Plot Selection to
view the data processed in different ways. The options for Plot Selection are
Raw Data This option displays the raw, unprocessed data that is currently in memory. There
will be one curve for each analog input channel (4 for the acquisitions made using the
PCI-6115 DAQ board, and 8 for acquisitions with the PXIe-4492). The vertical axis
is in units of volts, while the horizontal axis depends on the Clock Source used for
the acquisition. Internal clock acquisitions are displayed as a function of time, while
external clock acquisitions are displayed as a function of wavelength.
Fourier Transform (Raw) This option displays the discrete Fourier transform of the raw
data currently in memory. There will be one curve for each analog input channel.
Internal clock acquisitions are displayed as a function of frequency, while external clock
acquisitions are displayed as a function of time, or delay.
4
Strictly speaking, only the reference arm contribution to the S and P signals should be balanced. For
weak reflectors (4% or less) it is acceptable to balance the signals in the presence of a test arm contribution.
For strong reflectors, however, this is not the case. Therefore, if there is a strong reflector in the test arm,
remove it (or pinch off the fiber if you know how to do this without breaking it) when balancing the S and P
signals.
19
Figure 7: The Peak Selection and Measurements array.
OFDR Time Domain This options combines applies a window function specified by Window to the data acquired on the S and P channels prior to discrete Fourier transformation. The two signal are then combined in quadrature to produce the data shown in
the main graph.
Confocal This option display confocal scan data. It is not available for wavelength sweep
data, and is grayed out when wavelength sweep data is in memory.
Group Delay This option is not yet implemented.
Windows Applying a window function to the raw data before Fourier transformation can
aid in visualizing and interpreting OFDR data. When no window is applied, spectral leakage
can cause broad “shoulders” on reflection peaks. Application of a Hanning window reduces
the effects of spectral leakage and can aid in resolving small reflection peaks. A flat-top
window improves the scan-to-scan stability of peak amplitude measurements at the expense
of resolution.
3.1.4
Peak Selection and Measurements
Once an OFDR measurement has been performed, reflection peaks may be analyzed to precisely determine the amplitude of the reflector as well as the position of the reflector. To
perform these analyses, peaks must be specified by the user so that the software is able to
locate the desired peaks within the OFDR time domain data set. Peak specification is accomplished using the Peak Selection and Measurements array, shown in Fig. 7. Each element
of the Peak Selection and Measurements array is a cluster of controls that may be associated
with a single reflection peak. The elements of each Peak Selection and Measurements cluster
are:
Peak # The peak number used to refer to the peak. This value is always equal to the
element number within the array.
20
Location The location of the peak within the OFDR time domain data set in nanoseconds.
Cursor List A list of the available cursors in the Main Graph. When cursors are added,
removed, or changed in the Main Graph, the Cursor List must be manually updated
by clicking Refresh Cursor List.
Colorbox The color of the cursor currently selected in Cursor List.
Pickup Sets Location to the time axis value of the Main Graph cursor currently selected
in Cursor List.
Lock Locks Location to the time axis value of the Main Graph cursor currently selected
in Cursor List. When Lock is on, Location will automatically update when the
position of the selected cursor is changed.
Amplitude Indicates the measured amplitude of the peak.
Amplitude Mean Indicates the mean of recent amplitude measurements of the peak. The
recent measurement values used to calculate the mean value are the values present in
the Amplitude Chart.
Amplitude Std. Dev. Indicates the standard deviation of the recent amplitude measurements of the peak stored in the Amplitude Chart.
Ref. Peak The reference peak used for the precision ranging calculation to precisely determine the range to the peak. This control is a drop-down list containing all currently
configured peaks in the Peak Selection and Measurements array. If “None” is selected,
the range is calculated relative to the reference arm of the OFDR interferometer. If a
reference peak is selected, the range is calculated relative to the reference peak.
Range (ps) The range to the reflection peak calculated using the precision ranging algorithm. Strictly speaking, this is the optical path delay to the peak in picoseconds.
Range Mean Indicates the mean of recent range measurements for the peak. The recent
measurement values used to calculate the mean value are the values present in the
Range Chart.
Range Std. Dev. Indicates the standard deviation of the recent range measurements for
the peak stored in the Range Chart.
X Removes the peak from the Peak Selection and Measurements array.
Performing Measurements Each time an externally clocked OFDR measurement is performed, the range measurements in the Peak Selection and Measurements array are updated
based on the newly acquired data. The amplitude measurements are also updated if Plot
Selection is set to OFDR Time Domain. This is because the precision ranging calculation
uses the raw measurement data as a starting point, while the amplitude calculation uses the
OFDR time domain data, including application of the window function specified by Window. This data is only produced when Plot Selection is set to OFDR Time Domain. If
21
wavelength sweep data is acquired with Clock Source set to Internal, then range data is not
updated since the precision ranging calculation relies on data sampled at equal increments
of optical frequency. The amplitude measurement does not have this requirement, however,
so amplitude measurement values will update for new internally clocked data.
If the Peak Selection and Measurements array has been modified since the last wavelength
sweep, the measurement values may be updated without acquiring new data by clicking the
Recalculate button.
Measurement Charts and the Selected Peaks graph Additional information about
the peaks specified in the Peak Selection and Measurements array and the associated peak
measurements can be found in the upper right of the main user interface in the Supplemental Information Display area. Three of the options found in the Supplemental Information
Display selector are relevant to peak selection and measurements. The other options are
described elsewhere in this document. The options relevant here are:
Selected Peaks Both the amplitude and precision ranging calculations begin by selecting a
number of data points surrounding the specified peak locations. This plot shows the selected data points for each calculation. This plot is useful, for example, for ensuring the
set of points used for amplitude measurements is centered on the peak, or to see whether
or not the precision ranging filter window includes neighboring peaks (which should be
avoided). The Plot: selector provides the following choices: Amplitude Measurements,
Precision Ranging, and Precision Ranging:Phase. The first two options show the time
domain data subsets used for the amplitude and precision ranging calculations, respectively. The third option displays the frequency domain phase of the precision ranging
data subset. Within the plot window, there will be one curve for each peak configured
in the Peak Selection and Measurements array. The visibility of each curve may be
toggled using the checkbox next to the plot name in the plot legend.
Amplitude Chart Each time an amplitude measurement is performed, the resulting values
are added to this chart. The horizontal axis is measurement number, and the vertical axis is amplitude measurement value. There will be one curve for for each peak
configured in the Peak Selection and Measurements array. The visibility of each curve
may be toggled using the checkbox next to the plot name in the plot legend. Whether
visible or not, the data points stored in this chart are used to determine the amplitude
mean and standard deviation values reported in the Peak Selection and Measurements
array for each peak. Remove all stored data by clicking Clear Chart.
Range Chart Each time a precision ranging measurement is performed, the resulting values
are added to this chart. The horizontal axis is measurement number, and the vertical
axis is range in picoseconds. There will be one curve for for each peak configured
in the Peak Selection and Measurements array. Toggle visibility of each curve as in
the Amplitude Chart using the checkbox next to the plot name in the plot legend.
Whether visible or not, the data points stored in this chart are used to determine
the range mean and standard deviation values reported in the Peak Selection and
Measurements array for each peak. Remove all stored data by clicking Clear Chart.
22
The Use Cursor Colors checkbox is present when any of these three options is selected.
It provides an easy way to color code peaks among the Main Graph, the Peak Selection and
Measurements array, and supplemental graphs and charts by setting the supplemental plot
colors to match the associated Colorbox value in the Peak Selection and Measurements
array, which in turn matches the color of a cursor in the Main Graph, which may be used to
specify the peak location. Turning Use Cursor Colors off allows the user to freely set the
plot colors in graphs and charts.
3.1.5
Motion Control
The Scanning OFDR software provides direct control over the Seruga Seiki stages via GPIB
communication. The most commonly used stage settings are located to the right of the Peak
Selection and Measurements array in the Seruga Seiki Stage Settings area. This area includes
the following controls and indicators:
Active Stack Selects the active Seruga Seiki stage stack. Each stack comprises six axes of
motion. The physical stage stacks are labeled 1 and 2.
Active Axis Selects the active stage axis. Each stack has the following axes, which are
labeled on the hardware: X, Y, Z, θX , θY , and θZ .
Step This is an array of six step distances, with one entry for each axis of the active stage
stack. Distances are in units of stage “ticks”, where one tick is approximately equal to
40 nm. Valid step sizes are in the range 0–8,000,000.
Position This is an array of six current positions, with one entry for each axis of the active
stage stack. Positions are also in units of ticks. This array is an indicator only, and
cannot be used to set the axis positions (see Driving the Stages below).
Each axis has three other settings that determine how each motion request is executed.
These settings are less commonly changed, and are modified by selecting the menu option
System→Stage Settings. This brings up the Seruga Seiki Stage Settings dialog window, shown
in Fig. 8. This dialog window has the following controls:
Active Stack Has the same function as Active Stack in the Seruga Seiki Stage Settings
area of the main user interface.
Startup Speed This is an array of six current startup speed values, with one entry for each
axis of the active stage stack. The startup speed for an axis is the speed at which
motion begins, in units of ticks/s. Valid startup speed values are in the range 10–9999.
Acceleration This is an array of six acceleration values, with one entry for each axis of
the active stage stack. The acceleration setting for an axis is the rate at which motion
accelerates, beginning at Startup Speed and accelerating to Drive Speed, in units
of ticks/s2 . Valid acceleration values are in the range 0–9999.
23
Figure 8: The Seruga Seiki Stage Settings dialog window.
Drive Speed This is an array of six drive speed values, with one entry for each axis of the
active stage stack. the drive speed for an axis is the speed in units of ticks/s at which
motion takes place following a period of acceleration. Valid drive speed values are in
the range 1–999,999.
Step A duplicate of the Step array in the Seruga Seiki Stage Settings area of the main user
interface.
Driving the Stages The title bar of the lower right region of the user interface is a dropdown menu where one of the options is Motion Control. Under this heading are the controls
to remotely drive the Seruga Seiki stages. This set of controls is shown in Fig. 9.
Drive Axis These three buttons provide manual control over stage motion. The left arrow ( ) initiates counterclockwise, or negative direction motion. The right arrow
( )likewise initiates clockwise, or positive direction motion. Clicking either arrow
moves the selected Active Axis on the Active Stack a distance specified by the corresponding entry in the Step array. The change in axis position will be updated in real
time in the Position array. The Stop button ( ) halts any stage motion currently in
progress.
Zero These buttons provide two different ways to zero the position of the selected Active
Axis. Clicking the Go button moves the Active Axis to the position 0. Clicking Set
changes the label of the current Active Axis position to 0. Note that Set does not
move the stage.
24
Figure 9: The Motion Control control group.
Confocal Scanning Stage motion may be optionally accompanied by data acquisition to
enable confocal scanning. Generally confocal scanning is associated with motion along the
Z axis, but the software allows for data acquisition during motion of any axis. Controls
associated with confocal scanning are also located in the Motion Control area of the main
user interface.
Confocal Toggles confocal data acquisition on and off. When off, no data acquisition occurs
during stage motion. When on, data is acquired using the stage motion pulse signal as
the acquisition clock so that one data point is acquired on each analog input channel
for each tick that the stage axis moves.
Smoothing Toggles application of a digital smoothing filter to confocal scan data. Because
the OFDR system is a coherent system, confocal scan data often displays oscillatory
character as a function of position due to interference effects. These oscillations can
make it difficult to locate confocal reflection peaks. The oscillations can often be removed in postprocessing through the application of a digital low-pass filter. The filter
is a dual-sided amplitude-only filter with a flat passband and Gaussian roll-off.
Smoothing Filter Cutoff The width of the flat passband of the smoothing filter in units
of ticks−1 .
Smoothing Filter Rolloff The 1/e width of the Gaussian rolloff of the smoothing filter in
units of ticks−1 .
Stage Software Limits Software limits may be applied to the Seruga Seiki stage axes
so that axis motion does not go beyond user-configured positions. To configure the stage
software limits, select the menu option System→Stage Limits. This brings up the SS Stage
Limits dialog window, shown in Fig. 10. The upper left portion of this dialog window houses
the following controls:
Stack Selects the active stage stack.
25
Figure 10: The SS Stage Software Limits dialog window.
Axis Selects the active stage axis.
Software Limits Enabled Enables or disables software limits for the selected axis.
The upper right portion of the dialog window contains three indicators and a button control:
Current Position The current position of the active stage axis.
High Limit The current high software limit setting for the active stage axis.
Low Limit The current low software limit setting for the active stage axis.
Update Updates the above three indicators.
The central region of the dialog window contains the controls for setting new software limit
values:
New Limit Position The position value to use for the new software limit.
Use Current Position When checked, New Limit Position is set to the current position
of the active axis. If New Limit Position is changed to a different value, Use
Current Position becomes unchecked.
Set High Limit Sets the upper software limit for the active axis to the value of New Limit
Position.
Set Low Limit Sets the lower software limit for the active axis to the value of New Limit
Position.
Because software limits are specified in the stage axis coordinate system, changing the zero
location of this coordinate system causes a shift in the physical location of the software limits.
The Scanning OFDR software will optionally shift the software limit settings to preserve
26
the same physical location upon a change in the zero location for a stage axis. To enable
this option, select the menu option System→Shift Limits With Zero. When this option is
checked, limit settings are changed when the zero location for an axis changes, preserving
the same physical location for the limit. When unchecked, the software limit settings remain
unchanged, so a change in zero location for a stage axis results in a change in the physical
location of the software limit.
Manual Stage Motion Best practice when using the Scanning OFDR system is to use the
software interface to drive the stages and avoid manual stage motion by physically turning the
knobs on the stage stacks. This is because the Seruga Seiki D120 motion controller does not
register manual motion and does not update the axis position in response to manual motion.
This results in a shift of the axis coordinate system by an unknown amount each time an axis
knob is turned. Because software limits are specified in the axis coordinate system, manual
motion causes a change in the physical location of the software limits, potentially leading to
damage if the stage overruns an intended limit location causing a collision.
An alternative means of manual stage motion that does not cause a change in axis coordinate system is to use the “Handy Terminal” connected to the D120 motion controller. See
the Seruga Seiki D120 user manual for more information on using the Handy Terminal.
If it is necessary to perform manual stage motion by turning the knobs on the stage axes,
axis power must first be turned off through the Scanning OFDR software interface. This is
accomplished by selecting the menu option System→Allow Manual Motion. When this menu
option is checked, stage axis power is turned off and the axis knobs are unlocked. The Drive
Axis controls also become disabled. This option should remain unchecked during normal
operation, which keeps power applied to the stage axes and locks the axis knobs.
3.1.6
Peak Optimization
When using a focused probe beam to perform reflectivity measurements using the Scanning
OFDR, it is important to position the sample interface of interest precisely at the focus of the
probe beam. This is because reflected light must couple back into a single mode fiber core,
which acts as a confocal filter and rejects reflections from outside the focal region. This means
that the measured amplitude of reflection peaks will exhibit a maximum when the interface
is positioned at the focus, and fall off as the interface moves axially in either direction. For
reflection peaks positioned near the focus, the Scanning OFDR software can automatically
optimize the measured reflection amplitude by moving the sample axially and monitoring the
peak amplitude as a function of position. This process is referred to as Peak Optimization,
and is accomplished using the controls under the Peak Optimization heading selection in the
lower right region of the Scanning OFDR user interface. This set of controls is shown in
Fig. 11.
Peak Set the peak to optimize. This value refers to the Peak # of a peak that has been
configured in the Peak Selection and Measurements array.
Optimize Peak Initiates the peak optimization process. The peak optimization process
27
Figure 11: The Peak Optimization control group.
incrementally moves Active Axis by the value of the corresponding element of Step.
The amplitude of the peak specified by Peak is monitored, and motion continues as
long as the amplitude of the peak increases. If the amplitude decreases for motion
in one direction, the other direction is tried. Once the peak amplitude decreased for
motion in both directions, the axis position is returned to the location of the maximum
peak amplitude and the peak optimization routine terminates.
Abort Aborts the peak optimization process.
3.1.7
Sample Perpendicularization
A common measurement performed using the Scanning OFDR is a spatially resolved measurement of reflectivity for a planar sample under test as a function of transverse position.
Because of the confocal filtering effect of the single mode fiber core discussed above, it is
important that the planar interface remain at the focal position of the probe beam as its
position is scanned transversely. This requires that the planar interface of the sample must
be oriented so that it is parallel to the transverse stage axes and perpendicular to the axial
stage axis. (This process assumes the optical axis of the probe beam has been previously
aligned to the axial stage axis.) The Scanning OFDR software provides an automated sample
perpendicularization process. This process consists of the following steps:
1. Move transversely a known step size along one transverse axis.
2. Measure the axial location of the reflecting interface.
3. Move transversely a known step size in the opposite direction along the same transverse
axis.
4. Measure the axial location of the reflecting interface again.
5. Calculate the tilt angle of the interface as the inverse tangent of the difference in axial
locations of the interface over the difference in transverse measurement positions.
28
Figure 12: The Perpendicularization control group.
6. Rotate the sample an amount equal to the measured tilt angle.
7. Repeat this process for the other transverse axis.
To set parameter values and initiate the perpendicularization routine use the following controls found under the Perpendicularization heading selection, shown in Fig. 12:
Method Selects the method used for determining the axial position of the reflector. As of
this writing, only the Precision Ranging method has been implemented. Future methods
may include Confocal and Peak Optimization.
Transverse Axis Selects the transverse motion axis.
Confocal Axis Selects the confocal scanning axis for the Confocal method (not yet implemented).
Peak Specifies the reflection peak configured in the Peak Selection and Measurements array
that corresponds to the planar reflecting interface being perpendicularized.
Transverse Step Sets the transverse distance to move.
Tilt Angle Displays the measured tilt angle.
Measure Tilt Initiates a tilt angle measurement.
Adjust Angle Rotates the sample to compensate for the measured tilt angle. This button
is disabled until a tilt angle measurement has been performed.
3.1.8
Scanning OFDR Measurements
The Scanning OFDR software allows for measurements of reflection peak amplitude and range
to be performed as a function of either one or two spatial coordinates by sequentially performing OFDR measurements and moving the Seruga Seiki stage axes. Scanned measurements
29
Figure 13: The Scanning control group.
return an amplitude value and a range value for each peak specified in the Peak Selection
and Measurements array at each scan location. To perform scanned OFDR measurement,
use the controls under the Scanning heading selection, shown in Fig. 13:
Scan Type Selects a 1D or 2D scan.
Axis 1 Settings Specifies the scan settings for a 1D scan, or for the first axis of a 2D scan.
Axis 2 Settings Specifies the scan settings for for the second axis of a 2D scan.
Scan Initiates a scanned OFDR measurement.
Abort Aborts any scanned measurement currently in progress.
Each Axis Settings cluster contains the following fields:
Axis Selects the stage axis to move.
Steps Sets the number of steps to move Axis during the scan.
Direction The direction to move Axis during the scan.
Current Step Displays the current step for the axis during the scan.
Outside of these controls, scanned measurements also make use of a few controls outside of
the Scanning area. The Axis settings refer to axes on the stack specified by Active Stack.
Each scan step moves Axis a distance set by the corresponding element in Step. At each
scan location, the number of wavelength sweeps that are performed are set by Number of
Sweeps.
30
Figure 14: The 2D Scan Plot display.
Displaying Scan Data The Scanning OFDR software provides two ways to display scan
data: a 2D intensity plot for visualizing 2D scan data, and a line graph for plotting 1D
scan data or slices through 2D scan data sets. These plot options are accessed from the
Supplemental Information Display selector. Selecting 2D Scan Plot displays the intensity
plot shown in Fig. 14. This plot has the following options:
Peak Selects a peak from the Peak Selection and Measurements array for which to plot scan
data.
Quantity Selects Amplitude or Range data to plot.
Selecting Scan Slice Plot from the Supplemental Information Display selector displays the
graph shown in Fig. 15. This graph has the same options for selecting Peak and Quantity
as the 2D Scan Plot. Additionally, the following options are available:
Slice Direction When plotting a slice through a 2D scan data set, this selects whether to
use a slice parallel to Axis 1 or Axis 2.
Slice Position Selects the array index of the slice within the 2D scan data set along the
other axis which is not selected as the Slice Direction.
3.1.9
Saving Data
The Scanning OFDR software provides three options for saving data. These options are
found under the File menu.
31
Figure 15: The Scan Slice Plot display.
Save Raw Data This option saves the raw data acquired directly from the analog inputs
on the DAQ board without any additional data processing. It also includes as header
that records parameters describing the acquisition so that all data processing features
of the Scanning OFDR software may be reproduced. The data is stored as a binary file
with a .ofdr extension.
Save Main Graph Data This option saves the data present in the Main Graph of the
Scanning OFDR user interface as a tab-delimited text file. The first column is X-axis
data while other columns are Y-axis data. The number of columns will depend on the
number of plots in the Main Graph when this option is selected. Note that this option
saves all of the data in the Main Graph indicator, not only the data that is currently
visible.
Save Scan Data Use this option to saved scanned measurement data. Selecting this option
brings up the Save Scan Data dialog window, shown in Fig. 16. This dialog allows
the user to select which components of the scan data to save. The main array in the
center of the dialog window will contain an entry for each Peak that was configured
in the Peak Selection and Measurements array during the scanned measurement. For
each peak, the SaveAmp checkbox selects whether to save amplitude data, and the
SavePR checkbox selects whether to save range data. The field Prefix is used to
specify a string that serves as the beginning of the filenames for the data files for that
peak. The Append Timestamp checkbox selects whether to append a timestamp to
filenames. Folder Path is the hard disk location where the data files will be saved.
32
Figure 16: The Save Scan Data dialog window.
Autosaving Raw Data The Scanning OFDR software provides an option to automatically
save raw data each time a new acquisition is performed. Caution: autosaving raw data can
produce extremely large amounts of data. Before enabling autosaving for extensive measurement processes such as scanned OFDR measurements, make sure sufficient hard disk space
exists to store all of the data. To configure autosaving of raw data, select File→Configure
Autosave. This brings up the Configure Autosave Options dialog window, shown in Fig. 17.
This window provides the following controls:
Autosave Raw Data Enable or disable autosaving using this checkbox.
Autosave Data Folder The hard disk location where autosaved data is stored.
Filename Root A string prefix used for filenames. Filenames also include a timestamp.
Loading Raw Data Raw data files with a .ofdr extension may be loaded back into the
Scanning OFDR software application for viewing or further data processing. To load a raw
data file, select File→Load Raw Data.
3.1.10
Saving and Loading System Configuration
The current state of the Scanning OFDR software application, including the values of front
panel controls and hardware parameters, but excluding data currently in memory, may be
saved to a configuration file by selecting the menu option File→Save Configuration File. A
dialog window will appear with a prompt to select the filename and folder location to save
the file, and a default filename incorporating the registered user name and a timestamp is
provided. The file is saved with a .ini extension. The contents of the file is ascii text with
33
Figure 17: The Configure Autosave Options dialog window.
a key = value format for each parameter. While configuration files are human-readable
and editable outside of the Scanning OFDR software application, manual editing is not
recommended to avoid invalid keys and values. Once a configuration file has been saved,
the Scanning OFDR software application may be restored to the saved state by selecting the
menu option File→Load Configuration File to load the configuration file.
3.2
SubVI Listing
The following is a listing of all custom subVIs called by the Scanning OFDR software application, Scanning OFDR v2.2.vi. These VIs also make use of VIs supplied by National Instruments
with the LabVIEW 2011 installation, as well as VIs available through the OpenG project.
See OpenG.org for more information on OpenG VIs.
34
Agilent Cycle Number.vi
Called by: Agilent Startup Sequence.vi
Custom VIs called: None
Labview VIs called: None
Inputs: 3
LVClass
Name
Cluster
error in
Digital
GPIB Address
Digital
Number of Sweep
Cycles
Description
Input error cluster.
GPIB address of the Agilent 81680A tunable laser.
Requested number of sweeps. Allowable values are 1–100.
Outputs: 1
LVClass
Name
Cluster
error out
Description
Output error cluster.
VI description: This VI sets the number of consecutive wavelength sweeps the
Agilent 81680A tunable laser will perform.
35
Agilent Laser On-Off.vi
Called by: Sweep Agilent Laser 2.vi, Agilent Startup Sequence.vi
Custom VIs called: None
Labview VIs called: None
Inputs: 3
LVClass
Name
Description
Cluster
Error In
Digital
GPIB Address
GPIB address of the Agilent 81680A tunable laser.
Boolean
Laser On/Off
Requested optical output state. True=On, False=Off.
Input error cluster.
Outputs: 2
LVClass
Name
Cluster
Error Out
Boolean
Output
Description
Output error cluster.
Requested optical output state. True=On, False=Off.
VI description: This VI toggles the optical output of the Agilent 81680A tunable
laser on and off.
36
Agilent Power.vi
Called by: Scanning OFDR 2.2.vi, Agilent Startup Sequence.vi
Custom VIs called: None
Labview VIs called: None
Inputs: 3
LVClass
Name
Cluster
error in
Digital
GPIB Address
(Default=19)
Digital
Power(mW)
Description
Input error cluster.
GPIB address of the Agilent 81680A tunable laser.
Requested power setting in mW.
Outputs: 2
LVClass
Name
Cluster
error out
Digital
Output Power
(mW)
Description
Output error cluster.
Requested power setting in mW.
VI description: This VI sets the output power level of the Agilent 81680A tunable laser.
37
Agilent Query Sweep State.vi
Called by: Scanning OFDR 2.2.vi
Custom VIs called: OFDR Global.vi
Labview VIs called: None
Inputs: 1
LVClass
Name
Cluster
error in
Description
Input error cluster.
Outputs: 3
LVClass
Name
Description
String
data
Cluster
error out
Output error cluster.
Boolean
Sweeping?
Indicates whether or not the Agilent 81680A tunable laser
is currently sweeping.
VI description: This VI queries the state of the Agilent 81680A tunable laser to
determine if it is currently sweeping.
38
Agilent Start Wavelength.vi
Called by: Agilent Startup Sequence.vi
Custom VIs called: None
Labview VIs called: None
Inputs: 3
LVClass
Name
Cluster
error in
Digital
GPIB Address
Digital
Start Wavelength
(nm)
Description
Input error cluster.
GPIB address of the Agilent 81680A tunable laser.
Requested sweep start wavelength.
Outputs: 1
LVClass
Name
Cluster
error out
Description
Output error cluster.
VI description: This VI sets the sweep start wavelength on the Agilent 81680A
tunable laser.
39
Agilent Startup Sequence.vi
Called by: Scanning OFDR 2.2.vi
Custom VIs called: OFDR Global.vi, Agilent Sweep Speed.vi, Agilent Sweep Mode.vi,
Agilent Stop Wavelength.vi, Agilent Start Wavelength.vi, Agilent
Power.vi, Agilent Laser On-Off.vi, Agilent Cycle Number.vi
Labview VIs called: None
Inputs: 6
LVClass
Name
Description
Digital
End WL (nm)
Cluster
error in
Digital
Number of Sweep
Cycle
Requested number of sweeps.
Digital
Power (mW)
Requested laser power setting.
Digital
Start WL (nm)
ComboBox
Sweep Speed
(nm/s)
Requested sweep end wavelength.
Input error cluster.
Requested sweep start wavelength.
Requested laser tuning rate.
Allowable values are
0.5NM/S, 5NM/S, and 40NM/S.
Outputs: 1
LVClass
Name
Cluster
error out
Description
Output error cluster.
VI description: This VI prepares the Agilent 81680A tunable laser for an OFDR
measurement by setting the sweep start and end wavelengths, laser power, sweep speed, and
number of sweep cycles, as well as turning on the optical output.
40
Agilent Stop Wavelength.vi
Called by: Agilent Startup Sequence.vi
Custom VIs called: None
Labview VIs called: None
Inputs: 3
LVClass
Name
Cluster
error in
Digital
GPIB Address
Digital
Stop Wavelength
Description
Input error cluster.
GPIB address of the Agilent 81680A tunable laser.
Requested sweep end wavelength.
Outputs: 1
LVClass
Name
Cluster
error out
Description
Output error cluster.
VI description: This VI sets the sweep end wavelength on the Agilent 81680A
tunable laser.
41
Agilent Sweep Actions.vi
Called by: Scanning OFDR 2.2.vi, Sweep Agilent Laser 2.vi
Custom VIs called: None
Labview VIs called: None
Inputs: 3
LVClass
Name
Description
ComboBox
Action
Requested action. Allowable values are STOP, START,
PAUSE, and CONTINUE.
Cluster
error in
Digital
GPIB Address
Input error cluster.
GPIB address of the Agilent 81680A tunable laser.
Outputs: 1
LVClass
Name
Cluster
error out
Description
Output error cluster.
VI description: This VI stops, starts, pauses or continues a wavelength sweep
using the Agilent 81680A tunable laser.
42
Agilent Sweep Mode.vi
Called by: Agilent Startup Sequence.vi
Custom VIs called: None
Labview VIs called: None
Inputs: 3
LVClass
Name
Cluster
error in
Digital
GPIB Address
ComboBox
Sweep Mode
Description
Input error cluster.
GPIB address of the Agilent 81680A tunable laser.
Requested sweep mode. Allowable values are STEPPED,
MANUAL, and CONTINUOUS.
Outputs: 1
LVClass
Name
Cluster
error out
Description
Output error cluster.
VI description: This VI sets the sweep mode for the Agilent 81680A tunable
laser. The OFDR system only uses the CONTINUOUS sweep mode.
43
Agilent Sweep Speed.vi
Called by: Agilent Startup Sequence.vi
Custom VIs called: None
Labview VIs called: None
Inputs: 3
LVClass
Name
Description
Cluster
error in
Digital
GPIB Address
GPIB address of the Agilent 81680A tunable laser.
ComboBox
Sweep Speed
Requested tuning rate. Allowable values are 0.5NM/S,
5NM/S, and 40NM/S.
Input error cluster.
Outputs: 1
LVClass
Name
Cluster
error out
Description
Output error cluster.
VI description: This VI sets the sweep speed, or tuning rate, of the Agilent
81680A tunable laser.
44
baseband2.vi
Called by: Precision Ranging2.vi
Custom VIs called: None
Labview VIs called: None
Inputs: 1
LVClass
Name
Array
Data In
Description
Complex (midband) data set input.
Outputs: 1
LVClass
Name
Array
Baseband data
out
Description
Complex data set shifted to baseband.
VI description: This VI shifts complex data to baseband by multiplying the
phase by a pi-per-sample phase ramp. Note that this VI also works in reverse. If a baseband
signal is input, then the output is a midband signal. Here “baseband” means a signal with a
peak near the first element of it’s discrete Fourier transformed data array, while “midband”
means a signal with a peak near the center of the discrete Fourier transformed data array.
45
Buffer Points.vi
Called by: Scanning OFDR 2.2.vi
Custom VIs called: OFDR Global.vi, Clock Source Enum.ctl
Labview VIs called: None
Inputs: 6
LVClass
Name
Digital
Clock Freq (Hz)
Enum
Clock Source
Digital
End Wavelength
(nm)
Cluster
error in (no
error)
Digital
Start Wavelength
(nm)
Digital
Sweep Buffer
(nm)
Description
Clock frequency for timed acquisitions.
Clock source for data acquisition (see VI description).
Requested sweep end wavelenth in nanometers.
Input error cluster.
Requested sweep start wavelenth in nanometers.
Additional sweep bandwidth for wavelength calibration.
Outputs: 3
LVClass
Name
Digital
#pts w/ buffer
Cluster
error out
Digital
requested #pts
Description
Number of data points in the data array prior to wavelength calibration.
Output error cluster.
Number of data points in the final data array not including the sweep buffer for wavelength calibration.
VI description: This VI determines the number of data points to acquire during
a laser wavelength sweep. This VI an additional sweep buffer for wavelength calibration, but
this calibration has not been implemented in the Scanning OFDR software.
The number of data points depends on both the sweep range (start and end wavelengths)
and the type of clock used for acquisition. For internal clock aquisitions, the number of data
points depends on the tuning rate of the laser and the clock frequency. For external clock
46
acquisitions, the external clock is assumed to be an interferometer with a fixed path length
difference. In this case, the number of points depends on the interferometer delay, which is
stored in the global variable TrigDelay.
47
Calculate Tilt.vi
Called by: Scanning OFDR 2.2.vi
Custom VIs called: Tilt cluster.ctl, Processing States.ctl, OFDR Global.vi
Labview VIs called: None
Inputs: 4
LVClass
Name
LVVariant
Data
Cluster
error in
Digital
Notifier Code
Digital
Range
Description
A Tilt Cluster typedef cast as a variant (see VI description).
Input error cluster.
Code to indicate if distance data is ready. A value of 2
indicates new precision ranging data.
The measured distance to the sample surface.
Outputs: 4
LVClass
Name
Description
Boolean
Done?
Indicates whether the tilt calculation is complete.
Cluster
error out
Array
Queue States
Queue state array. This is either empty or contains the
CalcTilt state if more data is still required.
Digital
Tilt angle
The calculated tilt angle of the sample under test. If the
calculation is incomplete this returns a value of 360.
Output error cluster.
VI description: This VI performs data recording and calculation functions for
measuing the tilt of a sample under test. It is intended to be called in a data processing
loop during while the data for the tilt measurement is being acquired. This VI should be
called once per distance measurement. The tilt measurement requires two distance (range)
measurements at two different transverse locations of the sample under test. Because both
hardware communication and data processing states must execute before the correct data is
present in memory for the tilt measurement, the CalcTilt state in the main Scanning OFDR
program waits for a notifier before calling this VI. The notifier is used for other syncronization
tasks as well, this VI checks the notification code to determine whether it should proceed
48
with the tilt calculation, or if it should wait. If it should wait, it just enqueues the CalcTilt
state again. If the notifier indicates data is present, it stores the first range value in the
FirstPos element of the Tilt Cluster and increments the counter NumPos. When the second
distance value is ready, it calculates the tilt using the difference in ranges and the Transvere
Step value passed via the Tilt Cluster. The Method element of the Tilt Cluster specifies how
the range data was measured, which affects the calculation code should interpret this data.
Currently only the Precision Ranging method has been implemented.
49
Check Instruments.vi
Called by: Scanning OFDR 2.2.vi
Custom VIs called: OFDR Global.vi
Labview VIs called: None
Inputs: 2
LVClass
Name
Description
Cluster
error in (no
error)
Input error cluster.
Boolean
Show dialog?
Indicates whether to display a dialog window to the user
if hardware is not found.
Outputs: 2
LVClass
Name
Cluster
error out
String
Message
Description
Output error cluster.
Status message.
VI description: This VI checks for the presence of the Seruga Seiki stages and
the Agilent 81680A tunable laser at the GPIB addresses specified in the global variables
¡b¿Stage GPIB Address¡/b¿ and ¡b¿Laser GPIB Address¡/b¿.
50
Confocal Plot Data.vi
Called by: Scanning OFDR 2.2.vi
Custom VIs called: Smoothing Filter.vi, OFDR Global.vi
Labview VIs called: None
Inputs: 5
LVClass
Name
Description
Cluster
error in (no
error)
Input error cluster.
Digital
Filter Cutoff
Smoothing filter bandwidth specification.
Digital
Filter Roll-Off
Width
Array
Raw Data
Data array containing raw confocal scanning data.
Boolean
Smoothing
Selects whether to apply a smoothing filter to the confocal
data.
Smoothing filter roll-off specification.
Outputs: 2
LVClass
Name
Array
Confocal Data
Cluster
error out
Description
Processed confocal scan data.
Output error cluster.
VI description: This VI processes raw confocal scan data for display in the main
graph on the front panel of the Scanning OFDR software application. Specifically, it combines
data from the S and P channels and optionally applies a smoothing filter. See Smoothing
Filter.vi for a description of the filter.
51
DAQ Config v3.vi
Called by: Scanning OFDR 2.2.vi
Custom VIs called: OFDR Global.vi
Labview VIs called: DAQmx Timing.vi, DAQmx Timing (Sample Clock).vi, DAQmx Start
Task.vi, DAQmx Create Virtual Channel.vi, DAQmx Create Task.vi,
DAQmx Create Channel (AI-Voltage-Basic).vi, DAQmx Clear Task.vi,
Clear Errors.vi
Inputs: 5
LVClass
Name
Digital
Clock Frequency
(Hz)
Boolean
CW?
Cluster
error in (no
error)
Enum
Mode
Digital
Requested Sample
Points
Description
Clock speed for time-synchronous acquisitions. Maximum
values are 10MHz for the PCI-6115 and 204.8kHz for the
PXIe-4492.
Direction specifier for confocal scanning acquisitions.
¡B¿error in¡/B¿ can accept error information wired from
VIs previously called. Use this information to decide if
any functionality should be bypassed in the event of errors
from other VIs.
Right-click the ¡B¿error in¡/B¿ control on the front panel
and select ¡B¿Explain Error¡/B¿ or ¡B¿Explain Warning¡/B¿ from the shortcut menu for more information
about the error.
Clock mode for data acquisition (see VI description.)
The requested number of data points per channel to acquire.
Outputs: 2
LVClass
Name
DAQmxName
DAQmx Sweep
Capture Task
Cluster
error out
Description
Data acquisition task name.
Output error cluster.
VI description: This VI configures the data acquisition hardware in the OFDR
system in preparation for acquiring measurement data. Depending on the data acquisition
52
board being used, different methods of triggering and clocking the data acquisition process
may be supported. The modes supported by this VI (specified by Mode) include: [format]
Sweep Ext Clock. In this mode, the acquisition looks for a start trigger on the pin specfied
by the global variable Start Trig Pin and is clocked by an externally applied analog signal on
pin PFI0.
Sweep Int Clock. In this mode, the acquisition looks for a start trigger on the pin specfied by the global variable Start Trig Pin and is clocked by the internal clock on the data
acquisition board.
Confocal. In this mode, the start trigger and acquisition clock are both derived by an
externally applied digital signal applied to either of the pins specified by the global variables
Stage CW Pulse Pin and Stage CCW Pulse Pin, depending on the value of CW?.
No Sweep (SW trigger). In this mode, the acquisition does not look for an external start
trigger and instead begins immediately. The acquisition is clocked by the internal clock on
the data acquisition board.
The OFDR system hardware currently utilizes one of two data acquisition boards: a PCI6115 (physically located within the HP workstation and accessed via the BNC-2110 connector
block) and a PXIe-4492 (physically located in the PXIe-1073 chassis). The PCI-6115 supports
all of the above modes with a maximum clock rate of 10 MHz and 12-bit resolution. The
PXIe-4492 supports only the Sweep Int Clock and No Sweep (SW trigger) modes with a
maximum clock rate of 204.8 MHz and 24-bit resolution.
53
DAQ Read.vi
Called by: Scanning OFDR 2.2.vi
Custom VIs called: OFDR Global.vi
Labview VIs called: DAQmx Stop Task.vi, DAQmx Start Task.vi, DAQmx Read.vi,
DAQmx Fill In Error Info.vi
Inputs: 4
LVClass
Name
Description
DAQmxName
DAQmx Sweep
Capture Task
(Use Active)
Cluster
Error In
Data acquisition task name. If empty, the task configured
by DAQ Config v3.vi is used, if it exists.
Input error cluster.
Boolean
Start Task?
Digital
Timeout (30 sec)
(F)
Time to wait for data acquisition task to complete.
Outputs: 2
LVClass
Name
Description
Array
Data
Acquired data array.
Cluster
Error Out
Output error cluster.
VI description: This VI reads data from a data acquisition task initiated by
DAQ Config v3.vi.
54
DriveOpticalSwitch.vi
Called by: Scanning OFDR 2.2.vi
Custom VIs called: None
Labview VIs called: DAQmx Wait Until Done.vi, DAQmx Start Task.vi, DAQmx Create
Virtual Channel.vi, DAQmx Create Channel (CO-Pulse
Generation-Time).vi, DAQmx Clear Task.vi
Inputs: 2
LVClass
Name
Cluster
error in
Boolean
State T=close
Description
Input error cluster.
Requested fiber optic switch state.
Outputs: 1
LVClass
Name
Cluster
error out
Description
Output error cluster.
VI description: This VI uses the counter outputs (ctr0 and ctr1) on the PCI6115 data acquisition board to drive the E-Tek fiber optic switch.
55
Edit Hardware Parameters.vi
Called by: Scanning OFDR 2.2.vi
Custom VIs called: OFDR Global.vi
Labview VIs called: None
Inputs: 9
LVClass
Name
Description
Boolean
Cancel
Discard changes an close the dialog window.
Array
Channel
Assignments &
Coupling
Enum
DAQ Board
Cluster
error in (no
error)
Digital
Laser GPIB
Address
Boolean
OK
Digital
Stage GPIB
Address
Digital
Trigger Delay
(ns)
Trigger interferometer delay in nanoseconds.
Digital
Trigger
Hysteresis (V)
Trigger hysteresis level in volts.
Analog input channel configuration array.
Data acquisition board selection.
Input error cluster.
GPIB address of the Agilent 81680A tunable laser.
Apply changes and close the dialog window.
GPIB address of the Seruga Seiki D120 motion controller.
Outputs: 1
LVClass
Name
Cluster
error out
Description
Output error cluster.
VI description: This VI presents a dialog interface allowing the user to modify
hardware parameters for the OFDR system. Parameter settings in this VI must accurately
correspond to the present hardware state in order for the Scanning OFDR system to operate
without error.
56
Edit Stage Limits.vi
Called by: Scanning OFDR 2.2.vi
Custom VIs called: SS Toggle Software Limits.vi, SS Set Software Limit.vi, SS Set
Remote Mode.vi, SS Query Status.vi, SS Query Software Limit.vi, SS
Query Position.vi, OFDR Global.vi
Labview VIs called: None
Inputs: 12
LVClass
Name
Description
Enum
Axis
Boolean
Current->Hi
Limit
Set the high (clockwise) software limit to the current position.
Boolean
Current->Low
Limit
Set the low (counterclockwise) software limit to the current position.
Boolean
Done
Cluster
error in
Boolean
Limits Enabled
Toggle software limits for the selected axis on and off.
Digital
New Limit
Postion
Enter a value for a new software limit position setting.
Boolean
Set High Limit
Set the high (clockwise) software limit to the value of New
Limit Position.
Boolean
Set Low Limit
Set the low (counterclockwise) software limit to the value
of New Limit Position.
Enum
Stack
Stage stack selection.
Boolean
Update
Update displayed position and limit values for selected
stack and axis.
Boolean
Use Current
Postion
Specify whether to use the current axis position for a
software limit setting.
Stage axis selection.
Input error cluster.
Outputs: 4
57
LVClass
Name
Description
Digital
Current Position
Cluster
error out
Output error cluster.
Digital
High Limit
High (clockwise) software limit setting for the selected
axis.
Digital
Low Limit
Low (counterclockwise) software limit setting for the selected axis.
Current position of the selected axis.
VI description: This VI is a dialog user interface for setting the software limits
for the Seruga Seiki stages.
58
Enqueue Config States.vi
Called by: Scanning OFDR 2.2.vi
Custom VIs called: Stage Settings Cluster.ctl, Stage Setting Array.ctl, Stage
Parameter.ctl, Processing States.ctl, Communication States.ctl,
Active Stack Enum.ctl
Labview VIs called: None
Inputs: 4
LVClass
Name
TypedRefNum
Comm Queue
Cluster
error in (no
error)
TypedRefNum
Proc Queue
Cluster
Value Cluster
Description
Reference to the Hardware Communication Queue.
Input error cluster.
Reference to the Data Processing Queue.
Cluster of configuration values (see VI description).
Outputs: 1
LVClass
Name
Cluster
error out
Description
Output error cluster.
VI description: This VI queues the states necessary to update the state of the
hardware and software after loading a configuration file. Value Cluster contains values read
from the configuration file that are required to be passed to the various states in the queues.
59
Enqueue Tilt Measurement.vi
Called by: Scanning OFDR 2.2.vi
Custom VIs called: Tilt cluster.ctl, Stage Parameter.ctl, Log Manager.vi, Communication
States.ctl, Axis Selector.ctl
Labview VIs called: None
Inputs: 4
LVClass
Name
Cluster
error in (no
error)
Description
Input error cluster.
LVObjectRefNum
Status Ref
LVObjectRefNum
Step Ref
Reference to a stage axis step distance settings array in
the calling VI.
Tilt cluster
Cluster of tilt measurement parameters (see VI description).
Cluster
Reference to status log string control.
Outputs: 2
LVClass
Name
Cluster
error out
Array
State array
Description
Output error cluster.
Array of queue states to perform a tilt measurement.
VI description: This VI enqueues the states necessary to perform a measurement
of the tilt angle of a sample under test. The steps in this process are as follows: [format]
1. Set active axis to Transverse Axis 2. Set Transverse Axis step size to Transverse Step
3. Move CW 4. Measure distance 5. Move CCW twice 6. Measure distance 7. Move CW 8.
Set Transverse Axis step size back to prior value
Tilt measurement parameters are passed to this VI via the Tilt Cluster, though not all
elements of the Tilt Cluster are used. The following elements are used: [format]
Transverse Axis : Stage axis for transverse motion. Transvese Step: Transverse distance
to move. Method: Tilt measurement method. Currently only the Precision Ranging method
is fully implemented. Confocal Axis: Confocal scan axis when using the Confocal method.
60
Fourier Interpolation.vi
Called by: Resample.vi, WL vs Time.vi
Custom VIs called: None
Labview VIs called: NI AALPro.lvlib:Real FFT.vi, NI AALPro.lvlib:Inverse Real FFT.vi,
NI AALPro.lvlib:Inverse FFT.vi, NI AALPro.lvlib:FFT.vi
Inputs: 2
LVClass
Name
Array
Data
Digital
Interp Factor
Description
Input data array to be interpolated.
Factor by which to increase the number of data points in
the data array.
Outputs: 1
LVClass
Name
Array
Interpolated
Data
Description
Output interpolated data array.
VI description: This VI interpolates a data array by zero padding in the Fourier
domain. The number of points in the data array is increased by a factor of Interp Factor.
61
Generate X-Axis.vi
Called by: Scanning OFDR 2.2.vi
Custom VIs called: Plot Selection.ctl, OFDR Global.vi, Acquisition Parameters.ctl
Labview VIs called: None
Inputs: 3
LVClass
Name
Cluster
Aquisition
Parameters
Cluster
error in (no
error)
Enum
Plot Selection
Description
Acquisition parameters cluster describing the raw data in
memory.
Input error cluster.
Selects the type of data to plot.
Outputs: 3
LVClass
Name
Description
Cluster
error out
Output error cluster.
Array
X-Axis
X-axis data for plot.
String
X-Axis Label
X-axis label for plot.
VI description: This VI generates scaled X-axis data for use in the main graph
plots on the front panel of the main Scanning OFDR software application. The content of
the X-axis data depends on the type of plot requested (specificed by Plot Selection) and the
parameters describing the data acqusition (specified by Acquisition Parameters).
62
Get Channel Assignments.vi
Called by: Scanning OFDR 2.2.vi, Precision Ranging2.vi
Custom VIs called: OFDR Global.vi
Labview VIs called: None
Inputs: 1
LVClass
Name
Cluster
error in (no
error)
Description
Input error cluster.
Outputs: 5
LVClass
Name
Description
Digital
Aux
Cluster
error out
Digital
HCN
Digital
P
P channel assignment.
Digital
S
S channel assignment.
Aux channel assignment.
Output error cluster.
HCN channel assignment.
VI description: Data manipulation functions generally expect data acquired on
a specific channel. Within the OFDR software, these channels are specified by name, and
the user may associate each name with any available physical analog input channel. This VI
returns the analog input channel number associated with the S, P, Aux, and HCN channel
names.
63
Handle Peak Array.vi
Called by: Scanning OFDR 2.2.vi
Custom VIs called: Peak Cluster3.ctl
Labview VIs called: None
Inputs: 6
LVClass
Name
Array
Chart Refs
Cluster
error in (no
error)
LVObjectRefNum
Main Graph Ref
Description
Input error cluster.
Reference to the Main Graph on the front panel of the
main Scanning OFDR program.
Array
Peaks (New)
New peak array with changes.
Array
Peaks (Old)
Peak array prior to changes.
Array
WFGraphs
Outputs: 5
LVClass
Name
Description
Cluster
error out
Output error cluster.
Array
Peaks Out
Updated peak array.
Boolean
Recalc Amp?
Boolean
Recalc PR?
Boolean
SameSize?
VI description: This VI handles changes made to the Peak Selection and Measurements array in the main Scanning OFDR program.
64
Load Configuration.vi
Called by: Load OFDR Config.vi
Custom VIs called: None
Labview VIs called: TRef Get All FP References.vi, NI LVConfig.lvlib:Config Data
RefNum.ctl
OpenG VIs called: Read Key (Variant) ogtk.vi
Inputs: 4
LVClass
Name
Cluster
error in (no
error)
TypedRefNum
INI refnum
String
Tag
VIRefNum
VI reference
Description
Input error cluster.
Configuration file reference.
Description tag. Only tagged controls are loaded.
Reference to the VI being configured.
Outputs: 3
LVClass
Name
Cluster
error out
TypedRefNum
INI refnum out
VIRefNum
VI reference out
Description
Output error cluster.
Configuration file reference.
Reference to the VI being configured.
VI description: This VI calls the OpenG function Read Key (Variant).vi to read
front panel control values of the VI specied by VI Path from a configuration file specified by
INI Path only if the beginning of the control description matches Tag. Read Key (Variant).vi
is recursive so that nested controls are handled. Only tags for top level controls are checked,
however, so for controls inside clusters or arrays all controls in the array are either written or
not depending on the description tag of the parent control. Controls inside tabs are parsed
before getting passed to Read Key (Variant).vi, so they are not subject to this limitation.
Configuration file keys must match control labels.
65
Load OFDR Config.vi
Called by: Scanning OFDR 2.2.vi
Custom VIs called: Load Configuration.vi
Labview VIs called: NI LVConfig.lvlib:Open Config Data.vi, NI LVConfig.lvlib:Close Config
Data.vi
OpenG VIs called: Read Key (Variant) ogtk.vi
Inputs: 5
LVClass
Name
Path
configuration
file path
The path to the platform-independent configuration file.
Cursor
Reference to the Cursor enum in the Peak Selection and
Measurements array on the front panel of the main OFDR
program interface.
LVObjectRefNum
Cluster
error in (no
error)
LVObjectRefNum
VIRefNum
Graph Main Ref
VI reference
Description
Input error cluster.
Reference to the main graph on the front panel of the
main OFDR program interface.
Reference to the VI being configured.
Outputs: 2
LVClass
Name
Cluster
error out
VIRefNum
VI reference out
Description
Output error cluster.
Reference to the VI being configured.
VI description: This VI loads control values for the main OFDR program interface and OFDR Global.vi from a configuration (*.ini) file. Explicit references to the Main
Graph and Cursor list are passed because properties of these controls other than their values
are loaded from the configuration file.
66
Log Manager.vi
Called by: Scanning OFDR 2.2.vi, Enqueue Tilt Measurement.vi, Move SS
Stage.vi
Custom VIs called: None
Labview VIs called: Space Constant.vi
Inputs: 5
LVClass
Name
Boolean
Append
timestamp? (T)
Boolean
Clear
Cluster
error in (no
error)
LVObjectRefNum
String
Description
Select whether to append timestamp to log entry.
Select whether to clear the log.
Input error cluster.
Log (Ref)
Reference to status log string control.
New line
New line to add to the status log.
Outputs: 1
LVClass
Name
Cluster
error out
Description
Output error cluster.
VI description: This VI manages the Status Log in the main Scanning OFDR
program.
67
Measurement Options Dialog.vi
Called by: Scanning OFDR 2.2.vi
Custom VIs called: None
Labview VIs called: None
Inputs: 5
LVClass
Name
Description
Boolean
Cancel
Discard changes and close the dialog window.
Digital
Endpoints to
Neglect
Number of endpoints to neglect during precision ranging
linear curve fit.
Digital
Filter Size
Number of points used for the precision ranging digital
filter.
Boolean
OK
Digital
Peak Area Points
Accept changes and close the dialog window.
Number of points used for peak amplitude calculation.
Outputs: 4
LVClass
Name
Description
Boolean
Canceled?
Indicate whether or not the user canceled the operation.
Digital
Endpoints to
Neglect
Number of endpoints to neglect during precision ranging
linear curve fit.
Digital
Filter Size
Number of points used for the precision ranging digital
filter.
Digital
Peak Area Points
Number of points used for peak amplitude calculation.
VI description: This VI presents a dialog interface for the user to modify options
associated with peak amplitude and precision ranging measurements.
68
Move SS Stage.vi
Called by: Scanning OFDR 2.2.vi
Custom VIs called: SS Monitor.vi, SS Go To Position.vi, SS Drive Axis.vi, OFDR
Global.vi, Log Manager.vi, Axis Selector.ctl, Active Stack Enum.ctl
Labview VIs called: None
Inputs: 8
LVClass
Name
Description
Enum
Active Axis
Stage axis selection.
Enum
Active Stack
Stage stack selection.
LVVariant
Data
Cluster
error in
Boolean
Log?
Indicate whether to make an entry in the OFDR status
log.
LVObjectRefNum
Position (Ref)
Reference to stage axis position array on the main OFDR
front panel.
LVObjectRefNum
Status
LVObjectRefNum
Stop (ref)
Queue data message. See VI description.
Input error cluster.
Reference to status log string control.
Reference to Stop control on the main OFDR front panel.
Outputs: 3
LVClass
Name
Description
Boolean
At Limit?
Indicates whether selected axis is at a limit.
Boolean
Axis powered?
Indicates whether selected axis is powered.
Cluster
error out
Output error cluster.
VI description: This VI provides motion control of the Seruga Seiki stages. It
communicates with front panel controls in Scanning OFDR 2.2.vi via control references. Data
is a two-element boolean array cast as a variant in order to be passed by queue in the calling
VI. If the first element in the boolean array is true, the axis moves to position zero. If the
first element is false, the axis move it’s current step distance. The second element of the
boolean array indicates direction: True for clockwise, False for counterclockwise. Motion
may be aborted within the calling VI via the Stop (ref) boolean control reference.
69
OFDR Global.vi
Called by: Scanning OFDR 2.2.vi, Agilent Query Sweep State.vi, Sweep Agilent
Laser 2.vi, Agilent Startup Sequence.vi, DAQ Read.vi, DAQ Config
v3.vi, Set Postion Label.vi, SS Set Software Limit.vi, SS Query
Software Limit.vi, SS Query Position.vi, SS Set Position Value.vi,
Move SS Stage.vi, SS Stop.vi, SS Query Status.vi, SS Go To
Position.vi, SS Drive Axis.vi, SS Select Axis.vi, SS Query Distance.vi,
SS Query Acceleration.vi, SS Query Start Up Speed.vi, SS Query
Drive Speed.vi, SS Toggle Motor Power.vi, SS Set Remote Mode.vi,
SS Set Acceleration.vi, SS Set Distance.vi, SS Set Drive Speed.vi, SS
Set Start Up Speed.vi, Check Instruments.vi, Resample.vi, WL vs
Time.vi, Get Channel Assignments.vi, Calculate Tilt.vi, Confocal Plot
Data.vi, OFDR Plot Data.vi, Generate X-Axis.vi, Signal Levels.vi,
Buffer Points.vi, Edit Hardware Parameters.vi, Stage Settings
Dialog.vi, Edit Stage Limits.vi, SS Toggle Software Limits.vi
Custom VIs called: None
Labview VIs called: None
Inputs: 15
70
LVClass
Name
Description
Array
Axis Labels
Digital
c (m/s)
OFDRConfig
Array
Channel
Assignments &
Coupling
OFDRConfig
Enum
DAQ Board
OFDRConfig
Digital
Ext. clock
level (V)
OFDRConfig
Digital
Hysteresis (V)
OFDRConfig
Digital
Laser GPIB
Address
OFDRConfig
Digital
Stage Angular
Tick (deg/tick)
OFDRConfig
DAQmxName
Stage CCW Pulse
Pin
OFDRConfig
DAQmxName
Stage CW Pulse
Pin
OFDRConfig
Digital
Stage GPIB
Address
OFDRConfig
Digital
Stage Linear
Tick (nm/tick)
OFDRConfig
DAQmxName
Start Trig Pin
OFDRConfig
Ring
Sweep Rate
(nm/s)
OFDRConfig
Digital
TrigDelay
OFDRConfig
Outputs: 1
LVClass
Name
Description
DAQmxName
DAQmx Sweep
Capture Task
OFDRConfig
VI description:
71
OFDR Plot Data.vi
Called by: Scanning OFDR 2.2.vi
Custom VIs called: OFDR Global.vi
Labview VIs called: NI AALPro.lvlib:Real FFT.vi, NI AALPro.lvlib:Hanning Window.vi,
NI AALPro.lvlib:Hanning Window (DBL).vi, NI AALPro.lvlib:Flat
Top Window.vi, NI AALPro.lvlib:Flat Top Window (DBL).vi,
NI AALPro.lvlib:FFT.vi
Inputs: 3
LVClass
Name
Cluster
error in (no
error)
Array
Raw Data
Enum
Window
Description
Input error cluster.
Raw wavelength sweep data array.
Window function applied to the raw data prior to the
Fourier transform.
Outputs: 2
LVClass
Name
Description
Cluster
error out
Output error cluster.
Array
OFDR Data
Processed OFDR data.
VI description: This VI processes raw wavelength sweep data to produce the
OFDR data plotted in the main graph of the Scanning OFDR software application. Processing includes the optional application of a window function, Fourier transform, and combination of the S and P channel data.
72
Peak Amplitudes2.vi
Called by: Scanning OFDR 2.2.vi
Custom VIs called: Peak Cluster3.ctl
Labview VIs called: NI AALBase.lvlib:Std Deviation and Variance.vi
Inputs: 7
LVClass
Name
LVObjectRefNum
Chart AM
Description
A reference to the Amplitude chart on the front panel of
the main Scanning OFDR software application.
Array
Data
OFDR plot data.
Digital
Data Buffer Size
Cluster
error in (no
error)
Input error cluster.
Digital
Peak Area Pts
The number of points to integrate in the peak amplitude
calculation.
Array
Peak Array
The Peak Selection and Measurements array passed from
the main Scanning OFDR VI.
Digital
TrigDelay
Reciprocal of the frequency spacing of the OFDR data
set.
The number of OFDR data points.
Outputs: 3
LVClass
Name
Description
Cluster
error out
Array
Peak Array Out
Output Peak Selection and Measurements with updated
amplitude measurement values.
Array
Peak selections
The data points used for each peak amplitude calculation.
Output error cluster.
VI description: This VI calculates reflection peak amplitudes from OFDR measurement data for reflection peaks specified by the user in the Peak Selection and Measurements array on the front panel of the main Scanning OFDR software application. The peak
amplitude calculation consists of numerical integration over a subset of the OFDR data array centered at the peak locations specified by Location in the Peak Array and including a
73
number of points specified by Peak Area Pts. Note that TrigDelay is passed as a parameter
to this VI rather than reading OFDR Global.vi because the global variable is the hardware
value, while data loaded from a file may use a different value.
74
Peak Optimizer.vi
Called by: Scanning OFDR 2.2.vi
Custom VIs called: Communication States.ctl
Labview VIs called: None
Inputs: 6
LVClass
Name
Description
Boolean
Abort (Op)
Aborts peak optimization.
Digital
Amplitude
Current measured peak amplitude value.
Digital
Ctr2
Cluster
Data Cluster
Queue message data cluster. Two elements: boolean Init?
to indicate first call, and numeric Peak (Opt.) to indicate
which peak to optimize.
Cluster
error in (no
error)
Input error cluster.
Digital
Last
Counter to track number of direction changes.
Previous measured peak amplitude value.
Outputs: 5
LVClass
Name
Description
Digital
Ctr2 Out
Boolean
Done?
Cluster
error out
Output error cluster.
Digital
Last Out
Current measured peak amplitude value.
Array
Q States
Queue state array.
Counter to track number of direction changes.
Indicates whether peak optimization process is complete.
VI description: This VI manages peak optimization by moving the stage and
monitoring peak amplitude. Peak optimization is accomplished using a hill climb algorithm,
i.e., the stage continues to move in a particular direction as long as the peak amplitude
increases. The first time peak amplitude decreases the stage reverses direction; the second
time it decreases the algorithm terminates.
75
Precision Ranging2.vi
Called by: Scanning OFDR 2.2.vi
Custom VIs called: Peak Cluster3.ctl, Get Channel Assignments.vi, baseband2.vi
Labview VIs called: NI
NI
NI
NI
AALPro.lvlib:Unwrap Phase.vi, NI AALPro.lvlib:Real FFT.vi,
AALPro.lvlib:Linear Fit.vi, NI AALPro.lvlib:Inverse FFT.vi,
AALPro.lvlib:Inverse Complex FFT.vi, NI AALPro.lvlib:FFT.vi,
AALBase.lvlib:Std Deviation and Variance.vi
Inputs: 7
LVClass
Name
LVObjectRefNum
Chart PR
Description
A reference to the Range Chart on the front panel of the
main Scanning OFDR software application.
Cluster
error in (no
error)
Input error cluster.
Digital
Filter Size
(Pts)
The number of points to selected at each peak location
for the precision ranging calculation.
Digital
NumEndpoints
The number of endpoints to neglect during precision ranging linear curve fit.
Array
Peak Array
The Peak Selection and Measurements array passed from
the main Scanning OFDR VI.
Array
Raw data
The raw wavelength sweep data array.
Digital
TrigDelay
Reciprocal of the frequency spacing of the OFDR data
set.
Outputs: 4
LVClass
Name
Description
Cluster
error out
Array
Peak Array Out
Output Peak Selection and Measurements array with updated precision ranging measurement values.
Array
Peak selections
The data points used for each precision ranging calculation.
Array
Phases
The frequency domain phases of each filtered data subset.
Output error cluster.
VI description: This VI performs data processing on raw OFDR scan data to
76
precisely locate reflection peaks to within a small fraction of the range resolution of the
system. Peak locations within the OFDR time domain data set are passed via the Peaks
Array, which is an array of clusters of the same type as the Peak Selection and Measurements
array on the front panel of the main Scanning OFDR software application. The precision
ranging calculation consists of selecting a number of points given by Filter Size (Pts) from
the OFDR time domain data array around the location of each peak. These data subsets
are inverse Fourer transformed, and the resulting frequency domain phases are shifted to
baseband and then fit to a line. The slope of the line determines the reflector location to
within a small fraction of the time domain sampling interval.
77
Queue Manager (Comm).vi
Called by: Scanning OFDR 2.2.vi
Custom VIs called: Communication States.ctl
Labview VIs called: Clear Errors.vi
Inputs: 4
LVClass
Name
Description
Cluster
Error in
Input error cluster.
Array
Q States
Array of states to add to the queue.
TypedRefNum
Queue In
Reference to the Communication Queue.
Enum
Where?
Indicates whether to add new states to the front or back
of the queue, or to replace states currently in the queue.
Outputs: 2
LVClass
Name
Description
Cluster
Error out
Output error cluster.
TypedRefNum
Queue Out
Reference to the Communication Queue.
VI description: This VI manages the Communication Queue in the main Scanning OFDR program.
78
Queue Manager (Proc).vi
Called by: Scanning OFDR 2.2.vi
Custom VIs called: Processing States.ctl
Labview VIs called: Clear Errors.vi
Inputs: 4
LVClass
Name
Description
Cluster
Error in
Input error cluster.
Array
Q States
Array of states to add to the queue.
TypedRefNum
Queue In
Reference to the Data Processing Queue.
Enum
Where?
Indicates whether to add new states to the front or back
of the queue, or to replace states currently in the queue.
Outputs: 2
LVClass
Name
Description
Cluster
Error out
Output error cluster.
TypedRefNum
Queue Out
Reference to the Data Processing Queue.
VI description: This VI manages the Data Processing Queue in the main Scanning OFDR program.
79
Register User.vi
Called by: Scanning OFDR 2.2.vi
Custom VIs called: None
Labview VIs called: None
Inputs: 4
LVClass
Name
Description
Boolean
Cancel
Discard changes and close the dialog window.
Cluster
error in (no
error)
Boolean
Ok
ComboBox
User
Input error cluster.
Accept changes and close the dialog window.
The name of the user. Previous users are stored in a
drop-down list.
Outputs: 5
LVClass
Name
Description
Boolean
Canceled?
Indicate whether the user canceled the operation.
Cluster
error out
Output error cluster.
Boolean
New User?
Indicates whether registered user was present in the dropdown list.
String
User out
The name of the user.
VIRefNum
vi reference
Reference to this VI so changes to the drop-down list can
be saved after execution.
VI description: This VI presents a dialog interface to register the name of the
user.
80
Resample.vi
Called by: Scanning OFDR 2.2.vi
Custom VIs called: OFDR Global.vi, Fourier Interpolation.vi
Labview VIs called: NI Gmath.lvlib:Interpolate 1D.vi
Inputs: 4
LVClass
Name
Description
Array
Data
The time-sampled wavelength sweep data to be resampled
onto a grid of equal optical frequency increments.
Array
Frequency v.
time
Frequency evolution data during the wavelength sweep.
Digital
Interp Factor
Factor by which to increase the sampling density of the
input Data array via Fourier interpolation prior to resampling.
Ring
method
The interpolation method. See the LabVIEW documentation for Interpolate 1D.vi for descriptions of the available methods.
Outputs: 4
LVClass
Name
Description
Digital
Data buffer size
The number of data points in the resampled output data
array.
Digital
Effective
trigger delay
The reciprocal of the frequency spacing of the resampled
data array.
Digital
New start WL
The start wavelength of the resampled data array. This
may be slightly different that the start wavelength of the
input data array depending on the interpolation method.
Array
Resampled Data
The resampled ouput data array.
VI description: This VI interpolates time-synchronously sampled wavelength
sweep data onto a grid of equal frequency increments using a known frequency vs time
relationship for the wavelength sweep. This VI optionally performs a Fourier interpolation
on the time-sampled data prior to interpolation onto the frequency grid. The frequency vs
81
time data array is assumed to be decending in frequency, corresponding to wavelength sweeps
from low to high wavelengths. The time increment of the frequency vs time data array is not
needed; the data points only need to be separated by equal time intervals.
82
Save Configuration.vi
Called by: Save OFDR Config.vi
Custom VIs called: None
Labview VIs called: TRef Get All FP References.vi, NI LVConfig.lvlib:Config Data
RefNum.ctl
OpenG VIs called: Write Key (Variant) ogtk.vi
Inputs: 4
LVClass
Name
Cluster
error in (no
error)
TypedRefNum
INI refnum
String
Tag
VIRefNum
VI reference
Description
Input error cluster.
Configuration file reference.
Description tag. Only tagged controls are saved.
Reference to the VI whose configuration is being saved.
Outputs: 3
LVClass
Name
Cluster
error out
TypedRefNum
INI refnum out
VIRefNum
VI reference out
Description
Output error cluster.
Configuration file reference.
Reference to the VI whose configuration is being saved.
VI description: This VI calls the OpenG function Write Key (Variant) to write
front panel control values of the VI specied by VI Path to a configuration file specified by
INI Path only if the beginning of the control description matches Tag. Write Key (Variant)
is recursive so that nested controls are handled. Only tags for top level controls are checked,
however, so for controls inside clusters or arrays all controls in the array are either written or
not depending on the description tag of the parent control. Controls inside tabs are parsed
before getting passed to Write Key (Variant), so they are not subject to this limitation.
83
Save OFDR Config.vi
Called by: Scanning OFDR 2.2.vi
Custom VIs called: Save Configuration.vi
Labview VIs called: NI LVConfig.lvlib:Open Config Data.vi, NI LVConfig.lvlib:Close Config
Data.vi
OpenG VIs called: Write Key (Variant) ogtk.vi
Inputs: 4
LVClass
Name
Path
configuration
file path
The path to the platform-independent configuration file.
Cluster
error in (no
error)
Input error cluster.
LVObjectRefNum
VIRefNum
Description
Graph Main Ref
Reference to the main graph on the front panel of the
main OFDR program interface.
VI reference
Reference to the VI whose configuration is being saved.
Outputs: 2
LVClass
Name
Cluster
error out
VIRefNum
VI reference out
Description
Output error cluster.
Reference to the VI whose configuration is being saved.
VI description: This VI accepts a reference to the main OFDR VI and saves
controls in both that VI and OFDR Global.vi tagged with ”OFDRConfig” in their descriptions to a configuration (*.ini) file. Also takes a reference to the main graph in the main
OFDR VI so that cursor information can also be saved to the configuration file.
84
Save Options Dialog.vi
Called by: Scanning OFDR 2.2.vi
Custom VIs called: None
Labview VIs called: None
Inputs: 5
LVClass
Name
Description
Path
Autosave Data
Folder
Specifies the folder where autosaved OFDR data is stored.
Boolean
Autosave Raw
Data
Toggles autosaving of OFDR data on and off.
Boolean
Cancel
Discard changes and close the dialog window.
String
Filename Root
Boolean
OK
String used to begin filenames for autosaved OFDR data.
Accept changes and close the dialog window.
Outputs: 4
LVClass
Name
Description
Path
Autosave Data
Folder out
The folder where autosaved OFDR data is stored.
Boolean
Autosave Raw
Data out
Indicates whether autosaving of OFDR data is enabled or
disabled.
Boolean
Canceled?
String
Filename Root
out
Indicates whether the user canceled the operation.
String used to begin filenames for autosaved OFDR data.
VI description: This VI presents a dialog interface to the user to configure options for automatically saving raw OFDR data whenever wavelength sweeps are performed.
When autosaving is enabled, data is saved using filenames that begin with Filename Root
followed by a timestamp.
85
Save Scan Data Dialog.vi
Called by: Scanning OFDR 2.2.vi
Custom VIs called: Save Scan Cluster.ctl
Labview VIs called: Write To Spreadsheet File.vi, Write To Spreadsheet File (DBL).vi
Inputs: 7
LVClass
Name
Description
Boolean
Append Timestamp
Array
Array
Array of clusters of data save parameters (see VI description).
Boolean
Cancel
Discard changes and close the dialog window.
Cluster
error in (no
error)
Input error cluster.
Path
Folder Path
Select the destination folder for saved data.
Boolean
OK
Accept changes and close the dialog window.
DataValRefNum
scan data value
reference
Data value reference to scanned OFDR data.
Select whether to append a timestamp to filenames.
Outputs: 3
LVClass
Name
Description
Boolean
Canceled?
Indicates whether the user canceled the operation.
Cluster
error out
Output error cluster.
Path
Folder Path Out
The destination folder for saved data.
VI description: This VI presents a dialog interface to the user to configure options for saving scanned OFDR data. The Array of data save parameters will contain one
element for each peak that has been configured in the Peak Selection and Measurements array
in the main Scanning OFDR program. For each peak, the user may select the save amplitude
or precision ranging data, or both. For each peak the user may also enter a prefix used for
the data filenames. Amplitude data files will have ”Amp” appended to the prefix, and range
data files will have ”Range” appended to the prefix. A timestamp may also optionally be
appended to the filenames. Data are saved in a tab-delimited ASCII spreadsheet format.
86
Scan Manager.vi
Called by: Scanning OFDR 2.2.vi
Custom VIs called: Stage Parameter.ctl, Scan Type Enum.ctl, Scan Axis Settings.ctl,
Communication States.ctl, Axis Selector.ctl
Labview VIs called: None
Inputs: 7
LVClass
Name
Digital
#Sweeps
Boolean
Abort Scan
Cluster
Axis 1 Settings
Specifies the scan settings for a 1D scan, or for the first
axis of a 2D scan.
Cluster
Axis 2 Settings
Specifies the scan settings for the second axis of a 2D
scan.
Cluster
error in (no
error)
Enum
Scan Type
Selects a 1D or 2D scan.
Step (Ref)
Reference to stage axis step distance settings array on the
main OFDR front panel.
LVObjectRefNum
Description
The number of wavelength sweeps to perform at each scan
location.
Aborts current scan.
Input error cluster.
Outputs: 4
LVClass
Name
Description
Cluster
Axis 1 out
Scan settings cluster output with updated Current Step.
Cluster
Axis 2 out
Scan settings cluster output with updated Current Step.
Cluster
error out
Output error cluster.
Array
Queue States
Queue state array.
VI description: This VI manages scanning OFDR measurement using the Seruga
Sekei stages. It enqueues states to be called in the main Scanning OFDR program that
perform swept wavelength measurements and stage motion. It is meant to be called in a
loop, where each call performs a single OFDR measurement and determines the next stage
movement, if any.
87
Set Postion Label.vi
Called by: Scanning OFDR 2.2.vi
Custom VIs called: Stage Setting Array.ctl, SS Set Software Limit.vi, SS Set Position
Value.vi, SS Query Software Limit.vi, SS Query Position.vi, OFDR
Global.vi, Axis Selector.ctl, Active Stack Enum.ctl
Labview VIs called: None
Inputs: 6
LVClass
Name
Description
Enum
Active Axis
Stage axis selection.
Enum
Active Stack
Stage stack selection.
Cluster
error in
Digital
New Position
Label
Array
Position
Boolean
Shift limits?
Input error cluster.
New position label setting.
Stage axis position array.
Indicates whether or not to shift axis software limits.
Outputs: 3
LVClass
Name
Cluster
error out
String
Message
Array
Position out
Description
Output error cluster.
Message for status log.
Stage axis position array.
VI description: This VI sets the position label for the selected Seruga Seiki stage
axis to a new value. Note that this VI does not move the stage, but only changes the label
value for the current position.
Because the axis software limits are set in terms of an axis position, changing the position
label results in a shift of the physical location of the sotware limits if the stage position
values of the sofware limits are not also shifted. This VI will optionally perform the required
software limit position shift in order to maintain the same physical location of the software
limits.
88
Signal Levels.vi
Called by: Scanning OFDR 2.2.vi
Custom VIs called: OFDR Global.vi
Labview VIs called: NI AALBase.lvlib:Mean.vi
Inputs: 2
LVClass
Name
Cluster
error in (no
error)
Array
Raw Data
Description
Input error cluster.
Input raw data array.
Outputs: 4
LVClass
Name
Description
Digital
Aux Mean
The mean data value on the Aux channel.
Cluster
error out
Output error cluster.
Digital
P Mean
The mean data value on the P channel.
Digital
S Mean
The mean data value on the S channel.
VI description: This VI calculates the mean data values on the S, P, and Aux
channels.
89
Smoothing Filter.vi
Called by: Confocal Plot Data.vi
Custom VIs called: None
Labview VIs called: NI AALPro.lvlib:Real FFT.vi, NI AALPro.lvlib:Inverse FFT.vi,
NI AALPro.lvlib:Inverse Complex FFT.vi, NI AALPro.lvlib:FFT.vi
Inputs: 4
LVClass
Name
Description
Digital
Cutoff
Width of the flat passband of the smoothing filter.
Array
Data
Cluster
error in (no
error)
Digital
Roll-Off Width
Input data array to be smoothed.
Input error cluster.
1/e width of the Gaussian roll-off of the smoothing filter.
Outputs: 4
LVClass
Name
Description
Cluster
error out
Array
Filter Window
The filter function that is multipled by the Fourier transform of the input Data array.
Array
Filtered Data
Output data array with the smoothing filter applied.
WaveformGraph
Waveform Graph
Output error cluster.
VI description: This VI applies a digital low-pass filter applied to the supplied
data input data array. The filter is a dual-sided amplitude-only filter with a flat passband and
Gaussian roll-off. The width of the flat passband is given by ¡b¿Cutoff¡/b¿ and the 1/e width
of the Gaussian roll-off is given by ¡b¿Roll-Off Width¡/b¿. Frequency units are normalized
relative to the sampling frequency.
90
SS Drive Axis.vi
Called by: Move SS Stage.vi
Custom VIs called: OFDR Global.vi
Labview VIs called: None
Inputs: 3
LVClass
Name
Description
String
Axis
Axis selection. Allowable values are A1-A6 for stage stack
1, or A7-A12 for stage stack 2.
Boolean
Direction
Direction to move axis. True moves clockwise, false moves
counterclockwise.
Cluster
error in
Input error cluster
Outputs: 1
LVClass
Name
Cluster
error out
Description
Output error cluster
VI description: Moves the selected Seruga Seiki stage axis using the current
settings for Drive Speed, Start Up Speed, Acceleration, and Distance.
91
SS Go To Position.vi
Called by: Move SS Stage.vi
Custom VIs called: OFDR Global.vi
Labview VIs called: None
Inputs: 3
LVClass
Name
Description
String
Axis
Cluster
error in
Input error cluster
Digital
Position
Position to move the selected axis to.
Axis selection. Allowable values are A1-A6 for stage stack
1, or A7-A12 for stage stack 2.
Outputs: 1
LVClass
Name
Cluster
error out
Description
Output error cluster.
VI description: Moves the selected Seruga Seiki stage axis to the specified position. Positions are specified in stage units (“ticks”) of approximately 40 nm. Allowable
position values are in the range -8000000 to 8000000.
92
SS Monitor.vi
Called by: Move SS Stage.vi
Custom VIs called: Stage Setting Array.ctl, SS Stop.vi, SS Query Status.vi, SS Query
Position.vi, Axis Selector.ctl
Labview VIs called: None
Inputs: 5
LVClass
Name
Description
Enum
Active Axis
String
Axis
Cluster
error in
Input error cluster.
Array
Position
Stage axis position array.
Boolean
Stop
Stage axis selection for updating software controls.
Axis selection for hardware communication. Allowable
values are A1-A6 for stage stack 1, or A7-A12 for stage
stack 2.
Optionally stop current motion.
Outputs: 6
LVClass
Name
Description
Boolean
At Limit?
Indicate if axis is at a limit.
Boolean
Axis powered?
Indicates if axis is powered.
Cluster
error out
Boolean
Interrupted?
Boolean
Moving?
Indicate if axis is moving
Array
Position out
Stage axis position array.
Output error cluster.
Indicate if prior axis motion was interrupted.
VI description: This VI is intended to be called in a loop to monitor a Seruga
Seiki stage axis during motion. It reports the position and status of the axis and allows
motion to be interrupted.
93
SS Query Acceleration.vi
Called by: Scanning OFDR 2.2.vi, Stage Settings Dialog.vi
Custom VIs called: OFDR Global.vi
Labview VIs called: None
Inputs: 2
LVClass
Name
String
Axis
Cluster
error in
Description
Axis selection. Allowable values are A1-A6 for stage stack
1, or A7-A12 for stage stack 2.
Input error cluster
Outputs: 2
LVClass
Name
Digital
Acceleration
Cluster
error out
Description
Current acceleration setting.
Output error cluster
VI description: Queries the acceleration setting for the specified Seruga Seiki
stage axis.
94
SS Query Distance.vi
Called by: Scanning OFDR 2.2.vi, Stage Settings Dialog.vi
Custom VIs called: OFDR Global.vi
Labview VIs called: None
Inputs: 2
LVClass
Name
String
Axis
Cluster
error in
Description
Axis selection. Allowable values are A1-A6 for stage stack
1, or A7-A12 for stage stack 2.
Input error cluster.
Outputs: 2
LVClass
Name
Description
Digital
Distance
Current step distance.
Cluster
error out
Outpur error cluster.
VI description: Queries the step distance for the specified Seruga Seiki stage
axis.
95
SS Query Drive Speed.vi
Called by: Scanning OFDR 2.2.vi, Stage Settings Dialog.vi
Custom VIs called: OFDR Global.vi
Labview VIs called: None
Inputs: 2
LVClass
Name
String
Axis
Cluster
error in
Description
Axis selection. Allowable values are A1-A6 for stage stack
1, or A7-A12 for stage stack 2.
Input error cluster.
Outputs: 2
LVClass
Name
Digital
Drive Speed
Cluster
error out
Description
Current drive speed setting.
Output error cluster.
VI description: Queries the drive speed setting for the specified Seruga Seiki
stage axis.
96
SS Query Position.vi
Called by: Scanning OFDR 2.2.vi, Set Postion Label.vi, SS Monitor.vi, Edit
Stage Limits.vi
Custom VIs called: OFDR Global.vi
Labview VIs called: None
Inputs: 2
LVClass
Name
String
Axis
Cluster
error in
Description
Axis selection. Allowable values are A1-A6 for stage stack
1, or A7-A12 for stage stack 2.
Input error cluster.
Outputs: 2
LVClass
Name
Cluster
error out
Digital
Position Value
Description
Output error cluster.
Current position.
VI description: Queries the position ofthe specified Seruga Seiki stage axis.
97
SS Query Software Limit.vi
Called by: Set Postion Label.vi, Edit Stage Limits.vi
Custom VIs called: OFDR Global.vi
Labview VIs called: None
Inputs: 3
LVClass
Name
Description
String
Axis
Cluster
error in
Input error cluster.
Boolean
Hi Limit?
Specifies whether to query the clockwise limit (True) or
the counterclockwise limit (False).
Axis selection. Allowable values are A1-A6 for stage stack
1, or A7-A12 for stage stack 2.
Outputs: 2
LVClass
Name
Cluster
error out
Digital
Limit Value Out
Description
Output error cluster.
The position of the requested software limit.
VI description: Queries the position of the software limits for the specified
Seruga Seiki stage axis.
98
SS Query Start Up Speed.vi
Called by: Scanning OFDR 2.2.vi, Stage Settings Dialog.vi
Custom VIs called: OFDR Global.vi
Labview VIs called: None
Inputs: 2
LVClass
Name
String
Axis
Cluster
error in
Description
Axis selection. Allowable values are A1-A6 for stage stack
1, or A7-A12 for stage stack 2.
Input error cluster.
Outputs: 2
LVClass
Name
Cluster
error out
Digital
Startup Speed
Description
Output error cluster.
Current startup speed setting.
VI description: Queries the start up speed setting for the specified Seruga Seiki
stage axis.
99
SS Query Status.vi
Called by: SS Monitor.vi, Edit Stage Limits.vi
Custom VIs called: OFDR Global.vi
Labview VIs called: None
Inputs: 2
LVClass
Name
String
Axis
Cluster
error in
Description
Axis selection. Allowable values are A1-A6 for stage stack
1, or A7-A12 for stage stack 2.
Input error cluster.
Outputs: 2
LVClass
Name
Cluster
error out
Cluster
Status Cluster
Description
Output error cluster.
Axis status cluster.
VI description: Queries the status of the specified Seruga Seiki stage axis. The
Status Cluster output by this VI includes the following boolean indicators: [format]
Axis Powered?, At CCW Mechanical Limit?, At CW Mechanical Limit?, Moving?, At
CCW SW Limit?, At CW SW Limit?, Interrupted?, Axis Selected?, CCW SW Limit On?,
CW SW Limit On?
100
SS Select Axis.vi
Called by: Scanning OFDR 2.2.vi
Custom VIs called: OFDR Global.vi
Labview VIs called: None
Inputs: 2
LVClass
Name
String
Axis
Cluster
error in
Description
Axis selection. Allowable values are A1-A6 for stage stack
1, or A7-A12 for stage stack 2.
Input error cluster.
Outputs: 1
LVClass
Name
Cluster
error out
Description
Output error cluster.
VI description: Specifies the active axis selection on the Seruga Seiki D120 motion controller.
101
SS Set Acceleration.vi
Called by: Scanning OFDR 2.2.vi, Stage Settings Dialog.vi
Custom VIs called: OFDR Global.vi
Labview VIs called: None
Inputs: 3
LVClass
Name
Digital
Acceleration
String
Axis
Cluster
error in
Description
Acceleration value. Allowable values are 0–9999.
Axis selection. Allowable values are A1–A6 for stage stack
1, or A7–A12 for stage stack 2.
Input error cluster.
Outputs: 1
LVClass
Name
Cluster
error out
Description
Output error cluster.
VI description: Sets the acceleration value for the specified Seruga Seiki stage
axis.
102
SS Set Distance.vi
Called by: Scanning OFDR 2.2.vi, Stage Settings Dialog.vi
Custom VIs called: OFDR Global.vi
Labview VIs called: None
Inputs: 3
LVClass
Name
Description
String
Axis
Digital
Distance
Step distance value. Allowable values are 0–8000000.
Cluster
error in
Input error cluster.
Axis selection. Allowable values are A1–A6 for stage stack
1, or A7–A12 for stage stack 2.
Outputs: 1
LVClass
Name
Cluster
error out
Description
Output error cluster.
VI description: Sets the step distance value for the specified Seruga Seiki stage
axis.
103
SS Set Drive Speed.vi
Called by: Scanning OFDR 2.2.vi, Stage Settings Dialog.vi
Custom VIs called: OFDR Global.vi
Labview VIs called: None
Inputs: 3
LVClass
Name
String
Axis
Digital
Drive Speed
Cluster
error in
Description
Axis selection. Allowable values are A1–A6 for stage stack
1, or A7–A12 for stage stack 2.
Drive speed value. Allowable values are 1–999999.
Input error cluster.
Outputs: 1
LVClass
Name
Cluster
error out
Description
Output error cluster.
VI description: Sets the drive speed value for the specified Seruga Seiki stage
axis.
104
SS Set Position Value.vi
Called by: Set Postion Label.vi
Custom VIs called: OFDR Global.vi
Labview VIs called: None
Inputs: 3
LVClass
Name
String
Axis
Cluster
error in
Digital
Position Value
Description
Axis selection. Allowable values are A1–A6 for stage stack
1, or A7–A12 for stage stack 2.
Input error cluster.
Position value. Allowable values are 1–999999.
Outputs: 1
LVClass
Name
Cluster
error out
Description
Output error cluster.
VI description: Sets the position value for the specified Seruga Seiki stage axis.
Note that this VI does not move the stage, but only changes the position label value for the
current position.
105
SS Set Remote Mode.vi
Called by: Scanning OFDR 2.2.vi, Stage Settings Dialog.vi, Edit Stage Limits.vi
Custom VIs called: OFDR Global.vi
Labview VIs called: None
Inputs: 1
LVClass
Name
Cluster
error in
Description
Input error cluster.
Outputs: 1
LVClass
Name
Cluster
error out
Description
Output error cluster.
VI description: Sets the Seruga Seiki D120 motion controller to remote mode.
This VI must be called before calling any other SS Stage VIs.
106
SS Set Software Limit.vi
Called by: Set Postion Label.vi, Edit Stage Limits.vi
Custom VIs called: OFDR Global.vi
Labview VIs called: None
Inputs: 4
LVClass
Name
Description
String
Axis
Cluster
error in
Input error cluster.
Boolean
Hi Limit?
Specifies whether to set the clockwise limit (True) or the
counterclockwise limit (False).
Digital
Position Value
Axis selection. Allowable values are A1-A6 for stage stack
1, or A7-A12 for stage stack 2.
The requested position of the software limit.
Outputs: 2
LVClass
Name
Cluster
error out
Digital
Limit Value Out
Description
Output error cluster.
The actual value of the specified software limit.
VI description: Sets the position of the software limits for the specified Seruga
Seiki stage axis.
107
SS Set Start Up Speed.vi
Called by: Scanning OFDR 2.2.vi, Stage Settings Dialog.vi
Custom VIs called: OFDR Global.vi
Labview VIs called: None
Inputs: 3
LVClass
Name
String
Axis
Cluster
error in
Digital
Start Up Speed
Description
Axis selection. Allowable values are A1–A6 for stage stack
1, or A7–A12 for stage stack 2.
Input error cluster.
Start up speed value. Allowable values are 10–9999.
Outputs: 1
LVClass
Name
Cluster
error out
Description
Output error cluster.
VI description: Sets the start up speed value for the specified Seruga Seiki stage
axis.
108
SS Stop.vi
Called by: SS Monitor.vi
Custom VIs called: OFDR Global.vi
Labview VIs called: None
Inputs: 1
LVClass
Name
Cluster
error in
Description
Input error cluster.
Outputs: 1
LVClass
Name
Cluster
error out
Description
Output error cluster.
VI description: Stops a Seruga Seiki stage axis currently in motion. Note that
the axis does not stop instantly, but rather decelerates smoothly to a stop.
109
SS Toggle Motor Power.vi
Called by: Scanning OFDR 2.2.vi
Custom VIs called: OFDR Global.vi
Labview VIs called: None
Inputs: 3
LVClass
Name
String
Axis
Cluster
error in
Boolean
Motor On/Off
Description
Axis selection. Allowable values are A1-A6 for stage stack
1, or A7-A12 for stage stack 2.
Input error cluster.
Motor power setting. True=On, False=Off.
Outputs: 1
LVClass
Name
Cluster
error out
Description
Output error cluster.
VI description: Toggles the power to individual Seruga Seiki stage axes. Motor
power must be on before controlling axes remotely. When motor power is off, the manual
knobs on the stages may be turned. Motor power is indicated on the D120 motion controller
by the case of the axis label. Uppercase (ex: A1) indicates axis power is on, while lowercase
(ex: a1) indicates axis power is off.
110
SS Toggle Software Limits.vi
Called by: Edit Stage Limits.vi
Custom VIs called: OFDR Global.vi
Labview VIs called: None
Inputs: 3
LVClass
Name
Description
String
Axis
Boolean
Enable?
Software limit setting. True=On, False=Off.
Cluster
error in
Input error cluster.
Axis selection. Allowable values are A1-A6 for stage stack
1, or A7-A12 for stage stack 2.
Outputs: 1
LVClass
Name
Cluster
error out
Description
Output error cluster.
VI description: Toggles software limits on and off for the specified Seruga Seiki
stage axis.
111
Stage Settings Dialog.vi
Called by: Scanning OFDR 2.2.vi
Custom VIs called: Stage Setting Array.ctl, SS Set Start Up Speed.vi, SS Set Remote
Mode.vi, SS Set Drive Speed.vi, SS Set Distance.vi, SS Set
Acceleration.vi, SS Query Start Up Speed.vi, SS Query Drive
Speed.vi, SS Query Distance.vi, SS Query Acceleration.vi, OFDR
Global.vi, Active Stack Enum.ctl
Labview VIs called: None
Inputs: 9
LVClass
Name
Description
Array
Acceleration
Stage axis acceleration settings array.
Enum
Active Stack
Stage stack selection
Boolean
Apply
Apply changes to stage values.
Boolean
Cancel
Close dialog and discard changes.
Array
Drive Speed
Stage axis drive speed settings array.
Cluster
error in (no
error)
Input error cluster.
Boolean
OK
Array
Startup Speed
Stage axis startup speed settings array.
Array
Step
Stage axis step distance settings array.
Close dialog and apply changes to stage values.
Outputs: 7
LVClass
Name
Description
Array
Acceleration Out
Stage axis acceleration settings array.
Enum
Active Stack Out
Stage stack selection
Boolean
Canceled?
Array
Drive Speed Out
Cluster
error out
Array
Startup Speed
Out
Stage axis startup speed settings array.
Array
Step Out
Stage axis step distance settings array.
Indicate if the user canceled the operation.
Stage axis drive speed settings array.
Output error cluster.
112
VI description: This VI provides a dialog user interface to modify Seruga Seiki
stage settings.
113
Sweep Agilent Laser 2.vi
Called by: Scanning OFDR 2.2.vi
Custom VIs called: OFDR Global.vi, Agilent Sweep Actions.vi, Agilent Laser On-Off.vi
Labview VIs called: None
Inputs: 1
LVClass
Name
Cluster
Error In
Description
Input error cluster.
Outputs: 1
LVClass
Name
Cluster
Error Out
Description
Output error cluster.
VI description: This VI initiates a wavelength sweep with the Agilent 81680A
tunable laser.
114
Sweep Mgr Q Cleanup.vi
Called by: Scanning OFDR 2.2.vi
Custom VIs called: Communication States.ctl
Labview VIs called: None
Inputs: 2
LVClass
Name
Description
Cluster
Error in
Input error cluster.
TypedRefNum
Queue In
Queue reference.
Outputs: 2
LVClass
Name
Description
Cluster
Error out
Output error cluster.
TypedRefNum
Queue Out
Queue reference.
VI description: When continuous wavelength sweeping is halted by the user, or
when a fixed number of sweeps is requested and sweeping is aborted before all sweeps have
completed, states may be present in the Communication Queue that should not execute. This
VI removes such states from the queue.
115
Update End WL.vi
Called by: Scanning OFDR 2.2.vi
Custom VIs called: Wavelength Range.vi
Labview VIs called: LVStringsAndValuesArrayTypeDef.ctl
Inputs: 4
LVClass
Name
Digital
End Wavelength
Cluster
error in (no
error)
Digital
Start Wavelength
Digital
Trigger Delay
(ns)
Description
Modified sweep end wavelength setting so that data set
size is radix 2.
Input error cluster.
Sweep start wavelength.
Trigger interferometer delay.
Outputs: 3
LVClass
Name
Description
Digital
End Wavelength
Current sweep end wavelength setting.
Array
End WL Strings
And Values []
Cluster of strings and values representing wavelength
sweep ranges for six radix-2 data set sizes.
Cluster
error out
Output error cluster.
VI description: The main Scanning OFDR software application allows the user
to toggle between restricting data set sizes to be a power of 2, or allowing arbitrary data set
sizes. Given a sweep start wavelength and the trigger interferometer delay, this VI determines
the sweep end wavelength for a radix 2 data set nearest to the previous sweep end wavelength
setting. It also provides a set of six wavelength ranges corresponding to data set sizes of 2
raised to the powers of 14 through 19. These ranges are not always appropriate, especially for
short trigger interferometer delays, so this VI should be updated with a more robust range
selection algorithm.
116
Update Scan Data.vi
Called by: Scanning OFDR 2.2.vi
Custom VIs called: None
Labview VIs called: NI AALBase.lvlib:Mean.vi
Inputs: 6
LVClass
Name
Description
Digital
#Sweeps
The number of wavelength sweeps to average at each scan
location.
Array
Chart Refs
References the Amplitude Chart and Range Chart on the
front panel of the main Scanning OFDR software application organized in an array.
Digital
Current Step 1
Current scan step along Axis 1.
Digital
Current Step 2
Current scan step along Axis 2.
Cluster
error in (no
error)
Array
Scan Data
Input error cluster.
Scan data array (see VI description)
Outputs: 2
LVClass
Name
Cluster
error out
Array
Updated Scan
Data
Description
Output error cluster.
Updated scan data array.
VI description: This VI updates the Scan Data array each time an OFDR measurement has completed during a scanned measurement. The Scan Data array contains
amplitude and range data at each scan position for each peak configured in the Peak Selection and Measurements array on the front panel of the main Scanning OFDR software
application. The Scan Data array is a three dimensional array. Each selected peak is associated with two adjacent pages in the array in the order of peak number. The first of
these two pages is for amplitude data, and the second is for range data. Within each page,
rows and columns correspond to locations within a 2D scan. Rows correspond to steps along
Axis 1, and columns correspond to steps along Axis 2. For 1D scans, each page is still a 2D
117
data array structure, but with only one row. Each time an OFDR measurement completes
during a scan, this VI places the resulting amplitude and range values at the correct data
locations within the Scan Data array. If multiple wavelength sweeps are requested at each
scan location, data stored in the Amplitude Chart and Range Chart on the front panel of
the main Scanning OFDR software application is used for averaging.
This VI could be made more memory efficient by passing the Scan Data data value
reference rather than the Scan Data array.
118
Wavelength Range.vi
Called by: Update End WL.vi
Custom VIs called: None
Labview VIs called: None
Inputs: 3
LVClass
Name
Digital
# of Ranges
Digital
Start Wavelength
(nm)
Digital
Trigger Delay
(ns)
Description
The number of sweep ranges requested.
Wavelength sweep start wavelength.
Trigger interferometer delay; reciprocal of the frequency
spacing of wavelength sweep data.
Outputs: 2
LVClass
Name
Description
Array
Data Set Sizes
The number of data points in the data sets corresponding
the returned sweep ranges.
Array
Sweep Ranges
The wavelength sweep ranges corresponding to data set
sizes equal to powers of 2.
VI description: This VI determines the wavelength sweep ranges corresponding
to data set sizes that are equal to powers of 2. The largest data set size is always 219 , and a
number of ranges specified by # of Ranges is returned.
119
WL vs Time.vi
Called by: Scanning OFDR 2.2.vi
Custom VIs called: OFDR Global.vi, Fourier Interpolation.vi
Labview VIs called: NI AALPro.lvlib:Unwrap Phase.vi, NI AALPro.lvlib:Fast Hilbert
Transform.vi, NI AALBase.lvlib:Mean.vi
Inputs: 5
LVClass
Name
Description
Digital
Clock rate (Hz)
Data acquisition sampling rate.
Digital
Interferometer
Delay (ns)
Relative delay between the interferometer paths.
Digital
Interp Factor
Factor by which to Fourier interpolate the Raw Data prior
to the Hilbert transform.
Array
Raw Data
Time-sampled wavelength sweep data for a simple pathmismatched interferometer.
Digital
Start WL (nm)
Sweep start wavelength.
Outputs: 4
LVClass
Name
Description
Array
Frequency (GHz)
Measured frequency vs time data.
Digital
Time step (ms)
Time step size for wavelength and frequency output data
arrays.
WaveformGraph
Waveform Graph
Array
Wavlength (nm)
Measured wavelength vs time data.
VI description: This VI calculates the laser wavelength versus time from timesampled wavelength sweep data for a simple interferometer on the Aux channel with a relative
delay equal given by Interferometer Delay (ns). This VI uses the Hilbert transform method
described in Ahn et. al., Applied Optics, 44, 35, 7630. The sampling density of the raw data
is optionally increased by a factor of Interp Factor prior to the Hilbert transform by Fourier
interpolation using zero padding.
120