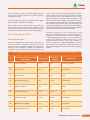
1
Green Brick Making Manual A Practical Guide on How to Make Green Bricks Contact Details: Technology and Action for Rural Advancement B-32, TARA Crescent, Qutub Institutional Area, New Delhi-110016 Phone Number: 011-26544100 Email: [email protected], [email protected] All the content or information present here is the exclusive property of Technology and Action for Rural Advancement (TARA). The content/ information contained here is correct at the time of publishing. The views expressed in this catalogue do not necessarily reflect the views of any organisation(s) associated with Technology and Action for Rural Advancement. No material from here may be copied, modified, reproduced, republished, uploaded, transmitted, posted or distributed in any form without prior written permission from TARA. Unauthorised use of the content/information appearing here may violate copyright, trademark & other applicable laws & could result is criminal or civil penalties. ©Technology and Action for Rural Advancement 2014 Preface This manual has been developed in response to the interest in Malawi to understand the process of production of green bricks. It aims to describe the different methods of production of green bricks. The manual also explains in detail the methods of testing of soil for determining its suitability in brick making and the drying, stacking and storage of green bricks. This user manual is expected to serve as a basic tool for the workers and supervisors in a kiln to delineate the essential parameters of producing green bricks. This manual doesn’t claim to be complete or perfect. It is in the hands of users to utilise it fully by using it as a reference guide for further improvement. The authors would appreciate if you could share your ideas and work experiences to further improve this manual. Society for Technology and Action for Rural Advancement, India. Acknowledgments During the course of developing this manual, every effort was made to include the existing knowledge base, along with interactions between personnel associated with the technology. We would like to acknowledge the support of various organizations, TARA Machines and Tech. Services Pvt. Ltd., India; Centre for Community Organization and Development (CCODE), Lilongwe, Malawi; Eco bricks Limited, Lilongwe, Malawi and IPE Global, New Delhi; who have whole heartedly contributed towards developing the same. Our sincere thanks to various individuals, whose views have been accessed personally, through one-to-one interactions, the internet and printed documents. The research efforts captured in this manual would not have been possible without the institutional support given to the project organisations by Deutsche Gesellschalt fur Internationale Zusammenarbeit (GIZ) GmbH and the Knowledge Partnership Programme (KPP) of the Department of International Development (DFID), India. Managed and supported by IPE Global, the KPP aims to step up collaboration around ideas, knowledge, evidence, accountability, technology and innovation, impacting the delivery of global public goods and services and leverage Indian experiences to reduce poverty in LDCs. Society for Technology & Action for Rural Advancement, India Contents Chapter 1: Appropriate Soils for Brick Making........................................................8 1.1 Introduction ................................................................................................................ 8 1.2 Origin and Formation of Soil ..................................................................................... 8 1.3 Formation of Soil ........................................................................................................ 9 1.4 Types of Soils in Malawi ............................................................................................. 9 Chapter 2: Soil Suitability in Brick Making ............................................................11 2.1 Additives .................................................................................................................... 11 Chapter 3: Preparatory Work before Construction ..............................................13 3.1 Introduction .............................................................................................................. 13 3.2 Visual Test ................................................................................................................. 13 3.3 Field Test ................................................................................................................... 14 3.4 Laboratory Tests ....................................................................................................... 17 Chapter 4: Choice of Brick and Production Options .............................................19 4.1 Introduction .............................................................................................................. 19 4.2 Brick Types and Choice ............................................................................................ 19 4.3 Use of Internal Fuel in Making of Green Bricks ..................................................... 20 Chapter 5: Green Brick Production Process ..........................................................22 5.1 Introduction .............................................................................................................. 22 5.2 Necessary Conditions for Green Brick Making ...................................................... 22 5.3 Standarisation of Green Bricks ............................................................................... 25 5.4 Stages of Green Brick Making ................................................................................. 27 5.5. The Moulding Process.............................................................................................. 38 Chapter 6: Drying, Stacking and Storage Process .................................................41 6.1 Introduction ...............................................................................................................41 6.2 Drying Principles .......................................................................................................41 6.3 Factors Affecting Brick Drying .................................................................................42 6.4 Behaviour of a Brick during Drying................................. ....................................... 42 GREEN BRICK MAKING MANUAL 5 VERTICAL SHAFT BRICK KILN 6.5 Determination of Drying ....................................................................................... ........ ............. 43 6.6 Stacking Patterns and Its Effect on Drying ................................................................. . ............. 43 6.7 Process of Natural Brick Drying ........................................................................ ............ ............. 44 6.8 Various Stacking Patterns and Storage of Green Bricks .......................................... .. ............. 44 Figures Figure 1 Red Soil .................................................................................................................... ............. 9 Figure 2 Black Soil ................................................................................................................. ............. 10 Figure 3 Alluvial Soil ......................................................................................................... ..... ............. 10 Figure 4 Boiler Ash as Internal Fuel ..................................................................................... ............. 12 Figure 5 Fly Ash as an Anti-Shrinkage Material ........................................................... ....... ............. 12 Figure 6 Ball Test for Determining Suitability of Soil for Use in Brick Making ................ ............. 14 Figure 7 Sedimentation Test for Determining Suitability of Soil for Use in Brick Making............ 14 Figure 8 SmearingTest for Determining Suitability of Soil for Use in Brick Making ....... ............. 15 Figure 9 Crumbling Test for Determining Suitability of Soil for Use in Brick Making ..... ............. 15 Figure 10 Pencil Test for Determining Suitability of Soil for Use in Brick Making .......... ............. 16 Figure 11 Ball Shape Test for Determining Suitability of Soil for Use in Brick Making... ............. 16 Figure 12 Lemon Test for Determining Suitability of Soil for Use in Brick Making ..................... 16 Figure 13 Burnt Clay Bricks .......................................................................... ..................... .. ............. 19 Figure 14 Sand Lime Bricks .................................................................................................. ............. 20 Figure 15 Tobacco Dust as Internal Fuel ............................................................................. ............. 20 Figure 16 Black Core in Fired Bricks .................................................................................... ............. 21 Figure 17 Reduction Spots in Fired Red Bricks ................................................................... ............. 21 Figure 18 Manual Mixing Process ........................................................................................ ............. 29 Figure 19 Rotovator ................................................................................................. ............. ............. 32 Figure 20 Wet Mixing ............................................................................................................ ............. 33 Figure 21 Slop Moulding ....................................................................................................... ............. 33 Figure 22 Soft Mud Moulding Machine ............................................................................... ............. 38 Figure 23 Different Patterns of Stacking ............................................................................. ............. 43 Figure 24 Storage of Green Bricks ....................................................................................... ............. 44 6 GREEN BRICK MAKING MANUAL Tables Table 1 Comparison of Chemical Analysis of Good and Ordinary Soil Sample for VSBK Firing 17 Table 2 Properties of Good Brick Making Soil .................................................................... ............. 18 Table 3 Shrinkage Rates and Mould Sizes .......................................................................... ............. 27 Table 4 Interior Mould Sizes................................................................................................. ............. 36 GREEN BRICK MAKING MANUAL 7 VERTICAL SHAFT BRICK KILN Chapter 1 Appropriate Soils for Brick Making 1.1 Introduction The history of brick making goes back to the earliest days of civilization. It is averred that bricks were made more than 10,000 years ago. Although such great antiquity cannot yet be proved, archaeologists working at various sites have more or less accurately determined that the burned and the unburned bricks in the lower levels of the great temple were made more than 5,000 years old. Successive civilizations in the Euphrates – Tigris delta used clay bricks for building their houses, palaces and temples; many of the original bricks, such as those used in the 6th century BC to build Babylon, were taken from the ruins to build the towns of Ctesiphon and Baghdad. Out of Western Asia the art of brick making appears to have spread westward towards Egypt and the Mediterranean and eastward to China and India. Soil is formed by weathering of rocks. It is a lengthy process and takes millions of years for its formation. Thus it is an extremely valuable resource and should be used judiciously for making bricks. It is essential to be aware of the properties of soil before use in brick making. These are usually referred to as plasticity, grain size, organic content, colour and other chemical properties. All these properties need to be judiciously studied before determining the suitability in making bricks. 1.2 Origin and Formation of Soil 8 chemical compounds known as minerals. Many of these minerals in turn combine together to form aggregates which is known as rocks. Rocks are divided into three main groups according to their origin and structure. Igneous Rocks Igneous rocks are those that have been formed by the action of heat. These rocks were the first to be formed when the molten mass cooled and consolidated into solid rock. The igneous rocks constitute nearly 25% of the earth’s crust and are sometimes even 15 km thick. These rocks are mostly crystalline in nature and occur in big masses. Sedimentary Rocks These rocks have formed through the action of water. They form from sediments brought by water. Hence they are called sedimentary rocks. The sediment may consist of various types of substances and of various sizes of particles. These particles are cemented together by substances like silica, iron oxide or lime to give a solid form. Most of these rocks are deposited in layers or strata. All sedimentary rocks are of secondary or derivative origin, as they consist of materials that have previously existed on or beneath the surface of the earth. The transportation, accumulation and consolidation of these materials give rise to new rocks. Soil Forming Rocks Metamorphic Rocks The earth’s crust (outer solid later) is principally composed of mineral matter. The mineral matter is made up of various elements combined together to form compounds. Almost all the elements are present in the earth’s crust (e.g. oxygen, silicon, iron, calcium etc.). Each element is in combination with one or more elements to form definite Metamorphic rocks have resulted from the subsequent transformation of igneous and sedimentary rocks under the influence of heat, pressure and chemically active liquids and gases. When the change is considerable, the rocks are said to have undergone metamorphosis and the new rock is known as a metamorphic rock. GREEN BRICK MAKING MANUAL 1.3 Formation of Soil 1.4 Types of Soils in Malawi The transformation of rocks into soil is termed as soil formation or soil development. Soil formation starts primarily with the weathering of rocks. The weathering processes are primarily destructive in nature and help to change the consolidated rocks into unconsolidated soil. Soils relevant to brick making in Malawi can be divided broadly into following major groups. Weathering processes are of two types: Physical Weathering It is a mechanical process, causing disintegration of massive rocks into smaller particles without any chemical change or formation of newer products. Physical weathering is caused by the following factors. Temperature The alternate expansion and contraction of rocks due to variation in temperature produce cracks. The number of cracks slowly increases and the rock gets broken into pieces. Water Red Soil Red colour in red soils is due to the presence of various oxides of iron. They are either formed in-situ or from products of decomposition of rocks washed to a lower level. They generally include soils locally known as red sandy soils and red alluvium. They are mostly formed under sub-humid climate from an assorted rock formation. Their main features are light texture, porous structure, absence of lime and organic matter. In the upper part of a typical stratum, silty red soils are found. With depth the clayey fraction increases with the presence of granular particles of morrum or stones. These types of soil are suitable for brick making with a deep cherry red fired colour. However, due to its high presence of silt and sand particles appropriate strength is not developed. Caution should be exercised in selecting these kinds of soils since at depths they might contain coarser particles. (Refer Figure 1) In cold regions, water freezes in rock joints and expands in volume. Due to this tremendous pressure the rock splits into loose mass of stones. Rain water falling on the rocks also causes some abrasion. Moving water due to rains in rivers and flood plains has tremendous transport capacity and by its rolling actions further grinds the stones into smaller pieces. Water through its erosion forces removes the weathered parts and deposits as fine sand, silt or clay. Wind Wind carrying particles in suspension, like sand from rock fragments, when blowing constantly over a rock at great speed exerts a grinding action whereby the rock gets disintegrated. Chemical Weathering Chemical weathering takes place mainly at the surface of rocks with the dissolution of soluble minerals and formation of secondary products. This is called chemical transformation. No chemical weathering is possible without the presence of water. The rate of chemical reactions increases with dissolved carbon dioxide and other solvents in water. Higher temperatures and humid climates also greatly aid in chemical weathering. This is the reason of finding high amount of soil in tropical climates. Figure 1: Red Soil Lateritic Soil They are found mostly in areas of high rainfall. They are light in texture and have an open free draining structure. They are deficient in lime and thus highly suitable for brick making. Laterite soils formed at high levels have a pale red colour and are highly gravelly in composition. Those formed at lower levels have a darker colour due to accumulation of humus and a slightly finer texture. These types of soils are also suitable for brick making. However due to sandy nature they must be GREEN BRICK MAKING MANUAL 9 VERTICAL SHAFT BRICK KILN well compacted by mechanical means (pugmilling) to avoid breakage and attain the desired strength. Black Soil Black soils are developed from Basaltic rocks under semi-arid conditions. The soils are typically black or dark brown in colour with high content of lime nodules. They are locally known as regur, or black cotton soil, deep and medium black soils. Their texture ranges from sandy clay to heavy clay. Some black soils are porous. However majority of them are highly compact and impervious. One of Figure 3: Alluvial Soil varies from sandy clay to silty clay and even clayey in case of river delta areas. The structure is also variable, loose and free draining in case of sandy soils and compact and impervious in case of clayey soils. Due to its medium plasticity and high silt content, they are most suitable for brick making. (Refer Figure 3) Desert Soils Figure 2: Black Soil the characteristics of black soil is that it swells on wetting and shrinks and cracks when dry. These types of soils are highly unsuitable for brick making as a whole. (Refer Figure 2) Alluvial Soil Alluvial soils are the best available soil for both agriculture and brick making. These types of soils are characterised by extreme depth and yellowish to grey or grayish brown in colour. The texture 10 GREEN BRICK MAKING MANUAL They have been developed in arid regions mostly under the influence of physical weathering. They are mainly sandy and contain varying proportions of lime. These types of soils are unsuitable for brick making. Saline and Alkaline Soils These soils are developed in arid and semi arid regions. Poor drainage is also responsible for their development. Due to high salt content, these types of soils are unsuitable for brick making. Although in some parts of coastal India evidences of brick making are found, the fired brick quality are poor and are characterized by salt petering. Chapter 2 Soil Suitability in Brick Making A brick production unit needs to have a good quality soil to produce a high strength green brick. The better the green brick, better the fired properties. Certain types of clay are not good for brick making. For example, soils with high sand content have no plasticity and are difficult for forming. After moulding these types of bricks will deform on its own dead weight and are liable to crack during handling. Similarly the soil used for making pottery is not good for making bricks because it has a high shrinkage rate which causes the brick to crack during drying. To select the proper soil for brick making, generally select an area which has a tradition of brick making. For non brick making areas the soil from varying areas and depths should be tested for suitability in brick making. The most important criteria for a go or no go are the following: Soil should not contain any lime Soil should be free of stone particles Soil should be plastic i.e. it should retain its formability For simple field tests to check the quality of clay refer to Chapter 3. However, these processes are indicative only and will only give you an idea of the soil. For confirmative tests it is always recommended to get your soil tested from an accredited laboratory. Based on field trials it is generally assumed that from a 135 ft x 135 ft land, dug upto 2 ft depth, approximately 6 lakhs of green bricks can be produced. Thus for a 2 shaft VSBK producing around 25 lakh bricks per season, one would require approximately 540 ft x 540 ft of land. However the requirement of land will decrease if the soil depth is more that 2 ft. 2.1 Additives In green brick making additives are of the following types: Internal fuel Anti shrinkage material Structure opening material Internal Fuel For firing of green bricks in VSBK in an energy efficient manner, addition of internal fuel is an absolute necessity. Without internal fuel content, firing of green bricks in a VSBK is not recommended. Internal fuel not only reduces the external fuel consumption but also saves on the emission thereby reducing pollution. Internal fuel is a waste materials produced by process industries. They include Tobacco industry waste Boiler ash Textile industry sludge Coal dust of inferior quality Distillery industry waste Agro industry waste Bottom ash from sugar manufacturing industries These are dumped by the industries and are mostly available free of cost. It is mixed with the soil during its dry mixing process. Quantity of addition depends on the quality of the soil and the internal fuel. (Refer Figure 4) GREEN BRICK MAKING MANUAL 11 VERTICAL SHAFT BRICK KILN Stone dust Sandy soil Before addition refer to an expert for determining the quantity to be added. Too much addition might affect the fired brick property. (Refer Figure 5) Structure Opening Material Figure 4: Boiler Ash as Internal Fuel Anti Shrinkage Material To make highly plastic soils suitable for brick making anti shrinkage materials are added. This is to avoid high shrinkage and resultant cracks during drying in the open atmosphere. Depending upon the availability the following types of anti shrinkage materials can be added Fly ash Fine sand Medium sand (< 2 mm grain size) In areas of very low humidity and high temperature, a structure opening material is used in green brick making. This is sometimes in addition to the anti shrinkage material also. The materials generally used are Rice husk Wheat straw Saw dust These types of materials are used only during the summer months. They are used within the green brick to delay the shrinkage rate of green bricks during drying. These types of materials are added to a maximum of 2% only depending upon the plasticity of the soil. Too much addition reduces the property of the fired brick. Figure 5: Fly Ash as an Anti-Shrinkage Material 12 GREEN BRICK MAKING MANUAL Chapter 3 Preparatory Work before Construction 3.1 Introduction The quality of fired bricks depends largely upon the soil properties, skill of the moulders and firemen, no matter which technology is used for firing the bricks. The basic constituents of soil are the clay and silica minerals which contain minerals like alumina, potassium, iron, calcium, sodium etc. These mineral constituents have various characteristics on brick forming, drying and firing. Good brick quality cannot be achieved from all types of soil. The only way to determine the fired brick quality from a particular soil is to make the desired product on a trial basis and analyse the results. Confirmatory tests of soil are also performed to explain and understand the product quality. Site should not be nearby the river areas, Site must be free from tree plantation, (because of probability of high organic content within the soil e.g. roots, leaves etc. Further tree plantations will provide a shadow on the green bricks thus taking more time to dry.) Site should not be near forest area to prevent damage to forest trees by the emissions from the firing process. VSBK Soil Selection Soil should not contain any limestone (because presence of limestone particles greater than 1 mm gives lime bursting in a fired brick) Soil should be free of stone particles (because presence of stone particles damages the brick during the firing process due to unequal thermal expansion). Soil should be plastic i.e. it should retain its formability for forming a strong green brick. Soil Suitable for Brick Business The very first step to determine the first feasibility of soil for a brick production site is to check its quality and availability. For economic viability, it has been calculated that a VSBK business requires the local available soil for a period of atleast 3-5 years. Therefore soil suitability is connected with VSBK site selection criteria. This is done by visual inspection of site and performing primary soil tests at site and soil reserve calculation. 3.2 Visual Test The visual test gives a quick go or no go decision for selecting the brick production soil for further testing. The following rough criteria should be considered: VSBK Site Selection Enough soil at site to last for a period of 3–5 years keeping the economics of brick business point of view. Soil Reserve Calculation The soil reserve calculation is needed for mainly two reasons: To ensure that the raw material last for a period that guarantee that the initial business investment can be recovered and profit can be achieved. To ensure that the same raw material quality is available for producing consistent quality of fired product. GREEN BRICK MAKING MANUAL 13 VERTICAL SHAFT BRICK KILN 3.3 Field Test There are a few basic field tests that an experienced brick maker or VSBK technology expert must master. Although indicative, a good professional will always derive the correct conclusion out of the field based tests. Ball Test Ball test is mainly for determining sand and clay proportion in the soil. This test is very essential for soil having high plasticity and low silica content, because quantity of sand and water to be added for the proper plasticity can be found out. (Refer Figure 6) Take a handful of soil and put some water in it. Water should not be too high to make slurry out of the mixture. It should be enough to make the soil moist and make dough by hand. With the hand and fingers mix the soil and water thoroughly. After uniform mixing try to make a ball out of the soil. This activity might take some time depending on the amount of water added. If the water content is more then add more dry soil. After the ball is reasonably well formed, drop the ball from a height of atleast 1 m. Alternatively, the ball can be dropped from shoulder height with hands straight. Take care that the surface on which the ball is dropped is levelled and clean – preferably a concrete surface or a hard surface. Never do the test in a wet or a loose surface. Observe the ball on the floor. If the ball retains its shape with little amount of deformation at the bottom only, then the soil is plastic clayey in nature. However if the ball flattens out upon hitting the floor, then the soil is sandy in nature. Take another ball and dry it under atmosphere or under a small open fire. Cool the ball and repeat the test. If the ball cracks into many pieces after contact with the floor then the soil is sandy in nature. However, if the ball breaks into two to three pieces then the soil is clayey and plastic in nature. Sedimentation Test Observe the smoothness of the surface of the ball. For plastic soils the surface will be shiny and uniform. However, for sandy soils it will be difficult to make a round shaped ball. Figure 7: Sedimentation Test for Determining Suitability of Soil for Use in Brick Making This process is also known as “Bottle Test” for determining the proportion of clay and sand particles in the soil. It also gives the idea of percentage mixture of sand and clay in the soil. (Refer Figure 7) Fill one-fourth quantity of the glass beaker with the required soil. Add half teaspoonful of salt into the soil. Add water to about 50% above the soil level. Wait for a few minutes till the water percolates to the bottom (there will be a distinct colour difference). Stir the soil and water mixture vigorously with a spoon for at least 2-5 minutes. The colour of the stirred material should be uniform. Figure 6: Ball Test for Determining Suitability of Soil for Use in Brick Making 14 GREEN BRICK MAKING MANUAL Pour the stirred slurry into the measuring cylinder. Add some more water in the beaker and drain off the entire soil into the measuring cylinder. Take care that no soil is attached to the sides of the measuring cylinder. Place the measuring cylinder on a level platform and allow it to stand for atleast 12 hours or until the water becomes clear at the top. When the water is clear, measure the height of the sand (h1), silt (h2) and clay (h3) layers. The respective sand, silt and clay content are calculated in percentage by dividing the respective heights with the total height (h1+h2+h3) and multiplying by 100. Let the thumb dry out. After drying if the soil layer falls off easily or can be removed then the soil is sandy or silty in nature without any plasticity. However if the soil stick to the thumb and index finger after drying the it is plastic in nature. Observe for coarser particles in the soil smear. It gives a measure of the coarse sand in the soil. Finger Crumbling Test Smearing Test In the field after digging the land upto the required depth take out a small quantity of the required soil. (Refer Figure 9) After the required depth of soil is reached take some loose soil (found near the dug out area) and put a little bit of water into it. Alternatively a soil lump may also be taken. Take care not to put too much of water and make a watery paste. (Refer Figure 8) After the soil is saturated with water, mix the soil and water on the left hand. With the soil a ball should be tried to make. Roll the moist ball in hand enough so that the ball is dried out to a little bit. Figure 8: Smearing Test for Determining Suitability of Soil for Use in Brick Making Pinch out a little bit of the soil with the thumb and the index finger and smear on the thumb by the index finger at one go. The smearing should be done as fine as possible. During this process observe for any coarse particles. It will be felt by the fingers. After the smearing, the soil does not form a smooth and thin layer, then the soil is sandy. To know the plasticity of the layers of soil, this test can be performed whenever intended to, since it is not an expensive one and takes a few seconds to perform. Figure 9: Crumbling Test for Determining Suitability of Soil for Use in Brick Making Take two button sized (preferably smooth surface) soil lumps. The soil lumps should be sized so that it can be held between two fingers e.g. thumb and index finger. Press lightly the two fingers on the soil lumps. Increase the pressure as and when required. If with low to medium pressure the two soil lumps gets pressed against each other and cracks, falling apart into a several pieces then the soil is likely to be silty or sandy with no plasticity. If with the maximum pressure, the soil buttons does not disintegrate or gets broken into two to three pieces only, the soil is a semi plastic to plastic soil. Take care to perform this test repeatedly for three to four times to get the approximate idea. Before doing the test, take care that both the soil being tested are of the same quality. If the thin soil layer is shiny and evenly spread out over the thumb then the soil is plastic in nature. GREEN BRICK MAKING MANUAL 15 VERTICAL SHAFT BRICK KILN Pencil Test Take a handful of soil and put sufficient water in it to enable to roll out a pencil out of the soil. Take care to mix the soil in hand for some time. This is to allow some plasticity being developed within the clayey particles of the soil. Water should not be too high to make slurry out of the mixture. It should be enough to make the soil moist and make dough by hand. (Refer Figure 10) Figure 10: Pencil Test for Determining Suitability of Soil for Use in Brick Making With the hand and fingers mix the soil and water thoroughly. After uniform mixing, place the moist soil on the two palms and try to roll out a fine pencil out of the soil. The diameter of the rolled soil should be enough as per a pencil; not too thick or too thin. If the soil forms a pencil long enough without breaking or disintegrating, then it is indicative of a plastic soil. However if the soil length breaks out then the soil is non plastic sandy in nature. Ball Shape Test and uniform ball. If after repeated attempts the soil daub does not form into a round ball, then the soil is sandy. During this process, if water is released out of the ball then the soil is silty / sandy. However if after a few attempts, a good, smooth and round ball is formed, then the soil is semi plastic to plastic in nature. Wash hands with water. If washing is easy then the soil is silty / sandy with low clay content. However even after repeated washing, soil is sticking into the palms then the soil is clayey in nature. Figure 11: Ball Shape Test for Determining Suitability of Soil for Use in Brick Making After washing if soil sticks to the corners of the finger nails then the soil has high clay content. Lemon Test Take a lump of soil from the required area or depth. Try to avoid loose soil since the lime nodules (if any) might not be contained within a small amount of loose soil. Look for soil lumps which have white spots in it. (Refer Figure 12) Place a small amount of soil in the Petridish. Ground the soil into a loose form by hand. Do not put water into the soil, since it will retard the process of reaction with the acid. After the required soil depth is reached collect loose or lumps of the representative soil to be tested. (Refer Figure 11) Take water and mix with the soil to make it moist enough to roll into a ball. Wait for a few minutes or till all the soil has absorbed the water. Use one hand to roll the moist into a ball. This process might take a little bit time depending upon the amount of water added. If the amount of water added is accidentally more than that required then take some more soil. Use fingers to smoothen and uniformly mix the moisture with the soil. Try to form the soil mixed with water into a smooth 16 GREEN BRICK MAKING MANUAL Figure 12: Lemon Test for Determining Suitability of Soil for Use in Brick Making Take a small amount of acid by the pipette and put over the soil. Watch closely for any effervescence or bubbling action. If the soil does not show any effervescent, repeat the test with a separate soil sample. After repeat tests, if the soil does not show any effervescent, then it is free of lime. However, even if there are minute cases of effervescence, the soil contains lime nodules harmful for brick making. 3.4 Laboratory Tests Chemical Analysis Chemical composition of the soil is found out by chemical analysis. Chemical analysis has been one of the most reliable indicators to judge the quality of soil suitable for VSBK. The important chemicals to be analysed are Alumina, Silica, Iron oxide, Calcium Oxide, Manganese oxide, Sodium oxide and Potassium oxide. Our experience shows that, Alumina, Iron and Magnesium has a very significant role in defining the brick quality. If the amount of Alumina is higher (range 20 to 30%) in the soil, bricks have good ring, if the percentage of Iron oxide is greater than 5%; it gives cherry red color and Magnesium oxide gives the yellowness, so generally less percentage of Magnesium (below 2%) is preferred for brick making in VSBK. Chemical analysis of soil is carried out using different methodology such as Furnace ignition, Gravimetric analysis and Titrimetric analysis in a well-equipped laboratory. It is not possible to analyse the chemical composition of soil using some practical methods at the site. However, a person having the in depth knowledge in ceramic can predict the compositions of major chemicals by visually judging the soil and brick quality. (Refer Table 1) Table 1: Comparison of Chemical Analysis of Good and Ordinary Soil Sample for VSBK Firing S No. Test Parameters on Dry Basis (% by mass) Good sample Ordinary Sample Method Use 1 Loss of Ignition 7.7 3.2 Furnace ignition 2 Silica as SiO2 61.8 80 Gravimetric 3 Iron as Fe2O3 3 0.9 AAS 4 Aluminum as Al2O3 23 14.6 Calculation 5 Sodium as Na2o 0.2 0.1 AAS 6 Potassium as K2O 2.76 Trace AAS 7 Calcium as CaO Trace Trace Titrimetric 8 Magnesium as MgO 1.2 1.2 Titrimetric 9 Organic Carbon as C 0.82 0.66 Titrimetric GREEN BRICK MAKING MANUAL 17 VERTICAL SHAFT BRICK KILN Mineralogical Analysis Mineralogical analysis of soils gives a qualitative data on the phases present. Determination of phases is essential to know and predict the material behaviour after reactions have taken place. The mineralogical phases in soils are determined by X-ray diffraction analysis. Generally before firing, the following phases are present: Illite (most common), Montmorillonite (present in black soils), Kaolinite (white china clays) Quartz (in the form of sand) Muscovite, feldspar, haematite etc. After firing with a mixture of soil, sand, and internal fuel the following phases are developed within a fired brick: Mullite (needle like structure, gives strength) Free quartz (gives fired strength) Amorphous phase (glassy phase, acts as a binding material) Physical Analysis Percentage of clay, silt and sand can be determined by physical analysis. Similarly, plasticity index, liquid limit and plastic limit of soil are also determined 18 GREEN BRICK MAKING MANUAL Table 2: Properties of Good Brick Making Soil Elements Percentage Clay 20 – 30 Clay & Silt 40 – 65 Liquid Limit 25 – 38 Plasticity Index 7 – 16 Volumetric shrinkage 15 – 25 by physical analysis. The properties of good brick making soil are given in Table 2. The given range of liquid limit, plasticity index and volumetric shrinkage for producing good brick quality has not yet been practically conformed. In places where the physical parameters cannot be analysed, one can even proceed to next step of soil testing on the basis of chemical analysis. Chapter 4 Choice of Brick and Production Options 4.1 Introduction Many people may confuse clay brick with “brick” made from other materials. For example, concrete units rely on a cement paste to bond the materials together. Moreover, concrete units are inherently a grayish color, which means that users must inject color pigments before the setting process and use color sealant afterwards to have a color affect. On the other hand, clay brick has thousands of color and shade options that will not fade. Contrary to some people’s perceptions, clay brick is actually significantly stronger than concrete brick as well. Another brick-like material, made from fly ash, claims to meet the same performance standards as clay brick. Bricks are made from clay and shale – some of the most abundant, natural materials on earth – and then fired through a kiln at up to 1000 -1200º C. The reason the brick turns into such a durable material is that the clay/shale unit actually goes through a vitrification process in the kiln, which enables the clay particles to fuse together. Concrete Bricks Fly ash Clay Bricks Common Burnt Clay Bricks Clay bricks are man-made materials that are widely used in building, civil engineering work and landscape design. They are also used for paving footpaths, sidewalks, driveways and garden beds. Clay is a natural earth material with plastic properties. It becomes cohesive when kneaded, expands when wet, shrinks when dry and gains strength when fired. The material can also be made into various textures to complement the exterior appearance of a home. Common burnt clay bricks are formed by pressing in molds. Then these bricks are dried and fired in a kiln. Common burnt clay bricks are used in 4.2 Brick Types and Choice Bricks are used for building and pavement all throughout the world. In the USA brick was once used as a pavement material, and now it is more widely used as a decorative surface rather than a roadway material. Bricks are usually laid flat and are usually bonded forming a structure to increase its stability and strength. There are several types of bricks used many of them being about eight inches long and four inches thick. There are various types of bricks used in masonry. Common Burnt Clay Bricks Sand Lime Bricks (Calcium Silicate Bricks) Engineering Bricks Figure 13: Burnt Clay Bricks GREEN BRICK MAKING MANUAL 19 VERTICAL SHAFT BRICK KILN generalwork with no special attractive appearances. When these bricks are used in walls, they require plastering or rendering. Sand Lime Bricks Sand lime bricks are made by mixing sand, fly ash and lime followed by a chemical process during wet mixing. The mix is then moulded under pressure forming the brick (Refer Figure 14). These bricks can offer advantages over clay bricks such as: Their color appearance is grey instead of the regular reddish color different colors as pigmented during its production. Concrete blocks may be produced with hollow centres to reduce weight or improve insulation. The use of block work allows structures to be built in the traditional masonry style with layers (or courses) of staggered blocks. Blocks come in many sizes, blocks are usually 390 mm × 190 mm × 190 mm excluding mortar joints. Fly Ash Clay Bricks Predetermined quantity of fly ash is added to the soil, depending upon the characteristics of the soil, and thoroughly mixed when the mix attains proper moisture content, casting of the bricks was done manually and the moulded bricks were air dried. Then bricks were placed in the kiln for firing at 900 ± 10° C there after removed for use in building construction. 4.3 Use of Internal Fuel in Making of Green Bricks Figure 14: Sand Lime Bricks Their shape is uniform and presents a smoother finish that doesn’t require plastering These bricks offer excellent strength as a loadbearing member Engineering Bricks Engineering bricks are bricks manufactured at extremely high temperatures, forming a dense and strong brick, allowing the brick to limit strength and water absorption. Use of internal fuel in brick making is based on the premise that substituting wastes into brick making process either as fuels, pore opening or anti shrinkage materials can improve the profitability of brick making enterprises, reduce the working hazards and also reduce the environmental impact of brick making. Many types of domestic, agricultural and industrial wastes have an acceptable heat value and therefore have a potential for use in domestic or industrial processes that require heat. Some wastes. e.g. boiler ash, slags, charcoal wastes, rice husks can be clean burning and so less polluting than conventional fuels such as coal or wood. Certain industrial wastes acts as fluxes, thereby lowering the firing temperature and hence the energy Engineering bricks offer excellent load bearing capacity damp-proof characteristics and chemical resisting properties. These bricks satisfy the minimum crushing strength and having a minimum density of 1.9 kg/dm³, and have been fired to the point of sintering, they count as engineering bricks. Concrete Bricks Concrete bricks are made from solid concrete. Concrete bricks are usually placed in facades, fences, and provide an excellent aesthetic presence. These bricks can be manufactured to provide 20 GREEN BRICK MAKING MANUAL Figure 15: Tobacco Dust as Internal Fuel required to form the ceramic bonds in clay mixes. This will obviously reduce fuel use and its associated costs proportionally. The typical internal fuel that can be used in Malawi is tobacco ash and boiler ash. (Refer Figure 15) Advantages of Using Internal Fuel The compressive strength of bricks can be increased by the addition of wastes that act as fluxes. If such an increase is not required, the addition of a flux may mean that, as an alternative, bricks can be fired at a lower temperature, saving fuel while maintaining acceptable properties. heavy metal compounds found in some internal fuels. Usually a fired brick can contain within its structure these harmful substances without significant leaching. Hence there is no risk to either builders or users of these bricks. Brick making therefore has potential of being the means of disposal of heavy metals and harmful substances which can otherwise find its way into human consumption. Internal fuel use in brick making can also reduce the suspended particulate matter released into the atmosphere when coal is burnt as an external fuel. For more details on the internal fuel, refer to the VSBK Operation Manual. The density of common bricks is typically in the range of 1.60 – 1.80 gm/cm3. When particulate fuel is included in the bricks this burns away and leaves pores. Thus the density of the final product is reduced. On the other hand they are somewhat less strong and durable. If density falls below 1.60 gm/cm3, bricks would not be durable enough for use in construction. Some types of internal fuel can cause the fired bricks to change their colour. This is mainly caused due to appreciable lime or iron content within the additive. Alternatively, presence of iron also acts as a flux, which decreases the vitrification temperature, thereby decreasing energy consumption. For internal fuel bricks, reduction in chemical reaction occurs when insufficient air gets to the fuel. The result is inefficient burning of bricks and the fuel remains partly burnt. Also, during firing if bricks are placed too close together in the kiln, black reduction spots can occur where the surfaces are in contact. Bricks with reduction cores and spots are more likely to exhibit substandard properties (Refer Figure 16 and 17). Often consumers do not like the appearance and reluctant to buy the bricks. Therefore firing of internal fuel bricks has to be for a long period in a slow manner with increased airflow. This problem is not supposed to occur when the firing is done in a fixed chimney Bull’s Trench Kiln. This is mainly due to its extremely slow firing schedule with appreciable air flow through the gaps between the brick setting. In some cases, there is an interesting advantage associated with internal fuel use in brick making. Fired clay bricks can incorporate harmful or even Figure 16: Black Core in Fired Bricks Figure 17: Reduction Spots in Fired Red Bricks GREEN BRICK MAKING MANUAL 21 VERTICAL SHAFT BRICK KILN Chapter 5 Green Brick Production Process 5.1 Introduction Green brick production is the heart and science of brick making. It is the most important aspect in any and all type of brick making to achieve quality and hence - profitability. Each step of the entire green brick production system is interlinked and is dependent on the earlier process. All the process of green brick making are equally important. Neglecting any one process will affect the final product quality. The VSBK firing system is a fast firing process with very little tolerances for errors. Due to dynamic movement of the entire brick columns and the load distribution on each brick, the quality of the green brick must be nearly perfect. However, this aspect of the VSBK technology is never recognised, resulting in poor brick quality. This has a direct effect on the fired product resulting in deteriorating profits. This is not understood by any brick producer thus putting the entire blame on non-performance of the VSBK technology. Basic premise of VSBK technology and its correlation with green brick quality GARBAGE IN = GARBAGE OUT This chapter describes the best green brick production practices with respect to manual moulding and soft mud moulding with selective mechanization. Heavy duty structural product fabrication including stiff extrusion has not been discussed here since they are not of economical relevance with respect to Malawi brick production scenario. 22 GREEN BRICK MAKING MANUAL 5.2 Necessary Conditions for Green Brick Making Malawi has abundant natural resources for making bricks in the form of soil. Various types of soils are found in Malawi for brick making. However for sustainable brick production soil is not the only raw material. The ultimate objective of any brick production unit is its profitability and the presence of an increasing market is the most important pre requisite for establishing a brick production unit. The minimum conditions needed to establish and produce good quality green bricks are: Soil Additives Water Mixing Ageing Drying Tools and equipments Motivation Space Management Soil A brick production unit needs to have an acceptable quality soil to produce a high strength green brick. The better the green brick, better the fired properties. Certain types of clay are not good for brick making. For example soils with high sand content have no plasticity and are difficult for forming. After moulding these types of bricks will deform on its own dead weight and are liable to crack during handling. Similarly the soil used for making pottery is not good for making bricks because it has a high shrinkage rate which causes the brick to crack during drying. To select the proper soil for brick making, generally select an area which has a tradition of brick making. For non-brick making areas the soil from varying areas and depths should be tested for suitability in brick making. The most important criteria for a go or no go are the following: Soil should not contain any lime Soil should be free of large stone particles Soil should be plastic i.e. it should retain its formability Additives In green brick making additives are of the following types: Internal fuel Anti-shrinkage material Structure opening material Internal Fuel For firing of green bricks in VSBK in an energy efficient manner, addition of internal fuel is an absolute necessity. Without internal fuel content, firing of green bricks in a VSBK is not recommended. Internal fuel not only reduces the external fuel consumption but also saves on the emission thereby reducing pollution. Internal fuel is a waste materials produced by process industries. The various types of internal fuel suitable for Malawi include: Tobacco industry waste Boiler ash from sugar industries Textile industry sludge Coal dust of inferior quality Distillery industry waste Agro industry waste These wastes are usually dumped by the industries and are mostly available free of cost. It is mixed with the soil during its dry mixing process. Quantity of addition depends on the quality of the soil and the internal fuel. Anti-shrinkage Material To make highly plastic soils suitable for brick making anti shrinkage materials are added. This is to avoid high shrinkage and resultant cracks during drying in the open atmosphere. Depending upon the availability the following types of anti-shrinkage materials can be added: Boiler ash Fine sand Stone dust Sandy soil Before addition refer to an expert for determining the quantity to be added. Too much addition might affect the fired brick property. Structure Opening Material In areas of very low humidity and high temperature e.g. summer months in Malawi, a structure opening material should be used in green brick making. This is sometimes in addition to as anti-shrinkage material also. The materials generally used are: Rice husk Wheat straw Saw dust These types of materials are used only during the summer months. They are used within the green brick to delay the shrinkage rate of green bricks during drying. These type of materials are added to a maximum of 2% only depending upon the plasticity of the soil. Too much addition reduces the property of the fired brick. Water One of the most important raw materials for making bricks is water. To produce bricks one must have sufficient quantity of water available. Before starting a brick production unit, a continuous source of water supply must be determined. GREEN BRICK MAKING MANUAL 23 VERTICAL SHAFT BRICK KILN Generally for brick production water is supplied from own submersible water pumps, or deep wells. Check the water level for the availability of water during the summer season also. To produce 1,000 bricks approximately 750 litres of water is needed during moulding only. Apart from water source and lifting, proper distribution system needs to be established so that it reaches to moulder in appropriate time and quantity. Mixing An important criterion to produce good green bricks is that all the raw materials including additives, soil and water should be mixed thoroughly. Aggregation of any single material within a green brick is a source of weak spot thereby reducing its fired property. Usually mixing is done manually by moulders. However if proper supervision is not there often the mixing is not done properly. It is always recommended to adopt a mechanized means of mixing e.g. by pugmill. This will not only ensure uniformity of the materials but also a greater compacted material will less water content, which is good for achieving quality. For mechanized brick making through soft mud moulding technique to extrusion, mixing is completed within the process. Ageing The process of ageing uniformly dissolves the dry particles of soil and develops plasticity within the soil. Uniformly plastic soil makes bricks of uniform quality. The process and time of ageing depends on the quality of the soil and may vary from 24 hours to several days. The longer the time, the better the ageing. Always remember that ageing should be done under moist and warm conditions. Higher temperature helps in speeding up the ageing process. Drying Proper use of dry green bricks is essential to achieve good fired quality. Before transportation or stocking of green bricks it has to be ensured that the green bricks are fully dry. To achieve this proper stacking of bricks is a necessary prerequisite. The rate of drying or drying time depends upon the plasticity of the soil and the atmospheric conditions. Higher plasticity soil will take more time for drying than sandy soils. 24 GREEN BRICK MAKING MANUAL Similarly the same quality of green bricks will dry much faster during the summer time compared to the winter time. Generally in hot areas with very low humidity (30% - 40%) green bricks get fully dried within 4–5 days. Whereas the same bricks during winter time will always contain moisture of 6% 10% even after 21 days. Tools and Equipment A brick making unit needs basic tools in order to make green bricks. For a two shaft VSBK unit requiring approximately 10,000 bricks per day will need a family of 10-12 moulders depending on their productivity. The following minimum equipments will be needed for smooth production: 1 pugmill 6 pick axes 12 spades 12 wheelbarrows 4 levelling rings 12 brooms 2 cft box 24 moulds 12 bowcutters Space Sufficient space is needed for moulding and drying bricks. The site should be hard, smooth, clean and leveled. During the winter months more space is needed due to longer drying time whereas proportionately lesser time is required in the summer months. To accommodate 12 moulder family will need an area of approximately 9,000 sq.m. Motivation The production of handmade bricks is exhausting, tedious and dirty work. Therefore, in order for a brick production unit to succeed, the workers must be motivated towards their want to produce the bricks. A cordial atmosphere of give-and-take should be tried and installed amongst the work force. They need to feel that the making of good green bricks will benefit them by earning a living through an increased profit from surplus generated in the business. Management As with any production unit or business, good management is the key to a successful brick business. Unfortunately this aspect is often ignored or forgotten because brick making is considered to be a “low” or relatively simple technology. It has to be remembered that a brick production unit cannot withstand more setbacks than a normal commercial business. Management of a brick unit means planning, organizing, staffing and controlling the production in order that the bricks can be produced within budget and sold profitably. This has to be ensured through Quality Strength Benefits of Standardisation Many builders and contractors do not like to use bricks from small time producers like clamps since the bricks can vary a great deal in form, size, colour and quality. For example one clamp owner may make a brick of 200 mm x 100 mm x 60 mm and another in the same area may make a brick 220 mm x 100 mm x 68 mm. Because the sizes differ, it is difficult for a builder to mix these bricks when building a wall. A large contractor may need 20,00,000 bricks annually, yet many small clamp owners may produce on 1,00,000 bricks per season. Thus if he purchases bricks from 20 different producers making 10 different sizes and quality it would cause problems for construction. Adequate and timely supplies of raw material Maintenance of equipment Suitable production facilities for workers, their safety and comfort Quality control of raw material, process and finished product Smooth flow of production Adequate financial arrangements for wages and general purchases Good book keeping system Suitable recruitment and training of skilled personnel Specific tasks and roles for each staff There are three general types of brick forms: Skill upgradation Hollow blocks Good human behaviour Solid extruded bricks Solid hand moulded bricks 5.3 Standardisation of Green Bricks Standardisation of green bricks is necessary to deliver into the market a uniform quality of fired brick. This is necessary since in a VSBK the shaft size is decided based on the green brick size and cannot be changed afterwards. The characteristics of standardisation are based on Form Size Another advantage of standardising the bricks is being able to accurately calculate the number of bricks needed to construct a building. It also means that the size of the openings (e.g. doors and windows) can be calculated and can be made before the building is completed. Standardised bricks also save cement due to lesser amount of plastering and mortar joints. For standard brick size refer to Malawian Standard codes. The standard brick dimension as stated is 230 mm x 110 mm x 75 mm. Characteristics of Standardisation Form Hollow Blocks Normally these types of blocks are made in a large brick factory with special machines and equipment. In rural areas it is also possible to make hollow blocks with special wooden moulds, but the results are often unsatisfactory. Builders often like using hollow blocks because the larger size allows them to build a house in less time than with smaller solid bricks. The only disadvantage is that they do not have any frogs (depression in bricks). GREEN BRICK MAKING MANUAL 25 VERTICAL SHAFT BRICK KILN Solid Extruded Bricks Although these bricks are widely used in South Africa, they are slowly gaining prominence in the rest of Africa. They are also made with expensive machines and infrastructure. These bricks generally have high strength. They are generally used in special construction areas with exposed brick work. However these bricks are not gaining popularity due to the following Length There is a very important relationship between the length of a brick and its width because of the way we follow brick laying. Do not possess frog High cost of extruded machine The length of a brick should be equal to twice its width plus 10 mm (for the mortar joint). A brick with this length will be easier to build with because it will provide an even surface on both sides of the wall. High infrastructure development Height Cannot dry in the open atmosphere Specialised firing techniques The height of a brick, though of less importance also has a relationship with the length of the brick. The height of three bricks plus two 10 mm mortar joint should be equal to the length of the brick. But nowhere this relation is followed. Solid Hand Moulded Bricks Solid bricks are most commonly manufactured by both big and small clamp owners and VSBK entrepreneurs. They have the following advantages: The form is simple. It is much easier to make the mould and easier to mould the brick Generally the height varies according to tradition and the firing practice. In clamp kilns the height varies between 50 mm to 70 mm. In a VSBK firing system best results in terms of quality and energy consumption are obtained with green brick height between 70 mm to 75 mm. They can be fired in all types of kilns Minimum and Maximum Dimensions The bricks have good strength and can be used also as a load bearing structure. They can be used to build arches If the bricks are made and fired properly, it is not necessary to plaster the wall, thus saving on construction costs Each fired brick made by ordinary hand moulding process will never be exactly the same size. They will vary due to mixing process, water content during moulding, compaction style and size of moulds. Whereas these variations are unavoidable, they should be limited within a range. Size A brick has a length, width and height. The size or dimensions of a brick are determined by how it will be used in construction. Width The width of a brick should be small enough to allow a mason to lift the brick with one hand and place it on a bed of mortar. For an average mason, the width should not be more than 115 mm. If the brick was wider, the mason would have to put down the trowel while building the wall to pick up the brick by two hands. As a result time would be wasted. In addition, a wider brick would weigh more and 26 therefore tire the mason more quickly. In terms of production, a larger brick is more difficult to fire in a kiln and consumes more energy for the same price realization. GREEN BRICK MAKING MANUAL Ideally bricks manufactured by any process should have dimensional tolerances of 2%. This means that if the brick size is 230 mm x 110 mm x 70 mm, the length of the brick should be between 226 mm and 234 mm. The width should be between 108 mm to 112 mm and the height between 69 mm to 71 mm. Quality A good quality brick should be regular in shape and size, with smooth even sides and with no cracks or defects. Normally poor quality bricks are a result of poor soil selection or as a result of poor techniques when making the bricks. However these errors can easily be overcome. Strength 5.4 Stages of Green Brick Making Bricks must have enough strength to carry the weight of the roof. If bricks are well made and well fired, there will be a metallic sound or ring when they are knocked together. If they make a dull sound, it could mean that the soil is improper or they are either cracked or underfired. Table 3: Shrinkage Rates and Mould Sizes Fired Brick Size: 230mm x 110mm x 70mm Shrinkage Rate A simple test for strength is to drop a brick from a height of 1m (shoulder height) horizontally on a hard floor. A good brick will not break. This test should be repeated with a wet brick (a brick soaked in water for 7 days). If the soaked brick does not break when dropped, the quality is good enough to be used in construction. If the bricks dissolve or fall apart underwater or during handling, the bricks were probably underfired or too sandy. Mortar Joint Brick mortar can be made form lime, cement or mud. Generally in urban areas cement is used whereas mud masonry is used in rural villages. The purpose of mortar is to join the bricks together in a fixed position and to smooth out the irregularities in the shape and size of the bricks. This is necessary in order to transmit the load or weight correctly and evenly throughout every part of the wall. The strength of the mortar should be less than that of the brick. This will prevent the bricks from cracking when a wall or a foundation settles. If movement does occur, it is better to have the mortar crack instead of the brick because it is easier to repair or replace mortar than a brick. The strength of a wall is also affected by the thickness of the mortar joints. A 20 to 30 mm sandcement mortar joint is much weaker than a joint of 10 mm. For a strong wall, all mortar joints should be 10 mm thick. Moulds All good brick making material will shrink when dried and fired. Generally the shrinkage is higher in the green stage. During firing it is nominal to negligible. Thus the brick making moulds should be larger than the final size of the brick. Good brick making soils have shrinkage between 5% - 10% and therefore the moulds should be 5% - 10% larger than the fired brick size. It is extremely essential to accurately calculate the shrinkage rate of the soil under various temperatures and heating schedules for finally determining the mould size. This has to be done in a laboratory or by a ceramic expert. (Refer Table 3) Interior Mould Dimensions Length Width Height 5% 241 mm 115 mm 73 mm 6% 244 mm 117 mm 74 mm 7% 246 mm 118 mm 75 mm 8% 248 mm 119 mm 76 mm 9% 251 mm 120 mm 76 mm 10% 253 mm 121 mm 77 mm There are six main stages of green brick making before they go for firing. They are: Extraction of clay Soil preparation Grinding Soil processing Manual mixing Pugmilling Filtration Moulding Drying Stacking Within each of these stages there are several important steps. Each one of them is important on GREEN BRICK MAKING MANUAL 27 VERTICAL SHAFT BRICK KILN its own right and is complimentary to each other towards achieving the ultimate product – a good green brick. Equipments Shovels Each of the steps has been discussed in more detail in subsequently. Broom Pick axes Wheel barrows Tractor Extraction of Clay Before the start brick production the search for a good clay deposit should be over. Not only the quality but the availability of it for atleast 5 years must be ensured. Once the source of soil has been located and properly tested in laboratory the process of extraction starts. The first step is to cut the grass and any short bushes. (Never select an area which has a high concentration of big trees. They are very difficult to cut and are not possible to take out the roots.) Clean the area from any other foreign matter like roots, vegetation, dry leaves, and stones. When the area is cleaned, approximately 6 inches of the top soil should be removed for use in agriculture. The depth will vary until one encounters clear soil. After removing the top soil, the digging and transportation of dry soil begins. The soil should be dug to atleast to a depth of 6 ft or till one encounter good soil whichever is lesser. During digging soil should be taken out vertically and not horizontally. This is necessary since one encounters more plastic soil as depth increases. This might not be true always. Before digging of actual soil for brick making commences one should make an assessment of the soil quality based on vertical and horizontal digging. Whenever one encounters a sandy layer digging of soil should be discontinued. The soil can be prepared in situ at the digging site or can be transported based on the requirement and site conditions. If the moulding site is far away from the firing area and the soil quality is appreciably good then it is profitable to transport the green bricks instead of soil. In a 100 cft capacity tractor the soil transported will be enough to make only 800 bricks. However in the same tractor one can transport at least 2000 of dried green bricks. Thus transportation of dried green bricks saves on expenses. The only disadvantage is that if the green bricks are not of good quality then it will incur appreciable transportation breakage. 28 GREEN BRICK MAKING MANUAL Soil Preparation Grinding In Malawi a majority of the brick making soils available are usually coarser in variety. Although the most widely used are the black soils, throughout the country occurrences of red colour granular soils are prolific. In presently followed practices, these soils are usually dug out and formed into bricks. Presence of coarser particles induces cracking shrinkage due to these coarser particles. These kind of coarse texture soils should be ground into smaller sizes to create more surface areas for higher degree of plasticity. There are various industrial scale crushers and grinders available for size reduction of coarse soils. The most common equipment’s are jaw crusher, roller crushers, disintegrators and pulverizers in order of decreasing fineness. Choice of crushing equipment’s is usually left to the process engineering part of the brick production system comparable with the economics of brick production. The most suitable and low cost equipment for crushing of coarser particles are the disintegrators. These are quite inexpensive and can be fabricated and maintained locally. The only issue is the maintenance of the impact blades and the sieve. This issue can also be solved with choice of hardened steel materials. The only disadvantage of using disintegrators is that the soil has to be dry. Use of moist soil will choke the openings of the sieve and retard the productivity process. Soil Processing To make good quality green bricks, the dry/moist lumpy clay has to be properly mixed with additives into a uniform, smooth and soft moist mixture containing no hard lumps of soil or stones. It should not be too soft or too hard and should have enough plasticity for shaping and retaining the form. To obtain this mixture, the soil is treated in four different steps: Batching and addition of additives Dry mixing Ageing Wet mixing Keeping the basic steps same the process of soil preparation varies depending upon the general practice followed in various regions. Mostly they can be classified broadly into four different categories: Manual mixing Semi-mechanised mixing Filtration techniques Other mixing techniques Internal fuel is added depending on its quality, soil characteristics and external fuel consumption. Convert the internal fuel and other additives from weight to volume basis. For this you need to construct a cft box. It is a wooden box having internal dimensions 1ft x 1ft x 1ft. It also has two handles on two ends for easy handling and transportation. Convert the material to be added from weight into volume. 1 2 3 4 5 6 Each of the process has been discussed in greater detail below. Manual Mixing To make good quality green bricks, the dry lumpy soil has to be mixed uniformly with additives and then turned into a smooth, soft paste. Batching and Additives After digging or transporting the soil, it is spread evenly over the mixing area. The lesser the pile height, the better the mixing in lesser time. Take eight fired bricks from your area. Around the soil pile keep them in an octagonal pattern on the height. Thus the height of the soil pile can now be measured to one brick length. Spread the soil evenly to this brick height. You will require to move the bricks to widen the pile. The dummy bricks can now be taken out. Always perform this step before adding other materials. Sieve the additives in a 2 mm mesh before mixing. However the rice husk if added does not require any sieving since it is of uniform size. Keep aside the sieved material that passed through the 2 mm mesh. Sieving is of utmost importance since any particles bigger than 2 mm will make the fired brick weak due to absence of any binding with the soil matrix. Depending on soil plasticity, anti-shrinkage materials like stone dust, fine sand, boiler ash are added. Figure 18: Manual Mixing Process Add one material at a time. Preferably the low density materials should be added first i.e. internal fuel and then stone dust. For all purposes, rice husk to be added at the last. The material to be added should be spread uniformly over the pile. If in any place there is a cluster of additives spread uniformly over the soil by hand. Repeat the process similarly for other additives. Dry Mixing After the materials are added, the pile should be dry mixed at least two times. Dry mixing should be started from one end only. Never start dry mixing from two ends by two persons. For dry mixing use a spade have a blade length of more than 9 inches. This will ensure that during cutting the blade GREEN BRICK MAKING MANUAL 29 VERTICAL SHAFT BRICK KILN reaches the bottom. Always make a small and deep cut. If the first cut does not reaches the bottom, then next time again cut it to reach the bottom. Never try another area. Remember that best mixing is achieved by cutting vertically and not horizontally. After the whole pile is mixed, repeat the process again. During the cutting process break any big lumps of soil into small pieces. Take out any roots or organic matter. Reject all stony particles. Ideal dry mixing can be judged by the uniformity of colour of the pile After proper mixing again, spread the mixed pile uniformly having a brick height. Start the flow of water from temporary channels. Remember that the water flow should be slow to allow the soil to absorb water. Never force the water on the soil. Generally there are no methods of controlling the quantity of water. It is best to leave it to the jurisdiction of the moulders. However, best bricks are made with low water content. Generally 20% - 25% by weight of soil, water is added. However this depends on the soil quality. Sandy soils require lesser water, whereas clayey soil needs more water. Ageing After the mixed soil and additives has been watered it is very important to see that the whole mix is aged properly. Ageing is the process of adding water to the soil and allowing it to stand undisturbed for a few days before mixing. This process enables the soil lumps to soften and break into smaller pieces making the mixing process easier. Technically water enters the clay particles and enhances the plasticity of the mix. Plasticity ensures good shape, size and finishing of green bricks. For ageing in manual mixing generally the process followed is to allow the water to stand with the soil. For proper ageing of the soil the following needs to be ensured: 30 The whole soil pile is covered with water Too much water is not on the pile The water does not evaporate during the ageing process. If need arises then the pile needs to be covered with a black plastic. The longer the ageing process the better the soil properties. However to have a judicious mix of property and productivity the ideal time of ageing has to be atleast for 72 hours. GREEN BRICK MAKING MANUAL Wet Mixing After the soil and additives has been aged well, it needs to be mixed and kneaded. The purpose of mixing is to ensure that the soil mix is a smooth, soft and homogenous mixture containing no hard lumps. There are various methods of mixing aged clay for small scale brick making. One can use a machine or do it manually. Semi mechanised mixing process has been described later. The main problem with this type of process is that it requires a 3-phase electricity connection for operation. In remote areas installation of electrical connection is costly. Moreover supply of the same is also erratic. Thus, the most preferred mixing process is manual – trampling by feet. The aged clay is spread out where moulders trample it with their feet until it becomes a smooth mixture with a uniform colour. One advantage of this system is that rocks, stones, vegetation can be felt with the feet and removed. The main disadvantages are that uniform mixing is not possible. Sincere workers will ensure a smoother mixture. Another difficulty is that it is inhumane and tiring. Moulders daily have to spend atleast 1-2 hour for ensuring smooth mix. At times this type of mixing process can be hazardous also. If there are any sharp objects within the soil e.g. nails, metal parts, pieces of glass or rough stones the moulders are likely to get hurt. Thus wherever possible this type of mixing process should be avoided. Semi-mechanised Mixing In this type of mixing the quantity and process has been optimized for a two shaft VSBK requiring around 10,000 – 12,000 green bricks per day. This type of mixing process has the advantage of ensuring uniform quality of aged and mixed soil to the moulders. It ensures uniform quality of green bricks. Although the processing requires greater manpower its ultimate profitability is the reduction of breakage and better fired product. Batching and additives During semi-mechanized mixing, since the whole processing of soil takes place at a time so it makes more sense to transport the soil in an area nearer to the mixing machine. Soil needs to be transported in tractors. After removal of the top soil the digging and transporting the dry clay soil has to be done to the transporting area. After one tractor load of soil has been transported and dumped the required amount of additives has to be spread uniformly over the whole pile. Depending upon the green brick weight one tractor load of soil will produce approximately 1000 – 1200 green bricks. Thus to produce 10,000 green bricks approximately 10 tractor loads of soil is required each day. The second tractor load of soil has to be unloaded over the previous pile only. Do not unload away from the pile. The same process of additives spreading has to be adopted. This type of unloading in piles has to be followed till the required soil has been transported. For ensuring smooth production, three number of piles are needed. The first pile will be used after 72 hours of ageing and mixing. All the piles has to be placed in a semi circular fashion around the mixing machine so that the transportation time from the pile to the pugmill is minimized. the machine appropriate layout of the process and its management is necessary. Filtration Techniques This type of mixing process is generally followed in areas where the soil contains a large amount of lime and stone granules. It is impracticable to invest in grinding machines since it is out of the reach of small brick makers. On the other hand it is necessary to separate the granules for arresting cracks within the green bricks and make it amenable to moulding. The main disadvantages of this process are that it requires a large amount of water and is time consuming. Additionally it takes up a large land for processing and is suitable only for very small brick makers who operate intermittent clamp kilns. The quality of soil is excellent and addition of nonplastic material is an absolute necessity to reduce the plasticity and prevent shrinkage cracks. Dry Mixing Filtration of Soil After the required soils and additives had been added the pile has to be cut and mixed in the dry state at least twice. The process described earlier has to be followed. Generally the soil is transported in tractors and dumped near the filtration machine. The filtration machine consists of a drum with a paddle stirrer attached at the central part. The top part is open to accommodate the soil and water. At the bottom there is an outlet for the slurry to drain out. Watering and Ageing For ageing the same process described earlier has to be followed. Pugmilling After the required ageing is completed the aged soil is put into a mixing machine – the pugmill. The pugmill is a simple mechanical mixer operated through a 7.5 HP electrical motor or a 10 HP diesel engine. It is cylindrical 10 mm thick MS sheet drum of approximately 200 – 250 litre capacity. It has a central shaft to which paddle blades are fixed at various positions. Soil is fed from the top and taken out from the bottom. Uniform mixing of the soil is due to its churning inside the drum at various stages and forcing out the mixed soil through the bottom by the paddles. The uniformity of the mix is judged by the homogenous colour. It operates through a gear and pinion system and speed can be varied for faster output. It is a continuous process having an output of 12,000 – 15,000 bricks per day. It has to be remembered that to get the optimum output from Soil is fed from the top into the drum. Sufficient water is added to dissolve the soil. The paddle is rotated through a motor to agitate the soil-water mix and break down any soil lumps. Coarser soil lumps are also dissolved in this action. After the soil is fully dissolved in water which usually takes around 30 – 45 minutes, it is drained out over an 1mm MS sieve. The coarser particles are taken out while the soil mix is drained out to storage bins through channels made for drainage. Usually the filtration machine is placed on an elevation to take advantage of the natural drainage system. Storage and Additives For storage of the soil slurry, the most economical means is to dig pits and store in them. Usually this is the process followed. Ideally the pits should be as shallow as possible to facilitate evaporation. The dimension of the pits should be 20 ft x 10ft x 1 ft. The depth should not be more since it will be difficult for people to mix the slurry with additives. Each pit is sufficient to mould atleast GREEN BRICK MAKING MANUAL 31 VERTICAL SHAFT BRICK KILN 2000 bricks serving two moulder families. Thus to mould 12,000 bricks per day 6 numbers of pits are required. During the summer months it takes approximately 4 days for the slurry in the pit to dry enough for amenable to moulding. Thus to ensure uninterrupted production there should be atleast 24 pits. The pits usually are dug in the ground. This facilitates evaporation of water from the surface and soaking from the bottom. After the pits are filled with soil slurry, required additives are spread uniformly over it. The internal fuel quantity is the same as during other moulding process. However to decrease the plasticity and reduce shrinkage cracks approximately 20%-30% by weight of stone dust or fine sand is added. In addition fly ash, bottom ash or boiler ash from thermal power plants are also added between the range of 10% - 30% as filler materials. These materials not only reduce the plasticity but increase the green and fired strength of the bricks. Additionally it reduces the consumption of external fuel during firing also. Rotovator This is a simple rotating attachment fixed at the back of a tractor. (Refer Figure 19) In this process for required mixing a large shallow pit is made on the ground. The pit dimension is approximately 100 ft x 100 ft having a depth of not more than 1 ft. Soil is transported and dumped in the pit uniformly. After required levelling additives are measured and spread uniformly over the soil layer. Care is taken to see that the soil-additive layer is not more than 6 – 9 inches at any place. Water is added in sufficient quantity to make the soil wet. In this process generally more water is added than Wet Mixing and Ageing After the additives are spread out evenly over the slurry pits, it is churned in the watery state in the pit with the help of wooden or metal ladles. This ensures a very good mixing of the soil and the additives which gives a uniform firing property and strength. The mixed soil is left to dry out naturally for atleast 3 to 4 days in the pit. Apart from drying good ageing also takes place. This further increases the plasticity of the soil. Generally by around 3 to 4 days the mixed soil becomes ready for moulding. However this time depends on the weather conditions. In winter season this time even extends beyond 7days. During this phase the mixed soil is taken out from the respective pits and left at the surface for further drying. The empty pit is further used for another batch of soil slurry. Other Mixing Techniques Apart from the above three most commonly followed soil preparation techniques, in some parts of Asia local indigenous mixing techniques have also been evolved due to an enterprising, innovative mentality by progressive entrepreneurs and can be innovatively adated in Malawi also. A short description of some of them has been attempted in the following sections. 32 GREEN BRICK MAKING MANUAL Figure 19: Rotovator required for moulding. This soil mixed with water is left to age in the shallow pit for atleast 48 – 72 hours. After required ageing, the tractor is moved around the soil in circles. Initially it is made to rotate on the outer layer in a circular fashion. Gradually the circle is made smaller so that the soil all around is mixed uniformly. At any given time the central part is not mixed at all since the tractor cannot make the round at that place. After uniform mixing the soil is transported by respective moulders for green brick making. The advantages of this process are that a large quantity of soil can be mixed at a time. Moreover the total mixing time is only about 2-4 hours and it requires no labour. However one has to invest on an expensive tractor for this work although it can be used for carrying fired bricks. The soil mixing quality is also not upto the mark and often it gives rise to inconsistent fired brick quality. Wet Mixing In this process a deep pit is dug in the ground approximately to a depth of 3 – 4 ft. The pit is filled with soil at the first instance. Required additives are uniform mixing quality since small particles of unmixed particles still remain within the soil mix. Moulding Figure 20: Wet Mixing spread out over the soil and dry mixed thoroughly. The main difference with other processes is that the water added is of large quantity. The whole pit is flooded with water so that the mix is fully under water. After required ageing for atleast 24 – 48 hours it is mixed manually. (Refer Figure 20) The mixing is usually done by hand. The moulder steps down into the pit with naked feet and tramples the soil mix. During this process the hand is also used to break soil lumps and take out any hard or solid particles like stone, roots etc. It is generally believed that the right depth of the soil mix is judged by the fact that the nose of the bend moulder during mixing should remain just above the water. This is generally an effective way of mixing but quite laborious and is possible where water is available in plenty. Paddle Mixing This type of mixing is the same as manual mixing process. The main difference is in the wet mixing methodology. Unlike manual mixing excess amount of water is added into the dry mix and left to age for the required time. After tempering the wet soil mix is spread into a very thin layer. The height of the layer is never more than 6 inches. Four to five persons jointly trample the soil in a watery state. The trample style is very much different than the ordinary manual process. The steps are very small ensuring uniform mixing. This type of mixing is extremely time consuming and tedious. It is also hazardous since moulders might damage their feet from presence of sharp objects. However the quality of the mixed soil is much better than the ordinary manual process. Still even through this process one cannot achieve Moulding is the process by which the prepared soil is formed into the shape of a brick. There are two methods of moulding; manual and mechanized. Manual process consists of slop moulding and sand moulding. Mechanized moulding consists of semi mechanized pressing and low cost extrusion. Apart from these there are more sophisticated methods of brick making e.g. mechanical pressing, hydraulic pressing and stiff extrusion. The latter methods are out of the scope of discussion since they are out of bounds for small scale brick makers due to its extremely high investment cost. Figure 21: Slop Moulding Slop Moulding Slop moulding is the most traditional method of brick making. The brick is formed in a rectangular wooden or metal mould which has no bottom or top. The mould is wetted and placed on the ground and filled with a very wet soil-additives mixture. Palm of the hand is used to remove the excess soil and smooth the top of the brick. The mould is then lifted off, leaving the brick on the ground to dry. (Refer Figure 22) Often this method produces poor quality bricks because of the excess water used both in the mixing of the soil and the wetting of the mould. The soil mixture becomes so wet and soft that the newly made brick begins to deform under its own weight. It takes the shape of the ground on which it is laid. Once placed on the ground, it cannot be moved because it is so soft. Often the brick is marked or deformed if accidentally touched or moved the GREEN BRICK MAKING MANUAL 33 VERTICAL SHAFT BRICK KILN brick dries properly. The excess water can also cause the brick to crack and break during drying. Sand Moulding Sand moulding is a drier method of shaping bricks. If proper care is taken during moulding it can be comparable even with machine made bricks. Sand moulding uses a drier stiffer soil mixture compared to slop moulding. The soil is formed into a wedge shape and all its sides are covered with a “releasing agent” which prevents the soil from sticking to the sides of the mould. The most common releasing agent is fine, red burning sand and hence the term “sand moulding”. However, in some areas other type of releasing agent e.g. saw dust, brick dust, coal dust and even fly ash is used as a releasing agent. The soil wedge, covered with releasing agent, is thrown with force into a simple mould open at only one end. Rather than use hand to level off the top of the mould, a “bow cutter” is used to remove the excess soil from the mould. The mould is overturned and taken out vertically to slide out the newly formed green brick on the ground. Demoulding yard Quantity of Water Adding the correct amount of water during soil preparation is critical for making good quality bricks. The lesser amount of water used, the better the quality. The best quality green bricks are made by hydraulic presses where the amount of water is only around 2-4%. Amount of water also depends on the soil quality. Generally sandy, silty soils will require lesser water than clayey plastic soils. However actually in practice the amount of water depends entirely on the habit of moulders. Soil with higher amount of water is easier to mould than those with lesser water. Close supervision is necessary to control the habit of adding more water with moulders. If there is too much water in the soil, the green brick will: Deform easily under its own weight after moulding (true in cases of sandy and silty non plastic soils) Deform when placed on uneven or bumpy ground Because the soil to make the brick has appreciably less amount of water compared to slop moulding, the moulded brick is much harder. However it is not possible to handle the bricks before 24 hours of drying. Since the bricks are hard they do not deform easily due to its own weight. They also dry faster with much less cracking and breakage. Have higher and inconsistent shrinkage Crack during drying especially in the summer months Take much more time to dry It has to be remembered that all the above advantages depends on the soil property. Non plastic, sandy or silty soil is not good for this type of moulding and all the merits of sand moulding are nullified. Productivity will be less since it will take more time for moulders to mould bricks Finishing will not be perfect since the soil may not flow into the corners of the mould during throwing the wedge Presence of layer cracks The whole sand moulding process can be broadly classified into seven steps. They are: 34 Quantity of water Making and throwing the wedge Releasing agent The mould Cleaning tools Bow cutter GREEN BRICK MAKING MANUAL If there is too less water in the soil: Generally the optimum amount of water in soils should range between 20% - 25% by weight. Sandy and silty soils will require lesser water whereas clayey soils will require more water. There is a simple test that can be done to check if the soil has the correct amount of water. A wedge should be made out of the moulding soil manually and it should be vertically kept on a hard ground with the narrow edge down. If the wedge does not change its shape, the amount of water is correct. If the wedge begins to deform, there is too much water in the soil mix. If the soil mix is too wet and soft then, non plastic materials or even soil mix can be added uniformly. If this process is not practically feasible then just spread the soil mix in thin layer and allow it to dry until it reaches the correct moisture content and stiffness. However before using the soil, the pile has to be mixed uniformly since during the drying process the top layer will be drier than the bottom of the spread out pile. Uniform mixing of uneven dried soil is necessary to achieve optimum quality. Making and Throwing the Wedge Usually during moulding, moulder for convenience sake stores a considerable amount of processed soil. Moulder is usually not a single individual but a family of two. In South Asia generally partnership is between husband and wife. It can even be done individually. Distinct roles and activities are determined and followed. One member usually carves out a measured (by practice and experience) quantity of soil mix from the heap and rolls over the releasing agent before passing over to moulder. The throwing wedge is formed with the ball of soil mix rolled over the releasing agent. The wedge is a triangular shape of soil having length slightly shorter than the mould length. When the wedge has been coated evenly with the releasing agent, it is thrown into the mould with force. To generate a natural force it is usually thrown from approximately a height of 1ft above the mould. The art of good moulding is the angle and force of throwing the wedge into the mould. The shape of the wedge is very important. When thrown, it should enter the mould and strike the bottom of the mould first without touching the sides. To do this, the length and the width of the throwing wedge should be slightly less than the length and width of the mould. When the wedge is made and thrown correctly, the soil will spread out along the bottom of the mould first before filling the sides of the mould. The releasing agent prevents the clay from sticking to any part of the mould and as a result allows the green brick to slide easily out of the mould. When the wedge is poorly made or thrown, the brick will not slide out of the mould easily. This happens because the mould has cut off the releasing agent from the side of the wedge causing the exposed soil to stick to the mould. Forming and throwing the wedge is a skill. Experience has shown that it may take 100 practice throws before a new brick moulder is able to make and throw a wedge correctly. If the brick does stick to the mould or the finishing of the green brick is not sharp the mould should be cleaned properly with cleaning tools – especially the depressions before attempting to throw a new wedge. Releasing Agent The releasing agent is a fine, non plastic, dry material which coats the throwing wedge. It prevents the soft soil from sticking to the sides of the mould and helps the green brick to slide easily out of the mould. Additionally releasing agent gives a good colour to the fired brick. The most important property of a releasing agent is its fineness and burning colour. The finer the material, better the finish of the green brick. Also consumption of material is lesser if finer material is used. To test the firing colour of the releasing agent, take a small quantity in a flat clay crucible. Make a three stone fire and heat the releasing agent till it is red hot. The firing material is usually wood. After cooling observe the fired colour. It gives a fair indication of the fired colour it will impart to the green brick. Normally the releasing agent is fine sand. However where fine sand is not available, sawdust, coal dust and even fly ash may be used. Never use coarse sand as a releasing agent. It will not only decrease the finishing of the green brick but also increase the consumption. Normally the releasing agent is spread as a thin layer over the ground and the soil ball is rolled over it. The Mould This is the device that gives the brick its shape. There are two major parts to it: The Mould Box It is the rectangular container where the brick is formed. The mould is usually made of good quality seasoned wood. In some places metal moulds made of MS sheets, aluminium are also found. In some parts of western India moulders are habituated to use moulded plastic moulds. GREEN BRICK MAKING MANUAL 35 VERTICAL SHAFT BRICK KILN Usually, the mould is reinforced at the corners on the outer side by metal angles to give it more strength. The inside of the mould is lined by thin metal sheets to help give the green brick a smooth finish. It also helps in minimizing the wear and tear and easy sliding of the brick. Consumption of releasing agent is also reduced by metal sheet lining. The Frog The frog in all types of moulds is made from wood. It is used to form a cavity or indentation on one side of the brick. The deeper the frog, lesser will be the brick weight and simultaneous savings of soil. It also allows the brick to dry faster and gives the brick a form which improves its adherence to cement mortar during construction. Presence of a frog also acts as advertisement for the brick manufacturer and enables him to distinguish his product from others. Fired brick size 230mm x 110mm x 70mm Equivalent to commonly expressed 9inch x 4inch x 3inch size Shrinkage Rate Interior Mould Dimensions Length Width Height 4% 239mm 114mm 73mm 5% 242mm 116mm 74mm 6% 244mm 117mm 74mm 7% 246mm 118mm 75mm 8% 248mm 119mm 76mm 9% 251mm 120mm 76mm 10% 253mm 121mm 77mm Making a Wooden Mould Before making a wooden mould for brick making two things must be determined: first, the final size Table 4: Interior Mould Sizes Fired brick size 255mm x 122mm x 78mm Equivalent to commonly expressed 8inch x 4inch x 4inch size 10inch x 5inch x 3inch size 36 Shrinkage Rate Interior Mould Dimensions Length Width Height 81mm 4% 208mm 99mm 99mm 128mm 82mm 5% 210mm 100mm 100mm 270mm 129mm 83mm 6% 212mm 101mm 101mm 7% 273mm 131mm 83mm 7% 214mm 102mm 102mm 8% 275mm 132mm 84mm 8% 216mm 103mm 103mm 9% 278mm 133mm 85mm 9% 218mm 104mm 104mm 10% 281mm 134mm 86mm 10% 220mm 105mm 105mm Shrinkage Rate Interior Mould Dimensions Length Width Height 4% 265mm 127mm 5% 268mm 6% GREEN BRICK MAKING MANUAL of the fired brick and secondly, the overall (both green and fired) shrinkage of the soil from the moulded state to the fired stage. cleaned thoroughly. After each such cleanings the mould is sprinkled with releasing agent for furthur fresh mouldings. Once the fired brick size has been decided, the interior dimensions of the mould can be calculated. Remember that most of the red clay bricks have a shrinkage rate between 4% - 10%. Soils with shrinkage lesser than 4% will not develop any binding properties making the brick weak and fragile. Soils with shrinkage higher than 10% will be difficult to control especially the fired dimensions. A little bit of more water will change the dimensions by 1% - 2%. Moreover greater the shrinkage, higher is the chances of the green brick developing shrinkage cracks and warping during drying. Bow Cutter For any brick production to get a balance between reasonable strength and productivity with minimal green brick rejection a shrinkage rate between 6% 8% is ideal. The best way to determine the shrinkage rate for a particular combination of soil and additives is to entrust an established laboratory to do the testing. Never try to do it yourself since determination of shrinkage rates is the most important step towards a successful brick making enterprise. The following table (Table 4) shows the interior mould sizes for various shrinkage rates to produce three most common types of fired bricks. Cleaning Tools If the wedge is not covered properly with releasing agent, or if it was not thrown correctly into the mould, the soil will stick to the sides of the mould. It will then be necessary to clean the stuck soil from the mould with a cleaning tool after the brick is removed. Apart from this after repeated mouldings, soft soil tends to fill the sharp corners of the mould and the depressions of the frog. This imparts a rough finish to the green brick. To take care of this and ensure smooth and sharp finish to the green brick a cleaning tool is required by which the stuck soil is cleaned off from the mould. A simple sharp blade is required to take out soil from the depressions. A flat blade is required to clean the soil sticking to the mould sides. Generally by experience, after approximately 10 – 15 mouldings the mould needs to be cleaned. When it is not possible to clean the stuck soil by the cleaning tools, the mould should be dipped in water and After the wedge of soil is thrown into the mould, the excess soil over the mould needs to be removed and the surface smoothened. The bow cutter cuts and smoothes at the same time as it is moved along the top of the mould. The excess soil is removed and placed to one side. Never mould the next brick with the cut off soil. Always use fresh dough. At the end of the moulding or when the pile gets high enough mix the cut off pieces manually into smooth dough and mould bricks separately. After the excess soil is removed from the top of the mould, sprinkle a little releasing agent over the freshly exposed surface and smoothen with hand. This prevents the freshly laid green brick to stick to the demoulding area. The bow cutter is a simple instrument and can be made very easily in any workshop. It is made of a 10 – 12 mm MS rod and bend in the form of a small bow or a rectangular U. The length of the bend area should be atleast 4 inches more than the mould breadth. Drill two holes at the two ends of the bow. Tie a fine wire at the two ends to obtain a bow cutter. Take care that the wire is not too fine. It will break if it encounters a solid particle. It should not also be too thick. The finish of the green brick will suffer. Regularly clean the bow cutter since during cutting there will be chances of organic matter sticking to the wire. Demoulding Yard After the green bricks are made, they are generally demoulded on the ground. Before start of moulding considerable time and effort is spent on preparing the ground for demoulding. Before start of moulding the ground upon which bricks will be laid should be made leveled. All vegetation and traces of roots should be taken off. One day earlier before moulding the ground is sprinkled with water. Take care not to put too much water. Enough water should be sprinkled so that the surface gets moist. After about 6-8 hours with a curved round base tool the ground is furthur leveled. The tool is made from cutting out the base of a curved metal container (termed tasla or kadai in India). Locally this is termed as ring. Before moulding, releasing agent is sprinkled over the ground so that freshly laid bricks do not stick to the ground. GREEN BRICK MAKING MANUAL 37 VERTICAL SHAFT BRICK KILN After every 4-5 demouldings the ground is again leveled with the help of a ring. To keep the ground leveled, ensure that no heavy vehicle movement is allowed over it. Always stack the bricks on the periphery of the moulding yard so that tractors or hand carts can transport bricks. After coming out of the mould the bricks lie flat on the ground. At this time they cannot be handled since they are very soft. If the ground is not leveled the green bricks assume the level of the ground and will warp due to undulations. In some cases, to get a better finish and shape concrete platforms are also constructed for demoulding bricks. This is the most suitable way for ensuring good quality. However it is costly and small scale brick makers often will not be able to afford it. Soft Mud Extrusion Soft mud moulding process is similar to sand mould moulding process but done through mechanized means. It does not require skilled workers and can be operated with women also. The water content in the bricks is similar to hand moulding at around 1520% but much higher than stiff extrusion moulding which is a round 5-8%. These bricks are dried in open atmosphere. The quality of soft mud moulding bricks are much superior to normal sand or slop moulding as usually followed in Malawi. During the pugging action followed, the soil, water and other additives get very uniformly mixed with a de-airing action. This mixes the material uniformly and increases the density of the pugged soil. Thus bricks made by soft mud moulding process has a 20-30% more density than normal slop or sand moulding. The equipments required for soft mud moulding as under: Machine In a soft mud moulding machine the main parts are motor driven by electricity or diesel engine. The power consumption of the motor is 7.5 HP. This machine is also equipped with a water recirculation pump whose capacity is 16 litres/second. Stainless Steel Mould The other component of the machine is stainless steel mould. Three bricks can be made out of one stainless steel mould. The minimum no of mould provided in a machine is 24 or it depends up on the capacity of a machine. 38 GREEN BRICK MAKING MANUAL Figure 22: Soft Mud Moulding Machine 5.5 The Moulding Process Soft Mud Extrusion Moulding In soft mud moulding process soil have to be dumped in a longitudinal way so that the machine can be moved along with the dumped soil. The design of soil stacking down the moulding yard is very important. The total length in width-wise between dumped soil, machine and de-moulding area should not exceed 70 ft to get optimum output of bricks in numbers to the rated capacity of the machine (Refer Figure 23) The following are the stage of moulding in a soft mud moulding machine. Stage 1: Dumping of Soil Dumping of soil in the moulding yard is one of the most important jobs in the moulding process. Soil should be dumped in a longitudinal manner. While doing so care must be taken that the height of dumped soil should not exceed 2ft and width of the dumped soil should not increase 10ft. Stage 2: Ageing of soil Process of ageing of soil is same as for hands moulded bricks moulding process. Stage 3: Feeding of Aged Soil After ageing the prepared soil is fed to the machine manually or mechanically (with the help of conveyor belt). In manual process there are 3 to 4 labour required to feed aged soil in the machine continuously. In mechanical process 2 labours continuously shovel aged soil in the conveyor belt. Stage 4: Pugging of Aged Soil Step 2: Storing Pugged Soil at Moulding Yard This activity is done by the machine. The horizontal Augur is mounted in the machine which is mounted on bearing at the either end of the machine. This Augur is having portable blades attached in it which act as horizontal pugmill. This Augur not only pugs the aged soil but also helps to fill up the empty mould with its rotational action. Storing pugged soil at moulding yard The pugged soil is stored individual moulders working yard in such a way that it provides an additional 12 hours ageing time. The soil is a longitudinal manner roughly 80 cm width and 40-50 cm height and covered with a plastic. Once moulding work is starting themoulder is uncovering the plastic as less as possible to enable access to the soil for preparing the dough. Stage 5: Filling of Empty Mould The stainless steel moulds are pushed mechanically to the bottom of the cavity of the barrel designed for the mould. The moulds get filled up by gravitational force of the pugged soil and by the action of the Augur. The filled up mould then pushed up and taken out by another action of pushing arm which is connected on the augur. This is continuous process and one by one the moulds get filled and taken out. Stage 6: Scraping of Excess Pugged Soil Excess filled soil in the stainless steel mould is mechanically scraped off by the action of scraper. Stage 7: De-moulding of Bricks Filled up moulds are then de-moulded manually in the moulding yard. Care must be while releasing the mould. The mould is moved upside down and with both hand pressure and it is pushed back. While pushing back mould should come up vertically straight. For more details, please refer to the User Manual on TARA BrickMek-SUPER, the soft mud moulding technology. Sand Moulding The details of sand moulding are similar to all countries. The only difference is the size and dimensions of moulds. Although a single brick mould is used in almost all countries in certain countries moulders do use a 2, 3 or even 4 brick moulds. Step 1: Transportation of Prepared Soil Transportation of prepared soil The pugged soil is transported to the moulding yard for green brick making generally by wheel barrow. The soil is transported and unloaded at the different spots of the moulding yard as per convenience of moulders. Step 3: Dough Preparation Dough is a lump of prepared soil which is rolled over the releasing agent to decrease the adhesiveness between the dough and the mould box. The dough preparation requires skill in order to cut the correct amount of soil from the stored pile. Too much cutting of soil implies unnecessary waste of energy as well wastage of processed soil. Too less soil implies adding soil in the mould with the risk of creating a texture. Step 4: Forming of Wedge The wedge is a triangular shape of soil having length slightly shorter than the mould length. When the wedge has been coated evenly with the releasing agent, it is thrown into the mould with force. Step 5: Throwing of Wedge into the Mould Box After the preparation of wedge it is thrown into the mould box. To generate a natural force it is usually thrown from approximately a height of 30-40 cm above the mould. The art of good moulding is to get the correct angle and force of throwing the wedge into the mould. The shape of the wedge is very important. When thrown, it should enter the mould and strike the bottom of the mould first without touching the sides. To do this, the length and the width of the throwing wedge should be slightly less than the length and width of the mould. When the wedge is made and thrown correctly, the soil will spread out along the bottom of the mould first before filling the sides of the mould. The releasing agent prevents the clay from sticking to any part of the mould and as a result allows the green brick to slide easily out of the mould. When the wedge is poorly made or thrown, the brick will not slide out of the mould easily. This happens because the mould has cut off the releasing agent from the side of the wedge causing the exposed soil to stick to the mould. Forming and throwing the GREEN BRICK MAKING MANUAL 39 VERTICAL SHAFT BRICK KILN wedge is a skill. Experience has shown that it may take 100 practice throws before a new brick moulder is able to make and throw a wedge correctly. If the brick does stick to the mould or the finishing of the green brick is not sharp the mould should be cleaned properly with cleaning tools – especially the depressions before attempting to throw a new wedge. Step 6: Compaction of Dough After the wedge is thrown into the mould box with force, it is compacted with hand. Care should be taken not to produce excessive pressure at a particular region. This makes brick irregular in shape. Step 7: Cutting of Excessive Dough and Levelling Once the dough is compacted the excess soil on the top of the mould must be removed and cut by bow cutter. Care should be taken that the cutting is straight and in a horizontal line. Excessive pressure should not be put during the cutting since this will cut the dough in an irregular and concave manner thereby reducing the thickness of the brick. 40 GREEN BRICK MAKING MANUAL Step 8: Releasing and Levelling After the soil is properly compacted in the mould, the green brick is demoulded in the moulding yard. The green brick is released from the mould with great care. It should be pulled gently and in a perpendicular direction of the brick. The consequence of rough or irregular pulling destroys and bends the corner of the green brick. After the brick is demoulded into the ground, it is pressed gently by the bottom of the mould. This ensures that all corners are straightened and the edges are sharp. Step 9: Cleaning of Mould Moulds should be cleaned after forming of roughly 10 to 15 bricks. If the mould is not cleaned regularly the finish of the green bricks decreases. Once moulding work is completed the wooden box must be dipped into water and left overnight until the next moulding. This ensures that no cracks will develop, keep the box in correct shape and increases its life span. Chapter 6 Drying, Stacking and Storage Process 6.1 Introduction First Drying Phase Brick production consists of four main processes: raw material preparation, moulding, drying and firing. Each process has an influence on the fired brick production and quality. Although drying does not assume importance in favour of the other processes, still it is one of the most critical processes for getting an appropriate fired brick quality. In this phase the energy, mostly as heat from sun rays is transferred from the surrounding environment to evaporate the surface moisture from the green brick. The primary objective of this chapter is to understand the drying process and the factors which control its properties. This would help in finding a balance between the property required in the fired brick and the time of drying that can be allowed. Drying assumes more importance in a VSBK firing system, since it is a short cycle firing and more drier the bricks better the results. Dry bricks save on energy since the fuel used is utilized for chemical reactions and not for removal of moisture. Proper drying of green bricks in VSBK firing system assumes importance since even with 3% free moisture present in the green brick about 14.8% of total heat input is wasted in driving off this moisture. Second Drying Phase Upon completion of first phase, the internal moisture within the green bricks is transferred to the surface and is subsequently evaporated. The rate at which drying is accomplished is governed by the rate at which the two processes proceed. Energy transfer as heat from the surrounding environment to the wet solid can occur as a result of convection, conduction or radiation. In some cases drying occurs as a combination of all three effects. In most cases heat is transferred to the surface of the wet solid and then to the interior. Water exists in a green brick in three different forms: 6.2 Drying Principles Drying in brick making commonly refers to the process of thermally removing moisture to yield a solid product. Thermally removing the moisture can be attained by either mechanical heating (dryer) or atmospheric drying (exposure to sun rays). In common brick making, and in future discussions we will be limiting only to atmospheric drying. How Does Drying Occur? When a wet solid is subjected to thermal drying, two processes occur simultaneously: Moisture Free water Water of saturation Hygroscopic water Chemically combined water The process of drying deals with the removal of various forms of moisture present within the green brick. A part of the moisture exists as free water, which fills the pore spaces within the soil mass and imparts plasticity to it. Once this moisture is removed, the soil is rigid and does not flow under moderate pressures, but still looks wet in appearance. This condition of a green brick is GREEN BRICK MAKING MANUAL 41 VERTICAL SHAFT BRICK KILN termed as “leather hard”. Removal of free water is the first phase of drying. It occurs relatively faster and is completed within the first 24 – 48 hours after moulding. The remaining part of the moisture, water of saturation, is the water clinging to the surfaces of grains after the pores have been dried up from their free water. The free water and the water of saturation can be removed by evaporation. Hygroscopic water (also called equilibrium moisture content) exists because of vapour present in the surrounding atmosphere which is a manifestation of the relative humidity of the atmosphere. It generally does not have any connection with the amount of water added within the soil during moulding. This water cannot be removed by atmospheric conditions. It can only be removed by heating to 120OC. For removal of chemically combined water within the structure of phases, heating to 200OC – 800OC is essential. Internal Factors Moisture Content within the Brick During manual moulding of green bricks the minimum moisture content varies between 25% 35%. The moisture content is a factor of the ease of workability of the soil and moulder habits. High moisture content within the green bricks will take longer time to dry compared to those moulded with lesser water. Soil Characteristics External Factors Soil plasticity and the grain size is an important characteristic to determine the drying times. Finer the grain size higher will be the plasticity resulting in more closed packing of the grains. This will result in lower amount of open pores or finer size of them. More sandy the soil higher will be the amount of pores and their chances of interconnectivity. Bricks with larger concentration of pores i.e. sandy soils will dry faster compared to bricks made with clayey soil due to enhanced capillary action. Atmospheric Temperature Brick Moulding Type Increased atmospheric temperature (e.g. summer months) provides higher energy input. Hence higher drying rates are expected. Thus during the day time in summer months highest rates of drying are experienced. Depending upon the climatic conditions sometimes the rates are so high that outdoor drying of freshly moulded bricks results in dry shrinkage cracks within a few minutes. Brick moulding patterns also has a role to play in determining the drying rate. More compact the brick, lesser will the amount of pores and the water content. Thus it will dry faster. Thus hollow soil blocks dry much faster due to greater surface area exposed to atmosphere and higher area of surface diffusivity. 6.3 Factors Affecting Brick Drying The following factors affect the drying rate of a brick. In most of the cases two or more factors contribute to the effect. Relative Humidity Relative humidity in the atmosphere gives a measure of the moisture content in the atmosphere. Higher the moisture content lesser will be the capillary action for evaporation of water from the pores of the brick. Lower relative humidity means lower vapour pressure in the air thus increasing the drying rates. 42 established around the green brick. These situations retard the drying process. It is therefore necessary to have enough movement of air across the drying surface and around the drying brick to drive off this moisture. Increase in the air velocity thus enhances the drying rates. 6.4 Behaviour of a Brick during Drying Air Velocity There is a marked difference between the drying rate during the night (or more precisely when there is no sunlight) and day (when there is sunshine). The drying rate is very fast during the day and slow during the night. Even during the initial period there is no drying at the night. At the latter part of the drying even condensation takes place during the night. During drying of a green brick, due to excess removal of moisture and its higher density than the air, there is a tendency for a moisture gradient to be Depending upon the temperature and the relative humidity content, the initial 1-2 days of drying is extremely important. If the drying takes place too GREEN BRICK MAKING MANUAL fast, then there is a chance of the bricks to develop cracks due to differential shrinkage between the surface and the central part. During this stage the bricks tend to warp also. Since the bricks are laid flat on the surface, the exposed portion dries out much faster than the surface in contact with the ground. Drying accompanies shrinkage. Thus the brick tends to bend in a concave manner. In the latter stage after 1-2 days the bricks should be placed on the smallest surface to enable drying from all directions. Otherwise there might be small cracks formed inside the brick which cannot be seen with the naked eye. These cracks eventually expand during the firing process resulting cracks during firing or loss of strength. 6.5 Determination of Drying The following simple drying tests are, if carried out regularly, not only help to master the drying process but also enable to judge the final quality of the product. Weighing Test Procedure: Weigh 10 green (just moulded) bricks. List down their weights, dimensions and the time of moulding and each measurement. Each day weigh the green bricks and record the weights. Inference: The difference between weight and dry bricks can be used to determine the rate of drying. When the dry green weights of the bricks become constant and do not change for 2-3 days of measurements, the green bricks are optimally dried. Inference: If there are no visible colour difference than the bricks are absolutely dry. However there is a distinct colour gradation between the periphery and the central core than the bricks have not dried properly. Sound Test Procedure: Take two dried green bricks from the stack. Hold the two bricks with two hands. Strike them lightly. Inference: If there is a dull sound then the bricks have not dried properly. However, if the bricks make a sound when two wooden pieces are struck then the bricks are sufficiently dried. 6.6 Stacking Patterns and Its Effect on Drying After drying to leather hard conditions on the moulding yard, green bricks are ready to be lifted and stacked in rows. This is usually done to Allow full airflow circulation for further drying Create space in the moulding ground for further moulding Leather hard condition is determined physically by the condition when there will be no finger prints on the green bricks during handling. Also at this stage the green brick can be handled with four fingers of a hand. Water Vapour Test Procedure: Select any brick considered to be dry. Take a transparent airtight plastic bag, put the green inside it and seal the opening. Keep the sealed plastic bag with green brick in the open sun for about 2 -3 hours. Inference: The brick will start to heat up. Any resident water inside the brick will start to evaporate. If moisture appears on the inside of the sealed plastic bag, then the bricks are not properly dried yet. Breaking Test Procedure: Select any green brick considered to be dry. Break it into two halves. Look at the central surface of the broken pieces. Figure 24: Different Patterns of Stacking GREEN BRICK MAKING MANUAL 43 VERTICAL SHAFT BRICK KILN Stacking of green bricks requires special attention and only well trained workers can do it in a wellmanaged way. Generally the stacking is done by moulders itself. Stacking is usually the process of keeping the green bricks in rows. Generally a stack of 10 layers are used for drying. The height is usually followed due to convenience of stacking. Various patterns of stacking are followed in brick making. In some parts a herringbone pattern of stacking is followed. However the most generally followed pattern is by keeping the bricks crossed. This allows for faster and even drying. If the stacking is not uniform and proper air gap is not provided then there will be uneven drying of bricks. The surfaces in contact with each other will always remain moist. This will result to cracking of the green bricks. Whatever the stacking pattern, always there has to be a gap of atleast 3 – 4 cm between each and every brick for proper airflow. (Refer Figure 24) 6.7 Process of Natural Brick Drying Moulding Yard Drying After the green bricks are moulded allow 1-2 days for drying to leather hard conditions. This is defined by the ability to handle a green brick with four fingers without damage or distortion. Remember that the time stated here is hypothetical and will vary depending upon your local conditions. After placing each brick ensure that the right gap is maintained. If there are any bricks found deshaped or cracked reject them and send them to the recycling yard. Always keep a plastic sheet ready for covering the stack from unseasonal rains. 6.8 Various Stacking Platterns and Storage of Green Bricks Storing of green bricks is usually stored for firing in the rainy season. During the summer months green bricks dry faster. Thus the rate of production will be very high. These bricks after proper drying needs to stored for future firing. There are two things to be kept in mind during storing. Firstly the storing pattern should be such that damage due to rain will not occur. Secondly it should be economical and not cover much space. Generally for making the storing chamber calculate the number of bricks one needs to store. It is advisable to make more number of small stores than a single very large store. This is done to ensure less damaged bricks. Depending upon the dry green brick strength the stack height varies between 20 to 30 brick height. Once the area is calculated, and the site selected for storing clear the area from any vegetation. After cleaning the land should be levelled properly. Place at least three layers of fired bricks to make the base. After 1 – 2 days turn the bricks on their length. This will ensure more surface area exposed to the atmosphere and even drying. This type of turning on edges also helps in reducing warpage. After again 1 – 2 days turn the bricks on their width. This is the position of the bricks where the maximum surface area is exposed. Stack Drying When the bricks are properly dried from the surface they are now ready to place in the drying stack. This situation is judged by pressing your finger on the bricks. If the green bricks still feel soft or else there are finger marks keep it in the moulding yard for further drying. If the bricks feel hard and there are no finger marks they are ready for stacking. During stacking carry two bricks at a time with your two hand and place it gently on the stack. 44 GREEN BRICK MAKING MANUAL Figure 25: Storage of Green Bricks The level might be varied so that during rain water does not flow over the green bricks. Start placing the green bricks from one corner. Ensure that there should be no gap between the bricks. Always start stacking of bricks from one side only. If haphazard stacking is started then there will be chances of gaps when the stack meets together. Initially the stack should be vertical. The height of this type of stacking might vary. Generally it is half the length of the total stack. After reaching the desired height the stacking of the green bricks should be made in such a way that a sloping roof is made. (Refer Figure 25) After completion of the stack cover the top with a thick plastic. Please remember that the plastic should cover only the top to protect the bricks from rain damage. On top of the plastic place red bricks all along. Alternatively you can put a layer of burnt coal ash and then a layer of red bricks. This is done to prevent the red bricks against slipping during heavy rains. When using the store, keep a plastic. During transportation intervals keep the whole stack covered with plastic so that sudden rains do not damage it. GREEN BRICK MAKING MANUAL 45 Registered Office: B-32, TARA Crescent, Qutab Institutional Area, New Delhi-110 016, India