1
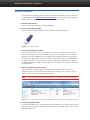
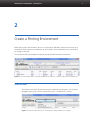
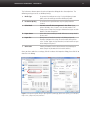
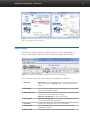
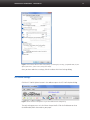
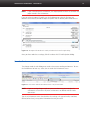
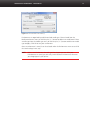
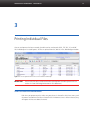
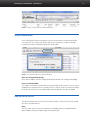
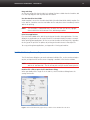
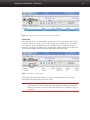
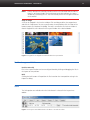
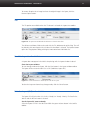
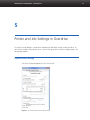
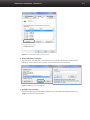
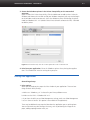
ColorBurst Overdrive for Windows v1 User’s manual © 1993-2013 CSE, Inc. Overdrive RIP for Windows · USER MANUAL © and ™ 1993-2013 Compatible Systems Engineering, Inc. All rights reserved. Compatible Systems Engineering, Inc. (CSE) reserves the right to change the information in this document without prior notice. The software described in this document is furnished under a license agreement. The software may be used or copied only in accordance with the terms of the agreement. No part of this manual may be reproduced or transmitted in any form or by any means, electronic or mechanical, including photocopying, recording or information storage and retrieval systems, for any purpose other than the purchaser’s personal use, without the express written permission of CSE. ColorBurst and Overdrive are trademarks of CSE, Inc. PostScript and Photoshop are registered trademarks of Adobe Systems Incorporated in the United States and/or other countries. EPSON and EPSON Stylus are registered trademarks of Seiko Epson Corporation (SEC), registered in the U.S. and other countries. PANTONE® Colors displayed in the software application or in the user documentation may not match PANTONE-identified standards. Consult current PANTONE Color Publications for accurate color. PANTONE® and other Pantone, Inc. trademarks are the property of Pantone, Inc. © Pantone, Inc., 2001. Pantone, Inc. is the copyright owner of color data and/or software which are licensed to Compatible Systems Engineering, Inc. to distribute for use only in combination with ColorBurst software. PANTONE Color Data and/or Software shall not be copied onto another disk or into memory unless as part of the execution of ColorBurst. All other trademarks are the property of their respective owners and are hereby acknowledged. 2 Overdrive RIP for Windows · USER MANUAL 3 Contents Getting Started 6 Minimum Requirements . . . . . . . . . . . . . . . . . . . . . . . . . . . . . . . . . . . . . . . . . . . . . . . . 6 Overdrive Installation . . . . . . . . . . . . . . . . . . . . . . . . . . . . . . . . . . . . . . . . . . . . . . . . . . 7 Overdrive Utilities . . . . . . . . . . . . . . . . . . . . . . . . . . . . . . . . . . . . . . . . . . . . . . . . . . . . . 8 Create a Printing Environment 9 Select a Printer . . . . . . . . . . . . . . . . . . . . . . . . . . . . . . . . . . . . . . . . . . . . . . . . . . . . . . . . 9 Select a starting Environment . . . . . . . . . . . . . . . . . . . . . . . . . . . . . . . . . . . . . . . . . . 10 Print Driver Preferences . . . . . . . . . . . . . . . . . . . . . . . . . . . . . . . . . . . . . . . . . . . . . . . 10 Printer Settings . . . . . . . . . . . . . . . . . . . . . . . . . . . . . . . . . . . . . . . . . . . . . . . . . . . . . . 12 ICC Profile Settings . . . . . . . . . . . . . . . . . . . . . . . . . . . . . . . . . . . . . . . . . . . . . . . . . . . 13 Save the Environment . . . . . . . . . . . . . . . . . . . . . . . . . . . . . . . . . . . . . . . . . . . . . . . . . 14 Printing Individual Files 16 Select a Printer and Environment . . . . . . . . . . . . . . . . . . . . . . . . . . . . . . . . . . . . . . . . 16 Set your Media Width . . . . . . . . . . . . . . . . . . . . . . . . . . . . . . . . . . . . . . . . . . . . . . . . . 17 Add files to the Job List . . . . . . . . . . . . . . . . . . . . . . . . . . . . . . . . . . . . . . . . . . . . . . . . Open . . . . . . . . . . . . . . . . . . . . . . . . . . . . . . . . . . . . . . . . . . . . . . . . . . . . . . . . . Drag and drop . . . . . . . . . . . . . . . . . . . . . . . . . . . . . . . . . . . . . . . . . . . . . . . . . . Use the Overdrive Hot Folder . . . . . . . . . . . . . . . . . . . . . . . . . . . . . . . . . . . . . . . Print from applications . . . . . . . . . . . . . . . . . . . . . . . . . . . . . . . . . . . . . . . . . . . . 17 17 18 18 18 Overdrive RIP for Windows · USER MANUAL 4 Set File Attributes, Preview, Crop . . . . . . . . . . . . . . . . . . . . . . . . . . . . . . . . . . . . . . . . 18 Activate your file and turn the RIP On . . . . . . . . . . . . . . . . . . . . . . . . . . . . . . . . . . . . 19 Printing Layouts in Overdrive 21 Create a new Layout . . . . . . . . . . . . . . . . . . . . . . . . . . . . . . . . . . . . . . . . . . . . . . . . . . 21 Start with a blank layout . . . . . . . . . . . . . . . . . . . . . . . . . . . . . . . . . . . . . . . . . . 21 Create a new Layout from files in the Job or Done Lists . . . . . . . . . . . . . . . . . . . 22 Layout Properties . . . . . . . . . . . . . . . . . . . . . . . . . . . . . . . . . . . . . . . . . . . . . . . . . . . . . Layout Area tab . . . . . . . . . . . . . . . . . . . . . . . . . . . . . . . . . . . . . . . . . . . . . . . . . Cut Marks tab . . . . . . . . . . . . . . . . . . . . . . . . . . . . . . . . . . . . . . . . . . . . . . . . . . Job Titles tab . . . . . . . . . . . . . . . . . . . . . . . . . . . . . . . . . . . . . . . . . . . . . . . . . . . 22 22 23 23 Add Files to an open Layout . . . . . . . . . . . . . . . . . . . . . . . . . . . . . . . . . . . . . . . . . . . . 24 Add button . . . . . . . . . . . . . . . . . . . . . . . . . . . . . . . . . . . . . . . . . . . . . . . . . . . . 24 Layout button . . . . . . . . . . . . . . . . . . . . . . . . . . . . . . . . . . . . . . . . . . . . . . . . . . 24 Preview and Crop . . . . . . . . . . . . . . . . . . . . . . . . . . . . . . . . . . . . . . . . . . . . . . . . . . . . . 24 Position Images and Refit . . . . . . . . . . . . . . . . . . . . . . . . . . . . . . . . . . . . . . . . . . . . . . 25 Position manually . . . . . . . . . . . . . . . . . . . . . . . . . . . . . . . . . . . . . . . . . . . . . . . . 25 Refit . . . . . . . . . . . . . . . . . . . . . . . . . . . . . . . . . . . . . . . . . . . . . . . . . . . . . . . . . . 25 Scale . . . . . . . . . . . . . . . . . . . . . . . . . . . . . . . . . . . . . . . . . . . . . . . . . . . . . . . . . . . . . . . 25 Rotate . . . . . . . . . . . . . . . . . . . . . . . . . . . . . . . . . . . . . . . . . . . . . . . . . . . . . . . . . . . . . . 26 Step and Repeat . . . . . . . . . . . . . . . . . . . . . . . . . . . . . . . . . . . . . . . . . . . . . . . . . . . . . . 26 Tile . . . . . . . . . . . . . . . . . . . . . . . . . . . . . . . . . . . . . . . . . . . . . . . . . . . . . . . . . . . . . . . . . 27 Send the Layout to the Job list . . . . . . . . . . . . . . . . . . . . . . . . . . . . . . . . . . . . . . . . . . 27 Print the Layout (CLF) in the Job List . . . . . . . . . . . . . . . . . . . . . . . . . . . . . . . . . . . . . 27 Printer and Job Settings in Overdrive 29 General Printer Settings . . . . . . . . . . . . . . . . . . . . . . . . . . . . . . . . . . . . . . . . . . . . . . . Job Setup . . . . . . . . . . . . . . . . . . . . . . . . . . . . . . . . . . . . . . . . . . . . . . . . . . . . . . Automatic Rotation . . . . . . . . . . . . . . . . . . . . . . . . . . . . . . . . . . . . . . . . . . . . . . Mirror Image . . . . . . . . . . . . . . . . . . . . . . . . . . . . . . . . . . . . . . . . . . . . . . . . . . . 29 30 30 30 Layout Area Settings . . . . . . . . . . . . . . . . . . . . . . . . . . . . . . . . . . . . . . . . . . . . . . . . . . Dimensions . . . . . . . . . . . . . . . . . . . . . . . . . . . . . . . . . . . . . . . . . . . . . . . . . . . . Margin between jobs in layout . . . . . . . . . . . . . . . . . . . . . . . . . . . . . . . . . . . . . . Offset to upper left of first job . . . . . . . . . . . . . . . . . . . . . . . . . . . . . . . . . . . . . . Auto-position options . . . . . . . . . . . . . . . . . . . . . . . . . . . . . . . . . . . . . . . . . . . . Multiple page jobs . . . . . . . . . . . . . . . . . . . . . . . . . . . . . . . . . . . . . . . . . . . . . . . 30 30 31 31 31 31 Cut Marks . . . . . . . . . . . . . . . . . . . . . . . . . . . . . . . . . . . . . . . . . . . . . . . . . . . . . . . . . . . Print Cut Marks . . . . . . . . . . . . . . . . . . . . . . . . . . . . . . . . . . . . . . . . . . . . . . . . . Specify shape of marks . . . . . . . . . . . . . . . . . . . . . . . . . . . . . . . . . . . . . . . . . . . Enter Dimensions . . . . . . . . . . . . . . . . . . . . . . . . . . . . . . . . . . . . . . . . . . . . . . . . Position marks . . . . . . . . . . . . . . . . . . . . . . . . . . . . . . . . . . . . . . . . . . . . . . . . . . 31 32 32 33 33 Overdrive RIP for Windows · USER MANUAL 5 Nested Layouts . . . . . . . . . . . . . . . . . . . . . . . . . . . . . . . . . . . . . . . . . . . . . . . . . 33 Job Titles . . . . . . . . . . . . . . . . . . . . . . . . . . . . . . . . . . . . . . . . . . . . . . . . . . . . . . . . . . . . Print Job Titles and Title Options . . . . . . . . . . . . . . . . . . . . . . . . . . . . . . . . . . . . . Nested Layouts . . . . . . . . . . . . . . . . . . . . . . . . . . . . . . . . . . . . . . . . . . . . . . . . . Space Reserved for Titles . . . . . . . . . . . . . . . . . . . . . . . . . . . . . . . . . . . . . . . . . . Printing to Overdrive 33 33 34 34 A-1 Important Notes . . . . . . . . . . . . . . . . . . . . . . . . . . . . . . . . . . . . . . . . . . . . . . . . . . . . . A-1 Printer Configuration . . . . . . . . . . . . . . . . . . . . . . . . . . . . . . . . . . . . . . . . . . . . . . . . . A-2 Printing from applications on the Overdrive RIP workstation . . . . . . . . . . . . . . . A-5 Printing from a networked Windows computer . . . . . . . . . . . . . . . . . . . . . . . . . . . A-5 Printing from a networked Mac OS X computer . . . . . . . . . . . . . . . . . . . . . . . . . . . A-5 Printing from applications . . . . . . . . . . . . . . . . . . . . . . . . . . . . . . . . . . . . . . . . . . . . A-6 Overdrive RIP for Windows · USER MANUAL 6 1 Getting Started ColorBurst Overdrive is a PostScript® Language Level 3 compatible Raster Image Processor (RIP) that uses new advances in color management and printing technology to deliver high-end color, accurate proofing and Pantone matching for inkjet printers. Support for any paper is immediately available due to the universal nature of Overdrive’s color management. Overdrive supports RGB, CMYK, and Grayscale TIFF and JPEG file formats, as well as PS, EPS, and PDF files. A Hot Folder is included for printing across networks, and Overdrive can be printed to directly from your favorite applications. Minimum Requirements Before installing Overdrive, make sure your computer meets the following requirements. Operating System Windows 7: all workflows supported Windows 8: printing from applications is not supported (files can be sent to the Hot Folder or placed directly in the Job List to print) CPU Dual-core 2.6 GHz CPU or faster recommended RAM 4 Gb RAM minimum Disk Space 20 GB or larger hard disk recommended, as needed for processing jobs Monitor 1024x768 minimum resolution required Printer Connection Gigabit Ethernet or USB 2.0 connection required for printer driver Printer Driver The most recent printer driver available for your printer must be downloaded from the printer manufacturer’s web site and installed prior to running Overdrive (older drivers may cause problems when printing) Overdrive RIP for Windows · USER MANUAL Overdrive Installation To install and run Overdrive, you will need the Overdrive for Windows installer, which can be downloaded from http://www.overdriverip.com. You will also need your Overdrive dongle; otherwise you may run Overdrive in demo mode for 15 days. 1. Check the OS version. Make sure that your computer is running Windows 7. 2.Insert the Overdrive dongle. Plug the supplied Overdrive dongle into any available USB port or USB hub. Figure 1.1. The Overdrive dongle. 3. Launch the Overdrive installer. In the Overdrive installer, select the first option to Install the Overdrive RIP. When installation starts, follow the instructions on your screen. After the Overdrive RIP installation is complete, you will be prompted to install Multi File Port Monitor (used when printing to Overdrive from applications and client machines) and Sentinel Runtime (the dongle driver). A ColorBurst printer is created to print to Overdrive from other applications, but needs to be configured before printing. (See Appendix A for instructions on setting up Overdrive as a network printer.) 4.Verify the ColorBurst printer status. After installation is complete, open your computer’s Printers list and make sure the ColorBurst printer and your printer driver both have a “Ready” status. A printer with an “Offline” status will not be recognized by Overdrive. NOTE The printer driver must be installed and have a “Ready” status when printing. Figure 1.2. The ColorBurst printer and an Epson SP9900 printer with a “Ready” status in the Windows Printers list. 5. Launch the Overdrive RIP. Overdrive installation creates two Overdrive desktop shortcuts—one for the demo version, and one for the full product (dongle required). Overdrive is installed in your C: drive unless you specify otherwise. 7 Overdrive RIP for Windows · USER MANUAL Figure 1.3. The Overdrive shortcuts on the desktop. 6.Register Overdrive. Register your copy of Overdrive (an internet connection is required). If you click Register Later, the registration window will pop up every few hours until registration is completed. NOTE After launching Overdrive for the first time, please exit the program to create an initial settings (ini) file, and relaunch Overdrive. Overdrive Utilities The following utilities are installed as part of the initial Overdrive installation. Dongle Updater This program can be used to update your dongle remotely in the event of an upgrade purchase. ColorBurst Print Drivers The print drivers are required when printing to ColorBurst Overdrive over a network. See Appendix A for instructions on setting up Overdrive as a network printer. 8 Overdrive RIP for Windows · USER MANUAL 2 Create a Printing Environment Before you can print from Overdrive, you must set your printer and color settings and save them as an Environment. Once created, an environment can be selected in the Environments menu to recall all of the settings in one step. This section will walk you through the required settings to build a basic print environment. Figure 2.1. The main Overdrive window. The Printers and Environments menus are on the first toolbar, next to the Overdrive logo. Select a Printer The Printers menu shows the printers currently installed on your computer. This list can be changed in your System’s Printer settings (Start menu > Control Panel > Printers). Figure 2.2. The Printers menus allows you to select any printer currently installed on your computer. 9 Overdrive RIP for Windows · USER MANUAL Select a starting Environment Overdrive ships with a basic selection of preset environments for Epson Stylus Pro printers. These are meant to be used as a starting point—they will need to be modified to match your printing environment. Select the environment that matches your media type. If preset environments are not available for your printer, you will see “AutoGenerated” as the starting Environment. Figure 2.3. Select a starting environment, if available. Print Driver Preferences Click the Print Driver Preferences button in the toolbar to opens Print dialog where you can access your printer driver settings (print preferences). This dialog is not used to print; clicking OK simply closes the dialog and saves the driver settings for use with Overdrive. Figure 2.4. Click the Print Driver Preferences button to open the Print dialog, where you can set the printer Properties. 10 Overdrive RIP for Windows · USER MANUAL 11 The Preferences button opens the printer Properties dialog for the selected printer. The following settings must be set before printing: a Media Type Set to match the media you are using. If using a third-party/custom profile, select the media type used when building the profile. b Resolution/Quality Set as desired. Print speed decreases as print quality/resolution increases. c Color Mode You must turn off color management in the driver. Epson printers: for Mode, select “Custom” to set the color mode to “Off.” Canon printers: Change Easy Settings to Advanced Settings to set Color Mode to “No color management.” d Paper Source Select roll or sheet to match your media. Roll auto cut settings should be set as well. e Paper Size Epson printers: All media size settings in this dialog are ignored; Overdrive’s job/layout size settings are used instead. Canon printers: select “Custom” paper size (any dimensions) so that Overdrive can pass values through to the printer. f Orientation Portrait (no rotation) must be selected. Do not select Landscape or rotate. (Images may be rotated in the Overdrive Job List.) Once you have made these settings, click OK to close the Properties dialog, then click OK to close the Print dialog. a f b c d e Figure 2.5. The printer Properties dialog for Epson printers: a) Media Type, b) Resolution/Quality, c) Color Mode, d) Paper Source, e) Paper Size, and f) Orientation. Overdrive RIP for Windows · USER MANUAL a 12 e b c f d Figure 2.6. The printer Properties dialog for Canon printers: a) Media Type, b) Resolution/Quality, c) Color Mode, d) Paper Source, e) Paper Size, and f) Orientation. Printer Settings Click the Printer Settings button in the toolbar to open the Printer Settings dialog. The Printer Settings dialog is used to define print settings for individual jobs and layouts. Figure 2.7. Click the Printer Settings button to open the Overdrive Printer Settings dialog. Use this chart to set Overdrive Printer Settings when building an environment: a Job Setup Sheet paper: select “Use Absolute Height” and enter the length of your paper in the Height field. Roll paper: select “Use Job Height plus extra height.” b Positioning Select “Center job inside page” to center all images, or select “Offset from upper left corner of page” (default). c Unprintable areas Default value is 0.1 for all sides; match your printer’s non-printable margins (see your printer documentation for exact values). Borderless printing only: set all four values to zero. d Auto expand Borderless printing only: Select “Automatically expand job” and enter “0.1” for width and height to autoexpand. e Resolution Resolution must always be set to “Use Printer Resolution.” f Auto rotation Select “Auto rotate for best fit” to rotate images to fit media width automatically, if possible. g Mirror Image Select “Mirror Image” to reverse image for printing on backlit film. Overdrive RIP for Windows · USER MANUAL a b c d e f g Figure 2.8. The General tab in the Printer Settings dialog: a) Job Setup, b) Positioning, c) Unprintable Areas, d) Auto expand, e) Resolution, f) Auto rotation, and g) Mirror Image. Once you have made these settings, click OK to close the Printer Settings dialog, ICC Profile Settings Click the ICC Profile Options button in the toolbar to open the ICC Profile Options dialog. Figure 2.9. Click the Printer Settings button to open the Overdrive Printer Settings dialog. The only setting you must set is the Printer Output Profile. Click the Find button to select the RGB media profile that matches your paper. 13 Overdrive RIP for Windows · USER MANUAL NOTE If you selected a preset environment, the output profile has been set to match the paper named in the environment. If you are using a custom ICC profile, use the Find button to select the file from any location. Once selected, Overdrive copies the profile into the default profile folder for use. Figure 2.10. The Output Profile must be set to match your media in the ICC Profiles Options dialog. Once you have made these settings, click OK to close the ICC Profile Options dialog. Save the Environment The changes made in each dialog were saved as the current working environment. To save the Environment for later use, select Save As under the Environment menu. Figure 2.11. Select Save As under the Environments menu to save your environment. NOTE If you are saving changes made to a preset environment, you must give the environment a new name. All preset environments are locked and can not be overwritten. Type in an Environment name that describes the settings—the type of media, resolution, format (roll or sheet), or any other information that may be useful. 14 Overdrive RIP for Windows · USER MANUAL Figure 2.12. The Environment Save As dialog. Environments are organized by media brand and media type. Select a brand from the Media manufacturer menu, or click the plus (“+”) button to add a new media brand. Select a media type from the Media type menu, or click the plus (“+”) button to add a new media type category. Click OK to save your environment. Once an environment is saved, it can be selected under the Environments menu to set all of the saved settings in one step. NOTE Make a new Environment for each type/size of paper you use. After your Environments are saved, you can easily switch between Environments whenever you change paper in your printer. 15 Overdrive RIP for Windows · USER MANUAL 3 Printing Individual Files After an environment has been created, Overdrive can be used to print JPEG, TIFF, EPS, PS, and PDF files individually or in nested layouts. All files are printed from the Job List in the Job Manager window. Figure 3.1. Files are printed from the Job List in the Overdrive Job Manager. IMPORTANT You must build a print environment before printing from Overdrive (please refer to section 2: Create a Printing Environment in this document). Select a Printer and Environment Each time you prepare to print, make sure your printer is selected in the Printers menu, and the correct environment has been selected in the Environments menu. When selected, they will appear in blue text above the menus. 16 Overdrive RIP for Windows · USER MANUAL Figure 3.2. Select your printer and environment before printing. Set your Media Width After selecting your printing environment, you will need to make sure your Media Width is set correctly. This setting is not saved as part of the environment, so you can change environments without needing to change the media width. Figure 3.3. Set the media width in the Change Media dialog. Open the Change Media dialog In the Job List toolbar, click the Change Media button to open the Change Media dialog. Enter your Media Width The number entered here should match the physical width of your media. To see the actual imageable area (inside the printer’s margins) press the Tab key. Click OK to close the dialog when you are finished. The new Media Width will be displayed in the Job List toolbar. Add files to the Job List The Job List contains the list of files to print from Overdrive. There are several ways to add files to the Overdrive Job List. Open The File > Open menu item (or Open button in the toolbar) opens a standard Windows Open dialog to allow you to open image files for processing. 17 Overdrive RIP for Windows · USER MANUAL Drag and drop An easy way to get files into the Job List is to drag files from a folder into the Overdrive Job List. You may drag files from any local disk or network. Use the Overdrive Hot Folder Another option is to use the Overdrive Hot Folder (Overdrive\Hot Folder folder) to place files in the Job List. Overdrive scans the Hot Folder for files and places them immediately into the Job List for printing. NOTE The Hot Folder is a drop folder only. To delete files from the Job List, highlight them and click the Delete button in the Job Manager toolbar. Print from applications Files can also be added to the Job List by printing to Overdrive from applications. The Print dialog in any application can be used to send files to Overdrive locally or across a network. When printing from applications, all files are sent to Overdrive as PostScript files, regardless of the type of file printed. The process of printing to Overdrive creates a PostScript file. To set up printing from applications, see Appendix A: Printing to Overdrive. Set File Attributes, Preview, Crop The File Attributes dialog lets you scale and rotate individual files, set the number of copies to print, and preview files on the screen. Cropping is available in the Preview window. NOTE If the width of your file is larger than the Media Width, you will get a Status in the Job List of “Job too wide.” The file will not print until you scale or rotate your file. Double-click a file to open the File Attributes dialog When you double-click a single file in the Job List, the File Attributes dialog shows the settings for that file. Figure 3.4. The File Attributes dialog opens when you double-click an individual file in the Job list. 18 Overdrive RIP for Windows · USER MANUAL Change the size or orientation of your image You can scale your image to a percentage or to a width. The image will be scaled proportionally unless you select the Scale width and height independently checkbox. Use the directional “A” buttons to rotate the image. NOTE When entering values for scaling, it is recommended that the file resolution go no lower than 100 ppi—the print quality will suffer if you print below 100 ppi. Set the number of copies to print Type the number of prints you want in the Copies to print field. Preview your image The Preview button at the bottom of the File Attributes dialog will open the image in a Preview window. Crop your image Click and drag inside the Preview window to define the crop area and click the Crop button. To enter a specific crop size and position, click the Crop to Size button to open the Crop Box Size dialog. The crop is saved when the Preview window is closed. Figure 3.5. An image in the Preview window before cropping and after cropping. Activate your file and turn the RIP On To print files from Overdrive, the files in the Job list must have a “Ready” or “Ready Priority” status and the RIP On button must be selected in the Job list bar. The Receive on Hold checkbox is selected in the Job list bar by default. This gives all files in the Job list a status of “On hold” so any necessary changes can be made in File Attributes. Files with a status of “On hold” must be activated to print. Activate files to print Select your file in the Job List and click the green Activate button in the Job Manager toolbar to change the status to “Ready.” To change the status to “Ready - Priority” and move the file to the top of the Job list, click the green Print Now button instead. (Files can be changed back to “On hold” status by clicking the yellow Hold button, or deleted by clicking the red “X” delete button.) 19 Overdrive RIP for Windows · USER MANUAL Figure 3.6. Activate your file to change the status from “On hold” to “Ready.” Click RIP On When you click RIP On, Overdrive begins to process the file at the top of the Job List with a “Ready - Priority” or “Ready” status. (You can drag files to reorder them in the Job List.) If your printer is connected properly your file will begin to print. During processing, the Overdrive status bar at the bottom of the Job Manager window changes to a progress bar. The Messages window shows information about processing and printing. Figure 3.7. Click RIP On to start processing. After printing, files move to the Done List. Files can be moved back to the Job list for reprinting or deleted by clicking the Delete button. NOTE If you want to cancel a job while it is processing, select the file and click the red Cancel button. If the file was printing at the time of cancellation, you may have to cancel the job on the printer’s front panel before the file will go to a status of Cancelled. 20 Overdrive RIP for Windows · USER MANUAL 4 Printing Layouts in Overdrive Overdrive allows you to nest files in layouts to save media when printing. Files are auto-nested for best fit, but can be manually positioned in the Layout window. Files can be added to Layouts from the Job List using the Layout button or from the Layout window using the Add button. When a Layout is complete it is sent to the Job List as a layout with an expand/collapse arrow to the left of the name in the Job List. When the layout is expanded in the Job List, all files in the layout are listed with a status of “In layout.” Layouts are numbered sequentially to keep track of them in the Job list. Layouts have a file name extension of .CLF (ColorBurst Layout File). Figure 4.1. An expanded layout (CLF) in the Job list. The files in the layout are listed with a status of “In layout.” Create a new Layout There are two ways to create a new layout. Start with a blank layout To create a new blank layout, make sure nothing is selected in the Job List or Done List and click the Layout button in the Job Manager toolbar. 21 Overdrive RIP for Windows · USER MANUAL Create a new Layout from files in the Job or Done Lists You can create a new layout from multiple files already listed in the Job List or Done List by selecting the files and clicking the Layout button in the toolbar. The selected files will be placed in the new Layout arranged for best fit. Figure 4.2. Layouts are created by clicking the Layout button in the Job Manager toolbar. If files are selected in the Job list, they are added to the Layout. Layout Properties The Layout Properties dialog allows you to set properties for the current layout, including the layout height, margins, offsets, cut marks, and job titles. Each layout’s default settings are based on the currently selected environment. Click the Properties button in the Layout Area window to open the Layout Properties dialog. Figure 4.3. Click the Properties button to open the Layout Properties dialog. NOTE Changes to the Layout Properties are saved as part of the current layout only— the selected environment and Layout Properties of other layouts are not affected. To set defaults for all layouts, use the Layout Area tab in the Job Manager’s Printer Settings dialog. Layout Area tab The Dimensions settings define the size of the Layout. The width, which is dimmed, must be set in the Job Manager window by clicking the Change Media button. The Height is used to set the height of the layout worksheet, so it is usually set to a high number to ensure the layout has room to fit images (default is 200 inches). The layout will only print the length of the images in the layout, not the height entered. The margin settings allow you to specify how much white space is added between each image in a layout. The Across value adds space between the left and right sides of images, while the Down value adds space between the tops and bottoms of images. Use the In and Down Offset to move images away from the top left corner of the layout. Positive values move all images in the current layout to the right and down. Negative values 22 Overdrive RIP for Windows · USER MANUAL can be entered to move part of the image off the media. This can center large images, move tick marks out of view, or eliminate built-in white space in the image. Jobs are placed in the layout based on the Auto-position options. The three position options are Order entered, Largest first, and Smallest first. Jobs can be placed to fill all available space or aligned in rows for easier cutting, with the option of centering jobs in the layout. If you already have files in the layout, you can click the Refit button to see how the settings affect placement. When multipage jobs are added to a layout, pages are placed based on the Multiple Page Jobs setting. Multiple pages can be nested in a layout, or each individual page can be printed in a separate layout. Figure 4.4. The Layout Properties dialog allows you to set properties for the current layout. Cut Marks tab The Print cut marks checkbox determines whether or not cut marks are printed around each image in the layout. When the Print cut marks checkbox is selected, there are five different cut mark shapes to choose from. Each type is visually represented by a diagram to show what the marks will look like. To select a cut mark shape, click on the diagram to highlight it. The appropriate options in the Cut Marks tab will become available depending on which shape/diagram is selected. For a detailed description of each mark type, please refer to section 5: Printer and Job Settings in Overdrive. Job Titles tab The Job Titles tab in the Printer Options dialog is used to specify job title options for individual images, the entire layout, or both. A job title is printed information, including the file name, describing an image (or layout) that is not intended to be part of the final printed product. When titles are turned on, a gray bar representing each title will appear in the Layout window. 23 Overdrive RIP for Windows · USER MANUAL For a detailed description of job titles, please refer to section 5: Printer and Job Settings in Overdrive. Add Files to an open Layout Files are placed in the layout based on the Auto-position settings in the Layout Properties dialog. The layout is refit after each new file is added to maintain positioning. Add button To add files to the Layout window, click the Add button. Figure 4.5. Click the Add button to add files to an open layout. Layout button Files can also be added to an open Layout from the Job list by selecting the files and clicking the Layout button in the Job Manager toolbar. Files can be removed from the Layout by selecting the file and clicking the Remove button. NOTE When adding files to layouts please keep in mind that the entire layout is processed before printing begins. To print layouts efficiently, it is recommended to keep layouts shallow rather than create very long layouts. Preview and Crop When a file is first added to a Layout it is represented by an empty box until a preview thumbnail is created. Create a preview bitmap To create a preview bitmap for a file, select the file and click the Preview button or doubleclick the file. The file is opened in the Preview window and a layout thumbnail is created. 24 Overdrive RIP for Windows · USER MANUAL NOTE Preview bitmaps are stored by Overdrive until the file is deleted from the Job list, Done list, or Layout window. Preview bitmaps can be deleted from the Layout window by Ctrl-clicking the file. You will need to preview the file again to rebuild the thumbnail. Crop an image A file can be cropped in the Preview window. Click and drag to define the cropped area and click the Crop button. To enter a specific crop size and position, click the Crop to Size button to open the Crop Box Size dialog. The crop is saved when the Preview window is closed. Cropped files are indicated in the Layout window with a dashed border. Figure 4.6. Cropped files are displayed with a dashed border in the Layout Window. Position Images and Refit Position manually Files in the Layout window can be manually positioned by clicking and dragging the files in the Layout to new positions. Refit Clicking the Refit button will reposition the files based on the Auto-position setting in the Properties dialog. Scale The Scale options are available when the Scale button is selected in the Layout Area toolbar. Figure 4.7. Scale options are available when the Scale button is selected in the toolbar. 25 Overdrive RIP for Windows · USER MANUAL Select an image in the Layout to scale to a percentage or to a width. The image will be scaled proportionally unless you select the Scale width and height independently checkbox. Click the Reset button to revert the image to its original size (100%). Rotate The Rotate options are available when the Rotate button is selected in the Layout Area toolbar. Select an image in the layout and use the directional “A” buttons to rotate the image. Figure 4.8. Rotate options are available when the Rotate button is selected in the toolbar. Step and Repeat The Step and Repeat options are available when the Step and Repeat button is selected the Layout Area toolbar. Figure 4.9. Step and Repeat options are available when the Step and Repeat button is selected in the toolbar. You may specify a number of images to add to the layout by entering a value in the Copies field and clicking the Step&Repeat button. For example, if you enter a value of 5 and click Step&Repeat, the image will be repeated for a total of five copies, as long as there is enough space in the Layout window for all five images to fit. NOTE The selected image is considered the first image, and more images are added to make up the total number of copies. To fill a layout with an image, select the Fill the entire layout area checkbox and click the Step&Repeat button. The Columns checkbox lets you add images in a specified number of columns. The Rows checkbox lets you add images in a specified number of rows. If both of these options are selected, the image will be repeated in the specified number of columns and rows. 26 Overdrive RIP for Windows · USER MANUAL To remove all copies of an image but leave the original image in the layout, click the Remove Copies button. Tile The Tile options are available when the Tile button is selected the Layout Area toolbar. Figure 4.10. Tile options are available when the tile button is selected in the toolbar. The Columns and Rows fields can be used with the Tile Job button for quick tiling. Tiles will be placed in their own layout unless the Nest tiles checkbox is selected. The Options button opens the Tiling Options dialog, which gives more control over individual tiles. Send the Layout to the Job list A Layout does not appear in the Job list for printing until the Layout window is closed. Close the Layout window To save changes made to the layout, click the Print button in the Layout window toolbar. The layout will be sent to the Job List as a CLF (ColorBurst Layout File). Figure 4.11. Click the Print button to send the layout to the Job List to print. To close the Layout and cancel any changes made, click the Cancel button. Print the Layout (CLF) in the Job List The layout CLF will print when it is the first “Ready” or “Ready - Priority” file listed in the Job List and the RIP On button is selected. Set the layout CLF status to Ready Select the layout CLF file in the Job list and click the green Activate button in the Job list toolbar. 27 Overdrive RIP for Windows · USER MANUAL Turn the RIP On When you click RIP On, Overdrive begins to process the file at the top of the Job List with a “Ready - Priority” or “Ready” status. If your printer is connected properly the file will begin to print. During processing, the Overdrive status bar at the bottom of the Job Manager window changes to a progress bar. The Messages window shows information about processing and printing. After printing, the layout CLF moves to the Done List. The layout CLF can be moved back to the Job list for reprinting or deleted by clicking the Delete button. NOTE If you want to cancel a job while it is processing, select the file and click the red Cancel button. If the file was printing at the time of cancellation, you may have to cancel the job on the printer’s front panel before the file will go to a status of Cancelled. 28 Overdrive RIP for Windows · USER MANUAL 5 Printer and Job Settings in Overdrive The Printer Settings dialog is used to define individual job and layout settings used by Overdrive. To open Printer Settings, select Options menu > Printer Settings or click the Printer Settings button in the Job Manager toolbar. General Printer Settings The Printer Settings dialog opens in the General tab. Figure 5.1. The General tab in the Printer Settings dialog. 29 Overdrive RIP for Windows · USER MANUAL Job Setup The Job Setup settings are used when individual files are printed from the Job list. The Width, which is dimmed here, is set by clicking the Change Media button. When Use Absolute Height is selected, a Height value must be entered. Each printed job will be exactly as long as the Height value—if the job is longer than the Height, it will be truncated; if the job is shorter, the paper will advance to the specified Height. By default, the Use Job Height Plus Margins button is selected with a value of zero to save media— this setting prints the job without extra space. Entering a non-zero value will add margins before and after the job. There are two options for image placement. The first, Center job, will automatically center an image on the media based on the dimensions entered. The second option is Offset from upper left corner. The In and Down values are used to offset an image from the top left corner of the printable area on your media. The Unprintable Areas settings are based on your printer’s non-printable margins. The default values are set to 0.1 inch. These should be set to match your printer’s non-printable margins (refer to your printer’s documentation for margin size). If printing borderless, set these values to zero and use the Automatically Expand Job setting to scale for borderless (set the auto expand width and height to 0.1). Automatic Rotation Auto Rotate for best fit can correct two common problems—it can rotate images that come in with an “Image too wide” status, and it can be used to automatically rotate images to save media. If an image is wider than the media width, the image comes into the Job List with a status of “Image too wide.” When Auto Rotate is selected the image is automatically rotated in an attempt to make the image fit the media. This only works if the other dimension is less than the width of the printer. When Auto rotate is selected, all images are compared to the media width and are rotated to a “Landscape” orientation to conserve roll media. Mirror Image The Mirror Image check box allows you to print an image reversed. Use this option when printing on transparent material that is to be backlit when displayed. Layout Area Settings The settings in the Layout Area tab are used to determine the layout size, margins, and offsets. Dimensions The Dimensions settings define the size of the Layout. The width, which is dimmed, must be set in the Job Manager window by clicking the Change Media button. The Height is used to set the height of the layout worksheet, so it is usually set to a high number to ensure the layout has room to fit images. The layout will only print the length of the images in the layout, not the height entered. 30 Overdrive RIP for Windows · USER MANUAL Figure 5.2. The Layout Area tab in the Printer Settings dialog. Margin between jobs in layout The margin settings allow you to specify how much white space is added between each image in a layout. The Across value adds space between the left and right sides of images, while the Down value adds space between the tops and bottoms of images. Offset to upper left of first job Use the In and Down offset to move images away from the top left corner of the layout. Positive values move all images in the current layout to the right and down. Negative values can be entered to move part of the image off the media. This can center large images, move tick marks out of view, or eliminate built-in white space in the image. Auto-position options Jobs are placed in the layout based on the Auto-position options. The three position options are Order entered, Largest first, and Smallest first. Jobs can be placed to fill all available space or aligned in rows for easier cutting, with the option of centering jobs in the layout. If you already have files in the layout, you can click the Refit button to see how the settings affect placement. Multiple page jobs When multipage jobs are added to a layout, pages are placed based on the Multiple Page Jobs setting. Multiple pages can be nested in a layout, or each individual page can be printed in a separate layout. Cut Marks The fourth tab in the Printer Settings dialog is the Cut Marks tab. These settings used to turn cut marks on or off, as well as specify the type of cut marks and their position. 31 Overdrive RIP for Windows · USER MANUAL Figure 5.3. The Cut Marks tab in the Printer Settings dialog. Print Cut Marks The Print cut marks checkbox determines whether or not cut marks are printed around each image in the layout. When this box is selected, Overdrive creates marks to indicate where to trim the image. The rest of the options in the Cut Marks tab are only available when this checkbox is selected. Specify shape of marks When the Print cut marks checkbox is selected, there are six different cut mark shapes to choose from. Each type is visually represented by a diagram to show what the marks will look like. To select a cut mark shape, click on the diagram to highlight it. The appropriate options in the Cut Marks tab will become available depending on which shape/diagram is selected. For standard crop marks, select the first diagram, Cut Marks. This will create an “L”–shaped mark, facing out from the image, in each corner of the image. When used with tiling, the Cut mark will print at the overlap mark so that when the tiles are cut they will line up with each other without overlap. The second option is Corner marks. This will print an “L”–shaped mark on the corners of the image facing into the image. When Corner marks are used with tiling, the marks print on the perimeter of the image, allowing physical overlap when trimmed. The third option is Circles. This setting will print circles in the corners as cut marks instead of L–shaped marks. Circles should be selected when using cutters requiring circular cut marks, such as the I–Cut. When Circles is selected, make sure to set the Diameter of circle to match the requirements of the cutter. The next two cut mark shapes create cut or corner marks as well as a dashed or solid box drawn around each image. These shapes can be selected when using an automatic cutting device, such as the Fotoba. The two entry boxes below the diagrams, Black (on) size and White (off) size, determine whether the line is solid or dashed. To draw a solid black box, set the Black (on) size to 1 (or any number other than zero) and set the White (off) size to zero (0). To draw a solid white box, set the Black (on) size to zero and set the White (off) 32 Overdrive RIP for Windows · USER MANUAL size to any number other than zero. To draw a dashed line, give both boxes values other than zero. A value of zero in both edit boxes indicates that no cut box will be drawn. The last option is Squares. This setting will print squares in the corners as cut marks instead of L–shaped marks. Squares should be selected when using cutters requiring square cut marks, such as Summa cutters. When Squares is selected, make sure to set the Width and Height of square to match the requirements of the cutter. Enter Dimensions The Enter dimensions group lets you enter the Width and Height of the cut marks, if applicable. When Circles is chosen as the cut mark shape, the dimensions settings change to Diameter of circle. The thickness of cut marks can be changed in the Enter dimensions group. Click on the Specify Thickness In Pixels button to choose a width of 1, 2, 3, or 4 pixels. If you want a different measure, you may enter it manually by selecting the Specify Thickness In Units of Measure button and entering the value in the Units entry box. Position marks The Position marks group lets you add space between the marks and the corners of the image. You can enter a positive number to add space around the image, or a negative number to place the mark inside the image, for trimming bleed. Nested Layouts The Nested Layouts group contains settings that determine cut mark placement when a layout is printed. There are two choices: position one set of cut marks at the corners of the layout boundary, or place cut marks at the corners of all jobs in a layout. Job Titles The Job Titles tab in the Printer Options dialog is used to specify job title options for individual images or entire layouts. A job title is printed information describing an image (or layout) that is not intended to be part of the final printed product. When titles are turned on, a gray bar representing each title will appear in the Layout window. Print Job Titles and Title Options The Print job titles checkbox determines whether job titles are printed. If selected, job titles are created and printed, and the rest of the options in the Job Titles tab become available. The file name (or layout name for layout titles) is always part of a job title information. When layout titles are printed, the layout name is determined by the File Name Template in the Layout Options dialog. If no other title options are selected, the name is the only information printed. Selecting the Include full path of job name checkbox will enable the inclusion of the full path used to open the file. If Include full path is not selected, the file name without any path is included in the job title. If you select the Include current time and date checkbox, the current time, day of the week, and date will be included. The time and date are determined at the time the title is created. 33 Overdrive RIP for Windows · USER MANUAL If you select the Include printer setup file name checkbox, the name of the Printer Setup file will be included in the job title. The Printer Setup file in effect is shown in the main menu bar after the Help menu. The Include additional comment box allows you to add a comment to the job title. Simply type your comment in the comment entry box below. You may enter a maximum of 255 characters. Any comment entered here will print in all image and layout job titles. If you select the Uppercase checkbox, the entire title will print using uppercase letters. Otherwise, all characters except the first letter of the day and month name will be printed in lowercase letters. Figure 5.4. The Job Titles tab in the Printer Settings dialog. Nested Layouts The Nested Layouts group contains settings that determine the type of job titles that are printed. There are three choices: print a layout title only, print job titles only, or print both layout and job titles. Job titles appear above each individual image; a layout title appears at the top of a layout (above two or more nested images). Space Reserved for Titles The Space reserved for titles group allows you to set the size and spacing for titles. When job titles are included, the height of the title is added to the height of the image. This means that the job title affects vertical positioning and the height of the block in the layout window. Horizontal positioning is not affected by whether titles are included because, while the title may have enough information to extend past the right edge of the image, it is always clipped at the right edge. If the point size or spacing values are adjusted, the Layout window will be updated to reflect the changes after the Printer Options dialog is closed. You may change the size of the title using the Point size of type in job value entry box. The minimum size for titles is 4 points; the maximum size is 144 points. The Additional vertical space between job title and job entry box allows you to adjust the amount of space between the title and job. This can allow space to cut the title away from the image. You may add up to 4 inches of extra space between the title and job. 34 Overdrive RIP for Windows · USER MANUAL Appendix A Printing to Overdrive Overdrive can be used as a print server to print directly from Windows applications and other networked computers. Files will print from the application to a ColorBurst printer, which sends files to the Overdrive RIP Job List as a PostScript file. IMPORTANT This workflow is supported when Overdrive is installed under Windows 7 only. Any networked computer, including those running Windows 8 and Mac OS X, can print to the Overdrive printer when installed under Windows 7. Important Notes Before you get started there are a few things you should know about printing directly from applications to the Overdrive RIP. 1. Overdrive must be installed and running. If Overdrive is not running when you print your file, Windows will not be able to send your file to Overdrive. The file will remain in the printer until Overdrive is launched. 2. The ColorBurst PPD v4.1 must be installed on every workstation that will print to Overdrive. The ColorBurst printer can be used as a network printer and will publish on the network as a Bonjour printer (IP Protocol) or LPR printer. PPD installers for Windows and Mac OS X are included in the Overdrive Printer Driver folder. 3.If the page size is not set up correctly in the application, your files will not print correctly. Page parameters (bounding box) are assigned through the Page Setup in many applications. Some applications will let you do a page size internally (such as Quark or InDesign). Other applications will require you to set a page size in the Print window (such as Photoshop). If you do print from Photoshop make sure you have the correct page size set in your application. A-1 Overdrive RIP for Windows · USER MANUAL 4.Data from Photoshop must be sent in Binary form. This can be set in the Print with Preview window. You must select Output and then set the encoding to Binary. 5. The Hot Folder can be used as an alternative to printing directly from applications. Files can be saved or copied across a network to the Overdrive Hot Folder for printing. Files in the Hot Folder are automatically added to the Job List in their native format (PDF, TIFF, JPG, etc.) rather than PostScript (all files printed from applications come into the Job List as PostScript). Printer Configuration During standard Overdrive installation, a ColorBurst printer is created in your system Printer list, and the Multi File Port driver is installed. Before printing to Overdrive, you must configure the ColorBurst printer to properly use the Multi File Port driver. 1. Open the ColorBurst printer. Go to Start menu > Control Panel > Printers. Select the ColorBurst printer and double-click to open. In the Printer menu, select Properties. Figure A.1. Select Properties in the Printer menu of the ColorBurst printer window. 2. Add a Port. In the ColorBurst Properties window, select the Ports tab. Click the Add Port button. A-2 Overdrive RIP for Windows · USER MANUAL Figure A.2. Click the Add Port button in the Ports tab. 3.Select and name a new port. Select Multi File Port Monitor in the Printer Ports list and click the New Port button. When prompted, enter Overdrive RIP in the Port name field and click the Ok button. Figure A.3. Name the new port Overdrive RIP. 4. Configure the new port. Click the button next to Output path to browse to the Overdrive RIP\Spooler folder. Enter %t.ps in the Filename pattern field. A-3 Overdrive RIP for Windows · USER MANUAL Figure A.4. Select the ColorBurst_Overdrive\Spooler folder and enter Filename pattern %t.ps. 5.Save the new port. Click Ok to save the settings. You will see the Printer name assigned with the new Port name. Click Close to save the ColorBurst Properties. The ColorBurst printer is now properly configured to receive the file and redirect it to the Overdrive\Spooler folder. The file will automatically be added to the Overdrive Job List. Figure A.5. The new Overdrive RIP Multi file port appears in the list. A-4 Overdrive RIP for Windows · USER MANUAL Printing from applications on the Overdrive RIP workstation 1.Install Overdrive under Windows 7 and configure the ColorBurst printer. If you have already installed Overdrive and configured the ColorBurst printer, you do not need to do any additional setup. 2. Print from your application. In the application’s Print dialog, select ColorBurst as the printer. When you click Print, the file will be sent to the ColorBurst Job List as a PostScript file (regardless of the file type). Printing from a networked Windows computer The following process adds a ColorBurst printer to a networked Windows computer. 1. Open the Add Printer Wizard. In the Control Panel, select Printers. Select Add a Printer to open the Add Printer Wizard. Click the Next button to continue. 2.Select Network Printer. Select the Network printer option. You will be printing to the ColorBurst printer which sends the file to the Overdrive Job List to print to the actual printer. Click Next to continue. 3. Browse for a printer. Choose “Browse for a printer” and click Next. Select ColorBurst from the list of shared printers and click Next. 4.Install Printer Driver. If you need to install the ColorBurst print driver, a message will appear to automatically install a print driver on your machine. Click “Yes” to install the ColorBurst PPD. If you do not get the message to install a print driver, you will need to copy the ColorBurst Printer Driver folder to your machine so you can select “Have Disk” and install the PPD manually. After clicking Have Disk, navigate to the Print Driver folder, select the ColorBurst INF file and click Open. 5.Default printer. The last option is to set ColorBurst as your default printer. After you click Next, the printer setup will be complete. You can now print to this new printer from any application. Printing from a networked Mac OS X computer 1.Install the ColorBurst PPD on the networked Mac OS X computer. A ColorBurst OS X PPD installer is included in the ColorBurst RIP > Printer Driver folder. Copy the Mac OS X PPD Installer to the Mac OS X computer you want to print from. Double–click the installer to run it on your Mac. The PPD file will be installed in the correct location. 2. Check the Overdrive RIP workstation to make sure Overdrive is running. ColorBurst must be running to create a printer in the Mac OS X Printer Setup Utility. A-5 Overdrive RIP for Windows · USER MANUAL 3. Create the ColorBurst printer in the Printer Setup Utility on the networked computer. Open the Mac OS X Printer Setup Utility. Click the Add button to add a printer. Select the Windows tab. Browse the network to find your Windows computer (you may need to log in to the Windows machine to connect). Select the ColorBurst printer and change the printer model to ColorBurst RIP - v4.1 (choose Select Printer Software to locate the PPD). Click Add to add the printer. Figure A.6. In the Windows tab, select the ColorBurst printer and use the ColorBurst RIP PPD. 4. Print from your application. Select the ColorBurst printer when printing from applications. The Overdrive RIP must be running when you print. Printing from applications General Page Setup 1. Print settings. When you are ready to print, open the Print window in your application. There are four things to check when printing: a. Make sure “ColorBurst_v4” is selected in your Printer pulldown menu. b. Make sure the PPD is “ColorBurst RIP v4.1”. c. If you have the ability to set Color Management settings, make sure Color Management is set to “Same As Source” (this option is not available in all applications). There may be additional setup required, based on the application you are printing from. You can also make any other changes necessary, such as positioning the image on the paper, adding crop/registration marks, etc. A-6 Overdrive RIP for Windows · USER MANUAL NOTE If your Page Setup is not set properly you will get undesirable results. 2. Click the Print button. The file will print to the ColorBurst RIP printer. It will then be sent to the Job List in Overdrive. 3. Check the Overdrive Job List. If the Receive On Hold checkbox is selected, the file will not print right away. The RIP list must be active and the file must have a status of Ready to print. To change a file status of Hold to Ready, select the file in the list and click the Activate button. A-7