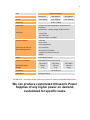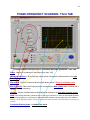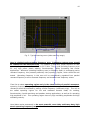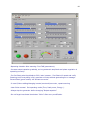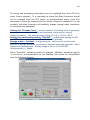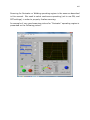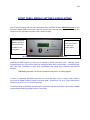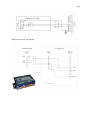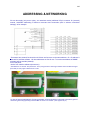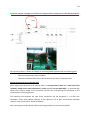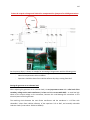
1
1 Marais 36 2400, Le Locle Switzerland [email protected] Phone: +41- (0)-32-9314045 email: [email protected] http://www.mpi-ultrasonics.com http://mastersonics.com WELDING generators Can drive any kind of ultrasonic transducers: for cleaning, welding, sonochemistry, bonding, machining… Without LCD STANDARD FEATURES INCLUDE: With LCD . Automatic Frequency Tuning . Digital Amplitude Control . Good Part/Bad Part Output Signal 400W . Multiple Job Storage 1000 W and up 400W .Weld quality monitoring is available in time, energy and distance . Ultrasonics Load Meter Scale 1000W . Upper and Lower Weld Quality Settings 1000W . PLC I/O (Input/Output) Ports . Soft Start Overload Protection Circuitry . Load Regulation Circuitry 2000W 3000W 2000W 3000W Power available in 400W, 1000W, 2000W and 3000W (higher power on demand) 2 Item Data base system WG-400 W Power max. 400 W Frequency WG-1000 W WG-2000 W max. 1000 W max. 2000 W 20 kHz- 100kHz Amplitude constant and load-independent amplitude at the transducer possible with: analog voltage, RS 485 interface Interfaces . status LED's . PLC-interfaces . Remote support via RS485 Protected against . overload . short circuit . over temperature Connectors on the rear panel of the generator . line-connector . RF-connector (HV-BNC) . interface-connector Canon 15 . RS485 Mains: 216-240VAC 50÷60Hz Current consumption dependent on the model max 7A Dimensions (mm) Weight 250 x 210 x 80 mm 270 x 250 x 135 mm 435 x 380 x 100 mm 4 kg 6 kg 10 kg Standards Application ATTENTION: CE-conformity welding, bonding A shielded control cable must always be used for the RS485-USB interface. We can produce customized Ultrasonic Power Supplies of any higher power on demand, customized for specific loads. 3 Ultrasonic World Message 1. Our ultrasonic power supplies are compatible or easily modifiable to drive almost any piezoelectric ultrasonic transducer presently used/known in High Power Ultrasonics Industry, operating between 15 and 100 kHz (or wider) (of course, modifications in critical and demanding cases should be made in our labs). The same generator can operate on any frequency between 15 and 100 KHz (digital software settings, easy frequency selection in any range, and easy frequency window selection in any range). 2. We have the largest and modifiable frequency-window controls (almost any frequency interval, compared to 1 until 2 kHz from competition). 3. We can replace almost any industrial ultrasonic power supply that is presently available from well known worldwide producers, including generators for metals welding, atomizing, ultrasonic sieving, cutting etc. (of course, not immediately, but still after a very short time after we get necessary information from a client). 4. Our ultrasonic power supplies are using advantages of dynamic load power regulation between series and parallel resonance (capturing even wider frequency intervals). We can operate any piezoelectric, ultrasonic transducer in its resonant, fixed frequency regimes, in any numerically selected operating frequency interval, and in many forced, arbitrary frequency-modulated wideband regimes. Our generators are much better in many aspects when compared to the well-known ultrasonic generators from others. Our generators can be used on the same way as any other ultrasonic generator, and on many other unique ways. All presently known industrial and manual control options are available (manual, LCD front panel settings and controls, analog, PLC… Everything can be arranged as any other producer (or user) of ultrasonic generators is doing). 5. We implement (safe operating) internal scanning procedure in order to select the optimal operating regime and settings for certain ultrasonic transducer. 6. If ultrasonic tool/sonotrode/load is operating in a very large temperature range (from – 300°C until +1000°C), resonant frequency of such system could change for several kHz. Our ultrasonic generators can make automatic frequency, amplitude and power tracking in such situations. 7. If a user would make mechanical corrections on a sonotrode (for instance cutting blade sharpening), this will change resulting resonant frequency, but our generator can still track it in a much wider frequency range compared to any other ultrasonic generator from competitors. 4 8. Our Ultrasonic Power Supplies have smooth power and amplitude regulation. We are applying limitation of maximal load power, maximal transducer amplitude and maximal output voltage on piezoceramics. We are applying overheating, short-circuit, over-current and over-voltage protections. 9. We can produce customized ultrasonic power supplies without power limitations (from 100 W until 100 kW, operating until 100 kHz or higher). 10. Our standard line of Ultrasonic Power Supplies is operating on European main supply voltage input, being tolerable to input voltages from 200 Vac until 240 Vac, 50/60 Hz. We can easily produce the same Power supplies for other input voltages (115 Vac 50/60 Hz). Internally, all of our standard Ultrasonic Power Supplies have stabilized, universal voltage SMPS for control and logic modules operating from 95 to 265 Vac. We can also (optionally) apply high power PFC input for customized Power Supplies. 11. We have the largest number of settings regarding operating parameters and conditions controls, frequency modulations, forced and/or automatic resonance-regimes driving, applicable for all presently known Industrial Ultrasonics Applications (such as welding, cleaning, sonochemistry, materials processing, ultrasonically assisted metallurgy, bonding, sieving, cutting, machining, atomizing, driving multi-frequency & wideband transducers etc.). Nevertheless, it is good to know that the biggest challenge in operating different ultrasonic loads (and transducers) is related to the fact that all electrical adjustments and settings are completely related to properties of mechanical system we would like to drive. The same transducer (with different mechanical loading) can produce different output power at the same output voltage and frequency. In certain cases, it is necessary that the first-time modifications and settings be made in our labs. Systematically we are converging to design solutions for ultrasonic power supplies, which are close to universal, but there will always be a space when client will need our assistance. Until present, nobody is offering such options. In addition, we have internally adjustable compensating, inductive and capacitive components, adjustable voltage outputs etc. 12. Our Ultrasonic Power Supplies have all kind of modern industrial control options (PLC, PC software controls, LabView, ModBus, USB, analog input controls…). We can customize and introduce any other control option. Our ultrasonic generators can be controlled with: -any kind of PLC -analogue control signals from 0-10V -amplitude variable and discrete signals -on/off switching, error signals, etc -or with RS485 based communications (we are giving the communication protocol). 13. Once after optimal settings are made (on certain of our ultrasonic power supplies, and for certain converter), there is almost no need to do anything more. Just use it on a usual 5 way as using any other modern ultrasonic generator, and control only basic parameters (like timing, amplitude, energy etc.). There is no more need to use Lab View software controls. 14. No need for using computer… Generators can operate without externally connected computers (like any other generator from competitors). Of course, when somebody is using computer (to control our generators), this will be an excellent tool for learning, training, R&D, factory settings… but not necessary. Any other control can be used (available): We are presently using windows XP (or Windows 7, compatibility mode with XP…). Computer is good mostly for internal factory operations before generator is sent to end users… Literature (e-book): http://bookstore.mpi-ultrasonics.com/index.php?main_page=product_info&cPath=48&products_id=165 6 Load current and load voltage, Start-up, rising times until getting regulated and stable amplitudes Measured transient time intervals (presented here) are in the range of 2 ms, enabling very fast welding and pulse repetitive regimes. Compare it with competition and you will see that we are for an order of magnitude faster. 7 INTRODUCTION Please read these operating instructions carefully and follow them before installing or commissioning your product. Failure to observe these instructions can present a risk to life. Units may be operated by trained personnel only. Failure to comply with this will result in a loss of warranty rights. The device may only be operated and maintained by personnel who have read and understood this operating manual and are familiar with the applicable legal regulations for accident prevention and workplace safety. ASSEMBLY In addition, ambient temperatures of over 30°C should be avoided. Choose a suitable location that will protect the device from moisture, water, excessive sunlight and heat. ATTENTION: • Choose a location that will prevent steam or any other aggressive vapors from penetrating the device. • Over a period of time, chemically contaminated ambient air can lead to the device being irreparably damaged. Power supply The ultrasonic generator draws its power (230 V / 50 / 60 Hz) via the connection cable. It has an internal main fuse (10 AF). If you need to change the fuses, unscrew the top of the housing. 8 ATTENTION: • • • • For safety reasons, always disconnect the unit from the mains before changing fuses. Plug racks into earthed sockets only. Always replace blown fuses with new fuses of the same type. This should only be performed by qualified, skilled personnel. Connections on the back of the generator HF OUTPUT: Output of the HF voltage (possible to have different high voltage connectors). RS485 Fuse Main Supply Input ATTENTION: • • • • • Use only cables specified by the manufacturer. Use only shielded transducer connection cables. Connect the shielding to the PE conductor on the generator side. Only use cables with sufficient cross-section. Minimum wires cross-section: 1.5 mm2. 9 Assignment of the 15-pole DSUB interface socket (RS485) PIN No. on DSUB SOCKET Signal name Description Interface X1 1 +12 VOLT OUT 12 Volt for external use 2 POUT Output 0 – 10 Volt = Power output 0 – 100 % 3 P-EXT.-IN Input 0 – 10 Volt for power control 4 GND Shared reference point = Ground 5/9 HF-DA-ERROR Relay root (shared) for “HF-DA” and “ERROR” 6 HF-DA Relay output “HF-DA” 7 ERROR Relay output “ERROR” 8 A A signal of RS 485 interface 9/5 HF-DA-ERROR Relay root (shared) for “HF-DA” and “ERROR” 10 B B signal of RS 485 interface 11 <> Nominal Output for nominal value 12 FAN-ON Monitoring output = 12 Volt when the fan is running 13 FS-24 V Remote control input (with 12 – 24 Volt) 14 FS-GND Remote control input (to GND) 15 GND Shared reference point = Ground ATTENTION: A shielded control cable must always be used for the RS485 interface. -RS485 industrial interface is available on pin 8, 10. (We can give our Interface protocol to interested clients). -Otherwise generator could be controlled with on/off 12 to 24 volts signal on pins 13, 14. -Output power could be controlled by 0-10V on pins 3, 4. -All these features make our WELDING generator very flexible for controls by PLC, HMI or SCADA systems. -Our new digital WELDING generator could be set at any operating frequency in the range 15 to 100 kHz with accuracy of 0.03 Hz* (of course ultrasonic transducer and load should be able to operate in a desirable frequency range…). 10 Interface Description (RS485) 1) Signal “+12 Volt Out” DSUB PIN 1 A voltage of 12 V is available at this output. This voltage can be loaded with max. 100 mA and can, for example, be used to output a voltage for the function “HF-DA” and/or “Error”. This voltage can also be used to switch on the generator on the input “FS-24 V”. 2) Signal “POUT” DSUB PIN 2 At this output a voltage proportional to the power output of between 0 and 10 V (= 0 % – 100 % power output) is available. Reference point = “GND”. 3) Signal “P-EXT.-IN” DSUB PIN 3 By connecting a voltage between 0 V and 10 V, the output of the generator can be set to operate between 0% and 100 % of its nominal amplitude or power. To regulate the generator via an external 0-10V signal it is also necessary to connect such signal between pin 3 and pin 4 (pin 4 is GND). To allow to such external DC signal to drive the generator it is important to set, via LabView software, the “Amplitude” value to "0", when the input analog signal starts to have priority. Reference point = “GND”. 4) Signal “HF-DA ERROR” DSUB PIN 5/9 Shared in/output for the internal relays “HF-DA” and “ERROR” (these PINs are connected internally). 5) Signal “HF-DA” DSUB PIN 6 If the ultrasonic generator has been switched on via of the signals “FS-24 V”, “FS-GND” and is producing HF voltage (i.e. there is no malfunction), an internal floating relay contact is closed. (between PIN 6 und PIN 5/9) The “root” of this relay contact leads through to a PIN 5/9 (these pins are connected internally) in the DSUB socket. A voltage connected to Pin 5/9 can be switched through (max. 24 VDC / 100 mA). Standard factory setting: Contact closed when the generator outputs HF voltage. 6) Signal “Error” DSUB PIN 7 11 This is the output of an internal relay (root to PIN 5/9). This relay reports generator malfunctions. This means that if the generator is switched on and, for some reason, the power output does not correspond to the set level, this relay is activated. Factory default settings: Closed in the event of a malfunction. It is possible to change the polarity in the Settings menu under the heading I/O Polarities (“Error detect”). An external voltage connected to “HF-DA-Error” can, of course, also be switched through here (max. 24 VDC / 100 mA). 7) Signal “FAN-ON” DSUB PIN 12 At this output, there is a control voltage (12 Volt) for monitoring the fan function when the internal fan is running. 8) Signal “FS-24 Volt” DSUB PIN 13 Switching on the generator (Ultrasound On) by connecting a voltage between 15 – 24 Volt between PIN 13 and GND (PIN 4/15). 9) Signal “FS-GND” DSUB PIN 14 Switching on the generator (ultrasound ON) with a relay contact or switch by connecting PIN 14 on the DSUB socket to GND (PIN 4 /15). 10) Signal “<> Nominal” DSUB PIN 11 Open Collector output: high signal if a window function is active and the generator is operated outside the window set; low signal if a window function is active and the generator is operated within the window set. 11) Signal “GND” DSUB PIN 4, 15 The GND signal is available on multiple pins of the DSUB socket. It is the common reference point for all input and output signals. 12) Relay WARNING DSUB PIN 16 This is the output of an internal relay (root to PIN 5/9). This relay reports generator malfunctions. This means that if the generator is switched on and, for some reason, the power output does not correspond to the set level, this relay is activated. Factory default settings: Closed in the event of a malfunction: 12 -Overload -Occurred Some of Welding limits An external voltage connected to “HF-DA-Error” can, also be switched through here (max. 24 VDC / 100 mA). 13) DSUB PIN 22,23,24,25 Selecting internal programs with different settings: In this manual - there is an additional picture for 25 pin DSUB connector - which is applicable only for 1000W generator with selecting switches for different transducers (for welding clients using number of transducers), but the names and numbers of all other pins are the same as described above. 13 Important Comments: High power Welding generators have the ability to store more than one weld setup in memory so an operator can simply pick and recall a setup from memory. Presently only 1000W welding generators have such options (16 sets of different settings, for different converters-sonotrodes combinations can be memorized and later selected from memory). Such settings can be selected with the switching-PCB on the back-side connector (inside of the generator box). The same back-side connector with switching-PCB can also be installed on 2000/3000 W welding generators (on request), but still not on 400W, welding generators (not enough space; - power board should be modified). If somebody is interested to have such options on 2000/3000 welding generators, it is necessary to order customized, new generator, where an additional switching-circuit PCB will be installed (and this has certain price). We are not proposing to make such modifications on older generators that are sold without such option, and we are not selling additional interface boards and connectors in order to make such hardware updates (since this will be complicated for clients to implement). Presently, clients having older 2/3 kW generators (without selectable memory options), can realize similar functionality (and much more complex and more flexible programing) trough RS485 communications. To start the generator externally - connect pin1 to pin13; to stop the generator disconnect these pins. See the picture: 14 Protocol for serial port communications for Welding generators produced until the end of 2010 Data format 115200 baud 8 bit no parity 2 stop bits RS485 100 ohm standard line Request for parameter %06f<cr> request for frequency %06d<cr> request for amplitude %06s<cr> request for span %06p<cr> request for phase %06t<cr> request for time %06k<cr> request for peak power %06e<cr> request for energy %06r<cr> request for time limit plus %06o<cr> request for time limit minus %06l<cr> request for peak power plus %06u<cr> request for peak power minus %06v<cr> request for energy limit plus %06w<cr> request for energy limit minus %06c<cr> request for output capacitor %06?<cr> request for parameters Answers #02fxxxxx<cr> answer for frequency scale 1Hz #02dxxxxx<cr> answer for amplitude scale 0.1% #02sxxxxx<cr> answer for span scale 1Hz #02pxxxxx<cr> answer for phase scale 5mV #02txxxxx<cr> answer for time scale 0.01s #02kxxxxx<cr> answer for peak power scale 1W #02exxxxx<cr> answer for energy scale 1Ws #02rxxxxx<cr> answer for time limit plus scale 0.01s #02oxxxxx<cr> answer for time limit minus scale 0.01s #02lxxxxx<cr> answer for peak power limit plus scale 1W #02uxxxxx<cr> answer for peak power limit minus scale 1W #02vxxxxx<cr> answer for energy limit plus scale 1Ws #02wxxxxx<cr> answer for energy limit minus scale 1Ws #02cxxxxx<cr> answer for output capacitor scale 1nF #02?aaapppfffffsvvvaaaeeeettttrrrr<cr> answer for parameters -aaa - amplitude scale 0.1% -ppp - phase scale 5mV -fffff - frequency scale 1Hz -s status 0 - off 1 - on 2 - overheat 15 3 - overcurent 5 - limit time 6 - limit peak power 7 - limit energy 8 - untested 9 - overload -vvv actuator value of internal regulator scale 0.1% -aaa power scale 1W -eeee last weld energy scale 1Ws -tttt last weld time scale 0.01s -rrrr peak power scale 1W Settings #06fxxxxx<cr> set frequency scale 1Hz #06dxxxxx<cr> set amplitude scale 0.1% #06sxxxxx<cr> set span scale 1Hz #06pxxxxx<cr> set phase scale 5mV #06txxxxx<cr> set time scale 0.01s #06kxxxxx<cr> set peak power scale 1W #06exxxxx<cr> set energy scale 1Ws #06rxxxxx<cr> set time limit plus scale 0.01s #06oxxxxx<cr> set time limit minus scale 0.01s #06lxxxxx<cr> set peak power limit plus scale 1W #06uxxxxx<cr> set peak power limit minus scale 1W #06vxxxxx<cr> set energy limit plus scale 1Ws #06wxxxxx<cr> set energy limit minus scale 1Ws #06cxxxxx<cr> set output capacitor scale 1nF Answer for settings ><cr> Remark - <cr> is ASCII code for ‘Carriage return’ hex code 0x0D decimal 13 Start generator @06start<cr> Answer for start ok><cr> Stop generator @06stop<cr> Answer for stop ok><cr> Write to eeprom memory @06wr<cr> Answer for write ok><cr> 16 Updated, Latest Protocol for serial port communications for new WELDING generators, which are produced and sold starting from February 2011 Since latest ultrasonic power supplies (generators) have more complex and advanced software controls, it was necessary to introduce new command lines (blue color text in this document). Data format 115200 baud, 8 bit, no parity, 2 stop bits RS485 100 ohm standard line Request for parameter %06f<cr> request for frequency %06d<cr> request for amplitude %06s<cr> request for span %06p<cr> request for phase %06t<cr> request for time %06k<cr> request for peak power %06e<cr> request for energy %06r<cr> request for time limit plus %06o<cr> request for time limit minus %06l<cr> request for peak power plus %06u<cr> request for peak power minus %06v<cr> request for energy limit plus %06w<cr> request for energy limit minus %06c<cr> request for output capacitor %06S<cr> request for scanning range %06C<cr> request for current gain %06M<cr> request for startup mode %06H<cr> request for output choke * %06T<cr> request for output voltage * %06?<cr> request for parameters Answers #02fxxxxx<cr> answer for frequency scale 1Hz #02dxxxxx<cr> answer for amplitude scale 0.1% #02sxxxxx<cr> answer for span scale 1Hz #02pxxxxx<cr> answer for phase scale 5mV #02txxxxx<cr> answer for time scale 0.01s #02kxxxxx<cr> answer for peak power scale 1W #02exxxxx<cr> answer for energy scale 1Ws #02rxxxxx<cr> answer for time limit plus scale 0.01s #02oxxxxx<cr> answer for time limit minus scale 0.01s #02lxxxxx<cr> answer for peak power limit plus scale 1W #02uxxxxx<cr> answer for peak power limit minus scale 1W #02vxxxxx<cr> answer for energy limit plus scale 1Ws #02wxxxxx<cr> answer for energy limit minus scale 1Ws #02cxxxxx<cr> answer for output capacitor scale 1nF #02Sxxxxx<cr> answer for scanning range scale 1Hz 17 #02Cxxxxx<cr> answer for current gain scale 0.01% #02Mxxxxx<cr> answer for startup mode 0-normal 1-scan on save start 2-scan every time 3-hot start #02Hxxxxx<cr> answer for output choke 1 - 800µH 2-1000µH 3-1200µH * #02Txxxxx<cr> answer for output voltage 1-low 2-midle 3-high * #02?aaapppfffffsvvvaaaeeeettttrrrrnhhhm<cr> answer for parameters -aaa - amplitude scale 0.1% -ppp - phase scale 5mV -fffff - frequency scale 1Hz -s status 0 - off 1 - on 2 - overheat 3 - overcurrent 5 - limit time 6 - limit peak power 7 - limit energy 8 - untested 9 - overload -vvv actuator value of internal regulator scale 0.1% -aaa power scale 1W -eeee last weld energy scale 1Ws -tttt last weld time scale 0.01s -rrrr peak power scale 1W -n load number (only 1000W generators) -hhh transducer current in relative units -m mode of operation 0 off state, 1 normal operation, 2 scanning Settings #06fxxxxx<cr> set frequency scale 1Hz #06dxxxxx<cr> set amplitude scale 0.1% #06sxxxxx<cr> set span scale 1Hz #06pxxxxx<cr> set phase scale 5mV #06txxxxx<cr> set time scale 0.01s #06kxxxxx<cr> set peak power scale 1W #06exxxxx<cr> set energy scale 1Ws #06rxxxxx<cr> set time limit plus scale 0.01s #06oxxxxx<cr> set time limit minus scale 0.01s #06lxxxxx<cr> set peak power limit plus scale 1W #06uxxxxx<cr> set peak power limit minus scale 1W #06vxxxxx<cr> set energy limit plus scale 1Ws #06wxxxxx<cr> set energy limit minus scale 1Ws #06cxxxxx<cr> set output capacitor scale 1nF %06Sxxxxx<cr> set scanning range scale 1Hz %06Cxxxxx<cr> set current gain 0.01% %06Mxxxxx<cr> set startup mode %06Hxxxxx<cr> set output choke * %06Txxxxx<cr> set output voltage * 18 Advanced current level controls and settings (for generators made in 2011 and later): Requests: %06A<cr> request for Advanced HF current level Answers: #02Axxxxx<cr> answer for Advanced HF current level Set values: %06Axxxxx<cr> set Advanced HF current level ---------------------------------------------------------------------- * Only for welding generators 2000W and 3000W Answer for settings ><cr> Remark - <cr> is ASCII code for ‘Carriage return’ hex code 0x0D decimal 13 Start generator @06start<cr> Answer for start ok><cr> Stop generator @06stop<cr> Answer for stop ok><cr> Write to eeprom memory @06wr<cr> Answer for write ok><cr> 19 GENERATOR CONTROLS Operator elements and display on the front panel LED-on: Lights up when the device is being supplied with mains voltage correctly and the power switch is ON LED-error: Lights up in the event of an error ON/OFF button: The generator is switching on and off by pressing this button. Menu - Encoder / Select: For setting and entering values 20 The LCD Amplitude Display shows the set value of output power and its performance on "A" bar. From 0% to 100% of nominal generator power. During initial testing of new sonotrodes, set the amplitude to some low value (example: 5% to 10%). Start Frequency Here encoder can be used to set the initial operating frequency (which is little bit higher than fp). Here, the encoder can be used to adjust the starting frequency. Start frequency f-start can be changed/adjusted also during the generator operation. The generator has an automatic “frequency tuning” inside the frequency capture range (see the explanation which follows). The frequency capture range can be set by “Span” parameter from 0 to 1 kHz (below the start frequency, towards lower frequencies: f-capture = fstart - Span). The operating resonant frequency of ultrasonic system must be found in advance (before operating the system full-power), performing initial low power scan-testing with the generator Lab View software. This frequency will be found somewhere below the frequency where scanned generator current is maximal, and where the scanned phase function is smoothly rising from its minimal value towards its maximum, when in the same time, the frequency is going towards lower frequencies). The frequency area which is covered (by this type of regulation) depends on the device type (it is impedance-characteristic dependent: fcapture = f-start - Span). 21 Welding process will stop after given Time interval (here 3.83 s). There are no limits for operating Power and delivered Energy (because of zero settings). “Welding by limiting the Peak power on the load”. Welding process will stop when Peak power is reached. There are no limits for total operating Time and delivered Energy (because of zero settings). “Welding by limited amount of Energy” which should be sent to a load. Welding process will stop when given amount of Energy is delivered to a load (here 1208 Ws). There are no limits for total operating Time and operating Peak power (because of zero settings). 22 Time plus (=) maximal allowed operating time which can drive a load (here 7.52 s). If real operating time would be for some reason higher than Time plus, generator will produce error message on the front panel of generator box and on the software user interface. Time minus (=) minimal allowed operating time which can drive a load (here 2.08 s). If real, actual load operating time would be for some reason lower than Time minus, generator will produce error message on the front panel of generator box and on the software user interface. Peak power plus (=) maximal allowed Peak power which can drive a load (here 193 W). If real, actual load Peak power would be for some reason higher than Peak power plus, generator will produce error message on the front panel of generator box and on the software user interface. 23 Peak power minus (=) minimal allowed Peak power which can drive a load (here 85 W). If real, actual load Peak power would be for some reason lower than Peak power minus, generator will produce error message on the front panel of generator box and on the software user interface. The numeric operating-power value is not shown on the LCD, but on the menu "Amplitude", it is possible to see the selected value for amplitude (xxx %), and on the bottom of the same LCD it is the bar-graph showing instantaneous amplitude, like on an analog indicator. The exact operating-power is visible on generator LabView software, and it is also accessible through RS485 communication. Energy plus (=) maximal allowed Energy which can drive a load (here 1651 Ws). If real load Energy would be for some reason higher than Energy plus, generator will produce error message on the front panel of generator box and on the software user interface. Energy minus (=) minimal allowed Energy which can drive a load (here 866 Ws). If real load Energy would be for some reason lower than Energy minus, generator will produce error message on the front panel of generator box and on the software user interface. 24 Memory After turning the encoder, the display returns to the start frequency, and all settings for all parameters are stored in memory. Once a setting parameter (for example Fstart) is changed manually, using the front panel encoder (on LCD module), this can also be stored in the internal generator memory by the same LCD module: By selecting the "Memory write" menu, and then it is necessary to turn the encoder clockwise for one step; - The "Memory write" menu will disappear, and we will see the next menu "Fs" (meaning, memorizing is executed). This way, new parameters are written in the internal memory of generator. Menu option "Address" which is located between "Energy-" and "Memory" via front panel encoder (LCD) is the address of the device in a network working solution (RS485 network). All devices, by default, are on the address – 6 – (factory settings). This is the address where it is initially placed the communication with generator LabView software. When a PC (trough communication cable and RS485 interface) is connected to the generator, PC automatically starts regulating the generator with higher priority. When a PC is disconnected, it is immediately possible to use regulations on the front panel of the generator. After all initial settings are made (using a PC and supplied Lab View software), Ultrasonic Generator can be activated, and it will start driving ultrasonic converter by pressing ON/OFF button (which is on the front panel). Do not start the generator until all initial settings are verified and sett to safe (low power and low risk) positions. LCD symbols meaning: TA, TR, OF, V, J All of these are not messages for the customer; only for service (factory) use. When the encoder is in the regime J it is changing the values of the selected parameter. Regime V is changing the parameter. The default settings are stored in memory 6. If we change the value of some of the parameters, and store in memory 7, what is the procedure? We cannot make it if we follow the instructions from the manual. …This is not an address in the memory, but it is an address of the device when generator is communicating with the computer through RS 485. It is not possible to set anything in memory 7. Only the present (last) settings could be saved in the memory. Attempt to do tis will change the factory settings. 25 Frequency-capture range = Span: This is the safe-operating, low-power frequency scanning of ultrasonic load (Ultrasonic converter + booster + sonotrode + etc.), where the scanning display would visualize the phase difference versus frequency between a load current and load voltage (red color curve), and input DC generator current (white color curve). Such frequency scanning is realized using the Lab View software supplied with ultrasonic generator). In order to make scanning, personal computer with installed Lab View software should be connected to ultrasonic generator trough RS485 interface. Initially (first safe-operating, low power frequency scanning) should be selected to cover only the expected operating frequency range of ultrasonic system. In here-described scanning, frequency is smoothly changing towards lower values, starting from f-start and finalizing scanning at the frequency which is equal to f-start – Span. Span is the frequency interval we select as a frequency-capture range (in Lab View Software). For instance, if ultrasonic system consists of: 20 kHz ultrasonic converter + 20 kHz booster + 20 kHz sonotrode (where not all of them are exactly tuned to operate on 20 kHz, or to have single operating frequency of 20 kHz), we know that we should expect the resulting, central operating frequency of such system to be somewhere close to 20 kHz, and consequently, we could select the scanning frequency range to be between 20 and 21 kHz (meaning f-start = 21 kHz, and Span = 1 kHz). Of course, another relevant example could be to select such frequency scanning between 19.5 kHz and 20.5 kHz (meaning: f-start = 20.5 kHz, Span = 1 kHz). Later (during scanning), the Lab View software will search and find real, average operating frequency somewhere inside of the area covered by scanning). When/where generator input DC current (during such scanning) is reaching certain relative maximum (at certain frequency), this is indicating that ultrasonic load is also consuming certain power, and/or increasing its oscillating activity. This is the reason why we are taking such DC current maximum as the (upper) reference point for frequency scanning. In reality, this is also related to impedance curve of ultrasonic system under testing, since empirically we know that central operating frequency of a stable operating regime of ultrasonic system (in WELDING regime, under wideband frequency sweeping) should be below the frequency when the input DC current is reaching its maximum. This is also the reason to select an initial f-start just below the frequency where DC current is reaching maximum, and where the phasedifference function has its minimum (with a tendency to grow towards lower frequencies). In the next step (next safe-operating frequency scanning) we should select new (shorter) value for Span to cover only the closest part of the phase-curve (red color), which is showing the part of phase-difference curve starting from certain minimal value until its first maximal value (below the frequency where input, DC generator current is maximal). New f-start will be again at the point where the phase curve is minimal. This way, we will visualize mentioned part of the phase difference curve on a larger display, and we will be able to estimate the frequency which is in the middle of that frequency interval, and which is approximately equal: f-start – 0.5(Span). Later, real WELDING operating frequency regime (under automatic regulation found by internally implemented hardware and software) will find its average or central operating frequency (inside of the new Span interval) and we will be able to perform/set large frequency sweeping around that frequency (in both directions). One of examples showing such experimental frequency Span determination of the most promising WELDING operating zone will be presented later. 26 MPI WELDING Generators Software This is National Instruments, Lab View based operating software for controlling and setting our ultrasonic generators. In order to operate such software from a personal computer, it is necessary to install Lab View Run-Time and NI serial ports drivers (before using our ultrasonic generators software). NI software can be downloaded from the web links listed below: Lab View Run-Time Engine 2009 SP1 - Windows 2000/7/7 64 bit/XP/Server 2008 R2 (64-bit)/Vista/Vista x64/Server 2003 R2 (32-bit) - (32-bit Standard RTE) http://joule.ni.com/nidu/cds/view/p/id/1600/lang/en Standard download. Find if there is more recent version. Additional install driver for serial ports: NI-VISA Run-Time Engine 4.6.2 - Windows 2000/7/7 64 bit/XP/Server 2008 x64/Vista/Vista x64/Server 2003 http://joule.ni.com/nidu/cds/view/p/id/1606/lang/en Find if there is more recent version. The generator is communicating with Lab View software trough USB to RS485 adapter. Install the latest driver from here: http://www.ftdichip.com/FTDrivers.htm) Necessary software for our ultrasonic generators is also here: http://www.mastersonics.com/documents/mmm_basics/mmm_power_supplies/AMMM/ and here: http://www.mastersonics.com/documents/mmm_basics/mmm_power_supplies/AMMM/ALL-welding-generators/ Our ultrasonic generators can operate autonomously (without computer or anything else attached to the generator). It is not necessary to use personal computer and Lab View software. Software is useful and necessary only for first time settings, factory settings, service and maintenance reasons, when ultrasonic load or converter/sonotrode/booster is changed, or in case of problems. Software is also useful as the diagnostic, testing and educational tool to explore different potentially well-operating oscillating modes. If ultrasonic generator is sold to somebody together with ultrasonic transducer/booster/sonotrode… all necessary tuning and settings are already made before delivery, and client can operate such ultrasonic system without connecting it to a computer. Our older Lab View 8.5 based software for controlling ultrasonic generators is here: labview8_5-software http://www.mastersonics.com/documents/mmm_basics/mmm_power_supplies/AMMM/labview8_5-software/ (http://www.mastersonics.com/documents/mmm_basics/mmm_power_supplies/AMMM/) 27 for operating generators produced and sold in 2011 until 2013, please follow the following To be able to use our Lab View based software initial steps: Go here and download all necessary software files (MS Windows XP/7, 32/64 bits): http://www.mastersonics.com/documents/mmm_basics/mmm_power_supplies/AMMM/ALLwelding-generators/welding_scan+current-limit-20_11_2012/ Comment: Create WELDING (directory) box on a PC that will be used to control your WELDING generator. Place inside of the WELDING box the following files: http://www.mastersonics.com/documents/mmm_basics/mmm_power_supplies/AMMM/ALLwelding-generators/welding_scan+current-limit-20_11_2012/ controls and regulations of welding generators-latest.pdf Welding_scan.exe Welding_scan.ini Scan weldind.vi Welding_scan.aliases Always download (from Internet) and install: -Latest NI Visa drivers - drivers for all PC ports. (http://www.ni.com/download/ni-visa5.4/4230/en/) -Latest FTDI - USB to RS485 converter drivers -Proper NI Runtime for windows 28 Latest versions of generators (starting from October 2013) have two selectable operating regimes such as: Welding generators and Sonicator (or sonochemistry processors). See more about Sonicator operating regime at the end of this manual. Both Welding and Sonicator operating regime cannot be activated in the same time (when one is active, the other is passive). To be able to use our Lab View based software for “Welding+Sonicator” generators, please follow the following initial steps: Install NI Runtime for Windows, version 2012-2014 Go here and download all necessary software files (MS Windows XP/7, 32/64 bits): http://www.mastersonics.com/documents/mmm_basics/mmm_power_supplies/AMMM/ALLwelding-generators/Welding+Sonicator/Sonicator%20weldind_29102013/ Comment: Create WELDING+Sonicator (directory) box on a PC that will be used to control your WELDING generator. Place inside of the WELDING box the following files: controls and regulations of welding generators-latest.pdf soniweldicator.exe soniweldicator.ini Sonicator welding.vi soniweldicator.aliases Always download (from Internet) and install: -Latest NI Visa drivers - drivers for all PC ports. (http://www.ni.com/download/ni-visa5.4/4230/en/) -Latest FTDI - USB to RS485 converter drivers -Proper NI Runtime for windows 29 1. Connect ultrasonic generator to a PC using the RS485-USB adapter (supplied with the WELDING generator; -see the picture below). Switch ON the main switch of your WELDING ultrasonic generator (This is only a main supply power input; -for instance 230 Vac, 50/60 Hz. Ultrasonic output power is still not activated). PC will not connect to ultrasonic generator if generator is not powered by main supply input. 2. Activate RS485-USB connection line between your WELDING generator and your PC: In the lower left corner of the software interface (First TAB) it is necessary to select a free/available COM port and press Rescan - this will activate the connection between the generator and a PC, and the green lamp “Connection” will start blinking (the blinking green light is always a sign, that there is established communication between generator and PC). 30 For better checking (regarding COM port selection) go to Control Panel (MS Windows XP) to verify which COM port is assigned to USB-RS485 adapter (see the picture below). When a PC (trough communication cable and RS485 interface) is connected to the generator, PC automatically starts regulating the generator with higher priority. When a PC is disconnected, it is immediately possible to use regulations on the front panel of the generator (LCD + rotary encoder + small ON-OFF = start-stop button). Of course, WELDING generators can also be externally controlled using a PLC, or analog controls. For safety reasons, when ultrasonic system is started first time, when (any or all of): ultrasonic load (transducer, booster, sonotrode ….) are unknown, or new, or replaced, set the Amplitude value to certain low value (for instance on 10%). Then start low power testing and scanning in order to find the best operating frequency interval. 31 -After activating older “Welding_scan.exe/” or newer “soniweldicator.exe” software you will see the following LabVIEW user interface for controlling WELDING generators (which has 3 software settings TABs): Select “400 W” if you have welding 400W generator Select “1000 W” if you have welding 1000W generator Select “2000 W” if you have welding 2000W generator Select “3000 W” if you have welding 3000W generator (made before 2012) Select “3000 W m” if you have welding 3000W generator (made after October 2012) Literature (e-book): http://bookstore.mpi-ultrasonics.com/index.php?main_page=product_info&cPath=48&products_id=165 32 How to change numerical and other setting values for operating frequency and scanning ranges If we cannot select automatically (by default) proper frequency Range, proper Start frequency, proper Span value and proper scanning range, there is a simple way to do it manually and numerically by direct writing of new, desired values into proper windows. For instance, if operating frequency Range should be something else, compared to what we see on the Range window, we can simply click (with a mouse) over the area where frequency interval numbers should appear and type/write on the same way (same format) new frequency interval, like on the picture below: If we would like to change Start frequency and Span (because by default we do not see desired numbers there), we will again simply click over the last existing numerical position and type new numbers there, like on the pictures below. Old number/s can be simply (manually, by typing) be replaced by new numbers. This way we will be able to modify settings and scanning values in order to get most appropriate intervals for specific ultrasonic loads. Of course, certain logic should be respected, since we should not select new numerical values to be outside of the operating limits of WELDING generators. 33 OPERATING MODES OF WELDING ULTRASONIC GENERATORS A) WELDING generators can operate in the CONTINUOUS TEST MODE (for scanning, testing and first time settings). B) WELDING by given Time: Welding by limiting only a welding time. Welding process will stop after given Time interval. There are no limits for operating Power and delivered Energy. C) WELDING by Peak power: Welding by limiting the Peak power on the load. Welding process will stop when Peak power is reached. There are no limits for total operating Time and delivered Energy. D) WELDING by Energy: Welding by limited amount of Energy which should be sent to a load. Welding process will stop when given amount of Energy is delivered to a load. There are no limits for total operating Time and operating Peak power. Important comments: Programmable “Welding by Height” is still not applied is our welding generators. To make "Welding by Height", it will be necessary to use certain controller, which drives the step motor and switches ultrasonic generator ON and OFF, and conveniently update the software. This generator presently reacts only as a “SLAVE” device. Our LabView software is only the test and adjusting software, which cannot operate like data logger software: it cannot collect data about the welding process and save them. It only shows the momentary, temporary/immediate values of the running parameters. Presently we are offering only free LabView source software, and for additional functions, it is necessary to create new, updated software. Since client has the source software, new functions can easily be realized on number of ways. If the green lamp "Connection” in the generator LabView software is not blinking - there is no active connection between ultrasonic generator and PC (no software settings and regulations can be made). In such case, check the software installation (and reinstall if necessary), check the RS485-USB adapter (maybe connectors are not in place), check the ports and wires. Follow manual and first connect the generator to your PC and to proper LabView software (applicable for your generator), and later you can change settings, and see actual operating parameters. For realizing remote control, generator has input START/STOP on the pin13. For controlling start/stop it is possible to apply an external free (independent) voltage potential, connected between pin1 and pin13, or to apply external voltage from 12Vdc to 24Vdc between pin13(+) and pin14(-). When we apply (+) voltage on the pin13, generator is ON, other option is OFF. 34 PARAMETERS & BASIC SETTINGS Principal software user-interface for controlling WELDING generators: First TAB Phase difference settings (after scanning): optimal 2.5 v; -acceptable from 1 V until 3.5 V Start frequency selection: Usually just above parallel resonant frequency of the transducer Span (=) operating frequency interval selection (=) Localized inside (Start frequency – Span) Amplitude (=) oscillating mechanical amplitude selection Output capacitor (=) Parallel capacitance added to the transducer capacitance (should be selected) Numerical, manually editable fields (for arbitrary selections of operating intervals which are inside of operating domains of WELDING generators. Power selector: Should be selected in relation to applied standard generator. Read – Write options: After all settings are properly and optimally made, we can save the file with such settings using Write button (like saving any PC file). Later, we can simply invite/Read one of such files (for a specific load) and WELDING generator will start operating as previously memorized. Blue Write button is for internal memory saving inside of the generator (should be applied after scanning and any change of settings). 35 Generators produced in 2012 and later have an additional software option (on the second LabView software TAB) to limit the converter current. This is the “Advanced current limiting”. How to use such load current limit will be explained later. Auto rescan: If we are using in the same time a PC LabView software and LCD rotary encoder controls, auto rescan will be activated, meaning generator will automatically make new scanning in order to update all settings values. Select “400 W” if you have welding 400W generator Select “1000 W” if you have welding 1000W generator Select “2000 W” if you have welding 2000W generator Select “3000 W” if you have welding 3000W generator (made before 2012) Select “3000 W m” if you have welding 3000W generator (made after October 2012) Literature (e-book): http://bookstore.mpi-ultrasonics.com/index.php?main_page=product_info&cPath=48&products_id=165 36 Output capacitor selection (third TAB) Software selectable Output capacitor = Ccompensating is related to the output ultrasonic load circuit, and it is optimizing transducer impedance matching with the ultrasonic generator. When capacitance is selected properly, ultrasonic load will produce maximal output power on certain resonant frequency of connected ultrasonic transducer (see the picture below). Select also proper frequency Range which corresponds to applied ultrasonic transducer. By default, automatically, we have 1 kHz wide Max. Span, but manually we can select and type another value. MAX frequency & MIN frequency corresponds to end-values of the Start frequency slider (for instance, here 32 and 38 kHz). For simplified logical understanding (of such resonant matching), we can imagine that what we connect to the secondary side of the output ferrite transformer is a simple, serial L-C (inductance + certain capacitance) circuit. Ultrasonic converter is connected in parallel to the capacitance of mentioned serial L-C circuit. Inside of the generator, series compensating inductance is fixed (and has two values internally selectable by jumpers): usually it is 1 mH for most of high power transducers operating around 20 kHz, and 0.5 mH in cases of higher frequency transducers (operating around 40 kHz and higher). 37 In order to adjust the load impedance to operate optimally on certain operating frequency ftransducer , we will effectively increase capacitance of the transducer by adding different, compensating parallel capacitances Ccompensating = Output capacitor, this way creating necessary equivalent capacitance Ceq . Internally, Welding generator has 8 values of selectable combinations of Ccompensating (in steps of 5 nF, such as: 5, 10, 15, 20, 25, 30, 35, 40 nF). Maximal capacitance of 40 nF can be connected in parallel to certain ultrasonic transducer. Inside of the generator (by default), there is always 5 nF capacitance, installed in parallel connection to an output transducer (which cannot be changed or disconnected by LabVIEW software). Only maximum of 35 nF can be added parallel to a transducer by LabVIEW software. This will create the total added capacitance that will go until max. 40 nF (non counting capacitance of the transducer). When we set by LabVIEW software the value of 40 nF, this will show that 40 nF is added in parallel to ultrasonic transducer (5 nF which are always there, and 35 nF which are added by software). Mathematical formula for calculating necessary parallel capacitance (which should be added to transducer) is: 1 1 = =( )[Hz] ftransducer 2= p LCeq 2p LCeq 1 C − Ctransducer compensating = Ceq − Ctransducer= 4p2Lf 2 −3 = = 1mH = 10 H (or 0.5mH) L Lcompensating transducer ⇒ 1000 1 C = C= − C C C ( )[F] + = = transducer transducer compensating 2 eq compensating 4p2 f 2 4p2Lf transducer transducer Ccompensating ( =)externally added capaci tance Example: ftransducer = 20000Hz 1 −9 =60nF Ceq =20 ⋅ 10 + Cparallel =4p2Lf 2 −9 20nF = 20 ⋅ 10 F ⇒ Ctransducer = transducer Ceq − Ctransducer = (60− 20) nF = 40nF = = 10 −3 H L 1mH Ccompensating = We can measure Ceq (inside of WELDING generator, on its output; -parallel to a connected transducer) and compare it with calculated value for Ceq in order to be sure that proper equivalent capacitance is reached (or to be sure that proper parallel capacitance Ccompensating is connected to the transducer). Parallel capacitance Ccompensating (until 40 nF) is software selectable in AMMM generators (with LabVIEW software Welding_scan.exe). Parallel capacitance can also be added in some other values, manually, by soldering specific capacitors (inside of the generator; -only for experts). Every time when we (manually) change Ccompensating = Output capacitor by LabVIEW software, we need to stop the generator, since Output capacitor will not be automatically changed in real time when ultrasonic converter is powered by 38 ultrasonic frequency, high voltage signal. When we stop the generator, software selected output capacitor command will activate internal relays and apply selected capacitor, and after that we can start the generator (in other words, compensating capacitor can be changed only when ultrasonic transducer is not operating; -generator is not producing high voltage output). Calculated value of Ccompensating presents only an approximated and maximal target value of capacitance that can be added in parallel to ultrasonic transducer (that we know how far we can go). In reality, when we make such capacitive impedance matching, we should start (testing ultrasonic transducer when operating in real loading conditions) from minimal value of Ccompensating (which is 5 nF). Then, we should gradually increase it until calculated value, or better to say until the other, lower value (which could be below calculated Ccompensating ), until we get optimal operating conditions on ultrasonic load. Optimal operating conditions are related to: reaching maximal load power on ultrasonic transducer, reaching maximal and safe operating voltage on piezoceramics, while still keeping automatic amplitude control and automatic or regulated frequency tracking. In order to get sufficiently high and still safe operating conditions on ultrasonic load it is recommendable to start with minimal output voltage value on the secondary side of the output ferrite transformer (by connecting proper jumper which corresponds to minimal output voltage). If maximal ultrasonic loading power is still not high enough, we will increase output voltage on the ferrite transformer (by selecting the next value), and this will automatically increase maximal voltage on ultrasonic transducer. We need to be careful that voltage on piezoceramics has its safe limits, and that we need to operate below maximal acceptable voltage (which is usually until 200 V-rms per every millimeter of piezoceramics thickness). When performing low power scanning (using our LabView software), in order to find or estimate optimal frequency range of certain transducer, compensating capacitance should be set on minimum (= 5 nF). Later, in high power regime, it should be again adjusted to its optimal value (increased). 39 WARNING (only for experienced and experts) In cases of new ultrasonic transducers resonant matching (first time testing and tuning) it is important to be very careful with the output voltage on ultrasonic transducer. 100% amplitude (in the software settings) is equal to maximal safe operating and acceptable voltage over the transducer (measured directly on piezoceramics). The RMS voltage should be measured directly on the transducer during all impedance matching and manipulations with output voltages on the output ferrite transformer. Output ferrite transformer has 3, jumper-selectable voltage outputs in order to be able to adjust maximal safe operating voltage. Special high-voltage/highfrequency, wideband RMS voltmeter should be applied when measuring voltage on the transducer (also oscilloscope with differential, isolated channel inputs for high voltage applications). If transducer has piezoceramics which are 5 mm thick (each of them), maximal RMS voltage on such transducer can be 1000 V (= 1000 x 1.41 V - peak. If transducer has piezoceramics which are only 1 mm thick (each of them), maximal applied RMS voltage on it should not be higher than 200 V (= 200 x 1.41 V – peak). Be sure you are working in the “CONTINUOUS MODE” (set Time, Peak power, Energy to 0). First TAB, upper right side (when performing first time tuning and matching of new transducer). When performing low power scanning (using our LabView software), in order to find or estimate optimal frequency range of certain transducer, compensating capacitance should be set on minimum (= 5 nF). 40 Examples for calculating compensating capacitance: C transducer [nF] C L compensation compensa [nF] tion [uH] 3 5 500 F[kHz] 100.71 3 3 3 3 3 3 3 3 10 15 20 25 30 35 40 45 500 500 500 500 500 500 500 500 71.21 53.08 50.35 45.04 41.11 38.06 35.61 33.57 3 3 3 3 3 3 3 3 3 20 20 20 20 20 5 10 15 20 25 30 35 40 45 5 10 15 20 25 1000 1000 1000 1000 1000 1000 1000 1000 1000 1000 1000 1000 1000 1000 71.21 50.35 41.11 35.61 31.85 29.07 26.92 25.18 23.74 71.21 50.35 41.11 35.61 31.85 20 20 20 20 30 35 40 45 1000 1000 1000 1000 29.07 26.92 25.18 23.74 41 Principal software user-interface for controlling WELDING generators: First TAB (basic settings): Continuous mode First select proper capacitance Basic setting parameters established after scanning First connect proper Screen example for continuous operating mode: “TEST operation without limits, for implementing basic tuning and settings for new loads”. Welding process can be controlled by Start and Stop buttons. Output capacitor can be adjusted for optimal impedance-power matching. Every time when parameters of certain operating-mode variable are set to 0 (zero), like here encircled, the LabVIEV software for ultrasonic generators is considering this as: function not in use, or function without limits, and/or as a continuous operating regime (this is also valid for other software TABs). Of course, this is not valid for other setting parameters that are not establishing/defining basic operating modes. Auto range: If switch is selected for Auto range (upper position), only frequency ranges given in the software by default will be visible and selectable. If lower switch position is chosen, it is possible to enter manually different frequency and span values. Range: Operating frequency range for certain ultrasonic load should be selected or typed here. MIN frequency & MAX frequency: corresponds to end-values of the Start frequency slider (for instance, here 31 and 36 kHz). MAX Span: By default, automatically, we have 1 kHz wide Max. Span, but manually we can select and type another value. Span is frequency capture interval for resonant regime tracking. 42 Principal software user-interface for controlling WELDING generators: First TAB (basic settings): Welding by Time Screen example for “Welding by limiting only a welding time”. Welding process will stop after given Time interval (here 3.83 s). There are no limits for operating Power and delivered Energy (because of zero settings). Every time when parameters of certain operating-mode variable are set to 0 (zero), like here encircled, the LabVIEV software for ultrasonic generators is considering this as: function not in use, or function without limits, and/or as a continuous operating regime (this is also valid for other software TABs). Of course, this is not valid for other setting parameters that are not establishing/defining basic operating modes. Phase set point, start frequency, compensating capacitance and frequency Span can be later slightly changed in real time, during ultrasonic generator operating high power, until we reach desired operating amplitude regulation, while still keeping automatic phase regulation. These are very important and very useful options. Literature (e-book): http://bookstore.mpi-ultrasonics.com/index.php?main_page=product_info&cPath=48&products_id=165 43 Principal software user-interface for controlling WELDING generators: First TAB (basic settings): Welding by Peak power Screen example for “Welding by limiting the Peak power on the load”. Welding process will stop when Peak power is reached (here 189 W). There are no limits for total operating Time and delivered Energy (because of zero settings). Every time when parameters of certain operating-mode variable are set to 0 (zero), like here encircled, the LabVIEV software for ultrasonic generators is considering this as: function not in use, or function without limits, and/or as a continuous operating regime (this is also valid for other software TABs). Of course, this is not valid for other setting parameters that are not establishing/defining basic operating modes. 44 Principal software user-interface for controlling WELDING generators: First TAB (basic settings): Welding by delivered Energy Screen example for “Welding by limited amount of Energy” which should be sent to a load. Welding process will stop when given amount of Energy is delivered to a load (here 1208 Ws). There are no limits for total operating Time and operating Peak power (because of zero settings). Every time when parameters of certain operating-mode variable are set to 0 (zero), like here encircled, the LabVIEV software for ultrasonic generators is considering this as: function not in use, or function without limits, and/or as a continuous operating regime (this is also valid for other software TABs). Of course, this is not valid for other setting parameters which are not establishing/defining basic operating modes. For this operating mode Time and Peak power should always be set to 0 (zero), because if we set either Time or Peak power to other non-zero values, Energy mode will be deactivated. 45 Principal software user-interface for controlling WELDING generators: Second TAB setting of basic operating intervals, boundary conditions and limitations: Welding by delivered Energy. Here, delivered energy amount is defined (limited) on the first TAB, and setting limits on this TAB are only Peak Power and Time. Last measured values memorized from a previous welding Peak power plus (=) maximal allowed Peak power which can drive a load (here 193 W). If real, actual load Peak power would be for some reason higher than Peak power plus, generator will produce error message on the front panel of generator box and on the software user interface. Peak power minus (=) minimal allowed Peak power which can drive a load (here 85 W). If real, actual load Peak power would be for some reason lower than Peak power minus, generator will produce error message on the front panel of generator box and on the software user interface. Time plus (=) maximal allowed operating time which can drive a load (here 7.52 s). If real operating time would be for some reason higher than Time plus, generator will produce error message on the front panel of generator box and on the software user interface. Time minus (=) minimal allowed operating time which can drive a load (here 2.08 s). If real, actual load operating time would be for some reason lower than Time minus, generator will produce error message on the front panel of generator box and on the software user interface. 46 Principal software user-interface for controlling WELDING generators: Second TAB setting of basic operating intervals, boundary conditions and limitations: Welding by Peak Power. Here, operating Peak power is defined (limited) on the first TAB, and setting limits on this TAB are only Energy and Time. Last measured values memorized from a previous welding Energy plus (=) maximal allowed Energy which can drive a load (here 1651 Ws). If real load Energy would be for some reason higher than Energy plus, generator will produce error message on the front panel of generator box and on the software user interface. Energy minus (=) minimal allowed Energy which can drive a load (here 866 Ws). If real load Energy would be for some reason lower than Energy minus, generator will produce error message on the front panel of generator box and on the software user interface. Time plus (=) maximal allowed operating time which can drive a load (here 7.52 s). If real operating time would be for some reason higher than Time plus, generator will produce error message on the front panel of generator box and on the software user interface. Time minus (=) minimal allowed operating time which can drive a load (here 2.08 s). If real, actual load operating time would be for some reason lower than Time minus, generator will produce error message on the front panel of generator box and on the software user interface. 47 All settings that are available on our Lab View operating software can be realized from the backpanel 25-pin connector using PLC (for instance: start/stop the generator with discrete external signals, to build RS485 network etc.). Generator can be fully interfaced and controlled thru the rear panel connector to any PLC controller. External PLC will start the weld cycle (via bringing pins 1 & 13 together). In our operating Lab View software it is possible to set “+ & - control limits” for power, energy and time. The limits given in settings are generating warning: closing relay warning (back panel 25 pin DSUB connector) and sending warning status via RS485 communication (see the communication parameters) only if the selected (limited) parameter is outside the chosen limits, during a real welding. When all limits are set to zero - no warning occurs (this is how the software is organized; -practical convention). The "weld to" levels can be selected on the main tab on the operating Lab View software (see the picture below). For instance, if it is necessary to weld with energy until 100Ws, you have to set Energy value to 100Ws (simply type 100 in the Energy window and enter). If you want to receive warning from the generator if the welding process is away from 100Ws -set the Energy limits in certain desired window, i.e. Energy plus on -130Ws, and Energy minus on -80Ws (see the picture below). 48 In case of getting errors regarding any limits (which are set by user) of peak-power, energy and time, there will be the following consequences, error-messages or actions: 1. In the top, right angle of LCD, will appear one of the messages: LP-peak power limit, or LEenergy limit, or LT-time limit. 2. For ultrasonic generators that have 25 pin Canon connector on the back: The internal relay, connected between pin-16 and pins -5,9 (read relevant information in this User Manual) switches on, and later automatically resets on every next ON signal. 3. In the RS485 serial communications protocol generator returns a warning "status" number (read relevant information in this User Manual). 49 PHASE-FREQUENCY SCANNING: Third TAB Principal software user-interface for controlling WELDING generators: Third TAB Steps: Number of measured or scanning points (max. 100). Numerical indicators: All numerically visible values correspond to what we see on the right side screen. Max. phase: Extreme, measured phase (upper phase value). Phase (=) red color curve Max. frequency: This is the frequency which corresponds to Max. phase value (in reality this is parallel resonant frequency). Cursors: Can be visualized and moved/dragged by mouse on the right side, scanning screen. Scan: By pressing this button, phase-frequency scanning is activated. In order to find optimal operating frequency range (Span), it is necessary to apply LabVIEW software scanning (right side of the software screen). When applying software scanning it is important that ultrasonic load is operating in air (being not loaded). Corrected effective phase: (=) white color curve 50 Before analyzing/scanning and using frequency-phase tracking mode, select proper operating frequency range, which corresponds to a known operating frequency range of ultrasonic transducer (or load)? Elliptically encircled setting zones (of LabVIEW software MPIwelding.exe) are not used in a resonant “frequency-phase” tracking mode. When performing low power scanning (using our LabView software), in order to find or estimate optimal frequency range of certain transducer, compensating capacitance should be set on minimum (= 5 nF). Save/Write inside of the generator memory (last operating situation). Save/Write settings as any computer file. Low Power Scanning or “Frequency-Phase” measuring mode is the safeoperating, low-power frequency scanning of ultrasonic load (Ultrasonic converter + booster + sonotrode + etc.), where the scanning display would visualize the phase difference between a load current and load voltage versus frequency (red color curve), and Effective, corrected Phase curve (white color curve). Such frequency scanning is realized using the LabView software (MPIwelding.exe) supplied with ultrasonic generator). In order to make scanning, personal computer with installed Lab View software should be connected to ultrasonic generator trough RS485 interface. When applying software scanning (or frequency-phase tracking) it is recommendable to make scanning when ultrasonic load is operating in air (being not loaded), and later to make the same scanning when transducer is loaded (and to compare results, which should be mutually similar). Initially (first safe operating, low power frequency scanning) should be selected to cover only the expected operating frequency range of ultrasonic system. For instance, if we know the series and parallel resonant frequency of certain transducer (measured by impedance analyzer), selected scanning frequency interval should be little bit wider and overlap both series and parallel resonant frequencies. In here-described scanning, frequency is smoothly changing towards lower values, starting from f-start (which is higher than parallel resonant frequency) and finalizing scanning at the frequency that is equal to f-start – Span. Span is the frequency interval we select as a frequency-capture range (in Lab View Software). For instance, if ultrasonic system consists of 20 kHz ultrasonic converter + 20 kHz booster + 20 kHz sonotrode (where not all of them are exactly tuned to operate on 20 kHz, or have single operating frequency of 20 kHz), we know that we should expect the resulting, central operating frequency of such system to be somewhere close to 20 kHz. Consequently, we could select the scanning frequency range to be between 20 and 21 kHz (meaning f-start = 21 kHz, and Span = 1 kHz). Of course, another relevant example could be to select such frequency scanning between 19.5 kHz and 20.5 kHz (meaning f-start = 20.5 kHz, Span = 1 kHz). Later (during scanning), the Lab View software will search and find real, average operating frequency somewhere inside of the area covered by scanning). In the next step (next safe-operating frequency scanning) we should select new (shorter) value for Span to cover only the central part of the phase curves (both, red and white color curves). New f-start will be again at the point where the phase curve is minimal (meaning closer to parallel resonance). This way, we will visualize mentioned part of the phase difference curve on a larger display, and we will be able to estimate the frequency which is in the middle of that frequency interval, and which is approximately 51 equal: f-start – 0.5(Span). Later, real operating frequency regime (under automatic effective phase regulation, found by internally implemented hardware and software) will find its average or effective operating frequency (inside of the new Span interval) and we will be able to perform/set large frequency sweeping around that frequency (in both directions). 1. For safety reasons, when ultrasonic system is started first time, when (any or all of): ultrasonic transducer, booster, sonotrode and output sonotrode-tool are unknown, or new, or replaced, set a low Amplitude value (20%, for instance). Later, after scanning and proper operating regime is found (when proper f-start is found); -power level can be readjusted (if necessary). Start frequency f-start can be changed/adjusted also during the generator operation. The generator has an automatic “frequency tuning” inside the frequency capture range (see the explanation that follows). The frequency capture range can be set by “Span” parameter from 0 to 1 kHz (below the start frequency, towards lower frequencies: f-capture = f-start - Span). If we set Span = 0, generator will not search for optimal operating frequency between Series and Parallel resonances (and generator will operate in a relatively fixed and forced, nonresonant, not automatically controlled oscillating regime, with fixed and forced frequency sweeping, regardless of impedance characteristics and natural resonant frequencies). In such situations, we can set start frequency anywhere we like (no automatic regulation). The operating resonant frequency of ultrasonic system must be found in advance (before operating the system full power), performing initial low power scan testing with the generator LabVIEW software. This frequency will be found somewhere below the frequency where scanned generator current is maximal, and where the scanned phase function is smoothly rising from its minimal value towards its maximum, when in the same time, the frequency is going towards lower frequencies). The frequency area which is covered (by this type of regulation) depends on the device type (it is impedance-characteristic dependent: f-capture = f-start - Span). Initially (first safe-operating, low-power frequency scanning) should be selected to cover only the expected operating frequency range of ultrasonic system (Span). Initial Start frequency and Span can be adjusted on the left side of the software screen (see the picture below). 52 In here-described scanning, frequency is smoothly changing towards lower values, starting from f-start and finalizing scanning at the frequency which is equal to f-start – Span. Span is the frequency interval we select as a frequency-capture range (in LabVIEW Software). For instance, if ultrasonic system consists of: 20 kHz ultrasonic converter + 20 kHz booster + 20 kHz sonotrode + 20 kHz sonotrode-tool (where not all of them are exactly tuned to operate on 20 kHz, or to have single operating frequency of 20 kHz), we know that we should expect the resulting, central operating frequency of a sonotrode-tool to be somewhere close to 20 kHz, and consequently, we could select the initial scanning frequency range to be between 20 and 21 kHz (meaning f-start = 21 kHz, and Span = 1 kHz). Of course, another relevant example could be to select such frequency scanning between 19.5 kHz and 20.5 kHz (meaning: f-start = 20.5 kHz, Span = 1 kHz). Later (during scanning), the Lab View software will draw the Phase characteristics (versus frequency) inside of the area covered by scanning (by Span). 2. On the lower right side of the third TAB, there is the Scan button, which is activating the safe-operating, low power ultrasonic load scanning (kind of load impedance scanning). Before Scan is activated, it is important to select scanning frequency resolution (number of steps), which is selectable from 40 to 100. See Scan and steps positions on the picture, below. 53 After certain time scanning will stop and on the upper right corner of the user-software interface we will see the plots of scanned phase (red color curve) and effective, corrected phase (white color curve). A typical scanning screen is presented on the picture below (Span is well selected, capturing the area of both series and parallel resonant frequencies, and wider). 54 Relevant, most probable operating point, which is good for automatic frequency and phase regulation; on the white color curve). Real phase curve (red color curve; has only informative meaning to recognize where the well operating frequency interval is). White and red phase curve should be seen on a similar way, together (in any other case). In this frequency frequency-capture area (here from 19.5 until 20 kHz) converter will be operational and automatically regulated by ultrasonic generator under different dynamic, loading conditions. Series and parallel resonances are inside the encircled area (not visible on this scanning plot, but if measured by Impedance Analyzer, would be here). This is the most probable and expected phase level (phase set point) that will be regulated by ultrasonic generator (here about 0.75 V). We are intentionally selecting such smooth, linear phase area, since such areas are easy for automatic regulation. Yellow horizontal and vertical lines are manually moveable cursors that are useful for estimating and marking most probable operating phase and frequency (where automatic regulation will be optimal). In this frequency area we should select the Start frequency: fstart. Ultrasonic generator will start operating from selected start frequency and very fast find its optimal resonant frequency that is under automatic regulation, here. If converter is operating in air, this frequency will be very close to its parallel resonant frequency. 55 Two examples (different piezoelectric converters) of properly selected phase set point that will be automatically regulated. 56 3. Find proper resonant mode and start frequency f-start by measuring Impedance-PhaseFrequency characteristics using Lab View software (as already explained). Have in mind that initial resonant frequency characteristics will change after certain time, because of ultrasonic oscillations and involved materials aging and stabilization (stress relief, friction between contact surfaces, thermal aging, operating temperature…). Also, resonant frequencies will be very much operating-temperature dependent (converter and sonotrode could heat during operation). Repeat scanning of phase-frequency characteristics after certain time, or in case of noticing problems during ultrasonic oscillations (maybe resonant characteristics are significantly changed and new generator settings should be applied). 4. Set the “PHASE” initial value (first bar) in the range from 0.5 to 3V (ideally and preferably below 2.5 V, because maximal phase comparator DC voltage is 5 V ( = +90°); -see the picture below). Do not start the generator until all initial settings are verified and sett to safe (low power and low risk) positions. 5. After all initial settings are made, Ultrasonic Generator can be activated (from a PC), and it will start driving ultrasonic converter by pressing Start (see the picture below). First press on the Start button will find and memorize the proper, average operating frequency, which corresponds to the selected effective phase-difference value. Generator will operate low power, very short time, and stop. In the second activation of the Start button, generator will start operating with selected settings (regulating amplitude, phase and frequency). 6. After all settings are tested, we can transfer them to the generator internal memory by using the Write button (see below). This is very important operation, because all 57 software settings are still virtual, and present only in the LabView software (on a PC screen), until we transfer them to the internal memory of the generator. 7. Generator can be controlled either manually (rotary encoder + LCD) or from a PC (but not in the same time from both of them). Read – Write options: After all settings are properly and optimally made, we can save the file with such settings using Write button (like saving any PC file). Later, we can simply invite/Read one of such files (for a specific load) and WELDING generator will start operating as previously memorized. 58 av (%): Is the actuator value of the automatic (closed loop regulator) for effective phase. This is real time indicator. Ideal situation is that av is close to 50%, meaning to be somewhere in the linear zone of the phase curve. If "av" is showing 0 (zero value) this means that starting frequency (f-start) is selected too low. Change f-start and place it slightly higher compared to the value selected before. If "av" is closer to maximal values, either starting frequency is selected too high, or "Span" value is not large enough. Change f-start and Span value, until getting av between 30% and 50%. Later, after scanning and proper operating regime is found (when proper f-start is found); sweeping parameters and power level can be readjusted (if necessary). Phase set point, start frequency and frequency Span can be later slightly changed in real time, during ultrasonic generator operating high power, until we reach desired operating amplitude regulation, while still keeping automatic effective phase regulation. These are very important and very useful options. The generator has an automatic “resonant frequency tuning” inside the frequency capture range (see the explanation that follows). The frequency capture range can be set by “Span” parameter from 0 to 1 kHz (below the start frequency, towards lower frequencies: f-capture = fstart - Span). If we set Span = 0, generator will not search for optimal operating frequency between Series and Parallel resonances (and generator will operate in a relatively fixed and forced, non-resonant, not automatically controlled oscillating regime, regardless of impedance 59 characteristics and natural resonant frequencies). In such situations, we can set start frequency anywhere we like (no automatic regulation). Manually, we can select any other Span, which is wider or shorter than 1 kHz (because certain converters will request larger Span values). The operating resonant frequency of ultrasonic system must be found in advance (before operating the system full power), performing initial low power scan testing with the generator LabVIEW software. This frequency will be found somewhere below the frequency where scanned generator current is maximal (not visible during scanning), and where the scanned phase function is smoothly rising from its minimal value towards its maximum, when in the same time, the frequency is going towards lower frequencies). The frequency area which is covered (by this type of regulation) depends on the device type (it is impedance-characteristic dependent: f-capture = f-start - Span). Frequency-capture range should be found when generator is performing the safe-operating, low-power frequency scanning of ultrasonic load (Ultrasonic converter + booster + sonotrode + sonotrode-tool), where the scanning display (LabVIEW software) would visualize the effective phase difference between a load current and load voltage versus frequency (white color curve). Such low-power frequency scanning is realized using the LabVIEW software supplied with ultrasonic generator). In order to make scanning, personal computer with installed Lab View software should be connected to ultrasonic generator trough RS485 interface as explained before. Initially (first safe-operating, low-power frequency scanning) should be selected to cover only the expected operating frequency range of ultrasonic system (Span); -to cover frequency area of both series and parallel resonant frequencies. The ideal situation is to have network-impedance analyzer and measure Impedance-Phasefrequency curves in order to find series and parallel resonant frequency of the converter. Later, we will select Span that should cover the frequency area that is little bit larger than zone covered by series and parallel resonant frequency. For instance, if certain converter has series resonance on 19 kHz, and parallel resonance on 21 kHz, we can select Span which will cover the area from 18.5 until 21.5 kHz. Initial Start frequency and Span can be adjusted on the left side of the software screen (see the picture below). 60 In here-described scanning, frequency is smoothly changing towards lower values, starting from f-start and finalizing scanning at the frequency that is equal to f-start – Span. Span is the frequency interval we select as a frequency-capture range (in LabVIEW Software). For instance, if ultrasonic system consists of: 20 kHz ultrasonic converter + 20 kHz booster + 20 kHz sonotrode + 20 kHz sonotrode-tool (where not all of them are exactly tuned to operate on 20 kHz, or to have single operating frequency of 20 kHz), we know that we should expect the resulting, central operating frequency of a sonotrode-tool to be somewhere close to 20 kHz, and consequently, we could select the initial scanning frequency range to be between 20 and 21 kHz (meaning f-start = 21 kHz, and Span = 1 kHz). Of course, another relevant example could be to select such frequency scanning between 19.5 kHz and 20.5 kHz (meaning: f-start = 20.5 kHz, Span = 1 kHz). 61 Later (during scanning), the Lab View software will draw the Phase characteristics (versus frequency) inside of the area covered by scanning (by Span). On the lower left side of third scan TAB, there is the Scan button, which is activating the safeoperating, low power ultrasonic load scanning (kind of load impedance scanning). Before Scan is activated, it is important to select scanning frequency resolution (number of steps), which is selectable from 40 to 100. See Scan and steps positions on the picture, below. After certain time scanning will stop and on the upper right corner of the user-software interface we will see the plots of scanned phase (red color curve) and Effective, corrected Phase (white color curve). The examples of scanning screen are presented on the pictures below. 62 Literature (e-book): http://bookstore.mpi-ultrasonics.com/index.php?main_page=product_info&cPath=48&products_id=165 63 AMMM & Welding Ultrasonic Power Supplies Examples of proper selection of operating frequency ranges (during Scanning) If you have impedance analyzer, make impedance measurements and select initial scanning range that will capture both series and parallel resonant frequency and little bit wider (on both sides). Fig. 1. Typical scanning curve (wide scanning range). Somewhere in this area is series resonance (here, close to 19.82 kHz) Somewhere in this area is parallel resonance (here, close to 19.92 kHz) Before performing scanning, set amplitude to 0 (zero), set output capacitor to minimum (5 nF), set operating mode to “continuous”, disable all sweeping parameters (set them to 0), set operating frequency range (minimal and maximal frequency and Span) inside the expected operating frequency interval. 64 Fig. 2. Typical scanning curve (wide scanning range). Somewhere in this area, it will be the best to select set point for phase regulation. For example, on this curve optimal phase values are between 0.5 and 2 V. Here selected optimum is 1.25 V. 65 Fig. 3. Typical scanning curve (wide scanning range). Here is relatively safe operating frequency area. Frequency capture range should be reduced to here-encircled area. For instance, in this case, proper selection for safe operating frequency area is from 19.82 to 20.23 kHz. This is good operating frequency area for very high power plastic welding, Sonochemistry, liquids processing and similar applications. Whenever operating frequency area (or frequency Span) is overlapping series resonant frequency, this presents potentially risky operating regime, which should be well tested. Operating frequency in this area will be automatically regulated from parallel resonant frequency to series resonant frequency and towards lower frequency values. If we like to select operating regime only in the close vicinity of parallel resonance, operating frequency range (and frequency Span) should be selected like here. Series resonance should be excluded by setting minimal frequency (sufficiently high). This will be the safest operating regime for low and moderate acoustic loads, for welding, Sonochemistry, liquids atomizing and powders sieving applications, as well as for operating high amplitude in air. This operating regime has very high oscillating amplitudes and high oscillating velocity. Here (below series resonance) is the most powerful, most risky and heavy-duty, high stress operating frequency range. Converter has increased heat dissipation in this area. 66 Do not operate converter in air or low load conditions, here. Converter should be fully loaded before being activated in this frequency area. Avoid operating in this area whenever possible and not absolutely necessary. Fig. 4. Typical scanning curve (wide scanning range). Here is very risky frequency area (high stress, high amplitude, increased converter heating, high oscillatory pressure). Better to avoid this area. This is the area below series resonant frequency. Be very careful if operating in this area. Operate here only under heavy loading (not in air), like in cases of metal welding applications. 67 Fig. 5. Typical scanning curve (wide scanning range). Select this frequency area for heavy-duty operations under loading (like metals welding). Here selected frequency range is from 19.79 to 20.21 kHz. Do not operate in air. Whenever operating frequency area (or frequency Span) is overlapping series resonant frequency, this presents potentially risky operating regime, which should be well tested. Operating frequency in this area will be automatically regulated from parallel resonant frequency to series resonant frequency and towards lower frequency values. Select the frequency interval that covers only parallel resonance and higher frequencies, and does not cover series resonance. This is the safest operating regime for low and moderate acoustic loads, for welding, Sonochemistry, liquids atomizing and powders sieving applications, as well as for operating high amplitude in air. This operating regime has very high oscillating amplitudes and high oscillating velocity. 68 Fig. 6. Typical scanning curve (wide scanning range). Select this frequency area for continuous operating under moderate and high power loading (like for welding and liquids processing). Here selected safe frequency range is from 19.84 to 20.3 kHz. Select the frequency interval that covers only parallel resonance and higher frequencies, and does not cover series resonance. This is the safest operating regime for low and moderate acoustic loads, for welding, Sonochemistry, liquids atomizing and powders sieving applications, as well as for operating high amplitude in air. This operating regime has very high oscillating amplitudes and high oscillating velocity. 69 Fig. 7. Typical scanning curve (optimal, safe operating range). Here is well-selected (total), safe frequency capture and regulation area for most of high power welding and liquid processing applications. Whenever operating frequency area (or frequency Span) is overlapping series resonant frequency, this presents potentially risky operating regime, which should be well tested. Operating frequency in this area will be automatically regulated from parallel resonant frequency to series resonant frequency and towards lower frequency values. 70 Fig. 8. Another example of very wide frequency interval scanning Well selected frequency capture area applications. for most of moderate and high power Frequency area for metals welding and other heavy-duty applications under loading (do not operate in air). Whenever operating frequency area (or frequency Span) is overlapping series resonant frequency, this presents potentially risky operating regime, which should be well tested. Operating frequency in this area will be automatically regulated from parallel resonant frequency to series resonant frequency and towards lower frequency values. 71 Fig. 9. Heavy-duty frequency operating area (operate only under loading) Here is very risky, high stress operating area. Avoid operating here. 72 Fig. 10. Wide moderate and high power frequency operating area (for most of applications) Select the frequency interval that covers only parallel resonance and higher frequencies, and does not cover series resonance. This is the safest operating regime for low and moderate acoustic loads, for welding, Sonochemistry, liquids atomizing and powders sieving applications, as well as for operating high amplitude in air. This operating regime has very high oscillating amplitudes and high oscillating velocity. 73 Fig. 11. Well-selected frequency operating area for moderate and high power (for most of applications) Select the frequency interval that covers only parallel resonance and higher frequencies, and does not cover series resonance. This is the safest operating regime for low and moderate acoustic loads, for welding, Sonochemistry, liquids atomizing and powders sieving applications, as well as for operating high amplitude in air. This operating regime has very high oscillating amplitudes and high oscillating velocity. 74 Fig. 12. Frequency operating area for high power, heavy-duty (for metals welding applications). Operate only under loading (not in air). Risky operating regime. In all cases when series resonant frequency and certain frequency interval below is captured, this is presenting very risky operating zone. Test carefully and modify parameters until safe operating regime is found. Moderate power, safe-operating frequency area (operating in air, for atomizing and powders sieving applications) 75 Fig. 13. Well-selected frequency operating area for moderate high power (for most of applications) On this frequency-capture-range, frequency area below series resonance is avoided. Select the frequency interval that covers only parallel resonance and higher frequencies, and does not cover series resonance. This is the safest operating regime for low and moderate acoustic loads, for welding, Sonochemistry, liquids atomizing and powders sieving applications, as well as for operating high amplitude in air. This operating regime has very high oscillating amplitudes and high oscillating velocity. 76 Fig. 14. Well selected phase set point (here 1.5 V). lower linear zone of phase curve with negative slope. Should always be selected in a This is very well selected frequency area for most of moderate and high power applications. Select the frequency interval that covers only parallel resonance and higher frequencies, and does not cover series resonance. This is the safest operating regime for low and moderate acoustic loads, for welding, Sonochemistry, liquids atomizing and powders sieving applications, as well as for operating high amplitude in air. This operating regime has very high oscillating amplitudes and high oscillating velocity. 77 Fig. 15. Well selected, reduced frequency operating area for moderate and high power (for most of applications) and for very fast welding (start-up transient time between two welds is very short). Select the frequency interval that covers only parallel resonance and higher frequencies, and does not cover series resonance. This is the safest operating regime for low and moderate acoustic loads, for welding, Sonochemistry, liquids atomizing and powders sieving applications, as well as for operating high amplitude in air. This operating regime has very high oscillating amplitudes and high oscillating velocity. 78 Very good settings strategy for reaching optimal operating conditions 1. If you have impedance analyzer, make impedance measurements and select initial scanning range that will capture both series and parallel resonant frequency and little bit wider (on both sides). 2. Measure and/or calculate the frequency interval between series and parallel resonant frequency ∆f = f p − f s = f 2 − f1 3. Set the Span value (on the first settings tab) to be between ∆f < Span < 6∆f , (optimal Span could be between 2 and 4 ∆f ). Test later different Span values and select one that is producing optimal operating conditions. 4. Initially set the Start frequency to be in the low phase, low current zone (far from any other resonance), and to have the value f start ≤ f p + 3∆f = f s + 4∆f (below maximal frequency). Fig. 2. Typical scanning curve (wide scanning range). Here is series resonant frequency fs. Here is parallel resonant frequency fs. Select Start frequency somewhere here 5. Make all scanning, testing and tuning as already explained in this manual, while also respecting points 1, 2, 3 and 4 (see above on this page). 6. Test the generator and verify if amplitude and phase are being regulated correctly (and automatically). Try operating mostly around parallel resonance. 7. Readjust only start frequency going from higher to lower frequencies until reaching proper and stable, automatic regulation of phase and amplitude. Do not increase the Span. Optimal operating conditions in this case will found only by readjusting start frequency. All other setting parameters will stay unchanged as previously selected). 79 EXTREMELY IMPORTANT The most important (unavoidable, ultimate objective) for resonance or frequency-phase tracking modes is to achieve stable, automatic, real time phase and amplitude regulation when transducer is loaded (and operating on a sufficiently high power, above the critical power threshold). To recognize that we realized such operating regime we should compare: a) Phase set point value with the actual, real-time regulated phase value and the numbers in both windows should be almost the same. b) Amplitude set point value with the actual, real-time regulated amplitude value and the numbers in both windows should be almost the same. To achieve described automatic tracking the Effective Phase set point, start frequency and frequency Span can be slightly readjusted in real time, during ultrasonic generator operating high power, until we reach desired operating amplitude regulation, while still keeping automatic effective phase regulation. These are very important and very useful options. 80 Amplitude: This is very particular amplitude regulator, which is starting to regulate amplitude from certain (minimal) threshold point (which is specific for every ultrasonic load). Below that amplitude threshold point there is no automatic amplitude regulation (amplitude is too small to be regulated). Starting from the amplitude threshold AMMM generator is making automatic amplitude regulation (percentage-wise), which should be almost equal to the set point level of amplitude given on the first TAB settings. Upper amplitude level that can be reached by automatic regulation is also limited. Example: For certain transducer, we will be able to have smooth, automatic amplitude regulation only between 20% and 70% of the full scale (and we should never expect that automatic amplitude regulation will operate from 0 to 100%). If mechanical (ultrasonic) load starts consuming power that numerically corresponds to the percentage of the amplitude set point, generator will start regulating power instead of regulating amplitude, but using the same numerical value of the amplitude. Example: If the set point of amplitude is 50%, generator will regulate amplitude on 50% in the power range from 0% to 50%. If consuming power will increase (over 50%), generator will start regulating only the power taking 50% as the nominal generator power or set point for power (and amplitude will automatically decrease, giving priority to the power regulation). If the consumed power will drop below 50%, amplitude regulation will automatically become dominant regulating process, and amplitude will be regulated on 50%. Power regulator (%): Is the actuator value of the automatic (closed loop regulator) for amplitude and/or power. This is real time indicator. Ideal situation is for power regulator is to be close to the set point of amplitude (and/or power). 81 “Amplitude (=) Output voltage”. Oscillating (mechanical) amplitude of ultrasonic converter is directly, linearly proportional to the output voltage of ultrasonic generator (measured on input terminals of ultrasonic, piezoelectric transducer). Amplitude (set point) on the Lab View software display (user interface) shows the desired (targeted) output voltage of ultrasonic generator presented in % (Example: in 400W generators, 100% amplitude = 1000V, on 5mm thick piezoceramic elements). This is the value we would like to achieve (to get and regulate) during ultrasonic generator and transducer operation. Amplitude indicator (on Lab View software interface) shows the actual value of the output amplitude, meaning it shows the realized (practically operating) amplitude on ultrasonic transducer. The optimal, regular, best case scenario (when automatic regulation is operating well) is that desired Amplitude (set point) is equal to the actual, practically operating (oscillating, mechanical) amplitude = Amplitude indicator value). This is not always the case, and in order to achieve good generator regulation we are scanning ultrasonic load and making different settings, until we rich that Amplitude, set point will be equal to what Amplitude indicator is showing. Generator regulates the Amplitude (or output voltage over the transducer) until the output power (in Watts, when transducer is loaded) increases to the value, selected in % with "varying amplitude", using the Amplitude slider. Example (for 400W generators): When selected Amplitude is 50%, and Amplitude indicator shows 50% - this means that in such regulation the voltage over transducer is 500V. If in the same time Analog power regulator, indicator shows 30% - this means that consumed power is 120W (30% from 400W = 120W). Power regulator (indicator) is organized to show any value between 10% and 100%. Power regulator indicator shows the % actuator (driving) value of internal power regulator (which corresponds to the duty cycle of PWM driving signal, on the gates of output power transistors, expressed in %). This regulator either keeps (or shows) the desired value of oscillating amplitude (what is directly proportional to the output voltage on the transducer), or keeps generated, delivered power to the transducer, depending on transducer loading conditions. For instance; - if Amplitude (of 400W generator) is set at 50% - generator supplies 500V on its output if the transducer is not loaded (meaning operating in air). When transducer is loaded and consumes more than 50% of power (meaning more than 200W), then the power regulator reduces the output voltage (meaning oscillating amplitude) until the generated power delivered to the transducer reaches 50% (or 200W). This is the double, closed feedback loops regulating system (regulating amplitude and power), which is giving higher priority to the output power regulation. Analog Power indicator (=) % of Operating Power (when generator is operating and converter is loaded) (=) % from the total power of the generator. Analog Power Indicator shows the actual, generated (practically realized) load power (50% = 200W for 400W generators), supplied to the input terminals of ultrasonic transducer. 82 WELDING GENERATOR OPERATING IN A CONTINUOUS MODE SETTING & SCANNING example for 20 kHz welding converter (2 kW) -Install all necessary Lab View software (read the manual for welding generators). -Activate our Lab View software: “welding_scan.exe” (or “MPIwelding.exe”) -First Tab (parameters): -Select proper Serial port (Rescan). Verify that connection to your PC is activated (small green light “Connection” starts blinking). -Set Time, Peak power and Energy to “0” -Select “Frequency Range”, where is expected that transducer will operate (manual or automatic). -Set “Nominal power” to what correspond to hardware – in this example 2000W -Second Tab (limits): Set all limits also to “0”. This is our software convention to initiate continuous mode. 83 -Always stop the generator before changing “Output capacitor” and/or “Output choke”(third Tab)– see below the block diagram of the output stage of generator. Output capacitors are selected in all type of generators (400, 1000, 2000, 3000 W) from Lab View software with slider. The preferred value of Output voltage and Compensating inductance are selected from the software (2000 and 3000W generators only) or by jumpers inside the generator (older versions are using jumpers). C1 C2 C3 5nF 10nF 20nF Converter SW3 500UH SW2 1000UH 200V SW1 300V 100V -Before Scanning, set the output capacitor to minimum (5nF) with the slider in top left corner (third Tab). -Set/or select with jumpers the output voltage to minimum - 100V (first time, for untested converter) -Set/or select with jumpers the Compensating inductance to 1000uH or 500uH relative to resonant frequency of ultrasonic converter (see complete user manual – chapter Output capacitor selection) -Make scan procedure (see the user manual chapter: AMMM & Welding Ultrasonic Power Supplies Examples of proper selection of operating frequency ranges (during Scanning)). -Slowly change (increase) the “OUTPUT CAPACITOR”, “OUTPUT VOLTAGE” and “COMPENSATING INDUCTANCE”, to obtain the best operating conditions and automatic power and phase regulation (as explained in the user manual). NOW YOUR GENERATOR IS READY FOR CONTINIOUS OPERATION. 84 OPTIMAL GENERATOR SETTINGS 1. Whatever we do with different generator settings, the answer if this is beneficial for ultrasonic operating regime is the output power level that should be maximized with every particular setting (watch analog power level meter). 2. The second important criteria is that ultrasonic load would operate very smoothly, without producing sharp, strange, cracking, whistling, clipping and/or low frequency noise or similar effects. 3. The most important criterion to be able to say that ultrasonic system is operating properly and safely (and that will last very long time) is that nothing is significantly and rapidly heating. For instance, ultrasonic transducer, other metal parts, executive resonating tools and load should not dissipate too much heat energy and no one joint should heat. Also ultrasonic generator (box) should not heat. Temperature during operation for all mechanical parts should always be close to room temperature and below 50°C. 4. After certain settings are made (when generator is not operating, or during generator operation, in real time, including additional settings and adjustments made later), every time is necessary to save such settings (regardless if generator is operating or not), if we would like that next time (after switching OFF the generator and repeating switch ON) generator would start using last settings. When make SAVE = Write (by pressing blue button on the bottom right side of the software user-interface panel) the last settings are stored in the generator for currently operating transducer. If the save button (blue button) is not pressed, nothing is saved in the generator, even if adjustments are made during tests (when generator operates). The same procedure should be repeated for every new (different) transducer. After every power-up it is absolutely necessary to test and find new operating frequency of transducer/s. Why? Let’s imagine that generator and transducer are operating for long time under some conditions which are related to: ambience temperature, temperature of piezoceramics, temperature of sonotrode… Such conditions are defining operating frequency of ultrasonic system, which could vary/deviate until 1 kHz compared to initially tested frequency (when transducer was on a standard room, temperature). If the generator shuts-down (for some reason) and after certain time again powers-up (when temperature of critical components will naturally change), the applied automatics 85 (PLC) which is controlling ultrasonic generator should test again all transducers (all older program parameters are still in the memory of the generator, but new situation related to temperature-dependent acoustic properties is no more the same). 5. After all initial settings are made (using a PC and supplied Lab View software), Ultrasonic Generator can be activated, and it will start driving ultrasonic converter by pressing green Start button (which is on the software front panel; -lower left corner on all three TABs). Do not start the generator until all initial settings are verified and sett to safe (low power and low risk) positions after the safe-operating ultrasonic load scanning. 6. Now ultrasonic power output can be switched ON (Start). In case if ultrasonic transducer (meaning complete ultrasonic load) is overloading WELDING generator, generator will stop operating and show ERROR message (overcurrent, overheat, overload). Red color LED on the generator box (front panel) will light, and one of visual indications (either Overcurrent or Overheat, Overload) on the Lab VIEW user-interface (lower left side) will be activated. Reduce the amplitude, readjust operating frequency, find new settings (slightly different compared to what was before), and repeat the process until successfully restarting the generator. 7. Read – Write options: After all settings are properly and optimally made, we can save the file with such settings using Write button (like saving any PC file). We are giving to such files any name/s we like with “.tune” ending. Later, we can simply invite/Read one of such files (for a specific load) and WELDING generator will start operating as previously memorized (taking settings data from a specific .tune file). 8. Power, Power selector: generator). Proper power level should be selected (related to applied 9. Power: Visual (analog) indication of the power level. Power indicator: (=) actually regulated power which corresponds to the PWM duty cycle (=) Numerical duplicate of the analog power indicator. Non-editable fields: only indicators. 86 10. Before exploring any of OPERATING MODES OF WELDING ULTRASONIC GENERATORS, select proper operating frequency Range, which corresponds to a known operating frequency range of ultrasonic transducer (or load), or enter other numerical values manually in the following format: 19-21 kHz (just an example). If the Range Switch is in upper position (=) Auto range, many of predefined frequency ranges will automatically appear (upper greed LED will light). If we need another frequency range, we can simply type new numbers. If the Range Switch is in lower position (=) Manual range, user can enter arbitrarily chosen frequency and span values (lower green LED will light). Every ultrasonic transducer and/or ultrasonic load has its acceptable/tolerable and optimal operating frequency range/s (It is usually designed and optimized to operate on certain resonant frequency). Do not select frequency ranges that are not acceptable for ultrasonic transducer and ultrasonic load (something will be damaged). In addition, frequency ranges that are too much different, compared to the producer-specified operating frequency range of applied ultrasonic transducer should not be used. In many cases, operating ranges should be selected manually, because standard default values are not covering desired operating frequency zone. 11. Effective Phase set point, start frequency and frequency Span can be later slightly changed in real time, during ultrasonic generator operating high power, until we reach desired operating amplitude regulation, while still keeping automatic phase regulation. These are very important and very useful options. 12. Do not forget to activate cooling on ultrasonic converter (if operating in heavy duty conditions). 13. Monitor operating temperature on all oscillating parts (converter, booster, sonotrode) and if temperature is non-uniformly distributed and significantly increasing in certain zones, stop the generator and find reasons causing temperature rising (apply refastening, new scanning…). Literature (e-book): http://bookstore.mpi-ultrasonics.com/index.php?main_page=product_info&cPath=48&products_id=165 87 SETTING & SCANNING example for DUKANE 20 kHz welding converter (2 kW) SHORT REMINDER FOR BEGGINERS -Install all necessary LabView software (read our manual). -Activate MPIwelding.exe -Select proper Serial port (Rescan). Verify that connection to your PC is activated. -Set output capacitor to minimum (5nF) before scanning -Set Time, Peak power, Energy to “0” -Set Nominal power to what correspond to hardware (here 2000W) -Select frequency Range, or MIN and MAX frequency & MAX span. -If Auto frequency range is used, span is automatically selected to be 1 kHz -Always stop the generator before changing “Output capacitor” 88 -Do not forget to activate blue button “Write” after every modification -Set all values to « 0 » minimum before scanning -Do not forget to activate blue button “Write” after every modification 89 -Scanning diagram (after scanning). In this case we do not see series resonance, but after we add booster/sonotrode… we will be able to see series resonance. -Select Phase set point in the middle linearity area of white curve (here 2 V looks OK), and go to the first TAB (parameters) and set selected Phase. -Do not forget to activate blue button “Write” after every modification 90 -Operating situation after scanning: First TAB (parameters). -Increase output capacitor gradually, as long automatic amplitude and phase regulation is operating correctly. -For first Start select Amplitude to 20%, later increase… First Start will repeat and verify Scanning and if everything is OK, generator will stop without generating error message. Second Start (green button) will activate converter. -In case if/when adding/changing booster/sonotrode/converter, repeat scanning -Later follow manual. Set operating mode (Time, Peak power, Energy…). -Always stop the generator before changing “Output capacitor” -Do not forget to activate blue button “Write” after every modification 91 New features of WELDING generators: which are produced and sold starting from February 2011 (Auto rescan, Scanning range, Current gain, 4 Selectable Startup modes, Extra Span) Users and owners of older generators (sold before February 2011) could also use this latest updated Lab View software version, but newly introduced functions, such as: "scanning range", "current gain", "extra span", "start-up mode" and "scan" will not work. Everything else (what was present in older Lab View software will work as before). Applying this new lab View software on old generators will not produce negative effects, except presence of few not working (new) functions. Scanning range: Applicable in cases of “auto” tuning. With this manual regulation we can define the scanning window (which is equal to: F-start – Scanning-range), when we select any of automatic frequency ranges. Inside of this window, the “Span” window will be automatically selected and displayed (without user’s intervention) after we apply Frequency-Phase-Scanning (on the third Tab). We can also select “manual” ranges (as first time selected frequency and Span range, for first time scanning). Operating frequency Span window will be equal to the frequency interval between F-start and the point of operating frequency, where the Phase signal has maximum (see the third Tab). In such case, generator will be 92 locked to operate only inside automatically selected or calculated “Span” window, which is on the right side of Phase-frequency, resonant curve (on the Third Tab). The best Phase-frequency operating point (horizontal cursor line) in this case is also automatically selected, and dynamically controlled, and can also be automatically readjusted in real time, during transducer loading (by internal software of the generator). Here, relevant Phase Feedback Signal value (=) [FS] (=) certain phase value, on the WHITE curve that is presenting complex, MODIFIED-PHASE curve (realized after the first-time scanning; -visible on the third, Scanning TAB; (=) Cursor phase (=) where horizontal yellow cursor line is crossing WHITE modified phase curve. Modification of the real PHASE (RED curve) is made internally (inside of the generator), and instead of RED color, real PHASE-FREQUNCY curve, we will use as very relevant, artificially created inside of the generator, new, MODIFIED-WHITE PHASE curve. Modified phase curve is kind of specific, mixed signal curve between real phase and load current. This is the relevant curve for settings and regulations. RED color, real PHASE curve has only an informative function (for real, mechanical resonant zone recognition), while WHITE, MODIFIED-PHASE curve should be overlapped inside/below RED-color, REAL PHASE curve. Where RED and WHITE curves are not mutually overlapping, and not creating typical resonant, bell-shape peaks, we will not have proper, real, and operating resonant regime/s (there we could have only non-resonant, forced and frequency-modulated operating regimes). If automatically selectable frequency ranges are not covering the best operating frequency range of certain ultrasonic load, instead of “auto” Range, we can manually and numerically define any other operating frequency range, by activating “manual” button which has windows for MAX frequency, MIN frequency and MAX span (see first Tab, lower corner, right side). Practically, manually selected operating frequency range is important for initial scanning interval definition, when certain ultrasonic load (transducer) is tested first time… Later, automatic tuning process will define new, safe operating frequency Span. 93 The best, safe operating frequency and best set-phase point (=) [FS] will be automatically found, after scanning (by internal software calculation), inside of the Operating frequency Span window where: NEW MODIFIED-PHASE = [FS] = FSmin+[(FSmax –FSmin)/3] . After first Scanning procedure (third Tab), we will see that all, new, automatically produced values, are dynamically (in real time) changing the initially selected values of: Operating frequency Span and Phase (in relation to loading conditions existing during scanning). On the phase-frequency scanning curve (third TAB, Scanning) we see: -WHITE LINE (=) Principal Regulation curve (=) MODIFIED-PHASE curve -RED LINE (=) Real PHASE measured on the load (ultrasonic converter) between load current and voltage. -GREEN LINE (=) Output Load current -The YELLOW cursor lines are showing (crossing) the value of Modified Phase, where ultrasonic generator is auto-tuned, after Scanning procedure. 94 Current gain, (First Tab, second slider on the right, upper side corner): is presenting the current-feedback amplification coefficient, which is smoothly defining the “weight” of the output, load-current signal (GREEN line on the Scan Graph, Third Tab), within the MODIFIED WHITE PHASE curve. When load Current gain is selected to have value near zero, “0”, generator is working like typical, parallel-resonance (high impedance loads) ultrasonic generators (such as Branson, Sonics and many other of USA-made generators). When load Current gain is selected to have value near to five, “5”, generator is operating closer to series resonance (low load impedance) generators, dominantly being controlled by output load current (like many ultrasonic generators made in Germany). By selecting a compromising, Load Current gain value of “2” in many cases will produce good operating regimes (should be experimentally adjusted). Next two pictures are showing how different Current gain coefficients are changing the shape of MODIFIED WHITE PHASE curve. Current gain (welding) = 0 Current gain = 0. Maximal value on the white-phase curve is around 4.75 V. After such phase maximum, white line is falling down towards lower frequencies, 95 reaching below the automatically selected/calculated operating phase level (which is in this case equal to 1,8V). Vertical and horizontal YELLOW lines are Phase and Frequency cursors (defining automatically found, new operating area). Current gain (welding) = 5 Current gain = 5. Maximal value on the white-phase curve is close to 1.9 V. After such phase maximum, white line (in a direction towards lower frequencies), is NOT falling below the automatically selected operating phase level (which is in this case close to 0.8V). Vertical and horizontal YELLOW lines are Phase and Frequency cursors (defining automatically found, new operating area, or Operating frequency Span. 96 Extra span In addition to regular, safe Operating frequency Span, found after scanning (or after auto-tuning), it is possible to make certain (manually and numerically selectable) extension of the Span, towards, lower frequencies, in the area of series resonance. This way, automatically found safe operating Span will become larger and ultrasonic load will be able to operate under heavy loading (like in cases of metals welding). 97 Selectable Startup Modes for AMMM and Welding generators: (First Tab, third window on the right, upper side) 1. Normal without scan: – This is normal operation every time starting from Fstart, and stopping when manually selected phase value is found (and later automatically controlled). 2. Hot Start: – After power-up, or after safety stop, (after every accidental situation) generator always starts from F-start, finds automatically the selected “Phase” level value of Modified-White-Phase Curve [FS] and stops. Generator is not making scanning and auto-tuning. – Every next start will be from the last (previously memorized) well-operated frequency (like in cases of welding generators). 98 3. Safe start: - After power-up, or after safety stop (or after accidental situation), generator will perform new SCANNING inside of the previously selected SCANNING window (see first Tab, Scanning range, first slider – upper right), which is manually selected using “Scanning range” slider. This way, generator will automatically adjust the new values of Phase [FS] and Span (performing AUTOTUNING). For every next start, generator is operating from F-start, but without new SCANNING, and inside the SCANING window (which was selected manually, using “Scanning range” slider). Generator makes scanning and auto-tuning procedure only if some error occurred in a last operation cycle. 4. Scanning every time: - Generator (after activating start signal) will always make new SCANNING from F-start, inside the SCANNING window (see first Tab, Scanning range, first slider – upper right), which should be manually selected using “Scanning range” slider on the first Tab). Every time, ultrasonic generator will automatically adjust the new values of Phase and Span (performing AUTOTUNING), and it will operate with newly found values. Generator is operating the same way (repeating scanning and finding new Phase and Span) after every (new) start signal. This regime is good for applications where fast start is not very important, such as: sonochemistry, ultrasonic cleaning, ultrasonic materials processing, stress relief, liquids atomizing, continuous cutting process… Generator starts from Fstart every time, scanning the load, selecting the best operation point and start working with selected power on it. 99 Advanced HF current level Advanced HF current level is a value of the output (load) current through piezoelectric ultrasonic transducer expressed in relative units (ru). Setting the desired maximum value of this current is realized by the slider Advanced HF current limiting. Output current Field is showing the maximal load current. Such setting is limiting and avoiding dangerous levels of a load currents that could damage the ultrasonic transducer or generator. Setting Method: When working (first time, during scanning on the second TAB) with an unknown transducer, it is recommendable to set the slider at the maximum value (in order to find what the maximal, relative load current level is). Then, it is necessary to scan and adjust the generator as described in this manual. 100 During normal (high power) operation of the generator and ultrasonic converter, the operator can see what the maximum value of a load current is – shown in the field Output current. Then, it is possible to select the desired maximal load current level in the field Advanced current limiting, which should not be crossed during the launch and operation of the generator. This is the feature that extends the life of the transducer and attached sonotrodes, and increases the reliability of the generator as well. If you want to eliminate this feature, simply place the slider at its maximal value. Additional words in the communication protocol for advanced current level: Requests: %06A<cr> request for Advanced HF current level Answers: #02Axxxxx<cr> answer for Advanced HF current level Set values: %06Axxxxx<cr> set Advanced HF current level INITIAL SCANNING & SETTINGS VERY IMPORTANT RECOMMENDATIONS Ultrasonic loads are electro-acoustic resonant devices, and oscillating amplitude depends on components of relevant resonance loop (INTDUCTIVE, CAPACETIVE compensation + transformer voltage). Our generator gives freedom to select big number of combinations of these components - to reach different levels of Q-factor of resonance loop producing different levels of maximal amplitudes of a load. It is recommended, initially, to make SCAN on lover amplitudes (for safe operation) and later to increase the amplitude in small steps, selecting higher voltage value, bigger number of compensating capacitors, different inductive compensation... We suggest starting calibrating or adjusting capacitance, inductance and output voltage (in no-load conditions, in air) from certain minimum, which could be 20% or 25%, 101 or 30%. If you see that set points of phase and amplitude are the same as regulated (operating) phase and amplitude, then go to a higher power level, for instance to 40%, and do the same until reaching stable regulation (if necessary change something: capacitance, inductance, output voltage, reduce set-phase value, span…)… after reaching stable regulation on 40%, do the same for 50%... and continue with higher values until your ultrasonic system will accept. For instance, some loads (converter + booster + sonotrode) will follow stable, linear regulation only until 60% or, until 70%, or 55%… because of a design, geometry, and non-linear properties of the system… Anyway, you will see (in no-load conditions, in air) what will be the maximal amplitude when set-phase and setamplitude levels are still under stable control. Now, go back to 30% of set-amplitude level and verify that phase and amplitude are still well regulated and stable. If necessary, make small adjustments of all available parameters, again, until you rich stable amplitude and phase regulation from certain minimal amplitude to certain maximal amplitude (for instance from 30% to 60%). Then, change the amplitude scale and instead of zero as the beginning, type in our LabView operating software your minimal, well-operating amplitude value (for instance 30%). Instead of 100% (on the LabView software) type your maximal, well-operating amplitude value (for instance 60%). Now your generator and ultrasonic system will effectively operate between 30% and 60% (or between other two levels), but in relative full-scale this will be a full range (as operating from 0% to 100%). 102 Sonicator Operating Regime LabView executive software for Sonicator operating is: soniweldicator.exe , 1.3 Mb, 15 Dec 2013, and can be downloaded from here: http://www.mastersonics.com/documents/mmm_basics/mmm_power_supplies/AMMM/ALLwelding-generators/Welding+Sonicator/Sonicator%20weldind_29102013/ . For liquids processing, mixing, homogenization, electrochemical deposition and other sonochemistry applications… we can operate ultrasonic generator when selecting “Sonicator” regime. Everything else, related to initial generator scanning, settings and tuning is the same as described in this manual. Next important, operating parameter is ultrasonic transducer “Amplitude”, which is directly related and proportional to ultrasonic power delivered to a 103 load (or to a liquid under processing).. . It is important to know that under certain loading conditions, there is always certain minimal and maximal amplitude threshold when ultrasonic generator can drive ultrasonic transducer in a controllable, linear operating regime. For instance, for most of applications, minimal “Amplitude” when generator starts regulating Amplitude is 30%, and maximal Amplitude (until automatic regulation is still operating properly) is 80% or 90%. Do not force ultrasonic generator to operate below 30% or higher than 90%, because Amplitude and Phase regulation could be non-linear and irregular. The next important operating regime settings are related to timing parameters such as: Time ON = Operating period, Time OFF = No activity period, Process Energy = Desired (selected) energy that should be given to a liquid load (when reaching desired amount of energy, generator will stop). We can also set the total “Process Time” (meaning how long generator will operate in a pulse repetitive regime). 104 All timing and processing parameters can be regulated from the LCD front panel (rotary encoder). It is important to notice that Start frequency should not be changed from the LCD panel, by unexperienced users, since this parameter is found by scanning and for certain ultrasonic transducer it is not probably that start frequency will suddenly change (except when transducer or sonotrode are damaged). Setting for "Process Time" - counter totalizer of working time of generator (when generator is switched ON and generates continuous or pulsing ultrasonic waves): The setting range is from “0 to 9 h: 59 min: 59 s” Setting for periodically pulsing “ON/OFF” - independent setting for ON and OFF time; -each of them can be from 0 to 59 seconds. Energy meter - totalizer - energy set point -continuously monitors the amount of energy delivered to ultrasonic load and stops the generator when reaches the desired value. Setting range is from 0 to 9 999 999 Joule/seconds (=) Watts. When “Sonicator” operating regime is selected, “Welding” operating regime is not active, and parameters on the Welding Tab cannot be manipulated (see the following picture). 105 Scanning for Sonicator or Welding operating regime is the same as described in this manual. We need to select continuous operating (not to use ON, and OFF settings) in order to properly finalize scanning. An example of very good scanning picture for “Sonicator” operating regime is presented on the following picture. 106 LCD controls of Welding generator for SONICATOR regimes Total Time (=) Ttot: This defines the TOTAL TIME for operating welding generator in sonicator regime. T ON: Ton is periodically repeatable time interval in which the generator is ON (the generator is generating ultrasonic signal). For example the generator is working one minute (this is T ON), and later is not working 2 minutes (this is T- OFF). T OFF: Toff is periodically repeatable time interval when generator is not operating (The generator is not generating ultrasonic signal at the output). 107 En: En shows the generated energy - energy meter of the energy delivered to the load. St time: St time is smallest time interval or STEP for changing the variables T ON, T OFF and T- TOTAL (in this case is 1 second). It could be selected as second, minute or hour. Ampl: AMLITUDE of the output voltage supplied to the load expressed in percent from the maximal acceptable voltage. Bar Graph symbols meaning: A (=) actual amplitude; f (=) actual phase value - it depends on working conditions and on what is selected from the adjustments menu; R (=) actual value of the frequency regulator, inside the span window - when it is not totally filled or total empty - the generator works (regulates) properly. Best is to be somewhere in the middle. 108 FRONT PANEL, MANUAL SETTINGS & REGULATIONS After all optimal settings are found and memorized using LabVIEW software (MPIwelding.exe) we can disconnect RS485-USB controls (stop using PC controls) and continue using only manual settings and controls from the generator front panel (LCD + Rotary encoder). RJ45-connector for RS485 control (has the same function as RS485 on the back panel). Manual ON/OFF (or start/stop) button for ultrasonic output power. Memory (=) Write (=) Blue switch on the LabVIEW software interface Changing the Menu options (on LCD) can be realized by pressing the Menu knob. Changing actual, numerical values (on LCD) can be realized by rotating the Menu knob (in the middle). It is always better, safer and more comfortable to make such modifications and setting using LabVIEW user-interface software. WELDING generators can also be controlled using a PLC or analog signals. In some of customized WELDING generators we could find either 15-pin or 25-pin Canon (Sub-D) connectors for RS485 interface (usually on the back plate). All pins from 1 to 15 on 15-pin connector are identical to pins from 1 to 15 on 25-pin connector. On the front panel of WELDING generators there is another RJ45 connector which is also used for RS485 communications between generator and PC (see below). 109 110 ADDRESSING & NETWORKING We can also apply (only as an option; -non standard version) additional 25 pin connector for (external) manual, switchable addressing of different converters and sonotrodes (with in advance memorized settings), as for example: Generators have network function/s but all of them until now are on the same address - 06. -02 address is reserved for LabView software. -All other addresses are free for use. To set the new address of AMMM generator will be possible (allowed): -from LCD panel -And/or from LabView software (ammm.exe). -The address is on the LCD - like parameter. -Every new generator is working on address 6 and could be changed (from LCD) to every upper address from 7 to 30. -In case of network application/s of many generators, all units should be connected to the same ground. -Otherwise galvanically (optically) isolated rs485 converters are needed… (also supplied by us). 111 ONLY FOR EXPERTS AND TRAINED BY MPI Our ultrasonic power supplies, beside software settings, can also be internally adjusted to operate number of different ultrasonic transducers. For instance, if ultrasonic transducer has certain low or high, maximal, safe operating voltage (on piezoceramics), output generator voltage should be, and can be changed internally by selecting proper jumpers. In addition, internal compensating inductance could have different values, selectable by jumpers, in cases when effective, static capacitance of certain transducer is too low or too high (not covered by factory default settings). We are not suggesting to our clients to play with such options, except if they are trained by MPI, and already well experienced in Ultrasonics R&D. They can get such training from MPI, and they anyway need to have specific test and measurement equipment (such as: an Oscilloscope with differential, floating inputs with amplitude gain from 1 to 1000 in order to measure low and very high RMS voltage, Impedance analyzer, R-L-C meter etc…). See such jumpers’ adjustable situations on the next three pages. 112 Internal output voltage and inductive compensation jumpers for 400 W generators On the picture, above, is shown an example for connecting 400 W generator with the following specs: - Main ferrite transformer at 200V output voltage - Inductive compensation choke at 1000uH - Capacitors should be chosen from LabView software by relays, starting from 10nF. Setting the generator to an unknown load: When adjusting the generator to an unknown load, it is very important to start with a safer level of the secondary voltage on the main transformer (the best would be to start with 100V) – to avoid too high values of the output voltage to the transducer, because this could damage the transducer or the electrical parts inside the generator. The matching circuit between the main ferrite transformer and the transducer is a LC filter with selectable C values from LabView software, of the capacitors: 5nF to 40nF, and manually selectable inductive choke (in two values -500uH or 1000uH). After scanning the load by LabView software scanning procedure we have two possibilities: 113 1. Self-tuning of the generator is complete if the resonant curve appears on the graphic – in this case just continue working and start the generator. Test the generator on desired amplitude value and if the generator reaches the desired value of amplitude and phase, SAVE the settings. If not, increase the voltage of the main transformer (manually, using the jumper) to the next value and repeat the above procedure, without changing the inductive compensation. If 300V is chosen but still not producing well enough amplitude, start increasing the capacitor value gradually. If the amplitude is still not good enough, then increase the inductive compensation to 1000 uH and start with 100V and 10 nF. The main safety rule is to start carefully - preferably with 100V, 10 nF and 500uH. If the inductive compensation is increased from 500uH to 1000uH, then start with 10nF capacitor value again. 2. If self-tuning of the generator is still not completed and the resonant curve does not appear on the scanning tab, then you have to search it in another frequency range, or the load is damaged. In case the load is not damaged, change the frequency range by LabView software and repeat the procedure, described in case under 1. 114 Internal output voltage and inductive compensation jumpers for older 400 W generators produced until 2010 115 Internal output voltage and inductive compensation jumpers for 1kW generators On the picture, above, is shown an example for connecting 1 kW generator with the following specs: - Main ferrite transformer at 200V output voltage - Inductive compensation choke at 1000uH - Capacitors should be chosen from LabView software by relays, starting from 10nF. Setting the generator to an unknown load: When adjusting the generator to an unknown load, it is very important to start with a safer level of the secondary voltage on the main transformer (the best would be to start with 100V) – to avoid too high values of the output voltage to the transducer, because this could damage the transducer or the electrical parts inside the generator. The matching circuit between the main ferrite transformer and the transducer is a LC filter with selectable C values from LabView software, of the capacitors: 5nF to 40nF, and manually selectable inductive choke (in two values -500uH or 1000uH). 116 After scanning the load by LabView software scanning procedure we have two possibilities: 3. Self-tuning of the generator is complete if the resonant curve appears on the graphic – in this case just continue working and start the generator. Test the generator on desired amplitude value and if the generator reaches the desired value of amplitude and phase, SAVE the settings. If not, increase the voltage of the main transformer (manually, using the jumper) to the next value and repeat the above procedure, without changing the inductive compensation. If 300V is chosen but still not producing well enough amplitude, start increasing the capacitor value gradually. If the amplitude is still not good enough, then increase the inductive compensation to 1000 uH and start with 100V and 10 nF. The main safety rule is to start carefully - preferably with 100V, 10 nF and 500uH. If the inductive compensation is increased from 500uH to 1000uH, then start with 10nF capacitor value again. 4. If self-tuning of the generator is still not completed and the resonant curve does not appear on the scanning tab, then you have to search it in another frequency range, or the load is damaged. In case the load is not damaged, change the frequency range by LabView software and repeat the procedure, described in case under 1. 117 Internal output voltage and inductive compensation jumpers for older 1kW generators produced until 2010. 118 Internal output voltage and inductive compensation jumpers for 2 & 3 kW generators for older generators produced until 2010 (new generators, 2011 and later, have all of such settings realized by LabView software). 119 Setting the generator to an unknown load: When adjusting the generator to an unknown load, it is very important to start with a safer level of the secondary voltage on the main transformer (the best would be to start with 100V) – to avoid too high values of the output voltage to the transducer, because this could damage the transducer or the electrical parts inside the generator. The matching circuit between the main ferrite transformer and the transducer is a LC filter with selectable C values from LabView software, of the capacitors: 5nF to 40nF, and manually selectable inductive choke (in two values -500uH or 1000uH). After scanning the load by LabView software scanning procedure we have two possibilities: 1. Self-tuning of the generator is complete if the resonant curve appears on the graphic – in this case just continue working and start the generator. Test the generator on desired amplitude value and if the generator reaches the desired value of amplitude and phase, SAVE the settings. If not, increase the voltage of the main transformer (manually, using the jumper) to the next value and repeat the above procedure, without changing the inductive compensation. If 300V is chosen but still not producing well enough amplitude, start increasing the capacitor value gradually. If the amplitude is still not good enough, then increase the inductive compensation to 1000 uH and start with 100V and 10 nF. The main safety rule is to start carefully - preferably with 100V, 10 nF and 500uH. If the inductive compensation is increased from 500uH to 1000uH, then start with 10nF capacitor value again. 2. If self-tuning of the generator is still not completed and the resonant curve does not appear on the scanning tab, then you have to search it in another frequency range, or the load is damaged. In case the load is not damaged, change the frequency range by LabView software and repeat the procedure, described in case under 1. 120 SAFETY INSTRUCTIONS Before starting up your device, please read through the following instructions carefully, both for your own safety and for the safety of the device. Keep this manual where it can be readily accessed by all systems users. Installation is to be carried out by qualified technical personnel only! The ultrasonic generator is to be operated by properly trained personnel only! Due to the way it operates, additional safety measures must be taken if the device is to be used in areas posing an explosion risk. The electromagnetic compatibility corresponds to the standards and regulations listed in the specifications. All necessary settings were either made in the factory or are described in this handbook. However, should problems occur on start-up, please do not make any prohibited adjustments to the device, as this would endanger your warranty rights. If in doubt, please contact our technical service staff. Please contact our technical service if you have any doubts or questions. Work inside the device may only be carried out to the extent described and, as with the electrical connection, should only be performed by skilled personnel. When performing such work, the ultrasonic generator must be completely disconnected from the mains (unplug the mains connection). Inputs or outputs that are used for controlling or monitoring purposes should be twisted and shielded. The device must not be in close proximity to electrically charged components or cables. The shielding should be connected to the generator‘s earth on one side of the generator. Attention: All connections for the signal or control lines are in galvanic connection with the generator. Always observe any warnings or instructions given on the device itself. The device must always be disconnected from the mains before cleaning or when installing/uninstalling an option. 121 Do not use liquid cleaners or sprays. Only use a damp cloth. The platform for the device must be sufficiently stable, as the device being jolted or falling could cause severe damage. Ensure that the power supply specifications given on the device are met. Only those transducers that have the correct frequency, power output and dimensions may be used with this generator. HF cables from the generator to the transducer as well as mains cables to the generator may not be rolled up if they are too long. Instead, they must be shortened to the required length due to the risk of overheating. With the exception of the permitted tasks listed in the handbook, you should never attempt to repair or modify the device yourself. In the following cases you should disconnect the device from the mains and contact a qualified service engineer: · If the mains cable or plug is damaged · If liquid has penetrated into the device · If the device has fallen over or the housing is damaged · If the device displays noticeably different behavior than standard operation ATTENTION: Repairs and modifications may only be carried out by competent, skilled personnel. 122 ERROR MESSAGES AND TROUBLESHOOTING The following error messages may appear in the display: “OC” OVERCURRENT The electronic over-current fuse has detected an error Possible causes: · Transducer is defective · Power supply or plug is defective Remedy: · Unscrew the transducer connection on the housing · Switch on the generator without the transducer connected a) Error message still displayed: Generator is defective b) Error message no longer displayed: Check the transducer and power supply “OH” OVERHEATING The electronic overheating fuse has detected an error Possible causes: · Not enough space around the generator. · Working surroundings are too hot There are 6 possible errors (or error messages): - "Untested" – when start frequency is changed - on the LCD appears in the right up corner -"TS" and the red diode lights - "Overcurrent" – when there is an overcurrent - on the LCD appears in the right up corner -"OC" and the red diode lights - "Overheat" – when there is overheating inside of the generator - on the LCD appears in 123 the right up corner -"OH" and the red diode lights - "Overload" - when resonant frequency is missing (damaged sonotrode , broken cable ..etc.) - on the LCD appears in the right up corner -"OL" and the red diode lights, what corresponds to No HF detected, or Frequency not found - "Overvoltage" – when there is an overvoltage on the output of the generator(bad or wrong sonotrode , broken cable ..etc.) - on the LCD appears in the right up corner -"OV" and the red diode lights All these errors are sent via RS485 to Lab View software (see the next picture): Errors about welding setting limits: In case of getting errors regarding any limits (which are set by user) of peak-power, energy and time, there will be the following consequences, error-messages or actions: 1. In the top, right angle of LCD will appear one of the messages: LP-peak power limit, or LEenergy limit, or LT-time limit. 2. For ultrasonic generators that have 25 pin Canon connector on the back: The internal relay, connected between pin-16 and pins -5,9 (read relevant information in this User Manual) switches on, and later automatically resets on every next ON signal. 3. In the RS485 serial communications protocol generator returns a warning "status" number (read relevant information in this User Manual). MAINTENANCE The ultrasonic generator does not need special maintenance. Dust and dirt should be removed regularly using a damp cloth. ATTENTION: • Do not use aggressive cleaning solvents! • Not suitable for ultrasonic cleaning! 124 WARRANTY The length and coverage of the warranty can be found in the terms of delivery as part of the general terms and conditions (valid at the time of purchase) or in the sales contract / order confirmation, should any special agreements have been made. The following cases are not covered by warranty: · · · · · · · Damage caused by inappropriate operation The device not being used for its intended purpose Inappropriate alterations or modifications made without prior authorization from the manufacturer Damage caused by extreme circumstances, such as knocks, falling over, moisture and dirt Insufficiently qualified operating staff Non-compliance with current safety and accident-prevention regulations Damage resulting from modifications made to the operating instructions SERVICE HOTLINE Should you still have questions after reading through the operating instructions thoroughly, please feel free to call our service hotline. Please have the following information to hand to help us answer your questions quickly. Device type, serial number (the serial number is on the backside of the generator) SPARE PARTS We can only deliver spare parts and accessories if you order them specifically. Literature (e-book): http://bookstore.mpi-ultrasonics.com/index.php?main_page=product_info&cPath=48&products_id=165