1
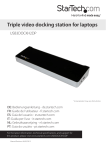
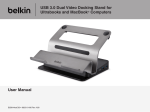
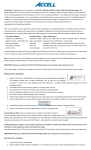
1
USB 3.0 4K Docking Station
CSV-3103D
USER’S MANUAL
Table of Contents
SAFETY INSTRUCTIONS
COPYRIGHT
TRADEMARKS
REGULATORY COMPLIANCE
FCC CONDITIONS
CE
WEEE INFORMATION
INTRODUCTION
FEATURES
PACKAGE CONTENTS
SYSTEM REQUIREMENTS
PRODUCT OVERVIEW
FRONT
REAR
SPECIFICATION
CONNECTION
INSTALLATION
VERIFYING THE INSTALLATION
DISPLAY CONFIGURATION
UTILITY SETTINGS
DESCRIPTION OF THE SETTINGS
MULTI-MONITOR CONFIGURATION
EXTENDED MODE
CURSOR DISAPPEARED
VIDEO PLAYBACK IN EXTENDED MODE
MIRROR MODE
SWITCH THE PRIMARY MONITOR
WINDOWS SHORTCUT
SUPPORTED RESOLUTION
AUDIO CONFIGURATION
UNINSTALL THE DRIVER
TECHNICAL SUPPORT
2
2
2
3
3
3
3
4
5
5
5
6
6
7
9
10
11
14
16
16
17
19
20
21
21
21
22
22
23
24
25
27
Page 1 of 28
Before attempting to connect, operate or adjust this product,
please save and read the User's Manual completely. The style
of the product shown in this User's Manual may be different
from the actual unit due to various models.
Safety Instructions
Always read the safety instructions carefully:
• Keep this User’s Manual for future reference
• Keep this equipment away from humidity
• If any of the following situation arises, get the
equipment checked by a service technician:
- The equipment has been exposed to moisture.
- The equipment has been dropped and damaged.
- The equipment has obvious sign of breakage.
- The equipment has not been working well or
cannot get it to work according to the User’s
Manual.
Copyright
This document contains proprietary information
protected by copyright. All right are reserved. No part of
this manual may be reproduced by any mechanical,
electronic or other means, in any form, without prior
written permission of the manufacturer.
Trademarks
All trademarks and registered trademarks are the
property of their respective owners or companies.
Page 2 of 28
Regulatory Compliance
FCC Conditions
This equipment has been tested and found to comply
with Part 15 Class B of the FCC Rules. Operation is
subject to the following two conditions: (1) This device
may not cause harmful interference. (2) This device
must accept any interference received and include
interference that may cause undesired operation.
CE
This equipment is in compliance with the requirements
of the following regulations: EN 55 022: CLASS B
WEEE Information
For EU (European Union) member users: According to
the WEEE (Waste electrical and electronic equipment)
Directive, do not dispose of this product as household
waste or commercial waste. Waste electrical and
electronic equipment should be appropriately collected
and recycled as required by practices established for
your country. For information on recycling of this
product, please contact your local authorities, your
household waste disposal service or the shop where you
purchased the product.
Page 3 of 28
Introduction
The USB 3.0 3 to 2 4K Docking Station is designed for
extra connectivity demands. With the docking station,
you can extend the connection of a computer to more
USB peripherals, Ethernet network, the speaker and the
microphone through one single USB cable.
With the built-in USB 3.0 ports, the docking station
enables you to enjoy the super speed data transmission
between USB peripherals. Aside from USB 3.0, this
product is compliant with USB 2.0/1.1 specification. You
will be able to keep and use your USB 2.0/1.1 devices as
usual.
In addition, the docking station is equipped with video
output. With the DVI, HDMI and DP ports, you can
mirror your primary screen, or extend the Window
desktop allowing visibility of more applications at the
same time. Enhanced expansion capability plus the
stylish appearance, this docking station with video is the
most versatile accessory that also complements your
home or office space.
• Incorporates HDMI® technology.
Page 4 of 28
Features
• USB 3.0 downstream port x3
- Downward compatible with USB 2.0/1.1
- One USB port supports BC 1.2 charging
• Display Port
- DP/HDMI: resolution up to 3840x2160 pixels *
- DVI: resolution up to 2048x1152 pixels
• Support audio 2.1 channel
• Support Gigabit Ethernet
NOTE: Please note that when using the DP (or HDMI)
and the DVI connector simultaneously, the DP (or HDMI)
connector will not be able to reach 4K resolutions.
Package Contents
• USB 3.0 3 to 2 4K Docking Station x1
• USB Cable x1
• Power Adapter x1
• CD (Driver and User’s Manual) x1
• Quick Installation Guide x1
System Requirements
• Operating Systems:
- Microsoft: Windows® 7 SP1 or later/ Windows® 8/
Windows® 8.1
Page 5 of 28
Product Overview
Front
1
2
ITEM
DESCRIPTION
1 POWER LED
INDICATE POWER ON/OFF
2 USB 3.0 PORT
CONNECT TO USB 3.0 DEVICES
Page 6 of 28
Rear
3
4
5
6
10
7
8
9
ITEM
DESCRIPTION
3 POWER JACK
CONNECT TO THE POWER ADAPTER
4 USB 3.0 PORT (TYPE B)
CONNECT TO COMPUTER
5 DVI CONNECTOR
CONNECT TO A DVI MONITOR
6 DISPLAYPORT™/HDMI™ CONNECTOR
CONNECT TO A DISPLAYPORT™/HDMI™
MONITOR
7 RJ45 PORT
CONNECT TO ETHERNET
8 USB 3.0 PORT
CONNECT TO USB 3.0 DEVICES WITH BC 1.2
CHARGING
9 MIC JACK
CONNECT TO A MICROPHONE
10 SPEAKER JACK
CONNECT TO A SPEAKER OR EARPHONE
Page 7 of 28
NOTE: The DP and HDMI connectors can only be used
one at a time. Slide the lid in front of the two connectors to
uncover the connector you want to use and connect it to
the monitor. For example, to use the HDMI connector, slide
the lid to the front of the DP connector to uncover the HDMI
connector, and then connect it to the HDMI monitor.
Please note that when using the DP (or HDMI) and the DVI
connector simultaneously, the DP (or HDMI) connector will
not be able to reach 4K resolutions.
Page 8 of 28
Specification
CONNECTOR
VIDEO OUTPUT
DP/HDMI FEMALE CONNECTOR
DVI FEMALE CONNECTOR
VIDEO
HOST UPSTREAM LINK
USB B TYPE FEMALE
CONNECTOR
HUB DOWNSTREAM LINK
USB A TYPE FEMALE
CONNECTOR (USB 3.0 x3, with
BC1.2 x1)
AUDIO PORT
3.5MM STEREO MINI-JACK
ETHERNET PORT
RJ45 CONNECTOR
POWER
DC POWER JACK
RESOLUTION
DP/HDMI: 3840X2160*
DVI: 2048X1152
COLOR DEPTH
16 BITS AND 32 BITS
AUDIO
CHANNEL
2.1 CH
ETHERNET
TYPE
10/100/1000 BASE-T
POWER
POWER MODE
SELF-POWERED
POWER ADAPTER
INPUT:AC 100-240V
OUTPUT: DC 5V/4A
PHYSICAL PROPERTIES
WORKING ENVIRONMENT
HOUSING
PC + ABS (Plastic)
DIMENSION
189.1(L) x 74.49(W) x
26.32(H)mm
OPERATION TEMPERATURE
10-40 DEGREE
STORAGE TEMPERATURE
20-70 DEGREE
COMPLIANCE
CE,FCC
* The DP and HDMI connectors can only be used one at a time. Slide the lid
in front of the two connectors to uncover the connector you want to use
and connect it to the monitor. Please note that when using the DP (or
HDMI) and the DVI connector simultaneously, the DP (or HDMI) connector
will not be able to reach 4K resolutions.
Page 9 of 28
Connection
To connect the USB peripherals, Ethernet, speaker and
microphone, follow the illustrations below to connect
the corresponding connectors.
NOTE: The DP and HDMI connectors can only be used one
at a time. Slide the lid in front of the two connectors to
uncover the connector you want to use and connect it to
the monitor. For example, to use the HDMI connector, slide
the lid to the front of the DP connector to uncover the
HDMI connector, and then connect it to the HDMI monitor.
Please note that when using the DP (or HDMI) and the DVI
connector simultaneously, the DP (or HDMI) connector will
not be able to reach 4K resolutions.
Page 10 of 28
Installation
Caution: DO NOT connect the docking station to
a computer before installing the provided driver.
Note that the screenshots on this user's manual may
vary slightly from each operating system.
Windows® 7/ Windows® 8/ Windows® 8.1
1. Insert the provided CD into your disc drive.
2. Click Run Autorun.exe to start the installation.
Page 11 of 28
NOTE:
If the AutoPlay does not appear automatically,
locate and double-click on the Setup.exe file in the
driver folder to launch the setup.
Enter the administrator password and then click Yes
to start the installation if a User Account Control
dialog box appears.
3. Click I Accept for the next step.
Page 12 of 28
4. Be patient with the installation procedure.
5. Connect the Docking Station to a computer after the
driver installation is completed. For connection
details, refer to the chapter of Connection.
6. When the operating system detects the docking
station, the reminder message will appear on the
system tray.
Page 13 of 28
Verifying the installation
To verify the driver of the adapter, follow the step below.
1. Following the path to open the device manager.
Windows® 7:
Control Panel\ System and Security\ Systems\
Device manager
Windows® 8/ Windows® 8.1:
Settings\ Control Panel\ System and Security\
System\ Device manager
2. You will find Display Adapter device listed as below.
Page 14 of 28
*Actual strings depend on your operating system. The screen
shots are from Windows® 8 and might vary slightly for each
operating system.
NOTE:
If you cannot find the driver in the list, the driver may
not be properly installed. Please delete the item,
unplug the adapter and repeat the installation steps.
Page 15 of 28
Display configuration
NOTE: The following screenshots in this section are
using Windows® 7 operating system. It may not match
your operating system but the definitions of buttons, tabs
and menus are the same.
Utility settings
The supplied utility allows configuring the display mode,
screen rotation, screen resolution, and physical
arrangement of your monitors.
1. Click utility icon in Windows System Tray.
NOTE: If you cannot find the icon in Windows System
Tray, click arrow icon to bring up icon list to find it.
2. Select a preferred option, and then click it using
mouse.
Page 16 of 28
Description of the settings
OPTIONS
DESCRIPTION
DISPLAYLINK MANAGER
ENABLE THE WINDOWS SCREEN RESOLUTION
PAGE
CHECK FOR UPDATES
CHECK THE LATEST DRIVER AND DOWNLOAD
IF AVAILABLE
SCREEN RESOLUTION
CLICK TO SELECT AN AVAILABLE RESOLUTION.
NOTE THAT THIS FUNCTION IS INVALID IN
MIRROR MODE, AS THE RESOLUTION IS
DEFINED AS THE RESOLUTION OF THE
PRIMARY MONITOR
SCREEN ROTATION
ROTATE THE SCREEN ACCORDING TO THE
DESIRED ORIENTATION
EXTEND TO
THE CURSOR CAN EXTEND TO DESIRED
SCREEN VIA LEFT/RIGHT/ABOVE/BELOW WAY
MOVING
EXTEND
EXTEND THE SCREEN ACCORDING TO THE
DESIRED ORIENTATION
SET AS MAIN MONITOR
SET THIS SCREEN TO THE MAIN SCREEN
NOTEBOOK MONITOR OFF
SWITCH THE ADD-ON MONITOR TO THE MAIN
DISPLAY AND TURN OFF THE SCREEN OF THE
LAPTOP.
NOTE: THIS FUNCTION WORKS ONLY WHEN
ONE ADD-ON MONITOR IS CONNECTED. THIS
OPTION WILL ALSO ONLY APPEAR ON LAPTOP.
Page 17 of 28
OPTIONS
DESCRIPTION
MIRROR
DUPLICATE THE PRIMARY MONITOR TO THE
MONITOR WHICH CONNECTS WITH THE
ADAPTER
OFF
TURN OFF THE MONITOR
FIT TO TV
ADJUST THE SIZE OF WINDOWS DESKTOP ON
THE TV
NOTE: THIS FUNCTION WORKS ONLY WHEN
ONE ADD-ON MONITOR IS CONNECTED.
BESIDES, THIS OPTION WILL ALSO ONLY WORK
IN EXTENDED MODE. THE ADD-ON MONITOR
WILL CHANGE TO THE EXTENDED MODE IF
SELECTING THIS OPTION WHILE IN MIRROR
MODE.
AUDIO SETUP
ENABLE THE WINDOWS AUDIO
CONFIGURATION PAGE. THIS FUNCTION
WORKS ONLY IN SPECIFIC MODELS.
VIDEO SETUP
ENABLE THE WINDOWS SCREEN RESOLUTION
PAGE.
Page 18 of 28
Multi-monitor configuration
The DP, HDMI and DVI monitors can be connected
through the Docking Station if monitors are already
connected to the PC. Once extra monitors are
connected, it can be configured to use either “mirror
mode”, “extended mode” or be the primary display.
NOTE: The DP and HDMI connectors can only be used one
at a time. Slide the lid in front of the two connectors to
uncover the connector you want to use and connect it to the
monitor.
Windows® 7/ Windows® 8/ Windows® 8.1
Position the mouse anywhere on the Windows Desktop,
Right-click and select Screen Resolution.
Alternatively, click the utility icon in the Windows
System Tray, and then select DisplayLink Manager or
Video Setup.
Page 19 of 28
Extended mode
1. Refer to the Windows system configuration
section to open the configuration page.
2. In the Display drop-down menu, select the
preferred monitor.
3. Check the Multiple Displays > Extend these
displays on Window® 7/ Window® 8/ Window® 8.1.
4. Click OK to confirm and close the settings screen.
5. Once the setting is completed, simply drag and
drop the application icons or the opened windows to
the add-on monitor. However, some applications
may not support to display on the extended desktop.
Page 20 of 28
Cursor disappeared
If the status remains in the extended mode but the
adapter is disconnected, the desktop will still be panned
to the add-on monitor. The cursor may not be found on
the primary monitor in such a case. If it happens,
connect the add-on monitor through the adapter again or
keep moving the mouse.
Video playback in extended mode
If the video or DVD playback quality is poor or low
performance in extended mode, please playback it on
the primary monitor instead of the add-on monitor.
Mirror mode
1. Refer to the Windows system configuration
section to open the configuration page.
2. In the Display drop-down menu, select the
preferred monitor.
3. Check the Multiple Displays > Duplicate these
displays on Window® 7/ Window® 8/ Window® 8.1.
4. Click OK to confirm and close the settings screen.
Page 21 of 28
Switch the primary monitor
1. Refer to the Windows system configuration
section to open the configuration page.
2. In the Display drop-down menu, select the
preferred monitor.
3. Check the box of Make this my main display on
Window® 7, or Set as Main Monitor on
Windows® 8/ Windows® 8.1.
NOTE: For some computers, you may need to
disable the main display by unchecking the
box of Extend the desktop onto this monitor
or Extend my Windows desktop onto this
monitor.
4. Click OK to confirm and close the settings screen.
Windows shortcut
Press Windows button + P to bring up the menu as
below, and then select a desired option.
This function is available for Windows® 7 / Windows® 8 /
Windows® 8.1.
Page 22 of 28
Supported resolution
Before adjusting the resolution, refer to the table below
for the supported resolution.
* Note that interlaced modes and reduced blanking modes are
not supported.
Page 23 of 28
Audio configuration
By default, when the docking station is connected to a
computer, the audio configuration may be changed to
USB (Multimedia) Audio Device automatically (this
setting depends on models). If it does not work, follow
the steps below to setup.
Windows® 7/ Windows® 8/ Windows® 8.1
1. Open Control Panel and then select the hardware
and sound icon.
2. Click Sound > Manage audio devices and then
select USB Audio Device or Displaylink Audio.
Page 24 of 28
Uninstall the driver
1. Follow the instructions to find the driver path, and
then right-click on DisplayLink Graphics to uninstall
the driver.
Widnows® 7
Control Panel > Programs > Programs and Features
> Uninstall or change the program
Widnows® 8/ Widnows® 8.1
Settings > Control Panel > Programs > Uninstall a
program
2. Click Yes to confirm the uninstallation.
Page 25 of 28
3. Click Yes to restart your computer. You can also
disconnect the video connection now.
Page 26 of 28
Technical Support
Club 3D offers customers diversified products
and complete sales services. We look forward to
your comments to provide you with better service.
If you have any technical or application issues
about our products, please contact us through
Club 3D support website:
http://www.club-3d.com/index.php/support.en.html
Simply fill in the required information on the website
and submit your question to us. We will reply to you
within 48 hours.
Page 27 of 28
USB 3.0 4K Docking Station
CSV-3103D
USER’S MANUAL
Page 28 of 28