1
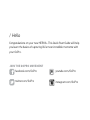
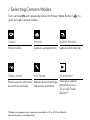
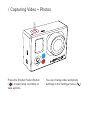
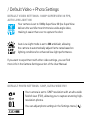
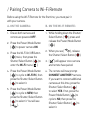
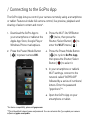
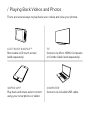
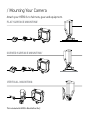
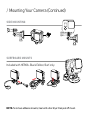
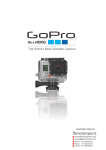
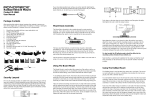
QUICK START GUIDE
/ Hello
Congratulations on your new HERO3+. This Quick Start Guide will help
you learn the basics of capturing life’s most incredible moments with
your GoPro.
JOIN THE GOPRO MOVEMENT
facebook.com/GoPro
youtube.com/GoPro
twitter.com/GoPro
instagram.com/GoPro
/ Getting Started
1
REMOVE CAMERA FROM HOUSING
2
REMOVE CAMERA
SIDE DOOR AND
INSERT MICROSD
CARD
(Class 10 required, sold separately)
3
REMOVE CAMERA
BACK DOOR AND
INSERT BATTERY
4
CHARGE BATTERY
USING INCLUDED
USB CABLE
/ Camera Essentials
]
Shutter/Select Button [
Camera Status Light [red]
LCD Status Screen
]
Power/Mode Button [
Wi-Fi On/Off Button [
]
Wi-Fi Status Light [blue]
Camera Status Light [red]
POWERING CAMERA ON AND OFF
To power ON
Press the Power/Mode Button [
To power OFF
]. Press and hold the Power/Mode
] for two seconds.
Button [
/ Selecting Camera Modes
Turn camera ON and repeatedly press the Power/Mode Button [
cycle through camera modes.
] to
VIDEO
PHOTO
BURST PHOTO
Record video
Capture a single photo
Capture photo bursts
TIME LAPSE
SETTINGS
PLAYBACK*
Shoot a series of photos Adjust camera settings, View your videos
and photos on a
resolution and more
at set time intervals
TV or LCD Touch
BacPacTM
*Playback only appears when camera is connected to a TV or LCD Touch BacPac
(optional accessory, sold separately).
/ Camera Settings*
TO ADJUST CAMERA SETTINGS:
1. Press the Power/Mode Button [
2. Press the Shutter/Select Button [
3. Press the Power/Mode Button [
4. Press the Shutter/Select Button [
] to cycle to Settings mode [ ].
] to enter the Settings menu.
] to cycle through options.
] to select desired option.
MAIN CAMERA MODES
CAMERA SETTINGS
CAPTURE SETTINGS
PROTUNE SETTINGS
SET UP
*For a full explanation of camera settings, see the User Manual.
WI-FI
/ Capturing Video + Photos
Press the Shutter/Select Button
[
] to start/stop recording or
take a photo.
You can change video and photo
settings in the Settings menu [ ].
/ Default Video + Photo Settings
DEFAULT VIDEO SETTINGS: 1080P SUPERVIEW 30 FPS,
AUTO LOW LIGHT ON
Your camera is set to 1080p SuperView 30 fps. SuperView
delivers the world’s most immersive wide angle video,
making it easier than ever to capture the shot.
Auto Low Light mode is set to ON at default, allowing
the camera to automatically adjust frame rates based on
lighting conditions for enhanced low-light performance.
If you want to experiment with other video settings, you can find
more info in the Camera Settings section of the User Manual.
DEFAULT PHOTO SETTINGS: 12MP, ULTRA WIDE FOV
Your camera is set to 12MP resolution with an ultra wide
field of view (FOV), allowing you to capture stunning highresolution photos.
You can adjust photo settings in the Settings menu [
].
/ Pairing Camera to Wi-Fi Remote
Before using the Wi-Fi Remote for the first time, you must pair it
with your camera.
A. ON THE CAMERA:
B. ON THE WI-FI REMOTE:
1. Ensure both camera and
1. While holding down the Shutter/
remote are powered OFF.
2. Press the Power/Mode Button
[
] to power camera ON.
3. Press the Wi-Fi On/Off Button
] twice, then press the
[
] to
Shutter/Select Button [
enter the Wi-Fi menu [ ].
4. Press the Power/Mode Button
] to cycle to Wi-Fi RC, then
[
press the Shutter/Select Button
] to select it.
[
5. Press the Power/Mode Button
] to cycle to NEW, then
[
press the Shutter/Select Button
] to select it. You will see
[
].
[
], press and
Select Button [
release the Power/Mode Button
].
[
2. When you see [
], release
].
the Shutter/Select Button [
3. [
] will appear once camera
and remote have paired.
4. The remote will now prompt
CONNECT ANOTHER? camera.
If you want to connect additional
cameras at this time, press the
]
Shutter/Select Button [
to select YES. If not, press the
] to
Power/Mode Button [
cycle to NO, then press the
] to
Shutter/Select Button [
select it.
/ Connecting to the GoPro App
The GoPro App lets you control your camera remotely using a smartphone
or tablet. Features include full camera control, live preview, playback and
sharing of select content and more*.
1. Download the GoPro App to
your smartphone or tablet at the
Apple App Store, Google Play or
Windows Phone marketplace.
2. Press the Power/Mode Button
[
] to power camera ON.
3. Press the Wi-Fi On/Off Button
] twice, then press the
[
] to
Shutter/Select Button [
enter the Wi-Fi menu [ ].
4. Press the Power/Mode Button
] to cycle to GoPro App,
[
then press the Shutter/Select
] to select it.
Button [
5. In your smartphone or tablet’s
Wi-Fi settings, connect to the
network called “GOPRO-BP”
followed by a series of numbers/
letters. Enter the password
“goprohero”**.
6. Open the GoPro App on your
smartphone or tablet.
*For device compatibility, please visit gopro.com.
**This is the default network name and password. You can customize this if you update your camera
software at gopro.com/update.
/ Playing Back Videos and Photos
There are several ways to play back your videos and view your photos.
LCD TOUCH BACPACTM
Removable LCD touch screen
(sold separately).
TV
Connect via Micro HDMI, Composite
or Combo Cable (sold separately).
GOPRO APP
Play back and share select content
using your smartphone or tablet.
COMPUTER
Connect via included USB cable.
/ Mounting Your Camera
Attach your HERO3+ to helmets, gear and equipment.
FLAT SURFACE MOUNTING*
CURVED SURFACE MOUNTING*
VERTICAL MOUNTING
*Not included with HERO3+ Black Edition/Surf.
/ Mounting Your Camera (Continued)
SIDE MOUNTING
SURFBOARD MOUNTS
Included with HERO3+ Black Edition/Surf only.
NOTE: To remove adhesive mounts, heat with a hair dryer then peel off mount.
/ Help + Resources
CUSTOMER SUPPORT
GoPro is dedicated to providing the best possible service. To reach
GoPro Customer Support, visit gopro.com/support.
GOPRO TUTORIAL VIDEOS
How-to tutorials, pro tips and tricks to help you make the most of
your GoPro products. Visit youtube.com/goprotutorials.
CAMERA SOFTWARE UPDATES
To get the latest features and best performance from your HERO3+,
make sure you’re using the most current camera software. To check
for available updates and download the latest camera software, visit
gopro.com/update.