1
Measurements
MEASUREMENT CONSIDERATIONS
1. Wind blowing across the microphone increases the noise measurement. Use the
supplied windscreen to cover the microphone when applicable.
2.
Calibrate the instrument before each use if possible. Especially if the meter has not
been used for a long period of time.
3.
Do not store or operate the instrument in areas of high temperature or humidity.
4.
Keep meter and microphone dry.
5.
Avoid severe vibration. Protect the meter from impact. Do not drop it. Transport the
meter in the supplied case.
6.
Remove the battery when the meter is to be stored for long periods of time.
BASIC OPERATION
1.
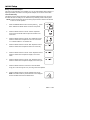
Turn the meter ON by pressing the
2.
Select ‘A’ or ‘C” frequency weighting by pressing the A/C button.
button.
3.
Select Fast or Slow response time by pressing the FAST/SLOW button.
4.
Use the LEVEL button to select the appropriate range. The range is shown near the
top of the display. Use a range that puts the sound level reading in the center of the
range. If the OVER or UNDER icons appear on the display, select a new range if
possible.
5.
The numeric and bargraph displays indicate the sound level measurement.
6.
To turn the meter off, press and hold the
button for 3 seconds.
LEVEL
The LEVEL button is used to select the measurement range. Press this button to step
through the ranges as indicated on the display (30 to 80, 50 to 100, 80 to 130, or 30 to 130
autoranging)
A/C FREQUENCY WEIGHTING
Press the A/C button to select ‘A’ or ‘C’ frequency weighting. With ‘A’ weighting selected,
the frequency response of the meter is similar to the response of the human ear. ‘A’
weighting is commonly used for environmental or hearing conservation programs such as
OSHA regulatory testing and noise ordinance law enforcement. ‘C’ weighting is a much
flatter response and is suitable for the sound level analysis of machines, engines, etc.
Most noise measurements are performed using 'A' Weighting and SLOW Response.
FAST/SLOW RESPONSE TIME
Use the FAST/SLOW button to select a FAST (125 ms) or a SLOW (1 second) response
time. Select FAST to capture noise peaks and noises that occur very quickly. Select the
SLOW response to monitor a sound source that has a consistent noise level or to average
quickly changing levels. Select SLOW response for most applications.
HOLD
Press the HOLD button “freeze” the current reading in the display. Press the button again
to resume normal operation.
5
HD600 V1.2 8/07