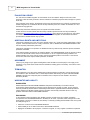
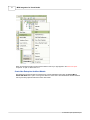
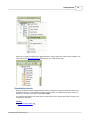
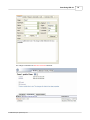
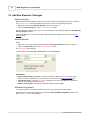
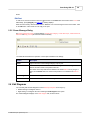
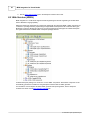
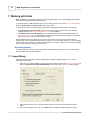
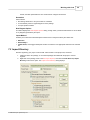
1
MDG Integration for Visual
Studio
Welcome to the MDG Integration for Visual Studio. The MDG
Integration for Visual Studio takes the high-level modeling power of
Enterprise Architect and the Unified Modeling Language and directly
integrates it with Visual Studio 2005 and 2008.
© Copyright 1998-2008 Sparx Systems Pty Ltd
MDG Integration for Visual Studio
Introduction
by Alistair Leslie-Hughes
MDG Integration for Visual Studio takes the high-level modeling
power of Enterprise Architect and the Unified Modeling
Language, and directly integrates it with Visual Studio 2005 and
2008.
MDG Integration for Visual Studio
© 1998-2008 Sparx Systems Pty Ltd
All rights reserved. No parts of this work may be reproduced in any form or by any means - graphic, electronic, or
mechanical, including photocopying, recording, taping, or information storage and retrieval systems - without the
written permission of the publisher.
Products that are referred to in this document may be either trademarks and/or registered trademarks of the
respective owners. The publisher and the author make no claim to these trademarks.
While every precaution has been taken in the preparation of this document, the publisher and the author assume no
responsibility for errors or omissions, or for damages resulting from the use of information contained in this document
or from the use of programs and source code that may accompany it. In no event shall the publisher and the author be
liable for any loss of profit or any other commercial damage caused or alleged to have been caused directly or
indirectly by this document.
Printed: April 2008
Publisher
Sparx Systems
Managing Editor
Geoffrey Sparks
Technical Editors
Alistair Leslie-Hughes
Special thanks to:
All the people who have contributed suggestions, examples,
bug reports and assistance in the development of Enterprise
Architect. The task of developing and maintaining this tool has
been greatly enhanced by their contribution.
I
MDG Integration for Visual Studio
Table of Contents
Foreword
1
3
Part I Introduction
1 Copyright Notice
................................................................................................................................... 3
2 Software Product
...................................................................................................................................
License Agreement
4
3 Using MDG Integration
...................................................................................................................................
for Visual Studio
6
8
Part II Getting Started
1 Add an Enterprise
...................................................................................................................................
Architect Model
8
2 Link to a Model
...................................................................................................................................
Package
11
3 Multiple Linking
................................................................................................................................... 11
4 MDG Integrate
...................................................................................................................................
Options
12
15
Part III Start Using UML 2.1
1 EA Project Explorer
................................................................................................................................... 15
Object Properties
..........................................................................................................................................................
17
2 Add New Elements
...................................................................................................................................
/ Packages
19
3 Model Tab ................................................................................................................................... 20
Navigating Hyperlinks
..........................................................................................................................................................
View UML diagrams
..........................................................................................................................................................
22
22
4 Search Tab ................................................................................................................................... 25
5 Project Discussion
...................................................................................................................................
Forum
26
Categories, Topics
..........................................................................................................................................................
and Posts
Forum Message
..........................................................................................................................................................
Dialog
27
28
6 Edit Diagrams
................................................................................................................................... 28
Part IV Import and Synchronize TFS Work Items
31
1 Maintain Work
...................................................................................................................................
Items
33
2 Manage Mapped
...................................................................................................................................
Fields
34
Part V Version Control
37
1 Version Control
...................................................................................................................................
Overview
39
2 Controlled Packages
................................................................................................................................... 40
Part VI XML Technologies
42
1 XML Schema...................................................................................................................................
(XSD)
42
2 Web Services
...................................................................................................................................
(WSDL)
43
Part VII Working with Code
45
1 Import Binary
................................................................................................................................... 45
© 1998-2007 Sparx Systems Pty Ltd
Contents
II
2 Import Directory
................................................................................................................................... 46
3 Model Driven...................................................................................................................................
Transformation
47
Part VIII Import Database Schema from ODBC
51
Part IX Baselines, Differencing and Merges
54
Part X Generate RTF Documentation
56
Part XI Generate HTML Documentation
58
Index
59
© 1998-2007 Sparx Systems Pty Ltd
II
1
Foreword
Foreword
MDG Integration for Visual Studio takes the
high-level modeling power of Enterprise
Architect and the Unified Modeling Language,
and directly integrates it with Visual Studio
2005 and 2008
© 1998-2007 Sparx Systems Pty Ltd
Part
I
3
MDG Integration for Visual Studio
1 Introduction
Welcome to the Enterprise Architect MDG Integration for Visual Studio, version 3.5. This set of tools takes the
high-level modeling power of Enterprise Architect 7.1 and the Unified Modeling Language 2.1, and directly
integrates it with Visual Studio 2005 and 2008.
With MDG Integration you can:
· Provide the UML Analyst, Designer and Architect with the tools to build detailed and precise UML 2.1
models
· Give the Visual Studio developer focused access to UML model content
· Offer the development team strong traceability features, from requirements to model, code, tests and finally
to deployed artifacts
· Increase productivity by linking UML models to Domain Specific Language (DSL) tools and artifacts.
Before working with MDG Integration for Visual Studio, please review the following:
· Copyright Notice 3
· Software Product License Agreement 4
· Using MDG Integration For Visual Studio
6
1.1 Copyright Notice
Copyright © 1998-2008 Sparx Systems Pty. Ltd. All rights reserved.
The software contains proprietary information of Sparx Systems Pty Ltd. It is provided under a license
agreement containing restrictions on use and disclosure and is also protected by copyright law. Reverse
engineering of the software is prohibited. Please read the license agreement 4 for full details.
Due to continued product development, this information may change without notice. The information and
intellectual property contained herein is confidential between Sparx Systems and the client and remains the
exclusive property of Sparx Systems. If you find any problems in the documentation, please report them to us
in writing. Sparx Systems does not warrant that this document is error-free. No part of this publication may be
reproduced, stored in a retrieval system, or transmitted in any form or by any means, electronic, mechanical,
photocopying, recording or otherwise without the prior written permission of Sparx Systems. Licensed users
are granted the right to print a single hardcopy of the user manual per licensed copy of the software, but may
not sell, distribute or otherwise dispose of the hardcopy without written consent of Sparx Systems.
Sparx Systems Pty. Ltd.
7 Curtis St,
Creswick, Victoria 3363,
AUSTRALIA
Phone: +61 (3) 5345 1140
Fax: +61 (3) 5345 1104
© 1998-2007 Sparx Systems Pty Ltd
Introduction
4
Support Email: [email protected]
Sales Email: [email protected]
Website: www.sparxsystems.com
Visual Studio is copyright (C) 2008 Microsoft
website: msdn.microsoft.com/vstudio/
1.2 Software Product License Agreement
MDG Integration Version 3.5 for Visual Studio
Copyright (C) 1998-2008 Sparx Systems Pty Ltd. All Rights Reserved
IMPORTANT-READ CAREFULLY: This End User License Agreement ("EULA") is a legal agreement between
YOU as Licensee and SPARX for the SOFTWARE PRODUCT identified above. By installing, copying, or
otherwise using the SOFTWARE PRODUCT, YOU agree to be bound by the terms of this EULA. If YOU do
not agree to the terms of this EULA, promptly return the unused SOFTWARE PRODUCT to the place of
purchase for a full refund.
The copyright in the SOFTWARE PRODUCT and its documentation is owned by Sparx Systems Pty Ltd A.C.N
085 034 546. Subject to the terms of this EULA, YOU are granted a non-exclusive right for the duration of the
EULA to use the SOFTWARE PRODUCT. YOU do not acquire ownership of copyright or other intellectual
property rights in any part of the SOFTWARE PRODUCT by virtue of this EULA.
Your use of this software indicates your acceptance of this EULA and warranty.
DEFINITIONS
In this End User License Agreement, unless the contrary intention appears,
·
·
·
·
·
·
·
·
"EULA" means this End User License Agreement
"SPARX" means Sparx Systems Pty Ltd A.C.N 085 034 546
"Licensee" means YOU, or the organization (if any) on whose behalf YOU are taking the EULA.
"Registered Edition of MDG Integration for Visual Studio" means the edition of the SOFTWARE PRODUCT
which is available for purchase from the web site: (http://www.sparxsystems.com/ea_purchase.htm)
following the thirty day free evaluation period.
"SOFTWARE PRODUCT" or "SOFTWARE" means MDG Integration for Visual Studio, which includes
computer software and associated media and printed materials, and may include online or electronic
documentation.
"Support Services" means email based support provided by SPARX, including advice on usage of
Enterprise Architect, investigation of bugs, fixes, repairs of models if and when appropriate and general
product support.
"SPARX support engineers" means employees of SPARX who provide on-line support services.
"Trial edition of MDG Integration for Visual Studio" means the edition of the SOFTWARE PRODUCT which
is available free of charge for evaluation purposes for a period of 30 days.
GRANT OF LICENSE
In accordance with the terms of this EULA YOU are granted the following rights:
a) To install and use one copy of the SOFTWARE PRODUCT, or in its place, any prior version for the
same operating system, on a single computer. As the primary user of the computer on which the
SOFTWARE PRODUCT is installed, YOU may make a second copy for your exclusive use on either a
home or portable computer.
b) To store or install a copy of the SOFTWARE PRODUCT on a storage device, such as a network server,
used only to install or run the SOFTWARE PRODUCT over an internal network. If YOU wish to increase
the number of users entitled to concurrently access the SOFTWARE PRODUCT, YOU must notify
SPARX and agree to pay an additional fee.
c) To make copies of the SOFTWARE PRODUCT for backup and archival purposes.
© 1998-2007 Sparx Systems Pty Ltd
5
MDG Integration for Visual Studio
EVALUATION LICENSE
The Trial version of MDG Integration for Visual Studio is not free software. Subject to the terms of this
agreement, YOU are hereby licensed to use this software for evaluation purposes without charge for a period
of 30 days.
Upon expiration of the 30 days, the Software Product must be removed from the computer. Unregistered use
of MDG Integration for Visual Studio after the 30-day evaluation period is in violation of Australian, U.S. and
international copyright laws.
SPARX may extend the evaluation period on request and at their discretion.
If YOU choose to use this software after the 30 day evaluation period a license must be purchased (as
described at http://www.sparxsystems.com/ea_purchase.htm). Upon payment of the license fee, YOU will be
sent details on where to download the registered edition of MDG Integration for Visual Studio and will be
provided with a suitable software 'key' by email.
ADDITIONAL RIGHTS AND LIMITATIONS.
YOU hereby undertake not to sell, rent, lease, translate, adapt, vary, modify, decompile, disassemble, reverse
engineer, create derivative works of, modify, sub-license, loan or distribute the SOFTWARE PRODUCT other
than as expressly authorized by this EULA.
YOU further undertake not to reproduce or distribute license key-codes except under the express and written
permission of SPARX.
If the Software Product purchased is an Academic Edition, YOU ACKNOWLEDGE THAT the license is limited
to use in an educational context, either for self-education or use in a registered teaching institution. The
Academic Edition may not be used to produce commercial software products or be used in a commercial
environment, without the express written permission of SPARX.
ASSIGNMENT
YOU may only assign all your rights and obligations under this EULA to another party if YOU supply to the
transferee a copy of this EULA and all other documentation including proof of ownership. Your license is then
terminated.
TERMINATION
Without prejudice to any other rights, SPARX may terminate this EULA if YOU fail to comply with the terms
and conditions. Upon termination YOU or YOUR representative shall destroy all copies of the SOFTWARE
PRODUCT and all of its component parts or otherwise return or dispose of such material in the manner
directed by SPARX.
WARRANTIES AND LIABILITY
WARRANTIES
SPARX warrants that the SOFTWARE PRODUCT will perform substantially in accordance with the
accompanying written materials for a period of ninety (90) days from the date of receipt, and any Support
Services provided by SPARX shall be substantially as described in applicable written materials provided to
YOU by SPARX, and SPARX support engineers will make commercially reasonable efforts to solve any
problems associated with the SOFTWARE PRODUCT.
EXCLUSIONS
To the maximum extent permitted by law, SPARX excludes, for itself and for any supplier of software
incorporated in the SOFTWARE PRODUCT, all liability for all claims , expenses, losses, damages and costs
made against or incurred or suffered by YOU directly or indirectly (including without limitation lost costs, profits
and data) arising out of:
· YOUR use or misuse of the SOFTWARE PRODUCT
· YOUR inability to use or obtain access to the SOFTWARE PRODUCT
· Negligence of SPARX or its employees, contractors or agents, or of any supplier of software incorporated
© 1998-2007 Sparx Systems Pty Ltd
Introduction
6
in the SOFTWARE PRODUCT, in connection with the performance of SPARX'S obligations under this
EULA, or
· Termination of this EULA by either party for any reason.
LIMITATION
The SOFTWARE PRODUCT and any documentation are provided "AS IS" and all warranties whether express,
implied, statutory or otherwise, relating in any way to the subject matter of this EULA or to this EULA generally,
including without limitation, warranties as to: quality, fitness; merchantability; correctness; accuracy; reliability;
correspondence with any description or sample, meeting your or any other requirements; uninterrupted use;
compliance with any relevant legislation and being error or virus free are excluded. Where any legislation
implies in this EULA any term, and that legislation avoids or prohibits provisions in a contract excluding or
modifying such a term, such term shall be deemed to be included in this EULA. However, the liability of
SPARX for any breach of such term shall if permitted by legislation be limited, at SPARX'S option to any one
or more of the following upon return of the SOFTWARE PRODUCT and a copy of the receipt:
· If the breach relates to the SOFTWARE PRODUCT:
· the replacement of the SOFTWARE PRODUCT or the supply of an equivalent SOFTWARE PRODUCT
· the repair of such SOFTWARE PRODUCT; or the payment of the cost of replacing the SOFTWARE
PRODUCT or of acquiring an equivalent SOFTWARE PRODUCT, or
· the payment of the cost of having the SOFTWARE PRODUCT repaired.
· If the breach relates to services in relation to the SOFTWARE PRODUCT:
· the supplying of the services again, or
· the payment of the cost of having the services supplied again.
TRADEMARKS
All names of products and companies used in this EULA, the SOFTWARE PRODUCT, or the enclosed
documentation may be trademarks of their corresponding owners. Their use in this EULA is intended to be in
compliance with the respective guidelines and licenses. Windows, Windows NT, Windows ME, Windows XP
and Windows 2000 are trademarks of Microsoft.
GOVERNING LAW
This agreement shall be construed in accordance with the laws of the Commonwealth of AUSTRALIA.
1.3 Using MDG Integration for Visual Studio
The MDG Integration for Visual Studio brings together the model-and-design aspects of Enterprise Architect
and UML with all the power of Visual Studio.
Architects and Engineers can communicate directly and efficiently within the Visual Studio environment, and
Engineers can see exactly which project elements they are working on and how they relate to the rest of a
system. Model elements appear in a special Enterprise Architect window within Visual Studio. Navigation from
code to model only takes a mouse-click, and does not require leaving the Visual Studio interface.
For example, a workflow might go like this:
· Architect and designers prepare the model. In this case assume that the model resides in a central
database.
· Specific coding tasks are assigned to the software engineers. The engineers can view the model from
within Visual Studio. Once assigned a task, an engineer can locate all the model elements within their task
domain, along with any notes made by the Architect.
· All the team members involved on the project can use the inbuilt Forum function to swap notes and files.
Not only does this facilitate communication amongst team members, but helps to keep track of progress
and changes to a project.
To begin using the MDG Integration for Visual Studio, see Getting Started
© 1998-2007 Sparx Systems Pty Ltd
8
.
Part
II
Getting Started
8
2 Getting Started
After installation, you are ready to integrate your Visual Studio project with Sparx Systems' Enterprise
Architect.
An Enterprise Architect model (a file with a .eap extension) can be added to a project using standard Visual
Studio features. In addition, a wizard is supplied to automate creation and addition in one step. The following
subsections describe this process in detail.
· Add an Enterprise Architect Model
· Link to a Model Package 11
· Multiple Linkings 11
See Also
· MDG Integrate Options
8
12
2.1 Add an Enterprise Architect Model
Add Existing Enterprise Architect Models
If you have an existing .EAP file to incorporate into your Visual Studio solution or project, you can add it using
the standard Visual Studio facilities:
· Project | Add Existing Item ([Shift]+[Alt]+[A])
· Solution Explorer's context menu: Add | Existing Item.
The following illustration shows the Solution Explorer option.
© 1998-2007 Sparx Systems Pty Ltd
9
MDG Integration for Visual Studio
When an Enterprise Architect model has been added in this way it might appear in the Solution Explorer
unopened. To open it, double click on it.
Create New Enterprise Architect Models
New Enterprise Architect models are created using a wizard available through either the Project Menu |
Attach UML Model menu option or through the solution's context menu as indicated below. Models added in
this way are always placed inside the Solution Items folder.
© 1998-2007 Sparx Systems Pty Ltd
Getting Started
10
After a new or existing model has been added through the ensuing wizard, the model hierarchy displays in an
Enterprise Architect EA Project Explorer 15 window on the Visual Studio screen.
Embed Multiple Models
While it is possible to embed multiple Enterprise Architect models into a single Visual Studio solution (and
embedded projects), it is not possible for the MDG to identify which, of multiple linked projects, contain an
element you are trying to view (eg. through View in UML).
It is therefore important that you ensure that any linked model is in the Solution Items folder, and is the first
model listed in that folder.
See Also
· Link to a Model Package
© 1998-2007 Sparx Systems Pty Ltd
11
11
MDG Integration for Visual Studio
2.2 Link to a Model Package
To link a Visual Studio project with an Enterprise Architect model package, follow these steps:
· Select an existing package, or create a new model package in the EA Project Explorer - right-click on the
parent node and select the Add | New Package menu option; give the package a meaningful name.
· Link the package to a Visual Studio project by right-clicking on the package and selecting Current
Package | Link Existing UML Package to Visual Studio Project. The Connect Project dialog displays,
listing the currently-active projects.
· Select the project to link with the Enterprise Architect file, and click the OK button.
When a package has been linked, this status is indicated by a Visual Studio icon next to the package name.
The UML package and the Visual Studio project are now integrated, enabling you to work using the UML
model and the powerful toolset of Enterprise Architect, all from within Visual Studio.
See Also
· Multiple Linkings
11
2.3 Multiple Linking
It is possible to link many different Visual Studio projects with multiple UML packages simultaneously.
Right-click on the required parent package in the EA Project Explorer window and select the Current
Package | Import and Link Visual Studio Projects menu option.
© 1998-2007 Sparx Systems Pty Ltd
Getting Started
12
Select the check box for each project to import, or click on the Select All button to select all projects in the list.
Click on the OK button to reverse engineer the project(s). A new package is generated for each project, under
the selected parent package.
Once the Integration Environment has successfully imported and linked the projects, you can view them in the
EA Project Explorer 15 window.
2.4 MDG Integrate Options
Before you start using the MDG Integration for Visual Studio, you should set the options for synchronizing your
work in Visual Studio and Enterprise Architect.
In the EA Project Explorer window, right-click on the linked package and select the MDG Options context
menu option. The MDG Integrate Options dialog displays.
© 1998-2007 Sparx Systems Pty Ltd
13
MDG Integration for Visual Studio
Option
Function
Automatically Synch model
with EA (recommended)
MDG automatically refreshes the EA Project Explorer when elements within
Enterprise Architect change.
Switch to Visual Studio on
closing Enterprise Architect
Click on the appropriate radio button:
· Refresh Entire Model - The entire model is refreshed.
· Refresh Current Model - The currently-selected package in MDG is
refreshed when Enterprise Architect is closed.
Note:
If a non-package is selected, MDG iterates up the tree and refreshes from
the first package that is found.
· Do not Refresh Anything - Nothing is refreshed.
Synchronize Model with
Code
Click on the appropriate radio button:
· Manual - You manually synchronize the code with the model.
· Automatically - When code is added or saved, the model is
automatically updated to reflect the change.
In the MDG Integrate Options dialog, the Automatically Sync model with EA option enables synchronization
of the EA Project Explorer when you switch to the full Enterprise Architect user interface and back (using the
Open in Enterprise Architect menu option). The Synchronize Model with Code Automatically radio button,
however, makes MDG automatically reverse synchronize your source into your model when you save changes
to your source files.
To automatically synchronize changes made in your model to your code, open Enterprise Architect using the
Open in Enterprise Architect command, right-click on the MDG linked package, select the Build and Run |
Package Build Scripts menu option and select the Use Live Code Generation checkbox. With this enabled,
any changes you make in your model should be immediately synchronized in your source code.
© 1998-2007 Sparx Systems Pty Ltd
Part
III
15
MDG Integration for Visual Studio
3 Start Using UML 2.1
UML elements can be viewed and, to some extent, manipulated through Enterprise Architect's Project Browser
and Documentation View without linking. For easy cross-referencing of UML and code models, however, you
must link a Visual Studio project to an Enterprise Architect package. See Link To a Model Package 11 for
instructions. Equally, you can double-click on any .EAP file visible in the Solution Explorer.
This activates the MDG Integration for Visual Studio main interface components:
· The EA Project Explorer 15 window, which shows the UML packages, diagrams and elements in a
hierarchical view
· The UML Documentation tab, which is the main work area of MDG Integration for Visual Studio (see below)
· The <elementname>.<language> tab, which displays the code for an element selected from the EA Project
Explorer
· The UML Diagram tab 28 , which displays a diagram selected from the EA Project Explorer or UML
Documentation tab.
The UML Documentation tab itself has four tabs:
· The Model 20 tab displays the diagrams and UML properties of the model elements; most of the report
information from the MDG Integration for Visual Studio is displayed on this tab
· The Search 25 tab is used to find UML elements; search returns are shown as a report view with clickable
items
· The Forum 26 tab enables you to discuss projects using a BBS-style forum interface within Visual Studio
· The Help tab displays the HTML-based help for quick reference.
To display the UML Documentation tab, in the EA Project Explorer window either:
· double-click on an element name, or
· right-click on an element name and select the View UML Documentation context menu
16
option.
3.1 EA Project Explorer
The EA Project Explorer contains an MS Explorer-style representation of the UML model, as shown below. It
lists the UML packages, diagrams, elements, attributes and methods.
© 1998-2007 Sparx Systems Pty Ltd
Start Using UML 2.1
16
The EA Project Explorer helps you navigate your UML project from within Visual Studio. Right-click on an item
in the tree to open a context-sensitive menu that enables you to investigate the item, or to perform operations
on it. The following examples show the context menus for a package and an element.
From these menus you can also perform other actions such as:
· Browse UML 15
· View Properties
© 1998-2007 Sparx Systems Pty Ltd
17
17
MDG Integration for Visual Studio
·
·
·
·
·
Edit UML Diagrams 28
XML Services 42
Import Team Foundation Server Work Items
Code Generation 45
Model Driven Transformation 47
31
Alternatively, you can use the EA Project Explorer toolbar icons.
From left to right, these icons enable you to:
·
·
·
·
·
·
·
Open the selected project in Enterprise Architect
View the UML documentation
Add a package
Add a diagram
Add an element
Display the properties of the selected object
Perform a search via the Search 25 tab.
3.1.1 Object Properties
Right-click on an element, diagram, attribute or method in the EA Project Explorer and select the Properties
context menu option. Alternatively, click on the object and on the Properties icon in the EA Project Explorer
toolbar.
The appropriate Properties dialog displays.
See the Enterprise Architect User Guide for information on object properties and their settings, responsibilities,
constraints, links, scenarios, associated files, object files and classifiers, and boundary element settings.
To display Help on properties from the Enterprise Architect User Guide, click on either:
·
·
·
·
·
The Help button on the displayed Properties dialog, or
This link to diagram details
This link to element details
This link to attribute details
This link to operation / method details.
Changes to any information in the Properties dialogs are automatically reflected on the Model tab. In this
example the Notes of Class Form1 have been modified.
© 1998-2007 Sparx Systems Pty Ltd
Start Using UML 2.1
The change is reflected in the UML Documentation tab below:
© 1998-2007 Sparx Systems Pty Ltd
18
19
MDG Integration for Visual Studio
3.2 Add New Elements / Packages
Add New Package
MDG Integration for Visual Studio enables you to add new elements and packages to the model. To start, in
the EA Project Explorer select the package under which to create your new package and either:
· Right-click and select the Add | New Package context menu option, or
· Click on the New Package icon in the EA Project Explorer toolbar.
Give the package a relevant name. If you do not want a diagram for this package, deselect the Automatically
add new diagram checkbox.
Click on the OK button. If you are also adding a diagram, provide the diagram name and type on the New
Diagram dialog.
Add New Element
Either:
· Right-click on the newly-created package and select the Add | New Element context menu option, or
· Click on the New Element icon in the EA Project Explorer toolbar.
The New Element dialog displays.
In this example, the selected Type is UseCase with the name Use Case 1.
Checkboxes
· Open Properties Dialog on Creation - Select this checkbox to display the Properties dialog for the
element, to tailor its information; for more information on this window, see Object Properties. 17
· Close Dialog on OK - Closes the New Element dialog when you click on the OK button; deselect the
checkbox to add multiple elements in one go.
· Add to Current Diagram - Add the newly imported Class to the open diagram.
Add Model using Wizard
You can also add one or more basic model structures to your project using a template wizard.
Right-click on the appropriate root package and select the Add | Add Model using Wizard context menu
option. The Model Wizard dialog displays.
© 1998-2007 Sparx Systems Pty Ltd
Start Using UML 2.1
20
Click on the checkbox for each model to add to your project.
Control
Description
Select From
Select the model template group from which to select the template on which to
base the model.
All
Select all of the models.
None
Clear all models selected.
OK
Click on this button to create the standard hierarchy for your project.
Cancel
Click on this button to leave a blank project tree.
Help
Display Help on the dialog.
3.3 Model Tab
The Model tab shows the currently selected model element. The element name is displayed In the top left
corner of the tab.
© 1998-2007 Sparx Systems Pty Ltd
21
MDG Integration for Visual Studio
Just after the element name are two icons - an Enterprise Architect icon and a code page icon.
· Click on the Enterprise Architect icon to open Enterprise Architect in the current model. (If Enterprise
Architect is already open, this icon opens another instance of the application.)
· Click on the code page icon to display the <elementname>.<language> tab, which displays the code for the
selected element, including its attributes, operations, and associations.
The element's attributes, operations, Tagged Values, parameters and associations - both to and from the
element - are also shown in the main body of the Model tab.
Additional information on the element can be seen by clicking on the Project and Advanced expansion boxes.
© 1998-2007 Sparx Systems Pty Ltd
Start Using UML 2.1
22
3.3.1 Navigating Hyperlinks
Within the UML Documentation tab, you can navigate between diagrams and sections using hyperlinks.
For example, you might click on the diagram name and display the diagram
22
.
Or perhaps, under the Associations From tab, click on an element hyperlink (such as Program, above) and
display the element details for the source element. On that screen you could check under the Associations To
tab and follow the link back to the original (Form1) element.
3.3.2 View UML diagrams
By clicking on the Diagrams hyperlink on the UML Documentation - Model tab, you can also display the UML
models themselves. In the following example, the hyperlink WindowsApplication5 is clicked on.
This displays the UML diagram on the UML Documentation view (not the UML Diagram tab).
© 1998-2007 Sparx Systems Pty Ltd
23
MDG Integration for Visual Studio
Notice that you can view the details of the Class, including its attributes and methods, all taken from
Enterprise Architect. You should not change data in this view.
Alternatively, double-click on a diagram in the EA Project Explorer window, and click on the UML Diagram 28
tab. (This has no effect on the UML Documentation tab). This is the view in which you can edit the diagram.
© 1998-2007 Sparx Systems Pty Ltd
Start Using UML 2.1
24
You can also add your elements into a new Visual Studio Class diagram. To do this, right-click on an element
inside a linked folder, and select the View Class Diagram context menu option. The Class Details tab
displays at the bottom of the screen, and a Diagram tab opens in the body of the screen.
© 1998-2007 Sparx Systems Pty Ltd
25
MDG Integration for Visual Studio
3.4 Search Tab
The Search tab is a convenient way of locating the elements of a model. You can search on a range of criteria,
from element name, type, and scope to element connections, or status within a project (work-in-progress,
completed).
To begin a search, click on the Search tab.
In the Search Term input box, enter the text string to search for, then click on the drop-down arrow in the
Search List field and select the type of search to perform.
© 1998-2007 Sparx Systems Pty Ltd
Start Using UML 2.1
26
To execute the search, click on the Run Search button.
You can click anywhere on the entry for a returned result to navigate to the Model tab for the item.
You can also specify which columns are returned. Click on the Columns button to display a list of the
information that is returned. To turn a column on or off, simple select or deselect the checkbox next to the
column title.
3.5 Project Discussion Forum
The Project Discussion Forum can be used to discuss the development of your project from within the Visual
Studio environment. It operates much like any other web-based forum you might have used, applying the
concept of Categories, Threads, and Posts.
You can access the Project Discussion Forum via the UML Documentation tab, selecting the Forum tab.
The Forum tab consists of two main areas: the message thread area, and the message contents area.
© 1998-2007 Sparx Systems Pty Ltd
27
MDG Integration for Visual Studio
The message thread area is located on the left hand side, and appears as a tree. The message thread area is
used to create new categories and threads, and to select posts for viewing, editing or deleting. When a post is
selected for viewing, it appears in the message contents area on the right hand side.
See Also
· Categories, Topics and Posts
· Forum Message Dialog 28
27
3.5.1 Categories, Topics and Posts
The Project Discussion Forum enables you to create Categories, which contain Topics, which contain Posts.
You can also edit and reply to posts.
Add Category
To create a new Category, click on the New Category icon at the bottom of the Forum tab. The Create New
Category 28 dialog displays.
Enter the name and any relevant details into the Text field. Enter the name of the author. Click on the OK
button. You can now add new topics to the category.
Add Topic
To create a new Topic, click on the New Topic button at the bottom of the Forum tab. The Create New Topic
28 dialog displays.
Enter the name and any relevant details into the Text field, and enter the name of the author. Click on the OK
button. You can now add new posts to the topic.
Add Post
To create a new Post, click on the New Post button at the bottom of the Forum tab. The Create New Post
dialog displays.
28
Enter the name and any relevant details into the Text field, and enter the name of the author. Click on the OK
button. Other users can now reply to the post.
Reply to Post
To reply to a Post, click on the Post in the Forum tab and click on the Add Reply button at the bottom of the
Forum tab. The Reply to Post 28 dialog displays.
Enter the name and any relevant details into the Text field, and enter the name of the author. Click on the OK
© 1998-2007 Sparx Systems Pty Ltd
Start Using UML 2.1
28
button.
Edit Post
To edit a Post, click on the Post in the Forum tab and click on the Edit button at the bottom of the Forum tab.
Alternatively, press [Ctrl]+[E]. The Edit Post 28 dialog displays.
Enter the name and any relevant details into the Text field. You cannot change the name of the author. Click
on the OK button. Other users can now reply to the post.
3.5.2 Forum Message Dialog
The Project Discussion Forum message dialogs (Create New Category, Create New Topic, Create New Post,
Edit Post and Reply to Post) all share the same functionality.
The table below describes the operation of each option available for the dialogs.
Control
Description
Name
Type in the name of the message category, topic or post.
Author
Click on the drop-down arrow and select the message author name, or type in a new
name if the author name is not present in the list.
The names in the drop-down list are defined in the model Authors list. If you type a
name into the Author field, it is used for this post but it is not added to the Authors
list.
Formatting Tools
Standard formatting options for text.
OK
Click on this button to confirm the message.
3.6 Edit Diagrams
You can easily edit the UML diagrams from the EA Project Explorer in two ways, by:
· Double-clicking on a diagram name or
· Right-clicking on a diagram name and selecting the Edit Diagram menu option
The selected diagram displays on the UML Diagram tab, as shown below.
© 1998-2007 Sparx Systems Pty Ltd
29
MDG Integration for Visual Studio
You can add new elements and give them their own attributes, operations and types, and customize or
arrange them. You can also drag existing elements from the EA Project Explorer window.
To add elements and connectors to the diagram, either use the Enterprise Architect Quick Linker arrow or
right-click on the diagram background and select the New Element or Connector context menu option to
display the UML Toolbox shortcut menu.
To add attributes and operations, right-click on the element in the diagram or EA Project Explorer and select
the Attributes or Operations context menu option. For further information, open the Enterprise Architect User
Guide topic by:
· Clicking on the Help button on the Attributes or Operations dialog, or
· Selecting these Sparx Systems website links for attributes and operations.
© 1998-2007 Sparx Systems Pty Ltd
Part
IV
31
MDG Integration for Visual Studio
4 Import and Synchronize TFS Work Items
MDG Integration for Visual Studio enables you to import and synchronize work items from Team Foundation
Server. It also enables you to add, view, edit and unlink work items 33 that have been linked against a UML
element, and to map work item fields 34 against Enterprise Architect elements and element properties.
Import Work Items
To import work items, follow the steps below:
1. In the EA Project Explorer, right-click on the required package and select the Team Foundation Server
| Import Work Items context menu option. The Select Queries dialog displays.
2. Click on the checkbox against each query for which to import work items from Team Foundation Server.
3. Click on the Link Selected Queries to Package checkbox.
4. Click on the OK button. The work items in the selected queries are imported and, if the Link Selected
Queries to Package checkbox is selected, the queries are stored against the package.
You can return to this dialog to add and remove queries for a package.
Synchronize With TFS
When a package has stored queries against it, new elements are automatically added and existing elements
updated, based on each query.
Note:
Elements are never deleted.
To manage the mapped fields for a work item linked against a UML element, right-click on the required
package in the EA Project Explorer and select the Team Foundation Server | Manage Mapped Fields
context menu option.
© 1998-2007 Sparx Systems Pty Ltd
Import and Synchronize TFS Work Items
32
Field/Button
Description
Work Item Type
Click on the drop-down arrow and select the type of work item to
configure.
Don't create Elements for this work
item type
Select this checkbox to prevent MDG Integration For Visual Studio
from creating an Enterprise Architect element if the query returns a
work item of the specified type.
UML Element
If MDG Integration For Visual Studio is to create an element, click
on the drop-down arrow and select the type of element to create.
Element Stereotype
If required, click on the drop-down arrow and select the stereotype
to apply to the element.
Work Item Field
If required, click on a work item field against which to configure an
Enterprise Architect property.
Configure
Click on this button to select an Enterprise Architect property to
configure against the selected work item field.
Clear
Clear the currently-selected mapping.
Default
Apply the default mapping for this work item type.
© 1998-2007 Sparx Systems Pty Ltd
33
MDG Integration for Visual Studio
4.1 Maintain Work Items
The EA Work Items tab enables you to add and update work items against a selected element, configure the
connection to the Team Foundation Server, and connect to or disconnect from the server.
To display the EA Work Items tab, right-click on the required element in the EA Project View and select the
Team Foundation Server | Maintain Work Items context menu option.
The EA Work Items tab has a toolbar. The functions provided by the toolbar icons are, from left to right:
·
·
·
·
·
Add New Work Item - create a new work item linked to the currently-selected element
Save - Save all changes to the current work item (selected from the panel underneath the toolbar)
Link - Link one or more work items to the selected element
Remove - unlink selected work items from the selected element
Properties - Define the current Team Foundation Server connection properties; displays the Link
Properties 33 dialog
· Connect - Connect to the Team Foundation Server
· Disconnect - Disconnect from the Team Foundation Server.
Connection Properties
The Link Properties dialog enables you to configure the connection to the Team Foundation Server.
© 1998-2007 Sparx Systems Pty Ltd
Import and Synchronize TFS Work Items
34
1. In the Team Foundation Server field, type the name of the server to connect to.
2. In the Team System Project field, type or select the name of the project to connect to.
3. Select the Make Selected Project the Default checkbox to make the specified project the default.
4. Click on the OK button.
4.2 Manage Mapped Fields
To manage the mapped fields for a work item linked against a UML element, right-click on the required
package in the EA Project Explorer and select the Team Foundation Server | Manage Mapped Fields
context menu option.
© 1998-2007 Sparx Systems Pty Ltd
35
MDG Integration for Visual Studio
Field/Button
Description
Work Item Type
Click on the drop-down arrow and select the type of work item to
configure.
Don't create Elements for this work
item type
Select this checkbox to prevent MDG Integration For Visual Studio
from creating an Enterprise Architect element if the query returns a
work item of the specified type.
UML Element
If MDG Integration For Visual Studio is to create an element, click
on the drop-down arrow and select the type of element to create.
Element Stereotype
If required, click on the drop-down arrow and select the stereotype
to apply to the element.
Work Item Field
If required, click on a work item field against which to configure an
Enterprise Architect property.
Configure
Click on this button to select an Enterprise Architect property to
configure against the selected work item field.
Clear
Clear the currently-selected mapping.
Default
Apply the default mapping for this work item type.
© 1998-2007 Sparx Systems Pty Ltd
Part
V
37
MDG Integration for Visual Studio
5 Version Control
MDG Integration for Visual Studio supports Enterprise Architect's version control of packages and their
component sub-packages in a central repository. This repository is maintained by third-party version control
applications that control access and record revisions. Version controlled packages are packages that have
been configured for use with version control software. The supported Version Control products are CVS, SCC,
TFS and Subversion.
Version control can be assigned to individual packages. Each package can only be linked to one version
control configuration at a time, although it is possible to connect multiple control configurations for each
model. The Version Control Configurations dialog can be used to connect to an SCC provider, CVS
configuration, MS Team Foundation Server or Subversion configuration.
In MDG Integration for Visual Studio, right-click on the required package in the EA Project Explorer and select
the Version Control menu option. To set the version control configuration then select the Version Control
Options... menu item.
The options on the Version Control menu are described in the following table.
© 1998-2007 Sparx Systems Pty Ltd
Version Control
38
Menu Item
Functionality
Configure Package
Displays the Package Control dialog, which enables you to specify whether this
package (and its children) is controlled, and which file it is controlled through.
Check In Branch
For the selected branch of the model, (i.e. the selected package and all of its child
packages) displays a list of all version controlled packages within that branch that
are checked out to the current user. You can then select packages in the displayed
list, to be submitted for check-in.
Check In
Submits the currently selected package and all sub-packages to the central
repository. Enterprise Architect prompts you to enter optional comments describing
changes to the packages.
Check Out
Retrieves the latest revision of the currently selected package and sub-packages
from the central repository, overwriting the current packages. After check out the
packages are available for editing.
Undo Check Out
Cancels all changes you have made to the currently-selected package and subpackages. Restores the model to the state it was in before package was checked
out, leaving the selected package and sub-packages locked.
Get Latest
Available only on Private Models, for packages that are checked in.
Retrieves the latest revision of the package from the repository.
Get All Latest
Available only on Private Models.
Retrieves the latest revision of all version controlled packages in the project. Only
retrieves packages that are checked in.
Put Latest
Updates the central repository with the currently-selected package (which you have
checked out), while retaining checkout status on the package. This is equivalent to
checking a package in and immediately checking it back out again.
File Properties
Asks the version control provider to show the version control properties associated
with the XML export file pertaining to the currently-selected package.
File History
Where the controlling package has been configured by an SCC provider, this
provider shows a change history for the package. Refer to your provider's
documentation for details on how to use the control. Otherwise, if the version control
is CVS the history is shown via Enterprise Architect's internal CVS history menu.
Get Package
Enables you to gain access from packages in the version control repository that is
not currently available in the users model.
Version Control
Options
Displays the Version Control Options dialog.
Work Offline
Toggles version control between offline and online.
More Information
For further information on version control, see the Enterprise Architect User Guide. To access the Enterprise
Architect User Guide, either:
· Click on the Help button on the Version Control Settings dialog, or
· Click on this Sparx Systems web page link.
See Also
· Version Control Overview
· Controlled Packages 40
© 1998-2007 Sparx Systems Pty Ltd
39
39
MDG Integration for Visual Studio
5.1 Version Control Overview
Features
The version control feature provides two key facilities:
· Coordinating the sharing of packages between users
· Saving a history of changes to Enterprise Architect packages, including the ability to retrieve previous
versions.
System Requirements
To use version control in MDG Integration for Visual Studio, a third-party source-code control application is
required. MDG Integration for Visual Studio supports the following version control applications:
· Subversion, which is available from http://subversion.tigris.org/
· CVS, which is available from http://www.tortoisecvs.org/
· Any version control product that complies with the Microsoft Common Source Code Control standard,
version 1.1 or higher.
Set-Up
Before using MDG Integration for Visual Studio's version control facility, your version control software must be
installed on each machine where it is intended to be used.
Typically there are:
· A server component that manages a version control repository
· Client components on the workstations that MDG Integration for Visual Studio uses to communicate with
the server.
A version control client must be installed on every machine where you run MDG Integration for Visual Studio
and want to access your version control system. Once the version control software has been installed and
configured, you must define a Version Control Configuration within MDG Integration for Visual Studio, to use
your installed version control product.
Usage
There are four basic ways in which you might apply the version control facility:
Use
Description
Single Shared model
Users share an MDG Integration for Visual Studio model, stored in a central EAP file
or DBMS repository. This configuration enables users to see other users' packages
without explicitly having to retrieve them.
· Version control regulates access to packages, and maintains package revision
history.
Multiple Private
models
An MDG Integration for Visual Studio model is created by a single user who
configures it for version control. The model file is then distributed to other users, with
each user storing their own private copy of the model.
· Users update their model's packages through version control.
· Version control regulates access to packages, and maintains package revision
history.
· Other users' new packages are retrieved using the Get Package menu option.
Shared packages
Individual users create separate MDG Integration for Visual Studio models but share
one or more packages.
· Users share packages through version control.
© 1998-2007 Sparx Systems Pty Ltd
Version Control
40
Use
Description
Standard packages
A company might have a standard set of packages that are broadly shared (as readonly files).
· Individual users retrieve packages with the Get Package menu option.
See Also
· Version Control 37
· Controlled Packages
40
5.2 Controlled Packages
Controlled packages are a powerful means of 'externalizing' parts of an MDG Integration for Visual Studio
model. Using controlled packages you can:
· Support widely distributed development by having team members submit packages in the form of XML for
import into a central Enterprise Architect repository.
· Support version control, by writing model elements in XML text files suitable for version control using
standard version control software. Using XMI this way enables you to manually connect to third-party
version control software outside the MDG Integration for Visual Studio environment. MDG Integration for
Visual Studio internally supports the configuration of version control through SCC and CVS.
· Support import and export of model elements between different models; for example, a Class library can be
re-used in many models and kept up to date in target models using controlled packages, reloading
packages as required when new versions of the Class model become available.
Package XML is standard XMI-compliant output that can be loaded into any XML viewer, or used by any XMLbased tool to perform manipulations and extracts, such as document or code generators.
For more information on Controlled Packages, see the Enterprise Architect User Guide topic via this Sparx
Systems web Help link.
© 1998-2007 Sparx Systems Pty Ltd
Part
VI
XML Technologies
42
6 XML Technologies
MDG Integration for Visual Studio enables rapid modeling and forward and reverse engineering of two key
W3C XML technologies: XML Schema (XSD) and Web Service Definition Language (WSDL).
XSD and WSDL support is critical for the development of a complete Service Oriented Architecture (SOA),
and the coupling of UML 2.1 and XML provides the natural mechanism for specifying, constructing and
deploying XML based SOA artifacts within an organization.
The following topics explain how to work with these technologies using MDG Integration for Visual Studio:
· XML Schema (XSD) 42
· Web Services (WSDL)
43
6.1 XML Schema (XSD)
MDG Integration for Visual Studio enables forward and reverse engineering of W3C XML schemas (XSD).
Model XSD Schema
XML schemas are modeled using UML Class diagrams within MDG Integration for Visual Studio, as in
Enterprise Architect. See the Model XSD Schema help topic in the Enterprise Architect User Guide.
The UML Profile for XSD specifies a set of stereotypes, Tagged Values and constraints that can be applied to
the UML model in order to change particular aspects of the resulting schema.
Note:
You cannot edit Tagged Values in MDG Integration for Visual Studio. To work on Tagged Values, switch to
Enterprise Architect.
When modeling XSD constructs, it is often useful to have the XSD primitive types represented as UML
elements. In this way, user-defined types (for example) can reference the datatype elements as part of
inheritance or association relationships.
Sparx Systems provides the set of primitive XSD data types as a UML package in the form of an XMI file. Each
XSD primitive type is represented by a UML Class in a package named XSDDatatypes.
Generate XSD
The Generate XML Schema feature forward engineers a UML Class model to a W3C XML Schema (XSD) file.
An XML schema corresponds to a UML package in MDG Integration for Visual Studio, therefore XML schema
generation is a package-level operation.
To generate an XML schema from a package, follow the steps below:
1. In the EA Project Explorer, right click on the package to be converted to XSD. The context menu
displays.
2. Select the XML Services | Generate XML Schema menu option. The Generate XML Schema dialog
displays, showing the name of the selected package in the Source Package field.
3. See the Generate XSD topic in the Enterprise Architect User Guide.
Import XSD
The Import XML Schema facility reverse engineers a W3C XML Schema (XSD) file as a UML Class model.
XSD files are imported into MDG Integration for Visual Studio as a UML package.
To import an XSD file, follow the steps below:
1. In the EA Project Explorer, right click on the package to contain the imported XSD package. The context
menu displays.
2. Select the XML Services | Import XML Schema menu option.
© 1998-2007 Sparx Systems Pty Ltd
43
MDG Integration for Visual Studio
3. See the Import XSD Schema topic in the Enterprise Architect User Guide.
6.2 Web Services (WSDL)
MDG Integration for Visual Studio supports forward engineering and reverse engineering of the W3C Web
Service Definition Language (WSDL).
WSDL documents are represented as components marked with the stereotype WSDL. WSDL documents are
contained in a package hierarchy representing the target WSDL namespace and its constituent XSD Types,
Messages, PortTypes, Bindings and Services. The top-level package is stereotyped as a WSDLnamespace.
The figure below shows a skeletal WSDL namespace package structure:
A WSDLnamespace package can contain one or more WSDL components. Each WSDL component can be
automatically generated to a WSDL file using Enterprise Architect's built-in WSDL generator.
For information on the Enterprise Architect WSDL generator and importing WSDL, see the Enterprise
Architect User Guide via this Sparx Systems web Help link.
© 1998-2007 Sparx Systems Pty Ltd
Part
VII
45
MDG Integration for Visual Studio
7 Working with Code
MDG integration for Visual Studio enables you to generate code directly from model packages and elements,
and to automatically synchronize model and code.
To generate code for a UML model element, such as a Class, right-click on it in the EA Project Explorer and
select the Code Services | Generate Code context menu option.
To generate the code for a model package, right-click on the package and select either of the following:
· The Code Services | Generate Code context menu option to simply generate code for an individual
package element; the Generate Package Source Code dialog displays.
· The Code Services | Generate Package option to generate code for the entire selected package; the
Synchronize Package Contents dialog displays, with the options to either forward engineer the code (from
model to source) or reverse engineer (source to model).
Synchronization keeps your models and your code in line, so that you can always be sure that what is
represented in code is represented in the model. For instance, if you have made changes to a Class definition
by hand-coding, your model is out of date. Synchronization ensures that the Class you have altered is updated
in the model to reflect the changes you have made.
Reverse Engineering
The MDG Integration for Visual Studio is also able to reverse engineer both source code and Visual Studio
binary portables into UML Class diagrams.
7.1 Import Binary
Enterprise Architect is capable of reverse engineering Visual Studio portable binaries (*.exe, *.dll) and
generating Class models.
1. Right-click on the target package (in which to store the resulting models) in the EA Project Explorer and
select the Code Services | Import Binary Module context menu option. The Import dialog displays.
2. Select the file to import. Once you have selected the file you must set certain options, as outlined
below.
3. Once all your settings are set, click on the Import button. Enterprise Architect imports the binary
© 1998-2007 Sparx Systems Pty Ltd
Working with Code
46
module; the UML representation is then constructed as a diagram and laid out.
Generation
Select whether
· Pre-existing classes are to be synchronized or overwritten
· To automatically create a Logical Diagram for each package
· To import private members.
New Diagram Options
This button displays the New Diagram Options dialog, through which you define what features are to be visible
in any diagrams generated by the import.
Import Method
Enables you to select the method Enterprise Architect uses to analyse the binary file. Select from:
· Reflection
· Disassembly or
· Let EA decide, which triggers Enterprise Architect to select the most appropriate method for the selected
file.
7.2 Import Directory
Reverse engineering your project code into UML Class models is a simple process, as follows:
1. Create and link a new package, or use a linked package associated with the project to reverse
engineer.
2. Right-click on the package name in the EA Project Explorer, and select the Code Services | Import
Directory context menu option. The Import Source Directory dialog displays.
© 1998-2007 Sparx Systems Pty Ltd
47
MDG Integration for Visual Studio
(The above screen shows the default settings for C#.)
3. Select the root directory for the package to import.
4. Set the source code type (such as C++ or C#) and the expected file extension (.c, .cs). You can select
from a number of further options to control the import process, as below.
5. Once you have set your options, click on the OK button to invoke Enterprise Architect to process the
directory. When Enterprise Architect is finished, the newly created models appear in the EA Project
Explorer and in the Model tab.
Options
Main Body of Dialog
These options define what data is imported.
· Recursively Process Subdirectories - select to make Enterprise Architect search the directory being
imported for subdirectories, and to also process them
· Create Logical Diagram for Each Package - select to make Enterprise Architect create a logical diagram
for each package being imported
· Import defined components - select to import only those packages with defined components
· Do not import private members - select to prevent private members from being imported.
Package Structure
This selection offers different methods for controlling packaging of the imported objects.
· Create Package Per Directory - select to create a new package for each directory, including the selected
root and all subdirectories if recursion is checked
· Create Package Per Namespace - select to create a new model package for each namespace
encountered in the code being imported
· Create Package Per File - select to create a new package for each source file that is being imported.
Synchronization
This section controls the way Enterprise Architect's import process deals with pre-existing models.
· Synchronize existing classes - select to synchronize models; existing models are altered to comply with
the results of reverse engineering, but are not completely overwritten or deleted
· Overwrite existing classes - select to overwrite any model with the same name already existing in the
package you are importing to, with the newly-generated model.
Remove Classes not found in code
· Never delete - select to never delete any Classes found in the model but not found in the code
· Prompt for action - select to prompt you if Classes found that are not in the code are to be removed first
· Always delete - select to delete Classes without prompting you.
New Diagram Options
This button displays the New Diagram Options dialog, through which you define what features are to be visible
in any diagrams generated by the import.
7.3 Model Driven Transformation
MDG Integration for Visual Studio supports the Model-Driven Architecture and the use of Platform
Independent Models (PIMs) and Platform Specific Models (PSMs).
You can create a PIM and define rules for transforming a PIM into a PSM. For instance, a single independent
model might generate specific models that account for particular features of a system or language, such as C#
or Java.
To perform an MDA transform you must have a master model, the PIM. Once you have created or imported a
© 1998-2007 Sparx Systems Pty Ltd
Working with Code
48
model, right-click on the containing package and select the Current Package | Apply MDA Transformation
context menu option. The Model Transformation dialog displays.
When the dialog displays, all elements are selected and all transformations previously performed from any of
the Classes are checked.
Control
Description
Elements
Selects the elements that are to be included in the transformation.
All
Selects all of the elements from the list to be included in the transformation.
None
Deselects all of the elements from the list.
Transformations
Enables you to select which transformations to perform and the package
each of them should be transformed to.
Select Package [...]
Use the [...] button to select the package in which the transformed
elements are created.
Generate Code on result
Specifies whether or not to automatically generate code from the target
classes.
Perform Transformations on
result
Specifies whether transformations previously done on target classes should
be automatically executed.
Intermediary File Path
Specifies the filename of the intermediary file (if any).
Write Always
Specifies whether an intermediary file should be written to disk.
Write Now
Generates the intermediary file but doesn't perform the transform.
Do Transform
Executes the transform command.
© 1998-2007 Sparx Systems Pty Ltd
49
MDG Integration for Visual Studio
For instance, to transform the basic package into a C# application, in the Transformations panel select the
checkbox for C#. Once you select the transformation type, Enterprise Architect prompts you to select the
destination folder. In the example below the Implementation Model (PSM) folder is selected:
Click on the Do Transform button to perform the transformation. These Classes are also generated as code
and imported into the Visual Studio Project.
© 1998-2007 Sparx Systems Pty Ltd
Part
VIII
51
MDG Integration for Visual Studio
8 Import Database Schema from ODBC
MDG integration for Visual Studio supports importing database tables from an ODBC data source. Tables are
imported as stereotyped Classes with suitable data definitions for the source DBMS.
Note:
Import of stored procedures and views is supported for DB2; SQL Server; Firebird/Interbase; Informix; Ingres;
Oracle 9i, 10g and 11g; MySQL; PostgreSQL; Sybase Adaptive Server Enterprise (ASE) and Sybase
Adaptive Server Anywhere (ASA).
Import Database Tables and Stored Procedures
To import database tables and stored procedures, follow the steps below:
1. Select a package in the EA Project Explorer.
2. To import into:
· the package only, right-click on the package and select the Code Services | Import DDL from
ODBC context menu option
· a suitable diagram in the selected package, right-click on the opened diagram and select the Import
DB Schema from ODBC context menu option.
The Import DB Schema from ODBC Source dialog displays.
© 1998-2007 Sparx Systems Pty Ltd
Import Database Schema from ODBC
3. See the Import Database Schema from ODBC topic in the Enterprise Architect User Guide.
© 1998-2007 Sparx Systems Pty Ltd
52
Part
IX
Baselines, Differencing and Merges
54
9 Baselines, Differencing and Merges
MDG integration for Visual Studio includes tools to help you manage and review changes to your models over
time. These tools apply the concepts of Baselines, Differencing and Merges.
To access these facilities, right-click on the required package in the EA Project Explorer and select the
Current Package | Manage Baselines menu option.
Baselines
MDG integration for Visual Studio provides a facility to create a Baseline (snapshot) of the contents of a
selected package and its child packages at a particular point in time, enabling you to later compare that
branch of the model at that time with the current state of the branch. Baselines are stored in the same XML
format as is used for version control, but are stored within the project in compressed format. You can also
have parallel copies of parts of your model for team development, and create Baselines within each copy to
merge changes into the project master.
Differencing
Differencing (Diff, or Compare) enables you to explore the differences between the current state of a specific
part of your project, and previous or parallel versions captured in a Baseline or an XML file on disk.
Merges
Once Differencing is complete, you can merge information from the Baseline into the current project; it is not
possible to go the other way. You can merge information manually, change by change, or automatically by
electing to merge in all changes in one batch procedure. You can also revert completely to the original
Baseline by importing the stored XMI directly, and merge in information and elements from a Baseline in a
different project, making it possible to keep multiple versions of a single model in synch.
For further information on the Baseline and Differencing facilities, see the Enterprise Architect User Guide.
© 1998-2007 Sparx Systems Pty Ltd
Part
X
Generate RTF Documentation
56
10 Generate RTF Documentation
MDG integration for Visual Studio can automate the generation of RTF documentation based on your project
models. Rich text reports are documents produced by Enterprise Architect in Rich Text Format (RTF), a format
common to many word processors.
The RTF Generator
Enterprise Architect has an enhanced RTF Document Generator that features:
· Powerful WYSIWYG RTF style template editor support, enabling:
· Headers and Footers
· Images
· Indexes
· Tabular Sections
· Nested Sections
· All model elements, connectors, diagrams and their properties
· Template import and export using XML
· Basic templates supplied for customization.
· A document generator that:
· Provides simplified options
· Generates complex documents based on RTF templates.
· An embedded RTF viewer that you use to view RTF documents generated in Enterprise Architect directly
within Enterprise Architect.
To generate RTF Documentation
Briefly, to generate the documentation for a model package:
1. Right-click on the package name in the EA Project Explorer.
2. Select the Current Package | Documentation | Rich Text Format (RTF) Report menu option. The
Generate RTF Documentation dialog displays.
3. Enter a filename for the document to be created, and select a style template.
4. Click on the Generate button to start Enterprise Architect generating the RTF file. The Progress bar
displays the progress of the RTF generation.
Once the document has been created you can view it immediately by clicking on the View button. You can
also view the document at any time later by opening the file from the directory in which it was created.
More Information
For further information on the Generate RTF Documentation dialog and RTF report generation, review the
Enterprise Architect User Guide. To access this information, either:
· Click on the Help button on the Generate RTF Documentation dialog, or
· Click on this Sparx Systems web page link.
Note:
MDG Integration for Visual Studio does not apply Word Masters, Bookmarks or Virtual Documents. It uses
the Enhanced RTF Document Generator and has no access to the Enterprise Architect Legacy RTF
Generator.
© 1998-2007 Sparx Systems Pty Ltd
Part
XI
Generate HTML Documentation
58
11 Generate HTML Documentation
MDG integration for Visual Studio can automate generation of documentation based on your project models.
To generate documentation for a model package:
1. Right-click on the package name in the EA Project Explorer.
2. Select the Current Package | Documentation | HTML Report context menu option. The Generate
HTML Report dialog displays.
3. Enter a title and the output directory for the web site to be generated.
4. Click Generate to generate the HTML files. The Progress field shows the progress of the HTML
Generation.
Once the document has been created you can view it immediately by clicking on the View button on the
dialog.
More Information
For further information on the Generate HTML Report dialog and HTML report generation, review the
Enterprise Architect User Guide. To access this information, either:
· Click on the Help button on the Generate HTML Report dialog, or
· Click on this Sparx Systems web page link.
© 1998-2007 Sparx Systems Pty Ltd
MDG Integration for Visual Studio
59
Index
-DDiagram
Edit 28
Properties 17
Diff Utility 54
Disconnect
From TFS 33
Discussion Forum 26
Add Category 27
Add Post 27
Add Topic 27
Edit Post 27
Message Dialog 28
Reply to Post 27
Documentation
HTML 58
RTF 56
-**.EAP
8
-AAdd
.EAP file 8
EA Model 8
Model Using Wizard
New Elements 19
New Packages 19
19
-BBaseline
Introduction
-E-
54
EA Project Explorer 15
Introduction 15
Edit
Diagrams 28
Post In Forum 27
Element
Add 19
EULA 4
-CCategory, Forum
Add 27
Code
Forward Engineer 45
Generate 45
Synchronize With Model
Working With 45
Compare
Utility 54
Compiled 17 April 2008 3
Connect
To TFS 33
Connection
Properties 33
To TFS, Configure 33
Controlled Packages 40
Create
Category In Forum 27
Post In Forum 27
Topic In Forum 27
45
-FForum
26
-GGenerate
HTML Documentation 58
RTF Documentation 56
-HHTML Documentation
Generate 58
Hyperlinks
© 1998-2007 Sparx Systems Pty Ltd
Index
Hyperlinks
Navigating
Link Project To 11
Model Tab 20
Hyperlinks 22
View UML Diagrams
Model Wizard 19
Multiple Linking 11
22
-IImport
Binary 45
Database Schema from ODBC
DDL Schema from ODBC 51
Directory 46
TFS Work Items 31
-O-
51
ODBC
Import From 51
Options
Refresh Model 12
Synchronize Code 12
-LLicense Agreement 4
Link
Multiple Projects 11
To Model Package 11
Visual Studio Project To Model Package 11
Visual Studio Solution To Model Package 11
-MManage
Mapped Work Item Fields 34
Mapped Fields
Manage 34
MDA Transformation 47
MDG Integration for Visual Studio
Components 15
Copyright Notice 3
Getting Started 8
Introduction 3
Model Tab 20
Options 12
Overview 6
Software Product License Agreement
Using 15
Workflow 6
Message Dialog
Create New Category 28
Create New Post 28
Create New Topic 28
Edit Post 28
Reply to Post 28
Model Driven Transformation 47
Model Package
© 1998-2007 Sparx Systems Pty Ltd
22
4
-PPackage
Add 19
Assign Version Control 37
Check In 37
Check Out 37
Configure 37
Controlled 40
Get Latest 37
Get Package 37
Put Latest 37
WSDL Namespace 43
PIM 47
Platform Independent Model 47
Platform Specific Model 47
Post, Forum
Add 27
Edit 27
Reply To 27
Properties
Diagram 17
PSM 47
-RReply
To Post In Forum 27
Reverse Engineer
Import Binary 45
Import Directory 46
ODBC Data Sources 51
60
61
MDG Integration for Visual Studio
RTF Documentation
Generate 56
Run Search 25
-SSearch
Project 25
Source Code Control
Synchronize
TFS Work Items
37
31
-TTeam Foundation Server
Configure Connection 33
Connect To 33
Disconnect From 33
Import Work Items 31
Maintain Work Items 33
Synchronize Work Items 31
TFS
Configure Connection 33
Connect To 33
Disconnect From 33
Import Work Items 31
Maintain Work Items 33
Synchronize Work Items 31
Topic, Forum
Add 27
-UUML 2.0
Using 15
UML Documentation View 15
Display Diagrams 22
UML Model 8
Using UML 2.0 15
-VVersion Control
Assign 37
Check In 37
Check Out 37
Configure 37
Controlled Packages 40
CVS 37
Features 39
Get Latest 37
Get Package 37
Options 37
Overview 39
Put Latest 37
SCV 37
Setup 39
Subversion 37
System Requirements 39
TFS 37
Usage 39
View
Model 20
UML Diagrams 22
Views
Documentation 15
-WWeb Services (WSDL) 43
Work Item
Manage Mapped Fields 34
Map Fields To Enterprise Architect Properties
34
Work Items
Add New 33
Import 31
Link To Element 33
Remove From Element 33
Synchronize 31
TFS 31
TFS, Maintain 33
WSDL 43
-XXML Schema (XSD) 42
XML Technologies
Introduction 42
Web Services (WSDL) 43
XML Schema (XSD) 42
XSD
XML Schema 42
© 1998-2007 Sparx Systems Pty Ltd
62
© 1998-2007 Sparx Systems Pty Ltd
MDG Integration for Visual Studio
www.sparxsystems.com