1
FBackup
Take full control of your backup
FBackup User Manual
Copyright © 2009 Softland
FBackup User Manual
for FBackup version 4
by Softland
This documentation contains proprietary information of Softland.
All rights reserved. No part of this documentation shall be reproduced, stored in a
retrieval system or transmitted by any means, electronic, mechanical,
photocopying, recoding, or otherwise, without permission from Softland. No patent
liability is assumed with respect to the use of the information contained herein.
The information in this document is subject to change without notice. Although
every precaution has been taken in the preparation of this book, Softland assumes
no responsibility for errors and omissions. Nor is any liability assumed for
damages resulting from the information contained herein.
Windows ® is a registered trademark of the Microsoft Corporation. All other
products or company names in this document are used for identification purposes
only, and may be trademarks of their respective owners.
Contents
3
Table of Contents
6
Part I Introduction
1 Product Description
...................................................................................................................................
6
2 System Requirements
...................................................................................................................................
7
3 Installation
...................................................................................................................................
7
10
Part II Getting Started
1 How to Configure
...................................................................................................................................
a New Backup?
10
2 How to Run
...................................................................................................................................
a Backup Job?
11
3 How to Manage
...................................................................................................................................
Backup Jobs?
12
4 How to Restore
...................................................................................................................................
from a Backup?
12
5 How to Password
...................................................................................................................................
Protect a Backup?
13
6 How to Schedule
...................................................................................................................................
a Backup?
13
7 How to Backup
...................................................................................................................................
to USB or Firewire drives?
14
17
Part III Backup Types
1 Backup Types
...................................................................................................................................
17
19
Part IV Main Window
1 Commands
...................................................................................................................................
19
2 Getting Started
...................................................................................................................................
21
3 Backup List
...................................................................................................................................
22
4 Create Shortcut
...................................................................................................................................
23
5 Plugins ...................................................................................................................................
24
6 Logging ...................................................................................................................................
25
7 Keyboard
...................................................................................................................................
Shortcuts
27
29
Part V New Backup Wizard
1 Overview...................................................................................................................................
29
2 Name and
...................................................................................................................................
destination
29
Local
.......................................................................................................................................................... 30
Network
.......................................................................................................................................................... 31
3 What do ...................................................................................................................................
you want to backup?
32
4 How do you
...................................................................................................................................
want to backup?
33
5 When do...................................................................................................................................
you want to backup?
34
37
Part VI Backup Properties
1 Overview...................................................................................................................................
FBackup 4 User Manual
37
Copyright © 2009 Softland
3
4
FBackup 4
2 General ...................................................................................................................................
37
3 Destination
...................................................................................................................................
37
Local hard drive
.......................................................................................................................................................... 38
External hard drive.......................................................................................................................................................... 39
Network
.......................................................................................................................................................... 40
4 Sources ...................................................................................................................................
42
5 Filters
...................................................................................................................................
43
6 Type
...................................................................................................................................
44
7 Compression
...................................................................................................................................
45
8 Advanced
...................................................................................................................................
46
9 Scheduler
...................................................................................................................................
47
Scheduler Properties
.......................................................................................................................................................... 48
51
Part VII Restore Wizard
1 Where and
...................................................................................................................................
how to restore
51
2 What do ...................................................................................................................................
you want to restore
52
3 Do you want
...................................................................................................................................
to filter the files
53
56
Part VIII File Filtering
1 Overview...................................................................................................................................
56
2 File Filter...................................................................................................................................
56
59
Part IX Options
1 General ...................................................................................................................................
59
2 Startup ...................................................................................................................................
59
3 Application
...................................................................................................................................
folders
60
4 Updates ...................................................................................................................................
61
64
Part X Help
1 Check for
...................................................................................................................................
Updates
64
2 About
64
Index
FBackup 4 User Manual
...................................................................................................................................
65
Copyright © 2009 Softland
Introduction
Part
I
6
FBackup 4
1
Introduction
1.1
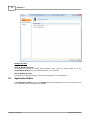
Product Description
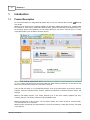
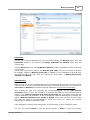
For more information on using FBackup please refer to our user manual (PDF format):
FBackup
User Guide
FBackup is an award-winning backup software for Windows. FBackup protects your valuable data
from partial or total loss by automating backup tasks, password protecting and compressing it to
save storage space. Using FBackup you can easily backup to any local or network drive, or other
removable media (such as USB or Firewire drives).
FBackup can backup open/locked files(if the files are located on local partitions on Windows
XP/2003) and it can perform full and mirror backups. When defining a backup you can also set file
filters and schedule the backup for automatic execution.
There is also the option to run predefined backups, such as My Documents, My Pictures, Internet
Explorer Favorites, Mozilla FireFox Profiles, Mozilla Thunderbird or Outlook Express emails and
settings.
FBackup has ZIP64 support (can create backups over 2 GB) and creates standard zip files,
meaning that you can access it with any zip compatible utility.
FBackup keeps track of file versions. You can easily restore any version of files or a whole folder.
You can filter files to be restored.
FBackup tests the backup files automatically to ensure the backup is safe and correctly executed
(uses CRC32).
FBackup 4 User Manual
Copyright © 2009 Softland
Introduction
7
FBackup works with any drive letter, including mapped network drives and UNC paths.
FBackup runs on Windows 2000/2003/XP/Vista and offers multi language support.
1.2
System Requirements
To install FBackup you need Windows 2000/XP/Server 2003 or Windows Vista and at least 20
megabytes of free disk space. Installing additional language files may increase the space
requirements.
Because the application uses zip compression, additional disk space is needed for the temporary
directory. The amount of free space depends on the size of files to backup.
Note: FBackup can backup open files only if installed on Windows XP, Windows 2003 Server or
Windows Vista and if the files are on NTFS partitions. FBackup works on Windows 2000 too but
this feature will not be available on these systems.
1.3
Installation
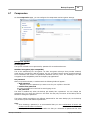
Install
To install FBackup on a computer you need to have administrative rights. The installation process
does not take much time. All you need to do is to follow the instructions of the FBackup Setup
Wizard. There is no need to reboot at the end of the setup, you can run the program right after it
is installed on your machine.
If you have already installed an older version of FBackup, you can install the new version on top
of the older one, no need to uninstall it (the installer will recognize if the program is running and
ask if you wish to close it in order to continue). You might need to close FBackup manually if it is
in a middle of an operation.
Note: If you have version 3.x (or previous) installed, you can install version 4.x without
uninstalling the other one. FBackup 4 will be installed and run separately, and will give you the
option to import your backup jobs/groups from the previous versions.
When you start the installation process you will be prompted to choose a language for the setup
wizard. Later during the setup you can check to install other language files too. If you install
multiple language files, FBackup will use the selected language as the default one. After
installation, to switch between them, go to FBackup's menu, select Tools->Options->General.
Steps during installation:
1) Select setup language - you need to choose from the drop-down box a language for the
setup wizard
2) Setup welcome message - press Next to continue
3) License agreement - shows the FBackup EULA. After you read and accept it, check the I
accept the agreement option and click Next to continue.
6). Select additional tasks
i) Create a desktop icon - checked by default, places a shortcut on desktop
ii) Associate FBackup 4 with the ".fkc" extension - checked by default, will associate
the .fkc files with FBackup (".fkc" are catalogs created by FBackup after each backup)
iii) Start on Windows startup - if checked FBackup will load each time Windows starts
iv) Create a Quick Launch icon - checked by default, places an icon in the Quick
Launch toolbar
8) Select languages for the interface - you can check to multiple languages for FBackup's
FBackup 4 User Manual
Copyright © 2009 Softland
8
FBackup 4
interface
9) Select default interface language - if multiple languages were selected, you need to
select a default one
10) Ready to install FBackup. Click on Install to start the installation.
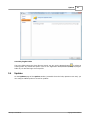
Uninstall
To uninstall FBackup, first you need to close the application. Then go to the FBackup application
group (from the Windows Start -> Programs -> menu and click Uninstall).
You can also uninstall FBackup using the Add/Remove Programs option from Start->Settings>Control Panel.
FBackup 4 User Manual
Copyright © 2009 Softland
Getting Started
Part
II
10
FBackup 4
2
Getting Started
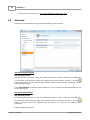
2.1
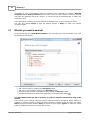
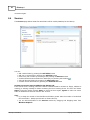
How to Configure a New Backup?
To create a new backup job, click on the New Backup Wizard toolbar button (
). For each
backup job you must specify at least its name, a valid storage destination and the source files
(first two steps of this wizard), the rest of the options not being mandatory. In New Backup
Wizard, you can switch anytime to Advanced mode for more configuration options.
These are the steps you must perform in the New Backup Wizard:
1) Enter the name of the backup in the Backup name field and select a location where you
want to save the backup. You can choose as destination:
- your local hard drive (Local)
- a network computer (LAN)
Click Next to go to the following step.
2) Select the files and folders you want to backup (sources of the backup) or choose a
predefined backup from the drop down list and click Next.
FBackup 4 User Manual
Copyright © 2009 Softland
Getting Started
11
3) Select how do you want to backup. You can also use encryption for the backup types that
creates zip files.
2.2
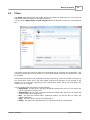
How to Run a Backup Job?
To start a backup click the Backup button (
) from the application's toolbar or press F6.
During the execution of the backup, you will see a Backup image appear in front of the icon
chosen for the backup job. If the backup is finished successfully (without errors and warnings)
this image will disappear restoring the initial view of the backup jobs' icon.
If one or more files could not be backed up (not enough user rights etc.), then the Warning icon
appears in front of the default backup job icon, after the backup finished. Read the log files (from
View->Job Logs->Last Backup log) for details about the files that were not backed up. The
Warning icon will disappear when the backup is executed again and all files were backed up.
If an error occurred during backup and the backup was aborted, the Error icon appears in front of
the backup job. Read the log files (from View->Job Logs->Last Backup log) for details about
the errors. The icon will disappear when the backup is executed again and the execution is
successful.
FBackup 4 User Manual
Copyright © 2009 Softland
12
2.3
FBackup 4
How to Manage Backup Jobs?
Copy an Existing Backup Configuration
You can use the Create Like (Ctrl+L) option from the File menu to create a duplicate of the
selected backup job and after that you can easily modify its configuration. This option can also be
selected from the right-click menu of the backup job.
Modify a Backup Job Configuration
First you must select the backup job you wish to modify. Then press the Properties button (
) from the application's toolbar. This will open the Backup Properties window. You can also
change its configuration by choosing Properties from the right-click menu of the backup job.
After the Properties window is opened, go to the page with the settings you want to modify.
Delete a Backup Job
Select the backup job you want to delete and select Delete Backup option from the File menu.
Another possibility is to choose Delete from the right-click menu of the backup job.
Files and folders from the source and destination will not be deleted, by any of these operations.
2.4
How to Restore from a Backup?
With FBackup you can do the following restore operations:
· restore the latest version of all files
· filtered restore
· restore the latest version of a particular file
· restore the latest version of multiple selected files
To make a full or a filtered restore start the Restore Wizard by pressing the Restore button (
) from the application's toolbar. You can restore to the original location or to a different
location of your choice.
Beside files, folder information is also added to backup, so a restore process can recreate the
original folder structure.
FBackup 4 User Manual
Copyright © 2009 Softland
Getting Started
2.5
13
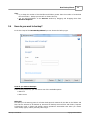
How to Password Protect a Backup?
Passwords are used to protect your backup files from unauthorized access.
Setting the Password
The Encryption Settings window is shown in the Compression page under the Type section of
the Backup Properties window or in the New Backup Wizard.
By default the No encryption option is selected.
The Zip(2) compatible encryption is compatible with all third party zip applications.
When choosing a password, it is recommended that you use a combination of letters and numbers
and at least a 6 character long password.
You should manually enter the password in the New password field and re-enter it in the
Confirm new password field to avoid typing errors.
The Old password field is enabled only when the backup job already has a password. You can
change the password only if you enter the old one in this field.
This way only the owner of the backup will be allowed to change the password.
The system makes it possible to set different passwords for the same backup job, so the backup
may contain zip files with different passwords. FBackup does not store passwords. Make sure that
you remember all passwords that have been used for a backup job, or you will not be able to
restore your files.
How to Remove the Password?
In the Backup Properties->Compression page, go to Encrypt the zip file section, select the
No Encryption option and enter the password that you used in the Old password field. You
cannot remove the password if you don't provide the old one.
Using Passwords when Restoring
During the restore process of backups with password protection, the Enter Password dialog will
appear. Enter the password and press OK. If you do not know the password for this backup
number you can:
· press Skip backup to go to the next archive - the restore may be incomplete in this case.
· press Stop restore to stop the whole process - the restore will be incomplete, because
only a part of the files were restored.
2.6
How to Schedule a Backup?
You can schedule a backup from the Backup Properties window.
Open the Backup Properties window by pressing the Properties button (
application's toolbar and go to Scheduler page.
FBackup 4 User Manual
) from the
Copyright © 2009 Softland
14
FBackup 4
In order to add a new scheduled backup press the Add button and select the needed
configuration in the newly opened window.
After defining the scheduled backup you must set its run time by pressing the Schedule button.
If you skip this step the default Windows value will be used (usually is Daily at 9:00 am). .
2.7
How to Backup to USB or Firewire drives?
You can backup your data to an USB or Firewire drive and from an USB or Firewire drive using
FBackup. This is a practical backup destination as it allows you to store important files to external
devices, offering increased portability. It can be considered as an additional protection against
data loss as the result of hardware failure or other disasters.
There are external USB hard drives with performance comparable to conventional hard drives.
These portable drives (called enclosures) are composed of devices that connect through USB on
one side and to conventional hard drives on the other side. A hard drive is installed into the
enclosure and then the enclosure is plugged into the computer, thus creating a normal USB
backup device. Given the size of nowadays hard drives, this can be considered a mass storage
device for backup purposes.
There are external hard drives that beside the USB technology use also Firewire as a connection
port. On one side Firewire hard drives tend to have increased speed over USB, but on the other
side USB ports are more common on computers.
Steps in backing up to USB drive with FBackup:
1) Start your USB device. Before starting the backup process make sure that the USB drive
is started and working. Usually the enclosure should have a start button and display the
status of the drive using led displays. When it is started a green led should be lighted.
2) Make sure your drive is formatted. If you have just purchased the drive and didn’t use
it yet, you might have to format it (only if you didn’t use it before, since formatting will erase
everything from it). Formatting the USB drive in Windows Vista:
· Go to Start->Settings->Control panel->System and Maintenance->Administrative
Tools->Computer Management
If you are prompted for an administrator password or confirmation, type the password or
provide confirmation.
· Under Storage click Disk Management
· To format the volume with the default settings, in the Format dialog box, click OK,
and then click OK again.
· Test to see if the drive is now recognized by going to Windows Explorer (a new
drive letter should appear)
3) Configure FBackup. If the drive is formatted and recognized by Windows, it will be
recognized by FBackup too. Now, to backup to the USB drive you should define a backup job
in FBackup that has the destination set to the USB drive. To ensure this, please select the
backup job you want to run, press CTRL+P in order to open the Backup Properties window
and select the USB and Firewire page under Destination. Select a drive from the External
FBackup 4 User Manual
Copyright © 2009 Softland
Getting Started
15
hard drive drop down list. You can also define a new backup job and in the "Where do you
want to save your backup" section, select the USB drive.
FBackup 4 User Manual
Copyright © 2009 Softland
Backup Types
Part
III
Backup Types
3
Backup Types
3.1
Backup Types
17
FBackup stores a summary snapshot of the file information into a backup catalog file (".fkc") each
time a backup is executed. For every file backed up, the snapshot contains the file name, size and
attributes as well as the date and time of creation, latest modification and latest access.
Legacy backup applications inspect each file's archive flag to identify which files have been
changed. FBackup will not interfere with any other backup software, because it does not read or
change the archive flag, it uses the catalog file to decide which files have to be backed up and
which not.
Full Backup
Full backup is the starting point for all other backups and contains all the data in the folders and
files that are selected to be backed up. Because full backup stores all files and folders, frequent
full backups result in faster and simpler restore operations. Remember that when you choose
other backup types, restore jobs may take longer.
Mirror Backup
A mirror backup is identical to a full backup, with the exception that the files are not compressed
in zip files and they cannot be protected with a password. A mirror backup is most frequently
used to create an exact copy of the backup data. It has the benefit that the backup files can also
be readily accessed using tools like Windows Explorer.
FBackup 4 User Manual
Copyright © 2009 Softland
Main Window
Part
IV
Main Window
4
Main Window
4.1
Commands
19
Toolbar
The toolbar contains a selection of the most important FBackup functions.
New - starts the New Backup Wizard
Open - creates a new backup job from the opened ".fkc" or ".ini" file
Properties - opens a dialog to edit the backup job configuration
Backup - starts the backup process for the currently selected backup job. Clicking the small
arrow displays the following drop-down menu:
· Make - performs the backup type defined in backup properties
· Make Full - performs a full backup regardless of the backup type
Restore - starts the Restore Wizard
· Restore Latest Version - restores the latest version to its original location without
showing the Restore wizard
· Restore Latest Version To - restores the latest version to another location (prompts
for one) without showing the Restore wizard
Cancel - cancels the backup, test or restore process
Refresh - reloads the backup catalog
Menu commands
File
· New Backup... starts the New Backup Wizard, same as the New toolbar button or
keyboard shortcut Ctrl+N
· Open Backup... creates a new backup job from the opened ".fkc" or ".ini" file, same as the
Open toolbar button or the keyboard shortcut Ctrl+O
· Create Like duplicates the selected backup job, same as the toolbar button Create Like or
the keyboard shortcut Ctrl+E
· Create Shortcut... creates a shortcut to a backup job (for easy backup execution from
outside the program) on your desktop, quick launch or other location
· Delete Backup - removes the current selected backup, same as the toolbar button Delete
or the keyboard shortcut Ctrl+Del
· Properties... opens the backup properties window, same as the toolbar button Properties
FBackup 4 User Manual
Copyright © 2009 Softland
20
FBackup 4
or the keyboard shortcut Ctrl+P
· Exit - exits the application, same as the keyboard shortcut Alt+F4
View
· Open Folder - shows list of folders that can be opened with Windows Explorer
· Destination Folder - folder containing the destination files
· Catalog Folder - folder containing the ".fkc" files
· Initialization Folder - folder containing the ".ini" files
· Job Logs - contains a list of available logs
· Last Backup Log - shows the latest backup log for the selected backup job. If there
is no log file, the menu is disabled.
· Last Restore Log - shows the latest restore log for the selected backup job. If there
is no log file, the menu is disabled.
· Open Log Folder - opens Windows Explorer showing the contents of the log folder
· View Application Log - shows the application's log file. If there is no log file, the menu is
disabled.
· Restore Default Layout - restores FBackup's windows size, position and columns
Actions
· Backup
· Make Backup - starts the backup process for the selected backup job, same as the
Backup toolbar button or keyboard shortcut F6
· Make Full Backup - performs a full backup regardless of the backup type
· Restore
· Restore... starts the Restore wizard same as the Restore toolbar button or the
keyboard shortcut F7
· Restore Latest Version - restores the latest version to its original location without
showing the Restore wizard
· Restore Latest Version To... - restores the latest version to another location
(prompts for one) without showing the Restore wizard
· Cancel (F8) - cancels the backup, test or restore process, same as the Cancel toolbar
button
· Refresh (F5) - reloads the backup catalog
FBackup 4 User Manual
Copyright © 2009 Softland
Main Window
21
Tools
· Plugins - opens the Manage Plugins window
· Getting Started - opens the Getting Started window
· Options - opens the Options window
Help
·
·
·
·
·
4.2
FBackup Help (F1) - opens the help file
Visit FBackup.com opens the FBackup website
Visit the support forum opens the forum page
Check for updates - displays a window with the available updates
About FBackup - opens the About box of FBackup
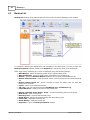
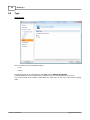
Getting Started
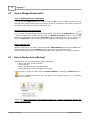
This window is displayed when you first run FBackup. You can also access this window if you
select Getting Started from the Tools menu.
There are two large buttons for backup and restore and a list of articles about FBackup.
Backup
Press this button to create or run backup jobs.
Create a new Backup
Press the New button to start creating a new backup job using the New Backup Wizard.
Run Selected Backup
Select an existing backup job from the list and press Backup to run the selected job.
Restore
Open an Existing Backup
Use the Open button to recreate a backup job from the backup catalog (.fkc) or from the
initialization file (.ini).
The recreated backup job will be added to the backup list.
Restore Selected Backup
Select an existing backup job from the list and press Restore to open the Restore Wizard.
If you don't want to show the FBackup Startup window next time you open FBackup, uncheck
the Show this dialog at next start option.
By default this option is checked.
FBackup 4 User Manual
Copyright © 2009 Softland
22
4.3
FBackup 4
Backup List
Backup list contains all the defined backups visible in the left side of FBackup's main window.
To configure a backup job's appearance (icon and label) in the backup list, you have to open the
Backup Properties window, switch to the General tab, change the name of the backup job.
When right clicking a backup job, a menu is displayed giving the following options:
· Make Backup - starts the backup process for the selected backup job
· Make Full Backup - performs a full backup regardless of the backup type
· Restore - opens the Restore Wizard window for the currently selected backup job
· Restore Latest Version - starts the latest version restore process for the selected backup
job
· Restore Latest Version To - opens a window to select the folder were you want the
backup to be restored
· Cancel - aborts current backup process
· Job Logs - lets you open and view the Last Backup Log, Last Restore Log
· Create Shortcut... creates a shortcut to the backup job
·
·
·
·
·
·
·
Backup <Selected Group Name> Group - executes all backup jobs from the group
New Group... adds a new group
Rename group... renames the selected group
Delete Group - deletes the selected group and all its backup jobs
Create Like - duplicates a backup job
Delete Backup - deletes a backup job
Properties... opens the Backup Properties window
FBackup 4 User Manual
Copyright © 2009 Softland
Main Window
4.4
23
Create Shortcut
The Create Shortcut window can be opened from the File->Create Shortcut... menu item or
by right-clicking the backup job from the backup list and selecting Create Shortcut... It creates
a shortcut for the backup job on a designated location and you can simply run the backup job by
double-clicking it.
Once you have selected the Action to be performed and the backup job/group to run, press OK to
create the shortcut. A window will prompt you to select a name for your shortcut and its
destination. Once that's completed, the shortcut will be placed in the selected destination.
FBackup 4 User Manual
Copyright © 2009 Softland
24
FBackup 4
Execute
Main application
Option set by default. When you will double-click the backup shortcut, the main application will
start and the backup will be executed. Furthermore, if the Close after run option is checked,
FBackup will be closed after the backup job is executed.
Action
You can select an action to perform when you double-click on the shortcut:
· Backup
Clear backup before run
If this is checked, FBackup will first delete the ".fkc" file and all zip files associated with the
current backup job and after that execute the action.
· Load - at the scheduled date it opens FBackup and selects the backup job
4.5
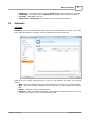
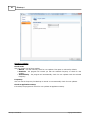
Plugins
The Manage Plugins window allows you to add, remove, enable or disable the Backup4ll plugins.
After installing a plugin, you can use it on the What do you want to backup page when
creating a new backup job using the New Backup Wizard or on the Sources page using
Advanced mode (Backup Properties).
FBackup 4 User Manual
Copyright © 2009 Softland
Main Window
25
Add
Press this button to install a new backup plugin.
You will be asked to select the plugin file location from your computer. Multiple plugin files can be
selected and open.
Delete
Use this button to remove one or more selected plugins from the list. This plugins will be removed
from the New Backup Wizard too.
Please note that if you delete a plugin from FBackup, all backup jobs using that plugin will be
removed when you restart FBackup.
Properties
Pressing this button will open a window with details about the selected plugin and its creator as:
Plugin Name, File Name, Plugin GUID, Company, Company Site and Company E-mail.
Get Plugins
Pressing this button will open our internet website on the Free Backup Plugins page.
Here you can download plugins to be used when creating backup jobs.
Close
Press this button to close the Manage Plugins window.
4.6
Logging
FBackup provides a log engine that helps you track the backup, restore operations. It is
composed of four subsystems: backup logging, restore logging. Log files are accessible from the
View->Job Logs menu item. You can also see an "overview" of all three subsystems by selecting
FBackup 4 User Manual
Copyright © 2009 Softland
26
FBackup 4
the View Application Log menu item.
For each operation the system logs:
· start time and date
· the operation
· errors or warnings
· end time and date
The Tools->Options->Logs and history configuration window provides additional options that
you can select to further customize the logging process.
Content
Log detailed information
If this option is enabled, the logs will contain information about every file used in the backup,
restore or test process.
Include summary in log
If this option is checked, the logs will include all the text available in the Summary view.
Log folder
After a long period the application will generate a large number of log files. Since all the log files
are stored in the same folder, the system has an option to limit the size of the log folder. Just
select Restricted to and choose a Size and Unit for the log folder (default is 10MB). If the log
file of the running backup job is larger than the limit, it will still be stored in the log folder. When
the same operation will run again, the previous log file will be deleted.
Backup Logging
Logged operations:
· Checking sources/destination
· Creating file list
· Archiving files
· Saving catalog
Other information added to the logs: the total number of files added to backup, the total size of
files added to backup and the number of files excluded.
Restore Logging
FBackup 4 User Manual
Copyright © 2009 Softland
Main Window
27
Logged operation (except mirror backup): Processing zip file. The total number of restore files
is logged and the start/end time of restoring.
4.7
Keyboard Shortcuts
Keyboard shortcuts configured in FBackup:
New backup wizard - CTRL + N
Open backup - CTRL + O
Backup job properties - CTRL + P
Refresh - F5
Execute backup - F6
Restore - F7
Cancel - F8
Focus menu - F10
FBackup 4 User Manual
Copyright © 2009 Softland
New Backup Wizard
Part
V
New Backup Wizard
5
New Backup Wizard
5.1
Overview
29
Using the New Backup Wizard you can easily create a new backup job. The steps in wizard
must be followed in the given order.
If you want to create a new backup job using advanced options, you can do that by pressing the
Advanced mode button that will open the Backup Properties window. All settings from the
New Backup Wizard are included in the Backup Properties.
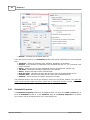
5.2
Name and destination
In the first step of the New Backup Wizard you can configure the backup name and the backup
destination.
Name your backup
Backup Name
Enter the name of the backup job. This name will appear in the backup list, right under the
chosen picture. This field is mandatory.
The name of the backup job is closely related to the name of the subdirectory in destination that
contains zipped and mirrored files and to the name of the catalog. That is why when you rename
the backup job, the name of the catalog and the name of the subdirectory from destination are
also changed if possible.
FBackup 4 User Manual
Copyright © 2009 Softland
30
FBackup 4
If the destination is on HDD (local), LAN (network) or FTP (remote) the name of the subdirectory
and the name of the catalog are always changed, except for the case when you do not have
enough permission to rename or some files are locked.
Where do you want to save your backup
User can select one of the available destinations:
· Local: hard disk drive, floppy drive, zip drive, USB drive, mapped network drive
· Network: UNC network drive
5.2.1
Local
You can use a valid local destination for your backup: hard disk drives, floppy disk drives, zip
drives, USB drives .
The Local option is selected by default when you define a new backup. From the Drive list, you
can select either one of your hard disk partitions, mapped network drives, the floppy disk. By
default, the first partition is selected (usually C:).
In the Folder where to perform the backup field by default it is the path to the My FBackup 4
folder (\Users\<user name>\Documents\MyFBackup 4). You can click on the Select another
destination icon
stored.
and browse to a destination folder of your choice where the backup will be
If the destination drive is missing (when the network is disconnected for instance or floppy, CD or
FBackup 4 User Manual
Copyright © 2009 Softland
New Backup Wizard
31
DVD is missing), an error message is shown containing the list of missing drives. The user can
choose Cancel to stop the backup process or Retry to check the drive again. If the scheduler
starts the backup then the system will retry as many times as set in the Tools->Options>Backup window and if still not possible to access the drive it will abort the backup process.
5.2.2
Network
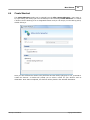
You can use a network destination for your backup by selecting the Network option in the
Where do you want to save your backup? section.
Click the Browse button and go through the My Network Places to select a destination where
the backup will be stored.
You can also enter network paths in the Folder field. Only a full path is allowed. For example,
suppose \\Backup_Server\PC1 is mapped on your workstation as drive X, then the following
paths are both valid and indicate the same folder: \\Backup_Server\PC1\Backup or X:
\Backup.
Make sure you can write in the destination and in the selected folder (you have the proper rights
and the media is not write-protected) before finishing the backup configuration. You can enter an
User name and Password to access the network destination if it requires authentication. If you
are logged in as an user that has rights to write to the specified network destination, you can
check the First use Windows auth. option. What this option does is that it checks on the
network destination if the logged in user has rights to access it.
After entering the path and eventually the username and password, use the Test button to see if
the destination is reachable and that you have sufficient rights to access it. The network
connection was tested successfully pop-up message means that the network destination was
FBackup 4 User Manual
Copyright © 2009 Softland
32
FBackup 4
accessible. In case of insufficient rights the following error message will appear: Network
connection error. Access is denied. In this case you have to either make sure that the entered
username and password values are correct, or contact the network administrator to obtain the
necessary rights.
If the destination is missing (when the network is disconnected), an error message is shown.
The user can choose Cancel to stop the backup process or Retry to check the network
connection again.
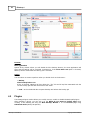
5.3
What do you want to backup?
In the second step of the New Backup Wizard, you must select the files and folders to be used
by FBackup for the backup.
You can:
· add a whole folder by pressing the Add folder button
· add one or several files by pressing the Add files button
· remove any file or folder by selecting it and pressing the Remove button
· exclude subdirectories and files from backup by un-checking the thickbox
You must add at least one file or directory in order to continue with the next step of the
wizard.
If the source drive is missing (when the network is disconnected for instance or floppy, CD/DVD is
missing), a warning message is shown containing the list of missing drives. The user can choose
Abort to stop the backup process, Retry to check the drive again, Ignore to mark the source
folder as deleted and continue with the next sources.
FBackup 4 User Manual
Copyright © 2009 Softland
New Backup Wizard
33
Tips:
· try to keep the number of checked files and folders greater than the number of unchecked
files and folders - backup process will run faster this way.
· you can add files/folders to the Sources window by dragging and dropping them from
Windows Explorer.
5.4
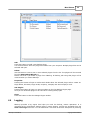
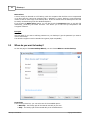
How do you want to backup?
In the third step of the New Backup Wizard you can choose the backup type.
How do you want to backup?
From the drop-down list, you can choose one of the available options:
· Make full
· Make mirror
Make full
Full backup is the starting point for all other backups and contains all the data in the folders and
files that are selected to be backed up. Because full backup stores all files and folders, frequent
full backups result in faster and simpler restore operations. Remember that when you choose
other backup types, restore jobs may take longer.
FBackup 4 User Manual
Copyright © 2009 Softland
34
FBackup 4
Make mirror
A mirror backup is identical to a full backup, with the exception that the files are not compressed
in zip files and they cannot be protected with a password. A mirror backup is most frequently
used to create an exact copy of the backup data. It has the benefit that the backup files can also
be readily accessed using tools like Windows Explorer.
If you choose the Make mirror option, you can also check the Compress option to zip each file
individually, preserving the folder structure. This allows you to use the zip compression and
encryption features.
Encrypt?
Use this option if you want to add zip protection to your backups. Type the password you want to
use for this backup.
The default encryption used is Standard encryption (Zip2 compatible)
5.5
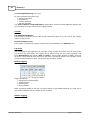
When do you want to backup?
On the last page of the New Backup Wizard, you can choose When to run the backup.
How often?
From the drop-down list, you can select one of the available option:
· Manually - the backup job will be started manually by the user
· Daily - the backup job will be started daily at its scheduled time
FBackup 4 User Manual
Copyright © 2009 Softland
New Backup Wizard
35
· Weekly - the backup job will be started weekly at its scheduled time
· Monthly - the backup job will be started monthly at its scheduled time
· Shutdown - the backup job will be started at the computer shutdown
By default, the selected option is Manually.
What day?
This field is activated only when the Weekly or Monthly option is selected in the How often list.
If the Weekly option is selected, you can choose the day of the week when to run the backup.
If the Monthly option is selected, you can choose the day number of the month when to run the
backup.
What hour?
From this field, you can select the hour for the backup job to start.
User
In this field, by default, the current logged in user's login name will be displayed.
Password
If your user account has a password make sure that you enter it by pressing the Set password
button. We do not save your password but it is needed in order to set up the scheduled task in
the Windows Task Scheduler. If your user account does not have a password you must select
the Allow blank passwords when scheduling option from Tools->Options->Preferences.
Also, make sure that you enter the correct password - if the password is wrong the scheduled
task will not run.
FBackup 4 User Manual
Copyright © 2009 Softland
Backup Properties
Part
VI
Backup Properties
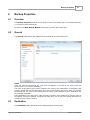
6
Backup Properties
6.1
Overview
37
The Backup Properties window can be used to create new backup jobs in the advanced mode,
or to edit an existing backup job.
By default, the New Backup Wizard will be used to create new backup jobs.
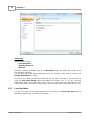
6.2
General
The General page defines the appearance of the backup job in the backup list.
Name
Enter the name of the backup job. This name will appear in the backup list, right under the
chosen picture. This field is mandatory.
The name of the backup job is closely related to the name of the subdirectory in destination that
contains zipped and mirrored files and to the name of the catalog. That is why when you rename
the backup job, the name of the catalog and the name of the subdirectory from destination are
also changed if possible.
If the destination is on HDD (local), LAN (network) the name of the subdirectory and the name of
the catalog are always changed, except for the case when you do not have enough permission to
rename or some files are locked.
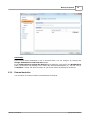
6.3
Destination
The Destination page defines where the backup archive will be stored.
FBackup 4 User Manual
Copyright © 2009 Softland
38
FBackup 4
Destination
Valid
·
·
·
destination types:
Local hard drive
External hard drive
Network
Selecting a backup destination type on the Destination page, will enable the options on the
corresponding type page.
You can also change the backup destination from any destination type page by checking the
Change destination to... option.
If you lost your backup job from the backup list and you want to recreate it, you can do so by
using the File->Open backup option and selecting an existing ".fkc" or ".ini" file. The same
action takes place if you double click on the ".fkc" file. A new backup job configuration will be
added to the backup list and the configuration of the new backup job is copied from the ".fkc" file.
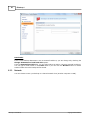
6.3.1
Local hard drive
You can use a valid local hard disk destination for your backup. The Local hard drive option is
selected by default when you define a new backup.
FBackup 4 User Manual
Copyright © 2009 Softland
Backup Properties
39
Destination
If the current backup destination is not a local hard drive, you can change it by checking the
Change destination to local hard drive option.
In the Folder where to perform the backup field by default it is the path to the My FBackup 4
folder (\Documents and Settings\<user name>\My Documents\MyFBackup 4). You can click on
the Browse... button and select a location of your choice where the backup will be stored.
6.3.2
External hard drive
You can select an external hard drive as destination for backup.
FBackup 4 User Manual
Copyright © 2009 Softland
40
FBackup 4
Destination
If the current backup destination is not an external hard drive, you can change it by checking the
Change destination to local hard drive option.
From the External hard drive list, you can select either an USB or a Firewire external hard drive.
You can type a folder name in the Folder field or you can click the Browse button to choose
another folder where the backup will be stored.
6.3.3
Network
You can choose to save your backup to a shared network drive (another computer or NAS).
FBackup 4 User Manual
Copyright © 2009 Softland
Backup Properties
41
Destination
You can use a network destination for your backup by selecting the Network option from the
Destination window or by checking the Change destination to network option from the
network page.
Click the Browse button to open My Network Places and select a destination where the backup
will be stored.
You can also enter network paths in the Network path (UNC) field. Only a full path is allowed.
For example, suppose \\Backup_Server\PC1 is mapped on your workstation as drive X, then
the following paths are both valid and indicate the same folder: \\Backup_Server\PC1
\Backup or X:\Backup.
Authentication
Make sure you can write in the destination and in the selected folder (you have the proper rights
and the media is not write-protected) before finishing the backup configuration. You can enter an
User name and Password to access the network destination if it requires authentication.
After entering the path and eventually the username/password, use the Test network
connection button to see if the destination is reachable and that you have sufficient rights to
access it. The network connection was tested successfully pop-up message means that the
network destination was accessible. In case of insufficient rights the following error message will
appear: Network connection error. Access is denied. In this case you have to either make
sure that the entered username/password values are correct, or contact the network
administrator to obtain the necessary rights.
If the destination is missing (when the network is disconnected), an error message is shown.
The user can choose Cancel to stop the backup process or Retry to check the network
FBackup 4 User Manual
Copyright © 2009 Softland
42
FBackup 4
connection again.
6.4
Sources
The Sources page defines what files and folders will be used by FBackup for the backup.
You can:
· add a whole folder by pressing the Add folder button
· add one or several files by pressing the Add files button
· remove any file or folder by selecting it and pressing the Remove button
· exclude subdirectories and files from backup by un-checking the thickbox
· select all files and folders by pressing the Check all button
· unselect all files and folders by pressing the Uncheck all button
At least one source must be added to the backup job.
If the source drive is missing (when the network is disconnected for instance or floppy, CD/DVD is
missing), a warning message is shown containing the list of missing drives. The user can choose
Abort to stop the backup process, Retry to check the drive again, Ignore to mark the source
folder as deleted and continue with the next sources.
Tips:
· try to keep the number of checked files and folders greater than the number of unchecked
files and folders - backup process will run faster this way.
· you can add files/foders to the Sources window by dragging and dropping them from
Windows Explorer
FBackup 4 User Manual
Copyright © 2009 Softland
Backup Properties
6.5
43
Filters
The Filters page defines files and folders filters to be applied to backup sources. Only files and
folders that match the filters will be added to backup.
You can use the Add include and Add exclude buttons to add filter rules for the current backup
job.
The system selects only files that match the include filter and do not match the exclude filter. This
means the exclude filter is more powerful: if a file satisfies both include and exclude filters, it will
be excluded.
Include and exclude filters are composed from filter restrictions. Two or more filter restrictions in
the include filter means that a file must satisfy at least one restriction to be included in the
backup. Two or more filter restrictions in the exclude filter means that a file must satisfy any
restriction to be excluded.
You can manage filter restrictions using the buttons:
· Add include - this will open a new Filter Properties window from where you can add a new
include restriction to the filters list.
· Add exclude - this will open a new Filter Properties window from where you can add a new
exclude restriction to the filters list.
· Edit - will open the selected filter's properties window. You will be able to modify the
selected restriction.
· Copy - this will create a copy of the selected filter.
· Delete - will remove the selected filter from the list of include or exclude filters.
FBackup 4 User Manual
Copyright © 2009 Softland
44
6.6
FBackup 4
Type
Backup type
User can select one of these backup types:
· Full
· Mirror
The backup type can be changed from the Type page in Backup Properties.
Fullbackup backup use zip compression to reduce the size of the stored backup versions.
The mirror backup type creates in destination an exact copy of the source file without zipping
them.
FBackup 4 User Manual
Copyright © 2009 Softland
Backup Properties
6.7
45
Compression
On the Compression page, you can configure the compression and encryption settings.
Encrypt the zip files
No encryption
The zip files created are not protected by password for unauthorized access.
Standard encryption (Zip2 compatible)
This is the standard Zip 2.0 encryption: an older encryption technique that provides relatively
weak security compared to AES encryption. Zip 2.0 encryption format cannot provide protection
from individuals with access to specialized password recovery tools. Its advantage over AES
encryption is the compatibility with all third party zip applications.
Set password
After you press this button, a windows with the following fields will appear:
· New password
Manually enter the password you want to use for your zip files in this field
· Confirm new password
Re-enter the password in this field to avoid typing errors.
· Old password
This field is enabled only when the backup job already has a password. You can change the
password only if you enter the old one in this field. This way only the owner of the backup will be
allowed to change the password.
The system makes it possible to set different passwords for the same backup job, so the backup
may contain zip files with different passwords.
Tips:
· when choosing a password, it is recommended that you use a combination of letters and
numbers and at least 8 characters.
· FBackup does not store passwords. Make sure that you remember all passwords that have
FBackup 4 User Manual
Copyright © 2009 Softland
46
FBackup 4
been used for a backup job, or you will not be able to restore your files.
6.8
Advanced
Options on this page affect the way a particular backup job is executed.
Run action before backup
Run program/action
Check this option and select one of the predefined actions or choose a different executable file.
You can either enter directly the path to the program (has to be between quotes) or click the
button to browse for the file. FBackup waits until the action is finished before proceeding with the
actual backup process.
The <Clear backup> predefined action deletes the ".fkc" file and all zip files associated with the
current backup job.
Run action after backup
Run program/action
Check this option and select one of the predefined actions or choose a different executable file.
You can either enter directly the path to the program (has to be between quotes) or click the
button to browse for the file. FBackup does not wait for the action to be finished before
proceeding.
Available predefined actions:
FBackup 4 User Manual
Copyright © 2009 Softland
Backup Properties
·
·
·
·
6.9
47
<Stand by> - The computer will enter in the Stand by state after the backup is executed.
<Hibernate> - Computer enters in Hibernate (if available) after the backup execution.
<Log off> - Logs off current user.
<Shut down> - Shuts down the computer after the backup was executed.
Scheduler
Scheduler
Scheduler lists all the available information about the scheduled tasks and allows you to Add,
Edit, Delete and Schedule new tasks. This only applies to the current backup job.
Right-clicking an existing scheduled task (or using the top buttons) will display the following
options:
· Add - opens the Scheduler Properties window and allows you to add a new scheduled task
· Edit - opens the Scheduler Properties window where you can edit selected the scheduled
task
· Delete - removes the selected scheduled task
· Schedule - opens the Windows Scheduled Tasks properties window that allows you to set
the time and frequency for the selected scheduled task.
FBackup 4 User Manual
Copyright © 2009 Softland
48
FBackup 4
· Refresh - refreshes the scheduled tasks list
There are several columns in the Schedulers window that provide information for each scheduled
task:
· Scheduler - shows the scheduler type: Windows, Standalone or Shutdown.
· Enabled - if the checkbox is marked then the scheduled task will run, if is unchecked it will
not be executed
· Action - shows the type of action associated with the scheduled task (default, full)
· Job Name - shows the task name assigned by the scheduler
· Status - displays the status of the scheduled task
· Next Run Time - calculates the next date and time when the scheduled task will run.
· Last Run Time - shows the last date and time when the scheduled task ran.
· Schedule - shows the type of schedule selected for the task
The scheduled tasks in the list can be sorted by clicking on the column headers. The right-click
menu on the column header provides a handy way to show/hide columns (except the Enabled
which are grayed out).
6.9.1
Scheduler Properties
The Scheduler Properties window will be displayed when you click on the Add or Edit button in
the main Scheduler window or in the Scheduler page of the Backup Properties. This allows
you to add or edit a scheduled task for the current backup job.
FBackup 4 User Manual
Copyright © 2009 Softland
Backup Properties
49
Execute
Main application
This is the option set by default. If FBackup is closed when a scheduled task needs to be
executed, the main application starts and the task runs. Furthermore, if the Close after run
option is checked, FBackup will be closed after the task is executed.
Action
You can select an action to perform when the scheduled task for the current backup job runs:
· Backup
Clear backup before run
If this is checked, FBackup will first delete the ".fkc" file and all zip files associated with the
current backup job and after that execute the scheduled backup.
· Load - At the scheduled date it opens FBackup and selects the backup job
FBackup 4 User Manual
Copyright © 2009 Softland
Restore Wizard
Part
VII
Restore Wizard
7
Restore Wizard
7.1
Where and how to restore
51
Using the Restore Wizard you can restore from a backup job. In the first step you can choose
the destination, the priority of the execution and customize the restore operation if you wish.
Where do you want to restore?
Use original location
Copies the files from the zip backup into the original location. If a file with the same name already
exists, a dialog will be shown prompting for an action before the restore can continue.
Choose another location
FBackup 4 User Manual
Copyright © 2009 Softland
52
FBackup 4
Copies files from the zip backup to a different folder. If selected, you can choose a different folder
to restore files from the backup.
Do not create drive letter folder
If checked, FBackup will restore the files in the designated location using the original directory
structure. If you select this option and you have files from multiple drives, some files might get
overwritten. For example, if you backed up your Documents and Settings folder from your C
drive, when you restore it to a different location having the Do not create drive letter folder
unchecked, FBackup will first create a folder named C and in it place the Documents and
Settings folder. If you would have checked the Do not create drive letter folder option, the
folder named C wouldn't have been created.
How do you want to restore?
Restore the latest version of all files
FBackup will restore the latest version for all the files in the backup.
Choose files and restore the latest version
FBackup will restore the latest version for all the files in the backup. You will be able to filter the
files using the Preview page.
Choose/filter files and restore the latest version
FBackup will restore the latest version of the files. Files that are excluded from backup are not
restored. Check the status of the files in the Explore view of the main screen.
7.2
What do you want to restore
This is the second step of the Restore Wizard. It appears only for Choose files and restore
from the latest version, Choose/filter files and restore the latest version options.
FBackup 4 User Manual
Copyright © 2009 Softland
Restore Wizard
53
You can uncheck the files you don't want to restore. By default, all files are checked.
Information provided for each file:
· File/Folder - Name of the file/folder
· Size - Size of the the file
· Modified - Date and time when the file version was last modified (at backup execution)
· Backup no. - The last backup number containing the file
The file versions in the list can be sorted by clicking on the column headers. The right-click menu
on the column header provides a handy way to show/hide unnecessary columns (except the File/
Folder column which is grayed out).
7.3
Do you want to filter the files
This is the third step of the Restore Wizard for Choose/filter files and restore the latest
version restore type. You can filter the files to be restored.
Its behavior is the same as the Filters page of the New Backup Wizard or the Backup
Properties window, except that the process is restore and not backup.
The Filters page defines files filters to be applied to files that are going to be restored. Only files
and folders that match the filters will be restored.
You can add include or exclude filters. By default all files are included in the list to be restored.
FBackup 4 User Manual
Copyright © 2009 Softland
54
FBackup 4
The system selects only files that match the include filter and do not match the exclude filter. This
means the exclude filter is more powerful: if a file satisfies both include and exclude filters, it will
not be processed by the system.
Include and exclude filters are composed from filter restrictions:
· two or more filter restrictions in the include filter means that a file must satisfy at least one
restriction to be restored.
· two or more filter restrictions in the exclude filter means that a file must satisfy any
restriction to be excluded.
The exclude filters have the Use as exclude filter box checked.
You can manage filter restrictions using the buttons:
· Add include - this will open a new window from where you can add a new restriction to the
list of include filters.
· Add exclude - this will open a new window from where you can add a new restriction to
the list of exclude filters.
· Edit - will open the same window as Add, with the selected filter's properties. You will be
able to modify the selected restriction.
· Copy - will create a copy of the selected filter.
· Delete - will delete the selected filter from the list.
FBackup 4 User Manual
Copyright © 2009 Softland
File Filtering
Part
VIII
56
FBackup 4
8
File Filtering
8.1
Overview
File filtering in FBackup provides an intuitive way to define what files and folders to back up or
restore.
Select Folders and Files for filtering
The files can be filtered when added to backup. On the Backup Properties->Sources page each
file and folder is shown in the tree with a checkbox in front of it. If you uncheck it, the file or
folder will be excluded from the backup or restore process.
After applying filters, each file and folder is shown in the tree with a checkbox in front of it. If you
uncheck it, the file or folder will be excluded from the backup or restore process.
Filter
The role of the filter is to restrict the files from the sources or destination that will participate in
the backup or restore process. The filter actually consists of two filters: the include filter and the
exclude filter.
Include filter shows which files will be included in the backup or restore process.
Exclude filter shows the files that will be excluded from the backup or restore. If the "Use as
exclude filter" box is not checked, it means that filter is an include one.
By default, the filter are defined as include filters and the "Use as exclude filter" box is unchecked.
If no filters are defined, then all the files and folders from the sources will be backed up or
restored.
8.2
File Filter
The Edit file filter item window is shown every time a file filter restriction is added or modified.
It can be opened by pressing the Add button from the Filters page (New Backup Wizard, Backup
Properties, Restore Wizard window or Tools->Options) or the Edit button (if filters are already
defined).
FBackup 4 User Manual
Copyright © 2009 Softland
File Filtering
57
General
In the Filter name field you can type the name of the created filter. By default, the "New filter
configuration" name is assigned. If you use an existing filter, the name of that filter is used.
File name
Enabling this will allow defining filters based on file name pattern.
Press Add and select an existing file extension from the Filter combo (*.doc, *.pdf, *.zip etc.). If
the extension does not exist in the combo, just type it in and press OK. You can use the Edit or
Delete buttons to modify/remove the file name filters defined.
File name patterns can include:
· * - it matches one or more letters. For example a*.doc matches all files that start with a
and have .doc extension
· ? - it matches only one letter. For example a*.do? matches all files that start with a and
have any extension composed of three letters, the first two being do
FBackup 4 User Manual
Copyright © 2009 Softland
Options
Part
IX
Options
9
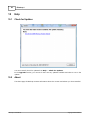
Options
9.1
General
59
The General page of the Options window (accessible from the Tools, Options menu item)
contains general settings of the program.
Language
In the Language section you can select the language of the program interface by choosing
another one from the drop down list. Only the languages that were installed with the program are
displayed. The language of the interface changes only after the Options window is closed by
pressing the OK button. The selected language is kept as long as you don't change it or it
becomes invalid due to software updates.
The text box below the Language field shows details about the selected language (like translator
name and contact information).
9.2
Startup
The Startup page of the Options window (accessible from the Tools, Options menu item)
contains startup related settings of the program.
FBackup 4 User Manual
Copyright © 2009 Softland
60
FBackup 4
Startup and tray
Start at Windows startup
If checked the program is started when Windows starts using the window state set in the
Visualization mode group. By default this option is not checked.
Show "Getting Started"
If checked, the "Getting Started" window is displayed when you start FBackup.
9.3
Application folders
The Application folders page of the Options window (accessible from the Tools, Options menu
item) contains general settings of the program.
FBackup 4 User Manual
Copyright © 2009 Softland
Options
61
Override plugins folder
This is the folder where the plugin files are saved. You can use the Browse button
to select an
existing folder. By default this option is set to the "Application Data\Softland\FBackup 4\Plugins"
folder of your Window login account profile.
9.4
Updates
On the Updates page of the Options window (accessible from the Tools, Options menu item) you
can configure FBackup when to check for updates.
FBackup 4 User Manual
Copyright © 2009 Softland
62
FBackup 4
Check for updates
Check mode
User can choose one of these modes:
· Manual - user will manually check for new updates. This option is selected by default.
· Reminder - the program will remind you with the selected frequency to check for new
updates
· Automatically - the program will automatically check for new updates with the selected
frequency.
Frequency
User can set the frequency for FBackup to remind or to automatically check for new updates.
Check at application startup
If checked, the program will check for new updates at application startup.
FBackup 4 User Manual
Copyright © 2009 Softland
Help
Part
X
64
FBackup 4
10
Help
10.1
Check for Updates
You can manually check for updates from Help -> Check for Updates.
In the Upgrade window, you can see if there are any updates available and what is new in the
update.
10.2
About
The About page of FBackup contains information about the version and edition you have installed
FBackup 4 User Manual
Copyright © 2009 Softland
Index
Index
-AAbort backup 47
Advanced mode 37
Application log 25
Archive bit 46
-BBackup 19
Backup list 22
Backup Properties destination 37
Backup Properties overview 37
Backup properties sources 42
Backup to USB drives 14
backup type 33, 44
Backup types
Differential backup 17
Full backup 17
Incremental backup 17
Mirror backup 17
Backup wizard destination 29, 30, 31
Backup wizard general 37
Backup wizard name 29
Backup wizard overview 29
Backup wizard what to backup 32
Blank passwords 48
-CCancel 19
CD drive 37
Change criteria 46
Change Icon 37
Clear archive bit 44
Clear backup 48
Collapse 19
Commands 19
Comparison criteria 46
Configure new backup 10
Copy 19
Create a new backup 10
Create like 19
FBackup 4 User Manual
Create shortcut
65
23
-DDelete 19
Delete group 19
Delete sources 46
Description 6
Differential 17, 44
Differential backup 33
Drive letter folder 51
-EEmpty directories 46
Enclosures 14
Encryption
AES encryption 13
Zip encryption 13
Erase disc 48
Exclude 56
Execute backup 11
Exit 19
Expand 19
Explore 19
External device 14
-FFBackup 6
FBackup Configurations
File filtering 56
File locations
Catalog 60
Destination 60
FkcFiles 60
IniFiles 60
Initialization 60
Log 60
Temporary 60
Filter
By attribute 56
By date 56
By name 56
By size 56
Directories 56
Files 56
37
Copyright © 2009 Softland
66
FBackup 4
Filter
Folders 56
Filter backup
Customize filter 43
Exclude files 43
Include files 43
Main filter 43
Filter restore
Customize filter 53
Exclude files 53
Include files 53
Main filter 53
Firewire 14, 39
Floppy drive 37
Folder filtering 56
FTP 29, 37
Full 17, 44
Full backup 33
-GGeneral options
Align caption 59
Appearance 59
Background color 59
Blank passwords 59
Captions 59
Context menu 59
Daylight saving 59
Explorer icons 59
Hidden files 59
Hide empty folders 59
Hint 59
Icon size 59
Insecure passwords 59
Measurement 59
Sort backups 59
Toolbar 59
Getting Started
Backup 21
New 21
Open 21
Restore 21
Group 37
FBackup 4 User Manual
-HHard disk drive
History 25
37
-IImport 19
Include 56
Incremental 17, 44
Incremental backup 33
Installation
Install 7
License agreement 7
Setup language 7
Uninstall 7
Introduction 6
-KKeyboard shortcuts
27
-LLabeling 46
LAN 29, 31, 37, 40
Legacy 46
Local catalog 46
Local destination 38
Local drives 29, 30, 37
Logging 25
-MMake 19
Make differential 19
Make full 19
Make incremental 19
Manage backup jobs
Copy backup 12
Delete backup 12
Modify backup 12
Manage plugins 24, 32
Mapped network drive 37
Mirror 17, 44
Copyright © 2009 Softland
Index
Mirror backup 33
My Documents 37
My Pictures 37
-NName 37
New 19
New backup 10
New backup wizard
Advanced 10
Destination 10
Explore 10
Filters 10
General 10
Scheduler 10
Sources 10
Statistics 10
Summary 10
Type 10
New group 19
NTFS 46
-OOpen backup 19
Open files 46
Outlook Express 37
Override catalog 37
Override filter 43, 53, 56
-PPassword 13
Password protect a backup 13
Portability 14
Predefined backup 24, 32, 37
Product description 6
Properties 19
-RRefresh 19
Remove password 13
Rename group 19
Restore 19
Advanced 51
FBackup 4 User Manual
67
Basic 51
Full 51
Restore latest version 12
Restore to 12
Restore wizard 12
Standard 51
Restore from a backup 12
Restrictions 43, 53
Run a backup job 11
Run at shutdown 48
Run backup 11
Running 19
-SSchedule 34
Add 47
Close window 48
Command line 48
Delete 47
Edit 47
Hide window 48
Main application 48
Schedule 47
Schedule a backup 13
Scheduler 19
Standalone scheduler 13
Task scheduler 13
Shortcut 23
Show deleted 19
Show excluded 19
Show modified 19
Show new 19
Show unchanged 19
Sources
Abort 32, 42
Add files 32, 42
Add folder 32, 42
Ignore 32, 42
Remove 32, 42
Retry 32, 42
Standalone scheduler 47, 48
Start backup 11
Startup options
Windows startup 59
Statistics 19
Summary 19, 52
System requirements 7
Copyright © 2009 Softland
68
FBackup 4
-TTask 47
Test 19, 46
Toolbar 19
Tray icon
Close 59
Minimize 59
Show errors 59
-UUNC network drive 37
USB 39
USB backup
Detect device 14
Format device 14
One Touch Backup 14
Start device 14
USB drive 14, 37
-VVisualization
Maximized 59
Window state 59
Volume Shadow Copy
46
-WWindows 2000 7
Windows 2003 Server 7
Windows 98 SE 7
Windows Me 7
Windows NT SP6 7
Windows scheduler 47, 48
Windows XP 7
Wizard 29, 37
-ZZip compression 45
Zip drive 37
Zip encryption 45
FBackup 4 User Manual
Copyright © 2009 Softland