1
Version 6.0
User Manual
© 2015 Fortes Solutions BV
Principal Toolbox User Manual
Principal Toolbox 6.0
© 2015 Fortes Solutions BV
All rights reserved. No parts of this work may be reproduced in any form or by any means - graphic, electronic, or
mechanical, including photocopying, recording, taping, or information storage and retrieval systems - without the
written permission of the publisher.
Products that are referred to in this document may be either trademarks and/or registered trademarks of the
respective owners. The publisher and the author make no claim to these trademarks.
While every precaution has been taken in the preparation of this document, the publisher and the author assume no
responsibility for errors or omissions, or for damages resulting from the use of information contained in this document
or from the use of programs and source code that may accompany it. In no event shall the publisher and the author be
liable for any loss of profit or any other commercial damage caused or alleged to have been caused directly or
indirectly by this document.
Printed: 2015
Publisher
Fortes Solutions B.V.
4
Principal Toolbox 6.0
Table of Contents
0
Part I Introduction to the Principal Toolbox
8
1 Structure of Principal
...................................................................................................................................
Toolbox
8
2 Hardware and...................................................................................................................................
Software requirements
9
3 Required Internet
...................................................................................................................................
Explorer Security settings
10
4 Navigation ................................................................................................................................... 10
5 Logging on ................................................................................................................................... 11
Part II Basics Principal Toolbox
12
1 Home page ................................................................................................................................... 12
2 Enterprise dashboard
................................................................................................................................... 13
3 Programme ...................................................................................................................................
dashboard
14
4 Permissions...................................................................................................................................
and roles
15
5 Entering and...................................................................................................................................
changing data
18
6 The use of colours
...................................................................................................................................
within projects
18
7 RAG indicators
...................................................................................................................................
(traffic lights)
20
8 Views
................................................................................................................................... 21
9 Manage views
................................................................................................................................... 23
10 Document management
................................................................................................................................... 24
11 Email function
................................................................................................................................... 24
12 Search function
................................................................................................................................... 25
13 Project models
................................................................................................................................... 25
14 Portfolio models
................................................................................................................................... 26
Part III Functionalities
27
1 Project management
................................................................................................................................... 27
Project dashboard
..........................................................................................................................................................
Planning a project
..........................................................................................................................................................
Creating a.........................................................................................................................................................
project
Defining a.........................................................................................................................................................
product breakdown structure
Creating the product
.........................................................................................................................................
breakdown structure
Graphical view of
.........................................................................................................................................
the product breakdown
Editing stages .........................................................................................................................................
Editing work packages
.........................................................................................................................................
Planning products
.........................................................................................................................................
Planning product
.........................................................................................................................................................
milestones
Using the dashboard
.........................................................................................................................................
or plan tab
Using the Gantt .........................................................................................................................................
editor
Baseline support.........................................................................................................................................
Product page
.........................................................................................................................................................
Assigning.........................................................................................................................................................
responsibilities for products
Assigning.........................................................................................................................................................
budgets
Defining dependencies
.........................................................................................................................................................
Requesting
.........................................................................................................................................................
resources
Managing a project
..........................................................................................................................................................
© 2015 Fortes Solutions BV
27
30
31
32
33
34
34
36
38
39
40
40
42
43
44
46
47
50
51
Contents
5
Progress:.........................................................................................................................................................
Planning
Registration
.........................................................................................................................................................
of actual hours
Filling in time sheets
.........................................................................................................................................
(add-on)
Time sheet approval
.........................................................................................................................................
(add-on)
Reporting.........................................................................................................................................................
Portfolio reporting
.........................................................................................................................................
(add-on)
Copying data .........................................................................................................................................
Generating automated
.........................................................................................................................................
reports
Setting tolerances
.........................................................................................................................................
Document.........................................................................................................................................................
management and approval
Adding documents
.........................................................................................................................................
and templates to products
Updating a document
.........................................................................................................................................
Document approval
.........................................................................................................................................
(add-on)
Adding minutes .........................................................................................................................................
of meetings
Issues, risks,
.........................................................................................................................................................
quality reviews and lessons learned
Issue log
.........................................................................................................................................
Risk log
.........................................................................................................................................
Quality review log
.........................................................................................................................................
Change log
.........................................................................................................................................
Daily/action log .........................................................................................................................................
Lessons learned.........................................................................................................................................
Finishing a project
..........................................................................................................................................................
Archiving .........................................................................................................................................................
a project (-model)
Removing.........................................................................................................................................................
projects and project models
Managing project
..........................................................................................................................................................
models
Editing project
.........................................................................................................................................................
models
Creating project
.........................................................................................................................................................
models
Moving project
.........................................................................................................................................................
models
Enterprise.........................................................................................................................................................
models
Generic PRINCE2
..........................................................................................................................................................
Planning Model
Planning a
.........................................................................................................................................................
Project
Plan Costs
.........................................................................................................................................................
Plan Hours
.........................................................................................................................................................
51
52
52
53
53
53
54
55
56
58
59
59
60
61
62
63
65
65
67
68
69
71
71
72
74
74
75
75
76
77
78
81
82
2 Portfolio management
...................................................................................................................................
(add-on)
83
Portfolio dashboard
..........................................................................................................................................................
Working with ..........................................................................................................................................................
portfolios
New portfolios
.........................................................................................................................................................
Defining new portfolios
.........................................................................................................................................
Portfolio items .........................................................................................................................................
Creating portfolio
.........................................................................................................................................
items
Portfolio administration
.........................................................................................................................................................
Moving portfolio .........................................................................................................................................
items
Modifying the project
.........................................................................................................................................
reference
History log
.........................................................................................................................................
Portfolio documents
.........................................................................................................................................
Portfolio archive.........................................................................................................................................
Versioning
.........................................................................................................................................
Managing.........................................................................................................................................................
a portfolio
Generating reports
.........................................................................................................................................
Requesting reports
.........................................................................................................................................
Financials
.........................................................................................................................................
Notifications
.........................................................................................................................................
Portfolio Gantt .........................................................................................................................................
Portfolio model
..........................................................................................................................................................
Defining a.........................................................................................................................................................
project sheet
The reporting
.........................................................................................................................................................
model
Field configuration
.........................................................................................................................................................
Financial .........................................................................................................................................................
configuration
© 2015 Fortes Solutions BV
84
85
85
85
86
86
88
88
89
89
90
90
90
91
91
91
93
94
94
94
95
95
97
99
6
Principal Toolbox 6.0
3 Resource Allocation
...................................................................................................................................
(add-on)
101
Managing a ..........................................................................................................................................................
resource pool
Setting up
.........................................................................................................................................................
a resource pool
Non Project
.........................................................................................................................................................
Activities
Managing
.........................................................................................................................................................
resource availability
Managing
.........................................................................................................................................................
requests and allocations
Managing resources
..........................................................................................................................................................
on projects
Requesting
.........................................................................................................................................................
resources
Planning.........................................................................................................................................................
resources
102
103
106
106
108
110
110
112
4 Time registration
...................................................................................................................................
(add-on)
113
Generating, ..........................................................................................................................................................
submitting and approving timesheets
Creating.........................................................................................................................................................
a time entry configuration
Creating.........................................................................................................................................................
time entry groups
Configuring
.........................................................................................................................................................
the approval process
Submitting
.........................................................................................................................................................
timesheets
Approving
.........................................................................................................................................................
timesheets
Time and cost
..........................................................................................................................................................
allocations
Defining.........................................................................................................................................................
and allocating hourly rates
Letting project
.........................................................................................................................................................
managers choose hourly rates
Time and
.........................................................................................................................................................
cost allocations against products
Part IV Automated Reports
113
113
118
119
121
122
123
123
124
126
126
1 Automated...................................................................................................................................
reports
127
Automated Word
..........................................................................................................................................................
reports
128
Automated Excel
..........................................................................................................................................................
reports
130
Using an.........................................................................................................................................................
Excel Report
131
Creating.........................................................................................................................................................
an Excel Report Template
132
Open the basic.........................................................................................................................................
Excel Report Template
132
Inserting Principal
.........................................................................................................................................
Toolbox Keywords
134
Creating a Chart
.........................................................................................................................................
Based on Principal Toolbox Data
136
Creating a Pivot
.........................................................................................................................................
Table Based on Principal Toolbox Data
137
Finishing the Excel
.........................................................................................................................................
Report Template
139
Advanced
.........................................................................................................................................................
Topics
140
Extending the Report
.........................................................................................................................................
Data
140
Apply Conditional
.........................................................................................................................................
Formatting
142
2 Timeline reporting
................................................................................................................................... 144
3 Widgets
................................................................................................................................... 148
Widget Configuration
..........................................................................................................................................................
Project Specific
..........................................................................................................................................................
Widgets
Part V Advanced options
148
150
152
1 Advanced Customisation
...................................................................................................................................
& Workflow (add-on)
152
Part VI System Administrator: Setup & Settings
1 Setup
154
................................................................................................................................... 154
Principal Toolbox
..........................................................................................................................................................
Email notification
..........................................................................................................................................................
Creating non-project
..........................................................................................................................................................
activities
Defining custom
..........................................................................................................................................................
fields
2 Settings
................................................................................................................................... 160
License key ..........................................................................................................................................................
and carrying out updates
Applying.........................................................................................................................................................
for a license key
Request.........................................................................................................................................................
for additional user licenses
Renewal.........................................................................................................................................................
of an outdated license key
© 2015 Fortes Solutions BV
155
155
155
159
161
161
161
161
Contents
7
Setting up
.........................................................................................................................................................
the license key
Updating.........................................................................................................................................................
the software
User administration
..........................................................................................................................................................
Person details
.........................................................................................................................................................
Advanced
.........................................................................................................................................................
options
System Settings
..........................................................................................................................................................
Part VII Troubleshooting and Solutions
162
162
163
164
165
167
168
1 Troubleshooting
................................................................................................................................... 168
Index
170
© 2015 Fortes Solutions BV
8
1
Principal Toolbox 6.0
Introduction to the Principal Toolbox
Principal Toolbox offers a powerful set of tools for the management of your projects, programmes and
portfolios. PRINCE2™ support for projects is offered in project models and in the way processes are
supported by the Principal Toolbox by default. Customising Principal Toolbox to follow the processes
of your own organisation is easily accomplished.
This manual offers a comprehensive guide explaining how to use the Principal Toolbox. In the
application itself the context-sensitive help is available on virtually every page. You can access the
help by clicking the
button.
The complete manual is available in PDF format for download as well:
Download User Manual as a PDF file
1.1
Structure of Principal Toolbox
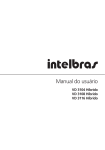
The projects within the Principal Toolbox are organised in a hierarchical structure. This structure is
configured and used within the project side of the Principal Toolbox. The picture below shows how a
hierarchy can be build to host programmes and projects.
Example of an Enterprise Hierarchy. Each organisation will have a unique representation of their programmes and projects.
This structure can be changed to fit your organisation's needs. The highest level is called the
'enterprise level'. At this level, folders can be added to represent entities within your organisation.
The folders can be any of the following types:
· Work area: can contain work areas, programmes and project lists
· Programme: can contain work areas, programmes, project lists and projects
· Project list: can only contain projects
By choosing the right type of folders, the actual structure of for example business units, programmes
and projects within your organisation can be reflected in the Principal Toolbox. The enterprise
hierarchy aids in keeping an overview of all programmes and projects run throughout the organisation.
The same projects that have been fit in with this hierarchy that reflects the organisational structure,
can also be made part of a portfolio. Portfolios are manages in a separate area within the Principal
Toolbox, and this functionality is provided by an add-on module (Portfolio Management add-on 83 ).
The illustration below shows how Project Management and Portfolio Management work together:
© 2015 Fortes Solutions BV
Introduction to the Principal Toolbox
1.2
9
Hardware and Software requirements
The following hardware and software requirements must be in place for using Principal Toolbox.
Minimum Requirements:
Operating System
Microsoft Windows XP or later
Browser
Microsoft Internet Explorer 8 or later, FireFox 3 or later or Google Chrome1
Network
Network or internet connection
Display
Resolution 1024x768 or higher
Software Requirements for using reports and exports:
Software
Microsoft Office 2002 or later 2
Software
Adobe Acrobat Reader 5 or later
Using Microsoft Project for planning projects:
Software
Microsoft Project 2002 or later
If your browser's pop-up blocker settings are configured for maximum security, you will not be able to
view any pop-up windows within Principal Toolbox. This includes all pop-up windows, even those that
provide necessary functionality such as the calendar pop-up for choosing a date, the help window, and
more.
Also some script blockers may be active. You will not be able to use drag and drop functionality within
Principal Toolbox (for example the drag and drop functionality on the edit project plan page and the
Gannt editor) if these script blockers are not disabled.
Some virus scanners, firewalls or browser add-ons, like the Google toolbar, also have pop-up or script
blocking. Consult your software documentation on those products for details on how to configure them
to allow pop-up windows and scripts from the Principal Toolbox.
1. Be sure there are no script blocking security settings or script blocking firewalls active.
2. For working with automated reports in Excel, the template needs rights to execute macro's.
© 2015 Fortes Solutions BV
10
1.3
Principal Toolbox 6.0
Required Internet Explorer Security settings
The Principal Toolbox is completely web-based. This means it runs in your internet browser. Below you
will find a table with the required security settings of the appropriate Internet Explorer security zone
used by Principal Toolbox. In Internet Explorer go to Tools > Internet Options, select the Security tab
and choose custom level to change the settings.
Sectio Setting
n
Value
Remarks
Enable
Script errors on different pages occurs when
disabled.
Automatic prompting for file downloads
Enable
Function to pack project offline can't offer to download
the offline project.
File download
Enable
When disabled, automated reports and documents
can't be downloaded.
Allow META REFRESH
Enable
Internet Explorer window stays blanc after login when
disabled
Allow websites to open windows without address or
status bars
Enable
Internet Explorer will display a grey address bar in all
pop-ups when disabled
Launching applications and unsafe files
Enable
Required for installing the MS Project Client add-in.
Submit non-encrypted form data
Enable
When disabled, Internet Explorer can't update
changes in text fields.
Use Pop-up Blocker
Disabled
Internet Explorer blocks the "Edit name for new item"
dialog after adding the first product on the Edit project
plan page when enabled
Active scripting
Enable
Login button on login screen doesn't react. Drag and
drop in Edit Project Plan window won't work when
disabled
Automatic for logon
only in Intranet zone
When Single SIgn On is enabled, this setting allows
to sent username and password over the intranet
ActiveX controls and plug-ins
Initialize and script ActiveX controls not marked as
safe for scripting
Downloads
Miscellaneous
Scripting
User Authentication
Logon
1.4
Navigation
The Principal Toolbox is a web-based application in which navigation works the same way you are
used to on the internet. You perform actions by clicking with your mouse button or by clicking
hyperlinks on the page.
However, the regular buttons of your web browser will not work within the application.
Browser buttons won't work
Instead, navigating through Principal Toolbox is done by using the dark blue header within your
browser window. 'Project management' is the highest level in the hierarchy for your organisation's
programme and project tree. From there, you can navigate down the branches of the tree to locate
your projects.
On your home page, accessible through the 'Home' link in the dark blue header, you will find all
projects, products and log items you are connected to. This way, you can quickly locate your projects
and items you have to work on.
© 2015 Fortes Solutions BV
Introduction to the Principal Toolbox
11
Throughout the application, except on your homepage, you will find the so-called bread crumbs that
show you where you are in the programme and project tree. Click the bread crumbs anywhere higher
up in the hierarchy.
Project Dashboard; bread crumbs
1.5
Logging on
Before you can log on to Principal Toolbox, the system administrator must first create a user name for
you. After this has been done, you can log on using the following steps.
Note: Some organisations have so-called single sign-on configuration. In this case, you are
logged on automatically with your Windows user name.
1. Start up Internet explorer and navigate to the Principal Toolbox homepage. The internet address is
found in the email that you have received from your administrator. The user name and password are
also found in this email.
2. The log on window is shown.
3. Fill in your user name and password and click OK. The Principal Toolbox will open with your
homepage.
© 2015 Fortes Solutions BV
12
Principal Toolbox 6.0
2
Basics Principal Toolbox
2.1
Home page
On the home page you are able to see all programmes and projects you have a role/part in, as well as
products, log items (including issues, risks, etc.) that have been assigned to you. After logging on to
the Principal Toolbox you will be directed to your home page.
Home page
1. Area for general information.
2. Time sheets to be filled in and/or approved (add-on Timesheets)
3. Products/documents to be approved (add-on Advanced Customisation & Workflow)
4. All programmes and projects you have a role in.
5. All products, issues, risks, quality reviews, actions and changes assigned to you.
Configuring your home page
To configure the layout of your personal home page, click the button Customise Home Page. The
opened window gives you the possibility to select:
· Which programmes should be displayed.
· Which projects should be displayed.
· How to display the products.
· How to display the log items.
© 2015 Fortes Solutions BV
Basics Principal Toolbox
13
Editing Home page settings
Tabs shown on your home page
Your home page displays several tabs. Depending on your organisation's license some tabs might not
be available. Here you can see:
· Approve Hours shows all hours from other users you should approve or disapprove.
· My Time Sheets shows all your time sheets when time registration is turned on.
2.2
Enterprise dashboard
The Project Management dashboard is the highest level in the programme and project tree. Note that
'Project Management' can be replaced by the name of your organisation. The Project Management
dashboard is accessible through the link in the blue header.
On the Project Management dashboard you are able to reach all programmes within the organisation
and you are able to get information regarding the progress of programmes as judged by the
programme manager.
Enterprise dashboard
1. Tab pages
The tab pages are standardized on the enterprise dashboard. The name of the tab page indicates
the content of the page.
© 2015 Fortes Solutions BV
14
Principal Toolbox 6.0
- Documents & Knowledge
:
- Models
- Archive
:
:
A folder structure can be created here where files of any format
can be stored and shared.
An overview of the project models on the enterprise level.
Archived work areas / programmes / project lists and project
models on the enterprise level.
2. Functions at enterprise level
With these buttons you can edit user roles on the Enterprise dashboard (‘Edit members’), edit the
text and the image on the dashboard (‘Edit’), add and edit widgets ('Edit Widgets'), send an
e-mail, print the current page and search the entire database.
3. Programme listing
A list of all work areas / programmes and project lists on this level. Shown behind each
programme name is a RAG indicator which indicates the status of the programme and the
manager’s name.
4. Reports
This area is shown if you have either a manager role or a reader role on this level. Reports give
you access to views (tables) concerning all programmes, projects, products etc. within all project
within the database.
2.3
Programme dashboard
The programme dashboard provides you with an overview of all sub-programmes and projects within
the respective programme.
Programme dashboard
1. Tabs
The tabs are standard for each programme. The name of the tab indicates the content of the
page. Depending on your organisation's license some tabs might not be available.
- Properties
- Gantt & Dependencies
- Documents & Knowledge
- Models
- Archive
:
:
:
:
:
An overview of the programme properties and history.
Graphical representation of all projects within the programme.
Archive of important documents and/or useful best-practices.
An overview of the project models within the programme.
Archived projects and project models within the programme.
2. List of projects (and programmes when applicable)
Gives an overview of the projects within this programme. A number of figures are presented that
enable you to get an overview of the project status. The traffic lights used for the planning, hours
and costs are defined by the tolerances 56 set by the programme manager.
© 2015 Fortes Solutions BV
Basics Principal Toolbox
15
3. Programme information
Some information regarding the specific programme (name, objective and status).
4. Logs
On programme level the following logs are available for use; issue, risk and daily/action log. A
counter is displayed for each log indicating the number of items there are for each log and if there
are new items. The log is selected by clicking the name of the log.
5. Report
Creation of reports/views about all projects and products within this programme.
6. Functions at programme level
Here you can make the ‘Programme dashboard’ available to users 15 (‘Edit members’), change
the text and the logo of the dashboard (‘Edit Properties’), send an e-mail, print the current page,
use the search function. The programme manager can also setup the tolerances 56 for the
planning, hours and costs of all projects with this programme by using the ‘Edit Tolerances’
button.
7. List of available project models
Gives an overview of the project models available within this programme.
2.4
Permissions and roles
Authorisation model
The Principal Toolbox allows for two types of users:
1. Administrators, who get access to everything everywhere
2. Users, who get access to entities and areas within the Principal Toolbox by assigning them roles
The roles that are assigned to a user determine what access the user has. Access can be restricted to
various actions, like getting read-only access or allowing full access including removing items. A user
can be assigned multiple roles at the same time. Below follows an overview of the various roles and
the access rights associated with them.
Roles on enterprise, work areas, programmes, and project lists
Role
Rights
Enterprise Manager
(enterprise = highest level in the
programme hierarchy)
· Create and archive programmes on the enterprise
dashboard
· Assign programme manager(s) to a new programme
· Assign programme reader(s) to a new programme
· Manage roles at the enterprise level
· Access information of all programmes and projects
· Modify picture and text on enterprise dashboard
Enterprise Support
· Identical access rights as the Enterprise Manager
Enterprise Reader
· Access information of all programmes and projects
· Work area / programme / project list
Manager
· Work area / programme / project list
Support
· Create, move and archive projects and project models
on assigned level
· Create, move and archive sub-programmes
· Remove and restore archived projects, project models
on assigned level
· Assign project manager to a new project
· Manage roles (managers and readers) of assigned level
· Create, edit and remove issues, documents, risk’s etc.
within assigned level
· Read all information within own and underlying levels
· Set tolerances for the projects within assigned
programme / project list
· Modify layout of programme / project list dashboard
© 2015 Fortes Solutions BV
16
Principal Toolbox 6.0
Role
Rights
Work area / programme / project list
Reader
· Read all information within own and underlying levels
Roles on portfolios
Role
Rights
Portfolio Management Manager
·
·
·
·
·
·
·
·
Portfolio Management Reader
· Read access to all data within the assigned level
Portfolio Management Members
· Can be assigned to individual portfolios as readers or
managers
Note: before being granted access to portfolios, users first
have to be a member of Portfolio Management
Create and archive portfolios
Assign managers and readers to individual portfolios
Manage roles at all levels within the portfolios
Access to all portfolios and their data
Create and archive portfolio items within portfolios
Administer portfolio models
Remove and restore archived portfolio items
Assign a project manager when starting a project from a
portfolio item
· Changing the portfolio dashboard layout
Roles within projects
Role
Rights
Project Manager and Project Support
·
·
·
·
·
Project Board members
(Executive, Senior User, Senior
Supplier)
Team member
Manage all information within own project
Edit project plan, planning, logs, etc.
Edit project team
Set the general status of own project
Modify lay-out project dashboard
· Read all information within a project
· Add issues to the issue log
· Read all information within a project, except project
costs information.
· Add issues to the issue log
Roles on products
Role
Rights
Owner
· Add deliverables (documents) to a product
· Add new log items (issues, risks, changes, actions,
quality reviews) related to the product.
· Editing all product specific and custom fields
Reviewer
· Add deliverables (documents) to a product
· Add new log items (issues, risks, changes, actions,
quality reviews) related to the product.
· Editing all product specific and custom fields
Participant
· Add new issues related to the product.
© 2015 Fortes Solutions BV
Basics Principal Toolbox
17
Roles on logs (issues, risks, changes, actions, quality reviews)
Role
Rights
Owner
· Change all information in a log item
· Assign the log item to another project team member
Creator
· Change all information in a log item
· Assign the log item to another project team member
Project Manager and Project Support
· Change all information in a log item
· Assign the log item to another project team member
Roles within Resource Allocation
Role
Rights
Resource Allocation Manager
Has the following rights on all Resource Pools:
· Assign users to resource pools
· Remove users from resource pools
· Changing properties of resource pools
· Managing the Non-project Activity Sets
· Defining resource availability
· Allocating project and non-project work
Resource Allocation Reader
Has the following rights on all Resource Pools:
· Access to all resource pools
· Reader access to all allocation requests, time
allocations, and availability data
Resource Allocation Members
· Can be assigned as managers or readers to one or
more resource pools
Note: before assigning users as managers or readers to a
resource pool, they first have to be listed as a Resource
Allocation Member.
Resource Pool Manager
· Assigning and removing users from the resource pool
· Changing properties of the resource pool
· Assigning and removing Non-project Activity Sets from
the resource pool
· Defining resource availability
· Allocating hours against projects and non-project
activities
Resource Pool Reader
· Read access to the resource pool
· This includes read access to all allocation requests,
time allocations and availability data on the applicable
resource pool
Roles within Time Entry
Role
Rights
Time Entry Coordinators
Has the following rights within all Time Registration
groups:
· Assigning and removing users from the Time
Registration groups
· Changing properties of Time Registration groups
· Managing Non-project Activity Sets
· Creating and changing Time Registration configurations
· Reading and modifying of the time sheets of all users
Time Entry Readers
Has the following rights within all Time Registration
© 2015 Fortes Solutions BV
18
Principal Toolbox 6.0
Role
Rights
groups:
· Access to all Time Registration groups
· Read-only access to the time sheets of all users
2.5
Time Entry Members
· Can be assigned access to one or more of the Time
Registration groups
Note: before assigning users as managers or readers to a
Time Registration group, they first have to be listed as a
Time Entry member
Group Manager and Group Support
· Assigning and removing users from the applicable Time
Registration group
· Modifying properties of the Time Registration group
· Managing Non-project Activities associated with the
Time Registration group
· Modifying time sheets of all members of the Time
Registration group
Group Reader
· Read access to the Timer Registration group
· This includes read access to the time sheets of all the
members of the Time Registration group
Entering and changing data
To enter and change data, you will always have to click the Edit button. If you have the user rights to
edit data and the page contains editable fields, you will always find this button on the page you are at.
When creating new log items, like issues, risks etcetera, you will directly enter the editing mode, so
you won't have to click edit.
2.6
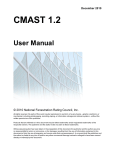
The use of colours within projects
On the project dashboard, colours are used to indicate the active stage, types of products and to draw
attention to potential problems.
Stage colour
The active stage in your project is coloured yellow, the other stages are grey. It does not mean the
other stages cannot be edited, it is an indication and used for filtering purposes in certain views. In the
product checklist, stage names are shown in black. On the Gantt chart, stage bars are also shown in
black.
Types of products
Three types of products are identified in Principal Toolbox. Throughout the Principal Toolbox, these
are shown in the following colours:
· Green: products of the project board, mostly authorisations and decision points.
· Blue: project management products, like the project mandate, PID, highlight reports etc.
· Amber: Specialist products. Specialist products are all products that are part of the product
breakdown and define the final result of the project.
Work packages are shown in a bold amber font type. On the Gantt chart, work packages are solid
amber.
© 2015 Fortes Solutions BV
Basics Principal Toolbox
19
Active stage in yellow
Active stage in yellow. Passed planned milestones in red. If final milestone has passed, red indicator in front of product.
Three different colours for different types of products
Indication of potential problems
© 2015 Fortes Solutions BV
20
Principal Toolbox 6.0
On the project dashboard, dates are default depicted in black. If a date is either today or in the past, it
is shown in red to draw attention.
In front of the product names indicators show potential problems:
(red)
(yellow)
(blue)
Final planned date has passed.
An inconsistency is present with the product milestones (e.g. start milestone is
planned later than the draft milestone)
Is shown when a conflict arises due to conflicting dependencies. If an end date of a ‘
Predecessor’ is delayed or planned later than the start date of the ‘Successor’ a blue
traffic light is shown to indicate a problem.
In the following section, the use of RAG indicators
explained.
2.7
20
on programme / project list dashboards is
RAG indicators (traffic lights)
On dashboards of work areas, programmes and project lists, and on your home page, the status of
projects is shown with RAG indicators. These indicate the actual status on a programme, project, or
product.
The red, amber and green indicators are used in respect to the status of the enterprise, programme, or
the project.
For projects, indicators are shown for:
- General status : Set manually by the project manager to give the general opinion about project
status.
- Planning status : Based on the tolerances of the programme / project list. Uses the number of
products overdue.
- Cost status
: Based on the tolerances of the programme / project list. Uses the deviation of
expected costs from the budget.
- Hours status : Based on the tolerances of the programme / project list. Uses the deviation of
expected spent hours from the budget.
(red)
- Major deviation from the plan on costs, hours or planning.
- Based on the tolerances set.
(amber)
- Minor deviation from the plan on costs, hours or planning.
- Based on the tolerances set.
(green)
- No deviation from the plan on costs, hours or planning.
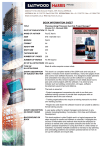
- Based on the tolerances set.
The tolerances on the programme / project list can be defined by the programme manager at the
dashboard of that level. These tolerances can be set in percentages or in absolute numbers.
© 2015 Fortes Solutions BV
Basics Principal Toolbox
21
Tolerances can be set on the programme level
The use of indicators within projects is explained in the previous section 18 .
For setting the tolerances in a programme or projectlist see: Setting tolerances
2.8
56
Views
Throughout Principal Toolbox, views are available to present information in a tabular form. On all
organisational levels (e.g. enterprise, programmes, project lists) and within projects (on all logs and
the ‘Plan’ and ‘Report’ tab) views are used.
The Principal Toolbox contains predefined views that are generally useful, but it is also possible to
define your own views for your personal purposes. All views can be used for monitoring progress or in
automated reports 127 .
Use the drop-down list as shown in the picture above to select available views. With the View Options
drop-down menu you can define your own view and set options for views.
Note: on the Reports tab, you can choose the object you want to see information about in your
project: Products, Cost/hour entries and Resource assignments are options.
Note: Resource assignments are only available when the add-on Resource Allocation 101 is
available within your organisation.
The different options in the View Options menu are:
© 2015 Fortes Solutions BV
22
Principal Toolbox 6.0
Set filter
Set columns
Set widths
Advanced
:
:
:
:
Make default
Save view
Manage views
:
:
:
Define a filter to make a selection of the shown products / issues / etc.
Add or remove columns from the view.
Set the column width, so the view fits better on screen or in a report.
· Define calculations on certain columns.
· Show or hide column names
This sets a view to the personal default.
Save the view for later use.
Set properties for the view. You find more information at 'Manage views
23
'.
Note that on some pages not all functions are available for use. The following example illustrates how
to define a view on the ‘Report’ tab. The view will show all finished products and totals of budgeted and
actual hours and costs.
1. Go to the ‘Report’ tab.
2. In this example we will add a filter that shows all finished products in the project.
Since we want to see a list of products, we choose Products in the left hand side
of the window.
3. Click Set Filter in the View Options menu.
To select finished products set the field ‘Final Status’ to ‘true’. After clicking OK
you get a view of the selected, finished products.
4. With Set Columns you can add and remove columns from the view.
· To add columns to the view, select them on the left side in column 'All
fields'. Click the >> button to add the columns.
· To remove columns from the view, select them on the right hand side
and click << to remove.
· Set the order of columns with the up and down buttons.
You can also set the Sorting order of the view. The field ‘Complete list’ will show
you either 50 results per page or the entire list on one page.
5. Change the column widths with the Set Widths option. Drag the line between
columns to increase or decrease the column size.
Note: If you would like to use your ‘own’ views for reporting you will have to
take into account the maximum width of a page. The columns may not be wider
than the portrait or landscape headers. Otherwise the table will be too wide for
the page.
How to create your own report templates is described in the section Automated
Reports 127 .
Note: the bars for portrait and landscape are of approximate size. Check the
result in your reports.
6. To show totals of numerical fields click the ‘Advanced’ option, and select the
columns for which you would like to know the totals. Click OK.
7. If you want to save the newly defined view you need to save it with Save View. To
overwrite an existing view you saved before, select the name of this view at the
Existing view pull down list. To create a new view enter the new name at 'New
view'. Click Save to save the view.
8. Select personal, local or global. See manage views for more information.
9. With the ‘Make Default’ option a specific view can be set to the personal default
view on that page
10.With the button ‘Manage Views’ the views available can be managed. See
Managing views. 23
© 2015 Fortes Solutions BV
Basics Principal Toolbox
23
Tip: If you define a (new) view as standard with the ‘Make Default’ button, the view will be shown
when opening that tab.
2.9
Manage views
Within the Principal Toolbox all users are able to define (personal) views of the information presented
on the different report pages.
As already explained in the previous section, views can be defined on the different levels (e.g.
enterprise, programme), on all logs and on the ‘Plan’ and ‘Report’ tab.
With the Manage Views option, which is available on all mentioned pages, you can manage these
views.
1. Go to a page where views can be defined and click Manage Views.
2. A window will pop-up which lists all available views for this page. This window shows all available
views.
Built-in views
:
Global views
:
Local and personal views :
Predefined views which are standard within the Principal Toolbox.
Global views defined by the organisation.
Project or user specific views
The settings for the global views can be modified by the system administrator. The settings for the
local and personal views can be modified by the user who has created the view and the system
administrator.
List of views
3. To modify a view, click the name of the specific view. The built-in views can be hidden from the
users of the Principal Toolbox (helpful for views defined only for reporting purposes). To do so click
the specific view and place the tick mark
.
© 2015 Fortes Solutions BV
24
Principal Toolbox 6.0
4. General and local and personal views have some more options that can be defined;
Name
Remarks
Hidden
:
:
:
Type
Location
:
:
To change the name of the view.
Add remarks to the specific view.
Makes a view not visible in the pull-down menu. The view is still available for the
automated reports.
Select availability for all users (view becomes a general view) or personal.
Everywhere; view is available on all locations (all levels).
On this location only; view is available on this specific location(e.g. this project
only).
Adding a new view
5. Furthermore, you are able to import and export views. To export a particular view click the 'Export'
button and save the view to your desktop location. To import this view again click the 'Import' button
on the 'Manage views' page and select the *.ptv file. This view will be added as a personal and local
view. Using the buttons as described above the type of view can be changed.
6. To remove views from the Principal Toolbox use the remove button.
2.10
Document management
Within the Principal Toolbox you can store documents at various locations. Principal Toolbox will keep
the document in the database, so they will be available to all users with access to the document in the
Principal Toolbox. It is possible to overwrite older versions with newer ones. The Principal Toolbox will
keep the old versions in storage. These will remain available for the manager of the particular level in
the tool.
On top of that, it is possible to put an approval cycle on deliverables and/or documents with the
add-on ‘Advanced Customisation & Workflow’. See Document management and approval 58 for more
information about storing documents in Principal Toolbox.
2.11
Email function
From almost any page in Principal Toolbox you can create email messages. These messages will
automatically be addressed to the relevant team members, or e.g. the owner of log items etc. The
message itself will contain summarised info about the page you created it from, and a hyperlink to the
page in Principal Toolbox.
, in the upper
1. Click the email button
right hand corner of a specific page. In this
example a new issue is created on the
Apollo project and we want to inform the
members of the new issue.
2. A new page will appear with a short
description of the item (in this case: issue
12). You can select the project members
you wish to notify. These can be inserted
manually or by clicking To, CC or BCC.
© 2015 Fortes Solutions BV
Basics Principal Toolbox
25
3. Check the default contents of the
message. You can make changes to it as
you wish. Be careful to let the hyperlink
intact, since this is very helpful to the
recipient(s).
4. When finished, click Send e-mail and the
mail is sent to the recipients.
Note: Since the email is sent by Principal Toolbox itself, the message will not be stored by your
normal email software. For this reason, you get a 'BCC' of the email message.
2.12
Search function
The search function allows you to perform keyword searches. You can also use the creation
period to specify the period when the item was created.
The search function can be found on all dashboards and on the home page.
Search page
2.13
Project models
In Principal Toolbox, all projects that have been created are based on a project model. A project model
is an extensive template for projects. It contains products, document templates associated with these
products, lessons learned, and automated reports. This way, it is possible to have standardised
projects throughout the organisation, and project managers always have the right document and report
templates available. Right from the start of the project, automated reports (if configured correctly) are
available for reporting purposes. Below, an example of the dashboard of a project model is shown.
© 2015 Fortes Solutions BV
26
Principal Toolbox 6.0
Part of the dashboard of the PRINCE2 project model, which is identical to a project dashboard.
It is possible to have multiple project models within your organisation. So you can have a default
PRINCE2 project model for general use and more specialised project models with specialised content.
For instance, a project model for sales or for software implementation. For these purposes, you are
able to build a product breakdown (see the section about product breakdown 32 ) that matches most
situations for these specialised projects. When starting a project based on one of the models, you are
able to adapt the product breakdown to fit the specific circumstances of the project.
More information about the creation and management of project models can be found in the section
Managing project models 74 .
2.14
Portfolio models
When creating a portfolio, it will be based on a portfolio model. This is similar to how a project is based
on a project model.
A portfolio model contains automated reports, pre-defined project sheets, reporting models and a
financial model. Using portfolio models ensures that portfolios throughout the organization follow the
same standards.
The portfolio dashboard
It's possible to define multiple portfolio models for different portfolios. Please refer to the section about
© 2015 Fortes Solutions BV
Basics Principal Toolbox
the Portfolio Model
26
27
for information about setting up and configuring models.
3
Functionalities
3.1
Project management
3.1.1
Project dashboard
The project dashboard is one of the most important windows, because it enables the project manager
to monitor the progress of the project.
Project dashboard
1. Tabs
The tabs are standard for each project. Depending on your organisation's license some tabs might
not be available. The name of the tab indicates the content of the page:
© 2015 Fortes Solutions BV
28
Principal Toolbox 6.0
- Properties
:
- Product breakdown
:
- Plan
:
- Gantt
:
- Product Flow (add-on)
:
- Activity Planning (add-on)
:
- Resource Allocation (add-on) :
- Documents
:
- Portfolio Report (add-on)
:
- Reports
:
- Guide
:
Includes all project properties including custom fields and
portfolio information.
A decomposition of the products realised by the project. The
tab gives a graphical representation of the breakdown.
To set milestones and assign resources to the different
products.
Overview of the project's hours and cost.
Graphical representation of the project products/activities and
export functionality to MS Project.
When the MS Project add-on is available you can integrate with
MS Project. Furthermore the Product Flow Diagram is visible.
When the MS Project add-on is available you can see the latest
published project plan
When the Resource Allocation add-on is available, the Project
Manager is able to request resources from resource pools. It
also gives the Project Manager an overview of the requested
and allocated resources.
To manage project related documents the Project Manager can
use the tab ' Documents'. This tab makes it easier to search for
specific documents within a project. The tab gives you several
options to search for documents.
When the Portfolio Management add-on is available and the
Portfolio Manager has requested a report, the Portfolio Report
tab will appear. The Project Manager can update the requested
information on this tab and publish it to the portfolio.
Report functionality about the products, cost / hour entries and
resource assignments of the project.
Explanation of the project in order of time (stage, products and
templates)
2. General project information
In this field you will find the general project information such as; objective(goal), organisation
(project team) and status. This information can be changed using the ‘Edit’ button).
3. Logs
It gives an overview of the logs 62 that are used in a PRINCE2™ environment. A counter is
displayed for each log indicating the number of items there are for each log and if there are new
items. The log is selected by clicking the name of the log.
4. Automated reports
A list of all automated reports
127
available within this project.
5. My to do list
Overview of the actions that are assigned to you and their deadline. By clicking an action you
obtain the additional information.
6. PRINCE2™
Here you see the PRINCE2™ process model on which your project is based upon. The stage your
project has reached is highlighted (yellow stage) and you can quickly go to the details of a stage by
clicking a stage.
7. Product list
Here you find the product planning concerned with the various stages and work packages.
8. Functions at project level
Here you can compose the project team (Edit members), edit the general project information (
Edit see point 2), use the search function, make a print of the current page, inform the project
members by email and export key project information to a zip file (‘Pack project offline’). See the
section about pack project offline for extra information.
9. Edit plan
With the ‘Edit plan’ button you can design and modify your project plan. Furthermore you can
© 2015 Fortes Solutions BV
Functionalities
produce a product breakdown structure here. (See section product breakdown
33
29
).
© 2015 Fortes Solutions BV
30
3.1.2
Principal Toolbox 6.0
Planning a project
Project planning within the Principal Toolbox can be done by following these seven steps:
1.
2.
3.
4.
5.
6.
7.
Defining a product breakdown structure. 32
Defining stages and work packages. 34
Assign products to work packages. 38
Planning the milestones of the project (basic
Assign responsibilities for products 44 .
Assignment of budgets (hours and costs). 46
Defining dependencies between products. 47
40
or advanced option
40
).
This sequence is just a suggestion. An iterative planning process is always possible; editing your
project plan and other data remains possible throughout your project.
© 2015 Fortes Solutions BV
Functionalities
3.1.2.1
31
Creating a project
Projects are always created from a programme or project list dashboard. To create a new project do
the following:
1. Go to the dashboard of the programme or project list.
2. Click New in the Project listing heading. The window ‘Add Project’ appears.
Creating a new project
3. Fill in the appropriate data at ‘Project properties’:
Name
: Project name
Objective
: Short description of the project's objective
Project model
: Select the project model on which the project will be based
Product planning : If the add-on Microsoft Project Client Integration is available, you have the
choice to plan your project using MS Project. This adds the possibility
(however much more complexity!) of activity based planning.
4. Scroll to the ‘Add project members’ section and add the project manager from the list of ‘
Available users’. If known, you can add the other members as well. With the search option a
specific user can be found easily.
Depending on your system settings, this page either shows you the roles project manager, project
board and team members or it will show all PRINCE2 roles e.g. Senior supplier, project support,
project assurance.
© 2015 Fortes Solutions BV
32
Principal Toolbox 6.0
Edit members; limited role set
Edit members; all PRINCE2 roles
5. By clicking ‘OK’ the project will be created.
Note: Creating a new project can be done by the system administrator, and manager and readers of a
programme / project list.
3.1.2.2
Defining a product breakdown structure
The definition of a product breakdown structure assists in thinking through the result of the project, i.e.
the final product. The final product of a project is broken down into manageable parts in the product
breakdown structure. These parts are called specialist products and can be both physical products as
well as documents.
Note: Only project managers and project support can edit the project plan.
Stages are edited in the 'Edit Project Plan' window. Before starting any action, go to this window from
the project dashboard, product breakdown tab or plan tab, by clicking
.
The Edit Project Plan window - introduction
The ‘Edit Project Plan’ window is divided into two parts. On the left hand side you find the project plan,
i.e. products that are present in your planning and on the project dashboard. On the right hand side
you find an area where you can define new products, the product breakdown structure and work
packages. In the Principal Toolbox, it is possible to have products defined and not use them in the
planning. These can be kept in 'storage' on the right hand side of the window. See the remarks below
for further explanation.
Three tabs are present on the right hand side of the window
Specialist: use this tab to define the product breakdown structure with amber colored specialist
products.
Management: use this tab to organize the stock of management products.
· Blue products for the project manager,
· Green products for the project board (e.g. authorizations and decision points).
Work Packages: here you can define new work packages.
© 2015 Fortes Solutions BV
Functionalities
33
Edit project plan
Some remarks about the mechanisms of this window.
· All products and work packages are shown on the right hand side of the window. If they are used in
the project plan, they will be shown grey in the right half of the window. If they are not used in the
project plan, they are colored (blue/amber/green) on the right hand side. You could consider the right
hand side a (temporary) storage space for products not planned for delivery. This can be useful
when templates or helpful texts are present you don't want to lose.
· Creating new stages / work packages / products is done by dragging them from the top of the
window into either side of the window. Any of the items shown below can be dragged onto the
project plan.
Important: when placing an item, check your mouse pointer. A black line must show to create a new
item. If no black line shows at your mouse pointer, move your mouse around until you see it appear.
· Creating new specialist products: drag them onto the product list. The tab 'Specialist' will come to
front if it wasn't. Drop the new product when you see the black line appear.
· Deleting items: only products / work packages which are not used in the project plan (i.e. not present
in the left half of the window) can be deleted. Deleting items is done by dragging them onto the trash
can in the upper right hand corner.
· Select multiple items at once by clicking the first, then click the next item while keeping CTRL or
SHIFT pressed. CTRL lets you select multiple items one by one, SHIFT will select all in-between
lying items at once.
· Deleting stages is done by dragging the stage directly onto the garbage bin. Products and work
packages present in the stage are retained on the right hand side of the window.
A detailed description of how to create or change the product breakdown is given in the next section.
3.1.2.2.1 Creating the product breakdown structure
Note: Only project managers and project support can edit the project plan.
If a product breakdown is already present, you can choose to either rename and re-order the products
in the product breakdown, or you can delete the products from the present breakdown and start with
an empty list.
· To rename items, double-click a colored product and enter the new name in the pop-up.
· If the product is grey, look it up in the project plan on the left side of the window and double-click the
product there to rename.
· To delete products, they must not be present in the project plan. First drag them to the right hand
side of the window, then onto the garbage bin.
© 2015 Fortes Solutions BV
34
Principal Toolbox 6.0
· To add products, drag
to the position you want to insert the new product. Check the
mouse pointer, it must show a black line.
· Change the order of products by dragging them to the right position.
· To change the hierarchy, use the arrow buttons in the right hand corner. Be sure to be on the
specialist tab.
Product Breakdown
Move, delete and rename products:
· The order of the products in the list can easily be changed by dragging the specific product to the
correct location.
· To remove a product from the product breakdown, click the product and drag it to the recycle bin.
· To change the name of the product, double-click the product and change the name.
How to assign products to stages and work packages is described in the next sections.
3.1.2.2.2 Graphical view of the product breakdown
After editing the product breakdown, a graphical overview of the product breakdown is shown on the
tab 'Product breakdown' in your project.
1. Go to the tab ‘Product Breakdown’.
2. On the left (Breakdown representation) you can select the view ‘Graphical (All products)’. A view
similar to the view beneath will be shown.
Product Breakdown Structure
Products which are not assigned to a work package are shown in grey (and are not part of the project
plan). Products assigned to a stage and / or work package are shown in yellow.
Assigning products to stages and work packages is described in the next two sections.
3.1.2.2.3 Editing stages
Note: Only project managers and project support can edit the project plan.
Stages are edited in the 'Edit Project Plan' window. Before starting, go to this window from the project
dashboard, product breakdown tab or plan tab, by clicking 'Edit Project Plan'.
© 2015 Fortes Solutions BV
Functionalities
35
Before editing stages, first open the 'Edit project plan' window.
Renaming a stage
To rename a stage, double-click its name. Edit the name in the pop-up.
Adding a stage
To add a stage to your project plan, drag 'New stage' from the top of the window (shown below) to the
right position in your project plan (the left side of the window).
Add a stage by dragging 'new stage' into your project plan.
Moving stages
To move a stage, click its name and drag it to the right position. Check the black line indicating where
the stage will be positioned.
© 2015 Fortes Solutions BV
36
Principal Toolbox 6.0
Deleting a stage
To delete a stage, click its name and drag it right onto the garbage bin in the upper right hand corner
of the window. If the stage contains products and/or work packages, these will be moved to their
respective tabs on the right hand side of the window, so these will not be deleted.
Delete a stage by dragging it right onto the garbage bin.
3.1.2.2.4 Editing work packages
Note: Only project managers and project support can edit the project plan.
Work packages are used to assign multiple products to the same team (PRINCE2), or as a means of
making a further subdivision in stages. Principal Toolbox uses them to calculate summarised start and
end dates, and subtotals of costs and hours.
Note: empty work packages result in errors when the Principal Toolbox calculates progress on
the project dashboard, so only use work packages with products inside (see the section
planning products 38 ).
Stages are edited in the 'Edit Project Plan' window. Before starting any action, go to this window from
the project dashboard, product breakdown tab or plan tab, by clicking 'Edit Project Plan'.
© 2015 Fortes Solutions BV
Functionalities
37
Before editing work packages, first open the 'Edit project plan' window.
Renaming a work package
To rename a work package, double-click its name. Edit the name in the pop-up.
Adding a work package
To add a work package to your project plan, drag 'New work package' from the top of the window
(shown below) to the right position in your project plan (the left side of the window).
Alternatively, you can first define the work package in the right hand side of the window, and then drag
it to the right position in your project plan.
Add a work package by dragging 'new work package' into your project plan.
Moving work packages
To move a work package, click its name and drag it to the right position. Check the black line
© 2015 Fortes Solutions BV
38
Principal Toolbox 6.0
indicating where the work package will be positioned.
Deleting a work package
To delete a work package, click its name and drag it to the work packages list on the right hand half of
the window. Only work packages that are not present in the project plan anymore, can be deleted by
dragging them from the right hand part of the window onto the garbage bin (step 2 in the figure below).
Deleting a work package: 1) drag it from the left part to the right hand part of the window.
2) Drag it from the 'work packages' tab onto the garbage bin.
3.1.2.2.5 Planning products
Stages are edited in the 'Edit project plan' window. Before starting any action, go to this window from
the project dashboard, product breakdown tab or plan tab, by clicking 'Edit project plan'.
Defining new products
You can find an explanation of creating a product breakdown 32 in the appropriate section. The
definition of management products works in almost the same manner. Drag 'New man. product' onto
the right hand part of the window. Use the blue management products for products of the project
manager (like the project plan, highlight reports etc.). The green management products are meant for
the project board (e.g. project authorisation, next stage authorisations etc.).
Adding products to the project plan
Products are always added to stages, and optionally to work packages. To plan products, simply drag
them from the right hand side of the window to the correct position in the stage or work package. Click
the 'specialist' tab for products that are part of the product breakdown. Management products are
found on the 'management' tab.
Products which have been placed in the project plan are grey in the product breakdown overview, or
the management products overview. The way to set planning dates for your project is described in the
chapter planning product milestones 39 .
Hint: check the use of colors of products etc. in section 'the use of colours within projects
18
Making a product mandatory
It is possible to make products mandatory. This means that a product is set in the project plan. A
project manager is not able to change or delete the product. When a project manager wants to change
the project plan the mandatory products are highlighted with a small lock. This immediately shows
© 2015 Fortes Solutions BV
Functionalities
39
which products are mandatory.
Mandatory products in the project plan
The setting ‘mandatory’ is part of the product properties and therefore visible on the product page. A
mandatory product within a project model can only be modified by the model owner and within an
ongoing project by the system administrator.
To make a product mandatory, go to the product page of the product you would like to make
mandatory. Click on Edit and check the box that says 'Mandatory'. Then click on Save to save your
changes.
Making a product mandatory on the product page
By using this functionality correctly it is possible to increase the uniformity of the work flow and improve
the overall grip on the projects.
3.1.2.3
Planning product milestones
Each product in the project has four milestones you can use to manage product delivery.
· Start:
set the date work has to start on the product
· Draft:
plan the delivery of a draft version
· Checked:
set the end date for quality review
· Final:
the planned date for delivery of the final version of the product.
Planning the milestones within the project can be done in two ways:
On the dashboard and plan tab :
Set milestones individually on the project dashboard or ‘Plan’ tab.
40
On the Gantt chart
40
:
Use the Gantt chart editor with ‘drag & drop’ functionality.
The option with dashboard and plan tab is more or less like working like an Excel sheet, using a table
to fill out dates for your project. The Gantt chart option provides a graphical planning chart, which you
can edit using ‘drag & drop‘ functionality. We will explain the two options in the next two paragraphs.
© 2015 Fortes Solutions BV
40
Principal Toolbox 6.0
3.1.2.3.1 Using the dashboard or plan tab
On the project dashboard and the 'Plan' tab, dates can be set by use of the keyboard and by selecting
them in a calendar with your mouse.
Filling in the milestones on the 'plan' tab.
1. Go to the project dashboard or the 'Plan' tab.
2. Fill in the milestones for each products:
set the date work has to start on the product
o Start:
plan the delivery of a draft version
o Draft:
o Checked: set the end date for quality review
the planned date for delivery of the final version of the product.
o Final:
The use of these milestones is optional. Principal Toolbox uses start and end dates to calculate
duration of the project, stages and work packages. Therefore it is recommended to use at least
these milestones on each product.
3. Dates are changed by clicking the double dashes, or by clicking an already present planned
milestone. Enter the date with your keyboard, or select the date in the calendar.
Note: If a milestone has finished (depicted by:'ü ), you cannot change the date directly
anymore. To change milestone data then, click the product name to open the product detail
window. On the 'general' tab, you can delete or change the actual dates for each milestone.
3.1.2.3.2 Using the Gantt editor
A Gantt chart shows a timeline of your product with the product milestones. Because Gantt charts are
simple to understand and easy to construct, they are often used by project managers.
To use the Gantt chart in your project, follow these steps.
1. From inside your project, click the Gantt tab. A Gantt chart will be shown with all stages, work
packages, and products listed. When you haven't entered any planned dates (milestones) yet, the
start date of the project will be set to the date of today and the duration of all products will be set
according to the duration in the project model.
© 2015 Fortes Solutions BV
Functionalities
41
Gantt
2. To edit the Gantt chart, click
in the blue page header.
Note: Only products can be planned directly in Principal Toolbox. Stages and work packages
are summaries of the products they contain, so these cannot be changed directly.
Note: To select products in the edit Gantt window, click the product name on the left of the
window. To select multiple products, keep CTRL or SHIFT pressed while clicking multiple
products.
3. On the next page the planning can be entered in two ways. In the left hand half you can enter dates
by clicking the cells and using the calendars. Alternatively, you can use the graphical part of the
window. Here, you can change duration and dates with your mouse by dragging the time lines of
products.
. In the dialogue,
4. First of all you need to define the start date of your project. To do so click
select the start date. This can also be used to move a group of products to a specific start date. See
the note above for info about selecting multiple products.
5. Set the date of the first product in every stage or work package by dragging this to the planned start
date or use the button shown above. All products in this specific work package or stage will be
moved automatically to this date.
6. The next step is to plan the products in this specific stage or work package individually:
a. To move the product forwards or backwards in time you need to place the cursor in the centre of
the product bar, hold the left mouse button down and drag it to the correct position.
b. To alter the duration, you need to place the cursor on one of the sides of the product time-bar and
drag the side in the desired direction.
7. To define the draft and checked milestones or to set dates in a calendar, you can use the left side of
the ‘Edit Gantt’ window. After clicking in a cell, a pop-up shows a calendar where you can choose
the date.
As soon as you have set the draft or checked milestones in the table on the left, they are shown in
the timeline on the right. Now you can drag them with your mouse as well.
© 2015 Fortes Solutions BV
42
Principal Toolbox 6.0
Editing the Gantt
8. To define dependencies between products, select two products and click Add dependency. This
will create a finish-to-start dependency between the two products. To edit dependencies see the
section defining dependencies 47 . To delete a dependency use Remove dependency. Buttons:
9. If dependency conflicts exist in your planning you can use the 'Solve conflicts button':
the products you want to be recalculated and click the button.
Before: dependency conflict
. Select
After: problem solved
10.When the plan is finished, click the ‘Save’ button to save the changes made.
Note: inconsistencies or conflicts resulting from mutually depending products are indicated by
coloured indicators. For their meaning, consult the use of colours in projects 18 . For more help
on dependencies, see defining dependencies 47 .
3.1.2.3.3 Baseline support
To keep track of progress and changes in the original planning is can be very useful to work with
baselines. It allows you to compare the current schedule with the baseline planning.
There are two possible baselines in the Principal Toolbox. You can set a planning as Initial Baseline or
Current Baseline. Setting the baseline will copy the current product planning to the selected baseline
for comparison when the project progresses.
Set Baseline
Save a planning as Initial or Current baseline by clicking Set Baseline. This button is available on the
project dashboard, Plan and Gantt.
Choose the baseline type (Initial or Current Baseline) to save the schedule.
© 2015 Fortes Solutions BV
Functionalities
43
Setting a baseline
View a Baseline
In the Gantt chart a baseline planning can be shown in the current plan. You can choose to show the
Initial or Current Baseline in the actual Gantt.
Selecting a baseline
Baselines on the Gantt
3.1.2.4
Product page
Every product which is defined has a standard product page. In order to consult the detailed
information concerning this specific product you click the product name in the project dashboard.
© 2015 Fortes Solutions BV
44
Principal Toolbox 6.0
Product page
On the ‘Product page’ there are some extra tab pages: Logs, Dependencies and Costs & Hours (not
shown). The Logs tab allows you to register items such as: issues, risks and quality review 62 . On
the Dependencies 47 tab you can define dependencies between products to create a product flow.
When the add-on 'Advanced Cost Registration' is available this tab is available for entering cost
entries (See section cost administration).
Logs tab
3.1.2.5
Dependencies tab
Assigning responsibilities for products
Next step is to assign the responsible owners to the products in your project. This can be done by
either the project manager or project support roles. Before you can assign products to project
members, you have to make sure that all required resources are a member of your project
(management) team.
Assemble your project team
1. Go to the ‘dashboard’ tab of your project.
2. Click ‘Edit Members’ to see the members of your project team. To add people to your
project team, select them from the list on the right and click ‘Add’ at a specific role to
assign them. Use the search option to easily find a specific user.
© 2015 Fortes Solutions BV
Functionalities
45
Depending on your system settings, this page shows you either the project manager,
project board and team members, or it shows all PRINCE2 roles i.e. Senior supplier,
project support, project assurance, etc. This can be changed by the system
administrator.
Edit members; setting 'limited set of roles'
Edit members; setting 'full set of PRINCE2 roles'
3. Click ‘OK’ at the bottom of the window to save the changes.
Assign products to owners, reviewers and participants
1. Go to the ‘Plan’ tab.
2. Complete following information for each product:
Owner
Reviewer
Participants
:
:
:
Owner/responsible for the product.
Reviewer of the product.
Participants at the product realisation.
© 2015 Fortes Solutions BV
46
Principal Toolbox 6.0
Plan tab
By clicking on Edit and then clicking on the double dash a menu appears and you can
select resources or dates. Selected resources and dates can be changed later in the
same way.
The menu which assigns participants to a product also works in another way whereby
more people can be added.
3. Select one or more members from the column on the right
with your left mouse button (to select multiple members at
the same time, keep the CTRL key pressed) and click the
‘<’ key.
4. Click ‘OK’ to assign the participants to the product. You can remove members by selecting them
from the left hand row and then clicking the ‘>’ key.
3.1.2.6
Assigning budgets
In the Principal Toolbox, product based planning takes a central place. Budgeting and cost registration
is also product based, so all costs are calculated towards products.
Note: time, stage or project based costing is also possible in Principal Toolbox. In this case,
dummy (management) products are added to the project plan (see planning products 38 ). In
the case of time or project based costing, add the dummy products to the last stage of your
project. This way, they stay visible throughout the project.
For the registration of both costs and hours, five types of registration are available:
: The approved budget
· Budget
· Committed : Costs you will have to pay, e.g. a contract signed, but not yet invoiced
: Money or hours actually spent
· Actual
· Remaining : An estimate of costs or hours necessary to complete the product.
: The variance relative to the budget.
· Variance
Formula: variance = (committed + actual + remaining) - budget
Below you'll find the steps to set the budget for your project.
1. Go to the 'Plan' tab.
2. In the pull down menu select Costs manual or hours manual.
© 2015 Fortes Solutions BV
Functionalities
47
3. Click the Edit button and fill in the budget in the field 'Hours budget manual’ (hours) and ‘Cost
budget manual’ (costs). Fill in ‘Hours remaining manual’ and ‘Cost remaining manual’ with the same
value of hours and costs. By doing this you keep the ‘variance’ with respect to the budget, at the
start of the project at 0. As the project progresses you can see at ‘variance’ the number of hours or
costs over or under the budget.
4. Alternatively, go to the each product page and click the tab Costs & Hours and insert the different
budgets there.
Costs & Hours on a project level
Costs & Hours on a product level
Using description above gives an overview of your project costs and hours in tabular form. If you want
to keep track of history or the construction of the numbers on the page, the Principal Toolbox has the
option of cost and hour entries. If these are available within your organisation, you will find a section
'costs / hours listing' on each product page, on the 'Cost & Hours' tab, as shown below. See the
section working with cost entries for more information.
3.1.2.7
Defining dependencies
The easiest way to define dependencies within your project is by using the editable Gantt 40 .
Dependencies created on the Gantt chart are inserted as 'finish-to-start' relationships. To modify the
dependency type or to define dependencies with products from other projects (inter-project
dependencies) you need to open the product details (from the project dashboard, plan or costs &
hours tab) and go to the 'Dependencies' tab.
1. Click the name of the product you want to create a dependency for, and select the tab
'Dependencies’.
© 2015 Fortes Solutions BV
48
Principal Toolbox 6.0
Dependencies tab in the product detail window
2. On this tab you can add ‘Predecessors’, from your project and from external projects. Click Add to
select one or more ‘Predecessors'. Then select the project and the product which are the ‘
Predecessors’ and define the type of relation, options are:
Finish-to-finish:
Finish-to-start:
Start-to-finish:
Start-to-start:
Product (B) cannot be finished
until product (A) has been
finished. For example, if you
have two products, "Wiring"
and "Installation inspected",
"Installation inspected" cannot
be finished until "Add wiring"
has been finished.
Work on product (B) cannot
start until product (A) has been
finished. For example, if you
have two products.
"Constructed fence" and
"Painted fence", "Painted
fence" cannot be started until
"Constructed fence" has been
finished. This is the most
common type of dependency.
Product (B) cannot be finished
until work on product (A) has
been started. The
Predecessor must be started
before current product can
finish.
Work on product (B) cannot
start until work on product (A)
starts. For example, if you
have two products,
"Foundation poured" and
"Concrete levelled", "Concrete
levelled" cannot begin until
"Foundation poured" begins.
3. Click OK to create the relationship.
Note: only predecessors can be defined. This way, a project manager cannot make another
© 2015 Fortes Solutions BV
Functionalities
49
project dependent on his or her own project. To define successors, the project managers have
to cooperate.
4. The type of the dependency and the lag (delay) can be modified on the main page. Lag is a delay
between products that have a dependency. For example, if you need a two-day delay between the
finish of one product and the start of another, you can establish a finish-to-start dependency and
specify two days of lag time.
Adding a dependency
The relationships are verified based on the start and end date of the products. If an end date of a ‘
Predecessor’ is delayed or planned later than the start date of the ‘Successor’ and the relation is
defined as; Finish-to-Start, a blue traffic light is shown to indicate a problem.
Dependency on the project dashboard
External dependencies
External dependencies are represented in the projects Gantt diagram. These are represented with a
big dot and the word 'external'. To see details of the dependency; place your mouse on the
dependency and a pop-up screen will show the details.
Dependencies on the Gantt
On programme level these inter-project dependencies are also represented so the programme
manager can see bottlenecks in the execution of the programme.
See the screenshots below:
© 2015 Fortes Solutions BV
50
Principal Toolbox 6.0
Dependencies on the programme Gantt
If for some reason the Office relocation project is delayed or planned later the Gantt will indicate that
there is a problem with the planning.
Dependencies on the programme Gantt
3.1.2.8
Requesting resources
The Project Manager is able to request resources to staff his project. Resources can be requested as
skill, or, if the project manager has a specific preference, as ‘named’ resources. Before a project
manager is able to request resources from a resource pool, a pool or multiple pools have to be linked
to the project.
How a Project Manager links a resource pool to his project and how a he or she requests resources
van be found at 'Requesting resources within a project' 110 .
Note: To be able to request and allocate resources, the Resource Allocation module needs to
be available!
© 2015 Fortes Solutions BV
Functionalities
3.1.3
51
Managing a project
During the execution of a project the defined products are to be realised. In this section you will find:
·
·
·
·
·
·
3.1.3.1
How to monitor and enter progress.
How to communicate with Principal Toolbox.
Ways of composing reports and views.
How documents/templates are managed.
How issues and risks are registered and monitored.
How to use the hours entry module.
Progress: Planning
You are able to get an easy overview of the progress of the project on the project dashboard.
Immediately visible are:
· delayed and finished products
· the number of issues, risks etc. within your project and per product or work package.
· deliverables added to products, etc.
On the dashboard:
Planning on the project dashboard
· Planned dates set on today or before today are shown in red.
· If the final planned date lies before today a red dot appears to the left of the product name.
· Finished milestones are marked with a tick: ü. If the final milestone is ticked off, the tick is shown to
the left of the product name.
On the Gantt chart;
Planning on the Gantt chart
· If the final milestone of the product is delayed a red dot appears next to the product name.
· If milestones of the product have been finished, this is shown in the planning with a solid colour bar
inside the product bar. (In the figure shown above, the draft version of the Initiation Stage Plan has
been finished)
· Finished products are marked with a tick (ü) and the solid bar indicates when the product actually
has been finished (e.g., in the figure above, the Project Mandate was finished on the 25th of May,
but was scheduled to finish on the 21th).
To report progress you do the following:
1. Go to the ‘Project Dashboard’.
2. Click the name of the product to view the ‘Product page’.
3. To change the planned date, select the date and enter the new date in the calendar.
© 2015 Fortes Solutions BV
52
Principal Toolbox 6.0
4. To register passing of milestones, tick the checkbox for Start/Draft/Checked/Final. The date will be
set to today by default, alternatively enter another date in the column 'actual date'.
Planning on the product page
5. Passing a milestone can also be marked directly on the project dashboard. To do this click the
appropriate milestone date next to the product and tick it off using the tick sign.
3.1.3.2
Registration of actual hours
Registration of hours in the Principal Toolbox can be done in multiple ways, depending on the available
add-ons:
· Manual entry of aggregated hours per product (no add-on required).
· Enter hours using hour entries. This way you can keep track of history and the build-up of the
number of actual hours shown (requires add-on 'Advanced Cost Registration').
· Time entry with the Principal Toolbox add-on 'Timesheets'. Users of Principal Toolbox get a weekly
time sheet on which they can enter their actual spent hours (requires add-on 'Timesheets').
System administrators and time sheet managers, check 'Configuration of time entry
information about possible configurations.
113
' for more
3.1.3.2.1 Filling in time sheets (add-on)
When users of Principal Toolbox have been added in the module 'Timesheets', they get a weekly time
sheet on their home page:
By clicking the date of the time sheet, the time sheet opens. On it you will find the selection of products
you are allowed to book hours on. The selection of products that is shown is dependent on the settings
of your 'time entry group'. It could be, that only products are shown of which you are owner, reviewer or
participant. Alternatively, only products with an hours budget can be shown on time sheets.
In both cases, you can add the number of hours in the row of the appropriate product, in the column of
the correct day. The total number of hours for each product, day, and week is shown directly on
screen.
At the bottom of your time sheet, you find a selector for projects and non-project activities. Here you
can select products or activities that are not shown in the product list.
After finishing your time sheet, you need to request approval on the data you entered. How this works
© 2015 Fortes Solutions BV
Functionalities
is described in the next section
53
53
.
Timesheet
Principle of time sheets and hour entries
Time sheets need to be approved, otherwise the hours and associated costs will not be accepted.
After approval of the time sheet, the fields of the time sheet will be added to the appropriate products
in the form of a so called cost/hour entry. These entries are visible to the project manager from the
product detail page. They provide an overview of the different bookings that have been made on
products and allow to see which user worked how many hours on what date on which product.
3.1.3.2.2 Time sheet approval (add-on)
For the requester
After filling in the time sheet, you need to request approval. This is done with the 'request approval'
button. The approval request is automatically delivered to the approvers.
Note: only approved hours will be taken into account in the project costs & hours overview. Before
approval, they are not visible in projects or products.
If a time sheet has been disapproved, it will re-appear on your home page with status 'disapproved'.
To see why it was disapproved, open the time sheet and click Status to see any remarks of the
(dis)approvers. You can make any necessary changes and request approval again.
At the section 'My open time sheets' on your home page, you will find an overview of your time
sheets with the approval status. Here, you can access approved time sheets. Note the view selector
on this tab, this defines which time sheets are visible.
For the approver
Check the section 'Configuration of time entry
3.1.3.3
113
'.
Reporting
Within the Principal Toolbox you can make progress information available and generate reports. In this
section the various options will be presented.
3.1.3.3.1 Portfolio reporting (add-on)
If and when the project manager is expected to report project status information back to the Portfolio, a
reporting request will be sent and appear on the project.
The request is found within the project on a separate tab with name "Portfolio Report". The report
© 2015 Fortes Solutions BV
54
Principal Toolbox 6.0
layout is based on the reporting model as defined on the portfolio.
To supply the requested information the project manager follows these steps:
1. Within the project, select the tab "Portfolio Report" and press the "Edit" button
The porfolio report is to be filled out by the project manager
2. Update the editable fields with the latest information, and press the "Save" button
3. Then press the "Publish to Portfolio" button to send the information off to the portfolio.
3.1.3.3.2 Copying data
Within the Principal Toolbox there are two options to copy a specific view to another application.
Options are:
- Copy to clipboard.
- Save list to RTF.
- Save list as XLS.
Copy to clipboard
The ‘Copy to clipboard’ function is a quick way to export the information shown on the current page to
another application (e.g. email).
1. Click the
button.
2. Then open the file you want to paste the information into. Choose Paste and arrange the document
composition yourself.
Note: The 'Copy to clipboard' function only works in Internet Explorer, not in FireFox or Chrome.
For these browsers, use the RTF or XLS function instead.
Note: Some applications empty the clipboard when they are started. In that case, first open the
application and only then copy the information.
© 2015 Fortes Solutions BV
Functionalities
55
Save list as RTF
The 'Save this list as RTF' function creates a so called RTF (rich text format) file which can be opened
in MS Word.
1. Click the
button.
2. The web browser opens a pop up for opening or saving the RTF list.
Note: This is the Internet Explorer behaviour. For other browsers the downloaded file may
appear differently.
3. When clicking the 'Open' button, MS Word will automatically be opened and the data is available for
further modification.
Save list as XLS
The 'Save this list as XLS' function creates a so called XLS file which can be opened in MS Excel.
4. Click the
button.
5. The web browser opens a pop up for opening or saving the Excel list.
6. When clicking the 'Open' button, MS Excel will automatically be opened and the data is available for
further modification.
3.1.3.3.3 Generating automated reports
The Principal Toolbox has extensive report functionality available. These reports come either as
RTF-files (readable by all text processors, like Word, WordPerfect) and Microsoft Excel files.
Within the Principal Toolbox a number of fixed keywords are available which you can use in your
templates. When generating a report these keywords will be replaced by information from the Principal
Toolbox database.
All views defined in the Principal Toolbox (general and personal) are available for reporting.
1. Go to the ‘Project Dashboard’ or go to a specific product page where a merge template is
available.
© 2015 Fortes Solutions BV
56
Principal Toolbox 6.0
On the Project Dashboard
On the product page
2. To generate a report with the project actuals, click the name of the report at the heading ‘
Automated Reports’ or at the product page.
3. After the report is opened in a new screen it can be altered and then saved. In order to make the
report available to the project team it is necessary to upload it in the Principal Toolbox (see the next
section, Adding documents 59 ).
See Automated reports
127
for more information
3.1.3.3.4 Setting tolerances
Tolerances are used to monitor project status. At the start of the project, the project manager and
project board agree on the tolerance for the project. Tolerances are the allowed deviation in time,
quality, costs and hours from the planned values. When a project exceeds the agreed tolerances,
according to project management methodology it needs to be reported to the project board. In
Principal Toolbox, this can be made visible with the RAG indicators on any programme dashboard.
Note: tolerances need to be set for each project list and programme separately. They are not
inherited from higher levels.
Tolerances can be set by a programme manger for the programme / project list as a whole and for
projects separately. To set tolerances, click 'Edit Tolerances' on the programme dashboard.
© 2015 Fortes Solutions BV
Functionalities
57
Tolerances can be set for the entire programme or project specific
In the 'Programme and project tolerances' window, you can set tolerances for the following four
categories.
:
Shows whether or not the active stage is running behind or on schedule with
· Stage
respect to the planning end date.
:
Counts the number of products that are overdue (final planned date before today
· Planning
and product is not finished).
:
Compares the spent hours (commited + actual + variance) with the budget.
· Hours
:
Compares the spent costs (commited + actual + variance) with the budget.
· Costs
The 'default project tolerances' are used for all projects in the programme. If project specific tolerances
are filled for a project, these will overrule the default tolerances.
- Activate the Project specific tolerances per project by selecting the checkbox in the column Project
Specific Tolerances.
- For the tolerance settings to be active for the current stage select the checkbox in the column
Planning active stage only.
By default you will see an overview of the Stage planning and Product Planning tolerances.
Setting planning tolerances
Select the view Cost & Hours Tolerances from the drop down list to set the Cost and Hours
tolerances.
© 2015 Fortes Solutions BV
58
Principal Toolbox 6.0
Setting Cost & Hours tolerances
For each of these, you can set both absolute numbers and percentages of the total. The colours of the
RAG indicators are set according to worst case scenario tolerances for cost and hours. Example:
Tolerances set:
Costs orange (%):
Costs red (%)
Costs orange (abs)
Costs red (abs)
Project costs:
Budget
Committed
Actual
Remaining
10%
20%
5,000
10,000
100,000.00
25,000.00
65,000.00
23,000.00
So the expected costs for the project are (25,000 + 65,000 + 23,000) = 113,000. The budget is
100,000, so the expected deviation is 13,000.
According to the percentages set, this would result in an amber (orange) indicator. However, since the
absolute number for a red indicator is 10,000, it will show red on the programme dashboard.
3.1.3.4
Document management and approval
You can store documents at various locations within the Principal Toolbox. The Principal Toolbox will
keep the document in the database, so it will be available to all users with access to the document in
the Principal Toolbox. It is possible to overwrite older versions with newer ones. The Principal Toolbox
will keep the old versions in storage. These will remain available for the manager of the particular level
in the tool.
On top of that, it is possible to put an approval cycle on deliverables and/or documents with the
add-on ‘Advanced Customisation & Workflow’.
To make document management much easier, the tab 'Documents' has been added on the project
level. This tab makes it easier to search for specific documents within a project. The tab gives you
several options to search for documents.
© 2015 Fortes Solutions BV
Functionalities
Most recent documents
:
Search all project documents :
Project related
:
documentation
Documents on Plan
:
59
List of the 100 most recently changed documents for this project.
Search for documents in this project.
Documents that are not linked to a specific product.
Documents per product
3.1.3.4.1 Adding documents and templates to products
Documents in any file type can be added to a 'Product page’:
Product Description
Templates
Deliverables
:
:
:
Product specification; goal, composition and quality demands.
Template(s) as the basis for the (management) products.
Products/documents to be delivered.
1. Go to the ‘Product page’.
2. Click Add in order to add a document or to add an intranet link. Fill in the following information:
Description
: Description of the document.
Revision/Doc nr.
: Document version.
Filename
: Select a document with the ‘Browse’ button or, alternatively
Internet address
: Fill in a hyperlink.
Internal document link: Provide a document ID from a document at another location in the
Principal Toolbox application. The ID can be found in the document
history.
This allows for a centrally placed document to be linked to from projects.
Update by updating only the original centrally placed document.
3. Click OK to add a document to the Principal Toolbox.
You are able to open documents saved in the Principal Toolbox, however you are not allowed to edit
them. In order to edit a document it is necessary to download the document. After editing you have to
add it as a new version.
Note: Hyperlinks have the following syntax:
· internet addresses look like "http://intranet.organisation.com/documents/example.doc"
· links to document locations look like: "file://p:\documents\example.doc"
When using links to document locations, make sure all users have the same drive mapping.
3.1.3.4.2 Updating a document
1. Locate the document you want to update.
2. To update the document with a new version, select it and click Update. Fill in the following
information:
© 2015 Fortes Solutions BV
60
Principal Toolbox 6.0
Description
Revision/Doc number
Filename
:
:
:
Internet address
Internal document link
:
:
Standard description of the last version
New version number.
Select the new version of the document with the ‘Browse’
button,
OR fill in a hyperlink.
Provide a document ID from a document at another location in
the Principal Toolbox application. The ID can be found in the
document history.
This allows for a centrally placed document to be linked to from
projects. Update by updating only the original centrally placed
document.
3. Select the document concerned and click Show History in order to show a list of all the former
versions of the document. Remove other versions by using the ‘Remove’ button.
3.1.3.4.3 Document approval (add-on)
Important documents like the Project Initiation Document (PID) and end project report need to be
approved by a member of the project board. Other documents/deliverables in the project may need to
be approved by a specific person as well. To support this approval procedure, the ‘Approval’ add-on is
available.
1. Go to the 'product page' of a product.
2. Click Add or Add note at Deliverables to insert a specific deliverable.
3. To request approval on this document, place the tick mark in front of the document and click the ‘
Request Approval’ button. A new window will open.
4. First you will have to define the approver(s) for the document. The next step is to set the due date
and insert any remarks to inform the approver(s). If you do not want to send an e-mail to the
approver, remove the tick mark at ‘Notify Approvers’.
© 2015 Fortes Solutions BV
Functionalities
61
Requesting approval
5. Click OK to sent the document in for approval. On the product page the status changes to 'Waiting
for approval’.
Approving a document
The reviewer needs to review the document and approve or disapprove it. The documents which need
to be approved can be found at the reviewers ‘Home' page.
1. Go to your ‘Home' page. Here you will see all documents waiting for approval.
2. Click the Product name to open the specific ‘Product page’. To review the document click the
document name.
3. After the review you need to ‘Approve’ or ‘Reject’ the document by clicking the appropriate button
. A new window will appear where you can insert remarks.
4. Click ‘OK’ to finish the approval procedure. And the status of the document will change to Approved
or Rejected.
3.1.3.4.4 Adding minutes of meetings
Fast consultation of the minutes of meetings can be very useful for the project team members and
makes the dissemination of minutes and diary dates unnecessary.
© 2015 Fortes Solutions BV
62
Principal Toolbox 6.0
In the logs section on your project dashboard you find a link for ‘Minutes of meetings’. Here you can
keep all of the meeting reports and appropriate documents.
1. Go to the ‘Project dashboard’
2. Select ‘Minutes of meetings’ under the logs.
Logs
3. Using ‘Add’ you can add the minutes of the meeting, with ‘Add note’ you can add a note and with
remove you can remove it again.
4. Using the ‘History’ and ‘Update’ buttons you can look at the history of a document and with update
you can replace an existing document (see Updating a document 59 ).
Minutes of meetings
3.1.3.5
Issues, risks, quality reviews and lessons learned
Within the Principal Toolbox all (possible) log items (issues, risks, quality reviews, changes, lessons
learned) can be logged through the different logs available on the project dashboard.
On all logs custom fields can be defined with the add-on ‘Custom fields’ 159 . Only the basic
functionality is explained in the manual. The logs available within the Principal Toolbox, are
· Issue log 63
· Risk log 65
· Quality review log 65
· Change log 67
· Daily / Action log 68
· Lessons learned log 69
Note: An issue, risk etc. can initially be created on project level, but after examination can be
reassigned to a specific product or work package. To assign an issue, risk, etc. to a product (or
to change the product which is affected) open the issue and select the appropriate product in
the pull-down menu at 'Product'.
Note: The owner of a log item are able to change all information of that log item. The project
manager and project support can change all information of all log items at any time.
© 2015 Fortes Solutions BV
Functionalities
63
Adding an issue
History log
For every log-item there is a history tab available. This shows history information for tracking who has
done what.
History tab for an issue
Discussion messages on log items
On a log item it is possible to add discussion messages. On these messages the author and date is
registered.
Here you are able to start a new discussion
3.1.3.5.1 Issue log
Issues can be created in two ways; by clicking ‘Issue log’ on the ‘Project dashboard’ or by making a
new issue from a product on the product page. In the second case the issue will automatically be
related to the specific product.
1. Go to the summary page of a product.
2. Now click the tab ’Logs’.
3. Click ‘New’ in the blue ‘Issue listing’ bar. Then fill in the following information:
© 2015 Fortes Solutions BV
64
Principal Toolbox 6.0
Description
Type
Status
Priority
Due date
Decision
Owner
Product
:
:
:
:
:
:
:
:
Remarks
:
Give a description of the issue.
Choose the type; RFC, Off-spec, Question, Concern or Issue.
Give the status of the issue.
Decide the priority of the issue.
When does the issue need to be resolved?
The decision concerning the issue.
Owner/responsible person for the issue.
To which product or work package is the issue related, leave blank when
it is project related.
Any remarks concerning the issue.
4. By clicking ‘Add’ or ‘Add note’ you can add important documents/notes on to the issue.
Adding a new issue
5. You can always alter the issue later by clicking on the issue in the 'Issue log'.
6. The project manager and project support roles can also copy and move issues. To copy an issue to
another programme or project, you can use the 'Copy' and 'Move' buttons:
. With
copy, you create a duplicate issue within your own project. With the move button, you can select
another project or programme to move the risk to.
7. In order to close an issue you can set the ‘Status’ to ‘Closed’ but you can also select the log item(s)
by clicking the row to select and then clicking the 'ü' button.
Issue log
Note: All project team members are allowed to create new issues. The project manager and
© 2015 Fortes Solutions BV
Functionalities
65
project support can edit all issues. The owner and creator of an issue can edit all information of
that particular issue.
3.1.3.5.2 Risk log
The risk log is a central place where risks are identified, described and where certain decisions and
actions are taken.
A risk can be made in two ways; by clicking ‘Risk log’ on the ‘Project dashboard’ or by making a new
risk at a product on the ‘Product page’. In the second case the risk is automatically related to the
specific product.
1. Go to the ‘Product page’ of a product.
2. Now click the tab ’Logs’.
3. Click here behind ‘Risk listing’ on ‘New’. Then fill in the following information:
Description
Type
Status
Priority
Due date
Decision
Chance
Severity
Owner
Creator
Product
Remarks
:
:
:
:
:
:
:
:
:
:
:
:
Give a description of the risk.
Fill in the type of risk.
Fill in the risk status.
Decide the risk priority.
Final date where after risk measures need to be taken.
The decision of the risk occurring.
Chance of the risk occurring.
Impact cause upon risk occurrence.
Owner/responsible person for the risk.
Author of the risk.
To which product is the risk related, leave blank when it is project related.
Any remarks concerning the issue.
4. Save your new entry by clicking the 'Save' button.
5. Furthermore you can also add an action to the risk by clicking ‘New’ behind ‘Risk listing.
6. By clicking ‘Add’ or ‘Add note’ you can add important documents/notes to the risk.
7. You can change the risk any time at a later date by clicking it's description in the ‘Risk log’.
8. Close a risk by setting the status to 'Closed'
9. The project manager and project support roles can also copy and move risks. To copy a risk to
another programme or project, you can use the 'Copy' and 'Move' buttons:
. With
copy, you create a duplicate risk within your own project. With the move button, you can select
another project or programme to move the risk to.
Note: Only the project manager and project support can create new risks. However, the owner
and reviewer of a product can also create risks related to that product. The project manager and
project support can edit all risks. The owner and creator of a risk can edit all information of that
particular risk.
3.1.3.5.3 Quality review log
A quality review (quality control) is a standard method to test a product for its measurable quality
criteria. This technique is especially suitable for documents (e.g. developments, procedures and
reports).
The criteria for the quality of a product are taken up in a product description. It describes the goal of
the product, the composition of the product, which sources are to be used, the form in which the
© 2015 Fortes Solutions BV
66
Principal Toolbox 6.0
product should be delivered and which quality criteria the product must meet.
We will describe the quality review procedure underneath:
1. Go to the ‘Product page’ of a product. The ‘checked’ date on this page gives the date on which the
quality review should be finished. To document this further, quality reviews can be created in the
quality review log.
2. Click the ’Logs’ tab.
3. Click ‘New’ in the blue "Quality review listing" bar.
4. Fill in the following information:
Description
Status
Priority
Due date
Method
Reviewer
Results
Owner
Creator
Created
Product
:
:
:
:
:
:
:
:
:
:
:
Remarks
:
Short description of the quality review.
Open/Closed. Has the review been carried out?
Priority of the quality review.
When is the review due by.
Describe the method (see the Product Description).
Who will carry out the review.
Give the review results. (--, OK and action items)
Owner of the quality review.
Creator of the quality review.
Date when the quality review was made.
To which product is the review related, leave blank when it is project
related.
Remarks with regard to the quality review.
5. Click the 'Save' button to save your new entry.
6. It is possible to add actions and documents to the quality review. To add an action you need to do
the following; click ‘New’ behind ‘Action listing’ and fill in the following information:
Name
Description
Status
Priority
Due date
Owner
Creator
Related to
Remarks
:
:
:
:
:
:
:
:
:
Name (identifier) of the action
Description of the action
Status (open / closed)
Priority
When should the action be finished
Owner / person responsible for the action
Who has created the action
Here a link to the quality review will be shown.
Any remarks, status description.
7. Click the 'Save' button to save your new entry.
8. By clicking ‘Add’ or ‘Add note’ behind documents you can add documents or notes with additional
information to the quality review.
© 2015 Fortes Solutions BV
Functionalities
67
Adding a quality review
9. To copy or move a Quality review to another programme or project, you can use the 'Copy' or
'Move' button:
.
3.1.3.5.4 Change log
The Principal Toolbox has a separate ‘Change log’, which offers a central repository for documentation
of changes within your project.
The project manager needs to judge all issues by their priority and their impact. In case that an issue
(off-spec, RFC) falls within the tolerance of a stage then he/she can choose to accept the issue and
log the change in the ‘Change log’.
If an issue leads to the result that the project/stage is threatened to fall outside the tolerances set the
project manager needs to discuss the issue with the project board. They decide whether actions on the
issue are carried out or not. If the project board decides to accept the issue then the project manager
needs to define a change.
1. Go to the ‘Project dashboard’.
2. Go to the ‘Change log’.
3. Click 'New' in the blue ‘Change listing’ bar.
4. Fill in the following information:
Description
Type
Status
Priority
Due date
Owner
Creator
Created
Product
Remarks
:
:
:
:
:
:
:
:
:
:
Description of the change.
Choose between Specification, Hours, Costs and Planning
Open / closed
Low, normal, high, critical
Optional, final date the change needs to be dealt with.
Responsible owner of the change
Creator of the change.
Date of creation
Optional: product the change is related to.
Any remarks / status description.
5. Save the new entry by clicking the 'Save' button.
6. If necessary, it is possible to add a related action to the change. Click ‘New’ in the blue 'Action
© 2015 Fortes Solutions BV
68
Principal Toolbox 6.0
listing' header on the details page of the change. For more info about actions see Daily/action log
68 .
7. By clicking ‘Add’ or ‘Add note’ in the 'Documents' header you can add any related documents or
notes.
8. To copy or move a change to another programme or project, you can use the 'Copy' or 'Move'
button:
.
9. To close the change, set the status of the change to 'closed'. Alternatively, from the change log, you
can select the change and set the status to closed with the ü button.
Change log
3.1.3.5.5 Daily/action log
Actions can be created from product pages, related to issues, risks, changes, quality reviews and from
the action log.
To define an action do the following:
1. There are several places from where you can create actions, if you have the correct user rights:
a. From the project dashboard, open the 'Daily/action log'.
b. Alternatively, go the 'Logs' tab of a product.
c. Find the blue 'Action listing' header when on the detail page of an issue, risk, or other log item.
2. Now click Action log and fill in the following information:
Name
Description
Status
Priority
Due date
Owner
Creator
Related to
Remarks
© 2015 Fortes Solutions BV
:
:
:
:
:
:
:
:
:
Name of the action.
Description of the action.
Status (Open/Closed).
Priority.
When does the action need to be completed.
Owner/responsible for the product.
Creator of the action.
Relation to a product, issue, risk, etc.
Any remarks
Functionalities
69
Adding an action
3. Click the 'Save' button to save your new action.
Note: Only the project manager and project support can create new actions. However, the
owner and reviewer of a product can also create actions related to that product. The project
manager and project support can edit all actions. The owner and creator of an action can edit all
information of that particular action
3.1.3.5.6 Lessons learned
To archive positive or negative experiences that may be useful in future projects the lessons learned
log is available. Based on the lessons learned log you can create an automated 'lessons learned
report' at the end of the project. The lessons learned can be from all areas of interest; the project
management method, tools used, good/bad experience with suppliers, etc.
The report can published to allow the organisation to improve the best practices from among other
things its project management. Add valuable lessons learned to the project model(s) to have them
easily available for project managers and team members.
1. Go to the ‘Project dashboard’
2. Now click the ’Lessons learned log’.
Lessons learned log
3. Create a new lessons learned entry by clicking 'New'.
4. Fill in the following information:
Name
: Name of the lesson learned
Creator
: The creator is filled in by the tool.
Created
: Creation date of the lesson learned. Filled automatically.
Remarks
: Explanation of the lesson learned.
5. If more information needs to be added to the lesson learned, a document or note can be attached.
© 2015 Fortes Solutions BV
70
Principal Toolbox 6.0
Click ‘Add’ or ‘Add note’ in the blue 'Documents' header to add a document or note.
6. After completion of these actions, click the 'Save' button to save the new entry.
7. To copy or move a lessons learned to another programme or project, you can use the 'Copy' or
'Move' button:
.
Lesson learned
Note: Only the project manager and project support can create new actions. However, the
owner and reviewer of a product can also create actions related to that product. The project
manager and project support can edit all actions. The owner and creator of an action can edit all
information of that particular action.
© 2015 Fortes Solutions BV
Functionalities
3.1.4
71
Finishing a project
Once the products of the project have been realised the project needs to be finished in a controlled
way. A number of management products such as the lessons learned report, end project report, and a
follow-on action recommendation can be used to report about open actions and recommendations.
The project board will then confirm the project closure.
The lessons learned report can be based on the lessons learned log that has been kept during the
project. It is quite easy to generate an automated report 127 of this log.
The other logs can be consulted to make the end project report and the recommendations for follow up
actions. In the recommendations for follow on actions all the points of attention are shown that are no
longer carried out in the project but can be dealt in a new project.
In this section we will further review:
- archiving projects; 71
- removing a project or project model.
72
The activities described in this section can only be carried out by the programme manager.
3.1.4.1
Archiving a project (-model)
Note: Archiving a project can be done by the manager of a programme / project list, or the
system administrator. Archived projects are no longer visible to users without these roles. If you
want the project to remain available, create a separate project list called 'Archived projects', or a
similar name.
After the project has been finished and the project organisation has been disbanded the project can be
archived.
Archive
1. Go to the ‘Programme dashboard'.
2. Select the project concerned by clicking on it's row.
© 2015 Fortes Solutions BV
72
Principal Toolbox 6.0
Selecting the row of the project
3. Click
to move the selected project(s) to the archive tab.
4. In a pop-up window, you are asked to confirm archiving the selected project (-model). After clicking
OK the project (-model) is move to the archive.
5. The archive can be found at the tab 'Archive' on the programme / project list level. Note that each
programme or project list has its own archive.
6. Restoring a project or project model can be done from the 'Archive' tab.
3.1.4.2
Removing projects and project models
Removing projects and project models requires two steps; first you need to archive the project (model)
and thereafter you can remove the project (model) from the archive. How to archive a project (model),
see chapter Archiving a project (-model) 71 .
1. After archiving a project (model), go to archived project (model) by clicking the 'Archive' tab.
Archive tab
2. Select the project (model) concerned by clicking it's row.
3. Click ‘Remove’ behind the project (model) and confirm with ‘OK’.
© 2015 Fortes Solutions BV
Functionalities
73
Remember: Once projects or project models have been removed from Principal Toolbox it is
not possible to roll back this decision.
© 2015 Fortes Solutions BV
74
3.1.5
Principal Toolbox 6.0
Managing project models
In the Principal Toolbox, all projects that are created are based on a project model. A project model is
an extensive template for projects. It contains products, templates added to these products, lessons
learned, and automated reports. This way, it is possible to have standardised projects throughout the
organisation, and project managers always have the right templates available. Right from the moment
a project is created, automated reports (if available in the project model) are available for reporting
purposes. Below, an example of the dashboard of a project model is shown.
Part of the dashboard of the PRINCE2 project model. The dashboard of a project model is identical to a project
dashboard.
It is possible to have multiple project models within your organisation. For instance, a default PRINCE2
project model for general use and more specialised project models with specialised content. For
instance, a project model for sales or one for software implementation. For these purposes, you could
build a product breakdown (see the section about product breakdown 32 ) that matches most
situations for these specialised projects.
In the next sections, you will find information about
· Editing project models 74
· Creating project models 75
· Moving project models 75
How to create automated reports is explained in the Automated reports
3.1.5.1
127
section.
Editing project models
Note: Project models can be edited by the manager of the project model, or by the system
administrator.
Project models can be edited in the same way projects are edited in Principal Toolbox. So, it is
possible to add templates, documents, automated reports, a product breakdown, issues, risks, lessons
learned, etcetera.
Any data you enter into the project model, except for user names (owners of issues, products, etc.) are
copied into projects created with that project model.
To prevent your original project model from being polluted, or your templates etc. from being lost, it is
recommended to work with a temporary project when you want to create or change a project model.
This way, you can enter example data to check views and automated reports, without affecting the
original project model. Take the following steps:
1. Navigate to a programme / project list where you can create a temporary project. If there is no such
programme or project list, create it or discuss it with the system administrator.
© 2015 Fortes Solutions BV
Functionalities
75
2. Create the temporary project, based on the project model that best approaches your desired end
result.
3. Change the project to match your desired model.
a. Optionally, add a product breakdown for projects with similar end results.
b. Add the default management products that are used in your organisation. Use the blue products
for management products.
c. Add green project board products to mark decision points, go / no go decisions in your projects.
d. Set up stages, work packages and add the appropriate (management) products to the stages and
work packages.
e. From the project dashboard, add templates to products.
f. Add automated reports 127 to your project dashboard.
4. When finished editing the project, navigate back to the programme / project list dashboard. Create
the project model as described in the next section 75 .
5. After finishing the project model, archive and then remove the temporary project.
Notes:
· All operational data in your project will be discarded when creating a project model. So
milestone dates, deliverables, issues, risks, changes, quality reviews, cost and hour data will
be removed.
· Any data in the project model itself will be copied into the project when you create a project
based on that project model, except for any user names in your project.
· After creating a project, there is no link whatsoever between the project model and the
project. So if you change any document templates, or automated reports in the project model,
this will not affect the project.
3.1.5.2
Creating project models
New project models are always based on existing projects. A system administrator or programme /
project list manager can create project models from any project. First select a project by clicking in the
row of the project concerned. Use the 'Model' button available at the programme / project list
dashboard, as illustrated below.
Programme Dashboard
In the dialogue, give an appropriate name to the project model. After choosing OK, the project model
will appear on the dashboard of the programme or project list underneath the 'Project model listing'
header at the bottom of the page.
3.1.5.3
Moving project models
When creating a project model, it will be placed within the programme or project list where it was
created. It will be available to the level it was created and - if they exist - any project lists or
programmes below that level.
Moving a project model is done by first exporting it and then importing it into the right location. If you
want to make the project model available to all programmes and project lists, go to the highest level in
the Principal Toolbox and then open the tab 'Models'.
1. Export a project model by selecting it on the project list / programme dashboard. Click 'Export'. In
© 2015 Fortes Solutions BV
76
Principal Toolbox 6.0
the dialogue, fill in a name for the project model and optionally a description.
Exporting a project model
2. Navigate to the programme / project list you want to add the project model to. In the 'Project model
listing' header, click the Import button. Give the name for the project model and a description.
3. Select the manager for the project model from the user list.
Importing a project model
4. Locate the project model file you just saved and import it.
5. If you do not want to have the project model on two locations, navigate back to where you created
the model. Archive the project model.
3.1.5.4
Enterprise models
Project models can be created in any project list or programme. The model will be available on the
level of the containing programme / project list and on all sub-levels. To make a project model
available throughout the Principal Toolbox you can publish it at the so-called enterprise level (the
highest level) in the Principal Toolbox.
Two options are available to get the project model at the highest level.
First option
1. The 'new project model' option.
a. Go to the highest level of Principal Toolbox (enterprise level). Open the tab Models.
b. Click New at project model listing.
c. In the dialogue, define the name and description for the project model.
In the lower part of the window, select the programme where the project model is located. Then
select the project model you want to promote to enterprise model.
d. Click OK and the model is added to the list of enterprise project models. The model is now
available within all programmes of Principal Toolbox and can be chosen when creating a new
project anywhere.
© 2015 Fortes Solutions BV
Functionalities
77
Second option
2. With the export / import option.
a. First export the project model you want to publish. The model will now be saved as a file. Save it
at an appropriate location.
b. Then navigate to the highest level of Principal Toolbox (enterprise level). Open the tab Models.
c. Click Import. Choose the project model file and fill in the other fields in the dialogue.
d. Click OK and the model is imported into the list of enterprise project models. The model is now
available within all programmes of Principal Toolbox and can be chosen when creating a new
project anywhere.
Enterprise models
3.1.6
Generic PRINCE2 Planning Model
As of release 6.0 a new project model has been made available. The new project model, called
Generic PRINCE2 Planning Model, offers new functionalities for the Gantt. To be able to use the new
Generic PRINCE2 Planning Model, you will have to import the new project model first. You can request
the new Generic PRINCE2 Planning Model from our Support Office.
Starting up a new project with the Generic PRINCE2 Planning Model:
1. Go to the Portfolio dashboard and click on New in the ‘Project listing’.
2. Enter the details and select the new project model.
3. Select a project manager and click on OK to create the project.
Create a new project with the new Generic PRINCE2 Planning Model
© 2015 Fortes Solutions BV
78
Principal Toolbox 6.0
The project is now available on the programme and/or portfolio dashboard. The project manager is
now able to start planning his or her project.
3.1.6.1
Planning a Project
With the Generic PRINCE2 Project Planning it is no longer possible to edit the project plan via the
project dashboard or via the ‘Plan’ tab. The ‘Plan’ and ‘Gantt’ tabs have been replaced by one tab
called ‘Planning’. The tab ‘Planning’ contains three sub-tabs: ‘Gantt’, ‘Costs’ and ‘Hours’. On the tab
‘Gantt’ you can add new planning items (products, work packages or stages) and edit the planning of
those items.
Generic PRINCE2 Planning Model
Adding a planning item:
© 2015 Fortes Solutions BV
Functionalities
79
1. Go to the tab ‘Planning’ to edit the
project plan.
2. Click on the tab ‘Gantt’ on
edit the project plan.
to
3. Click on a ‘+’ to add a new planning
item. A new row will appear. Give the
item a name.
4. The item can be moved by dragging
and dropping it. The green or the blue
arrow will indicate where the item will
be placed.
5. A planning item isn't a product, work
package or stage yet. To edit a
planning item, select the row by using
the ‘ü’.
6. Use Change Type to change the
planning item in to a product, work
package or activity.
Planning a project:
1. It is possible to planning an item by
enlarging and dragging the bar on the
Gantt.
2. It is also possible to plan items by
using the calendar in the columns ‘Start
Planned’ and ‘Final Planned’.
3. Dependencies can be defined by
clicking on the item and dragging a line
to the next item.
4. Click on Save to save your changes.
It is also possible to define milestones on the product page. The product page can be accessed via the
'Project Dashboard’.
Available buttons on the Gantt:
1. Remove selected planning items.
2. Move selected planning items to the left.
3. Move selected planning items to the right.
4. Make dependencies between 2 products (use Ctrl+click, Shift+click or the ‘ü’ to select multiple
products).
5. Remove a dependency.
6. Solve problems arising from conflicting dependencies.
7. Print the Gantt.
8. Determine the scale of the Gantt. It is now possible to zoom in or out.
© 2015 Fortes Solutions BV
80
Principal Toolbox 6.0
Set baseline:
1. It is also possible to set baselines. Go to the ‘Gantt’ tab and click on Set.
2. Select ‘Initial baseline’ or ‘Actual baseline’ and click on Set.
3. You can now select the baseline that you would like to display above the Gantt.
Percentage Completed:
It is now also possible to enter a
‘Percentage Completed’ per item on the
Gantt. The percentage can be entered
by the project manager on the Gantt or
by the product owner on the product
page. The result will be displayed
directly on the Gantt with black bars.
Views
It is now also possible to create a modified view on the Gantt. This way, you can determine which
information will be displayed on the Gantt.
Define view:
1. Click on Edit to edit the Gantt.
and select Columns.
2. Click on
3. Select the columns you would like to display by using the ‘ü’.
A new or edited view needs to be saved; otherwise the view will be lost!
4. Click on Save as in the same dropdown menu .
5. Select ‘New’ and give the view a name.
6. Confirm with Save View.
7. Select the new view below default.
Product Breakdown Structure
Next to the Gantt you can define you product breakdown structure. On the tab Product Breakdown
Structure you can view the results of the changes.
Define Product Breakdown Structure:
1. Click on the ‘+’ to add a new
specialist product . A new row will
appear. Give the product a name.
2. It is possible to move a product by
dragging and dropping the product.
3. Select the (specialist) product by
using the ‘ü’ in front of the product.
4. Define the hierarchy of the products
by selecting product and using the
buttons
and
. With
you can lower the level, with
can increase it.
you
5. Take a look at the result on the tab
‘Product Breakdown Structure’.
© 2015 Fortes Solutions BV
Functionalities
81
Product Breakdown Structure with the Generic PRINCE2 Planning Model
3.1.6.2
Plan Costs
On the tab ‘Costs’ you can capture the (planned) costs of the project plan. Furthermore, it is also
possible to display the budget and actuals here. Costs can also be linked to financial categories.
Plan costs with the Generic PRINCE2 Planning Model
Note: by default, the project budget is captured on the portfolio and will only be displayed on the
project. This depends on the financial configuration on the portfolio.
Capture planned costs:
© 2015 Fortes Solutions BV
82
Principal Toolbox 6.0
1. Go to the tab ‘Costs’ and click on
Edit.
2. Double click on the Gantt in the
column ‘Planned Costs’. The planned
costs can be captured per product on
the Gantt.
3. Click on Add financial category.
4. Select the required financial
categories and click on Add.
5. Click on the empty field behind the
financial category (in the column
‘Planned’) and enter the planned costs.
This will immediately create an entry.
When the planning changes the entries
will also be modified.
The budget, planned costs and actuals will be displayed on a summary graph on the bottom of the
‘Costs’ tab.
Summary graph with costs
3.1.6.3
Plan Hours
On the tab ‘Resources’ it is possible to capture planned and budgeted hours per resource or skill. The
budget for hours is not captured on the portfolio, but can also be captured on the project by the project
manager.
Plan hours with the Generic PRINCE2 Planning Model
© 2015 Fortes Solutions BV
Functionalities
83
Hour budget per resource:
1. Go to the tab ‘Resources’ and click
on Edit.
2. Click on Add Resource.
3. Select the required resources and
confirm with Add.
4. Double click on the empty field
behind the resource and enter a start
and end date with a budget.
Or:
5. Go to the tab ‘Resources’ and click
on Edit.
6. Click on Add Skill.
7. Select the required skills and confirm
with Add.
8. Double click on the empty field
behind the skill and enter a start and
end date with a budget.
Plan hours:
1. Go to the tab ‘Resources’ and click
on Edit.
2. Double click on the Gantt in the
column ‘Planned Hours’. The planned
hours can also be captured per
product.
3. Click on Add Resource or on Add
Skill.
4. Select the required resource or skill
and click on Add.
5. Click on the empty field behind the
resource or skill (in the column
‘Planned’) and enter the planned hours.
This will immediately create an entry.
When the planning changes the entries
will also be modified.
The budget, planned costs and actuals will also be displayed on a summary graph on the bottom of the
‘Hours’ tab.
3.2
Portfolio management (add-on)
The Portfolio Management module enables the collection of initiatives and a subset of an organisation’
s projects and programmes. Additionally, the module provides functionality to monitor progress of the
projects and programmes within the portfolio, and to generate various portfolio related reports.
© 2015 Fortes Solutions BV
84
Principal Toolbox 6.0
Various portfolio’s can be created, in order to get meaningful collections of related programmes and
projects, e.g. a portfolio of projects that have the same sponsorship or all projects that contribute to the
same strategic goal(s).
To work with portfolio management, the following activities are of importance:
-
Defining new portfolios 85
Administering portfolios 88
Managing portfolios 91
Creating a portfolio model
94
These subjects will be covered in the sections below.
3.2.1
Portfolio dashboard
The portfolio dashboard allows a portfolio manager to group portfolios in providing a clear overview.
Portfolio Dashboard
1. General portfolio properties
This section displays basic information like, name, description, status and a status description. The
information can be edited by the portfolio manager by using the 'Edit Properties' button.
2. Automated Reports
Displays a list of the Automated Reports
127
that are available on the selected portfolio.
3. Reports
Shows the different categories of reports which can be used to show lists of projects, products,
issues etc. for the portfolio items contained within the active portfolio.
4. Timeline Reports
Displays a list of the timeline reports that are available on the selected Portfolio. Timeline reports
allow the user to display data over a certain period, like cost information. The horizon and resolution
of the table or graph can be set by the portfolio manager.
5. Report Models
The reporting of project data to the portfolio manager is based on a report model. Each portfolio can
have multiple report models to support different reporting cycles, for example: a monthly highlight
report and a detailed reporting model for each quarter.
6. Previous Versions
© 2015 Fortes Solutions BV
Functionalities
85
Lists all the previously saved versions of the Portfolio. This allows the portfolio manager to go back
in time and compare the portfolio's status between versions. The latest status of the portfolio is
saved by using the button 'Save as version'.
7. Portfolio item actions
This bar contains buttons for all the actions that can act on the individual (or a selection of) portfolio
items. Some of the actions are 'Save as version', 'Send report request' and 'New'.
8. Tabs
Each portfolio contains the same tabs. Which tabs are shown may depend on the organization's
license: the presence of some tabs is linked to the availability of a certain module. The purpose of
each tab:
Dashboard
:
as per the detailed description above.
Properties
:
lists all the basic information of the Portfolio, including any
custom fields.
Financials
:
the financial overview tab displays the entered budgets,
actual costs and the forecast.
Portfolio Gantt
:
shows all the portfolio items in a Gantt based on their start
and end dates.
Documents
:
a common repository for all documents relating to the
portfolio and their items.
Archive
:
lists all the archived portfolio items, and allows for items to be
deleted or recovered from the archive.
9. Portfolio actions
This bar contains a number of actions which act on the active portfolio.
Edit properties
:
allows for editing the name, objective, the status and status
description of the portfolio.
Edit members
:
to change who gets full or read access to the portfolio
Customize Page Text
:
for customizing the introductory text on the portfolio's
dashboard
Edit Field Configuration
:
the field configuration determines how data needs to be
synchronized between project and portfolio item.
Edit Page Layout
:
edit the page layout of portfolio items, letting the portfolio
manager determine what fields are important and how to display them.
Edit Widgets
:
Add and edit widgets on your portfolio dashboard.
3.2.2
Working with portfolios
3.2.2.1
New portfolios
3.2.2.1.1 Defining new portfolios
The portfolio management module allows you to manage your business projects and ideas in
portfolios. In order to do this, one or more portfolios need to be defined. For example a portfolio for
every business unit or regional department in your organization, or a portfolio could consist of all
projects that contribute to a strategic objective of your organization.
Defining a new Portfolio
1. Navigate to the Portfolio Management module in the dark blue header on the top of the screen. In
the main window the Portfolio Management module is displayed, with three tabs: “Dashboard”,
“Archive” and “Models”. The tab “Dashboard” is opened by default.
© 2015 Fortes Solutions BV
86
Principal Toolbox 6.0
2. Click New on the dashboard to define a new portfolio. A popup window will appear in which de
details of the new portfolio can be entered.
Portfolio Management module
3. Click OK. You will now return to the portfolio dashboard where all portfolios are listed, including the
new portfolio you just created.
3.2.2.1.2 Portfolio items
When opening the Portfolio Management module, which is found in the top blue bar at the top of the
screen, an overview of all portfolios is shown. Click on the name of one of the portfolios to open it.
A portfolio contains portfolio items of which there are various types:
· Initiative: a business idea that may well be turned into a project in the future
· Single Sheet Project: a simple type of project without detailed plan
· Project: a standard project with a plan, which is managed using the project management side of the
Principal Toolbox
A portfolio item can be used to store management information like the budget, information about
resources, planning information, and the goals of the project. How to create a portfolio item is
explained in this section: Creating portfolio items 86 .
Each type of portfolio item has its own icon:
Initiative:
Single Sheet Project:
Project:
3.2.2.1.3 Creating portfolio items
From inside a portfolio, new Ideas, Single Sheet Projects and regular Projects can be created which
become part of that portfolio. A regular Project that is created and started from a Portfolio will
automatically appear as a project on the Project Management side of the Principal Toolbox. However,
a Project that was started from the Project Management module, will not automatically be associated
with a Portfolio. To put a link in place between an existing Project and a new Portfolio item, please
refer to 'Modifying the project reference' 89 .
When using the Portfolio Management module it's good practice to always create and start projects
from within a Portfolio. This way it's guaranteed there's always a link between each Portfolio item and
its corresponding Project. This way of working can be enforced by the Principal Toolbox. By enabling
this setting it will prevent any project from starting without having been assigned to a portfolio.
© 2015 Fortes Solutions BV
Functionalities
87
To enable this setting:
1. Click on Setup and select Configuration.
2. Click on Principal Toolbox on the left side of the screen.
3. Change the setting 'Projects can be started from within portfolios only' to Yes
Up next are detailed instructions on the various ways projects and initiatives can be created and
started.
Creating an Initiative
1. Open a portfolio and click on New to create a new entry in the portfolio.
Starting a project on the portfolio
2. Enter a name for the Portfolio Item, and the objective and remarks (optionally).
3. Assign a Project Manager to the new portfolio item (in case the portfolio item is converted to a
project later on, the project will be automatically assigned to the project manager specified here).
4. Do not start a project: an Initiative is just an idea without an actual project being underway.
5. Click on OK to create the portfolio item.
Note: in case an existing Project needs to be associated with the newly created Initiative, then
please follow the steps above followed by the instructions in Modifying the project reference 89 .
Starting a Project when creating an Initiative
1. Follow the same procedure as when creating an Initiative (see above), but choose for Start Project
when entering the details.
2. Next, choose the Project Model the new project should be based on, and choose a Programme the
new project will be made part of.
3. The new project will automatically appear within the Project Management module. The Project
Manager will have full access to the new project and can start entering a plan and team members
as required.
© 2015 Fortes Solutions BV
88
Principal Toolbox 6.0
Starting a new project
Note: The newly created project will appear in the Project Management Module of the Principal
Toolbox. It will be assigned to the project manager (as chosen when creating the Initiative) and
is associated with the portfolio item.
Starting a Project from an existing Initiative
1. Open the portfolio item (initiative) and click on the button
to start a project
2. Choose which Project Model to use, and in which Programme the project should be created
3. After pressing OK the Project will be created. The icon of the portfolio item will have changed from
in to
depicting that the Project has started.
Starting a Single Sheet Project
1. To create or start a Single Sheet Project one follows the same procedure as when starting a regular
Project, but when selecting the project model specifically choose the Single Sheet Project model.
2. Then choose the programme in which to create the project and press OK
3. The Initiative is now associated with a Single Sheet Project that is also visible to the Project
Manager from the Project Management module.
Note: the Single Sheet Project model is a simplified version of the regular project models.
3.2.2.2
Portfolio administration
3.2.2.2.1 Moving portfolio items
Portfolio items, whether they're Initiative or Projects, can be moved between Portfolios. This is
achieved as follows:
1. Inside the portfolio that contains the item that needs moving, highlight the portfolio item and press
'Move'.
2. The window that appears allows you to select the destination portfolio.
© 2015 Fortes Solutions BV
Functionalities
89
Moving a project
3.2.2.2.2 Modifying the project reference
Projects that are underway but have not been assigned to a portfolio, are not visible from the Portfolio
Management module. They can be added to a portfolio by creating a new portfolio item and manually
link it to the existing project. Follow these steps to establish the link:
1. Open the portfolio item (initiative) and click on the button
2. Select the project that the portfolio item needs to be linked by typing the first few characters and
choosing the correct one
3. Click ‘OK’ to establish the link
Editing the project reference
3.2.2.2.3 History log
One of the tabs off the dashboard of each portfolio item is labeled History. On this tab a history is
recorded of all changes that have been made to the portfolio item through time. It makes it possible to
check who made which changes when.
Historie Tab on a portfolio item
© 2015 Fortes Solutions BV
90
Principal Toolbox 6.0
3.2.2.2.4 Portfolio documents
Documents can be attached to the portfolio items or to the portfolio itself. The latter may be useful in
cases where the document is applicable to all (or most) portfolio items.
Documents on the portfolio
To attach, update or remove documents from the portfolio, navigate to the Documents tab from the
portfolio dashboard. This will open the document library and show all the documents stored within the
Portfolio. Where each portfolio has a library, the Enterprise level also has a library which can be used
for centrally storing documents.
For more information on document management with the Principal Toolbox, please refer to Document
management and approval 58 .
3.2.2.2.5 Portfolio archive
A portfolio and each individual items can be archived by pressing the button 'Archive'. Those
portfolios or portfolio items that are selected when pressing Archive will be moved from the active list
in to the archive.
The archive and all the archived items are accessible through the Archive tab on the dashboard. The
archived portfolios and items can be restored from the archive when required.
Please be aware that archiving a portfolio or one or more of its items does not also archive the projects
that are associated with them. If the projects need to be archived as well, this needs to be done from
the Project Management module.
3.2.2.2.6 Versioning
To keep a record of historic portfolio data, the Principal Toolbox allows the user to make a snapshot of
a portfolio in time. By doing so, the current version of the portfolio is kept and at a later time, it can be
compared to other snapshots or to the current version of the portfolio.
Creating a snapshot
1. Open the dashboard of the portfolio
2. Use the 'Save as version' button to create a snapshot of all portfolio items within the portfolio
3. Give the version a name and optionally some notes and press OK.
The stored versions of the portfolio are displayed on the dashboard under the 'Previous versions'
section. A saved version can be opened and referenced by clicking on its name.
© 2015 Fortes Solutions BV
Functionalities
91
The 'Previous versions' section on the portfolio dashboard.
Note: it is possible to generate reports based on data of previous versions of portfolios. That
way it is possible to compare and analyze the data through time.
3.2.2.3
Managing a portfolio
3.2.2.3.1 Generating reports
To keep on top of all projects and items within the portfolio, various reporting capabilities are available.
· Automated reports: these are reports based on Excel or Word. The reports allow for flexible and
powerful ways of extracting and summarizing information about the portfolio. Please refer to
Automated Reports 127 for more information on setting these type of report up.
· Reports: these type of reports are contained in the Principal Toolbox and can be used to show table
structured overviews of the different entities in the tool, for example products, risks, issues or cost
entries.
· Timeline reports: displays an overview of data across a period of time. For example the costs per
month over the duration of the project, or the number of hours a resource has been allocated to the
project for the next period. More information on setting up timeline reports can be found in Timeline
reports 144 .
3.2.2.3.2 Requesting reports
The Portfolio Management module allows one to introduce a periodic reporting cycle. The report is
requested from the Portfolio side and appears on the project where the project manager can fill it out.
Once the Project Manager publishes the report, it updates the information within the portfolio which
allows the portfolio manager to stay up to date with the project status. For setting up such a report
model, please refer to the section 'The reporting model 95 '.
When a report model has been set up, it can be used to request status information on the projects that
are part of the portfolio.
Requesting a report
To send a reporting request to the project manager, please follow these steps:
1. In the opened portfolio, select one or more projects (portfolio items linked to projects). Selecting
more than one project at a time can be achieved by using the shift or control button while selecting.
Once selected, press the 'Send report request' button. A window will appear in which the report
properties can be chosen.
© 2015 Fortes Solutions BV
92
Principal Toolbox 6.0
2. Specify the due date for the report, followed by the report model it should be based on, and if
required, send some additional instructions or remarks with the report request.
The report request will be send to the selected projects
3. If required, the project manager can be send an additional email as a notification that a report
request has been submitted. To have an email sent, just tick the box 'Send notification by e-mail'.
Writing and submitting a portfolio report
Once the report request has been submitted, the report itself will appear on the 'Portfolio Report' tab
of the project. To fill the report out, the project manager follows these steps:
1. From the project dashboard, the project manager opens the 'Portfolio Report' tab and presses the
'Edit' button.
The report can be filled in by project managers, after which it can be submitted to the portfolio manager
2. The project manager then fills out all the fields that are editable. Not all fields will be editable: some
© 2015 Fortes Solutions BV
Functionalities
93
may be automatically calculated, like financial information.
3. When done, the project manager presses the 'Save' button, followed by the 'Publish to Portfolio'
button.
Monitoring the report status
From the portfolio, the portfolio manager can monitor the status of the report requests that were sent
out. (Note: it may be necessary to add the field 'Report Status' as a column to the active view on the
dashboard).
The status of the latest report request is identified by these icons:
Report request pending; hasn't been submitted yet
The report request was received and the report has been submitted
Report request pending; report submission is overdue
As soon as a portfolio report has been submitted by the project manager, the data on the portfolio item
is updated with the latest data as provided by the project manager.
The dashboard shows the status of the report request
3.2.2.3.3 Financials
Each portfolio can be used to generate financial overviews based on the individual portfolio items. The
financial overview gives insight into budgets, actual and committed costs, and the latest financial
forecasts. The financial overview is found in different places within the Principal Toolbox. These are:
· The 'financials' tab on each portfolio item
· The 'financials' tab on each portfolio, which gives an overview of all portfolio items contained in the
portfolio
· The 'financials' tab on the portfolio report, which is found on the project once a report has been
requested (it's the information entered here that's used to populate the tabs on the portfolio and its
items).
The financial overviews can be configured in many ways to suit different needs. Please check
'Financial configuration' 99 for more details on how to configure the financial overview.
© 2015 Fortes Solutions BV
94
Principal Toolbox 6.0
The financials overview on the portfolio
3.2.2.3.4 Notifications
Email notification
Use this button to send an email to the project manager of the project from within the portfolio. For
example, this could be used to remind the project manager to fill out the pending portfolio report.
3.2.2.3.5 Portfolio Gantt
Each portfolio dashboard contains a tab 'Portfolio Gantt'. The Gantt chart shows the start, end-date
and duration of all portfolio items within the portfolio.
The portfolio Gantt
Using the Gantt, dependencies between portfolio items can be defined. In order to do so, follow these
steps:
1. Press the 'Edit' button
2. Click and hold the button down on one of the bars.
3. Then drag the cursor to one of the other bars to make an arrow appear.
4. Drop the arrow onto one of the other bars to create the dependency.
Note: to remove a dependency, right-click on the arrow and choose one of the 'disconnect'
options that appear.
From within the Gantt, the start and end date of the portfolio initiatives (not currently active projects)
can be changed as well. Just click on the start or end of one of the bars, and drag it to the required
date. The same can be done by entering the dates on the left-hand side in the date fields.
3.2.3
Portfolio model
Each portfolio can be based on a portfolio model. Using a model ensures portfolios are configured in
one (or more) identical ways.
Items which are part of the model:
·
·
·
·
·
The page lay-out of the portfolio items
The reporting model
The automated reports (please see Automated reports
The field configuration
The financial configuration
127
for more information)
Note: all of the above items can also be set on each individual portfolio after it has been created
© 2015 Fortes Solutions BV
Functionalities
95
Example portfolio model
3.2.3.1
Defining a project sheet
The page lay-out of the project sheet, which is shown when opening a portfolio item, can be
customized for each portfolio or portfolio model. The project sheet can be used in displaying the basic
project or initiative properties, including custom fields and status information. The page lay-out is
defined by:
1. From the Portfolio Management dashboard, open a portfolio model or one of the existing portfolios.
2. Press the button 'Edit Page Layout'.
3. A new windows opens of which the left-hand allows for defining the layout, whilst the right-hand side
contains a list of all fields and properties that can be dragged onto the layout side.
Editing the page layout
3.2.3.2
The reporting model
Portfolio reports allow one to define a reporting cycle which allows data to be published from project
level to the portfolio. To allow for this cycle to take place, a reporting model needs to be defined which
specifies what information needs to be captured.
© 2015 Fortes Solutions BV
96
Principal Toolbox 6.0
Creating a new reporting model
Each portfolio can contain multiple reporting models. Each model can be used for different reporting
cycles. For example, one model could be used for a monthly reporting cycle and another one, more
detailed report, for a quarterly cycle.
To create new reporting model, follow these steps:
1. From within the portfolio model (or from an existing portfolio), press the button 'New' which is
located in the header bar 'Report Models'.
2. In the new window that appears, enter a name and an objective for the new reporting model.
3. Press 'Save' to save the new reporting model.
Configuring the reporting model
The newly created reporting model uses some default settings. To customize the data that is to be
captured follow these steps:
1. From within the portfolio model (or from an existing portfolio), click on the name of the reporting
model that needs configuring.
2. Click on 'Model Configuration' and select the sections that are to be used in the report (property
section and / or finance section).
3. The 'Properties' section can be configured by pressing the 'Edit Page Layout' button.
4. The new window that appears contains three sections: the new page layout (left-hand side), the
layout components (right-hand side, top half), and a list of the available fields and properties (righthand side, lower half). The page components and fields situated at the right-hand side can be
dragged over the the left-hand side to build a custom page layout to be used in the reporting model.
By dragging fields and page components from right to left, a new page layout can be defined.
5. Press the 'Save' button to save the new page lay-out
6. Besides the 'Properties' section, the 'Finance' section can be customized separately. Please refer to
'Financial Configuration' 99 for more information.
© 2015 Fortes Solutions BV
Functionalities
3.2.3.3
97
Field configuration
Fields and properties which are used on the project sheet to show information about the portfolio item
are not automatically linked to the corresponding fields on the project. It is possible to set the
behaviour between these fields using the 'Field Configuration' button. Customizing the behaviour
between fields is mostly applicable to custom fields, although it can be changed for some pre-defined
fields as well.
Custom fields are added at project level and automatically appear on the Properties tab of the project
and the project sheet of the portfolio items (unless a custom page lay-out has been defined, which
means they have to be manually added). Although the fields at project and portfolio level appear to be
the same, since they're carrying the same name, their behaviour and therefore content may differ.
The behaviour of these fields is defined within the portfolio or on the portfolio model.
The button 'Field Configuration' is found on the portfolio or the portfolio model, as highlighted above.
The following behaviours can be set for both the project and portfolio fields:
· Fields can be made available or be hidden
· Fields can be made editable or read-only
· Synchronization can be set: either off, or one-directional from project to portfolio or the other way
· Or the fields can be set based on a customized calculation (behaviour set to 'custom')
Note: Synchronization only works one way! It's either synchronized from project to portfolio or
from portfolio to project, but not both ways.
Note: Only use 'custom' behaviour when told to by Fortes Solutions.
Changing the field configuration
1. From within the portfolio model (or an existing portfolio) press the button 'Field Configuration'. A
new window will appear which contains a list of all project and portfolio fields and their behaviours.
2. Press 'Edit' to change the settings of the fields.
© 2015 Fortes Solutions BV
98
Principal Toolbox 6.0
Field configuration
3. Choose one of the following combination of options on the project or portfolio side:
Settings
Options
No Local Configuration
Not Available
Available
Available
No Local Configuration
Not Editable
Editable
Edit Level
Editable before project start
No Local Configuration
Synchronized
Behaviour
Synchronized after project
start
Custom
4. Press 'Save' to save the altered field configuration.
© 2015 Fortes Solutions BV
Resulting behaviour
No configuration applicable
The field will not be available
for use at portfolio and / or
project level
The field will be available for
use at portfolio and / or project
level
No configuration applicable
The field is not editable at
portfolio and / or project level
The field will be editable at
portfolio and / or project level
The field will be editable at
portfolio level up until the
moment the corresponding
project has been created (this
option is only available on the
portfolio side)
No configuration applicable
The field will be synchronized
from portfolio to project level,
or the other way around (one
way only)
The field will be synchronized
from project level to portfolio
level as soon as the
corresponding project has
been created.
The behaviour of the field is
defined by a custom
calculation as provided by
Fortes Solutions
Functionalities
3.2.3.4
99
Financial configuration
Within the portfolio, the individual project sheets, and within the portfolio report on the project, financial
overviews can be shown and filled out. The financial overview displays budgets, actual and committed
costs, and a forecast.
The following items of the financial overview can be configured to suit different needs:
· The behaviour and the resolution of the fields Budget, Actual, Committed and Forecast.
· The financial period that should be displayed (current period, previous period and the period
following the current one)
· The financial categories that should be displayed
· Other display options
Configuration
1. From the Portfolio Management dashboard, open a portfolio model or one of the existing portfolios.
2. Open the 'Financials' tab and press the button 'Finance Configuration'.
Finance Configuration
3. The window that opens allows the financial configuration to be changed
4. Select 'Use custom configuration', which will bring up more settings
5. The following items can be configured:
Financial periods
:
and / or next financial period
Behaviour
:
Forecasting process :
purposes
Financial categories :
Display options
:
attached
Set the current financial periods, and whether to show the preceding
Change who can edit which fields at which point in the process
Define which part of the period should be displayed for forecasting
Determine which financial categories will be available for use
Choose whether to show financial categories which have no data
© 2015 Fortes Solutions BV
100
Principal Toolbox 6.0
6. Adding new financial categories is done from the 'Setup' and 'Configuration', in the 'Financial
categories' section. This can only be done by an administrator.
© 2015 Fortes Solutions BV
Functionalities
101
Creating financial categories
3.3
Resource Allocation (add-on)
Resource Allocation supports the process of planning and managing resources on projects. The
process can be carried out in different ways:
· Resources are requested at project level
· Resources are requested at product level
· Or a hybrid option: both at product and project level
Two roles are associated with this process:
-
The project manager can request resources to staff his or her project. Resources can be
requested as skill, or, if the project manager has a specific preference, as ‘named’ resources.
-
The resource allocation manager (or ‘resource manager’ for short) is the manager of one or
more resource pools. As such, the resource manager registers resources, resource availability
and resource skills. Furthermore, the resource manager manages resource requests from project
managers by allocating resources to specific projects.
How to set up a resource pool, the resources, skills and the availability of the resources, is explained
below.
Note: A user can be given resource manager rights in Principal Toolbox by an administrator. To
do so, navigate to the Resource Allocation module and click on Edit Members.
Edit members for Resource Allocation
© 2015 Fortes Solutions BV
102
3.3.1
Principal Toolbox 6.0
Managing a resource pool
A resource pool and pending resource allocation requests are managed by a resource allocation
manager.
1. Navigate to the resource pool that you would like edit.
2. Navigate to the “Resource Allocation” tab. In the “Request & Allocation” section, a grid is shown
with requested, allocated, remaining and available hours per period for each resource.
The cells in this grid are color coded to provide a quick overview:
·
Blue cells indicate resource requests that are not yet (fully) fulfilled with allocated
resources.
·
Green cells indicate remaining hours that can be allocated to projects or
non-project related activities.
·
Red cells indicate over-allocation of a resource in a specific period.
Overview of the entire resource pool
Note: The columns with planned, requested, and allocated hours can be toggled on and off by
checking or unchecking the checkboxes directly underneath the header of the Request &
Allocation section.
Note: If needed, the timeline setting of the grid can be edited. To do so, click on Edit Timeline
Settings. Set the horizon and start date according to your preferences.
3. Click Edit in the header of the “Request and Allocation” section to change allocation details of
resources to various projects.
Click on the ‘+’-sign in front of a project to expand that project and look at the details per resource.
Alternatively, click on the ‘+’-sign in front of the top row “[All resource]” to view all resources in the
resource pool without sections per project.
4. To allocate a resource, or change an existing allocation, edit the values in the “Allocated” columns
for each resource per period.
Note: In case of a requested skill instead of a specific ‘named’ resource, first select the
© 2015 Fortes Solutions BV
Functionalities
103
resource with the requested skill as primary or secondary skill that you want to allocate before
entering the allocated hours.
5. Click Save to save your changes. This will automatically send new or changed allocation details to
the appropriate Project Managers.
3.3.1.1
Setting up a resource pool
Before you are able to request and allocate resources you will have to define one or more resource
pools. To do this, you will have to define skills and then appoint these skills to resources. After you
have done that, you can add resources to a resource pool.
Adding, removing and editing skills
In order to be able to define resources and their skills, a set of skills needs to be defined first. Skills
have to be defined only once and can be used for multiple resources and resource pools. This allows
you to report on skills over multiple resource pools.
1. Navigate to the Setup and Configuration in the dark blue header on the top of the screen.
2. On the left-hand side of the screen you'll find many options including 'Manage Skills'.
Manage Skills at Setup
3. To add a new skill: Click New to add a skill (a popup window will appear in which the name of the
new skill can be specified)
4. To remove previously defined skills: Select a skill (or select multiple skills by using the ‘Control’-key)
and click Remove.
5. To edit previously defined skills: Click on the name of the skill to be edited (a popup window with the
skill details opens). Click Edit to edit the skill name.
Adding a skill
Adding new resources in Principal Toolbox
Before resources can be appointed to a resource pool, resources and their skills need to be defined in
the Principal Toolbox. Users are automatically available as resources, additional resources can be
defined by a resource manager as follows.
© 2015 Fortes Solutions BV
104
Principal Toolbox 6.0
1. Navigate to Setup and Configuration in the dark blue header on the top of the screen. The
left-hand side of the screen contains a link to 'Manage resources'.
Manage Resources at Setup
2. The screen contains two sections: one for 'no users' and one for 'users'. Click 'New' in the 'no users'
section to set up a resource which is not is associated with an user account in the Principal Toolbox.
Creating a new resource (no user)
3. A new window will appear. Enter the details of the new resource and click Save. The new resource
will be listed in the section 'Resources (no users)'.
Appointing primary and secondary skills to resources
1. To appoint primary skills to resources (both users and non-users) click on Edit. Select the desired
primary skill and click on Save. (Alternatively, to edit both primary and secondary skills of a
resource, follow the steps below.)
Appointing a primary skill
2. To appoint (a) secondary skill(s) to resources (both users and non-users), click on the name of the
resource you want to appoint skills to (a new window will appear in which the resource details are
listed)
© 2015 Fortes Solutions BV
Functionalities
105
Appointing a secondary skill
3. Click Edit to modify the resource details, including the primary and secondary skills.
4. Click Save to save the modifications, and click Close to return to the main window.
Creating a resource pool and appointing resources to a resource pool
A new resource pool can be created by the resource manager.
1. Navigate to the “Dashboard” tab of the Resource Allocation module.
Dashboard tab
2. Click New to create a new resource pool. Specify the name and, optionally, a description for the
resource pool and click OK.
3. To appoint resources to a resource pool, click on the name of the resource pool (in the tab
“Dashboard”) that you want to add resources to.
Note: a resource can be appointed to multiple resource pools.
4. Click on the tab “Resource Availability” and click on Add / Remove Resources (a popup window
with the available resources and already appointed resources will appear).
Adding resources
© 2015 Fortes Solutions BV
106
Principal Toolbox 6.0
5. Select (a) resource(s) on the right and click “<<” to appoint the selected resources to the resource
pool.
6. Click OK to save your changes.
3.3.1.2
Non Project Activities
To allow for allocation of a resource to non-project activities (and thus diminishing the resource’s
available hours for project allocation), one or more predefined sets of non-project activities need to be
assigned to a resource pool.
1. Navigate to the Resource Pool.
2. In the tab “Dashboard”, click Edit Properties to edit the main properties of the resource pool. A
popup window will appear in which the properties of the resource pool can be edited.
Select a non-project activity set
3. Select the right non-project activity set(s) to be assigned to the resource pool and click OK to
return to the main window.
Creating non-project activity sets 155 is part of the 'Configuration'. For more information click on
System Administrator: Setup & Settings 154
3.3.1.3
Managing resource availability
The resource availability can be managed by the resource manager.
1. To edit availability of resources in a resource pool, click on the name of the resource pool.
2. Click on the tab “Resource Availability”. A grid with the allocated hours, remaining hours and
available hours is shown.
© 2015 Fortes Solutions BV
Functionalities
107
Adding the resource availability
Note: The columns with allocated, remaining and available hours can be toggled on and off by
checking or unchecking the checkboxes directly underneath the header of the resource
availability section.
Note: If needed, the timeline setting of the availability grid can be edited. To do so, click on Edit
Timeline Settings. Set the horizon and start date according to your preferences. It is also
possible to set the scale and unit.
3. Click Edit in the title bar of the Resource Availability Section. In the table in the Resource
Availability section, the available hours can be entered for each resource in the columns “
Available” per period. Only specify the hours that each resource is available to be allocated to
projects
Adding non-project activities
4. To allocate a resource to non-project activities:
a. Add a new row for the resource that needs to be assigned to non-project activities
by clicking on the ‘+’ sign in front of the resource’s name. A new row appears with
a blank activity field.
b. Click on the blank activity field and select the right non-project activity.
c. The hours to be allocated to the selected non-project activity can be entered in the
columns “Allocated” per period.
d. Repeat steps 5a through 5c for each additional non-project activity.
© 2015 Fortes Solutions BV
108
Principal Toolbox 6.0
5. Click Save to save your changes.
3.3.1.4
Managing requests and allocations
The owner of a resource pool (a resource manager) is responsible for evaluating all resource requests
that are coming in, and turning them into allocations.
1. From within the Resource Allocation module, open the resource pool that needs managing.
2. Open the 'Request & Allocation (Projects)' tab from the dashboard.
It will display a planning board with requested and/or planned, allocated and remaining hours for
each resource.
Note: depending on the chosen resource allocation process, the button 'Edit Timeline Settings'
allows for changing whether planned and/or requested hours are being displayed. To make the
change, set the 'Resource Allocation Process' to one of 'Project request driven', 'Project
demand driven', or 'Hybrid'.
The individual cells in the planning board are colour coded to give an immediate impression:
- Blue: shows all requests for resources which haven't been (completely) satisfied by resource
allocations
- Green: depict remaining hours available to be allocated against projects and non-project
activities
- Red: alarm the resource manager to the fact that resources have been allocated over and
above their availability
The planning board is used to manage the requests for resources
Note: the columns with requested, allocated, remaining and available hours can each be hidden by
toggling the checkboxes
Note: using the button 'Edit timeline settings', the period covered by the planning board, and its
resolution can be changed
3. Press the 'Edit' button in the 'Request and Allocation per Project' section of the screen to edit the
allocation of resources.
Use the '+'-sign to check the details per individual resource on a project. By expanding the
'Resources Summary' it'll show the total allocation per resource independent of the projects.
© 2015 Fortes Solutions BV
Functionalities
109
4. To change the allocation of a resource, fill out the values in the Allocation column. This can be
done for each separate period. The period is determined by the timeline settings.
Note: when a skill has been requested, instead of a specific named resource, the resource manager
will have to select a named resource with the specified skill before allocating hours.
5. Press 'Save' to keep all changes. The allocations are published to the projects and are now
available to the project managers.
Note: with the '<', '>' and '>>'is is possible to move all editable values one week to the left (<), one
week to the right (>) or four weeks to the right (>>) .
Move editable values
Discussions between project manager and resource manager
Using the Principal Toolbox it's possible to discuss requests and allocations between project manager
and resource manager. The discussion is initiated by the resource manager and works like a chat
service. It's used as follows:
1. From the resource allocation module, open a resource pool and navigate to the 'Request &
Allocation' tab.
2. Press the Edit button of the planning board.
3. Press the Pencil icon next to the project for which a discussion is to be started
Opening a discussion log
4. A chat session is opened in which the resource manager can enter a message for the project
manager.
© 2015 Fortes Solutions BV
110
Principal Toolbox 6.0
Discussion log
5. After pressing 'OK' a message will be sent to the project manager.
6. The project manager receives the message in the Resource Allocation tab on the project. A
response can be given by clicking 'Edit' and sending it by using the Envelope button.
Discussion log on projects
3.3.2
Managing resources on projects
Using the Principal Toolbox resources can be requested to work on projects. Requests can be
submitted for the project as a whole or by individual product. When done by individual product it's
called a 'demand' rather than a 'request'. Depending on the organization's requirements one of these
planning processes can be chosen, or a hybrid model can be used.
3.3.2.1
Requesting resources
Before a project manager is able to request resources from a resource pool, a pool or multiple pools
have to be linked to the project.
1. Go to the project and click on Edit Properties. A pop-up will appear where you can link a resource
pool to a project.
© 2015 Fortes Solutions BV
Functionalities
111
Add a resource pool to the project
2. By using the “<<” the project manager is able to add more resource pools.
3. Click Ok to save your changes
The project manager is now able to request resources from the resource pool.
1. In a project, navigate to the “Resource Management” tab, section “Resource Allocation”. In the
“Request & Allocation” section, a grid is shown with planned, requested,
and allocated hours.
Blue cells indicate resource requests that are not yet (fully) fulfilled with allocated resources by the
resource allocation manager.
Note: The columns with planned, requested, and allocated hours can be toggled on and off by
checking or unchecking the checkboxes directly underneath the header of the Request &
Allocation section.
Note: If needed, the timeline setting of the grid can be edited. To do so, click on Edit Timeline
Settings. Set the horizon and start date according to your preferences. It is also possible to set
the scale and unit.
2. To assign one or more resource pools to the project (only needs to be done once for every project,
or whenever changes are required), click Edit Resource Pools in the Request & Allocation
header. A popup window will appear in which one or more available resources pools can be
assigned to the project.
3. In the header of the “Request & Allocation” section, click Edit to start requesting resources for the
project.
© 2015 Fortes Solutions BV
112
Principal Toolbox 6.0
Requesting resources on a project
4. To add a row in which a resource or skill request can be entered, click on the ‘+’-sign in front of the
appropriate resource pool. To request a resource, perform one of the following steps:
a. To request a specific ‘named’ resource, select a resource name from the drop
down menu in the resource name field underneath the appropriate resource pool.
Optionally, select the skill that the resource is requested for in the drop down
menu in the skill field next to the resource name field.
b. To request a skill instead of a specific resource, select a skill name from the drop
down menu in the skill field underneath the appropriate resource pool. The
resource manager will allocate a resource with the desired skill to match the
request.
5. Click Save to save your changes. This will automatically send new or changed requests to the
Resource Allocation Manager.
3.3.2.2
Planning resources
Instead of, or complimentary to requesting resources at project level, resources can be 'planned' at
product level. To do so, follow these steps:
1. Open one of the products on the project and navigate to the tab 'Resource Demand'.
2. Within the section 'Resource Demand' press the Edit button.
3. Using the planning board, resources can be planned by Skill, named Resource, or both.
4. Additionally the hourly rate can be chosen as it may be specific to the project.
Note: as soon as a resource registers hours against a project, using the time entry module, the
default hourly rate as defined for the resource will be used. If this default rate is different from the
rate as chosen when demanding resources, the project manager will have to explicitly change the
rate that is used when the resource enters time against the project. Please see 'Letting project
managers choose hourly rate' 124 for instructions on how to set the appropriate rate.
Resource planning on product level
An overview of all planned resources on the project is found on the 'Resource Allocation' tab, under
the header 'Resource Management'. To only view planned resources (and not the requests) the
timeline settings have to be changed. Press the 'Edit Timeline Settings' button to set the Resource
© 2015 Fortes Solutions BV
Functionalities
113
Allocation Process to 'Project Demand Driven'.
Any hours planned against the product will be evenly distributed across the duration of the product,
which is defined by its start and end dates.
3.4
Time registration (add-on)
Registration of hours using the Principal Toolbox is done by using the module 'Time Entry'. Users of
the Principal Toolbox who are assigned to so-called Time Registration groups will receive a timesheet
which they can then use to register the hours worked against projects and non-project activities, like
leave. Using these timesheets, actual cost entries can be allocated against projects and non-project
activities according to pre-defined hourly rates.
3.4.1
Generating, submitting and approving timesheets
The process contains the following steps, which are explained in the next sections.
1. Creating a time entry configuration 113
With this step, you define which products are shown on users' time sheets, and whether or not they
have a free choice of products on their time sheet. Different configurations can be used for different
departments.
2. Creating non-project activity sets 155
These sets can be used to define activities that are not part of projects. These could be operational
duties, and non-productive hours, like sick leave, holidays, leave. For different departments,
different sets can be created.
3. Creating time entry groups 118
These groups define departments / teams. Members of a group share configuration, non-project
activity sets and the approvers of the weekly time sheets.
Add-on 'Timesheets'
See also Registration of actual hours
3.4.1.1
52
for more information about using timesheets.
Creating a time entry configuration
The time entry configuration defines:
· which products are shown on time sheets:
o "membership" based: only products of which the user is owner, reviewer or participant are shown
© 2015 Fortes Solutions BV
114
Principal Toolbox 6.0
on the time sheet, regardless of budget.
o budget based: only products that have a budget assigned are shown, but then to all members of a
project.
· whether only products from active stages are shown, or all products from the project
· whether users are allowed to choose products of projects they are not a member of.
Creating a time entry configuration
There are multiple ways to create time entry configuration. The default way to define a time entry
configuration is described below.
1. In the dark blue page header, click on Time Entry.
Time Entry Page
2. On the Dashboard tab that appears, click New in the header Time entry configurations to create
a new time sheet configuration.
Time Entry Configuration
© 2015 Fortes Solutions BV
Functionalities
115
3. Fill in the following information:
Name
Description
Product membership
Product budget
Allow free entry
:
:
:
:
:
Name of the time entry configuration.
Description of the time entry configuration.
Select which products will be automatically available for time entry.
Select which products will be automatically available for time entry.
Select if users may select products free.
4. Click Save to store the time registration configuration.
5. Now you can close this dialog, by clicking Close.
Time entry configuration with Planning Item Filters
Another way to create a time entry configuration is by using so-called 'Planning Item Filters'. These
configuration options are bit more flexible and offer more filter options.
1. To enable the 'Planning Item Filters' navigate to Setup, Configuration and click on Time Entry
and Settings.
2. Click on Edit to enable the 'Support for Activity Planning'.
Enable Support for Activity Planning
3. Go back to Time Entry in the dark blue bar.
4. Click on New in the header Time Entry Configurations to create a new time entry configuration.
© 2015 Fortes Solutions BV
116
Principal Toolbox 6.0
Time Entry Configuration with planning item filters
5. Fill in the following information:
© 2015 Fortes Solutions BV
Functionalities
Name
:
Description
:
Pre-selected Planning Item Filters:
Selectable Planning Items
:
Show fields on time sheet
:
Approval
:
117
Name of the time entry configuration.
Description of the time entry configuration.
Select which products will be automatically available for
time entry. Every option contains filters that will determine
which products will be displayed on the timesheet. The
following options are available:
· Show all products by default.
· Only show the products with a budget (With budget).
· Only show the products with a budget and in progress
(With budget and in progress).
· Only show the products with an owner assigned (With
ownership).
· Only show the products with an owner assigned and in
progress (With ownership and in progress)
· Show all products/activities with the field 'Pre-selected
on Timesheets' selected on the product page. By
selecting this field on all products it is possible to
determine per product wether it should appear on the
timesheet.
Select which products can be selected on the timesheet
by the users. The same options are available as
described above.
· Product field (read-only): select which information about
the product will be displayed on the timesheet (i.e. the
number of risks, the number of issues, etc.)
· Entry Field (selectable in time sheet): select on which
entry field data can be entered in the timesheet.
· Select the option 'Auto Approve on Submit' if the
Department Manager doesn't need to approve the
hours. For more information about the approval
process please take a look at: Configuring the approval
process 119 .
· Create draft entries on request approval: use this
option if a draft entry needs to be created when
requesting approval.
6. Click Save to store the time registration configuration.
7. Now you can close this dialog, by clicking Close.
Creating Planning Item Filters
It is also possible to create your own 'Planning Item Filter'. By creating you own filters you can
determine which type of products should be pre-selected of selectable.
1. Click in the Time Entry Configuration on the tab Planning Item Filters
2. To create your own 'Planning Item Filter' click on View Options and select Set Filter.
Creating a Planning Item Filter
© 2015 Fortes Solutions BV
118
Principal Toolbox 6.0
3. A list with available filters will appear. Configure the filter and click on OK.
4. To save the view click on View Options and Save View.
5. Enter the name of the view, select the type and click on OK.
6. The 'Planning Item Filter' is now available in the time entry configuration.
3.4.1.2
Creating time entry groups
Now you can attach your created 'time entry configuration' and 'non-project activity sets' to a new 'time
entry group'. This time entry group will be the entire population of time-writing users, or a department
or team with different settings.
An important property of the time entry group is the approver selection. Per group, you define who is
responsible for approving the time sheets of the members.
To define time entry groups:
1. In the dark blue bar in the top, click 'Time Entry'.
2. On the 'Dashboard' tab, click 'New' in the section 'Time entry groups' to create a new time sheet
configuration.
Time Entry
3. Then fill in the following information:
Name
Description
Group manager
:
:
:
Selected time sheet configuration :
Selected set(s) of non-project
activities
:
Name of the time entry group.
Description of the time entry group.
Select the group manager who can edit the settings of
the time entry group.
Select which time sheet configuration is active for this
entry group.
Select if users may book hours on created non-project
activities.
4. Click OK to store the time entry group configuration.
© 2015 Fortes Solutions BV
Functionalities
119
Time Entry Group Configuration
5. When the time entry group is stored, it will appear in the listing of 'Time entry groups'. Now click the
created entry to config the time entry group.
6. Go to the 'Members & Approvers' tab to add members of this time entry group.
7. Click the 'Add / Remove' button to add or remove group members and approvers.
Members and Approvers of a Time Entry Group
3.4.1.3
Configuring the approval process
Approving timesheets can be set up in four different ways:
· Approval required by the project manager and line manager:
© 2015 Fortes Solutions BV
120
Principal Toolbox 6.0
· Approval required by the line manager only
· Approval required by the project manager only
· No approval required: timesheets are automatically approved when submitted
The approval process can be configured in these various ways using a number of settings. The steps
to configure each approval process follow below.
Approval by project manager only
1. Navigate to Setup, Configuration, Time Entry, Settings, and set the setting 'Allow project
manager to approve hours' to 'Yes'.
2. Open one of the project models and on the dashboard press 'Edit Properties'.
3. Within the section 'Time Entry' tick the box for 'Approval of project hours by project manager'.
4. The project manager will now be able to approve hours by project. To do so, the project manager
opens a project, navigates to the Resource Management tab, and opens the 'Approve Hours'
screen. The project manager will get an overview of all the hours that have been submitted against
the project and which require approval.
A similar overview, but then across all projects, can be found on the project manager's dashboard
on the tab 'Approve Hours'.
Approval by line manager only
In case a line manager needs to be able to approve timesheets, the line manager needs to be made
an Approver on one or more Time Registration Groups.
1. Open a Time Registration Group from within the Time Entry module
2. Open the tab 'Members & Approvers'
© 2015 Fortes Solutions BV
Functionalities
121
3. Add the line manager to the 'Group Approvers' section by using the appropriate 'Add' button.
4. Any submitted timesheets by members of this time registration group will now appear on the
personal dashboard of the line manager, ready to be approved (or rejected).
Automatic approval
Enabling Auto Approve on Submit will remove the need for line manager to approve timesheets. This
setting is changes as follows:
1. Navigate to the Time Entry module
2. Open one of the Time Entry Configurations and enable the setting 'Auto Approve on Submit'
3. The setting is now enabled for all Time Entry Groups that rely on this particular Time Entry
Configuration.
Note: this setting will now prevent line manager from approving timesheets, even in those cases
where they've been listed as Approvers on Time Entry Groups.
Configuring the right approval process
With the above knowledge in mind, the approval process can now be configured as required.
Approval by project manager and line manager
1. Enable the option to have project managers approve hours (see above for instructions)
2. Set the line manager up to approve hours (on the Time Registration Group)
3. Check that the applicable Time Entry Configuration is not set up for Auto Approve
Approval by line manager only
1. Set the line manager up to approve hours (on the Time Registration Group)
2. Check that project managers are not allowed to approve hours (see above for instructions)
3. Check that the applicable Time Entry Configuration is not set up for Auto Approve
Approval by project manager only
1. Enable the option to have project manager approve hours (see above for instructions)
2. Enable the Auto Approve on the applicable Time Entry Configuration (this will ensure that line
managers are skipped)
Automatic approval
1. Enable the Auto Approve on the applicable Time Entry Configuration
2. Check that project manager are not allowed to approve hours (see above for instructions)
3.4.1.4
Submitting timesheets
Any timesheets that need filling out will appear on the personal dashboard of the employee on the tab
'My Time Sheets'.
© 2015 Fortes Solutions BV
122
Principal Toolbox 6.0
My open timesheets on the homepage
Any open timesheets will be displayed as a listing. Click on the start date of the timesheet to open it.
The following window will open:
A timesheet
When finished entering hours, press 'Save' or 'Save and Request Approval'. The latter option will
only be available when an approval process has been set up.
After requesting approval, the project manager and / or the line manager will get the request for
approval on their personal dashboard as a reminder. Please see 'Approving timesheets' 122 for
instructions on how to approve the submitted timesheets.
3.4.1.5
Approving timesheets
Approval by project manager
When a timesheet has been submitted and it contains hours against the project manager's project,
and the hours require approval, they'll appear on the project manager's personal dashboard. The tab
'Approve Hours' will show a list of all hours that require approval.
Approving hours
Approval by line manager
When a line manager has been registered as an approver on one or more time entry groups, a list of
the submitted timesheets will appear on the line manager's personal dashboard.
© 2015 Fortes Solutions BV
Functionalities
123
To be approved timesheets on the homepage
By clicking on the start date of one of the timesheets it opens and the line manager, after reviewing the
contents, can choose to Approve or Reject the request for approval.
Approving a timesheet
3.4.2
Time and cost allocations
Against products, part of a project, cost and hour entries can automatically be generated from the
timesheets that have been submitted. The tab 'Costs & Hours' on each product will then list all the
costs and hours in line with the timesheets from project team members that registered hours against
the project.
The costs associated with the hours that the team member registered are based on an hourly rate.
Each resource has its own hourly rate, as defined in the Setup. Besides this personal hourly rate, the
project manager can be allowed to override that rate for a project specific rate.
To enable the automatic generation of cost and hour entries based on time entry, take the following
steps.
1. Define and allocate hourly rates
123
2. Let project managers set hourly rates
124
3. Get cost and hour entries against individual products
3.4.2.1
126
Defining and allocating hourly rates
Defining hourly rates
Before assigning hourly rates to individual resources, define the rates as follows:
1. Navigate to Setup, Configuration and click on 'Manage Hour Rates'
2. Click 'New' to add a new hourly rate
3. In the window that appears, choose a name, a description, a code (free text), and the hourly rate in
© 2015 Fortes Solutions BV
124
Principal Toolbox 6.0
dollars (or applicable currency).
New hour rate
4. Once saved, the hourly rate will be available to be assigned to resources.
Allocating hourly rates
1. From within Configuration navigate to 'Manage Resources'
2. Edit one of the resources by clicking on its first name
3. The window that appears allows to set one specific hourly rate for this resource.
Managing resources
3.4.2.2
Letting project managers choose hourly rates
It's possible to let the project manager choose hourly rates for the resources on a project. This feature
has to be enabled in the Setup and on the project model.
Setup
1. From within Configuration click on Time Entry.
2. Open the Settings, and enable the setting 'Allow project manager(s) to configure hour rates per
resource'.
© 2015 Fortes Solutions BV
Functionalities
125
Allow project manager(s) to configure hour rates per resource
Project Model
1. Open one of the project models
2. At the project model's dashboard press 'Edit Properties'
3. Enable the setting 'Configuration of hour rates per resource by project manager'.
Edit properties on projects
After this setting has been enabled, the project manager can alter the hourly rate for the resources on
the project. This is achieved as follows:
1. From the project dashboard, click on the tab 'Resource Management' and choose for 'Resource
Rates'
2. Press the 'Edit' button and set the required hourly rate for each resource on the project.
© 2015 Fortes Solutions BV
126
Principal Toolbox 6.0
Assigning project specific resource rates
3.4.2.3
Time and cost allocations against products
After setting the appropriate hourly rate, each time a timesheet has been approved hour entries will be
allocated against the appropriate products. Costs will be associated with the hours based on the
applicable hourly rate: either the resource's rate, or if set, the rate as defined by the project manager.
The generated hour and cost entries are listed on the 'Costs & Hours' tab on each product.
Cost & hours tab on products
4
Automated Reports
Reports can be used in projects to generate reports about your projects. Reports can be created in
the Principal Toolbox and both in Word and in Excel. The Word reports offer more possibilities for
editing after generating the report, while the Excel reports offer more flexibility in working with tables. It
is also possible to use so-called ' Timeline reports' to show information over time.
The automated report functionality of Principal Toolbox has especially been designed to allow you to
create and edit your own automated reports.
© 2015 Fortes Solutions BV
Automated Reports
4.1
127
Automated reports
Note: automated reports within projects are available to project managers and project support.
On programme level they are available to the programme manager.
Note: Normally, automated reports will be provided with the project model(s) of your
organisation. It is possible, however, to create your own reports for your programme or project.
Automated reports can be used in projects to automatically generate reports about your projects.
Automated reports can be created both in Word and in Excel. The Word reports offer more
possibilities for editing after generating the report, while the Excel reports offer more flexibility in
working with tables.
The automated report functionality of Principal Toolbox has especially been designed to allow you to
create and edit your own automated reports.
Principle of automated reports
Automated reports use keywords that are replaced with data from the Principal Toolbox database. This
can be either simple content of fields, like a project name and a start date, or complete tables. These
tables are the views (either pre- or self-defined) at various locations in Principal Toolbox.
The keywords, which include references to the views, can be found in the 'Keyword reference'. When
clicking a keyword, it is copied to the Windows clipboard. You can now paste the keyword in your
report template. After saving the template on your system, upload it to Principal Toolbox and the report
is available for use.
Note: some applications empty the clipboard when they are started up. In this case, first open
the application and then click the keyword.
Where to find and manage automated reports
Within projects:
On the project dashboard in the section 'Automated reports’ or at a specific product page.
Click 'Edit' at automated reports to manage reports within a project or project model
© 2015 Fortes Solutions BV
128
Principal Toolbox 6.0
On product pages templates for automated reports can be added as well
Within programmes / project lists:
On the dashboard, at the section 'Automated reports'.
Automated Reports on a programme
In the next sections, you will find more detailed information about creating and managing automated
reports.
4.1.1
Automated Word reports
Note: Word reports are based on templates that have to be saved as Rich Text Format (*.rtf)
files.
1. Go to the dashboard and click the button ‘Edit’ in the Automated report header, or go to the specific
‘Product’ page where you want to insert the new automated merge report.
2. You can do any of the following:
© 2015 Fortes Solutions BV
Automated Reports
129
. The template will be
a. Open one of the templates already present, by clicking
opened, and at the same time Principal Toolbox will open a window with the 'Keyword Reference'.
b. Start with a 'normal' or new Word document. Click Keyword Reference to open the window
containing the keywords.
3. The Keyword Reference window will open where you can select the keywords. To select a keyword,
just click it.
Keyword list
5. Go back to your template in Word. Look up the position where you want to paste the keyword.
Pasting can be done in two ways:
a. By selecting Paste in the Edit menu
b. With the shortcut key CTRL+V.
6. Finish the automated merge report and save it as an RTF-file.
a. Choose Save As in the File menu
b. In the dialogue, choose an appropriate folder for your template.
c. At Save as type choose Rich Text Format (*.rtf)
d. Click Save to save the template
7. Go back to Principal Toolbox. To upload the merge template in the Principal Toolbox, click
the Templates section (in the Edit Automated Reports window or on a product page). Fill in the
© 2015 Fortes Solutions BV
in
130
Principal Toolbox 6.0
following information:
Description
Revision/Doc nr.
Filename
Internal document link
:
:
:
:
This will be the title of the report shown on the dashboard
Use this to give a version number to your template
Locate the RTF-file with the browse button
Provide a document ID from a document at another location in the
Principal Toolbox application. The ID can be found in the document
history.
This allows for a centrally placed document to be linked to from
projects. Update by updating only the original centrally placed
document.
8. IMPORTANT: Make sure the checkbox 'Document is a merge template' is ticked!
Adding a Word file
9. Click ‘OK’ to add the merge template to the Principal Toolbox.
10.The document is now available as an Automated Report. If you added it to the section Automated
Reports on a programme / project list or project dashboard, you will find it in the list Automated
Reports. If you added it to a product page, it will appear in the list 'Templates' on the General tab.
11.To generate the Automated Report click the template name and it will open in a new window.
12.After the report is opened in a new window it can be altered and then saved. In order to make the
report available to the project team it is necessary to upload it in the Principal Toolbox.
Note: To edit the automated report or merge template later on, go back to step 2a and continue.
Note: In RTF templates the system setting (default or custom) is used for language, not the
personal locale.
4.1.2
Automated Excel reports
The Microsoft Excel reporting allows you to create well formatted reports based on Principal Toolbox
data. The reports can be extended with charts.
An automated report for Excel must to contain macros to be able to retrieve data from Principal
Toolbox. Therefore, you need to be able to run macros to generate these reports. The Excel reports
are based on a special Principal Toolbox template. This template contains keyword that point to fields
and views in Principal Toolbox. When generating a report, these keywords are replaced by data from
the Principal Toolbox.
© 2015 Fortes Solutions BV
Automated Reports
131
In this section, we will explain how to generate Excel reports. Creating and editing templates yourself is
possible, even with basic Excel knowledge Some of the more advanced features would require some
more knowledge of Excel. The topics can be found below:
· Using an Excel report 131
· Creating an Excel report template 132
· Advanced topics 140 .
Note: automated reports within projects are available to project managers and project support.
On programme level they are available to the programme manager.
You will need sufficient rights on your computer to run Excel macros.
4.1.2.1
Using an Excel Report
To generate an Excel report, you can click the report name, on a programme / project list dashboard,
or on the project dashboard. In the example below, the available Excel report is shown and can be
clicked by the user.
Automated reports on the project dashboard
When the Excel report is downloaded, the following message is shown to you by your browser.
In this dialog, click 'Save' and select an appropriate location for the template. Then click 'Open' to
open the report in Excel. Saving the report first ensures that the Excel file will be opened correctly. If
opened directly, the required support macro's included in the Excel file will not be started.
Note: always Save an Excel report before opening it!
When opening the file in Excel, the data is automatically 'refreshed' with the currently available data.
© 2015 Fortes Solutions BV
132
Principal Toolbox 6.0
Automated issue log in Excel
If you want to add the report as a deliverable in a project, add it as a deliverable. See section adding
documents to products 59 .
4.1.2.2
Creating an Excel Report Template
Creating an Excel report template is done by following these steps:
1. Download a basic Excel report template 132
2. Open the template and insert keywords 134
3. Create charts 136 and Pivot tables 137 based on the Principal Toolbox data
4. Finish the template and make the report template available within the 139 Principal Toolbox
For more advanced topics, see the 'Advanced Topics'
140
chapter.
4.1.2.2.1 Open the basic Excel Report Template
Note: you need to be manager of the programme or project to create and edit report templates.
Within a project, also project support can do this.
To create an Excel report template, log in to the Principal Toolbox application and navigate to the
'level' on which you want to place an Excel report. For example, when you want to create a project
report, navigate to the project. When a programme report needs to be created, navigate to a
programme where you have access to the automated reports.
On the chosen level, click the Edit button to access the available automated reports. A page as
shown below should appear.
© 2015 Fortes Solutions BV
Automated Reports
133
Automated reports page.
On this page, click the 'Download Basic Excel Template' button to download an empty template that
can be used as a start for creating the report template. Instead of starting a new template, an existing
template can be used to modify, if one is available. In this case, click the 'Open template' button on the
Excel template in the list.
When the Excel template is downloaded, following message is prompted by the browser.
In this dialog, click 'Save' and select an appropriate location for the template. Then click 'Open' to
start configuring the template in Excel. Saving the template first ensures that the Excel file is opened
correctly. If opened directly, the required support macro's included in the Excel file will not be started.
On completion, you should have the Excel file opened on the work station as shown below. When
prompted whether to enable or disable macro's, click to enable macro's (as they are required to use
the template correctly).
Empty Excel file
Note that you should have a menu entry called 'Principal Toolbox' and two Principal Toolbox toolbars:
The Principal Toolbox Report & Template Toolbar
© 2015 Fortes Solutions BV
134
Principal Toolbox 6.0
This toolbar provides functions related to reporting. It offers to insert either a Pivot table or a chart
based on the Principal Toolbox data. For more information, see creating a chart 136 and creating a
Pivot table 137 based on Principal Toolbox data.
The Principal Toolbox Template Toolbar
This toolbar provides functions related to setting up a template. The keywords that relate to the
Principal Toolbox data can be referenced, inserted and the data refreshed.
4.1.2.2.2 Inserting Principal Toolbox Keywords
Keywords are used to define which data will be imported from Principal Toolbox into your report.
These keywords are provided in a context-sensitive list, the keyword reference. This list can be
opened from within your Excel template. Click the 'Merge Keywords' button on the template toolbar to
open a browser window with the available keywords for this template.
A page like the one below should appear. Note that the content of the page may differ per project /
programme.
Note: if the report is to be used on different locations within the application, make sure to only
use generally available keywords. This is mainly the case with the availability of views.
Keyword list
Click a keyword to copy the information to your clipboard. Then select the appropriate location in the
Excel template where you want to place the related data. To get the keyword in the template, choose
Paste in the Edit menu. Alternatively use the shortcut key CTRL+V.
For example, when clicking the 'name' keyword, the keyword can be inserted in the Excel file on
location B2. Note that when inserting the keyword, the keyword is replaced with the actual data
© 2015 Fortes Solutions BV
Automated Reports
135
immediately. During this process, a dialog appears showing the progress of the operation.
Now, insert a view (table of date) in the template by selecting a keyword related to views. In the
example below, the view on open issues is inserted.
Inserting a keyword
Again, the keyword is immediately replaced with the data. You are now able to change the format of
the table appropriately. E.g., make the column heading bold and have adapted width of the columns.
Formatting the table
In the example above, the table has been adjusted and additional information inserted (labels, report
title etc.). If necessary, the data can be refreshed by clicking the [Refresh PT Data] button on the
template toolbar.
© 2015 Fortes Solutions BV
136
Principal Toolbox 6.0
4.1.2.2.3 Creating a Chart Based on Principal Toolbox Data
To create (or insert) a chart based on Principal Toolbox data, it is required that the data has already
been inserted through a keyword, see 'Inserting Principal Toolbox Keywords 134 '.
Next, click the 'Insert Chart Based on PT Data' button on the report toolbar.
A dialog as shown below should appear. In this dialog, select the data that should be used as the
source for the chart and the location where the chart will be related to (if not placed on a new sheet if
chosen).
To alter the chart location, click the [_] button (behind chart location) and select the location. This is
mainly useful for showing the chart on a sheet different from the source data.
The selection for Principal Toolbox data will show all available data inserted by keywords in the
template. Please note that the selected data is automatically interpreted by Excel to be applied in the
chart. This works best for data that is organised as a 'label column', followed by chart data columns,
see the example below.
To insert the chart, click OK. When inserting normally (on an existing sheet), the following should
appear (as an example).
© 2015 Fortes Solutions BV
Automated Reports
137
Inserting a Chart
The same chart would appear on a new sheet when this was selected. Please note that the chart type
is by default set to 'stacked columns'. The user has to tune the chart by normal Excel functionality.
4.1.2.2.4 Creating a Pivot Table Based on Principal Toolbox Data
To create (or insert) a Pivot table based on Principal Toolbox data, it is required that the data has
already been inserted through a keyword, see 'Inserting Principal Toolbox Keywords 134 '.
Next, click the 'Insert Pivot Table Based on PT Data' button on the report toolbar.
A dialog as shown below should appear. In this dialog, select the data that should be used as the
source for the chart and the location where the chart will be related to (if not placed on a new sheet if
chosen).
© 2015 Fortes Solutions BV
138
Principal Toolbox 6.0
To alter the Pivot table location, click the [_] button and select the location. The selection for Principal
Toolbox data will show all available data inserted by keywords in the template. Additionally, the user
can click to add a Pivot chart (connected to the Pivot table. This chart will be placed on a new sheet
automatically.
To insert the Pivot table, click OK. The following should appear (as an example).
Inserting a Pivot Table
In this setup, the user is able to drag the required fields to the appropriate location in the Pivot table. In
the example shown below, the Pivot table is configured such that it shows the number of issues per
project and per issue type.
© 2015 Fortes Solutions BV
Automated Reports
139
Pivot Table inserted
4.1.2.2.5 Finishing the Excel Report Template
When all the keywords have been inserted into the template and required charts and Pivot tables have
been added, the template can be made available within the Principal Toolbox.
To publish the template for use of reporting, navigate to the appropriate location in Principal Toolbox.
For example, if you would like to use the report on a programme, navigate to that specific programme
dashboard to add the template.
Tip: If you add the template in a model (either a project model or an MSP programme model),
the report becomes available automatically on the projects / MSP programmes that are created
based on the model.
At the appropriate location, access the automated report list ([Edit] button on the list of available
automated reports). See also creating an Excel report template 132 .
To upload the merge template in the Principal Toolbox, click
Edit Automated Reports window). Fill in the following information:
Description
Revision/Doc nr.
Filename
Internal document link
:
:
:
:
in the Templates header (in the
This will be the title of the report shown on the dashboard
Use this to give a version number to your template
Locate the XLS-file with the browse button
Provide a document ID from a document at another location in the
Principal Toolbox application. The ID can be found in the document
history.
This allows for a centrally placed document to be linked to from
projects. Update by updating only the original centrally placed
document.
IMPORTANT: Make sure the checkbox 'Document is a merge template' is ticked!
© 2015 Fortes Solutions BV
140
Principal Toolbox 6.0
Adding a Excel Report Template
Click ‘OK’ to add the merge template to the Principal Toolbox. The document has now been made
available as an Automated Report and it can be found on the dashboard in the list Automated Reports.
To generate the Automated Report click the template name and it will open in a new window. After
completion, the template can be used as a report within the project / programme etc. See using the
Excel report 131 .
4.1.2.3
Advanced Topics
Configuring the template may require advanced options like formatting the table conditionally, add
calculated data to the original Principal Toolbox data or add custom calculations / processing.
The Excel client reporting allows you to add this kind of configuration to the automated report
templates. For these topics it is assumed that the user is familiar with the options and functionality
provided by Excel.
4.1.2.3.1 Extending the Report Data
Extending report data allows you to add information to the report data retrieved from the Principal
Toolbox. For instance, adding a calculated column to a table. This can be useful when data has to be
presented different than the default formatting or if the data needs to be post-processed.
The report extension is standard Excel functionality and can be applied as is on single cell data (like
the budget field of a project). However, for tables of data based on views in the Principal Toolbox, it is
more complex. The data coming from Principal Toolbox have a dynamic behaviour. The number of
rows may change in time and / or the location at which the report is used. This behaviour makes
extending the report data (and other advanced options) a bit complex as it has to be configured in
such a manner that it works independently from the number of rows in the table.
To explain the proper way of configuring extended report data, consider the following example. Here,
the impact of a risk is to be determined based on the Principal Toolbox fields 'Chance' and 'Severity'.
The impact is to be determined by the impact matrix stated below.
Chance
Severity
Small
Medium
High
Small
Medium
High
1
2
5
2
4
10
5
10
25
In the table, the impact is stated as a value between 1 and 25. The objective is now to add this impact
as a column to the report data.
To start, it assumes that an appropriate view is created in the Principal Toolbox and is available as a
© 2015 Fortes Solutions BV
Automated Reports
141
keyword for use in the Excel template. As a result, a template as shown below could be created.
Extending the report data
To add the calculated impact data, a column heading is added next to the 'Priority' column. Also, in the
cell below this heading, the following formula is entered:
=IF(F5="Small";IF(G5="Small";1;IF(G5="Medium";2;5));IF(F5="Medium";IF
(G5="Small";2;IF(G5="Medium";4;10));IF(G5="Small";5;IF
(G5="Medium";10;25))))
(adapt the formula as necessary to refer to the correct cells!)
This formula calculates the impact based on the values detected for 'Chance' and 'Severity'. Next,
extend the formula to be applied to all rows and the first empty row below the table of data. See the
picture below.
© 2015 Fortes Solutions BV
142
Principal Toolbox 6.0
Report data extended
The row below the data is considered to be a 'store' of the formulas and formatting to be applied to the
table. When refreshing the data, the formula(s) in the first empty row below the table of data will be
used for all rows (independent of whether there are more or less rows of data).
When the extended data is placed adjacent to the table of data from the keyword itself, the extended
data can also be used for Pivot tables and charts, see the appropriate help pages for more
information.
4.1.2.3.2 Apply Conditional Formatting
Conditional formatting allows to alter the visualisation of data depending on value conditions of the
data. For example, when the data represents a number and the number is above a certain level, the
colouring of the data may turn red.
The conditional formatting is standard Excel functionality and can be applied as is on single cell data
(like the status field of a project). However, for tables of data based on views in the Principal Toolbox,
it is more complex. The data in the Excel client reports, as provided by the Principal Toolbox, has a
dynamic behaviour. The number of rows of data may change in time and / or the location at which the
report is used. This behaviour makes the conditional formatting (and other advanced options) a bit
complex as it has to be configured such that it works independently from the number of rows in the
table.
To explain the proper way of configuring conditional formatting using the Excel reporting functionality,
consider the example as given in the topic regarding extending the report data 140 .
Now, we will add formatting to the rows that have an impact that is greater than equal to 10. If so, the
text in the row will turn red.
© 2015 Fortes Solutions BV
Automated Reports
143
Apply conditional Formatting
In the picture above, the row below the data is selected to apply the conditional formatting to. Note that
this row is considered the 'store' for formatting and calculations to be applied to the table data.
For this row, the conditional formatting is set. The formatting is set as a formula to apply the formatting
to the entire row depending on a single cell value (instead of applying the formatting to a single cell
depending on that same cell). The formula entered is:
=IF($H7>=10;TRUE;FALSE)
(adapt the formula as necessary to refer to the correct cell!)
The cell H7 refers to the impact value for the selected row. The formatting is set to red text. When the
data is now refreshed (click [Refresh PT Data] on template toolbar), the formatting is applied to all the
table data as well, see below.
© 2015 Fortes Solutions BV
144
Principal Toolbox 6.0
Conditional formatting applied
4.2
Timeline reporting
A timeline is a graphical representation of information in relation to time. Timeline reports enable you to
instantly report on different types of cost or hour entries over time. Timeline reports can be used to
compare your available resource capacity with you requested and allocated resource availability. It can
also be used to compare the budget and actual costs within a project.
Timeline reports work like pivot-table known from MS Excel. It creates reports on entries coming from
time registration, cost entries and resource management.
Example: Timeline Report
Based on the start and end date of an entry a timeline report creates an overview in time, for instance
the total costs per month per project or the number of hours resources are allocated to projects.
The timeline reports can be found on the same location as the normal reports. So they are available
enterprise-, programme-, portfolio- and project level. They are also available in the different modules
© 2015 Fortes Solutions BV
Automated Reports
145
like time registration and resource management.
Two representation types are available:
- table
- chart
Timeline report views can be used in automated Excel and Word reports.
Example: Timeline Report Chart
Example: Timeline Report Table
The different options in the View options menu are:
© 2015 Fortes Solutions BV
146
Principal Toolbox 6.0
Basic Setting
Set filters
:
:
Set widths
:
Make default
:
Save view
Manage views
:
:
To configure the timeline report view
Define a filter to make a selection of
the shown items
Set the column width, so the view fits
better on screen or in a MS Word
report. Drag the line between columns
to increase or decrease the column
size.
This sets a view to the personal
default
Save the view for later use.
Set properties for the view. You find
more information at 'Manage views
23 '.
Create a Timeline report view
This example describes how to create a table with costs per product per month for this year within a
project represented as a timeline report.
Basic Settings
1. Navigate to your project in Principal Toolbox and go to the ‘Report’ tab
2. Click on ‘entries’ in the Timeline report - section
3. Open ‘view options’ and choose ‘Basic Settings’
4. Set the values for the settings
a. unit : select ‘Money (changes on book date)’. This setting is used to select which kind of
entries (costs or hours) you want to see and in which unit it is represented on screen. The
system automatically calculates the data between different unit settings.
b. Scale: set scale to weeks to show the costs per week.
c.
Start date: set a dynamic or fixed start date where the windows of the timeline must start.
Select ‘This year’ as a dynamic start date.
d. Horizon: set the number of weeks, months or quarters to show starting at the start date.
5. Apply a filter on entries: select ‘Budget’ and ‘Actual’ in the filter type. This will give you only the
cost-entries of the type budget and actual.
© 2015 Fortes Solutions BV
Automated Reports
147
6. Select ‘Table’ as the representation type to get a table with the budget and actual costs
7. Table configuration – select the field to show per row. Select product and type to display the
product name in the type of entry (budget or actual).
8. Click ‘OK’ and see the result on screen
Save view
If you want to save the newly defined view you need to save it with Save view. To overwrite an existing
view you saved before, select the name of this view at the Existing view pull down list. To create a new
view, enter the new name at 'New view'. Click Save to save the view.
Save view
Select personal, local or global. See manage views
23
for more information.
- With the ‘Make default’ option a specific view can be set to the personal default view on that page.
© 2015 Fortes Solutions BV
148
Principal Toolbox 6.0
- With the button ‘Manage views’ the views available can be managed. See Managing views
4.3
23
.
Widgets
Widgets can present data directly, without having to run a report or opening a view. Widgets are easy
to configure and refresh the data automatically. Widgets can be used for reports, but can also support
specific processes and can be developed specifically for customers.
Widgets on a portfolio dashboard
Widgets are available on several places in the Principal Toolbox. They will not be displayed
automatically.
Enable widgets:
1. Click on Edit Widgets to make widgets available on your screen.
2. Use the ‘ü’ to display the widgets.
3. Select the number of widgets that should be displayed.
4. Select the type and confirm with Ok.
Edit the widget lay-out
Widgets will now be displayed on the page.
4.3.1
Widget Configuration
The displayed widgets can be configured/modified. Click on Configure to edit the widget. The
configuration possibilities depend on the type of widget. The different types of widgets with their
configuration options are explained below.
© 2015 Fortes Solutions BV
Automated Reports
149
Bar chart:
1. Name: name of the widget.
2. Values: count projects or specify field.
3. Group by: specify field.
4. Show: values or percentages.
Bubble chart:
1. Name: name of the widget.
2. X-axis: information on this axis.
3. Y-axis: information on this axis.
4. Size: information that determines size of the bubble.
5. Colour: random or i.e. project field ‘Status’.
Pie chart:
1. Name: name of the widget.
2. Values: number of projects or specify field.
3. Group by: specify field.
4. Combine slices (<): combine below certain percentage.
5. Show: what should the widget display.
Timeline chart:
1. Name: name of the widget.
© 2015 Fortes Solutions BV
150
Principal Toolbox 6.0
2. Type: line-, cumulative line- or bar chart.
3. Show: costs and/or hours.
4. Legend: on/off.
5. Scale: weeks, months, quarters or years.
6. Start date: dynamic or fixed.
7. Horizon: in months.
8. Type: which data should be displayed.
Filter
On Widgets with the type ‘bar chart’ or ‘pie chart’ it is also possible to apply a filter. With a filter it is
possible to display specific data in the widget (drill-down).
1. Click on Filter to apply a filter.
2. Click on Add filter to add a new filter.
3. Click on the ‘X’ to remove a filter.
4. Click on Ok to confirm changes.
Add filters to a widget
4.3.2
Project Specific Widgets
On the project level of the Principal Toolbox two other widgets can also be displayed. These are the
‘risk matrix’ and ‘burn-down widget’. Both can be displayed on the ‘Report’ tab of a project.
Risk matrix:
The risk matrix displays all risks in and overview based on chance and severity. The risk matrix cannot
be configured.
© 2015 Fortes Solutions BV
Automated Reports
151
Risk Matrix
Burn-down widget:
The burn-down (or burn-up) widget displays the planned and actual hours together with the ideal and
current trend line. De burn-down widget can be configured. Click on Configure and fill in the following
information:
Burn-down chart:
1. Name of the widget.
2. Type of graph: burn-down or burn-up.
3. Show series: which data should be shown.
4. Start date: project start date or fixed.
5. Horizon: Project end date or fixed.
Configuration of a burn-down chart
Burn-down chart
© 2015 Fortes Solutions BV
152
Principal Toolbox 6.0
5
Advanced options
5.1
Advanced Customisation & Workflow (add-on)
With the add-on ‘Advanced Customization & Workflow’ an organisation can define electronic forms in
the different project models. These pages can be tailored to the specific needs of the organisation or
programme.
1. Go to a project model and create a new product to customize or select an existing product.
2. Click the product to open the product details page.
3. Click the button
Default layout
Custom layout
Custom layout with approval
to define the layout of the page.
:
:
:
Standard Principal Toolbox view;
To choose which fields are visible on the product page.
To customise and define an approval for the page.
Product page
4. In this example a new page with an approval cycle is defined. Place a tick in front of ‘Custom
layout with approval’.
5. Next step is to define which fields need to be available on the page. In the first pull-down menu
select if the field is a project field (e.g. project name) or a product field. Then select the field to show
on this custom product page.
6. The last action on the page is to select what field will be set when all the reviewers approve the data
on the product. In the example given, a custom product field (product approval) is used to set on
approval.
7. When this project model is used for a project, the project manager (or the owner) inserts data on the
© 2015 Fortes Solutions BV
Advanced options
product and then requests approval for the product by clicking the
153
button.
8. A new window will open where the approvers need to be selected, a due date can be set and
remarks can be inserted. To send an email to the approver(s) about this product approval, tick
'Notify approvers’.
9. The approver(s) will be informed through an email and will have a note on their ‘Home’ page.
10.To review the product page click the product name and the specific ‘Product’ page opens.
Approve or disapprove the product
11.After review click ‘Approve’ or ‘Disapprove’ and insert any remarks.
12.In this example we have approved the product and the status of the ‘Product approved’ field is
automatically set to ‘Approved’.
© 2015 Fortes Solutions BV
154
6
Principal Toolbox 6.0
System Administrator: Setup & Settings
The administrator can simply control the Principal Toolbox via the 'Configuration page' and the '
Settings page'. In order to access the 'Configuration page' you need to click Setup in the dark blue
header of the Principal Toolbox application and select Configuration. To access the 'Settings page'
you need to click Setup in the dark blue header of the Principal Toolbox and select Settings. These
functions are initially only available to users with administrator rights.
Setup page
Settings page
On the Configuration page you can find several configuration options, such as non-project activities
and custom fields. In the middle of the 'Configuration page' you can see the information of your current
license. Underneath are options to alter the license key and the version type.
6.1
Setup
On the Configuration page you can find several configuration options, such as non-project activities
and custom fields. On the left hand side of the page you see a list with subjects that point to the
different setup pages.
We will review the most important subjects in this section:
- Principal Toolbox settings 155
- Email notification 155
- Creating non-product activity sets 155
- Defining custom fields 159
© 2015 Fortes Solutions BV
System Administrator: Setup & Settings
6.1.1
155
Principal Toolbox
Note: this section is only relevant to system administrators.
This is an overview of the advanced system settings. Normally spoken these do not need to be
changed. Some of these settings will only be shown when add-on's are activated.
Page
Link
Setting
Standard value
Only expand active and
next stage
No
Remarks
Principal Toolbox
Activate product selector in Yes
logs
MS Project file
export
Use of PRINCE2™ roles
No
If the full PRINCE2 organisation is used within the
organisation, select 'Yes'.
As soon as possible
constraint
As soon as possible
If progress of project is to be monitored in MS Project
change this to 'Yes'
Must finish on constraint
Must finish on
To change to a NL version of MS Project:
“ Moet eindigen op ”
Must start on constraint
Must start on
To change to a NL version of MS Project
“ Moet starten op ”
Edit project progress in
Principal Toolbox
If progress of project is to be monitored in MS Project
change this to 'Microsoft Project'
Show installer step
Yes
Should the installer step be shown? If not, change to 'No'
Show download option
Yes
Should the add-in installer download step be shown? If
not, change to 'No'
MS Project integration (add-on)
Add-in installer
Customer installer
instruction text
Needs to be changed when a specific customer
instruction is needed here.
Time entry (add-on)
Manage time
sheets
Click 'New' to create new time sheets or select a specific
timesheet and click 'Remove' to delete.
Cost entry (add-on)
Manage cost
entries
6.1.2
Select a Cost entry and click 'Remove' to delete cost
entries which are not approved.
Email notification
Email notification on log items, time sheets, approvals etc. sends an email automatically when
something becomes overdue.
Most of the notification are turned off by default.
Modify e-mail notification settings
1. Go to Setup > Configuration > Notifications
1. Click on Edit to modify the notification settings
Email notification settings
6.1.3
Creating non-project activities
Specify non-project activity sets for activities that are done outside projects. This can be productive
hours, like service management, meetings, general, etc. You can also add a category for non© 2015 Fortes Solutions BV
156
Principal Toolbox 6.0
productive hours, like sickness, holidays, special leave etc.
Different sets can be defined if different departments use different categories or have different nonproject activities. It is also possible to have multiple non-project activity sets active for one group. So
you could define one set for the entire organisation (e.g. with the categories sickness, leave), and a
separate set for each department with department specific activities.
Creating non-project activity sets
1. In the dark blue bar in the top, click 'Setup' and navigate to 'Configuration'.
2. On the left side of the screen you will find 'Configuration', click 'Manage Non-project Activity Sets'.
3. Click on New in the section 'Non-project activity sets' to create a Non-project Activity Set.
Non-project activity sets on the 'Setup' page
3. Then fill in the following information:
Name
Objective
:
:
Name of the non-project activity set.
Objective of the non-project activity set.
4. Click OK to create the non-project activity set.
5. When the non-project activity set is stored, it will appear in the listing of 'Non-project activity sets'.
Now click the created set to add the non-project activities to the set.
6. Click
to add categories and activities, or to change the current set-up.
7. In the window that has been opened, you can create new items with drag and drop.
a. First add a new category. Drag New category into the lower part of the window as shown below.
© 2015 Fortes Solutions BV
System Administrator: Setup & Settings
157
b. In the pop-up, add a name for the category.
c. Then, drag new activity into the category, as shown below.
d. Give a name to the new activity.
Note: Activities can only be placed inside categories, so you'll need to define at least one
category.
e. Add new categories and activities to get your set complete. Below you find an example of
categories with activities.
© 2015 Fortes Solutions BV
158
Principal Toolbox 6.0
Click Save to save the set. Close the window to go back to the time entry pages.
© 2015 Fortes Solutions BV
System Administrator: Setup & Settings
6.1.4
159
Defining custom fields
Within organisations there often is a need to define custom fields such as, for example; project costs,
SAP numbers and project codes or there is the need to have extra fields on, for example the logs, the
product page or a programme level. With the Principal Toolbox you are able to define these fields.
These fields can be used for defining custom views and reports.
1. Go to the Configuration page by clicking on Setup and Configuration.
2. Click the link Customize fields. Then you select the item where you want to add a custom field.
You can define custom fields on:
Action
Allocations
Benefit
Change
Cost/Hour
Entry
Issue
Lessons
learned
Resource Programme/Project
list/Enterprise
Projects
Resource Pool
Quality
Overview
Risk
Portfolios
Product/ Workpackage/ Stage
Entry
3. Click the specific item to define a custom field. Click Edit to define a custom field.
Defining a custom field
4. An new window will open where you need to fill in the following data:
Available for use
Field name
Field description
Editable
Field type
Field width
Field default value
:
:
:
:
:
:
:
Highlight to make the field available on the pages.
Name of the custom field.
Description of the field.
Highlight to make the field editable.
Select the type of the custom field.
Width of the field on the screen.
Default value of the field.
5. There are some different field types available for the custom field. We will explain them shortly:
© 2015 Fortes Solutions BV
160
Principal Toolbox 6.0
String
Memo
Number
Double
Currency
Date
Checkbox
Picklist (single)
Picklist(muliti)
Person (single)
Person (multi)
:
:
:
:
:
:
:
:
:
:
:
Text field with max. 255 characters.
Text field with unlimited characters.
Number field with no decimal accuracy (for example 2342).
Number with single decimal accuracy (for example 3,5).
Number with two decimal accuracy (for example 3,45).
Date field
A basic checkbox.
From the picklist only one can be selected.
From the picklist multiple values can be selected.
From the picklist only one person can be selected
From the picklist multiple persons can be selected
When selecting a picklist, a new data field will appear named ‘Picklists values’ where you can
specify the different values.
6. Then click OK and the field will be available at the specific page.
The screenshot below shows you a custom field to set the product quality after the quality review. It is
a multi picklist with the values; --,-,0,+,++.
A custom field (Product Quality) has been added to a product
Default the Principal Toolbox is configured with ten custom fields for each item. If
you need extra custom fields these can be created with the Add custom fields
button
Remember: To reset an existing custom field go to the edit page of the custom field -> Click Edit'->
Click Advanced and then hit the Reset button. When you are sure you want to reset the field click OK.
All values inserted by users will be deleted from the system and can not be retrieved !
6.2
Settings
In the middle of the 'Settings page' you can see the information of your current license. Underneath are
options to alter the license key and the version type. On the left hand side of the page you see a list
with subjects that point to the different settings pages.
We will review the most important subjects in this section:
- obtaining the license key and carrying out updates 161
- management of users 163
© 2015 Fortes Solutions BV
System Administrator: Setup & Settings
6.2.1
161
License key and carrying out updates
Under the heading License key on the Settings page you come across a number of options:
- Request license key 161 ;
- Request additional user licenses
- Renew expired license key 161 ;
- Enter license key 162 ;
- Update software 162 .
6.2.1.1
161
;
Applying for a license key
If you have carried out the installation yourself and then arrived at the 'Settings' page it is necessary to
request for a license key at Fortes Solutions.
1. Go to the 'Settings' page.
2. Click the link Request license key.
3. Fill in the following information:
Customer Name
Purchase order
Machine ID
:
:
:
Company name
Code received in letter sent.
Filled in automatically.
4. By clicking the key Create e-mail a message or mail is made which you will need to send. Within
one work day you will receive a license key from Fortes Solutions.
6.2.1.2
Request for additional user licenses
The license you received is based on the number of users named in the Principal Toolbox. If you have
reached the maximum number of user licenses you cannot make any new users. With the option ‘
Request additional user licenses’ you are able to increase the number of existing licenses.
1. Go to the 'Settings' page.
2. Click the link Request additional user licenses.
3. Fill in the following information :
Purchase order
:
New User Limit
:
Code received in the post or if your first request for more licenses you
can fill in unknown or ‘-’.
Here you can fill in the number of users that you really need.
4. By clicking the key Create e-mail a mail is then made which you are required to send. As soon as
the extra licenses are approved you will receive a new license key from Fortes Solutions.
6.2.1.3
Renewal of an outdated license key
If your license has expired you can request a new license using this option.
1. Go to the 'Settings' page.
2. Click the link Renew expired license key.
3. Fill in the following information:
© 2015 Fortes Solutions BV
162
Principal Toolbox 6.0
Purchase order
Code received in the post or if your first request for more licenses you
can fill in unknown or ‘-’.
.
4. By clicking the Create e-mail key a mail will be made that you will need to send. Within one working
day you will receive a new license key from Fortes Solutions.
6.2.1.4
:
Setting up the license key
After making a request for a license key in one of the ways shown above you will receive the
necessary information by e-mail. This license key then needs to be activated in the Principal Toolbox.
1. Go to the 'Settings' page.
2. Click the link Enter License key.
3. Fill in the following information:
Name :
Key
:
Name of the organisation; Fill in the exact name as written in the e-mail.
The license key from the e-mail.
4. Then click OK whereupon the license key will be activated. You will be required to restart system in
which the Principal Toolbox runs, once again.
In some cases the Principal Toolbox will give an alert on the license page (main page of the Settings),
ignore this alert and start up the system once more. If the alert continues then check again whether all
information is filled in correctly.
6.2.1.5
Updating the software
Implementing updates and the installing of new releases of the Principal Toolbox is done via the ‘
Settings’ screen. You will receive a file in the form of a .jar or .sql file from Fortes Solutions in order to
implement an update or to be able to install a new release.
Remember: Before starting the update we recommend to backup the database and application. Users
should be informed of the update and should not be working on the system during the update.
1. Go to the 'Settings' page.
2. Click the link Update software.
3. Now click Start update procedure.
4. Log out all active users and click Proceed with step 2.
5. Wait while storing the unsaved data and select the checkbox in front of Check when backup of
database has been performed.
6. Click the button Proceed with step 3.
7. Locate the appropriate file (.jar file or .sql file) using the Browse key.
8. Click the Proceed with step 4 key in order to carry out the update.
9. After completion of the update, the update procedure restarts the Principal Toolbox application.
10.After the restart, log in as administrator and wait for update processes and the sanity check to
finish. This can take time depending on the update and the size of the database.
© 2015 Fortes Solutions BV
System Administrator: Setup & Settings
163
11.The system is ready for use after completion of the update processes and the sanity check.
When problems or fault announcements arise please contact Fortes Solutions: [email protected].
6.2.2
User administration
Control of users of the Principal Toolbox runs via de Settings page. Using the link User
Administration you are able to control the existing users and to add new users.
1. Go to the Settings page.
2. Click the link User Administration. A list of all users of the Principal Toolbox will appear.
3. Further click Add
in order to add a
new user.
4. The screen Add
person appears,
fill in the following
data:
Firstname
Initials
Lastname
Email
Hour rate
:
:
:
:
:
Username
External (add-on)
:
:
System Role
:
Remarks
:
First name of the user.
Initials of the user.
Surname of the user.
Users email.
Hour rate (optional). This hour rate is used in the add-on hours
registration.
User name
Highlight if the user is an external supplier in the project. By doing this
only the allocated products, issues, etc. are visible.
Normal User or Administrator. The administrator role has logically all
rights. A normal user, has only the rights that are allowed depending
on his/her permissions within the programmes and projects.
User specific remarks to send within the e-mail.
5. Click OK in order to make a user in the system.
© 2015 Fortes Solutions BV
164
Principal Toolbox 6.0
An email will be generated based on
this information. When there is no
mail server configured in the Principal
Toolbox or there is no email address
filled in during the creation of the new
account, you are able to fill the email
with the relevant information and then
send this further to the user by
yourself. Otherwise the Principal
Toolbox will generate the email
automatically and send this to the
users email address.
In order to delete users or to change
the current information you go to the
User Administration page and by
using the Edit and Remove buttons
you are able to alter or remove
information about a user.
6.2.2.1
Person details
Besides the basic information for the user login there is an option to add detailed information per
user/resource.
1. Go to the 'Settings' page.
2. Click the link User Administration. A list of all users of the Principal Toolbox will appear.
3. Click a specific user/resource to add the detailed information.
4. Now click Edit to insert the following information:
Company
Address
ZiP/Postal Code
City
Country
Phone
Phone (home)
Fax
Mobile
Birthdate
Gender
Remarks
Calendar
© 2015 Fortes Solutions BV
:
:
:
:
:
:
:
:
:
:
:
:
:
Name of the company.
Address of the company.
ZIP/Postal Code.
City where the office is located.
Country where the office is located.
Office phone number.
Private home phone number.
Fax number.
Mobile phone number.
Date of birth.
Male or female.
Any remarks.
Calendars applicable to the user
System Administrator: Setup & Settings
165
Person details
6.2.2.2
Advanced options
The administrator has rights to modify advanced options for the login policy. There are several security
settings possible for the password.
Go to the Settings page and navigate to System settings > User login settings
User login settings
These settings can be changed:
© 2015 Fortes Solutions BV
166
Principal Toolbox 6.0
Password expiry time in days
:
Maximum incorrect attempts
:
Lockout duration
:
Minimal password length
Mix upper en lower case letters
Use special symbols in passwords
:
:
:
User numbers in passwords
:
This is the time (in days) a password is valid. After this
date the user has to enter a new pasword. ('0' is no
expiry)
Number of login attempts before a user account is
locked. ('0' is infinite)
Number of minutes a user account stays locked. ('0' is
infinite, the administrator can reset a locked account.)
The number of characters a password should consist of.
Enforce the user of both upper and lower case letters.
Enforce the use of symbols (non alphanumeric) in each
password, like @, &
Enforce the use of numbers in a password.
The administrator is able to reset an account. When an account is reset a new password is created by
the system.
Go the User Administration and open the account to reset.
Password reset
© 2015 Fortes Solutions BV
System Administrator: Setup & Settings
6.2.3
167
System Settings
Note: this section is only relevant to system administrators.
This is an overview of the advanced system settings. Normally spoken these do not need to be
changed. Some of these settings will only be shown when add-on's are activated.
Page
Link
Setting
Standard value
Remarks
Document storage location
Location chosen
during installation
All documents within the Principal Toolbox are saved and
coded here
Default system locale
English
Default language settings for the all users. Users can a
personal language if setting 'Personal locale' is set to yes
.
First week of the year
Week that contains
Configure week numbering.
a minimum of 4 days
in January (ISO)
Personal locale
No
Users can a personal language if setting 'Personal locale'
is set to yes.
Link to Document
Management System
-empty-
Specify a URL to a external location which is used to add
a external document link.
Application location
-default value-
Only change when problems.
Garbage collector
Yes
By normal use, keep the standard values.
Debug
No
By normal use, keep the standard values.
Max file size
90 Mb
By normal use, keep the standard values.
Person display name
Lastname, initials
Modify if necessary
URL prefix static files
-default value-
Number of currency
decimals
2
Number of displayed decimals for all currency values.
Login type
Basic
Change if one works with IIS.
Multiple domains
No
System settings
User Login
settings
More settings:
See User adminisration >
Advanced options 165
Mail
LDAP settings
SMTP Server
Specify the SMTP server for sending email
System address
from-address used for emails automatically sent by
Principal Toolbox, for example notifications.
Fixed from-address
Fill in a fixed from address which is used instead of the
users email address when sending email from Principal
Toolbox
Fixed reply-to address
only specify when all mails sent should be replied to one
email address
all settings and field mappings for LDAP synchronisation.
Contact [email protected] for more information about
LDAP synchronizationand Single-sign-on options
© 2015 Fortes Solutions BV
168
Principal Toolbox 6.0
7
Troubleshooting and Solutions
7.1
Troubleshooting
Sort
Issue
Solution
Internet Explorer window stays blanc or Principal Toolbox logo
hangs after login.
On the Tools menu, click Internet Options. Open the Security
tab and click the Custom level button. In the Miscellaneous
section, set Allow META REFRESH to enabled.
Single Sign On is enabled, but Internet Explorer ask user
credentials when opening the Principal Toolbox.
On the Tools menu, click Internet Options. Open the Security
tab and click the Custom level button. In the User
Authentication section, check the setting Logon and adjust to
the significant value.
Can't login into the application because the login button doesn't
work at all.
On the Tools menu, click Internet Options. Open the Security
tab and click the Custom level button. In the Scripting section,
set Active scripting to enabled.
Login
Automated reports and document downloading and uploading
Automated reports and documents can't be downloaded.
On the Tools menu, click Internet Options. Open the Security
tab and click the Custom level button. In the Downloads
section, set File download to enabled.
Keywords for automatic reports won't be copied to the clipboard.
On the Tools menu, click Internet Options. Open the Security
tab and click the Custom level button. In the Scripting section,
set Allow Programmatic clipboard access to enabled.
There are noPrincipal Toolbox reporting toolbars in the Excel
template available.
Make sure you have saved the file before opening. On the Tools
menu, click Macro > Security. When the Security dialog is
opened, click the tab Security Level and set the security level to
Medium. Re-open the Excel template. Excel should ask to
accept to run macros.
Nothing happens when the Save list as RTF button is clicked
On the Tools menu, click Internet Options. Open the Security
tab and click the Custom level button. In the Downloads
section, set File download to enabled.
Edit Project Plan
Drag and drop in Edit Project Plan window won't work.
On the Tools menu, click Internet Options. Open the Security
tab and click the Custom level button. In the Scripting section,
set Active scripting to enabled.
Internet Explorer blocks a pop-up after adding the first product on
the Edit project plan page.
On the Tools menu, click Internet Options. Open the Security
tab and click the Custom level button. In the Miscellaneous
section, set Use Pop-up Blocker to disabled (make sure there
are no other Pop-up blockers active).
The Edit Project Plan window hangs while message "Processing
please wait" is displayed.
On the Tools menu, click Internet Options. Open the Security
tab and click the Custom level button. In the ActiveX controls
and plug-ins section, set Script ActiveX controls marked safe
for scripting to enabled (make sure there is no other script
blocking software active).
Gantt chart editing
Can't drag bars in edit Gantt dialog.
On the Tools menu, click Internet Options. Open the Security
tab and click the Custom level button. In the Scripting section,
set Active scripting to enabled.
Miscellaneous
Internet Explorer reports Script errors on different pages.
On the Tools menu, click Internet Options. Open the Security
tab and click the Custom level button. In the ActiveX controls
and plug-ins section, set Initialize and script ActiveX controls
not marked as safe for scripting enabled
Links to projects and programmes on the homepage doesn't
work.
On the Tools menu, click Internet Options. Open the Security
tab and click the Custom level button. In the Scripting section,
set Active scripting to enabled.
Pack Project Offline window hangs while message "Processing
please wait" is displayed.
On the Tools menu, click Internet Options. Open the Security
tab and click the Custom level button. In the Downloads
section, set Automatic prompting for file downloads to
enabled.
No pop-up windows are opening while clicking links.
On the Tools menu, click Internet Options. Open the Security
tab and click the Custom level button. In the Miscellaneous
section, set Use Pop-up Blocker to disabled (make sure there
are no other Pop-up blockers active).
© 2015 Fortes Solutions BV
Troubleshooting and Solutions
Sort
169
Issue
Solution
Can't download the MS Project Client add-in.
On the Tools menu, click Internet Options. Open the Security
tab and click the Custom level button. In the Miscellaneous
section, set Launching applications and unsafe files to
enabled.
Functions in drop down menus won't work.
On the Tools menu, click Internet Options. Open the Security
tab and click the Custom level button. In the Scripting section,
set Active scripting to enabled.
© 2015 Fortes Solutions BV
170
Principal Toolbox 6.0
Copy to clipboard 54
Cost types 46
Costing 46
Create stages 34
Create work packages 36
Creating model 75
Creating project model 75
Creating projects 31
Current 42
Custom fields 159
Custom page layout 152
Index
-AAction log 68
Active stage 18
Add custom fields 159
Add project 31
Add resources 103
Add stages 34
Add work packages 36
Adding data 18
Adding documents 59
Adding products 32
Adding stages 32
Advanced customization & Workflow
Advanced Settings 167
Allocating resource 102
Appointing skills 103
Approval 53
Approval of hours 53
Approvers 52
Archive 13, 71
Archiving 71
Assign non-project activities 106
Assigning approvers 52
Author 15
Automated reports 55, 128, 130
Availability 106
-BBaseline 42
Breadcrumbs 10
Budgets 46
Built-in views 23
-CChange log 67
Changes 62
Changing data 18
Chart 136
Colours 18
Column selection 21
Column width 21
Conditional Formatting 142
Configuration 154
Conflicting dependencies 18
© 2015 Fortes Solutions BV
-D152
Define project plan 32
Defining portfolio 85
Delete stages 34
Delete work packages 36
Deleting products 32
Deleting stages 32
Dependencies 47
Document approval 60
Document management 24
Documents & knowledge 13
Download 8
-EEdit model 74
Edit project model 74
Edit project plan 32, 38
Editing data 18
Eenterprise manager 15
Email 24
Email notification 155
Enter License key 162
Enterprise 8
Enterprise dashboard 13
Enterprise model 76
Enterprise reader 15
Excel 130
Excel report 134
Excel template 132, 139
External 47
External dependencies 47
-FFilter 21
Find 25
Finish-to-finish
47
Index
Finish-to-start 47
Folders 8
Formulas 140
Managing a resource pool 102
Managing views 23
Mandatory 38
Mandatory products 38
Merge template 128, 130
Merge template keywords 128, 130
Milestones 39
Minutes of the meeting 61
Models 13
Move products 32
Move stages 34
Move work packages 36
Moving project 75
Moving project model 75
-GGantt 40, 42
General views 23
Generic models 76
Global view 21
Graphical 34
-HHardware requirements 9
Hide column names 21
Home page 12
Hour rate 163
Hour registration 52
Hour types 46
Hours registration 52
-NNavigation 10
New portfolio 85
Non project activities
Non-project activities
Import views 23
Initial 42
Internet explorer settings 10
Inter-project dependencies 47
Issue log 63
-KKeyword reference 128, 130
Keywords 128, 130, 134
Knowledge repository 13
-L-
-MManage resources 101
Manage views 23
106
106, 155
-O-
-I-
Lag 47
Lessons learned 69
License key 161
Local and personal views
Local view 21
Log on 11
171
23
Outdated license key
Owner 15, 44
161
-PParticipant 44
PDF 8
Permissions 15
Person details 164
Personal view 21
Pivot table 137
Plan 42
Plan tab 40
Planning products 38
Portfolio 8
Portfolio management 83
Primary 103
Principal Toolbox settings 155
Product based budgeting 46
Product based planning 32
Product breakdown 34
Product breakdown structure 32, 33
Product page 43
Programme 8
Programme dashboard 14
Programme manager 15
Programme reader 15
© 2015 Fortes Solutions BV
172
Principal Toolbox 6.0
Progress: Planning 51
Project based budgeting 46
Project board member 15
Project dashboard 27
Project management 30, 51, 71
Project management products 18
Project manager 15
Project model 25, 74
Project plan 32, 38
Project planning 30
Project team 44
-QQuality review
65
-RRAG indicators 18, 20
Removal of projects 72
Rename products 32
Report 55
Reports over time 144
Requesting resource 50, 110
Resource allocation 101
Resource availability 106
Resource management 50, 101
Resource manager 101
Resource pool 102, 103
Resources 44
Reviewer 15, 44
Risk log 65
Roles 15
RTF 54
-SSearch 25
Secundary 103
Settings 154
Setup 154
Show column names 21
Skills 103
Software requirements 9
Specialist products 18, 32
Stage colour 18
Starting up a project 31
Start-to-finish 47
Start-to-start 47
Status indicators 20
Structure 8
© 2015 Fortes Solutions BV
System Administrator
154
-TTeam member 15
Time based budgeting 46
Time entry 52, 113
Time entry group 118
Time registration 52
Time sheet 52
Timeline reporting 144
Timeline reports 144
Tolerances 20, 56
Traffic lights 20
Troubleshooting 168
Types of products 18
-UUpdate 59, 161
Updating the software 162
User 163
User administration 163
User login settings 165
User rights 15
-VViews
21, 23
-WWord 128
Work area 8
Work packages
36