1
Aptis
Handbook for Technical Writers
Copyright
Handbook for Technical Writers
Publication Date: 8/29/00
This guide is designed to aid in the use of the CommVergence product. It should not be taken as a guarantee of system features.
Billing Concepts® exclusively retains the right at any time to modify, change, or otherwise alter the contents of this guide or the
system that it describes. This documentation has been reviewed for errors and inaccuracies, but Billing Concepts® does not
warrant that omissions and/or discrepancies do not exist. This documentation may refer to programs or program changes that
have not been released or if released may not be installed at your site. All efforts have been made to get to you the most up to date
and site-specific documentation possible. This documentation contains examples of reports. All the names and addresses used are
fictitious. Any similarity of this data to actual names and addresses is coincidental. No part of this guide may be copied or
reproduced in any way without the prior written permission of Billing Concepts®. Copyright 1999 Billing Concepts®. All Rights
Reserved.
CommVergence 1999 Billing Concepts®.
Trademark Information
All Billing Concepts® products are trademarks or registered trademarks of Billing Concepts®. All other brand and product names
mentioned herein are trademarks or registered trademarks of their respective holders.
Limitation of Liability
Billing Concepts’ liability for damages for any cause or causes whatsoever shall never exceed the software license fee paid by
Customer for the Systems. Customer agrees that Billing Concepts® shall not be liable for damages for lost profits or lost savings
or for indirect, incidental, or consequential damages under any circumstances.
Non-Disclosure Agreement
Any party in receipt of this information (the Customer) shall (a) hold all INFORMATION received from Billing Concepts® in
confidence, (b) use such INFORMATION only for the purpose of gaining assistance using the licensed software or evaluating the
possibility of forming a joint business relationship or other commercial arrangement between the parties concerning such
INFORMATION, (c) reproduce such INFORMATION only to the extent necessary for such purpose, (d) restrict disclosure of such
INFORMATION to its employees with a need to know (and advise such employees of the obligations assumed herein), and (e) not
disclose such INFORMATION to any third party, including but not limited to any manufacturer or independent contractor,
without prior written approval of Billing Concepts®. In addition, with respect to any equipment, component, software, or other
items delivered to any party by Billing Concepts®, the Customer shall not reverse engineer, disassemble, de-compile, or otherwise
analyze the physical construction of, any such items. So there.
All INFORMATION shall remain the sole property of Billing Concepts®, and all materials containing any such INFORMATION
(including all copies made by CUSTOMER parties in receipt of the INFORMATION) shall be returned to Billing Concepts®
immediately upon termination or expiration of this Agreement, or upon the Customer's determination that it no longer has a need
for such INFORMATION. Upon request of Billing Concepts®, the Customer shall certify in writing that all materials containing
such INFORMATION (including all copies thereof) have been returned to Billing Concepts®.
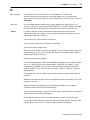
Chapter 1:
General Doc Practices . . . . . . . . . . . . . . . . . . . . . . . . . . . . . . . . . . . . . . . . . . . 1
Overview of This Book . . . . . . . . . . . . . . . . . . . . . . . . . . . . . . . . . . . . . . . . . . . . . . . . . . . . . . . . . . . . . 2
Publishing Overview . . . . . . . . . . . . . . . . . . . . . . . . . . . . . . . . . . . . . . . . . . . . . . . . . . . . . . . . . . . . . . 3
Organization of Volumes. . . . . . . . . . . . . . . . . . . . . . . . . . . . . . . . . . . . . . . . . . . . . . . . . . . . . . . . 3
Organization of Chapter . . . . . . . . . . . . . . . . . . . . . . . . . . . . . . . . . . . . . . . . . . . . . . . . . . . . . . . . 4
Organization of Section . . . . . . . . . . . . . . . . . . . . . . . . . . . . . . . . . . . . . . . . . . . . . . . . . . . . . . . . . 4
Adding a New User in CommVergence. . . . . . . . . . . . . . . . . . . . . . . . . . . . . . . . . . . . . . . . . . . . . . . . 5
Capturing and Saving Screens . . . . . . . . . . . . . . . . . . . . . . . . . . . . . . . . . . . . . . . . . . . . . . . . . . . . . 12
Setting up Paint Shop Pro for capture . . . . . . . . . . . . . . . . . . . . . . . . . . . . . . . . . . . . . . . . . . . . 12
Setting up Image Robot for conversion . . . . . . . . . . . . . . . . . . . . . . . . . . . . . . . . . . . . . . . . . . . 12
How to capture a screen shot with Paint Shop Pro . . . . . . . . . . . . . . . . . . . . . . . . . . . . . . . . . . 13
How to use Image Robot to convert a graphic . . . . . . . . . . . . . . . . . . . . . . . . . . . . . . . . . . . . . . 13
How to Import into a FrameMaker Document . . . . . . . . . . . . . . . . . . . . . . . . . . . . . . . . . . . . . 14
Indexing . . . . . . . . . . . . . . . . . . . . . . . . . . . . . . . . . . . . . . . . . . . . . . . . . . . . . . . . . . . . . . . . . . . . . . . 15
About Indexing at Billing Concepts . . . . . . . . . . . . . . . . . . . . . . . . . . . . . . . . . . . . . . . . . . . . . . 15
First Pass: Index Generation and Editing. . . . . . . . . . . . . . . . . . . . . . . . . . . . . . . . . . . . . . 15
Second Pass: Further Editing and Application of Logic . . . . . . . . . . . . . . . . . . . . . . . . . . . 16
Third and Subsequent Passes: Polish . . . . . . . . . . . . . . . . . . . . . . . . . . . . . . . . . . . . . . . . . 17
Evaluation Checklist . . . . . . . . . . . . . . . . . . . . . . . . . . . . . . . . . . . . . . . . . . . . . . . . . . . . . . . . . . 18
Reader Appropriateness . . . . . . . . . . . . . . . . . . . . . . . . . . . . . . . . . . . . . . . . . . . . . . . . . . . . 18
Main Headings . . . . . . . . . . . . . . . . . . . . . . . . . . . . . . . . . . . . . . . . . . . . . . . . . . . . . . . . . . . 18
Subheadings . . . . . . . . . . . . . . . . . . . . . . . . . . . . . . . . . . . . . . . . . . . . . . . . . . . . . . . . . . . . . 18
Double Postings. . . . . . . . . . . . . . . . . . . . . . . . . . . . . . . . . . . . . . . . . . . . . . . . . . . . . . . . . . . 18
Locators (Page References). . . . . . . . . . . . . . . . . . . . . . . . . . . . . . . . . . . . . . . . . . . . . . . . . . 19
Cross-References . . . . . . . . . . . . . . . . . . . . . . . . . . . . . . . . . . . . . . . . . . . . . . . . . . . . . . . . . . 19
Length and Type . . . . . . . . . . . . . . . . . . . . . . . . . . . . . . . . . . . . . . . . . . . . . . . . . . . . . . . . . . 19
Format . . . . . . . . . . . . . . . . . . . . . . . . . . . . . . . . . . . . . . . . . . . . . . . . . . . . . . . . . . . . . . . . . . 19
Indexing from the Editor’s Point of View . . . . . . . . . . . . . . . . . . . . . . . . . . . . . . . . . . . . . . . . . . . . . 20
Initial Pass of Marker List Generation . . . . . . . . . . . . . . . . . . . . . . . . . . . . . . . . . . . . . . . . . . . 20
Applying Edited List of Markers . . . . . . . . . . . . . . . . . . . . . . . . . . . . . . . . . . . . . . . . . . . . . . . . 22
Entry Screens. . . . . . . . . . . . . . . . . . . . . . . . . . . . . . . . . . . . . . . . . . . . . . . . . . . . . . . . . . . . . . . . . . . 23
Setting Up the Master Index. . . . . . . . . . . . . . . . . . . . . . . . . . . . . . . . . . . . . . . . . . . . . . . . . . . . . . . 25
Referring to Other Books in the Collection . . . . . . . . . . . . . . . . . . . . . . . . . . . . . . . . . . . . . . . . . . . 26
iv
Contents
Chapter 2:
Using the Templates . . . . . . . . . . . . . . . . . . . . . . . . . . . . . . . . . . . . . . . . . . . . 29
Template Definitions . . . . . . . . . . . . . . . . . . . . . . . . . . . . . . . . . . . . . . . . . . . . . . . . . . . . . . . . . . . . . 30
Paragraph Tags . . . . . . . . . . . . . . . . . . . . . . . . . . . . . . . . . . . . . . . . . . . . . . . . . . . . . . . . . . . . . . . . . 31
Character Tags. . . . . . . . . . . . . . . . . . . . . . . . . . . . . . . . . . . . . . . . . . . . . . . . . . . . . . . . . . . . . . . . . . 38
Cross-Reference Formats. . . . . . . . . . . . . . . . . . . . . . . . . . . . . . . . . . . . . . . . . . . . . . . . . . . . . . . . . . 40
Variable Definitions . . . . . . . . . . . . . . . . . . . . . . . . . . . . . . . . . . . . . . . . . . . . . . . . . . . . . . . . . . 41
Marker Types. . . . . . . . . . . . . . . . . . . . . . . . . . . . . . . . . . . . . . . . . . . . . . . . . . . . . . . . . . . . . . . . 41
Updating Documents with New Templates . . . . . . . . . . . . . . . . . . . . . . . . . . . . . . . . . . . . . . . . . . . 42
Overview of Importing Templates . . . . . . . . . . . . . . . . . . . . . . . . . . . . . . . . . . . . . . . . . . . . . . . 42
General Procedure for Importing Templates . . . . . . . . . . . . . . . . . . . . . . . . . . . . . . . . . . . . . . . 43
Importing Templates after Porting Existing Online Books . . . . . . . . . . . . . . . . . . . . . . . . . . . 44
Recreating Customized Paragraph Definitions . . . . . . . . . . . . . . . . . . . . . . . . . . . . . . . . . . . . . 46
Chapter 3:
Publishing Procedures . . . . . . . . . . . . . . . . . . . . . . . . . . . . . . . . . . . . . . . . . 47
Publisher Information . . . . . . . . . . . . . . . . . . . . . . . . . . . . . . . . . . . . . . . . . . . . . . . . . . . . . . . . . . . . 48
Overview of the Publishing Process . . . . . . . . . . . . . . . . . . . . . . . . . . . . . . . . . . . . . . . . . . . . . . . . . 49
Publishing the Hard Copy Books . . . . . . . . . . . . . . . . . . . . . . . . . . . . . . . . . . . . . . . . . . . . . . . . . . . 50
Necessary Order for Publishing Books. . . . . . . . . . . . . . . . . . . . . . . . . . . . . . . . . . . . . . . . . . . . 50
Publishing the Reports Reference Guide . . . . . . . . . . . . . . . . . . . . . . . . . . . . . . . . . . . . . . . . . . 50
Publishing the Master Index . . . . . . . . . . . . . . . . . . . . . . . . . . . . . . . . . . . . . . . . . . . . . . . . . . . 51
Publishing All Other Books . . . . . . . . . . . . . . . . . . . . . . . . . . . . . . . . . . . . . . . . . . . . . . . . . . . . 51
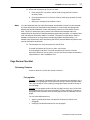
Page Review Checklist . . . . . . . . . . . . . . . . . . . . . . . . . . . . . . . . . . . . . . . . . . . . . . . . . . . . . . . . 53
Reviewing Chapters . . . . . . . . . . . . . . . . . . . . . . . . . . . . . . . . . . . . . . . . . . . . . . . . . . . . . . . 53
Poor pagination. . . . . . . . . . . . . . . . . . . . . . . . . . . . . . . . . . . . . . . . . . . . . . . . . . . . . . . . 53
Headers/Footers . . . . . . . . . . . . . . . . . . . . . . . . . . . . . . . . . . . . . . . . . . . . . . . . . . . . . . . 54
Reviewing Generated Chapters . . . . . . . . . . . . . . . . . . . . . . . . . . . . . . . . . . . . . . . . . . . . . . 54
Headers/Footers . . . . . . . . . . . . . . . . . . . . . . . . . . . . . . . . . . . . . . . . . . . . . . . . . . . . . . . 54
Lines that Break . . . . . . . . . . . . . . . . . . . . . . . . . . . . . . . . . . . . . . . . . . . . . . . . . . . . . . . 54
Separated Entries. . . . . . . . . . . . . . . . . . . . . . . . . . . . . . . . . . . . . . . . . . . . . . . . . . . . . . 54
Separator Breaks . . . . . . . . . . . . . . . . . . . . . . . . . . . . . . . . . . . . . . . . . . . . . . . . . . . . . . 54
Porting and Publishing the Online Books . . . . . . . . . . . . . . . . . . . . . . . . . . . . . . . . . . . . . . . . . . . . 55
Overview of Online Porting. . . . . . . . . . . . . . . . . . . . . . . . . . . . . . . . . . . . . . . . . . . . . . . . . . . . . 55
Publishing the Online Books . . . . . . . . . . . . . . . . . . . . . . . . . . . . . . . . . . . . . . . . . . . . . . . . . . . 55
Finalizing the Online Documentation Set . . . . . . . . . . . . . . . . . . . . . . . . . . . . . . . . . . . . . . . . . 58
Chapter 4:
Terminology . . . . . . . . . . . . . . . . . . . . . . . . . . . . . . . . . . . . . . . . . . . . . . . . . . . . . 59
A . . . . . . . . . . . . . . . . . . . . . . . . . . . . . . . . . . . . . . . . . . . . . . . . . . . . . . . . . . . . . . . . . . . . . . . . . . . . . 59
B . . . . . . . . . . . . . . . . . . . . . . . . . . . . . . . . . . . . . . . . . . . . . . . . . . . . . . . . . . . . . . . . . . . . . . . . . . . . . 64
C . . . . . . . . . . . . . . . . . . . . . . . . . . . . . . . . . . . . . . . . . . . . . . . . . . . . . . . . . . . . . . . . . . . . . . . . . . . . . 67
D . . . . . . . . . . . . . . . . . . . . . . . . . . . . . . . . . . . . . . . . . . . . . . . . . . . . . . . . . . . . . . . . . . . . . . . . . . . . . 75
E . . . . . . . . . . . . . . . . . . . . . . . . . . . . . . . . . . . . . . . . . . . . . . . . . . . . . . . . . . . . . . . . . . . . . . . . . . . . . 80
F . . . . . . . . . . . . . . . . . . . . . . . . . . . . . . . . . . . . . . . . . . . . . . . . . . . . . . . . . . . . . . . . . . . . . . . . . . . . . 82
G . . . . . . . . . . . . . . . . . . . . . . . . . . . . . . . . . . . . . . . . . . . . . . . . . . . . . . . . . . . . . . . . . . . . . . . . . . . . . 85
H . . . . . . . . . . . . . . . . . . . . . . . . . . . . . . . . . . . . . . . . . . . . . . . . . . . . . . . . . . . . . . . . . . . . . . . . . . . . . 86
I . . . . . . . . . . . . . . . . . . . . . . . . . . . . . . . . . . . . . . . . . . . . . . . . . . . . . . . . . . . . . . . . . . . . . . . . . . . . . . 87
J. . . . . . . . . . . . . . . . . . . . . . . . . . . . . . . . . . . . . . . . . . . . . . . . . . . . . . . . . . . . . . . . . . . . . . . . . . . . . . 89
K . . . . . . . . . . . . . . . . . . . . . . . . . . . . . . . . . . . . . . . . . . . . . . . . . . . . . . . . . . . . . . . . . . . . . . . . . . . . . 90
L . . . . . . . . . . . . . . . . . . . . . . . . . . . . . . . . . . . . . . . . . . . . . . . . . . . . . . . . . . . . . . . . . . . . . . . . . . . . . 91
M . . . . . . . . . . . . . . . . . . . . . . . . . . . . . . . . . . . . . . . . . . . . . . . . . . . . . . . . . . . . . . . . . . . . . . . . . . . . . 94
N . . . . . . . . . . . . . . . . . . . . . . . . . . . . . . . . . . . . . . . . . . . . . . . . . . . . . . . . . . . . . . . . . . . . . . . . . . . . . 97
O . . . . . . . . . . . . . . . . . . . . . . . . . . . . . . . . . . . . . . . . . . . . . . . . . . . . . . . . . . . . . . . . . . . . . . . . . . . . . 99
P . . . . . . . . . . . . . . . . . . . . . . . . . . . . . . . . . . . . . . . . . . . . . . . . . . . . . . . . . . . . . . . . . . . . . . . . . . . . 100
Aptis™
Contents
Q.......
R.......
S .......
T.......
U. . . . . . .
V.......
W. . . . . . .
X.......
Y.......
Z .......
......
......
......
......
......
......
......
......
......
......
.......
.......
.......
.......
.......
.......
.......
.......
.......
.......
......
......
......
......
......
......
......
......
......
......
.......
.......
.......
.......
.......
.......
.......
.......
.......
.......
......
......
......
......
......
......
......
......
......
......
......
......
......
......
......
......
......
......
......
......
.......
.......
.......
.......
.......
.......
.......
.......
.......
.......
......
......
......
......
......
......
......
......
......
......
..................
..................
..................
..................
..................
..................
..................
..................
..................
..................
v
105
106
107
110
114
115
116
117
118
119
Index . . . . . . . . . . . . . . . . . . . . . . . . . . . . . . . . . . . . . . . . . . . . . . . . . . . . . . . . . . . . . . . . . . . . . . . . . . 121
Handbook for Technical Writers
vi
Contents
Aptis™
Topics Discussed In This Chapter:
Publishing Overview,
3
Adding a New User in CommVergence,
Capturing and Saving Screens,
Indexing,
12
15
Setting Up the Master Index,
25
5
2
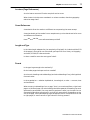
Overview of This Book
Overview of This Book
This book is a compilation of various approaches and procedures used in the Technical
Writing and Documentation team’s work. It is, and probably will remain, a work in
progress.
As processes and procedures change and evolve, so will this book. As existing
procedures are documented, this book will be augmented. Stay tuned for further
developments.
As of this writing, the following topics in this chapter are acceptably complete:
Publishing Overview,
3
Adding a New User in CommVergence,
Capturing and Saving Screens,
Indexing,
5
12
15
Entry Screens,
23
The following topics are acknowledged to “need work”:
Setting Up the Master Index,
25
Referring to Other Books in the Collection,
Aptis™
26
Chapter 1 General Doc Practices
3
Publishing Overview
Billing Concepts documentation is designed to serve two types of customer need:
•
Procedural documentation, which provides users with step-by-step methods to
accomplish tasks using our product, and
•
Reference documentation, which provides users with specific information
about the meaning of fields displayed on screens throughout the system.
We organize the main body of our book into functional units designed to fulfil the need
for procedural documentation. We provide a Field and Screen Guide in an appendix to
meet the need for reference documentation. That appendix is the topic of a later
section in this chapter.
Organization of Volumes
Each book in the Aptis documentation series contains the following parts:
•
Title Page and Cover;
•
Table of Contents;
•
List of Figures;
•
List of Report Figures, if necessary;
•
Chapters, which contain the procedures and conceptual material needed for
understanding them;
•
Appendices, which contain procedures common to all modules in the system
and which contain the field and screen reference material mentioned earlier
in this chapter, and
•
Index.
The technical writer assigned to the book is responsible for the production of the
entire volume. As noted in other sections of this book, the documentation team has
implemented procedures to ease the development of each of the individual sections,
but the responsibility for activating those procedures remains with the assigned
writer.
In general, the first chapter of each book will describe the organization of the book,
introduce technical terminology used throughout the book, provide background
sufficient for a generally informed reader to understand the purpose of the module
and under what circumstances the procedures explained in the book are to be
undertaken. If the topic of the book includes a long “super-procedure,” such as
running a billing, the first chapter should outline, with a brief explanation, the major
steps involved in the “super-procedure,” with cross-references to the sections of the
books which detail those steps. Finally, the initial chapter should provide step-by-step
instructions, with screen shots, leading the user to the initial screen (if any) from
which most if not all of the procedures in the book begin.
Handbook for Technical Writers
4
Publishing Overview
Organization of Chapter
Each chapter begins with a Chapter Title Page which contains the following elements:
•
The LTOC (Local Table of Contents) heading, produced by the LTOC
Heading format, and
•
A cross-reference to each Heading 2 in the chapter, in LTOC format. The
author is responsible for creating these entries.
The text of each chapter begins with an overview which introduces users to the
concepts and procedures explained in the chapter. If the subject of the chapter
involves a series of processes which must be performed in a prescribed order, the
overview presents that order, with cross-references to the processes and an
explanation of why the prescribed order is necessary. If most of the procedures in the
chapter start from a common menu or screen, the overview should include step-bystep instructions, with screen shots, to access that menu or screen.
After analysis of the procedures involved in the chapter, the author will divide the
material into discrete procedures, each of which will constitute a section of the
chapter.
Organization of Section
Each section will detail the step-by-step actions needed to accomplish a particular
procedure. Each section will begin with an overview which:
•
Discusses for users the conditions under which the procedure covered will be
executed,
•
Explains, in general, what data are generated, changed or removed by the
procedure and how those data are used, and
•
In cases where inappropriate application of the procedures could result in
data loss or degradation of database integrity, warnings and/or cautions
should be included, in text format.
A Quick-Key Path from the main screen of the application to the screen on which the
user initiates the procedure follows the overview. The individual steps which comprise
the procedure follow the path.
Each step should be a complete entity, indicating the screen the user should be
viewing when initiating the step, the action the user needs to take, and the screen (or
message) the user will view when the action is complete. A screen shot of this screen
(or message) should follow the step.
Aptis™
Chapter 1 General Doc Practices
5
Adding a New User in CommVergence
When a new writer joins the group, the editor must assure that he or she has access
rights to the CommVergence system. This should be done to correct the situation
when the user gets a “Not authorized to any Major/Minor” error message.
The process takes place in two steps:
•
Add a new user to the system
•
Select major/minor pairs for the user.
To add a new user to the system:
1. Activate the version of CommVergence to be used. Generally, the command to
do this will be STRDOC, although if the changes to be documented exist on
another system, a different command may be used.
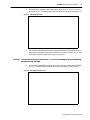
2. At the Mainscreen, press F2 (M AI N T E NA N C E ). The CommVergence Set Up
menu will display. (See Figure 1.)
Figure 1: CommVergence Set Up
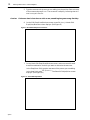
3. On the CommVergence Set Up menu, choose option 6 (S E C U R I TY M AI N T EN A N C E
S YST EM S ET U P ) and press E N T ER . The Security System Setup menu will
display. (See Figure 2.)
Handbook for Technical Writers
6
Adding a New User in CommVergence
Figure 2: Security System Setup
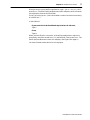
4. On the Security System Setup menu, choose option 4 (E D I T U SER A U T H O R I TY )
and press E N T ER . The Display Employees screen displays. (See Figure 3 on
page 6.)
Figure 3: Display Employees
5. On the Display Employees screen, type the username of the employee and
press E N T ER . The screen will redisplay.
If the user is already in the system,
The screen will position on that user. This is undesirable. Contact someone to
find out more about this.
If the user is not in the system,
The screen will position to the user whose username is closest to that of the
one you entered. This is what is expected; continue to step 6.
Aptis™
Chapter 1 General Doc Practices
7
6. On the Display Employees screen, press F9 (A D D E MPLO YE E ). A blank Edit
Employee/User Record displays. (See Figure 4.)
Figure 4: Edit Employee/User Record
7. On the Edit Employee/User Record, fill in the following fields:
User Code:
The username of the person you are adding
First Name
The first name of the person you are adding
Last Name
The last name of the person you are adding
Type
Enter R (R AD I O ). This allows the system to assign that person a trouble
tickets.
Dispatch Ofc
Press F4 (P R OMP T ). The Select Dispatch Office screen displays.(See Figure 5
on page 8.)
Handbook for Technical Writers
8
Adding a New User in CommVergence
Figure 5: Select Dispatch Office
On the Select Dispatch Office screen, use the TA B key to move the cursor to
the desired dispatch office (at this point, it doesn’t really matter which
one), type 1 (S E LEC T R E QU ES T ) and press E N T E R . The Edit Employee/User
Record screen will display, with the value you selected entered into the
Dispatch Ofc field.
8. When you have finished entering information into the Edit Employee/User
Record screen, press E N TE R . A Confirm Prompt will display. Press Y. The
Display Employee screen displays.(See Figure 3 on page 6.)
You have now added that user to the employee file. Press F3 (E XI T ) until you
return to the CommVergence Set Up screen.
To select major/minor pairs for the user:
1. On the CommVergence Set Up screen, select 5 (G EN E R AL S Y ST EM C O DE
TABL ES ) and press E N T ER . The General System Code Tables menu will display.
(See Figure 6.)
Figure 6: General System Code Tables
Aptis™
Chapter 1 General Doc Practices
9
2. On the General System Code Tables menu, select 27 (E D I T E MP LOY EE /U SE R )
and press E N T ER . The Edit Employee/User screen will display. (See Figure 7.)
Figure 7: Edit Employee/User
3. On the Edit Employee/User screen, type the username of the person you are
entering in the Empl/User field at the top of the screen and press E NT E R . The
screen will redisplay, showing the entry for that user.
Caution: If it does not display the proper user, or if an error message displays, something
has gone wrong. Get help.
4. On the Edit Employee/User screen for the user you are adding, press F6 (BE
E N TI T Y ). The Edit Empl/User/Business screen will display. (See Figure 8.)
Figure 8: Edit Empl/User/Business
Handbook for Technical Writers
10
Adding a New User in CommVergence
5. Type the username of the user you are adding into the position field at the top
of the screen and press E N T ER . The screen will redisplay, indicating that this
user is not yet in the file.
Caution: If the user does in fact show on this screen, something has gone wrong. Get help.
6. On the Edit Empl/User/Business screen, press F9 (A D D ). A blank Edit
Empl/User/Business screen displays. (See Figure 9.)
Figure 9: Blank Edit Empl/User/ Business
7. On the blank Edit Empl/User/Business screen, enter one record for each
Area/Site combination to which you want to authorize the new user.
In the Empl/User field, type the username of the person you are adding.
In the Area field, press F4 (P R OM PT ). The Select BE Major/Minor screen
displays. (See Figure 10.)
Figure 10: Select BE Major/Minor
Aptis™
Chapter 1 General Doc Practices
11
Move the cursor to an Area/Site combination, type 1 (S E LEC T R E QU E ST ) and
press E N T ER . The Edit Empl/User/Business screen redisplays, with the values
you selected in the Area and Site fields.
In the Typ field, type AU. (I don’t know what it means, but that’s what nearly
all of them are..)
In the Def field
If you want this to be the default major/minor for the user,
Type Y
If not,
Type N.
When you have filled in a record for all Area/Site combinations, make sure
that exactly one of the records has a Y in the Def field. Then press E N T ER . The
Edit Empl/User/Business screen will redisplay. (See Figure 8 on page 9.)
You have finished authorization for this employee.
Handbook for Technical Writers
12
Capturing and Saving Screens
Capturing and Saving Screens
Screen shots provide important visual landmarks for users. to ensure that they have
completed an instruction or series of instruction correctly. You should include a screen
shot at every milestone in a procedure.
We use two programs to create a screen shot: Paint Shop Pro and Image Robot. Paint
Shop Pro is used for capture and initial editing of the screen shot. Image Robot is used
to convert the bitmap (.bmp) produced by Paint Shop Pro into the .gif format we use in
the FrameMaker documents.
Setting up Paint Shop Pro for capture
1. After launching Paint Shop Pro, select C A PT U R E > S E TU P . The Capture Setup
dialog displays.
2. Within the Capture option box on the Capture Setup dialog, click the Oobject
radio button.
This sets your Capture utility to grab whatever application object you are
focused on. An object ranges from a field/button to an entire window, thus
giving you the widest range of capture options.
3. Within the Activate Capture Using option box on the Capture Setup dialog,
click the radio button for whichever capture method you are most comfortable
using.
Most of the team prefers a right mouse click, but some may prefer a function
key or other keystroke.
In general, we do not use the Include Cursor option; it can create false
emphasis to a particular area in a capture.
4. Click the OK button.
Setting up Image Robot for conversion
1. Within Image Robot, select S C R I PT > O PEN . The Open Script File dialog
displays.
2. Navigate the file structure to locate the directory Documentation/Program
Files/Image Robot.
3. Choose the appropriate script:
If you are documentating a GUI application,
choose 256GIF to 16GIF.jsc
If you are documenting a greenscreen application,
choose NewColorConverter050698.jsc
4. Click O P EN . The JASC Image Robot window will display.
Aptis™
Chapter 1 General Doc Practices
13
How to capture a screen shot with Paint Shop Pro
1. In the program being documented, display the screen you wish to capture.
2. Make Paint Shop Pro the active application and press S H I F T +C. The screen
you wish to capture will become the active application.
3. Click the right-hand side mouse button (if that is what you indicated in the
ACTIVATE CAPTURE USING option on the Capture Setup dialog; if not, use
whatever option you chose there). Control will return to Paint Shop Pro; a
document containing an image of the captured screen will be the active
document.
4. Select F ILE > S A VE A S . The Save As dialog box will display.
5. Navigate the file structure to locate the correct folder in which to save the
screen shot. Use the screen title of the captured screen as the file name.
If you are documenting a green-screen application,
Use type Windows or OS/2 Bitmap (.bmp).
If you are documenting a GUI application,
Use type Compuserve Graphics Interchange (.gif).
Remember to use this name as the Figure Title, as this will make changing
the book at a later date easier. Click S A VE .
How to use Image Robot to convert a graphic
1. Make sure the appropriate script is in place (GUI Bitmap to GIF.jsc for GUI
applications; NewColorConverter050698.jsc for greenscreen). The name of the
screen appears in the title bar of the Image Robot window. If the proper script
is not in use, see Setting up Image Robot for conversion on page 12 for
instructions to open it.
2. Click S TA R T . The Batch Process Input Files dialog box displays.
3. Navigate the file structure to locate the folder in which you saved the .bmp file
during the capture operation. Click on that file to highlight it; then click N EX T .
The Batch Process Output Options dialog box will display.
4. On the Batch Process Output Options, make sure that
•
The Save as Type contains GIF - CompuServe
•
The Sub type contains Version 89a - Noninterlaced
If necessary, make the appropriate selections from the drop-down menus at
the right of each of those fields.
5. Navigate the file structure to locate the folder from which FrameMaker will
select the finished .gif file.
Handbook for Technical Writers
14
Capturing and Saving Screens
6. Click F I N I S H . The Batch Conversion Status window will display; in it, a list of
instructions will display as they are executed. When Image Robot has
executed the entire script, the title of that window will change to 1 File(s)
Successfully Converted.
7. At that point, click OK. Image Robot has completed its operation; you now
have the proper format for use in a FrameMaker document.
WARNING:
If the file is already black and white, do not run the file through Image Robot. If
you do, the application will change all the black pixels to white — and you will
have to recapture all the screen shots that have been changed.
How to Import into a FrameMaker Document
When you are ready to insert the screen shot into your FrameMaker document:
1. Press E N T ER to start a new line.
2. Set the paragraph style of the new paragraph to Figure Title. This will
automatically generate the word “Figure” and the appropriate consecutive
number for this figure.
3. Type a title for the figure. It is important that this be the screen title for the
captured screen; if more than one screen has the same screen title, use a
descriptor to distinguish them, but do not use initial caps in the descriptor
portion of the figure title. Press E N T ER .
4. Press A LT -F, then I, then F. If you prefer using the pull-down menus, choose
F ILE > I MPO R T > F IL E .
5. Navigate the file system to locate the directory in which you saved the
converted screen caption document. Click on the document to highlight it,
make sure that Import by Reference is checked, then click Import.
6. FrameMaker will ask for the resolution you wish to use for the graphic in the
document.
If the screen is a standard AS/400 screen,
Type 210 dpi, but you may need to modify this later
If the screen is a report from the AS/400,
Type 175 dpi, but you may need to modify this later
If the screen is from a GUI product,
Type 130 , but you may need to modify this later
The screen shot will be placed in your document.
Aptis™
Chapter 1 General Doc Practices
15
Indexing
An index is not an outline, nor is it a concordance. It’s an intelligently compiled list of
topics covered in the work, prepared with the reader’s needs in mind.
from Index Evaluation Checklist, Chicago/Great Lakes Chapter of the
American Society of Indexer
A good index records every pertinent statement made within the body of the text.
from The Chicago Manual of Style
About Indexing at Billing Concepts
Our books, in general, consist of two types of material: explicative and procedural. The
explicative material provides an overview and a context for the procedure which is
about to be detailed. This may include an illustrative example, an indication of the
variety of situations in which the procedure is used, and cautions or warnings about
effects of the procedure. The procedural material provides step-by-step guidance in
executing procedures.
Because we use FrameMaker, a good portion of the work of actually generating the
index can be done for us, through the use of the templates, which include headings.
Each chapter begins with a Heading 1 format. The main topics of the chapter are
named in Heading 2 format. The topics are further subdivided by the use of Heading 3
formats.
In general, the Overview should be the first Heading 3 item under a Heading 2 topic.
This area contains the explicative material discussed earlier in this section. For
purposes of consistency, we ask that this Heading 3 item be of the form Overview:
blah-blah-blah, where blah-blah-blah is the subject of the topic. Subsequent Heading
3 items should name the procedure being detailed.
Our procedure for creating an index is a mixture of software and human judgment.
First Pass: Index Generation and Editing
The IXgen software, from Frank Stears Associates, reads a FrameMaker document
and creates a list of all headers in a book. It then transmutes these items according to
a word-rotation algorithm.
Handbook for Technical Writers
16
Indexing
In this way, the heading
Processing a Electronic Fund Transfer Billing
generates the following index candidates (note case):
processing electronic fund transfer billing
billing, processing electronic fund transfer
transfer billing, processing electronic fund
fund transfer billing, processing electronic
electronic fund transfer billing, processing
Now the human judgment enters the picture. From the list created by IXgen, you need
to decide which items are to be deleted, which should be retained and which need to be
transformed. In the above example, the following items were kept:
processing electronic fund transfer billing
billing, processing electronic fund transfer
electronic fund transfer billing, processing
Additionally, the following items were added, because the expertise of the indexer
recognized that “electronic fund transfer” is a synonym for “credit card.”
processing credit card billing
billing, processing credit card
credit card billing, processing
After you have completed your edits, notify the person responsible for applying the
index to the FrameMaker document.
Second Pass: Further Editing and Application of Logic
After the application of the index to the FrameMaker document, two files are made
available: the actual FrameMaker index file and the IXgen file. The FrameMaker file
shows what the index would look like if the document were printed without further
editing. The IXgen file contains all the items which comprise that index, listed in
alphabetical order.
At this point, you should revisit the IXgen file looking for items which should be
corrected due to inaccuracy (spelling errors, for example) or inconsistency (referring to
“records” in some entries and “record” in others).
You will also notice that all the index entries in the FrameMaker file will be level one
entries, without the sub-entries common to a professionally generated index. The
application of logic enters the story at this point. When two or more entries begin with
the same word or words, use that word or phrase as the level one entry, with the
remainder of the entry as the level two entries. In IXgen, this is accomplished by
inserting a colon (:) to indicate a change of level.
Aptis™
Chapter 1 General Doc Practices
17
From the previous example,
billing, processing credit card
billing, processing electronic fund transfer
processing, credit card billing
processing, electronic fund transfer
becomes
billing:process credit card
billing:process electronic fund transfer
process:credit card billing
process:electronic fund transfer.
Notice that, in addition to the insertion of the colon, the form of the verb has changed
from the gerund “processing” to the imperative “process.” This change is
recommended; readers should not be required to guess which form of the verb we will
use; while the gerund (or other form) is appropriate to the more conversational style of
a heading, the more standardized imperative form is in keeping with the tone of an
index. After a trip or two to the index, readers will come to expect to see “add” to refer
to headings which are entitled “adding” or “to add” or “how to add”.
When you have completed this pass, notify the person responsible for applying the
IXgen changes to the FrameMaker document. When that application is completed, the
index items above will appear as:
billing
process credit card pp
processing electronic fund transfer pp
process
credit card billing pp
electronic fund transfer pp
These entries, of course, will be interspersed among the other index items dealing
with the concept “billing” or those index items which describe a “process” procedure.
Third and Subsequent Passes: Polish
Continue to refine and modify the files produced by IXgen, until you are satisfied with
the results, keeping (as always) the needs of the harried reader, who is anxious to find
the information, because the person who normally does this just left the office due to
illness and the job has to be done before the close of business.
Handbook for Technical Writers
18
Indexing
Evaluation Checklist
The following material is a summary of the Index Evaluation Checklist, provided by
the Chicago/Great Lakes Chapter of the American Society of Indexers.
Reader Appropriateness
Are the terms in the index those which the intended reader is most likely to look up
first?
Main Headings
Are the main headings relevant to the needs of the reader?
Are they pertinent, specific, comprehensive?
Not too general yet not too narrow?
Not inane or improbable?
Do main headings have more than 5-7 locators (page reference)? If so, further
polishing is needed; they should be broken down into subheadings.
Subheadings
Are the subheadings useful?
Are subheadings concise, with the most important word at the beginning?
Is the number of subheadings about right? More than one column’s worth is probably
too many.
Are subheadings overanalyzed? A long list of subheadings with a single locator each is
an indication of overanalysis.
Could they be combined?
Should some subheadings become main headings with their own subheadings
instead?
Do subheadings have more than 5-7 locators? If more, they should eiter be broken
down into sub-subheadings or be changed to main headings.
Double Postings
For the reader’s convenience, many subheadings should be double posted - that is,
they should exist as main headings, too
Aptis™
Chapter 1 General Doc Practices
19
Locators (Page References)
Are the locators accurate? Check a sample of entries to see.
When locators include roman numberals or volume numbers, does the typography
make the usage clear?
Cross-References
A see should direct the reader to a different term expressing the same concept.
A see also should guid te reader from a complete entry to the related entries for more
and difference information.
Have see and see also cross-references been provided?
Length and Type
Is the index length adequate for the complexity of the book? An index should be 3-5%
of the pages in the typical non-fiction book, perhaps 5-8% for a history or biography,
and more (15-20%) for reference books.
Is there a need for more than one type of index?
Format
Is the type large enough to be read easily?
Do the index pages look open and not crowded?
Are the main headings and subheadings (and sub-subheadings if any) distinguished
from each other.
Is the organization — whether alphabetical, chronological, or other — accurate, clear
and consistent?
When an entry’s subheadings “turn a page,” that is, are continued from a right-hand
page to a left-hand page, the main heading should be repeated, followed by the word
continued in parentheses. (You may need to type these in after your last edit. Do not
Generate/Update after typing them in, as that will remove them.) Depending on the
size of the page, continued headings might be appropriate for continuations from left
to right pages, or even from left to right columns. Are they present?
Handbook for Technical Writers
20
Indexing from the Editor’s Point of View
Indexing from the Editor’s Point of View
Before the writers can begin indexing the materials in their documents, the editor
must create the markers which are gathered to create the index document.
This process occurs in two phases: initial pass and update runs.
The initial pass:
•
Removes all old markers to ensure that the newly created index does not
reflect any material from previous books;
•
Creates markers from paragraph tags, and
•
Creates the marker list which the writers will edit to create the index.
The update runs:
•
Apply the edits which the writers have made in the marker list to the
document itself;
•
Create and prints the index which would be generated from the current
marker list, and
•
Create a new marker list for the writers to use in refining their index.
The Documentation team uses the IXGen marker management tool to create, modify,
maintain and apply the marker lists used in generating the indexes, tables of figures
and tables of report figures.
Initial Pass of Marker List Generation
The initial pass of marker list generation indicates which chapters from the book
document are to be included when creating a marker list, removes all old markers,
creates new markers based on paragraph tags and creates and massages the marker
list to be passed to the writers for editing.
To generate the marker list:
1. In FrameMaker, open the book file for the book you wish to index.
2. With the book file open, pull down the IXgen menu and select Select Files. The
Select Files to Process screen will display.
3. On the Select Files to Process screen, make sure that all non-generated files
(except the TPCOV file) are in the Process Files column and that all generated
files (and the TPCOV file) are in the Ignore Files column. Double-click the file
name to move the file from one column to another. When you are finished,
click Open Selected Files. The main FrameMaker window will display, with
the Book file expanded and each of the selected files opened and minimized.
Aptis™
Chapter 1 General Doc Practices
21
4. For each file to be included in the index, do the following:
a. Open the chapter (this is most easily done by double-clicking on the
chapter in the Book panel).
b. Use the Find command to replace markers of the following types with
<null>: IXG entries; Index; Figure Titles, and Report Figure Titles.
c.
Save and close the chapter.
5. When you have removed all the old markers from the book, you now need to
generate new markers. With the Book file active, pull down the IXgen menu
and choose Open Selected Files. Each of the selected files will be opened and
minized.
6. With the Book file active, pull down the IXgen menu and choose Markers from
Para Tags. The Create Markers from Paragraph Tags window will display.
Pull down the choice list from the Create markers of type: blank and choose
IXG entries. The From paragraphs tagged panel should include only the
following items: Heading 1; Heading 2; Heading 3; Heading 4; Heading 5, and
Side head. When this is the case, click Create. IXgen will generate markers of
type IXG entries at each place where a heading or side head paragraph tag
exists. The main FrameMaker window will display.
7. With the Book file active, pull down the IXgen menu and choose Markers from
Para Tags. The Create Markers from Paragraph Tags window will display.
Pull down the choice list from the Create markers of type: blank and choose
Figure Titles. The From paragraphs tagged panel should include only the
following items: Figure Title. When this is the case, click Create. The main
FrameMaker window will display.
8. With the Book file active, pull down the IXgen menu and choose Markers from
Para Tags. The Create Markers from Paragraph Tags window will display.
Pull down the choice list from the Create markers of type: blank and choose
Report Figure Titles. The From paragraphs tagged panel should include only
the following items: Figure Title Report. When this is the case, click Create.
The main FrameMaker window will display.
9. On the main FrameMaker window, save the Book file. Close and save each
individual Chapter file.
10. On the main FrameMaker window, pull down the IXgen menu and choose Gen
Editable Marker List. The Generate Editable Marker List screen will display.
Make sure that the only item in the Collection markers of type: panel is IXgen
entries. When this is the case, click Generate. The IXgen Editable Marker List
— Usage Summary screen will display.
11. When IXgen has finished collecting all the IXgen entries, pull down the ISgen
menu and choose Apply Edited Marker List. The Apply Edited Marker List
screen will display. Click Permute (rotate) marker text and, if necessary, Split
multiple index entries into separate markers. With checks in both those boxes,
click Apply. After a significant amount of processing, the IXgen Editable
Marker List — Usage Summary screen will redisplay.
12. On the IXgen Editable Marker List — Usage Summary screen, pull down the
IXgen menu and choose Capitalization. The Marker Text Capitalization
screen will display. Make selections such that all levels read “all words in
lower case” then click Set. The IXgen Editable Marker List — Usage
Summary screen will redisplay.
Handbook for Technical Writers
22
Indexing from the Editor’s Point of View
13. On the IXgen Editable Marker List — Usage Summary screen, use
FrameMaker’s Find command to change all comma-space character
combinations to a semicolon. When this is the case, save this document in the
folder with the book; use the name Index Entries when saving this editable
marker list. This is the file which the writers will edit to create the index.
14. On the IXgen Editable Marker List — Usage Summary screen, pull down the
IXgen menu and choose Apply Edited Marker List. The Apply Edited Marker
List screen will display. Make sure that neither the Permute or Split boxes
are checked (i.e., both are unchecked), and click Apply.
15. Close the IXgen Editable Marker List — Usage Summary screen, saving if
prompted. The Book file window will display. Generate and update the book.
Notify the writer that the Index Entries file is ready for editing.
Applying Edited List of Markers
After the writer has provided an edit of the marker list created by the above
procedure, it is necessary to apply the remaining and changed markers, create an
index based on those markers and then re-generate an editable list of markers for
subsequent editing.
To accomplish this:
1. In FrameMaker, open the Book file for the affected book. Then open the Index
Entries file for that book.
2. With the Index Entries file active, pull down the IXgen menu and choose
Apply Edited Marker List. The Apply Edited Marker List screen will display.
Make sure that only the Split box is checked and click Apply.
3. Close the Index Entries file, saving if prompted. The Book file will become
active.
4. Generate and update the book file.
5. Open the Index file in the book and print it as a reference for the writer to use.
This reflects what the index would look like if further edits to the Index
Entries file are not made. When the printing is complete, close the Index file.
The Book file will become active.
6. With the Book file active, pull down the IXgen menu and choose Gen Editable
Marker List. When it is complete, pull down File and choose Save As. Click on
the Index Entries file, choose Save and confirm that you want to overwrite the
file.
7. Notify the writer that the index items have been applied, that an index is
available and Index Entries file is ready for another pass.
Aptis™
Chapter 1 General Doc Practices
23
Entry Screens
When you document screens which require entrie in many fields, define the fields at
that point instead of referring the reader to the Field and Screen Guide appendix.
At the step of the procedure where the user will be entering data into the fields, use
the Side Head style with the text “Field Definitions for <name of screen>”. In the text
frame next to that sidehead, define all the fields on the screen in the order in which
they appear on the screen, top-left to top-right then down to bottom-right. This should
be close to, the Tab order of the fields. The name of the field should be in Term
Indented format, which automatically formats the next paragraph as Term Definition.
If the field being defined is a “code” field, where a single-character or two-character
code is used to stand for something, define the codes in-line. If there are more than
four codes, use a table to define them.
An example of these styles is shown in Figure 11:
Figure 11: Data Entry Example Screen
Field Definitions
for Payment
Entry
Amount Received
Enter the amount of the payment in this field.
MOP
A code indicating the form in which the customer presented the payment.
Press F4 (P R OMP T ) for a list of acceptable codes.
Table 1. Valid Values for MOP
Code
Meaning
1
Cash
2
Check
4
Credit Card
5
Money Order
Handbook for Technical Writers
24
Entry Screens
Check
In the case where a customer offers part of the payment in cash and part in a
check, enter the check portion of the payment here.
Check Number
Enter the number of the check here. This may be a required field; for
information on setting up this field, see the Configuration Guide, page
whatever.
Deposit Amount
If the payment is made to satisfy a required deposit, enter the amount of the
payment which is to be applied to the deposit here.
Aptis™
Chapter 1 General Doc Practices
25
Setting Up the Master Index
1. Open the Master Index book and add the new files of the documentation set to
it.
2. Generate the Master Index book.
3. Print the book as a PostScript file, but print only the cover, chapter, and index
files. Make sure the PostScript file name is the same as the book name.
4. Distill the PostScript file.
Handbook for Technical Writers
26
Referring to Other Books in the Collection
Referring to Other Books in the Collection
When referring to other books in the collection, you should never type the title of the
book. Always insert a book title variable. This enables us to globally change the title of
a book easily should the title ever change.
Table 2. Book Title Variables
Aptis™
Variable
Definition
Result
BT: Application and Service Order
<Italic>Application and Service Order User
Guide<Default ¶ Font>
Service Order User Guide
BT: Billing User Guide
<Italic>Billing User
Guide<Default ¶ Font>
Billing User Guide
BT: CABS
<Italic>Carrier Access Billing
User Guide<Default ¶ Font>
Carrier Access Billing User
Guide
BT: Capital Credits
<Italic>Capital Credits User
Guide<Default ¶ Font>
Capital Credits User Guide
BT: CVWin Configuration
<Italic>CVWin System Configuration Guide<Default 
Font>
CVWin System Configuration
Guide
BT: CVWin Fundamentals
<Italic>CVWin Fundamentals User Guide<Default 
Font>
CVWin Fundamentals User
Guide
BT: Directory User
Guide
<Italic>Directory User
Guide<Default ¶ Font>
Directory User Guide
BT: Financials & Inventory - Work Order User
Guide
<Italic>Work Order Processing User Guide<Default 
Font>
Work Order Processing User
Guide
BT: Financials Accounts Payable
<Italic>Accounts Payable
User Guide<Default ¶ Font>
Accounts Payable User Guide
BT: Financials - Cash
Receipts
<Italic>Cash Receipts User
Guide<Default ¶ Font>
Cash Receipts User Guide
BT: Financials - General
Ledger
<Italic>General Ledger User
Guide<Default ¶ Font>
General Ledger User Guide
BT: Financials - Payroll
<Italic>Payroll User
Guide<Default ¶ Font>
Payroll User Guide
BT: Financials - Time
Entry & Spreads
<Italic>Time Entry - Spreads
User Guide<Default ¶ Font>
Time Entry - Spreads User
Guide
BT: Inquiry User Guide
<Italic>Inquiry and Directory
Assistant User
Guide<Default ¶ Font>
Inquiry and Directory Assistant
User Guide
BT: Interfaces Guide
<Italic>Interfaces
Guide<Default ¶ Font>
Interfaces Guide
BT: International Carrier Settlement System
<Italic>International Carrier
Settlement System User
Guide<Default ¶ Font>
International Carrier Settlement System User Guide
Chapter 1 General Doc Practices
27
Variable
Definition
Result
BT: Inventory - Management Guide
<Italic>Inventory Management User Guide<Default 
Font>
Inventory Management User
Guide
BT: Inventory - Point of
Sale
<Italic>Inventory Point of
Sale User Guide<Default 
Font>
Inventory Point of Sale User
Guide
BT: Inventory - Purchase Order
<Italic>Inventory Purchase
Order User Guide<Default 
Font>
Inventory Purchase Order User
Guide
BT: Inventory - Transactions
<Italic>Inventory Transactions User Guide<Default 
Font>
Inventory Transactions User
Guide
BT: Inventory - Warranty
<Italic>Inventory Warranty
User Guide<Default ¶ Font>
Inventory Warranty User Guide
BT: Letter Generation
<Italic>Letter Generation
User Guide<Default ¶ Font>
Letter Generation User Guide
BT: Line Equipment
<Italic>Line Equipment User
Guide<Default ¶ Font>
Line Equipment User Guide
BT: Master Index and
List of Figures
<Italic>Master Index and
List of Figures<Default 
Font>
Master Index and List of Figures
BT: Payments User
Guide
<Italic>Payments User
Guide<Default ¶ Font>
Payments User Guide
BT: Reports Reference
Guide
<Italic>Reports Reference
Guide<Default ¶ Font>
Reports Reference Guide
BT: System Configuration Admin Guide
<Italic>System Configuration Guide<Bold>
System Configuration Guide
BT: Table and Field Reference Guide
<Italic>Table and Field Reference Guide<Default 
Font>
Table and Field Reference
Guide
BT: Trouble Tickets
User Guide
<Italic>Trouble Tickets User
Guide<Default ¶ Font>
Trouble Tickets User Guide
BT: Usage Processing
<Italic>Usage Processing
User Guide<Default ¶ Font>
Usage Processing User Guide
BT: Web Biller Administrator Guide
<Italic>WebBill Administrator Guide<Default ¶ Font>
WebBill Administrator Guide
Handbook for Technical Writers
28
Aptis™
Referring to Other Books in the Collection
Topics Discussed In This Chapter:
Template Definitions,
30
Updating Documents with New Templates,
42
30
Template Definitions
Template Definitions
Topics Discussed In This Section
Paragraph Tags,
31
Character Tags,
38
Cross-Reference Formats,
Link FigureNum,
Marker Types,
Aptis™
41
40
40
31
Chapter 2 Using the Templates
Paragraph Tags
Aptis documentation makes extensive use of paragraph tags for two reasons:
1. To ensure a consistent “look” to the various sections of a single book and to
all books in the documentation set.
2. To ensure that translating FrameMaker files to different file types will
produce predictable results.
Additionally, we have found that the use of such tags has freed writers from the
mind-numbing task of remembering such things as “Do I use bold, italic in the
sidehead when I want to warn the users that taking such-and-such action might
damage their file?” or “Two pages and three screen shots ago, I started this step in
the procedure. Am I on Step 3 or Step 4?”
This section of the guide explains each of the tags in the standard set of Aptis
formats, what it does and under what circumstances you should use it.
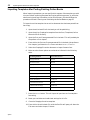
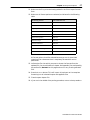
Table 3. Where to Find Paragraph Tags
Tag Name
Page
Tag Name
Page
Tag Name
Page
Alpha-Num A
page 32
Heading 2
page 34
Number List 1
page 35
Alpha-Num A
page 32
Heading 3
page 34
Number List 1+
page 35
Appendix Number
page 32
Heading 4
page 34
Quick Key
page 35
Bullet List
page 32
Heading 5
page 34
Quick Key Text
page 36
Bullet List Indented
page 32
Indent Para .25
page 34
Side by Side
page 36
Caution
page 32
Indent Para .5
page 34
Side Head
page 36
Chapter Number
page 32
Indent Para .75
page 34
Single Step Procedure
page 36
Example
page 33
Indent Para 1.0
page 34
Syntax
page 36
Figure Title
page 33
LTOC
page 34
TableHeader
page 36
Figure Title Reports
page 33
LTOC Heading
page 35
TableText
page 36
Figure Title Reports
Anch
page 33
Normal
page 35
Table Title
page 36
Footer
page 33
Normal Anchor
page 35
Term
page 36
Function
page 34
Term Definition
page 37
Header
page 34
Note
page 35
Term Indented
page 37
Heading 1
page 34
Note Indented
page 35
Warning
page 37
Heading 1 MI
page 34
TableHeader
page 36
Handbook for Technical Writers
32
Paragraph Tags
Alpha-Num A
This begins a new alphabetic list. Use this format when a numbered list of steps in
a procedure needs a sublist of steps. It should be used rarely; often, a re-analysis of
the problem will reveal a method of presenting the information which is less
convoluted. Should you decide to use this, be prepared to explain your decision: it
will be questioned.
Alpha-Num A+
This continues an alphabetic list, picking the next consecutive letter after the last
use.
Appendix Number
This provides an appendix number and the rules which are used at the beginning
of each appendix in a book, in each book of the set. Its use provides a consistent
“look” to the Aptis documentation set.
Bullet List
This format indicates the paragraph is part of a bulleted list, the left margin of
which is 0.5 inches from the left margin of the text frame; the bullets themselves
are indent 0.25 inches from the left margin of the text frame.. For example, the
following paragraphs are in bullet list format.
•
The first item
•
The second item
Use this format when the left margin of your text is the left margin of the text
frame and you want to indicate a number of items, all of which have the same
significance, or when you want to indicate the steps of a “super-procedure,” such as
Running a Billing. The items in the bullet list will then end with cross-references
to the explanation of the procedures which comprise the “super-procedure.”
Bullet List Indented
This format indicates that the paragraph is part of a bulleted list, the left margin
at 0.75 inches from the left margin of the text frame. For example, the following
paragraphs are in bullet list indented format:
Use this format when:
Caution
•
You wish to make several points relating to the same issue;
•
You need to indicate several alternatives, or
•
You want to list components of a particular process.
This format creates bold, italic text in the sidehead area with the word “Caution”,
followed by a Tab, followed by the text that you have typed. Cf. Note on page 35,
Note Indented on page 35, Warning on page 37.
Use this format to indicate to users conditions which could result in data loss, as in
the following:
Caution: If you press the F3 (E X I T ) key before pressing E N T ER , the data you have entered will
be lost.
Chapter Number
Aptis™
This format present the chapter heading found at the beginning of each chapter of
each book in our series; it includes the word “Chapter”and the appropriate number.
Chapter 2 Using the Templates
33
Example
This format produces the word a thin rule, followed by the word “Example” in the
sidehead frame. At the time of this writing, its use is under discussion.
Example
This is an example of the example format. To use this format:
1. Start a new paragraph
2. Change the paragraph format to “Example.”
3. Press E N T ER .
4. Begin your example.
Figure Title
This format serves several purposes. First, it provides the words “Figure Title”
above each figure in the chapter. Second, it uses a variable to establish the correct
figure number. Third, it allows you to type the text for the title of the figure.
Finally, it sets up the “next paragraph” format to ensure that the transition from
hard-copy to HTML and PDF formats will be predictable.
To use this format:
1. Start a new paragraph.
2. Change its format to Figure Title.
3. Type the title for the figure; our style suggests using the screen title of the
captured screen as the figure title. Press E N T ER .
4. Import the figure itself, using F IL E > I MP OR T > F I LE
Figure Title Reports
Like the Figure Title format, this format serves several purposes. It is used when
the screen shot used is that of a report, rather than a screen panel or menu.
Instead of keeping the screen shot in the text area, Figure Title Reports allows the
use of the sidehead area of the page as well, thereby allowing a more legible
presentation in the manual.
To use this format:
1. Start a new paragraph.
2. Change its format to Figure Title Reports.
3. Type the title for the figure; our style suggests using the screen title of the
captured screen as the figure title. Press E N T ER .
4. Import the figure itself, using F IL E > I MP OR T > F I LE
Figure Title Reports
Anch
This format is automatically applied by the Figure Title Reports format; it assists
in the conversion from hard-copy to HTML and PDF formats. You need do nothing
to use this format.
Footer
This is the format used for the footers; you don’t need to make use of this format.
Handbook for Technical Writers
34
Paragraph Tags
Function
Use this format when introducing a new function in documentation for APIs. If it is
invoked at the top of the page, it merely formats the type for the name of the
function; if it is invoked in mid-page, it places a rule above the name of the
function.
Header
This is the format used for the headers; you don’t need to make use of this format.
Heading 1
This format produces the chapter title found at the beginning of each chapter of
every book in our series. The format forces the beginning of a right-hand page,
includes the text of the chapter title and the rules underneath.
Heading 1 MI
This is identical to the Heading 1 format, but is named differently for use in the
Master Index to general the Table of Contents, Index, List of Figures, List of
Reference Figures and other master files.
Heading 2
This format produces the topic headings which divide the major sections of each
chapter in all of our books.
Heading 3
This format produces the subtopic headings which divide a major section.
Heading 4
This format distinguishes subjects within a subtopic.
Heading 5
This format distinguishes sub-subjects within a subtopic; rarely used.
Indent Para .25
This format indents the paragraph so that it aligns with the numbers in the
Number List formats. This is often used for the paragraphs which introduce a
numbered procedure.
Indent Para .5
This format indents the paragraph so that it aligns with the text in the Number
List formats. Used when you want to include additional paragraphs under a
numbered step.
Indent Para .75
This format indents the paragraph to produce a .25-inch indent from the text in
Number List formats.
Indent Para 1.0
This format indents the paragraph to produce a .50-inch indent from the text in
Number List formats.
Number List, Indent examples
1. This is Number List 1 format
This paragraph is Indent Para .25 format. Note that its left margin is the same
as the number in the paragraph above it.
2. This is number List 1+ format
This is Indent Para .50 format.
This is Indent Para .75 format.
This is Indent Para 1.0 format.
LTOC
Aptis™
This format produces the individual items in a Local Table of Contents, found at
the beginning of each chapter.
Chapter 2 Using the Templates
35
LTOC Heading
This format produces the heading found between the Chapter heading and the
items in the Local Table of Contents. It produces the text “Topics Discussed In This
Chapter:”.
Normal
This format produces normal text which spans the text frame of the page. Use this
format for the introductory and explanatory material for each topic and subtopic,
as well as for the material preceding a numbered procedure.
Normal Anchor
This format is used in the transformation of hard-copy into HTML to ensure that
graphics are placed correctly with respect to text.
Note
This format produces the text “Note:” followed by a tab in the center of the
Sidehead frame. The text of the note, which will be written by the author, begins in
the sidehead frame and is in italic style. Use this format to draw attention to a
crucial piece of information. In terms of status, the Note format falls between a
Caution, which warns of possible loss of data, and a Note Indented, which alerts
the reader to an important, but not crucial, piece of information. Use sparingly. Cf.
Caution on page 32, Note Indented on page 35, Warning on page 37
Note Indented
This format produces the Bold Italic text “Note:” followed by a tab. Its left margin
is the same as produced by Indent Para .5. Use this format to draw attention to an
important, but not crucial, piece of information. In terms of status, this is the
lowest of the “alert” formats. Use sparingly.
Note:
Number List 1
This format produces the number 1, followed by a parenthesis and a tab. The left
wrap margin of text in this format is the same as that produced by Indent Para .5.
Use this format for the first step in a numbered procedure.
Number List 1+
Quick Key
This format is used to indicate a keypress path to the beginning screen of a
procedure. Each step-by-step procedure does not need to begin at the mainscreen;
after giving a step-by-step earlier in the section (or chapter) indicating how to get
to a screen from which a number of procedures are run, use the quick-key path to
“remind” users how to get to that starting screen.
To use the Quick Key format:
1. Press E N T ER to start a new paragraph
2. Change the format of the new paragraph to Quick Key. The “dagger” will
be inserted, with the I-bar to its right.
3. Press E N T ER . The words “Quick-Key Path:” followed by a colon. At this
point, type the key path.
The character style for the key path is Key/Button. The keypath begins at
the screen which appears when you type the command to start the
program. No descriptors are included after either option numbers or
function keys. When the path requires pressing the Enter key, use the
symbol ↵ to indicate this. Elements in the key path are separated by two
spaces; no other separators (commas, etc) are used.
Handbook for Technical Writers
36
Paragraph Tags
Within the key-path itself, we have established the following usages:
•
The screen which appears when you type the command to start the
program is style Mainscreen, one word, capital “M”
•
When referring to a complex procedure within the keypath, such as
Create a New Batch, place the reference inside parentheses.
•
When referring to placement of a particular key-command, such as
typing a “B” next to a header record, use square brackets, as in B [next
to header record]
•
When working in a GUI environment, use the “greater than sign”
between elements to indicate menu cascades, as in File > Import >
Format
•
When working in a Menu Manager environment, where keystroke
choices may vary from installation to installation, use the “greater
than sign” between screen names to aid the user in distinguishing
where one begins and another ends, as in Mainscreen > Financial Main
Menu > General Ledger Main Menu > General Ledger Reports Menu
Quick Key Text
The definition of Quick Key automatically inserts this format after Quick Key
format. You do not need take any special action to activate this format.
Side by Side
This format produces output resembling a two-column table without rules. Use
this format in programming and API documentation to explain arguments passed
to and from functions.
Side Head
This format moves the paragraph into the side head frame. Use sparingly. One
place in which we want to consistently use this format is when defining fields to be
filled in a procedure. Use the Side Head format for the text “Field Definitions for
<name of screen>”; the accompanying field definitions should be contained in the
text frame.
Single Step
Procedure
This format produces the single-step procedure sigil. Use this format whenever a
procedure is composed of a single step. This should be a rare occurrence.
Syntax
This is a distinctive format used to explain the various options of a function in
programming and API documentation.
TableHeader
This format provides a uniform typeface for column headers in tables. Use this
format in all column headers for all tables.
TableText
This format provides a uniform typeface for entries in a table. Use this format for
the text in all cells of all tables.
Table Title
This format produces the text “Table” followed by the appropriate numeral, given
the table’s position in the text. Use this format in the paragraph above a table to
give the table a title and to ensure that it will be available for cross-reference and
will be included in any lists which gather table markers.
Term
This format places a bold, italic term at the left margin of the text frame. Use this
format in a field/screen reference outside of the context of a numbered procedure.
Aptis™
Chapter 2 Using the Templates
37
Term Definition
This format follows the Term format automatically. Use this format in a
field/screen reference to explain either what appears in a given field or what the
user needs to enter into a field.
Term Indented
This format place a bold, italic term at a 0.5 inch indent from the left margin of the
text frame. Use this format in a field/screen reference in the context of a numbered
procedure.
Warning
This format place an all-caps bold WARNING text at the left margin of the
sidehead frame. Use this format to warn of very serious consequences, such as
action which would compromise the integrity of a database. Cf. Caution on page 32,
Note on page 35, Note Indented on page 35.
WARNING:
Deleting records from the HOUSE file could result in corruption of the
database.
Handbook for Technical Writers
38
Character Tags
Character Tags
Character tags are used to ensure that a given “look” will be consistent throughout
our manual series. Additionally, the use of character tags ensures a smooth
transition from hard-copy to online to HTML. For example, to make something
italic, use the italic character tag; do not use the Ctrl-B which will produce bold
text
Default Paragraph
Font
This is the base font used for basic body text throughout all the books.
Bold
This is the basic body text in bold weight.
Emphasis
This is the basic body text in italics.
Equation/Variables
This is the basic body text in italics.
HyperText
This is basic body text in a different color. It is used in the pdfs and html
versions of the books to indicate an active link to another section of the
book.
Input
This is a Courier-type font used to indicate characters which are to input
by the user. In most of our books, we use Key/Button format for this
indication. Check before using this style.
Italic
This is basic body text in italic. When you want italic type, use this
character format.
Italic/Bold
This is basic body text in boldface italic. Use this typeface to indicate
conditions, such as:
If you want to read the rest,
Turn to the next page.
Key/Button
This character format uses a different base font. Use this format to
indicate a key or button the user must press in a procedure, or to indicate
text which is to be typed exactly as indicated in the book. An example of
Key/Button format is: Press the E N TE R key.
Normal
This format is a holdover of days gone by. It will be removed from the
selections when we perform our next “format sweep.”
PageNumber
This is the format used for the page numbers. For an example of this
format, look in the upper right-hand corner of this page.
Quick Key
This is the format used for the “dagger” in the Quick-Key paths. You do not
have to explicitly select this format, nor should you.
Quick Key Text
This is the format used for the text following the indicator “Quick-Key
Path.” You do not have to explicity select this format, nor should you.
SubScript
This format is used to create a subscript in text, for those rare occasions
when you need to indicate a chemical name for a substance, such as H 2O.
Aptis™
Chapter 2 Using the Templates
39
SuperScript
This format is used to create a superscript in text, for those rare occasions
when you need to indicate an exponent, as in y = x2+x-1500.
Symbols
This format is a relic and will probably be removed when we perform our
next “format sweep”.
Wingding
This format is a symbolic text font used to produce the Enter symbol ( ↵) in
Quick-Key Paths. Most people find it easier to locate the symbol
somewhere else in the documentation, copy it and paste it into their text.
Handbook for Technical Writers
40
Cross-Reference Formats
Cross-Reference Formats
Cross-reference formats are used to refer readers to another section in a manual or
to a specific figure in the manual. As of this writing, we are aware that there are
too many of these, that their naming is far from intuitive and that a “weeding” is
called for. Nonetheless, the following is a list of all the current cross-reference
formats, with an indicator of what will appear when each is selected.
Figure 12: Basic Figure for Cross Reference
Link FigureNum
Figure 12
Link
FigureNumOnPage
Figure 12 on page 40
Link
FigureTitleOnPage
Figure 12, Basic Figure for Cross Reference, on page 40
Link Paranum
Figure 12:
Link Paratext
For figure: Basic Figure for Cross Reference
For header: Cross-Reference Formats
Link
ParatextinParanum
OnPage
For figure: Basic Figure for Cross Reference in Chapter 2 on page 40
Link TableNumOnly
Table 12
LTOC and
PageNumber
Cross-Reference Formats,
For header: Cross-Reference Formats in Chapter 2 on page 40
40
This is used for chapter and local tables of contents.
NoLink FigureNum
Figure 12
NoLink
FigureNumOnPage
Figure 12 on page 40
NoLink Paranum
Figure 12:
NoLink Paratext
Basic Figure for Cross Reference
NumOnly
12
PageNum
page 40
Paranum,ParatextO
nPage
Chapter 2, Basic Figure for Cross Reference, on page 40
ParanumOnPage
Chapter 2 on page 40
ParatextInParanum
Basic Figure for Cross Reference in Chapter 2
Aptis™
Chapter 2 Using the Templates
ParatextOnPage
Basic Figure for Cross Reference on page 40
ScreenIsDisplayed
The Basic Figure for Cross Reference screen is displayed as shown in
Figure 12 on page 40.
TableAll
Table 12, Basic Figure for Cross Reference, on page 40
TableNumOnPage
Table 12 on page 40
41
Variable Definitions
Variable definitions are used throughout the manual set to assure consistent
labelling throughout the set. The manager or director makes changes to these
variables as needed into the template for TOC and the values for the variables are
propagated throughout the set during the publishing process. Do not make any
changes to variable definitions unless instructed to by the manager or the director.
Marker Types
Markers are used to generate the index, list of figures and list of report figures. We
use IXgen as our marker management software.
The particular markers are:
Ixg Entries
Used to generate the index. These markers are created by the Markers from
Paragraph Tags command in IXgen. For most books, they will be created for the
header tags and the sidehead tag. The inclusion of the sidehead tag is used to
create index entries for the “Field Definitions for” description of fields on particular
screens.
Figure Titles
Note the final “s”. These markers are created by the Markers from Paragraph Tags
command in IXgen. They will be created for the Figure Title tag, and are used to
create the List of Figures.
Report Figure Titles
These markers are created by the Markers from Paragraph Tags command in
IXgen. They will be created for the Report Figure Title tag, and are used to create
the List of Report Figures.
Handbook for Technical Writers
42
Updating Documents with New Templates
Updating Documents with New Templates
The primary purpose for using templates is to ensure that all Billing Concepts
documentation maintains the same look, feel, and function.
Adhering to the templates enables the documentation team and employees of
Billing Concepts to open any file and be familiar with the layout of the manual.
Overview of Importing Templates
There are a number of different scenarios that require importing templates. The
procedures for each scenario differ slightly. Which scenario you face will determine
which procedure to follow.
The general scenarios are:
•
Importing templates for newly created Frame-generated files (index, table
of contents, list of figures, list of reports figures).
When you create a new book and add a generated file to the book file (such
as an index), the first time you generate the book with the newly added
generated file, FrameMaker will create the new file but will not include
formatting elements from our templates.
You will have to import the templates for these files. Once you have done
this, you will not have to re-import the templates for subsequent regenerations of the book.
For this scenario, you can follow the general procedure for updating
templates. See General Procedure for Importing Templates on page 43.
•
If you have changed the template set, you will have to update all files that
need to reflect the change.
For this scenario, you can follow the general procedure for updating
templates. See General Procedure for Importing Templates on page 43.
•
Importing templates during the porting to online process for new online
books.
If you have created a new book and are in the process of porting that book
to online for the first time, you will have to import all online templates to
each respective file: online title page and cover template to the online
version of the title page for the book, online table of contents template to
the online version of the table of contents for the book, and so on.
For this scenario, you can follow the general procedure for updating
templates. See General Procedure for Importing Templates on page 43.
•
Importing templates during the porting porting to online process for
existing online books.
If you have an existing book that has already been published in hard copy
and online format and are in the process of re-publishing it in online
format, then the procedure for updating templates is slightly different.
Aptis™
Chapter 2 Using the Templates
43
See Overview of Online Porting on page 55 for specific information
regarding the difference between porting to online for existing versus new
books.
For this scenario, you can follow the general procedure for updating
templates. See Importing Templates after Porting Existing Online Books on
page 44.
General Procedure for Importing Templates
When importing templates, you can specify which aspects of the template you wish
to import.
When importing templates during the publishing process, in particular when
moving hard copy information to the online format, you should follow the
procedure outlined in Porting and Publishing the Online Books on page 55.
To import a template into an existing document:
1. From within FrameMaker, pull down the F IL E menu, and select N EW .
If your maker.ini file is configured correctly, you should receive the
templates directory on the documentation drive.
2. Select the appropriate template directory (online, hard copy, cd-rom, and
so on).
3. Select the appropriate template (ChapApp.fm, Index.fm, List of
Figures.fm, Part.fm, TOC.fm, or Tpcov.fm).
4. From within the new document, pull down the F IL E menu and select
I M PO R T , F IL E .
5. Locate and select the file that you want to update, making sure you have
the Copy Into Document option selected.
6. Press the I MPO R T button.
7. At the Import Text Flow dialog box, make sure the following options are
selected:
Section
Options
Flow to Import
Body Page Flow: A (Main Flow)
Formatting of Imported Flow
Reformat to Use Current Document’s Formats
8. Press the I MPO R T button.
9. From within the new document, pull down the F IL E menu and select S AV E
A S.
10. Locate the original file, and select it. This will save the current file over the
existing file.
11. Press the S AV E button.
Handbook for Technical Writers
44
Updating Documents with New Templates
Importing Templates after Porting Existing Online Books
When importing templates, you can specify which aspects of the template you wish
to import. When importing templates during the publishing process, in particular
when moving hard copy information to the online format, you should follow the
procedure outlined in Porting and Publishing the Online Books on page 55.
To import the online template into an online document that has been ported from
hard copy:
1. Open the online book file for the book you will be publishing.
2. Open the online ChapApp.fm template from the Doc:\Templates\Online
Manuals 8.5x11 directory.
3. Open the first non-Frame-generated file in the book. This will probably be
the preface or first chapter.
4. From within the first non-Frame-generated file in the book (the preface or
first chapter), pull down the F IL E menu and select I MP OR T , F O R MAT S .
5. Select the ChapApp file as the document to import formats from.
6. Make sure the format options are selected as indicated in the following
table:
Formatting Element
Selected/De-Selected
Paragraph Formats
Selected
Character Formats
Selected
Page Layouts
Selected
Table Formats
Selected
Color Definitions
Selected
Document Properties
Selected
Reference Pages
Selected
Variable Definitions
De-Selected
Cross-Reference Formats
Selected
Conditional Text Settings
De-Selected
Math Definitions
Selected
7. Press the I MPO R T button. This will import all pertinent on-line template
formatting.
8. Reset your variables and conditional settings for this file.
9. Close the ChapApp.fm online template.
10. From within the online book file, with the first file still open, pull down the
File menu and select Import, Formats.
Aptis™
Chapter 2 Using the Templates
45
11. Make sure the file you have already updated is the file to import formats
from.
12. Make sure all format options are selected, as indicated in the following
table:
Formatting Element
Selected/De-Selected
Paragraph Formats
Selected
Character Formats
Selected
Page Layouts
Selected
Table Formats
Selected
Color Definitions
Selected
Document Properties
Selected
Reference Pages
Selected
Variable Definitions
Selected
Cross-Reference Formats
Selected
Conditional Text Settings
Selected
Math Definitions
Selected
All format options should be selected because you are (or should be)
importing from a document that is completely formatted for online
publication.
13. Indicate the files into which you want to import the formats from the
updated file. You should select all chapter and appendix files, and possibly
the preface file, but not the title page and cover or any Frame-generated
files.
14. Press the I MPO R T button. This will import all pertinent on-line template
formatting into all selected chapter and appendix files.
15. Close the open chapter file.
16. If you are in the middle of the porting procedure, return to that procedure.
Handbook for Technical Writers
46
Updating Documents with New Templates
Recreating Customized Paragraph Definitions
If you had customized paragraph styles in your original document that do not exist
in the new template, you can easily recreate these once you have updated the
template for the document using the above procedure. However, because of the
difficulties created by customized paragraph definitions when translating
FrameMaker documents into HTML, we strongly discourage the use of the
customized paragraph definitions.
To re-create special paragraph definitions:
1. Locate your customized paragraph in the document and place your cursor
somewhere in the paragraph.
2. Open the paragraph designer ( CT R L + M ).
3. In the Paragraph Designer dialog box, pull down the Commands dropdown list and select New Format.
4. In the New Format dialog box, name the paragraph style, and make sure
the Store in Catalog and Apply to Selection options are both selected
5. Press the C R E AT E button.
Aptis™
Topics Discussed In This Chapter:
Publisher Information,
48
Overview of the Publishing Process,
Publishing the Hard Copy Books,
49
50
Porting and Publishing the Online Books,
55
48
Publisher Information
Publisher Information
Our publisher is:
Laser Image Corporate Publishing
2810 Meridian Parkway, Suite 132
Durham, North Carolina 27713
1-800-644-5822
LICP publishes all of our paper documentation from postscript files produced from
FrameMaker.
LICP also produce our CD-ROMs, including jewel case inserts, graphic label on ROM,
and data to ROM.—LICP actually outsources the graphic label and the data to a
company called RTM (Research Triangle Media).
Aptis™
Chapter 3 Publishing Procedures
49
Overview of the Publishing Process
The following steps provides a general overview of the entire publishing process.
1. Finalize the hard copy books. See Publishing the Hard Copy Books on page 50
for details of this procedure.
2. Upload the hard copy postscript files to the publisher.
3. Port the finalized versions of the hard copy books to on-line. See Porting and
Publishing the Online Books on page 55 for details of this procedure.
4. Finalize the on-line books and publish them electronically. See Finalizing the
Online Documentation Set on page 58 for details of this procedure.
5. Create CD-ROMs for initial release distribution.
6. Create a CD-ROM of everything that has been published. This gives us a
snapshot in time of the information we developed and published for the
release.
Handbook for Technical Writers
50
Publishing the Hard Copy Books
Publishing the Hard Copy Books
Topics Discussed In This Section
Necessary Order for Publishing Books,
Publishing the Reports Reference Guide,
Publishing the Master Index,
Publishing All Other Books,
50
50
51
51
Necessary Order for Publishing Books
Two books depend on the completion and availability of files from other books:
•
The Reports Reference Guide
•
The Master Index
Because these books depend on the completion and availability of files from other
books, they must be published last. All other books must be published prior to these
two books.
This holds true whether you are publishing for hard copy or for online.
The order for publishing all books must be:
1. Publish all books except the Reports Reference Guide and the Master Index.
2. Publish the Reports Reference Guide.
3. Publish the Master Index.
Publishing the Reports Reference Guide
The Reports Reference Guide includes the reports chapters from several other books.
After you have published for hard copy all books that have reports chapters, make a
copy of the reports chapters of those books in the Reports Reference Guide
subdirectory for publishing.
This provides the opportunity to include index entries from the Reports Reference
Guide in the Master Index..
Aptis™
Chapter 3 Publishing Procedures
51
Publishing the Master Index
The Master Index can only be generated once all books of its type (for instance, all
hard copy books) have been published. This is true for hard copy as well as for online.
In order to produce and publish the hard copy version of the Master Index, you must
first finalize and publish the hard copy versions of all of the books being published.
The Master Index references all files from every book that will include index entries.
Typically this is limited to Chapters and Appendixes.
See Setting Up the Master Index on page 25 for specific information pertaining to the
setup of this book.
Publishing All Other Books
1. Open the FrameMaker book file for the book you will be publishing.
2. Set your printer driver to Apple LaserWriter Pro 600.
Pull down File; select Print Setup. The Print Setup window displays.
If the Name field does not contain AppleWriter Pro 600, click to the right of
the field and select AppleWriter Pro 600 from the drop-down menu.
Click P R OP ER T I ES . The AppleWriter Pro 600 Document Properties window
displays. Check the following values:
Paper Size = Letter
Orientation = Portrait
Resolution = 600
Color Appearance = Color
If you need to change any of these values on the Advanced tab, click on the
value you need to change and select the correct value from the list which
appears at the bottom of the window.
When the values in the AppleWriter Pro 600 Document Properties window are
correct, click OK. The Print Setup window redisplays. Click OK to return to
the book file window.
3. From the book file window, double-click on the TPCOV file to open it. Make
sure all variables used in the TPCOV are correct.
4. Minimize the TPCOV. Make sure the book file window is active; If it is not,
click on its title-bar to make it active.
5. With the book file active, pull down File, highlight Import and select Formats
from the side menu. The Import Formats window will display. It is comprised
of two sections: in the top section, you will indicate which formats you want to
import; in the bottom section, you will indicate which files you want to import
the formats into.
In the top section, make sure that only the Color Definitions, Variable
Definitions and Conditional Text Settings are checked. Boxes for all other
formats must be unchecked.
Handbook for Technical Writers
52
Publishing the Hard Copy Books
In the bottom section, make sure that all files making up the book are in the
Update list, on the left-hand side of the section. The Don’t Update list, on
the right-hand side of the section, should be empty.
Click I MPO R T .
6. Pull down File and choose Generate/Update. The Generate/Update Book
window displays.
Make sure that the Table of Contents, List of Figures, List of Reference
Figures and Index files are in the left-hand (Update) list. Click U PD AT E .
7. When the updating process is complete, you will need to open each nongenerated file in the book individually. Page through the file using two-page
view (E SC Z P), looking for layout errors (primarily widows and orphans).
For guidelines on what to look for, see Reviewing Chapters on page 53.
After you have completed a file, save it and go on to the next.
8. When you have completed reviewing all chapters in the book, pull down File
and choose Generate/Update. The Generate/Update Book window displays.
Make sure that the Table of Contents, List of Figures, List of Report Figures
(if any) and Index files are in the left-hand (Update) list. Click U PD AT E .
9. When the updating process is complete, you will need to open each generated
file in order, scanning for such layout errors as a subsidiary level beginning on
a different page than its leader.
For guidelines on what to look for, see Reviewing Generated Chapters on page
54.
Caution: Remember, when looking through the Table of Contents, List of Figures and List
of Report Figures files, that you must not increase the number of pages contained
in those files. It is better to leave an error than to increase the number of pages.
The above warning does not apply to the Index file. Because it is at the end of
the book, adding pages to it will not cause its accuracy to be compromised.
10. When you are satisfied that everything looks in order, print the book to a file
as postscript. Make sure you use the Apple LaserWriter Pro 600 printer
driver.
To do this:
a. From the book file, pull down the File menu and select Print.
b. Make sure the following selections are made:
All for the page range is checked.
Odd and Even numbered pages is checked.
Print Only to File is checked, and an appropriate file name is indicated.
No other options need to be selected.
c.
Press the Print button.
11. Distill the postscript file using Adobe Acrobat Distiller by double-clicking the
PS file in Windows Explorer.
Aptis™
Chapter 3 Publishing Procedures
53
12. If your pdf and postscript files are in order:
a. Place the pdf file in the Doc:\Admin\Publishing\product\Paranoia
Directory folder.
b. Place the postscript file in the Doc:\Admin\Publishing\product\Printed
Books folder.
c.
Note:
Notify your manager that the book is done.
It is very important that you notify the manager that the book is done. Only the manager
will have the authority to load books to the Common Drive and notify the appropriate
persons that the documentation is now available for internal use. Two reasons for this
exist. The first is the obvious quality-control issue. Because the manager bears the
responsibility for the quality of the documentation produced by the team, it is essential that
he or she examine the material before it is release. The second is organization. Because
members of the technical writing team are spread throughout the organization, it is
necessary that there be only one voice offering the Official Announcements of products and
services available from the team.
13. The manager will verify the postscript and pdf files.
If the pdf and postscript files are in order, you’re done.
If the manager finds items in the pdf and postscript files that could be
optimized, he/she will let you know. You will then have to make the necessary
improvements in the FrameMaker files.
Page Review Checklist
Reviewing Chapters
Issues to watch for include, but are not limited to:
Poor pagination
Example: If a Heading 3 paragraph falls near the bottom of a page with only a
few lines or one paragraph of information following it before the page breaks.
This may look better if the Heading 3 paragraph simply started at the top of
the next page.
Example: If a paragraph ends at the top of a page, but only one or a few lines
of the paragraph fall to the top of the page. This may look better if the entire
paragraph were situated at the top of the page and not split between the two
pages.
You can make adjustments by:
•
applying a Keep With Next or Keep With Previous attribute to the
paragraph,
•
modifying the Widows/Orphans for the paragraph,
Handbook for Technical Writers
54
Publishing the Hard Copy Books
•
modifying the Start attribute (under Pagination tab in the designer) to be
Top of Page, or Top of Column. (Use Top of Column when adjusting
pagination issues in the index.)
Headers/Footers
Make sure all of your headers and footers are displaying the correct
information.
Reviewing Generated Chapters
There are four issues to watch for:
Headers/Footers
In all files, make sure your headers and footers are displaying the correct
information.
Lines that Break
In the TOC, LOF, and LORF, watch for headings/figure titles that are longer
than one line; these should be broken with a soft return (<S H I F T >+<E N TE R >).
Note: Watch your pagination!
If you make enough changes, you may affect the overall number of pages in
the TOC, LOF, or LORF. If this happens you will be throwing off the accuracy
of the pages as represented in the table of contents.
For instance, if you make enough changes to the table of contents and it adds
two pages to the file, your list of figures, list of reports figures, and preface
files will be incorrectly numbered; additionally, they will be incorrectly
referenced in the table of contents.
Separated Entries
In the Index, watch for level 1 entries that are separated by a page or column
break from their subordinate level 2 entries. Similarly, watch for level 2
entries that are separated by a page or column break from their subordinate
level 3 entries (not common because we generally don’t go that deep, but you
never know).
Separator Breaks
Also in the Index, watch for less than optimum breaks between your
separators (A B C, etc.) and the corresponding entries for the letter. For
instance, if B starts near the bottom of the page/column so that only a few
entries for B are on that page/column, apply a Start attribute of Top of
Column to the B separator to force it to the top of the column.
Aptis™
Chapter 3 Publishing Procedures
55
Porting and Publishing the Online Books
Topics Discussed In This Section
Overview of Online Porting,
Publishing the Online Books,
55
55
Finalizing the Online Documentation Set,
58
Overview of Online Porting
Every time we publish to online format, the hard copy book file and all of its content
files have to be ported.
Publishing the Online Books
1. In Windows Explorer, copy the non-generated files for the book you will be
publishing from the Hard Copy Book Set folder to the Online Book Set folder.
Note:
Make sure to copy, not to move, the non-generated files into the Online Book Set; when this
operation is completed, the files must still exist in the Hard Copy Book Set.
2. In FrameMaker, create a new document.
Pull down File and choose New. The New window will display; you will use
this window to locate the template for the new file you are creating.
Navigate the file system to get to the folder:
Documentation/Admin/Templates/Online Manuals 8.5x11
In that folder, click on the ChapAppIntro.fm file.
Click N EW . An empty two-page file will display.
3. With that file open, pull down File, highlight Import and choose File from the
sidemenu. The Import menu will display.
Navigate the file system to get to the folder:
Documentation/Online Book Set/<the folder for your book>
In that folder, click on the file which contains Chapter One of the book. Make
sure that the “Copy into Document” option is chosen; then click I MPO R T . The
text for that chapter will flow into the new file, using the template you
selected in step 2.
4. Save this new file over the previous version of Chapter One.
Pull down File and choose Save As. The Save Document window will display.
Navigate the file system to get to the folder:
Documentation/Online Book Set/<the folder for your book>
Handbook for Technical Writers
56
Porting and Publishing the Online Books
In that folder, click on the file which contains Chapter One of the book. Click
S AVE . You will be asked to confirm that you wish to overwrite the existing file
with that name. Click OK. The file will be overwritten, using the templates
established in step 2.
5. Minimize the window containing Chapter 1.
6. Open the Book file for the book. With that window active, import all formats
into all non-generated files in the book.
Pull down File, highlight Import and select Formats from the side menu. The
Import Formats window will display.
Check the following:
The Import from Document field contains the name of the Chapter 1
document for this book, and that the current folder is in the Online Book
Set folder.
All formats are checked in the Import and Update section.
No formats are checked in the When Updating, Remove section.
All non-generated files are listed in the Update section.
All generated files are listed in the Don’t Update section.
Click I MPO R T .
FrameMaker will copy all the formats from the Chapter 1 file into all nongenerated files in the book.
7. From the Book file window, open the TPCOV file and minimize it.
8. From the Book file for that book, import the Color Definitions, Variable
Definitions and Conditional Text Settings into all files in the book.
Pull down File, highlight Import and select Formats from the side menu. The
Import Formats window will display.
Check the following:
The Import from Document field contains the name of the TPCOV file for
this book, and that the current folder is in the Online Book Set folder.
In the Import and Update section, only Color Definitions, Variable
Definitions and Conditional Text Settings are checked. All others must be
unchecked.
No formats are checked in the When Updating, Remove section.
All files are listed in the Update section.
No files are listed in the Don’t Update section.
Click I MPO R T .
FrameMaker will copy all the formats from the TPCOV file into all files in the
book.
9. Generate and Update the book.
Pull down File and choose Generate/Update. The Generate/Update Book
window will display.
Aptis™
Chapter 3 Publishing Procedures
57
Make sure that all the generated files are listed in the Generate section and
that none are listed in the Don’t Generate section.
Click U PD A TE .
10. When the updating process is complete, you will need to open each nongenerated file in the book individually. Page through the file using two-page
view (E SC Z P), looking for layout errors (primarily widows and orphans).
After you have completed a file, save it and go on to the next.
For guidelines of what to look for, see Reviewing Chapters on page 53.
11. Pull down File and choose Generate/Update. The Generate/Update Book
window displays.
Make sure that the Table of Contents, List of Figures, List of Reference
Figures and Index files are in the left-hand (Update) list. Click U PD AT E .
12. When the updating process is complete, you will need to open each generated
file in order, scanning for such layout errors as a subsidiary level beginning on
a different page than its leader.
Caution: Remember, when looking through the Table of Contents, List of Figures and List
of Report Figures files, that you must not alter the number of pages contained in
those files. It is better to leave an error than to change the number of pages.
The above warning does not apply to the Index file. Because it is at the end of
the book, adding pages to it will not cause its accuracy to be compromised.
For guidelines of what to look for, see Reviewing Generated Chapters on page
54.
13. When you are satisfied that everything looks in order, save the book in PDF
format.
Pull down File and choose Save As.
Make sure:
In the Save In area, the file will be saved within the Online Book Set
folder
In the File Name area, the book file name is correct
In the Save As Type, PDF is selected.
Click S AVE .
14. If your pdf file is in order:
a. Place the pdf file in the Doc:\Admin\Publishing\product\Online Doc Set
folder.
b. Notify the Documentation Manager that your book is done.
15. The Manager will verify the pdf version of the book.
If the pdf file is in order, you’re done.
If the Manager finds items in the pdf file that could be optimized, he/she will
let you know. You will then have to make the necessary improvements in the
FrameMaker files.
Handbook for Technical Writers
58
Porting and Publishing the Online Books
Finalizing the Online Documentation Set
1. Create the Contents file for the on-line documentation set in FrameMaker.
This file should contain a text entry for all of the books in the documentation
set plus entries for Reader Installation and Help Files in 32-bit versions. (See
an earlier contents file.)
2. Print the contents file using the Apple LaserWriter Pro 600 printer driver.
3. With the Contents.pdf file in the On-line Book Set subdirectory, open Acrobat
Exchange and make links from the contents file to the book files.
4. Generate an index for the documentation set using Acrobat Catalog. The
index should be created in the On-line Book Set subdirectory. This index is
used to do word searches on the entire documentation set (versus one book
file) when using the Acrobat Reader.
5. Update the readme.txt file if necessary.
Aptis™
A
abbreviations
and acronyms
An acronym is a pronounceable word formed from the initial letter or letters of major
parts of a compound term. An abbreviation is usually formed in the same way but is
not pronounced as a word. Acronyms are always all caps, regardless of the
capitalization style of the spelled-out form.
Abbreviations: bps—for bits per second
Acronyms: ROM—for read only memory
Always spell out an abbreviation or acronym on first occurrence, and define it if its
meaning isn’t self-evident. Include acronyms and abbreviations in the glossary.
Do not use periods except in abbreviations for English (nonmetric) units of
measurement or in the abbreviations U.S., A.M., and P.M. Do not add an apostrophe
before the s when forming the plural
ICs, RAMs, ROMs
For the rules on forming the plural of letters, characters, and symbols, see plurals.
Do not use e.g., etc., or i.e. Instead, use for example, and so forth, and that is, or the
equivalent phrase.
Many product names are acronyms for longer phrases that describe the product.
Expansion of such acronyms may be unnecessary if the acronym is commonly used,
such as the acronym BASIC. In such cases, omit the acronym definition.
Do not use abbreviations in chapter and section titles. Acronyms may be used in
chapter and sections titles providing they are defined in the text that follows.
Do not begin a sentence with an abbreviation. You may use an acronym to begin
sentences if they have been explained fully in the preceding text.
60
A
For rules on using abbreviations with numbers, see numbers.
above and below
Avoid using above, below, earlier, preceding, or later as pointers to information in text.
Where possible, use specific cross-references, for example, See the section Selection the
Driver. If you cannot use specific cross-references, use previous and following.
abort
do not use abort when you mean cancel. Avoid in user documentation.
access
Avoid using access as a verb. Use more precise examples.
Log on to...
accessory
Use accessory only for actual accessories such as carrying cases and mouse pages, not
for peripheral devices. Do not use accessory device.
active
Application Icon
Use when you name the icon in the menu bar that represents the active application.
adapter
Not Adaptor
address
Use this style when giving Aptis’ address:
Department Name / Contact Person
Aptis
8 Corporate Woods Blvd.
Albany NY 12211
or the appropriate address for your office site.
affect(v., n.),
versus effect(n.,
v.)
Consider the following guidelines when using the terms affect and effect. Unless you
are discussing emotional issues, use affect as a verb. Affect means to influence,
change, or have an effect on. Affect as a noun denotes an emotion or emotional
response.
Even minor changes affect the performance of the database.
Effect can be used a noun or a verb. When used as a noun effect means the result of
some action.
Even minor changes have an effect on the performance of the database.
When used as a verb, effect means to cause to happen or to bring about.
To effect even minor changes in the database, you...
allow
Avoid using allow when you can restructure a sentence so that the reader is the
subject. Use enable instead of allow.
Correct:
CD Author allows you to create a database.
Aptis™
Chapter 4 Terminology
61
Preferable:
With CD Author you can create a database.
alot
Do not use; if you mean “apportion” or “grant,” use “allot”. If you mean “a great deal”
or “often”, use those words, or when absolutely necessary “a lot”.
alphabetize
Alphabetize letter by letter, not word by word.
among /
between
Quoted from The Careful Writer by Theodore Bernstein:
If Miss Thistlebottom taught you in elementary school that between applies to two
things and among to more than two, she probably knew what she was doing: She
was making things easy for herself. It is simpler to lay down a rule than to try to
stimulate discriminating thinking, particularly in a school class that ranges from
blockheads to eggheads.
Among, to be sure, applies to more than two things, but the relationship it
expresses is usually a rather loose one. When three or more things are brought
into a relationship severally and reciprocally, between is proper. In the following
passage between would be better than among: “Apart from discussions among
Washington, Paris, and London on the prospective conference....” The idea of two
is inherent etymologically in the word between, but so is it inherent in the
discussions here referred to: the meetings were being held by Washington and
Paris, by paris and London, by London and Washington. Similarly, to speak of a
treaty between nine powers would be completely proper and exact. When the
relationship is looser, among is the proper word: “War reparations were
distributed among the nine victorious powers.”
Among shows a relationship between two items.
The following table lists the most common terms used among the technical writing
staff.
Between shows a relationship involving two or more items as long as the items are
considered separately. Between is typically followed by either a plural (between
machines) or by two or more expressions joined by and.
What is the difference between VISUAL, BASIC, and C++?
ampersand
Only use the ampersand character (&) when describing a command name or other onscreen element that uses the character. In all other cases, use the word and.
and / or
Rewrite to avoid this construction.
and also
Do not use; redundant.
angle brackets
Use angle brackets, not brackets, to describe these symbols: < >. When distinguishing
between the two symbols, write left angle brackets or right angle brackets.
You can also use greater than or less than to describe these symbols in the appropriate
context.
API
Acronym for Application Program Interface.
Handbook for Technical Writers
62
A
apostrophe
An apostrophe is curly; a foot-mark is straight.
Use the curly apostrophe except in command line descriptions.
appendix
Appendices contain reference material or material that supplements information
presented in the chapters of the document. Appendices may not be necessary in all
manuals; they are most often needed when the material in the documentation is
complex.
Typically, appendices contain the following information:
•
Error messages
•
Tables, graphs, and lists
•
Code examples
•
Bibliographic information
•
Detailed descriptions of equipment or procedures that may add additional
information that the reader may find useful, but not necessarily critical to the
operation of the equipment or procedure described.
•
Additional or advanced user information such as customizing a user interface,
dialog box, or menu option.
•
When a book has only one appendix, refer to it as Appendix, not Appendix A.
appendices
Not Appendixes.
application
In user manuals, when referring to a single application program, use application
program on first mention; thereafter, use program or application program. Avoid
using application by itself in user manuals.
Use application or end-user application when referring an application created using a
Aptis product.
application
software
Not applications software. Use only when referring to application software in general.
Use application program or program when referring to a single program.
Arabic (adj.)
Always capitalized when referring to numerals.
See also Roman, roman.
arrow
In user manuals, use pointer in general references; use arrow or arrow pointer when
describing the specific type of pointer shown in Figure 1.
The pointer becomes an arrow [or I-beam, or cross-bar, and so on].
arrow keys
Use lowercase when referring to the arrow keys; do not use the term direction keys.
Use the font style “Key/Button” when referring to a particular arrow key, such as
R I G H T A R R O W K EY.
Use the arrow keys to move the cursor from cell to cell.
Press the left arrow key.
Aptis™
Chapter 4 Terminology
as
63
Do not use as as a synonym for the terms because and while.
Do not confuse the conjunction as with the preposition like. As introduces clauses, like
introduces phrases.
as to whether
Do not use; the single word “whether” will suffice.
assure
Do not use assure when you mean ensure or insure. Assure means to remove the
doubt, or to be positive.
We assure our customers of our product quality.
Handbook for Technical Writers
64
B
B
basically,
essentially,
totally
These words seldom add anything useful to a sentence. Try the sentence without them
and, almost always, you will see the sentence improve.
being that or
being as
These words are a non-standard substitute for “because.”
below
Do not use below to describe an element that has not yet occurred in a manual. If
necessary, use a more specific reference, such as later in this chapter. For a chapter or
section, include the chapter or section title. For a figure or a table, include the number
of the figure or table.
For more information, see “Printing” later in this chapter.
For a summary of slot and drive and numbers, see XREF on page XREF.
between /
among
Quoted from The Careful Writer by Theodore Bernstein:
If Miss Thistlebottom taught you in elementary school that between applies to two
things and among to more than two, she probably knew what she was doing: She
was making things easy for herself. It is simpler to lay down a rule than to try to
stimulate discriminating thinking, particularly in a school class that ranges from
blockheads to eggheads.
Among, to be sure, applies to more than two things, but the relationship it
expresses is usually a rather loose one. When three or more things are brought
into a relationship severally and reciprocally, between is proper. In the following
passage between would be better than among: “Apart from discussions among
Washington, Paris, and London on the prospective conference....” The idea of two
is inherent etymologically in the word between, but so is it inherent in the
discussions here referred to: the meetings were being held by Washington and
Paris, by paris and London, by London and Washington. Similarly, to speak of a
treaty between nine powers would be completely proper and exact. When the
relationship is looser, among is the proper word: “War reparations were
distributed among the nine victorious powers.”
bibliography
Do not include a bibliography unless it serves a specific purpose. If you have relied on
printed sources other than Aptis manuals, you should credit those sources in a
bibliography.
If the scope of the manual is limited but you feel that many readers may want to seek
out more information on their own, a bibliography can also be useful.
The bibliography always begins on a new page.
bibliographic
entries
Aptis™
In each entry, invert the first author’s name (last name first, with a comma both
before and after the first name of names). Italicize book and periodical titles. Enclose
article titles in quotation marks. Do not give the name of the state or country when
the place of publication is a well-known city. If you need to provide a state name, use
the correct postal abbreviation.
Chapter 4 Terminology
65
For complete rules on bibliographic citation, refer to the Publication Manual of the
American Psychological Association, 4th edition (or the most current).
bit
Do not use when you mean pixel or a dot on the screen.
bitmap (n., v.),
bitmapped (adj.),
bitmapping (n.)
One word in all forms. You can use either bitmap font or bitmapped font, but be
consistent.
bits per second
(bps)
Not the same as baud. Spell out on first occurrence.
black-and-white
(adj.), black and
white (pred. adj.)
She’s writing about the black-and-white monitor.
blank character
Do not use; use space character.
blinking
Use blinking to describe the insertion point. Do not use the term flashing to mean
blinking.
board
Do not use to mean card. A board is built in, a card can be taken out by the user.
boldface
Use boldface for file names and path names. Do not use bold face introduce new terms,
use italics. You can use boldface for emphasis, but use sparingly.
The image on the screen is black and white.
This needs considerable thought and definition.
Boolean (adj.)
Note capitalization.
boot
Do not use for start up or switch on in user manuals. In manuals written for new
users, however, you may want to mention the term boot or include it in your glossary.
boot disk
Do not use except in technical documents; use startup disk.
bps
Abbreviation for bits per second. Spell out on first occurrence.
braces ({ })
Not curly brackets, but it’s OK to define braces as curly brackets on first mention.
When you need to distinguish between opening and closing braces, use left brace and
right brace.
In syntax expressions using brackets and braces, braces indicate that all of the
enclosed elements are required.
brackets ([ ])
Use the following guidelines when using brackets in text:
•
If you cannot avoid nested parenthetical remarks, use brackets for the inner
remark and parentheses for the outer remark.
•
If brackets enclose a sentence, place the period inside the right bracket.
•
If brackets enclose a phrase that ends in a sentence, place the period outside
the right bracket.
Handbook for Technical Writers
66
B
In syntax expressions using brackets and braces, brackets indicate that all of the
enclosed elements are optional. Braces, with choices stacked vertically within them,
indicate that the user should choose exactly one of the items.
built-in (adj.),
built in (pred.
adj.)
Hyphenate only before the noun.
The dialog box shows the name of the disk in the built-in drive.
The 3.5-inch disk drive is built in.
built-in disk
drive
Use either built-in disk drive or internal disk drive, whichever is used in the product.
built-in video
card
In user manuals, use to describe video cards that are installed at the factory; do not
use on-board video cards.
button
You click an on-screen button, you press a mechanical button. Capitalize names of
rounded-rectangle buttons as you would a title.
Click Cancel.
Click the Connect to Network button
Press the mouse button.
See also click.
buttons
When writing about a software’s application environment, buttons are on screen
controls that enable the end user to choose actions or operations. Use the names of
buttons as adjectives, not nouns.
Correct
Click the OK button.
Not correct
Click OK.
Capitalize the first letter of button names, use lowercase for all other letters; an
exception to this guideline is the OK button.
When referring to hardware, specify the type of button, such as an On/Off switch, or
mouse button.
Always refer to a key on the keyboard as key, not button.
Button tool
Aptis™
Note capitalization.
Chapter 4 Terminology
67
C
cable
Use cable to describe what physically connects two pieces of hardware.
cache (n., v.,),
cached (v.),
caching (n., v.,)
Note spelling. See also RAM cache.
call (a program)
Do not use call when you mean load.
callouts
A callout is a short text label with a line that points to part of a figure. Use callouts if
you need to identify something within a figure.
Callouts are usually positioned outside the boundaries of the figure, and a thin line,
known as a leader line, connects the callout to what it identifies within the figure.
Use callouts freely when they are necessary, but keep in mind that too many callouts
can be distracting to the reader. Keep callouts brief, both for clarity and for an
uncluttered look.
cancel
It’s OK to use cancel instead of halt to avoid awkwardness. In a dialog box in the
desktop interface, the user clicks the Cancel (note capitalization) button when he or
she does not want to continue performing a particular action.
canceled,
canceling
Not cancelled, cancelling
capitalization
all caps
THIS LINE IS AN EXAMPLE OF ALL CAPS
Avoid using all caps.
caps/lowercase
This Line Is an Example of Caps/Lowercase
Use caps/lowercase for book titles, part titles, chapter titles, titles of major sections of
disks, running feet that use chapter titles, and cross-references to such titles.
In cross-references to a specific appendix or chapter or to the preface capitalize the
word Appendix, Chapter, or Preface. But when referring to appendices, chapters, or
prefaces in general, do not capitalize the word appendix, chapter, or preface.
See the Preface for more information
See the Appendix for a list of specifications
The preface of a manual is a good place to explain the typographic conventions you
follow in the text.
Handbook for Technical Writers
68
C
In cross-references to sections that never take a title (glossary, index, table of
contents, and so on), do not capitalize the name of the section.
Follow these rules when using caps/lowercase:
•
Capitalize every word except articles, coordinating conjunctions, to infinitives,
and prepositions of three letters or fewer (except when a preposition is part of
a verb phrase).
Switching On the Computer
Introduction to the CD Answer for the Macintosh
How to Start CD Author
Getting Started With Databases
•
Capitalize the first and last word, no matter what their part of speech
Of Mice and Men
The Rule We Fail to Live By
•
Capitalize the second word in a hyphenated compound.
Correct
High-Level Event, 32-Bit Addressing
Exception
Built-in Disk Drive
•
Capitalize Is, It, Than, That, and This.
initial cap only
This line is an example of initial cap only.
Do not use initial cap in cross-references to section heads; use caps/lowercase.
When using initial cap only, capitalize only the first letter of the first word, as well as
the first letter of any proper nouns and proper adjectives.
file names
Use lowercase, bold letters for file names, unless they are case sensitive.
need discussion of this
my_file. txt
Pathnames
Use lowercase, bold letters for pathnames, unless they are case sensitive.
need discussion of this
C:\pegasus\docs\relnotes
Aptis™
Chapter 4 Terminology
captions
69
Figure captions and table captions should be initial cap only. In general, a caption
should read like a title. Do not use a caption to explain a figure at length; make the
explanation part of the regular text preceding the figure.
Do not use figure captions or table captions; instead use the defined stles of Figure
Heading and Table Heading. These items should use caps/lowercase style.
card
Refers to a removable circuit board that is installed in as slot. Compare board.
caret
Do not use when you mean circumflex. A caret (^) is used, for example, to mark a
dynamic variable in PASCAL.
carriage return
Use only when referring specifically to ASCII character $0D or its equivalent. Use
return character when writing about, for example, searches for return characters. Use
Return key for the key you press.
CD
Abbreviation for compact disc. Spell out on first occurrence.
CD-ROM
Abbreviation and acronym for compact disc read-only memory. For Commsoft’s
audience it is not necessary to spell out CD-ROM.
Note hyphenation and capitalization.
As a plural use CD-ROM xxx (where xxx is discs, or volumes, or drives, and so on).
central
processing unit
(CPU)
Spell out on first occurrence. Do not use when referring to the whole computer.
chapter
Capitalize the word chapter in references to specific chapters.
Chapter 5, “Expanding Your Database”.
Chapters 4 and 5.
in the next chapter.
chapter opener
Include a paragraph of chapter-opening text for all sections. This material introduces
the chapter to your reader.
chapter table of
contents
Do not include a chapter table of contents at the beginning of each chapter. However,
if there is a significant amount of material in the chapter you may include a bulleted
list of topics readers should be aware of.
character
Use in reference to what a key on the computer’s keyboard stands for.
Compare symbol.
check
Do not use when you mean the action of clicking a checkbox to select an option.
checkbox
Refers to an on-screen box. Checkbox is one word; note lowercase. Not box or ballot
box. You click a checkbox to select or deselect an option; you do not check or uncheck a
checkbox.
Handbook for Technical Writers
70
C
See also button, radio button.
checkmark
Refers to the X that’s in a checkbox when the checkbox is selected. One word.
choose
Use choose, not select, for menu commands. In general, the user selects something
(such as a disk icon, a graphic image, or a section of text) and then chooses a command
to act on the selection.
For tear-off menus that become palettes, choose is still appropriate. See also select.
click
On first occurrence, describe the action of positioning the pointer on an object and
briefly pressing and releasing the mouse button. You do not click on the mouse button,
you press and release it. After that, simply refer to the object to be clicked.
Icon: Click the disk icon.
Button: Click the cancel button.
Checkbox: Click Auto Page Numbering.
click and drag
Do not use. You either click or you drag.
Correct
You drag the file to the C:\ drive.
Click the icon to select and then drag it to the C:\ drive.
click in
You click in a window or region, such as a scroll bar; you click all other on-screen
elements, such as icons, checkboxes, and buttons.
click on
Do not use; use click.
close
You close a window or a document. Do not refer to an icon as a closed window.
See also open.
close box
Note lowercase.
code
Use code when offering code samples. Code is new courier, 9pt.
If the language you are working in has a standard style of indentation, use it. If it
doesn’t have such a style, develop a logical method of your own and use it consistently.
Develop a method of spacing around punctuation and use it consistently. It’s often
best to use “English-style” spacing because it’s easy to remember and stick with.
Use code for what the user types, for program listings, and for small pieces of sample
code.
For more detailed guidelines on using computer voice in technical documentation, see
“Code in Text” in Appendix A.
Aptis™
Chapter 4 Terminology
71
Do not use code for names of buttons, bars, menu commands, menu titles, or other onscreen elements that are caps/lowercase; use regular text font for this purpose. For
such items that are initial cap only, use regular text font in quotation marks.
Click the Cancel button.
Choose Page Setup from the File Menu.
Click the “Keep lines together” checkbox.
Do not use code for error messages or system messages. If you quote a message
exactly as it appears on the screen, use regular text font in quotation marks. If you
paraphrase a message, use regular text font without quotation marks.
In user manuals, do not use code in part of chapter titles; text heads; cross-references
to parts, chapters, or sections; or entries in the table of contents. Avoid using code in
callouts and figure captions.
Do not use code for names of files, folders, or directories.
Punctuation following a word or phrase in computer voice is in regular text font, not
in code, unless the punctuation mark is part of the computer language element
represented or part of what the user should type.
code file
Two words, except in reference to the Pascal predefined file type codefile.
code names
Use exactly the same form for a product’s code name throughout a manual or product
training disk. (If the name is sometimes misspelled or otherwise treated
inconsistently, a global search-and-replace is not possible.)
colons
Avoid using colons in text heads, if it is absolutely necessary to use a colon in a
header, capitalize the first word after the colon.
color pixels
Not colored pixels.
command
Use command or menu command in user manual; do not use menu options.
The menu contains a list of commands.
Use the Save command to save any changes to your file.
Use menu item to refer to items in the menu and open programs in the Application
menu. A command is in a menu, not on a menu; a menu contains commands.
command
names
Use caps/lowercase; do not capitalize command.
the Find command
Do not capitalize a command name when used as a normal English verb.
Choose Cut from the Edit menu.
Now cut the selected text from your document.
Handbook for Technical Writers
72
C
Some commands have an ellipsis (“...”) following the command name in the menu. Use
the periods in any text head made up solely of the command name and in the
corresponding table of contents entry; do not use the periods in running text or in the
index.
For commands or other on-screen elements of two or more words whose names are
initial cap only, use quotation marks.
Click the checkbox labeled “Keep lines together.”
commas
Use the serial comma (a comma preceding and or or in a list of three or more items).
compact disc
(CD)
Not compact disk. It is not necessary to spell out on first occurrence in Commsoft
documentation.
Company, Co.
Spell out or abbreviate according to the particular company’s preference.
compiler
Capitalize compiler only when using the full name.
The Metrowerks Compiler is not the only compiler we use.
compile time
(n.), compiletime (adj.)
Note hyphenation of adjective.
comprise
A whole comprises parts. Parts constitute a whole. Do not use is comprised of.
A class comprises students.
Students constitute a class.
considered to be
Eliminate the “to be” and, unless it’s important who’s doing the considering, try to
eilimate the entire phrase.
constitute
Parts constitute a whole. A whole comprises parts.
Students constitute a class.
A class comprises students.
container
Avoid in user documentation except when explaining what a folder or disk is; use
folder or disk.
Control
The key. Do not use CTRL. Ctrl is OK when space constraints do not allow use of the
full term.
control
character (n.),
controlcharacter (adj.)
Note hyphenation of adjective.
Control key
The name of the specific key is capitalized: Control key.
controlled,
controlling
Not controled, controling.
Aptis™
Chapter 4 Terminology
73
controller card
Refers to a type of card that drives or controls a peripheral device. Be specific: disk
controller card.
control panel
Lowercase. Refers to a file of type ‘cdev’ that allows the user to set or control some
features of hardware or software, such as the volume of the speaker or the number of
colors displayed on screen. Such files are available in most operating languages. Refer
to a control panel by its name (capitalized) and add the words control panel
(lowercase)—Views control panel, Map control panel, and so on. However, refer to the
General Control control panel as the General Controls panel.
Control Panels
folder
Note lowercase folder.
coprocessor
No hyphen.
copy
To put a copy of something on the Clipboard by selecting it and choosing the Copy
command from a menu.
copy-protect (v.),
copy-protected
(adj., pred. adj.),
copy-projection
(n.)
Hyphenated in all forms. A copy-protected disk or file is one that cannot be copied
legally. Compare with write-protect, write-protected, write-projection.
copy right page
All manuals and updates must have a copyright page or copyright notice. This page is
always the second in a book and does not have a page number or a footer.
The copyright page is a boilerplate element and is part of the Cover template and
must include a document part number.
All trademarked products (third-party) mentioned in the manual must receive a credit
line on the copyright page.
For information on trademark symbols, see Trademark.
cord
Use only when describing the power cord.
Corporation,
Corp.
Spell out or abbreviate according to the particular corporation’s preference.
CPU
Abbreviation for central processing unit. Spell out and define on first occurrence. Do
not use when referring to the whole computer.
CR
Abbreviation for carriage return. Do not use. Use Return key for the key you press.
crash
In manuals for new users, reassure the reader that the term crash does not imply
damage to hardware.
crossbar
One word.
crosshair
One word. Refers to a pointer that is always two fine crossed lines. Use only when the
thickness of the lines does not change.
Handbook for Technical Writers
74
C
crossreferences
to chapter titles
use caps/lowercase and enclose the title, but not the word Chapter or the chapter
number, in quotation marks.
See Chapter 2, “Using CD Answer to Retrieve Information.”
to disk titles
In manuals, use caps/lowercase and italics; do not use quotation marks. Do not
capitalize or italicize the word disk unless it’s part of the title as it appears on the disk
label. Do not include trademark symbols.
Tutorial disk
CD Answer Basics
In on-screen text, use quotation marks, not italics.
to manual titles
In manuals, use caps/lowercase and italics; do not use quotation marks. Do not
capitalize or italicize phrases like user’s guide unless they are part of the title as it
appears on the cover of the manual. Do not include trademark symbols.
See Getting Started With Pegasus
See your Pegasus user’s guide.
In on-screen text, use quotation marks, not italics.
to section titles
Use caps/lowercase and enclose the title in quotation marks.
See “Trouble Installing Pegasus” in Chapter 1.
Ctrl
Abbreviation for Control; initial cap only. Use only when space constraints do not
allow use of the full term (as in column heads in tables); otherwise, use Control, as in
Control key or Control-S.
Curly brackets ({
})
Do not use; use braces. It is OK to define braces on first mention as curly brackets.
cursor
Use insertion point or pointer, depending on context. Cursor may be appropriate in
describing other interfaces and in technical manuals.
cut
To remove something by selecting it and choosing the Cut command from a menu. The
selection is placed on the Clipboard.
Aptis™
Chapter 4 Terminology
75
D
em dash
dashes
Use the em dash (—, alt-0151, Ctrl-q Q) to set off a word or phrase that interrupts or
changes the direction of a sentence or to set off a lengthy list that would otherwise
make the syntax of a sentence confusing. Do not overuse em dashes. If the text being
set off does not come at the end of the sentence, use an em dash both before and after
it.
In cross-references to a specific part of a manual, use an em dash to separate the part
number from the part title.
For more information, see Getting Started With Pegasus: Part 1—Setting Up Your
Computer.
en dash
Use the en dash (–, Control-q P) for the following purposes:
•
between numbers that represent the endpoints of a continuous range: bits 317, 1986-1987 (but see exception following this list)
•
between the elements of a compound adjective when one of those elements is
itself two words
•
between keystroke names in a combination keystroke when at least one of
those names is itself two words: Option-right bracket, Option-Up Arrow
•
to separate double-click from other keystroke names in a combination
keystroke (but use hyphens elsewhere in the sequence)
•
as a minus sign
Some programming languages, such as Pascal, use two unspaced periods to represent
a range of numbers in code: 0..15. Use this form for number ranges in code only. Use
the en dash elsewhere.
Do not confusion the en dash with a dash (-, the key on the keyboard)
See also hyphenation.
data
Singular or plural, depending on the context. When used as a collective noun, data
takes a singular verb. When the meaning is not collective, use a plural verb. In user
manuals, avoid in favor of information if information make sense in the context.
database (n,
adj.‘)
One word. As a noun, database refers to the body of data manipulated by a database
program.
data file
Two words, except in reference to the Pascal predefined file type datafile.
date/time record
Note slash and lowercase.
default
Define on first occurrence.
Handbook for Technical Writers
76
D
dehighlight,
dehighlighted
Do not use. Use deselect as a verb when appropriate; otherwise reword. Use not
highlighted as an adjective.
DEL character
Not DELETE character or rubout character. Refers directly to the ASCII character
$7F.
Delete
The key; not DEL key.
Compare Forward Delete (Fwd Del).
depress
Do not use; use press.
deprotect
Do not use; use remove protection.
deselect (v.)
OK to use when you mean cancel a selection. Not uncheck, unselect, unhighlight, or
dehighlight.
Compare unselected.
desktop (n., adj.)
One word lowercase. Refers to the working area on the screen when the Finder is
active. Use desktop or Finder desktop in user manuals when discussing activities the
user performs or things the user sees on the desktop.
device
Use to refer to any piece of hardware that connects directly (or indirectly through a
network) to the computer. User peripheral device on first mention.
Compare accessory.
device name
Two words. Note the treatment of these similar terms: file name, pathname, user
name, volume name.
dialog box
Refers to a box that appears on the screen to request information. Do not use just
dialog to refer to a dialog box. Name dialog boxes only if necessary. Naming a dialog
box after the command that brings it up to the screen is preferable. (The application
selection dialog box is the exception because it appears so often.)
Avoid naming features within dialog boxes if at all possible. Instead, rely on figures
with explanatory callouts about the function of each feature. If you need to name a
feature, give it a generic name (such as text box) and make it as unobstrusive a part of
the explanation as you can.
dialog message
Do not use; use message.
different from
Not different than. Make sure that both elements being compared are parallel nouns.
The user interface of CDAuthor is different from that of Pegasus.
differently than
Use when comparing two parallel clauses. do not use different than, different from, or
differently from for this purpose. Rewrite whenever possible to set up a construction in
which different from is used to compare two parallel nouns.
She uses the computer differently than he does.
Aptis™
Chapter 4 Terminology
77
dimmed
Use grayed out, not dimmed or hollow, to describe a shaded icon, menu command,
button, or option in a dialog box.
direction keys
Do not use; use arrow keys.
directory name
Refers to the name that appears above a list (directory) of files in a dialog box. Do not
use menu title for this purpose.
disabled
In user manuals, do not use when you mean dimmed.
disc
Use only when referring to a compact disc, videodisc, optical disc, or other laser
technology discs; otherwise, use disk. In ongoing references to compact discs, disc is
preferable to CD or CD-ROM.
See also CD-ROM.
disk
Not diskette, flexible disk, floppy, floppy microdiskette, micro diskette, or
microfloppydiskette. Not disc except when referring to a compact disc, videodisc,
optical disc, or other laser technology discs.
If the medium is magnetic it’s disk. Use floppy disk to distinguish from hard disks or
compact discs; never use just floppy for this purpose. In user documentation, use disk
instead of volume to refer in general to floppy disks, hard disks, shared disks, and CDROM discs.
Use an article when appropriate; the disk; a disk; save on a disk; not save to disk.
Never use as a short form for disk drive.
Describe a disk according to the following criteria (and in this order):
6. storage capacity, in number of bytes
7. physical size in inches or centimeters, but always use decimals rather than
factions
8. removability from its drive (removable or fixed)
9. flexibility of medium (floppy or hard)
800K 3.5-inch removable floppy disk
Include only as much information as is necessary to avoid confusion in the context of
each description.
disk drive (n.,
adj.)
When mentioning a particular device, do not capitalize disk drive or drive
disk drive 1, drive A.
When describing a preprinted disk drive label, however, follow the capitalization style
used on the label.
Do not hyphenate disk drive when it is used as a compound adjective.
See also drive.
diskette
Do not use; use disk.
Handbook for Technical Writers
78
D
disk name
Use when referring to the name for the disk as it appears on the desktop interface; do
no use disk title for this purpose.
Disk Operating
System
Not necessary to spell out; use DOS.
disk titles
Use caps/lowercase and italics for the full title of a disk. The word disk may or may
not be part of the title; follow the usage on the official label. The is usually not part of
the disk title.
Use lowercase when referring to a disk by less than its full title. or for disks with
“generic” titles.
Insert the system disk into the internal drive.
The installer program is on the printer installation disk.
display
Do not use when you mean desktop or screen, or when referring to a cathode-ray type
monitor.
display device
Refers to a device connected to the computer that displays text or graphics. If possible,
be more specific: monitor or television set.
display system
Refers to a monitor and the display card (sometimes called a video card) that supports
it.
document
In user manuals, refers to a file the user creates and can open, edit, and print.
Compare file.
document
window
Do not use; use document or window, not both.
done
Use done as a complement; use finish or complete as a verb.
DOS
Acronym for Disk Operating System. It is not necessary to spell out on the first
occurrence.
dot
use dot, not bit, when describing an individual screen pixel.
See also pixel.
dot matrix (n.),
dot-matrix (adj.)
Note hyphenation of adjective.
double click (n.),
double-click (v.),
double-clicking
(n., v.)
Note hyphenation.
Down arrow
The key.
download (v.),
downloadable
(adj.)
One word. A file that can be downloaded is a downloadable file.
Aptis™
Chapter 4 Terminology
drag
79
Refers to the act of positioning a pointer, pressing and holding the mouse button,
moving the mouse, and then releasing the mouse button. If you are writing for new
users, define on first mention.
Always use drag in reference to objects on the screen. Do not use drag the mouse. Do
not use click and drag.
drive
Use disk drive except in passages in which using both words becomes cumbersome or
overly repetitive. Do not capitalize drive or disk drive except with describing a
preprinted disk drive label on which the term is capitalized, or when using a product
name.
drivers
Capitalize the word driver in a driver name only if it is part of the product name; for
example, Sound Driver or Disk Driver. When using the term driver generically, as in
printer driver, do not capitalize.
drop box
Do not use.
due to the fact
that
Using this phrase is a sure sign that your sentence is in trouble. Did you mean
“because”? “Due to” is acceptable after a linking verb; otherwise, avoid it.
Handbook for Technical Writers
80
E
E
each and every
One or the other, but not both.
edition
Lowercase. Not edition file except where necessary for explanation.
editor
Capitalize editor only when using the full name: the MPW editor, but the editor.
effect (n., v.),
affect (v.)
Consider the following guidelines when using the terms affect and effect. Use affect as
a verb. Affect means to influence, change, or have an effect on.
Even minor changes affect the performance of the database.
Effect can be used a noun or a verb. When used as a noun effect means the result of
some action.
Even minor changes have an effect on the performance of the database.
When used as a verb, effect means to cause to happen or to bring about.
To effect even minor changes in the database, you...
e.g.
Do not use; use for example or such as.
eject (trans. v)
Do not use as an intransitive verb
The disk drive ejects the disk
ellipsis points
Some commands have three unspaced periods following the command line name in
the menu. Use the periods in any text head made up solely of the command name and
in the corresponding entry in the table of contents; do not use the periods in running
text or in the index.
When three periods are used to present material omitted with a quotation, or text that
trails off, the printing convention is to separate the periods with spaces.
When the material preceding the ellipsis points is a complete sentence, add a fourth
point as a period, before the ellipsis points and closed up with the last word.
Some programming languages, such as Pascal, use two unspaced periods to represent
a range of numbers in code: 0..15. Use this form for number ranges in code only. Use
the en dash elsewhere.
embed
Not imbed.
em dash
See dashes.
en dash
See dashes.
ensure, insure
Use ensure to mean make sure or guarantee. Use insure to describe what an
insurance company does.
Aptis™
Chapter 4 Terminology
enter
81
Do not use when you mean type or press. Enter is appropriate when referring to data.
Enter implies typing information and pressing the Enter or Return key.
You enter data, type words and characters, and press keys.
Compare press, type.
entitled
Do not use; use titled or named, or named.
EOF
Abbreviation for end-of-file. Spell out on first occurrence.
error messages
Enclose in quotation marks; reproduce exact spelling and punctuation (even if
incorrect).
equal sign
Not equals sign or equal symbol.
equally as
Something can be “equally important” or “as important as”, but not “equally as
important”.
Esc
The key. Include the word Escape in parentheses on first occurrence.
Press the Esc (Escape) key.
When describing escape sequences, do not use hyphen between names of keys,
because the keys are pressed and released separately.
et al.
Do not use; use and others.
etc.
Do not use; use and so on.
Better still, provide one more example to suggest that you could have written more,
but chose not to.
exit
You exit from, leave, or quit a program. You never exit a program.
Handbook for Technical Writers
82
F
F
face
Do not use; use font or font family, whichever is appropriate.
felt-tip pen
Note hyphenation. Not felt-tipped pen.
female
connector
Do not use; use socket.
See also connector.
fewer, less
Use fewer for countable items; use less for quantity or bulk.
Field tool
Note capitalization.
figure
Line art, photographs, and screen shots are all considered figures. Figures should be
used when their presence will enhance the reader’s understanding or enjoyment or
will illustrate a procedure or point that is not evident from the text alone.
Whimsical line art can be appropriate in a manual, as long as it is used to help
telegraph the sense of a topic to the reader.
figure caption
Most figure captions include both a figure number and a figure title. Not all figures
need caption; you may spoil some of the effect of whimsical line art, for example, if you
belabor the obvious by giving such a figure a number and title. But anytime you need
to refer specifically to a figure, that figure needs a number and a title.
Unnumbered figures are not included in a list of figures and tables. A figure with a
number must also have a title; a figure with a title generally has a number.
Figure titles should be short and to the point; a line and a half should be considered
the absolute maximum. Avoid changing type styles in figure titles.
Capitalization style for figure titles is initial cap only; there is no ending punctuation,
even if the figure caption is a complete sentence. Use articles in captions whenever
appropriate.
All numbered figures should have appropriate in-text references to point the reader to
the appropriate figure.
In-text references can follow three styles:
•
at the end of the text sentence, in parentheses:
Choose Create Database from the Compile menu (see Figure 1).
•
standing alone as a complete sentence without parentheses:
See Figure 1.
•
as part of a sentence:
You can also use, as shown in Figure 1, the Compile menu.
You can use either of these styles, but be consistent.
figure text
Aptis™
Use figure text, also known as labels, for any type that accompanies a figure but is not
connected to the figure by a leader line. Keep labels brief.
Chapter 4 Terminology
file
83
Refers to any entity stored on a disk, regardless of whether the user can open, edit, or
print it.
Compare document.
file name
Two words. In specific references, capitalization should agree with the catalog or
directory listing.
Note the treatment of these similar terms: device name, pathname, user name,
volume name.
file server
Two words. In user documentation, use only when you are explaining what a file
server is (a computer that is dedicated to holding files shared by users on a network).
Use shared disk to refer to a file server icon on the desktop.
See also shared disk.
file sharing (n.),
file-sharing (adj.)
Two words. Note hyphenation of adjective.
file types
Two words.
finish
Do not use is finished with. Use finish as a verb and done as a subject. But do not use
done as a subject complement if the subject is a person.
first person
Do not use.
firstly, secondly,
thirdly
Number things with first, second, third (or numerals), not with adverbial forms.
fixed-width (adj.)
Preferred to describe fonts, such as Courier, in which each character takes up the
same amount of space on the line.
flashing
Do not use to describe the insertion point or the cursor; use blinking for this purpose.
flexible disk
Do not use; use disk.
floppy, floppy
microdiskette
Do not use; use disk. Use floppy disk to distinguish from hard disks or compact discs;
never use just floppy for this purpose.
flowchart
One word.
folder
A folder can contain documents, applications, and other folders. Folders are
sometimes called subdirectories.
Capitalize folder names according to how they are named and how they appear on the
screen. If the word folder does not appear in the folder name, do not capitalize the f.
folio
Page numbers, or folios, appear on all pages except the inside front and back covers,
the title page, the copyright page, liability page, part openers, and any blank left-hand
pages preceding chapter openers. In front matter (including the preface), folios are
lowercase Roman numerals. In the text and back matter, folios are Arabic numerals.
font
A complete set of characters in one typeface (such as Palatino).
Handbook for Technical Writers
84
F
format (n.)
Refers to the arrangement of appearance of text, graphics, and other elements (such
as footers) on a page.
format (v.)
When referring to disks and tapes use format rather than initialize.
form feed (n.),
form-feed (adj.)
Note hyphenation of adjective.
forward delete
(FWD Del)
Do not use.
fractions
In nontechnical documentation, spell out fractions whose denominator is 10 or less in
running text. Spell-out fractions are hyphenated: one-tenth, one-fifth, and so on.
front, frontmost
The active window is the front or frontmost window.
front matter
Front matter elements include the inside front cover, the title page, the copyright
page, liability page, the table of contents, the list of figures and tables, the RFI
statement, and the preface. Front matter pages are numbered with lowercase Roman
numerals rather than Arabic numerals.
Some front matter elements are boilerplate elements; use the appropriate boilerplate
information.
function keys
Refers to the keys on the keyboard labeled F1, F2, F3, and so on. Note that function is
lowercase.
future tense
Do not use.
Aptis™
Chapter 4 Terminology
85
G
gage
Never. See gauge on page 85
gauge
This is the correct spelling.
GB
Abbreviation for gigabyte.
Gbit
Abbreviation for gigabit.
glossary
The writer determines whether a book needs a glossary.
Select terms for inclusion in the glossary with the most naive user in mind. Terms
unfamiliar to most readers should always be included in the glossary. Such terms
should also be defined on first occurrence and shown in italic in the text.
graphic (adj.)
Not graphical; except in graphical user interface.
graphical user
interface
Note lowercase.
graphics (n, adj.)
The noun form usually takes a singular verb.
Use graphics (not graphic) as an adjective in relation to the field of graphic art or
graphic design.
gray
Not grey.
grayed
Use grayed out instead of dimmed or highlighted in gray.
See also dimmed.
grayscale
One word.
greater-than
sign
Note hyphenation. Not greater-than symbol. You can also use right angle bracket if
appropriate in the context.
grounded outlet
Not grounding-type outlet.
Handbook for Technical Writers
86
H
H
halt
Refers to what happens when the operation of a program stops. Compare abort;
cancel; exit; interrupt; stop.
hard disk (n.,
adj.)
Two words.
HD disk
Do not use. Use high-density disk.
He/she
Do not use. Use “he or she” or pluralize (if appropriate) to avoid the problem of the
gender-specifi pronoun altogether.
hexadecimal
Expressed in base-16. Base-16 has the “digits” 0 through F; this allows you to make
numbers which look like words, such as CAD (which has a base-10 value of 3,245
[12*256 + 10*16 + 13]).
hierarchical
Not hierarchial.
high-density
disk
Preferable to KD or 1.4MB floppy disk. Explain on first use that these disks contain
1.4MB of storage space.
highlight (trans
v.)
No hyphen. Not hilight. Refers to what you do to an option to indicate that you want
to select it.
highlighted (adj.)
No hyphen. Not hilighted. Use “a highlighted icon changes color” or “a highlighted
icons is filled in.”
Do not use unhighlighted or dehighlighted for an item that isn’t highlighted; use not
highlighted.
highlighting (n.)
No hyphen. Not hilighting. Refers to the inverse display (text is light on dark when
surrounding text is dark on light) of an option. Do not use highlight as a noun.
high resolution
(n.), highresolution (adj.)
The short form hi-res (n., adj.) is OK if space constraints warrant it.
hyphenation
Turn hypenation off. Try not to hyphenate if at all possible.
Aptis™
Chapter 4 Terminology
87
I
I
Do not use first person.
I-beam
Note capitalization. Refers to the pointer.
IC
Abbreviation for integrated circuit. Spell out on first occurrence.
i.e.
Do not use; use that is.
IEEE
Abbreviation for Institute of Electrical and Electronic Engineers. Spell out on first
occurrence.
imbed
Do not use; use embed.
in terms of
Try to eliminate this phrase
Incorporated,
Inc.
Spell out or abbreviate according to the particular corporation’s preference.
index
Manuals of more than 30 pages should have an index.
indicator
Refers to the wedge-shaped symbol that appears in certain menus.
information
Use instead of data in user manuals if it makes sense in the context.
INIT
INIT refers to files that contain ‘INIT’ resources and thus start up when the user
turns on the computer.
initialize
Do not use when referring to tape; use format for this purpose. When referring to
disks, initialize and format mean the same thing.
in order to
Not necessary; use to.
inline
One word.
input (n., adj.)
Do not use as a verb; use enter or type, depending on the context.
input/output
(I/O) device
Note capitalization and slash. Spell out on first occurrence.
insertion point
Always preceded by an article.
The insertion point does not flash, it blinks.
inside
Not inside of.
insure, ensure
Use insure to describe what an insurance company does. Use ensure to mean make
sure or guarantee.
integrated
circuit (IC)
Spell out on first occurrence.
Internet
Note capitalization.
Handbook for Technical Writers
88
I
interrupt
Use as a verb when describing what happens at the hardware level when a running
program is stopped. Hardware interrupts a running program; a user stops a running
program.
in-use light
Note hyphenation.
inverse,
displayed in
If you include this term in a user manual, be sure to explain it on first occurrence.
inverted
Do not use when you mean highlighted.
invoke (a
program)
Do not use; use load or run, whichever is appropriate in the context.
I/O device
Abbreviation for input/output device. Note capitalization and slash. Spell out on first
occurrence.
Italic
Use italics for
•
references to titles of disks and titles of manuals
•
letters as letters, words as words, and phrases as phrases
the i, the o’s
the word boot
the phrases Welcome to Billing Concepts
But: Type Q, press Ctrl-S.
•
emphasis
•
metasymbols in syntax examples
•
introduce terms
In on-screen text, use quotation marks.
In manuals use italics, not quotation marks, after stands for, labeled, named, termed,
the term, and so on. If the term is an on screen element, however, use plain text for
elements whose names are caps/lowercase or plain text in quotation marks for
elements whose names are initial cap only.
Aptis™
Chapter 4 Terminology
89
J
jargon
Avoid jargon whenever possible.
justification
Do not use to refer to the alignment of text to the right or left margin; use alignment.
Text that is aligned on both the right and the left margin is justified.
Compare alignment.
Handbook for Technical Writers
90
K
K
K, KB
Abbreviation for kilobyte.
Kbit, Kbits
Abbreviation for kilobit and kilobits.
keyboard
equivalent
Not Command-key equivalent unless all combinations referred to use the command
key.
key-down (adj.)
Note hyphenation.
keypad
One word. Use keypad or numeric keypad, not numerical keyboard.
keypress
One word.
keys
Use caps/lowercase for names of modifer keys: Option key, Control key, Shift key. You
press a key; you type a character, word, or phrase.
In general, do not use articles in reference to key.
Press Control.
But ease the user into the documentation by using the and key the first time you
mention a keystroke.
Press the Control key.
In combination keystrokes, use hyphens to signify that the first key or keys should be
held down while the last key is pressed. Do not use hyphens if each key should be held
down separately. Be sure to explain this convention on first use.
Control-Shift-N
Esc N
keystroke
One word.
key-up (adj.)
Note hyphenation.
keyword
Refers to a special word that identifies a particular type of statement or command,
such as IF. Follow the capitalization of the programming language involved.
kilobit
See Kbit, Kbits
kilobyte
See K, KB
Aptis™
Chapter 4 Terminology
91
L
labeled, labeling
Not labelled, labelling.
labels
See figure text.
leave
You leave, exit from, or quit a program. You never exit a program.
Compare abort; cancel; halt; interrup; stop.
Left arrow
The key. When referring to more than one of the arrow keys, arrow is lowercase (as in
the arrow keys).
left-hand
Avoid except in reference to left-hand pages; use just left whenever possible.
leftmost
No hyphen.
left side
Not left-hand side.
less, fewer
Use less for quantity or bulk, use fewer for countable items.
less-than sign
Note hyphenation. Not less-than symbol. You can also use left angle bracket if
appropriate to the context.
letter-quality
printer
Note hyphenation.
limited warranty
Note lowercase.
line
Not necessarily the same of statement. One line may contain several statements, and
one statement may extend over several lines.
line fed (n.), linefeed (adj)
Note hyphenation of adjective.
linker
Capitalize linker only when using the full name; The Metrowerks Linker, but the
linker.
lists
There are three types of lists: bulleted, multicolumn, and numbered.
Avoid subnesting lists within lists.
bulleted list
Use a bulleted list when you want to stress the parallelism of a number of options,
elements, rules, or instructions that need not be presented or performed in a
particular order.
Within a single list, make all bulleted items parallel.
Handbook for Technical Writers
92
L
Bulleted lists generally fall into one of the following categories:
•
a regular sentence divided into a list
This type of list emphasizes the parts of a series. The syntax of the
sentence is unbroken; there is no colon after the main clause, and each
bulleted item is a sentence fragment with no close punctuation.
•
a simple list
The main clause is followed by a colon, and each bulleted item is a
sentence fragment with no punctuation.
•
a complex list
The main clause is followed by a colon, and each bulleted item is a
complete sentence closed with a period.
multicolumn list
Use a multicolumn list when you want to present simple data in tabular form without
all the formal parameters of a table. You may use column heads. A multicolumn list
does not have spanners, row titles, or stubs.
multicolumn lists do not have numbers or titles.
Do not use multicolumn lists for complex information or for lengthy lists of data. The
entire list should not exceed one page; and for best results should not be more than
one half of a page.
numbered list
Use a numbered list when you want to stress the sequential nature of steps, rules, or
instructions.
Each item in the list should be a complete sentence. Begin each item with a capital
letter and end each sentence with closing punctuation.
load (a program)
Not call or invoke.
local area
network (LAN)
Three words.
lock
Users lock documents or applications; they write-protect their disks. Disks are copyprotected by the manufacturer.
logical
operators
Do not use as verbs.
log in (v.), login
(adj.)
Do not use login as a noun or a verb. When referring to the command, use lowercase
code.
log off (v.), logoff
(adj.)
Do not use logoff as a noun or a verb. When referring to the command, use lowercase
code.
Aptis™
Chapter 4 Terminology
93
log on (v.), logon
(adj.)
Do not use logon as a noun or a verb. When referring to the command, use lowercase
code.
look up (v.),
lookup (n., adj.)
Spell the verb as two words, close up the noun or adjective.
lowercase
One word, no hyphen (exception to American Heritage). When used in conjunction
with uppercase as a noun, use uppercase and lowercase, both words spelled out in that
order.
Handbook for Technical Writers
94
M
M
Main Bill-to
Number
Use caps as shown when referring to the field; use all lower-case when referring to the
concept, except when beginning a sentence.
main logic board
Not motherboard or main circuit board. You can also use main board.
main memory
Not central memory.
male connector
Do not use; use plug. See also connector.
manual titles
In manuals, use italics for full titles; in on-screen text, use quotation marks.
Use caps/lowercase as used in the title. The article the is usually part of the manual
title. Always give the title exactly as it appears on the manual (but eliminate any
trademark symbols).
When referring to an edition number, use lowercase and spell out both the ordinal
number and edition.
Technical Introduction to the Macintosh Family, second edition.
Generic references to manuals are neither capitalized nor italicized.
See the owner’s guide that came with your printer.
Note that not all titles include the word guide. See also cross-reference; volume
(book).
mass storage
device
OK in reference to a hard disk drive, a tape backup unit, or a CD-ROM drive, but not
in reference to a 3.5 inch or 5.25 inch disk drive.
MB
Abbreviation for megabyte. Spell out on first occurrence.
The adjective form is not hyphenated: 20 MB hard disk.
In the noun form, a space separates the numeral and the abbreviation, and the preposition of is
necessary before the unit that the value quantifies: 20 MB of memory.
Mbit (sing. n.,
adj.), Mbits (pl.n.)
Abbreviations for megabit and megabits. Spell out on first occurrence.
The adjective form is hyphenated: 10-Mbit memory.
In the noun form, the preposition of is necessary before the unit that the value
quantifies: 10-Mbits of memory.
megabit
See Mbit, Mbits.
megabyte
see MB.
memory
address,
memory location
OK to use just address or location for brevity. Don’t use commas even in numbers of
five digits or more.
Aptis™
Chapter 4 Terminology
95
memory
expansion card
Lowercase in generic references
memory pages
Used in A/UX documentation. Use lowercase, and spell out page numbers if you give
them, to distinguish from display pages: zero page, page one.
menu command
Use command or menu command in user manuals; do not use menu option. A menu
command is in a menu, not on a menu; a menu contains commands. See also
command names.
menu titles
Note capitalization: Edit menu, File menu, and so on.
menu types
Note hyphenation: pop-up menu, pull-down menu, tear-off menu.
metasymbols
Refers to artificial terms that have meaning only in your manual and are to be
replaced by a value or symbol. In running text, use italic regular text font when
referring to a metasymbol, and spell out the metasymbol just as it would appear in a
syntax description. Use plain style when using the name of a metasymbol in ordinary
prose.
Correct: Replace volume-name with a name of up to 12 characters.
Correct: The volume name may have up to 12 characters.
Incorrect: The volume-name may have up to 12 characters.
mice
Do not use; use mouse devices.
micro disk,
micro diskette,
microfloppydisk
ette
Do not use; use disk.
mini (prefix)
Hyphenate before a word beginning with a vowel; close up before a word beginning
with a consonant.
mini-assembler, miniwindow, minicircular connector
miniwindow
Refers to a box appearing in some applications that has some but not all features of a
regular window. Do not use window.
minus sign
Not minus symbol. Use an en dash for a minus sign (except in code, where a hyphen
is used).
MIPS
Acronym for million instructions per second. Spell out on first occurrence. Do not
drop the s when you are referring to a single unit: one MIPS, not one MIP.
mode
Avoid in user manuals when referring to software (for example, when describing a
paint program, say, “When using the paintbrush,” not “When you are in paintbrush
mode.”) In technical documentation, when referring to software, you enter or leave a
mode; you don’t turn on or turn off a mode.
model
Do not use when you could use computer.
Handbook for Technical Writers
96
M
Correct: How you use this feature depends on which model of Macintosh computer
you have.
Correct: The setup guide that came with your computer provides instructions.
Incorrect: The setup guide that came with your model provides instructions.
modem
In user manuals, you may want to define as modulator/demodulator in the glossary.
Do not spell out in the text, even on first occurrence.
modem port
Note lowercase. Not phone port.
modifier key
Use instead of control key in the generic sense for a key that affects the action of other
keys, such as the Option, Control, Esc, and Shift keys.
monospaced
(adj.)
Not monospace. See fixed-width.
motherboard
Do not use; use main logic board or main board.
mount
Avoid in user documentation. Use connect to. OK to use mount in technical
documentation and when discussing certain environments.
User documentation: You can connect to a shared disk by opening an alias for that
disk.
Technical documentation: To use a VAXshare file server, you log on to the file server
and then mount the volumes to which you want access.
mouse and
mouse terms
Drop references to the mouse as quickly as possible. Switch emphasis to the actions
on the screen, such as clicking, dragging, selecting, or choosing. See also choose;
click; drag; press; select.
mouse devices
Not mice.
multi (prefix)
Hyphenate before a word beginning with a vowel; close up before a word beginning
with a consonant.
multicharacter, multicolumn, multi-user
multiplication
sign
Aptis™
Not multiplication symbol.
Chapter 4 Terminology
97
N
9-pin connector
Use a numeral (do not spell out nine). Note hyphenation. Avoid in user
manuals—describe the connector by its size and shape, icon, or in another way
appropriate to the context, because it may have fewer than nine actual pins. See also
connector.
non (prefix)
Close up except before a proper noun, a proper adjective, an abbreviation, or an
acronym, or when the resulting word would be difficult to read; for example, non-ADB,
non-keyboard device, non-Macintosh, non-operational state, but nonrecurring.
numbers
In general, spell out cardinal numbers from zero through ten unless you are
expressing numbers as numbers. (Use a numeral, not matter how small, if you are
expressing numbers as numbers.)
You can attach as many as seven SCSI devices.
You can have as many as 31 characters in a filename.
The numeral 8 occurs eight times.
Spell out ordinal numbers from zero through ten. Form ordinal numbers larger than
ten by adding st, nd, rd, or th as appropriate. Where two numbers appear together,
consider spelling one of them out.
There are sixteen 32-bit registers.
Use an en dash between numbers that represent the endpoints of a continuous range:
bits 3-17. Use full span for continuing numbers: 1986-1987, not 1986-87. Some
programming languages, such as Pascal, use two unspaced periods to represent a
range of numbers: 0..15. Use this form for number ranges in code only. Use the en
dash elsewhere.
Use numerals for units of measure (inches, feet, seconds), no matter how small the
number is.
Numbers of the same category within a paragraph should all be numerals if any of the
numbers is over 10.
We have 25 Macintosh computers and 4 LaserWriter printers on the network.
(Computers and printers are the same category.)
There are two kinds of 32-bit registers, only one of which needs to be saved. (Kinds of
registers and bits are different categories.)
Do not spell out the 8 in 8-pin minicircular connector or the 9 in 9-pin connector.
Use numerals when referring to a specific address, bit, byte, chapter, disk drive, field,
key, pin, sector, slot, or track, or when expressing amounts of memory.
Handbook for Technical Writers
98
N
Rephrase to avoid starting a sentence with a number. If you must start a sentence
with a number, spell out the number. Always spell out numbers when expressing an
approximation.
In referring to numbers, use larger and smaller, not higher and lower.
In referring to software version numbers, use later and earlier. For example, refer to
Finder version 6.0.2 or later.
Use a comma to point off numbers of five digits or more.
1024
65,536
But don’t use a comma in memory addresses or numbers representing
microprocessors.
$FFFF FFFF
68020 microprocessor
Form the plural of a number by adding an apostrophe and an s.
1’s, 5’s
Use numerals for numeric values in text except for zero in the same sentence as
nonzero.
ord(blue) returns 0.
Function fseek returns nonzero for improper seeks; otherwise, it returns zero.
number sign
Not pound sign or number symbol to describe this character: #.
numeric (adj.)
Not numerical, except when referring specifically to numerical order. See also
numerics.
numeric keypad
Can be shortened to keypad. Don’t use numerical keypad or numeric keyboard.
numerics (n.
adj.)
As a noun, numerics takes a singular verb. Use numerics (not numeric) as an
adjective in relation to the science of numerics.
numerics capabilities
numerics environment
Aptis™
Chapter 4 Terminology
99
O
offline (adj. pred.
adj., adv.)
One word.
OK
Not okay.
online (adj., pred.
adj., adv.)
One word.
on-screen (adj.),
on screen (pred.
adj., adv.)
Note hyphenation of adjective.
on-screen text
Use quotation marks, not italics, for words as words, letters as letters, and phrases as
phrases, and for manual and disk titles.
open
You open icons, folders, documents, and applications. In user documentation, avoid
“open a window” and “open window.”
Handbook for Technical Writers
100
P
P
parts
passive voice
Whenever possible, don’t use; use active voice. Passive voice is sometimes appropriate
and necessary —when using the active voice would require highly convoluted
sentence structure or excessive anthropomorphism, for example—but rewrite to avoid
passive voice if you can.
In training disks, a passive construction may be appropriate to avoid miscuing the
reader—that is, when describing an action that the user is not supposed to try yet.
Explanation screen: An icon is selected by clicking it.
User-try screen: You try it. Click the icon.
pathname
One word. Note the treatment of these similar terms: device name, filename, user
name, volume name.
pay-per-view
Hyphenated
Peer Review
Praise what works well in the draft; point to specific passages.
Comment on large issues first (Does the draft respond to the assignment? Are
important and interesting ideas presented? Is the main point clear and interesting? Is
there a clear focus? Is the draft effectively organized? Is the sequence of points logical?
Are ideas adequately developed? If appropriate, is the draft convincing in its
argument? Is evidence used properly?). Go on to smaller issues later (awkward or
confusing sentences, style, grammar, word choice, proofreading).
Time is limited (for your response and for the author's revision), so concentrate on the
most important ways the draft could be improved.
Comment on whether the introduction clearly announces the topic and suggests the
approach that will be taken; on whether ideas are clear and understandable.
Be specific in your response (explain where you get stuck, what you don't understand)
and in your suggestions for revision. And as much as you can, explain why you're
making particular suggestions.
Try describing what you see (or hear) in the paper--what you see as the main point,
what you see as the organizational pattern.
Identify what's missing, what needs to be explained more fully. Also identify what can
be cut.
per
Use “according to” instead.
percent
One word. Always preceded by a numeral, no matter how small the value.
Unless the word ends a sentence, percent is never followed by a period.
1 percent
Aptis™
Chapter 4 Terminology
101
It’s OK to use the percent symbol (%) instead of the word percent in technical
appendices, specification lists, and tables, or when the word must appear so many
times in a text passage that its use becomes cumbersome.
When describing a nonspecific quantity, use percentage, as in a small percentage of
the population.
phone numbers
When giving phone numbers, do not put the area code in parentheses or include the
leading 1; for example: 800-282-2732.
phone port
Do not use; use modem port.
pin
In user manuals, avoid referring to connectors by the number of pins because the
actual number of pins may not match the designation. Describe the connector by its
size and shape, icon, or in another way appropriate to the context.
When referring to connectors in technical manuals, use a numeral and a hyphen
before pin: 9-pin, 11-pin, 25-pin, 50-pin.
pixel
Short for picture element. Not synonymous with bit. Define on first occurrence.
plurals
acronyms and abbreviations
To form the plural of an acronym or an abbreviation, add an s but no apostrophe.
ICs, RAMs, ROMs
adjectives
Do not add s to an adjective unless necessary. For example, it’s electronic circuit but
electronics engineer. Other words that fall into this class of adjectives are graphic
and graphics, communication and communications, numeric and numerics.
letters, characters, symbols
To form the plural of a letter, character, or symbol, add an apostrophe and an s.
p’s, 6’s, +’s
nouns
Do not use (s) to indicate that a noun can be either singular or plural. Spell out the
singular and plural forms if necessary; if possible, rewrite to avoid either construction.
Incorrect: Initializing your disk(s)
Correct: Initializing your hard disk or disks
Preferable: Initializing hard disks
product names
Form the plural of trademarked product names by adding the plural generic noun to
the singular product name used as an adjective.
Handbook for Technical Writers
102
P
Incorrect: Macintoshes, Quadras, LaserWriters
Correct: Macintosh computers, Macintosh Quadra computers, LaserWriter printers
If a product name includes a generic noun as well as a trademarked adjective, form
the plural as you would with any noun.
Apple 3.5 Drives, LocalTalk Custom Wiring Kits
words as words
Form the plural of a word italicized to show that it is used as a word by adding an
apostrophe and an s. Do not italicize the apostrophe or the s.
He had too many and’s in the sentence.
plus sign
Not plus symbol.
point (n.)
Use only when writing about font sizes. Don’t use as a synonym for dot or to describe
a place or spot on the screen.
point (v.)
When describing the desktop interface, do not use point as a verb without first
defining it for the reader.
First occurrence: Move the mouse to position the pointer on the Recycle Bin icon.
(This action is called pointing.) Then press the mouse button to select the icon. (This
action is called clicking the icon.)
Thereafter: Point to the Recycle Bin icon and click to select it.
Once the reader is familiar with basic mouse techniques, it’s often not necessary to
mention point at all.
Click the Recycle Bin icon or Select the Recycle Bin icon.
pointer
OK in general references, but be specific whenever appropriate: arrow, crossbar,
crosshair, I-beam, wristwatch.
pop up (v.), popup (adj.)
Note hyphenation of adjective.
port
Do not capitalize the names of ports: modem port, printer port, SCSI port. See also
connector.
possessives
Form the possessive of a singular noun, including one that ends in s, by adding an
apostrophe and an s.
the computer’s power cord
the boss’s husband
Form the possessive of a plural noun that ends in s by adding an apostrophe. Form
the possessive of a plural noun that does not end in s by adding an apostrophe and an
s.
Aptis™
Chapter 4 Terminology
103
the student’s curriculum
children’s requirements
Form the possessive of a proper noun or a proper name, including one that ends in s,
by adding an apostrophe and an s. Form the possessive of a plural proper noun or
proper name by adding an apostrophe.
Howard Hughes’s official biography
the Joneses’ computer
PostScript
Note capitalization. Don’t use small caps.
pound sign
Don’t use; use number sign for this character: #.
power off (v.)
Do not use; use switch off.
power on (v.)
Do not use; use switch on.
pre (prefix)
Close up even when it forms a double vowel, as in preexisting.
press
Use for keys on the keyboard and mechanical buttons and switches to mean pressing
down and releasing. Don’t use click, hit, tap, or type.
Press the Return key.
Use for button on the screen or the mouse button to mean only pressing down, without
releasing.
To click, press and release the mouse button.
Press the New button to see a list of memo forms, then drag to the form you want.
See also click; enter; type.
print (v.)
Not print out.
printout (n.)
One word.
print out (v.)
Do not use; use print.
program
In user manuals, when referring to a single application program, use application
program on first mention; thereafter, use program or application program. Use
application software or software to refer to application software in general.
program names
Do not use code style. Capitalization should agree with the directory or catalog
listing. Do not confuse a program name with a product name.
One of the program files used for AppleWorks is named APLWORKS.SYSTEM.
See also product names.
Handbook for Technical Writers
104
P
prompt (n., v.,
adj.)
Avoid as a verb except in reference to what the system does when it displays an actual
prompt character on the screen.
The prompt reminds you to do something.
The system then prompts you for information (with a prompt character).
The prompt character is sometimes a bracket.
pronunciation
Whenever the pronunciation of an acronym is not self-evident, it’s a good idea to give
a pronunciation key. Use all caps for the stressed syllable; use a hyphen between
syllables. Enclose the phonetic spelling in quotation marks.
SCSI (pronounced “SKUH-zee”)
propeller
Not propellor.
protocol
When referring to specific protocol names, capitalize protocol; for example, the Name
Binding Protocol (NBP). When referring to protocol names in third-party products,
capitalize according to the third-party company’s style. When using protocol as a
generic term, use lowercase.
The AppleTalk protocols can be placed in the framework of the ISO-OSI model.
Use an article before the spell-out name of the protocol; do not use an article before
the abbreviation when it stands alone.
The Name Binding Protocol resides at the transport layer of the reference model.
A protocol like NBP resides at the transport layer of the reference mode.
pull down (v.),
pull-down (adj.)
Note hyphenation of adjective.
punctuation
In general, a punctuation mark should be in the same type style and font as the
preceding word.
See the glossary for the definition of word wrap. (The period is boldfaced.)
Note the following exception to this rule:
•
Punctuation following code in running text should be in the font of the overall
sentence, not in code, unless the punctuation mark is part of what actually
appears on the screen or in the program listing. Avoid punctuation after
something the user should type. (The user may type the punctuation.)
A closing parenthesis, bracket, or quotation mark should be in the same
style as the opening mark. (For example, a closing parenthesis following
an italicized word should be in plain style, not italic, unless all text
between the parentheses is italicized.)
•
Aptis™
When forming the plural of an italicized letter used as a letter, a number used
as a number, or a word used as a word, neither the apostrophe nor the s is
italicized.
Chapter 4 Terminology
105
Q
Quick Reference
Card
A copyright notice should appear on all Quick Reference Cards:
Copyright 1994, 1995 Billing Concepts, Inc. All Rights Reserved.
quit
You quit, exit from, or leave a program. You never exit a program.
quotation marks
Use curly opening and closing quotation marks except in code and resource types in
any font.
Strictly speaking, a quotation mark is curly and comes only in pairs. An apostrophe is
curly and comes singly. The non-curly things are either foot-marks (single) or inchmarks (double).
Put periods and commas within quotation marks. If necessary for clarity, periods and
commas can go outside, as in AN$ = “1”. Semicolons, colons, questions marks, and
exclamation points go outside quotation marks unless they are part of an actual
quotation.
When giving the name of a resource type, use straight single quotation inch-marks in
code and place any punctuation outside the quotation marks.
Examples of resource types are ‘FONT’, ‘NFNT’, and ‘cdev’.
Use quotation marks, not quote marks or quotes. (Quote is a verb; quotation is a noun
or an adjective.)
Use quotation marks for:
•
cross-reference to other sections of the manual
•
cross-references to chapter titles
•
direct quotations
•
letters as letters and words as words in on-screen text
•
manual and disk titles in on-screen text
In manuals, use italics, not quotation marks, for terms after called, known as, labeled,
stands for, termed, and so on. If a term is an on-screen element, use plain style for
elements whose names are caps/lowercase, quotation marks for elements whose
names are initial cap only.
INIT stands for initialize.
A folder names New Folder appears.
Click the checkbox labeled “Keep lines together.”
Enclose quotations from the screen, such as error messages or system messages, in
quotation marks.
Handbook for Technical Writers
106
R
R
radio button
Refers to an on-screen button. Use only in technical documentation; use button in user
manuals. No quotation marks around radio; no hyphen. See also button.
RAM
Acronym for random-access memory. Spell out on first occurrence.
RAM cache (n.)
Lowercase c.
re (prefix)
Usually closed up, even when it forms a double vowel, as in reenter. Exceptions:
when a closed formation creates a word with a different meaning, as in recreate or recreate (as in re-create the file).
read-only
memory (ROM)
Note hypenation. Spell out on first occurrence.
read/write (adj.)
Note slash, as in read/write memory.
real time (n.),
real-time (adj.)
Note hyphenation of adjective.
reference
Do not use as a verb; use refer to.
register
Capitalize names of specific registers, but do not capitalize the word register. Do not
capitalize generic register names such as bank register and control register.
release
Do not use when referring to a system software version number.
resize
Not size or grow. OK to write change the size of.
Return
The key.
When you press Return, you generate a return character.
Right Arrow
The key. When referring to more than one of the arrow keys, arrow is lowercase (as in
the arrow keys).
right-hand
Avoid except in reference to right-hand (recto) pages; use just right whenever possible.
right side
Not right-hand side.
road map
Two words.
ROM
Acronym for read-only memory. Spell out on first occurrence.
Roman, roman
(adj.)
Capitalize when referring to numerals; lowercase when referring to type style. See
also Arabic.
run time (n.),
run-time (adj.)
Note hyphenation of adjective.
Aptis™
Chapter 4 Terminology
107
S
save on a disk
Not save to disk.
screen
Not display.
screen titles
In green-screen applications:
Refer to the screen title in the middle of the top line, followed by the word “screen”; as
in “Select Customer screen”.
If there is no screen title, use a descriptive phrase followed by the word “screen”
followed by the program name, enclosed in parentheses; as in “the select customer
screen (CSSSR01R).”
If there is neither screen title or program name, use a descriptive phrase; as in “the
select customer screen”. Enter a Team Track issue for the item, making sure to
include the exact path.
scroll
Avoid using as a transitive verb.
Correct: Scroll through a document.
Correct: Scroll to view more of the document.
Incorrect: Scroll a document.
scroll bar
Two words.
scroll box
Two words.
SCSI
Acronym for Small Computer System Interface. Spell out on first occurrence. The
acronym is pronounced “SKUH-zee,” so it is preceded by a, not an.
The AppleCD 300 CD-ROM drive is a SCSI device.
select
Use select, not choose, for icons, windows, objects, graphic images, sections of text, or
options in dialog boxes. Use choose for menu commands, including those in tear-off
menus. See also choose.
self-test (n., adj.)
Note hyphenation. Do not use as a verb.
setup (n. adj.),
set up (v.)
One word except as a verb.
shared disk
In user documentation, use shared disk when you discuss connected to another
computer over the network. When you discuss setting up a folder to share on your
own computer use shared folder. Use file server only when explaining the concept of
file servers.
Shift
The key. Note capitalization.
Shift-click (n., v.,
adj.)
Note capitalization and hyphenation. (The hyphen denotes a combined keystroke.)
Handbook for Technical Writers
108
S
Small children may have trouble with the Shift-click.
Shift-click to extend the selection.
Use the Shift-click technique to select more than one icon.
shortcut
One word.
sign
Use sign, not symbol, in the following terms: division sign, equal sign, greater-than
sign, less-than sign, minus sign, multiplication sign, number sign, and plus sign.
since
Can be used to mean because, but only if it begins a sentence. When using since in
this way, however, make sure it isn’t possible to misread the sentence as an
expression of temporal relationship. In general, avoid using since in documentation.
Correct: Since the address is passed on every call, you must...
Incorrect: Using access privileges is a good idea, since you probably won’t want all
users to make changes to the document.
68000, 68020, ...
Do not use a comma in a number representing a microprocessor. Do not use 68K for
68000. On first occurrence, use Motorola 68000 microprocessor; thereafter, the
manufacturer need not be mentioned.
size (v.)
Do not use; use resize or change the size of (in reference to a window or an object).
software
Use application software or software to refer to application software in general. Use
application program or program when referring to a single program.
source file
Two words, except in reference to the Pascal predefined file type sourcefile.
Space bar
Two words. Note capitalization.
splash screen
Do not use; use opening display, startup display, or startup screen.
stand-alone
(adj.)
Note hyphenation. Do not use as a noun.
start up (v.),
startup (adj.)
Avoid as a noun, especially in user manuals.
Start up the Macintosh.
Insert the startup disk.
startup display,
startup screen
Not splash screen; startup display, startup screen, and opening display are all OK.
state name
Use the two-letter abbreviation. (Both letters are capitalized in these abbreviations.)
step
Do not capitalize, even in specific references.
step 1, steps 1 and 2, several steps
Aptis™
Chapter 4 Terminology
109
stop
A general term meaning to cause a process, command, or program to cease. Compare
abort; cancel; exit; halt; interrupt.
subaccount
No hyphen
submenu
Use when describing hierarchical menus. When the user drags the pointer to the side
of a hierarchical menu command with a triangular indicator, a submenu appears.
switch on,
switch off
Don’t use power down, power off, power on, or power up in user manuals. OK to use
turn on and turn off when the process does not involve a switch.
symbol
OK in a generic sense, as in the percent symbol (%). Don’t use symbol when you mean
character, letter, or digit.
Use sign, not symbol, in the following terms: division sign, equal sign, greater-than
sign, less-than sign, minus sign, multiplication sign, number sign, and plus sign.
syntax
descriptions
Use code for literals (parts of the language, values, and so on), italic regular text font
for metasymbols (artificial terms that have meaning only in your book and are to be
replaced by a value or symbol), and plain style regular text font for brackets that
enclose something that’s optional. Pay close attention to punctuation.
READ ([file, ] var)
Use a hyphen or an embedded cap to connect two words that act as a single
metasymbol.
Correct: source-file or sourceFile
Incorrect: sourcefile or source_file
The hyphen is preferred to the embedded cap because it avoids confusion of the
metasymbol with a routine name.
Be consistent when naming metasymbols; for example, do not alternate between
commands and command-list.
system
Use as a broad term; a system includes a computer and any peripheral devices,
accessories, and software.
system
extension
In user documentation, may be used to describe files (for instances files of type ‘INIT’,
‘appe’, and ‘seri’) that extend the abilities of the computer. Compare INIT.
System file
Note capitalization. Refers to the specifically named file in the System Folder.
system files
Lowercase. Refers to any files used by the computer to start itself up or to provide
system-wide information.
System Folder
Note capitalization.
system
messages
Enclose in quotation marks; reproduce exact spelling and punctuation, even if
incorrect.
Handbook for Technical Writers
110
T
T
Tab, tab
Capitalize when referring to the key; use lowercase when referring to the character.
When you press Tab, you generate a tab character.
The tab character (HT, for horizontal tab) has ASCII value $09.
table
Use tables whenever numbers or text would be clearer if presented in rows and
columns.
Capitalization style for all parts of a table is initial cap only.
table of contents
Most manuals of ten pages or more should have a table of contents, which always
begins on a new right-hand page (almost always iii).
The table of contents should include part, chapter, and chapter-equivalent titles and
all level-one, level-two, and level-three heads. If absolutely necessary, level-four
heads can be included (but remember that a book long enough to require level-four
heads will also have an index, and that most readers rely on the index rather than the
table of contents when they want to locate a specific topic).
The wording, capitalization, punctuation, and spelling of all heads and titles must be
exactly the same in the text as in the table of contents.
tear-off menu
Refers to a menu that can be dragged from the menu bar and left on the desktop
either as a list of commands or as a palette. Note hyphenation.
telecommunicati
on
Telecommunication refers to the act; telecommunications refers to the field. When
used as an adjective, the correct term is telecommunications.
Telecommunications gets simpler by the day, though you can’t prove it by most
manuals on this subject.
The telecommunications industry is expanding rapidly.
television
Not television set or TV set. After the first occurrence, TV is OK. Compare video
monitor.
television
monitor
Do not use. Use video monitor or monitor.
text file
Two words, except in reference to the Pascal predefined file type textfile.
text head
Use different levels of text heads to make the organization of a manual clearer to the
reader, but remember that too many heads too close together will distract the reader
and clutter the page.
In general, organize your sections so that level-four heads are subordinate to levelthree heads, level-three heads to level-two heads, and so on. (Don’t skip a level of
heads.) When the next logical level of heading seems too prominent for a given usage
(in troubleshooting chapters, for example), try to use display sentences rather than
skipping a level of text heads.
Aptis™
Chapter 4 Terminology
111
Do not begin a chapter with a level-one head; start with an introductory paragraph or
two before your first text head. Likewise, do not place a level-two head immediately
after a level-one head, and so on. A brief overview of a section—even if it’s only a
sentence—is useful before you begin using the next level of text head.
If you use a particular level of head at all in a given chapter or section, use at least
two. Strictly speaking, a chapter or section can not be subdivided into only one part.
The wording of parallel head within a section should be parallel: verb forms should be
the same (gerunds, imperatives, and so on) from head to head; comparable terms
should all be either singular or plural, not a mix; and if you’re using complete
sentences for some heads, use them for all comparable heads.
Avoid cute, flippant, or gimmicky heads. Humor can be an effective means of
unhanding the reader’s experience, but it generally works best in the text rather than
in titles or heads. Count on your prose to create the excitement necessary to carry the
reader along; keep heads simple and descriptive.
The capitalization style for all levels of text heads is initial cap only. Avoid colons in
heads whenever possible. If a colon in a head is required, capitalize the first word
after the colon.
that
Use to introduce a restrictive clause; clauses beginning with that are generally not set
off with commas. Compare which.
Correct: This is the house that Jack built. (There are many houses; the phrase that
Jack built restricts [narrows the meaning of] the subject of the sentence to one house.)
Correct: The largest house in town, which Jack’s sister built, is also the newest.
(There is only one largest house; the phrase which Jack’s sister built, although it
provides more information, does not restrict the subject of the sentence.)
3.5
Not 3 1/2 when referring to 3.6-inch disks.
title bar
Two words. Note lowercase.
titled
Not entitled.
title page
All manuals must have a title page. This page is the first in the book (page i) and does
not have a page number or a running foot.
In a manual that will be distributed only in the United States, any trademarked
product whose name appears on the title page must receive the appropriate
trademark symbol. Unlike trademark symbols in running text, the symbols on the
title page align with the base of the product name.
titles, chapter
and section
Mark part titles, chapter titles, and heads concise and consistent. Keep the reader’s
needs in mind, and remember that these elements are used primarily as locators for
someone skimming through a manual.
toolkit
One word.
toward
Not towards.
Handbook for Technical Writers
112
T
trackball
An input device used as a substitute for a mouse. One word.
trademarks
Any trademarked product mentioned in a manual must be mentioned in the
appropriate credit line—for trademarks or registered trademarks—on the copyright
page. Credit lines for all third-party trademarked products must also be given on the
copyright page.
When a product is a trademarked term, it should be used often throughout the
document as an adjective modifying a generic noun (particularly on first occurrence in
the preface and in each chapter). Avoid using a trademarked term in the possessive
or the plural form.
TrueType
One word.
troubleshoot (v.),
troubleshooting
(n., adj.)
One word.
turn on, turn off
OK to use when describing power to a computer or peripheral device.
tutorial steps
Early in an instructional sequence, phrase tutorial steps to reflect the sequence of the
novice user’s action. Say “Pull down the File menu and choose Open,” instead of
“Choose Open from the File men.” The latter phrasing is appropriate for procedures
in reference manuals and in later sections of tutorials when the sequence of choosing
from menus has been well reinforced.
TV
Not TV set or television set. Use television on first occurrence. Compare video
monitor.
TV Monitor
Do not use. Use video monitor or monitor.
25-pin
connector
Note hyphenation. Avoid in user manuals—describe the connector by its size and
shape, icon, or in another way appropriate to the context, because it may have fewer
than 25 actual pins. See also connector.
type (n.)
Use in general references to the text that appears on a printed page. Do not use type
when you mean font or font family.
type (v.)
Use to describe the act of pressing keys to produce characters on the screen. In
manuals, use code style to represent what the user actually types, regular text font to
describe generically what the user types. For on-screen text, use the code style.
Type PR#4.
Type Hello.
Type your name.
Compare enter; press.
typeface
Aptis™
Use to refer to a distinct design for a particular character set. Each typeface has its
own name, such as Times or Garamond. Compare font.
Chapter 4 Terminology
113
The Font Manager places fonts of the same typeface (regardless of font style or point
size, or whether they are outline or bitmap fonts) into a single font family.
type family
Do not use; use font family.
type size
Do not use; use size or font size.
Handbook for Technical Writers
114
U
U
uncheck
Do not use; use deselect.
underlining
Do not use in manuals. See also boldface; italic; quotation marks.
unhighlight (v.)
Do not use. Use deselect for the action of clicking to remove highlighting.
unhighlighted
(adj.)
Do not use; use not highlighted.
UNIX system
All caps, but not an acronym. UNIX is an adjective and cannot stand alone.
unprotect
Do not use; use remove protection.
unselected
Use to describe something that has not yet been selected. Not deselected or
dehighlighted.
Up Arrow
The key. When referring to more than one of the arrow keys, arrow is lowercase (as in
the arrow keys).
uppercase
One word, no hyphen. When used in conjunction with lowercase as a noun (or to
modify a noun), use uppercase and lowercase (both words spelled out, in that order).
upside-down
(adj.)
Note hyphenation.
upward
Not upwards.
U.S.
Note periods. Use the abbreviation as an adjective only; as a noun, spell out United
States.
user group
Not users group or user’s group.
user name
Two words. Note the treatment of these similar terms: device name, filename,
pathname, volume name.
user ID
Two words; capitalize ID
user-defined
Hyphenated, per CMS14 p. 222 “Adjectival compounds consisting of a noun plus a
participle are usually hyphenated before the noun to prevent ambiguity.”
utilize
Don’t use this word where “use” would suffice.
Aptis™
Chapter 4 Terminology
115
V
version
Lowercase, as in AppleShare version 1.1. Use later rather than higher in phrases
such as Finder version 6.0.2 or later.
versus
Not vs. Rewrite to avoid using versus when possible.
video cable
Do not use; use monitor cable. OK to use to identify the monitor cable for people
familiar with the term video cable.
video jack
Not video connector.
video port
Do not use when you mean the port to which the monitor is connected; use monitor
port.
video monitor
Not television monitor or TV monitor. After first occurrence, it is OK to shorten the
term to monitor.
virtual memory
Not Virtual Memory or VM.
volume (book)
Books are divided into volumes when page length exceeds manageable limits.
Different volumes don’t have different titles because the division into volumes doesn’t
represent a difference in subject matter. Use Arabic numerals for volume numbers.
Volume 1, Volume 2
volume (disk)
Do not use to refer to disks in user documentation; use disk or the specific kind of disk
you’re referring to.
volume name
Two words. In specific references, capitalization should agree with the directory
listing: the volume named PERSONNEL.
Note the treatment of these similar terms: device name, filename, pathname, user
name.
vs.
Do not use; use versus when absolutely necessary, but rewrite to avoid the term when
possible.
Handbook for Technical Writers
116
W
W
WWW, World
Wide Web, Web
Refer to the World Wide Web as WWW, or the Web, as in “your NetAnswer Web site.”
we
Do not use first person; rewrite in terms of the reader or the product.
Correct: For best results, your Macintosh should have at least 512K of RAM.
Acceptable: It is recommended that your Macintosh have at least 512K of RAM.
Incorrect: We recommend that your Macintosh have at least 512K of RAM.
which
Use only to introduce an unrestrictive clause; clauses beginning with which are
always set off with commas. Compare that.
Correct: The largest house in town, which Jack’s sister built, is also the newest.
(There is only one largest house; the phrase which Jack’s sister built, although it
provides more information, does not restrict [narrow the meaning of] the sentence.)
Correct: This is the house that Jack built. (There are many houses; the phrase that
Jack built restricts the subject of the sentence to one house.)
whir
Not whirr. But whirring.
The disk drive whirs; in a moment you see the opening display on the screen.
wide area
network (WAN)
Three words.
window
When an icon is opened, what appears on the screen is called a window, not an open
window. Inactive windows or objects are in back of or behind active windows.
word processing
(n.), wordprocessing (adj.)
Note hyphenation of adjective.
words as words
Italicize a word when it is used as a word. Use an apostrophe and an s to form the
plural, but don’t italicize the apostrophe or the s.
He had too many and’s in the sentence.
work file
Two words, except in reference to the Pascal predefined file type workfile.
workstation (n.
adj.)
One word.
write-protect (v.
adj.), writeprotected (adj.,
pred. adj.), writeprotection (n.)
Hyphenated in all forms.
You use the write-protect tab to write-protect a disk.
When a disk is write-protected, it can’t be changed.
Sometimes it’s necessary to remove the write-protection from a disk.
Aptis™
Chapter 4 Terminology
117
X
x
When used as a place holder for replaceable number, x is lowercase and plain style.
$02xx (represents a range of Memory Manager errors)
Do not use x’s as place holders in numbers representing microporcessors.
Incorrect: 68xxx microprocessor
Correct: 68000-family microprocessor
All caps. Refers to the handshake.
Handbook for Technical Writers
118
Y
Y
Year-end
Aptis™
Requires a hyphen.
Chapter 4 Terminology
119
Z
zero character
OK for the ASCII character $30. Do not confuse with null character ($00).
zeros
Not zeroes.
zip code
Note lowercase.
zoom box
Two words. Note lowercase.
Handbook for Technical Writers
120
Aptis™
Z
A
adding a new user in CommVergence
Alpha-Num A paragraph style
character style
Bold 38
Equation/Variables 38
Italic 38
Italic/Bold 38
Key/Button 38
Normal 38
PageNumber 38
Quick Key 38
Quick Key Text 38
SubScript 38
SuperScript 39
Symbols 39
Wingding 39
5
32
Alpha-Num A+ paragraph style
32
Appendix Number paragraph style
applying edited list of markers
32
22
B
Bold character style
38
character tags
books
publishing all other 51
publishing online 55
books, publishing hard copy
Bug Fix Report
checklist
18
checklist, page review
53
CommVergence, adding a new user in
50
5
conversion, setting up Image Robot for
26
Bullet List Indented paragraph style
Bullet List paragraph style
32
capture, setting up Paint Shop Pro for
12
capturing a screen shot with Paint Shop Pro
capturing and saving screens
Caution paragraph style
12
32
Chapter Number paragraph style
chapter, organization of
4
chapters
reviewing generated
54
53
32
12
convert a graphic, using Image Robot to
32
C
chapters, reviewing
38
13
cross-reference format 40
Link FigureNum 40
Link FigureNumOnPage 40
Link FigureTitleOnPage 40
Link Paranum 40
Link Paratext 40
Link ParatextinParanumOnPage
Link TableNumOnly 40
NoLink FigureNum 40
NoLink FigureNumOnPage 40
NoLink Paranum 40
NumOnly 40
PageNum 40
ParanumOnPage 40
Paratext 40
ParatextInParanum 40
40
13
122
Index
H
ParatextOnPage 41
TableAll 41
TableNumOnPage 41
cross-references in index
hard copy books
publishing 50
19
customized paragraph definitions
recreating 46
Header paragraph style
34
headers/footers
when reviewing chapters
generated 54
ungenerated 54
D
Default Paragraph Font paragraph style
doc practices, general
38
1
documentation set,finalizing the online
double postings in index
58
18
E
Heading 1 MI paragraph style
Heading 1 paragraph style
34
Heading 2 paragraph style
34
Heading 3 paragraph style
34
Heading 4 paragraph style
34
Heading 5 paragraph style
34
headings, main
18
HyperText paragraph style
edited list of markers, applying
Emphasis paragraph style
entry screens, format of
38
I
Equation/Variables character style
Example paragraph style
38
22
23
evaluation checklist for index
34
38
Image Robot
converting screen shots 13
setting up for conversion 12
18
33
importing screen shot into document
importing templates after porting existing online
books 44
F
Indent Para .25 paragraph style
Figure Title paragraph style
33
Indent Para .5 paragraph style
Figure Title Reports Anch paragraph style
Figure Title Reports paragraph style
Figure Titles marker type
Footer paragraph style
33
33
41
finalizing online documentation set
format of index
58
33
19
Function paragraph style
34
G
general procedure for importing templates
generated chapters, reviewing
54
graphic, using Image Robot to convert
13
43
34
34
Indent Para .75 paragraph style
34
Indent Para 1.0 paragraph style
34
index
about 15
creation
applying edited list of markers 22
initial pass — marker list generation 20
second pass — further editing and application of logic 16
third and subsequent passes —
polish 17
cross-references in 19
double postings in 18
editor’s point of view 20
evaluation checklist for 18
format 19
general 15
generation and editing 15
mail headings in 18
subheadings 18
index review
Aptis™
14
18
123
Index
indexing at Billing Concepts
Input paragraph style
Italic character style
N
15
38
38
Italic/Bold character style
Ixg Entries marker type
38
41
necessary order for publishing books
50
new user in CommVergence, adding
5
NoLink FigureNum cross-reference format
NoLink FigureNumOnPage cross-reference
format 40
K
NoLink Paranum cross-reference format
Key/Button character style
NoLink Paratext cross-reference format
38
Normal Anchor paragraph style
Normal character style
lines that break,when reviewing generated
chapters 54
Note paragraph style
Link FigureNum cross-reference format
Number List 1+ paragraph style
35
NumOnly cross-reference format
40
35
Note Indented paragraph style
Link FigureTitleOnPage cross-reference
format 40
Link Paranum cross-reference format
35
35
Number List 1 paragraph style
Link FigureNumOnPage cross-reference
format 40
35
O
40
Link ParatextinParanumOnPage cross-reference
format 40
online books
porting 55
publishing 55
Link TableNumOnly cross-reference format
online documentation set, finalizing
Link Paratext cross-reference format
40
LTOC and PageNumber paragraph style
LTOC Heading paragraph style
LTOC paragraph style
35
34
40
40
online porting, overview
58
55
organization
chapter 4
section 4
volume 3
other books in the collection, referring to
M
main headings in index
marker type
Figure Titles 41
Ixg entries 41
Report Figure Titles
26
overview
chapter 2
online porting 55
publishing 3
publishing process 49
templates, importing 42
18
41
41
markers, applying edited list of
master index
publishing 51
setting up 25
40
38
L
40
40
35
Normal paragraph style
marker types
40
22
P
page review checklist
53
PageNum cross-reference format
PageNumber character style
40
38
Paint Shop Pro
capturing a screen shot with
setting up for capture 12
13
Handbook for Technical Writers
124
Index
ParatextOnPage cross-reference format
paragraph style
Alpha-Num A 32
Alpha-Num A+ 32
Appendix Number 32
Bullet List 32
Bullet List Indented 32
Caution 32
Chapter Number 32
Default Paragraph Font 38
Emphasis 38
Example 33
Figure Title 33
Figure Title Anch 33
Figure Title Report 33
Footer 33
Function 34
Header 34
Heading 1 34
Heading 1 MI 34
Heading 2 34
Heading 3 34
Heading 4 34
Heading 5 34
HyperText 38
Indent Para .25 34
Indent Para .5 34
Indent Para .75 34
Indent Para 1.0 34
Input 38
LTOC 34, 35
LTOC and Page Number 40
Normal 35
Normal Anchor 35
Note 35
Note Indented 35
Number List 1 35
Number List 1+ 35
paragraph style 36
Quick Key 35
Quick Key Text 36
ScreenIsDisplay 41
Side by Side 36
Side Head 36
Single Step Procedure 36
Syntax 36
Table Title 36
TableText 36
Term 36
Term Defintion 37
Term Indented 37
Warning 37
Paragraph Tags
poor pagination
when reviewing chapters
Quick Key character style
Quick Key paragraph style
38
35
Quick Key Text character style
38
Quick Key Text paragraph style
36
R
referring to other books in the collection
release notes
Bug Fix Report
26
26
Report Figure Titles marker type
41
reports reference guide
publishing 50
reviewing
chapters 53
generated chapters
54
S
screen shot
capturing with Paint Shop Pro
importing into adocument 14
13
ScreenIsDisplayed paragraph style
41
screens, capturing and saving
section, organization of
40
ParatextInParanum cross-reference format
Aptis™
48
Q
40
ParanumOnPage cross-reference format
55
publishing
all other books 51
books, necessary order for 50
hard copy books 50
master index 51
online books 55
overview 3
overview of process 49
procedures 47
reports reference guide 50
31
Paranum,ParatextOnPage
53
porting and publishing online books
publisher
information
41
40
12
4
separated entries, when reviewing generated
chapters 54
Index
separator breaks, when reviewing generated
chapters 54
setting up
Image Robot for conversion 12
master index 25
Paint Shop Pro for capture 12
Side by Side paragraph style
Side Head paragraph style
W
Warning paragraph style
37
Wingding character style
39
36
36
Single Step Procedure paragraph style
subheadings in index
125
36
18
SubScript character style
38
SuperScript character style
Symbols character style
39
Syntax paragraph style
36
39
T
Table Title paragraph style
36
TableAll cross-reference format
TableHeader paragraph style
41
36
TableNumOnPage cross-reference format
TableText paragraph style
tags
character
41
36
38
template definitions
30
templates
using 29
Term Definition paragraph style
Term Indented paragraph style
Term paragraph style
37
37
36
U
updating documents with new templates
42
V
variable definitions
41
volumes, organization of
3
Handbook for Technical Writers
126
Aptis™
Index