1
Level I Programming
Level III Programming
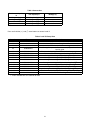
Level I program values are identified by the legend on
the faceplate of the control. A green LED is illuminated
when a Level I "P” value is displayed. Following are the
Level I “P” values:
Press and hold the (←) and (↑) arrow buttons for 3
seconds to enter the Level III programming mode. The
display will show the letter “L” in the far left display digit.
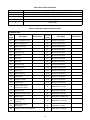
The parameter “L-number” is displayed in the far right
display digit. The SET button is inactive except for L4. If
SET is pressed when L4 is displayed, Peak Flow is
reset to zero. If SET is pressed when any other location
is displayed the control will beep.
•
•
•
•
Time of Day
Time of Regeneration
Hardness
Capacity
P1
P2
P3
P5
P4 is skipped on the 962 Stager Programing.
Level IV Programming
Setting Time of Day
Press and hold the (←) and (↓) arrow buttons for 3
seconds to enter the Level IV programming mode. Level
IV programming is used to enter the user defined cycle
times and day of week regeneration. All controllers have
default settings for 4 cycle softener operation. The
operation type is determined by the value that is
programmed in “P17” and must be changed if not
being used as a 4 cycle conditioner.
Press the SET button. The display will show the time of
day with the minutes digit blinking. Press the UP (↑)
arrow button to increase the number or the DOWN (↓)
arrow button to decrease the number. To skip the
number without changing, press the LEFT (←) arrow
button. The first digit will stop flashing and the next digit
will start flashing. When the far left digit is reached,
pressing the LEFT (←) arrow button returns the flashing
to the far right digit. Continue changing numbers until
the desired Time of Day is obtained. Press the SET
button to enter the value. The PM indicator will toggle
when the “tens digit” of the hours is increased. The far
left digit is used to indicate the day of week. Number 1
being Sunday and number 7 being Saturday.
Entering "C" Values
"C" values are used to define a specific number of
cycles to meet the application needs and are accessible
through level IV programming mode.
Example: If the control is used in a system that has a
total of 10 cycles of operation, select 6 for P17 and
program C1-C10 for the amount of time desired for each
cycle (up to 255 minutes).
The time of Regeneration, Hardness, and Capacity are
set in a similar manner.
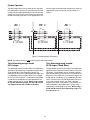
Each "C" value represents 1 position of the rotary pilot
stager that is being used. A maximum of 15 cycles may
be used, each programmable from 0-255 minutes.
Level II Programming
The control will automatically enter Level II
programming if P19 or P20 have not been set.
While the controller is in regeneration the display will
show a “C” value in the far left display and the time
remaining (in minutes) for that “C” value.
Press and hold the (↑) and (↓) arrow buttons for 3
seconds to enter the Level II programming mode. The
display will show the letter “P” in the far left display digit.
The parameter “P-number” is displayed in the far right
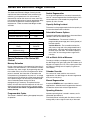
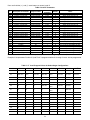
display digit. See Table 1 for Level I and II programming
values.
Example: [C1 15] = 15 min remaining in C1.
Entering “d” Values (Regeneration Days)
“d” values are used to start a regeneration on a certain
day of the week. There are seven “d” values numbered
from 1 to 7, with 1 representing Sunday and 7
representing Saturday. Set a 1 in “d7” to initiate an
automatic regeneration every Saturday at the Time of
Regeneration (P2). The automatic regenerations will
occur at the time set in P2 regardless of the capacity
remaining in the system. A value of “0” indicates no
regeneration on that day. The default value is “0” for all
“d” values.
Changing a Program Value
Once the P value you want to change is displayed,
press the (←) arrow button to display the current entry
for that value. To change or modify the value, press the
SET button. The digit on the right hand side of the
display will begin to flash. Use the (↑) or (↓) arrow
buttons to select the desired entry. Once the desired
entry is obtained, press the (←) button to move to the
next digit and change as needed. Once you have
completed the appropriate changes, press the SET
button. When you press the SET button the new entry is
stored and the control automatically scrolls to the next
P value. If a beep sounds, the new entry was not
accepted. Table 1 lists the range available for a specific
program value.
8