1
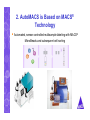
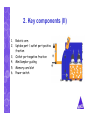
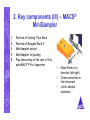
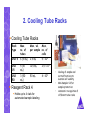
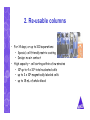
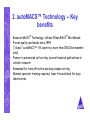
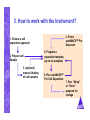
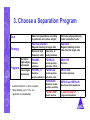
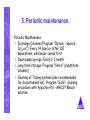
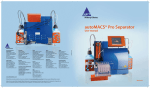
AutoMACS Pro Presentation
Lausanne, EPFL-SV-PTECH-PTCF
9.6.2010
Alain Hirschy
Application Specialist DACH
[email protected]
Agenda
1.
2.
3.
4.
5.
6.
7.
8.
Introduction to MACS Technology
Key components of the AutoMACS Pro
How to work with the instrument?
Software and sensors
Maintenance
Wear parts cleaning/exchange
Rescue procedure
Troubleshooting
1. Introduction to MACS Technology
•
MACS® MicroBeads are super-paramagnetic particles of approximately
50 nanometers in diameter, being comparable to the size of a virus.
•
MicroBeads do not change the scatter properties of the cell in the flow
cytometer or influence the light-microscopic appearance of the cell. They
form a stable colloidal suspension and do not precipitate or aggregate in
magnetic fields.
•
MACS MicroBeads are composed of a biodegradable matrix made of iron
oxide and polysaccharide. Hence, it is not necessary to detach cell-bound
beads after the separation process, saving hands-on time.
•
Usually, MACS MicroBeads do not alter structure, function, or activity
status of labeled cells, and they are not known to interfere with
subsequent experiments.
•
The isolated cells can be used directly for subsequent studies or cell
culture.
1. MACS® Technology – Benefits
•
MACS® Column Technology
–
Gentle isolation of viable, functionally active cells
–
Excellent purity, recovery, and viability
–
Flexible cell sorting strategies:
• positive selection – depletion – multiparameter sorting
–
For virtually any cell type: more than 250 separation reagents
2. AutoMACS is Based on MACS®
Technology
§ Automated, sensor-controlled multisample labeling with MACS®
MicroBeads and subsequent cell sorting
2. Automated multisample cell
sorting
• MACS® MiniSampler & robotic arm
• Automated labeling option
• Cooling racks for 5, 15, 50 mL sample tubes
• Sensor-controlled process
– Choice of 12 separation programs
– Automated sensor-controlled sample loading and
fraction elution
– Automated mandatory washing between samples
– Sensor-controlled buffer supply
2. Key components (I)
1.
2.
3.
4.
5.
Touchscreen
Robotic arm
Barcode Reader
Fluid container (4)
Rack detection
1
2
3
4
4
5
2. Key components (II)
1.
2.
3.
4.
5.
6.
Robotic arm
Uptake port / outlet port positive
fraction
2
Outlet port negative fraction
MiniSampler guiding
3
Memory card slot
Power switch
5
1
6
4
2. Key components (III) – MACS®
MiniSampler
1.
2.
3.
4.
5.
Position of Cooling Tube Rack
Position of Reagent Rack 4
MiniSampler socket
MiniSampler lid guiding
Plug connecting at the rear of the
autoMACSTM Pro Separator
2
1
3
4
5
§
§
§
Move Racks in xdirection (left-right)
Direct connection to
the instrument
Lid for sample
protection
2. Cooling Tube Racks
§ Cooling Tube Racks
Rack
type
Max.
no. of
tubes
Max. vol. Max.
per sample no. of
cells
Chill 5
6 (5 mL)
2.5 mL
5×10⁸
Chill
15
5 (15
mL)
12.5 mL
2.5×10⁹
50 mL
4×10⁹
Chill
50
3 (50
mL)
§ Reagent Rack 4
§ Holds up to 4 vials for
automated sample labeling
•
•
•
Cooling of sample and
sorted fractions to
sustain cell viability
MiniSampler lid for
sample protection
Automatic recognition of
different tube racks
2. MACS® Buffer
• Connects directly to the instrument
• Controlled for cell separation performance
• High-quality ingredients
Buffer
Color-code
Running Buffer
blue
Washing Solution
Storage Solution*
green
black
Order no.
130-091221
130-091222
n.a.
§ Three Solutions are used to
operate and maintain
autoMACS™ Instruments
2. Re-usable columns
• For 14 days, or up to 100 separations
– Special, cell-friendly matrix coating
– Design: no air contact
• High capacity – cell sorting within a few minutes
– 105 up to 4 x 10⁹ total nucleated cells
– up to 2 x 10⁸ magnetically labeled cells
– up to 15 mL of whole blood
2. autoMACS™ Technology – Key
benefits
• Based on MACS® Technology, utilizes 50nm MACS® MicroBeads
• Proven quality worldwide since 1999
(“classic“ autoMACSTM, 43 countries, more than 1800 Instruments
sold)
• Pioneer in automated cell sorting, several hundred publications in
cellular research
• Renowned for time-effective and easy sample sorting
• Minimal operator training required, lower the workload for busy
laboratories
3. Before you start
•
Prepare single cell suspension
– Avoid cell clumps (use pre-filters)
– Avoid excess of dead cells
• Follow labeling instructions in datasheet
– Same protocol used for manual and automated
MACS® cell separation
3. How to work with the Instrument?
4. Prime
autoMACSTM Pro
Separator
1. Choose a cell
separation approach
2. Prepare cell
Sample
3. (optional)
manual labeling
of cell samples
5. Program a
separation template
(up to six samples)
6. Run autoMACSTM
Pro Cell Separation
7. Run “Sleep”
or “Store”
program for
storage
3. Choose a Separation Program
Goal
Strategy
Program
Select cell populations according
to particular cell surface antigen
Eliminate cell population(s),
obtain 'untouched' cells
Positive selection
Depletion
Magnetic labeling of target cells
Magnetic labeling of cells
other than the target cells
Normal to high
frequency cells
Rare cells, or
purity increase
Normal to
high antigen
expression
POSSEL
POSSELD
DEPLETE
Positive
selection
Double positive
selection, 0.5 mL
Depletion
Low antigen
expression
POSSEL_S
POSSELD2
DEPLETES
Double positive
Sensitive
positive selection selection, 2 mL
* automatic Dilution 1:3 prior to uptake
** Stage loading (up to 7 mL), not
applicable to autolabelling
Sensitive depletion
POSSELDS
DEPL05 and DEPL025
Sensitive double
positive selection
Special sensitive depletions
POSSELWB*
A_Depl/A_Depls**
Blood, marrow
Large scale depletion
3. Priming, Rinsing and Cleaning
• Priming
– Program "Rinse" from Menu "Wash only"
• Qrinse (Quick Rinse)
– 2 min, rinse and refill with Running buffer
– Standard short rinse, abundant cells
• Rinse
– 5 min, rinse with Washing solution; rinse and refill
with Running buffer
– Mandatory after sticky samples, e.g. whole blood or
tissues
– Recommended before rare cell isolations
4. Easy operation with intuitive
software
• Reagent menu—load protocol information by scanning
reagents
• Separation menu—program separation sequence and start
process
• Status menu—monitor instrument status and progress of
separation
• Log list menu—access process details and history
• Option menu—access special programs and user settings
Reagent
Separation
Status
Log list
Option
4. Bottle illumination display
instrument status
5. Routine maintenance
• Good sample preparation
– Avoid cell clumps (use Pre-Sep filters) and excess of dead cells
– Choose corect separation & wash program combination for best
results
• QRINSE vs. RINSE
• "Rinse" recommended: before rare cell isolations, between
species, sticky material, e.g whole blood, bone marrow, tissues,...
• Daily Maintenance
– Priming: Program "Rinse"
– Shut down: Program "Sleep" for overnight
storage (fill with Ethanol)
5. Periodic maintenance
• Periodic Maintenance
– Exchange Columns (Program "Option - Special Col_ex"): Every 14 days or after 100
separations, whichever comes first
– Clean pump syringe: Every 1-2 month
– Long term storage: Program "Store" (substitute
columns)
– Cleaning of Tubing system (also recommended
for decontamination): Program "Safe", cleaning
procedure with hypochlorite – MACS® Bleach
solution
6. Cleaning/exchange of Wear parts
• Cleaning of pump syringe (7.3.2)
• Cleaning of washing station (7.3.3)
• Exchange of valves (7.4.1)
…are explained in details in the user manual
7. Rescue procedure
•
Described in User Manuel under 7.7
•
•
•
•
•
•
•
•
•
•
•
•
•
•
•
•
•
•
•
7.7.1 Rescue procedure A
1 Restart the instrument by switching it OFF and ON again.
2 Undo the tubing connector at the negative port and place into a
50 mL tube.
3 Take out the uptake port needle from the needle holder and
place it into a 50 mL tube.
4 Undo the tubing connector of the waste tube at the waste bottle
and place it into a 50 mL tube; place a second 50mL tube beside
this one.
5 Run the program Qrinse. This will rinse the complete fluidic
system with autoMACS Pro Running Buffer eluting the cells into
the 50 mL tubes. Depending on which step of the separation
program that the interruption occurred the cells will be found in
any one of the vials.
6 Combine all fractions and centrifuge at 350×g for 10 minutes.
7 Discard the supernatant and apply cells to a reseparation as soon
as possible. Keep cells on ice until the separation.
8 Reconnect all tubing at the appropriate positions and reposition
up-take needle in needle holder
8. Troubleshooting
•
•
•
General:
o What are the aim and the experiment
o How often was the experiment performed before? Did it work then?
•
•
•
•
•
Results:
o How many cells were found in the different fractions (original, positive, negative)?
o What was the frequency of target cells found in the different fractions (original,
positive, negative)?
o Are flow data available? Which gating was performed? Where dead cells stained?
•
•
•
•
•
•
•
•
Protocol:
o Which sample material was used? Which species? Frozen or fresh sample? How was
the sample stored prior to the separation procedure?
o How was the cell suspension prepared? Was the single cell suspension checked?
o Which MACS reagent was used? Was it still within the shelf life?
o Which buffer was used (composition)?
o Which fluorochromes were used? When was the fluorescent staining performed?
o How was the magnetic labelling performed (time, temperature, amount of reagent,
total labelling volume)?
o Which instrument program was used? How many cells were loaded onto the column or
instrument?
•