1
Oracle VM
R
VirtualBox
User Manual
Version 4.0.8
c 2004-2011 Oracle Corporation
http://www.virtualbox.org
Contents
1 First steps
1.1
Why is virtualization useful? . . . . . . . . . . . . . . .
1.2
Some terminology . . . . . . . . . . . . . . . . . . . . .
1.3
Features overview . . . . . . . . . . . . . . . . . . . . .
1.4
Supported host operating systems . . . . . . . . . . . .
1.5
Installing VirtualBox and extension packs . . . . . . . .
1.6
Starting VirtualBox . . . . . . . . . . . . . . . . . . . .
1.7
Creating your first virtual machine . . . . . . . . . . .
1.8
Running your virtual machine . . . . . . . . . . . . . .
1.8.1
Starting a new VM for the first time . . . . . .
1.8.2
Capturing and releasing keyboard and mouse
1.8.3
Typing special characters . . . . . . . . . . . .
1.8.4
Changing removable media . . . . . . . . . . .
1.8.5
Resizing the machine’s window . . . . . . . .
1.8.6
Saving the state of the machine . . . . . . . .
1.9
Snapshots . . . . . . . . . . . . . . . . . . . . . . . . .
1.9.1
Taking, restoring and deleting snapshots . . .
1.9.2
Snapshot contents . . . . . . . . . . . . . . . .
1.10 Virtual machine configuration . . . . . . . . . . . . . .
1.11 Removing virtual machines . . . . . . . . . . . . . . . .
1.12 Importing and exporting virtual machines . . . . . . .
1.13 Alternative front-ends . . . . . . . . . . . . . . . . . . .
.
.
.
.
.
.
.
.
.
.
.
.
.
.
.
.
.
.
.
.
.
.
.
.
.
.
.
.
.
.
.
.
.
.
.
.
.
.
.
.
.
.
.
.
.
.
.
.
.
.
.
.
.
.
.
.
.
.
.
.
.
.
.
.
.
.
.
.
.
.
.
.
.
.
.
.
.
.
.
.
.
.
.
.
.
.
.
.
.
.
.
.
.
.
.
.
.
.
.
.
.
.
.
.
.
.
.
.
.
.
.
.
.
.
.
.
.
.
.
.
.
.
.
.
.
.
.
.
.
.
.
.
.
.
.
.
.
.
.
.
.
.
.
.
.
.
.
.
.
.
.
.
.
.
.
.
.
.
.
.
.
.
.
.
.
.
.
.
.
.
.
.
.
.
.
.
.
.
.
.
.
.
.
.
.
.
.
.
.
.
.
.
.
.
.
.
.
.
.
.
.
.
.
.
.
.
.
.
.
.
.
.
.
.
.
.
.
.
.
.
.
.
.
.
.
.
.
.
.
.
.
.
.
.
.
.
.
.
.
.
.
.
.
.
.
.
.
.
.
.
.
.
.
.
.
.
.
.
.
.
.
.
.
.
.
.
.
.
.
.
.
.
.
.
.
.
.
.
.
.
.
.
.
.
.
.
.
.
.
.
.
.
.
.
9
10
10
11
13
14
14
16
18
19
19
20
21
21
22
23
23
25
26
26
26
28
2 Installation details
2.1
Installing on Windows hosts . . . . . . . . . . . . .
2.1.1
Prerequisites . . . . . . . . . . . . . . . . .
2.1.2
Performing the installation . . . . . . . . .
2.1.3
Uninstallation . . . . . . . . . . . . . . . .
2.1.4
Unattended installation . . . . . . . . . . .
2.2
Installing on Mac OS X hosts . . . . . . . . . . . . .
2.2.1
Performing the installation . . . . . . . . .
2.2.2
Uninstallation . . . . . . . . . . . . . . . .
2.2.3
Unattended installation . . . . . . . . . . .
2.3
Installing on Linux hosts . . . . . . . . . . . . . . .
2.3.1
Prerequisites . . . . . . . . . . . . . . . . .
2.3.2
The VirtualBox kernel module . . . . . . .
2.3.3
Performing the installation . . . . . . . . .
2.3.4
The vboxusers group . . . . . . . . . . . .
2.3.5
Starting VirtualBox on Linux . . . . . . . .
2.4
Installing on Solaris hosts . . . . . . . . . . . . . .
2.4.1
Performing the installation . . . . . . . . .
2.4.2
Starting VirtualBox on Solaris . . . . . . .
2.4.3
Uninstallation . . . . . . . . . . . . . . . .
2.4.4
Unattended installation . . . . . . . . . . .
2.4.5
Configuring a zone for running VirtualBox
.
.
.
.
.
.
.
.
.
.
.
.
.
.
.
.
.
.
.
.
.
.
.
.
.
.
.
.
.
.
.
.
.
.
.
.
.
.
.
.
.
.
.
.
.
.
.
.
.
.
.
.
.
.
.
.
.
.
.
.
.
.
.
.
.
.
.
.
.
.
.
.
.
.
.
.
.
.
.
.
.
.
.
.
.
.
.
.
.
.
.
.
.
.
.
.
.
.
.
.
.
.
.
.
.
.
.
.
.
.
.
.
.
.
.
.
.
.
.
.
.
.
.
.
.
.
.
.
.
.
.
.
.
.
.
.
.
.
.
.
.
.
.
.
.
.
.
.
.
.
.
.
.
.
.
.
.
.
.
.
.
.
.
.
.
.
.
.
.
.
.
.
.
.
.
.
.
.
.
.
.
.
.
.
.
.
.
.
.
.
.
.
.
.
.
.
.
.
.
.
.
.
.
.
.
.
.
.
.
.
.
.
.
.
.
.
.
.
.
.
.
.
.
.
.
.
.
.
.
.
.
.
.
.
.
.
.
.
.
.
.
.
.
.
.
.
.
.
.
.
.
.
.
.
.
.
.
.
.
.
.
.
.
.
.
.
.
.
.
.
.
.
.
.
.
.
.
.
.
.
.
.
.
.
.
.
.
.
.
.
.
.
.
.
29
29
29
29
30
30
31
31
31
31
31
31
32
33
36
36
37
37
37
37
38
38
2
.
.
.
.
.
.
.
.
.
.
.
.
.
.
.
.
.
.
.
.
.
.
.
.
.
.
.
.
.
.
.
.
.
.
.
.
.
.
.
.
.
.
Contents
3 Configuring virtual machines
3.1
Supported guest operating systems . . . . . . . . . . . . . .
3.1.1
Mac OS X Server guests . . . . . . . . . . . . . . . .
3.1.2
64-bit guests . . . . . . . . . . . . . . . . . . . . . .
3.2
Emulated hardware . . . . . . . . . . . . . . . . . . . . . . .
3.3
General settings . . . . . . . . . . . . . . . . . . . . . . . . .
3.3.1
“Basic” tab . . . . . . . . . . . . . . . . . . . . . . .
3.3.2
“Advanced” tab . . . . . . . . . . . . . . . . . . . .
3.3.3
“Description” tab . . . . . . . . . . . . . . . . . . .
3.4
System settings . . . . . . . . . . . . . . . . . . . . . . . . .
3.4.1
“Motherboard” tab . . . . . . . . . . . . . . . . . .
3.4.2
“Processor” tab . . . . . . . . . . . . . . . . . . . .
3.4.3
“Acceleration” tab . . . . . . . . . . . . . . . . . . .
3.5
Display settings . . . . . . . . . . . . . . . . . . . . . . . . .
3.6
Storage settings . . . . . . . . . . . . . . . . . . . . . . . . .
3.7
Audio settings . . . . . . . . . . . . . . . . . . . . . . . . . .
3.8
Network settings . . . . . . . . . . . . . . . . . . . . . . . .
3.9
Serial ports . . . . . . . . . . . . . . . . . . . . . . . . . . .
3.10 USB support . . . . . . . . . . . . . . . . . . . . . . . . . . .
3.10.1 USB settings . . . . . . . . . . . . . . . . . . . . . .
3.10.2 Implementation notes for Windows and Linux hosts
3.11 Shared folders . . . . . . . . . . . . . . . . . . . . . . . . . .
3.12 Alternative firmware (EFI) . . . . . . . . . . . . . . . . . . .
3.12.1 Video modes in EFI . . . . . . . . . . . . . . . . . .
.
.
.
.
.
.
.
.
.
.
.
.
.
.
.
.
.
.
.
.
.
.
.
.
.
.
.
.
.
.
.
.
.
.
.
.
.
.
.
.
.
.
.
.
.
.
.
.
.
.
.
.
.
.
.
.
.
.
.
.
.
.
.
.
.
.
.
.
.
.
.
.
.
.
.
.
.
.
.
.
.
.
.
.
.
.
.
.
.
.
.
.
.
.
.
.
.
.
.
.
.
.
.
.
.
.
.
.
.
.
.
.
.
.
.
.
.
.
.
.
.
.
.
.
.
.
.
.
.
.
.
.
.
.
.
.
.
.
.
.
.
.
.
.
.
.
.
.
.
.
.
.
.
.
.
.
.
.
.
.
.
.
.
.
.
.
.
.
.
.
.
.
.
.
.
.
.
.
.
.
.
.
.
.
.
.
.
.
.
.
.
.
.
.
.
.
.
.
.
.
.
.
.
.
.
.
.
.
.
.
.
.
.
.
.
.
.
.
.
.
.
.
.
.
.
.
.
.
.
.
39
39
40
40
41
42
42
42
42
43
43
44
45
45
46
48
48
48
49
49
51
51
51
52
4 Guest Additions
4.1
Introduction . . . . . . . . . . . . . . . . . . . . . . . . . . . . .
4.2
Installing and Maintaining Guest Additions . . . . . . . . . . . .
4.2.1
Guest Additions for Windows . . . . . . . . . . . . . . .
4.2.2
Guest Additions for Linux . . . . . . . . . . . . . . . . .
4.2.3
Guest Additions for Solaris . . . . . . . . . . . . . . . .
4.2.4
Guest Additions for OS/2 . . . . . . . . . . . . . . . . .
4.3
Shared folders . . . . . . . . . . . . . . . . . . . . . . . . . . . .
4.3.1
Manual mounting . . . . . . . . . . . . . . . . . . . . .
4.3.2
Automatic mounting . . . . . . . . . . . . . . . . . . .
4.4
Hardware-accelerated graphics . . . . . . . . . . . . . . . . . .
4.4.1
Hardware 3D acceleration (OpenGL and Direct3D 8/9)
4.4.2
Hardware 2D video acceleration for Windows guests . .
4.5
Seamless windows . . . . . . . . . . . . . . . . . . . . . . . . .
4.6
Guest properties . . . . . . . . . . . . . . . . . . . . . . . . . . .
4.7
Guest control . . . . . . . . . . . . . . . . . . . . . . . . . . . .
4.8
Memory overcommitment . . . . . . . . . . . . . . . . . . . . .
4.8.1
Memory ballooning . . . . . . . . . . . . . . . . . . . .
4.8.2
Page Fusion . . . . . . . . . . . . . . . . . . . . . . . .
.
.
.
.
.
.
.
.
.
.
.
.
.
.
.
.
.
.
.
.
.
.
.
.
.
.
.
.
.
.
.
.
.
.
.
.
.
.
.
.
.
.
.
.
.
.
.
.
.
.
.
.
.
.
.
.
.
.
.
.
.
.
.
.
.
.
.
.
.
.
.
.
.
.
.
.
.
.
.
.
.
.
.
.
.
.
.
.
.
.
.
.
.
.
.
.
.
.
.
.
.
.
.
.
.
.
.
.
.
.
.
.
.
.
.
.
.
.
.
.
.
.
.
.
.
.
.
.
.
.
.
.
.
.
.
.
.
.
.
.
.
.
.
.
.
.
.
.
.
.
.
.
.
.
.
.
.
.
.
.
.
.
53
53
54
54
56
61
62
62
63
64
64
64
65
66
66
68
68
69
69
5 Virtual storage
5.1
Hard disk controllers: IDE, SATA (AHCI), SCSI, SAS
5.2
Disk image files (VDI, VMDK, VHD, HDD) . . . . .
5.3
The Virtual Media Manager . . . . . . . . . . . . .
5.4
Special image write modes . . . . . . . . . . . . . .
5.5
Differencing images . . . . . . . . . . . . . . . . . .
5.6
Cloning disk images . . . . . . . . . . . . . . . . . .
5.7
Host I/O caching . . . . . . . . . . . . . . . . . . .
5.8
Limiting bandwidth for disk images . . . . . . . . .
.
.
.
.
.
.
.
.
.
.
.
.
.
.
.
.
.
.
.
.
.
.
.
.
.
.
.
.
.
.
.
.
.
.
.
.
.
.
.
.
.
.
.
.
.
.
.
.
.
.
.
.
.
.
.
.
.
.
.
.
.
.
.
.
.
.
.
.
.
.
.
.
71
71
73
74
76
77
79
80
80
3
.
.
.
.
.
.
.
.
.
.
.
.
.
.
.
.
.
.
.
.
.
.
.
.
.
.
.
.
.
.
.
.
.
.
.
.
.
.
.
.
.
.
.
.
.
.
.
.
.
.
.
.
.
.
.
.
.
.
.
.
.
.
.
.
.
.
.
.
.
.
.
.
.
.
.
.
.
.
.
Contents
5.9
CD/DVD support . . . . . . . . . . . . . . . . . . . . . . . . . . . . . . . . . . .
5.10 iSCSI servers . . . . . . . . . . . . . . . . . . . . . . . . . . . . . . . . . . . . . .
6 Virtual networking
6.1
Virtual networking hardware . . . . . . . . . . .
6.2
Introduction to networking modes . . . . . . . .
6.3
Network Address Translation (NAT) . . . . . . .
6.3.1
Configuring port forwarding with NAT
6.3.2
PXE booting with NAT . . . . . . . . . .
6.3.3
NAT limitations . . . . . . . . . . . . .
6.4
Bridged networking . . . . . . . . . . . . . . . .
6.5
Internal networking . . . . . . . . . . . . . . . .
6.6
Host-only networking . . . . . . . . . . . . . . .
81
82
.
.
.
.
.
.
.
.
.
.
.
.
.
.
.
.
.
.
.
.
.
.
.
.
.
.
.
.
.
.
.
.
.
.
.
.
.
.
.
.
.
.
.
.
.
.
.
.
.
.
.
.
.
.
.
.
.
.
.
.
.
.
.
83
83
84
85
85
86
86
87
88
88
7 Remote virtual machines
7.1
Remote display (VRDP support) . . . . . . . . . . . . . . . . . . . . .
7.1.1
Common third-party RDP viewers . . . . . . . . . . . . . . .
7.1.2
VBoxHeadless, the remote desktop server . . . . . . . . . . .
7.1.3
Step by step: creating a virtual machine on a headless server
7.1.4
Remote USB . . . . . . . . . . . . . . . . . . . . . . . . . . .
7.1.5
RDP authentication . . . . . . . . . . . . . . . . . . . . . . .
7.1.6
RDP encryption . . . . . . . . . . . . . . . . . . . . . . . . .
7.1.7
Multiple connections to the VRDP server . . . . . . . . . . .
7.1.8
Multiple remote monitors . . . . . . . . . . . . . . . . . . . .
7.1.9
VRDP video redirection . . . . . . . . . . . . . . . . . . . . .
7.1.10 VRDP customization . . . . . . . . . . . . . . . . . . . . . . .
7.2
Teleporting . . . . . . . . . . . . . . . . . . . . . . . . . . . . . . . .
.
.
.
.
.
.
.
.
.
.
.
.
.
.
.
.
.
.
.
.
.
.
.
.
.
.
.
.
.
.
.
.
.
.
.
.
.
.
.
.
.
.
.
.
.
.
.
.
.
.
.
.
.
.
.
.
.
.
.
.
.
.
.
.
.
.
.
.
.
.
.
.
90
90
90
91
92
93
94
95
95
96
96
96
97
8 VBoxManage
8.1
Introduction . . . . . . . . . . . . . . . . . . . . . . . . . . . . . . . . .
8.2
Commands overview . . . . . . . . . . . . . . . . . . . . . . . . . . . .
8.3
VBoxManage list . . . . . . . . . . . . . . . . . . . . . . . . . . . . . .
8.4
VBoxManage showvminfo . . . . . . . . . . . . . . . . . . . . . . . . .
8.5
VBoxManage registervm / unregistervm . . . . . . . . . . . . . . . . .
8.6
VBoxManage createvm . . . . . . . . . . . . . . . . . . . . . . . . . . .
8.7
VBoxManage modifyvm . . . . . . . . . . . . . . . . . . . . . . . . . .
8.7.1
General settings . . . . . . . . . . . . . . . . . . . . . . . . . .
8.7.2
Networking settings . . . . . . . . . . . . . . . . . . . . . . . .
8.7.3
Serial port, audio, clipboard, remote desktop and USB settings
8.7.4
Remote machine settings . . . . . . . . . . . . . . . . . . . . .
8.7.5
Teleporting settings . . . . . . . . . . . . . . . . . . . . . . . .
8.8
VBoxManage import . . . . . . . . . . . . . . . . . . . . . . . . . . . .
8.9
VBoxManage export . . . . . . . . . . . . . . . . . . . . . . . . . . . . .
8.10 VBoxManage startvm . . . . . . . . . . . . . . . . . . . . . . . . . . . .
8.11 VBoxManage controlvm . . . . . . . . . . . . . . . . . . . . . . . . . .
8.12 VBoxManage discardstate . . . . . . . . . . . . . . . . . . . . . . . . .
8.13 VBoxManage adoptstate . . . . . . . . . . . . . . . . . . . . . . . . . .
8.14 VBoxManage snapshot . . . . . . . . . . . . . . . . . . . . . . . . . . .
8.15 VBoxManage closemedium . . . . . . . . . . . . . . . . . . . . . . . . .
8.16 VBoxManage storageattach . . . . . . . . . . . . . . . . . . . . . . . . .
8.17 VBoxManage storagectl . . . . . . . . . . . . . . . . . . . . . . . . . . .
8.18 VBoxManage bandwidthctl . . . . . . . . . . . . . . . . . . . . . . . . .
8.19 VBoxManage showhdinfo . . . . . . . . . . . . . . . . . . . . . . . . . .
8.20 VBoxManage createhd . . . . . . . . . . . . . . . . . . . . . . . . . . .
.
.
.
.
.
.
.
.
.
.
.
.
.
.
.
.
.
.
.
.
.
.
.
.
.
.
.
.
.
.
.
.
.
.
.
.
.
.
.
.
.
.
.
.
.
.
.
.
.
.
.
.
.
.
.
.
.
.
.
.
.
.
.
.
.
.
.
.
.
.
.
.
.
.
.
.
.
.
.
.
.
.
.
.
.
.
.
.
.
.
.
.
.
.
.
.
.
.
.
.
.
.
.
.
.
.
.
.
.
.
.
.
.
.
.
.
.
.
.
.
.
.
.
.
.
99
99
100
106
107
108
109
109
109
111
113
114
114
115
116
116
117
118
118
119
119
119
121
122
122
122
4
.
.
.
.
.
.
.
.
.
.
.
.
.
.
.
.
.
.
.
.
.
.
.
.
.
.
.
.
.
.
.
.
.
.
.
.
.
.
.
.
.
.
.
.
.
.
.
.
.
.
.
.
.
.
.
.
.
.
.
.
.
.
.
.
.
.
.
.
.
.
.
.
.
.
.
.
.
.
.
.
.
.
.
.
.
.
.
.
.
.
.
.
.
.
.
.
.
.
.
Contents
8.21
8.22
8.23
8.24
8.25
8.26
8.27
8.28
8.29
8.30
8.31
8.32
8.33
8.34
VBoxManage modifyhd . . . . . . . . . . .
VBoxManage clonehd . . . . . . . . . . . .
VBoxManage convertfromraw . . . . . . .
VBoxManage getextradata/setextradata . .
VBoxManage setproperty . . . . . . . . . .
VBoxManage usbfilter add/modify/remove
VBoxManage sharedfolder add/remove . .
VBoxManage guestproperty . . . . . . . .
VBoxManage guestcontrol . . . . . . . . .
VBoxManage debugvm . . . . . . . . . . .
VBoxManage metrics . . . . . . . . . . . .
VBoxManage hostonlyif . . . . . . . . . . .
VBoxManage dhcpserver . . . . . . . . . .
VBoxManage extpack . . . . . . . . . . . .
.
.
.
.
.
.
.
.
.
.
.
.
.
.
.
.
.
.
.
.
.
.
.
.
.
.
.
.
.
.
.
.
.
.
.
.
.
.
.
.
.
.
.
.
.
.
.
.
.
.
.
.
.
.
.
.
.
.
.
.
.
.
.
.
.
.
.
.
.
.
.
.
.
.
.
.
.
.
.
.
.
.
.
.
.
.
.
.
.
.
.
.
.
.
.
.
.
.
.
.
.
.
.
.
.
.
.
.
.
.
.
.
.
.
.
.
.
.
.
.
.
.
.
.
.
.
.
.
.
.
.
.
.
.
.
.
.
.
.
.
.
.
.
.
.
.
.
.
.
.
.
.
.
.
.
.
.
.
.
.
.
.
.
.
.
.
.
.
.
.
.
.
.
.
.
.
.
.
.
.
.
.
.
.
.
.
.
.
.
.
.
.
.
.
.
.
.
.
.
.
.
.
.
.
.
.
.
.
.
.
.
.
.
.
.
.
.
.
.
.
.
.
.
.
.
.
.
.
.
.
.
.
.
.
.
.
.
.
.
.
.
.
.
.
.
.
.
.
.
.
.
.
.
.
.
.
.
.
.
.
.
.
.
.
.
.
.
.
.
.
.
.
.
.
.
.
.
.
.
.
9 Advanced topics
9.1
VBoxSDL, the simplified VM displayer . . . . . . . . . . . . . . . . . . . . . . .
9.1.1
Introduction . . . . . . . . . . . . . . . . . . . . . . . . . . . . . . . .
9.1.2
Secure labeling with VBoxSDL . . . . . . . . . . . . . . . . . . . . . .
9.1.3
Releasing modifiers with VBoxSDL on Linux . . . . . . . . . . . . . .
9.2
Automated guest logons . . . . . . . . . . . . . . . . . . . . . . . . . . . . . .
9.2.1
Automated Windows guest logons . . . . . . . . . . . . . . . . . . . .
9.2.2
Automated Linux/Unix guest logons . . . . . . . . . . . . . . . . . . .
9.3
Advanced configuration for Windows guests . . . . . . . . . . . . . . . . . . .
9.3.1
Automated Windows system preparation . . . . . . . . . . . . . . . .
9.4
Advanced configuration for Linux and Solaris guests . . . . . . . . . . . . . . .
9.4.1
Manual setup of selected guest services on Linux . . . . . . . . . . . .
9.4.2
Guest graphics and mouse driver setup in depth . . . . . . . . . . . .
9.5
CPU hot-plugging . . . . . . . . . . . . . . . . . . . . . . . . . . . . . . . . . .
9.6
Advanced display configuration . . . . . . . . . . . . . . . . . . . . . . . . . .
9.6.1
Custom VESA resolutions . . . . . . . . . . . . . . . . . . . . . . . . .
9.6.2
Configuring the maximum resolution of guests when using the
graphical frontend . . . . . . . . . . . . . . . . . . . . . . . . . . . . .
9.7
Advanced storage configuration . . . . . . . . . . . . . . . . . . . . . . . . . .
9.7.1
Using a raw host hard disk from a guest . . . . . . . . . . . . . . . . .
9.7.2
Configuring the hard disk vendor product data (VPD) . . . . . . . . .
9.7.3
Access iSCSI targets via Internal Networking . . . . . . . . . . . . . .
9.8
Launching more than 120 VMs on Solaris hosts . . . . . . . . . . . . . . . . .
9.9
Legacy commands for using serial ports . . . . . . . . . . . . . . . . . . . . . .
9.10 Fine-tuning the VirtualBox NAT engine . . . . . . . . . . . . . . . . . . . . . .
9.10.1 Configuring the address of a NAT network interface . . . . . . . . . .
9.10.2 Configuring the boot server (next server) of a NAT network interface .
9.10.3 Tuning TCP/IP buffers for NAT . . . . . . . . . . . . . . . . . . . . . .
9.10.4 Binding NAT sockets to a specific interface . . . . . . . . . . . . . . .
9.10.5 Enabling DNS proxy in NAT mode . . . . . . . . . . . . . . . . . . . .
9.10.6 Using the host’s resolver as a DNS proxy in NAT mode . . . . . . . . .
9.10.7 Configuring aliasing of the NAT engine . . . . . . . . . . . . . . . . .
9.11 Configuring the BIOS DMI information . . . . . . . . . . . . . . . . . . . . . .
9.12 Fine-tuning timers and time synchronization . . . . . . . . . . . . . . . . . . .
9.12.1 Configuring the guest time stamp counter (TSC) to reflect guest
execution . . . . . . . . . . . . . . . . . . . . . . . . . . . . . . . . . .
9.12.2 Accelerate or slow down the guest clock . . . . . . . . . . . . . . . . .
9.12.3 Tuning the Guest Additions time synchronization parameters . . . . .
9.13 Configuring multiple host-only network interfaces on Solaris hosts . . . . . . .
5
.
.
.
.
.
.
.
.
.
.
.
.
.
.
123
124
124
125
125
126
126
126
127
130
131
132
132
133
.
.
.
.
.
.
.
.
.
.
.
.
.
.
.
134
134
134
134
135
136
136
137
138
138
139
139
139
140
141
141
.
.
.
.
.
.
.
.
.
.
.
.
.
.
.
.
.
141
142
142
144
144
145
145
145
145
146
146
146
146
147
147
147
148
.
.
.
.
148
148
149
149
Contents
9.14
9.15
9.16
9.17
Configuring the VirtualBox CoreDumper on Solaris hosts
Locking down the VirtualBox manager GUI . . . . . . . .
Starting the VirtualBox web service automatically . . . .
Memory Ballooning Service . . . . . . . . . . . . . . . .
.
.
.
.
.
.
.
.
.
.
.
.
.
.
.
.
.
.
.
.
.
.
.
.
.
.
.
.
.
.
.
.
.
.
.
.
.
.
.
.
.
.
.
.
.
.
.
.
.
.
.
.
150
151
151
152
10 Technical background
10.1 Where VirtualBox stores its files . . . . . . . . . . . . . . . .
10.1.1 Machines created by VirtualBox version 4.0 or later
10.1.2 Machines created by VirtualBox versions before 4.0
10.1.3 Global configuration data . . . . . . . . . . . . . . .
10.1.4 Summary of 4.0 configuration changes . . . . . . .
10.1.5 VirtualBox XML files . . . . . . . . . . . . . . . . . .
10.2 VirtualBox executables and components . . . . . . . . . . .
10.3 Hardware vs. software virtualization . . . . . . . . . . . . .
10.4 Details about software virtualization . . . . . . . . . . . . .
10.5 Details about hardware virtualization . . . . . . . . . . . . .
10.6 Nested paging and VPIDs . . . . . . . . . . . . . . . . . . . .
.
.
.
.
.
.
.
.
.
.
.
.
.
.
.
.
.
.
.
.
.
.
.
.
.
.
.
.
.
.
.
.
.
.
.
.
.
.
.
.
.
.
.
.
.
.
.
.
.
.
.
.
.
.
.
.
.
.
.
.
.
.
.
.
.
.
.
.
.
.
.
.
.
.
.
.
.
.
.
.
.
.
.
.
.
.
.
.
.
.
.
.
.
.
.
.
.
.
.
.
.
.
.
.
.
.
.
.
.
.
.
.
.
.
.
.
.
.
.
.
.
153
153
153
154
154
155
155
155
157
158
160
161
11 VirtualBox programming interfaces
163
12 Troubleshooting
12.1 Procedures and tools . . . . . . . . . . . . . . . . . . . . . . . . . . . . . . .
12.1.1 Categorizing and isolating problems . . . . . . . . . . . . . . . . . .
12.1.2 Collecting debugging information . . . . . . . . . . . . . . . . . . .
12.1.3 The built-in VM debugger . . . . . . . . . . . . . . . . . . . . . . . .
12.1.4 VM core format . . . . . . . . . . . . . . . . . . . . . . . . . . . . .
12.2 General . . . . . . . . . . . . . . . . . . . . . . . . . . . . . . . . . . . . . .
12.2.1 Guest shows IDE/SATA errors for file-based images on slow host
file system . . . . . . . . . . . . . . . . . . . . . . . . . . . . . . . .
12.2.2 Responding to guest IDE/SATA flush requests . . . . . . . . . . . . .
12.2.3 Poor performance caused by host power management . . . . . . . .
12.2.4 GUI: 2D Video Acceleration option is grayed out . . . . . . . . . . .
12.3 Windows guests . . . . . . . . . . . . . . . . . . . . . . . . . . . . . . . . . .
12.3.1 Windows bluescreens after changing VM configuration . . . . . . .
12.3.2 Windows 0x101 bluescreens with SMP enabled (IPI timeout) . . . .
12.3.3 Windows 2000 installation failures . . . . . . . . . . . . . . . . . .
12.3.4 How to record bluescreen information from Windows guests . . . .
12.3.5 No networking in Windows Vista guests . . . . . . . . . . . . . . . .
12.3.6 Windows guests may cause a high CPU load . . . . . . . . . . . . .
12.3.7 Long delays when accessing shared folders . . . . . . . . . . . . . .
12.4 Linux and X11 guests . . . . . . . . . . . . . . . . . . . . . . . . . . . . . . .
12.4.1 Linux guests may cause a high CPU load . . . . . . . . . . . . . . .
12.4.2 AMD Barcelona CPUs . . . . . . . . . . . . . . . . . . . . . . . . . .
12.4.3 Buggy Linux 2.6 kernel versions . . . . . . . . . . . . . . . . . . . .
12.4.4 Shared clipboard, auto-resizing and seamless desktop in X11 guests
12.5 Windows hosts . . . . . . . . . . . . . . . . . . . . . . . . . . . . . . . . . .
12.5.1 VBoxSVC out-of-process COM server issues . . . . . . . . . . . . . .
12.5.2 CD/DVD changes not recognized . . . . . . . . . . . . . . . . . . . .
12.5.3 Sluggish response when using Microsoft RDP client . . . . . . . . .
12.5.4 Running an iSCSI initiator and target on a single system . . . . . . .
12.5.5 Bridged networking adapters missing . . . . . . . . . . . . . . . . .
12.5.6 Host-only networking adapters cannot be created . . . . . . . . . .
12.6 Linux hosts . . . . . . . . . . . . . . . . . . . . . . . . . . . . . . . . . . . .
12.6.1 Linux kernel module refuses to load . . . . . . . . . . . . . . . . . .
6
.
.
.
.
.
.
.
.
.
.
.
.
164
164
164
165
165
167
168
.
.
.
.
.
.
.
.
.
.
.
.
.
.
.
.
.
.
.
.
.
.
.
.
.
.
.
.
.
.
.
.
.
.
.
.
.
.
.
.
.
.
.
.
.
.
.
.
.
.
.
.
168
169
169
169
170
170
170
170
171
171
171
171
171
171
172
172
172
172
172
173
173
173
174
174
174
174
Contents
12.6.2 Linux host CD/DVD drive not found . . . . . . . . . . . . .
12.6.3 Linux host CD/DVD drive not found (older distributions) .
12.6.4 Linux host floppy not found . . . . . . . . . . . . . . . . .
12.6.5 Strange guest IDE error messages when writing to CD/DVD
12.6.6 VBoxSVC IPC issues . . . . . . . . . . . . . . . . . . . . . .
12.6.7 USB not working . . . . . . . . . . . . . . . . . . . . . . .
12.6.8 PAX/grsec kernels . . . . . . . . . . . . . . . . . . . . . . .
12.6.9 Linux kernel vmalloc pool exhausted . . . . . . . . . . . .
12.7 Solaris hosts . . . . . . . . . . . . . . . . . . . . . . . . . . . . . . .
12.7.1 Cannot start VM, not enough contiguous memory . . . . .
12.7.2 VM aborts with out of memory errors on Solaris 10 hosts .
.
.
.
.
.
.
.
.
.
.
.
.
.
.
.
.
.
.
.
.
.
.
.
.
.
.
.
.
.
.
.
.
.
.
.
.
.
.
.
.
.
.
.
.
.
.
.
.
.
.
.
.
.
.
.
.
.
.
.
.
.
.
.
.
.
.
.
.
.
.
.
.
.
.
.
.
.
174
175
175
175
176
176
177
177
177
177
177
13 Security considerations
179
13.1 Potentially insecure operations . . . . . . . . . . . . . . . . . . . . . . . . . . . . 179
13.2 Authentication . . . . . . . . . . . . . . . . . . . . . . . . . . . . . . . . . . . . . 179
13.3 Encryption . . . . . . . . . . . . . . . . . . . . . . . . . . . . . . . . . . . . . . . 179
14 Known limitations
15 Change log
15.1 Version 4.0.8 (2011-05-16) .
15.2 Version 4.0.6 (2011-04-21) .
15.3 Version 4.0.4 (2011-02-17) .
15.4 Version 4.0.2 (2011-01-18) .
15.5 Version 4.0.0 (2010-12-22) .
15.6 Version 3.2.12 (2010-11-30)
15.7 Version 3.2.10 (2010-10-08)
15.8 Version 3.2.8 (2010-08-05) .
15.9 Version 3.2.6 (2010-06-25) .
15.10 Version 3.2.4 (2010-06-07) .
15.11 Version 3.2.2 (2010-06-02) .
15.12 Version 3.2.0 (2010-05-18) .
15.13 Version 3.1.8 (2010-05-10) .
15.14 Version 3.1.6 (2010-03-25) .
15.15 Version 3.1.4 (2010-02-12) .
15.16 Version 3.1.2 (2009-12-17) .
15.17 Version 3.1.0 (2009-11-30) .
15.18 Version 3.0.12 (2009-11-10)
15.19 Version 3.0.10 (2009-10-29)
15.20 Version 3.0.8 (2009-10-02) .
15.21 Version 3.0.6 (2009-09-09) .
15.22 Version 3.0.4 (2009-08-04) .
15.23 Version 3.0.2 (2009-07-10) .
15.24 Version 3.0.0 (2009-06-30) .
15.25 Version 2.2.4 (2009-05-29) .
15.26 Version 2.2.2 (2009-04-27) .
15.27 Version 2.2.0 (2009-04-08) .
15.28 Version 2.1.4 (2009-02-16) .
15.29 Version 2.1.2 (2009-01-21) .
15.30 Version 2.1.0 (2008-12-17) .
15.31 Version 2.0.8 (2009-03-10) .
15.32 Version 2.0.6 (2008-11-21) .
15.33 Version 2.0.4 (2008-10-24) .
15.34 Version 2.0.2 (2008-09-12) .
181
.
.
.
.
.
.
.
.
.
.
.
.
.
.
.
.
.
.
.
.
.
.
.
.
.
.
.
.
.
.
.
.
.
.
.
.
.
.
.
.
.
.
.
.
.
.
.
.
.
.
.
.
.
.
.
.
.
.
.
.
.
.
.
.
.
.
.
.
.
.
.
.
.
.
.
.
.
.
.
.
.
.
.
.
.
.
.
.
.
.
.
.
.
.
.
.
.
.
.
.
.
.
.
.
.
.
.
.
.
.
.
.
.
.
.
.
.
.
.
.
.
.
.
.
.
.
.
.
.
.
.
.
.
.
.
.
.
.
.
.
.
.
.
.
.
.
.
.
.
.
.
.
.
.
.
.
.
.
.
.
.
.
.
.
.
.
.
.
.
.
7
.
.
.
.
.
.
.
.
.
.
.
.
.
.
.
.
.
.
.
.
.
.
.
.
.
.
.
.
.
.
.
.
.
.
.
.
.
.
.
.
.
.
.
.
.
.
.
.
.
.
.
.
.
.
.
.
.
.
.
.
.
.
.
.
.
.
.
.
.
.
.
.
.
.
.
.
.
.
.
.
.
.
.
.
.
.
.
.
.
.
.
.
.
.
.
.
.
.
.
.
.
.
.
.
.
.
.
.
.
.
.
.
.
.
.
.
.
.
.
.
.
.
.
.
.
.
.
.
.
.
.
.
.
.
.
.
.
.
.
.
.
.
.
.
.
.
.
.
.
.
.
.
.
.
.
.
.
.
.
.
.
.
.
.
.
.
.
.
.
.
.
.
.
.
.
.
.
.
.
.
.
.
.
.
.
.
.
.
.
.
.
.
.
.
.
.
.
.
.
.
.
.
.
.
.
.
.
.
.
.
.
.
.
.
.
.
.
.
.
.
.
.
.
.
.
.
.
.
.
.
.
.
.
.
.
.
.
.
.
.
.
.
.
.
.
.
.
.
.
.
.
.
.
.
.
.
.
.
.
.
.
.
.
.
.
.
.
.
.
.
.
.
.
.
.
.
.
.
.
.
.
.
.
.
.
.
.
.
.
.
.
.
.
.
.
.
.
.
.
.
.
.
.
.
.
.
.
.
.
.
.
.
.
.
.
.
.
.
.
.
.
.
.
.
.
.
.
.
.
.
.
.
.
.
.
.
.
.
.
.
.
.
.
.
.
.
.
.
.
.
.
.
.
.
.
.
.
.
.
.
.
.
.
.
.
.
.
.
.
.
.
.
.
.
.
.
.
.
.
.
.
.
.
.
.
.
.
.
.
.
.
.
.
.
.
.
.
.
.
.
.
.
.
.
.
.
.
.
.
.
.
.
.
.
.
.
.
.
.
.
.
.
.
.
.
.
.
.
.
.
.
.
.
.
.
.
.
.
.
.
.
.
.
.
.
.
.
.
.
.
.
.
.
.
.
.
.
.
.
.
.
.
.
.
.
.
.
.
.
.
.
.
.
.
.
.
.
.
.
.
.
.
.
.
.
.
.
.
.
.
.
.
.
.
.
.
.
.
.
.
.
.
.
.
.
.
.
.
.
.
.
.
.
.
.
.
.
.
.
.
.
.
.
.
.
.
.
.
.
.
.
.
.
.
.
.
.
.
.
.
.
.
.
.
.
.
.
.
.
.
.
.
.
.
.
.
.
.
.
.
.
.
.
.
.
.
.
.
.
.
.
.
.
.
.
.
.
.
.
.
.
.
.
.
.
.
.
.
.
.
.
.
.
.
.
.
.
.
.
.
.
.
.
.
.
.
.
.
.
.
.
.
.
.
.
.
.
.
.
.
.
.
.
.
.
.
.
.
.
.
.
.
.
.
.
.
.
.
.
.
.
.
.
.
.
.
.
.
.
.
.
.
.
.
.
.
.
.
.
.
.
.
.
.
.
.
.
.
.
.
.
.
.
.
.
.
.
.
.
.
.
.
.
.
.
.
.
.
.
.
.
.
.
.
.
.
.
.
.
.
.
.
.
.
.
.
.
.
.
.
.
.
.
.
.
.
.
.
.
.
.
.
.
.
.
.
.
.
.
.
.
.
.
.
.
.
.
.
.
.
.
.
.
.
.
.
.
.
.
.
.
.
.
.
.
.
.
.
.
.
.
.
.
.
.
.
.
.
.
.
.
.
.
.
.
.
.
.
.
.
.
.
.
.
.
.
.
.
.
.
.
.
.
.
.
.
.
.
.
.
.
.
.
.
.
.
.
.
.
.
.
.
.
.
.
.
183
183
184
186
188
189
191
193
195
196
198
199
200
202
203
205
207
208
210
211
212
213
216
217
218
220
222
223
225
227
230
231
232
233
234
Contents
15.35 Version 2.0.0 (2008-09-04) . . . . . . . . . . . . . . . . . . . . . . . . . . . . . . 236
16 Third-party materials and licenses
16.1 Materials . . . . . . . . . . . . . . . . . . . . . . . . . . .
16.2 Licenses . . . . . . . . . . . . . . . . . . . . . . . . . . .
16.2.1 GNU General Public License (GPL) . . . . . . . .
16.2.2 GNU Lesser General Public License (LGPL) . . .
16.2.3 Mozilla Public License (MPL) . . . . . . . . . . .
16.2.4 MIT License . . . . . . . . . . . . . . . . . . . .
16.2.5 X Consortium License (X11) . . . . . . . . . . .
16.2.6 zlib license . . . . . . . . . . . . . . . . . . . . .
16.2.7 OpenSSL license . . . . . . . . . . . . . . . . . .
16.2.8 Slirp license . . . . . . . . . . . . . . . . . . . .
16.2.9 liblzf license . . . . . . . . . . . . . . . . . . . .
16.2.10 libpng license . . . . . . . . . . . . . . . . . . .
16.2.11 lwIP license . . . . . . . . . . . . . . . . . . . .
16.2.12 libxml license . . . . . . . . . . . . . . . . . . .
16.2.13 libxslt licenses . . . . . . . . . . . . . . . . . . .
16.2.14 gSOAP Public License Version 1.3a . . . . . . . .
16.2.15 Chromium licenses . . . . . . . . . . . . . . . .
16.2.16 curl license . . . . . . . . . . . . . . . . . . . . .
16.2.17 libgd license . . . . . . . . . . . . . . . . . . . .
16.2.18 BSD license from Intel . . . . . . . . . . . . . .
16.2.19 libjpeg License . . . . . . . . . . . . . . . . . . .
16.2.20 x86 SIMD extension for IJG JPEG library license
.
.
.
.
.
.
.
.
.
.
.
.
.
.
.
.
.
.
.
.
.
.
.
.
.
.
.
.
.
.
.
.
.
.
.
.
.
.
.
.
.
.
.
.
.
.
.
.
.
.
.
.
.
.
.
.
.
.
.
.
.
.
.
.
.
.
.
.
.
.
.
.
.
.
.
.
.
.
.
.
.
.
.
.
.
.
.
.
.
.
.
.
.
.
.
.
.
.
.
.
.
.
.
.
.
.
.
.
.
.
.
.
.
.
.
.
.
.
.
.
.
.
.
.
.
.
.
.
.
.
.
.
.
.
.
.
.
.
.
.
.
.
.
.
.
.
.
.
.
.
.
.
.
.
.
.
.
.
.
.
.
.
.
.
.
.
.
.
.
.
.
.
.
.
.
.
.
.
.
.
.
.
.
.
.
.
.
.
.
.
.
.
.
.
.
.
.
.
.
.
.
.
.
.
.
.
.
.
.
.
.
.
.
.
.
.
.
.
.
.
.
.
.
.
.
.
.
.
.
.
.
.
.
.
.
.
.
.
.
.
.
.
.
.
.
.
.
.
.
.
.
.
.
.
.
.
.
.
.
.
.
.
.
.
.
.
.
.
.
.
.
.
.
.
.
.
.
.
.
.
.
.
.
.
.
.
237
237
239
239
243
248
254
254
254
254
255
256
256
256
257
257
258
263
265
265
266
266
267
17 VirtualBox privacy policy
268
Glossary
269
8
1 First steps
Welcome to Oracle VM VirtualBox!
VirtualBox is a cross-platform virtualization application. What does that mean? For one thing,
it installs on your existing Intel or AMD-based computers, whether they are running Windows,
Mac, Linux or Solaris operating systems. Secondly, it extends the capabilities of your existing
computer so that it can run multiple operating systems (inside multiple virtual machines) at the
same time. So, for example, you can run Windows and Linux on your Mac, run Windows Server
2008 on your Linux server, run Linux on your Windows PC, and so on, all alongside your existing
applications. You can install and run as many virtual machines as you like – the only practical
limits are disk space and memory.
VirtualBox is deceptively simple yet also very powerful. It can run everywhere from small
embedded systems or desktop class machines all the way up to datacenter deployments and
even Cloud environments.
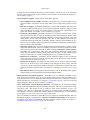
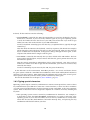
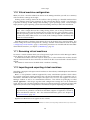
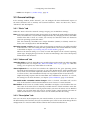
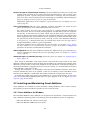
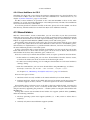
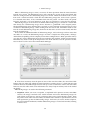
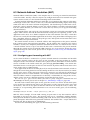
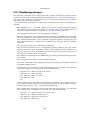
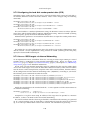
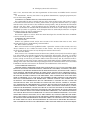
The following screenshot shows you how VirtualBox, installed on a Mac computer, is running
Windows 7 in a virtual machine window:
In this User Manual, we’ll begin simply with a quick introduction to virtualization and how to
get your first virtual machine running with the easy-to-use VirtualBox graphical user interface.
Subsequent chapters will go into much more detail covering more powerful tools and features,
but fortunately, it is not necessary to read the entire User Manual before you can use VirtualBox.
You can find a summary of VirtualBox’s capabilities in chapter 1.3, Features overview, page 11.
For existing VirtualBox users who just want to see what’s new in this release, there is a detailed
list in chapter 15, Change log, page 183.
9
1 First steps
1.1 Why is virtualization useful?
The techniques and features that VirtualBox provides are useful for several scenarios:
• Running multiple operating systems simultaneously. VirtualBox allows you to run more
than one operating system at a time. This way, you can run software written for one
operating system on another (for example, Windows software on Linux or a Mac) without
having to reboot to use it. Since you can configure what kinds of “virtual” hardware should
be presented to each such operating system, you can install an old operating system such
as DOS or OS/2 even if your real computer’s hardware is no longer supported by that
operating system.
• Easier software installations. Software vendors can use virtual machines to ship entire
software configurations. For example, installing a complete mail server solution on a real
machine can be a tedious task. With VirtualBox, such a complex setup (then often called
an “appliance”) can be packed into a virtual machine. Installing and running a mail server
becomes as easy as importing such an appliance into VirtualBox.
• Testing and disaster recovery. Once installed, a virtual machine and its virtual hard disks
can be considered a “container” that can be arbitrarily frozen, woken up, copied, backed
up, and transported between hosts.
On top of that, with the use of another VirtualBox feature called “snapshots”, one can save
a particular state of a virtual machine and revert back to that state, if necessary. This way,
one can freely experiment with a computing environment. If something goes wrong (e.g.
after installing misbehaving software or infecting the guest with a virus), one can easily
switch back to a previous snapshot and avoid the need of frequent backups and restores.
Any number of snapshots can be created, allowing you to travel back and forward in virtual
machine time. You can delete snapshots while a VM is running to reclaim disk space.
• Infrastructure consolidation. Virtualization can significantly reduce hardware and electricity costs. Most of the time, computers today only use a fraction of their potential power
and run with low average system loads. A lot of hardware resources as well as electricity
is thereby wasted. So, instead of running many such physical computers that are only partially used, one can pack many virtual machines onto a few powerful hosts and balance the
loads between them.
1.2 Some terminology
When dealing with virtualization (and also for understanding the following chapters of this
documentation), it helps to acquaint oneself with a bit of crucial terminology, especially the
following terms:
Host operating system (host OS). This is the operating system of the physical computer on
which VirtualBox was installed. There are versions of VirtualBox for Windows, Mac OS
X, Linux and Solaris hosts; for details, please see chapter 1.4, Supported host operating
systems, page 13.
Most of the time, this User Manual discusses all VirtualBox versions together. There may
be platform-specific differences which we will point out where appropriate.
Guest operating system (guest OS). This is the operating system that is running inside the
virtual machine. Theoretically, VirtualBox can run any x86 operating system (DOS, Windows, OS/2, FreeBSD, OpenBSD), but to achieve near-native performance of the guest
code on your machine, we had to go through a lot of optimizations that are specific to
certain operating systems. So while your favorite operating system may run as a guest, we
10
1 First steps
officially support and optimize for a select few (which, however, include the most common
ones).
See chapter 3.1, Supported guest operating systems, page 39 for details.
Virtual machine (VM). This is the special environment that VirtualBox creates for your guest
operating system while it is running. In other words, you run your guest operating system
“in” a VM. Normally, a VM will be shown as a window on your computer’s desktop, but
depending on which of the various frontends of VirtualBox you use, it can be displayed in
full-screen mode or remotely on another computer.
In a more abstract way, internally, VirtualBox thinks of a VM as a set of parameters that
determine its behavior. They include hardware settings (how much memory the VM should
have, what hard disks VirtualBox should virtualize through which container files, what CDs
are mounted etc.) as well as state information (whether the VM is currently running, saved,
its snapshots etc.). These settings are mirrored in the VirtualBox Manager window as well
as the VBoxManage command line program; see chapter 8, VBoxManage, page 99. In other
words, a VM is also what you can see in its settings dialog.
Guest Additions. This refers to special software packages which are shipped with VirtualBox
but designed to be installed inside a VM to improve performance of the guest OS and to
add extra features. This is described in detail in chapter 4, Guest Additions, page 53.
1.3 Features overview
Here’s a brief outline of VirtualBox’s main features:
• Portability. VirtualBox runs on a large number of 32-bit and 64-bit host operating systems
(again, see chapter 1.4, Supported host operating systems, page 13 for details).
VirtualBox is a so-called “hosted” hypervisor (sometimes referred to as a “type 2” hypervisor). Whereas a “bare-metal” or “type 1” hypervisor would run directly on the hardware,
VirtualBox requires an existing operating system to be installed. It can thus run alongside
existing applications on that host.
To a very large degree, VirtualBox is functionally identical on all of the host platforms, and
the same file and image formats are used. This allows you to run virtual machines created
on one host on another host with a different host operating system; for example, you can
create a virtual machine on Windows and then run it under Linux.
In addition, virtual machines can easily be imported and exported using the Open Virtualization Format (OVF, see chapter 1.12, Importing and exporting virtual machines, page 26),
an industry standard created for this purpose. You can even import OVFs that were created
with a different virtualization software.
• No hardware virtualization required. For many scenarios, VirtualBox does not require
the processor features built into newer hardware like Intel VT-x or AMD-V. As opposed
to many other virtualization solutions, you can therefore use VirtualBox even on older
hardware where these features are not present. The technical details are explained in
chapter 10.3, Hardware vs. software virtualization, page 157.
• Guest Additions: shared folders, seamless windows, 3D virtualization. The VirtualBox
Guest Additions are software packages which can be installed inside of supported guest
systems to improve their performance and to provide additional integration and communication with the host system. After installing the Guest Additions, a virtual machine will support automatic adjustment of video resolutions, seamless windows, accelerated 3D graphics
and more. The Guest Additions are described in detail in chapter 4, Guest Additions, page
53.
11
1 First steps
In particular, Guest Additions provide for “shared folders”, which let you access files from
the host system from within a guest machine. Shared folders are described in chapter 4.3,
Shared folders, page 62.
• Great hardware support. Among others, VirtualBox supports:
– Guest multiprocessing (SMP). VirtualBox can present up to 32 virtual CPUs to each
virtual machine, irrespective of how many CPU cores are physically present on your
host.
– USB device support. VirtualBox implements a virtual USB controller and allows you
to connect arbitrary USB devices to your virtual machines without having to install
device-specific drivers on the host. USB support is not limited to certain device categories. For details, see chapter 3.10.1, USB settings, page 49.
– Hardware compatibility. VirtualBox virtualizes a vast array of virtual devices, among
them many devices that are typically provided by other virtualization platforms. That
includes IDE, SCSI and SATA hard disk controllers, several virtual network cards and
sound cards, virtual serial and parallel ports and an Input/Output Advanced Programmable Interrupt Controller (I/O APIC), which is found in many modern PC systems. This eases cloning of PC images from real machines and importing of third-party
virtual machines into VirtualBox.
– Full ACPI support. The Advanced Configuration and Power Interface (ACPI) is fully
supported by VirtualBox. This eases cloning of PC images from real machines or thirdparty virtual machines into VirtualBox. With its unique ACPI power status support,
VirtualBox can even report to ACPI-aware guest operating systems the power status
of the host. For mobile systems running on battery, the guest can thus enable energy
saving and notify the user of the remaining power (e.g. in fullscreen modes).
– Multiscreen resolutions. VirtualBox virtual machines support screen resolutions
many times that of a physical screen, allowing them to be spread over a large number
of screens attached to the host system.
– Built-in iSCSI support. This unique feature allows you to connect a virtual machine
directly to an iSCSI storage server without going through the host system. The VM
accesses the iSCSI target directly without the extra overhead that is required for virtualizing hard disks in container files. For details, see chapter 5.10, iSCSI servers, page
82.
– PXE Network boot. The integrated virtual network cards of VirtualBox fully support
remote booting via the Preboot Execution Environment (PXE).
• Multigeneration branched snapshots. VirtualBox can save arbitrary snapshots of the
state of the virtual machine. You can go back in time and revert the virtual machine to any
such snapshot and start an alternative VM configuration from there, effectively creating a
whole snapshot tree. For details, see chapter 1.9, Snapshots, page 23. You can create and
delete snapshots while the virtual machine is running.
• Clean architecture; unprecedented modularity. VirtualBox has an extremely modular
design with well-defined internal programming interfaces and a clean separation of client
and server code. This makes it easy to control it from several interfaces at once: for
example, you can start a VM simply by clicking on a button in the VirtualBox graphical
user interface and then control that machine from the command line, or even remotely.
See chapter 1.13, Alternative front-ends, page 28 for details.
Due to its modular architecture, VirtualBox can also expose its full functionality and configurability through a comprehensive software development kit (SDK), which allows for
integrating every aspect of VirtualBox with other software systems. Please see chapter 11,
VirtualBox programming interfaces, page 163 for details.
12
1 First steps
• Remote machine display. The VirtualBox Remote Desktop Extension (VRDE) allows for
high-performance remote access to any running virtual machine. This extension supports
the Remote Desktop Protocol (RDP) originally built into Microsoft Windows, with special
additions for full client USB support.
The VRDE does not rely on the RDP server that is built into Microsoft Windows; instead, it
is plugged directly into the virtualization layer. As a result, it works with guest operating
systems other than Windows (even in text mode) and does not require application support
in the virtual machine either. The VRDE is described in detail in chapter 7.1, Remote display
(VRDP support), page 90.
On top of this special capacity, VirtualBox offers you more unique features:
– Extensible RDP authentication. VirtualBox already supports Winlogon on Windows
and PAM on Linux for RDP authentication. In addition, it includes an easy-to-use SDK
which allows you to create arbitrary interfaces for other methods of authentication;
see chapter 7.1.5, RDP authentication, page 94 for details.
– USB over RDP. Via RDP virtual channel support, VirtualBox also allows you to connect
arbitrary USB devices locally to a virtual machine which is running remotely on a
VirtualBox RDP server; see chapter 7.1.4, Remote USB, page 93 for details.
1.4 Supported host operating systems
Currently, VirtualBox runs on the following host operating systems:
• Windows hosts:
–
–
–
–
–
Windows XP, all service packs (32-bit)
Windows Server 2003 (32-bit)
Windows Vista (32-bit and 64-bit1 ).
Windows Server 2008 (32-bit and 64-bit)
Windows 7 (32-bit and 64-bit)
• Mac OS X hosts:2
– 10.5 (Leopard, 32-bit)
– 10.6 (Snow Leopard, 32-bit and 64-bit)
Intel hardware is required; please see chapter 14, Known limitations, page 181 also.
• Linux hosts (32-bit and 64-bit3 ). Among others, this includes:
– Ubuntu 6.06 (“Dapper Drake”), 6.10 (“Edgy Eft”), 7.04 (“Feisty Fawn”), 7.10 (“Gutsy
Gibbon”), 8.04 (“Hardy Heron”), 8.10 (“Intrepid Ibex”), 9.04 (“Jaunty Jackalope”),
9.10 (“Karmic Koala”), 10.04 (“Lucid Lynx”), 10.10 (“Maverick Meerkat).
– Debian GNU/Linux 3.1 (“sarge”), 4.0 (“etch”), 5.0 (“lenny”) and 6.0 (“squeeze”)
– Oracle Enterprise Linux 4 and 5, Oracle Linux 6
– Redhat Enterprise Linux 4, 5 and 6
– Fedora Core 4 to 14
– Gentoo Linux
– SUSE Linux 9, 10 and 11, openSUSE 10.3, 11.0, 11.1, 11.2, 11.3
– Mandriva 2007.1, 2008.0, 2009.1, 2010.0 and 2010.1
1 Support
for 64-bit Windows was added with VirtualBox 1.5.
Mac OS X support (beta stage) was added with VirtualBox 1.4, full support with 1.6. Mac OS X 10.4
(Tiger) support was removed with VirtualBox 3.1.
3 Support for 64-bit Linux was added with VirtualBox 1.4.
2 Preliminary
13
1 First steps
It should be possible to use VirtualBox on most systems based on Linux kernel 2.6 using
either the VirtualBox installer or by doing a manual installation; see chapter 2.3, Installing
on Linux hosts, page 31. However, the formally tested and supported Linux distributions
are those for which we offer a dedicated package.
Note that starting with VirtualBox 2.1, Linux 2.4-based host operating systems are no
longer supported.
• Solaris hosts (32-bit and 64-bit) are supported with the restrictions listed in chapter 14,
Known limitations, page 181:
– Solaris 11 Express (Nevada build 86 and higher, OpenSolaris 2008.05 and higher)
– Solaris 10 (u8 and higher)
1.5 Installing VirtualBox and extension packs
VirtualBox comes in many different packages, and installation depends on your host operating
system. If you have installed software before, installation should be straightforward: on each
host platform, VirtualBox uses the installation method that is most common and easy to use. If
you run into trouble or have special requirements, please refer to chapter 2, Installation details,
page 29 for details about the various installation methods.
Starting with version 4.0, VirtualBox is split into several components.
1. The base package consists of all open-source components and is licensed under the GNU
General Public License V2.
2. Additional extension packs can be downloaded which extend the functionality of the
VirtualBox base package. Currently, Oracle provides the one extension pack, which can
be found at http://www.virtualbox.org and provides the following added functionality:
a) The virtual USB 2.0 (EHCI) device; see chapter 3.10.1, USB settings, page 49.
b) VirtualBox Remote Desktop Protocol (VRDP) support; see chapter 7.1, Remote display
(VRDP support), page 90.
c) Intel PXE boot ROM with support for the E1000 network card.
VirtualBox extension packages have a .vbox-extpack file name extension. To install an
extension, simply double-click on the package file, and the VirtualBox Manager will guide
you through the required steps.
To view the extension packs that are currently installed, please start the VirtualBox Manager (see the next section). From the “File” menu, please select “Preferences”. In the
window that shows up, go to the “Extensions” category which shows you the extensions
which are currently installed and allows you to remove a package or add a new one.
Alternatively you can use VBoxManage on the command line: see chapter 8.34, VBoxManage extpack, page 133 for details.
1.6 Starting VirtualBox
After installation, you can start VirtualBox as follows:
• On a Windows host, in the standard “Programs” menu, click on the item in the “VirtualBox”
group. On Vista or Windows 7, you can also type “VirtualBox” in the search box of the
“Start” menu.
14
1 First steps
• On a Mac OS X host, in the Finder, double-click on the “VirtualBox” item in the “Applications” folder. (You may want to drag this item onto your Dock.)
• On a Linux or Solaris host, depending on your desktop environment, a “VirtualBox” item
may have been placed in either the “System” or “System Tools” group of your “Applications”
menu. Alternatively, you can type VirtualBox in a terminal.
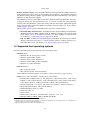
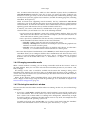
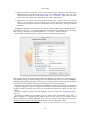
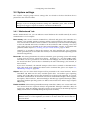
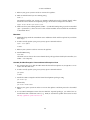
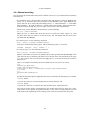
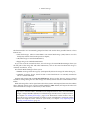
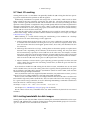
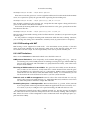
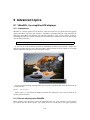
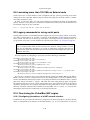
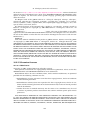
When you start VirtualBox for the first time, a window like the following should come up:
This window is called the “VirtualBox Manager”. On the left, you can see a pane that will later
list all your virtual machines. Since you have not created any, the list is empty. A row of buttons
above it allows you to create new VMs and work on existing VMs, once you have some. The pane
on the right displays the properties of the virtual machine currently selected, if any. Again, since
you don’t have any machines yet, the pane displays a welcome message.
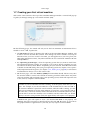
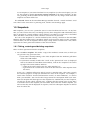
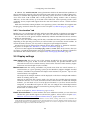
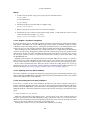
To give you an idea what VirtualBox might look like later, after you have created many machines, here’s another example:
15
1 First steps
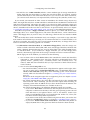
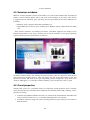
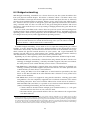
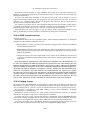
1.7 Creating your first virtual machine
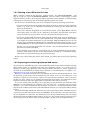
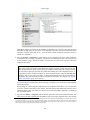
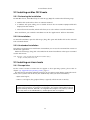
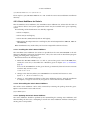
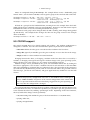
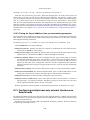
Click on the “New” button at the top of the VirtualBox Manager window. A wizard will pop up
to guide you through setting up a new virtual machine (VM):
On the following pages, the wizard will ask you for the bare minimum of information that is
needed to create a VM, in particular:
1. The VM name will later be shown in the VM list of the VirtualBox Manager window, and
it will be used for the VM’s files on disk. Even though any name could be used, keep in
mind that once you have created a few VMs, you will appreciate if you have given your
VMs rather informative names; “My VM” would thus be less useful than “Windows XP SP2
with OpenOffice”.
2. For “Operating System Type”, select the operating system that you want to install later.
The supported operating systems are grouped; if you want to install something very unusual that is not listed, select “Other”. Depending on your selection, VirtualBox will enable
or disable certain VM settings that your guest operating system may require. This is particularly important for 64-bit guests (see chapter 3.1.2, 64-bit guests, page 40). It is therefore
recommended to always set it to the correct value.
3. On the next page, select the memory (RAM) that VirtualBox should allocate every time
the virtual machine is started. The amount of memory given here will be taken away from
your host machine and presented to the guest operating system, which will report this size
as the (virtual) computer’s installed RAM.
Note: Choose this setting carefully! The memory you give to the VM will not be
available to your host OS while the VM is running, so do not specify more than you can
spare. For example, if your host machine has 1 GB of RAM and you enter 512 MB as
the amount of RAM for a particular virtual machine, while that VM is running, you will
only have 512 MB left for all the other software on your host. If you run two VMs at
the same time, even more memory will be allocated for the second VM (which may not
even be able to start if that memory is not available). On the other hand, you should
specify as much as your guest OS (and your applications) will require to run properly.
A Windows XP guest will require at least a few hundred MB RAM to run properly, and
Windows Vista will even refuse to install with less than 512 MB. Of course, if you want to
run graphics-intensive applications in your VM, you may require even more RAM.
16
1 First steps
So, as a rule of thumb, if you have 1 GB of RAM or more in your host computer, it is usually
safe to allocate 512 MB to each VM. But, in any case, make sure you always have at least
256 to 512 MB of RAM left on your host operating system. Otherwise you may cause your
host OS to excessively swap out memory to your hard disk, effectively bringing your host
system to a standstill.
As with the other settings, you can change this setting later, after you have created the VM.
4. Next, you must specify a virtual hard disk for your VM.
There are many and potentially complicated ways in which VirtualBox can provide hard
disk space to a VM (see chapter 5, Virtual storage, page 71 for details), but the most
common way is to use a large image file on your “real” hard disk, whose contents VirtualBox
presents to your VM as if it were a complete hard disk. This file represents an entire hard
disk then, so you can even copy it to another host and use it with another VirtualBox
installation.
The wizard shows you the following window:
Here you have the following options:
• To create a new, empty virtual hard disk, press the “New” button.
• You can pick an existing disk image file.
The drop-down list presented in the window contains all disk images which are currently remembered by VirtualBox, probably because they are currently attached to a
virtual machine (or have been in the past).
Alternatively, you can click on the small folder button next to the drop-down list to
bring up a standard file dialog, which allows you to pick any disk image file on your
host disk.
Most probably, if you are using VirtualBox for the first time, you will want to create a new
disk image. Hence, press the “New” button.
This brings up another window, the “Create New Virtual Disk Wizard”, which helps you
create a new disk image file in the new virtual machine’s folder.
VirtualBox supports two types of image files:
• A dynamically expanding file will only grow in size when the guest actually stores
data on its virtual hard disk. It will therefore initially be small on the host hard drive
and only later grow to the size specified as it is filled with data.
17
1 First steps
• A fixed-size file will immediately occupy the file specified, even if only a fraction of
the virtual hard disk space is actually in use. While occupying much more space, a
fixed-size file incurs less overhead and is therefore slightly faster than a dynamically
expanding file.
For details about the differences, please refer to chapter 5.2, Disk image files (VDI, VMDK,
VHD, HDD), page 73.
To prevent your physical hard disk from running full, VirtualBox limits the size of the image
file. Still, it needs to be large enough to hold the contents of your operating system and the
applications you want to install – for a modern Windows or Linux guest, you will probably
need several gigabytes for any serious use:
After having selected or created your image file, again press “Next” to go to the next page.
5. After clicking on “Finish”, your new virtual machine will be created. You will then see it
in the list on the left side of the Manager window, with the name you entered initially.
1.8 Running your virtual machine
To start a virtual machine, you have several options:
• Double-click on its entry in the list within the Manager window or
• select its entry in the list in the Manager window it and press the “Start” button at the top
or
• for virtual machines created with VirtualBox 4.0 or later, navigate to the “VirtualBox VMs”
folder in your system user’s home directory, find the subdirectory of the machine you want
to start and double-click on the machine settings file (with a .vbox file extension).
This opens up a new window, and the virtual machine which you selected will boot up. Everything which would normally be seen on the virtual system’s monitor is shown in the window, as
can be seen with the image in chapter 1.2, Some terminology, page 10.
In general, you can use the virtual machine much like you would use a real computer. There
are couple of points worth mentioning however.
18
1 First steps
1.8.1 Starting a new VM for the first time
When a VM gets started for the first time, another wizard – the “First Start Wizard” – will
pop up to help you select an installation medium. Since the VM is created empty, it would
otherwise behave just like a real computer with no operating system installed: it will do nothing
and display an error message that no bootable operating system was found.
For this reason, the wizard helps you select a medium to install an operating system from.
• If you have physical CD or DVD media from which you want to install your guest operating
system (e.g. in the case of a Windows installation CD or DVD), put the media into your
host’s CD or DVD drive.
Then, in the wizard’s drop-down list of installation media, select “Host drive” with the
correct drive letter (or, in the case of a Linux host, device file). This will allow your VM to
access the media in your host drive, and you can proceed to install from there.
• If you have downloaded installation media from the Internet in the form of an ISO image
file (most probably in the case of a Linux distribution), you would normally burn this file
to an empty CD or DVD and proceed as just described. With VirtualBox however, you can
skip this step and mount the ISO file directly. VirtualBox will then present this file as a CD
or DVD-ROM drive to the virtual machine, much like it does with virtual hard disk images.
For this case, the wizard’s drop-down list contains a list of installation media that were
previously used with VirtualBox.
If your medium is not in the list (especially if you are using VirtualBox for the first time),
select the small folder icon next to the drop-down list to bring up a standard file dialog,
with which you can pick the image file on your host disks.
In both cases, after making the choices in the wizard, you will be able to install your operating
system.
1.8.2 Capturing and releasing keyboard and mouse
As of version 3.2, VirtualBox provides a virtual USB tablet device to new virtual machines through
which mouse events are communicated to the guest operating system. As a result, if you are
running a modern guest operating system that can handle such devices, mouse support may
work out of the box without the mouse being “captured” as described below; see chapter 3.4.1,
“Motherboard” tab, page 43 for more information.
Otherwise, if the virtual machine only sees standard PS/2 mouse and keyboard devices, since
the operating system in the virtual machine does not “know” that it is not running on a real
computer, it expects to have exclusive control over your keyboard and mouse. This is, however,
not the case since, unless you are running the VM in full-screen mode, your VM needs to share
keyboard and mouse with other applications and possibly other VMs on your host.
As a result, initially after installing a guest operating system and before you install the Guest
Additions (we will explain this in a minute), only one of the two – your VM or the rest of your
computer – can “own” the keyboard and the mouse. You will see a second mouse pointer which
will always be confined to the limits of the VM window. Basically, you activate the VM by clicking
inside it.
To return ownership of keyboard and mouse to your host operating system, VirtualBox reserves
a special key on your keyboard for itself: the “host key”. By default, this is the right Control key
on your keyboard; on a Mac host, the default host key is the left Command key. You can change
this default in the VirtualBox Global Settings. In any case, the current setting for the host key is
always displayed at the bottom right of your VM window, should you have forgotten about it:
19
1 First steps
In detail, all this translates into the following:
• Your keyboard is owned by the VM if the VM window on your host desktop has the keyboard focus (and then, if you have many windows open in your guest operating system
as well, the window that has the focus in your VM). This means that if you want to type
within your VM, click on the title bar of your VM window first.
To release keyboard ownership, press the Host key (as explained above, typically the right
Control key).
Note that while the VM owns the keyboard, some key sequences (like Alt-Tab for example)
will no longer be seen by the host, but will go to the guest instead. After you press the host
key to re-enable the host keyboard, all key presses will go through the host again, so that
sequences like Alt-Tab will no longer reach the guest.
• Your mouse is owned by the VM only after you have clicked in the VM window. The host
mouse pointer will disappear, and your mouse will drive the guest’s pointer instead of your
normal mouse pointer.
Note that mouse ownership is independent of that of the keyboard: even after you have
clicked on a titlebar to be able to type into the VM window, your mouse is not necessarily
owned by the VM yet.
To release ownership of your mouse by the VM, also press the Host key.
As this behavior can be inconvenient, VirtualBox provides a set of tools and device drivers
for guest systems called the “VirtualBox Guest Additions” which make VM keyboard and mouse
operation a lot more seamless. Most importantly, the Additions will get rid of the second “guest”
mouse pointer and make your host mouse pointer work directly in the guest.
This will be described later in chapter 4, Guest Additions, page 53.
1.8.3 Typing special characters
Operating systems expect certain key combinations to initiate certain procedures. Some of these
key combinations may be difficult to enter into a virtual machine, as there are three candidates
as to who receives keyboard input: the host operating system, VirtualBox, or the guest operating
system. Who of these three receives keypresses depends on a number of factors, including the
key itself.
• Host operating systems reserve certain key combinations for themselves. For example, it
is impossible to enter the Ctrl+Alt+Delete combination if you want to reboot the guest
operating system in your virtual machine, because this key combination is usually hardwired into the host OS (both Windows and Linux intercept this), and pressing this key
combination will therefore reboot your host.
20
1 First steps
Also, on Linux and Solaris hosts, which use the X Window System, the key combination
Ctrl+Alt+Backspace normally resets the X server (to restart the entire graphical user
interface in case it got stuck). As the X server intercepts this combination, pressing it will
usually restart your host graphical user interface (and kill all running programs, including
VirtualBox, in the process).
Third, on Linux hosts supporting virtual terminals, the key combination Ctrl+Alt+Fx
(where Fx is one of the function keys from F1 to F12) normally allows to switch between
virtual terminals. As with Ctrl+Alt+Delete, these combinations are intercepted by the host
operating system and therefore always switch terminals on the host.
If, instead, you want to send these key combinations to the guest operating system in the
virtual machine, you will need to use one of the following methods:
– Use the items in the “Machine” menu of the virtual machine window. There you will
find “Insert Ctrl+Alt+Delete” and “Ctrl+Alt+Backspace”; the latter will only have an
effect with Linux or Solaris guests, however.
– Press special key combinations with the Host key (normally the right Control key),
which VirtualBox will then translate for the virtual machine:
∗ Host key + Del to send Ctrl+Alt+Del (to reboot the guest);
∗ Host key + Backspace to send Ctrl+Alt+Backspace (to restart the graphical user
interface of a Linux or Solaris guest);
∗ Host key + F1 (or other function keys) to simulate Ctrl+Alt+F1 (or other function keys, i.e. to switch between virtual terminals in a Linux guest).
• For some other keyboard combinations such as Alt-Tab (to switch between open windows),
VirtualBox allows you to configure whether these combinations will affect the host or the
guest, if a virtual machine currently has the focus. This is a global setting for all virtual
machines and can be found under “File” -> “Preferences” -> “Input” -> “Auto-capture
keyboard”.
1.8.4 Changing removable media
While a virtual machine is running, you can change removable media in the “Devices” menu of
the VM’s window. Here you can select in detail what VirtualBox presents to your VM as a CD,
DVD, or floppy.
The settings are the same as would be available for the VM in the “Settings” dialog of the
VirtualBox main window, but since that dialog is disabled while the VM is in the “running” or
“saved” state, this extra menu saves you from having to shut down and restart the VM every time
you want to change media.
Hence, in the “Devices” menu, VirtualBox allows you to attach the host drive to the guest or
select a floppy or DVD image using the Disk Image Manager, all as described in chapter 1.10,
Virtual machine configuration, page 26.
1.8.5 Resizing the machine’s window
You can resize the virtual machine’s window when it is running. In that case, one of three things
will happen:
1. If you have “scale mode” enabled, then the virtual machine’s screen will be scaled to the
size of the window. This can be useful if you have many machines running and want to
have a look at one of them while it is running in the background. Alternatively, it might
be useful to enlarge a window if the VM’s output screen is very small, for example because
you are running an old operating system in it.
To enable scale mode, press the host key + C, or select “Scale mode” from the “Machine”
menu in the VM window. To leave scale mode, press the host key + C again.
21
1 First steps
Please see chapter 14, Known limitations, page 181 for additional remarks.
2. If you have the Guest Additions installed and they support automatic resizing, the Guest
Additions will automatically adjust the screen resolution of the guest operating system. For
example, if you are running a Windows guest with a resolution of 1024x768 pixels and you
then resize the VM window to make it 100 pixels wider, the Guest Additions will change
the Windows display resolution to 1124x768.
Please see chapter 4, Guest Additions, page 53 for more information about the Guest Additions.
3. Otherwise, if the window is bigger than the VM’s screen, the screen will be centered. If it
is smaller, then scroll bars will be added to the machine window.
1.8.6 Saving the state of the machine
When you click on the “Close” button of your virtual machine window (at the top right of the window, just like you would close any other window on your system), VirtualBox asks you whether
you want to “save” or “power off” the VM. (As a shortcut, you can also press the Host key together
with “Q”.)
The difference between these three options is crucial. They mean:
• Save the machine state: With this option, VirtualBox “freezes” the virtual machine by
completely saving its state to your local disk.
When you start the VM again later, you will find that the VM continues exactly where it
was left off. All your programs will still be open, and your computer resumes operation.
Saving the state of a virtual machine is thus in some ways similar to suspending a laptop
computer (e.g. by closing its lid).
• Send the shutdown signal. This will send an ACPI shutdown signal to the virtual machine,
which has the same effect as if you had pressed the power button on a real computer. So
long as the VM is running a fairly modern operating system, this should trigger a proper
shutdown mechanism from within the VM.
• Power off the machine: With this option, VirtualBox also stops running the virtual machine, but without saving its state.
Warning: This is equivalent to pulling the power plug on a real computer without
shutting it down properly. If you start the machine again after powering it off, your
operating system will have to reboot completely and may begin a lengthy check of
its (virtual) system disks. As a result, this should not normally be done, since it can
potentially cause data loss or an inconsistent state of the guest system on disk.
22
1 First steps
As an exception, if your virtual machine has any snapshots (see the next chapter), you can
use this option to quickly restore the current snapshot of the virtual machine. In that
case, powering off the machine will not disrupt its state, but any changes made since that
snapshot was taken will be lost.
The “Discard” button in the VirtualBox Manager window discards a virtual machine’s saved
state. This has the same effect as powering it off, and the same warnings apply.
1.9 Snapshots
With snapshots, you can save a particular state of a virtual machine for later use. At any later
time, you can revert to that state, even though you may have changed the VM considerably since
then. A snapshot of a virtual machine is thus similar to a machine in “saved” state, as described
above, but there can be many of them, and these saved states are preserved.
You can see the snapshots of a virtual machine by first selecting a machine in the VirtualBox
Manager and then clicking on the “Snapshots” button at the top right. Until you take a snapshot
of the machine, the list of snapshots will be empty except for the “Current state” item, which
represents the “Now” point in the lifetime of the virtual machine.
1.9.1 Taking, restoring and deleting snapshots
There are three operations related to snapshots:
1. You can take a snapshot. This makes a copy of the machine’s current state, to which you
can go back at any given time later.
• If your VM is currently running, select “Take snapshot” from the “Machine” pull-down
menu of the VM window.
• If your VM is currently in either the “saved” or the “powered off” state (as displayed
next to the VM in the VirtualBox main window), click on the “Snapshots” tab on the
top right of the main window, and then
– either on the small camera icon (for “Take snapshot”) or
– right-click on the “Current State” item in the list and select “Take snapshot” from
the menu.
In any case, a window will pop up and ask you for a snapshot name. This name is purely
for reference purposes to help you remember the state of the snapshot. For example, a
useful name would be “Fresh installation from scratch, no Guest Additions”, or “Service
Pack 3 just installed”. You can also add a longer text in the “Description” field if you want.
Your new snapshot will then appear in the snapshots list. Underneath your new snapshot,
you will see an item called “Current state”, signifying that the current state of your VM is
a variation based on the snapshot you took earlier. If you later take another snapshot, you
will see that they will be displayed in sequence, and each subsequent snapshot is derived
from an earlier one:
23
1 First steps
VirtualBox imposes no limits on the number of snapshots you can take. The only practical
limitation is disk space on your host: each snapshot stores the state of the virtual machine
and thus occupies some disk space. (See the next section for details on what exactly is
stored in a snapshot.)
2. You can restore a snapshot by right-clicking on any snapshot you have taken in the list
of snapshots. By restoring a snapshot, you go back (or forward) in time: the current state
of the machine is lost, and the machine is restored to the exact state it was in when the
snapshot was taken.4
Note: Restoring a snapshot will affect the virtual hard drives that are connected to your
VM, as the entire state of the virtual hard drive will be reverted as well. This means also
that all files that have been created since the snapshot and all other file changes will be
lost. In order to prevent such data loss while still making use of the snapshot feature, it
is possible to add a second hard drive in “write-through” mode using the VBoxManage
interface and use it to store your data. As write-through hard drives are not included in
snapshots, they remain unaltered when a machine is reverted. See chapter 5.4, Special
image write modes, page 76 for details.
To avoid losing the current state when restoring a snapshot, you can create a new snapshot
before the restore.
By restoring an earlier snapshot and taking more snapshots from there, it is even possible
to create a kind of alternate reality and to switch between these different histories of the
virtual machine. This can result in a whole tree of virtual machine snapshots, as shown in
the screenshot above.
3. You can also delete a snapshot, which will not affect the state of the virtual machine, but
only release the files on disk that VirtualBox used to store the snapshot data, thus freeing
4 Both the terminology and the functionality of restoring snapshots has changed with VirtualBox 3.1.
Before that version,
it was only possible to go back to the very last snapshot taken – not earlier ones, and the operation was called “Discard
current state” instead of “Restore last snapshot”. The limitation has been lifted with version 3.1. It is now possible to
restore any snapshot, going backward and forward in time.
24
1 First steps
disk space. To delete a snapshot, right-click on it in the snapshots tree and select “Delete”.
As of VirtualBox 3.2, snapshots can be deleted even while a machine is running.
Note: Whereas taking and restoring snapshots are fairly quick operations, deleting a
snapshot can take a considerable amount of time since large amounts of data may need
to be copied between several disk image files. Temporary disk files may also need large
amounts of disk space while the operation is in progress.
There are some situations which cannot be handled while a VM is running, and you will
get an appropriate message that you need to perform this snapshot deletion when the VM
is shut down.
1.9.2 Snapshot contents
Think of a snapshot as a point in time that you have preserved. More formally, a snapshot consists
of three things:
• It contains a complete copy of the VM settings, including the hardware configuration, so
that when you restore a snapshot, the VM settings are restored as well. (For example, if
you changed the hard disk configuration or the VM’s system settings, that change is undone
when you restore the snapshot.)
The copy of the settings is stored in the machine configuration, an XML text file, and thus
occupies very little space.
• The complete state of all the virtual disks attached to the machine is preserved. Going back
to a snapshot means that all changes that had been made to the machine’s disks – file by
file, bit by bit – will be undone as well. Files that were since created will disappear, files
that were deleted will be restored, changes to files will be reverted.
(Strictly speaking, this is only true for virtual hard disks in “normal” mode. As mentioned
above, you can configure disks to behave differently with snapshots; see chapter 5.4, Special
image write modes, page 76. Even more formally and technically correct, it is not the virtual
disk itself that is restored when a snapshot is restored. Instead, when a snapshot is taken,
VirtualBox creates differencing images which contain only the changes since the snapshot
were taken, and when the snapshot is restored, VirtualBox throws away that differencing
image, thus going back to the previous state. This is both faster and uses less disk space.
For the details, which can be complex, please see chapter 5.5, Differencing images, page
77.)
Creating the differencing image as such does not occupy much space on the host disk
initially, since the differencing image will initially be empty (and grow dynamically later
with each write operation to the disk). The longer you use the machine after having created
the snapshot, however, the more the differencing image will grow in size.
• Finally, if you took a snapshot while the machine was running, the memory state of the
machine is also saved in the snapshot (the same way the memory can be saved when you
close the VM window). When you restore such a snapshot, execution resumes at exactly
the point when the snapshot was taken.
The memory state file can be as large as the memory size of the virtual machine and will
therefore occupy quite some disk space as well.
25
1 First steps
1.10 Virtual machine configuration
When you select a virtual machine from the list in the Manager window, you will see a summary
of that machine’s settings on the right.
Clicking on the “Settings” button in the toolbar at the top brings up a detailed window where
you can configure many of the properties of the selected VM. But be careful: even though it
is possible to change all VM settings after installing a guest operating system, certain changes
might prevent a guest operating system from functioning correctly if done after installation.
Note: The “Settings” button is disabled while a VM is either in the “running” or “saved”
state. This is simply because the settings dialog allows you to change fundamental
characteristics of the virtual computer that is created for your guest operating system,
and this operating system may not take it well when, for example, half of its memory
is taken away from under its feet. As a result, if the “Settings” button is disabled, shut
down the current VM first.
VirtualBox provides a plethora of parameters that can be changed for a virtual machine. The
various settings that can be changed in the “Settings” window are described in detail in chapter
3, Configuring virtual machines, page 39. Even more parameters are available with the VirtualBox
command line interface; see chapter 8, VBoxManage, page 99.
1.11 Removing virtual machines
To remove a virtual machine which you no longer need, right-click on it in the Manager’s VM list
select “Remove” from the context menu that comes up.
A confirmation window will come up that allows you to select whether the machine should
only be removed from the list of machines or whether the files associated with it should also be
deleted.
The “Remove” menu item is disabled while a machine is running.
1.12 Importing and exporting virtual machines
VirtualBox can import and export virtual machines in the industry-standard Open Virtualization
Format (OVF).5
OVF is a cross-platform standard supported by many virtualization products which allows
for creating ready-made virtual machines that can then be imported into a virtualizer such as
VirtualBox. VirtualBox makes OVF import and export easy to access and supports it from the
Manager window as well as its command-line interface. This allows for packaging so-called
virtual appliances: disk images together with configuration settings that can be distributed
easily. This way one can offer complete ready-to-use software packages (operating systems with
applications) that need no configuration or installation except for importing into VirtualBox.
Note: The OVF standard is complex, and support in VirtualBox is an ongoing process.
In particular, no guarantee is made that VirtualBox supports all appliances created by
other virtualization software. For a list of known limitations, please see chapter 14,
Known limitations, page 181.
Appliances in OVF format can appear in two variants:
5 OVF
support was originally introduced with VirtualBox 2.2 and has seen major improvements with every version since.
26
1 First steps
1. They can come in several files, as one or several disk images, typically in the widely-used
VMDK format (see chapter 5.2, Disk image files (VDI, VMDK, VHD, HDD), page 73) and a
textual description file in an XML dialect with an .ovf extension. These files must then
reside in the same directory for VirtualBox to be able to import them.
2. Alternatively, the above files can be packed together into a single archive file, typically
with an .ova extension. (Such archive files use a variant of the TAR archive format and
can therefore be unpacked outside of VirtualBox with any utility that can unpack standard
TAR files.)
To import an appliance in one of the above formats, simply double-click on the OVF/OVA file.6
Alternatively, select “File” -> “Import appliance” from the Manager window. In the file dialog
that comes up, navigate to the file with either the .ovf or the .ova file extension.
If VirtualBox can handle the file, a dialog similar to the following will appear:
This presents the virtual machines described in the OVF file and allows you to change the virtual machine settings by double-clicking on the description items. Once you click on “Import”,
VirtualBox will copy the disk images and create local virtual machines with the settings described
in the dialog. These will then show up in the Manager’s list of virtual machines.
Note that since disk images tend to be big, and VMDK images that come with virtual appliances
are typically shipped in a special compressed format that is unsuitable for being used by virtual
machines directly, the images will need to be unpacked and copied first, which can take a few
minutes.
For how to import an image at the command line, please see chapter 8.8, VBoxManage import,
page 115.
Conversely, to export virtual machines that you already have in VirtualBox, select “File” ->
“Export appliance”. A different dialog window shows up that allows you to combine several
virtual machines into an OVF appliance. Then, select the target location where the target files
should be stored, and the conversion process begins. This can again take a while.
6 Starting
with version 4.0, VirtualBox creates file type associations for OVF and OVA files on your host operating system.
27
1 First steps
For how to export an image at the command line, please see chapter 8.9, VBoxManage export,
page 116.
Note: OVF cannot describe snapshots that were taken for a virtual machine. As a
result, when you export a virtual machine that has snapshots, only the current state of
the machine will be exported, and the disk images in the export will have a “flattened”
state identical to the current state of the virtual machine.
1.13 Alternative front-ends
As briefly mentioned in chapter 1.3, Features overview, page 11, VirtualBox has a very flexible
internal design that allows for using multiple interfaces to control the same virtual machines. To
illustrate, you can, for example, start a virtual machine with the VirtualBox Manager window
and then stop it from the command line. With VirtualBox’s support for the Remote Desktop
Protocol (RDP), you can even run virtual machines remotely on a headless server and have all
the graphical output redirected over the network.
In detail, the following front-ends are shipped in the standard VirtualBox package:
1. VirtualBox is the VirtualBox Manager. This graphical user interface uses the Qt toolkit;
most of this User Manual is dedicated to describing it. While this is the easiest to use, some
of the more advanced VirtualBox features are kept away from it to keep it simple.
2. VBoxManage is our command-line interface for automated and very detailed control of
every aspect of VirtualBox. It is described in chapter 8, VBoxManage, page 99.
3. VBoxSDL is an alternative, simple graphical front-end with an intentionally limited feature set, designed to only display virtual machines that are controlled in detail with
VBoxManage. This is interesting for business environments where displaying all the bells
and whistles of the full GUI is not feasible. VBoxSDL is described in chapter 9.1, VBoxSDL,
the simplified VM displayer, page 134.
4. Finally, VBoxHeadless is yet another front-end that produces no visible output on the host
at all, but merely acts as a RDP server if the VirtualBox Remote Desktop Extension (VRDE)
is installed. As opposed to the other graphical interfaces, the headless front-end requires
no graphics support. This is useful, for example, if you want to host your virtual machines
on a headless Linux server that has no X Window system installed. For details, see chapter
7.1.2, VBoxHeadless, the remote desktop server, page 91.
If the above front-ends still do not satisfy your particular needs, it is possible to create yet another
front-end to the complex virtualization engine that is the core of VirtualBox, as the VirtualBox
core neatly exposes all of its features in a clean API; please refer to chapter 11, VirtualBox
programming interfaces, page 163.
28
2 Installation details
As installation of VirtualBox varies depending on your host operating system, we provide installation instructions in four separate chapters for Windows, Mac OS X, Linux and Solaris, respectively.
2.1 Installing on Windows hosts
2.1.1 Prerequisites
For the various versions of Windows that we support as host operating systems, please refer to
chapter 1.4, Supported host operating systems, page 13.
In addition, Windows Installer 1.1 or higher must be present on your system. This should be
the case if you have all recent Windows updates installed.
2.1.2 Performing the installation
The VirtualBox installation can be started
• either by double-clicking on its executable file (contains both 32- and 64-bit architectures)
• or by entering
VirtualBox.exe -extract
on the command line. This will extract both installers into a temporary directory in which
you’ll then find the usual .MSI files. Then you can do a
msiexec /i VirtualBox-<version>-MultiArch_<x86|amd64>.msi
to perform the installation.
In either case, this will display the installation welcome dialog and allow you to choose where
to install VirtualBox to and which components to install. In addition to the VirtualBox application, the following components are available:
USB support This package contains special drivers for your Windows host that VirtualBox requires to fully support USB devices inside your virtual machines.
Networking This package contains extra networking drivers for your Windows host that
VirtualBox needs to support Bridged Networking (to make your VM’s virtual network cards
accessible from other machines on your physical network).
Python Support This package contains Python scripting support for the VirtualBox API (see
chapter 11, VirtualBox programming interfaces, page 163). For this to work, an already
working Windows Python installation on the system is required.1
Depending on your Windows configuration, you may see warnings about “unsigned drivers” or
similar. Please select “Continue” on these warnings as otherwise VirtualBox might not function
correctly after installation.
1 See,
for example, http://www.python.org/download/windows/.
29
2 Installation details
The installer will create a “VirtualBox” group in the Windows “Start” menu which allows you
to launch the application and access its documentation.
With standard settings, VirtualBox will be installed for all users on the local system. In case
this is not wanted, you have to invoke the installer by first extracting it by using
VirtualBox.exe -extract
and then do as follows:
VirtualBox.exe -msiparams ALLUSERS=2
or
msiexec /i VirtualBox-<version>-MultiArch_<x86|amd64>.msi ALLUSERS=2
on the extracted .MSI files. This will install VirtualBox only for the current user.
If you do not want to install all features of VirtualBox, you can set the optional ADDLOCAL
parameter to explicitly name the features to be installed. The following features are available:
VBoxApplication Main binaries of VirtualBox.
Note: This feature must not be absent since it contains the minimum set of files to have
working VirtualBox installation.
VBoxUSB USB support.
VBoxNetwork All networking support; includes the VBoxNetworkFlt and VBoxNetworkAdp features (see below).
VBoxNetworkFlt Bridged networking support.
VBoxNetworkAdp Host-only networking support.
VBoxPython Python support.
For example, to only install USB support along with the main binaries, do a:
VirtualBox.exe -msiparams ADDLOCAL=VBoxApplication,VBoxUSB
or
msiexec /i VirtualBox-<version>-MultiArch_<x86|amd64>.msi ADDLOCAL=VBoxApplication,VBoxUSB
2.1.3 Uninstallation
As VirtualBox uses the standard Microsoft Windows installer, VirtualBox can be safely uninstalled
at any time by choosing the program entry in the “Add/Remove Programs” applet in the Windows
Control Panel.
2.1.4 Unattended installation
Unattended installations can be performed using the standard MSI support.
30
2 Installation details
2.2 Installing on Mac OS X hosts
2.2.1 Performing the installation
For Mac OS X hosts, VirtualBox ships in a disk image (dmg) file. Perform the following steps:
1. Double-click on that file to have its contents mounted.
2. A window will open telling you to double click on the VirtualBox.mpkg installer file
displayed in that window.
3. This will start the installer, which will allow you to select where to install VirtualBox to.
After installation, you can find a VirtualBox icon in the “Applications” folder in the Finder.
2.2.2 Uninstallation
To uninstall VirtualBox, open the disk image (dmg) file again and double-click on the uninstall
icon contained therein.
2.2.3 Unattended installation
To perform a non-interactive installation of VirtualBox you can use the command line version of
the installer application.
Mount the disk image (dmg) file as described in the normal installation. Then open a terminal
session and execute:
sudo installer -pkg /Volumes/VirtualBox/VirtualBox.mpkg \
-target /Volumes/Macintosh\ HD
2.3 Installing on Linux hosts
2.3.1 Prerequisites
For the various versions of Linux that we support as host operating systems, please refer to
chapter 1.4, Supported host operating systems, page 13.
You will need to install the following packages on your Linux system before starting the installation (some systems will do this for you automatically when you install VirtualBox):
• Qt 4.4.0 or higher;
• SDL 1.2.7 or higher (this graphics library is typically called libsdl or similar).
Note: To be precise, these packages are only required if you want to run the VirtualBox
graphical user interfaces. In particular, VirtualBox, the graphical VirtualBox manager,
requires both Qt and SDL; VBoxSDL, our simplified GUI, requires only SDL. By contrast,
if you only want to run VBoxHeadless, neither Qt nor SDL are required.
31
2 Installation details
2.3.2 The VirtualBox kernel module
VirtualBox uses a special kernel module called vboxdrv to perform physical memory allocation
and to gain control of the processor for guest system execution. Without this kernel module,
you can still use the VirtualBox manager to configure virtual machines, but they will not start. In
addition, there are the network kernel modules vboxnetflt and vboxnetadp which are required
for the more advanced networking features of VirtualBox.
The VirtualBox kernel module is automatically installed on your system when you install
VirtualBox. To maintain it with future kernel updates, for most Linux distributions – for example Fedora Core 11 and later, Ubuntu 8.04 (Hardy) and later and Mandriva 2009.1 and later –,
generally we recommend installing Dynamic Kernel Module Support (DKMS)2 . This framework
helps with building and upgrading kernel modules.
If DKMS is not already installed, execute one of the following:
• On an Ubuntu system:
sudo apt-get install dkms
• On a Fedora system:
yum install dkms
• On a Mandriva system:
urpmi dkms
If DKMS is available and installed, the VirtualBox kernel module should always work automatically, and it will be automatically rebuilt if your host kernel is updated.
Otherwise, there are only two situations in which you will need to worry about the kernel
module:
1. The original installation fails. This probably means that your Linux system is not prepared
for building external kernel modules.
Most Linux distributions can be set up simply by installing the right packages - normally,
these will be the GNU compiler (GCC), GNU Make (make) and packages containing header
files for your kernel - and making sure that all system updates are installed and that the
system is running the most up-to-date kernel included in the distribution. The version
numbers of the header file packages must be the same as that of the kernel you are using.
• With Debian and Ubuntu releases, you must install the right version of the
linux-headers and if it exists the linux-kbuild package. Current Ubuntu releases
should have the right packages installed by default.
• In even older Debian and Ubuntu releases, you must install the right version of the
kernel-headers package.
• On Fedora and Redhat systems, the package is kernel-devel.
• On SUSE and openSUSE Linux, you must install the right versions of the
kernel-source and kernel-syms packages.
• If you have built your own kernel, you will need to make sure that you also installed
all the required header and other files for building external modules to the right locations. The details of how to do this will depend on how you built your kernel, and if
you are unsure you should consult the documentation which you followed to do so.
2. The kernel of your Linux host was updated and DKMS is not installed. In that case, the
kernel module will need to be reinstalled by executing (as root):
/etc/init.d/vboxdrv setup
2 See http://en.wikipedia.org/wiki/Dynamic_Kernel_Module_Support
32
for an introduction.
2 Installation details
2.3.3 Performing the installation
VirtualBox is available in a number of package formats native to various common Linux distributions (see chapter 1.4, Supported host operating systems, page 13 for details). In addition, there
is an alternative generic installer (.run) which should work on most Linux distributions.
2.3.3.1 Installing VirtualBox from a Debian/Ubuntu package
First, download the appropriate package for your distribution. The following examples assume
that you are installing to a 32-bit Ubuntu Karmic system. Use dpkg to install the Debian package:
sudo dpkg -i VirtualBox-3.2_4.0.8_Ubuntu_karmic_i386.deb
You will be asked to accept the VirtualBox Personal Use and Evaluation License. Unless you
answer “yes” here, the installation will be aborted.
The installer will also search for a VirtualBox kernel module suitable for your kernel. The package includes pre-compiled modules for the most common kernel configurations. If no suitable
kernel module is found, the installation script tries to build a module itself. If the build process
is not successful you will be shown a warning and the package will be left unconfigured. Please
have a look at /var/log/vbox-install.log to find out why the compilation failed. You may
have to install the appropriate Linux kernel headers (see chapter 2.3.2, The VirtualBox kernel
module, page 32). After correcting any problems, do
sudo /etc/init.d/vboxdrv setup
This will start a second attempt to build the module.
If a suitable kernel module was found in the package or the module was successfully built, the
installation script will attempt to load that module. If this fails, please see chapter 12.6.1, Linux
kernel module refuses to load, page 174 for further information.
Once VirtualBox has been successfully installed and configured, you can start it by selecting
“VirtualBox” in your start menu or from the command line (see chapter 2.3.5, Starting VirtualBox
on Linux, page 36).
2.3.3.2 Using the alternative installer (VirtualBox.run)
The alternative installer performs the following steps:
• It unpacks the application files to the target directory,
/opt/VirtualBox/
which cannot be changed.
• It builds the VirtualBox kernel modules (vboxdrv, vboxnetflt and vboxnetadp) and installs them.
• It creates /etc/init.d/vboxdrv, an init script to start the VirtualBox kernel module.
• It creates a new system group called vboxusers.
• It creates symbolic links in /usr/bin to the a shell script (/opt/VirtualBox/VBox) which
does some sanity checks and dispatches to the actual executables, VirtualBox, VBoxSDL,
VBoxVRDP, VBoxHeadless and VBoxManage
• It creates /etc/udev/rules.d/10-vboxdrv.rules, a description file for udev, if that is
present, which makes the USB devices accessible to all users in the vboxusers group.
• It writes the installation directory to /etc/vbox/vbox.cfg.
33
2 Installation details
The installer must be executed as root with either install or uninstall as the first parameter.
sudo ./VirtualBox.run install
Or if you do not have the “sudo” command available, run the following as root instead:
./VirtualBox.run install
After that you need to put every user which should be able to access USB devices from
VirtualBox guests in the group vboxusers, either through the GUI user management tools or
by running the following command as root:
sudo usermod -a -G vboxusers username
Note: The usermod command of some older Linux distributions does not support the
-a option (which adds the user to the given group without affecting membership of
other groups). In this case, find out the current group memberships with the groups
command and add all these groups in a comma-separated list to the command line after
the -G option, e.g. like this: usermod -G group1,group2,vboxusers username.
2.3.3.3 Performing a manual installation
If, for any reason, you cannot use the shell script installer described previously, you can also
perform a manual installation. Invoke the installer like this:
./VirtualBox.run --keep --noexec
This will unpack all the files needed for installation in the directory install under the current
directory. The VirtualBox application files are contained in VirtualBox.tar.bz2 which you can
unpack to any directory on your system. For example:
sudo mkdir /opt/VirtualBox
sudo tar jxf ./install/VirtualBox.tar.bz2 -C /opt/VirtualBox
or as root:
mkdir /opt/VirtualBox
tar jxf ./install/VirtualBox.tar.bz2 -C /opt/VirtualBox
The sources for VirtualBox’s kernel module are provided in the src directory. To build the
module, change to the directory and issue
make
If everything builds correctly, issue the following command to install the module to the appropriate module directory:
sudo make install
In case you do not have sudo, switch the user account to root and perform
make install
34
2 Installation details
The VirtualBox kernel module needs a device node to operate. The above make command
will tell you how to create the device node, depending on your Linux system. The procedure
is slightly different for a classical Linux setup with a /dev directory, a system with the now
deprecated devfs and a modern Linux system with udev.
On certain Linux distributions, you might experience difficulties building the module. You will
have to analyze the error messages from the build system to diagnose the cause of the problems.
In general, make sure that the correct Linux kernel sources are used for the build process.
Note that the /dev/vboxdrv kernel module device node must be owned by root:root and must
be read/writable only for the user.
Next, you will have to install the system initialization script for the kernel module:
cp /opt/VirtualBox/vboxdrv.sh /etc/init.d/vboxdrv
(assuming you installed VirtualBox to the /opt/VirtualBox directory) and activate the initialization script using the right method for your distribution. You should create VirtualBox’s
configuration file:
mkdir /etc/vbox
echo INSTALL_DIR=/opt/VirtualBox > /etc/vbox/vbox.cfg
and, for convenience, create the following symbolic links:
ln
ln
ln
ln
-sf
-sf
-sf
-sf
/opt/VirtualBox/VBox.sh
/opt/VirtualBox/VBox.sh
/opt/VirtualBox/VBox.sh
/opt/VirtualBox/VBox.sh
/usr/bin/VirtualBox
/usr/bin/VBoxManage
/usr/bin/VBoxHeadless
/usr/bin/VBoxSDL
2.3.3.4 Updating and uninstalling VirtualBox
Before updating or uninstalling VirtualBox, you must terminate any virtual machines which are
currently running and exit the VirtualBox or VBoxSVC applications. To update VirtualBox, simply
run the installer of the updated version. To uninstall VirtualBox, invoke the installer like this:
sudo ./VirtualBox.run uninstall
or as root
./VirtualBox.run uninstall
. Starting with version 2.2.2, you can uninstall the .run package by invoking
/opt/VirtualBox/uninstall.sh
To manually uninstall VirtualBox, simply undo the steps in the manual installation in reverse
order.
2.3.3.5 Automatic installation of Debian packages
The Debian packages will request some user feedback when installed for the first time. The
debconf system is used to perform this task. To prevent any user interaction during installation,
default values can be defined. A file vboxconf can contain the following debconf settings:
virtualbox virtualbox/module-compilation-allowed boolean true
virtualbox virtualbox/delete-old-modules boolean true
The first line allows compilation of the vboxdrv kernel module if no module was found for the
current kernel. The second line allows the package to delete any old vboxdrv kernel modules
compiled by previous installations.
These default settings can be applied with
debconf-set-selections vboxconf
prior to the installation of the VirtualBox Debian package.
In addition there are some common configuration options that can be set prior to the installation, described in chapter 2.3.3.7, Automatic installation options, page 36.
35
2 Installation details
2.3.3.6 Automatic installation of .rpm packages
The .rpm format does not provide a configuration system comparable to the debconf system. See
chapter 2.3.3.7, Automatic installation options, page 36 for how to set some common installation
options provided by VirtualBox.
2.3.3.7 Automatic installation options
To configure the installation process of our .deb and .rpm packages, you can create a response
file named /etc/default/virtualbox. The automatic generation of the udev rule can be prevented by the following setting:
INSTALL_NO_UDEV=1
The creation of the group vboxusers can be prevented by
INSTALL_NO_GROUP=1
If the line
INSTALL_NO_VBOXDRV=1
is specified, the package installer will not try to build the vboxdrv kernel module if no module
fitting the current kernel was found.
2.3.4 The vboxusers group
The Linux installers create the system user group vboxusers during installation. Any system
user who is going to use USB devices from VirtualBox guests must be member of that group. A
user can be made member of the group vboxusers through the GUI user/group management or
at the command line with
sudo usermod -a -G vboxusers username
Note that adding an active user to that group will require that user to log out and back in
again. This should be done manually after successful installation of the package.
2.3.5 Starting VirtualBox on Linux
The easiest way to start a VirtualBox program is by running the program of your choice
(VirtualBox, VBoxManage, VBoxSDL or VBoxHeadless) from a terminal. These are symbolic
links to VBox.sh that start the required program for you.
The following detailed instructions should only be of interest if you wish to execute VirtualBox
without installing it first. You should start by compiling the vboxdrv kernel module (see above)
and inserting it into the Linux kernel. VirtualBox consists of a service daemon (VBoxSVC) and
several application programs. The daemon is automatically started if necessary. All VirtualBox
applications will communicate with the daemon through Unix local domain sockets. There
can be multiple daemon instances under different user accounts and applications can only
communicate with the daemon running under the user account as the application. The local
domain socket resides in a subdirectory of your system’s directory for temporary files called
.vbox-<username>-ipc. In case of communication problems or server startup problems, you
may try to remove this directory.
All VirtualBox applications (VirtualBox, VBoxSDL, VBoxManage and VBoxHeadless) require
the VirtualBox directory to be in the library path:
LD_LIBRARY_PATH=. ./VBoxManage showvminfo "Windows XP"
36
2 Installation details
2.4 Installing on Solaris hosts
For the specific versions of Solaris that we support as host operating systems, please refer to
chapter 1.4, Supported host operating systems, page 13.
If you have a previously installed instance of VirtualBox on your Solaris host, please uninstall it
first before installing a new instance. Refer to chapter 2.4.3, Uninstallation, page 37 for uninstall
instructions.
2.4.1 Performing the installation
VirtualBox is available as a standard Solaris package. Download the VirtualBox SunOS package
which includes both the 32-bit and 64-bit versions of VirtualBox. The installation must be performed as root and from the global zone as the VirtualBox installer loads kernel drivers which
cannot be done from non-global zones. To verify which zone you are currently in, execute the
zonename command. Execute the following commands:
gunzip -cd VirtualBox-4.0.8-SunOS.tar.gz | tar xvf -
Starting with VirtualBox 3.1 the VirtualBox kernel package is no longer a separate package
and has been integrated into the main package. Install the VirtualBox package using:
pkgadd -d VirtualBox-4.0.8-SunOS.pkg
Note: If you are using Solaris Zones, to install VirtualBox only into the current zone
and not into any other zone, use pkgadd -G. For more information refer to the pkgadd
manual; see also chapter 2.4.5, Configuring a zone for running VirtualBox, page 38.
The installer will then prompt you to enter the package you wish to install. Choose “1” or
“all” and proceed. Next the installer will ask you if you want to allow the postinstall script to
be executed. Choose “y” and proceed as it is essential to execute this script which installs the
VirtualBox kernel module. Following this confirmation the installer will install VirtualBox and
execute the postinstall setup script.
Once the postinstall script has been executed your installation is now complete. You may now
safely delete the uncompressed package and autoresponse files from your system. VirtualBox
would be installed in /opt/VirtualBox.
2.4.2 Starting VirtualBox on Solaris
The easiest way to start a VirtualBox program is by running the program of your choice
(VirtualBox, VBoxManage, VBoxSDL or VBoxHeadless) from a terminal. These are symbolic
links to VBox.sh that start the required program for you.
Alternatively, you can directly invoke the required programs from /opt/VirtualBox. Using
the links provided is easier as you do not have to type the full path.
You can configure some elements of the VirtualBox Qt GUI such as fonts and colours by
executing VBoxQtconfig from the terminal.
2.4.3 Uninstallation
Uninstallation of VirtualBox on Solaris requires root permissions. To perform the uninstallation,
start a root terminal session and execute:
pkgrm SUNWvbox
37
2 Installation details
After confirmation, this will remove VirtualBox from your system.
If you are uninstalling VirtualBox version 3.0 or lower, you need to remove the VirtualBox
kernel interface package, execute:
pkgrm SUNWvboxkern
2.4.4 Unattended installation
To perform a non-interactive installation of VirtualBox we have provided a response file named
autoresponse that the installer will use for responses to inputs rather than ask them from you.
Extract the tar.gz package as described in the normal installation. Then open a root terminal
session and execute:
pkgadd -d VirtualBox-4.0.8-SunOS-x86 -n -a autoresponse SUNWvbox
To perform a non-interactive uninstallation, open a root terminal session and execute:
pkgrm -n -a /opt/VirtualBox/autoresponse SUNWvbox
2.4.5 Configuring a zone for running VirtualBox
Starting with VirtualBox 1.6 it is possible to run VirtualBox from within Solaris zones. For
an introduction of Solaris zones, please refer to http://www.sun.com/bigadmin/features/
articles/solaris_zones.jsp.
Assuming that VirtualBox has already been installed into your zone, you need to give the zone
access to VirtualBox’s device node. This is done by performing the following steps. Start a root
terminal and execute:
zonecfg -z vboxzone
Inside the zonecfg prompt add the device resource and match properties to the zone. Here’s
how it can be done:
zonecfg:vboxzone>add device
zonecfg:vboxzone:device>set match=/dev/vboxdrv
zonecfg:vboxzone:device>end
zonecfg:vboxzone>verify
zonecfg:vboxzone>exit
If you are running VirtualBox 2.2.0 or above on Solaris 11 or Nevada hosts, you should add
a device for /dev/vboxusbmon too, similar to what was shown above. This does not apply to
Solaris 10 hosts due to lack of USB support.
Replace “vboxzone” with the name of the zone in which you intend to run VirtualBox. Next
reboot the zone using zoneadm and you should be able to run VirtualBox from within the configured zone.
38
3 Configuring virtual machines
Whereas chapter 1, First steps, page 9 gave you a quick introduction to VirtualBox and how to
get your first virtual machine running, the following chapter describes in detail how to configure
virtual machines.
You have considerable latitude in deciding what virtual hardware will be provided to the guest.
The virtual hardware can be used for communicating with the host system or with other guests.
For instance, if you provide VirtualBox with the image of a CD-ROM in an ISO file, VirtualBox
can present this image to a guest system as if it were a physical CD-ROM. Similarly, you can give
a guest system access to the real network via its virtual network card, and, if you so choose, give
the host system, other guests, or computers on the Internet access to the guest system.
3.1 Supported guest operating systems
Since VirtualBox is designed to provide a generic virtualization environment for x86 systems,
it may run operating systems of any kind, even those not listed here. However, the focus is to
optimize VirtualBox for the following guest systems:
Windows NT 4.0 All versions, editions and service packs are fully supported; however, there
are some issues with older service packs. We recommend to install service pack 6a. Guest
Additions are available with a limited feature set.
Windows 2000 / XP / Server 2003 / Vista / Server 2008 / Windows 7 All versions, editions
and service packs are fully supported (including 64-bit versions, under the preconditions
listed below). Guest Additions are available.
DOS / Windows 3.x / 95 / 98 / ME Limited testing has been performed. Use beyond legacy installation mechanisms not recommended. No Guest Additions available.
Linux 2.4 Limited support.
Linux 2.6 All versions/editions are fully supported (32 bits and 64 bits). Guest Additions are
available.
We strongly recommend using a Linux kernel version 2.6.13 or higher for better performance.
Note: Certain Linux kernel releases have bugs that prevent them from executing in a
virtual environment; please see chapter 12.4.3, Buggy Linux 2.6 kernel versions, page
172 for details.
Solaris 10, OpenSolaris Fully supported (32 bits and 64 bits). Guest Additions are available.
FreeBSD Requires hardware virtualization to be enabled. Limited support. Guest Additions are
not available yet.
OpenBSD Requires hardware virtualization to be enabled. Versions 3.7 and later are supported.
Guest Additions are not available yet.
39
3 Configuring virtual machines
OS/2 Warp 4.5 Requires hardware virtualization to be enabled. We officially support MCP2
only; other OS/2 versions may or may not work. Guest Additions are available with a
limited feature set.1
Mac OS X Server VirtualBox 3.2 added experimental support for Mac OS X Server guests, but
this comes with restrictions. Please see the following section as well as chapter 14, Known
limitations, page 181.
3.1.1 Mac OS X Server guests
Starting with version 3.2, VirtualBox has experimental support for Mac OS X Server guests. This
allows you to install and execute unmodified versions of Mac OS X Server on supported host
hardware.
Whereas competing solutions perform modifications to the Mac OS X Server install DVDs (e.g.
different boot loader and replaced files), VirtualBox is the first product to provide the modern
PC architecture expected by OS X without requiring any “hacks”.
You should be aware of a number of important issues before attempting to install a Mac OS
X Server guest:
1. Mac OS X is commercial, licensed software and contains both license and technical restrictions that limit its use to certain hardware and usage scenarios. It is important that
you understand and obey these restrictions.
In particular, for most versions of Mac OS X Server, Apple prohibits installing them on nonApple hardware. Also, only the server versions of Mac OS X are designed to be used in a
virtual environment; as a result, VirtualBox does not support client versions of Mac OS X
as a guest.
These license restrictions are also enforced on a technical level. Mac OS X Server verifies
whether it is running on Apple hardware, and most DVDs that that come with Apple hardware even check for an exact model. These restrictions are not circumvented by VirtualBox
and continue to apply.
2. Only CPUs known and tested by Apple are supported. As a result, if your Intel CPU is
newer than the build of Mac OS X Server, or if you have a non-Intel CPU, it will most likely
panic during bootup with an “Unsupported CPU” exception. It is generally best to use the
Mac OS X Server DVD that came with your Apple hardware.
3. The Mac OS X Server installer expects the harddisk to be partitioned so when it does not
offer a selection, you have to launch the Disk Utility from the “Tools” menu and partition
the hard disk. Then close the Disk Utility and proceed with the installation.
4. In addition, as Mac OS X Server support in VirtualBox is currently still experimental, please
refer also to chapter 14, Known limitations, page 181.
3.1.2 64-bit guests
VirtualBox supports 64-bit guest operating systems, even on 32-bit host operating systems,2 provided that the following conditions are met:
1. You need a 64-bit processor with hardware virtualization support (see chapter 10.3, Hardware vs. software virtualization, page 157).
1 See
chapter 14, Known limitations, page 181.
guest support was added with VirtualBox 2.0; support for 64-bit guests on 32-bit hosts was added with
VirtualBox 2.1.
2 64-bit
40
3 Configuring virtual machines
2. You must enable hardware virtualization for the particular VM for which you want 64-bit
support; software virtualization is not supported for 64-bit VMs.
3. If you want to use 64-bit guest support on a 32-bit host operating system, you must also
select a 64-bit operating system for the particular VM. Since supporting 64 bits on 32bit hosts incurs additional overhead, VirtualBox only enables this support upon explicit
request.
On 64-bit hosts (which typically come with hardware virtualization support), 64-bit guest
operating systems are always supported regardless of settings, so you can simply install a
64-bit operating system in the guest.
Warning: On any host, you should enable the I/O APIC for virtual machines that
you intend to use in 64-bit mode. This is especially true for 64-bit Windows VMs.
See chapter 3.3.2, “Advanced” tab, page 42. In addition, for 64-bit Windows guests,
you should make sure that the VM uses the Intel networking device, since there is
no 64-bit driver support for the AMD PCNet card; see chapter 6.1, Virtual networking
hardware, page 83.
If you use the “Create VM” wizard of the VirtualBox graphical user interface (see chapter
1.7, Creating your first virtual machine, page 16), VirtualBox will automatically use the correct
settings for each selected 64-bit operating system type.
3.2 Emulated hardware
VirtualBox virtualizes nearly all hardware of the host. Depending on a VM’s configuration, the
guest will see the following virtual hardware:
• Input devices. By default, VirtualBox emulates a standard PS/2 keyboard and mouse.
These devices are supported by almost all past and present operating systems.
In addition, VirtualBox can provide virtual USB input devices to avoid having to capture
mouse and keyboard, as described in chapter 1.8.2, Capturing and releasing keyboard and
mouse, page 19.
• Graphics. The VirtualBox graphics device (sometimes referred to as VGA device) is, unlike
nearly all other emulated devices, not based on any physical counterpart. It is a simple,
synthetic device which provides compatibility with standard VGA and several extended
registers used by the VESA BIOS Extensions (VBE).
• Storage. VirtualBox currently emulates the standard ATA interface found on Intel
PIIX3/PIIX4 chips, the SATA (AHCI) interface, and two SCSI adapters (LSI Logic and BusLogic); see chapter 5.1, Hard disk controllers: IDE, SATA (AHCI), SCSI, SAS, page 71 for
details. Whereas providing one of these would be enough for VirtualBox by itself, this multitude of storage adapters is required for compatibility with other hypervisors. Windows is
particularly picky about its boot devices, and migrating VMs between hypervisors is very
difficult or impossible if the storage controllers are different.
• Networking. See chapter 6.1, Virtual networking hardware, page 83.
• USB. VirtualBox emulates two USB host controllers, EHCI and OHCI. There is a need for
two host controllers because OHCI only handles USB low- and full-speed devices (both USB
1.x and 2.0), while EHCI only handles high-speed devices (USB 2.0 only). The emulated
USB controllers do not communicate directly with devices on the host but rather with a
virtual USB layer which abstracts the USB protocol and allows the use of remote USB
devices.
41
3 Configuring virtual machines
• Audio. See chapter 3.7, Audio settings, page 48.
3.3 General settings
In the Settings window, under “General”, you can configure the most fundamental aspects of
the virtual machine such as memory and essential hardware. There are three tabs, “Basic”,
“Advanced” and “Description”.
3.3.1 “Basic” tab
Under the “Basic” tab of the “General” settings category, you can find these settings:
Name The name under which the VM is shown in the list of VMs in the main window. Under this
name, VirtualBox also saves the VM’s configuration files. By changing the name, VirtualBox
renames these files as well. As a result, you can only use characters which are allowed in
your host operating system’s file names.
Note that internally, VirtualBox uses unique identifiers (UUIDs) to identify virtual machines. You can display these with VBoxManage.
Operating system / version The type of the guest operating system that is (or will be) installed
in the VM. This is the same setting that was specified in the “New Virtual Machine” wizard,
as described in chapter 1.7, Creating your first virtual machine, page 16.
Whereas the default settings of a newly created VM depend on the selected operating
system type, changing the type later has no effect on VM settings; this value is then purely
informational and decorative.
3.3.2 “Advanced” tab
Snapshot folder By default, VirtualBox saves snapshot data together with your other VirtualBox
configuration data; see chapter 10.1, Where VirtualBox stores its files, page 153. With this
setting, you can specify any other folder for each VM.
Shared clipboard You can select here whether the clipboard of the guest operating system
should be shared with that of your host. If you select “Bidirectional”, then VirtualBox will
always make sure that both clipboards contain the same data. If you select “Host to guest”
or “Guest to host”, then VirtualBox will only ever copy clipboard data in one direction.
Clipboard sharing requires that the VirtualBox Guest Additions be installed. As a result,
this setting has no effect otherwise; see chapter 4, Guest Additions, page 53 for details.
Removable media: remember runtime changes If this is checked, VirtualBox will save the
state of what media has been mounted between several runs of a virtual machine.
Mini toolbar In full screen or seamless mode, VirtualBox can display a small toolbar that contains some of the items that are normally available from the virtual machine’s menu bar.
This toolbar reduces itself to a small gray line unless you move the mouse over it. With the
toolbar, you can return from full screen or seamless mode, control machine execution or
enable certain devices. If you don’t want to see the toolbar, disable this setting.
3.3.3 “Description” tab
Here you can enter any description for your virtual machine, if you want. This has no effect on
the functionality of the machine, but you may find this space useful to note down things like the
configuration of a virtual machine and the software that has been installed into it.
42
3 Configuring virtual machines
3.4 System settings
The “System” category groups various settings that are related to the basic hardware that is
presented to the virtual machine.
Note: As the activation mechanism of Microsoft Windows is sensitive to hardware
changes, if you are changing hardware settings for a Windows guest, some of these
changes may trigger a request for another activation with Microsoft.
3.4.1 “Motherboard” tab
On the “Motherboard” tab, you can influence virtual hardware that would normally be on the
motherboard of a real computer.
Base memory This sets the amount of RAM that is allocated and given to the VM when it is
running. The specified amount of memory will be requested from the host operating system, so it must be available or made available as free memory on the host when attempting
to start the VM and will not be available to the host while the VM is running. This is the
same setting that was specified in the “New Virtual Machine” wizard, as described with
guidelines under chapter 1.7, Creating your first virtual machine, page 16 above.
Generally, it is possible to change the memory size after installing the guest operating
system (provided you do not reduce the memory to an amount where the operating system
would no longer boot).
Boot order This setting determines the order in which the guest operating system will attempt
to boot from the various virtual boot devices. Analogous to a real PC’s BIOS setting,
VirtualBox can tell a guest OS to start from the virtual floppy, the virtual CD/DVD drive,
the virtual hard drive (each of these as defined by the other VM settings), the network, or
none of these.
If you select “Network”, the VM will attempt to boot from a network via the PXE mechanism. This needs to be configured in detail on the command line; please see chapter 8.7,
VBoxManage modifyvm, page 109.
Chipset Here you can select which chipset will be presented to the virtual machine. Before
VirtualBox 4.0, PIIX3 was the only available option here. For modern guest operating
systems such as Mac OS X server, that old chipset is no longer well supported. As a result,
VirtualBox 4.0 introduced an emulation of the more modern ICH9 chipset, which supports
PCI express, three PCI buses, PCI-to-PCI bridges and Message Signalled Interrupts (MSI).
This allows modern operating systems to address more PCI devices and no longer requires
IRQ sharing.
Enable I/O APIC Advanced Programmable Interrupt Controllers (APICs) are a newer x86 hardware feature that have replaced old-style Programmable Interrupt Controllers (PICs) in
recent years. With an I/O APIC, operating systems can use more than 16 interrupt requests
(IRQs) and therefore avoid IRQ sharing for improved reliability.
Note: Enabling the I/O APIC is required for 64-bit guest operating systems, especially
Windows Vista; it is also required if you want to use more than one virtual CPU in a
virtual machine.
43
3 Configuring virtual machines
However, software support for I/O APICs has been unreliable with some operating systems other than Windows. Also, the use of an I/O APIC slightly increases the overhead of
virtualization and therefore slows down the guest OS a little.
Warning: All Windows operating systems starting with Windows 2000 install different
kernels depending on whether an I/O APIC is available. As with ACPI, the I/O APIC
therefore must not be turned off after installation of a Windows guest OS. Turning it on
after installation will have no effect however.
Enable EFI This enables Extensible Firmware Interface (EFI), which replaces the legacy BIOS
and may be useful for certain advanced use cases. Please refer to chapter 3.12, Alternative
firmware (EFI), page 51 for details.
Hardware clock in UTC time If checked, VirtualBox will report the system time in UTC format
to the guest instead of local (host) time. This affects how the virtual real-time clock (RTC)
operates and may be useful for Unix-like guest operating systems, which typically expect
the hardware clock to be set to UTC.
Enable absolute pointing device If enabled, VirtualBox reports to the virtual machine that
a USB tablet device is present and communicates mouse events to the virtual machine
through this device. If disabled, mouse events are communicated through a traditional
PS/2 virtual mouse device.
Using the virtual USB tablet has the advantage that movements are reported in absolute
coordinates (instead of as relative position changes), which allows VirtualBox to translate
mouse events over the VM window into tablet events without having to “capture” the
mouse in the guest as described in chapter 1.8.2, Capturing and releasing keyboard and
mouse, page 19. This makes using the VM less tedious even if Guest Additions are not
installed.3
In addition, you can turn off the Advanced Configuration and Power Interface (ACPI) which
VirtualBox presents to the guest operating system by default. ACPI is the current industry standard to allow operating systems to recognize hardware, configure motherboards and other devices and manage power. As all modern PCs contain this feature and Windows and Linux have
been supporting it for years, it is also enabled by default in VirtualBox. It can only be turned off
on the command line; see chapter 8.7, VBoxManage modifyvm, page 109.
Warning: All Windows operating systems starting with Windows 2000 install different
kernels depending on whether ACPI is available, so ACPI must not be turned off after
installation of a Windows guest OS. Turning it on after installation will have no effect
however.
3.4.2 “Processor” tab
On the “Processor” tab, you can set how many virtual CPU cores the guest operating systems
should see. Starting with version 3.0, VirtualBox supports symmetrical multiprocessing (SMP)
and can present up to 32 virtual CPU cores to each virtual machine.
You should not, however, configure virtual machines to use more CPU cores than you have
available physically.
3 The
virtual USB tablet was added with VirtualBox 3.2. Depending on the guest operating system selected, this is now
enabled by default for new virtual machines.
44
3 Configuring virtual machines
In addition, the “Enable PAE/NX” setting determines whether the PAE and NX capabilities of
the host CPU will be exposed to the virtual machine. PAE stands for “Physical Address Extension”.
Normally, if enabled and supported by the operating system, then even a 32-bit x86 CPU can
access more than 4 GB of RAM. This is made possible by adding another 4 bits to memory
addresses, so that with 36 bits, up to 64 GB can be addressed. Some operating systems (such
as Ubuntu Server) require PAE support from the CPU and cannot be run in a virtual machine
without it.
With virtual machines running modern server operating systems, VirtualBox also supports CPU
hot-plugging. For details about this, please refer to chapter 9.5, CPU hot-plugging, page 140.
3.4.3 “Acceleration” tab
On this page, you can determine whether and how VirtualBox should use hardware virtualization
extensions that your host CPU may support. This is the case with most CPUs built after 2006.
You can select for each virtual machine individually whether VirtualBox should use software
or hardware virtualization.4
In most cases, the default settings will be fine; VirtualBox will have picked sensible defaults
depending on the operating system that you selected when you created the virtual machine. In
certain situations, however, you may want to change these preconfigured defaults.
Advanced users may be interested in technical details about software vs. hardware virtualization; please see chapter 10.3, Hardware vs. software virtualization, page 157.
If your host’s CPU supports the nested paging (AMD-V) or EPT (Intel VT-x) features, then you
can expect a significant performance increase by enabling nested paging in addition to hardware
virtualization. For technical details, see chapter 10.6, Nested paging and VPIDs, page 161.
3.5 Display settings
Video memory size This sets the size of the memory provided by the virtual graphics card
available to the guest, in MB. As with the main memory, the specified amount will be
allocated from the host’s resident memory. Based on the amount of video memory, higher
resolutions and color depths may be available.
Monitor count With this setting VirtualBox can provide more than one virtual monitor to a
virtual machine. If a guest operating system (such as Windows) supports multiple attached
monitors, VirtualBox can pretend that multiple virtual monitors are present.5 Up to 8 such
virtual monitors are supported.
The output of the multiple monitors will be displayed on the host in multiple VM windows
which are running side by side.
However, in fullscreen and seamless mode, they will use the available physical monitors
attached to the host. As a result, for fullscreen and seamless modes to work with multiple
monitors, you will need at least as many physical monitors as you have virtual monitors
configured, or VirtualBox will report an error. You can configure the relationship between
guest and host monitors using the view menu by pressing Host key + Home when you are
in fullscreen or seamless mode.
Please see chapter 14, Known limitations, page 181 also.
Enable 3D acceleration If a virtual machine has Guest Additions installed, you can select here
whether the guest should support accelerated 3D graphics. Please refer to chapter 4.4.1,
Hardware 3D acceleration (OpenGL and Direct3D 8/9), page 64 for details.
4 Prior
to VirtualBox version 2.2, software virtualization was the default; starting with version 2.2, VirtualBox will
enable hardware virtualization by default for new virtual machines that you create. (Existing virtual machines are not
automatically changed for compatibility reasons, and the default can of course be changed for each virtual machine.)
5 Multiple monitor support was added with VirtualBox 3.2.
45
3 Configuring virtual machines
Enable 2D video acceleration If a virtual machine with Microsoft Windows has Guest Additions installed, you can select here whether the guest should support accelerated 2D video
graphics. Please refer to chapter 4.4.2, Hardware 2D video acceleration for Windows guests,
page 65 for details.
Remote display Under the “Remote display” tab, if the VirtualBox Remote Display Extension
(VRDE) is installed, you can enable the VRDP server that is built into VirtualBox. This
allows you to connect to the console of the virtual machine remotely with any standard
RDP viewer, such as mstsc.exe that comes with Microsoft Windows. On Linux and Solaris
systems you can use the standard open-source rdesktop program. These features are
described in detail in chapter 7.1, Remote display (VRDP support), page 90.
3.6 Storage settings
The “Storage” category in the VM settings allows you to connect virtual hard disk, CD/DVD and
floppy images and drives to your virtual machine.
In a real PC, so-called “storage controllers” connect physical disk drives to the rest of the computer. Similarly, VirtualBox presents virtual storage controllers to a virtual machine. Under each
controller, the virtual devices (hard disks, CD/DVD or floppy drives) attached to the controller
are shown.
Note: This section can only give you a quick introduction to the VirtualBox storage
settings. Since VirtualBox gives you an enormous wealth of options in this area, we
have dedicated an entire chapter of this User Manual to explaining all the details:
please see chapter 5, Virtual storage, page 71.
If you have used the “Create VM” wizard to create a machine, you will normally see something
like the following:
Depending on the guest operating system type that you selected when you created the VM, the
typical layout of storage devices in a new VM is as follows:
• You will see an IDE controller, to which a virtual CD/DVD drive has been attached (to the
“secondary master” port of the IDE controller).
46
3 Configuring virtual machines
• You will also see a SATA controller, which is a more modern type of storage controller for
higher hard disk data throughput, to which the virtual hard disks are attached. Initially
you will normally have one such virtual disk, but as you can see in the above screenshot,
you can have more than one, each represented by a disk image file (VDI files, in this case).
If you created your VM with an older version of VirtualBox, the default storage layout may
differ. You might then only have an IDE controller to which both the CD/DVD drive and the hard
disks have been attached. This might also apply if you selected an older operating system type
when you created the VM. Since older operating systems do not support SATA without additional
drivers, VirtualBox will make sure that no such devices are present initially. Please see chapter
5.1, Hard disk controllers: IDE, SATA (AHCI), SCSI, SAS, page 71 for additional information.
VirtualBox also provides a floppy controller, which is special: you cannot add devices other
than floppy drives to it. Virtual floppy drives, like virtual CD/DVD drives, can be connected to
either a host floppy drive (if you have one) or a disk image, which in this case must be in RAW
format.
You can modify these media attachments freely. For example, if you wish to copy some files
from another virtual disk that you created, you can connect that disk as a second hard disk, as in
the above screenshot. You could also add a second virtual CD/DVD drive, or change where these
items are attached. The following options are available:
• To add another virtual hard disk, or a CD/DVD or floppy drive, select the storage controller to which it should be added (IDE, SATA, SCSI, SAS, floppy controller) and then click
on the “add disk” button below the tree. You can then either select “Add CD/DVD device”
or “Add Hard Disk”. (If you clicked on a floppy controller, you can add a floppy drive
instead.) Alternatively, right-click on the storage controller and select a menu item there.
On the right part of the window, you can then set the following:
1. You can then select to which device slot of the controller the virtual disk should be
connected to. IDE controllers have four slots which have traditionally been called
“primary master”, “primary slave”, “secondary master” and “secondary slave”. By
contrast, SATA and SCSI controllers offer you up to 30 slots to which virtual devices
can be attached.
2. You can select which image file to use.
– For virtual hard disks, a button with a drop-down list appears on the right, offering you to either select a virtual hard disk file using a standard file dialog or to
create a new hard disk (image file), which will bring up the “Create new disk”
wizard, which was described in chapter 1.7, Creating your first virtual machine,
page 16.
For details on the image file types that are supported, please see chapter 5.2, Disk
image files (VDI, VMDK, VHD, HDD), page 73.
– For virtual CD/DVD drives, the image files will typically be in the standard ISO
format instead. Most commonly, you will select this option when installing an
operating system from an ISO file that you have obtained from the Internet. For
example, most Linux distributions are available in this way.
For virtual CD/DVD drives, the following additional options are available:
∗ If you select “Host drive” from the list, then the physical device of the host
computer is connected to the VM, so that the guest operating system can read
from and write to your physical device. This is, for instance, useful if you
want to install Windows from a real installation CD. In this case, select your
host drive from the drop-down list presented.
If you want to write (burn) CDs or DVDs using the host drive, you need to also
enable the “Passthrough” option; see chapter 5.9, CD/DVD support, page 81.
∗ If you select “Remove disk from virtual drive”, VirtualBox will present an
empty CD/DVD drive to the guest into which no media has been inserted.
47
3 Configuring virtual machines
• To remove an attachment, select it and click on the “remove” icon at the bottom (or
right-click on it and select the menu item).
Removable media (CD/DVDs and floppies) can be changed while the guest is running. Since
the “Settings” dialog is not available at that time, you can also access these settings from the
“Devices” menu of your virtual machine window.
3.7 Audio settings
The “Audio” section in a virtual machine’s Settings window determines whether the VM will see
a sound card connected, and whether the audio output should be heard on the host system.
If audio is enabled for a guest, you can choose between the emulation of an Intel AC’97
controller, an Intel HD Audio controller6 or a SoundBlaster 16 card. In any case, you can select
what audio driver VirtualBox will use on the host.
On a Linux host, depending on your host configuration, you can also select between the OSS,
ALSA or the PulseAudio subsystem. On newer Linux distributions (Fedora 8 and above, Ubuntu
8.04 and above) the PulseAudio subsystem should be preferred.
3.8 Network settings
The “Network” section in a virtual machine’s Settings window allows you to configure how
VirtualBox presents virtual network cards to your VM, and how they operate.
When you first create a virtual machine, VirtualBox by default enables one virtual network
card and selects the “Network Address Translation” (NAT) mode for it. This way the guest can
connect to the outside world using the host’s networking and the outside world can connect to
services on the guest which you choose to make visible outside of the virtual machine.
This default setup is good for probably 95% of VirtualBox users. However, VirtualBox is extremely flexible in how it can virtualize networking. It supports many virtual network cards
per virtual machine, the first four of which can be configured in detail in the Manager window.
Additional network cards can be configured on the command line with VBoxManage.
Because of the vast array of options available, we have dedicated an entire chapter of this
manual to discussing networking configuration; please see chapter 6, Virtual networking, page
83.
3.9 Serial ports
VirtualBox fully supports virtual serial ports in a virtual machine in an easy-to-use manner.7
Ever since the original IBM PC, personal computers have been equipped with one or two serial
ports (also called COM ports by DOS and Windows). Most importantly, computer mice used to
be connected to serial ports before USB became commonplace.
While serial ports are no longer as important as they used to be, there are still some important
uses left for them. For example, serial ports can be used to set up a primitive network over
a null-modem cable, in case Ethernet is not available. Also, serial ports are indispensable for
system programmers needing to do kernel debugging, since kernel debugging software usually
interacts with developers over a serial port. With virtual serial ports, system programmers can
do kernel debugging on a virtual machine instead of needing a real computer to connect to.
If a virtual serial port is enabled, the guest operating system sees a standard 16450-type device.
Both receiving and transmitting data is supported. How this virtual serial port is then connected
to the host is configurable, and the details depend on your host operating system.
6 Intel
HD Audio support was added with VirtualBox 4.0 because Windows 7 (32-bit and 64-bit versions) as well as
64-bit Windows Vista do not support the Intel AC’97 controller.
7 Serial port support was added with VirtualBox 1.5.
48
3 Configuring virtual machines
You can use either the graphical user interface or the command-line VBoxManage tool to set up
virtual serial ports. For the latter, please refer to chapter 8.7, VBoxManage modifyvm, page 109;
in that section, look for the --uart and --uartmode options.
In either case, you can configure up to two virtual serial ports simultaneously. For each such
device, you will need to determine
1. what kind of serial port the virtual machine should see by selecting an I/O base address
and interrupt (IRQ). For these, we recommend to use the traditional values8 , which are:
a)
b)
c)
d)
COM1:
COM2:
COM3:
COM4:
I/O base 0x3F8, IRQ 4
I/O base 0x2F8, IRQ 3
I/O base 0x3E8, IRQ 4
I/O base 0x2E8, IRQ 3
2. Then, you will need to determine what this virtual port should be connected to. For each
virtual serial port, you have the following options:
• You can elect to have the virtual serial port “disconnected”, which means that the
guest will see the device, but it will behave as if no cable had been connected to it.
• You can connect the virtual serial port to a physical serial port on your host. (On a
Windows host, this will be a name like COM1; on Linux or Solaris hosts, it will be a
device node like /dev/ttyS0). VirtualBox will then simply redirect all data received
from and sent to the virtual serial port to the physical device.
• You can tell VirtualBox to connect the virtual serial port to a software pipe on the host.
This depends on your host operating system:
– On a Windows host, data will be sent and received through a named pipe. You can
use a helper program called VMware Serial Line Gateway, available for download
at http://www.l4ka.org/91.php. This tool provides a fixed server mode named
pipe at \\.\pipe\vmwaredebug and connects incoming TCP connections on port
567 with the named pipe.
– On a Mac, Linux or OpenSolaris host, a local domain socket is used instead. On
Linux there are various tools which can connect to a local domain socket or create
one in server mode. The most flexible tool is socat and is available as part of
many distributions.
In this case, you can configure whether VirtualBox should create the named pipe (or,
on non-Windows hosts, the local domain socket) itself or whether VirtualBox should
assume that the pipe (or socket) exists already. With the VBoxManage command-line
options, this is referred to as “server” or “client” mode, respectively.
Up to two serial ports can be configured simultaneously per virtual machine, but you can pick
any port numbers out of the above. For example, you can configure two serial ports to be able to
work with COM2 and COM4 in the guest.
3.10 USB support
3.10.1 USB settings
The “USB” section in a virtual machine’s Settings window allows you to configure VirtualBox’s
sophisticated USB support.
VirtualBox can allow virtual machines to access the USB devices on your host directly. To
achieve this, VirtualBox presents the guest operating system with a virtual USB controller. As
soon as the guest system starts using a USB device, it will appear as unavailable on the host.
8 See,
for example, http://en.wikipedia.org/wiki/COM_(hardware_interface).
49
3 Configuring virtual machines
Note:
1. Be careful with USB devices that are currently in use on the host! For example, if
you allow your guest to connect to your USB hard disk that is currently mounted
on the host, when the guest is activated, it will be disconnected from the host
without a proper shutdown. This may cause data loss.
2. Solaris hosts have a few known limitations regarding USB support; please see
chapter 14, Known limitations, page 181.
In addition to allowing a guest access to your local USB devices, VirtualBox even allows your
guests to connect to remote USB devices by use of the VirtualBox Remote Desktop Extension
(VRDE). For details about this, see chapter 7.1.4, Remote USB, page 93.
In the Settings dialog, you can first configure whether USB is available in the guest at all, and
in addition also optionally enable the USB 2.0 (EHCI) controller for the guest. If so, you can
determine in detail which devices are available. For this, you must create so-called “filters” by
specifying certain properties of the USB device.
Note: The EHCI controller is shipped as a VirtualBox extension package, which must
be installed separately. See chapter 1.5, Installing VirtualBox and extension packs, page
14 for more information.
Clicking on the “+“ button to the right of the “USB Device Filters” window creates a new filter.
You can give the filter a name (for referencing it later) and specify the filter criteria. The more
criteria you specify, the more precisely devices will be selected. For instance, if you specify only
a vendor ID of 046d, all devices produced by Logitech will be available to the guest. If you fill
in all fields, on the other hand, the filter will only apply to a particular device model from a
particular vendor, and not even to other devices of the same type with a different revision and
serial number.
In detail, the following criteria are available:
1. Vendor and product ID. With USB, each vendor of USB products carries an identification
number that is unique world-wide, the “vendor ID”. Similarly, each line of products is
assigned a “product ID” number. Both numbers are commonly written in hexadecimal
(that is, they are composed of the numbers 0-9 and the letters A-F), and a colon separates
the vendor from the product ID. For example, 046d:c016 stands for Logitech as a vendor,
and the “M-UV69a Optical Wheel Mouse” product.
Alternatively, you can also specify “Manufacturer” and “Product” by name.
To list all the USB devices that are connected to your host machine with their respective
vendor and product IDs, you can use the following command (see chapter 8, VBoxManage,
page 99):
VBoxManage list usbhost
On Windows, you can also see all USB devices that are attached to your system in the
Device Manager. On Linux, you can use the lsusb command.
2. Serial number. While vendor and product ID are already quite specific to identify USB
devices, if you have two identical devices of the same brand and product line, you will also
need their serial numbers to filter them out correctly.
3. Remote. This setting specifies whether the device will be local only, or remote only (over
VRDP), or either.
50
3 Configuring virtual machines
On a Windows host, you will need to unplug and reconnect a USB device to use it after creating
a filter for it.
As an example, you could create a new USB filter and specify a vendor ID of 046d (Logitech,
Inc), a manufacturer index of 1, and “not remote”. Then any USB devices on the host system
produced by Logitech, Inc with a manufacturer index of 1 will be visible to the guest system.
Several filters can select a single device – for example, a filter which selects all Logitech devices,
and one which selects a particular webcam.
You can deactivate filters without deleting them by clicking in the checkbox next to the filter
name.
3.10.2 Implementation notes for Windows and Linux hosts
On Windows hosts, a kernel mode device driver provides USB proxy support. It implements both
a USB monitor, which allows VirtualBox to capture devices when they are plugged in, and a USB
device driver to claim USB devices for a particular virtual machine. As opposed to VirtualBox
versions before 1.4.0, system reboots are no longer necessary after installing the driver. Also,
you no longer need to replug devices for VirtualBox to claim them.
On newer Linux hosts, VirtualBox accesses USB devices through special files in the file system.
When VirtualBox is installed, these are made available to all users in the vboxusers system
group. In order to be able to access USB from guest systems, make sure that you are a member
of this group.
On older Linux hosts, USB devices are accessed using the usbfs file system. Therefore, the
user executing VirtualBox needs read and write permission to the USB file system. Most distributions provide a group (e.g. usbusers) which the VirtualBox user needs to be added to. Also,
VirtualBox can only proxy to virtual machines USB devices which are not claimed by a Linux
host USB driver. The Driver= entry in /proc/bus/usb/devices will show you which devices
are currently claimed. Please refer to chapter 12.6.7, USB not working, page 176 also for details
about usbfs.
3.11 Shared folders
Shared folders allow you to easily exchange data between a virtual machine and your host. This
feature requires that the VirtualBox Guest Additions be installed in a virtual machine and is
described in detail in chapter 4.3, Shared folders, page 62.
3.12 Alternative firmware (EFI)
Starting with release 3.1, VirtualBox includes experimental support for the Extensible Firmware
Interface (EFI), which is a new industry standard intended to eventually replace the legacy BIOS
as the primary interface for bootstrapping computers and certain system services later.
By default, VirtualBox uses the BIOS firmware for virtual machines. To use EFI for a given
virtual machine, you can enable EFI in the machine’s “Settings” dialog (see chapter 3.4.1, “Motherboard” tab, page 43). Alternatively, use the VBoxManage command line interface like this:
VBoxManage modifyvm "VM name" --firmware efi
To switch back to using the BIOS, use:
VBoxManage modifyvm "VM name" --firmware bios
One notable user of EFI is Apple’s Mac OS X, but recent Linuxes (such as Fedora 11) and Windows
(starting with Vista) offer special versions that can be booted using EFI as well.
Another possible use of EFI in VirtualBox is development and testing of EFI applications, without booting any OS.
51
3 Configuring virtual machines
Note that the VirtualBox EFI support is experimental and will be enhanced as EFI matures and
becomes more widespread. While Mac OS X and Linux guests are known to work fine, Windows
guests are currently unable to boot with the VirtualBox EFI implementation.
3.12.1 Video modes in EFI
EFI provides two distinct video interfaces: GOP (Graphics Output Protocol) and UGA (Universal
Graphics Adapter). Mac OS X uses GOP, while Linux tends to use UGA. VirtualBox provides a
configuration option to control the framebuffer size for both interfaces.
To control GOP, use the following VBoxManage command:
VBoxManage setextradata "VM name" VBoxInternal2/EfiGopMode N
Where N can be one of 0,1,2,3,4 referring to the 640x480, 800x600, 1024x768, 1280x1024,
1440x900 screen resolution respectively.
To change the UGA resolution:
VBoxManage setextradata "VM name" VBoxInternal2/UgaHorizontalResolution 1440
VBoxManage setextradata "VM name" VBoxInternal2/UgaVerticalResolution
900
The video mode for both GOP and UGA can only be changed when the VM is powered off and
remains persistent until changed.
52
4 Guest Additions
The previous chapter covered getting started with VirtualBox and installing operating systems in
a virtual machine. For any serious and interactive use, the VirtualBox Guest Additions will make
your life much easier by providing closer integration between host and guest and improving the
interactive performance of guest systems. This chapter describes the Guest Additions in detail.
4.1 Introduction
As mentioned in chapter 1.2, Some terminology, page 10, the Guest Additions are designed to
be installed inside a virtual machine after the guest operating system has been installed. They
consist of device drivers and system applications that optimize the guest operating system for
better performance and usability. Please see chapter 3.1, Supported guest operating systems, page
39 for details on what guest operating systems are fully supported with Guest Additions by
VirtualBox.
The VirtualBox Guest Additions for all supported guest operating systems are provided as a
single CD-ROM image file which is called VBoxGuestAdditions.iso. This image file is located
in the installation directory of VirtualBox. To install the Guest Additions for a particular VM, you
mount this ISO file in your VM as a virtual CD-ROM and install from there.
The Guest Additions offer the following features:
Mouse pointer integration To overcome the limitations for mouse support that were described
in chapter 1.8.2, Capturing and releasing keyboard and mouse, page 19, this provides you
with seamless mouse support. You will only have one mouse pointer and pressing the Host
key is no longer required to “free” the mouse from being captured by the guest OS. To
make this work, a special mouse driver is installed in the guest that communicates with the
“real” mouse driver on your host and moves the guest mouse pointer accordingly.
Shared folders These provide an easy way to exchange files between the host and the guest.
Much like ordinary Windows network shares, you can tell VirtualBox to treat a certain host
directory as a shared folder, and VirtualBox will make it available to the guest operating
system as a network share, irrespective of whether guest actually has a network. For details,
please refer to chapter 4.3, Shared folders, page 62.
Better video support While the virtual graphics card which VirtualBox emulates for any guest
operating system provides all the basic features, the custom video drivers that are installed
with the Guest Additions provide you with extra high and non-standard video modes as
well as accelerated video performance.
In addition, with Windows, Linux and Solaris guests, you can resize the virtual machine’s
window if the Guest Additions are installed. The video resolution in the guest will be automatically adjusted (as if you had manually entered an arbitrary resolution in the guest’s
display settings). Please see chapter 1.8.5, Resizing the machine’s window, page 21 also.
Finally, if the Guest Additions are installed, 3D graphics and 2D video for guest applications
can be accelerated; see chapter 4.4, Hardware-accelerated graphics, page 64.
Seamless windows With this feature, the individual windows that are displayed on the desktop
of the virtual machine can be mapped on the host’s desktop, as if the underlying application
was actually running on the host. See chapter 4.5, Seamless windows, page 66 for details.
53
4 Guest Additions
Generic host/guest communication channels The Guest Additions enable you to control and
monitor guest execution in ways other than those mentioned above. The so-called “guest
properties” provide a generic string-based mechanism to exchange data bits between a
guest and a host, some of which have special meanings for controlling and monitoring the
guest; see chapter 4.6, Guest properties, page 66 for details.
Additionally, applications can be started in a guest from the host; see chapter 4.7, Guest
control, page 68.
Time synchronization With the Guest Additions installed, VirtualBox can ensure that the
guest’s system time is better synchronized with that of the host.
For various reasons, the time in the guest might run at a slightly different rate than the
time on the host. The host could be receiving updates via NTP and its own time might not
run linearly. A VM could also be paused, which stops the flow of time in the guest for a
shorter or longer period of time. When the wall clock time between the guest and host only
differs slightly, the time synchronization service attempts to gradually and smoothly adjust
the guest time in small increments to either “catch up” or “lose” time. When the difference
is too great (e.g., a VM paused for hours or restored from saved state), the guest time is
changed immediately, without a gradual adjustment.
The Guest Additions will re-synchronize the time regularly. See chapter 9.12.3, Tuning
the Guest Additions time synchronization parameters, page 149 for how to configure the
parameters of the time synchronization mechanism.
Shared clipboard With the Guest Additions installed, the clipboard of the guest operating system can optionally be shared with your host operating system; see chapter 3.3, General
settings, page 42.
Automated logons (credentials passing) For details, please see chapter 9.2, Automated guest
logons, page 136.
Each version of VirtualBox, even minor releases, ship with their own version of the Guest
Additions. While the interfaces through which the VirtualBox core communicates with the Guest
Additions are kept stable so that Guest Additions already installed in a VM should continue to
work when VirtualBox is upgraded on the host, for best results, it is recommended to keep the
Guest Additions at the same version.
Starting with VirtualBox 3.1, the Windows and Linux Guest Additions therefore check automatically whether they have to be updated. If the host is running a newer VirtualBox version
than the Guest Additions, a notification with further instructions is displayed in the guest.
To disable this update check for the Guest Additions of a given virtual machine, set the value
of its /VirtualBox/GuestAdd/CheckHostVersion guest property to 0; see chapter 4.6, Guest
properties, page 66 for details.
4.2 Installing and Maintaining Guest Additions
Guest Additions are available for virtual machines running Windows, Linux, Solaris or OS/2.
The following sections describe the specifics of each variant in detail.
4.2.1 Guest Additions for Windows
The VirtualBox Windows Guest Additions are designed to be installed in a virtual machine running a Windows operating system. The following versions of Windows guests are supported:
• Microsoft Windows NT 4.0 (any service pack)
• Microsoft Windows 2000 (any service pack)
54
4 Guest Additions
• Microsoft Windows XP (any service pack)
• Microsoft Windows Server 2003 (any service pack)
• Microsoft Windows Server 2008
• Microsoft Windows Vista (all editions)
• Microsoft Windows 7 (all editions)
4.2.1.1 Installation
In the “Devices” menu in the virtual machine’s menu bar, VirtualBox has a handy menu item
named “Install guest additions”, which mounts the Guest Additions ISO file inside your virtual
machine. A Windows guest should then automatically start the Guest Additions installer, which
installs the Guest Additions into your Windows guest.
Note: For Direct 3D acceleration to work in a Windows Guest, you must install the
Guest Additions in “Safe Mode”; see chapter 14, Known limitations, page 181 for details.
If you prefer to mount the additions manually, you can perform the following steps:
1. Start the virtual machine in which you have installed Windows.
2. Select “Mount CD/DVD-ROM” from the “Devices” menu in the virtual machine’s menu bar
and then “CD/DVD-ROM image”. This brings up the Virtual Media Manager described in
chapter 5.3, The Virtual Media Manager, page 74.
3. In the Virtual Media Manager, press the “Add” button and browse your host file system for
the VBoxGuestAdditions.iso file:
• On a Windows host, you can find this file in the VirtualBox installation directory
(usually under C:\Program files\Oracle\VirtualBox ).
• On Mac OS X hosts, you can find this file in the application bundle of VirtualBox.
(Right click on the VirtualBox icon in Finder and choose Show Package Contents. There
it is located in the Contents/MacOS folder.)
• On a Linux host, you can find this file in the additions folder under where you
installed VirtualBox (normally /opt/VirtualBox/).
• On Solaris hosts, you can find this file in the additions folder under where you
installed VirtualBox (normally /opt/VirtualBox).
4. Back in the Virtual Media Manager, select that ISO file and press the “Select” button. This
will mount the ISO file and present it to your Windows guest as a CD-ROM.
Unless you have the Autostart feature disabled in your Windows guest, Windows will now
autostart the VirtualBox Guest Additions installation program from the Additions ISO. If the
Autostart feature has been turned off, choose VBoxWindowsAdditions.exe from the CD/DVD
drive inside the guest to start the installer.
The installer will add several device drivers to the Windows driver database and then invoke
the hardware detection wizard.
Depending on your configuration, it might display warnings that the drivers are not digitally
signed. You must confirm these in order to continue the installation and properly install the
Additions.
After installation, reboot your guest operating system to activate the Additions.
55
4 Guest Additions
4.2.1.2 Updating the Windows Guest Additions
Windows Guest Additions can be updated by running the installation program again, as previously described. This will then replace the previous Additions drivers with updated versions.
Alternatively, you may also open the Windows Device Manager and select “Update driver...“
for two devices:
1. the VirtualBox Graphics Adapter and
2. the VirtualBox System Device.
For each, choose to provide your own driver and use “Have Disk” to point the wizard to the
CD-ROM drive with the Guest Additions.
4.2.1.3 Unattended Installation
In order to allow for completely unattended guest installations, you can specify a command line
parameter to the install launcher:
VBoxWindowsAdditions.exe /S
This automatically installs the right files and drivers for the corresponding platform (32- or
64-bit).
Note: Because of the drivers are not yet WHQL certified, you still might get some driver
installation popups, depending on the Windows guest version.
For more options regarding unattended guest installations, consult the command line help by
using the command:
VBoxWindowsAdditions.exe /?
4.2.1.4 Manual file extraction
If you would like to install the files and drivers manually, you can extract the files from the
Windows Guest Additions setup by typing:
VBoxWindowsAdditions.exe /extract
To explicitly extract the Windows Guest Additions for another platform than the current running one (e.g. 64-bit files on a 32-bit system), you have to execute the appropriate platform
installer (VBoxWindowsAdditions-x86.exe or VBoxWindowsAdditions-amd64.exe) with the
/extract parameter.
4.2.2 Guest Additions for Linux
Like the Windows Guest Additions, the VirtualBox Guest Additions for Linux are a set of device
drivers and system applications which may be installed in the guest operating system.
The following Linux distributions are officially supported:
• Fedora as of Fedora Core 4;
• Redhat Enterprise Linux as of version 3;
• SUSE and openSUSE Linux as of version 9;
• Ubuntu as of version 5.10.
56
4 Guest Additions
Many other distributions are known to work with the Guest Additions.
The version of the Linux kernel supplied by default in SUSE and openSUSE 10.2, Ubuntu 6.10
(all versions) and Ubuntu 6.06 (server edition) contains a bug which can cause it to crash during
startup when it is run in a virtual machine. The Guest Additions work in those distributions.
Note that some Linux distributions already come with all or part of the VirtualBox Guest
Additions. You may choose to keep the distribution’s version of the Guest Additions but these
are often not up to date and limited in functionality, so we recommend replacing them with the
Guest Additions that come with VirtualBox. The VirtualBox Linux Guest Additions installer tries
to detect existing installation and replace them but depending on how the distribution integrates
the Guest Additions, this may require some manual interaction. It is highly recommended to
take a snapshot of the virtual machine before replacing pre-installed Guest Additions.
4.2.2.1 Installing the Linux Guest Additions
The VirtualBox Guest Additions for Linux are provided on the same virtual CD-ROM file as the
Guest Additions for Windows described above. They also come with an installation program
guiding you through the setup process, although, due to the significant differences between
Linux distributions, installation may be slightly more complex.
Installation generally involves the following steps:
1. Before installing the Guest Additions, you will have to prepare your guest system for
building external kernel modules. This works similarly as described in chapter 2.3.2, The
VirtualBox kernel module, page 32, except that this step must now be performed in your
Linux guest instead of on a Linux host system, as described there.
Again, as with Linux hosts, we recommend using DKMS if it is available for the guest
system. If it is not installed, use this command for Ubuntu/Debian systems:
sudo apt-get install dkms
or for Fedora systems:
yum install dkms
Be sure to install DKMS before installing the Linux Guest Additions. If DKMS is not available
or not installed, the guest kernel modules will need to be recreated manually whenever the
guest kernel is updated using the command
/etc/init.d/vboxadd setup
as root.
2. Insert the VBoxGuestAdditions.iso CD file into your Linux guest’s virtual CD-ROM drive,
exactly the same way as described for a Windows guest in chapter 4.2.1.1, Installation, page
55.
3. Change to the directory where your CD-ROM drive is mounted and execute as root:
sh ./VBoxLinuxAdditions.run
For your convenience, we provide the following step-by-step instructions for freshly installed
copies of recent versions of the most popular Linux distributions. After these preparational steps,
you can execute the VirtualBox Guest Additions installer as described above.
Ubuntu
1. In order to fully update your guest system, open a terminal and run
apt-get update
as root followed by
57
4 Guest Additions
apt-get upgrade
2. Install DKMS using
apt-get install dkms
3. Reboot your guest system in order to activate the updates and then proceed as described
above.
Fedora
1. In order to fully update your guest system, open a terminal and run
yum update
as root.
2. Install DKMS and the GNU C compiler using
yum install dkms
followed by
yum install gcc
3. Reboot your guest system in order to activate the updates and then proceed as described
above.
openSUSE
1. In order to fully update your guest system, open a terminal and run
zypper update
as root.
2. Install the make tool and the GNU C compiler using
zypper install make gcc
3. Reboot your guest system in order to activate the updates.
4. Find out which kernel you are running using
uname -a
An example would be 2.6.31.12-0.2-default which refers to the “default” kernel. Then
install the correct kernel development package. In the above example this would be
zypper install kernel-default-devel
5. Make sure that your running kernel (uname -a) and the kernel packages you have installed
(rpm -qa kernel\*) have the exact same version number. Proceed with the installation
as described above.
SuSE Linux Enterprise Desktop (SLED)
1. In order to fully update your guest system, open a terminal and run
zypper update
as root.
2. Install the GNU C compiler using
zypper install gcc
58
4 Guest Additions
3. Reboot your guest system in order to activate the updates.
4. Find out which kernel you are running using
uname -a
An example would be 2.6.27.19-5.1-default which refers to the “default” kernel. Then
install the correct kernel development package. In the above example this would be
zypper install kernel-syms kernel-source
5. Make sure that your running kernel (uname -a) and the kernel packages you have installed
(rpm -qa kernel\*) have the exact same version number. Proceed with the installation
as described above.
Mandrake
1. Mandrake ships with the VirtualBox Guest Additions which will be replaced if you follow
these steps.
2. In order to fully update your guest system, open a terminal and run
urpmi --auto-update
as root.
3. Reboot your system in order to activate the updates.
4. Install DKMS using
urpmi dkms
and make sure to choose the correct kernel-devel package when asked by the installer (use
uname -a to compare).
CentOS, Red Hat Enterprise Linux and Oracle Enterprise Linux
1. For versions prior to 6, add divider=10 to the kernel boot options in /etc/grub.conf to
reduce the idle CPU load.
2. In order to fully update your guest system, open a terminal and run
yum update
as root.
3. Install the GNU C compiler and the kernel development packages using
yum install gcc
followed by
yum install kernel-devel
4. Reboot your guest system in order to activate the updates and then proceed as described
above.
5. In case Oracle Enterprise Linux does not find the required packages, you either have to
install them from a different source (e.g. DVD) or use Oracle’s public Yum server located
at http://public-yum.oracle.com.
59
4 Guest Additions
Debian
1. In order to fully update your guest system, open a terminal and run
apt-get update
as root followed by
apt-get upgrade
2. Install the make tool and the GNU C compiler using
apt-get install make gcc
3. Reboot your guest system in order to activate the updates.
4. Determine the exact version of your kernel using uname -a and install the correct version
of the linux-headers package, e.g. using
apt-get install linux-headers-2.6.26-2-686
4.2.2.2 Graphics and mouse integration
In Linux and Solaris guests, VirtualBox graphics and mouse integration goes through the X Window System. VirtualBox can use the X.Org variant of the system (or XFree86 version 4.3 which
is identical to the first X.Org release). During the installation process, the X.Org display server
will be set up to use the graphics and mouse drivers which come with the Guest Additions.
After installing the Guest Additions into a fresh installation of a supported Linux distribution
or Solaris system (many unsupported systems will work correctly too), the guest’s graphics mode
will change to fit the size of the VirtualBox window on the host when it is resized. You can also
ask the guest system to switch to a particular resolution by sending a “video mode hint” using
the VBoxManage tool.
Multiple guest monitors are supported in guests using the X.Org server version 1.3 (which is
part of release 7.3 of the X Window System version 11) or a later version. The layout of the guest
screens can be adjusted as needed using the tools which come with the guest operating system.
If you want to understand more about the details of how the X.Org drivers are set up (in
particular if you wish to use them in a setting which our installer doesn’t handle correctly), you
should read chapter 9.4.2, Guest graphics and mouse driver setup in depth, page 139.
4.2.2.3 Updating the Linux Guest Additions
The Guest Additions can simply be updated by going through the installation procedure again
with an updated CD-ROM image. This will replace the drivers with updated versions. You should
reboot after updating the Guest Additions.
4.2.2.4 Uninstalling the Linux Guest Additions
If you have a version of the Guest Additions installed on your virtual machine and wish to
remove it without installing new ones, you can do so by inserting the Guest Additions CD image
into the virtual CD-ROM drive as described above and running the installer for the current Guest
Additions with the “uninstall” parameter from the path that the CD image is mounted on in the
guest:
sh ./VBoxLinuxAdditions.run uninstall
While this will normally work without issues, you may need to do some manual cleanup of
the guest (particularly of the XFree86Config or xorg.conf file) in some cases, particularly if the
Additions version installed or the guest operating system were very old, or if you made your own
changes to the Guest Additions setup after you installed them.
Starting with version 3.1.0, you can uninstall the Additions by invoking
60
4 Guest Additions
/opt/VBoxGuestAdditions-4.0.8/uninstall.sh
Please replace /opt/VBoxGuestAdditions-4.0.8 with the correct Guest Additions installation
directory.
4.2.3 Guest Additions for Solaris
Like the Windows Guest Additions, the VirtualBox Guest Additions for Solaris take the form of
a set of device drivers and system applications which may be installed in the guest operating
system.
The following Solaris distributions are officially supported:
• Solaris 11 Express;
• Solaris 10 (u5 and higher);
• Solaris Nevada/SXDE/SXCE (build 82 and higher);
• OpenSolaris (Developer Preview 2 and higher; this includes OpenSolaris 2008.05, 2008.11
and 2009.06);
Other distributions may work if they are based on comparable software releases.
4.2.3.1 Installing the Solaris Guest Additions
The VirtualBox Guest Additions for Solaris are provided on the same ISO CD-ROM as the Additions for Windows and Linux described above. They also come with an installation program
guiding you through the setup process.
Installation involves the following steps:
1. Mount the VBoxGuestAdditions.iso file as your Solaris guest’s virtual CD-ROM drive,
exactly the same way as described for a Windows guest in chapter 4.2.1.1, Installation,
page 55.
If in case the CD-ROM drive on the guest doesn’t get mounted (observed on some versions
of Solaris 10), execute as root:
svcadm restart volfs
2. Change to the directory where your CD-ROM drive is mounted and execute as root:
pkgadd -G -d ./VBoxSolarisAdditions.pkg
3. Choose “1” and confirm installation of the Guest Additions package. After the installation
is complete, re-login to X server on your guest to activate the X11 Guest Additions.
4.2.3.2 Uninstalling the Solaris Guest Additions
The Solaris Guest Additions can be safely removed by removing the package from the guest.
Open a root terminal session and execute:
pkgrm SUNWvboxguest
4.2.3.3 Updating the Solaris Guest Additions
The Guest Additions should be updated by first uninstalling the existing Guest Additions and
then installing the new ones. Attempting to install new Guest Additions without removing the
existing ones is not possible.
61
4 Guest Additions
4.2.4 Guest Additions for OS/2
VirtualBox also ships with a set of drivers that improve running OS/2 in a virtual machine. Due
to restrictions of OS/2 itself, this variant of the Guest Additions has a limited feature set; see
chapter 14, Known limitations, page 181 for details.
The OS/2 Guest Additions are provided on the same ISO CD-ROM as those for the other
platforms. As a result, mount the ISO in OS/2 as described previously. The OS/2 Guest Additions
are located in the directory \32bit\OS2.
As we do not provide an automatic installer at this time, please refer to the readme.txt file in
that directory, which describes how to install the OS/2 Guest Additions manually.
4.3 Shared folders
With the “shared folders” feature of VirtualBox, you can access files of your host system from
within the guest system. This is similar how you would use network shares in Windows networks
– except that shared folders do not need require networking, only the Guest Additions. Shared
Folders are supported with Windows (2000 or newer), Linux and Solaris guests.
Shared folders must physically reside on the host and are then shared with the guest, which
uses a special file system driver in the Guest Addition to talk to the host. For Windows guests,
shared folders are implemented as a pseudo-network redirector; for Linux and Solaris guests,
the Guest Additions provide a virtual file system.
To share a host folder with a virtual machine in VirtualBox, you must specify the path of that
folder and choose for it a “share name” that the guest can use to access it. Hence, first create the
shared folder on the host; then, within the guest, connect to it.
There are several ways in which shared folders can be set up for a particular virtual machine:
• In the window of a running VM, you can select “Shared folders” from the “Devices” menu,
or click on the folder icon on the status bar in the bottom right corner.
• If a VM is not currently running, you can configure shared folders in each virtual machine’s
“Settings” dialog.
• From the command line, you can create shared folders using VBoxManage, as follows:
VBoxManage sharedfolder add "VM name" --name "sharename" --hostpath "C:\test"
See chapter 8.27, VBoxManage sharedfolder add/remove, page 126 for details.
There are two types of shares:
1. VM shares which are only available to the VM for which they have been defined;
2. transient VM shares, which can be added and removed at runtime and do not persist after
a VM has stopped; for these, add the --transient option to the above command line.
Shared folders have read/write access to the files at the host path by default. To restrict the
guest to have read-only access, create a read-only shared folder. This can either be achieved
using the GUI or by appending the parameter --readonly when creating the shared folder with
VBoxManage.
Starting with version 4.0, VirtualBox shared folders also support symbolic links (symlinks),
under the following conditions:
1. The host operating system must support symlinks (i.e. a Mac, Linux or Solaris host is
required).
2. Currently only Linux Guest Additions support symlinks.
62
4 Guest Additions
4.3.1 Manual mounting
You can mount the shared folder from inside a VM the same way as you would mount an ordinary
network share:
• In a Windows guest, shared folders are browseable and therefore visible in Windows Explorer. So, to attach the host’s shared folder to your Windows guest, open Windows Explorer and look for it under “My Networking Places” -> “Entire Network” -> “VirtualBox
Shared Folders”. By right-clicking on a shared folder and selecting “Map network drive”
from the menu that pops up, you can assign a drive letter to that shared folder.
Alternatively, on the Windows command line, use the following:
net use x: \\vboxsvr\sharename
While vboxsvr is a fixed name (note that vboxsrv would also work), replace “x:“ with
the drive letter that you want to use for the share, and sharename with the share name
specified with VBoxManage.
• In a Linux guest, use the following command:
mount -t vboxsf [-o OPTIONS] sharename mountpoint
To mount a shared folder during boot, add the following entry to /etc/fstab:
sharename
mountpoint
vboxsf
defaults
0
0
• In a Solaris guest, use the following command:
mount -F vboxfs [-o OPTIONS] sharename mountpoint
Replace sharename (use lowercase) with the share name specified with VBoxManage or the
GUI, and mountpoint with the path where you want the share to be mounted on the guest
(e.g. /mnt/share). The usual mount rules apply, that is, create this directory first if it does
not exist yet.
Here is an example of mounting the shared folder for the user “jack” on Solaris:
$ id
uid=5000(jack) gid=1(other)
$ mkdir /export/home/jack/mount
$ pfexec mount -F vboxfs -o uid=5000,gid=1 jackshare /export/home/jack/mount
$ cd ~/mount
$ ls
sharedfile1.mp3 sharedfile2.txt
$
Beyond the standard options supplied by the mount command, the following are available:
iocharset CHARSET
to set the character set used for I/O operations (utf8 by default) and
convertcp CHARSET
to specify the character set used for the shared folder name (utf8 by default).
The generic mount options (documented in the mount manual page) apply also. Especially useful are the options uid, gid and mode, as they allow access by normal users (in
read/write mode, depending on the settings) even if root has mounted the filesystem.
63
4 Guest Additions
4.3.2 Automatic mounting
Starting with version 4.0, VirtualBox can mount shared folders automatically, at your option. If
automatic mounting is enabled for a specific shared folder, the Guest Additions will automatically
mount that folder as soon as a user logs into the guest OS. The details depend on the guest OS
type:
• With Windows guests, any auto-mounted shared folder will receive its own drive letter
(e.g. E:) depending on the free drive letters remaining in the guest.
If there no free drive letters left, auto-mounting will fail; as a result, the number of automounted shared folders is typically limited to 22 or less with Windows guests.
• With Linux guests, auto-mounted shared folders are mounted into the /media directory,
along with the prefix sf_. For example, the shared folder myfiles would be mounted to
/media/sf_myfiles on Linux and /mnt/sf_myfiles on Solaris.
The guest property /VirtualBox/GuestAdd/SharedFolders/MountPrefix determines
the prefix that is used. Change that guest property to a value other than “sf” to change
that prefix; see chapter 4.6, Guest properties, page 66 for details.
Note: Access to auto-mounted shared folders is only granted to the user group vboxsf,
which is created by the VirtualBox Guest Additions installer. Hence guest users have to
be member of that group to have read/write access or to have read-only access in case
the folder is not mapped writable.
To change the mount directory to something other than /media, you can set the guest
property /VirtualBox/GuestAdd/SharedFolders/MountDir.
• Solaris guests behave like Linux guests except that /mnt is used as the default mount
directory instead of /media.
To have any changes to auto-mounted shared folders applied while a VM is running, the guest
OS needs to be rebooted. (This applies only to auto-mounted shared folders, not the ones which
are mounted manually.)
4.4 Hardware-accelerated graphics
4.4.1 Hardware 3D acceleration (OpenGL and Direct3D 8/9)
The VirtualBox Guest Additions contain experimental hardware 3D support for Windows, Linux
and Solaris guests.1
With this feature, if an application inside your virtual machine uses 3D features through the
OpenGL or Direct3D 8/9 programming interfaces, instead of emulating them in software (which
would be slow), VirtualBox will attempt to use your host’s 3D hardware. This works for all
supported host platforms (Windows, Mac, Linux, Solaris), provided that your host operating
system can make use of your accelerated 3D hardware in the first place.
The 3D acceleration currently has the following preconditions:
1. It is only available for certain Windows, Linux and Solaris guests. In particular:
1 OpenGL
support for Windows guests was added with VirtualBox 2.1; support for Linux and Solaris followed with
VirtualBox 2.2. With VirtualBox 3.0, Direct3D 8/9 support was added for Windows guests. OpenGL 2.0 is now
supported as well.
64
4 Guest Additions
• 3D acceleration with Windows guests requires Windows 2000, Windows XP, Vista or
Windows 7. Both OpenGL and Direct3D 8/9 (not with Windows 2000) are supported
(experimental).
• OpenGL on Linux requires kernel 2.6.27 and higher as well as X.org server version 1.5
and higher. Ubuntu 10.10 and Fedora 14 have been tested and confirmed as working.
• OpenGL on Solaris guests requires X.org server version 1.5 and higher.
2. The Guest Additions must be installed.
Note: For Direct 3D acceleration to work in a Windows Guest, VirtualBox needs to
replace Windows system files in the virtual machine. As a result, the Guest Additions
installation program offers Direct 3D acceleration as an option that must be explicitly
enabled. Also, you must install the Guest Additions in “Safe Mode”; see chapter 14,
Known limitations, page 181 for details.
3. Because 3D support is still experimental at this time, it is disabled by default and must be
manually enabled in the VM settings (see chapter 3.3, General settings, page 42).
Note: Enabling 3D acceleration may expose security holes to malicious software
running in the guest. The third-party code that VirtualBox uses for this purpose
(Chromium) is not hardened enough to prevent every risky 3D operation on the host.
Technically, VirtualBox implements this by installing an additional hardware 3D driver inside
your guest when the Guest Additions are installed. This driver acts as a hardware 3D driver
and reports to the guest operating system that the (virtual) hardware is capable of 3D hardware
acceleration. When an application in the guest then requests hardware acceleration through
the OpenGL or Direct3D programming interfaces, these are sent to the host through a special
communication tunnel implemented by VirtualBox, and then the host performs the requested 3D
operation via the host’s programming interfaces.
4.4.2 Hardware 2D video acceleration for Windows guests
Starting with version 3.1, the VirtualBox Guest Additions contain experimental hardware 2D
video acceleration support for Windows guests.
With this feature, if an application (e.g. a video player) inside your Windows VM uses 2D
video overlays to play a movie clip, then VirtualBox will attempt to use your host’s video acceleration hardware instead of performing overlay stretching and color conversion in software (which
would be slow). This currently works for Windows, Linux and Mac host platforms, provided that
your host operating system can make use of 2D video acceleration in the first place.
The 2D video acceleration currently has the following preconditions:
1. It is only available for Windows guests (XP or later).
2. The Guest Additions must be installed.
3. Because 2D support is still experimental at this time, it is disabled by default and must be
manually enabled in the VM settings (see chapter 3.3, General settings, page 42).
Technically, VirtualBox implements this by exposing video overlay DirectDraw capabilities in
the Guest Additions video driver. The driver sends all overlay commands to the host through
a special communication tunnel implemented by VirtualBox. On the host side, OpenGL is then
used to implement color space transformation and scaling
65
4 Guest Additions
4.5 Seamless windows
With the “seamless windows” feature of VirtualBox, you can have the windows that are displayed
within a virtual machine appear side by side next to the windows of your host. This feature
is supported for the following guest operating systems (provided that the Guest Additions are
installed):
• Windows guests (support added with VirtualBox 1.5);
• Supported Linux or Solaris guests running the X Window System (added with VirtualBox
1.6).
After seamless windows are enabled (see below), VirtualBox suppresses the display of the
Desktop background of your guest, allowing you to run the windows of your guest operating
system seamlessly next to the windows of your host:
To enable seamless mode, after starting the virtual machine, press the Host key (normally the
right control key) together with “L”. This will enlarge the size of the VM’s display to the size
of your host screen and mask out the guest operating system’s background. To go back to the
“normal” VM display (i.e. to disable seamless windows), press the Host key and “L” again.
4.6 Guest properties
Starting with version 2.1, VirtualBox allows for requesting certain properties from a running
guest, provided that the VirtualBox Guest Additions are installed and the VM is running. This is
good for two things:
1. A number of predefined VM characteristics are automatically maintained by VirtualBox and
can be retrieved on the host, e.g. to monitor VM performance and statistics.
2. In addition, arbitrary string data can be exchanged between guest and host. This works in
both directions.
66
4 Guest Additions
To accomplish this, VirtualBox establishes a private communication channel between the
VirtualBox Guest Additions and the host, and software on both sides can use this channel to
exchange string data for arbitrary purposes. Guest properties are simply string keys to which a
value is attached. They can be set (written to) by either the host and the guest, and they can
also be read from both sides.
In addition to establishing the general mechanism of reading and writing values, a set of
predefined guest properties is automatically maintained by the VirtualBox Guest Additions to
allow for retrieving interesting guest data such as the guest’s exact operating system and service
pack level, the installed version of the Guest Additions, users that are currently logged into
the guest OS, network statistics and more. These predefined properties are all prefixed with
/VirtualBox/ and organized into a hierarchical tree of keys.
Some of this runtime information is shown when you select “Session Information Dialog” from
a virtual machine’s “Machine” menu.
A more flexible way to use this channel is via the VBoxManage guestproperty command set;
see chapter 8.28, VBoxManage guestproperty, page 126 for details. For example, to have all the
available guest properties for a given running VM listed with their respective values, use this:
$ VBoxManage guestproperty enumerate "Windows Vista III"
VirtualBox Command Line Management Interface Version 4.0.8
(C) 2005-2011 Oracle Corporation
All rights reserved.
Name: /VirtualBox/GuestInfo/OS/Product, value: Windows Vista Business Edition,
timestamp: 1229098278843087000, flags:
Name: /VirtualBox/GuestInfo/OS/Release, value: 6.0.6001,
timestamp: 1229098278950553000, flags:
Name: /VirtualBox/GuestInfo/OS/ServicePack, value: 1,
timestamp: 1229098279122627000, flags:
Name: /VirtualBox/GuestAdd/InstallDir,
value: C:/Program Files/Oracle/VirtualBox
Guest Additions, timestamp: 1229098279269739000, flags:
Name: /VirtualBox/GuestAdd/Revision, value: 40720,
timestamp: 1229098279345664000, flags:
Name: /VirtualBox/GuestAdd/Version, value: 4.0.8,
timestamp: 1229098279479515000, flags:
Name: /VirtualBox/GuestAdd/Components/VBoxControl.exe, value: 4.0.8r40720,
timestamp: 1229098279651731000, flags:
Name: /VirtualBox/GuestAdd/Components/VBoxHook.dll, value: 4.0.8r40720,
timestamp: 1229098279804835000, flags:
Name: /VirtualBox/GuestAdd/Components/VBoxDisp.dll, value: 4.0.8r40720,
timestamp: 1229098279880611000, flags:
Name: /VirtualBox/GuestAdd/Components/VBoxMRXNP.dll, value: 4.0.8r40720,
timestamp: 1229098279882618000, flags:
Name: /VirtualBox/GuestAdd/Components/VBoxService.exe, value: 4.0.8r40720,
timestamp: 1229098279883195000, flags:
Name: /VirtualBox/GuestAdd/Components/VBoxTray.exe, value: 4.0.8r40720,
timestamp: 1229098279885027000, flags:
Name: /VirtualBox/GuestAdd/Components/VBoxGuest.sys, value: 4.0.8r40720,
timestamp: 1229098279886838000, flags:
Name: /VirtualBox/GuestAdd/Components/VBoxMouse.sys, value: 4.0.8r40720,
timestamp: 1229098279890600000, flags:
Name: /VirtualBox/GuestAdd/Components/VBoxSF.sys, value: 4.0.8r40720,
timestamp: 1229098279893056000, flags:
Name: /VirtualBox/GuestAdd/Components/VBoxVideo.sys, value: 4.0.8r40720,
timestamp: 1229098279895767000, flags:
Name: /VirtualBox/GuestInfo/OS/LoggedInUsers, value: 1,
timestamp: 1229099826317660000, flags:
Name: /VirtualBox/GuestInfo/OS/NoLoggedInUsers, value: false,
timestamp: 1229098455580553000, flags:
Name: /VirtualBox/GuestInfo/Net/Count, value: 1,
timestamp: 1229099826299785000, flags:
Name: /VirtualBox/HostInfo/GUI/LanguageID, value: C,
timestamp: 1229098151272771000, flags:
Name: /VirtualBox/GuestInfo/Net/0/V4/IP, value: 192.168.2.102,
67
4 Guest Additions
timestamp: 1229099826300088000, flags:
Name: /VirtualBox/GuestInfo/Net/0/V4/Broadcast, value: 255.255.255.255,
timestamp: 1229099826300220000, flags:
Name: /VirtualBox/GuestInfo/Net/0/V4/Netmask, value: 255.255.255.0,
timestamp: 1229099826300350000, flags:
Name: /VirtualBox/GuestInfo/Net/0/Status, value: Up,
timestamp: 1229099826300524000, flags:
Name: /VirtualBox/GuestInfo/OS/LoggedInUsersList, value: username,
timestamp: 1229099826317386000, flags:
To query the value of a single property, use the “get” subcommand like this:
$ VBoxManage guestproperty get "Windows Vista III"
"/VirtualBox/GuestInfo/OS/Product"
VirtualBox Command Line Management Interface Version 4.0.8
(C) 2005-2011 Oracle Corporation
All rights reserved.
Value: Windows Vista Business Edition
To add or change guest properties from the guest, use the tool VBoxControl. This tool is
included in the Guest Additions of VirtualBox 2.2 or later. When started from a Linux guest, this
tool requires root privileges for security reasons:
$ sudo VBoxControl guestproperty enumerate
VirtualBox Guest Additions Command Line Management Interface Version 4.0.8
(C) 2009-2011 Oracle Corporation
All rights reserved.
Name: /VirtualBox/GuestInfo/OS/Release, value: 2.6.28-18-generic,
timestamp: 1265813265835667000, flags: <NULL>
Name: /VirtualBox/GuestInfo/OS/Version, value: #59-Ubuntu SMP Thu Jan 28 01:23:03 UTC 2010,
timestamp: 1265813265836305000, flags: <NULL>
...
For more complex needs, you can use the VirtualBox programming interfaces; see chapter 11,
VirtualBox programming interfaces, page 163.
4.7 Guest control
Starting with version 3.2, the Guest Additions of VirtualBox allow starting applications inside a
VM from the host system.
For this to work, the application needs to be installed inside the guest; no additional software
needs to be installed on the host. Additionally, text mode output (to stdout and stderr) can be
shown on the host for further processing along with options to specify user credentials and a
timeout value (in milliseconds) to limit time the application is able to run.
This feature can be used to automate deployment of software within the guest.
Starting with version 4.0, the Guest Additions for Windows allow for automatic updating (only
already installed Guest Additions 4.0 or later). Also, copying files from host to the guest as well
as remotely creating guest directories is available.
To use these features, use the VirtualBox command line, see chapter 8.29, VBoxManage guestcontrol, page 127.
4.8 Memory overcommitment
In server environments with many VMs; the Guest Additions can be used to share physical host
memory between several VMs, reducing the total amount of memory in use by the VMs. If
memory usage is the limiting factor and CPU resources are still available, this can help with
packing more VMs on each host.
68
4 Guest Additions
4.8.1 Memory ballooning
Starting with version 3.2, the Guest Additions of VirtualBox can change the amount of host
memory that a VM uses while the machine is running. Because of how this is implemented, this
feature is called “memory ballooning”.
Note: VirtualBox supports memory ballooning only on 64-bit hosts, and it is not supported on Mac OS X hosts.
Normally, to change the amount of memory allocated to a virtual machine, one has to shut
down the virtual machine entirely and modify its settings. With memory ballooning, memory
that was allocated for a virtual machine can be given to another virtual machine without having
to shut the machine down.
When memory ballooning is requested, the VirtualBox Guest Additions (which run inside the
guest) allocate physical memory from the guest operating system on the kernel level and lock
this memory down in the guest. This ensures that the guest will not use that memory any longer:
no guest applications can allocate it, and the guest kernel will not use it either. VirtualBox can
then re-use this memory and give it to another virtual machine.
The memory made available through the ballooning mechanism is only available for re-use by
VirtualBox. It is not returned as free memory to the host. Requesting balloon memory from a
running guest will therefore not increase the amount of free, unallocated memory on the host.
Effectively, memory ballooning is therefore a memory overcommitment mechanism for multiple
virtual machines while they are running. This can be useful to temporarily start another machine,
or in more complicated environments, for sophisticated memory management of many virtual
machines that may be running in parallel depending on how memory is used by the guests.
At this time, memory ballooning is only supported through VBoxManage. Use the following command to increase or decrease the size of the memory balloon within a running virtual
machine that has Guest Additions installed:
VBoxManage controlvm "VM name" guestmemoryballoon <n>
where "VM name" is the name or UUID of the virtual machine in question and <n> is the amount
of memory to allocate from the guest in megabytes. See chapter 8.11, VBoxManage controlvm,
page 117 for more information.
You can also set a default balloon that will automatically be requested from the VM every time
after it has started up with the following command:
VBoxManage modifyvm "VM name" --guestmemoryballoon <n>
By default, no balloon memory is allocated. This is a VM setting, like other modifyvm settings,
and therefore can only be set while the machine is shut down; see chapter 8.7, VBoxManage
modifyvm, page 109.
4.8.2 Page Fusion
Whereas memory ballooning simply reduces the amount of RAM that is available to a VM, Page
Fusion works differently: it avoids memory duplication between several similar running VMs.
In a server environment running several similar VMs (e.g. with identical operating systems)
on the same host, lots of memory pages are identical. VirtualBox’s Page Fusion technology,
introduced with VirtualBox 3.2, is a novel technique to efficiently identify these identical memory
pages and share them between multiple VMs.
Note: VirtualBox supports Page Fusion only on 64-bit hosts, and it is not supported on
Mac OS X hosts. Page Fusion currently works only with Windows guests (2000 and
later).
69
4 Guest Additions
The more similar the VMs on a given host are, the more efficiently Page Fusion can reduce the
amount of host memory that is in use. It therefore works best if all VMs on a host run identical
operating systems (e.g. Windows XP Service Pack 2). Instead of having a complete copy of each
operating system in each VM, Page Fusion identifies the identical memory pages in use by these
operating systems and eliminates the duplicates, sharing host memory between several machines
(“deduplication”). If a VM tries to modify a page that has been shared with other VMs, a new
page is allocated again for that VM with a copy of the shared page (“copy on write”). All this is
fully transparent to the virtual machine.
You may be familiar with this kind of memory overcommitment from other hypervisor products, which call this feature “page sharing” or “same page merging”. However, Page Fusion differs
significantly from those other solutions, whose approaches have several drawbacks:
1. Traditional hypervisors scan all guest memory and compute checksums (hashes) for every
single memory page. Then, they look for pages with identical hashes and compare the
entire content of those pages; if two pages produce the same hash, it is very likely that the
pages are identical in content. This, of course, can take rather long, especially if the system
is not idling. As a result, the additional memory only becomes available after a significant
amount of time (this can be hours or even days!). Even worse, this kind of page sharing
algorithm generally consumes significant CPU resources and increases the virtualization
overhead by 10-20%.
Page Fusion in VirtualBox uses logic in the VirtualBox Guest Additions to quickly identify
memory cells that are most likely identical across VMs. It can therefore achieve most of the
possible savings of page sharing almost immediately and with almost no overhead.
2. Page Fusion is also much less likely to be confused by identical memory that it will eliminate
just to learn seconds later that the memory will now change and having to perform a highly
expensive and often service-disrupting reallocation.
At this time, Page Fusion can only be controlled with VBoxManage, and only while a VM is
shut down. To enable Page Fusion for a VM, use the following command:
VBoxManage modifyvm "VM name" --pagefusion on
You can observe Page Fusion operation using some metrics. RAM/VMM/Shared shows the total
amount of fused pages, whereas the per-VM metric Guest/RAM/Usage/Shared will return the
amount of fused memory for a given VM. Please refer to chapter 8.31, VBoxManage metrics, page
131 for information on how to query metrics.
70
5 Virtual storage
As the virtual machine will most probably expect to see a hard disk built into its virtual computer,
VirtualBox must be able to present “real” storage to the guest as a virtual hard disk. There are
presently three methods in which to achieve this:
1. Most commonly, VirtualBox will use large image files on a real hard disk and present them
to a guest as a virtual hard disk. This is described in chapter 5.2, Disk image files (VDI,
VMDK, VHD, HDD), page 73.
2. Alternatively, if you have iSCSI storage servers, you can attach such a server to VirtualBox
as well; this is described in chapter 5.10, iSCSI servers, page 82.
3. Finally, as an experimental feature, you can allow a virtual machine to access one of your
host disks directly; this advanced feature is described in chapter 9.7.1, Using a raw host
hard disk from a guest, page 142.
Each such virtual storage device (image file, iSCSI target or physical hard disk) will need to be
connected to the virtual hard disk controller that VirtualBox presents to a virtual machine. This
is explained in the next section.
5.1 Hard disk controllers: IDE, SATA (AHCI), SCSI, SAS
In a real PC, hard disks and CD/DVD drives are connected to a device called hard disk controller
which drives hard disk operation and data transfers. VirtualBox can emulate the four most
common types of hard disk controllers typically found in today’s PCs: IDE, SATA (AHCI), SCSI
and SAS.1
• IDE (ATA) controllers have been in use since the 1980s. Initially, this type of interface
worked only with hard disks, but was later extended to also support CD-ROM drives and
other types of removable media. In physical PCs, this standard uses flat ribbon parallel
cables with 40 or 80 wires. Each such cable can connect two devices to a controller, which
have traditionally been called “master” and “slave”. Typical hard disk controllers have two
connectors for such cables; as a result, most PCs support up to four devices.
In VirtualBox, each virtual machine has one IDE controller enabled by default, which gives
you up to four virtual storage devices that you can attach to the machine. (By default, one
of these four – the secondary master – is preconfigured to be the machine’s virtual CD/DVD
drive, but this can be changed.2 )
So even if your guest operating system has no support for SCSI or SATA devices, it should
always be able to see the default IDE controller that is enabled by default.
You can also select which exact type of IDE controller hardware VirtualBox should present
to the virtual machine (PIIX3, PIIX4 or ICH6). This makes no difference in terms of performance, but if you import a virtual machine from another virtualization product, the
1 SATA
support was added with VirtualBox 1.6; experimental SCSI support was added with 2.1 and fully implemented
with 2.2. Generally, storage attachments were made much more flexible with VirtualBox 3.1; see below. Support for
the LSI Logic SAS controller was added with VirtualBox 3.2.
2 The assignment of the machine’s CD/DVD drive to the secondary master was fixed before VirtualBox 3.1; it is now
changeable, and the drive can be at other slots of the IDE controller, and there can be more than one such drive.
71
5 Virtual storage
operating system in that machine may expect a particular controller and crash if it isn’t
found.
After you have created a new virtual machine with the “New Virtual Machine” wizard of the
graphical user interface, you will typically see one IDE controller in the machine’s “Storage”
settings where the virtual CD/DVD drive will be attached to one of the four ports of this
controller.
• Serial ATA (SATA) is a newer standard introduced in 2003. Compared to IDE, it supports
both much higher speeds and more devices per hard disk controller. Also, with physical
hardware, devices can be added and removed while the system is running. The standard
interface for SATA controllers is called Advanced Host Controller Interface (AHCI).
For compatibility reasons, AHCI controllers by default operate the disks attached to it in
a so-called “IDE compatibility mode”, unless SATA support is explicitly requested. “IDE
compatibility mode” only means that the drives can be seen and operated by the computer’s
BIOS. Still, disks assigned to those slots will operate in full-speed AHCI mode once the guest
operating system has loaded its AHCI device driver.
Like a real SATA controller, VirtualBox’s virtual SATA controller operates faster and also
consumes less CPU resources than the virtual IDE controller. Also, this allows you to connect up to 30 virtual hard disks to one machine instead of just three, as with the VirtualBox
IDE controller (with the DVD drive already attached). Of these, the first four (numbered
0-3 in the graphical user interface) are operated in IDE compatibility mode by default.
For this reason, starting with version 3.2 and depending on the selected guest operating
system, VirtualBox uses SATA as the default for newly created virtual machines. One virtual
SATA controller is created by default, and the default disk that is created with a new VM is
attached to this controller.
Warning: The entire SATA controller and the virtual disks attached to it (including
those in IDE compatibility mode) will not be seen by operating systems that do not
have device support for AHCI. In particular, there is no support for AHCI in Windows
before Windows Vista, so Windows XP (even SP2) will not see such disks unless you
install additional drivers. It is possible to switch from IDE to SATA after installation by
installing the SATA drivers and changing the controller type in the VM settings dialog.a
a VirtualBox
recommends the Intel Matrix Storage drivers which can be downloaded from http://
downloadcenter.intel.com/Product_Filter.aspx?ProductID=2101.
To add a SATA controller to a machine for which it has not been enabled by default (either
because it was created by an earlier version of VirtualBox, or because SATA is not supported by default by the selected guest operating system), go to the “Storage” page of the
machine’s settings dialog, click on the “Add Controller” button under the “Storage Tree”
box and then select “Add SATA Controller”. After this, the additional controller will appear
as a separate PCI device in the virtual machine, and you can add virtual disks to it.
To change the IDE compatibility mode settings for the SATA controller, please see chapter
8.17, VBoxManage storagectl, page 121.
• SCSI is another established industry standard, standing for “Small Computer System Interface”. SCSI was standardized as early as 1986 as a generic interface for data transfer
between all kinds of devices, including storage devices. Today SCSI is still used for connecting hard disks and tape devices, but it has mostly been displaced in commodity hardware.
It is still in common use in high-performance workstations and servers.
Primarily for compatibility with other virtualization software, VirtualBox optionally supports LSI Logic and BusLogic SCSI controllers, to each of which up to 15 virtual hard disks
can be attached.
72
5 Virtual storage
To enable a SCSI controller, on the “Storage” page of a virtual machine’s settings dialog,
click on the “Add Controller” button under the “Storage Tree” box and then select “Add
SCSI Controller”. After this, the additional controller will appear as a separate PCI device
in the virtual machine.
Warning: As with the other controller types, a SCSI controller will only be seen by
operating systems with device support for it. Windows 2003 and later ships with drivers
for the LSI Logic controller, while Windows NT 4.0 and Windows 2000 ships with
drivers for the BusLogic controller. Windows XP ships with drivers for neither.
• Serial Attached SCSI (SAS) is another bus standard which uses the SCSI command set. As
opposed to SCSI, however, with physical devices, serial cables are used instead of parallel
ones, which simplifies physical device connections. In some ways, therefore, SAS is to SCSI
what SATA is to IDE: it allows for more reliable and faster connections.
To support high-end guests which require SAS controllers, VirtualBox emulates a LSI Logic
SAS controller, which can be enabled much the same way as a SCSI controller. At this time,
up to eight devices can be connected to the SAS controller.
Warning: As with SATA, the SAS controller will only be seen by operating systems with
device support for it. In particular, there is no support for SAS in Windows before
Windows Vista, so Windows XP (even SP2) will not see such disks unless you install
additional drivers.
In summary, VirtualBox gives you the following categories of virtual storage slots:
1. four slots attached to the traditional IDE controller, which are always present (one of which
typically is a virtual CD/DVD drive);
2. 30 slots attached to the SATA controller, if enabled and provided that your guest operating
system can see it; these slots can either be
a) in IDE compatibility mode (by default, slots 0-3) or
b) in SATA mode;
3. 15 slots attached to the SCSI controller, if enabled and supported by the guest operating
system;
4. eight slots attached to the SAS controller, if enabled and supported by the guest operating
system.
Given this large choice of storage controllers, you may ask yourself which one to choose. In
general, you should avoid IDE unless it is the only controller supported by your guest. Whether
you use SATA, SCSI or SAS does not make any real difference. The variety of controllers is only
supplied for VirtualBox for compatibility with existing hardware and other hypervisors.
5.2 Disk image files (VDI, VMDK, VHD, HDD)
Disk image files reside on the host system and are seen by the guest systems as hard disks of a
certain geometry. When a guest operating system reads from or writes to a hard disk, VirtualBox
redirects the request to the image file.
73
5 Virtual storage
Like a physical disk, a virtual disk has a size (capacity), which must be specified when the
image file is created. As opposed to a physical disk however, VirtualBox allows you to expand
an image file after creation, even if it has data already; see chapter 8.21, VBoxManage modifyhd,
page 123 for details.3
VirtualBox supports four variants of disk image files:
• Normally, VirtualBox uses its own container format for guest hard disks – Virtual Disk
Image (VDI) files. In particular, this format will be used when you create a new virtual
machine with a new disk.
• VirtualBox also fully supports the popular and open VMDK container format that is used
by many other virtualization products, in particular, by VMware.4
• VirtualBox also fully supports the VHD format used by Microsoft.
• Image files of Parallels version 2 (HDD format) are also supported.5 For lack of documentation of the format, newer formats (3 and 4) are not supported. You can however convert
such image files to version 2 format using tools provided by Parallels.
Irrespective of the disk capacity and format, as briefly mentioned in chapter 1.7, Creating your
first virtual machine, page 16, there are two options of how to create a disk image: fixed-size or
dynamically expanding.
• If you create a fixed-size image, an image file will be created on your host system which
has roughly the same size as the virtual disk’s capacity. So, for a 10G disk, you will have
a 10G file. Note that the creation of a fixed-size image can take a long time depending on
the size of the image and the write performance of your hard disk.
• For more flexible storage management, use a dynamically expanding image. This will
initially be very small and not occupy any space for unused virtual disk sectors, but the
image file will grow every time a disk sector is written to for the first time. While this
format takes less space initially, the fact that VirtualBox needs to constantly expand the
image file consumes additional computing resources, so until the disk has fully expanded,
write operations are slower than with fixed size disks. However, after a dynamic disk has
fully expanded, the performance penalty for read and write operations is negligible.
5.3 The Virtual Media Manager
VirtualBox keeps track of all the hard disk, CD/DVD-ROM and floppy disk images which are
in use by virtual machines. These are often referred to as “known media” and come from two
sources:
• all media currently attached to virtual machines;
• “registered” media for compatibility with VirtualBox versions older than version 4.0. For
details about how media registration has changed with version 4.0, please refer to chapter
10.1, Where VirtualBox stores its files, page 153.
The known media can be viewed and changed in the Virtual Media Manager, which you can
access from the “File” menu in the VirtualBox main window:
3 Image
resizing was added with VirtualBox 4.0.
support for VMDK was added with VirtualBox 1.4; since version 2.1, VirtualBox supports VMDK fully, meaning
that you can create snapshots and use all the other advanced features described above for VDI images with VMDK
also.
5 Support was added with VirtualBox 3.1.
4 Initial
74
5 Virtual storage
The known media are conveniently grouped in three tabs for the three possible formats. These
formats are:
• Hard disk images, either in VirtualBox’s own Virtual Disk Image (VDI) format or in the
third-party formats listed in the previous chapter;
• CD/DVD images in standard ISO format;
• floppy images in standard RAW format.
As you can see in the screenshot above, for each image, the Virtual Media Manager shows you
the full path of the image file and other information, such as the virtual machine the image is
currently attached to, if any.
The Virtual Media Manager allows you to
• remove an image from the registry (and optionally delete the image file when doing so);
• “release” an image, that is, detach it from a virtual machine if it is currently attached to
one as a virtual hard disk.
Starting with version 4.0, to create new disk images, please use the “Storage” page in a virtual
machine’s settings dialog because disk images are now by default stored in each machine’s own
folder.
Hard disk image files can be copied onto other host systems and imported into virtual machines
there, although certain guest systems (notably Windows 2000 and XP) will require that the new
virtual machine be set up in a similar way to the old one.
Note: Do not simply make copies of virtual disk images. If you import such a second
copy into a virtual machine, VirtualBox will complain with an error, since VirtualBox
assigns a unique identifier (UUID) to each disk image to make sure it is only used once.
See chapter 5.6, Cloning disk images, page 79 for instructions on this matter. Also, if
you want to copy a virtual machine to another system, VirtualBox has an import/export
facility that might be better suited for your needs; see chapter 1.12, Importing and
exporting virtual machines, page 26.
75
5 Virtual storage
5.4 Special image write modes
For each virtual disk image supported by VirtualBox, you can determine separately how it should
be affected by write operations from a virtual machine and snapshot operations. This applies to
all of the aforementioned image formats (VDI, VMDK, VHD or HDD) and irrespective of whether
an image is fixed-size or dynamically expanding.
By default, images are in “normal” mode. To mark an existing image with one of the nonstandard modes listed below, use VBoxManage modifyhd; see chapter 8.21, VBoxManage modifyhd, page 123. Alternatively, use VBoxManage to attach the image to a VM and use the --mtype
argument; see chapter 8.16, VBoxManage storageattach, page 119.
1. With normal images (the default setting), there are no restrictions on how guests can read
from and write to the disk.
When you take a snapshot of your virtual machine as described in chapter 1.9, Snapshots,
page 23, the state of such a “normal hard disk” will be recorded together with the snapshot,
and when reverting to the snapshot, its state will be fully reset.
(Technically, strictly speaking, the image file itself is not “reset”. Instead, when a snapshot
is taken, VirtualBox “freezes” the image file and no longer writes to it. For the write operations from the VM, a second, “differencing” image file is created which receives only the
changes to the original image; see the next section for details.)
While you can attach the same “normal” image to more than one virtual machine, only one
of these virtual machines attached to the same image file can be executed simultaneously,
as otherwise there would be conflicts if several machines write to the same image file.6
2. By contrast, write-through hard disks are completely unaffected by snapshots: their state
is not saved when a snapshot is taken, and not restored when a snapshot is restored.
3. Shareable hard disks are a variant of write-through hard disks. In principle they behave
exactly the same, i.e. their state is not saved when a snapshot is taken, and not restored
when a snapshot is restored. The difference only shows if you attach such disks to several
VMs. Shareable VMs may be attached to several VMs which may run concurrently. This
makes them suitable for use by cluster filesystems between VMs and similar applications
which are explicitly prepared to access a disk concurrently. Only fixed size images can be
used in this way, and dynamically growing images are rejected.
Warning: This is an expert feature, and misuse can lead to data loss – regular filesystems are not prepared to handle simultaneous changes by several parties.
4. Next, immutable images only remember write accesses temporarily while the virtual machine is running; all changes are lost when the virtual machine is powered on the next
time. As a result, as opposed to “normal” images, the same immutable image can be used
with several virtual machines without restrictions.
Creating an immutable image makes little sense since it would be initially empty and lose
its contents with every machine restart (unless you really want to have a disk that is always
unformatted when the machine starts up). As a result, normally, you would first create a
“normal” image and then, when you deem its contents useful, later mark it immutable.
If you take a snapshot of a machine with immutable images, then on every machine powerup, those images are reset to the state of the last (current) snapshot (instead of the state
of the original immutable image).
6 This
restriction is more lenient now than it was before VirtualBox 2.2. Previously, each “normal” disk image could only
be attached to one single machine. Now it can be attached to more than one machine so long as only one of these
machines is running.
76
5 Virtual storage
Note: As a special exception, immutable images are not reset if they are attached to
a machine whose last snapshot was taken while the machine was running (a so-called
“online” snapshot). As a result, if the machine’s current snapshot is such an “online”
snapshot, its immutable images behave exactly like the “normal” images described previously. To re-enable the automatic resetting of such images, delete the current snapshot of the machine.
Again, technically, VirtualBox never writes to an immutable image directly at all. All write
operations from the machine will be directed to a differencing image; the next time the
VM is powered on, the differencing image is reset so that every time the VM starts, its immutable images have exactly the same content.7 The differencing image is only reset when
the machine is powered on from within VirtualBox, not when you reboot by requesting a
reboot from within the machine. This is also why immutable images behave as described
above when snapshots are also present, which use differencing images as well.
If the automatic discarding of the differencing image on VM startup does not fit your needs,
you can turn it off using the autoreset parameter of VBoxManage modifyhd; see chapter
8.21, VBoxManage modifyhd, page 123 for details.
5. An image in multiattach mode can be attached to more than one virtual machine at the
same time, even if these machines are running simultaneously. For each virtual machine to
which such an image is attached, a differencing image is created. As a result, data that is
written to such a virtual disk by one machine is not seen by the other machines to which
the image is attached; each machine creates its own write history of the multiattach image.
Technically, a “multiattach” image behaves identically to an “immutable” image except the
differencing image is not reset every time the machine starts.
6. Finally, the read-only image is used automatically for CD/DVD images, since CDs/DVDs
can never be written to.
To illustrate the differences between the various types with respect to snapshots: Assume
you have installed your guest operating system in your VM, and you have taken a snapshot.
Imagine you have accidentally infected your VM with a virus and would like to go back to the
snapshot. With a normal hard disk image, you simply restore the snapshot, and the earlier
state of your hard disk image will be restored as well (and your virus infection will be undone).
With an immutable hard disk, all it takes is to shut down and power on your VM, and the virus
infection will be discarded. With a write-through image however, you cannot easily undo the
virus infection by means of virtualization, but will have to disinfect your virtual machine like a
real computer.
Still, you might find write-through images useful if you want to preserve critical data irrespective of snapshots, and since you can attach more than one image to a VM, you may want to have
one immutable for the operating system and one write-through for your data files.
5.5 Differencing images
The previous section hinted at differencing images and how they are used with snapshots, immutable images and multiple disk attachments. For the inquisitive VirtualBox user, this section
describes in more detail how they work.
A differencing image is a special disk image that only holds the differences to another image.
A differencing image by itself is useless, it must always refer to another image. The differencing
image is then typically referred to as a “child”, which holds the differences to its “parent”.
7 This
behavior also changed with VirtualBox 2.2. Previously, the differencing images were discarded when the machine
session ended; now they are discarded every time the machine is powered on.
77
5 Virtual storage
When a differencing image is active, it receives all write operations from the virtual machine
instead of its parent. The differencing image only contains the sectors of the virtual hard disk
that have changed since the differencing image was created. When the machine reads a sector
from such a virtual hard disk, it looks into the differencing image first. If the sector is present,
it is returned from there; if not, VirtualBox looks into the parent. In other words, the parent
becomes “read-only”; it is never written to again, but it is read from if a sector has not changed.
Differencing images can be chained. If another differencing image is created for a virtual disk
that already has a differencing image, then it becomes a “grandchild” of the original parent.
The first differencing image then becomes read-only as well, and write operations only go to the
second-level differencing image. When reading from the virtual disk, VirtualBox needs to look
into the second differencing image first, then into the first if the sector was not found, and then
into the original image.
There can be an unlimited number of differencing images, and each image can have more than
one child. As a result, the differencing images can form a complex tree with parents, “siblings”
and children, depending on how complex your machine configuration is. Write operations always
go to the one “active” differencing image that is attached to the machine, and for read operations,
VirtualBox may need to look up all the parents in the chain until the sector in question is found.
You can look at such a tree in the Virtual Media Manager:
In all of these situations, from the point of view of the virtual machine, the virtual hard disk
behaves like any other disk. While the virtual machine is running, there is a slight run-time I/O
overhead because VirtualBox might need to look up sectors several times. This is not noticeable
however since the tables with sector information are always kept in memory and can be looked
up quickly.
Differencing images are used in the following situations:
1. Snapshots. When you create a snapshot, as explained in the previous section, VirtualBox
“freezes” the images attached to the virtual machine and creates differencing images for
each of them (to be precise: one for each image that is not in “write-through” mode). From
the point of view of the virtual machine, the virtual disks continue to operate before, but all
write operations go into the differencing images. Each time you create another snapshot,
for each hard disk attachment, another differencing image is created and attached, forming
a chain or tree.
78
5 Virtual storage
In the above screenshot, you see that the original disk image is now attached to a snapshot,
representing the state of the disk when the snapshot was taken.
If you now restore a snapshot – that is, if you want to go back to the exact machine state
that was stored in the snapshot –, the following happens:
a) VirtualBox copies the virtual machine settings that were copied into the snapshot
back to the virtual machine. As a result, if you have made changes to the machine
configuration since taking the snapshot, they are undone.
b) If the snapshot was taken while the machine was running, it contains a saved machine
state, and that state is restored as well; after restoring the snapshot, the machine will
then be in “Saved” state and resume execution from there when it is next started.
Otherwise the machine will be in “Powered Off” state and do a full boot.
c) For each disk image attached to the machine, the differencing image holding all the
write operations since the current snapshot was taken is thrown away, and the original
parent image is made active again. (If you restored the “root” snapshot, then this will
be the root disk image for each attachment; otherwise, some other differencing image
descended from it.) This effectively restores the old machine state.
If you later delete a snapshot in order to free disk space, for each disk attachment, one of
the differencing images becomes obsolete. In this case, the differencing image of the disk
attachment cannot simply be deleted. Instead, VirtualBox needs to look at each sector of
the differencing image and needs to copy it back into its parent; this is called “merging”
images and can be a potentially lengthy process, depending on how large the differencing
image is. It can also temporarily need a considerable amount of extra disk space, before
the differencing image obsoleted by the merge operation is deleted.
2. Immutable images. When an image is switched to “immutable” mode, a differencing image is created as well. As with snapshots, the parent image then becomes read-only, and
the differencing image receives all the write operations. Every time the virtual machine is
started, all the immutable images which are attached to it have their respective differencing image thrown away, effectively resetting the virtual machine’s virtual disk with every
restart.
5.6 Cloning disk images
You can duplicate hard disk image files on the same host to quickly produce a second virtual
machine with the same operating system setup. However, you should only make copies of virtual
disk images using the utility supplied with VirtualBox; see chapter 8.22, VBoxManage clonehd,
page 124. This is because VirtualBox assigns a unique identity number (UUID) to each disk
image, which is also stored inside the image, and VirtualBox will refuse to work with two images
that use the same number. If you do accidentally try to reimport a disk image which you copied
normally, you can make a second copy using VirtualBox’s utility and import that instead.
Note that newer Linux distributions identify the boot hard disk from the ID of the drive. The
ID VirtualBox reports for a drive is determined from the UUID of the virtual disk image. So if you
clone a disk image and try to boot the copied image the guest might not be able to determine
its own boot disk as the UUID changed. In this case you have to adapt the disk ID in your boot
loader script (for example /boot/grub/menu.lst). The disk ID looks like this:
scsi-SATA_VBOX_HARDDISK_VB5cfdb1e2-c251e503
The ID for the copied image can be determined with
hdparm -i /dev/sda
79
5 Virtual storage
5.7 Host I/O caching
Starting with version 3.2, VirtualBox can optionally disable the I/O caching that the host operating system would otherwise perform on disk image files.
Traditionally, VirtualBox has opened disk image files as normal files, which results in them
being cached by the host operating system like any other file. The main advantage of this is
speed: when the guest OS writes to disk and the host OS cache uses delayed writing, the write
operation can be reported as completed to the guest OS quickly while the host OS can perform the
operation asynchronously. Also, when you start a VM a second time and have enough memory
available for the OS to use for caching, large parts of the virtual disk may be in system memory,
and the VM can access the data much faster.
Note that this applies only to image files; buffering never occurred for virtual disks residing on
remote iSCSI storage, which is the more common scenario in enterprise-class setups (see chapter
5.10, iSCSI servers, page 82).
While buffering is a useful default setting for virtualizating a few machines on a desktop
computer, there are some disadvantages to this approach:
1. Delayed writing through the host OS cache is less secure. When the guest OS writes data,
it considers the data written even though it has not yet arrived on a physical disk. If for
some reason the write does not happen (power failure, host crash), the likelihood of data
loss increases.
2. Disk image files tend to be very large. Caching them can therefore quickly use up the entire
host OS cache. Depending on the efficiency of the host OS caching, this may slow down
the host immensely, especially if several VMs run at the same time. For example, on Linux
hosts, host caching may result in Linux delaying all writes until the host cache is nearly full
and then writing out all these changes at once, possibly stalling VM execution for minutes.
This can result in I/O errors in the guest as I/O requests time out there.
3. Physical memory is often wasted as guest operating systems typically have their own I/O
caches, which may result in the data being cached twice (in both the guest and the host
caches) for little effect.
If you decide to disable host I/O caching for the above reasons, VirtualBox uses its own small
cache to buffer writes, but no read caching since this is typically already performed by the guest
OS. In addition, VirtualBox fully supports asynchronous I/O for its virtual SATA, SCSI and SAS
controllers through multiple I/O threads.
Since asynchronous I/O is not supported by IDE controllers, for performance reasons, you may
want to leave host caching enabled for your VM’s virtual IDE controllers.
For this reason, VirtualBox allows you to configure whether the host I/O cache is used for each
I/O controller separately. Either uncheck the “Use host I/O cache” box in the “Storage” settings
for a given virtual storage controller, or use the following VBoxManage command to disable the
host I/O cache for a virtual storage controller:
VBoxManage storagectl <vm> --name <controllername> --hostiocache off
See chapter 8.17, VBoxManage storagectl, page 121 for details.
For the above reasons also, VirtualBox now uses SATA controllers by default for new virtual
machines.
5.8 Limiting bandwidth for disk images
Starting with version 4.0, VirtualBox allows for limiting the maximum bandwidth used for asynchronous I/O. Additionally it supports sharing limits through bandwidth groups for several images. It is possible to have more than one such limit.
80
5 Virtual storage
Limits are configured through VBoxManage. The example below creates a bandwidth group
named “Limit”, sets the limit to 20 MB/s and assigns the group to the attached disks of the VM:
VBoxManage bandwidthctl "VM name" --name Limit --add disk --limit 20
VBoxManage storageattach "VM name" --controller "SATA" --port 0 --device 0 --type hdd
--medium disk1.vdi --bandwidthgroup Limit
VBoxManage storageattach "VM name" --controller "SATA" --port 1 --device 0 --type hdd
--medium disk2.vdi --bandwidthgroup Limit
All disks in a group share the bandwidth limit, meaning that in the example above the bandwidth of both images combined can never exceed 20 MB/s. However if one disk doesn’t require
bandwidth the other can use the remaining bandwidth of its group.
The limits for each group can be changed while the VM is running, with changes being picked
up immediately. The example below changes the limit for the group created in the example
above to 10 MB/s:
VBoxManage bandwidthctl "VM name" --name Limit --limit 10
5.9 CD/DVD support
The virtual CD/DVD drive(s) by default support only reading. The medium configuration is
changeable at runtime. You can select between three options to provide the medium data:
• Host Drive defines that the guest can read from the medium in the host drive.
• Image file (typically an ISO file) gives the guest read-only access to the data in the image.
• Empty stands for a drive without an inserted medium.
Changing between the above, or changing a medium in the host drive that is accessed by a
machine, or changing an image file will signal a medium change to the guest operating system,
which can then react to the change (e.g. by starting an installation program).
Medium changes can be prevented by the guest, and VirtualBox reflects that by locking the
host drive if appropriate. You can force a medium removal in such situations via the VirtualBox
GUI or the VBoxManage command line tool. Effectively this is the equivalent of the emergency
eject which many CD/DVD drives provide, with all associated side effects: the guest OS can issue
error messages, just like on real hardware, and guest applications may misbehave. Use this with
caution.
Note: The identification string of the drive provided to the guest (which, in the guest,
would be displayed by configuration tools such as the Windows Device Manager) is
always “VBOX CD-ROM”, irrespective of the current configuration of the virtual drive.
This is to prevent hardware detection from being triggered in the guest operating system every time the configuration is changed.
The standard CD/DVD emulation allows for reading standard data CD and DVD formats only.
As an experimental feature, for additional capabilities, it is possible to give the guest direct access
to the CD/DVD host drive by enabling “passthrough” mode. Depending on the host hardware,
this may enable three things to work, potentially:
• CD/DVD writing from within the guest, if the host DVD drive is a CD/DVD writer;
• playing audio CDs;
• playing encrypted DVDs.
81
5 Virtual storage
There is a “Passthrough” checkbox in the GUI dialog for configuring the media attached to a
storage controller, or you can use the --passthrough option with VBoxManage storageattach;
see chapter 8.16, VBoxManage storageattach, page 119 for details.
Even if pass-through is enabled, unsafe commands, such as updating the drive firmware, will
be blocked. Video CD formats are never supported, not even in passthrough mode, and cannot
be played from a virtual machine.
On Solaris hosts, pass-through requires running VirtualBox with real root permissions due to
security measures enforced by the host.
5.10 iSCSI servers
iSCSI stands for “Internet SCSI” and is a standard that allows for using the SCSI protocol over
Internet (TCP/IP) connections. Especially with the advent of Gigabit Ethernet, it has become
affordable to attach iSCSI storage servers simply as remote hard disks to a computer network. In
iSCSI terminology, the server providing storage resources is called an “iSCSI target”, while the
client connecting to the server and accessing its resources is called “iSCSI initiator”.
VirtualBox can transparently present iSCSI remote storage to a virtual machine as a virtual
hard disk. The guest operating system will not see any difference between a virtual disk image
(VDI file) and an iSCSI target. To achieve this, VirtualBox has an integrated iSCSI initiator.
VirtualBox’s iSCSI support has been developed according to the iSCSI standard and should
work with all standard-conforming iSCSI targets. To use an iSCSI target with VirtualBox, you
must use the command line; see chapter 8.16, VBoxManage storageattach, page 119.
82
6 Virtual networking
As briefly mentioned in chapter 3.8, Network settings, page 48, VirtualBox provides up to eight
virtual PCI Ethernet cards for each virtual machine. For each such card, you can individually
select
1. the hardware that will be virtualized as well as
2. the virtualization mode that the virtual card will be operating in with respect to your
physical networking hardware on the host.
Four of the network cards can be configured in the “Network” section of the settings dialog
in the graphical user interface of VirtualBox. You can configure all eight network cards on the
command line via VBoxManage modifyvm; see chapter 8.7, VBoxManage modifyvm, page 109.
This chapter explains the various networking settings in more detail.
6.1 Virtual networking hardware
For each card, you can individually select what kind of hardware will be presented to the virtual
machine. VirtualBox can virtualize the following six types of networking hardware:
• AMD PCNet PCI II (Am79C970A);
• AMD PCNet FAST III (Am79C973, the default);
• Intel PRO/1000 MT Desktop (82540EM);
• Intel PRO/1000 T Server (82543GC);
• Intel PRO/1000 MT Server (82545EM);
• Paravirtualized network adapter (virtio-net).
The PCNet FAST III is the default because it is supported by nearly all operating systems out
of the box, as well as the GNU GRUB boot manager. As an exception, the Intel PRO/1000 family
adapters are chosen for some guest operating system types that no longer ship with drivers for
the PCNet card, such as Windows Vista.
The Intel PRO/1000 MT Desktop type works with Windows Vista and later versions. The T
Server variant of the Intel PRO/1000 card is recognized by Windows XP guests without additional
driver installation. The MT Server variant facilitates OVF imports from other platforms.
The “Paravirtualized network adapter (virtio-net)“ is special. If you select this, then
VirtualBox does not virtualize common networking hardware (that is supported by common
guest operating systems out of the box). Instead, VirtualBox then expects a special software
interface for virtualized environments to be provided by the guest, thus avoiding the complexity
of emulating networking hardware and improving network performance. Starting with version
3.1, VirtualBox provides support for the industry-standard “virtio” networking drivers, which are
part of the open-source KVM project.
The “virtio” networking drivers are available for the following guest operating systems:
• Linux kernels version 2.6.25 or later can be configured to provide virtio support; some
distributions also back-ported virtio to older kernels.
83
6 Virtual networking
• For Windows 2000, XP and Vista, virtio drivers can be downloaded and installed from the
KVM project web page.1
VirtualBox also has limited support for so-called jumbo frames, i.e. networking packets with
more than 1500 bytes of data, provided that you use the Intel card virtualization and bridged
networking. In other words, jumbo frames are not supported with the AMD networking devices;
in those cases, jumbo packets will silently be dropped for both the transmit and the receive
direction. Guest operating systems trying to use this feature will observe this as a packet loss,
which may lead to unexpected application behavior in the guest. This does not cause problems
with guest operating systems in their default configuration, as jumbo frames need to be explicitly
enabled.
6.2 Introduction to networking modes
Each of the eight networking adapters can be separately configured to operate in one of the
following five modes:
Not attached In this mode, VirtualBox reports to the guest that a network card is present, but
that there is no connection – as if no Ethernet cable was plugged into the card. This way
it is possible to “pull” the virtual Ethernet cable and disrupt the connection, which can
be useful to inform a guest operating system that no network connection is available and
enforce a reconfiguration.
Network Address Translation (NAT) If all you want is to browse the Web, download files and
view e-mail inside the guest, then this default mode should be sufficient for you, and you
can safely skip the rest of this section. Please note that there are certain limitations when
using Windows file sharing (see chapter 6.3.3, NAT limitations, page 86 for details).
Bridged networking This is for more advanced networking needs such as network simulations
and running servers in a guest. When enabled, VirtualBox connects to one of your installed
network cards and exchanges network packets directly, circumventing your host operating
system’s network stack.
Internal networking This can be used to create a different kind of software-based network
which is visible to selected virtual machines, but not to applications running on the host or
to the outside world.
Host-only networking This can be used to create a network containing the host and a set of
virtual machines, without the need for the host’s physical network interface. Instead, a
virtual network interface (similar to a loopback interface) is created on the host, providing
connectivity among virtual machines and the host.
VDE (Virtual Distributed Ethernet) networking This option can be used to connect to a Virtual
Distributed Ethernet switch on a Linux or a FreeBSD host. It is only available if the VDE
software and the VDE plugin library from the VirtualSquare project are installed on the host
system. For more information on setting up VDE networks, please see the documentation
accompanying the software.
The following sections describe the available network modes in more detail.
1 http://www.linux-kvm.org/page/WindowsGuestDrivers.
84
6 Virtual networking
6.3 Network Address Translation (NAT)
Network Address Translation (NAT) is the simplest way of accessing an external network from
a virtual machine. Usually, it does not require any configuration on the host network and guest
system. For this reason, it is the default networking mode in VirtualBox.
A virtual machine with NAT enabled acts much like a real computer that connects to the Internet through a router. The “router”, in this case, is the VirtualBox networking engine, which maps
traffic from and to the virtual machine transparently. The disadvantage of NAT mode is that,
much like a private network behind a router, the virtual machine is invisible and unreachable
from the outside internet; you cannot run a server this way unless you set up port forwarding
(described below).
The network frames sent out by the guest operating system are received by VirtualBox’s NAT
engine, which extracts the TCP/IP data and resends it using the host operating system. To an
application on the host, or to another computer on the same network as the host, it looks like
the data was sent by the VirtualBox application on the host, using an IP address belonging to the
host. VirtualBox listens for replies to the packages sent, and repacks and resends them to the
guest machine on its private network.
The virtual machine receives its network address and configuration on the private network
from a DHCP server integrated into VirtualBox. The IP address thus assigned to the virtual
machine is usually on a completely different network than the host. As more than one card of
a virtual machine can be set up to use NAT, the first card is connected to the private network
10.0.2.0, the second card to the network 10.0.3.0 and so on. If you need to change the guestassigned IP range for some reason, please refer to chapter 9.10, Fine-tuning the VirtualBox NAT
engine, page 145.
6.3.1 Configuring port forwarding with NAT
As the virtual machine is connected to a private network internal to VirtualBox and invisible
to the host, network services on the guest are not accessible to the host machine or to other
computers on the same network. However, like a physical router, VirtualBox can make selected
services available to the world outside the guest through port forwarding. This means that
VirtualBox listens to certain ports on the host and resends all packets which arrive there to the
guest, on the same or a different port.
To an application on the host or other physical (or virtual) machines on the network, it looks as
though the service being proxied is actually running on the host. This also means that you cannot
run the same service on the same ports on the host. However, you still gain the advantages of
running the service in a virtual machine – for example, services on the host machine or on other
virtual machines cannot be compromised or crashed by a vulnerability or a bug in the service,
and the service can run in a different operating system than the host system.
You can set up a guest service which you wish to proxy using the command line tool
VBoxManage; for details, please refer to chapter 8.7, VBoxManage modifyvm, page 109.
You will need to know which ports on the guest the service uses and to decide which ports
to use on the host (often but not always you will want to use the same ports on the guest and
on the host). You can use any ports on the host which are not already in use by a service. For
example, to set up incoming NAT connections to an ssh server in the guest, use the following
command:
VBoxManage modifyvm "VM name" --natpf1 "guestssh,tcp,,2222,,22"
With the above example, all TCP traffic arriving on port 2222 on any host interface will be
forwarded to port 22 in the guest. The protocol name tcp is a mandatory attribute defining
which protocol should be used for forwarding (udp could also be used). The name guestssh is
purely descriptive and will be auto-generated if omitted. The number after --natpf denotes the
network card, like in other parts of VBoxManage.
To remove this forwarding rule again, use the following command:
85
6 Virtual networking
VBoxManage modifyvm "VM name" --natpf1 delete "guestssh"
If for some reason the guest uses a static assigned IP address not leased from the built-in DHCP
server, it is required to specify the guest IP when registering the forwarding rule:
VBoxManage modifyvm "VM name" --natpf1 "guestssh,tcp,,2222,10.0.2.19,22"
This example is identical to the previous one, except that the NAT engine is being told that the
guest can be found at the 10.0.2.19 address.
To forward all incoming traffic from a specific host interface to the guest, specify the IP of that
host interface like this:
VBoxManage modifyvm "VM name" --natpf1 "guestssh,tcp,127.0.0.1,2222,,22"
This forwards all TCP traffic arriving on the localhost interface (127.0.0.1) via port 2222 to port
22 in the guest.
It is not possible to configure incoming NAT connections while the VM is running. However,
you can change the settings for a VM which is currently saved (or powered off at a snapshot).
6.3.2 PXE booting with NAT
PXE booting is now supported in NAT mode. The NAT DHCP server provides a boot file
name of the form vmname.pxe if the directory TFTP exists in the directory where the user’s
VirtualBox.xml file is kept. It is the responsibility of the user to provide vmname.pxe.
6.3.3 NAT limitations
There are four limitations of NAT mode which users should be aware of:
ICMP protocol limitations: Some frequently used network debugging tools (e.g. ping or
tracerouting) rely on the ICMP protocol for sending/receiving messages. While ICMP support has been improved with VirtualBox 2.1 (ping should now work), some other tools
may not work reliably.
Receiving of UDP broadcasts is not reliable: The guest does not reliably receive broadcasts,
since, in order to save resources, it only listens for a certain amount of time after the guest
has sent UDP data on a particular port. As a consequence, NetBios name resolution based
on broadcasts does not always work (but WINS always works). As a workaround, you can
use the numeric IP of the desired server in the \\server\share notation.
Protocols such as GRE are unsupported: Protocols other than TCP and UDP are not supported. This means some VPN products (e.g. PPTP from Microsoft) cannot be used. There
are other VPN products which use simply TCP and UDP.
Forwarding host ports < 1024 impossible: On Unix-based hosts (e.g. Linux, Solaris, Mac OS
X) it is not possible to bind to ports below 1024 from applications that are not run by root.
As a result, if you try to configure such a port forwarding, the VM will refuse to start.
These limitations normally don’t affect standard network use. But the presence of NAT has
also subtle effects that may interfere with protocols that are normally working. One example is
NFS, where the server is often configured to refuse connections from non-privileged ports (i.e.
ports not below 1024).
86
6 Virtual networking
6.4 Bridged networking
With bridged networking, VirtualBox uses a device driver on your host system that filters data
from your physical network adapter. This driver is therefore called a “net filter” driver. This
allows VirtualBox to intercept data from the physical network and inject data into it, effectively
creating a new network interface in software. When a guest is using such a new software interface, it looks to the host system as though the guest were physically connected to the interface
using a network cable: the host can send data to the guest through that interface and receive
data from it. This means that you can set up routing or bridging between the guest and the rest
of your network.
For this to work, VirtualBox needs a device driver on your host system. The way bridged networking works has been completely rewritten with VirtualBox 2.0 and 2.1, depending on the host
operating system. From the user perspective, the main difference is that complex configuration
is no longer necessary on any of the supported host operating systems.2
Note: Even though TAP is no longer necessary on Linux with bridged networking, you
can still use TAP interfaces for certain advanced setups, since you can connect a VM to
any host interface – which could also be a TAP interface.
To enable bridged networking, all you need to do is to open the Settings dialog of a virtual
machine, go to the “Network” page and select “Bridged network” in the drop down list for the
“Attached to” field. Finally, select desired host interface from the list at the bottom of the page,
which contains the physical network interfaces of your systems. On a typical MacBook, for
example, this will allow you to select between “en1: AirPort” (which is the wireless interface)
and “en0: Ethernet”, which represents the interface with a network cable.
Depending on your host operating system, the following limitations should be kept in mind:
• On Macintosh hosts, functionality is limited when using AirPort (the Mac’s wireless networking) for bridged networking. Currently, VirtualBox supports only IPv4 over AirPort.
For other protocols such as IPv6 and IPX, you must choose a wired interface.
• On Linux hosts, functionality is limited when using wireless interfaces for bridged networking. Currently, VirtualBox supports only IPv4 over wireless. For other protocols such
as IPv6 and IPX, you must choose a wired interface.
Also, setting the MTU to less than 1500 bytes on wired interfaces provided by the sky2
driver on the Marvell Yukon II EC Ultra Ethernet NIC is known to cause packet losses
under certain conditions.
• On Solaris hosts, there is no support for using wireless interfaces. Filtering guest traffic
using IPFilter is also not completely supported due to technical restrictions of the Solaris
networking subsystem. These issues would be addressed in a future release of Solaris 11.
With VirtualBox 2.0.4 and above, it is possible to use Crossbow Virtual Network Interfaces
(VNICs) with bridged networking, but with the following caveats:
– A VNIC cannot be shared between multiple guest network interfaces, i.e. each guest
network interface must have its own, exclusive VNIC.
– The VNIC and the guest network interface that uses the VNIC must be assigned identical MAC addresses.
2 For
Mac OS X and Solaris hosts, net filter drivers were already added in VirtualBox 2.0 (as initial support for Host
Interface Networking on these platforms). With VirtualBox 2.1, net filter drivers were also added for the Windows
and Linux hosts, replacing the mechanisms previously present in VirtualBox for those platforms; especially on Linux,
the earlier method required creating TAP interfaces and bridges, which was complex and varied from one distribution
to the next. None of this is necessary anymore. Bridged network was formerly called “Host Interface Networking”
and has been renamed with version 2.2 without any change in functionality.
87
6 Virtual networking
When using VLAN interfaces with VirtualBox, they must be named according to the PPAhack naming scheme (e.g. “e1000g513001”), as otherwise the guest may receive packets
in an unexpected format.
6.5 Internal networking
Internal Networking is similar to bridged networking in that the VM can directly communicate
with the outside world. However, the “outside world” is limited to other VMs on the same host
which connect to the same internal network.
Even though technically, everything that can be done using internal networking can also be
done using bridged networking, there are security advantages with internal networking. In
bridged networking mode, all traffic goes through a physical interface of the host system. It is
therefore possible to attach a packet sniffer (such as Wireshark) to the host interface and log all
traffic that goes over it. If, for any reason, you prefer two or more VMs on the same machine
to communicate privately, hiding their data from both the host system and the user, bridged
networking therefore is not an option.
Internal networks are created automatically as needed, i.e. there is no central configuration.
Every internal network is identified simply by its name. Once there is more than one active virtual
network card with the same internal network ID, the VirtualBox support driver will automatically
“wire” the cards and act as a network switch. The VirtualBox support driver implements a
complete Ethernet switch and supports both broadcast/multicast frames and promiscuous mode.
In order to attach a VM’s network card to an internal network, set its networking mode to
“internal networking”. There are two ways to accomplish this:
• You can use a VM’s “Settings” dialog in the VirtualBox graphical user interface. In the
“Networking” category of the settings dialog, select “Internal Networking” from the dropdown list of networking modes. Now select the name of an existing internal network from
the drop-down below or enter a new name into the entry field.
• You can use
VBoxManage modifyvm "VM name" --nic<x> intnet
Optionally, you can specify a network name with the command
VBoxManage modifyvm "VM name" --intnet<x> "network name"
If you do not specify a network name, the network card will be attached to the network
intnet by default.
Unless you configure the (virtual) network cards in the guest operating systems that are participating in the internal network to use static IP addresses, you may want to use the DHCP server
that is built into VirtualBox to manage IP addresses for the internal network. Please see chapter
8.33, VBoxManage dhcpserver, page 132 for details.
As a security measure, the Linux implementation of internal networking only allows VMs
running under the same user ID to establish an internal network.
6.6 Host-only networking
Host-only networking is another networking mode that was added with version 2.2 of VirtualBox.
It can be thought of as a hybrid between the bridged and internal networking modes: as with
bridged networking, the virtual machines can talk to each other and the host as if they were
connected through a physical ethernet switch. Similarly, as with internal networking however, a
physical networking interface need not be present, and the virtual machines cannot talk to the
world outside the host since they are not connected to a physical networking interface.
88
6 Virtual networking
Instead, when host-only networking is used, VirtualBox creates a new software interface on
the host which then appears next to your existing network interfaces. In other words, whereas
with bridged networking an existing physical interface is used to attach virtual machines to,
with host-only networking a new “loopback” interface is created on the host. And whereas with
internal networking, the traffic between the virtual machines cannot be seen, the traffic on the
“loopback” interface on the host can be intercepted.
Host-only networking is particularly useful for preconfigured virtual appliances, where multiple virtual machines are shipped together and designed to cooperate. For example, one virtual
machine may contain a web server and a second one a database, and since they are intended
to talk to each other, the appliance can instruct VirtualBox to set up a host-only network for the
two. A second (bridged) network would then connect the web server to the outside world to
serve data to, but the outside world cannot connect to the database.
To change a virtual machine’s virtual network interface to “host only” mode:
• either go to the “Network” page in the virtual machine’s settings notebook in the graphical
user interface and select “Host-only networking”, or
• on the command line, type VBoxManage modifyvm "VM name" --nic<x> hostonly; see
chapter 8.7, VBoxManage modifyvm, page 109 for details.
For host-only networking, like with internal networking, you may find the DHCP server useful
that is built into VirtualBox. This can be enabled to then manage the IP addresses in the host-only
network since otherwise you would need to configure all IP addresses statically.
• In the VirtualBox graphical user interface, you can configure all these items in the global
settings via “File” -> “Settings” -> “Network”, which lists all host-only networks which are
presently in use. Click on the network name and then on the “Edit” button to the right, and
you can modify the adapter and DHCP settings.
• Alternatively, you can use VBoxManage dhcpserver on the command line; please see chapter 8.33, VBoxManage dhcpserver, page 132 for details.
89
7 Remote virtual machines
7.1 Remote display (VRDP support)
VirtualBox can display virtual machines remotely, meaning that a virtual machine can execute
on one machine even though the machine will be displayed on a second computer, and the
machine will be controlled from there as well, as if the virtual machine was running on that
second computer.
For maximum flexibility, starting with VirtualBox 4.0, VirtualBox implements remote machine
display through a generic extension interface, the VirtualBox Remote Desktop Extension (VRDE).
The base open-source VirtualBox package only provides this interface, while implementations
can be supplied by third parties with VirtualBox extension packages, which must be installed
separately from the base package. See chapter 1.5, Installing VirtualBox and extension packs,
page 14 for more information.
Oracle provides support for the VirtualBox Remote Display Protocol (VRDP) in such a
VirtualBox extension package. When this package is installed, VirtualBox versions 4.0 and later
support VRDP the same way as binary (non-open-source) versions of VirtualBox before 4.0 did.
VRDP is a backwards-compatible extension to Microsoft’s Remote Desktop Protocol (RDP).
Typically graphics updates and audio are sent from the remote machine to the client, while
keyboard and mouse events are sent back. As a result, you can use any standard RDP client to
control the remote VM.
Even when the extension is installed, the VRDP server is disabled by default. It can easily be
enabled on a per-VM basis either in the VirtualBox Manager in the “Display” settings (see chapter
3.5, Display settings, page 45) or with VBoxManage:
VBoxManage modifyvm "VM name" --vrde on
If you use VBoxHeadless (described further below), VRDP support will be automatically enabled since VBoxHeadless has no other means of output.
7.1.1 Common third-party RDP viewers
Since VRDP is backwards-compatible to RDP, you can use any standard RDP viewer to connect
to such a remote virtual machine (examples follow below). For this to work, you must specify
the IP address of your host system (not of the virtual machine!) as the server address to connect
to, as well as the port number that the RDP server is using.
By default, VRDP uses TCP port 3389. You will need to change the default port if you run
more than one VRDP server, since the port can only be used by one server at a time; you might
also need to change it on Windows hosts since the default port might already be used by the
RDP server that is built into Windows itself. Ports 5000 through 5050 are typically not used and
might be a good choice.
The port can be changed either in the “Display” settings of the graphical user interface or
with --vrdeport option of the VBoxManage modifyvm command. You can specify a commaseparated list of ports or ranges of ports. Use a dash between two port numbers to specify a
range. The VRDP server will bind to one of available ports from the specified list. For example,
VBoxManage modifyvm "VM name" --vrdeport 5000,5010-5012 will configure the server to
bind to one of the ports 5000, 5010, 5011 or 5012. See chapter 8.7, VBoxManage modifyvm,
page 109 for details.
90
7 Remote virtual machines
The actual port used by a running VM can be either queried with VBoxManage showvminfo
command or seen in the GUI on the “Runtime” tab of the “Session Information Dialog”, which is
accessible via the “Machine” menu of the VM window.
Here follow examples for the most common RDP viewers:
• On Windows, you can use the Microsoft Terminal Services Connector (mstsc.exe) that
ships with Windows. You can start it by bringing up the “Run” dialog (press the Windows
key and “R”) and typing “mstsc”. You can also find it under “Start” -> “All Programs” ->
“Accessories” -> “Remote Desktop Connection”. If you use the “Run” dialog, you can type
in options directly:
mstsc 1.2.3.4[:3389]
Replace “1.2.3.4” with the host IP address, and 3389 with a different port if necessary.
Note: When connecting to localhost in order to test the connection, the addresses
localhost and 127.0.0.1 might not work using mstsc.exe. Instead, the address
127.0.0.2[:3389] has to be used.
• On other systems, you can use the standard open-source rdesktop program. This ships
with most Linux distributions, but VirtualBox also comes with a modified variant of rdesktop for remote USB support (see chapter 7.1.4, Remote USB, page 93 below).
With rdesktop, use a command line such as the following:
rdesktop -a 16 -N 1.2.3.4:3389
As said for the Microsoft viewer above, replace “1.2.3.4” with the host IP address, and
3389 with a different port if necessary. The -a 16 option requests a color depth of 16
bits per pixel, which we recommend. (For best performance, after installation of the guest
operating system, you should set its display color depth to the same value). The -N option
enables use of the NumPad keys.
• If you run the KDE desktop, you might prefer krdc, the KDE RDP viewer. The command
line would look like this:
krdc --window --high-quality rdp:/1.2.3.4[:3389]
Again, replace “1.2.3.4” with the host IP address, and 3389 with a different port if necessary. The “rdp:/“ bit is required with krdc to switch it into RDP mode.
• With Sun Ray thin clients you can use uttsc, which is part of the Sun Ray Windows
Connector package. See the corresponding documentation for details.
7.1.2 VBoxHeadless, the remote desktop server
While any VM started from the VirtualBox Manager is capable of running virtual machines remotely, it is not convenient to have to run the full-fledged GUI if you never want to have VMs
displayed locally in the first place. In particular, if you are running server hardware whose only
purpose is to host VMs, and all your VMs are supposed to run remotely over VRDP, then it is
pointless to have a graphical user interface on the server at all – especially since, on a Linux or
Solaris host, the VirtualBox manager comes with dependencies on the Qt and SDL libraries. This
is inconvenient if you would rather not have the X Window system on your server at all.
VirtualBox therefore comes with yet another front-end called VBoxHeadless, which produces
no visible output on the host at all, but instead only delivers VRDP data. This front-end has no
dependencies on the X Window system on Linux and Solaris hosts.1
To start a virtual machine with VBoxHeadless, you have two options:
1 Before VirtualBox 1.6,
the headless server was called VBoxVRDP. For the sake of backwards compatibility, the VirtualBox
installation still installs an executable with that name as well.
91
7 Remote virtual machines
• You can use
VBoxManage startvm "VM name" --type headless
The extra --type option causes VirtualBox to use VBoxHeadless as the front-end to the
internal virtualization engine instead of the Qt front-end.
• The alternative is to use VBoxHeadless directly, as follows:
VBoxHeadless --startvm <uuid|name>
This way of starting the VM is preferred because you can see more detailed error messages,
especially for early failures before the VM execution is started. If you have trouble with
VBoxManage startvm, it can help greatly to start VBoxHeadless directly to diagnose the
problem cause.
Note that when you use VBoxHeadless to start a VM, since the headless server has no other
means of output, the VRDP server will always be enabled, regardless of whether you had enabled
the VRDP server in the VM’s settings. If this is undesirable (for example because you want to
access the VM via ssh only), start the VM like this:
VBoxHeadless --startvm <uuid|name> --vrde=off
To have the VRDP server enabled depending on the VM configuration, as the other front-ends
would, use this:
VBoxHeadless --startvm <uuid|name> --vrde=config
7.1.3 Step by step: creating a virtual machine on a headless server
The following instructions may give you an idea how to create a virtual machine on a headless
server over a network connection. We will create a virtual machine, establish an RDP connection
and install a guest operating system – all without having to touch the headless server. All you
need is the following:
1. VirtualBox on a server machine with a supported host operating system. The VirtualBox
extension pack for the VRDP server must be installed (see the previous section). For the
following example, we will assume a Linux server.
2. An ISO file accessible from the server, containing the installation data for the guest operating system to install (we will assume Windows XP in the following example).
3. A terminal connection to that host through which you can access a command line (e.g. via
ssh).
4. An RDP viewer on the remote client; see chapter 7.1.1, Common third-party RDP viewers,
page 90 above for examples.
Note again that on the server machine, since we will only use the headless server, neither Qt nor
SDL nor the X Window system will be needed.
1. On the headless server, create a new virtual machine:
VBoxManage createvm --name "Windows XP" --ostype WindowsXP --register
Note that if you do not specify --register, you will have to manually use the registervm
command later.
Note further that you do not need to specify --ostype, but doing so selects some sane
default values for certain VM parameters, for example the RAM size and the type of the
virtual network device. To get a complete list of supported operating systems you can use
92
7 Remote virtual machines
VBoxManage list ostypes
2. Make sure the settings for this VM are appropriate for the guest operating system that we
will install. For example:
VBoxManage modifyvm "Windows XP" --memory 256 --acpi on --boot1 dvd --nic1 nat
3. Create a virtual hard disk for the VM (in this case, 10GB in size):
VBoxManage createhd --filename "WinXP.vdi" --size 10000
4. Add an IDE Controller to the new VM:
VBoxManage storagectl "Windows XP" --name "IDE Controller"
--add ide --controller PIIX4
5. Set the VDI file created above as the first virtual hard disk of the new VM:
VBoxManage storageattach "Windows XP" --storagectl "IDE Controller"
--port 0 --device 0 --type hdd --medium "WinXP.vdi"
6. Attach the ISO file that contains the operating system installation that you want to install
later to the virtual machine, so the machine can boot from it:
VBoxManage storageattach "Windows XP" --storagectl "IDE Controller"
--port 0 --device 1 --type dvddrive --medium /full/path/to/iso.iso
7. Start the virtual machine using VBoxHeadless:
VBoxHeadless --startvm "Windows XP"
If everything worked, you should see a copyright notice. If, instead, you are returned to
the command line, then something went wrong.
8. On the client machine, fire up the RDP viewer and try to connect to the server (see chapter
7.1.1, Common third-party RDP viewers, page 90 above for how to use various common
RDP viewers).
You should now be seeing the installation routine of your guest operating system remotely
in the RDP viewer.
7.1.4 Remote USB
As a special feature on top of the VRDP support, VirtualBox supports remote USB devices over
the wire as well. That is, the VirtualBox guest that runs on one computer can access the USB
devices of the remote computer on which the VRDP data is being displayed the same way as
USB devices that are connected to the actual host. This allows for running virtual machines on
a VirtualBox host that acts as a server, where a client can connect from elsewhere that needs
only a network adapter and a display capable of running an RDP viewer. When USB devices are
plugged into the client, the remote VirtualBox server can access them.
For these remote USB devices, the same filter rules apply as for other USB devices, as described
with chapter 3.10.1, USB settings, page 49. All you have to do is specify “Remote” (or “Any”)
when setting up these rules.
Accessing remote USB devices is only possible if the RDP client supports this extension.
On Linux and Solaris hosts, the VirtualBox installation provides a suitable VRDP client called
rdesktop-vrdp. Recent versions of uttsc, a client tailored for the use with Sun Ray thin clients,
also support accessing remote USB devices. RDP clients for other platforms will be provided in
future VirtualBox versions.
To make a remote USB device available to a VM, rdesktop-vrdp should be started as follows:
rdesktop-vrdp -r usb -a 16 -N my.host.address
93
7 Remote virtual machines
Note that rdesktop-vrdp can access USB devices only through /proc/bus/usb. Please refer
to chapter 12.6.7, USB not working, page 176 for further details on how to properly set up the
permissions. Furthermore it is advisable to disable automatic loading of any host driver on the
remote host which might work on USB devices to ensure that the devices are accessible by the
RDP client. If the setup was properly done on the remote host, plug/unplug events are visible on
the VBox.log file of the VM.
7.1.5 RDP authentication
For each virtual machine that is remotely accessible via RDP, you can individually determine if
and how client connections are authenticated. For this, use VBoxManage modifyvm command
with the --vrdeauthtype option; see chapter 8.7, VBoxManage modifyvm, page 109 for a general introduction. Three methods of authentication are available:
• The “null” method means that there is no authentication at all; any client can connect to
the VRDP server and thus the virtual machine. This is, of course, very insecure and only to
be recommended for private networks.
• The “external” method provides external authentication through a special authentication
library. VirtualBox ships with two such authentication libraries:
1. The default authentication library, VBoxAuth, authenticates against user credentials
of the hosts. Depending on the host platform, this means:
– On Linux hosts, VBoxAuth.so authenticates users against the host’s PAM system.
– On Windows hosts, VBoxAuth.dll authenticates users against the host’s WinLogon system.
– On Mac OS X hosts, VBoxAuth.dylib authenticates users against the host’s directory service.2
In other words, the “external” method per default performs authentication with the
user accounts that exist on the host system. Any user with valid authentication credentials is accepted, i.e. the username does not have to correspond to the user running
the VM.
2. An additional library called VBoxAuthSimple performs authentication against credentials configured in the “extradata” section of a virtual machine’s XML settings file. This
is probably the simplest way to get authentication that does not depend on a running
and supported guest (see below). The following steps are required:
a) Enable VBoxAuthSimple with the following command:
VBoxManage setproperty vrdeauthlibrary "VBoxAuthSimple"
b) To enable the library for a particular VM, you must then switch authentication to
external:
VBoxManage modifyvm <vm> --vrdeauthtype external
Replace <vm> with the VM name or UUID.
c) You will then need to configure users and passwords by writing items into the
machine’s extradata. Since the XML machine settings file, into whose “extradata”
section the password needs to be written, is a plain text file, VirtualBox uses
hashes to encrypt passwords. The following command must be used:
VBoxManage setextradata <vm> "VBoxAuthSimple/users/<user>" <hash>
Replace <vm> with the VM name or UUID, <user> with the user name who should
be allowed to log in and <hash> with the encrypted password. As an example,
to obtain the hash value for the password “secret”, you can use the following
command:
VBoxManage internalcommands passwordhash "secret"
This will print
2 Support
for Mac OS X was added in version 3.2.
94
7 Remote virtual machines
2bb80d537b1da3e38bd30361aa855686bde0eacd7162fef6a25fe97bf527a25b
You can then use VBoxManage setextradata to store this value in the machine’s
“extradata” section.
As example, combined together, to set the password for the user “john” and the
machine “My VM” to “secret”, use this command:
VBoxManage setextradata "My VM" "VBoxAuthSimple/users/john"
2bb80d537b1da3e38bd30361aa855686bde0eacd7162fef6a25fe97bf527a25b
• Finally, the “guest” authentication method performs authentication with a special component that comes with the Guest Additions; as a result, authentication is not performed on
the host, but with the guest user accounts.
This method is currently still in testing and not yet supported.
In addition to the methods described above, you can replace the default “external” authentication module with any other module. For this, VirtualBox provides a well-defined interface that
allows you to write your own authentication module. This is described in detail in the VirtualBox
Software Development Kit (SDK) reference; please see chapter 11, VirtualBox programming interfaces, page 163 for details.
7.1.6 RDP encryption
RDP features data stream encryption, which is based on the RC4 symmetric cipher (with keys up
to 128bit). The RC4 keys are being replaced in regular intervals (every 4096 packets).
RDP provides three different authentication methods:
1. Historically, RDP4 authentication was used, with which the RDP client does not perform
any checks in order to verify the identity of the server it connects to. Since user credentials can be obtained using a “man in the middle” (MITM) attack, RDP4 authentication is
insecure and should generally not be used.
2. RDP5.1 authentication employs a server certificate for which the client possesses the public
key. This way it is guaranteed that the server possess the corresponding private key. However, as this hard-coded private key became public some years ago, RDP5.1 authentication
is also insecure and cannot be recommended.
3. RDP5.2 authentication is based on TLS 1.0 with customer-supplied certificates. The server
supplies a certificate to the client which must be signed by a certificate authority (CA) that
the client trusts (for the Microsoft RDP Client 5.2, the CA has to be added to the Windows
Trusted Root Certificate Authorities database). VirtualBox allows you to supply your own
CA and server certificate and uses OpenSSL for encryption.
While VirtualBox supports all of the above, only RDP5.2 authentication should be used in
environments where security is a concern. As the client that connects to the server determines
what type of encryption will be used, with rdesktop, the Linux RDP viewer, use the -4 or -5
options.
7.1.7 Multiple connections to the VRDP server
The VRDP server of VirtualBox supports multiple simultaneous connections to the same running
VM from different clients. All connected clients see the same screen output and share a mouse
pointer and keyboard focus. This is similar to several people using the same computer at the
same time, taking turns at the keyboard.
The following command enables multiple connection mode:
VBoxManage modifyvm "VM name" --vrdemulticon on
95
7 Remote virtual machines
7.1.8 Multiple remote monitors
To access two or more remote VM displays you have to enable the VRDP multiconnection mode
(see chapter 7.1.7, Multiple connections to the VRDP server, page 95).
The RDP client can select the virtual monitor number to connect to using the domain logon
parameter (-d). If the parameter ends with @ followed by a number, VirtualBox interprets this
number as the screen index. The primary guest screen is selected with @1, the first secondary
screen is @2, etc.
The Microsoft RDP6 client does not let you specify a separate domain name. Instead, use
domain\username in the Username: field – for example, @2\name. name must be supplied, and
must be the name used to log in if the VRDP server is set up to require credentials. If it is not,
you may use any text as the username.
7.1.9 VRDP video redirection
Starting with VirtualBox 3.2, the VRDP server can redirect video streams from the guest to the
RDP client. Video frames are compressed using the JPEG algorithm allowing a higher compression ratio than standard RDP bitmap compression methods. It is possible to increase the
compression ratio by lowering the video quality.
The VRDP server automatically detects video streams in a guest as frequently updated rectangular areas. As a result, this method works with any guest operating system without having to
install additional software in the guest; in particular, the Guest Additions are not required.
On the client side, however, currently only the Windows 7 Remote Desktop Connection client
supports this feature. If a client does not support video redirection, the VRDP server falls back to
regular bitmap updates.
The following command enables video redirection:
VBoxManage modifyvm "VM name" --vrdevideochannel on
The quality of the video is defined as a value from 10 to 100 percent, representing a JPEG
compression level (where lower numbers mean lower quality but higher compression). The
quality can be changed using the following command:
VBoxManage modifyvm "VM name" --vrdevideochannelquality 75
7.1.10 VRDP customization
With VirtualBox 4.0 it is possible to disable display output, mouse and keyboard input, audio,
remote USB or clipboard individually in the VRDP server.
The following commands change corresponding server settings:
VBoxManage
VBoxManage
VBoxManage
VBoxManage
VBoxManage
VBoxManage
modifyvm
modifyvm
modifyvm
modifyvm
modifyvm
modifyvm
"VM
"VM
"VM
"VM
"VM
"VM
name"
name"
name"
name"
name"
name"
--vrdeproperty
--vrdeproperty
--vrdeproperty
--vrdeproperty
--vrdeproperty
--vrdeproperty
Client/DisableDisplay=1
Client/DisableInput=1
Client/DisableUSB=1
Client/DisableAudio=1
Client/DisableClipboard=1
Client/DisableUpstreamAudio=1
To reenable a feature use a similar command without the trailing 1. For example:
VBoxManage modifyvm "VM name" --vrdeproperty Client/DisableDisplay=
These properties were introduced with VirtualBox 3.2.10. However, in the 3.2.x series, it was
necessary to use the following commands to alter these settings instead:
VBoxManage
VBoxManage
VBoxManage
VBoxManage
VBoxManage
setextradata
setextradata
setextradata
setextradata
setextradata
"VM
"VM
"VM
"VM
"VM
name"
name"
name"
name"
name"
"VRDP/Feature/Client/DisableDisplay" 1
"VRDP/Feature/Client/DisableInput" 1
"VRDP/Feature/Client/DisableUSB" 1
"VRDP/Feature/Client/DisableAudio" 1
"VRDP/Feature/Client/DisableClipboard" 1
96
7 Remote virtual machines
To reenable a feature use a similar command without the trailing 1. For example:
VBoxManage setextradata "VM name" "VRDP/Feature/Client/DisableDisplay"
7.2 Teleporting
Starting with version 3.1, VirtualBox supports “teleporting” – that is, moving a virtual machine
over a network from one VirtualBox host to another, while the virtual machine is running. This
works regardless of the host operating system that is running on the hosts: you can teleport
virtual machines between Solaris and Mac hosts, for example.
Teleporting requires that a machine be currently running on one host, which is then called
the “source”. The host to which the virtual machine will be teleported will then be called the
“target”; the machine on the target is then configured to wait for the source to contact the target.
The machine’s running state will then be transferred from the source to the target with minimal
downtime.
Teleporting happens over any TCP/IP network; the source and the target only need to agree
on a TCP/IP port which is specified in the teleporting settings.
At this time, there are a few prerequisites for this to work, however:
1. On the target host, you must configure a virtual machine in VirtualBox with exactly the
same hardware settings as the machine on the source that you want to teleport. This does
not apply to settings which are merely descriptive, such as the VM name, but obviously for
teleporting to work, the target machine must have the same amount of memory and other
hardware settings. Otherwise teleporting will fail with an error message.
2. The two virtual machines on the source and the target must share the same storage (hard
disks as well as floppy and CD/DVD images). This means that they either use the same
iSCSI targets or that the storage resides somewhere on the network and both hosts have
access to it via NFS or SMB/CIFS.
This also means that neither the source nor the target machine can have any snapshots.
Then perform the following steps:
1. On the target host, configure the virtual machine to wait for a teleport request to arrive
when it is started, instead of actually attempting to start the machine. This is done with
the following VBoxManage command:
VBoxManage modifyvm <targetvmname> --teleporter on --teleporterport <port>
where <targetvmname> is the name of the virtual machine on the target host and <port>
is a TCP/IP port number to be used on both the source and the target hosts. For example,
use 6000. For details, see chapter 8.7.5, Teleporting settings, page 114.
2. Start the VM on the target host. You will see that instead of actually running, it will show
a progress dialog. indicating that it is waiting for a teleport request to arrive.
3. Start the machine on the source host as usual. When it is running and you want it to be
teleported, issue the following command on the source host:
VBoxManage controlvm <sourcevmname> teleport --host <targethost> --port <port>
where <sourcevmname> is the name of the virtual machine on the source host (the machine
that is currently running), <targethost> is the host or IP name of the target host on which
the machine is waiting for the teleport request, and <port> must be the same number as
specified in the command on the target host. For details, see chapter 8.11, VBoxManage
controlvm, page 117.
97
7 Remote virtual machines
For testing, you can also teleport machines on the same host; in that case, use “localhost” as
the hostname on both the source and the target host.
Note: In rare cases, if the CPUs of the source and the target are very different, teleporting can fail with an error message, or the target may hang. This may happen
especially if the VM is running application software that is highly optimized to run
on a particular CPU without correctly checking that certain CPU features are actually
present. VirtualBox filters what CPU capabilities are presented to the guest operating
system. Advanced users can attempt to restrict these virtual CPU capabilities with the
VBoxManage --modifyvm --cpuid command; see chapter 8.7.5, Teleporting settings,
page 114.
98
8 VBoxManage
8.1 Introduction
As briefly mentioned in chapter 1.13, Alternative front-ends, page 28, VBoxManage is the
command-line interface to VirtualBox. With it, you can completely control VirtualBox from the
command line of your host operating system. VBoxManage supports all the features that the
graphical user interface gives you access to, but it supports a lot more than that. It exposes really
all the features of the virtualization engine, even those that cannot (yet) be accessed from the
GUI.
You will need to use the command line if you want to
• use a different user interface than the main GUI (for example, VBoxSDL or the VBoxHeadless server);
• control some of the more advanced and experimental configuration settings for a VM.
There are two main things to keep in mind when using VBoxManage: First, VBoxManage must
always be used with a specific “subcommand”, such as “list” or “createvm” or “startvm”. All the
subcommands that VBoxManage supports are described in detail in chapter 8, VBoxManage, page
99.
Second, most of these subcommands require that you specify a particular virtual machine after
the subcommand. There are two ways you can do this:
• You can specify the VM name, as it is shown in the VirtualBox GUI. Note that if that name
contains spaces, then you must enclose the entire name in double quotes (as it is always
required with command line arguments that contain spaces).
For example:
VBoxManage startvm "Windows XP"
• You can specify the UUID, which is the internal unique identifier that VirtualBox uses to
refer to the virtual machine. Assuming that the aforementioned VM called “Windows XP”
has the UUID shown below, the following command has the same effect as the previous:
VBoxManage startvm 670e746d-abea-4ba6-ad02-2a3b043810a5
You can type VBoxManage list vms to have all currently registered VMs listed with all their
settings, including their respective names and UUIDs.
Some typical examples of how to control VirtualBox from the command line are listed below:
• To create a new virtual machine from the command line and immediately register it with
VirtualBox, use VBoxManage createvm with the --register option,1 like this:
$ VBoxManage createvm --name "SUSE 10.2" --register
VirtualBox Command Line Management Interface Version 4.0.8
(C) 2005-2011 Oracle Corporation
All rights reserved.
Virtual machine ’SUSE 10.2’ is created.
UUID: c89fc351-8ec6-4f02-a048-57f4d25288e5
Settings file: ’/home/username/.VirtualBox/Machines/SUSE 10.2/SUSE 10.2.xml’
1 For
details, see chapter 8.6, VBoxManage createvm, page 109.
99
8 VBoxManage
As can be seen from the above output, a new virtual machine has been created with a new
UUID and a new XML settings file.
• To show the configuration of a particular VM, use VBoxManage showvminfo; see chapter
8.4, VBoxManage showvminfo, page 107 for details and an example.
• To change settings while a VM is powered off, use VBoxManage modifyvm, e.g. as follows:
VBoxManage modifyvm "Windows XP" --memory "512MB"
For details, see chapter 8.7, VBoxManage modifyvm, page 109.
• To change the storage configuration (e.g. to add a storage controller and then a virtual
disk), use VBoxManage storagectl and VBoxManage storageattach; see chapter 8.17,
VBoxManage storagectl, page 121 and chapter 8.16, VBoxManage storageattach, page 119
for details.
• To control VM operation, use one of the following:
– To start a VM that is currently powered off, use VBoxManage startvm; see chapter
8.10, VBoxManage startvm, page 116 for details.
– To pause or save a VM that is currently running or change some of its settings, use
VBoxManage controlvm; see chapter 8.11, VBoxManage controlvm, page 117 for details.
8.2 Commands overview
When running VBoxManage without parameters or when supplying an invalid command line, the
below syntax diagram will be shown. Note that the output will be slightly different depending on
the host platform; when in doubt, check the output of VBoxManage for the commands available
on your particular host.
Usage:
VBoxManage [-v|--version]
print version number and exit
VBoxManage [-q|--nologo] ... suppress the logo
VBoxManage list [--long|-l] vms|runningvms|ostypes|hostdvds|hostfloppies|
bridgedifs|hostonlyifs|dhcpservers|hostinfo|
hostcpuids|hddbackends|hdds|dvds|floppies|
usbhost|usbfilters|systemproperties|extpacks
VBoxManage showvminfo
VBoxManage showvminfo
<uuid>|<name> [--details]
[--machinereadable]
<uuid>|<name> --log <idx>
VBoxManage registervm
<filename>
VBoxManage unregistervm
<uuid>|<name> [--delete]
VBoxManage createvm
--name <name>
[--ostype <ostype>]
[--register]
[--basefolder <path> | --settingsfile <path>]
[--uuid <uuid>]
VBoxManage modifyvm
<uuid|name>
[--name <name>]
[--ostype <ostype>]
[--memory <memorysize in MB>]
[--pagefusion on|off]
100
8 VBoxManage
[--vram <vramsize in MB>]
[--acpi on|off]
[--ioapic on|off]
[--pae on|off]
[--hpet on|off]
[--hwvirtex on|off]
[--hwvirtexexcl on|off]
[--nestedpaging on|off]
[--largepages on|off]
[--vtxvpid on|off]
[--synthcpu on|off]
[--cpuidset <leaf> <eax> <ebx> <ecx> <edx>]
[--cpuidremove <leaf>]
[--cpuidremoveall]
[--hardwareuuid <uuid>]
[--cpus <number>]
[--cpuhotplug on|off]
[--plugcpu <id>]
[--unplugcpu <id>]
[--cpuexecutioncap <1-100>]
[--rtcuseutc on|off]
[--monitorcount <number>]
[--accelerate3d on|off]
[--accelerate2dvideo on|off]
[--firmware bios|efi|efi32|efi64]
[--chipset ich9|piix3]
[--bioslogofadein on|off]
[--bioslogofadeout on|off]
[--bioslogodisplaytime <msec>]
[--bioslogoimagepath <imagepath>]
[--biosbootmenu disabled|menuonly|messageandmenu]
[--biossystemtimeoffset <msec>]
[--biospxedebug on|off]
[--boot<1-4> none|floppy|dvd|disk|net>]
[--nic<1-N> none|null|nat|bridged|intnet|hostonly|
vde]
[--nictype<1-N> Am79C970A|Am79C973|
82540EM|82543GC|82545EM|
virtio]
[--cableconnected<1-N> on|off]
[--nictrace<1-N> on|off]
[--nictracefile<1-N> <filename>]
[--nicspeed<1-N> <kbps>]
[--nicbootprio<1-N> <priority>]
[--bridgeadapter<1-N> none|<devicename>]
[--hostonlyadapter<1-N> none|<devicename>]
[--intnet<1-N> <network name>]
[--natnet<1-N> <network>|default]
[--vdenet<1-N> <network>|default]
[--natsettings<1-N> [<mtu>],[<socksnd>],
[<sockrcv>],[<tcpsnd>],
[<tcprcv>]]
[--natpf<1-N> [<rulename>],tcp|udp,[<hostip>],
<hostport>,[<guestip>],<guestport>]
[--natpf<1-N> delete <rulename>]
[--nattftpprefix<1-N> <prefix>]
[--nattftpfile<1-N> <file>]
[--nattftpserver<1-N> <ip>]
[--natdnspassdomain<1-N> on|off]
[--natdnsproxy<1-N> on|off]
[--natdnshostresolver<1-N> on|off]
[--nataliasmode<1-N> default|[log],[proxyonly],
[sameports]]
[--macaddress<1-N> auto|<mac>]
[--mouse ps2|usb|usbtablet
[--keyboard ps2|usb
[--uart<1-N> off|<I/O base> <IRQ>]
101
8 VBoxManage
[--uartmode<1-N> disconnected|
server <pipe>|
client <pipe>|
file <file>|
<devicename>]
[--guestmemoryballoon <balloonsize in MB>]
[--gueststatisticsinterval <seconds>]
[--audio none|null|dsound|solaudio|oss|alsa|pulse|
oss|pulse|coreaudio]
[--audiocontroller ac97|hda|sb16]
[--clipboard disabled|hosttoguest|guesttohost|
bidirectional]
[--vrde on|off]
[--vrdeextpack default|<name>
[--vrdeproperty <name=[value]>]
[--vrdeport <hostport>]
[--vrdeaddress <hostip>]
[--vrdeauthtype null|external|guest]
[--vrdeauthlibrary default|<name>
[--vrdemulticon on|off]
[--vrdereusecon on|off]
[--vrdevideochannel on|off]
[--vrdevideochannelquality <percent>]
[--usb on|off]
[--usbehci on|off]
[--snapshotfolder default|<path>]
[--teleporter on|off]
[--teleporterport <port>]
[--teleporteraddress <address|empty>
[--teleporterpassword <password>]
VBoxManage import
<ovf/ova> [--dry-run|-n] [more options]
(run with -n to have options displayed
for a particular OVF)
VBoxManage export
<machines> --output|-o <ovf/ova>
[--legacy09]
[--manifest]
[--vsys <number of virtual system>]
[--product <product name>]
[--producturl <product url>]
[--vendor <vendor name>]
[--vendorurl <vendor url>]
[--version <version info>]
[--eula <license text>]
[--eulafile <filename>]
VBoxManage startvm
<uuid>|<name>
[--type gui|sdl|headless]
VBoxManage controlvm
<uuid>|<name>
pause|resume|reset|poweroff|savestate|
acpipowerbutton|acpisleepbutton|
keyboardputscancode <hex> [<hex> ...]|
setlinkstate<1-N> on|off |
nic<1-N> null|nat|bridged|intnet|hostonly
[<devicename>] |
nictrace<1-N> on|off
nictracefile<1-N> <filename>
natpf<1-N> [<rulename>],tcp|udp,[<hostip>],
<hostport>,[<guestip>],<guestport>
natpf<1-N> delete <rulename>
guestmemoryballoon <balloonsize in MB>]
gueststatisticsinterval <seconds>]
usbattach <uuid>|<address> |
usbdetach <uuid>|<address> |
vrde on|off |
102
8 VBoxManage
vrdeport <port> |
vrdeproperty <name=[value]> |
vrdevideochannelquality <percent>
setvideomodehint <xres> <yres> <bpp> [display] |
screenshotpng <file> [display] |
setcredentials <username> <password> <domain>
[--allowlocallogon <yes|no>] |
teleport --host <name> --port <port>
[--maxdowntime <msec>] [--password password]
plugcpu <id>
unplugcpu <id>
cpuexecutioncap <1-100>
VBoxManage discardstate
<uuid>|<name>
VBoxManage adoptstate
<uuid>|<name> <state_file>
VBoxManage snapshot
<uuid>|<name>
take <name> [--description <desc>] [--pause] |
delete <uuid>|<name> |
restore <uuid>|<name> |
restorecurrent |
edit <uuid>|<name>|--current
[--name <name>]
[--description <desc>] |
showvminfo <uuid>|<name>
VBoxManage closemedium
disk|dvd|floppy <uuid>|<filename>
[--delete]
VBoxManage storageattach
<uuid|vmname>
--storagectl <name>
--port <number>
--device <number>
[--type dvddrive|hdd|fdd]
[--medium none|emptydrive|
<uuid>|<filename>|host:<drive>|iscsi]
[--mtype normal|writethrough|immutable|shareable|
readonly|multiattach]
[--comment <text>]
[--passthrough on|off]
[--bandwidthgroup <name>]
[--forceunmount]
[--server <name>|<ip>]
[--target <target>]
[--port <port>]
[--lun <lun>]
[--encodedlun <lun>]
[--username <username>]
[--password <password>]
[--intnet]
VBoxManage storagectl
<uuid|vmname>
--name <name>
[--add ide|sata|scsi|floppy|sas]
[--controller LSILogic|LSILogicSAS|BusLogic|
IntelAHCI|PIIX3|PIIX4|ICH6|I82078]
[--sataideemulation<1-4> <1-30>]
[--sataportcount <1-30>]
[--hostiocache on|off]
[--bootable on|off]
[--remove]
VBoxManage bandwidthctl
<uuid|vmname>
--name <name>
[--add disk|network]
[--limit <megabytes per second>
103
8 VBoxManage
[--delete]
VBoxManage showhdinfo
<uuid>|<filename>
VBoxManage createhd
--filename <filename>
--size <megabytes>|--sizebyte <bytes>
[--format VDI|VMDK|VHD] (default: VDI)
[--variant Standard,Fixed,Split2G,Stream,ESX]
VBoxManage modifyhd
<uuid>|<filename>
[--type normal|writethrough|immutable|shareable|
readonly|multiattach]
[--autoreset on|off]
[--compact]
[--resize <megabytes>|--resizebyte <bytes>]
VBoxManage clonehd
<uuid>|<filename> <outputfile>
[--format VDI|VMDK|VHD|RAW|<other>]
[--variant Standard,Fixed,Split2G,Stream,ESX]
[--existing]
VBoxManage convertfromraw
<filename> <outputfile>
[--format VDI|VMDK|VHD]
[--variant Standard,Fixed,Split2G,Stream,ESX]
stdin <outputfile> <bytes>
[--format VDI|VMDK|VHD]
[--variant Standard,Fixed,Split2G,Stream,ESX]
VBoxManage convertfromraw
VBoxManage getextradata
global|<uuid>|<name>
<key>|enumerate
VBoxManage setextradata
global|<uuid>|<name>
<key>
[<value>] (no value deletes key)
VBoxManage setproperty
machinefolder default|<folder> |
vrdeauthlibrary default|<library> |
websrvauthlibrary default|null|<library> |
vrdeextpack null|<library> |
loghistorycount <value>
VBoxManage usbfilter
add <index,0-N>
--target <uuid>|<name>|global
--name <string>
--action ignore|hold (global filters only)
[--active yes|no] (yes)
[--vendorid <XXXX>] (null)
[--productid <XXXX>] (null)
[--revision <IIFF>] (null)
[--manufacturer <string>] (null)
[--product <string>] (null)
[--remote yes|no] (null, VM filters only)
[--serialnumber <string>] (null)
[--maskedinterfaces <XXXXXXXX>]
VBoxManage usbfilter
modify <index,0-N>
--target <uuid>|<name>|global
[--name <string>]
[--action ignore|hold] (global filters only)
[--active yes|no]
[--vendorid <XXXX>|""]
[--productid <XXXX>|""]
[--revision <IIFF>|""]
[--manufacturer <string>|""]
[--product <string>|""]
[--remote yes|no] (null, VM filters only)
[--serialnumber <string>|""]
104
8 VBoxManage
[--maskedinterfaces <XXXXXXXX>]
VBoxManage usbfilter
remove <index,0-N>
--target <uuid>|<name>|global
VBoxManage sharedfolder
add <vmname>|<uuid>
--name <name> --hostpath <hostpath>
[--transient] [--readonly] [--automount]
VBoxManage sharedfolder
remove <vmname>|<uuid>
--name <name> [--transient]
VBoxManage guestproperty
get <vmname>|<uuid>
<property> [--verbose]
VBoxManage guestproperty
set <vmname>|<uuid>
<property> [<value> [--flags <flags>]]
VBoxManage guestproperty
enumerate <vmname>|<uuid>
[--patterns <patterns>]
VBoxManage guestproperty
wait <vmname>|<uuid> <patterns>
[--timeout <msec>] [--fail-on-timeout]
VBoxManage guestcontrol
exec[ute] <vmname>|<uuid>
<path to program>
--username <name> --password <password>
[--arguments "<arguments>"]
[--environment "<NAME>=<VALUE> [<NAME>=<VALUE>]"]
[--flags <flags>] [--timeout <msec>]
[--verbose] [--wait-for exit,stdout,stderr||]
copyto|cp <vmname>|<uuid>
<source on host> <destination on guest>
--username <name> --password <password>
[--dryrun] [--follow] [--recursive] [--verbose]
createdir[ectory]|mkdir|md <vmname>|<uuid>
<directory to create on guest>
--username <name> --password <password>
[--parents] [--mode <mode>] [--verbose]
updateadditions <vmname>|<uuid>
[--source <guest additions .ISO>] [--verbose]
VBoxManage debugvm
<uuid>|<name>
dumpguestcore --filename <name> |
info <item> [args] |
injectnmi |
osdetect |
osinfo |
getregisters [--cpu <id>] <reg>|all ... |
setregisters [--cpu <id>] <reg>=<value> ... |
statistics [--reset] [--pattern <pattern>]
[--descriptions]
VBoxManage metrics
list [*|host|<vmname> [<metric_list>]]
(comma-separated)
VBoxManage metrics
setup
[--period <seconds>] (default: 1)
[--samples <count>] (default: 1)
[--list]
[*|host|<vmname> [<metric_list>]]
VBoxManage metrics
query [*|host|<vmname> [<metric_list>]]
105
8 VBoxManage
VBoxManage metrics
enable
[--list]
[*|host|<vmname> [<metric_list>]]
VBoxManage metrics
disable
[--list]
[*|host|<vmname> [<metric_list>]]
VBoxManage metrics
collect
[--period <seconds>] (default: 1)
[--samples <count>] (default: 1)
[--list]
[--detach]
[*|host|<vmname> [<metric_list>]]
VBoxManage hostonlyif
ipconfig <name>
[--dhcp |
--ip<ipv4> [--netmask<ipv4> (def: 255.255.255.0)] |
--ipv6<ipv6> [--netmasklengthv6<length> (def: 64)]]
create |
remove <name>
VBoxManage dhcpserver
add|modify --netname <network_name> |
--ifname <hostonly_if_name>
[--ip <ip_address>
--netmask <network_mask>
--lowerip <lower_ip>
--upperip <upper_ip>]
[--enable | --disable]
VBoxManage dhcpserver
remove --netname <network_name> |
--ifname <hostonly_if_name>
VBoxManage extpack
install <tarball> |
uninstall [--force] <name> |
cleanup
Each time VBoxManage is invoked, only one command can be executed. However, a command
might support several subcommands which then can be invoked in one single call. The following
sections provide detailed reference information on the different commands.
8.3 VBoxManage list
The list command gives relevant information about your system and information about
VirtualBox’s current settings.
The following subcommands are available with VBoxManage list:
• vms lists all virtual machines currently registered with VirtualBox. By default this displays
a compact list with each VM’s name and UUID; if you also specify --long or -l, this will
be a detailed list as with the showvminfo command (see below).
• runningvms lists all currently running virtual machines by their unique identifiers (UUIDs)
in the same format as with vms.
• ostypes lists all guest operating systems presently known to VirtualBox, along with the
identifiers used to refer to them with the modifyvm command.
• hostdvds, hostfloppies, respectively, list DVD, floppy, bridged networking and host-only
networking interfaces on the host, along with the name used to access them from within
VirtualBox.
106
8 VBoxManage
• bridgedifs, hostonlyifs and dhcpservers, respectively, list bridged network interfaces,
host-only network interfaces and DHCP servers currently available on the host. Please see
chapter 6, Virtual networking, page 83 for details on these.
• hostinfo displays information about the host system, such as CPUs, memory size and
operating system version.
• hostcpuids dumps the CPUID parameters for the host CPUs. This can be used for a more
fine grained analyis of the host’s virtualization capabilities.
• hddbackends lists all known virtual disk back-ends of VirtualBox. For each such format
(such as VDI, VMDK or RAW), this lists the back-end’s capabilities and configuration.
• hdds, dvds and floppies all give you information about virtual disk images currently in
use by VirtualBox, including all their settings, the unique identifiers (UUIDs) associated
with them by VirtualBox and all files associated with them. This is the command-line
equivalent of the Virtual Media Manager; see chapter 5.3, The Virtual Media Manager, page
74.
• usbhost supplies information about USB devices attached to the host, notably information
useful for constructing USB filters and whether they are currently in use by the host.
• usbfilters lists all global USB filters registered with VirtualBox – that is, filters for devices
which are accessible to all virtual machines – and displays the filter parameters.
• systemproperties displays some global VirtualBox settings, such as minimum and maximum guest RAM and virtual hard disk size, folder settings and the current authentication
library in use.
• extpacks displays all VirtualBox extension packs currently installed; see chapter 1.5, Installing VirtualBox and extension packs, page 14 and chapter 8.34, VBoxManage extpack,
page 133 for more information.
8.4 VBoxManage showvminfo
The showvminfo command shows information about a particular virtual machine. This is the
same information as VBoxManage list vms --long would show for all virtual machines.
You will get information similar to the following:
$ VBoxManage showvminfo "Windows XP"
VirtualBox Command Line Management Interface Version 4.0.8
(C) 2005-2011 Oracle Corporation
All rights reserved.
Name:
Guest OS:
UUID:
Config file:
Memory size:
VRAM size:
Number of CPUs:
Synthetic Cpu:
Boot menu mode:
Boot Device (1):
Boot Device (2):
Boot Device (3):
Boot Device (4):
ACPI:
IOAPIC:
PAE:
Windows XP
Other/Unknown
1bf3464d-57c6-4d49-92a9-a5cc3816b7e7
/home/username/.VirtualBox/Machines/Windows XP/Windows XP.xml
512MB
12MB
2
off
message and menu
DVD
HardDisk
Not Assigned
Not Assigned
on
on
on
107
8 VBoxManage
Time offset:
0 ms
Hardw. virt.ext: on
Hardw. virt.ext exclusive: on
Nested Paging:
on
VT-x VPID:
off
State:
powered off (since 2009-10-20T14:52:19.000000000)
Monitor count:
1
3D Acceleration: off
2D Video Acceleration: off
Teleporter Enabled: off
Teleporter Port: 0
Teleporter Address:
Teleporter Password:
Storage Controller
(0): IDE Controller
Storage Controller Type (0): PIIX4
Storage Controller
(1): Floppy Controller 1
Storage Controller Type (1): I82078
IDE Controller (0, 0): /home/user/windows.vdi (UUID: 46f6e53a-4557-460a-9b95-68b0f17d744b)
IDE Controller (0, 1): /home/user/openbsd-cd46.iso (UUID: 4335e162-59d3-4512-91d5-b63e94eebe0b)
Floppy Controller 1 (0, 0): /home/user/floppy.img (UUID: 62ac6ccb-df36-42f2-972e-22f836368137)
NIC 1:
disabled
NIC 2:
disabled
NIC 3:
disabled
NIC 4:
disabled
NIC 5:
disabled
NIC 6:
disabled
NIC 7:
disabled
NIC 8:
disabled
UART 1:
disabled
UART 2:
disabled
Audio:
disabled (Driver: Unknown)
Clipboard Mode: Bidirectional
VRDE:
disabled
USB:
disabled
USB Device Filters:
<none>
Shared folders:
<none>
Statistics update:
disabled
8.5 VBoxManage registervm / unregistervm
The registervm command allows you to import a virtual machine definition in an XML file into
VirtualBox. The machine must not conflict with one already registered in VirtualBox and it may
not have any hard or removable disks attached. It is advisable to place the definition file in the
machines folder before registering it.
Note: When creating a new virtual machine with VBoxManage createvm (see below),
you can directly specify the --register option to avoid having to register it separately.
The unregistervm command unregisters a virtual machine. If --delete is also specified, the
following files will automatically be deleted as well:
1. all hard disk image files, including differencing files, which are used by the machine and
not shared with other machines;
2. saved state files that the machine created, if any (one if the machine was in “saved” state
and one for each online snapshot);
108
8 VBoxManage
3. the machine XML file and its backups;
4. the machine log files, if any;
5. the machine directory, if it is empty after having deleted all the above.
8.6 VBoxManage createvm
This command creates a new XML virtual machine definition file.
The --name <name> parameter is required and must specify the name of the machine. Since
this name is used by default as the file name of the settings file (with the extension .xml) and
the machine folder (a subfolder of the .VirtualBox/Machines folder), it must conform to your
host operating system’s requirements for file name specifications. If the VM is later renamed, the
file and folder names will change automatically.
However, if the --basefolder <path> option is used, the machine folder will be named
<path>. In this case, the names of the file and the folder will not change if the virtual machine
is renamed.
By default, this command only creates the XML file without automatically registering the VM
with your VirtualBox installation. To register the VM instantly, use the optional --register
option, or run VBoxManage registervm separately afterwards.
8.7 VBoxManage modifyvm
This command changes the properties of a registered virtual machine which is not running.
Most of the properties that this command makes available correspond to the VM settings that
VirtualBox graphical user interface displays in each VM’s “Settings” dialog; these were described
in chapter 3, Configuring virtual machines, page 39. Some of the more advanced settings, however, are only available through the VBoxManage interface.
These commands require that the machine is powered off (neither running nor in “saved”
state). Some machine settings can also be changed while a machine is running; those settings
will then have a corresponding subcommand with the VBoxManage controlvm subcommand
(see chapter 8.11, VBoxManage controlvm, page 117).
8.7.1 General settings
The following general settings are available through VBoxManage modifyvm:
• --name <name>: This changes the VM’s name and possibly renames the internal virtual
machine files, as described with VBoxManage createvm above.
• --ostype <ostype>: This specifies what guest operating system is supposed to run in the
VM. To learn about the various identifiers that can be used here, use VBoxManage list
ostypes.
• --memory <memorysize>: This sets the amount of RAM, in MB, that the virtual machine
should allocate for itself from the host. See the remarks in chapter 1.7, Creating your first
virtual machine, page 16 for more information.
• --vram <vramsize>: This sets the amount of RAM that the virtual graphics card should
have. See chapter 3.5, Display settings, page 45 for details.
• --acpi on|off; --ioapic on|off: These two determine whether the VM should have
ACPI and I/O APIC support, respectively; see chapter 3.4.1, “Motherboard” tab, page 43 for
details.
109
8 VBoxManage
• --hardwareuuid <uuid>: The UUID presented to the guest via memory tables
(DMI/SMBIOS), hardware and guest properties. By default this is the same as the VM
uuid. Useful when cloning a VM. Teleporting takes care of this automatically.
• --cpus <cpucount>: This sets the number of virtual CPUs for the virtual machine (see
chapter 3.4.2, “Processor” tab, page 44). If CPU hot-plugging is enabled (see below), this
then sets the maximum number of virtual CPUs that can be plugged into the virtual machines.
• --rtcuseutc on|off: This option lets the real-time clock (RTC) operate in UTC time (see
chapter 3.4.1, “Motherboard” tab, page 43).
• --cpuhotplug on|off: This enables CPU hot-plugging. When enabled, virtual CPUs can
be added to and removed from a virtual machine while it is running. See chapter 9.5, CPU
hot-plugging, page 140 for more information.
• --plugcpu|unplugcpu <id>: If CPU hot-plugging is enabled (see above), this adds a
virtual CPU to the virtual machines (or removes one). <id> specifies the index of the
virtual CPU to be added or removed and must be a number from 0 to the maximum no. of
CPUs configured with the --cpus option. CPU 0 can never be removed.
• --cpuexecutioncap <1-100>: This setting controls how much cpu time a virtual CPU can
use. A value of 50 implies a single virtual CPU can use up to 50% of a single host CPU.
• --synthcpu on|off: This setting determines whether VirtualBox will expose a synthetic
CPU to the guest to allow live migration between host systems that differ significantly.
• --pae on|off: This enables/disables PAE (see chapter 3.4.2, “Processor” tab, page 44).
• --hpet on|off: This enables/disables a High Precision Event Timer (HPET) which can
replace the legacy system timers. This is turned off by default. Note that Windows supports
a HPET only from Vista onwards.
• --hwvirtex on|off: This enables or disables the use of hardware virtualization extensions (Intel VT-x or AMD-V) in the processor of your host system; see chapter 10.3, Hardware vs. software virtualization, page 157.
• --hwvirtexexcl on|off: This specifies whether VirtualBox will make exclusive use of
the hardware virtualization extensions (Intel VT-x or AMD-V) in the processor of your host
system; see chapter 10.3, Hardware vs. software virtualization, page 157. If you wish to
simultaneously share these extensions with other hypervisors, then you must disable this
setting. Doing so has negative performance implications.
• --nestedpaging on|off: If hardware virtualization is enabled, this additional setting
enables or disables the use of the nested paging feature in the processor of your host
system; see chapter 10.3, Hardware vs. software virtualization, page 157.
• --largepages on|off: If hardware virtualization and nested paging are enabled, for Intel
VT-x only, an additional performance improvement of up to 5% can be obtained by enabling
this setting. This causes the hypervisor to use large pages to reduce TLB use and overhead.
• --vtxvpid on|off: If hardware virtualization is enabled, for Intel VT-x only, this additional setting enables or disables the use of the tagged TLB (VPID) feature in the processor
of your host system; see chapter 10.3, Hardware vs. software virtualization, page 157.
• --accelerate3d on|off: This enables, if the Guest Additions are installed, whether hardware 3D acceleration should be available; see chapter 4.4.1, Hardware 3D acceleration
(OpenGL and Direct3D 8/9), page 64.
110
8 VBoxManage
• You can influence the BIOS logo that is displayed when a virtual machine starts up with a
number of settings. Per default, a VirtualBox logo is displayed.
With --bioslogofadein on|off and --bioslogofadeout on|off, you can determine
whether the logo should fade in and out, respectively.
With --bioslogodisplaytime <msec> you can set how long the logo should be visible,
in milliseconds.
With --bioslogoimagepath <imagepath> you can, if you are so inclined, replace the
image that is shown, with your own logo. The image must be an uncompressed 256 color
BMP file.
• --biosbootmenu disabled|menuonly|messageandmenu: This specifies whether the
BIOS allows the user to select a temporary boot device. menuonly suppresses the message,
but the user can still press F12 to select a temporary boot device.
• --boot<1-4> none|floppy|dvd|disk|net: This specifies the boot order for the virtual
machine. There are four “slots”, which the VM will try to access from 1 to 4, and for each
of which you can set a device that the VM should attempt to boot from.
• --snapshotfolder default|<path>: This allows you to specify the folder in which snapshots will be kept for a virtual machine.
• --firmware efi|bios: Specifies which firmware is used to boot particular virtual machine: EFI or BIOS. Use EFI only if your fully understand what you’re doing.
• --guestmemoryballoon <size> sets the default size of the guest memory balloon, that is,
memory allocated by the VirtualBox Guest Additions from the guest operating system and
returned to the hypervisor for re-use by other virtual machines. <size> must be specified
in megabytes. The default size is 0 megabytes. For details, see chapter 4.8.1, Memory
ballooning, page 69.
8.7.2 Networking settings
The following networking settings are available through VBoxManage modifyvm. With all these
settings, the decimal number directly following the option name (“1-N” in the list below) specifies
the virtual network adapter whose settings should be changed.
• --nic<1-N> none|null|nat|bridged|intnet|hostonly|vde: With this, you can set,
for each of the VM’s virtual network cards, what type of networking should be available.
They can be not present (none), not connected to the host (null), use network address
translation (nat), bridged networking (bridged) or communicate with other virtual machines using internal networking (intnet), host-only networking (hostonly) or on Linux
and FreeBSD hosts a Virtual Distributed Ethernet switch (vde). These options correspond
to the modes which are described in detail in chapter 6.2, Introduction to networking modes,
page 84.
• --nictype<1-N> Am79C970A|Am79C973|82540EM|82543GC|82545EM|virtio: This allows you, for each of the VM’s virtual network cards, to specify which networking hardware
VirtualBox presents to the guest; see chapter 6.1, Virtual networking hardware, page 83.
• --cableconnected<1-N> on|off: This allows you to temporarily disconnect a virtual
network interface, as if a network cable had been pulled from a real network card. This
might be useful for resetting certain software components in the VM.
• With the “nictrace” options, you can optionally trace network traffic by dumping it to a file,
for debugging purposes.
111
8 VBoxManage
With --nictrace<1-N> on|off, you can enable network tracing for a particular virtual
network card.
If enabled, you must specify with --nictracefile<1-N> <filename> what file the trace
should be logged to.
• --bridgeadapter<1-N> none|<devicename>: If bridged networking has been enabled
for a virtual network card (see the --nic option above; otherwise this setting has no
effect), use this option to specify which host interface the given virtual network interface
will use. For details, please see chapter 6.4, Bridged networking, page 87.
• --hostonlyadapter<1-N> none|<devicename>: If host-only networking has been enabled for a virtual network card (see the –nic option above; otherwise this setting has no
effect), use this option to specify which host-only networking interface the given virtual
network interface will use. For details, please see chapter 6.6, Host-only networking, page
88.
• --intnet<1-N> network: If internal networking has been enabled for a virtual network
card (see the --nic option above; otherwise this setting has no effect), use this option to
specify the name of the internal network (see chapter 6.5, Internal networking, page 88).
• --macaddress<1-N> auto|<mac>: With this option you can set the MAC address of the
virtual network card. Normally, each virtual network card is assigned a random address by
VirtualBox at VM creation.
• --vdenet<1-N> network: If Virtual Distributed Ethernet is available on the host and has
been enabled for a virtual network card (see the --nic option above; otherwise this setting
has no effect). Use this option to specify the name of a VDE network for the interface
to connect to (see chapter 6.2, Introduction to networking modes, page 84 and the VDE
documentation).
8.7.2.1 NAT Networking settings.
The following NAT networking settings are available through VBoxManage modifyvm. With all
these settings, the decimal number directly following the option name (“1-N” in the list below)
specifies the virtual network adapter whose settings should be changed.
• --natpf<1-N> [<name>],tcp|udp,[<hostip>],<hostport>,[<guestip>], <guestport>:
This option defines a NAT port-forwarding rule (please see chapter 6.3.1, Configuring port
forwarding with NAT, page 85 for details).
• --natpf<1-N> delete <name>: This option deletes a NAT port-forwarding rule (please
see chapter 6.3.1, Configuring port forwarding with NAT, page 85 for details).
• --nattftpprefix<1-N> <prefix>: This option defines a prefix for the built-in TFTP
server, i.e. where the boot file is located (please see chapter 6.3.2, PXE booting with NAT,
page 86 and chapter 9.10.2, Configuring the boot server (next server) of a NAT network
interface, page 146 for details).
• --nattftpfile<1-N> <bootfile>: This option defines the TFT boot file (please see chapter 9.10.2, Configuring the boot server (next server) of a NAT network interface, page 146 for
details).
• --nattftpserver<1-N> <tftpserver>: This option defines the TFTP server address to
boot from (please see chapter 9.10.2, Configuring the boot server (next server) of a NAT
network interface, page 146 for details).
• --natdnspassdomain<1-N> on|off: This option specifies whether the built-in DHCP
server passes the domain name for network name resolution.
112
8 VBoxManage
• --natdnsproxy<1-N> on|off: This option makes the NAT engine proxy all guest DNS
requests to the host’s DNS servers (please see chapter 9.10.5, Enabling DNS proxy in NAT
mode, page 146 for details).
• --natdnshostresolver<1-N> on|off: This option makes the NAT engine use the host’s
resolver mechanisms to handle DNS requests (please see chapter 9.10.5, Enabling DNS
proxy in NAT mode, page 146 for details).
• --natnatsettings<1-N> [<mtu>],[<socksnd>],[<sockrcv>],[<tcpsnd>], [<tcprcv>]:
This option controls several NAT settings (please see chapter 9.10.3, Tuning TCP/IP buffers
for NAT, page 146 for details).
• --nataliasmode<1-N> default|[log],[proxyonly],[sameports]: This option defines behaviour of NAT engine core: log - enables logging, proxyonly - switches of aliasing
mode makes NAT transparent, sameports enforces NAT engine to send packets via the same
port as they originated on, default - disable all mentioned modes above . (please see chapter 9.10.7, Configuring aliasing of the NAT engine, page 147 for details).
8.7.3 Serial port, audio, clipboard, remote desktop and USB settings
The following other hardware settings are available through VBoxManage modifyvm:
• --uart<1-N> off|<I/O base> <IRQ>: With this option you can configure virtual serial
ports for the VM; see chapter 3.9, Serial ports, page 48 for an introduction.
• --uartmode<1-N> <arg>: This setting controls how VirtualBox connects a given virtual
serial port (previously configured with the --uartX setting, see above) to the host on which
the virtual machine is running. As described in detail in chapter 3.9, Serial ports, page 48,
for each such port, you can specify <arg> as one of the following options:
– disconnected: Even though the serial port is shown to the guest, it has no “other
end” – like a real COM port without a cable.
– server <pipename>: On a Windows host, this tells VirtualBox to create a named
pipe on the host named <pipename> and connect the virtual serial device to it. Note
that Windows requires that the name of a named pipe begin with \\.\pipe\.
On a Linux host, instead of a named pipe, a local domain socket is used.
– client <pipename>: This operates just like server ..., except that the pipe (or
local domain socket) is not created by VirtualBox, but assumed to exist already.
– <devicename>: If, instead of the above, the device name of a physical hardware serial
port of the host is specified, the virtual serial port is connected to that hardware port.
On a Windows host, the device name will be a COM port such as COM1; on a Linux
host, the device name will look like /dev/ttyS0. This allows you to “wire” a real
serial port to a virtual machine.
• --audio none|null|oss: With this option, you can set whether the VM should have
audio support.
• --clipboard disabled|hosttoguest|guesttohost|bidirectional: With this setting, you can select whether the guest operating system’s clipboard should be shared with
the host; see chapter 3.3, General settings, page 42. This requires that the Guest Additions
be installed in the virtual machine.
• --monitorcount <count>: This enables multi-monitor support; see chapter 3.5, Display
settings, page 45.
• --usb on|off: This option enables or disables the VM’s virtual USB controller; see chapter
3.10.1, USB settings, page 49 for details.
113
8 VBoxManage
• --usbehci on|off: This option enables or disables the VM’s virtual USB 2.0 controller;
see chapter 3.10.1, USB settings, page 49 for details.
8.7.4 Remote machine settings
The following settings that affect remote machine behavior are available through VBoxManage
modifyvm:
• --vrde on|off: With the VirtualBox graphical user interface, this enables or disables
the VirtualBox remote desktop extension (VRDE) server. Note that if you are using
VBoxHeadless (see chapter 7.1.2, VBoxHeadless, the remote desktop server, page 91), VRDE
is enabled by default.
• --vrdeport default|<ports>: A port or a range of ports the VRDE server can bind to;
“default” or “0” means port 3389, the standard port for RDP. You can specify a commaseparated list of ports or ranges of ports. Use a dash between two port numbers to specify a range. The VRDE server will bind to one of available ports from the specified list.
Only one machine can use a given port at a time. For example, the option --vrdeport
5000,5010-5012 will tell the server to bind to one of following ports: 5000, 5010, 5011
or 5012.
• --vrdeaddress <IP address>: The IP address of the host network interface the VRDE
server will bind to. If specified, the server will accept connections only on the specified
host network interface.
• --vrdeauthtype null|external|guest: This allows you to choose whether and how
authorization will be performed; see chapter 7.1.5, RDP authentication, page 94 for details.
• --vrdemulticon on|off: This enables multiple connections to the same VRDE server, if
the server supports this feature; see chapter 7.1.7, Multiple connections to the VRDP server,
page 95.
• --vrdereusecon on|off: This specifies the VRDE server behavior when multiple connections are disabled. When this option is enabled, the server will allow a new client to
connect and will drop the existing connection. When this option is disabled (this is the default setting), a new connection will not be accepted if there is already a client connected
to the server.
• --vrdevideochannel on|off: This enables video redirection, if it is supported by the
VRDE server; see chapter 7.1.9, VRDP video redirection, page 96.
• --vrdevideochannelquality <percent>: Sets the image quality for video redirection;
see chapter 7.1.9, VRDP video redirection, page 96.
8.7.5 Teleporting settings
With the following commands for VBoxManage modifyvm you can configure a machine to be a
target for teleporting. See chapter 7.2, Teleporting, page 97 for an introduction.
• --teleporter on|off: With this setting you turn on or off whether a machine waits for
a teleporting request to come in on the network when it is started. If “on”, when the
machine is started, it does not boot the virtual machine as it would normally; instead, it
then waits for a teleporting request to come in on the port and address listed with the next
two parameters.
114
8 VBoxManage
• --teleporterport <port>, --teleporteraddress <address>: these must be used
with –teleporter and tell the virtual machine on which port and address it should listen
for a teleporting request from another virtual machine. <port> can be any free TCP/IP
port number (e.g. 6000); <address> can be any IP address or hostname and specifies the
TCP/IP socket to bind to. The default is “0.0.0.0”, which means any address.
• --teleporterpassword <password>: if this optional argument is given, then the teleporting request will only succeed if the source machine specifies the same password as the
one given with this command.
Note: Currently, the password is stored without encryption (i.e. in clear text) in the
XML machine configuration file.
• --cpuid <leaf> <eax> <ebx> <ecx> <edx>: Advanced users can use this command before a teleporting operation to restrict the virtual CPU capabilities that VirtualBox presents
to the guest operating system. This must be run on both the source and the target machines
involved in the teleporting and will then modify what the guest sees when it executes the
CPUID machine instruction. This might help with misbehaving applications that wrongly
assume that certain CPU capabilities are present. The meaning of the parameters is hardware dependent; please refer to the AMD or Intel processor manuals.
8.8 VBoxManage import
This command imports a virtual appliance in OVF format by copying the virtual disk images
and creating virtual machines in VirtualBox. See chapter 1.12, Importing and exporting virtual
machines, page 26 for an introduction to appliances.
The import subcommand takes at least the path name of an OVF file as input and expects
the disk images, if needed, in the same directory as the OVF file. A lot of additional commandline options are supported to control in detail what is being imported and modify the import
parameters, but the details depend on the content of the OVF file.
It is therefore recommended to first run the import subcommand with the --dry-run or -n
option. This will then print a description of the appliance’s contents to the screen how it would
be imported into VirtualBox, together with the optional command-line options to influence the
import behavior.
As an example, here is the screen output with a sample appliance containing a Windows XP
guest:
VBoxManage import WindowsXp.ovf --dry-run
Interpreting WindowsXp.ovf...
OK.
Virtual system 0:
0: Suggested OS type: "WindowsXP"
(change with "--vsys 0 --ostype <type>"; use "list ostypes" to list all)
1: Suggested VM name "Windows XP Professional_1"
(change with "--vsys 0 --vmname <name>")
3: Number of CPUs: 1
(change with "--vsys 0 --cpus <n>")
4: Guest memory: 956 MB (change with "--vsys 0 --memory <MB>")
5: Sound card (appliance expects "ensoniq1371", can change on import)
(disable with "--vsys 0 --unit 5 --ignore")
6: USB controller
(disable with "--vsys 0 --unit 6 --ignore")
7: Network adapter: orig bridged, config 2, extra type=bridged
8: Floppy
(disable with "--vsys 0 --unit 8 --ignore")
9: SCSI controller, type BusLogic
115
8 VBoxManage
(change with "--vsys 0 --unit 9 --scsitype {BusLogic|LsiLogic}";
disable with "--vsys 0 --unit 9 --ignore")
10: IDE controller, type PIIX4
(disable with "--vsys 0 --unit 10 --ignore")
11: Hard disk image: source image=WindowsXp.vmdk,
target path=/home/user/disks/WindowsXp.vmdk, controller=9;channel=0
(change controller with "--vsys 0 --unit 11 --controller <id>";
disable with "--vsys 0 --unit 11 --ignore")
As you can see, the individual configuration items are numbered, and depending on their type
support different command-line options. The import subcommand can be directed to ignore
many such items with a --vsys X --unit Y --ignore option, where X is the number of the
virtual system (zero unless there are several virtual system descriptions in the appliance) and Y
the item number, as printed on the screen.
In the above example, Item #1 specifies the name of the target machine in VirtualBox. Items
#9 and #10 specify hard disk controllers, respectively. Item #11 describes a hard disk image;
in this case, the additional --controller option indicates which item the disk image should be
connected to, with the default coming from the OVF file.
You can combine several items for the same virtual system behind the same --vsys option. For
example, to import a machine as described in the OVF, but without the sound card and without
the USB controller, and with the disk image connected to the IDE controller instead of the SCSI
controller, use this:
VBoxManage import WindowsXp.ovf
--vsys 0 --unit 5 --ignore --unit 6 --ignore --unit 11 --controller 10
8.9 VBoxManage export
This command exports one or more virtual machines from VirtualBox into a virtual appliance in
OVF format, including copying their virtual disk images to compressed VMDK. See chapter 1.12,
Importing and exporting virtual machines, page 26 for an introduction to appliances.
The export command is simple to use: list the machine (or the machines) that you would like
to export to the same OVF file and specify the target OVF file after an additional --output or -o
option. Note that the directory of the target OVF file will also receive the exported disk images in
the compressed VMDK format (regardless of the original format) and should have enough disk
space left for them.
Beside a simple export of a given virtual machine, you can append several product information
to the appliance file. Use --product, --producturl, --vendor, --vendorurl and --version
to specify this additional information. For legal reasons you may add a license text or the content
of a license file by using the --eula and --eulafile option respectively. As with OVF import,
you must use the --vsys X option to direct the previously mentioned options to the correct
virtual machine.
For virtualization products which aren’t fully compatible with the OVF standard 1.0 you can
enable a OVF 0.9 legacy mode with the --legacy09 option.
8.10 VBoxManage startvm
This command starts a virtual machine that is currently in the “Powered off” or “Saved” states.
Note: This is provided for backwards compatibility only. We recommend to start virtual
machines directly by running the respective front-end, as you might otherwise miss important error and state information that VirtualBox may display on the console. This
is especially important for front-ends other than VirtualBox, our graphical user interface, because those cannot display error messages in a popup window. See chapter
7.1.2, VBoxHeadless, the remote desktop server, page 91 for more information.
116
8 VBoxManage
The optional --type specifier determines whether the machine will be started in a window
(GUI mode, which is the default) or whether the output should go through VBoxHeadless, with
VRDE enabled or not; see chapter 7.1.2, VBoxHeadless, the remote desktop server, page 91 for
more information. The list of types is subject to change, and it’s not guaranteed that all types are
accepted by any product variant.
The following values are allowed:
gui Starts a VM showing a GUI window. This is the default.
headless Starts a VM without a window for remote display only.
8.11 VBoxManage controlvm
The controlvm subcommand allows you to change the state of a virtual machine that is currently
running. The following can be specified:
• VBoxManage controlvm <vm> pause temporarily puts a virtual machine on hold, without
changing its state for good. The VM window will be painted in gray to indicate that the
VM is currently paused. (This is equivalent to selecting the “Pause” item in the “Machine”
menu of the GUI.)
• Use VBoxManage controlvm <vm> resume to undo a previous pause command. (This is
equivalent to selecting the “Resume” item in the “Machine” menu of the GUI.)
• VBoxManage controlvm <vm> reset has the same effect on a virtual machine as pressing
the “Reset” button on a real computer: a cold reboot of the virtual machine, which will
restart and boot the guest operating system again immediately. The state of the VM is not
saved beforehand, and data may be lost. (This is equivalent to selecting the “Reset” item
in the “Machine” menu of the GUI.)
• VBoxManage controlvm <vm> poweroff has the same effect on a virtual machine as
pulling the power cable on a real computer. Again, the state of the VM is not saved beforehand, and data may be lost. (This is equivalent to selecting the “Close” item in the
“Machine” menu of the GUI or pressing the window’s close button, and then selecting
“Power off the machine” in the dialog.)
After this, the VM’s state will be “Powered off”. From there, it can be started again; see
chapter 8.10, VBoxManage startvm, page 116.
• VBoxManage controlvm <vm> savestate will save the current state of the VM to disk
and then stop the VM. (This is equivalent to selecting the “Close” item in the “Machine”
menu of the GUI or pressing the window’s close button, and then selecting “Save the machine state” in the dialog.)
After this, the VM’s state will be “Saved”. From there, it can be started again; see chapter
8.10, VBoxManage startvm, page 116.
• VBoxManage controlvm <vm> teleport --hostname <name> --port <port> [--password
<password>] makes the machine the source of a teleporting operation and initiates a teleport to the given target. See chapter 7.2, Teleporting, page 97 for an introduction. If the
optional password is specified, it must match the password that was given to the modifyvm
command for the target machine; see chapter 8.7.5, Teleporting settings, page 114 for
details.
A few extra options are available with controlvm that do not directly affect the VM’s running
state:
117
8 VBoxManage
• The setlinkstate<1-N> operation connects or disconnects virtual network cables from
their network interfaces.
• nic<1-N> null|nat|bridged|intnet|hostonly: With this, you can set, for each of the
VM’s virtual network cards, what type of networking should be available. They can be
not connected to the host (null), use network address translation (nat), bridged networking (bridged) or communicate with other virtual machines using internal networking (intnet) or host-only networking (hostonly). These options correspond to the modes
which are described in detail in chapter 6.2, Introduction to networking modes, page 84.
• usbattach and usbdettach make host USB devices visible to the virtual machine on the
fly, without the need for creating filters first. The USB devices can be specified by UUID
(unique identifier) or by address on the host system.
You can use VBoxManage list usbhost to locate this information.
• vrde on|off lets you enable or disable the VRDE server, if it is installed.
• vrdeport default|<ports> changes the port or a range of ports that the VRDE server
can bind to; “default” or “0” means port 3389, the standard port for RDP. For details, see
the description for the --vrdeport option in chapter 8.7.3, Serial port, audio, clipboard,
remote desktop and USB settings, page 113.
• setvideomodehint requests that the guest system change to a particular video mode. This
requires that the Guest Additions be installed, and will not work for all guest systems.
• screenshotpng takes a screenshot of the guest display and saves it in PNG format.
• The setcredentials operation is used for remote logons in Windows guests. For details,
please refer to chapter 9.2, Automated guest logons, page 136.
• The guestmemoryballoon operation changes the size of the guest memory balloon, that
is, memory allocated by the VirtualBox Guest Additions from the guest operating system
and returned to the hypervisor for re-use by other virtual machines. This must be specified
in megabytes. For details, see chapter 4.8.1, Memory ballooning, page 69.
• The cpuexecutioncap <1-100>: This operation controls how much cpu time a virtual
CPU can use. A value of 50 implies a single virtual CPU can use up to 50% of a single host
CPU.
8.12 VBoxManage discardstate
This command discards the saved state of a virtual machine which is not currently running,
which will cause its operating system to restart next time you start it. This is the equivalent of
pulling out the power cable on a physical machine, and should be avoided if possible.
8.13 VBoxManage adoptstate
If you have a saved state file (.sav) that is seperate from the VM configuration, you can use
this command to “adopt” the file. This will change the VM to saved state and when you start
it, VirtualBox will attempt to restore it from the saved state file you indicated. This command
should only be used in special setups.
118
8 VBoxManage
8.14 VBoxManage snapshot
This command is used to control snapshots from the command line. A snapshot consists of a
complete copy of the virtual machine settings, copied at the time when the snapshot was taken,
and optionally a virtual machine saved state file if the snapshot was taken while the machine
was running. After a snapshot has been taken, VirtualBox creates differencing hard disk for
each normal hard disk associated with the machine so that when a snapshot is restored, the
contents of the virtual machine’s virtual hard disks can be quickly reset by simply dropping the
pre-existing differencing files.
The take operation takes a snapshot of the current state of the virtual machine. You must
supply a name for the snapshot and can optionally supply a description. The new snapshot is
inserted into the snapshots tree as a child of the current snapshot and then becomes the new
current snapshot.
The delete operation deletes a snapshot (specified by name or by UUID). This can take a
while to finish since the differencing images associated with the snapshot might need to be
merged with their child differencing images.
The restore operation will restore the given snapshot (specified by name or by UUID) by
resetting the virtual machine’s settings and current state to that of the snapshot. The previous
current state of the machine will be lost. After this, the given snapshot becomes the new “current”
snapshot so that subsequent snapshots are inserted under the snapshot from which was restored.
The restorecurrent operation is a shortcut to restore the current snapshot (i.e. the snapshot
from which the current state is derived). This subcommand is equivalent to using the “restore”
subcommand with the name or UUID of the current snapshot, except that it avoids the extra step
of determining that name or UUID.
With the edit operation, you can change the name or description of an existing snapshot.
With the showvminfo operation, you can view the virtual machine settings that were stored
with an existing snapshot.
8.15 VBoxManage closemedium
This commands removes a hard disk, DVD or floppy image from a VirtualBox media registry.2
Optionally, you can request that the image be deleted. You will get appropriate diagnostics
that the deletion failed, however the image will become unregistered in any case.
8.16 VBoxManage storageattach
This command attaches/modifies/removes a storage medium connected to a storage controller
that was previously added with the storagectl command (see the previous section). The syntax
is as follows:
VBoxManage storageattach
<uuid|vmname>
--storagectl <name>
--port <number>
--device <number>
[--type dvddrive|hdd|fdd]
[--medium none|emptydrive|
<uuid>|<filename>|host:<drive>|iscsi]
[--mtype normal|writethrough|immutable|shareable]
[--comment <text>]
[--passthrough on|off]
[--bandwidthgroup name|none]
2 Before
VirtualBox 4.0, it was necessary to call VBoxManage openmedium before a medium could be attached to a
virtual machine; that call “registered” the medium with the global VirtualBox media registry. With VirtualBox 4.0 this
is no longer necessary; media are added to media registries automatically. The “closemedium” call has been retained,
however, to allow for explicitly removing a medium from a registry.
119
8 VBoxManage
[--forceunmount]
[--server <name>|<ip>]
[--target <target>]
[--port <port>]
[--lun <lun>]
[--encodedlun <lun>]
[--username <username>]
[--password <password>]
[--intnet]
A number of parameters are commonly required; the ones at the end of the list are required
only for iSCSI targets (see below).
The common parameters are:
uuid|vmname The VM UUID or VM Name. Mandatory.
storagectl Name of the storage controller. Mandatory. The list of the storage controllers currently attached to a VM can be obtained with VBoxManage showvminfo; see chapter 8.4,
VBoxManage showvminfo, page 107.
port The number of the storage controller’s port which is to be modified. Mandatory.
device The number of the port’s device which is to be modified. Mandatory.
type Define the type of the drive to which the medium is being attached/detached/modified.
This argument can only be omitted if the type of medium can be determined from either
the medium given with the --medium argument or from a previous medium attachment.
medium Specifies what is to be attached. The following values are supported:
• “none”: Any existing device should be removed from the given slot.
• “emptydrive”: For a virtual DVD or floppy drive only, this makes the device slot behaves like a removeable drive into which no media has been inserted.
• If a UUID is specified, it must be the UUID of a storage medium that is already known
to VirtualBox (e.g. because it has been attached to another virtual machine). See
chapter 8.3, VBoxManage list, page 106 for how to list known media. This medium is
then attached to the given device slot.
• If a filename is specified, it must be the full path of an existing disk image (ISO, RAW,
VDI, VMDK or other), which is then attached to the given device slot.
• “host:<drive>“: For a virtual DVD or floppy drive only, this connects the given device
slot to the specified DVD or floppy drive on the host computer.
• “iscsi”: For virtual hard disks only, this allows for specifying an iSCSI target. In this
case, more parameters must be given; see below.
Some of the above changes, in particular for removeable media (floppies and CDs/DVDs),
can be effected while a VM is running. Others (device changes or changes in hard disk
device slots) require the VM to be powered off.
mtype Defines how this medium behaves with respect to snapshots and write operations. See
chapter 5.4, Special image write modes, page 76 for details.
comment Any description that you want to have stored with this medium (optional; for example, for an iSCSI target, “Big storage server downstairs”). This is purely descriptive and not
needed for the medium to function correctly.
passthrough For a virtual DVD drive only, you can enable DVD writing support (currently experimental; see chapter 5.9, CD/DVD support, page 81).
120
8 VBoxManage
bandwidthgroup Sets the bandwidth group to use for the given device; see chapter 5.8, Limiting
bandwidth for disk images, page 80.
forceunmount For a virtual DVD or floppy drive only, this forcibly unmounts the DVD/CD/Floppy
or mounts a new DVD/CD/Floppy even if the previous one is locked down by the guest for
reading. Again, see chapter 5.9, CD/DVD support, page 81 for details.
When “iscsi” is used with the --medium parameter for iSCSI support – see chapter 5.10, iSCSI
servers, page 82 –, additional parameters must or can be used:
server The host name or IP address of the iSCSI target; required.
target Target name string. This is determined by the iSCSI target and used to identify the
storage resource; required.
port TCP/IP port number of the iSCSI service on the target (optional).
lun Logical Unit Number of the target resource (optional). Often, this value is zero.
username, password Username and password for target authentication, if required (optional).
Note: Currently, username and password are stored without encryption (i.e. in clear
text) in the XML machine configuration file.
intnet If specified, connect to the iSCSI target via Internal Networking. This needs further configuration which is described in chapter 9.7.3, Access iSCSI targets via Internal Networking,
page 144.
8.17 VBoxManage storagectl
This command attaches/modifies/removes a storage controller. After this, virtual media can be
attached to the controller with the storageattach command (see the next section).
The syntax is as follows:
VBoxManage storagectl
<uuid|vmname>
--name <name>
[--add <ide/sata/scsi/floppy>]
[--controller <LsiLogic|LSILogicSAS|BusLogic|
IntelAhci|PIIX3|PIIX4|ICH6|I82078>]
[--sataideemulation<1-4> <1-30>]
[--sataportcount <1-30>]
[--hostiocache on|off]
[--bootable on|off]
[--remove]
where the parameters mean:
uuid|vmname The VM UUID or VM Name. Mandatory.
name Name of the storage controller. Mandatory.
add Define the type of the system bus to which the storage controller must be connected.
controller Allows to choose the type of chipset being emulated for the given storage controller.
sataideemulation This specifies which SATA ports should operate in IDE emulation mode. As
explained in chapter 5.1, Hard disk controllers: IDE, SATA (AHCI), SCSI, SAS, page 71, by
default, this is the case for SATA ports 1-4; with this command, you can map four IDE
channels to any of the 30 supported SATA ports.
121
8 VBoxManage
sataportcount This determines how many ports the SATA controller should support.
hostiocache Configures the use of the host I/O cache for all disk images attached to this storage
controller. For details, please see chapter 5.7, Host I/O caching, page 80.
bootable Selects whether this controller is bootable.
remove Removes the storage controller from the VM config.
8.18 VBoxManage bandwidthctl
This command creates/deletes/modifies bandwidth groups of the given virtual machine:
VBoxManage bandwidthctl
<uuid|vmname>
--name <name>
[--add disk
[--delete]
[--limit MB/s]
See chapter 5.8, Limiting bandwidth for disk images, page 80 for an introduction to bandwidth
limits. The parameters mean:
uuid|vmname The VM UUID or VM Name. Mandatory.
name Name of the bandwidth group. Mandatory.
add Creates a new bandwdith group with the given type.
delete Deletes a bandwdith group if it isn’t used anymore.
limit Sets the limit for the given group to the specified amount. Can be changed while the VM
is running.
8.19 VBoxManage showhdinfo
This command shows information about a virtual hard disk image, notably its size, its size on
disk, its type and the virtual machines which use it.
Note: For compatibility with earlier versions of VirtualBox, the “showvdiinfo” command is also supported and mapped internally to the “showhdinfo” command.
8.20 VBoxManage createhd
This command creates a new virtual hard disk image. The syntax is as follows:
VBoxManage createhd
--filename <filename>
--size <megabytes>
[--format VDI|VMDK|VHD] (default: VDI)
[--variant Standard,Fixed,Split2G,Stream,ESX]
where the parameters mean:
filename Allows to choose a file name. Mandatory.
size Allows to define the image capacity, in 1 MiB units. Mandatory.
122
8 VBoxManage
format Allows to choose a file format for the output file different from the file format of the
input file.
variant Allows to choose a file format variant for the output file. It is a comma-separated list
of variant flags. Not all combinations are supported, and specifying inconsistent flags will
result in an error message.
Note: For compatibility with earlier versions of VirtualBox, the “createvdi” command
is also supported and mapped internally to the “createhd” command.
8.21 VBoxManage modifyhd
With the modifyhd command, you can change the characteristics of a disk image after it has
been created:
VBoxManage modifyhd
<uuid>|<filename>
[--type normal|writethrough|immutable|shareable|
readonly|multiattach]
[--autoreset on|off]
[--compact]
[--resize <megabytes>|--resizebyte <bytes>]
Note: Despite the “hd” in the subcommand name, the command works with all disk
images, not only hard disks. For compatibility with earlier versions of VirtualBox, the
“modifyvdi” command is also supported and mapped internally to the “modifyhd” command.
The following options are available:
• With the --type argument, you can change the type of an existing image between the
normal, immutable, write-through and other modes; see chapter 5.4, Special image write
modes, page 76 for details.
• For immutable (differencing) hard disks only, the --autoreset on|off option determines
whether the disk is automatically reset on every VM startup (again, see chapter 5.4, Special
image write modes, page 76). The default is “on”.
• With the --compact option, can be used to compact disk images, i.e. remove blocks that
only contains zeroes. This will shrink a dynamically expanding image again; it will reduce the physical size of the image without affecting the logical size of the virtual disk.
Compaction works both for base images and for diff images created as part of a snapshot.
For this operation to be effective, it is required that free space in the guest system first be
zeroed out using a suitable software tool. For Windows guests, you can use the sdelete
tool provided by Microsoft. Execute sdelete -c in the guest to zero the free disk space
before compressing the virtual disk image.
Please note that compacting is currently only available for VDI images. A similar effect can
be achieved by zeroing out free blocks and then cloning the disk to any other dynamically
expanding format. You can use this workaround until compacting is also supported for disk
formats other than VDI.
123
8 VBoxManage
• The –resize option allows you to expand the capacity of an existing image; this increases
the logical size of a virtual disk without affecting the physical size much.3 This currently
works only for the VDI and VHD formats, and only for the dynamically expanding variants.
For example, if you originally created a 10G disk which is now full, you can use the –resize
command to add more space to the virtual disk without having to create a new image and
copy all data from within a virtual machine.
8.22 VBoxManage clonehd
This command duplicates a registered virtual hard disk image to a new image file with a new
unique identifier (UUID). The new image can be transferred to another host system or imported
into VirtualBox again using the Virtual Media Manager; see chapter 5.3, The Virtual Media Manager, page 74 and chapter 5.6, Cloning disk images, page 79. The syntax is as follows:
VBoxManage clonehd
<uuid>|<filename> <outputfile>
[--format VDI|VMDK|VHD|RAW|<other>]
[--variant Standard,Fixed,Split2G,Stream,ESX]
[--existing]
where the parameters mean:
format Allow to choose a file format for the output file different from the file format of the input
file.
variant Allow to choose a file format variant for the output file. It is a comma-separated list
of variant flags. Not all combinations are supported, and specifying inconsistent flags will
result in an error message.
existing Perform the clone operation to an already existing destination medium. Only the portion of the source medium which fits into the destination medium is copied. This means
if the destination medium is smaller than the source only a part of it is copied, and if the
destination medium is larger than the source the remaining part of the destination medium
is unchanged.
Note: For compatibility with earlier versions of VirtualBox, the “clonevdi” command is
also supported and mapped internally to the “clonehd” command.
8.23 VBoxManage convertfromraw
This command converts a raw disk image to a VirtualBox Disk Image (VDI) file. The syntax is as
follows:
VBoxManage convertfromraw
VBoxManage convertfromraw
<filename> <outputfile>
[--format VDI|VMDK|VHD]
[--variant Standard,Fixed,Split2G,Stream,ESX]
stdin <outputfile> <bytes>
[--format VDI|VMDK|VHD]
[--variant Standard,Fixed,Split2G,Stream,ESX]
where the parameters mean:
format Select the disk image format to create. Default is VDI.
3 Image
resizing was added with VirtualBox 4.0.
124
8 VBoxManage
variant Allow to choose a file format variant for the output file. It is a comma-separated list
of variant flags. Not all combinations are supported, and specifying inconsistent flags will
result in an error message.
The second form forces VBoxManage to read the content for the disk image from standard input
(useful for using that command in a pipe).
Note: For compatibility with earlier versions of VirtualBox, the “convertdd” command
is also supported and mapped internally to the “convertfromraw” command.
8.24 VBoxManage getextradata/setextradata
These commands let you attach and retrieve string data to a virtual machine or to a VirtualBox
configuration (by specifying global instead of a virtual machine name). You must specify a key
(as a text string) to associate the data with, which you can later use to retrieve it. For example:
VBoxManage setextradata Fedora5 installdate 2006.01.01
VBoxManage setextradata SUSE10 installdate 2006.02.02
would associate the string “2006.01.01” with the key installdate for the virtual machine Fedora5, and “2006.02.02” on the machine SUSE10. You could retrieve the information as follows:
VBoxManage getextradata Fedora5 installdate
which would return
VirtualBox Command Line Management Interface Version 4.0.8
(C) 2005-2011 Oracle Corporation
All rights reserved.
Value: 2006.01.01
8.25 VBoxManage setproperty
This command is used to change global settings which affect the entire VirtualBox installation.
Some of these correspond to the settings in the “Global settings” dialog in the graphical user
interface. The following properties are available:
machinefolder This specifies the default folder in which virtual machine definitions are kept;
see chapter 10.1, Where VirtualBox stores its files, page 153 for details.
vrdeauthlibrary This specifies which library to use when “external” authentication has been
selected for a particular virtual machine; see chapter 7.1.5, RDP authentication, page 94
for details.
websrvauthlibrary This specifies which library the web service uses to authenticate users. For
details about the VirtualBox web service, please refer to the separate VirtualBox SDK reference (see chapter 11, VirtualBox programming interfaces, page 163).
vrdelibrary This specifies which library implements the VirtualBox Remote Desktop Extension.
hwvirtexenabled This selects whether or not hardware virtualization support is enabled by
default.
125
8 VBoxManage
8.26 VBoxManage usbfilter add/modify/remove
The usbfilter commands are used for working with USB filters in virtual machines, or global
filters which affect the whole VirtualBox setup. Global filters are applied before machine-specific
filters, and may be used to prevent devices from being captured by any virtual machine. Global
filters are always applied in a particular order, and only the first filter which fits a device is applied. So for example, if the first global filter says to hold (make available) a particular Kingston
memory stick device and the second to ignore all Kingston devices, that memory stick will be
available to any machine with an appropriate filter, but no other Kingston device will.
When creating a USB filter using usbfilter add, you must supply three or four mandatory
parameters. The index specifies the position in the list at which the filter should be placed. If
there is already a filter at that position, then it and the following ones will be shifted back one
place. Otherwise the new filter will be added onto the end of the list. The target parameter
selects the virtual machine that the filter should be attached to or use “global” to apply it to all
virtual machines. name is a name for the new filter and for global filters, action says whether to
allow machines access to devices that fit the filter description (“hold”) or not to give them access
(“ignore”). In addition, you should specify parameters to filter by. You can find the parameters
for devices attached to your system using VBoxManage list usbhost. Finally, you can specify
whether the filter should be active, and for local filters, whether they are for local devices, remote
(over an RDP connection) or either.
When you modify a USB filter using usbfilter modify, you must specify the filter by index (see the output of VBoxManage list usbfilters to find global filter indexes and that of
VBoxManage showvminfo to find indexes for individual machines) and by target, which is either a virtual machine or “global”. The properties which can be changed are the same as for
usbfilter add. To remove a filter, use usbfilter remove and specify the index and the target.
8.27 VBoxManage sharedfolder add/remove
This command allows you to share folders on the host computer with guest operating systems.
For this, the guest systems must have a version of the VirtualBox Guest Additions installed which
supports this functionality.
Shared folders are described in detail in chapter 4.3, Shared folders, page 62.
8.28 VBoxManage guestproperty
The “guestproperty” commands allow you to get or set properties of a running virtual machine.
Please see chapter 4.6, Guest properties, page 66 for an introduction. As explained there, guest
properties are arbitrary key/value string pairs which can be written to and read from by either
the guest or the host, so they can be used as a low-volume communication channel for strings,
provided that a guest is running and has the Guest Additions installed. In addition, a number of
values whose keys begin with “/VirtualBox/“ are automatically set and maintained by the Guest
Additions.
The following subcommands are available (where <vm>, in each case, can either be a VM name
or a VM UUID, as with the other VBoxManage commands):
• enumerate <vm> [--patterns <pattern>]: This lists all the guest properties that are
available for the given VM, including the value. This list will be very limited if the guest’s
service process cannot be contacted, e.g. because the VM is not running or the Guest
Additions are not installed.
If --patterns <pattern> is specified, it acts as a filter to only list properties that match
the given pattern. The pattern can contain the following wildcard characters:
126
8 VBoxManage
– * (asterisk): represents any number of characters; for example, “/VirtualBox*“
would match all properties beginning with “/VirtualBox”.
– ? (question mark): represents a single arbitrary character; for example, “fo?“ would
match both “foo” and “for”.
– | (pipe symbol): can be used to specify multiple alternative patterns; for example,
“s*|t*“ would match anything starting with either “s” or “t”.
• get <vm>: This retrieves the value of a single property only. If the property cannot be
found (e.g. because the guest is not running), this will print
No value set!
• set <vm> <property> [<value> [--flags <flags>]]: This allows you to set a guest
property by specifying the key and value. If <value> is omitted, the property is deleted.
With --flags you can optionally specify additional behavior (you can combine several by
separating them with commas):
– TRANSIENT: the value will not be stored with the VM data when the VM exits;
– TRANSRESET: the value will be deleted as soon as the VM restarts and/or exits;
– RDONLYGUEST: the value can only be changed by the host, but the guest can only read
it;
– RDONLYHOST: reversely, the value can only be changed by the guest, but the host can
only read it;
– READONLY: a combination of the two, the value cannot be changed at all.
• wait <vm> <pattern> --timeout <timeout>: This waits for a particular value described by “pattern” to change or to be deleted or created. The pattern rules are the same
as for the “enumerate” subcommand above.
8.29 VBoxManage guestcontrol
The “guestcontrol” commands allow you to control certain things inside a guest from the host.
Please see chapter 4.7, Guest control, page 68 for an introduction.
Generally, the syntax is as follows:
VBoxManage guestcontrol <command>
The following subcommands are available (where <vm>, in each case, can either be a VM name
or a VM UUID, as with the other VBoxManage commands):
• execute, which allows for executing a program/script (process) which is already installed
and runnable on the guest. This command only works while a VM is up and running and
has the following syntax:
VBoxManage guestcontrol exec[ute] <vmname>|<uuid>
<path to program>
--username <name> --password <password>
[--arguments "<arguments>"]
[--environment "<NAME>=<VALUE> [<NAME>=<VALUE>]"]
[--flags <flags>] [--timeout <msec>]
[--verbose] [--wait-for exit,stdout,stderr||]
where the parameters mean:
uuid|vmname The VM UUID or VM name. Mandatory.
path to program Absolute path and process name of process to execute in the guest, e.g.
C:\Windows\System32\calc.exe
127
8 VBoxManage
–arguments “<arguments>“ One or more arguments to pass to the process being executed.
Arguments containing spaces must be enclosed in quotation marks. More than one
--arguments at a time can be specified to keep the command line tidy.
–environment “<NAME>=<VALUE>“ One or more environment variables to be set or
unset.
By default, the new process in the guest will be created with the standard environment
of the guest OS. This option allows for modifying that environment. To set/modify
a variable, a pair of NAME=VALUE must be specified; to unset a certain variable, the
name with no value must set, e.g. NAME=.
Arguments containing spaces must be enclosed in quotation marks. More than one
--environment at a time can be specified to keep the command line tidy.
–flags <flags> Additional flags to set. This is not used at the moment.
–timeout <msec> Value (in milliseconds) that specifies the time how long the started
process is allowed to run and how long VBoxManage waits for getting output from
that process. If no timeout is specified, VBoxManage will wait forever until the started
process ends or an error occured.
–username <name> Name of the user the process should run under. This user must exist
on the guest OS.
–password <password> Password of the user account specified with --username. If not
given, an empty password is assumed.
–verbose Tells VBoxManage to be more verbose.
–wait-for <action> Tells VBoxManage to wait for a certain action to happen and react to
it. The following actions are available:
exit Waits until the process ends and outputs its exit code along with the exit reason/flags.
stdout or stderr Waits until the process ends and outputs its exit code along with
the exit reason/flags. After that VBoxManage retrieves the output collected from
the guest process’s stdout and stderr.
Note: On Windows there are certain limitations for graphical applications; please see
chapter 14, Known limitations, page 181 for more information.
Examples:
VBoxManage --nologo guestcontrol execute "My VM" "/bin/ls" --arguments "-l /usr"
--username foo --password bar --wait-for stdout
VBoxManage --nologo guestcontrol execute "My VM" "c:\\windows\\system32\\ipconfig.exe"
--username foo --password bar --wait-for stdout
Note that the double backslashes in the second example are only required on Unix hosts.
• copyto, which allows copying files from the host to the guest (only with installed Guest
Additions 4.0 and later).
VBoxManage guestcontrol copyto|cp <vmname>|<uuid>
<source on host> <destination on guest>
--username <name> --password <password>
[--dryrun] [--follow] [--recursive] [--verbose]
where the parameters mean:
uuid|vmname The VM UUID or VM name. Mandatory.
128
8 VBoxManage
source on host Absolute path of source file(s) on host to copy over to the guest, e.g.
C:\Windows\System32\calc.exe. This also can be a wildcard expression, e.g.
C:\Windows\System32\*.dll
destination on guest Absolute destination path on the guest, e.g. C:\Temp
–username <name> Name of the user the copy process should run under. This user must
exist on the guest OS.
–password <password> Password of the user account specified with --username. If not
given, an empty password is assumed.
–dryrun Tells VBoxManage to only perform a dry run instead of really copying files to the
guest.
–follow Enables following symlinks on the host’s source.
–recursive Recursively copies files/directories of the specified source.
–verbose Tells VBoxManage to be more verbose.
–flags <flags> Additional flags to set. This is not used at the moment.
• createdirectory, which allows copying files from the host to the guest (only with installed Guest Additions 4.0 and later).
VBoxManage guestcontrol createdir[ectory]|mkdir|md <vmname>|<uuid>
<directory to create on guest>
[--username "<name>"] [--password "<password>"]
[--parents] [--mode <mode>] [--verbose]
where the parameters mean:
uuid|vmname The VM UUID or VM name. Mandatory.
directory to create on guest Absolute path of directory/directories to create on guest,
e.g. D:\Foo\Bar. Parent directories need to exist (e.g. in this example D:\Foo)
when switch --parents is omitted. The specified user must have appropriate rights
to create the specified directory.
–username <name> Name of the user the copy process should run under. This user must
exist on the guest OS.
–password <password> Password of the user account specified with --username. If not
given, an empty password is assumed.
–parents Also creates not yet existing parent directories of the specified directory, e.g. if
the directory D:\Foo of D:\Foo\Bar does not exist yet it will be created. Without
specifying --parent the action would have failed.
–mode <mode> Sets the permission mode of the specified directory. Only octal modes
(e.g. 0755) are supported right now.
–verbose Tells VBoxManage to be more verbose.
• updateadditions, which allows for updating an already installed Guest Additions version
on the guest (only already installed Guest Additions 4.0 and later).
VBoxManage guestcontrol updateadditions <vmname>|<uuid>
[--source "<guest additions .ISO file to use>"] [--verbose]
where the parameters mean:
uuid|vmname The VM UUID or VM name. Mandatory.
–source “<guest additions .ISO file to use>“ Full path to an alternative VirtualBox
Guest Additions .ISO file to use for the Guest Additions update.
–verbose Tells VBoxManage to be more verbose.
129
8 VBoxManage
8.30 VBoxManage debugvm
The “debugvm” commands are for experts who want to tinker with the exact details of virtual
machine execution. Like the VM debugger described in chapter 12.1.3, The built-in VM debugger,
page 165, these commands are only useful if you are very familiar with the details of the PC
architecture and how to debug software.
The subcommands of “debugvm” all operate on a running virtual machine. The following are
available:
• With dumpguestcore --filename <name>, you can create a system dump of the running
VM, which will be written into the given file. This file will have the standard ELF core
format (with custom sections); see chapter 12.1.4, VM core format, page 167.
This corresponds to the writecore command in the debugger.
• The info command is used to display info items relating to the VMM, device emulations
and associated drivers. This command takes one or two arguments: the name of the info
item, optionally followed by a string containing arguments specific to the info item. The
help info item provides a listning of the available items and hints about any optional
arguments.
This corresponds to the info command in the debugger.
• The injectnmi command causes a non-maskable interrupt (NMI) in the guest, which
might be useful for certain debugging scenarios. What happens exactly is dependent on
the guest operating system, but an NMI can crash the whole guest operating system. Do
not use unless you know what you’re doing.
• The osdetect command makes the VMM’s debugger facility (re-)detection the guest operation system.
This corresponds to the detect command in the debugger.
• The osinfo command is used to display info about the operating system (OS) detected by
the VMM’s debugger facility.
• The getregisters command is used to display CPU and device registers. The command
takes a list of registers, each having one of the following forms:
–
–
–
–
–
register-set.register-name.sub-field
register-set.register-name
cpu-register-name.sub-field
cpu-register-name
all
The all form will cause all registers to be shown (no sub-fields). The registers names are
case-insensitive. When requesting a CPU register the register set can be omitted, it will be
selected using the value of the --cpu option (defaulting to 0).
• The setregisters command is used to change CPU and device registers. The command
takes a list of register assignments, each having one of the following forms:
–
–
–
–
register-set.register-name.sub-field=value
register-set.register-name=value
cpu-register-name.sub-field=value
cpu-register-name=value
130
8 VBoxManage
The value format should be in the same style as what getregisters displays, with the exception that both octal and decimal can be used instead of hexadecimal. The register naming and the default CPU register set are handled the same way as with the getregisters
command.
• The statistics command can be used to display VMM statistics on the command line.
The --reset option will reset statistics. The affected statistics can be filtered with the
--pattern option, which accepts DOS/NT-style wildcards (? and *).
8.31 VBoxManage metrics
This command supports monitoring the usage of system resources. Resources are represented by
various metrics associated with the host system or a particular VM. For example, the host system
has a CPU/Load/User metric that shows the percentage of time CPUs spend executing in user
mode over a specific sampling period.
Metric data is collected and retained internally; it may be retrieved at any time with the
VBoxManage metrics query subcommand. The data is available as long as the background
VBoxSVC process is alive. That process terminates shortly after all VMs and frontends have been
closed.
By default no metrics are collected at all. Metrics collection does not start until VBoxManage
metrics setup is invoked with a proper sampling interval and the number of metrics to be retained. The interval is measured in seconds. For example, to enable collecting the host processor
and memory usage metrics every second and keeping the 5 most current samples, the following
command can be used:
VBoxManage metrics setup --period 1 --samples 5 host CPU/Load,RAM/Usage
Metric collection can only be enabled for started VMs. Collected data and collection settings
for a particular VM will disappear as soon as it shuts down. Use VBoxManage metrics list
subcommand to see which metrics are currently available. You can also use --list option with
any subcommand that modifies metric settings to find out which metrics were affected.
Note that the VBoxManage metrics setup subcommand discards all samples that may have
been previously collected for the specified set of objects and metrics.
To enable or disable metrics collection without discarding the data VBoxManage metrics
enable and VBoxManage metrics disable subcommands can be used. Note that these subcommands expect metrics, not submetrics, like CPU/Load or RAM/Usage as parameters. In other
words enabling CPU/Load/User while disabling CPU/Load/Kernel is not supported.
The host and VMs have different sets of associated metrics. Available metrics can be listed
with VBoxManage metrics list subcommand.
A complete metric name may include an aggregate function. The name has the following form:
Category/Metric[/SubMetric][:aggregate]. For example, RAM/Usage/Free:min stands for
the minimum amount of available memory over all retained data if applied to the host object.
Subcommands may apply to all objects and metrics or can be limited to one object or/and a
list of metrics. If no objects or metrics are given in the parameters, the subcommands will apply
to all available metrics of all objects. You may use an asterisk (“*“) to explicitly specify that the
command should be applied to all objects or metrics. Use “host” as the object name to limit the
scope of the command to host-related metrics. To limit the scope to a subset of metrics, use a
metric list with names separated by commas.
For example, to query metric data on the CPU time spent in user and kernel modes by the
virtual machine named “test”, you can use the following command:
VBoxManage metrics query test CPU/Load/User,CPU/Load/Kernel
The following list summarizes the available subcommands:
131
8 VBoxManage
list This subcommand shows the parameters of the currently existing metrics. Note that VMspecific metrics are only available when a particular VM is running.
setup This subcommand sets the interval between taking two samples of metric data and the
number of samples retained internally. The retained data is available for displaying with
the query subcommand. The --list option shows which metrics have been modified as
the result of the command execution.
enable This subcommand “resumes” data collection after it has been stopped with disable
subcommand. Note that specifying submetrics as parameters will not enable underlying
metrics. Use --list to find out if the command did what was expected.
disable This subcommand “suspends” data collection without affecting collection parameters or
collected data. Note that specifying submetrics as parameters will not disable underlying
metrics. Use --list to find out if the command did what was expected.
query This subcommand retrieves and displays the currently retained metric data.
Note: The query subcommand does not remove or “flush” retained data. If you query
often enough you will see how old samples are gradually being “phased out” by new
samples.
collect This subcommand sets the interval between taking two samples of metric data and the
number of samples retained internally. The collected data is displayed periodically until
Ctrl-C is pressed unless the --detach option is specified. With the --detach option, this
subcommand operates the same way as setup does. The --list option shows which
metrics match the specified filter.
8.32 VBoxManage hostonlyif
With “hostonlyif” you can change the IP configuration of a host-only network interface. For a
description of host-only networking, please refer to chapter 6.6, Host-only networking, page 88.
Each host-only interface is identified by a name and can either use the internal DHCP server or
a manual IP configuration (both IP4 and IP6).
8.33 VBoxManage dhcpserver
The “dhcpserver” commands allow you to control the DHCP server that is built into VirtualBox.
You may find this useful when using internal or host-only networking. (Theoretically, you can
enable it for a bridged network as well, but that will likely cause conflicts with other DHCP
servers in your physical network.)
Use the following command line options:
• If you use internal networking for a virtual network adapter of a virtual machine, use
VBoxManage dhcpserver add --netname <network_name>, where <network_name> is
the same network name you used with VBoxManage modifyvm <vmname> --intnet<X>
<network_name>.
• If you use host-only networking for a virtual network adapter of a virtual machine,
use VBoxManage dhcpserver add --ifname <hostonly_if_name> instead, where
<hostonly_if_name> is the same host-only interface name you used with VBoxManage
modifyvm <vmname> --hostonlyadapter<X> <hostonly_if_name>.
132
8 VBoxManage
Alternatively, you can also use the –netname option as with internal networks if you
know the host-only network’s name; you can see the names with VBoxManage list
hostonlyifs (see chapter 8.3, VBoxManage list, page 106 above).
The following additional parameters are required when first adding a DHCP server:
• With --ip, specify the IP address of the DHCP server itself.
• With --netmask, specify the netmask of the network.
• With --lowerip and --upperip, you can specify the lowest and highest IP address, respectively, that the DHCP server will hand out to clients.
Finally, you must specify --enable or the DHCP server will be created in the disabled state,
doing nothing.
After this, VirtualBox will automatically start the DHCP server for given internal or host-only
network as soon as the first virtual machine which uses that network is started.
Reversely, use VBoxManage dhcpserver remove with the given --netname <network_name>
or --ifname <hostonly_if_name> to remove the DHCP server again for the given internal or
host-only network.
To modify the settings of a DHCP server created earlier with VBoxManage dhcpserver add,
you can use VBoxManage dhcpserver modify for a given network or host-only interface name.
8.34 VBoxManage extpack
The “extpack” command allows you to add or remove VirtualBox extension packs, as described
in chapter 1.5, Installing VirtualBox and extension packs, page 14.
• To add a new extension pack, use VBoxManage extpack install <tarball>.
• To remove a previously installed extension pack, use VBoxManage extpack uninstall
<name>. You can use VBoxManage list extpacks to show the names of the extension
packs which are currently installed; please see chapter 8.3, VBoxManage list, page 106
also. The optional --force parameter can be used to override the refusal of an extension
pack to be uninstalled.
• The VBoxManage extpack cleanup command can be used to remove temporary files and
directories that may have been left behind if a previous install or uninstall command failed.
133
9 Advanced topics
9.1 VBoxSDL, the simplified VM displayer
9.1.1 Introduction
VBoxSDL is a simple graphical user interface (GUI) that lacks the nice point-and-click support
which VirtualBox, our main GUI, provides. VBoxSDL is currently primarily used internally for
debugging VirtualBox and therefore not officially supported. Still, you may find it useful for
environments where the virtual machines are not necessarily controlled by the same person that
uses the virtual machine.
Note: VBoxSDL is not available on the Mac OS X host platform.
As you can see in the following screenshot, VBoxSDL does indeed only provide a simple window that contains only the “pure” virtual machine, without menus or other controls to click upon
and no additional indicators of virtual machine activity:
To start a virtual machine with VBoxSDL instead of the VirtualBox GUI, enter the following on
a command line:
VBoxSDL --startvm <vm>
where <vm> is, as usual with VirtualBox command line parameters, the name or UUID of an
existing virtual machine.
9.1.2 Secure labeling with VBoxSDL
When running guest operating systems in fullscreen mode, the guest operating system usually
has control over the whole screen. This could present a security risk as the guest operating
134
9 Advanced topics
system might fool the user into thinking that it is either a different system (which might have a
higher security level) or it might present messages on the screen that appear to stem from the
host operating system.
In order to protect the user against the above mentioned security risks, the secure labeling
feature has been developed. Secure labeling is currently available only for VBoxSDL. When
enabled, a portion of the display area is reserved for a label in which a user defined message is
displayed. The label height in set to 20 pixels in VBoxSDL. The label font color and background
color can be optionally set as hexadecimal RGB color values. The following syntax is used to
enable secure labeling:
VBoxSDL --startvm "VM name"
--securelabel --seclabelfnt ~/fonts/arial.ttf
--seclabelsiz 14 --seclabelfgcol 00FF00 --seclabelbgcol 00FFFF
In addition to enabling secure labeling, a TrueType font has to be supplied. To use another
font size than 12 point use the parameter --seclabelsiz.
The label text can be set with
VBoxManage setextradata "VM name" "VBoxSDL/SecureLabel" "The Label"
Changing this label will take effect immediately.
Typically, full screen resolutions are limited to certain “standard” geometries such as 1024 x
768. Increasing this by twenty lines is not usually feasible, so in most cases, VBoxSDL will chose
the next higher resolution, e.g. 1280 x 1024 and the guest’s screen will not cover the whole
display surface. If VBoxSDL is unable to choose a higher resolution, the secure label will be
painted on top of the guest’s screen surface. In order to address the problem of the bottom part
of the guest screen being hidden, VBoxSDL can provide custom video modes to the guest that
are reduced by the height of the label. For Windows guests and recent Solaris and Linux guests,
the VirtualBox Guest Additions automatically provide the reduced video modes. Additionally,
the VESA BIOS has been adjusted to duplicate its standard mode table with adjusted resolutions.
The adjusted mode IDs can be calculated using the following formula:
reduced_modeid = modeid + 0x30
For example, in order to start Linux with 1024 x 748 x 16, the standard mode 0x117 (1024
x 768 x 16) is used as a base. The Linux video mode kernel parameter can then be calculated
using:
vga = 0x200 | 0x117 + 0x30
vga = 839
The reason for duplicating the standard modes instead of only supplying the adjusted modes
is that most guest operating systems require the standard VESA modes to be fixed and refuse to
start with different modes.
When using the X.org VESA driver, custom modelines have to be calculated and added to the
configuration (usually in /etc/X11/xorg.conf. A handy tool to determine modeline entries can
be found at http://www.tkk.fi/Misc/Electronics/faq/vga2rgb/calc.html.)
9.1.3 Releasing modifiers with VBoxSDL on Linux
When switching from a X virtual terminal (VT) to another VT using Ctrl-Alt-Fx while the
VBoxSDL window has the input focus, the guest will receive Ctrl and Alt keypress events without
receiving the corresponding key release events. This is an architectural limitation of Linux. In
order to reset the modifier keys, it is possible to send SIGUSR1 to the VBoxSDL main thread (first
entry in the ps list). For example, when switching away to another VT and saving the virtual
machine from this terminal, the following sequence can be used to make sure the VM is not
saved with stuck modifiers:
kill -usr1 <pid>
VBoxManage controlvm "Windows 2000" savestate
135
9 Advanced topics
9.2 Automated guest logons
VirtualBox provides Guest Addition modules for Windows, Linux and Solaris to enable automated
logons on the guest.
When a guest operating system is running in a virtual machine, it might be desirable to perform
coordinated and automated logons using credentials from a master logon system. (With “credentials”, we are referring to logon information consisting of user name, password and domain
name, where each value might be empty.)
9.2.1 Automated Windows guest logons
Since Windows NT, Windows has provided a modular system logon subsystem (“Winlogon”)
which can be customized and extended by means of so-called GINA modules (Graphical Identification and Authentication). With Windows Vista and Windows 7, the GINA modules were
replaced with a new mechanism called “credential providers”. The VirtualBox Guest Additions
for Windows come with both, a GINA and a credential provider module, and therefore enable
any Windows guest to perform automated logons.
To activate the VirtualBox GINA or credential provider module, install the Guest Additions
with using the command line switch /with_autologon. All the following manual steps required
for installing these modules will be then done by the installer.
To manually install the VirtualBox GINA module, extract the Guest Additions (see chapter 4.2.1.4, Manual file extraction, page 56) and copy the file VBoxGINA.dll to the Windows
SYSTEM32 directory. Then, in the registry, create the following key:
HKEY_LOCAL_MACHINE\SOFTWARE\Microsoft\Windows NT\CurrentVersion\Winlogon\GinaDLL
with a value of VBoxGINA.dll.
Note: The VirtualBox GINA module is implemented as a wrapper around the standard
Windows GINA module (MSGINA.DLL). As a result, it will most likely not work correctly
with 3rd party GINA modules.
To manually install the VirtualBox credential provider module, extract the Guest Additions
(see chapter 4.2.1.4, Manual file extraction, page 56) and copy the file VBoxCredProv.dll to
the Windows SYSTEM32 directory. Then, in the registry, create the following keys:
HKEY_LOCAL_MACHINE\SOFTWARE\Microsoft\Windows\CurrentVersion\
Authentication\Credential Providers\{275D3BCC-22BB-4948-A7F6-3A3054EBA92B}
HKEY_CLASSES_ROOT\CLSID\{275D3BCC-22BB-4948-A7F6-3A3054EBA92B}
HKEY_CLASSES_ROOT\CLSID\{275D3BCC-22BB-4948-A7F6-3A3054EBA92B}\InprocServer32
with all default values (the key named (Default) in each key) set to VBoxCredProv. After
that a new string named
HKEY_CLASSES_ROOT\CLSID\{275D3BCC-22BB-4948-A7F6-3A3054EBA92B}\InprocServer32\ThreadingModel
with a value of Apartment has to be created.
To set credentials, use the following command on a running VM:
VBoxManage controlvm "Windows XP" setcredentials "John Doe" "secretpassword" "DOMTEST"
While the VM is running, the credentials can be queried by the VirtualBox logon modules
(GINA or credential provider) using the VirtualBox Guest Additions device driver. When Windows is in “logged out” mode, the logon modules will constantly poll for credentials and if they
136
9 Advanced topics
are present, a logon will be attempted. After retrieving the credentials, the logon modules will
erase them so that the above command will have to be repeated for subsequent logons.
For security reasons, credentials are not stored in any persistent manner and will be lost when
the VM is reset. Also, the credentials are “write-only”, i.e. there is no way to retrieve the
credentials from the host side. Credentials can be reset from the host side by setting empty
values.
Depending on the particular variant of the Windows guest, the following restrictions apply:
1. For Windows XP guests, the logon subsystem needs to be configured to use the classic
logon dialog as the VirtualBox GINA module does not support the XP-style welcome dialog.
2. For Windows Vista and Windows 7 guests, the logon subsystem does not support the
so-called Secure Attention Sequence (CTRL+ALT+DEL). As a result, the guest’s group policy
settings need to be changed to not use the Secure Attention Sequence. Also, the user name
given is only compared to the true user name, not the user friendly name. This means
that when you rename a user, you still have to supply the original user name (internally,
Windows never renames user accounts).
3. Auto-logon handling of the built-in Windows Remote Desktop Service (formerly known as
Terminal Services) is disabled by default. To enable it, create the registry key
HKEY_LOCAL_MACHINE\SOFTWARE\Oracle\VirtualBox Guest Additions\AutoLogon
with a DWORD value of 1.
The following command forces VirtualBox to keep the credentials after they were read by the
guest and on VM reset:
VBoxManage setextradata "Windows XP" VBoxInternal/Devices/VMMDev/0/Config/KeepCredentials 1
Note that this is a potential security risk as a malicious application running on the guest could
request this information using the proper interface.
9.2.2 Automated Linux/Unix guest logons
Starting with version 3.2, VirtualBox provides a custom PAM module (Pluggable Authentication
Module) which can be used to perform automated guest logons on platforms which support this
framework. Virtually all modern Linux/Unix distributions rely on PAM.
The pam_vbox.so module itself does not do an actual verification of the credentials passed to
the guest OS; instead it relies on other modules such as pam_unix.so or pam_unix2.so down
in the PAM stack to do the actual validation using the credentials retrieved by pam_vbox.so.
Therefore pam_vbox.so has to be on top of the authentication PAM service list.
Note: The pam_vbox.so only supports the auth primitive. Other primitives such as
account, session or password are not supported.
The pam_vbox.so module is shipped as part of the Guest Additions but it is not installed
and/or activated on the guest OS by default. In order to install it, it has to be copied from
/opt/VBoxGuestAdditions-<version>/lib/VBoxGuestAdditions/ to the security modules
directory, usually /lib/security/. Please refer to your guest OS documentation for the correct
PAM module directory.
For example, to use pam_vbox.so with a Ubuntu Linux guest OS and GDM (the GNOME
Desktop Manager) to logon users automatically with the credentials passed by the host, the
guest OS has to be configured like the following:
1. The pam_vbox.so module has to be copied to the security modules directory, in this case it
is /lib/security.
137
9 Advanced topics
2. Edit the PAM configuration file for GDM found at /etc/pam.d/gdm, adding the line auth
requisite pam_vbox.so at the top. Additionaly, in most Linux distributions there is a
file called /etc/pam.d/common-auth. This file is included in many other services (like
the GDM file mentioned above). There you also have to add the line auth requisite
pam_vbox.so.
3. If authentication against the shadow database using pam_unix.so or pam_unix2.so is
desired, the argument try_first_pass is needed in order to pass the credentials from the
VirtualBox module to the shadow database authentication module. For Ubuntu, this needs
to be added to /etc/pam.d/common-auth, to the end of the line referencing pam_unix.so.
This argument tells the PAM module to use credentials already present in the stack, i.e. the
ones provided by the VirtualBox PAM module.
Warning: An incorrectly configured PAM stack can effectively prevent you from logging
into your guest system!
To make deployment easier, you can pass the argument debug right after the pam_vbox.so
statement. Debug log output will then be recorded using syslog.
Warning: At present, the GDM display manager only retrieves credentials at startup
so unless the credentials have been supplied to the guest before GDM starts, automatic
logon will not work. This limitation needs to be addressed by the GDM developers or
another display manager must be used.
9.3 Advanced configuration for Windows guests
9.3.1 Automated Windows system preparation
Beginning with Windows NT 4.0, Microsoft offers a “system preparation” tool (in short: Sysprep)
to prepare a Windows system for deployment or redistribution. Whereas Windows 2000 and
XP ship with Sysprep on the installation medium, the tool also is available for download on
the Microsoft web site. In a standard installation of Windows Vista and 7, Sysprep is already
included. Sysprep mainly consists of an executable called sysprep.exe which is invoked by the
user to put the Windows installation into preparation mode.
Starting with VirtualBox 3.2.2, the Guest Additions offer a way to launch a system preparation
on the guest operating system in an automated way, controlled from the host system. To achieve
that, see chapter 4.7, Guest control, page 68 for using the feature with the special identifier
sysprep as the program to execute, along with the user name sysprep and password sysprep
for the credentials. Sysprep then gets launched with the required system rights.
Note: Specifying the location of “sysprep.exe” is not possible – instead the following
paths are used (based on the operating system):
• C:\sysprep\sysprep.exe for Windows NT 4.0, 2000 and XP
• %WINDIR%\System32\Sysprep\sysprep.exe for Windows Vista, 2008 Server
and 7
The Guest Additions will automatically use the appropriate path to execute the system
preparation tool.
138
9 Advanced topics
9.4 Advanced configuration for Linux and Solaris guests
9.4.1 Manual setup of selected guest services on Linux
The VirtualBox Guest Additions contain several different drivers. If for any reason you do not
wish to set them all up, you can install the Guest Additions using the following command:
sh ./VBoxLinuxAdditions.run no_setup
After this, you will need to at least compile the kernel modules by running the command
/usr/lib/VBoxGuestAdditions/vboxadd setup
as root (you will need to replace lib by lib64 on some 64bit guests), and on older guests without
the udev service you will need to add the vboxadd service to the default runlevel to ensure that
the modules get loaded.
To setup the time synchronization service, run the command
/usr/lib/VBoxGuestAdditions/vboxadd-service setup
and add the service vboxadd-service to the default runlevel. To set up the X11 and OpenGL
part of the Guest Additions, run the command
/usr/lib/VBoxGuestAdditions/vboxadd-x11 setup
(you do not need to enable any services for this).
To recompile the guest kernel modules, use this command:
/usr/lib/VBoxGuestAdditions/vboxadd setup
After compilation you should reboot your guest to ensure that the new modules are actually
used.
9.4.2 Guest graphics and mouse driver setup in depth
This section assumes that you are familiar with configuring the X.Org server using xorg.conf and
optionally the newer mechanisms using hal or udev and xorg.conf.d. If not you can learn about
them by studying the documentation which comes with X.Org.
The VirtualBox Guest Additions come with drivers for X.Org versions
• X11R6.8/X11R6.9 and XFree86 version 4.3 (vboxvideo_drv_68.o and vboxmouse_drv_68.o)
• X11R7.0 (vboxvideo_drv_70.so and vboxmouse_drv_70.so)
• X11R7.1 (vboxvideo_drv_71.so and vboxmouse_drv_71.so)
• X.Org Server versions 1.3 and later (vboxvideo_drv_13.so and vboxmouse_drv_13.so and
so on).
By default these drivers can be found in the directory
/opt/VBoxGuestAdditions-<version>/lib/VBoxGuestAdditions
and the correct versions for the X server are symbolically linked into the X.Org driver directories.
For graphics integration to work correctly, the X server must load the vboxvideo driver (many
recent X server versions look for it automatically if they see that they are running in VirtualBox)
and for an optimal user experience the guest kernel drivers must be loaded and the Guest Additions tool VBoxClient must be running as a client in the X session. For mouse integration to
work correctly, the guest kernel drivers must be loaded and in addition, in X servers from X.Org
X11R6.8 to X11R7.1 and in XFree86 version 4.3 the right vboxmouse driver must be loaded
139
9 Advanced topics
and associated with /dev/mouse or /dev/psaux; in X.Org server 1.3 or later a driver for a PS/2
mouse must be loaded and the right vboxmouse driver must be associated with /dev/vboxguest.
The VirtualBox guest graphics driver can use any graphics configuration for which the virtual
resolution fits into the virtual video memory allocated to the virtual machine (minus a small
amount used by the guest driver) as described in chapter 3.5, Display settings, page 45. The driver
will offer a range of standard modes at least up to the default guest resolution for all active guest
monitors. In X.Org Server 1.3 and later the default mode can be changed by setting the output
property VBOX_MODE to “<width>x<height>“ for any guest monitor. When VBoxClient and
the kernel drivers are active this is done automatically when the host requests a mode change.
The driver for older versions can only receive new modes by querying the host for requests at
regular intervals.
With pre-1.3 X Servers you can also add your own modes to the X server configuration file. You
simply need to add them to the “Modes” list in the “Display” subsection of the “Screen” section.
For example, the section shown here has a custom 2048x800 resolution mode added:
Section "Screen"
Identifier
"Default Screen"
Device
"VirtualBox graphics card"
Monitor
"Generic Monitor"
DefaultDepth 24
SubSection "Display"
Depth
24
Modes
"2048x800" "800x600" "640x480"
EndSubSection
EndSection
9.5 CPU hot-plugging
With virtual machines running modern server operating systems, VirtualBox supports CPU hotplugging.1 Whereas on a physical computer this would mean that a CPU can be added or removed while the machine is running, VirtualBox supports adding and removing virtual CPUs
while a virtual machine is running.
CPU hot-plugging works only with guest operating systems that support it. So far this applies
only to Linux and Windows Server 2008 x64 Data Center Edition. Windows supports only hotadd while Linux supports hot-add and hot-remove but to use this feature with more than 8 CPUs
a 64bit Linux guest is required.
At this time, CPU hot-plugging requires using the VBoxManage command-line interface. First,
hot-plugging needs to be enabled for a virtual machine:
VBoxManage modifyvm "VM name" --cpuhotplug on
After that, the –cpus option specifies the maximum number of CPUs that the virtual machine
can have:
VBoxManage modifyvm "VM name" --cpus 8
When the VM is off, you can then add and remove virtual CPUs with the modifyvm –plugcpu and
–unplugcpu subcommands, which take the number of the virtual CPU as a parameter, like this:
VBoxManage modifyvm "VM name" --plugcpu 3
VBoxManage modifyvm "VM name" --unplugcpu 3
Note that CPU 0 can never be removed.
While the VM is running, CPUs can be added with the controlvm plugcpu/unplugcpu commands instead:
1 Support
for CPU hot-plugging was introduced with VirtualBox 3.2.
140
9 Advanced topics
VBoxManage controlvm "VM name" plugcpu 3
VBoxManage controlvm "VM name" unplugcpu 3
See chapter 8.7, VBoxManage modifyvm, page 109 and chapter 8.11, VBoxManage controlvm,
page 117 for details.
With Linux guests, the following applies: To prevent ejection while the CPU is still used it has
to be ejected from within the guest before. The Linux Guest Additions contain a service which
receives hot-remove events and ejects the CPU. Also, after a CPU is added to the VM it is not
automatically used by Linux. The Linux Guest Additions service will take care of that if installed.
If not a CPU can be started with the following command:
echo 1 > /sys/devices/system/cpu/cpu<id>/online
9.6 Advanced display configuration
9.6.1 Custom VESA resolutions
Apart from the standard VESA resolutions, the VirtualBox VESA BIOS allows you to add up to 16
custom video modes which will be reported to the guest operating system. When using Windows
guests with the VirtualBox Guest Additions, a custom graphics driver will be used instead of the
fallback VESA solution so this information does not apply.
Additional video modes can be configured for each VM using the extra data facility. The extra
data key is called CustomVideoMode<x> with x being a number from 1 to 16. Please note that
modes will be read from 1 until either the following number is not defined or 16 is reached. The
following example adds a video mode that corresponds to the native display resolution of many
notebook computers:
VBoxManage setextradata "VM name" "CustomVideoMode1" "1400x1050x16"
The VESA mode IDs for custom video modes start at 0x160. In order to use the above defined
custom video mode, the following command line has be supplied to Linux:
vga = 0x200 | 0x160
vga = 864
For guest operating systems with VirtualBox Guest Additions, a custom video mode can be set
using the video mode hint feature.
9.6.2 Configuring the maximum resolution of guests when using the
graphical frontend
When guest systems with the Guest Additions installed are started using the graphical frontend
(the normal VirtualBox application), they will not be allowed to use screen resolutions greater
than the host’s screen size unless the user manually resizes them by dragging the window, switching to fullscreen or seamless mode or sending a video mode hint using VBoxManage. This behavior is what most users will want, but if you have different needs, it is possible to change it by
issuing one of the following commands from the command line:
VBoxManage setextradata global GUI/MaxGuestResolution any
will remove all limits on guest resolutions.
VBoxManage setextradata global GUI/MaxGuestResolution >width,height<
manually specifies a maximum resolution.
VBoxManage setextradata global GUI/MaxGuestResolution auto
restores the default settings. Note that these settings apply globally to all guest systems, not
just to a single machine.
141
9 Advanced topics
9.7 Advanced storage configuration
9.7.1 Using a raw host hard disk from a guest
Starting with version 1.4, as an alternative to using virtual disk images (as described in detail in
chapter 5, Virtual storage, page 71), VirtualBox can also present either entire physical hard disks
or selected partitions thereof as virtual disks to virtual machines.
With VirtualBox, this type of access is called “raw hard disk access”; it allows a guest operating
system to access its virtual hard disk without going through the host OS file system. The actual
performance difference for image files vs. raw disk varies greatly depending on the overhead
of the host file system, whether dynamically growing images are used and on host OS caching
strategies. The caching indirectly also affects other aspects such as failure behavior, i.e. whether
the virtual disk contains all data written before a host OS crash. Consult your host OS documentation for details on this.
Warning: Raw hard disk access is for expert users only. Incorrect use or use of an
outdated configuration can lead to total loss of data on the physical disk. Most importantly, do not attempt to boot the partition with the currently running host operating
system in a guest. This will lead to severe data corruption.
Raw hard disk access – both for entire disks and individual partitions – is implemented as part
of the VMDK image format support. As a result, you will need to create a special VMDK image
file which defines where the data will be stored. After creating such a special VMDK image, you
can use it like a regular virtual disk image. For example, you can use the Virtual Media Manager
(chapter 5.3, The Virtual Media Manager, page 74) or VBoxManage to assign the image to a virtual
machine.
9.7.1.1 Access to entire physical hard disk
While this variant is the simplest to set up, you must be aware that this will give a guest operating
system direct and full access to an entire physical disk. If your host operating system is also booted
from this disk, please take special care to not access the partition from the guest at all. On the
positive side, the physical disk can be repartitioned in arbitrary ways without having to recreate
the image file that gives access to the raw disk.
To create an image that represents an entire physical hard disk (which will not contain any
actual data, as this will all be stored on the physical disk), on a Linux host, use the command
VBoxManage internalcommands createrawvmdk -filename /path/to/file.vmdk
-rawdisk /dev/sda
This creates the image /path/to/file.vmdk (must be absolute), and all data will be read and
written from /dev/sda.
On a Windows host, instead of the above device specification, use e.g. \\.\PhysicalDrive0.
On a Mac OS X host, instead of the above device specification use e.g. /dev/disk1. Note that
on OS X you can only get access to an entire disk if no volume is mounted from it.
Creating the image requires read/write access for the given device. Read/write access is also
later needed when using the image from a virtual machine.
Just like with regular disk images, this does not automatically attach the newly created image
to a virtual machine. This can be done with e.g.
VBoxManage storageattach WindowsXP --storagectl "IDE Controller"
--port 0 --device 0 --type hdd --medium /path/to/file.vmdk
When this is done the selected virtual machine will boot from the specified physical disk.
142
9 Advanced topics
9.7.1.2 Access to individual physical hard disk partitions
This “raw partition support” is quite similar to the “full hard disk” access described above. However, in this case, any partitioning information will be stored inside the VMDK image, so you can
e.g. install a different boot loader in the virtual hard disk without affecting the host’s partitioning information. While the guest will be able to see all partitions that exist on the physical disk,
access will be filtered in that reading from partitions for which no access is allowed the partitions
will only yield zeroes, and all writes to them are ignored.
To create a special image for raw partition support (which will contain a small amount of data,
as already mentioned), on a Linux host, use the command
VBoxManage internalcommands createrawvmdk -filename /path/to/file.vmdk
-rawdisk /dev/sda -partitions 1,5
As you can see, the command is identical to the one for “full hard disk” access, except for the
additional -partitions parameter. This example would create the image /path/to/file.vmdk
(which, again, must be absolute), and partitions 1 and 5 of /dev/sda would be made accessible
to the guest.
VirtualBox uses the same partition numbering as your Linux host. As a result, the numbers
given in the above example would refer to the first primary partition and the first logical drive in
the extended partition, respectively.
On a Windows host, instead of the above device specification, use e.g. \\.\PhysicalDrive0.
On a Mac OS X host, instead of the above device specification use e.g. /dev/disk1. Note that
on OS X you can only use partitions which are not mounted (eject the respective volume first).
Partition numbers are the same on Linux, Windows and Mac OS X hosts.
The numbers for the list of partitions can be taken from the output of
VBoxManage internalcommands listpartitions -rawdisk /dev/sda
The output lists the partition types and sizes to give the user enough information to identify the
partitions necessary for the guest.
Images which give access to individual partitions are specific to a particular host disk setup.
You cannot transfer these images to another host; also, whenever the host partitioning changes,
the image must be recreated.
Creating the image requires read/write access for the given device. Read/write access is also
later needed when using the image from a virtual machine. If this is not feasible, there is a special
variant for raw partition access (currently only available on Linux hosts) that avoids having to
give the current user access to the entire disk. To set up such an image, use
VBoxManage internalcommands createrawvmdk -filename /path/to/file.vmdk
-rawdisk /dev/sda -partitions 1,5 -relative
When used from a virtual machine, the image will then refer not to the entire disk, but only to the
individual partitions (in the example /dev/sda1 and /dev/sda5). As a consequence, read/write
access is only required for the affected partitions, not for the entire disk. During creation however, read-only access to the entire disk is required to obtain the partitioning information.
In some configurations it may be necessary to change the MBR code of the created image, e.g.
to replace the Linux boot loader that is used on the host by another boot loader. This allows e.g.
the guest to boot directly to Windows, while the host boots Linux from the “same” disk. For this
purpose the -mbr parameter is provided. It specifies a file name from which to take the MBR
code. The partition table is not modified at all, so a MBR file from a system with totally different
partitioning can be used. An example of this is
VBoxManage internalcommands createrawvmdk -filename /path/to/file.vmdk
-rawdisk /dev/sda -partitions 1,5 -mbr winxp.mbr
The modified MBR will be stored inside the image, not on the host disk.
The created image can be attached to a storage controller in a VM configuration as usual.
143
9 Advanced topics
9.7.2 Configuring the hard disk vendor product data (VPD)
VirtualBox reports vendor product data for its virtual hard disks which consist of hard disk serial number, firmware revision and model number. These can be changed using the following
commands:
VBoxManage setextradata "VM name"
"VBoxInternal/Devices/ahci/0/Config/Port0/SerialNumber" "serial"
VBoxManage setextradata "VM name"
"VBoxInternal/Devices/ahci/0/Config/Port0/FirmwareRevision" "firmware"
VBoxManage setextradata "VM name"
"VBoxInternal/Devices/ahci/0/Config/Port0/ModelNumber" "model"
The serial number is a 20 byte alphanumeric string, the firmware revision an 8 byte alphanumeric string and the model number a 40 byte alphanumeric string. Instead of “Port0” (referring
to the first port), specify the desired SATA hard disk port.
Additional three parameters are needed for CD/DVD drives to report the vendor product data:
VBoxManage setextradata "VM name"
"VBoxInternal/Devices/ahci/0/Config/Port0/ATAPIVendorId" "vendor"
VBoxManage setextradata "VM name"
"VBoxInternal/Devices/ahci/0/Config/Port0/ATAPIProductId" "product"
VBoxManage setextradata "VM name"
"VBoxInternal/Devices/ahci/0/Config/Port0/ATAPIRevision" "revision"
The vendor id is an 8 byte alphanumeric string, the product id an 16 byte alphanumeric string
and the revision a 4 byte alphanumeric string. Instead of “Port0” (referring to the first port),
specify the desired SATA hard disk port.
9.7.3 Access iSCSI targets via Internal Networking
As an experimental feature, VirtualBox allows for accessing an iSCSI target running in a virtual
machine which is configured for using Internal Networking mode. Please see chapter 5.10,
iSCSI servers, page 82; chapter 6.5, Internal networking, page 88; and chapter 8.16, VBoxManage
storageattach, page 119 for additional information.
The IP stack accessing Internal Networking must be configured in the virtual machine which
accesses the iSCSI target. A free static IP and a MAC address not used by other virtual machines
must be chosen. In the example below, adapt the name of the virtual machine, the MAC address,
the IP configuration and the Internal Networking name (“MyIntNet”) according to your needs.
The following seven commands must first be issued:
VBoxManage
VBoxManage
VBoxManage
VBoxManage
VBoxManage
VBoxManage
VBoxManage
setextradata
setextradata
setextradata
setextradata
setextradata
setextradata
setextradata
"VM
"VM
"VM
"VM
"VM
"VM
"VM
name"
name"
name"
name"
name"
name"
name"
VBoxInternal/Devices/IntNetIP/0/Trusted 1
VBoxInternal/Devices/IntNetIP/0/Config/MAC 08:00:27:01:02:0f
VBoxInternal/Devices/IntNetIP/0/Config/IP 10.0.9.1
VBoxInternal/Devices/IntNetIP/0/Config/Netmask 255.255.255.0
VBoxInternal/Devices/IntNetIP/0/LUN#0/Driver IntNet
VBoxInternal/Devices/IntNetIP/0/LUN#0/Config/Network MyIntNet
VBoxInternal/Devices/IntNetIP/0/LUN#0/Config/IsService 1
Finally the iSCSI disk must be attached with the --intnet option to tell the iSCSI initiator to
use internal networking:
VBoxManage storageattach ... --medium iscsi
--server 10.0.9.30 --target iqn.2008-12.com.sun:sampletarget --intnet
Compared to a “regular” iSCSI setup, IP address of the target must be specified as a numeric
IP address, as there is no DNS resolver for internal networking.
The virtual machine with the iSCSI target should be started before the VM using it is powered
on. If a virtual machine using an iSCSI disk is started without having the iSCSI target powered
up, it can take up to 200 seconds to detect this situation. The VM will fail to power up.
144
9 Advanced topics
9.8 Launching more than 120 VMs on Solaris hosts
Solaris hosts have a fixed number of IPC semaphores IDs per process preventing users from
starting more than 120 VMs. While trying to launch more VMs you would be shown a “Cannot
create IPC semaphore” error.
In order to run more VMs, you will need to bump the semaphore ID limit of the VBoxSVC
process. Execute as root the prctl command as shown below. The process ID of VBoxSVC can
be obtained using the ps list command.
prctl -r -n project.max-sem-ids -v 2048 <pid-of-VBoxSVC>
9.9 Legacy commands for using serial ports
Starting with version 1.4, VirtualBox provided support for virtual serial ports, which, at the time,
was rather complicated to set up with a sequence of VBoxManage setextradata statements.
Since version 1.5, that way of setting up serial ports is no longer necessary and deprecated. To
set up virtual serial ports, use the methods now described in chapter 3.9, Serial ports, page 48.
Note: For backwards compatibility, the old setextradata statements, whose description is retained below from the old version of the manual, take precedence over the
new way of configuring serial ports. As a result, if configuring serial ports the new way
doesn’t work, make sure the VM in question does not have old configuration data such
as below still active.
The old sequence of configuring a serial port used the following 6 commands:
VBoxManage setextradata "VM name"
"VBoxInternal/Devices/serial/0/Config/IRQ" 4
VBoxManage setextradata "VM name"
"VBoxInternal/Devices/serial/0/Config/IOBase" 0x3f8
VBoxManage setextradata "VM name"
"VBoxInternal/Devices/serial/0/LUN#0/Driver" Char
VBoxManage setextradata "VM name"
"VBoxInternal/Devices/serial/0/LUN#0/AttachedDriver/Driver" NamedPipe
VBoxManage setextradata "VM name"
"VBoxInternal/Devices/serial/0/LUN#0/AttachedDriver/Config/Location" "\\.\pipe\vboxCOM1"
VBoxManage setextradata "VM name"
"VBoxInternal/Devices/serial/0/LUN#0/AttachedDriver/Config/IsServer" 1
This sets up a serial port in the guest with the default settings for COM1 (IRQ 4, I/O address
0x3f8) and the Location setting assumes that this configuration is used on a Windows host,
because the Windows named pipe syntax is used. Keep in mind that on Windows hosts a named
pipe must always start with \\.\pipe\. On Linux the same config settings apply, except that
the path name for the Location can be chosen more freely. Local domain sockets can be placed
anywhere, provided the user running VirtualBox has the permission to create a new file in the
directory. The final command above defines that VirtualBox acts as a server, i.e. it creates the
named pipe itself instead of connecting to an already existing one.
9.10 Fine-tuning the VirtualBox NAT engine
9.10.1 Configuring the address of a NAT network interface
In NAT mode, the guest network interface is assigned to the IPv4 range 10.0.x.0/24 by default
where x corresponds to the instance of the NAT interface +2. So x is 2 when there is only one
145
9 Advanced topics
NAT instance active. In that case the guest is assigned to the address 10.0.2.15, the gateway is
set to 10.0.2.2 and the name server can be found at 10.0.2.3.
If, for any reason, the NAT network needs to be changed, this can be achieved with the following command:
VBoxManage modifyvm "VM name" --natnet1 "192.168/16"
This command would reserve the network addresses from 192.168.0.0 to 192.168.254.254
for the first NAT network instance of “VM name”. The guest IP would be assigned to
192.168.0.15 and the default gateway could be found at 192.168.0.2.
9.10.2 Configuring the boot server (next server) of a NAT network
interface
For network booting in NAT mode, by default VirtualBox uses a built-in TFTP server at the IP
address 10.0.2.3. This default behavior should work fine for typical remote-booting scenarios.
However, it is possible to change the boot server IP and the location of the boot image with the
following commands:
VBoxManage modifyvm "VM name" --nattftpserver1 10.0.2.2
VBoxManage modifyvm "VM name" --nattftpfile1 /srv/tftp/boot/MyPXEBoot.pxe
9.10.3 Tuning TCP/IP buffers for NAT
The VirtualBox NAT stack performance is often determined by its interaction with the host’s
TCP/IP stack and the size of several buffers (SO_RCVBUF and SO_SNDBUF). For certain setups
users might want to adjust the buffer size for a better performance. This can by achieved using
the following commands (values are in kilobytes and can range from 8 to 1024):
VBoxManage modifyvm "VM name" --natsettings1 16000,128,128,0,0
This example illustrates tuning the NAT settings. The first parameter is the MTU, then the size
of the socket’s send buffer and the size of the socket’s receive buffer, the initial size of the TCP
send window, and lastly the initial size of the TCP receive window. Note that specifying zero
means fallback to the default value.
Each of these buffers has a default size of 64KB and default MTU is 1500.
9.10.4 Binding NAT sockets to a specific interface
By default, VirtualBox’s NAT engine will route TCP/IP packets through the default interface
assigned by the host’s TCP/IP stack. (The technical reason for this is that the NAT engine uses
sockets for communication.) If, for some reason, you want to change this behavior, you can tell
the NAT engine to bind to a particular IP address instead. Use the following command:
VBoxManage modifyvm "VM name" --natbindip1 "10.45.0.2"
After this, all outgoing traffic will be sent through the interface with the IP address 10.45.0.2.
Please make sure that this interface is up and running prior to this assignment.
9.10.5 Enabling DNS proxy in NAT mode
The NAT engine by default offers the same DNS servers to the guest that are configured on the
host. In some scenarios, it can be desirable to hide the DNS server IPs from the guest, for example
when this information can change on the host due to expiring DHCP leases. In this case, you can
tell the NAT engine to act as DNS proxy using the following command:
VBoxManage modifyvm "VM name" --natdnsproxy1 on
146
9 Advanced topics
9.10.6 Using the host’s resolver as a DNS proxy in NAT mode
For resolving network names, the DHCP server of the NAT engine offers a list of registered
DNS servers of the host. If for some reason you need to hide this DNS server list and use the
host’s resolver settings, thereby forcing the VirtualBox NAT engine to intercept DNS requests and
forward them to host’s resolver, use the following command:
VBoxManage modifyvm "VM name" --natdnshostresolver1 on
Note that this setting is similar to the DNS proxy mode, however whereas the proxy mode
just forwards DNS requests to the appropriate servers, the resolver mode will interpret the DNS
requests and use the host’s DNS API to query the information and return it to the guest.
9.10.7 Configuring aliasing of the NAT engine
By default, the NAT core uses aliasing and uses random ports when generating an alias for a
connection. This works well for the most protocols like SSH, FTP and so on. Though some
protocols might need a more transparent behavior or may depend on the real port number the
packet was sent from. It is possible to change the NAT mode via the VBoxManage frontend with
the following commands:
VBoxManage modifyvm "VM name" --nataliasmode proxyonly
and
VBoxManage modifyvm "Linux Guest" --nataliasmode sameports
The first example disables aliasing and switches NAT into transparent mode, the second example enforces preserving of port values. These modes can be combined if necessary.
9.11 Configuring the BIOS DMI information
The DMI data VirtualBox provides to guests can be changed for a specific VM. Use the following
commands to configure the DMI BIOS information:
VBoxManage setextradata "VM name"
"VBoxInternal/Devices/pcbios/0/Config/DmiBIOSVendor"
VBoxManage setextradata "VM name"
"VBoxInternal/Devices/pcbios/0/Config/DmiBIOSVersion"
VBoxManage setextradata "VM name"
"VBoxInternal/Devices/pcbios/0/Config/DmiBIOSReleaseDate"
VBoxManage setextradata "VM name"
"VBoxInternal/Devices/pcbios/0/Config/DmiBIOSReleaseMajor"
VBoxManage setextradata "VM name"
"VBoxInternal/Devices/pcbios/0/Config/DmiBIOSReleaseMinor"
VBoxManage setextradata "VM name"
"VBoxInternal/Devices/pcbios/0/Config/DmiBIOSFirmwareMajor"
VBoxManage setextradata "VM name"
"VBoxInternal/Devices/pcbios/0/Config/DmiBIOSFirmwareMinor"
VBoxManage setextradata "VM name"
"VBoxInternal/Devices/pcbios/0/Config/DmiSystemVendor"
VBoxManage setextradata "VM name"
"VBoxInternal/Devices/pcbios/0/Config/DmiSystemProduct"
VBoxManage setextradata "VM name"
"VBoxInternal/Devices/pcbios/0/Config/DmiSystemVersion"
VBoxManage setextradata "VM name"
"VBoxInternal/Devices/pcbios/0/Config/DmiSystemSerial"
VBoxManage setextradata "VM name"
"VBoxInternal/Devices/pcbios/0/Config/DmiSystemSKU"
VBoxManage setextradata "VM name"
"VBoxInternal/Devices/pcbios/0/Config/DmiSystemFamily"
147
"BIOS Vendor"
"BIOS Version"
"BIOS Release Date"
1
2
3
4
"System Vendor"
"System Product"
"System Version"
"System Serial"
"System SKU"
"System Family"
9 Advanced topics
VBoxManage setextradata "VM name"
"VBoxInternal/Devices/pcbios/0/Config/DmiSystemUuid"
"9852bf98-b83c-49db-a8de-182c42c7226b"
If a DMI string is not set, the default value of VirtualBox is used. To set an empty string use
"<EMPTY>".
Note that in the above list, all quoted parameters (DmiBIOSVendor, DmiBIOSVersion but
not DmiBIOSReleaseMajor) are expected to be strings. If such a string is a valid number,
the parameter is treated as number and the VM will most probably refuse to start with an
VERR_CFGM_NOT_STRING error. In that case, use "string:<value>", for instance
VBoxManage setextradata "VM name"
"VBoxInternal/Devices/pcbios/0/Config/DmiSystemSerial"
"string:1234"
Changing this information can be necessary to provide the DMI information of the host to the
guest to prevent Windows from asking for a new product key. On Linux hosts the DMI BIOS
information can be obtained with
dmidecode -t0
and the DMI system information can be obtained with
dmidecode -t1
9.12 Fine-tuning timers and time synchronization
9.12.1 Configuring the guest time stamp counter (TSC) to reflect guest
execution
By default, VirtualBox keeps all sources of time visible to the guest synchronized to a single time
source, the monotonic host time. This reflects the assumptions of many guest operating systems,
which expect all time sources to reflect “wall clock” time. In special circumstances it may be
useful however to make the TSC (time stamp counter) in the guest reflect the time actually spent
executing the guest.
This special TSC handling mode can be enabled on a per-VM basis, and for best results must
be used only in combination with hardware virtualization. To enable this mode use the following
command:
VBoxManage setextradata "VM name" "VBoxInternal/TM/TSCTiedToExecution" 1
To revert to the default TSC handling mode use:
VBoxManage setextradata "VM name" "VBoxInternal/TM/TSCTiedToExecution"
Note that if you use the special TSC handling mode with a guest operating system which is very
strict about the consistency of time sources you may get a warning or error message about the
timing inconsistency. It may also cause clocks to become unreliable with some guest operating
systems depending on they use the TSC.
9.12.2 Accelerate or slow down the guest clock
For certain purposes it can be useful to accelerate or to slow down the (virtual) guest clock. This
can be achieved as follows:
VBoxManage setextradata "VM name" "VBoxInternal/TM/WarpDrivePercentage" 200
The above example will double the speed of the guest clock while
148
9 Advanced topics
VBoxManage setextradata "VM name" "VBoxInternal/TM/WarpDrivePercentage" 50
will halve the speed of the guest clock. Note that changing the rate of the virtual clock can
confuse the guest and can even lead to abnormal guest behavior. For instance, a higher clock
rate means shorter timeouts for virtual devices with the result that a slightly increased response
time of a virtual device due to an increased host load can cause guest failures. Note further
that any time synchronization mechanism will frequently try to resynchronize the guest clock
with the reference clock (which is the host clock if the VirtualBox Guest Additions are active).
Therefore any time synchronization should be disabled if the rate of the guest clock is changed as
described above (see chapter 9.12.3, Tuning the Guest Additions time synchronization parameters,
page 149).
9.12.3 Tuning the Guest Additions time synchronization parameters
The VirtualBox Guest Additions ensure that the guest’s system time is synchronized with the host
time. There are several parameters which can be tuned. The parameters can be set for a specific
VM using the following command:
VBoxManage guestproperty set VM_NAME "/VirtualBox/GuestAdd/VBoxService/PARAMETER" VALUE
where PARAMETER is one of the following:
--timesync-interval Specifies the interval at which to synchronize the time with the host.
The default is 10000 ms (10 seconds).
--timesync-min-adjust The minimum absolute drift value measured in milliseconds to make
adjustments for. The default is 1000 ms on OS/2 and 100 ms elsewhere.
--timesync-latency-factor The factor to multiply the time query latency with to calculate
the dynamic minimum adjust time. The default is 8 times, that means in detail: Measure
the time it takes to determine the host time (the guest has to contact the VM host service
which may take some time), multiply this value by 8 and do an adjustment only if the time
difference between host and guest is bigger than this value. Don’t do any time adjustment
otherwise.
--timesync-max-latency The max host timer query latency to accept. The default is 250 ms.
--timesync-set-threshold The absolute drift threshold, given as milliseconds where to start
setting the time instead of trying to smoothly adjust it. The default is 20 minutes.
--timesync-set-start Set the time when starting the time sync service.
--timesync-set-on-restore 0|1 Set the time after the VM was restored from a saved state
when passing 1 as parameter (default). Disable by passing 0. In the latter case, the time
will be adjusted smoothly which can take a long time.
All these parameters can be specified as command line parameters to VBoxService as well.
9.13 Configuring multiple host-only network interfaces on
Solaris hosts
By default VirtualBox provides you with one host-only network interface. Adding more host-only
network interfaces on Solaris hosts requires manual configuration. Here’s how to add two more
host-only network interfaces.
You first need to stop all running VMs and unplumb all existing “vboxnet” interfaces. Execute
the following commands as root:
149
9 Advanced topics
ifconfig vboxnet0 unplumb
Once you make sure all vboxnet interfaces are unplumbed, remove the driver using:
rem_drv vboxnet
then edit the file /platform/i86pc/kernel/drv/vboxnet.conf and add a line for the new
interfaces:
name="vboxnet" parent="pseudo" instance=1;
name="vboxnet" parent="pseudo" instance=2;
Add as many of these lines as required and make sure “instance” number is uniquely incremented. Next reload the vboxnet driver using:
add_drv vboxnet
Now plumb all the interfaces using ifconfig vboxnetX plumb (where X can be 0, 1 or 2 in this
case) and once plumbed you can then configure the interface like any other network interface.
To make your newly added interfaces’ settings persistent across reboots you will need to edit
the files /etc/netmasks, and if you are using NWAM /etc/nwam/llp and add the appropriate
entries to set the netmask and static IP for each of those interfaces. The VirtualBox installer only
updates these configuration files for the one “vboxnet0” interface it creates by default.
9.14 Configuring the VirtualBox CoreDumper on Solaris
hosts
VirtualBox is capable of producing its own core files when things go wrong and for more extensive debugging. Currently this is only available on Solaris hosts.
The VirtualBox CoreDumper can be enabled using the following command:
VBoxManage setextradata "VM name" VBoxInternal2/CoreDumpEnabled 1
You can specify which directory to use for core dumps with this command:
VBoxManage setextradata "VM name" VBoxInternal2/CoreDumpDir <path-to-directory>
Make sure the directory you specify is on a volume with sufficient free space and that the
VirtualBox process has sufficient permissions to write files to this directory. If you skip this
command and don’t specify any core dump directory, the current directory of the VirtualBox executable will be used (which would most likely fail when writing cores as they are protected with
root permissions). It is recommended you explicity set a core dump directory.
You must specify when the VirtualBox CoreDumper should be triggered. This is done using the
following commands:
VBoxManage setextradata "VM name" VBoxInternal2/CoreDumpReplaceSystemDump 1
VBoxManage setextradata "VM name" VBoxInternal2/CoreDumpLive 1
At least one of the above two commands will have to be provided if you have enabled the
VirtualBox CoreDumper.
Setting CoreDumpReplaceSystemDump sets up the VM to override the host’s core dumping
mechanism and in the event of any crash only the VirtualBox CoreDumper would produce the
core file.
Setting CoreDumpLive sets up the VM to produce cores whenever the VM receives a SIGUSR2
signal. After producing the core file, the VM will not be terminated and will continue to run. You
can take cores of the VM process using the command:
kill -s SIGUSR2 <VM-process-id>
Core files produced by the VirtualBox CoreDumper are of the form core.vb.<ProcessName>.<ProcessID>,
e.g.core.vb.VBoxHeadless.11321.
150
9 Advanced topics
9.15 Locking down the VirtualBox manager GUI
There are several advanced customization settings for locking down the VirtualBox manager, that
is, removing some features that the user should not see.
VBoxManage setextradata global GUI/Customizations OPTION[,OPTION...]
where OPTION is one of the following keywords:
noSelector Don’t allow to start the VirtualBox manager. Trying to do so will show a window
containing a proper error message.
noMenuBar VM windows will not contain a menu bar.
noStatusBar VM windows will not contain a status bar.
To disable any GUI customization do
VBoxManage setextradata global GUI/Customizations
To disable all host key combinations, open the preferences and change the host key to None.
This might be useful when using VirtualBox in a kiosk mode.
Furthermore, you can disallow certain actions when terminating a VM. To disallow specific
actions, type:
VBoxManage setextradata "VM name" GUI/RestrictedCloseActions OPTION[,OPTION...]
where OPTION is one of the following keywords:
SaveState Don’t allow the user to save the VM state when terminating the VM.
Shutdown Don’t allow the user to shutdown the VM by sending the ACPI power-off event to the
guest.
PowerOff Don’t allow the user to power off the VM.
Restore Don’t allow the user to return to the last snapshot when powering off the VM.
Any combination of the above is allowed. If all options are specified, the VM cannot be shut
down at all.
9.16 Starting the VirtualBox web service automatically
The VirtualBox web service (vboxwebsrv) is used for controlling VirtualBox remotely. It is documented in detail in the VirtualBox Software Development Kit (SDK); please see chapter 11,
VirtualBox programming interfaces, page 163. As the client base using this interface is growing,
we added start scripts for the various operation systems we support. The following describes
how to use them.
• On Mac OS X, launchd is used.
An example configuration file can be found in
$HOME/Library/LaunchAgents/org.virtualbox.vboxwebsrv.plist. It can be enabled
by changing the Disabled key from true to false. To manually start the service use the
following command:
launchctl load ~/Library/LaunchAgents/org.virtualbox.vboxwebsrv.plist
For additional information on how launchd services could be configured see http://
developer.apple.com/mac/library/documentation/MacOSX/Conceptual/BPSystemStartup/
BPSystemStartup.html.
151
9 Advanced topics
9.17 Memory Ballooning Service
Starting at VirtualBox 4.0.8 a new host executable called VBoxBalloonCtrl is available to automatically take care of a VM’s configured memory balloon (see chapter 4.8.1, Memory ballooning,
page 69 for an introduction to memory ballooning). This especially is useful for server environments where VMs may dynamically require more or less memory during runtime.
VBoxBalloonCtrl periodically checks a VM’s current memory balloon and its free guest RAM
and automatically adjusts the current memory balloon by inflating or deflating it accordingly.
This handling only applies to running VMs having recent Guest Additions installed.
To set up VBoxBalloonCtrl and adjust the maximum ballooning size a VM can reach the following parameters will be checked in the following order:
• specified via VBoxBalloonCtrl command line parameter --balloon-max
• per-VM parameter using
VBoxManage setextradata "VM-Name" VBoxInternal/Guest/BalloonSizeMax <Size in MB>
• global parameter for all VMs using
VBoxManage setextradata global VBoxInternal/Guest/BalloonSizeMax <Size in MB>
Note: If no maximum ballooning size is specified by at least one of the parameters
above, no ballooning will be performed at all.
For more options and parameters check the built-in command line help accessible with --help.
152
10 Technical background
The contents of this chapter are not required to use VirtualBox successfully. The following is
provided as additional information for readers who are more familiar with computer architecture
and technology and wish to find out more about how VirtualBox works “under the hood”.
10.1 Where VirtualBox stores its files
In VirtualBox, a virtual machine and its settings are described in a virtual machine settings file
in XML format. In addition, most virtual machine have one or more virtual hard disks, which
are typically represented by disk images (e.g. in VDI format). Where all these files are stored
depends on which version of VirtualBox created the machine.
10.1.1 Machines created by VirtualBox version 4.0 or later
Starting with version 4.0, by default, each virtual machine has one directory on your host computer where all the files of that machine are stored – the XML settings file (with a .vbox file
extension) and its disk images.
By default, this “machine folder” is placed in a common folder called “VirtualBox VMs”, which
VirtualBox creates in the current system user’s home directory. The location of this home directory depends on the conventions of the host operating system:
• On Windows, this is %HOMEDRIVE%%HOMEPATH%; typically something like C:\Documents
and Settings\Username\.
• On Mac OS X, this is /Users/username.
• On Linux and Solaris, this is /home/username.
For simplicity, we will abbreviate this as $HOME below. Using that convention, the common
folder for all virtual machines is $HOME/VirtualBox VMs.
As an example, when you create a virtual machine called “Example VM”, you will find that
VirtualBox creates
1. the folder $HOME/VirtualBox VMs/Example VM/ and, in that folder,
2. the settings file Example VM.vbox and
3. the virtual disk image Example VM.vdi.
This is the default layout if you use the “Create new virtual machine” wizard as described in
chapter 1.7, Creating your first virtual machine, page 16. Once you start working with the VM,
additional files will show up: you will find log files in a subfolder called Logs, and once you have
taken snapshots, they will appear in a Snapshots subfolder. For each VM, you can change the
location of its snapsnots folder in the VM settings.
You can change the default machine folder by selecting “Preferences” from the “File” menu
in the VirtualBox main window. Then, in the window that pops up, click on the “General” tab.
Alternatively, use VBoxManage setproperty machinefolder; see chapter 8.25, VBoxManage
setproperty, page 125.
153
10 Technical background
10.1.2 Machines created by VirtualBox versions before 4.0
If you have upgraded to VirtualBox 4.0 from an earlier version of VirtualBox, you probably have
settings files and disks in the earlier file system layout.
Before version 4.0, VirtualBox separated the machine settings files from virtual disk images.
The machine settings files had an .xml file extension and resided in a folder called “Machines”
under the global VirtualBox configuration directory (see the next section). So, for example, on
Linux, this was the hidden $HOME/.VirtualBox/Machines directory. The default hard disks
folder was called “HardDisks” and resided in the .VirtualBox folder as well. Both locations
could be changed by the user in the global preferences. (The concept of a “default hard disk
folder” has been abandoned with VirtualBox 4.0, since disk images now reside in each machine’s
folder by default.)
The old layout had several severe disadvantages.
1. It was very difficult to move a virtual machine from one host to another because the
files involved did not reside in the same folder. In addition, the virtual media of all
machines were registered with a global registry in the central VirtualBox settings file
($HOME/.VirtualBox/VirtualBox.xml).
To move a machine to another host, it was therefore not enough to move the XML settings
file and the disk images (which were in different locations), but the hard disk entries from
the global media registry XML had to be meticulously copied as well, which was close to
impossible if the machine had snapshots and therefore differencing images.
2. Storing virtual disk images, which can grow very large, under the hidden .VirtualBox
directory (at least on Linux and Solaris hosts) made many users wonder where their disk
space had gone.
Whereas new VMs created with VirtualBox 4.0 or later will conform to the new layout, for
maximum compatibility, old VMs are not converted to the new layout. Otherwise machine settings would be irrevocably broken if a user downgraded from 4.0 back to an older version of
VirtualBox.
10.1.3 Global configuration data
In addition to the files of the virtual machines, VirtualBox maintains global configuration data.
On Windows, Linux and Solaris, this is in $HOME/.VirtualBox (which makes it hidden on Linux
and Solaris), whereas on a Mac this resides in $HOME/Library/VirtualBox.
VirtualBox creates this configuration directory automatically if necessary. Optionally, you can
supply an alternate configuration directory by setting the VBOX_USER_HOME environment variable. (Since the global VirtualBox.xml settings file points to all other configuration files, this
allows for switching between several VirtualBox configurations entirely.)
Most importantly, in this directory, VirtualBox stores its global settings file, another XML file
called VirtualBox.xml. This includes global configuration options and the list of registered
virtual machines with pointers to their XML settings files. (Neither the location of this file nor its
directory has changed with VirtualBox 4.0.)
Before VirtualBox 4.0, all virtual media (disk image files) were also contained in a global
registry in this settings file. For compatibility, this media registry still exists if you upgrade
VirtualBox and there are media from machines which were created with a version before 4.0.
If you have no such machines, then there will be no global media registry; with VirtualBox 4.0,
each machine XML file has its own media registry.
Also before VirtualBox 4.0, the default “Machines” folder and the default “HardDisks” folder
resided under the VirtualBox configuration directory (e.g. $HOME/.VirtualBox/Machines on
Linux). If you are upgrading from a VirtualBox version before 4.0, files in these directories are
not automatically moved in order not to break backwards compatibility.
154
10 Technical background
10.1.4 Summary of 4.0 configuration changes
Default machines folder
Default disk image location
Machine settings file extension
Media registry
Media registration
Before 4.0
4.0 or above
$HOME/.VirtualBox/Machines
$HOME/.VirtualBox/HardDisks
.xml
Global VirtualBox.xml file
$HOME/VirtualBox VMs
Explicit open/close required
In each machine’s folder
.vbox
Each machine settings file
Automatic on attach
10.1.5 VirtualBox XML files
VirtualBox uses XML for both the machine settings files and the global configuration file,
VirtualBox.xml.
All VirtualBox XML files are versioned. When a new settings file is created (e.g. because a
new virtual machine is created), VirtualBox automatically uses the settings format of the current
VirtualBox version. These files may not be readable if you downgrade to an earlier version of
VirtualBox. However, when VirtualBox encounters a settings file from an earlier version (e.g.
after upgrading VirtualBox), it attempts to preserve the settings format as much as possible. It
will only silently upgrade the settings format if the current settings cannot be expressed in the
old format, for example because you enabled a feature that was not present in an earlier version
of VirtualBox.1 In such cases, VirtualBox backs up the old settings file in the virtual machine’s
configuration directory. If you need to go back to the earlier version of VirtualBox, then you will
need to manually copy these backup files back.
We intentionally do not document the specifications of the VirtualBox XML files, as we must
reserve the right to modify them in the future. We therefore strongly suggest that you do not
edit these files manually. VirtualBox provides complete access to its configuration data through
its the VBoxManage command line tool (see chapter 8, VBoxManage, page 99) and its API (see
chapter 11, VirtualBox programming interfaces, page 163).
10.2 VirtualBox executables and components
VirtualBox was designed to be modular and flexible. When the VirtualBox graphical user interface (GUI) is opened and a VM is started, at least three processes are running:
1. VBoxSVC, the VirtualBox service process which always runs in the background. This process is started automatically by the first VirtualBox client process (the GUI, VBoxManage,
VBoxHeadless, the web service or others) and exits a short time after the last client exits.
The service is responsible for bookkeeping, maintaining the state of all VMs, and for providing communication between VirtualBox components. This communication is implemented
via COM/XPCOM.
Note: When we refer to “clients” here, we mean the local clients of a particular VBoxSVC server process, not clients in a network. VirtualBox employs its own
client/server design to allow its processes to cooperate, but all these processes run under the same user account on the host operating system, and this is totally transparent
to the user.
1 As
an example, before VirtualBox 3.1, it was only possible to enable or disable a single DVD drive in a virtual machine.
If it was enabled, then it would always be visible as the secondary master of the IDE controller. With VirtualBox 3.1,
DVD drives can be attached to arbitrary slots of arbitrary controllers, so they could be the secondary slave of an IDE
controller or in a SATA slot. If you have a machine settings file from an earlier version and upgrade VirtualBox to 3.1
and then move the DVD drive from its default position, this cannot be expressed in the old settings format; the XML
machine file would get written in the new format, and a backup file of the old format would be kept.
155
10 Technical background
2. The GUI process, VirtualBox, a client application based on the cross-platform Qt library. When started without the --startvm option, this application acts as the VirtualBox
manager, displaying the VMs and their settings. It then communicates settings and
state changes to VBoxSVC and also reflects changes effected through other means, e.g.,
VBoxManage.
3. If the VirtualBox client application is started with the --startvm argument, it loads the
VMM library which includes the actual hypervisor and then runs a virtual machine and
provides the input and output for the guest.
Any VirtualBox front-end (client) will communicate with the service process and can both
control and reflect the current state. For example, either the VM selector or the VM window or
VBoxManage can be used to pause the running VM, and other components will always reflect
the changed state.
The VirtualBox GUI application is only one of several available front ends (clients). The complete list shipped with VirtualBox is:
1. VirtualBox, the Qt front end implementing the manager and running VMs;
2. VBoxManage, a less user-friendly but more powerful alternative, described in chapter 8,
VBoxManage, page 99.
3. VBoxSDL, a simple graphical front end based on the SDL library; see chapter 9.1, VBoxSDL,
the simplified VM displayer, page 134.
4. VBoxHeadless, a VM front end which does not directly provide any video output and
keyboard/mouse input, but allows redirection via VirtualBox Remote Desktop Extension;
see chapter 7.1.2, VBoxHeadless, the remote desktop server, page 91.
5. vboxwebsrv, the VirtualBox web service process which allows for controlling a VirtualBox
host remotely. This is described in detail in the VirtualBox Software Development Kit (SDK)
reference; please see chapter 11, VirtualBox programming interfaces, page 163 for details.
6. The VirtualBox Python shell, a Python alternative to VBoxManage. This is also described
in the SDK reference.
Internally, VirtualBox consists of many more or less separate components. You may encounter
these when analyzing VirtualBox internal error messages or log files. These include:
• IPRT, a portable runtime library which abstracts file access, threading, string manipulation,
etc. Whenever VirtualBox accesses host operating features, it does so through this library
for cross-platform portability.
• VMM (Virtual Machine Monitor), the heart of the hypervisor.
• EM (Execution Manager), controls execution of guest code.
• REM (Recompiled Execution Monitor), provides software emulation of CPU instructions.
• TRPM (Trap Manager), intercepts and processes guest traps and exceptions.
• HWACCM (Hardware Acceleration Manager), provides support for VT-x and AMD-V.
• PDM (Pluggable Device Manager), an abstract interface between the VMM and emulated
devices which separates device implementations from VMM internals and makes it easy
to add new emulated devices. Through PDM, third-party developers can add new virtual
devices to VirtualBox without having to change VirtualBox itself.
• PGM (Page Manager), a component controlling guest paging.
156
10 Technical background
• PATM (Patch Manager), patches guest code to improve and speed up software virtualization.
• TM (Time Manager), handles timers and all aspects of time inside guests.
• CFGM (Configuration Manager), provides a tree structure which holds configuration settings for the VM and all emulated devices.
• SSM (Saved State Manager), saves and loads VM state.
• VUSB (Virtual USB), a USB layer which separates emulated USB controllers from the controllers on the host and from USB devices; this also enables remote USB.
• DBGF (Debug Facility), a built-in VM debuger.
• VirtualBox emulates a number of devices to provide the hardware environment that various guests need. Most of these are standard devices found in many PC compatible machines and widely supported by guest operating systems. For network and storage devices
in particular, there are several options for the emulated devices to access the underlying
hardware. These devices are managed by PDM.
• Guest Additions for various guest operating systems. This is code that is installed from
within a virtual machine; see chapter 4, Guest Additions, page 53.
• The “Main” component is special: it ties all the above bits together and is the only public
API that VirtualBox provides. All the client processes listed above use only this API and
never access the hypervisor components directly. As a result, third-party applications that
use the VirtualBox Main API can rely on the fact that it is always well-tested and that all
capabilities of VirtualBox are fully exposed. It is this API that is described in the VirtualBox
SDK mentioned above (again, see chapter 11, VirtualBox programming interfaces, page
163).
10.3 Hardware vs. software virtualization
VirtualBox allows software in the virtual machine to run directly on the processor of the host,
but an array of complex techniques is employed to intercept operations that would interfere with
your host. Whenever the guest attempts to do something that could be harmful to your computer
and its data, VirtualBox steps in and takes action. In particular, for lots of hardware that the
guest believes to be accessing, VirtualBox simulates a certain “virtual” environment according to
how you have configured a virtual machine. For example, when the guest attempts to access a
hard disk, VirtualBox redirects these requests to whatever you have configured to be the virtual
machine’s virtual hard disk – normally, an image file on your host.
Unfortunately, the x86 platform was never designed to be virtualized. Detecting situations in
which VirtualBox needs to take control over the guest code that is executing, as described above,
is difficult. There are two ways in which to achive this:
• Since 2006, Intel and AMD processors have had support for so-called “hardware virtualization”. This means that these processors can help VirtualBox to intercept potentially
dangerous operations that a guest operating system may be attempting and also makes it
easier to present virtual hardware to a virtual machine.
These hardware features differ between Intel and AMD processors. Intel named its technology VT-x; AMD calls theirs AMD-V. The Intel and AMD support for virtualization is very
different in detail, but not very different in principle.
Note: On many systems, the hardware virtualization features first need to be enabled
in the BIOS before VirtualBox can use them.
157
10 Technical background
• As opposed to other virtualization software, for many usage scenarios, VirtualBox does not
require hardware virtualization features to be present. Through sophisticated techniques,
VirtualBox virtualizes many guest operating systems entirely in software. This means that
you can run virtual machines even on older processors which do not support hardware
virtualization.
Even though VirtualBox does not always require hardware virtualization, enabling it is required
in the following scenarios:
• Certain rare guest operating systems like OS/2 make use of very esoteric processor instructions that are not supported with our software virtualization. For virtual machines that
are configured to contain such an operating system, hardware virtualization is enabled
automatically.
• VirtualBox’s 64-bit guest support (added with version 2.0) and multiprocessing (SMP,
added with version 3.0) both require hardware virtualization to be enabled. (This is not
much of a limitation since the vast majority of today’s 64-bit and multicore CPUs ship with
hardware virtualization anyway; the exceptions to this rule are e.g. older Intel Celeron and
AMD Opteron CPUs.)
Warning: Do not run other hypervisors (open-source or commercial virtualization
products) together with VirtualBox! While several hypervisors can normally be installed
in parallel, do not attempt to run several virtual machines from competing hypervisors
at the same time. VirtualBox cannot track what another hypervisor is currently attempting to do on the same host, and especially if several products attempt to use
hardware virtualization features such as VT-x, this can crash the entire host. Also,
within VirtualBox, you can mix software and hardware virtualization when running
multiple VMs. In certain cases a small performance penalty will be unavoidable when
mixing VT-x and software virtualization VMs. We recommend not mixing virtualization
modes if maximum performance and low overhead are essential. This does not apply
to AMD-V.
10.4 Details about software virtualization
Implementing virtualization on x86 CPUs with no hardware virtualization support is an extraordinarily complex task because the CPU architecture was not designed to be virtualized. The
problems can usually be solved, but at the cost of reduced performance. Thus, there is a constant clash between virtualization performance and accuracy.
The x86 instruction set was originally designed in the 1970s and underwent significant
changes with the addition of protected mode in the 1980s with the 286 CPU architecture and
then again with the Intel 386 and its 32-bit architecture. Whereas the 386 did have limited virtualization support for real mode operation (V86 mode, as used by the “DOS Box” of Windows
3.x and OS/2 2.x), no support was provided for virtualizing the entire architecture.
In theory, software virtualization is not overly complex. In addition to the four privilege levels
(“rings”) provided by the hardware (of which typically only two are used: ring 0 for kernel mode
and ring 3 for user mode), one needs to differentiate between “host context” and “guest context”.
In “host context”, everything is as if no hypervisor was active. This might be the active mode if
another application on your host has been scheduled CPU time; in that case, there is a host ring
3 mode and a host ring 0 mode. The hypervisor is not involved.
In “guest context”, however, a virtual machine is active. So long as the guest code is running
in ring 3, this is not much of a problem since a hypervisor can set up the page tables properly
158
10 Technical background
and run that code natively on the processor. The problems mostly lie in how to intercept what
the guest’s kernel does.
There are several possible solutions to these problems. One approach is full software emulation, usually involving recompilation. That is, all code to be run by the guest is analyzed,
transformed into a form which will not allow the guest to either modify or see the true state of
the CPU, and only then executed. This process is obviously highly complex and costly in terms
of performance. (VirtualBox contains a recompiler based on QEMU which can be used for pure
software emulation, but the recompiler is only activated in special situations, described below.)
Another possible solution is paravirtualization, in which only specially modified guest OSes
are allowed to run. This way, most of the hardware access is abstracted and any functions which
would normally access the hardware or privileged CPU state are passed on to the hypervisor
instead. Paravirtualization can achieve good functionality and performance on standard x86
CPUs, but it can only work if the guest OS can actually be modified, which is obviously not
always the case.
VirtualBox chooses a different approach. When starting a virtual machine, through its ring-0
support kernel driver, VirtualBox has set up the host system so that it can run most of the guest
code natively, but it has inserted itself at the “bottom” of the picture. It can then assume control
when needed – if a privileged instruction is executed, the guest traps (in particular because
an I/O register was accessed and a device needs to be virtualized) or external interrupts occur.
VirtualBox may then handle this and either route a request to a virtual device or possibly delegate
handling such things to the guest or host OS. In guest context, VirtualBox can therefore be in
one of three states:
• Guest ring 3 code is run unmodified, at full speed, as much as possible. The number of
faults will generally be low (unless the guest allows port I/O from ring 3, something we
cannot do as we don’t want the guest to be able to access real ports). This is also referred
to as “raw mode”, as the guest ring-3 code runs unmodified.
• For guest code in ring 0, VirtualBox employs a nasty trick: it actually reconfigures the guest
so that its ring-0 code is run in ring 1 instead (which is normally not used in x86 operating
systems). As a result, when guest ring-0 code (actually running in ring 1) such as a guest
device driver attempts to write to an I/O register or execute a privileged instruction, the
VirtualBox hypervisor in “real” ring 0 can take over.
• The hypervisor (VMM) can be active. Every time a fault occurs, VirtualBox looks at the
offending instruction and can relegate it to a virtual device or the host OS or the guest OS
or run it in the recompiler.
In particular, the recompiler is used when guest code disables interrupts and VirtualBox
cannot figure out when they will be switched back on (in these situations, VirtualBox actually analyzes the guest code using its own disassembler). Also, certain privileged instructions such as LIDT need to be handled specially. Finally, any real-mode or protected-mode
code (e.g. BIOS code, a DOS guest, or any operating system startup) is run in the recompiler entirely.
Unfortunately this only works to a degree. Among others, the following situations require
special handling:
1. Running ring 0 code in ring 1 causes a lot of additional instruction faults, as ring 1 is not
allowed to execute any privileged instructions (of which guest’s ring-0 contains plenty).
With each of these faults, the VMM must step in and emulate the code to achieve the
desired behavior. While this works, emulating thousands of these faults is very expensive
and severely hurts the performance of the virtualized guest.
2. There are certain flaws in the implementation of ring 1 in the x86 architecture that were
never fixed. Certain instructions that should trap in ring 1 don’t. This affect for example the
159
10 Technical background
LGDT/SGDT, LIDT/SIDT, or POPF/PUSHF instruction pairs. Whereas the “load” operation
is privileged and can therefore be trapped, the “store” instruction always succeed. If the
guest is allowed to execute these, it will see the true state of the CPU, not the virtualized
state. The CPUID instruction also has the same problem.
3. A hypervisor typically needs to reserve some portion of the guest’s address space (both
linear address space and selectors) for its own use. This is not entirely transparent to the
guest OS and may cause clashes.
4. The SYSENTER instruction (used for system calls) executed by an application running in a
guest OS always transitions to ring 0. But that is where the hypervisor runs, not the guest
OS. In this case, the hypervisor must trap and emulate the instruction even when it is not
desirable.
5. The CPU segment registers contain a “hidden” descriptor cache which is not softwareaccessible. The hypervisor cannot read, save, or restore this state, but the guest OS may
use it.
6. Some resources must (and can) be trapped by the hypervisor, but the access is so frequent
that this creates a significant performance overhead. An example is the TPR (Task Priority)
register in 32-bit mode. Accesses to this register must be trapped by the hypervisor, but
certain guest operating systems (notably Windows and Solaris) write this register very
often, which adversely affects virtualization performance.
To fix these performance and security issues, VirtualBox contains a Code Scanning and Analysis
Manager (CSAM), which disassembles guest code, and the Patch Manager (PATM), which can
replace it at runtime.
Before executing ring 0 code, CSAM scans it recursively to discover problematic instructions.
PATM then performs in-situ patching, i.e. it replaces the instruction with a jump to hypervisor
memory where an integrated code generator has placed a more suitable implementation. In
reality, this is a very complex task as there are lots of odd situations to be discovered and handled
correctly. So, with its current complexity, one could argue that PATM is an advanced in-situ
recompiler.
In addition, every time a fault occurs, VirtualBox analyzes the offending code to determine if it
is possible to patch it in order to prevent it from causing more faults in the future. This approach
works well in practice and dramatically improves software virtualization performance.
10.5 Details about hardware virtualization
With Intel VT-x, there are two distinct modes of CPU operation: VMX root mode and non-root
mode.
• In root mode, the CPU operates much like older generations of processors without VT-x
support. There are four privilege levels (“rings”), and the same instruction set is supported,
with the addition of several virtualization specific instruction. Root mode is what a host
operating system without virtualization uses, and it is also used by a hypervisor when
virtualization is active.
• In non-root mode, CPU operation is significantly different. There are still four privilege
rings and the same instruction set, but a new structure called VMCS (Virtual Machine Control Structure) now controls the CPU operation and determines how certain instructions
behave. Non-root mode is where guest systems run.
Switching from root mode to non-root mode is called “VM entry”, the switch back is “VM exit”.
The VMCS includes a guest and host state area which is saved/restored at VM entry and exit.
Most importantly, the VMCS controls which guest operations will cause VM exits.
160
10 Technical background
The VMCS provides fairly fine-grained control over what the guests can and can’t do. For
example, a hypervisor can allow a guest to write certain bits in shadowed control registers, but
not others. This enables efficient virtualization in cases where guests can be allowed to write
control bits without disrupting the hypervisor, while preventing them from altering control bits
over which the hypervisor needs to retain full control. The VMCS also provides control over
interrupt delivery and exceptions.
Whenever an instruction or event causes a VM exit, the VMCS contains information about
the exit reason, often with accompanying detail. For example, if a write to the CR0 register
causes an exit, the offending instruction is recorded, along with the fact that a write access to
a control register caused the exit, and information about source and destination register. Thus
the hypervisor can efficiently handle the condition without needing advanced techniques such as
CSAM and PATM described above.
VT-x inherently avoids several of the problems which software virtualization faces. The guest
has its own completely separate address space not shared with the hypervisor, which eliminates
potential clashes. Additionally, guest OS kernel code runs at privilege ring 0 in VMX non-root
mode, obviating the problems by running ring 0 code at less privileged levels. For example the
SYSENTER instruction can transition to ring 0 without causing problems. Naturally, even at ring
0 in VMX non-root mode, any I/O access by guest code still causes a VM exit, allowing for device
emulation.
The biggest difference between VT-x and AMD-V is that AMD-V provides a more complete
virtualization environment. VT-x requires the VMX non-root code to run with paging enabled,
which precludes hardware virtualization of real-mode code and non-paged protected-mode software. This typically only includes firmware and OS loaders, but nevertheless complicates VT-x
hypervisor implementation. AMD-V does not have this restriction.
Of course hardware virtualization is not perfect. Compared to software virtualization, the
overhead of VM exits is relatively high. This causes problems for devices whose emulation requires high number of traps. One example is the VGA device in 16-color modes, where not only
every I/O port access but also every access to the framebuffer memory must be trapped.
10.6 Nested paging and VPIDs
In addition to “plain” hardware virtualization, your processor may also support additional sophisticated techniques:2
• A newer feature called “nested paging” implements some memory management in hardware, which can greatly accelerate hardware virtualization since these tasks no longer need
to be performed by the virtualization software.
With nested paging, the hardware provides another level of indirection when translating
linear to physical addresses. Page tables function as before, but linear addresses are now
translated to “guest physical” addresses first and not physical addresses directly. A new set
of paging registers now exists under the traditional paging mechanism and translates from
guest physical addresses to host physical addresses, which are used to access memory.
Nested paging eliminates the overhead caused by VM exits and page table accesses. In
essence, with nested page tables the guest can handle paging without intervention from
the hypervisor. Nested paging thus significantly improves virtualization performance.
On AMD processors, nested paging has been available starting with the Barcelona (K10)
architecture – they call it now “rapid virtualization indexing” (RVI). Intel added support for
nested paging, which they call “extended page tables” (EPT), with their Core i7 (Nehalem)
processors.
If nested paging is enabled, the VirtualBox hypervisor can also use large pages to reduce
TLB usage and overhead. This can yield a performance improvement of up to 5%. To
2 VirtualBox
2.0 added support for AMD’s nested paging; support for Intel’s EPT and VPIDs was added with version 2.1.
161
10 Technical background
enable this feature for a VM, you need to use the VBoxManage modifyvm --largepages
command; see chapter 8.7, VBoxManage modifyvm, page 109.
• On Intel CPUs, another hardware feature called “Virtual Processor Identifiers” (VPIDs)
can greatly accelerate context switching by reducing the need for expensive flushing of the
processor’s Translation Lookaside Buffers (TLBs).
To enable these features for a VM, you need to use the VBoxManage modifyvm
--vtxvpids and --largepages commands; see chapter 8.7, VBoxManage modifyvm,
page 109.
162
11 VirtualBox programming interfaces
VirtualBox comes with comprehensive support for third-party developers. The so-called “Main
API” of VirtualBox exposes the entire feature set of the virtualization engine. It is completely
documented and available to anyone who wishes to control VirtualBox programmatically.
The Main API is made available to C++ clients through COM (on Windows hosts) or XPCOM
(on other hosts). Bridges also exist for SOAP, Java and Python.
All programming information (documentation, reference information, header and other interface files as well as samples) have been split out to a separate Software Development Kit
(SDK), which is available for download from http://www.virtualbox.org. In particular, the
SDK comes with a “Programming Guide and Reference” in PDF format, which contains, among
other things, the information that was previously in this chapter of the User Manual.
163
12 Troubleshooting
This chapter provides answers to commonly asked questions. In order to improve your user
experience with VirtualBox, it is recommended to read this section to learn more about common
pitfalls and get recommendations on how to use the product.
12.1 Procedures and tools
12.1.1 Categorizing and isolating problems
More often than not, a virtualized guest behaves like a physical system. Any problems that a
physical machine would encounter, a virtual machine will encounter as well. If, for example,
Internet connectivity is lost due to external issues, virtual machines will be affected just as much
as physical ones.
If a true VirtualBox problem is encountered, it helps to categorize and isolate the problem first.
Here are some of the questions that should be answered before reporting a problem:
1. Is the problem specific to a certain guest OS? Specific release of a guest OS? Especially
with Linux guest related problems, the issue may be specific to a certain distribution and
version of Linux.
2. Is the problem specific to a certain host OS? Problems are usually not host OS specific
(because most of the VirtualBox code base is shared across all supported platforms), but
especially in the areas of networking and USB support, there are significant differences
between host platforms. Some GUI related issues are also host specific.
3. Is the problem specific to certain host hardware? This category of issues is typically related
to the host CPU. Because of significant differences between VT-x and AMD-V, problems may
be specific to one or the other technology. The exact CPU model may also make a difference
(even for software virtualization) because different CPUs support different features, which
may affect certain aspects of guest CPU operation.
4. Is the problem specific to a certain virtualization mode? Some problems may only occur in
software virtualization mode, others may be specific to hardware virtualization.
5. Is the problem specific to guest SMP? That is, is it related to the number of virtual CPUs
(VCPUs) in the guest? Using more than one CPU usually significantly affects the internal
operation of a guest OS.
6. Is the problem specific to the Guest Additions? In some cases, this is a given (e.g., a shared
folders problem), in other cases it may be less obvious (for example, display problems).
And if the problem is Guest Additions specific, is it also specific to a certain version of the
Additions?
7. Is the problem specific to a certain environment? Some problems are related to a particular
environment external to the VM; this usually involves network setup. Certain configurations of external servers such as DHCP or PXE may expose problems which do not occur
with other, similar servers.
8. Is the problem a regression? Knowing that an issue is a regression usually makes it significantly easier to find the solution. In this case, it is crucial to know which version is affected
and which is not.
164
12 Troubleshooting
12.1.2 Collecting debugging information
For problem determination, it is often important to collect debugging information which can be
analyzed by VirtualBox support. This section contains information about what kind of information can be obtained.
Every time VirtualBox starts up a VM, a so-called “release log file” is created containing lots
of information about the VM configuration and runtime events. The log file is called VBox.log
and resides in the VM log file folder. Typically this will be a directory like this:
$HOME/VirtualBox VMs/{machinename}/Logs
When starting a VM, the configuration file of the last run will be renamed to .1, up to .3.
Sometimes when there is a problem, it is useful to have a look at the logs. Also when requesting
support for VirtualBox, supplying the corresponding log file is mandatory.
For convenience, for each virtual machine, the VirtualBox main window can show these logs in
a window. To access it, select a virtual machine from the list on the left and select “Show logs...“
from the “Machine” window.
The release log file (VBox.log) contains a wealth of diagnostic information, such as Host OS
type and version, VirtualBox version and build (32-bit or 64-bit), a complete dump of the guest’s
configuration (CFGM), detailed information about the host CPU type and supported features,
whether hardware virtualization is enabled, information about VT-x/AMD-V setup, state transitions (creating, running, paused, stopping, etc.), guest BIOS messages, Guest Additions messages, device-specific log entries and, at the end of execution, final guest state and condensed
statistics.
In case of crashes, it is very important to collect crash dumps. This is true for both host and
guest crashes. For information about enabling core dumps on Linux, Solaris, and OS X systems,
refer to the core dump article on the VirtualBox website.1
You can also use VBoxManage debugvm to create a dump of a complete virtual machine; see
chapter 8.30, VBoxManage debugvm, page 130.
For network related problems, it is often helpful to capture a trace of network traffic. If the
traffic is routed through an adapter on the host, it is possible to use Wireshark or a similar tool
to capture the traffic there. However, this often also includes a lot of traffic unrelated to the VM.
VirtualBox provides an ability to capture network traffic only on a specific VM’s network
adapter. Refer to the network tracing article on the VirtualBox website2 for information on
enabling this capture. The trace files created by VirtualBox are in .pcap format and can be easily
analyzed with Wireshark.
12.1.3 The built-in VM debugger
VirtualBox includes a built-in VM debugger, which advanced users may find useful. This debugger allows for examining and, to some extent, controlling the VM state.
Warning: Use the VM debugger at your own risk. There is no support for it, and the
following documentation is only made available for advanced users with a very high
level of familiarity with the x86/AMD64 machine instruction set, as well as detailed
knowledge of the PC architecture. A degree of familiarity with the internals of the
guest OS in question may also be very helpful.
The VM debugger is available in all regular production versions of VirtualBox, but it is disabled
by default because the average user will have little use for it. There are two ways to access the
debugger:
1 http://www.virtualbox.org/wiki/Core_dump.
2 http://www.virtualbox.org/wiki/Network_tips.
165
12 Troubleshooting
• A debugger console window displayed alongside the VM
• Via the telnet protocol at port 5000
The debugger can be enabled in three ways:
• Start the VM directly using VirtualBox --startvm, with an additional --dbg, --debug,
or --debug-command-line argument. See the VirtualBox usage help for details.
• Set the VBOX_GUI_DBG_ENABLED or VBOX_GUI_DBG_AUTO_SHOW environment variable to
true before launching the VirtualBox process. Setting these variables (only their presence
is checked) is effective even when the first VirtualBox process is the VM selector window.
VMs subsequently launched from the selector will have the debugger enabled.
• Set the GUI/Dbg/Enabled extra data item to true before launching the VM. This can be
set globally or on a per VM basis.
A new ’Debug’ menu entry will be added to the VirtualBox application. This menu allows the
user to open the debugger console.
The VM debugger command syntax is loosely modeled on Microsoft and IBM debuggers used
on DOS, OS/2 and Windows. Users familiar with symdeb, CodeView, or the OS/2 kernel debugger will find the VirtualBox VM debugger familiar.
The most important command is help. This will print brief usage help for all debugger commands. The set of commands supported by the VM debugger changes frequently and the help
command is always up-to-date.
A brief summary of frequently used commands follows:
• stop – stops the VM execution and enables single stepping
• g – continue VM execution
• t – single step an instruction
• rg/rh/r – print the guest/hypervisor/current registers
• kg/kh/k – print the guest/hypervisor/current call stack
• da/db/dw/dd/dq – print memory contents as ASCII/bytes/words/dwords/qwords
• u – unassemble memory
• dg – print the guest’s GDT
• di – print the guest’s IDT
• dl – print the guest’s LDT
• dt – print the guest’s TSS
• dp* – print the guest’s page table structures
• bp/br – set a normal/recompiler breakpoint
• bl – list breakpoints
• bc – clear a breakpoint
• writecore – writes a VM core file to disk, refer chapter 12.1.4, VM core format, page 167
166
12 Troubleshooting
See the built-in help for other available commands.
The VM debugger supports symbolic debugging, although symbols for guest code are often
not available. For Solaris guests, the detect command automatically determines the guest OS
version and locates kernel symbols in guest’s memory. Symbolic debugging is then available.
For Linux guests, the detect commands also determines the guest OS version, but there are
no symbols in the guest’s memory. Kernel symbols are available in the file /proc/kallsyms
on Linux guests. This file must be copied to the host, for example using scp. The loadmap
debugger command can be used to make the symbol information available to the VM debugger.
Note that the kallsyms file contains the symbols for the currently loaded modules; if the guest’s
configuration changes, the symbols will change as well and must be updated.
For all guests, a simple way to verify that the correct symbols are loaded is the k command.
The guest is normally idling and it should be clear from the symbolic information that the guest
operating system’s idle loop is being executed.
Another group of debugger commands is the set of info commands. Running info help
provides complete usage information. The information commands provide ad-hoc data pertinent
to various emulated devices and aspects of the VMM. There is no general guideline for using the
info commands, the right command to use depends entirely on the problem being investigated.
Some of the info commands are:
• cfgm – print a branch of the configuration tree
• cpuid – display the guest CPUID leaves
• ioport – print registered I/O port ranges
• mmio – print registered MMIO ranges
• mode – print the current paging mode
• pit – print the i8254 PIT state
• pic – print the i8259A PIC state
• ohci/ehci – print a subset of the OHCI/EHCI USB controller state
• pcnet0 – print the PCnet state
• vgatext – print the contents of the VGA framebuffer formatted as standard text mode
• timers – print all VM timers
The output of the info commands generally requires in-depth knowledge of the emulated device and/or VirtualBox VMM internals. However, when used properly, the information provided
can be invaluable.
12.1.4 VM core format
VirtualBox uses the 64-bit ELF format for its VM core files created by VBoxManage debugvm;
see chapter 8.30, VBoxManage debugvm, page 130. The VM core file contain the memory and
CPU dumps of the VM and can be useful for debugging your guest OS. The 64-bit ELF object
format specficiation can be obtained here: http://downloads.openwatcom.org/ftp/devel/
docs/elf-64-gen.pdf.
The overall layout of the VM core format is as follows:
[ ELF 64 Header]
[ Program Header, type PT_NOTE ]
-> offset to COREDESCRIPTOR
[ Program Header, type PT_LOAD ] - one for each contiguous physical memory range
-> Memory offset of range
167
12 Troubleshooting
-> File offset
[ Note Header, type NT_VBOXCORE ]
[ COREDESCRIPTOR ]
-> Magic
-> VM core file version
-> VBox version
-> Number of vCPUs etc.
[ Note Header, type NT_VBOXCPU ] - one for each vCPU
[ vCPU 1 Note Header ]
[ CPUMCTX - vCPU 1 dump ]
[ Additional Notes + Data ] - currently unused
[ Memory dump ]
The memory descriptors contain physical addresses relative to the guest and not virtual addresses. Regions of memory such as MMIO regions are not included in the core file.
The relevant data structures and definitions can be found in the VirtualBox sources under
the following header files: include/VBox/dbgfcorefmt.h, include/VBox/cpumctx.h and
src/VBox/Runtime/include/internal/ldrELFCommon.h.
The VM core file can be inspected using elfdump and GNU readelf or other similar utilities.
12.2 General
12.2.1 Guest shows IDE/SATA errors for file-based images on slow host
file system
Occasionally, some host file systems provide very poor writing performance and as a consequence
cause the guest to time out IDE/SATA commands. This is normal behavior and should normally
cause no real problems, as the guest should repeat commands that have timed out. However
some guests (e.g. some Linux versions) have severe problems if a write to an image file takes
longer than about 15 seconds. Some file systems however require more than a minute to complete a single write, if the host cache contains a large amount of data that needs to be written.
The symptom for this problem is that the guest can no longer access its files during large write
or copying operations, usually leading to an immediate hang of the guest.
In order to work around this problem (the true fix is to use a faster file system that doesn’t
exhibit such unacceptable write performance), it is possible to flush the image file after a certain amount of data has been written. This interval is normally infinite, but can be configured
individually for each disk of a VM.
For IDE disks use the following command:
VBoxManage setextradata "VM name"
"VBoxInternal/Devices/piix3ide/0/LUN#[x]/Config/FlushInterval" [b]
For SATA disks use the following command:
VBoxManage setextradata "VM name"
"VBoxInternal/Devices/ahci/0/LUN#[x]/Config/FlushInterval" [b]
The value [x] that selects the disk for IDE is 0 for the master device on the first channel, 1 for
the slave device on the first channel, 2 for the master device on the second channel or 3 for the
master device on the second channel. For SATA use values between 0 and 29. Only disks support
this configuration option; it must not be set for CD/DVD drives.
The unit of the interval [b] is the number of bytes written since the last flush. The value for it
must be selected so that the occasional long write delays do not occur. Since the proper flush interval depends on the performance of the host and the host filesystem, finding the optimal value
that makes the problem disappear requires some experimentation. Values between 1000000 and
10000000 (1 to 10 megabytes) are a good starting point. Decreasing the interval both decreases
the probability of the problem and the write performance of the guest. Setting the value unnecessarily low will cost performance without providing any benefits. An interval of 1 will cause a
168
12 Troubleshooting
flush for each write operation and should solve the problem in any case, but has a severe write
performance penalty.
Providing a value of 0 for [b] is treated as an infinite flush interval, effectively disabling this
workaround. Removing the extra data key by specifying no value for [b] has the same effect.
12.2.2 Responding to guest IDE/SATA flush requests
If desired, the virtual disk images can be flushed when the guest issues the IDE FLUSH CACHE
command. Normally these requests are ignored for improved performance. The parameters
below are only accepted for disk drives. They must not be set for DVD drives.
To enable flushing for IDE disks, issue the following command:
VBoxManage setextradata "VM name" "VBoxInternal/Devices/piix3ide/0/LUN#[x]/Config/IgnoreFlush" 0
The value [x] that selects the disk is 0 for the master device on the first channel, 1 for the slave
device on the first channel, 2 for the master device on the second channel or 3 for the master
device on the second channel.
To enable flushing for SATA disks, issue the following command:
VBoxManage setextradata "VM name" "VBoxInternal/Devices/ahci/0/LUN#[x]/Config/IgnoreFlush" 0
The value [x] that selects the disk can be a value between 0 and 29.
Note that this doesn’t affect the flushes performed according to the configuration described in
chapter 12.2.1, Guest shows IDE/SATA errors for file-based images on slow host file system, page
168. Restoring the default of ignoring flush commands is possible by setting the value to 1 or by
removing the key.
12.2.3 Poor performance caused by host power management
On some hardware platforms and operating systems, virtualization peformance is negatively
affected by host CPU power management. The symptoms may be choppy audio in the guest or
erratic guest clock behavior.
Some of the problems may be caused by firmware and/or host operating system bugs. Therefore, updating the firmware and applying operating systems fixes is recommended.
For optimal virtualization performance, the C1E power state support in the system’s BIOS
should be disabled, if such a setting is available (not all systems support the C1E power state).
Disabling other power management settings may also improve performance. However, a balance
between performance and power consumption must always be considered.
12.2.4 GUI: 2D Video Acceleration option is grayed out
To use 2D Video Acceleration within VirtualBox, your host’s video card should support certain
OpenGL extensions. On startup, VirtualBox checks for those extensions, and, if the test fails, this
option is silently grayed out.
To find out why it has failed, you can manually execute the following command:
VBoxTestOGL --log "log_file_name" --test 2D
It will list the required OpenGL extensions one by one and will show you which one failed the
test. This usually means that you are running an outdated or misconfigured OpenGL driver on
your host. It can also mean that your video chip is lacking required functionality.
169
12 Troubleshooting
12.3 Windows guests
12.3.1 Windows bluescreens after changing VM configuration
Changing certain virtual machine settings can cause Windows guests to fail during start up with
a bluescreen. This may happen if you change VM settings after installing Windows, or if you
copy a disk image with an already installed Windows to a newly created VM which has settings
that differ from the original machine.
This applies in particular to the following settings:
• The ACPI and I/O APIC settings should never be changed after installing Windows. Depending on the presence of these hardware features, the Windows installation program
chooses special kernel and device driver versions and will fail to startup should these hardware features be removed. (Enabling them for a Windows VM which was installed without
them does not cause any harm. However, Windows will not use these features in this case.)
• Changing the storage controller hardware will cause bootup failures as well. This might
also apply to you if you copy a disk image from an older version of VirtualBox to a virtual
machine created with a newer VirtualBox version; the default subtype of IDE controller
hardware was changed from PIIX3 to PIIX4 with VirtualBox 2.2. Make sure these settings
are identical.
12.3.2 Windows 0x101 bluescreens with SMP enabled (IPI timeout)
If a VM is configured to have more than one processor (symmetrical multiprocessing, SMP), some
configurations of Windows guests crash with an 0x101 error message, indicating a timeout for
inter-processor interrupts (IPIs). These interrupts synchronize memory management between
processors.
According to Microsoft, this is due to a race condition in Windows. A hotfix is available.3 If
this does not help, please reduce the number of virtual processors to 1.
12.3.3 Windows 2000 installation failures
When installing Windows 2000 guests, you might run into one of the following issues:
• Installation reboots, usually during component registration.
• Installation fills the whole hard disk with empty log files.
• Installation complains about a failure installing msgina.dll.
These problems are all caused by a bug in the hard disk driver of Windows 2000. After issuing a
hard disk request, there is a race condition in the Windows driver code which leads to corruption
if the operation completes too fast, i.e. the hardware interrupt from the IDE controller arrives
too soon. With physical hardware, there is a guaranteed delay in most systems so the problem
is usually hidden there (however it should be possible to reproduce it on physical hardware as
well). In a virtual environment, it is possible for the operation to be done immediately (especially
on very fast systems with multiple CPUs) and the interrupt is signaled sooner than on a physical
system. The solution is to introduce an artificial delay before delivering such interrupts. This
delay can be configured for a VM using the following command:
VBoxManage setextradata "VM name" "VBoxInternal/Devices/piix3ide/0/Config/IRQDelay" 1
This sets the delay to one millisecond. In case this doesn’t help, increase it to a value between
1 and 5 milliseconds. Please note that this slows down disk performance. After installation, you
should be able to remove the key (or set it to 0).
3 See http://support.microsoft.com/kb/955076.
170
12 Troubleshooting
12.3.4 How to record bluescreen information from Windows guests
When Windows guests run into a kernel crash, they display the infamous bluescreen. Depending
on how Windows is configured, the information will remain on the screen until the machine
is restarted or it will reboot automatically. During installation, Windows is usually configured
to reboot automatically. With automatic reboots, there is no chance to record the bluescreen
information which might be important for problem determination.
VirtualBox provides a method of halting a guest when it wants to perform a reset. In order to
enable this feature, issue the following command:
VBoxManage setextradata "VM name" "VBoxInternal/PDM/HaltOnReset" 1
12.3.5 No networking in Windows Vista guests
With Windows Vista, Microsoft dropped support for the AMD PCNet card that VirtualBox used
to provide as the default virtual network card before version 1.6.0. For Windows Vista guests,
VirtualBox now uses an Intel E1000 card by default.
If, for some reason, you still want to use the AMD card, you need to download the PCNet
driver from the AMD website (available for 32-bit Windows only). You can transfer it into the
virtual machine using a shared folder, see (see chapter 4.3, Shared folders, page 62).
12.3.6 Windows guests may cause a high CPU load
Several background applications of Windows guests, especially virus scanners, are known to
increases the CPU load notably even if the guest appears to be idle. We recommend to deactivate
virus scanners within virtualized guests if possible.
12.3.7 Long delays when accessing shared folders
The performance for accesses to shared folders from a Windows guest might be decreased due
to delays during the resolution of the VirtualBox shared folders name service. To fix these delays, add the following entries to the file \windows\system32\drivers\etc\lmhosts of the
Windows guest:
255.255.255.255
255.255.255.255
VBOXSVR #PRE
VBOXSRV #PRE
After doing this change, a reboot of the guest is required.
12.4 Linux and X11 guests
12.4.1 Linux guests may cause a high CPU load
Some Linux guests may cause a high CPU load even if the guest system appears to be idle.
This can be caused by a high timer frequency of the guest kernel. Some Linux distributions,
for example Fedora, ship a Linux kernel configured for a timer frequency of 1000Hz. We
recommend to recompile the guest kernel and to select a timer frequency of 100Hz.
Linux kernels shipped with Red Hat Enterprise Linux (RHEL) as of release 4.7 and 5.1 as
well as kernels of related Linux distributions (for instance CentOS and Oracle Enterprise Linux)
support a kernel parameter divider=N. Hence, such kernels support a lower timer frequency
without recompilation. We suggest to add the kernel parameter divider=10 to select a guest
kernel timer frequency of 100Hz.
171
12 Troubleshooting
12.4.2 AMD Barcelona CPUs
Most Linux-based guests will fail with AMD Phenoms or Barcelona-level Opterons due to a bug
in the Linux kernel. Enable the I/O-APIC to work around the problem (see chapter 3.4, System
settings, page 43).
12.4.3 Buggy Linux 2.6 kernel versions
The following bugs in Linux kernels prevent them from executing correctly in VirtualBox, causing
VM boot crashes:
• The Linux kernel version 2.6.18 (and some 2.6.17 versions) introduced a race condition
that can cause boot crashes in VirtualBox. Please use a kernel version 2.6.19 or later.
• With hardware virtualization and the I/O APIC enabled, kernels before 2.6.24-rc6 may
panic on boot with the following message:
Kernel panic - not syncing: IO-APIC + timer doesn’t work! Boot with
apic=debug and send a report. Then try booting with the ’noapic’ option
If you see this message, either disable hardware virtualization or the I/O APIC (see chapter
3.4, System settings, page 43), or upgrade the guest to a newer kernel.4
12.4.4 Shared clipboard, auto-resizing and seamless desktop in X11
guests
Guest desktop services in guests running the X11 window system (Solaris, Linux and others) are
provided by a guest service called VBoxClient, which runs under the ID of the user who started
the desktop session and is automatically started using the following command lines
VBoxClient --clipboard
VBoxClient --display
VBoxClient --seamless
when your X11 user session is started if you are using a common desktop environment (Gnome,
KDE and others). If a particular desktop service is not working correctly, it is worth checking
whether the process which should provide it is running.
The VBoxClient processes create files in the user’s home directory with names of the form
.vboxclient-*.pid when they are running in order to prevent a given service from being
started twice. It can happen due to misconfiguration that these files are created owned by root
and not deleted when the services are stopped, which will prevent them from being started in
future sessions. If the services cannot be started, you may wish to check whether these files still
exist.
12.5 Windows hosts
12.5.1 VBoxSVC out-of-process COM server issues
VirtualBox makes use of the Microsoft Component Object Model (COM) for inter- and intraprocess communication. This allows VirtualBox to share a common configuration among different virtual machine processes and provide several user interface options based on a common architecture. All global status information and configuration is maintained by the process
VBoxSVC.exe, which is an out-of-process COM server. Whenever a VirtualBox process is started,
4 See http://www.mail-archive.com/[email protected]/msg30813.html
kernel fix.
172
for details about the
12 Troubleshooting
it requests access to the COM server and Windows automatically starts the process. Note that it
should never be started by the end user.
When the last process disconnects from the COM server, it will terminate itself after some
seconds. The VirtualBox configuration (XML files) is maintained and owned by the COM server
and the files are locked whenever the server runs.
In some cases - such as when a virtual machine is terminated unexpectedly - the COM server
will not notice that the client is disconnected and stay active for a longer period (10 minutes or
so) keeping the configuration files locked. In other rare cases the COM server might experience
an internal error and subsequently other processes fail to initialize it. In these situations, it is
recommended to use the Windows task manager to kill the process VBoxSVC.exe.
12.5.2 CD/DVD changes not recognized
In case you have assigned a physical CD/DVD drive to a guest and the guest does not notice when
the medium changes, make sure that the Windows media change notification (MCN) feature is
not turned off. This is represented by the following key in the Windows registry:
HKEY_LOCAL_MACHINE\System\CurrentControlSet\Services\Cdrom\Autorun
Certain applications may disable this key against Microsoft’s advice. If it is set to 0, change it to
1 and reboot your system. VirtualBox relies on Windows notifying it of media changes.
12.5.3 Sluggish response when using Microsoft RDP client
If connecting to a Virtual Machine via the Microsoft RDP client (called Remote Desktop Connection), there can be large delays between input (moving the mouse over a menu is the most
obvious situation) and output. This is because this RDP client collects input for a certain time
before sending it to the RDP server.
The interval can be decreased by setting a Windows registry key to smaller values than the
default of 100. The key does not exist initially and must be of type DWORD. The unit for its
values is milliseconds. Values around 20 are suitable for low-bandwidth connections between the
RDP client and server. Values around 4 can be used for a gigabit Ethernet connection. Generally
values below 10 achieve a performance that is very close to that of the local input devices and
screen of the host on which the Virtual Machine is running.
Depending whether the setting should be changed for an individual user or for the system,
either
HKEY_CURRENT_USER\Software\Microsoft\Terminal Server Client\Min Send Interval
or
HKEY_LOCAL_MACHINE\Software\Microsoft\Terminal Server Client\Min Send Interval
can be set appropriately.
12.5.4 Running an iSCSI initiator and target on a single system
Deadlocks can occur on a Windows host when attempting to access an iSCSI target running in
a guest virtual machine with an iSCSI initiator (e.g. Microsoft iSCSI Initiator) that is running
on the host. This is caused by a flaw in the Windows cache manager component, and causes
sluggish host system response for several minutes, followed by a “Delayed Write Failed” error
message in the system tray or in a separate message window. The guest is blocked during that
period and may show error messages or become unstable.
Setting the environment variable VBOX_DISABLE_HOST_DISK_CACHE to 1 will enable a
workaround for this problem until Microsoft addresses the issue. For example, open a command
prompt window and start VirtualBox like this:
173
12 Troubleshooting
set VBOX_DISABLE_HOST_DISK_CACHE=1
VirtualBox
While this will decrease guest disk performance (especially writes), it does not affect the performance of other applications running on the host.
12.5.5 Bridged networking adapters missing
If no bridged adapters show up in the “Networking” section of the VM settings, this typically
means that the bridged networking driver was not installed properly on your host. This could be
due to the following reasons:
• The maximum allowed filter count was reached on the host. In this case, the MSI log would
mention the 0x8004a029 error code returned on NetFlt network component install:
VBoxNetCfgWinInstallComponent: Install failed, hr (0x8004a029)
You can try to increase the maximum filter count in the Windows registry at the following
key:
HKEY_LOCAL_MACHINE\SYSTEM\CurrentControlSet\Control\Network\MaxNumFilters
The maximum number allowed is 14. After a reboot, try to re-install VirtualBox.
• The INF cache is corrupt. In this case, the install log (%windir%\inf\setupapi.log
on XP or %windir%\inf\setupapi.dev.log on Vista or later) would typically mention the failure to find a suitable driver package for either the sun_VBoxNetFlt or
sun_VBoxNetFltmp components. The solution then is to uninstall VirtualBox, remove the
INF cache (%windir%\inf\INFCACHE.1), reboot and try to re-install VirtualBox
12.5.6 Host-only networking adapters cannot be created
If host-only adapter cannot be created (either via the Manager or VBoxManage), then the INF
cache is probably corrupt. In this case, the install log (%windir%\inf\setupapi.log on XP
or %windir%\inf\setupapi.dev.log on Vista or later) would typically mention the failure to
find a suitable driver package for the sun_VBoxNetAdp component. Again, as with the bridged
networking problem described above, the solution is to uninstall VirtualBox, remove the INF
cache (%windir%\inf\INFCACHE.1), reboot and try to re-install VirtualBox.
12.6 Linux hosts
12.6.1 Linux kernel module refuses to load
If the VirtualBox kernel module (vboxdrv) refuses to load, i.e. you get an “Error inserting
vboxdrv: Invalid argument”, check (as root) the output of the dmesg command to find out why
the load failed. Most probably the kernel disagrees with the version of the gcc used to compile
the module. Make sure that you use the same compiler as used to build the kernel.
12.6.2 Linux host CD/DVD drive not found
If you have configured a virtual machine to use the host’s CD/DVD drive, but this does not appear
to work, make sure that the current user has permission to access the corresponding Linux device
file (/dev/hdc or /dev/scd0 or /dev/cdrom or similar). On most distributions, the user must
be added to a corresponding group (usually called cdrom or cdrw).
174
12 Troubleshooting
12.6.3 Linux host CD/DVD drive not found (older distributions)
On older Linux distributions, if your CD/DVD device has a different name, VirtualBox may be
unable to find it. On older Linux hosts, VirtualBox performs the following steps to locate your
CD/DVD drives:
1. VirtualBox examines if the environment variable VBOX_CDROM is defined (see below). If so,
VirtualBox omits all the following checks.
2. VirtualBox tests if /dev/cdrom works.
3. In addition, VirtualBox checks if any CD/DVD drives are currently mounted by checking
/etc/mtab.
4. In addition, VirtualBox checks if any of the entries in /etc/fstab point to CD/DVD devices.
In other words, you can try to set VBOX_CDROM to contain a list of your CD/DVD devices,
separated by colons, for example as follows:
export VBOX_CDROM=’/dev/cdrom0:/dev/cdrom1’
On modern Linux distributions, VirtualBox uses the hardware abstraction layer (hal) to locate
CD and DVD hardware.
12.6.4 Linux host floppy not found
The previous instructions (for CD and DVD drives) apply accordingly to floppy disks, except
that on older distributions VirtualBox tests for /dev/fd* devices by default, and this can be
overridden with the VBOX_FLOPPY environment variable.
12.6.5 Strange guest IDE error messages when writing to CD/DVD
If the experimental CD/DVD writer support is enabled with an incorrect VirtualBox, host or guest
configuration, it is possible that any attempt to access the CD/DVD writer fails and simply results
in guest kernel error messages (for Linux guests) or application error messages (for Windows
guests). VirtualBox performs the usual consistency checks when a VM is powered up (in particular it aborts with an error message if the device for the CD/DVD writer is not writable by the
user starting the VM), but it cannot detect all misconfigurations. The necessary host and guest
OS configuration is not specific for VirtualBox, but a few frequent problems are listed here which
occurred in connection with VirtualBox.
Special care must be taken to use the correct device. The configured host CD/DVD device file
name (in most cases /dev/cdrom) must point to the device that allows writing to the CD/DVD
unit. For CD/DVD writer units connected to a SCSI controller or to a IDE controller that interfaces to the Linux SCSI subsystem (common for some SATA controllers), this must refer to the
SCSI device node (e.g. /dev/scd0). Even for IDE CD/DVD writer units this must refer to the
appropriate SCSI CD-ROM device node (e.g. /dev/scd0) if the ide-scsi kernel module is loaded.
This module is required for CD/DVD writer support with all Linux 2.4 kernels and some early
2.6 kernels. Many Linux distributions load this module whenever a CD/DVD writer is detected
in the system, even if the kernel would support CD/DVD writers without the module. VirtualBox
supports the use of IDE device files (e.g. /dev/hdc), provided the kernel supports this and the
ide-scsi module is not loaded.
Similar rules (except that within the guest the CD/DVD writer is always an IDE device) apply to
the guest configuration. Since this setup is very common, it is likely that the default configuration
of the guest works as expected.
175
12 Troubleshooting
12.6.6 VBoxSVC IPC issues
On Linux, VirtualBox makes use of a custom version of Mozilla XPCOM (cross platform component object model) for inter- and intra-process communication (IPC). The process VBoxSVC
serves as a communication hub between different VirtualBox processes and maintains the global
configuration, i.e. the XML database. When starting a VirtualBox component, the processes
VBoxSVC and VirtualBoxXPCOMIPCD are started automatically. They are only accessible from
the user account they are running under. VBoxSVC owns the VirtualBox configuration database
which normally resides in /̃.VirtualBox. While it is running, the configuration files are locked.
Communication between the various VirtualBox components and VBoxSVC is performed through
a local domain socket residing in /tmp/.vbox-<username>-ipc. In case there are communication problems (i.e. a VirtualBox application cannot communicate with VBoxSVC), terminate the
daemons and remove the local domain socket directory.
12.6.7 USB not working
If USB is not working on your Linux host, make sure that the current user is a member of the
vboxusers group. On older hosts, you need to make sure that the user has permission to access
the USB filesystem (usbfs), which VirtualBox relies on to retrieve valid information about your
host’s USB devices. The rest of this section only applies to those older systems.
As usbfs is a virtual filesystem, a chmod on /proc/bus/usb has no effect. The permissions
for usbfs can therefore only be changed by editing the /etc/fstab file.
For example, most Linux distributions have a user group called usb or similar, of which the
current user must be a member. To give all users of that group access to usbfs, make sure the
following line is present:
# 85 is the USB group
none
/proc/bus/usb
usbfs
devgid=85,devmode=664
0
0
Replace 85 with the group ID that matches your system (search /etc/group for “usb” or similar).
Alternatively, if you don’t mind the security hole, give all users access to USB by changing “664”
to “666”.
The various distributions are very creative from which script the usbfs filesystem is mounted.
Sometimes the command is hidden in unexpected places. For SuSE 10.0 the mount command
is part of the udev configuration file /etc/udev/rules.d/50-udev.rules. As this distribution
has no user group called usb, you may e.g. use the vboxusers group which was created by
the VirtualBox installer. Since group numbers are allocated dynamically, the following example
uses 85 as a placeholder. Modify the line containing (a linebreak has been inserted to improve
readability)
DEVPATH="/module/usbcore", ACTION=="add",
RUN+="/bin/mount -t usbfs usbfs /proc/bus/usb"
and add the necessary options (make sure that everything is in a single line):
DEVPATH="/module/usbcore", ACTION=="add",
RUN+="/bin/mount -t usbfs usbfs /proc/bus/usb -o devgid=85,devmode=664"
Debian Etch has the mount command in /etc/init.d/mountkernfs.sh. Since that distribution has no group usb, it is also the easiest solution to allow all members of the group vboxusers
to access the USB subsystem. Modify the line
domount usbfs usbdevfs /proc/bus/usb -onoexec,nosuid,nodev
so that it contains
domount usbfs usbdevfs /proc/bus/usb -onoexec,nosuid,nodev,devgid=85,devmode=664
As usual, replace the 85 with the actual group number which should get access to USB devices.
Other distributions do similar operations in scripts stored in the /etc/init.d directory.
176
12 Troubleshooting
12.6.8 PAX/grsec kernels
Linux kernels including the grsec patch (see http://www.grsecurity.net/) and derivates have
to disable PAX_MPROTECT for the VBox binaries to be able to start a VM. The reason is that VBox
has to create executable code on anonymous memory.
12.6.9 Linux kernel vmalloc pool exhausted
When running a large number of VMs with a lot of RAM on a Linux system (say 20 VMs with 1GB
of RAM each), additional VMs might fail to start with a kernel error saying that the vmalloc pool
is exhausted and should be extended. The error message also tells you to specify vmalloc=256MB
in your kernel parameter list. If adding this parameter to your GRUB or LILO configuration makes
the kernel fail to boot (with a weird error message such as “failed to mount the root partition”),
then you have probably run into a memory conflict of your kernel and initial RAM disk. This can
be solved by adding the following parameter to your GRUB configuration:
uppermem 524288
12.7 Solaris hosts
12.7.1 Cannot start VM, not enough contiguous memory
The ZFS file system is known to use all available RAM as cache if the default system settings are
not changed. This may lead to a heavy fragmentation of the host memory preventing VirtualBox
VMs from being started. We recommend to limit the ZFS cache by adding a line
set zfs:zfs_arc_max = xxxx
to /etc/system where xxxx bytes is the amount of memory usable for the ZFS cache.
12.7.2 VM aborts with out of memory errors on Solaris 10 hosts
32-bit Solaris 10 hosts (bug 1225025) require swap space equal to, or greater than the host’s
physical memory size. For example, 8 GB physical memory would require at least 8 GB swap.
This can be configured during a Solaris 10 install by choosing a ’custom install’ and changing the
default partitions.
Note: This restriction applies only to 32-bit Solaris hosts, 64-bit hosts are not affected!
For existing Solaris 10 installs, an additional swap image needs to be mounted and used as
swap. Hence if you have 1 GB swap and 8 GB of physical memory, you require to add 7 GB more
swap. This can be done as follows:
For ZFS (as root user):
zfs create -V 8gb /_<ZFS volume>_/swap
swap -a /dev/zvol/dsk/_<ZFS volume>_/swap
To mount if after reboot, add the following line to /etc/vfstab:
/dev/zvol/dsk/_<ZFS volume>_/swap - - swap - no -
Alternatively, you could grow the existing swap using:
zfs set volsize=8G rpool/swap
177
12 Troubleshooting
And reboot the system for the changes to take effect.
For UFS (as root user):
mkfile 7g /path/to/swapfile.img
swap -a /path/to/swapfile.img
To mount it after reboot, add the following line to /etc/vfstab:
/path/to/swap.img - - swap - no -
178
13 Security considerations
13.1 Potentially insecure operations
The following features of VirtualBox can present security problems:
• Enabling 3D graphics via the Guest Additions exposes the host to additional security risks;
see chapter 4.4.1, Hardware 3D acceleration (OpenGL and Direct3D 8/9), page 64.
• When teleporting a machine, the data stream through which the machine’s memory contents are transferred from one host to another is not encrypted. A third party with access
to the network through which the data is transferred could therefore intercept that data.
• When using the VirtualBox web service to control a VirtualBox host remotely, connections
to the web service (through which the API calls are transferred via SOAP XML) are not
encrypted, but use plain HTTP. This is a potential security risk! For details about the web
service, please see chapter 11, VirtualBox programming interfaces, page 163.
13.2 Authentication
The following components of VirtualBox can use passwords for authentication:
• When using the VirtualBox extension pack provided by Oracle for VRDP remote desktop
support, you can optionally use various methods to configure RDP authentication. The
“null” method is very insecure and should be avoided in a public network. See chapter
7.1.5, RDP authentication, page 94 for details.
• When using teleporting, passwords can optionally be used to protect a machine waiting
to be teleported from unauthorized access. Note however that these passwords are stored
unencrypted in the machine configuration XML and therefore potentially readable on the
host. See chapter 7.2, Teleporting, page 97 and chapter 8.7.5, Teleporting settings, page
114.
• When using remote iSCSI storage and the storage server requires authentication, a password can optionally be supplied with the VBoxManage storageattach command. Note
however that this is stored unencrypted in the machine configuration and is therefore potentially readable on the host. See chapter 5.10, iSCSI servers, page 82 and chapter 8.16,
VBoxManage storageattach, page 119.
• When using the VirtualBox web service to control a VirtualBox host remotely, connections
to the web service are authenticated in various ways. This is described in detail in the
VirtualBox Software Development Kit (SDK) reference; please see chapter 11, VirtualBox
programming interfaces, page 163.
13.3 Encryption
The following components of VirtualBox use encryption to protect sensitive data:
179
13 Security considerations
• When using the VirtualBox extension pack provided by Oracle for VRDP remote desktop
support, RDP data can optionally be encrypted. See chapter 7.1.6, RDP encryption, page 95
for details.
180
14 Known limitations
This sections describes known problems with VirtualBox 4.0.8. Unless marked otherwise, these
issues are planned to be fixed in later releases.
• The following Guest SMP (multiprocessor) limitations exist:
– Poor performance with 32-bit guests on AMD CPUs. This affects mainly Windows
and Solaris guests, but possibly also some Linux kernel revisions. Partially solved in
3.0.6 for 32 bits Windows NT, 2000, XP and 2003 guests. Requires 3.0.6 or higher
Guest Additions to be installed.
– Poor performance with 32-bit guests on certain Intel CPU models that do not include
virtual APIC hardware optimization support. This affects mainly Windows and Solaris
guests, but possibly also some Linux kernel revisions. Partially solved in 3.0.12 for
32 bits Windows NT, 2000, XP and 2003 guests. Requires 3.0.12 or higher Guest
Additions to be installed.
• 64-bit guests on some 32-bit host systems with VT-x can cause instabilities to your
system. If you experience this, do not attempt to execute 64-bit guests. Refer to the
VirtualBox user forum for additional information.
• For Direct3D support in Windows guests to work, the Guest Additions must be installed
in Windows “safe mode”. Press F8 when the Windows guest is booting and select “Safe
mode”, then install the Guest Additions. Otherwise Windows’ file protection mechanism
will interfere with the replacement DLLs installed by VirtualBox and keep restoring the
original Windows system DLLs.
• Guest control. On Windows guests, a process lauched via the guest control execute support
will not be able to display a graphical user interface unless the user account under which it
is running is currently logged in and has a desktop session.
Also, to use accounts without or with an empty password, the guest’s group policy must
be changed. To do so, open the group policy editor on the command line by typing gpedit.msc, open the key Computer Configuration\Windows Settings\Security Settings\Local Policies\Security Options and change the value of Accounts: Limit local account
use of blank passwords to console logon only to Disabled.
• Compacting virtual disk images is limited to VDI files. The VBoxManage modifyhd
-compact command is currently only implemented for VDI files. At the moment the only
way to optimize the size of a virtual disk images in other formats (VMDK, VHD) is to clone
the image and then use the cloned image in the VM configuration.
• OVF import/export:
– OVF localization (multiple languages in one OVF file) is not yet supported.
– Some OVF sections like StartupSection, DeploymentOptionSection and InstallSection
are ignored.
– OVF environment documents, including their property sections and appliance configuration with ISO images, are not yet supported.
– Remote files via HTTP or other mechanisms are not yet supported.
• Neither scale mode nor seamless mode work correctly with guests using OpenGL 3D
features (such as with compiz-enabled window managers).
181
14 Known limitations
• On Mac OS X hosts, the following features are not yet implemented:
– Numlock emulation
– CPU frequency metric
– Memory ballooning
• Mac OS X Server guests:
– Mac OS X Server guests can only run on a certain host hardware. For details about license and host hardware limitations, please see chapter 3.1.1, Mac OS X Server guests,
page 40.
– VirtualBox does not provide Guest Additions for Mac OS X Server at this time.
– The graphics resolution currently defaults to 1024x768 as Mac OS X Server falls back
to the built-in EFI display support. See chapter 3.12.1, Video modes in EFI, page 52 for
more information on how to change EFI video modes.
– Even when idle, Mac OS X Server guests currently burn 100% CPU. This is a power
management issue that will be addressed in a future release.
– Mac OS X Server guests only work with one CPU assigned to the VM. Support for SMP
will be provided in a future release.
– Depending on your system and version of Mac OS X Server, you might experience
guest hangs after some time. This can be fixed by turning off energy saving (set
timeout to “Never”) in the system preferences.
– By default, the VirtualBox EFI enables debug output of the Mac OS X Server kernel
to help you diagnose boot problems. Note that there is a lot of output and not all
errors are fatal (they would also show on your physical Mac). You can turn off these
messages by issuing this command:
VBoxManage setextradata "VM name" "VBoxInternal2/EfiBootArgs" "
"
To revert to the previous behavior, use:
VBoxManage setextradata "VM name" "VBoxInternal2/EfiBootArgs" ""
• Solaris hosts:
– There is no support for USB devices connected to Solaris 10 hosts.
– USB support on Solaris hosts requires kernel version snv_124 or higher. Webcams and
other isochronous devices are known to have poor performance.
– No ACPI information (battery status, power source) is reported to the guest.
– No support for using wireless adapters with bridged networking.
• Guest Additions for OS/2. Shared folders are not yet supported with OS/2 guests. In addition, seamless windows and automatic guest resizing will probably never be implemented
due to inherent limitations of the OS/2 graphics system.
182
15 Change log
This section summarizes the changes between VirtualBox versions. Note that this change log is
not exhaustive; not all changes are listed.
VirtualBox version numbers consist of three numbers separated by dots where the first and
second number represent the major version and the 3rd number the minor version. Minor version
numbers of official releases are always even. An odd minor version number represents an internal
development or test build. In addition, each build contains a revision number.
15.1 Version 4.0.8 (2011-05-16)
This is a maintenance release. The following items were fixed and/or added:
• Mac OS X hosts: fixed incompatibility with recent Mac OS X versions in 64-bit mode (bug
#8474)
• Mac OS X hosts: fixed incompatibility with hosts with more than 16 cores (bug #8389)
• Mac OS X hosts: fixed painting corruptions on a second monitor in 64-bit mode (bug
#7606)
• GUI: restored functionality to set an empty host key to disallow any host key combination
(4.0.6 regression; bug #8793)
• GUI: more expressive error messages for USB proxy permission problems (mainly Linux
hosts; bug #8823)
• VBoxManage: added controlvm screenshotpng subcommand for saving the screenshot
of a running VM in PNG format
• VBoxHeadless: fixed potential crash during shutdown (Windows hosts only)
• NAT: built-in services use the correct Ethernet addresses in Ethernet header and in ARP
requests
• Host-only networking: fixed adapter reference counting
• E1000: fixed rare guest crashes with Linux SMP guests (bug #8755)
• SATA: fixed guest disk corruption under rare circumstances (only relevant for guests with
more than 2GB RAM; bug #8826)
• Storage: fixed data corruption after a snapshot was taken with asynchronous I/O enabled
(bug #8498)
• Floppy: several improvement
• HPET: another fix for time jumps (bug #8707)
• USB: use correct permissions when creating /dev/vboxusb (Linux hosts only)
• USB: removed assumption that string descriptors are null-terminated (Windows hosts only)
• 3D support: fixed a potential crash when resizing the guest window
183
15 Change log
• 3D support: fixed GNOME 3 rendering under Ubuntu 11.04 and Fedora 15
• Snapshots: fixed another bug which could lose entries in the media registry when restoring
a snapshot (bug #8363)
• Shared Folders: don’t stop mounting the other valid folders if one host folder is inaccessible
(4.0.6 regression)
• Linux Additions: check whether gcc and make are installed before building kernel modules
(bug #8795)
• Solaris Additions: added support for X.Org Server 1.10
• Guest Additions: fixed inappropriate Guest Additions update notification when using
vendor-specific version suffixes (bug #8844)
15.2 Version 4.0.6 (2011-04-21)
This is a maintenance release. The following items were fixed and/or added:
• VMM: fixed incorrect handling of ballooned pages when restoring a VMM from a saved
state
• VMM: don’t crash on hosts with more than 64 cores / hyperthreads; implemented support
for up to 256 host cores (except Windows hosts; bug #8489)
• VMM: fixed guru meditation for PAE guests running on hosts without PAE (bug #8006)
• VMM: fixed slow Linux guests with raw mode and recent guest kernels (bug #8726)
• GUI: support host key combinations (bug #979)
• GUI: fixed progress indicator (bug #7814)
• GUI: show the mouse pointer while the VM is paused if the USB tablet mouse emulation is
used (bug #6799)
• GUI: adapt the snapshot folder as well when renaming a VM (bug #8469)
• GUI: persistently remember the last folders of the disk/DVD/floppy selectors
• GUI: never allow to start a VM with USB-2.0 activated if the proper extension pack is
missing (bug #8182)
• GUI: fixed hang/crash when opening a file dialog in an non-existing folder (bug #8673)
• Snapshots: fixed a bug which could lose entries in the media registry when restoring a
snapshot (bug #8363)
• Snapshots: allow snapshots to be stored in the VM directory
• 3D support: fixed a crash if a VM was forced to terminate (Windows hosts only; bug
#7133)
• Storage: fixed memory leak (4.0 regression; bug #7966)
• Storage: fixed access to iSCSI targets over internal network
• Storage: fixed reading from disks with more than one snapshot for VHD and VMDK images
with disabled host cache (bug #8408)
184
15 Change log
• Storage: fixed a possible hang during VM suspend after an I/O error occurred
• Storage: fixed a possible hang during VM suspend / reset (bug #8276, #8294)
• Storage: automatically create a diff image when attaching a streamOptimized VMDK image
to a VM
• ATA/SATA: fixed automounting of virtual CD/DVD mediums with recent Linux distributions
by correctly reporting the current profile as ’none’ if no medium is present
• Buslogic: fixed emulation for certain guests (e.g. jRockit VE)
• Host-Only Networking: fixed interface creation failure on Windows hosts (4.0.4 regression;
bug #8362)
• Host-Only & Bridged & Internal Networking: fix for processing promiscuous mode requests
by VMs, defaulting to switch behaviour
• Host-Only Networking: fixed connectivity issue after resuming the host from sleep (bug
#3625)
• Bridged Networking: support for interface bonding on Mac OS X hosts (bug #8731)
• NAT: fixed processing of ARP announcements for guests with static assigned IPs (bug
#8609)
• VRDP: backward compatibility with VRDPAuth external authentication library (bug #8063)
• Shared Folders: don’t fail to start a VM if a path is not absolute, for example when importing an OVF from a different host (bug #7941)
• Audio: fixed crash under certain conditions (bug #8527)
• USB: fixed a crash when plugging certain USB devices (bug #8699)
• HPET: fixed time jumps when reading the counter (bug #8707)
• OVF/OVA: automatically adjust disk paths if the VM name is changed on import
• OVF/OVA: fix export to slow medias
• OVF/OVA: automatically repair inconsistent appliances with multiple disks (bug #8253)
• rdesktop-vrdp: fixed an assertion triggered under certain conditions (bug #8593)
• Windows hosts: fixed occasional hangs during VM shutdown because sometimes COM was
not properly uninitialized
• Mac OS X hosts: prevent the mouse from leaving the VM window while captured
• Mac OS X hosts: keep aspect ratio while resizing in scale mode (shift for old behaviour)
(part of bug #7822)
• X11 hosts: fixed Yen key support (bug #8438)
• X11 hosts: fixed a regression which caused Host+F1 to pop up help instead of sending
Ctrl+Alt+F1
• Linux hosts / Linux Additions: mangle IPRT symbols to allow installing VirtualBox inside a
VM while the Guest Additions are active (bug #5686)
185
15 Change log
• Linux hosts / Linux guests: workaround for a bug in GLIBC older than version 1.11 leading to crashes under certain conditions (signed/unsigned problem with memchr on 64-bit
machines)
• Solaris hosts: fixed a deadlock in event semaphores that could lead to unkillable VM processes
• Windows Additions: fixed Sysprep parameter handling
• Windows Additions: fixed spontaneous guest reboots under certain circumstances (4.0.2
regression; bugs #8406, #8429)
• Windows Additions: added auto logon support for locked workstations on legacy Windows
versions
• Windows Additions: fixed driver bugcheck error when handling PnP messages (4.0 regression; bug #8367)
• Windows Additions: fixed memory leak in VBoxVideo
• X11 Additions: added support for X.Org Server 1.10 final
• Linux Additions: Linux kernel 2.6.39-rc1 fixes
• Linux Additions: improved auto-run support (bug #5509)
• Linux Additions: fix mouse support on SUSE 11 SP 1 guests (bug #7946)
• Solaris Additions: added support for X.Org Server 1.9
• Guest Additions: various bugfixes for guest control execution
• Webservice: use own log file, with log rotation to limit size
15.3 Version 4.0.4 (2011-02-17)
This is a maintenance release. The following items were fixed and/or added:
• VMM: fixed recompiler crashes under certain conditions (bugs #8255, #8319 and further)
• VMM: fixed running 64-bit guests on 32-bit host with nested paging enabled on AMD CPUs
(4.0 regression; bug #7938)
• VMM: fixed timing issues / hangs for certain guests using the programmable interval timer
(bugs #8033 and #8062)
• VMM: large page and monitoring fixes for live snapshots (bugs #7910, #8059, #8125)
• GUI: fixed error message when trying to exceed the maximum number of host network
interfaces
• GUI: fixed saving of changes to the metadata of an existing snapshot (bug #8145)
• GUI: fixed rare crash on X11 hosts (bug #8131)
• GUI: when selecting a shared folder, start the file dialog in the users home directory (bug
#8017)
• ExtPack: enforce the correct permissions which might be restricted by umask when creating
directories (non-Windows hosts only; bug #7878)
186
15 Change log
• VBoxSDL: fixed crash when starting by specifying the VM UUID (4.0 regression; bug
#8342)
• VBoxManage: allow savestate even if the VM is already paused
• VBoxManage: fixed modifyvm –synthcpu (bug #6577)
• VBoxManage: fixed hang when doing guestcontrol execute –wait-for exit and displaying
process status on exit (bug #8235)
• VBoxManage: decreased CPU load during guestcontrol execute –wait-for exit/stdout while
waiting for the guest process to terminate (bug #7872)
• VBoxManage: fixed list hostdvds/hostfloppies
• VBoxManage: fixed storageattach for host DVD drives and host floppy drives
• Metrics: introduced RAM/VMM base metric.
• Main: improved sanity check when taking a VM screen shot (bug #7966)
• Main: fixed a crash under rare circumstances if a VM failed to start
• Main: fixed attaching of immutable disk images (bug #8105)
• Main: fixed a crash at VM shutdown (bug #6443)
• Main: fixed incorrect handling of cross-referenced medium attachments (bug #8129)
• Settings: fixed truncating of big integer values (4.0 regression)
• Settings: properly store the ICH9 chipset type (bug #8123)
• Host-Only & Bridged Networking: fixed VBox DHCP server startup issue for Windows hosts
(4.0 regression; bug #7905)
• Host-Only Networking: re-create vboxnetX interfaces after vboxnetadp.ko module reload
on Linux and Darwin (bugs #5934, #6341)
• NAT: fixed an mbuf leak under rare circumstances (bug #7459)
• ACPI: don’t allow the guest to enter S4 by default and don’t announce S1 and S4 in the
ACPI tables if disabled (bug #8008)
• Graphics card: made re-enabling disabled screens work correctly to prevent problems when
X11 guests enter screen saving mode (bug #8122)
• Storage: fixed write errors with snapshots if the host cache is disabled (4.0 regression; bug
#8221)
• ATA/SATA: fixed reset handling after ACPI suspend/resume
• BusLogic: fixed hang with SMP VMs
• Serial: another attempt to prevent lost characters during transmission (bug #1548)
• Linux hosts/guests: Linux 2.6.38-rc1 compile fixes
• Mac OS X hosts: fixed VBoxSVC crash when listing host interfaces without default gateway
(64-bit hosts only; bug #7955)
• Solaris/Darwin hosts: fixed VM CPU execution cap
187
15 Change log
• X.Org guests: fixed a crash on X server restart (bug #8231)
• X.Org guests: support X.Org Server 1.10 pre-release and Ubuntu 11.04 Alpha.
• X.Org guests: Add EDID emulation in the graphics driver to prevent GNOME settings daemon changing the mode on login.
• X.Org guests: never send graphics modes to the host that older VirtualBox versions can’t
handle.
• Linux Additions: fixed a memory leak in the shared folders code if a host link is not readable
(bug #8185)
• Windows Additions: fixed handling of Security Attention Sequence (SAS) with VBoxGINA
15.4 Version 4.0.2 (2011-01-18)
This is a maintenance release. The following items were fixed and/or added:
• GUI: don’t crash if a removable host drive referenced from the VM settings vanished
• GUI: fixed a crash when using the KDE4 Oxygen theme and clicked on the settings button
(4.0 regression; bug #7875)
• GUI: properly warn if the machine folder cannot be created (bug #8031)
• GUI: several fixes for multimonitor X11 guests
• ExtPack: don’t make the installer helper application suid root (Linux .deb/.rpm packages
only)
• ExtPack: improved user experience on Vista / Windows 7 when installing an extension
pack
• ExtPack: fixed issue with non-ascii characters in the path name during installing an extension pack (bug #9717)
• ExtPack: fixed SELinux issues on 32-bit Linux hosts
• VBoxManage: Host-only interface creation and removal is now supported for all platforms
except Solaris (bug #7741)
• VBoxManage: fixed segmentation fault when removing non-existent host-only interface
• Storage: fixed possible crashes with VMDK/VHD images with snapshots and asynchronous
I/O (4.0 regression)
• Storage: don’t eject the physical medium if a DVD/CDROM/floppy drive is detached from
a VM (bug #5825)
• Storage: be more robust when a faulty guest sends ATA commands to an ATAPI device (bug
#6597)
• Parallels: fixed deletion of the image during suspend, pause or power off (4.0 regression)
• Bridged networking: fixed host kernel panic when bridging to devices with no TX queue
(4.0 regression; Linux hosts only; bug #7908)
• NAT: port-forwarding rule registration respects protocol parameter (bug #8094)
• E1000: fixed PXE boot issues with WDS (bug #6330)
188
15 Change log
• Virtio-net: fixed the issue with TX performance in some Linux guests
• ICH9: fixed VM crash (software virtualization only; bug #7885)
• VGA: fixed VESA screen issue (4.0 regression; bug #7986)
• Shared Folders: fixed parameter parsing when creating symbolic links, fixes 32-bit/64-bit
bitness issue (bug #818)
• Main: fixed crash under rare circumstances due to an invalid logging string (4.0 regression)
• Main: improve error information propagation for errors preventing a VM start
• Main: fixed problems with snapshots and non-ASCII characters in machine paths (bug
#8024)
• Webservice: now listens to localhost by default as documented (bug #6067)
• Settings: do not fail loading machine settings if removeable drive attachment (host drive
or image) cannot be found; with 4.0 this is much more likely when machines are moved
from one host to another
• Settings: fixed issue that changing a snapshot name or description was not saved to machine XML
• OVF/OVA: fixed import of files created by other OVF tools (bug #7983)
• rdesktop-vrdp: fix a crash during USB device enumeration (bug #7981)
• Linux hosts: fixed a crash during USB device enumeration.
• Linux hosts: try a bit harder to allocate memory (bug #8035; 4.0 regression)
• Guest Additions: fixed parsing of parameters for guest control in VBoxService (4.0 regression; bug #8010)
• Windows Guest Additions: automatic logon on Windows Vista/Windows 7 now supports
unlocking previously locked workstations
15.5 Version 4.0.0 (2010-12-22)
This version is a major update. The following major new features were added:
• Reorganization of VirtualBox into a base package and Extension Packs; see chapter 1.5,
Installing VirtualBox and extension packs, page 14
• New settings/disk file layout for VM portability; see chapter 10.1, Where VirtualBox stores
its files, page 153
• Major rework of the GUI (now called “VirtualBox Manager”):
– Redesigned user interface with guest window preview (also for screenshots)
– New “scale” display mode with scaled guest display; see chapter 1.8.5, Resizing the
machine’s window, page 21
– Support for creating and starting .vbox desktop shortcuts (bug #1889)
– The VM list is now sortable
– Machines can now be deleted easily without a trace including snapshots and saved
states, and optionally including attached disk images (bug #5511; also, VBoxManage
unregistervm --delete can do the same now)
189
15 Change log
– Built-in creation of desktop file shortcuts to start VMs on double click (bug #2322)
• VMM: support more than 1.5/2 GB guest RAM on 32-bit hosts
• New virtual hardware:
– Intel ICH9 chipset with three PCI buses, PCI Express and Message Signaled Interrupts
(MSI); see chapter 3.4.1, “Motherboard” tab, page 43
– Intel HD Audio, for better support of modern guest operating systems (e.g. 64-bit
Windows; bug #2785)
• Improvements to OVF support (see chapter 1.12, Importing and exporting virtual machines,
page 26):
–
–
–
–
Open Virtualization Format Archive (OVA) support
Significant performance improvements during export and import
Creation of the manifest file on export is optional now
Imported disks can have formats other than VMDK
• Resource control: added support for limiting a VM’s CPU time and IO bandwidth; see
chapter 5.8, Limiting bandwidth for disk images, page 80
• Storage: support asynchronous I/O for iSCSI, VMDK, VHD and Parallels images
• Storage: support for resizing VDI and VHD images; see chapter 8.21, VBoxManage modifyhd, page 123.
• Guest Additions: support for multiple virtual screens in Linux and Solaris guests using
X.Org server 1.3 and later
• Language bindings: uniform Java bindings for both local (COM/XPCOM) and remote
(SOAP) invocation APIs
In addition, the following items were fixed and/or added:
• VMM: Enable large page support by default on 64-bit hosts (applies to nested paging only)
• VMM: fixed guru meditation when running Minix (VT-x only; bug #6557)
• VMM: fixed crash under certain circumstances (Linux hosts only, non VT-x/AMD-V mode
only; bugs #4529 and #7819)
• GUI: add configuration dialog for port forwarding in NAT mode (bug #1657)
• GUI: show the guest window content on save and restore
• GUI: certain GUI warnings don’t stop the VM output anymore
• GUI: fixed black fullscreen minitoolbar on KDE4 hosts (Linux hosts only; bug #5449)
• BIOS: implemented multi-sector reading to speed up booting of certain guests (e.g. Solaris)
• Bridged networking: improved throughput by filtering out outgoing packets intended for
the host before they reach the physical network (Linux hosts only; bug #7792)
• 3D support: allow use of CR_SYSTEM_GL_PATH again (bug #6864)
• 3D support: fixed various clipping/visibility issues (bugs #5659, #5794, #5848, #6018,
#6187, #6570)
• 3D support: guest application stack corruption when using glGetVertexAttrib[ifd]v (bug
#7395)
190
15 Change log
• 3D support: fixed OpenGL support for libMesa 7.9
• 3D support: fixed Unity/Compiz crashes on natty
• 2D Video acceleration: multimonitor support
• VRDP: fixed rare crash in multimonitor configuration
• VRDP: support for upstream audio
• Display: fixed occasional guest resize crash
• NAT: port forwarding rules can be applied at runtime
• SATA: allow to attach CD/DVD-ROM drives including passthrough (bug #7058)
• Floppy: support readonly image files, taking this as the criteria for making the medium
readonly (bug #5651)
• Audio: fixed memory corruption during playback under rare circumstances
• Audio: the DirectSound backend now allows VMs to be audible when another DirectSound
application is active, including another VM (bug #5578)
• EFI: support for SATA disks and CDROMs
• BIOS: reduce the stack usage of the VESA BIOS function #4F01 (Quake fix)
• OVF/OVA: fixed export of VMs with iSCSI disks
• Storage: Apple DMG image support for the virtual CD/DVD (bug #6760)
• Linux host USB support: introduced a less invasive way of accessing raw USB devices (bugs
#1093, #5345, #7759)
• Linux hosts: support recent Linux kernels with CONFIG_DEBUG_SET_MODULE_RONX set
• Guest Additions: Shared Folders now can be marked as being auto-mounted on Windows,
Linux and Solaris guests
• Linux Additions: Shared Folders now support symbolic links (bug #818)
• Linux Additions: combined 32-bit and 64-bit additions into one file
• Windows Additions: automatic logon on Windows Vista/Windows 7 is now able to handle
renamed user accounts; added various bugfixes
15.6 Version 3.2.12 (2010-11-30)
This is a maintenance release. The following items were fixed and/or added:
• VMM: fixed rare host crash when running 64-bit guests on 32-bit hosts (bug #7577)
• VMM: fixed host reboots under rare circumstances due to NMIs triggered by active performance counters (Linux hosts in non-VT-x/AMD-V mode only; bug #4529)
• VMM: fixed out of memory guru meditation for large memory guests (bug #7586)
• VMM: fixed a guru meditation related to large pages
• VMM: use new VT-x feature to keep the guest from hogging the CPU
191
15 Change log
• Snapshots: implemented deleting the last remaining snapshot while the VM is running
• GUI: perform the checks for exceeding the size limit of the host file system and for broken
asynchronous I/O on older Linux kernels with ext4 / xfs file systems not only when starting
the VM from scratch but also when starting from a saved state
• NAT: fixed memory leak (3.2.0 regression; bugs #6918, #7353)
• NAT: fixed Linux NFS root issue (bugs #7299)
• Networking: fixed VM reset handling in e1000
• VRDP: fixed rare crash in multimonitor configuration
• Display: fixed occasional guest resize crash
• Mouse: don’t send relative mouse events together with absolute mouse events (3.2.10
regression; bug #7571)
• Keyboard: fixes for the USB keyboard emulation; fixes for Korean keyboards
• Serial: don’t hang if the host device would block during open (bugs #5756, #5380)
• Serial: fixed modem status lines (Linux hosts only; bug #812)
• Graphics: Horizontal resolutions are no longer restricted to a multiple of 8 pixels (bug
#2047; requires Guest Additions update).
• USB: fixed a crash with older Linux kernels and non-ASCII characters in device strings
(Linux hosts only; bug #6983, #7158, #7733; version 3.2.8 contained an incomplete fix)
• USB: fixed a crash under rare circumstances (bug #7409; Windows hosts only)
• “iSCSI: respond to NOP-In requests from the target immediately to avoid being disconnected if the guest is idle
• 3D support: fixed a crash under certain circumstances (bug #7659)
• 3D support: fixed crashes for GLUT based apps (bug #6848)
• 3D support: added missing GLX 1.3 functionality (bugs #7652, #7195)
• 2D Video acceleration: fixed potential deadlock when saving the VM state (bug #4124)
• Windows hosts: another fix for BSODs under certain circumstances in VBoxNetFlt.sys (bug
#7601)
• Solaris hosts: fixed host USB DVD drive detection
• Mac OS X hosts: fixed swapped keys for certain ISO keyboard types (bug #2996)
• Linux hosts: added link state handling for TAP devices needed for proper operation with
bridged networking on kernels 2.6.36 and above (bug #7649)
• Linux hosts/guests: Linux 2.6.37 fixes
• Linux Additions: properly compile the vboxvideo module if DKMS is not installed (bug
#7572)
• Linux Additions: fixed a memory leak when accessing non-existing files on a Shared Folders
(bug #7705)
• Windows Additions: skip none-mapped user accounts when enumerating user accounts for
VM information
192
15 Change log
15.7 Version 3.2.10 (2010-10-08)
This is a maintenance release. The following items were fixed and/or added:
• VMM: V8086 mode fix for legacy DOS/Windows guests with EMM386 (3.2.8 regression)
• VMM: stability fix (bug #7342)
• VMM: fixed a Guru meditation related to large pages (bug #7300)
• VMM: fixed support for large pages on Linux hosts
• VMM: fixed a Guru meditation for large memory 64-bit guests on 32-bit hosts with nested
paging (bug #7544)
• VMM: performance improvements for VMs with more than 2GB RAM (bug #6928)
• GUI: fixed host key handling if the host key is set to Left Alt (Linux/Solaris hosts only; 3.2.0
regression; bug #6758)
• GUI: the VM can be minimized from the mini toolbar (bug #4952)
• GUI: handle Ctrl+Break properly on X11 hosts (3.2.0 regression; bug #6122)
• GUI: fixed the case where the user aborted the media selector for selecting the boot hard
disk from the VM wizard
• GUI: added a check for Linux kernels 2.6.36 or later which are known to have the asynchronous I/O bug on ext4 / xfs file systems fixed (Linux hosts only)
• OpenSolaris guests: use SATA controller by default
• Storage: fixed I/O errors in the guest after compacting VDI images (3.2.6 regression; bug
#7294)
• Storage: automatically repair base disk images with non-zero parent UUID which made
them inaccessible (bug #7289)
• Storage: fixed corrupted images if a merge operation was canceled
• IDE: added ATAPI passthrough support for audio CDs
• SATA: fixed a potential hang during boot of recent Solaris guests
• SATA: handle out of disk space and similar conditions better
• iSCSI: fixed sporadic hangs when closing the connection
• VGA: fixed missing redraw with multiple screens under certain circumstances (bug #7291)
• VGA: serveral small fixes for legacy VGA graphics modes
• Bridged networking: fixed occasional host freeze during VM shutdown (Linux hosts only)
• NAT: don’t check for the existence of the TFTP prefix when delivering a file via bootp (bug
#7384)
• NAT: fixed resolving of names at the host resolver (bug #7138)
• NAT: under rare conditions the NAT engine consumed 100% CPU load (non-Windows hosts
only)
• VRDP: fixed memory leak under certain circumstances (bug #5966)
193
15 Change log
• VRDP: fixed missing redraws with Windows guests under certain circumstances
• USB: properly discard blocking outstanding bulk URBs, fixes some printers
• USB: Blackberry fix (bug #6465)
• VBoxHeadless: fixed event queue processing problems which led to hangs if the VM could
not be started successfully
• VBoxManage: don’t crash if parameters with invalid characters are passed (bug #7388)
• VBoxManage: clonehd: fixed a bug where the command aborted with an error message
under rare circumstances
• VBoxManage metrics: made it work for directly started VMs again (3.2.8 regression; bug
#7482)
• 3D support: report GLX_ARB_get_proc_address as supported extension
• 3D support: guest application stack corruption when using glGetVertexAttrib[ifd]v (bug
#7395)
• 3D support: fixed broken 3D support when switching to fullscreen/seamless modes (bug
#7314)
• 3D support: fixed 32bit OpenGL apps under 64bit Windows XP/Vista (bug #7066)
• OVF: fixed bug when exporting a VM with multiple attached disks (bug #7366)
• OVF: fixed slow export for certain filesystems (bug #3719)
• OVF: disabled manifest (.mf file) support; manifests are no longer verified on import nor
written on export
• Shared clipboard/Windows: improved the reliability of the shared clipboard on Windows
hosts and guest (partial fix to bug #5266)
• Shared Folders: don’t show an empty directory if filenames with an invalid encoding exist
on the host (bug #7349)
• Shared Folders: return the proper error code when trying to list files for a non-existing
wildcard (bug #7004)
• Audio: fixed guest memory corruption when capturing from the NULL audio backend (bug
#6911)
• Audio: improved playback quality (less choppy)
• Web service: avoid unnecessary creation of idle threads
• Additions: fixed bug in the guest execution feature when passing more than one environment variable
• Additions: refresh all guest properties written by VBoxService after the VM was restored
from a saved state
• Additions: fixed a division by zero crash of VBoxService under certain circumstances
• Additions: immediately resynchronize the guest time with the host time after the VM was
restored from a saved state (bug #4018)
• Additions/Windows: fixed LsaEnumerate error when enumerating logged in users
194
15 Change log
• Additions/X.Org: support X.Org Server 1.9 (bug #7306)
• Additions/X.Org: don’t crash VBoxClient during reboot
• Solaris hosts: fixed host DVD drive enumeration on Solaris 10
• Solaris hosts: added a custom core dumper to procure more data in the event of a VM crash
• Solaris guests: fixed user idle detection
• Solaris guests: fixed a possible panic in Shared Folders when using the wrong user or group
IDs (bug #7295)
• Solaris guests: fixed Shared Folders from truncating files to 2GB on 32-bit guests (bug
#7324)
• Windows hosts: fixed a BSOD under certain circumstances in VBoxNetFlt.sys (bug #7448)
• Linux hosts/guests: Linux 2.6.36 fixes
• Linux hosts/guests: DKMS fixes (bug #5817)
• Mac OS X hosts: fixed missing dock menu entries (bug #7392)
15.8 Version 3.2.8 (2010-08-05)
This is a maintenance release. The following items were fixed and/or added:
• VMM: properly terminate the VM with an error if the guest is trying to switch to the PAE
mode but PAE is disabled in the VM settings
• GUI: switch to native file dialogs (Windows hosts only; bug #5459)
• GUI: don’t use native file dialogs on KDE hosts (Linux hosts only; bug #6809)
• 3D support: fixed GL_EXT_texture_sRGB support
• PXE: fixed ZENworks PXE boot regression
• OVF: fixed slower export and larger images under certain circumstances (3.2.6 regression;
bug #7073)
• USB: properly signal an interrupt if the port suspend status changes
• USB: respect the remote-only filter
• USB: avoid VM hang when changing the configuration of certain devices (Windows hosts
only)
• USB: fix a crash with older Linux kernels and non-ASCII characters in device strings (Linux
hosts only; bug #6983)
• PageFusion: fixed conflict with the guest execution feature
• PageFusion: fixed stability issues with a large number of VMs
• PageFusion: fixed host crashes with guest SMP and Win64 guests
• Memory ballooning: fixed problems restoring VMs with pre-allocation enabled
• Bridged networking: fixed performance issue with GRO enabled on bridged device (bug
#7059)
195
15 Change log
• Hostonly networking: fixed performance issue (3.2.6 regression; bug #7081)
• Hard disks: fix auto-reset of immutable disk at VM startup (bug #6832)
• BusLogic: several fixes for Windows NT/2000 and SCO OpenServer guests
• LsiLogic: fixed I/O errors under rare circumstances
• Sharing disks: support for attaching one disk to several VMs without external tools and
tricks
• Shared Folders: several fixes and performance enhancements for Solaris guests (bugs
#4154 and #6512)
• Solaris Installer: added support for remote installations
• Guest Properties API: correctly support enumerating the properties of a running VM with
an empty “patterns” field (bug #7171)
• Guest properties: properly delete transient properties on shutdown
• RDP video redirection performance improvements and stability fixes
• Settings: silently fix host audio driver when reading machine XML settings files or OVF
written by VirtualBox on a different host OS, for example convert DirectSound to PulseAudio (bug #7209)
• Settings: properly store the NAT network setting in XML settings file version 1.10 and later
(bug #6176)
• VBoxManage: handle differencing images with parent UUID correctly in subcommand
openmedium disk (bug #6751)
• Web service: enabled HTTP keepalive for much better performance
• Web service: added timestamps to logging output
• Web service: treat 8-bit strings as UTF-8 not ASCII
• X11 Additions: fix for Xorg 6.8 guests (e.g. RHEL4)
15.9 Version 3.2.6 (2010-06-25)
This is a maintenance release. The following items were fixed and/or added:
• VMM: fixed host crash when running 64-bit guests on 32-bit hosts with certain Intel CPUs
(VT-x only; bug #6166)
• VMM: allow 64-bit SMP guests on 32-bit hosts (VT-x and AMD-V only; does not apply to
Mac OS X, which already supports it)
• VMM: fixed Guru mediation if guests with more than 2GB are booted with VT-x/AMD-V
disabled (bug #5740)
• VMM: fixed TR limit trashing (VT-x and 64-bit host only; bug #7052)
• Page Fusion: several bug fixes for SMP guests (including bug #6964)
• Teleportation: several fixes and improvements
• Mac OS X server guests: compatibility fix
196
15 Change log
• EFI: fixed memory detection for guests with 2GB or more RAM assigned
• GUI: added a workaround for a Linux kernel bug which affecting asynchronous I/O on ext4
/ xfs file systems (Linux hosts only)
• GUI: added setting for multiple VRDP connections; useful if multiple screens are enabled
• GUI: another fix for the keyboard capturing bug under metacity (bug #6727)
• GUI: fixed quit dialog when used in seamless or fullscreen mode (Mac OS X hosts only; bug
#6938)
• GUI: handle the extra key on the Brazilian keyboard on X11 hosts again (bug #7022).
• 2D Video acceleration: fixed crashes when leaving the fullscreen mode (bug #6768)
• VBoxManage: fixed storageattach error handling (bug #6927)
• VBoxManage: fixed dhcpserver add (3.2.0 regression; bug #7031)
• Storage: fixed hang with images located on filesystems which don’t support asynchronous
I/O (bug #6905)
• Storage: fixed raw disks on Windows hosts (3.2.0 regression; bug #6987)
• LsiLogic: fixed hang with older Linux guests
• BusLogic: fixed hang during I/O
• SATA: set initial number of ports to 1 as some guests can’t handle 30 ports (e.g. CentOS 4
and FreeBSD; bug #6984)
• SATA: performance improvement
• SCSI: fixed error when using the full format option during Windows installation (bug
#5101)
• iSCSI: fixed authentication (bug #4031)
• Host-only/bridged networking: fixed excessive host kernel warnings under certain circumstances (Linux hosts only; 3.2.0 regression; bug #6872)
• NAT: fixed potential memory leaks
• NAT: increased the size of the memory pool for 16K Jumbo frames (performance tweak)
• NAT: allow to link/unlink the network cable even if the VM is currently paused
• E1000: disconnect cable was not properly handled if the NIC was not yet initialized by the
guest
• OVF: export performance optimization
• OVF: upgraded OS type definitions to CIM 2.25.0 so that Windows 7 and other OSes are
now tagged correctly on export
• Settings: the setting for disabling the host I/O cache was sometimes not properly saved
• Settings: save machine state into XML correctly even when snapshot folder has been
changed to a non-default location (bug #5656)
• USB: allow the guest to disable an EHCI port
197
15 Change log
• USB: find a valid language ID before querying strings (bug #7034)
• POSIX hosts: fixed several memory leaks (3.2.0 regression)
• Solaris hosts: fixed VDI access problem under certain circumstances (IDE/SATA; 3.2.0 regression)
• Solaris hosts: fixed VM fails to start on 32-bit hosts (3.2.0 regression; bug #6899)
• Windows hosts (32-bit): increase guest RAM limit if the host kernel allows for more virtual
address space
• Linux Additions: re-read a directory after a file was removed (bug #5251)
• Linux Additions: install the DRI driver in the right location on ArchLinux guests (bug
#6937)
• X11 Additions: fixed spurious mouse movement events (bug #4260)
• Solaris Additions: fixed guest execution feature
• Windows Additions: automatic logon on Windows Vista/Windows 7 is now able to handle
renamed and principal user accounts; added various bugfixes
• Windows Additions: improved command line parsing of the installer
• Windows Additions: fixed driver verifier bugcheck in VBoxMouse (bug #6453)
• 3D support: fixed OpenGL support for 32bit applications under 64bit Windows guests
15.10 Version 3.2.4 (2010-06-07)
This is a maintenance release. The following items were fixed and/or added:
• GUI: fixed superfluous resize-event on powering-on VM for X11 (improvement for the 3.2.2
fix)
• GUI: fixed keyboard capturing bug under metacity (bug #6727)
• Host-only/bridged networking: fixed guest-to-guest communication over wireless (3.2.0
regression; bug #6855)
• Storage: fixed a potential guest disk corruption with growing images (3.2.0 regression)
• Page Fusion: fixed shared module detection for Win64 guests
• 3D support: allow use of CR_SYSTEM_GL_PATH again (bug #6864)
• 3D support: fixed a host assertion for some multi-threaded guest applications (bug #5236)
• 3D support: fixed host crashes with nVIDIA drivers on WDDM startup
• OVF: fixed import of OVFs with a VM description (annotation) (3.2.2 regression; bug
#6914)
• VRDP: fixed issues with secondary monitors (bug #6759)
198
15 Change log
15.11 Version 3.2.2 (2010-06-02)
This is a maintenance release. The following items were fixed and/or added:
• VMM: fixed rare invalid guest state guru meditation (VT-x only)
• VMM: fixed poor performance with nested paging and unrestricted guest execution (VT-x
only; bug #6716)
• VMM: fixed occasional guru meditation during Windows 7 bootup (bug #6728)
• GUI: keep the status for remote control in sync with the actual state
• GUI: don’t exit after a successful refresh of an invalid VM configuration
• GUI: fixed keyboard capturing bug under metacity (bug #6727)
• GUI: fixed crash during VM termination if a modal dialog is open
• GUI: default controllers names of New VM Wizard are synchronized with VM settings
• GUI: fixed superfluous resize-event on powering-on VM for X11
• GUI: fixed regression - missed USB item’s tool-tip of USB devices menu
• GUI: Activate VM window on mouse-hovering for multi-monitor VMs
• VBoxSDL/Linux hosts: automated keyboard type detection (bug #5764)
• SATA: fixed crash during VM suspend under rare circumstances
• SATA: fixed crash during VM reset after a snapshot was taken
• Storage: fixed sporadic hang of SMP guests using SATA or LSI Logic SCSI and asynchronous
I/O
• Virtio-net: fix for guests with more than about 4GB RAM (bug #6784)
• Page Fusion: fixed VBoxService crash with enabled Page Fusion on Win64 guests
• Page Fusion: added kernel module sharing
• HGCM: fixed memory leak which showed up if the Guest Additions were accessing a nonexisting HGCM service
• Teleportation: several fixes
• Floppy: don’t disable the host I/O cache by default
• USB: fixed 3.1 regression with certain devices (e.g. iPhone); Windows host only
• Serial: updated the guest device emulation to 16550A and reduced the probability for
losing bytes during transmission (bug #1548)
• NAT: re-fetch the name server parameters from the host on guest DHCP requests to handle
host network switches more gracefully (bug #3847)
• NAT: fixed parsing of IPv4 addresses in CIDR notation (bug #6797)
• NAT: limit the number of name servers passed to the guest to four (non-Windows hosts
only; bug #4098)
• NAT: fixed DNS transaction ID mismatch (bug #6833)
199
15 Change log
• VDE: fixed changing the attachment during runtime
• Bridged networking: fixed memory leak in the Bridged Networking driver for Windows
hosts (bug #6824)
• Windows Additions: fix for NT4 guests (bug #6748)
• Windows Additions: re-introduced system preparation feature
• Linux guests: enable PAE for RedHat guests by default
• Linux guests: fix support for disabling mouse integration (bug #6714)
• Webservice: fixed a rare crash when calling IGuest methods from the webservice
• OVF: fixed wrong hard disk UUIDs on export (bug #6802)
• OVF: fixed 3.2.0 regression importing legacy OVF 0.9 files
• 3D support: fixed OpenGL support for 64bit applications on windows guests
• 3D support: fixed various host crashes (bugs #2954, #5713, #6443)
15.12 Version 3.2.0 (2010-05-18)
This version is a major update. The following major new features were added:
• Following the acquisition of Sun Microsystems by Oracle Corporation, the product is now
called “Oracle VM VirtualBox” and all references were changed without impacting compatibility
• Experimental support for Mac OS X Server guests (see chapter 3.1.1, Mac OS X Server
guests, page 40)
• Memory ballooning to dynamically in- or decrease the amount of RAM used by a VM (64-bit
hosts only) (see chapter 4.8.1, Memory ballooning, page 69)
• Page Fusion automatically de-duplicates RAM when running similar VMs thereby increasing capacity. Currently supported for Windows guests on 64-bit hosts (see chapter 4.8.2,
Page Fusion, page 69)
• CPU hot-plugging for Linux (hot-add and hot-remove) and certain Windows guests (hotadd only) (see chapter 9.5, CPU hot-plugging, page 140)
• New Hypervisor features: with both VT-x/AMD-V on 64-bit hosts, using large pages can
improve performance (see chapter 10.6, Nested paging and VPIDs, page 161); also, on VTx, unrestricted guest execution is now supported (if nested paging is enabled with VT-x,
real mode and protected mode without paging code runs faster, which mainly speeds up
guest OS booting)
• Support for deleting snapshots while the VM is running
• Support for multi-monitor guest setups in the GUI for Windows guests (see chapter 3.5,
Display settings, page 45)
• USB tablet/keyboard emulation for improved user experience if no Guest Additions are
available (see chapter 3.4.1, “Motherboard” tab, page 43)
• LsiLogic SAS controller emulation (see chapter 5.1, Hard disk controllers: IDE, SATA (AHCI),
SCSI, SAS, page 71)
200
15 Change log
• RDP video acceleration (see chapter 7.1.9, VRDP video redirection, page 96)
• NAT engine configuration via API and VBoxManage
• Use of host I/O cache is now configurable (see chapter 5.7, Host I/O caching, page 80)
• Guest Additions: added support for executing guest applications from the host system
(replaces the automatic system preparation feature; see chapter 4.7, Guest control, page
68)
• OVF: enhanced OVF support with custom namespace to preserve settings that are not part
of the base OVF standard
In addition, the following items were fixed and/or added:
• VMM: fixed Windows 2000 guest crash when configured with a large amount of RAM (bug
#5800)
• Linux/Solaris guests: PAM module for automatic logons added
• GUI: guess the OS type from the OS name when creating a new VM
• GUI: added VM setting for passing the time in UTC instead of passing the local host time
to the guest (bug #1310)
• GUI: fixed seamless mode on secondary monitors (bugs #1322 and #1669)
• GUI: offer to download the user manual in the OSE version (bug #6442)
• GUI: allow to set an empty host key to disallow any host key combination (bug #684)
• GUI: allow to restrict the possible actions when shutting down the VM from the GUI
• Main: allow to start a VM even if a virtual DVD or floppy medium is not accessible
• Settings: be more robust when saving the XML settings files
• Mac OS X: rewrite of the CoreAudio driver and added support for audio input (bug #5869)
• Mac OS X: external VRDP authentication module support (bug #3106)
• Mac OS X: moved the realtime dock preview settings to the VM settings (no global option
anymore). Use the dock menu to configure it
• Mac OS X: added the VM menu to the dock menu
• 3D support: fixed corrupted surface rendering (bug #5695)
• 3D support: fixed VM crashes when using ARB_IMAGING (bug #6014)
• 3D support: fixed assertion when guest applications uses several windows with single
OpenGL context (bug #4598)
• 3D support: added GL_ARB_pixel_buffer_object support
• 3D support: added OpenGL 2.1 support
• 3D support: fixed Final frame of Compiz animation not updated to the screen (Mac OS X
only) (bug #4653)
• 3D support: fixed blank screen after loading snapshot of VM with enabled Compiz
201
15 Change log
• Added support for Virtual Distributed Ethernet (VDE) (Linux hosts only; see chapter 6.2,
Introduction to networking modes, page 84)
• Added support for virtual high precision event timer (HPET)
• OVF: fixed mapping between two IDE channels in OVF and the one IDE controller in
VirtualBox
• OVF: fix VMDK format string identifiers and sort XML elements from rasd: namespace
alphabetically as prescribed by standard
• VBoxShell: interactive Python shell extended to be fully functional TUI for VirtualBox
• Linux Additions: support Fedora 13 (bug #6370)
• VBoxManage: fixed overly strict checks when creating a raw partition VMDK (bugs #688,
#4438)
15.13 Version 3.1.8 (2010-05-10)
This is a maintenance release. The following items were fixed and/or added:
• VMM: fixed crash with the OpenSUSE 11.3 milestone kernel during early boot (software
virtualization only)
• VMM: fixed invalid state during teleportation
• VMM: fixed OS/2 guest crash with nested paging enabled
• VMM: fixed massive display performance loss (AMD-V with nested paging only)
• GUI: fixed off-by-one bug when passing absolute mouse coordinates to the guest (3.1.6
regression)
• GUI: show the real version of the Guest Additions, not the interface version
• GUI: when adding a DVD or floppy slot in the VM mass storage settings dialog, don’t attach
a random medium but just leave the slot empty
• GUI: added --seamless and --fullscreen command line switches (bug #4220)
• GUI: fixed a SEGFAULT under rare circumstances
• 2D Video acceleration: fixed display issues when working with non 32-bit modes (bugs
#6094 & #6208)
• LsiLogic: fixed detection of hard disks attached to port 0 when using the drivers from LSI
• ATA: fixed sporadic crash with Linux guests when having a hard disk and DVD drive on the
same channel (bug #6079)
• Network: allow to start a VM even if not all network adapters are attached
• Network: promiscuous mode support for e1000 and paravirtualized adapters (bug #6519)
• NAT: fixed ICMP latency (non-Windows hosts only; bug #6427)
• SCSI: fixed guest crashes under certain circumstances when booting from SCSI devices
• VBoxManage: fixed several bugs in cloning of images (one of them is bug #6408)
202
15 Change log
• VBoxManage: fixed modifyvm –natnet default
• Solaris hosts: fixed a kernel panic when bridged networking might fail to initialize
• Solaris hosts: fixed priority tagged VLAN packets in bridged networking
• Shared Folders: fixed issue with copying read-only files (Linux guests only; bug #4890)
• Shared Folders: renamed the guest kernel module from vboxvfs to vboxsf to make it load
on demand by the Linux kernel. Fixes mounting from /etc/fstab in Ubuntu 10.04
• Shared Folders: fixed setuid file permissions (Solaris guests only)
• Shared Folders: fixed deleting directories recursively (Solaris guests only; bug #6513)
• Guest Additions: support seamless and dynamic resizing on certain older X11 guests (bug
#5840)
• Solaris Additions: fixed OpenGL library dependencies (bug #6435)
• Keyboard/Mouse emulation: fixed handling of simultaneous mouse/keyboard events under
certain circumstances (bug #5375)
• Mouse emulation: never switch straight back from Explorer to IntelliMouse mode as it
confuses the FreeBSD mouse driver (bug #6488)
• SDK: fixed memory leak in IDisplay::takeScreenShotSlow() (bug #6549)
• 3D support: fixed Final frame of Compiz animation not updated to the screen (Mac OS X
only) (bug #4653)
• VRDP: allow to bind to localhost only on Mac OS X (bug #5227)
• Linux hosts: add host USB support for Ubuntu 10.04 and other hosts without the hal
daemon or usbfs (bug #6343)
• webservice: more structs and array fixes in PHP bindings
• Windows hosts: make the bridged networking driver notify dll be correctly unregistred on
uninstall (bug #5780)
15.14 Version 3.1.6 (2010-03-25)
This is a maintenance release. The following items were fixed and/or added:
• Linux hosts: fixed timing issue on hosts with Linux kernels 2.6.31 or later with certain
CPUs (asynchronous timer mode; bug #6250)
• Linux hosts: properly handle host suspend/resume events on Linux kernels 2.6.30 or later
(bug #5562)
• Mac OS X hosts: fixed VBoxSVC crash while enumerating the host network interfaces under
certain circumstances
• Snapshots: fixed image corruption after snapshot merge under certain circumstances (bug
#6023)
• Snapshots: fixed crash with VBoxHeadless / OSE
• VMM: fixed reference counting guru meditation (bug #4940)
203
15 Change log
• VMM: improved guest SMP stability
• VMM: fixed VT-x hardware debug issues (bugs #477 & #5792)
• VMM: fixed PGMDynMapHCPage guru meditation (Mac OS X; VT-x only; bug #6095)
• VMM: fixed pgmPoolTrackFlushGCPhysPTInt guru meditations (Mac OS X; VT-x only; bugs
#6095 & #6125)
• VMM: fixed host crash when running PAE guests in VT-X mode (Mac OS X only; bug #5771)
• GUI: fix displaying of error message (bug #4345)
• GUI: fix inability to enter seamless mode (bugs #6185, #6188)
• 3D support: fixed assertion and flickering when guest application uses several windows
with a single OpenGL context (bug #4598)
• 3D support: fixed host crashes when using GL_EXT_compiled_vertex_array and array element calls (bug #6165)
• 3D support: fixed runtime linker errors with OpenGL guest libs (bug #5297)
• 3D support: fixed OpenGL extension viewer crash on startup (bug #4962)
• NAT: fixed a 3.1.4 regression on Windows hosts where graceful connection termination
was broken (bug #6237)
• NAT: alternative network setting was not stored persistent (bug #6176)
• NAT: fixed memory corruption during ICMP traffic under certain circumstances
• Network: allow to switch the host interface or the internal network while a VM is running
(bug #5781)
• VHD: fix for images with a block size different than 2MB
• USB: fixed filtered device attach regression (bug #6251)
• USB: fixed crash in OHCI under rare circumstances (bug #3571)
• VRDP: fixed hang under rare circumstances when attaching USB devices
• ACPI: prevent guest freezes when accessing /proc/acpi for determining the state of the
host battery and the AC adapter (Linux hosts only; bug #2836)
• PulseAudio: fixed guest freezes under certain conditions (3.1.4 regression; bug #6224)
• BIOS: increased space for DMI strings
• BIOS: fixed interrupt routing problem for certain configurations (I/O-APIC enabled, ACPI
not used; bug #6098)
• iSCSI: be more robust when handling the INQUIRY response
• iSCSI: be more robust when handling sense data
• BusLogic: fixed FreeBSD guests
• webservice: vboxwebsrv is now multithreaded
• webservice: fixed handling of structs and arrays in PHP bindings
204
15 Change log
• Solaris Installer: fixed netmask to stay persistent across reboots for Host-only interface
(bug #4590)
• Linux installer: removed external dependency to libpng12.so (bug #6243)
• Solaris Additions: fixed superfluous kernel logging (bug #6181)
• Linux Additions: fixed hang when starting the X server in Fedora12 guests and in guests
with Linux 2.6.33 or later (bug #6198)
• Linux Additions: support Mandriva speedboot runlevel (bug #5484)
• Linux Additions: fixed SELinux security context of mount.vboxsf (bug #6362)
• Linux Additions: support Ubuntu 10.04 (bug #5737)
• Web service: update PHP bindings to fix problems with enums and collections
15.15 Version 3.1.4 (2010-02-12)
This is a maintenance release. The following items were fixed and/or added:
• VMM: SMP stability fixes
• VMM: fixed guru meditation in certain rare cases (bug #5968)
• VMM: activate NXE for PAE enabled guests (VT-x and AMD-V on 32 bits hosts only; bug
#3578)
• VMM: added workaround for broken BIOSes that make VirtualBox think AMD-V is in use
(for details see bug #5639)
• VMM: fixed rare host reboot when restoring a saved state (bug #3945)
• VMM: fixed incompatibility with 2.6.32 Linux kernels (software virtualization only; bug
#6100)
• VMM: turn on nested paging by default for new VMs (if available; VT-x and AMD-V only)
• VMM: turn on VPID by default for new VMs (if available; VT-x only)
• VMM: perform strict CPUID compatibility checks when teleporting; to get the old behavior
set “VBoxInternal/CPUM/StrictCpuIdChecks” to 0
• VMM: fixed VM crash with certain 16 bits Windows applications (software virtualization
only; bug #5399)
• Snapshots: fixed a 3.1 regression that broke deletion of snapshots when a machine had
immutable or writethrough storage attached (bug #5727)
• Saved state: fixed VERR_SSM_LOADED_TOO_MUCH error when loading DisplayScreenshot(bug #6162)
• VBoxManage: add restorecurrent operation to snapshots command
• VBoxManage: fixed broken snapshot lookup by name (bug #6070
• GUI: fixed the broken “Reload” button that reloads the machine XML when a machine is
inaccessible
• GUI: fixed guest fullscreen mode after reboot (bug #5372)
205
15 Change log
• GUI: handle Ctrl+Break properly on X11 hosts (bug #6122)
• GUI: fixed status LEDs for storage devices
• GUI: workaround for disabling the seamless mode on KDE hosts (KWin bug)
• 3D support: fixed SELinux warning saying VBoxOGL.so requires text relocation (bug
#5690)
• 3D support: fixed Corrupted surface rendering (bug #5695)
• 3D support: free textures on guest application termination (bug #5206)
• 3D support: fixed ubigraph_server crashes (bug #4674)
• 3D support: fixes for 64-bit Solaris guests
• Seamless: disable seamless mode when guest changes screen resolution (bug #5655)
• NAT: fixed high CPU load under certain circumstances (Windows hosts only; bug #5787)
• NAT: fixed handling of the broadcast flag in DHCP requests
• NAT: fixed rare crash due to an assertion in the ICMP code (bug #3217)
• Virtio-net: don’t crash when ports accessed beyond the valid range (bug #5923)
• LsiLogic: fix for Windows 7 guests
• ATA: fix for guru meditation when installing Solaris 8 guests (bug #5972)
• VHD: fixed an incompatibility with Virtual PC (bug #5990)
• VHD: update the footer backup after setting a new UUID (bug #5004)
• Host DVD: really fixed loading “passthrough” setting from configuration file (bug #5681)
• Shared Folders: fixed resolving of symlink target on Linux (3.1.2 regression)
• VRDP: fixed VERR_NET_ADDRESS_IN_USE error when restarting a VM (3.1 regression; bug
#5902)
• VRDP: fixed crash on Mac OS X when 3D is enabled (3.1 regression)
• PulseAudio: fixed recording (bug #4302)
• USB: fixed a shutdown blue screen (Windows hosts only; bug #5885)
• BIOS: fixed attribute during text scroll (bug #3407)
• OVF: fix strange error messages on disk import errors
• OVF: do not require write access to the .ovf file during import (3.1 regression; bug #5762)
• iSCSI: fix taking snapshots of a running VM (bug #5849)
• Solaris hosts: several USB fixes (including support for Apple iPod; bug #5873)
• Solaris installer: fixed USB module removal and Solaris 10 “id” binary incompatibility
• Guest Additions: fixed wrong guest time adjustment if the guest clock is ahead (3.1 regression; non-Windows guests only)
• Linux Additions: fixed shared folders for Linux 2.6.32 guests (bug #5891)
206
15 Change log
• Linux Additions: make the mouse driver work on Debian 5.0.3 guests again (3.1.2 regression, bug #5832)
• Windows Additions: fixed malfunctioning VBoxService that broke time-sync (bug #5872)
• Windows Additions: fixed uninstallation issues on 64-bit guests
• Windows Additions: fixed some sysprep execution issues
• X.Org Additions: never reject the saved video mode as invalid (bug #5731)
• XFree86 Additions: accept video mode hints for the initial mode again
15.16 Version 3.1.2 (2009-12-17)
This is a maintenance release. The following items were fixed and/or added:
• VMM: fixed SMP stability regression
• USB: fixed USB related host crashes on 64 bits Windows hosts (bug #5237)
• Main: wrong default HWVirtExExclusive value for new VMs (bug #5664)
• Main: DVD passthrough setting was lost (bug #5681)
• VBoxManage: iSCSI disks do not support adding a comment (bug #4460)
• VBoxManage: added missing –cpus and –memory options to OVF –import
• GUI: fixed VBox URL in update dialog for German and Dutch languages
• GUI: NLS updates
• OVF: fixed export of non standard storage controller names (bug #5643)
• Solaris hosts: several USB fixes (including support for Apple iPhone)
• Mac OS X hosts: several fixes for the 3D support
• Mac OS X hosts: re-enabled CMD+Key combinations, even if the Host-Key isn’t CMD (bug
#5684)
• Mac OS X hosts: fixed to fast scrolling if the mouse wheel is used inside the guest (bug
#5672)
• Mac OS X hosts: dock & menubar don’t disappear in fullscreen when the VM is not running
on the primary display (bug #1762)
• Mac OS X hosts: added an option for enabling “Auto show Dock & Menubar in fullscreen”
(bug #5636)
• Windows host installer: fixed starting VBox with wrong privileges right after installation
(bug #4162)
• Host interface and host-only networking: prevent driver from unloading while a VM is still
active (Windows host only)
• Host-only networking: fixed host-only interface creation (Windows host only) (bug #5708)
• Virtio-net: don’t crash without an attached network
• Virtio-net: fixed the issue with intermittent network in VM with several virtual CPU cores
207
15 Change log
• NAT: fixed port-forwarding regressions (bug #5666)
• NAT: fixed crash under certain conditions (bug #5427)
• NAT: fixed resolving of names containing a slash or underscore when using the host resolver
DNS proxy (bug #5698)
• ATA: fixed sporadic crash when resuming after a VM was forcefully paused (e.g. due to
iSCSI target being unavailable)
• SATA: fixed raw vmdk disks (bug #5724)
• Linux guests: increased the default memory for Redhat and Fedora guests
• Linux Guest Additions: fixed installation on RHEL 3.9 guests and on some 64bit guests
• Linux Guest Additions: prevent SELinux warnings concerning text relocations in VBoxOGL.so (bug #5690)
• X11 guests: fixed mouse support for some Xorg 1.4 guests (openSUSE 11.0)
• X11 guests: fixed xorg.conf modification for some older Xorg releases (openSUSE 11.1)
• Windows guests: fixed some VBoxService shutdown issues
• Windows guests: fixed VBoxVideo spinlock issues on NT4
• Windows Guest Additions: fixed uninstallation issues of NT4
• Shared Folders: fixed resolving of symlink target (bug #5631)
• 2D Video acceleration: delay loading of OpenGL dlls for Windows hosts to avoid GUI
crashes on misconfigured systems
• 2D Video acceleration: fixed issues with video picture not displayed on playback
15.17 Version 3.1.0 (2009-11-30)
This version is a major update. The following major new features were added:
• Teleportation (aka live migration); migrate a live VM session from one host to another (see
chapter 7.2, Teleporting, page 97)
• VM states can now be restored from arbitrary snapshots instead of only the last one, and
new snapshots can be taken from other snapshots as well (“branched snapshots”; see chapter 1.9, Snapshots, page 23)
• 2D video acceleration for Windows guests; use the host video hardware for overlay stretching and color conversion (see chapter 4.4.2, Hardware 2D video acceleration for Windows
guests, page 65)
• More flexible storage attachments: CD/DVD drives can be attached to arbitrary storage
controllers, and there can be more than one such drive (chapter 5, Virtual storage, page
71)
• The network attachment type can be changed while a VM is running
• Complete rewrite of experimental USB support for OpenSolaris hosts making use of the
latest USB enhancements in Solaris Nevada 124 and higher
208
15 Change log
• Significant performance improvements for PAE and AMD64 guests (VT-x and AMD-V only;
normal (non-nested) paging)
• Experimental support for EFI (Extensible Firmware Interface; see chapter 3.12, Alternative
firmware (EFI), page 51)
• Support for paravirtualized network adapters (virtio-net; see chapter 6.1, Virtual networking hardware, page 83)
In addition, the following items were fixed and/or added:
• VMM: guest SMP fixes for certain rare cases
• GUI: snapshots include a screenshot
• GUI: locked storage media can be unmounted by force
• GUI: the log window grabbed all key events from other GUI windows (bug #5291)
• GUI: allow to disable USB filters (bug #5426)
• GUI: improved memory slider in the VM settings
• 3D support: major performance improvement in VBO processing
• 3D support: added GL_EXT_framebuffer_object, GL_EXT_compiled_vertex_array support
• 3D support: fixed crashes in FarCry, SecondLife, Call of Duty, Unreal Tournament, Eve
Online (bugs #2801, #2791)
• 3D support: fixed graphics corruption in World of Warcraft (bug #2816)
• 3D support: fixed Final frame of Compiz animation not updated to the screen (bug #4653)
• 3D support: fixed incorrect rendering of non ARGB textures under compiz
• iSCSI: support iSCSI targets with more than 2TiB capacity
• VRDP: fixed occasional VRDP server crash (bug #5424)
• Network: fixed the E1000 emulation for QNX (and probably other) guests (bug #3206)
• NAT: added host resolver DNS proxy (see chapter 9.10.6, Using the host’s resolver as a DNS
proxy in NAT mode, page 147)
• VMDK: fixed incorrectly rejected big images split into 2G pieces (bug #5523, #2787)
• VMDK: fixed compatibility issue with fixed or raw disk VMDK files (bug #2723)
• VHD: fixed incompatibility with Hyper-V
• Support for Parallels version 2 disk image (HDD) files; see chapter 5.2, Disk image files
(VDI, VMDK, VHD, HDD), page 73
• OVF: create manifest files on export and verify the content of an optional manifest file on
import
• OVF: fixed memory setting during import (bug #4188)
• Mouse device: now five buttons are passed to the guest (bug #3773)
• VBoxHeadless: fixed loss of saved state when VM fails to start
209
15 Change log
• VBoxSDL: fixed crash during shutdown (Windows hosts only)
• X11 based hosts: allow the user to specify their own scan code layout (bug #2302)
• Mac OS X hosts: don’t auto show the menu and dock in fullscreen (bug #4866)
• Mac OS X hosts (64 bit): don’t interpret mouse wheel events as left click (bug #5049)
• Mac OS X hosts: fixed a VM abort during shutdown under certain conditions
• Solaris hosts: combined the kernel interface package into the VirtualBox main package
• Solaris hosts: support for OpenSolaris Boomer architecture (with OSS audio backend)
• Shared Folders: VBOXSVR is visible in Network folder (Windows guests, bug #4842)
• Shared Folders: performance improvements (Windows guests, bug #1728)
• Windows, Linux and Solaris Additions: added balloon tip notifier if VirtualBox host version
was updated and Additions are out of date
• Solaris guests: fixed keyboard emulation (bug #1589)
• Solaris Additions: fixed as_pagelock() failed errors affecting guest properties (bug #5337)
• Windows Additions: added automatic logon support for Windows Vista and Windows 7
• Windows Additions: improved file version lookup for guest OS information
• Windows Additions: fixed runtime OS detection on Windows 7 for session information
• Windows Additions: fixed crash in seamless mode (contributed by Huihong Luo)
• Linux Additions: added support for uninstalling the Linux Guest Additions (bug #4039)
• Linux guest shared folders: allow mounting a shared folder if a file of the same name as
the folder exists in the current directory (bug #928)
• SDK: added object-oriented web service bindings for PHP5
15.18 Version 3.0.12 (2009-11-10)
This is a maintenance release. The following items were fixed and/or added:
• VMM: reduced IO-APIC overhead for 32 bits Windows NT/2000/XP/2003 guests; requires
64 bits support (VT-x only; bug #4392)
• VMM: fixed double timer interrupt delivery on old Linux kernels using IO-APIC (caused
guest time to run at double speed; bug #3135)
• VMM: re-initizalize VT-x and AMD-V after host suspend or hibernate; some BIOSes forget
this (Windows hosts only; bug #5421)
• VMM: fixed loading of saved state when RAM preallocation is enabled
• BIOS: ignore unknown shutdown codes instead of causing a guru meditation (bug #5389)
• GUI: never start a VM on a single click into the selector window (bug #2676)
• Serial: reduce the probability of lost bytes if the host end is connected to a raw file
• VMDK: fixed handling of split image variants and fix a 3.0.10 regression (bug #5355)
210
15 Change log
• VRDP: fixed occasional VRDP server crash
• Network: even if the virtual network cable was disconnected, some guests were able to
send / receive packets (E1000; bug #5366)
• Network: even if the virtual network cable was disconnected, the PCNet card received
some spurious packets which might confuse the guest (bug #4496)
• Shared Folders: fixed changing case of file names (bug #2520)
• Windows Additions: fixed crash in seamless mode (contributed by Huihong Luo)
• Linux Additions: fixed writing to files opened in O_APPEND mode (bug #3805)
• Solaris Additions: fixed regression in Guest Additions driver which among other things
caused lost guest property updates and periodic error messages being written to the system
log
15.19 Version 3.0.10 (2009-10-29)
This is a maintenance release. The following items were fixed and/or added:
• VMM: guest SMP stability fixes
• VMM: fixed guru meditation with nested paging and SMP guests (bug #5222)
• VMM: changed VT-x/AMD-V usage to detect other active hypervisors; necessary for e.g.
Windows 7 XP compatibility mode (Windows & Mac OS X hosts only; bug #4239)
• VMM: guru meditation during SCO OpenServer installation and reboot (VT-x only; bug
#5164)
• VMM: fixed accessed bit handling in certain cases (bug #5248)
• VMM: fixed VPID flushing (VT-x only)
• VMM: fixed broken nested paging for 64 bits guests on 32 bits hosts (AMD-V only; bug
#5285)
• VMM: fixed loading of old saved states/snapshots (bug #3984)
• Mac OS X hosts: fixed memory leaks (bug #5084)
• Mac OS X hosts (Snow Leopard): fixed redraw problem in a dual screen setup (bug #4942)
• Windows hosts: installer updates for Windows 7
• Solaris hosts: out of memory handled incorrectly (bug #5241)
• Solaris hosts: the previous fix for #5077 broke the DVD host support on Solaris 10 (VBox
3.0.8 regression)
• Linux hosts: fixed module compilation against Linux 2.6.32rc4 and later
• Guest Additions: fixed possible guest OS kernel memory exhaustion
• Guest Additions: fixed stability issues with SMP guests
• Windows Additions: fixed color depth issue with low resolution hosts, netbooks, etc. (bug
#4935)
211
15 Change log
• Windows Additions: fixed NO_MORE_FILES error when saving to shared folders (bug
#4106)
• Windows Additions: fixed subdirectory creation on shared folders (bug #4299)
• Linux Additions: sendfile() returned -EOVERFLOW when executed on a shared folder (bug
#2921)
• Linux Additions: fixed incorrect disk usage value (non-Windows hosts only)
• Linux installer: register the module sources at DKMS even if the package provides proper
modules for the current running kernel
• 3D support: removed invalid OpenGL assertion (bug #5158)
• Network: fixed the Am79C973 PCNet emulation for QNX (and probably other) guests (bug
#3206)
• VMDK: fix handling of split image variants
• VHD: do not delay updating the footer when expanding the image to prevent image inconsistency
• USB: stability fix for some USB 2.0 devices
• GUI: added a search index to the .chm help file
• GUI/Windows hosts: fixed CapsLock handling on French keyboards (bug #2025)
• Shared clipboard/X11 hosts: fixed a crash when clipboard initialisation failed (bug #4987)
15.20 Version 3.0.8 (2009-10-02)
This is a maintenance release. The following items were fixed and/or added:
• VMM: fixed 64 bits guest on 32 bits host regression in 3.0.6 (VT-x only; bug #4947)
• VMM: fixed a recompiler triple fault guru meditation (VT-x & AMD-V only; bug #5058)
• VMM: fixed hang after guest state restore (AMD-V, 32 bits Windows guest and IO-APIC
enabled only; bug #5059)
• VMM: fixed paging issue with OS/2 guests
• VMM: fixed guru meditation in rare cases (2.0 regression; software virtualization only)
• VMM: fixed release assertion during state restore when using the Sound Blaster 16 emulation (bug #5042)
• Security: fixed vulnerability that allowed to execute commands with root privileges
• Linux hosts: fixed runtime assertion in semaphore implementation which was triggered
under certain conditions (bug #616)
• Linux hosts: change the default USB access mode on certain distributions (bugs #3394 and
#4291)
• Linux hosts: on hardened Gentoo, the VBoxSVC daemon crashed by opening the VM network settings (bug #3732)
212
15 Change log
• Linux hosts, Solaris hosts: pass the XAUTHORITY variable along the DISPLAY variable
when starting a VM from VBoxManage or from the VM selector (bug #5063)
• Linux hosts: use sysfs to enumerate host drives if hal is not available
• Solaris hosts: fixed a bug which would hang the host sporadically as interrupts were not
re-enabled every time
• Solaris hosts: fixed a kernel panic with bridged and host-only networking (bug #4775)
• Solaris hosts: fixed incorrectly persistent CD/DVD-ROMs when changing them (bug
#5077)
• X11-based hosts: support additional function keys on Sun keyboards (bug #4907)
• Mac OS X hosts (Snow Leopard): fixed problem starting headless VMs without a graphical
session (bug #5002)
• Mac OS X hosts: fixed problem listing host-only adapter names with trailing garbage (attached VMs won’t start)
• Windows Additions: now work with Vista 64-bit Home editions (bug #3865)
• Windows Additions: fixed screen corruption with ZoomText Magnifier
• Windows Additions: fixed NPGetUniversalName failure (bug #4853)
• Windows Additions: fixed Windows NT regression (bug #4946)
• Windows Additions: fixed VBoxService not running if no Shared Folders are installed
• Linux Additions: implemented ftrunctate (bug #4771)
• VRDP: start VM even if configured VRDP port is in use
• Networking: the PCnet network device stopped receiving under rare conditions (bug
#4870)
• VBoxManage: implemented controlvm vrdpport command
• iSCSI: fixed issue with NetApp targets (bug #5072)
• SCSI: add support for virtual disks larger than 2TB
• USB: fixed potential crash when unplugging USB2 devices (bug #5089)
• NAT: IPSEC did not properly work with Linux guests (bug #4801)
15.21 Version 3.0.6 (2009-09-09)
This is a maintenance release. The following items were fixed and/or added:
• VMM: fixed IO-APIC overhead for 32 bits Windows NT, 2000, XP and 2003 guests (AMD-V
only; bug #4392)
• VMM: fixed a Guru meditation under certain circumstances when enabling a disabled device (bug #4510)
• VMM: fixed a Guru meditation when booting certain Arch Linux guests (software virtualization only; bug #2149)
213
15 Change log
• VMM: fixed hangs with 64 bits Solaris & OpenSolaris guests (bug #2258)
• VMM: fixed decreasing rdtsc values (AMD-V & VT-x only; bug #2869)
• VMM: small Solaris/OpenSolaris performance improvements (VT-x only)
• VMM: cpuid change to correct reported virtual CPU ID in Linux
• VMM: NetBSD 5.0.1 CD hangs during boot (VT-x only; bug #3947)
• Solaris hosts: worked around an issue that caused the host to hang (bug #4486)
• Solaris hosts: fixed a rare host system deadlock when using bridged networking
• Solaris hosts: fixed a potential host system deadlock when CPUs were onlined or offlined
• Solaris hosts installer: added missing dependency for UTF-8 package (bug #4899)
• Linux hosts: don’t crash on Linux PAE kernels < 2.6.11 (in particular RHEL/CentOS 4);
disable VT-x on Linux kernels < 2.6.13 (bug #1842)
• Linux/Solaris hosts: correctly detect keyboards with fewer keys than usual (bug #4799)
• Mac OS X hosts: prevent password dialogs in 32 bits Snow Leopard
• Python WS: fixed issue with certain enumerations constants having wrong values in Python
webservices bindings
• Python API: several threading and platform issues fixed
• Python shell: added exportVM command
• Python shell: various improvements and bugfixes
• Python shell: corrected detection of home directory in remote case
• OVF: fixed XML comment handling that could lead to parser errors
• Main: fixed a rare parsing problem with port numbers of USB device filters in machine
settings XML
• Main: restrict guest RAM size to 1.5 GB (32 bits Windows hosts only)
• Main: fixed possible hang during guest reboot (bug #3792)
• GUI: fixed rare crash when removing the last disk from the media manager (bug #4795)
• VBoxManage: fixed guestproperty for Mac OS X hosts (bug #3806)
• VBoxManage: fixed setting guest properties with –flags or -flags
• Webservice: fixed a severe memory leak, at least on platforms using XPCOM
• Serial: fixed host mode (Solaris, Linux and Mac OS X hosts; bug #4672)
• VRDP: Remote USB Protocol version 3
• SATA: fixed hangs and BSODs introduced with 3.0.4 (bugs #4695, #4739, #4710)
• SATA: fixed a bug which prevented Windows 7 from detecting more than one hard disk
• SATA/SCSI: fixed rare random guest crashes and hangs
• SCSI: fixed problem with Fedora 11 refusing to boot after kernel update
214
15 Change log
• iSCSI: fix logging out when the target has dropped the connection, fix negotiation of parameters, fix command resend when the connection was dropped, fix processing SCSI status for targets which do not use phase collapse
• BIOS: fixed a bug that caused the OS/2 boot manager to fail (2.1.0 regression, bug #3911)
• PulseAudio: don’t hang during VM termination if the connection to the server was unexpectedly terminated (bug #3100)
• Mouse: fixed weird mouse behaviour with SMP (Solaris) guests (bug #4538)
• HostOnly Network: fixed failure in CreateHostOnlyNetworkInterface() on Linux (no GUID)
• HostOnly Network: fixed wrong DHCP server startup while hostonly interface bringup on
Linux
• HostOnly Network: fixed incorrect factory and default MAC address on Solaris
• HostOnly Network: fixed the problem with listing host-only interfaces on Mac OS X when
all physical interfaces are down (bugs #4698, #4790)
• DHCP: fixed a bug in the DHCP server where it allocated one IP address less than the
configured range
• E1000: fixed receiving of multicast packets
• E1000: fixed up/down link notification after resuming a VM
• NAT: fixed Ethernet address corruptions (bug #4839)
• NAT: fixed hangs, dropped packets and retransmission problems (bug #4343)
• Bridged networking: fixed packet queue issue which might cause DRIVER_POWER_STATE_FAILURE
BSOD for Windows hosts (bug #4821)
• Windows Additions: fixed a bug in VBoxGINA which prevented selecting the right domain
when logging in the first time
• Windows host installer: should now also work on unicode systems (like Korean, bug
#3707)
• Windows host installer: check for sufficient disk space
• Shared clipboard: do not send zero-terminated text to X11 guests and hosts (bug #4712)
• Shared clipboard: use a less CPU intensive way of checking for new data on X11 guests
and hosts (bug #4092)
• Guest Additions: do not hide the host mouse cursor when restoring a saved state (bug
#4700)
• Windows guests: fixed issues with the display of the mouse cursor image (bugs #2603,
#2660 and #4817)
• SUSE 11 guests: fixed Guest Additions installation (bug #4506)
• Guest Additions: support Fedora 12 Alpha guests (bugs #4731, #4733 and #4734)
215
15 Change log
15.22 Version 3.0.4 (2009-08-04)
This is a maintenance release. The following items were fixed and/or added:
• VMM: 64 bits guest stability fixes (AMD-V only; bugs #3923 & #3666)
• VMM: SMP stability fixes (AMD-V only)
• VMM: SMP performance improvement (esp. for Solaris guests)
• VMM: eliminated several bugs which could lead to a host reboot
• VMM: fixed OS/2 ACP2 boot floppy hang (VT-x only)
• VMM: small performance improvement for OpenSolaris guests (AMD-V only)
• VMM: fixed CentOS/Xen reboot (software virtualization only; bug #4509)
• SATA: fixed hangs / BSOD during Windows XP installation (bug #4342)
• SATA: mark the ports as non hotpluggable (bug #3920)
• 3D support: fix deadlocks and context/window tracking for multithreaded applications
(bug #3922)
• 3D support: fix memory leaks when terminating OpenGL guest applications
• 3D support: fix crash in Call of Duty
• NAT: using two or more NAT adapters in one VM was broken (3.0.0 regression)
• NAT: fixed network communication corruptions (bugs #4499, #4540, #4591, #4604)
• NAT: fixed passive ftp access to host server (bug #4427)
• iSCSI: fixed cloning to/from iSCSI disks
• GUI: fixed path separator handling for the OVF export on Windows (bug #4354)
• GUI: the mini toolbar was only shown on the first host display (bug #4654)
• GUI: added a VM option to display the mini toolbar on top
• GUI: don’t crash when adding plus configuring host-only network interfaces
• Shared Folders: fixed selection of a drive root directory as a shared folder host path in
VirtualBox (Windows host only)
• USB: fixed a bug that may have rendered USB device filter settings inactive (3.0.2 regression, bug #4668)
• Guest Additions: report the Guest Additions version to the guest properties (bug #3415)
• Mac OS X hosts: fix creation of VMDK files giving raw partition access (bug #1461)
• Mac OS X hosts: improved support for Snow Leopard
• Linux hosts: fixed problems leading to wrong colors or transparency in host windows with
some graphics drivers (bug #3095)
• Linux hosts: hardware detection fallbacks if the hal service fails to find any DVD drives
• Linux and Solaris hosts: Work around color handling problems in Qt (bug #4353)
216
15 Change log
• Solaris hosts: fixed memory leaks in host-only networking
• Solaris Installer: fixed incorrect netmask for Host-only interface (bug #4590)
• Solaris Installer: added package dependency for Python and Python-devel (bug #4570)
• X11 guests: prevent windows from being skipped in seamless mode KDE guests (bugs
#1681 and #3574)
• X11 guests: fixed screen corruption in X11 guests when large amounts of video RAM were
allocated (bug #4430)
• X11 guests: some fixes when switching between host and guest-drawn mouse pointers
• X11 guests: fixed an issue which caused seamless mode to stop working as it should (the
main issue listed in bug #2238)
15.23 Version 3.0.2 (2009-07-10)
This is a maintenance release. The following items were fixed and/or added:
• VMM: fixed network regressions (guest hangs during network IO) (bug #4343)
• VMM: guest SMP performance improvements
• VMM: fixed hangs and poor performance with Kaspersky Internet Security (VT-x/AMD-V
only; bug #1778)
• VMM: fixed crashes when executing certain Linux guests (software virtualization only;
bugs #2696 & #3868)
• ACPI: fixed Windows 2000 kernel hangs with IO-APIC enabled (bug #4348)
• APIC: fixed high idle load for certain Linux guests (3.0 regression)
• BIOS: properly handle Ctrl-Alt-Del in real mode
• iSCSI: fixed configuration parsing (bug #4236)
• OVF: fix potential confusion when exporting networks
• OVF: compatibility fix (bug #4452)
• OVF: accept ovf:/disk/ specifiers with a single slash in addition to ovf://disk/ (bug #4452)
• NAT: fixed crashes under certain circumstances (bug #4330)
• 3D support: fixed dynamic linking on Solaris/OpenSolaris guests (bug #4399)
• 3D support: fixed incorrect context/window tracking for multithreaded apps
• Shared Folders: fixed loading from saved state (bug #1595)
• Shared Folders: host file permissions set to 0400 with Windows guest (bug #4381)
• X11 host and guest clipboard: fixed a number of issues, including bug #4380 and #4344
• X11 Additions: fixed some issues with seamless windows in X11 guests (bug #3727)
• Windows Additions: added VBoxServiceNT for NT4 guests (for time synchronization and
guest properties)
217
15 Change log
• Windows Additions: fixed version lookup
• Linux Installer: support Pardus Linux
• Linux hosts: workaround for buggy graphics drivers showing a black VM window on recent
distributions (bug #4335)
• Linux hosts: fixed typo in kernel module startup script (bug #4388)
• Solaris hosts: several installer fixes
• Solaris hosts: fixed a preemption issue causing VMs to never start on Solaris 10 (bug
#4328)
• Solaris guests: fixed mouse integration for OpenSolaris 2009.06 (bug #4365)
• Windows hosts: fixed high CPU usage after resuming the host (bug #2978)
• Fixed a settings file conversion bug which sometimes caused hardware acceleration to be
enabled for virtual machines that had no explicit configuration in the XML
15.24 Version 3.0.0 (2009-06-30)
This version is a major update. The following major new features were added:
• Guest SMP with up to 32 virtual CPUs (VT-x and AMD-V only; see chapter 3.4.2, “Processor”
tab, page 44)
• Windows guests: ability to use Direct3D 8/9 applications / games (experimental; see chapter 4.4.1, Hardware 3D acceleration (OpenGL and Direct3D 8/9), page 64)
• Support for OpenGL 2.0 for Windows, Linux and Solaris guests
In addition, the following items were fixed and/or added:
• Solaris hosts: allow suspend/resume on the host when a VM is running (bug #3826)
• Solaris hosts: loosen the restriction for contiguous physical memory under certain conditions
• Mac OS X hosts: fixed guest PAE
• Linux hosts: kernel module compile fixes for 2.6.31 (bug #4264)
• VMM: fixed occasional guru meditation when loading a saved state (VT-x only)
• VMM: eliminated IO-APIC overhead with 32 bits guests (VT-x only, some Intel CPUs don’t
support this feature (most do); bug #638)
• VMM: fixed 64 bits CentOS guest hangs during early boot (AMD-V only; bug #3927)
• VMM: performance improvements for certain PAE guests (e.g. Linux 2.6.29+ kernels)
• VMM: some Windows guests detected a completely wrong CPU frequency (bug #2227)
• VMM: fixed hanging and unkillable VM processes (bug #4040)
• VMM: fixed random infrequent guest crashes due XMM state corruption (Win64 hosts only)
• VMM: performance improvements for network I/O (VT-x/AMD-V only)
218
15 Change log
• GUI: added mini toolbar for fullscreen and seamless mode (Thanks to Huihong Luo)
• GUI: redesigned settings dialogs
• GUI: allow to create/remove more than one host-only network adapters (non Windows
hosts)
• GUI: display estimated time for long running operations (e.g. OVF import/export)
• GUI: fixed rare hangs when open the OVF import/export wizards (bug #4157)
• 3D support: fixed VM crashes for client applications using incorrect OpenGL states
• 3D support: fixed memory corruption when querying for supported texture compression
formats
• 3D support: fixed incorrect rendering of glDrawRangeElements
• 3D support: fixed memory leak when using VBOs
• 3D support: fixed glew library detection
• 3D support: fixed random textures corruption
• VRDP: support Windows 7 RDP client
• Networking: fixed another problem with TX checksum offloading with Linux kernels up to
version 2.6.18
• NAT: fixed “open ports on virtual router 10.0.2.2 - 513, 514” (forum)
• NAT: allow to configure socket and internal parameters
• NAT: allow to bind sockets to specific interface
• PXE boot: significant performance increase (VT-x/AMD-V only)
• VHD: properly write empty sectors when cloning of VHD images (bug #4080)
• VHD: fixed crash when discarding snapshots of a VHD image
• VHD: fixed access beyond the block bitmap which could lead to arbitrary crashes
• VBoxManage: fixed incorrect partition table processing when creating VMDK files giving
raw partition access (bug #3510)
• VBoxManage: support cloning to existing image file
• OVF: several OVF 1.0 compatibility fixes
• OVF: fixed exporting of disk images when multiple virtual machines are exported at once
• Virtual mouse device: eliminated micro-movements of the virtual mouse which were confusing some applications (bug #3782)
• Shared Folders: sometimes a file was created using the wrong permissions (2.2.0 regression; bug #3785)
• Shared Folders: allow to change file attributes from Linux guests and use the correct file
mode when creating files
• Shared Folders: some content was incorrectly written under certain conditions (bug
#1187)
219
15 Change log
• Shared Folders: fixed incorrect file timestamps, when using Windows guest on a Linux host
(bug #3404)
• X11 clipboard: fix duplicate end of lines (bug #4270)
• X11 guests: a number of shared clipboard fixes
• Linux guests: Guest Additions support for SUSE Linux Enterprise Desktop 11
• Linux guests: new daemon vboxadd-service to handle time synchronization and guest property lookup
• Linux guests: implemented guest properties (OS info, logged in users, basic network information)
• Windows host installer: VirtualBox Python API can now be installed automatically (requires
Python and Win32 Extensions installed)
• USB: Support for high-speed isochronous endpoints has been added. In addition, readahead buffering is performed for input endpoints (currently Linux hosts only). This should
allow additional devices to work, notably webcams (bug #242)
• USB: fixed error handling for some USB dongles
• Web service: fixed inability to handle NULL pointers for object arguments, which are valid
values for a lot of APIs, in both the raw and the object-oriented web service
• Web service: object-oriented bindings for JAX-WS did not exhibit interface inheritance
correctly, fixed
• Web service: added support for IDisplay and IGuest interfaces, which were previously
unavailable
• Registration dialog uses Sun Online accounts now
15.25 Version 2.2.4 (2009-05-29)
This is a maintenance release. The following items were fixed and/or added:
• Windows Installer: fixed a potential hang during installation
• Windows Installer: fixed several problems (bug #3892)
• Solaris hosts: make it work with Solaris build 114 or later (bug #3981)
• Solaris hosts: fixed a bug serial port character handling found during loopback (bug
#3120)
• Linux hosts: adapted vboxdrv.sh to the latest changes in VBoxManage list runningvms
(bug #4034)
• Windows hosts: fixed a crash caused by host-only/bridged networking
• Mac OS X hosts: fixed access to host DVD with passthrough disabled (bug #4077)
• Guest Additions: fixed problems with KDE 4 not recognizing mouse clicks
• Windows Additions: fixed incorrect 8-bit guest color depth in Windows 7 guests
• GUI: warn if VT-x/AMD-V could not be enabled for guests that require this setting (bug
#4055)
220
15 Change log
• VMM: fixed occasional crash due to insufficient memory
• VMM: fixed hanging 64 bits Solaris guests
• VMM: restore from a saved state occasionally failed (bugs #3984 and #2742)
• Clipboard: fixed a deadlock while shutting down the shared clipboard on X11 hosts (bug
#4020)
• OVF: fixed potential hang during import
• OVF: fixed potential crashes during import/export on Win64 hosts
• VBoxManage modifyhd --compact: fixed bug which could lead to crashes and image
corruption (bug #3864)
• VBoxManage metrics collect: now flushes the output stream
• VHD: made VBoxManage internalcommands sethduuid work for .vhd files (bug #3443)
• VHD: some .vhd files could not be cloned (bug #4080)
• NAT: improvement of TCP connection establishment (bug #2987)
• NAT: fixed order of DNS servers in DHCP lease (bug #4091)
• NAT: fixed DHCP lease for multiple name servers (bug #3692)
• NAT: fixed a potential segfault if the host lost its connectivity (bug #3964)
• Shared Folders: deny access to parent directories on Windows hosts (bug #4090)
• Shared Folders: make rm/rmdir work with Solaris guests on Windows hosts
• Networking: fixed the problem with blocked receiving thread when a broadcast packet
arrives too early to be handled by uninitialized e1000 adapter
• Networking: fixed the problem that caused host freezes/crashes when using bridged mode
with host’s interface having RX checksum offloading on (bug #3926 and related). Fixes
problems with TX offloading as well (bug #3870)
• PXE boot: Added support for PRO/1000 MT Server adapter
• Python bindings: fixed keyword conflict
• SCSI: fixed occasional crashes on Win64
• Serial: allow to redirect the serial port to a raw file (bug #1023)
• VRDP: fixed a rare incorrect screen update
• VMDK: fixed creating snapshots
221
15 Change log
15.26 Version 2.2.2 (2009-04-27)
This is a maintenance release. The following items were fixed and/or added:
• Host and guest clipboard: fixed a number of issues affecting hosts and guests running the
X window system
• Guest Additions: make sure the virtual mouse autodetection works on first reboot after
installing the Additions on X.Org server 1.5 and later
• Guest Additions: properly report process identity number of running services
• Guest Additions: clean up properly if the X Window server terminates
• Linux Additions: fixed installation path for OpenGL libraries in some 64-bit guests (bug
#3693)
• Solaris Additions: fixed installation to work when X.Org is not installed on the guest
• Solaris Additions: fixed a bug that could panic the guest when unmounting a busy shared
folder
• Windows Additions: fixed mouse pointer integration of some Windows guests (2.2.0 regression, bug #3734)
• Windows Additions: fixed installation on Windows Server 2008 Core (bug #2628)
• Main: do not try to use older versions of D-Bus (Linux hosts only, bug #3732)
• VMM: fixed out-of-memory conditions on Windows hosts (bug #3657)
• VMM: fixed occasional hangs when attaching USB devices during VM startup (2.2.0 regression; bugs #3787)
• VMM: fixed guru meditation related to memory management (software virtualization only)
• Virtual disks: fix possible data corruption when writing to diff images, incorrect detection
of redundant writes
• GUI: reworked network settings dialog
• GUI: properly show the detailed settings dialog of NAT networks (bug #3702)
• GUI: HostKey could not be changed (2.2.0 regression, bug #3689)
• GUI: fixed memory textfield size (Windows hosts only; bug #3679)
• GUI: fixed crash when selecting a shared folder path (Windows hosts only; bugs #3694,
#3751, #3756)
• VBoxManage modifyhd --compact: implemented again for VDI files, and now supports
relative paths (bug #2180, #2833)
• VBoxManage snapshot discard: made it work again (2.1.0 regression; bug #3714)
• NAT: on some Windows hosts, the guest didn’t receive a DHCP lease (bug #3655)
• NAT: fixed release assertion during poll() (bug #3667)
• Networking: fixed a deadlock caused by the PCnet network device emulation (2.2.0 regression, bug #3676)
222
15 Change log
• Clipboard: fixed random crashes (X11 hosts only, bug #3723)
• Shared Folders: fixed incorrect permissions for Solaris guests
• Shared Folders: fixed wrong file sizes with Solaris guests
• CBindings: fixed possible memory leak while releasing the IVirtualBox and ISession Objects
• Solaris hosts: fixed host-only network interface incompatibility with nwam/dhcpagent
(bug #3754)
• Windows installer: fixed several install and uninstall issues (bugs #3659, #3686, #1730,
#3711, #3373, #3382, #3701, #3685, #3710)
• Mac OS X hosts: preliminary support for Snow Leopard
15.27 Version 2.2.0 (2009-04-08)
This version is a major update. The following major new features were added:
• OVF (Open Virtualization Format) appliance import and export (see chapter 1.12, Importing and exporting virtual machines, page 26)
• Host-only networking mode (see chapter 6.6, Host-only networking, page 88)
• Hypervisor optimizations with significant performance gains for high context switching
rates
• Raised the memory limit for VMs on 64-bit hosts to 16GB
• VT-x/AMD-V are enabled by default for newly created virtual machines
• USB (OHCI & EHCI) is enabled by default for newly created virtual machines (Qt GUI only)
• Experimental USB support for OpenSolaris hosts
• Shared Folders for Solaris and OpenSolaris guests
• OpenGL 3D acceleration for Linux and Solaris guests (see chapter 4.4.1, Hardware 3D
acceleration (OpenGL and Direct3D 8/9), page 64)
• Added C API in addition to C++, Java, Python and Web Services
In addition, the following items were fixed and/or added:
• VMM: FreeBSD guest related fix for V86 flags (bug #2342)
• VMM: fixed guru meditation when booting an AsteriskNow Linux VM (bug #2342)
• VMM: fixed PGMPOOLKIND_FREE guru meditation (bugs #3356, #3431)
• VMM: fixed Windows XP boot hang (guest PAE + nested paging only)
• VMM: allow mixing of VT-x/AMD-V and software virtualization
• VMM: fixed extremely slow safe mode booting in e.g. Windows 2008 (VT-x/AMD-V only)
• VMM: significant speedup of certain GRUB boot loaders (e.g. Solaris) (VT-x/AMD-V only)
• VMM: real-mode IOPL fix for DOS guests (VT-x only)
223
15 Change log
• VMM: fixed VT-x detection with certain BIOSes that enable VT-x, but don’t set the lock bit
in MSR_IA32_FEATURE_CONTROL
• VMM: fixed hibernation issues on Windows XP hosts (VT-x only; bug #1794)
• VMM: properly emulate RDMSR from the TSC MSR, should fix some NetBSD guests
• VMM: emulate RDPMC; fixes Windows guests crashes when using the Kaspersky virus scanner (bug #1778)
• NAT: fixed truncated downloads (FTP) (bug #3257)
• NAT: blocked UDP packets caused a crash (bug #3426)
• NAT: allow to configure the next server and the boot file via VBoxManage (bug #2759)
• IDE: fixed hard disk upgrade from XML-1.2 settings (bug #1518)
• Hard disk: support more VMDK file variants (including fixed-size ESX server images)
• Hard disks: refuse to start the VM if a disk image is not writable
• USB: further reduced host CPU utilization for OHCI and EHCI; the “VBoxInternal/Devices/usbohci/0/Config/FrameRate” CFG key is no longer necessary and no longer supported
• USB: fixed BSOD on the host with certain USB devices (Windows hosts only; bug #1654)
• E1000: properly handle cable disconnects (bug #3421)
• VRDP: fixed hangs when VRDP server is enabled or disabled in runtime
• Shared Folders: respect umask settings on Linux, OSX and Solaris hosts when creating files
• X11 guests: prevented setting the locale in vboxmouse, as this caused problems with Turkish locales (bug #3563)
• X11 guests: show the guest mouse pointer at the right position if the virtual desktop is
larger than the guest resolution (bug #2306)
• Linux Additions: fixed typo when detecting Xorg 1.6 (bug #3555)
• Solaris guests: added xpg4/xcu4 dependency to the Guest Additions installer (bug #3524)
• Windows guests: bind the VBoxMouse.sys filter driver to the correct guest pointing device
(bug #1324)
• Windows hosts: fixed BSOD when starting a VM with enabled host interface (bug #3414)
• Linux hosts: do proper reference counting to prevent unloading the vboxnetflt module as
long as this code is in use (bug #3104)
• Linux hosts: do not leave zombies of VBoxSysInfo.sh (bug #3586)
• Linux installers: fixes for Slackware, Arch Linux and Linux from Scratch systems
• Windows installers: combined installer executable which contains both (32- and 64-bit)
architectures
• VBoxManage: less cryptic command-line error messages
• VBoxManage list vms commands now default to compact format
• VBoxManage controlvm dvdattach did not work if the image was attached before
224
15 Change log
• VBoxManage: allow creation of all supported disk image variants
• VBoxManage showvminfo: don’t spam the release log if the Guest Additions don’t support
statistics information (bug #3457)
• VBoxManage: big command line processing cleanup, the legacy single-dash options are
deprecated and will be removed in the next major release, so switch to the new options
now
• Hard disks: improved immutable disk support to auto-reset diff file at VM startup (related
to bug #2772)
• GUI: enable the audio adapter by default for new VMs
• GUI: warn if VT-x/AMD-V is not operational when starting a 64-bit guest
• GUI: deactivate 64-bit guest support when the host CPU does not support VT-x/AMD-V
• GUI: removed floppy icon from the status bar
• GUI: show build revision in about dialog
• GUI: fixed sticky status bar text
• GUI: improved error dialogs
• GUI: fail with an appropriate error message when trying to boot a read-only disk image
(bug #1745)
• GUI/Mac OS X: fixed disabled close button
• GUI/Windows: re-enabled support for copy and paste (Windows hosts 2.0 regression; bug
#2065)
• 3D support: added OpenGL select/feedback support (bug #2920)
• 3D support: close OpenGL subsystem for terminated guest applications (bug #3243)
• 3D support: fixed VM hangs when starting guests with 3D acceleration enabled (bug
#3437)
• PXE: fixed boot hangs when hardware virtualization is used (bug #2536)
• LsiLogic: fixed problems with Solaris guests
• Main API: close machine settings XML file when unregistering machine (bug #3548)
15.28 Version 2.1.4 (2009-02-16)
This is a maintenance release. The following items were fixed and/or added:
• Windows hosts: fixed host crashes/hangs on certain 32 bits Windows systems when running Linux guests (bugs #1606, #2269, #2763)
• Windows hosts: fixed network component BSOD issue (bugs #3168, #2916)
• Windows hosts: fixed installation issues (bugs #2517, #1730, #3130)
• Linux hosts: fixed occasional kernel oopses (bug #2556)
• Linux hosts: fixed module dependency for shipped modules (bug #3115)
225
15 Change log
• Linux hosts: moved the udev rules for USB forward so that they don’t override existing
system rules (bug #3143)
• Linux hosts: fixed the issue with guest not being able to communicate with each other
when attached via TAP interfaces (bug #3215)
• Linux hosts: give up probing for USB gracefully if DBus or hal are not available (bug
#3136)
• Linux hosts: fixed warnings in installer when SELinux was disabled (bug #3098)
• Linux hosts: VirtualBox sometimes failed to start if it had been started using sudo previously (bug #3270)
• Solaris hosts: fixed high CPU load while running many guests in parallel
• Solaris hosts: fixed inability to start more than 128 VMs
• VMM: fixed performance regression for Windows guests (bug #3172)
• VMM: ignore CPU stepping when restoring a saved state/snapshot
• REM: fixed inability to use gdb to debug programs in Linux guests with software virtualization (bug #3245)
• GUI: fixed dead key handling on Solaris hosts (bug #3256)
• GUI: in the shutdown dialog, disable the action send the shutdown signal if the guest is
currently not using ACPI
• GUI: suppress additional key release events sent by X11 hosts when keys are auto-repeated
(bug #1296)
• API: restore case insensitive OS type name lookup (bug #3087)
• VBoxHeadless: really don’t start X11 services (clipboard service, 3D acceleration; Solaris &
Darwin hosts only; bug #3199)
• NAT: fixed occasional crashes when the guest is doing traceroute (non-Windows hosts; bug
#3200)
• NAT: fixed crashes under high load (bug #3110)
• NAT: fixed truncated downloads (Windows hosts only, bug #3257)
• NAT: don’t intercept TFTP packages with a destination address different from the builtin
TFTP server (bug #3112)
• USB: several fixes for USB passthrough on Linux hosts
• USB: reduced host CPU utilization if EHCI is active
• VRDP: fixed VRDP server black screen after a client reconnect (bug #1989)
• VRDP: modified rdesktop client (rdesktop-vrdp) now uses NumLock state synchronization
(bug #3253)
• LsiLogic: make FreeBSD guests work (bug #3174)
• ATA: fixed deadlock when pausing VM due to problems with the virtual disk (e.g. disk full,
iSCSI target unavailable)
• iSCSI: fixed possible crash when pausing the VM
226
15 Change log
• 3D support: added missing GL_MAX_TEXTURE_COORDS_ARB (bug #3246)
• Windows Additions: fixed ERROR (e0000101) error during installation (bug #1923)
• Windows Additions: fixed Windows Explorer hang when browsing shared folders with 64
bit guests (bug #2225)
• Windows Additions: fixed guest screen distortions during a video mode change
• Windows Additions: fixed the Network drive not connected message for mapped shared
folders drives after the guest startup (bug #3157)
• Linux Additions: fixed occasional file corruption when writing files in O_APPEND mode to
a shared folder (bug #2844)
• Linux Additions: the mouse driver was not properly set up on X.Org release candidates
(bug #3212)
• Linux Additions: fixed installer to work with openSUSE 11.1 (bug #3213)
• Linux Additions: disable dynamic resizing if the X server is configured for fixed resolutions
• Linux/Solaris Additions: handle virtual resolutions properly which are larger than the actual guest resolution (bug #3096)
15.29 Version 2.1.2 (2009-01-21)
This is a maintenance release. The following items were fixed and/or added:
• USB: Linux host support fixes (bug #3136)
• VMM: fixed guru meditation for PAE guests on non-PAE hosts (AMD-V)
• VMM: fixed guru meditation on Mac OS X hosts when using VT-x
• VMM: allow running up to 1023 VMs on 64-bit hosts (used to be 127)
• VMM: several FreeBSD guest related fixes (bugs #2342, #2341, #2761)
• VMM: fixed guru meditation when installing Suse Enterprise Server 10U2 (VT-x only; bug
#3039)
• VMM: fixed guru meditation when booting Novell Netware 4.11 (VT-x only; bug #2898)
• VMM: fixed VERR_ADDRESS_TOO_BIG error on some Mac OS X systems when starting a
VM
• VMM: clear MSR_K6_EFER_SVME after probing for AMD-V (bug #3058)
• VMM: fixed guru meditation during Windows 7 boot with more than 2 GB guest RAM
(VT-x, nested paging only)
• VMM: fixed hang during OS/2 MCP2 boot (AMD-V and VT-x only)
• VMM: fixed loop during OpenBSD 4.0 boot (VT-x only)
• VMM: fixed random crashes related to FPU/XMM with 64 bits guests on 32 bits hosts
• VMM: fixed occasional XMM state corruption with 64 bits guests
• GUI: raised the RAM limit for new VMs to 75% of the host memory
227
15 Change log
• GUI: added Windows 7 as operating system type
• VBoxSDL: fixed -fixed fixedmode parameter (bug #3067)
• Clipboard: stability fixes (Linux and Solaris hosts only, bug #2675 and #3003)
• 3D support: fixed VM crashes for certain guest applications (bugs #2781, #2797, #2972,
#3089)
• LsiLogic: improved support for Windows guests (still experimental)
• VGA: fixed a 2.1.0 regression where guest screen resize events were not properly handled
(bug #2783)
• VGA: significant performance improvements when using VT-x/AMD-V on Mac OS X hosts
• VGA: better handling for VRAM offset changes (fixes GRUB2 and Dos DOOM display issues)
• VGA: custom VESA modes with invalid widths are now rounded up to correct ones (bug
#2895)
• IDE: fixed ATAPI passthrough support (Linux hosts only; bug #2795)
• Networking: fixed kernel panics due to NULL pointer dereference in Linux kernels < 2.6.20
(Linux hosts only; bug #2827)
• Networking: fixed intermittent BSODs when using the new host interface (Windows hosts
only; bugs #2832, #2937, #2929)
• Networking: fixed several issues with displaying hostif NICs in the GUI (Windows hosts
only; bugs 2814, #2842)
• Networking: fixed the issue with displaying hostif NICs without assigned IP addresses
(Linux hosts only; bug #2780)
• Networking: fixed the issue with sent packets coming back to internal network when using
hostif (Linux hosts only; bug #3056).
• NAT: fixed port forwarding (Windows hosts only; bug #2808)
• NAT: fixed booting from the builtin TFTP server (bug #1959)
• NAT: fixed occasional crashes (bug #2709)
• SATA: vendor product data (VPD) is now configurable
• SATA: raw disk partitions were not recognized (2.1.0 regression, Windows host only, bug
#2778)
• SATA: fixed timeouts in the guest when using raw VMDK files (Linux host only, bug #2796)
• SATA: huge speed up during certain I/O operations like formatting a drive
• SATA/IDE: fixed possible crash/errors during VM shutdown
• VRDP: fixed loading of libpam.so.1 from the host (Solaris hosts only)
• VRDP: fixed RDP client disconnects
• VRDP: fixed VRDP server misbehavior after a broken client connection
• VBoxManage showvminfo: fixed assertion for running VMs (bug #2773)
228
15 Change log
• VBoxManage convertfromraw: added parameter checking and made it default to creating
VDI files; fixed and documented format parameter (bug #2776)
• VBoxManage clonehd: fixed garbled output image when creating VDI files (bug #2813)
• VBoxManage guestproperty: fixed property enumeration (incorrect parameters/exception)
• VHD: fixed error when attaching certain container files (bug #2768)
• Solaris hosts: added support for serial ports (bug #1849)
• Solaris hosts: fix for Japanese keyboards (bug #2847)
• Solaris hosts: 32-bit and 64-bit versions now available as a single, unified package
• Linux hosts: don’t depend on libcap1 anymore (bug #2859)
• Linux hosts: kernel module compile fixes for 2.6.29-rc1
• Linux hosts: don’t drop any capability if the VM was started by root (2.1.0 regression)
• Mac OS X hosts: save the state of running or paused VMs when the host machine’s battery
reaches critical level
• Mac OS X hosts: improved window resizing of the VM window
• Mac OS X hosts: added GUI option to disable the dock icon realtime preview in the GUI to
decrease the host CPU load when the guest is doing 3D
• Mac OS X hosts: polished realtime preview dock icon
• Windows Additions: fixed guest property and logging OS type detection for Windows 2008
and Windows 7 Beta
• Windows Additions: added support for Windows 7 Beta (bugs #2995, #3015)
• Windows Additions: fixed Windows 2000 guest freeze when accessing files on shared folders (bug #2764)
• Windows Additions: fixed CTRL-ALT-DEL handling when using VBoxGINA
• Windows Additions Installer: added /extract switch to only extract (not install) the files to
a directory (can be specified with /D=path)
• Linux installer and Additions: added support for the Linux From Scratch distribution (bug
#1587) and recent Gentoo versions (bug #2938)
• Additions: added experimental support for X.Org Server 1.6 RC on Linux guests
• Linux Additions: fixed bug which prevented to properly set fmode on mapped shared folders (bug #1776)
• Linux Additions: fixed appending of files on shared folders (bug #1612)
• Linux Additions: ignore noauto option when mounting a shared folder (bug #2498)
• Linux Additions: fixed a driver issue preventing X11 from compiling keymaps (bug #2793
and #2905)
• X11 Additions: workaround in the mouse driver for a server crash when the driver is loaded
manually (bug #2397)
229
15 Change log
15.30 Version 2.1.0 (2008-12-17)
This version is a major update. The following major new features were added:
• Support for hardware virtualization (VT-x and AMD-V) on Mac OS X hosts
• Support for 64-bit guests on 32-bit host operating systems (experimental; see chapter 3.1.2,
64-bit guests, page 40)
• Added support for Intel Nehalem virtualization enhancements (EPT and VPID; see chapter
10.3, Hardware vs. software virtualization, page 157)
• Experimental 3D acceleration via OpenGL (see chapter 4.4.1, Hardware 3D acceleration
(OpenGL and Direct3D 8/9), page 64)
• Experimental LsiLogic and BusLogic SCSI controllers (see chapter 5.1, Hard disk controllers:
IDE, SATA (AHCI), SCSI, SAS, page 71)
• Full VMDK/VHD support including snapshots (see chapter 5.2, Disk image files (VDI, VMDK,
VHD, HDD), page 73)
• New NAT engine with significantly better performance, reliability and ICMP echo (ping)
support (bugs #1046, #2438, #2223, #1247)
• New Host Interface Networking implementations for Windows and Linux hosts with easier
setup (replaces TUN/TAP on Linux and manual bridging on Windows)
In addition, the following items were fixed and/or added:
• VMM: significant performance improvements for VT-x (real mode execution)
• VMM: support for hardware breakpoints (VT-x and AMD-V only; bug #477)
• VMM: VGA performance improvements for VT-x and AMD-V
• VMM: Solaris and OpenSolaris guest performance improvements for AMD-V (Barcelona
family CPUs only)
• VMM: fixed guru meditation while running the Dr. Web virus scanner (software virtualization only; bug #1439)
• VMM: deactivate VT-x and AMD-V when the host machine goes into suspend mode; reactivate when the host machine resumes (Windows, Mac OS X & Linux hosts; bug #1660)
• VMM: fixed guest hangs when restoring VT-x or AMD-V saved states/snapshots
• VMM: fixed guru meditation when executing a one byte debug instruction (VT-x only; bug
#2617)
• VMM: fixed guru meditation for PAE guests on non-PAE hosts (VT-x)
• VMM: disallow mixing of software and hardware virtualization execution in general (bug
#2404)
• VMM: fixed black screen when booting OS/2 1.x (AMD-V only)
• GUI: pause running VMs when the host machine goes into suspend mode (Windows & Mac
OS X hosts)
• GUI: resume previously paused VMs when the host machine resumes after suspend (Windows & Mac OS X hosts)
230
15 Change log
• GUI: save the state of running or paused VMs when the host machine’s battery reaches
critical level (Windows hosts)
• GUI: properly restore the position of the selector window when running on the compiz
window manager
• GUI: properly restore the VM in seamless mode (2.0 regression)
• GUI: warn user about non optimal memory settings
• GUI: structure operating system list according to family and version for improved usability
• GUI: predefined settings for QNX guests
• IDE: improved ATAPI passthrough support
• Networking: added support for up to 8 Ethernet adapters per VM
• Networking: fixed issue where a VM could lose connectivity after a reboot
• iSCSI: allow snapshot/diff creation using local VDI file
• iSCSI: improved interoperability with iSCSI targets
• Graphics: fixed handling of a guest video memory which is not a power of two (bug #2724)
• VBoxManage: fixed bug which prevented setting up the serial port for direct device access
• VBoxManage: added support for VMDK and VHD image creation
• VBoxManage: added support for image conversion (VDI/VMDK/VHD/RAW)
• Solaris hosts: added IPv6 support between host and guest when using host interface networking
• Mac OS X hosts: added ACPI host power status reporting
• API: redesigned storage model with better generalization
• API: allow attaching a hard disk to more than one VM at a time
• API: added methods to return network configuration information of the host system
• Shared Folders: performance and stability fixes for Windows guests (Microsoft Office Applications)
15.31 Version 2.0.8 (2009-03-10)
This is a maintenance release. The following items were fixed and/or added:
• VMM: fixed guest hangs when restoring VT-x or AMD-V saved states/snapshots
• VMM: fixed memory allocation issues which can cause VM start failures with
VERR_PGM_MAPPING_CONFLICT error
• VMM: fixed host crashes/hangs on certain 32 bits Windows systems when running Linux
guests (bugs #1606, #2269, #2763)
• XPCOM/Main: fixed synchronization bug caused by SYSV semaphore key collisions
• ATA: fixed deadlock when pausing VM due to problems with the virtual disk (e.g. disk full,
iSCSI target unavailable)
231
15 Change log
• iSCSI: fixed possible crash when pausing the VM
• iSCSI: fix PDU validity checking and detect final PDU reliably
• VBoxHeadless: really don’t start X11 services (clipboard service, 3D acceleration; Solaris &
Darwin hosts only; bug #3199)
• Networking: fixed issue where a VM could lose connectivity after a reboot
• Linux hosts: fixed occasional kernel oopses (bug #2556)
• Solaris hosts: fixed high CPU load while running many guests in parallel
• Solaris hosts: fixed inability to start more than 128 VMs
• Solaris/Web services: fixed SMF script to set home directory correctly
• Linux Additions: fixed occasional file corruption when writing files in O_APPEND mode to
a shared folder (bug #2844)
15.32 Version 2.0.6 (2008-11-21)
This is a maintenance release. The following items were fixed and/or added:
• VMM: fixed Guru meditation when running 64 bits Windows guests (bug #2220)
• VMM: fixed Solaris 10U6 boot hangs (VT-x and AMD-V) bug #2565)
• VMM: fixed Solaris 10U6 reboot hangs (AMD-V only; bug #2565)
• GUI: the host key was sometimes not properly displayed (Windows hosts only, bug #1996)
• GUI: the keyboard focus was lost after minimizing and restoring the VM window via the
Windows taskbar (bugs #784)
• VBoxManage: properly show SATA disks when showing the VM information (bug #2624)
• SATA: fixed access if the buffer size is not sector-aligned (bug #2024)
• SATA: improved performance
• SATA: fixed snapshot function with ports>1 (bug #2510)
• E1000: fixed crash under rare circumstances
• USB: fixed support for iPhone and Nokia devices (Linux host: bugs #470 & #491)
• Windows host installer: added proper handling of open VirtualBox applications when updating the installation
• Windows host installer: fixed default installation directory on 64-bit on new installations
(bug #2501)
• Linux/Solaris/Darwin hosts: verify permissions in /tmp/vbox-$USER-ipc
• Linux hosts: fixed assertion on high network load (AMD64 hosts, fix for Linux distributions
with glibc 2.6 and newer (bug #616)
• Linux hosts: don’t crash during shutdown with serial ports connected to a host device
• Solaris hosts: fixed incompatibility between IPSEC and host interface networking
232
15 Change log
• Solaris hosts: fixed a rare race condition while powering off VMs with host interface networking
• Solaris hosts: fixed VBoxSDL on Solaris 10 by shipping the required SDL library (bug
#2475)
• Windows Additions: fixed logged in users reporting via guest properties when using native
RDP connections
• Windows Additions: fixed Vista crashes when accessing shared folders under certain circumstances (bug #2461)
• Windows Additions: fixed shared folders access with MS-Office (bug #2591)
• Linux Additions: fixed compilation of vboxvfs.ko for 64-bit guests (bug #2550)
• SDK: added JAX-WS port caching to speedup connections
15.33 Version 2.0.4 (2008-10-24)
This is a maintenance release. The following items were fixed and/or added:
• VMM: better error reporting for VT-x failures
• VMM: don’t overflow the release log with PATM messages (bug #1775)
• VMM: fixed save state restore in real mode (software virtualization only)
• GUI: work around a Qt bug on Mac OS X (bug #2321)
• GUI: properly install the Qt4 accessible plugin (bug #629)
• SATA: error message when starting a VM with a VMDK connected to a SATA port (bug
#2182)
• SATA: fixed Guru mediation when booting OpenSolaris/64; most likely applies to other
guests as well (bug #2292)
• Network: don’t crash when changing the adapter link state if no host driver is attached
(bug #2333)
• VHD: fixed bug which prevents booting from VHD images bigger than 4GB (bug #2085)
• VRDP: fixed a repaint problem when the guest resolution was not equal to the client resolution
• Clipboard: don’t crash when host service initialization takes longer than expected (Linux
hosts only; bug #2001)
• Windows hosts: VBoxSVC.exe crash (bug #2212)
• Windows hosts: VBoxSVC.exe memory leak due to a Windows WMI memory leak (Vista
only) (bug #2242)
• Windows hosts: VBoxSVC.exe delays GUI startup
• Linux hosts: handle jiffies counter overflow (VM stuck after 300 seconds of host uptime;
bug #2247)
• Solaris hosts: fixed host or guest side networking going stale while using host interface
networking (bug #2474)
233
15 Change log
• Solaris hosts: added support for using unplumbed network interfaces and Crossbow Virtual
Network Interfaces (VNICs) with host interface networking
• Solaris hosts: reworked threading model improves performance for host interface networking
• Windows Additions: fixed crash when accessing deep directory structures in a shared folder
• Windows Additions: improved shared folder name resolving (bug #1728)
• Windows Additions: fixed Windows 2000 shutdown crash (bug #2254)
• Windows Additions: fixed error code for MoveFile() if the target exists (bug #2350)
• Linux Additions: fixed seek() for files bigger than 2GB (bug #2379)
• Linux Additions: support Ubuntu 8.10
• Linux Additions: clipboard fixes (bug #2015)
• Web services: improved documentation and fixed example (bug #1642)
15.34 Version 2.0.2 (2008-09-12)
This is a maintenance release. The following items were fixed and/or added:
• VMM: fixed inability to run more than one VM in parallel (AMD-V on CPUs with erratum
170 only; bug #2167)
• VMM: VT-x stability fixes (bug #2179 and others)
• VMM: fixed Linux 2.6.26+ kernel crashes (used by Ubuntu 8.10 Alpha, Fedora 10 Alpha;
bug #1875)
• VMM: fixed 64 bits Linux 2.6.26 kernel crashes (Debian)
• VMM: fixed Vista (32 bits) guest crash during boot when PAE and NX are enabled (applied
to 64 bits hosts with VT-x enabled only)
• VMM: fixed OS/2 guest crashes during boot (AMD-V; bug #2132)
• GUI: fixed crash when trying to release an inaccessible image in the virtual disk manager
• GUI: fixed invalid error message for a changed snapshot path even if that path wasn’t
changed (bug #2064)
• GUI: fixed crash when creating a new hard disk image (bug #2060)
• GUI: fixed crash when adding a hard disk in the VM settings (bug #2081)
• GUI: fixed a bug where VirtualBox isn’t working with the new QGtkStyle plugin (bug
#2066)
• GUI: fixed VM close dialog in seamless mode (Mac OS X hosts only; bug #2067)
• GUI: fixed standard menu entries for NLS versions (Mac OS X hosts only)
• GUI: disable the VT-x/AMD-V setting when it’s not supported by the CPU (or on Mac OS X
hosts)
• VBoxManage: fixed crash during internalcommands createrawvmdk (bug #2184)
234
15 Change log
• VBoxManage: fixed output of snapshot showvminfo (bug #698)
• Guest properties: added information about guest network interfaces (Windows guests
only)
• Shared Folders: fixed regression that caused Windows guest crashes
• API: fixed number of installed CPUs (Solaris hosts only)
• VRDP: allow a client to reconnect to an existing session on the VRDP server by dropping
the existing connection (configurable and disabled by default; only relevant when multiconnection mode is disabled)
• VRDP: fixed an image repaint problem
• Linux hosts: fixed bug in vboxdrv.ko that could corrupt kernel memory and panic the kernel
(bug #2078)
• Linux hosts: compile fixes for kernel module on Linux 2.6.27
• Mac OS X hosts: added Python support
• Additions: fixed a possible hang in HGCM communication after a VM reboot
• Windows Additions: added support for Windows XP 64 bits (bug #2117)
• Linux Additions: deactivate dynamic resizing on Linux guests with buggy X servers
• Linux Additions: support Ubuntu 8.10 guests and Fedora 9 guests (dynamic resizing disabled for the latter)
• Linux Additions: added installer check for the system architecture
• Linux Additions: fixed Xorg modules path for some Linux distributions (bug #2128)
• VMDK: be more liberal with ambiguous parts of the format specification and accept more
format variants (bug #2062)
• VHD: fixed a bug in the VHD backend which resulted in reading the wrong data (bug
#2085)
• Solaris hosts: fixed kernel panic on certain machines when starting VMs with host interface
networking (bug #2183)
• Solaris hosts: fixed inability to access NFS shares on the host when host interface networking was enabled
• Solaris hosts: installer now detects and reports when installing under the wrong architecture
• Solaris hosts: fixed security hardening that prevented starting VMs from non-global zones
even as root (bug #1948)
• Solaris Additions: combined the 32 bit and 64 bit Additions installer into a single package
• Mac OS X hosts: experimental support for attaching a real serial port to the guest
235
15 Change log
15.35 Version 2.0.0 (2008-09-04)
This version is a major update. The following major new features were added:
• 64 bits guest support (64 bits host only)
• New native Leopard user interface on Mac OS X hosts
• The GUI was converted from Qt3 to Qt4 with many visual improvements
• New-version notifier
• Guest property information interface
• Host Interface Networking on Mac OS X hosts
• New Host Interface Networking on Solaris hosts
• Support for Nested Paging on modern AMD CPUs (major performance gain)
• Framework for collecting performance and resource usage data (metrics)
• Added SATA asynchronous IO (NCQ: Native Command Queuing) when accessing raw
disks/partitions (major performance gain)
• Clipboard integration for OS/2 Guests
• Created separate SDK component featuring a new Python programming interface on Linux
and Solaris hosts
• Support for VHD disk images
In addition, the following items were fixed and/or added:
• VMM: VT-x fixes
• AHCI: improved performance
• GUI: keyboard fixes
• Linux installer: properly uninstall the package even if unregistering the DKMS module fails
• Linux Additions: the guest screen resolution is properly restored
• Network: added support for jumbo frames (> 1536 bytes)
• Shared Folders: fixed guest crash with Windows Media Player 11
• Mac OS X: Ctrl+Left mouse click doesn’t simulate a right mouse click in the guest anymore.
Use Hostkey+Left for a right mouse click emulation. (bug #1766)
With VirtualBox 3.2, changelog information for versions before 2.0 was removed in order to
save space. To access this information, please consult the User Manual of VirtualBox version 3.1
or earlier.
236
16 Third-party materials and licenses
VirtualBox incorporates materials from several Open Source software projects. Therefore the use
of these materials by VirtualBox is governed by different Open Source licenses. This document
reproduces these licenses and provides a list of the materials used and their respective licensing
conditions. Section 1 contains a list of the materials used. Section 2 reproduces the applicable
Open Source licenses. For each material, a reference to its license is provided.
The source code for the materials listed below as well as the rest of the VirtualBox code which
is released as open source are available at http://www.virtualbox.org, both as tarballs for
particular releases and as a live SVN repository.
16.1 Materials
• VirtualBox contains portions of QEMU which is governed by the licenses in chapter 16.2.5,
X Consortium License (X11), page 254 and chapter 16.2.2, GNU Lesser General Public License
(LGPL), page 243 and
(C) 2003-2005 Fabrice Bellard; Copyright (C) 2004-2005 Vassili Karpov (malc); Copyright
(c) 2004 Antony T Curtis; Copyright (C) 2003 Jocelyn Mayer
• VirtualBox contains code which is governed by the license in chapter 16.2.5, X Consortium
License (X11), page 254 and
Copyright 2004 by the Massachusetts Institute of Technology.
• VirtualBox contains code of the BOCHS VGA BIOS which is governed by the license in
chapter 16.2.2, GNU Lesser General Public License (LGPL), page 243 and
Copyright (C) 2001, 2002 the LGPL VGABios developers Team.
• VirtualBox contains code of the BOCHS ROM BIOS which is governed by the license in
chapter 16.2.2, GNU Lesser General Public License (LGPL), page 243 and
Copyright (C) 2002 MandrakeSoft S.A.; Copyright (C) 2004 Fabrice Bellard; Copyright (C)
2005 Struan Bartlett.
• VirtualBox contains the zlib library which is governed by the license in chapter 16.2.6, zlib
license, page 254 and
Copyright (C) 1995-2003 Jean-loup Gailly and Mark Adler.
• VirtualBox may contain OpenSSL which is governed by the license in chapter 16.2.7,
OpenSSL license, page 254 and
Copyright (C) 1995-1998 Eric Young ([email protected]). This product includes software
written by Tim Hudson ([email protected]).
• VirtualBox may contain NSPR and XPCOM which is governed by the license in chapter
16.2.3, Mozilla Public License (MPL), page 248 and
Copyright (C) The Authors.
• VirtualBox contains Slirp which is governed by the license in chapter 16.2.8, Slirp license,
page 255 and was written by Danny Gasparovski.
Copyright (C) 1995, 1996 All Rights Reserved.
237
16 Third-party materials and licenses
• VirtualBox contains liblzf which is governed by the license in chapter 16.2.9, liblzf license,
page 256 and
Copyright (C) 2000-2005 Marc Alexander Lehmann <[email protected]>
• VirtualBox may ship with a modified copy of rdesktop which is governed by the license in
chapter 16.2.1, GNU General Public License (GPL), page 239 and
Copyright (C) Matthew Chapman and others.
• VirtualBox may ship with a copy of kchmviewer which is governed by the license in chapter
16.2.1, GNU General Public License (GPL), page 239 and
Copyright (C) George Yunaev and others.
• VirtualBox may contain Etherboot which is governed by the license in chapter 16.2.1, GNU
General Public License (GPL), page 239 with the exception that aggregating Etherboot with
another work does not require the other work to be released under the same license (see
http://etherboot.sourceforge.net/clinks.html). Etherboot is
Copyright (C) Etherboot team.
• VirtualBox contains code from Wine which is governed by the license in chapter 16.2.2,
GNU Lesser General Public License (LGPL), page 243 and
Copyright 1993 Bob Amstadt, Copyright 1996 Albrecht Kleine, Copyright 1997 David
Faure, Copyright 1998 Morten Welinder, Copyright 1998 Ulrich Weigand, Copyright 1999
Ove Koven
• VirtualBox contains code from lwIP which is governed by the license in chapter 16.2.11,
lwIP license, page 256 and
Copyright (C) 2001, 2002 Swedish Institute of Computer Science.
• VirtualBox contains libxml which is governed by the license in chapter 16.2.12, libxml
license, page 257 and
Copyright (C) 1998-2003 Daniel Veillard.
• VirtualBox contains libxslt which is governed by the license in chapter 16.2.13, libxslt licenses, page 257 and
Copyright (C) 2001-2002 Daniel Veillard and Copyright (C) 2001-2002 Thomas Broyer,
Charlie Bozeman and Daniel Veillard.
• VirtualBox contains code from the gSOAP XML web services tools, which are licensed under
the license in chapter 16.2.14, gSOAP Public License Version 1.3a, page 258 and
Copyright (C) 2000-2007, Robert van Engelen, Genivia Inc., and others.
• VirtualBox ships with the application tunctl (shipped as VBoxTunctl) from the User-mode
Linux suite which is governed by the license in chapter 16.2.1, GNU General Public License
(GPL), page 239 and
Copyright (C) 2002 Jeff Dike.
• VirtualBox contains code from Chromium, an OpenGL implementation, which is goverened
by the licenses in chapter 16.2.15, Chromium licenses, page 263 and
Copyright (C) Stanford University, The Regents of the University of California, Red Hat,
and others.
• VirtualBox contains libcurl which is governed by the license in chapter 16.2.16, curl license,
page 265 and
Copyright (C) 1996-2009, Daniel Stenberg.
238
16 Third-party materials and licenses
• VirtualBox contains dnsproxy which is governed by the license in chapter 16.2.4, MIT License, page 254 and
Copyright (c) 2003, 2004, 2005 Armin Wolfermann.
• VirtualBox may contain iniparser which is governed by the license in chapter 16.2.4, MIT
License, page 254 and
Copyright (c) 2000-2008 by Nicolas Devillard.
• VirtualBox contains some code from libgd which is governed by the license in chapter
16.2.17, libgd license, page 265 and
Copyright 2000, 2001, 2002, 2003, 2004, 2005, 2006, 2007 Pierre-Alain Joye
([email protected]).
• VirtualBox contains code from the EFI Development Kit II which is governed by the license
in chapter 16.2.18, BSD license from Intel, page 266 and
Copyright (c) 2004-2008, Intel Corporation.
• VirtualBox contains libjpeg which is governed by the license in chapter 16.2.19, libjpeg
License, page 266 and
Copyright (C) 1991-2010, Thomas G. Lane, Guido Vollbeding.
• VirtualBox may contain x86 SIMD extension for IJG JPEG library which is governed by the
license in chapter 16.2.20, x86 SIMD extension for IJG JPEG library license, page 267 and
Copyright 2009 Pierre Ossman <[email protected]> for Cendio AB; Copyright 2010 D.
R. Commander; Copyright (C) 1999-2006, MIYASAKA Masaru.
16.2 Licenses
16.2.1 GNU General Public License (GPL)
GNU GENERAL PUBLIC LICENSE Version 2, June 1991
Copyright (C) 1989, 1991 Free Software Foundation, Inc.
51 Franklin St, Fifth Floor, Boston, MA 02110-1301 USA
Everyone is permitted to copy and distribute verbatim copies of this license document, but
changing it is not allowed.
Preamble
The licenses for most software are designed to take away your freedom to share and change
it. By contrast, the GNU General Public License is intended to guarantee your freedom to share
and change free software–to make sure the software is free for all its users. This General Public
License applies to most of the Free Software Foundation’s software and to any other program
whose authors commit to using it. (Some other Free Software Foundation software is covered by
the GNU Library General Public License instead.) You can apply it to your programs, too.
When we speak of free software, we are referring to freedom, not price. Our General Public
Licenses are designed to make sure that you have the freedom to distribute copies of free software
(and charge for this service if you wish), that you receive source code or can get it if you want
it, that you can change the software or use pieces of it in new free programs; and that you know
you can do these things.
To protect your rights, we need to make restrictions that forbid anyone to deny you these
rights or to ask you to surrender the rights. These restrictions translate to certain responsibilities
for you if you distribute copies of the software, or if you modify it.
For example, if you distribute copies of such a program, whether gratis or for a fee, you must
give the recipients all the rights that you have. You must make sure that they, too, receive or can
get the source code. And you must show them these terms so they know their rights.
239
16 Third-party materials and licenses
We protect your rights with two steps: (1) copyright the software, and (2) offer you this license
which gives you legal permission to copy, distribute and/or modify the software.
Also, for each author’s protection and ours, we want to make certain that everyone understands that there is no warranty for this free software. If the software is modified by someone
else and passed on, we want its recipients to know that what they have is not the original, so
that any problems introduced by others will not reflect on the original authors’ reputations.
Finally, any free program is threatened constantly by software patents. We wish to avoid the
danger that redistributors of a free program will individually obtain patent licenses, in effect
making the program proprietary. To prevent this, we have made it clear that any patent must be
licensed for everyone’s free use or not licensed at all.
The precise terms and conditions for copying, distribution and modification follow.
GNU GENERAL PUBLIC LICENSE TERMS AND CONDITIONS FOR COPYING, DISTRIBUTION
AND MODIFICATION
0. This License applies to any program or other work which contains a notice placed by the
copyright holder saying it may be distributed under the terms of this General Public License.
The “Program”, below, refers to any such program or work, and a “work based on the Program”
means either the Program or any derivative work under copyright law: that is to say, a work
containing the Program or a portion of it, either verbatim or with modifications and/or translated into another language. (Hereinafter, translation is included without limitation in the term
“modification”.) Each licensee is addressed as “you”.
Activities other than copying, distribution and modification are not covered by this License;
they are outside its scope. The act of running the Program is not restricted, and the output from
the Program is covered only if its contents constitute a work based on the Program (independent
of having been made by running the Program). Whether that is true depends on what the
Program does.
1. You may copy and distribute verbatim copies of the Program’s source code as you receive
it, in any medium, provided that you conspicuously and appropriately publish on each copy an
appropriate copyright notice and disclaimer of warranty; keep intact all the notices that refer to
this License and to the absence of any warranty; and give any other recipients of the Program a
copy of this License along with the Program.
You may charge a fee for the physical act of transferring a copy, and you may at your option
offer warranty protection in exchange for a fee.
2. You may modify your copy or copies of the Program or any portion of it, thus forming a
work based on the Program, and copy and distribute such modifications or work under the terms
of Section 1 above, provided that you also meet all of these conditions:
a) You must cause the modified files to carry prominent notices stating that you changed the
files and the date of any change.
b) You must cause any work that you distribute or publish, that in whole or in part contains
or is derived from the Program or any part thereof, to be licensed as a whole at no charge to all
third parties under the terms of this License.
c) If the modified program normally reads commands interactively when run, you must cause
it, when started running for such interactive use in the most ordinary way, to print or display an
announcement including an appropriate copyright notice and a notice that there is no warranty
(or else, saying that you provide a warranty) and that users may redistribute the program under
these conditions, and telling the user how to view a copy of this License. (Exception: if the
Program itself is interactive but does not normally print such an announcement, your work
based on the Program is not required to print an announcement.)
These requirements apply to the modified work as a whole. If identifiable sections of that work
are not derived from the Program, and can be reasonably considered independent and separate
works in themselves, then this License, and its terms, do not apply to those sections when you
distribute them as separate works. But when you distribute the same sections as part of a whole
which is a work based on the Program, the distribution of the whole must be on the terms of this
240
16 Third-party materials and licenses
License, whose permissions for other licensees extend to the entire whole, and thus to each and
every part regardless of who wrote it.
Thus, it is not the intent of this section to claim rights or contest your rights to work written
entirely by you; rather, the intent is to exercise the right to control the distribution of derivative
or collective works based on the Program.
In addition, mere aggregation of another work not based on the Program with the Program
(or with a work based on the Program) on a volume of a storage or distribution medium does
not bring the other work under the scope of this License.
3. You may copy and distribute the Program (or a work based on it, under Section 2) in object
code or executable form under the terms of Sections 1 and 2 above provided that you also do
one of the following:
a) Accompany it with the complete corresponding machine-readable source code, which must
be distributed under the terms of Sections 1 and 2 above on a medium customarily used for
software interchange; or,
b) Accompany it with a written offer, valid for at least three years, to give any third party,
for a charge no more than your cost of physically performing source distribution, a complete
machine-readable copy of the corresponding source code, to be distributed under the terms of
Sections 1 and 2 above on a medium customarily used for software interchange; or,
c) Accompany it with the information you received as to the offer to distribute corresponding source code. (This alternative is allowed only for noncommercial distribution and only if
you received the program in object code or executable form with such an offer, in accord with
Subsection b above.)
The source code for a work means the preferred form of the work for making modifications to
it. For an executable work, complete source code means all the source code for all modules it
contains, plus any associated interface definition files, plus the scripts used to control compilation
and installation of the executable. However, as a special exception, the source code distributed
need not include anything that is normally distributed (in either source or binary form) with the
major components (compiler, kernel, and so on) of the operating system on which the executable
runs, unless that component itself accompanies the executable.
If distribution of executable or object code is made by offering access to copy from a designated
place, then offering equivalent access to copy the source code from the same place counts as
distribution of the source code, even though third parties are not compelled to copy the source
along with the object code.
4. You may not copy, modify, sublicense, or distribute the Program except as expressly provided
under this License. Any attempt otherwise to copy, modify, sublicense or distribute the Program is
void, and will automatically terminate your rights under this License. However, parties who have
received copies, or rights, from you under this License will not have their licenses terminated so
long as such parties remain in full compliance.
5. You are not required to accept this License, since you have not signed it. However, nothing
else grants you permission to modify or distribute the Program or its derivative works. These
actions are prohibited by law if you do not accept this License. Therefore, by modifying or
distributing the Program (or any work based on the Program), you indicate your acceptance of
this License to do so, and all its terms and conditions for copying, distributing or modifying the
Program or works based on it.
6. Each time you redistribute the Program (or any work based on the Program), the recipient
automatically receives a license from the original licensor to copy, distribute or modify the Program subject to these terms and conditions. You may not impose any further restrictions on the
recipients’ exercise of the rights granted herein. You are not responsible for enforcing compliance
by third parties to this License.
7. If, as a consequence of a court judgment or allegation of patent infringement or for any
other reason (not limited to patent issues), conditions are imposed on you (whether by court
order, agreement or otherwise) that contradict the conditions of this License, they do not excuse
you from the conditions of this License. If you cannot distribute so as to satisfy simultaneously
241
16 Third-party materials and licenses
your obligations under this License and any other pertinent obligations, then as a consequence
you may not distribute the Program at all. For example, if a patent license would not permit
royalty-free redistribution of the Program by all those who receive copies directly or indirectly
through you, then the only way you could satisfy both it and this License would be to refrain
entirely from distribution of the Program.
If any portion of this section is held invalid or unenforceable under any particular circumstance, the balance of the section is intended to apply and the section as a whole is intended to
apply in other circumstances.
It is not the purpose of this section to induce you to infringe any patents or other property
right claims or to contest validity of any such claims; this section has the sole purpose of protecting the integrity of the free software distribution system, which is implemented by public
license practices. Many people have made generous contributions to the wide range of software
distributed through that system in reliance on consistent application of that system; it is up to
the author/donor to decide if he or she is willing to distribute software through any other system
and a licensee cannot impose that choice.
This section is intended to make thoroughly clear what is believed to be a consequence of the
rest of this License.
8. If the distribution and/or use of the Program is restricted in certain countries either by
patents or by copyrighted interfaces, the original copyright holder who places the Program under
this License may add an explicit geographical distribution limitation excluding those countries,
so that distribution is permitted only in or among countries not thus excluded. In such case, this
License incorporates the limitation as if written in the body of this License.
9. The Free Software Foundation may publish revised and/or new versions of the General
Public License from time to time. Such new versions will be similar in spirit to the present
version, but may differ in detail to address new problems or concerns.
Each version is given a distinguishing version number. If the Program specifies a version number of this License which applies to it and “any later version”, you have the option of following
the terms and conditions either of that version or of any later version published by the Free
Software Foundation. If the Program does not specify a version number of this License, you may
choose any version ever published by the Free Software Foundation.
10. If you wish to incorporate parts of the Program into other free programs whose distribution
conditions are different, write to the author to ask for permission. For software which is copyrighted by the Free Software Foundation, write to the Free Software Foundation; we sometimes
make exceptions for this. Our decision will be guided by the two goals of preserving the free
status of all derivatives of our free software and of promoting the sharing and reuse of software
generally.
NO WARRANTY
11. BECAUSE THE PROGRAM IS LICENSED FREE OF CHARGE, THERE IS NO WARRANTY
FOR THE PROGRAM, TO THE EXTENT PERMITTED BY APPLICABLE LAW. EXCEPT WHEN OTHERWISE STATED IN WRITING THE COPYRIGHT HOLDERS AND/OR OTHER PARTIES PROVIDE
THE PROGRAM “AS IS” WITHOUT WARRANTY OF ANY KIND, EITHER EXPRESSED OR IMPLIED, INCLUDING, BUT NOT LIMITED TO, THE IMPLIED WARRANTIES OF MERCHANTABILITY AND FITNESS FOR A PARTICULAR PURPOSE. THE ENTIRE RISK AS TO THE QUALITY AND
PERFORMANCE OF THE PROGRAM IS WITH YOU. SHOULD THE PROGRAM PROVE DEFECTIVE, YOU ASSUME THE COST OF ALL NECESSARY SERVICING, REPAIR OR CORRECTION.
12. IN NO EVENT UNLESS REQUIRED BY APPLICABLE LAW OR AGREED TO IN WRITING
WILL ANY COPYRIGHT HOLDER, OR ANY OTHER PARTY WHO MAY MODIFY AND/OR REDISTRIBUTE THE PROGRAM AS PERMITTED ABOVE, BE LIABLE TO YOU FOR DAMAGES,
INCLUDING ANY GENERAL, SPECIAL, INCIDENTAL OR CONSEQUENTIAL DAMAGES ARISING
OUT OF THE USE OR INABILITY TO USE THE PROGRAM (INCLUDING BUT NOT LIMITED TO
LOSS OF DATA OR DATA BEING RENDERED INACCURATE OR LOSSES SUSTAINED BY YOU
OR THIRD PARTIES OR A FAILURE OF THE PROGRAM TO OPERATE WITH ANY OTHER PRO-
242
16 Third-party materials and licenses
GRAMS), EVEN IF SUCH HOLDER OR OTHER PARTY HAS BEEN ADVISED OF THE POSSIBILITY
OF SUCH DAMAGES.
END OF TERMS AND CONDITIONS
16.2.2 GNU Lesser General Public License (LGPL)
GNU LESSER GENERAL PUBLIC LICENSE Version 2.1, February 1999
Copyright (C) 1991, 1999 Free Software Foundation, Inc. 59 Temple Place, Suite 330, Boston,
MA 02111-1307 USA Everyone is permitted to copy and distribute verbatim copies of this license
document, but changing it is not allowed.
[This is the first released version of the Lesser GPL. It also counts as the successor of the GNU
Library Public License, version 2, hence the version number 2.1.]
Preamble
The licenses for most software are designed to take away your freedom to share and change it.
By contrast, the GNU General Public Licenses are intended to guarantee your freedom to share
and change free software–to make sure the software is free for all its users.
This license, the Lesser General Public License, applies to some specially designated software
packages–typically libraries–of the Free Software Foundation and other authors who decide to
use it. You can use it too, but we suggest you first think carefully about whether this license or
the ordinary General Public License is the better strategy to use in any particular case, based on
the explanations below.
When we speak of free software, we are referring to freedom of use, not price. Our General
Public Licenses are designed to make sure that you have the freedom to distribute copies of free
software (and charge for this service if you wish); that you receive source code or can get it if
you want it; that you can change the software and use pieces of it in new free programs; and
that you are informed that you can do these things.
To protect your rights, we need to make restrictions that forbid distributors to deny you these
rights or to ask you to surrender these rights. These restrictions translate to certain responsibilities for you if you distribute copies of the library or if you modify it.
For example, if you distribute copies of the library, whether gratis or for a fee, you must give
the recipients all the rights that we gave you. You must make sure that they, too, receive or can
get the source code. If you link other code with the library, you must provide complete object
files to the recipients, so that they can relink them with the library after making changes to the
library and recompiling it. And you must show them these terms so they know their rights.
We protect your rights with a two-step method: (1) we copyright the library, and (2) we offer
you this license, which gives you legal permission to copy, distribute and/or modify the library.
To protect each distributor, we want to make it very clear that there is no warranty for the
free library. Also, if the library is modified by someone else and passed on, the recipients should
know that what they have is not the original version, so that the original author’s reputation will
not be affected by problems that might be introduced by others.
Finally, software patents pose a constant threat to the existence of any free program. We wish
to make sure that a company cannot effectively restrict the users of a free program by obtaining a
restrictive license from a patent holder. Therefore, we insist that any patent license obtained for
a version of the library must be consistent with the full freedom of use specified in this license.
Most GNU software, including some libraries, is covered by the ordinary GNU General Public
License. This license, the GNU Lesser General Public License, applies to certain designated libraries, and is quite different from the ordinary General Public License. We use this license for
certain libraries in order to permit linking those libraries into non-free programs.
When a program is linked with a library, whether statically or using a shared library, the
combination of the two is legally speaking a combined work, a derivative of the original library.
The ordinary General Public License therefore permits such linking only if the entire combination
fits its criteria of freedom. The Lesser General Public License permits more lax criteria for linking
other code with the library.
243
16 Third-party materials and licenses
We call this license the “Lesser” General Public License because it does Less to protect the
user’s freedom than the ordinary General Public License. It also provides other free software
developers Less of an advantage over competing non-free programs. These disadvantages are
the reason we use the ordinary General Public License for many libraries. However, the Lesser
license provides advantages in certain special circumstances.
For example, on rare occasions, there may be a special need to encourage the widest possible
use of a certain library, so that it becomes a de-facto standard. To achieve this, non-free programs
must be allowed to use the library. A more frequent case is that a free library does the same job
as widely used non-free libraries. In this case, there is little to gain by limiting the free library to
free software only, so we use the Lesser General Public License.
In other cases, permission to use a particular library in non-free programs enables a greater
number of people to use a large body of free software. For example, permission to use the GNU C
Library in non-free programs enables many more people to use the whole GNU operating system,
as well as its variant, the GNU/Linux operating system.
Although the Lesser General Public License is Less protective of the users’ freedom, it does
ensure that the user of a program that is linked with the Library has the freedom and the wherewithal to run that program using a modified version of the Library.
The precise terms and conditions for copying, distribution and modification follow. Pay close
attention to the difference between a “work based on the library” and a “work that uses the
library”. The former contains code derived from the library, whereas the latter must be combined
with the library in order to run.
GNU LESSER GENERAL PUBLIC LICENSE TERMS AND CONDITIONS FOR COPYING, DISTRIBUTION AND MODIFICATION
0. This License Agreement applies to any software library or other program which contains
a notice placed by the copyright holder or other authorized party saying it may be distributed
under the terms of this Lesser General Public License (also called “this License”). Each licensee
is addressed as “you”.
A “library” means a collection of software functions and/or data prepared so as to be conveniently linked with application programs (which use some of those functions and data) to form
executables.
The “Library”, below, refers to any such software library or work which has been distributed
under these terms. A “work based on the Library” means either the Library or any derivative
work under copyright law: that is to say, a work containing the Library or a portion of it, either verbatim or with modifications and/or translated straightforwardly into another language.
(Hereinafter, translation is included without limitation in the term “modification”.)
“Source code” for a work means the preferred form of the work for making modifications to it.
For a library, complete source code means all the source code for all modules it contains, plus any
associated interface definition files, plus the scripts used to control compilation and installation
of the library.
Activities other than copying, distribution and modification are not covered by this License;
they are outside its scope. The act of running a program using the Library is not restricted, and
output from such a program is covered only if its contents constitute a work based on the Library
(independent of the use of the Library in a tool for writing it). Whether that is true depends on
what the Library does and what the program that uses the Library does.
1. You may copy and distribute verbatim copies of the Library’s complete source code as you
receive it, in any medium, provided that you conspicuously and appropriately publish on each
copy an appropriate copyright notice and disclaimer of warranty; keep intact all the notices that
refer to this License and to the absence of any warranty; and distribute a copy of this License
along with the Library.
You may charge a fee for the physical act of transferring a copy, and you may at your option
offer warranty protection in exchange for a fee.
244
16 Third-party materials and licenses
2. You may modify your copy or copies of the Library or any portion of it, thus forming a
work based on the Library, and copy and distribute such modifications or work under the terms
of Section 1 above, provided that you also meet all of these conditions:
a) The modified work must itself be a software library.
b) You must cause the files modified to carry prominent notices stating that you changed the
files and the date of any change.
c) You must cause the whole of the work to be licensed at no charge to all third parties under
the terms of this License.
d) If a facility in the modified Library refers to a function or a table of data to be supplied by
an application program that uses the facility, other than as an argument passed when the facility
is invoked, then you must make a good faith effort to ensure that, in the event an application
does not supply such function or table, the facility still operates, and performs whatever part of
its purpose remains meaningful.
(For example, a function in a library to compute square roots has a purpose that is entirely welldefined independent of the application. Therefore, Subsection 2d requires that any applicationsupplied function or table used by this function must be optional: if the application does not
supply it, the square root function must still compute square roots.)
These requirements apply to the modified work as a whole. If identifiable sections of that work
are not derived from the Library, and can be reasonably considered independent and separate
works in themselves, then this License, and its terms, do not apply to those sections when you
distribute them as separate works. But when you distribute the same sections as part of a whole
which is a work based on the Library, the distribution of the whole must be on the terms of this
License, whose permissions for other licensees extend to the entire whole, and thus to each and
every part regardless of who wrote it.
Thus, it is not the intent of this section to claim rights or contest your rights to work written
entirely by you; rather, the intent is to exercise the right to control the distribution of derivative
or collective works based on the Library.
In addition, mere aggregation of another work not based on the Library with the Library (or
with a work based on the Library) on a volume of a storage or distribution medium does not
bring the other work under the scope of this License.
3. You may opt to apply the terms of the ordinary GNU General Public License instead of this
License to a given copy of the Library. To do this, you must alter all the notices that refer to this
License, so that they refer to the ordinary GNU General Public License, version 2, instead of to
this License. (If a newer version than version 2 of the ordinary GNU General Public License has
appeared, then you can specify that version instead if you wish.) Do not make any other change
in these notices.
Once this change is made in a given copy, it is irreversible for that copy, so the ordinary GNU
General Public License applies to all subsequent copies and derivative works made from that
copy.
This option is useful when you wish to copy part of the code of the Library into a program that
is not a library.
4. You may copy and distribute the Library (or a portion or derivative of it, under Section
2) in object code or executable form under the terms of Sections 1 and 2 above provided that
you accompany it with the complete corresponding machine-readable source code, which must
be distributed under the terms of Sections 1 and 2 above on a medium customarily used for
software interchange.
If distribution of object code is made by offering access to copy from a designated place, then
offering equivalent access to copy the source code from the same place satisfies the requirement
to distribute the source code, even though third parties are not compelled to copy the source
along with the object code.
5. A program that contains no derivative of any portion of the Library, but is designed to work
with the Library by being compiled or linked with it, is called a “work that uses the Library”.
245
16 Third-party materials and licenses
Such a work, in isolation, is not a derivative work of the Library, and therefore falls outside the
scope of this License.
However, linking a “work that uses the Library” with the Library creates an executable that is
a derivative of the Library (because it contains portions of the Library), rather than a “work that
uses the library”. The executable is therefore covered by this License. Section 6 states terms for
distribution of such executables.
When a “work that uses the Library” uses material from a header file that is part of the Library,
the object code for the work may be a derivative work of the Library even though the source code
is not. Whether this is true is especially significant if the work can be linked without the Library,
or if the work is itself a library. The threshold for this to be true is not precisely defined by law.
If such an object file uses only numerical parameters, data structure layouts and accessors, and
small macros and small inline functions (ten lines or less in length), then the use of the object
file is unrestricted, regardless of whether it is legally a derivative work. (Executables containing
this object code plus portions of the Library will still fall under Section 6.) Otherwise, if the work
is a derivative of the Library, you may distribute the object code for the work under the terms of
Section 6. Any executables containing that work also fall under Section 6, whether or not they
are linked directly with the Library itself.
6. As an exception to the Sections above, you may also combine or link a “work that uses the
Library” with the Library to produce a work containing portions of the Library, and distribute
that work under terms of your choice, provided that the terms permit modification of the work
for the customer’s own use and reverse engineering for debugging such modifications.
You must give prominent notice with each copy of the work that the Library is used in it and
that the Library and its use are covered by this License. You must supply a copy of this License.
If the work during execution displays copyright notices, you must include the copyright notice
for the Library among them, as well as a reference directing the user to the copy of this License.
Also, you must do one of these things:
a) Accompany the work with the complete corresponding machine-readable source code for
the Library including whatever changes were used in the work (which must be distributed under
Sections 1 and 2 above); and, if the work is an executable linked with the Library, with the
complete machine-readable “work that uses the Library”, as object code and/or source code, so
that the user can modify the Library and then relink to produce a modified executable containing
the modified Library. (It is understood that the user who changes the contents of definitions
files in the Library will not necessarily be able to recompile the application to use the modified
definitions.)
b) Use a suitable shared library mechanism for linking with the Library. A suitable mechanism
is one that (1) uses at run time a copy of the library already present on the user’s computer
system, rather than copying library functions into the executable, and (2) will operate properly
with a modified version of the library, if the user installs one, as long as the modified version is
interface-compatible with the version that the work was made with.
c) Accompany the work with a written offer, valid for at least three years, to give the same user
the materials specified in Subsection 6a, above, for a charge no more than the cost of performing
this distribution.
d) If distribution of the work is made by offering access to copy from a designated place, offer
equivalent access to copy the above specified materials from the same place.
e) Verify that the user has already received a copy of these materials or that you have already
sent this user a copy.
For an executable, the required form of the “work that uses the Library” must include any
data and utility programs needed for reproducing the executable from it. However, as a special
exception, the materials to be distributed need not include anything that is normally distributed
(in either source or binary form) with the major components (compiler, kernel, and so on) of the
operating system on which the executable runs, unless that component itself accompanies the
executable.
246
16 Third-party materials and licenses
It may happen that this requirement contradicts the license restrictions of other proprietary
libraries that do not normally accompany the operating system. Such a contradiction means you
cannot use both them and the Library together in an executable that you distribute.
7. You may place library facilities that are a work based on the Library side-by-side in a single
library together with other library facilities not covered by this License, and distribute such a
combined library, provided that the separate distribution of the work based on the Library and
of the other library facilities is otherwise permitted, and provided that you do these two things:
a) Accompany the combined library with a copy of the same work based on the Library, uncombined with any other library facilities. This must be distributed under the terms of the Sections
above.
b) Give prominent notice with the combined library of the fact that part of it is a work based
on the Library, and explaining where to find the accompanying uncombined form of the same
work.
8. You may not copy, modify, sublicense, link with, or distribute the Library except as expressly
provided under this License. Any attempt otherwise to copy, modify, sublicense, link with, or
distribute the Library is void, and will automatically terminate your rights under this License.
However, parties who have received copies, or rights, from you under this License will not have
their licenses terminated so long as such parties remain in full compliance.
9. You are not required to accept this License, since you have not signed it. However, nothing
else grants you permission to modify or distribute the Library or its derivative works. These
actions are prohibited by law if you do not accept this License. Therefore, by modifying or
distributing the Library (or any work based on the Library), you indicate your acceptance of
this License to do so, and all its terms and conditions for copying, distributing or modifying the
Library or works based on it.
10. Each time you redistribute the Library (or any work based on the Library), the recipient
automatically receives a license from the original licensor to copy, distribute, link with or modify
the Library subject to these terms and conditions. You may not impose any further restrictions
on the recipients’ exercise of the rights granted herein. You are not responsible for enforcing
compliance by third parties with this License.
11. If, as a consequence of a court judgment or allegation of patent infringement or for any
other reason (not limited to patent issues), conditions are imposed on you (whether by court
order, agreement or otherwise) that contradict the conditions of this License, they do not excuse
you from the conditions of this License. If you cannot distribute so as to satisfy simultaneously
your obligations under this License and any other pertinent obligations, then as a consequence
you may not distribute the Library at all. For example, if a patent license would not permit
royalty-free redistribution of the Library by all those who receive copies directly or indirectly
through you, then the only way you could satisfy both it and this License would be to refrain
entirely from distribution of the Library.
If any portion of this section is held invalid or unenforceable under any particular circumstance, the balance of the section is intended to apply, and the section as a whole is intended to
apply in other circumstances.
It is not the purpose of this section to induce you to infringe any patents or other property
right claims or to contest validity of any such claims; this section has the sole purpose of protecting the integrity of the free software distribution system which is implemented by public license
practices. Many people have made generous contributions to the wide range of software distributed through that system in reliance on consistent application of that system; it is up to the
author/donor to decide if he or she is willing to distribute software through any other system
and a licensee cannot impose that choice.
This section is intended to make thoroughly clear what is believed to be a consequence of the
rest of this License.
12. If the distribution and/or use of the Library is restricted in certain countries either by
patents or by copyrighted interfaces, the original copyright holder who places the Library under
this License may add an explicit geographical distribution limitation excluding those countries,
247
16 Third-party materials and licenses
so that distribution is permitted only in or among countries not thus excluded. In such case, this
License incorporates the limitation as if written in the body of this License.
13. The Free Software Foundation may publish revised and/or new versions of the Lesser
General Public License from time to time. Such new versions will be similar in spirit to the
present version, but may differ in detail to address new problems or concerns.
Each version is given a distinguishing version number. If the Library specifies a version number
of this License which applies to it and “any later version”, you have the option of following the
terms and conditions either of that version or of any later version published by the Free Software
Foundation. If the Library does not specify a license version number, you may choose any version
ever published by the Free Software Foundation.
14. If you wish to incorporate parts of the Library into other free programs whose distribution
conditions are incompatible with these, write to the author to ask for permission. For software
which is copyrighted by the Free Software Foundation, write to the Free Software Foundation; we
sometimes make exceptions for this. Our decision will be guided by the two goals of preserving
the free status of all derivatives of our free software and of promoting the sharing and reuse of
software generally.
NO WARRANTY
15. BECAUSE THE LIBRARY IS LICENSED FREE OF CHARGE, THERE IS NO WARRANTY FOR
THE LIBRARY, TO THE EXTENT PERMITTED BY APPLICABLE LAW. EXCEPT WHEN OTHERWISE STATED IN WRITING THE COPYRIGHT HOLDERS AND/OR OTHER PARTIES PROVIDE
THE LIBRARY “AS IS” WITHOUT WARRANTY OF ANY KIND, EITHER EXPRESSED OR IMPLIED,
INCLUDING, BUT NOT LIMITED TO, THE IMPLIED WARRANTIES OF MERCHANTABILITY AND
FITNESS FOR A PARTICULAR PURPOSE. THE ENTIRE RISK AS TO THE QUALITY AND PERFORMANCE OF THE LIBRARY IS WITH YOU. SHOULD THE LIBRARY PROVE DEFECTIVE, YOU
ASSUME THE COST OF ALL NECESSARY SERVICING, REPAIR OR CORRECTION.
16. IN NO EVENT UNLESS REQUIRED BY APPLICABLE LAW OR AGREED TO IN WRITING
WILL ANY COPYRIGHT HOLDER, OR ANY OTHER PARTY WHO MAY MODIFY AND/OR REDISTRIBUTE THE LIBRARY AS PERMITTED ABOVE, BE LIABLE TO YOU FOR DAMAGES, INCLUDING ANY GENERAL, SPECIAL, INCIDENTAL OR CONSEQUENTIAL DAMAGES ARISING OUT OF
THE USE OR INABILITY TO USE THE LIBRARY (INCLUDING BUT NOT LIMITED TO LOSS OF
DATA OR DATA BEING RENDERED INACCURATE OR LOSSES SUSTAINED BY YOU OR THIRD
PARTIES OR A FAILURE OF THE LIBRARY TO OPERATE WITH ANY OTHER SOFTWARE), EVEN
IF SUCH HOLDER OR OTHER PARTY HAS BEEN ADVISED OF THE POSSIBILITY OF SUCH
DAMAGES.
END OF TERMS AND CONDITIONS
16.2.3 Mozilla Public License (MPL)
MOZILLA PUBLIC LICENSE Version 1.1
1. Definitions.
1.0.1. “Commercial Use” means distribution or otherwise making the Covered Code available
to a third party.
1.1. “Contributor” means each entity that creates or contributes to the creation of Modifications.
1.2. “Contributor Version” means the combination of the Original Code, prior Modifications
used by a Contributor, and the Modifications made by that particular Contributor.
1.3. “Covered Code” means the Original Code or Modifications or the combination of the
Original Code and Modifications, in each case including portions thereof.
1.4. “Electronic Distribution Mechanism” means a mechanism generally accepted in the software development community for the electronic transfer of data.
1.5. “Executable” means Covered Code in any form other than Source Code.
1.6. “Initial Developer” means the individual or entity identified as the Initial Developer in the
Source Code notice required by Exhibit A.
248
16 Third-party materials and licenses
1.7. “Larger Work” means a work which combines Covered Code or portions thereof with code
not governed by the terms of this License.
1.8. “License” means this document.
1.8.1. “Licensable” means having the right to grant, to the maximum extent possible, whether
at the time of the initial grant or subsequently acquired, any and all of the rights conveyed herein.
1.9. “Modifications” means any addition to or deletion from the substance or structure of
either the Original Code or any previous Modifications. When Covered Code is released as a
series of files, a Modification is:
A. Any addition to or deletion from the contents of a file containing Original Code or previous
Modifications.
B. Any new file that contains any part of the Original Code or previous Modifications.
1.10. “Original Code” means Source Code of computer software code which is described in the
Source Code notice required by Exhibit A as Original Code, and which, at the time of its release
under this License is not already Covered Code governed by this License.
1.10.1. “Patent Claims” means any patent claim(s), now owned or hereafter acquired, including without limitation, method, process, and apparatus claims, in any patent Licensable by
grantor.
1.11. “Source Code” means the preferred form of the Covered Code for making modifications
to it, including all modules it contains, plus any associated interface definition files, scripts used
to control compilation and installation of an Executable, or source code differential comparisons
against either the Original Code or another well known, available Covered Code of the Contributor’s choice. The Source Code can be in a compressed or archival form, provided the appropriate
decompression or de-archiving software is widely available for no charge.
1.12. “You” (or “Your”) means an individual or a legal entity exercising rights under, and
complying with all of the terms of, this License or a future version of this License issued under
Section 6.1. For legal entities, “You” includes any entity which controls, is controlled by, or is
under common control with You. For purposes of this definition, “control” means (a) the power,
direct or indirect, to cause the direction or management of such entity, whether by contract
or otherwise, or (b) ownership of more than fifty percent (50%) of the outstanding shares or
beneficial ownership of such entity.
2. Source Code License.
2.1. The Initial Developer Grant. The Initial Developer hereby grants You a world-wide,
royalty-free, non-exclusive license, subject to third party intellectual property claims:
(a) under intellectual property rights (other than patent or trademark) Licensable by Initial
Developer to use, reproduce, modify, display, perform, sublicense and distribute the Original
Code (or portions thereof) with or without Modifications, and/or as part of a Larger Work; and
(b) under Patents Claims infringed by the making, using or selling of Original Code, to make,
have made, use, practice, sell, and offer for sale, and/or otherwise dispose of the Original Code
(or portions thereof).
(c) the licenses granted in this Section 2.1(a) and (b) are effective on the date Initial Developer
first distributes Original Code under the terms of this License.
(d) Notwithstanding Section 2.1(b) above, no patent license is granted: 1) for code that You
delete from the Original Code; 2) separate from the Original Code; or 3) for infringements
caused by: i) the modification of the Original Code or ii) the combination of the Original Code
with other software or devices.
2.2. Contributor Grant. Subject to third party intellectual property claims, each Contributor
hereby grants You a world-wide, royalty-free, non-exclusive license
(a) under intellectual property rights (other than patent or trademark) Licensable by Contributor, to use, reproduce, modify, display, perform, sublicense and distribute the Modifications
created by such Contributor (or portions thereof) either on an unmodified basis, with other
Modifications, as Covered Code and/or as part of a Larger Work; and
(b) under Patent Claims infringed by the making, using, or selling of Modifications made by
that Contributor either alone and/or in combination with its Contributor Version (or portions
249
16 Third-party materials and licenses
of such combination), to make, use, sell, offer for sale, have made, and/or otherwise dispose
of: 1) Modifications made by that Contributor (or portions thereof); and 2) the combination
of Modifications made by that Contributor with its Contributor Version (or portions of such
combination).
(c) the licenses granted in Sections 2.2(a) and 2.2(b) are effective on the date Contributor first
makes Commercial Use of the Covered Code.
(d) Notwithstanding Section 2.2(b) above, no patent license is granted: 1) for any code that
Contributor has deleted from the Contributor Version; 2) separate from the Contributor Version;
3) for infringements caused by: i) third party modifications of Contributor Version or ii) the
combination of Modifications made by that Contributor with other software (except as part of
the Contributor Version) or other devices; or 4) under Patent Claims infringed by Covered Code
in the absence of Modifications made by that Contributor.
3. Distribution Obligations.
3.1. Application of License. The Modifications which You create or to which You contribute
are governed by the terms of this License, including without limitation Section 2.2. The Source
Code version of Covered Code may be distributed only under the terms of this License or a
future version of this License released under Section 6.1, and You must include a copy of this
License with every copy of the Source Code You distribute. You may not offer or impose any
terms on any Source Code version that alters or restricts the applicable version of this License or
the recipients’ rights hereunder. However, You may include an additional document offering the
additional rights described in Section 3.5.
3.2. Availability of Source Code. Any Modification which You create or to which You contribute must be made available in Source Code form under the terms of this License either on the
same media as an Executable version or via an accepted Electronic Distribution Mechanism to
anyone to whom you made an Executable version available; and if made available via Electronic
Distribution Mechanism, must remain available for at least twelve (12) months after the date it
initially became available, or at least six (6) months after a subsequent version of that particular Modification has been made available to such recipients. You are responsible for ensuring
that the Source Code version remains available even if the Electronic Distribution Mechanism is
maintained by a third party.
3.3. Description of Modifications. You must cause all Covered Code to which You contribute
to contain a file documenting the changes You made to create that Covered Code and the date of
any change. You must include a prominent statement that the Modification is derived, directly
or indirectly, from Original Code provided by the Initial Developer and including the name of
the Initial Developer in (a) the Source Code, and (b) in any notice in an Executable version or
related documentation in which You describe the origin or ownership of the Covered Code.
3.4. Intellectual Property Matters
(a) Third Party Claims. If Contributor has knowledge that a license under a third party’s intellectual property rights is required to exercise the rights granted by such Contributor under
Sections 2.1 or 2.2, Contributor must include a text file with the Source Code distribution titled
“LEGAL” which describes the claim and the party making the claim in sufficient detail that a recipient will know whom to contact. If Contributor obtains such knowledge after the Modification
is made available as described in Section 3.2, Contributor shall promptly modify the LEGAL file
in all copies Contributor makes available thereafter and shall take other steps (such as notifying
appropriate mailing lists or newsgroups) reasonably calculated to inform those who received the
Covered Code that new knowledge has been obtained.
(b) Contributor APIs. If Contributor’s Modifications include an application programming interface and Contributor has knowledge of patent licenses which are reasonably necessary to
implement that API, Contributor must also include this information in the LEGAL file.
3.5. Required Notices. You must duplicate the notice in Exhibit A in each file of the Source
Code. If it is not possible to put such notice in a particular Source Code file due to its structure,
then You must include such notice in a location (such as a relevant directory) where a user would
be likely to look for such a notice. If You created one or more Modification(s) You may add your
250
16 Third-party materials and licenses
name as a Contributor to the notice described in Exhibit A. You must also duplicate this License in
any documentation for the Source Code where You describe recipients’ rights or ownership rights
relating to Covered Code. You may choose to offer, and to charge a fee for, warranty, support,
indemnity or liability obligations to one or more recipients of Covered Code. However, You may
do so only on Your own behalf, and not on behalf of the Initial Developer or any Contributor. You
must make it absolutely clear than any such warranty, support, indemnity or liability obligation
is offered by You alone, and You hereby agree to indemnify the Initial Developer and every
Contributor for any liability incurred by the Initial Developer or such Contributor as a result of
warranty, support, indemnity or liability terms You offer.
3.6. Distribution of Executable Versions. You may distribute Covered Code in Executable
form only if the requirements of Section 3.1-3.5 have been met for that Covered Code, and
if You include a notice stating that the Source Code version of the Covered Code is available
under the terms of this License, including a description of how and where You have fulfilled
the obligations of Section 3.2. The notice must be conspicuously included in any notice in an
Executable version, related documentation or collateral in which You describe recipients’ rights
relating to the Covered Code. You may distribute the Executable version of Covered Code or
ownership rights under a license of Your choice, which may contain terms different from this
License, provided that You are in compliance with the terms of this License and that the license
for the Executable version does not attempt to limit or alter the recipient’s rights in the Source
Code version from the rights set forth in this License. If You distribute the Executable version
under a different license You must make it absolutely clear that any terms which differ from this
License are offered by You alone, not by the Initial Developer or any Contributor. You hereby
agree to indemnify the Initial Developer and every Contributor for any liability incurred by the
Initial Developer or such Contributor as a result of any such terms You offer.
3.7. Larger Works. You may create a Larger Work by combining Covered Code with other code
not governed by the terms of this License and distribute the Larger Work as a single product. In
such a case, You must make sure the requirements of this License are fulfilled for the Covered
Code.
4. Inability to Comply Due to Statute or Regulation.If it is impossible for You to comply with
any of the terms of this License with respect to some or all of the Covered Code due to statute,
judicial order, or regulation then You must: (a) comply with the terms of this License to the maximum extent possible; and (b) describe the limitations and the code they affect. Such description
must be included in the LEGAL file described in Section 3.4 and must be included with all distributions of the Source Code. Except to the extent prohibited by statute or regulation, such
description must be sufficiently detailed for a recipient of ordinary skill to be able to understand
it.
5. Application of this License. This License applies to code to which the Initial Developer has
attached the notice in Exhibit A and to related Covered Code.
6. Versions of the License.
6.1. New Versions. Netscape Communications Corporation (“Netscape”) may publish revised
and/or new versions of the License from time to time. Each version will be given a distinguishing
version number.
6.2. Effect of New Versions. Once Covered Code has been published under a particular version
of the License, You may always continue to use it under the terms of that version. You may
also choose to use such Covered Code under the terms of any subsequent version of the License
published by Netscape. No one other than Netscape has the right to modify the terms applicable
to Covered Code created under this License.
6.3. Derivative Works. If You create or use a modified version of this License (which you
may only do in order to apply it to code which is not already Covered Code governed by this License), You must (a) rename Your license so that the phrases “Mozilla”, “MOZILLAPL”, “MOZPL”,
“Netscape”, “MPL”, “NPL” or any confusingly similar phrase do not appear in your license (except to note that your license differs from this License) and (b) otherwise make it clear that Your
version of the license contains terms which differ from the Mozilla Public License and Netscape
251
16 Third-party materials and licenses
Public License. (Filling in the name of the Initial Developer, Original Code or Contributor in
the notice described in Exhibit A shall not of themselves be deemed to be modifications of this
License.)
7. DISCLAIMER OF WARRANTY.
COVERED CODE IS PROVIDED UNDER THIS LICENSE ON AN “AS IS” BASIS, WITHOUT WARRANTY OF ANY KIND, EITHER EXPRESSED OR IMPLIED, INCLUDING, WITHOUT LIMITATION,
WARRANTIES THAT THE COVERED CODE IS FREE OF DEFECTS, MERCHANTABLE, FIT FOR A
PARTICULAR PURPOSE OR NON-INFRINGING. THE ENTIRE RISK AS TO THE QUALITY AND
PERFORMANCE OF THE COVERED CODE IS WITH YOU. SHOULD ANY COVERED CODE PROVE
DEFECTIVE IN ANY RESPECT, YOU (NOT THE INITIAL DEVELOPER OR ANY OTHER CONTRIBUTOR) ASSUME THE COST OF ANY NECESSARY SERVICING, REPAIR OR CORRECTION. THIS
DISCLAIMER OF WARRANTY CONSTITUTES AN ESSENTIAL PART OF THIS LICENSE. NO USE
OF ANY COVERED CODE IS AUTHORIZED HEREUNDER EXCEPT UNDER THIS DISCLAIMER.
8. TERMINATION.
8.1. This License and the rights granted hereunder will terminate automatically if You fail
to comply with terms herein and fail to cure such breach within 30 days of becoming aware of
the breach. All sublicenses to the Covered Code which are properly granted shall survive any
termination of this License. Provisions which, by their nature, must remain in effect beyond the
termination of this License shall survive.
8.2. If You initiate litigation by asserting a patent infringement claim (excluding declaratory
judgment actions) against Initial Developer or a Contributor (the Initial Developer or Contributor
against whom You file such action is referred to as “Participant”) alleging that:
(a) such Participant’s Contributor Version directly or indirectly infringes any patent, then any
and all rights granted by such Participant to You under Sections 2.1 and/or 2.2 of this License
shall, upon 60 days notice from Participant terminate prospectively, unless if within 60 days
after receipt of notice You either: (i) agree in writing to pay Participant a mutually agreeable
reasonable royalty for Your past and future use of Modifications made by such Participant, or (ii)
withdraw Your litigation claim with respect to the Contributor Version against such Participant.
If within 60 days of notice, a reasonable royalty and payment arrangement are not mutually
agreed upon in writing by the parties or the litigation claim is not withdrawn, the rights granted
by Participant to You under Sections 2.1 and/or 2.2 automatically terminate at the expiration of
the 60 day notice period specified above.
(b) any software, hardware, or device, other than such Participant’s Contributor Version, directly or indirectly infringes any patent, then any rights granted to You by such Participant under
Sections 2.1(b) and 2.2(b) are revoked effective as of the date You first made, used, sold, distributed, or had made, Modifications made by that Participant.
8.3. If You assert a patent infringement claim against Participant alleging that such Participant’s Contributor Version directly or indirectly infringes any patent where such claim is resolved
(such as by license or settlement) prior to the initiation of patent infringement litigation, then
the reasonable value of the licenses granted by such Participant under Sections 2.1 or 2.2 shall
be taken into account in determining the amount or value of any payment or license.
8.4. In the event of termination under Sections 8.1 or 8.2 above, all end user license agreements (excluding distributors and resellers) which have been validly granted by You or any
distributor hereunder prior to termination shall survive termination.
9. LIMITATION OF LIABILITY. UNDER NO CIRCUMSTANCES AND UNDER NO LEGAL THEORY, WHETHER TORT (INCLUDING NEGLIGENCE), CONTRACT, OR OTHERWISE, SHALL YOU,
THE INITIAL DEVELOPER, ANY OTHER CONTRIBUTOR, OR ANY DISTRIBUTOR OF COVERED
CODE, OR ANY SUPPLIER OF ANY OF SUCH PARTIES, BE LIABLE TO ANY PERSON FOR ANY
INDIRECT, SPECIAL, INCIDENTAL, OR CONSEQUENTIAL DAMAGES OF ANY CHARACTER INCLUDING, WITHOUT LIMITATION, DAMAGES FOR LOSS OF GOODWILL, WORK STOPPAGE,
COMPUTER FAILURE OR MALFUNCTION, OR ANY AND ALL OTHER COMMERCIAL DAMAGES OR LOSSES, EVEN IF SUCH PARTY SHALL HAVE BEEN INFORMED OF THE POSSIBILITY
OF SUCH DAMAGES. THIS LIMITATION OF LIABILITY SHALL NOT APPLY TO LIABILITY FOR
252
16 Third-party materials and licenses
DEATH OR PERSONAL INJURY RESULTING FROM SUCH PARTY’S NEGLIGENCE TO THE EXTENT APPLICABLE LAW PROHIBITS SUCH LIMITATION. SOME JURISDICTIONS DO NOT ALLOW THE EXCLUSION OR LIMITATION OF INCIDENTAL OR CONSEQUENTIAL DAMAGES, SO
THIS EXCLUSION AND LIMITATION MAY NOT APPLY TO YOU.
10. U.S. GOVERNMENT END USERS. The Covered Code is a “commercial item,“ as that term
is defined in 48 C.F.R. 2.101 (Oct. 1995), consisting of “commercial computer software” and
“commercial computer software documentation,“ as such terms are used in 48 C.F.R. 12.212
(Sept. 1995). Consistent with 48 C.F.R. 12.212 and 48 C.F.R. 227.7202-1 through 227.7202-4
(June 1995), all U.S. Government End Users acquire Covered Code with only those rights set
forth herein.
11. MISCELLANEOUS. This License represents the complete agreement concerning subject
matter hereof. If any provision of this License is held to be unenforceable, such provision shall
be reformed only to the extent necessary to make it enforceable. This License shall be governed
by California law provisions (except to the extent applicable law, if any, provides otherwise),
excluding its conflict-of-law provisions. With respect to disputes in which at least one party is
a citizen of, or an entity chartered or registered to do business in the United States of America,
any litigation relating to this License shall be subject to the jurisdiction of the Federal Courts
of the Northern District of California, with venue lying in Santa Clara County, California, with
the losing party responsible for costs, including without limitation, court costs and reasonable
attorneys’ fees and expenses. The application of the United Nations Convention on Contracts for
the International Sale of Goods is expressly excluded. Any law or regulation which provides that
the language of a contract shall be construed against the drafter shall not apply to this License.
12. RESPONSIBILITY FOR CLAIMS. As between Initial Developer and the Contributors, each
party is responsible for claims and damages arising, directly or indirectly, out of its utilization of
rights under this License and You agree to work with Initial Developer and Contributors to distribute such responsibility on an equitable basis. Nothing herein is intended or shall be deemed
to constitute any admission of liability.
13. MULTIPLE-LICENSED CODE. Initial Developer may designate portions of the Covered
Code as “Multiple-Licensed”. “Multiple-Licensed” means that the Initial Developer permits you
to utilize portions of the Covered Code under Your choice of the NPL or the alternative licenses,
if any, specified by the Initial Developer in the file described in Exhibit A.
EXHIBIT A -Mozilla Public License.
“The contents of this file are subject to the Mozilla Public License Version 1.1 (the “License”);
you may not use this file except in compliance with the License. You may obtain a copy of the
License at http://www.mozilla.org/MPL/
Software distributed under the License is distributed on an “AS IS” basis, WITHOUT WARRANTY OF ANY KIND, either express or implied. See the License for the specific language governing rights and limitations under the License.
The Original Code is ______________________________________.
The Initial Developer of the Original Code is ________________________. Portions created
by ______________________ are Copyright (C) ______ _______________________. All Rights
Reserved.
Contributor(s): ______________________________________.
Alternatively, the contents of this file may be used under the terms of the _____ license (the
“[___] License”), in which case the provisions of [______] License are applicable instead of those
above. If you wish to allow use of your version of this file only under the terms of the [____]
License and not to allow others to use your version of this file under the MPL, indicate your
decision by deleting the provisions above and replace them with the notice and other provisions
required by the [___] License. If you do not delete the provisions above, a recipient may use
your version of this file under either the MPL or the [___] License.“
[NOTE: The text of this Exhibit A may differ slightly from the text of the notices in the Source
Code files of the Original Code. You should use the text of this Exhibit A rather than the text
found in the Original Code Source Code for Your Modifications.]
253
16 Third-party materials and licenses
16.2.4 MIT License
Permission is hereby granted, free of charge, to any person obtaining a copy of this software and
associated documentation files (the “Software”), to deal in the Software without restriction, including without limitation the rights to use, copy, modify, merge, publish, distribute, sublicense,
and/or sell copies of the Software, and to permit persons to whom the Software is furnished to
do so, subject to the following conditions:
The above copyright notice and this permission notice shall be included in all copies or substantial portions of the Software.
THE SOFTWARE IS PROVIDED “AS IS”, WITHOUT WARRANTY OF ANY KIND, EXPRESS OR
IMPLIED, INCLUDING BUT NOT LIMITED TO THE WARRANTIES OF MERCHANTABILITY, FITNESS FOR A PARTICULAR PURPOSE AND NONINFRINGEMENT. IN NO EVENT SHALL THE
AUTHORS OR COPYRIGHT HOLDERS BE LIABLE FOR ANY CLAIM, DAMAGES OR OTHER LIABILITY, WHETHER IN AN ACTION OF CONTRACT, TORT OR OTHERWISE, ARISING FROM,
OUT OF OR IN CONNECTION WITH THE SOFTWARE OR THE USE OR OTHER DEALINGS IN
THE SOFTWARE.
16.2.5 X Consortium License (X11)
Permission is hereby granted, free of charge, to any person obtaining a copy of this software and
associated documentation files (the “Software”), to deal in the Software without restriction, including without limitation the rights to use, copy, modify, merge, publish, distribute, sublicense,
and/or sell copies of the Software, and to permit persons to whom the Software is furnished to
do so, subject to the following conditions:
The above copyright notice and this permission notice shall be included in all copies or substantial portions of the Software.
THE SOFTWARE IS PROVIDED “AS IS”, WITHOUT WARRANTY OF ANY KIND, EXPRESS OR
IMPLIED, INCLUDING BUT NOT LIMITED TO THE WARRANTIES OF MERCHANTABILITY, FITNESS FOR A PARTICULAR PURPOSE AND NONINFRINGEMENT. IN NO EVENT SHALL THE
AUTHORS OR COPYRIGHT HOLDERS BE LIABLE FOR ANY CLAIM, DAMAGES OR OTHER LIABILITY, WHETHER IN AN ACTION OF CONTRACT, TORT OR OTHERWISE, ARISING FROM,
OUT OF OR IN CONNECTION WITH THE SOFTWARE OR THE USE OR OTHER DEALINGS IN
THE SOFTWARE.
16.2.6 zlib license
This software is provided ’as-is’, without any express or implied warranty. In no event will the
authors be held liable for any damages arising from the use of this software.
Permission is granted to anyone to use this software for any purpose, including commercial
applications, and to alter it and redistribute it freely, subject to the following restrictions:
1. The origin of this software must not be misrepresented; you must not claim that you wrote
the original software. If you use this software in a product, an acknowledgment in the product
documentation would be appreciated but is not required.
2. Altered source versions must be plainly marked as such, and must not be misrepresented as
being the original software.
3. This notice may not be removed or altered from any source distribution.
Jean-loup Gailly
[email protected]
Mark Adler
[email protected]
16.2.7 OpenSSL license
This package is an SSL implementation written by Eric Young ([email protected]). The implementation was written so as to conform with Netscape’s SSL.
254
16 Third-party materials and licenses
This library is free for commercial and non-commercial use as long as the following conditions
are adhered to. The following conditions apply to all code found in this distribution, be it the
RC4, RSA, lhash, DES, etc., code; not just the SSL code. The SSL documentation included with
this distribution is covered by the same copyright terms except that the holder is Tim Hudson
([email protected]).
Copyright remains Eric Young’s, and as such any Copyright notices in the code are not to be
removed. If this package is used in a product, Eric Young should be given attribution as the
author of the parts of the library used. This can be in the form of a textual message at program
startup or in documentation (online or textual) provided with the package.
Redistribution and use in source and binary forms, with or without modification, are permitted
provided that the following conditions are met:
1. Redistributions of source code must retain the copyright notice, this list of conditions and
the following disclaimer.
2. Redistributions in binary form must reproduce the above copyright notice, this list of conditions and the following disclaimer in the documentation and/or other materials provided with
the distribution.
3. All advertising materials mentioning features or use of this software must display the following acknowledgement: “This product includes cryptographic software written by Eric Young
([email protected])“ The word ’cryptographic’ can be left out if the routines from the library
being used are not cryptographic related :-).
4. If you include any Windows specific code (or a derivative thereof) from the apps directory (application code) you must include an acknowledgement: “This product includes software
written by Tim Hudson ([email protected])“
THIS SOFTWARE IS PROVIDED BY ERIC YOUNG “AS IS” AND ANY EXPRESS OR IMPLIED
WARRANTIES, INCLUDING, BUT NOT LIMITED TO, THE IMPLIED WARRANTIES OF MERCHANTABILITY AND FITNESS FOR A PARTICULAR PURPOSE ARE DISCLAIMED. IN NO EVENT
SHALL THE AUTHOR OR CONTRIBUTORS BE LIABLE FOR ANY DIRECT, INDIRECT, INCIDENTAL, SPECIAL, EXEMPLARY, OR CONSEQUENTIAL DAMAGES (INCLUDING, BUT NOT LIMITED
TO, PROCUREMENT OF SUBSTITUTE GOODS OR SERVICES; LOSS OF USE, DATA, OR PROFITS; OR BUSINESS INTERRUPTION) HOWEVER CAUSED AND ON ANY THEORY OF LIABILITY,
WHETHER IN CONTRACT, STRICT LIABILITY, OR TORT (INCLUDING NEGLIGENCE OR OTHERWISE) ARISING IN ANY WAY OUT OF THE USE OF THIS SOFTWARE, EVEN IF ADVISED OF
THE POSSIBILITY OF SUCH DAMAGE.
The licence and distribution terms for any publicly available version or derivative of this code
cannot be changed. i.e. this code cannot simply be copied and put under another distribution
licence [including the GNU Public Licence.]
16.2.8 Slirp license
Redistribution and use in source and binary forms, with or without modification, are permitted
provided that the following conditions are met:
1. Redistributions of source code must retain the above copyright notice, this list of conditions
and the following disclaimer.
2. Redistributions in binary form must reproduce the above copyright notice, this list of conditions and the following disclaimer in the documentation and/or other materials provided with
the distribution.
3. All advertising materials mentioning features or use of this software must display the following acknowledgment: This product includes software developed by Danny Gasparovski.
THIS SOFTWARE IS PROVIDED “AS IS” AND ANY EXPRESS OR IMPLIED WARRANTIES, INCLUDING, BUT NOT LIMITED TO, THE IMPLIED WARRANTIES OF MERCHANTABILITY AND
FITNESS FOR A PARTICULAR PURPOSE ARE DISCLAIMED. IN NO EVENT SHALL DANNY GASPAROVSKI OR CONTRIBUTORS BE LIABLE FOR ANY DIRECT, INDIRECT, INCIDENTAL, SPECIAL, EXEMPLARY, OR CONSEQUENTIAL DAMAGES (INCLUDING, BUT NOT LIMITED TO,
255
16 Third-party materials and licenses
PROCUREMENT OF SUBSTITUTE GOODS OR SERVICES; LOSS OF USE, DATA, OR PROFITS;
OR BUSINESS INTERRUPTION) HOWEVER CAUSED AND ON ANY THEORY OF LIABILITY,
WHETHER IN CONTRACT, STRICT LIABILITY, OR TORT (INCLUDING NEGLIGENCE OR OTHERWISE) ARISING IN ANY WAY OUT OF THE USE OF THIS SOFTWARE, EVEN IF ADVISED OF
THE POSSIBILITY OF SUCH DAMAGE.
16.2.9 liblzf license
Redistribution and use in source and binary forms, with or without modification, are permitted
provided that the following conditions are met:
1. Redistributions of source code must retain the above copyright notice, this list of conditions
and the following disclaimer.
2. Redistributions in binary form must reproduce the above copyright notice, this list of conditions and the following disclaimer in the documentation and/or other materials provided with
the distribution.
3. The name of the author may not be used to endorse or promote products derived from this
software without specific prior written permission.
THIS SOFTWARE IS PROVIDED BY THE AUTHOR “AS IS” AND ANY EXPRESS OR IMPLIED
WARRANTIES, INCLUDING, BUT NOT LIMITED TO, THE IMPLIED WARRANTIES OF MERCHANTABILITY AND FITNESS FOR A PARTICULAR PURPOSE ARE DISCLAIMED. IN NO EVENT
SHALL THE AUTHOR BE LIABLE FOR ANY DIRECT, INDIRECT, INCIDENTAL, SPECIAL, EXEMPLARY, OR CONSEQUENTIAL DAMAGES (INCLUDING, BUT NOT LIMITED TO, PROCUREMENT
OF SUBSTITUTE GOODS OR SERVICES; LOSS OF USE, DATA, OR PROFITS; OR BUSINESS INTERRUPTION) HOWEVER CAUSED AND ON ANY THEORY OF LIABILITY, WHETHER IN CONTRACT, STRICT LIABILITY, OR TORT (INCLUDING NEGLIGENCE OR OTHERWISE) ARISING IN
ANY WAY OUT OF THE USE OF THIS SOFTWARE, EVEN IF ADVISED OF THE POSSIBILITY OF
SUCH DAMAGE.
16.2.10 libpng license
The PNG Reference Library is supplied “AS IS”. The Contributing Authors and Group 42, Inc.
disclaim all warranties, expressed or implied, including, without limitation, the warranties of
merchantability and of fitness for any purpose. The Contributing Authors and Group 42, Inc.
assume no liability for direct, indirect, incidental, special, exemplary, or consequential damages,
which may result from the use of the PNG Reference Library, even if advised of the possibility of
such damage.
Permission is hereby granted to use, copy, modify, and distribute this source code, or portions
hereof, for any purpose, without fee, subject to the following restrictions:
1. The origin of this source code must not be misrepresented.
2. Altered versions must be plainly marked as such and must not be misrepresented as being
the original source.
3. This Copyright notice may not be removed or altered from any source or altered source
distribution.
The Contributing Authors and Group 42, Inc. specifically permit, without fee, and encourage
the use of this source code as a component to supporting the PNG file format in commercial
products. If you use this source code in a product, acknowledgment is not required but would
be appreciated.
16.2.11 lwIP license
Redistribution and use in source and binary forms, with or without modification, are permitted
provided that the following conditions are met:
256
16 Third-party materials and licenses
1. Redistributions of source code must retain the above copyright notice, this list of conditions
and the following disclaimer.
2. Redistributions in binary form must reproduce the above copyright notice, this list of conditions and the following disclaimer in the documentation and/or other materials provided with
the distribution.
3. The name of the author may not be used to endorse or promote products derived from this
software without specific prior written permission.
THIS SOFTWARE IS PROVIDED BY THE AUTHOR “AS IS” AND ANY EXPRESS OR IMPLIED
WARRANTIES, INCLUDING, BUT NOT LIMITED TO, THE IMPLIED WARRANTIES OF MERCHANTABILITY AND FITNESS FOR A PARTICULAR PURPOSE ARE DISCLAIMED. IN NO EVENT
SHALL THE AUTHOR BE LIABLE FOR ANY DIRECT, INDIRECT, INCIDENTAL, SPECIAL, EXEMPLARY, OR CONSEQUENTIAL DAMAGES (INCLUDING, BUT NOT LIMITED TO, PROCUREMENT
OF SUBSTITUTE GOODS OR SERVICES; LOSS OF USE, DATA, OR PROFITS; OR BUSINESS INTERRUPTION) HOWEVER CAUSED AND ON ANY THEORY OF LIABILITY, WHETHER IN CONTRACT, STRICT LIABILITY, OR TORT (INCLUDING NEGLIGENCE OR OTHERWISE) ARISING IN
ANY WAY OUT OF THE USE OF THIS SOFTWARE, EVEN IF ADVISED OF THE POSSIBILITY OF
SUCH DAMAGE.
16.2.12 libxml license
Except where otherwise noted in the source code (e.g. the files hash.c, list.c and the trio files,
which are covered by a similar licence but with different Copyright notices) all the files are:
Copyright (C) 1998-2003 Daniel Veillard. All Rights Reserved.
Permission is hereby granted, free of charge, to any person obtaining a copy of this software
and associated documentation files (the “Software”), to deal in the Software without restriction, including without limitation the rights to use, copy, modify, merge, publish, distribute,
sublicense, and/or sell copies of the Software, and to permit persons to whom the Software is
furnished to do so, subject to the following conditions:
The above copyright notice and this permission notice shall be included in all copies or substantial portions of the Software.
THE SOFTWARE IS PROVIDED “AS IS”, WITHOUT WARRANTY OF ANY KIND, EXPRESS OR
IMPLIED, INCLUDING BUT NOT LIMITED TO THE WARRANTIES OF MERCHANTABILITY, FITNESS FOR A PARTICULAR PURPOSE AND NONINFRINGEMENT. IN NO EVENT SHALL THE
DANIEL VEILLARD BE LIABLE FOR ANY CLAIM, DAMAGES OR OTHER LIABILITY, WHETHER
IN AN ACTION OF CONTRACT, TORT OR OTHERWISE, ARISING FROM, OUT OF OR IN CONNECTION WITH THE SOFTWARE OR THE USE OR OTHER DEALINGS IN THE SOFTWARE.
Except as contained in this notice, the name of Daniel Veillard shall not be used in advertising
or otherwise to promote the sale, use or other dealings in this Software without prior written
authorization from him.
16.2.13 libxslt licenses
Licence for libxslt except libexslt:
Copyright (C) 2001-2002 Daniel Veillard. All Rights Reserved.
Permission is hereby granted, free of charge, to any person obtaining a copy of this software
and associated documentation files (the “Software”), to deal in the Software without restriction, including without limitation the rights to use, copy, modify, merge, publish, distribute,
sublicense, and/or sell copies of the Software, and to permit persons to whom the Software is
furnished to do so, subject to the following conditions:
The above copyright notice and this permission notice shall be included in all copies or substantial portions of the Software.
THE SOFTWARE IS PROVIDED “AS IS”, WITHOUT WARRANTY OF ANY KIND, EXPRESS OR
IMPLIED, INCLUDING BUT NOT LIMITED TO THE WARRANTIES OF MERCHANTABILITY, FITNESS FOR A PARTICULAR PURPOSE AND NONINFRINGEMENT. IN NO EVENT SHALL THE
257
16 Third-party materials and licenses
DANIEL VEILLARD BE LIABLE FOR ANY CLAIM, DAMAGES OR OTHER LIABILITY, WHETHER
IN AN ACTION OF CONTRACT, TORT OR OTHERWISE, ARISING FROM, OUT OF OR IN CONNECTION WITH THE SOFTWARE OR THE USE OR OTHER DEALINGS IN THE SOFTWARE.
Except as contained in this notice, the name of Daniel Veillard shall not be used in advertising
or otherwise to promote the sale, use or other dealings in this Software without prior written
authorization from him.
Licence for libexslt:
Copyright (C) 2001-2002 Thomas Broyer, Charlie Bozeman and Daniel Veillard. All Rights
Reserved.
Permission is hereby granted, free of charge, to any person obtaining a copy of this software
and associated documentation files (the “Software”), to deal in the Software without restriction, including without limitation the rights to use, copy, modify, merge, publish, distribute,
sublicense, and/or sell copies of the Software, and to permit persons to whom the Software is
furnished to do so, subject to the following conditions:
The above copyright notice and this permission notice shall be included in all copies or substantial portions of the Software.
THE SOFTWARE IS PROVIDED “AS IS”, WITHOUT WARRANTY OF ANY KIND, EXPRESS OR
IMPLIED, INCLUDING BUT NOT LIMITED TO THE WARRANTIES OF MERCHANTABILITY, FITNESS FOR A PARTICULAR PURPOSE AND NONINFRINGEMENT. IN NO EVENT SHALL THE
AUTHORS BE LIABLE FOR ANY CLAIM, DAMAGES OR OTHER LIABILITY, WHETHER IN AN
ACTION OF CONTRACT, TORT OR OTHERWISE, ARISING FROM, OUT OF OR IN CONNECTION WITH THE SOFTWARE OR THE USE OR OTHER DEALINGS IN THE SOFTWARE.
Except as contained in this notice, the name of the authors shall not be used in advertising
or otherwise to promote the sale, use or other dealings in this Software without prior written
authorization from him.
16.2.14 gSOAP Public License Version 1.3a
The gSOAP public license is derived from the Mozilla Public License (MPL1.1). The sections
that were deleted from the original MPL1.1 text are 1.0.1, 2.1.(c),(d), 2.2.(c),(d), 8.2.(b), 10,
and 11. Section 3.8 was added. The modified sections are 2.1.(b), 2.2.(b), 3.2 (simplified), 3.5
(deleted the last sentence), and 3.6 (simplified).
1 DEFINITIONS
1.1. “Contributor” means each entity that creates or contributes to the creation of Modifications.
1.2. “Contributor Version” means the combination of the Original Code, prior Modifications
used by a Contributor, and the Modifications made by that particular Contributor.
1.3. “Covered Code” means the Original Code, or Modifications or the combination of the
Original Code, and Modifications, in each case including portions thereof.
1.4. “Electronic Distribution Mechanism” means a mechanism generally accepted in the software development community for the electronic transfer of data.
1.5. “Executable” means Covered Code in any form other than Source Code.
1.6. “Initial Developer” means the individual or entity identified as the Initial Developer in the
Source Code notice required by Exhibit A.
1.7. “Larger Work” means a work which combines Covered Code or portions thereof with code
not governed by the terms of this License.
1.8. “License” means this document.
1.8.1. “Licensable” means having the right to grant, to the maximum extent possible, whether
at the time of the initial grant or subsequently acquired, any and all of the rights conveyed herein.
1.9. “Modifications” means any addition to or deletion from the substance or structure of
either the Original Code or any previous Modifications. When Covered Code is released as a
series of files, a Modification is:
258
16 Third-party materials and licenses
A. Any addition to or deletion from the contents of a file containing Original Code or previous
Modifications.
B. Any new file that contains any part of the Original Code, or previous Modifications.
1.10. “Original Code” means Source Code of computer software code which is described in the
Source Code notice required by Exhibit A as Original Code, and which, at the time of its release
under this License is not already Covered Code governed by this License.
1.10.1. “Patent Claims” means any patent claim(s), now owned or hereafter acquired, including without limitation, method, process, and apparatus claims, in any patent Licensable by
grantor.
1.11. “Source Code” means the preferred form of the Covered Code for making modifications
to it, including all modules it contains, plus any associated interface definition files, scripts used
to control compilation and installation of an Executable, or source code differential comparisons
against either the Original Code or another well known, available Covered Code of the Contributor’s choice. The Source Code can be in a compressed or archival form, provided the appropriate
decompression or de-archiving software is widely available for no charge.
1.12. “You” (or “Your”) means an individual or a legal entity exercising rights under, and
complying with all of the terms of, this License or a future version of this License issued under
Section 6.1. For legal entities, “You” includes any entity which controls, is controlled by, or is
under common control with You. For purposes of this definition, “control” means (a) the power,
direct or indirect, to cause the direction or management of such entity, whether by contract
or otherwise, or (b) ownership of more than fifty percent (50%) of the outstanding shares or
beneficial ownership of such entity.
2 SOURCE CODE LICENSE.
2.1. The Initial Developer Grant.
The Initial Developer hereby grants You a world-wide, royalty-free, non-exclusive license, subject to third party intellectual property claims:
(a) under intellectual property rights (other than patent or trademark) Licensable by Initial
Developer to use, reproduce, modify, display, perform, sublicense and distribute the Original
Code (or portions thereof) with or without Modifications, and/or as part of a Larger Work; and
(b) under patents now or hereafter owned or controlled by Initial Developer, to make, have
made, use and sell (“offer to sell and import”) the Original Code, Modifications, or portions
thereof, but solely to the extent that any such patent is reasonably necessary to enable You to
utilize, alone or in combination with other software, the Original Code, Modifications, or any
combination or portions thereof.
(c)
(d)
2.2. Contributor Grant.
Subject to third party intellectual property claims, each Contributor hereby grants You a worldwide, royalty-free, non-exclusive license
(a) under intellectual property rights (other than patent or trademark) Licensable by Contributor, to use, reproduce, modify, display, perform, sublicense and distribute the Modifications
created by such Contributor (or portions thereof) either on an unmodified basis, with other
Modifications, as Covered Code and/or as part of a Larger Work; and
(b) under patents now or hereafter owned or controlled by Contributor, to make, have made,
use and sell (“offer to sell and import”) the Contributor Version (or portions thereof), but solely
to the extent that any such patent is reasonably necessary to enable You to utilize, alone or in
combination with other software, the Contributor Version (or portions thereof).
(c)
(d)
3 DISTRIBUTION OBLIGATIONS.
3.1. Application of License.
The Modifications which You create or to which You contribute are governed by the terms
of this License, including without limitation Section 2.2. The Source Code version of Covered
259
16 Third-party materials and licenses
Code may be distributed only under the terms of this License or a future version of this License
released under Section 6.1, and You must include a copy of this License with every copy of the
Source Code You distribute. You may not offer or impose any terms on any Source Code version
that alters or restricts the applicable version of this License or the recipients’ rights hereunder.
However, You may include an additional document offering the additional rights described in
Section 3.5.
3.2. Availability of Source Code.
Any Modification created by You will be provided to the Initial Developer in Source Code form
and are subject to the terms of the License. 3.3. Description of Modifications.
You must cause all Covered Code to which You contribute to contain a file documenting the
changes You made to create that Covered Code and the date of any change. You must include a
prominent statement that the Modification is derived, directly or indirectly, from Original Code
provided by the Initial Developer and including the name of the Initial Developer in (a) the
Source Code, and (b) in any notice in an Executable version or related documentation in which
You describe the origin or ownership of the Covered Code.
3.4. Intellectual Property Matters.
(a) Third Party Claims. If Contributor has knowledge that a license under a third party’s intellectual property rights is required to exercise the rights granted by such Contributor under
Sections 2.1 or 2.2, Contributor must include a text file with the Source Code distribution titled
“LEGAL” which describes the claim and the party making the claim in sufficient detail that a recipient will know whom to contact. If Contributor obtains such knowledge after the Modification
is made available as described in Section 3.2, Contributor shall promptly modify the LEGAL file
in all copies Contributor makes available thereafter and shall take other steps (such as notifying
appropriate mailing lists or newsgroups) reasonably calculated to inform those who received the
Covered Code that new knowledge has been obtained.
(b) Contributor APIs. If Contributor’s Modifications include an application programming interface and Contributor has knowledge of patent licenses which are reasonably necessary to
implement that API, Contributor must also include this information in the LEGAL file.
(c) Representations. Contributor represents that, except as disclosed pursuant to Section
3.4(a) above, Contributor believes that Contributor’s Modifications are Contributor’s original
creation(s) and/or Contributor has sufficient rights to grant the rights conveyed by this License.
3.5. Required Notices. You must duplicate the notice in Exhibit A in each file of the Source
Code. If it is not possible to put such notice in a particular Source Code file due to its structure,
then You must include such notice in a location (such as a relevant directory) where a user would
be likely to look for such a notice. If You created one or more Modification(s) You may add your
name as a Contributor to the notice described in Exhibit A. You must also duplicate this License in
any documentation for the Source Code where You describe recipients’ rights or ownership rights
relating to Covered Code. You may choose to offer, and to charge a fee for, warranty, support,
indemnity or liability obligations to one or more recipients of Covered Code. However, You may
do so only on Your own behalf, and not on behalf of the Initial Developer or any Contributor.
3.6. Distribution of Executable Versions. You may distribute Covered Code in Executable form
only if the requirements of Section 3.1-3.5 have been met for that Covered Code. You may
distribute the Executable version of Covered Code or ownership rights under a license of Your
choice, which may contain terms different from this License, provided that You are in compliance
with the terms of this License and that the license for the Executable version does not attempt
to limit or alter the recipient’s rights in the Source Code version from the rights set forth in
this License. If You distribute the Executable version under a different license You must make it
absolutely clear that any terms which differ from this License are offered by You alone, not by the
Initial Developer or any Contributor. If you distribute executable versions containing Covered
Code as part of a product, you must reproduce the notice in Exhibit B in the documentation
and/or other materials provided with the product.
3.7. Larger Works. You may create a Larger Work by combining Covered Code with other code
not governed by the terms of this License and distribute the Larger Work as a single product. In
260
16 Third-party materials and licenses
such a case, You must make sure the requirements of this License are fulfilled for the Covered
Code.
3.8. Restrictions. You may not remove any product identification, copyright, proprietary notices or labels from gSOAP.
4 INABILITY TO COMPLY DUE TO STATUTE OR REGULATION.
If it is impossible for You to comply with any of the terms of this License with respect to some
or all of the Covered Code due to statute, judicial order, or regulation then You must: (a) comply
with the terms of this License to the maximum extent possible; and (b) describe the limitations
and the code they affect. Such description must be included in the LEGAL file described in
Section 3.4 and must be included with all distributions of the Source Code. Except to the extent
prohibited by statute or regulation, such description must be sufficiently detailed for a recipient
of ordinary skill to be able to understand it.
5 APPLICATION OF THIS LICENSE.
This License applies to code to which the Initial Developer has attached the notice in Exhibit
A and to related Covered Code.
6 VERSIONS OF THE LICENSE.
6.1. New Versions.
Grantor may publish revised and/or new versions of the License from time to time. Each
version will be given a distinguishing version number.
6.2. Effect of New Versions.
Once Covered Code has been published under a particular version of the License, You may
always continue to use it under the terms of that version. You may also choose to use such
Covered Code under the terms of any subsequent version of the License.
6.3. Derivative Works.
If You create or use a modified version of this License (which you may only do in order to apply
it to code which is not already Covered Code governed by this License), You must (a) rename
Your license so that the phrase “gSOAP” or any confusingly similar phrase do not appear in your
license (except to note that your license differs from this License) and (b) otherwise make it
clear that Your version of the license contains terms which differ from the gSOAP Public License.
(Filling in the name of the Initial Developer, Original Code or Contributor in the notice described
in Exhibit A shall not of themselves be deemed to be modifications of this License.)
7 DISCLAIMER OF WARRANTY.
COVERED CODE IS PROVIDED UNDER THIS LICENSE ON AN “AS IS” BASIS, WITHOUT WARRANTY OF ANY KIND, WHETHER EXPRESS, IMPLIED OR STATUTORY, INCLUDING, WITHOUT
LIMITATION, THE IMPLIED WARRANTIES OF MERCHANTABILITY, OF FITNESS FOR A PARTICULAR PURPOSE, NONINFRINGEMENT OF THIRD PARTY INTELLECTUAL PROPERTY RIGHTS,
AND ANY WARRANTY THAT MAY ARISE BY REASON OF TRADE USAGE, CUSTOM, OR COURSE
OF DEALING. WITHOUT LIMITING THE FOREGOING, YOU ACKNOWLEDGE THAT THE SOFTWARE IS PROVIDED “AS IS” AND THAT THE AUTHORS DO NOT WARRANT THE SOFTWARE
WILL RUN UNINTERRUPTED OR ERROR FREE. LIMITED LIABILITY THE ENTIRE RISK AS
TO RESULTS AND PERFORMANCE OF THE SOFTWARE IS ASSUMED BY YOU. UNDER NO
CIRCUMSTANCES WILL THE AUTHORS BE LIABLE FOR ANY SPECIAL, INDIRECT, INCIDENTAL, EXEMPLARY OR CONSEQUENTIAL DAMAGES OF ANY KIND OR NATURE WHATSOEVER,
WHETHER BASED ON CONTRACT, WARRANTY, TORT (INCLUDING NEGLIGENCE), STRICT
LIABILITY OR OTHERWISE, ARISING OUT OF OR IN ANY WAY RELATED TO THE SOFTWARE,
EVEN IF THE AUTHORS HAVE BEEN ADVISED ON THE POSSIBILITY OF SUCH DAMAGE OR
IF SUCH DAMAGE COULD HAVE BEEN REASONABLY FORESEEN, AND NOTWITHSTANDING
ANY FAILURE OF ESSENTIAL PURPOSE OF ANY EXCLUSIVE REMEDY PROVIDED. SUCH LIMITATION ON DAMAGES INCLUDES, BUT IS NOT LIMITED TO, DAMAGES FOR LOSS OF GOODWILL, LOST PROFITS, LOSS OF DATA OR SOFTWARE, WORK STOPPAGE, COMPUTER FAILURE
OR MALFUNCTION OR IMPAIRMENT OF OTHER GOODS. IN NO EVENT WILL THE AUTHORS
BE LIABLE FOR THE COSTS OF PROCUREMENT OF SUBSTITUTE SOFTWARE OR SERVICES.
YOU ACKNOWLEDGE THAT THIS SOFTWARE IS NOT DESIGNED FOR USE IN ON-LINE EQUIP-
261
16 Third-party materials and licenses
MENT IN HAZARDOUS ENVIRONMENTS SUCH AS OPERATION OF NUCLEAR FACILITIES, AIRCRAFT NAVIGATION OR CONTROL, OR LIFE-CRITICAL APPLICATIONS. THE AUTHORS EXPRESSLY DISCLAIM ANY LIABILITY RESULTING FROM USE OF THE SOFTWARE IN ANY SUCH
ON-LINE EQUIPMENT IN HAZARDOUS ENVIRONMENTS AND ACCEPTS NO LIABILITY IN RESPECT OF ANY ACTIONS OR CLAIMS BASED ON THE USE OF THE SOFTWARE IN ANY SUCH
ON-LINE EQUIPMENT IN HAZARDOUS ENVIRONMENTS BY YOU. FOR PURPOSES OF THIS
PARAGRAPH, THE TERM “LIFE-CRITICAL APPLICATION” MEANS AN APPLICATION IN WHICH
THE FUNCTIONING OR MALFUNCTIONING OF THE SOFTWARE MAY RESULT DIRECTLY OR
INDIRECTLY IN PHYSICAL INJURY OR LOSS OF HUMAN LIFE. THIS DISCLAIMER OF WARRANTY CONSTITUTES AN ESSENTIAL PART OF THIS LICENSE. NO USE OF ANY COVERED
CODE IS AUTHORIZED HEREUNDER EXCEPT UNDER THIS DISCLAIMER.
8 TERMINATION.
8.1.
This License and the rights granted hereunder will terminate automatically if You fail to comply
with terms herein and fail to cure such breach within 30 days of becoming aware of the breach.
All sublicenses to the Covered Code which are properly granted shall survive any termination of
this License. Provisions which, by their nature, must remain in effect beyond the termination of
this License shall survive.
8.2.
8.3.
If You assert a patent infringement claim against Participant alleging that such Participant’s
Contributor Version directly or indirectly infringes any patent where such claim is resolved (such
as by license or settlement) prior to the initiation of patent infringement litigation, then the
reasonable value of the licenses granted by such Participant under Sections 2.1 or 2.2 shall be
taken into account in determining the amount or value of any payment or license.
8.4. In the event of termination under Sections 8.1 or 8.2 above, all end user license agreements (excluding distributors and resellers) which have been validly granted by You or any
distributor hereunder prior to termination shall survive termination.
9 LIMITATION OF LIABILITY.
UNDER NO CIRCUMSTANCES AND UNDER NO LEGAL THEORY, WHETHER TORT (INCLUDING NEGLIGENCE), CONTRACT, OR OTHERWISE, SHALL YOU, THE INITIAL DEVELOPER, ANY
OTHER CONTRIBUTOR, OR ANY DISTRIBUTOR OF COVERED CODE, OR ANY SUPPLIER OF
ANY OF SUCH PARTIES, BE LIABLE TO ANY PERSON FOR ANY INDIRECT, SPECIAL, INCIDENTAL, OR CONSEQUENTIAL DAMAGES OF ANY CHARACTER INCLUDING, WITHOUT LIMITATION, DAMAGES FOR LOSS OF GOODWILL, WORK STOPPAGE, COMPUTER FAILURE OR MALFUNCTION, OR ANY AND ALL OTHER COMMERCIAL DAMAGES OR LOSSES, EVEN IF SUCH
PARTY SHALL HAVE BEEN INFORMED OF THE POSSIBILITY OF SUCH DAMAGES. THIS LIMITATION OF LIABILITY SHALL NOT APPLY TO LIABILITY FOR DEATH OR PERSONAL INJURY RESULTING FROM SUCH PARTY’S NEGLIGENCE TO THE EXTENT APPLICABLE LAW PROHIBITS
SUCH LIMITATION. SOME JURISDICTIONS DO NOT ALLOW THE EXCLUSION OR LIMITATION
OF INCIDENTAL OR CONSEQUENTIAL DAMAGES, SO THIS EXCLUSION AND LIMITATION MAY
NOT APPLY TO YOU.
10 U.S. GOVERNMENT END USERS.
11 MISCELLANEOUS.
12 RESPONSIBILITY FOR CLAIMS.
As between Initial Developer and the Contributors, each party is responsible for claims and
damages arising, directly or indirectly, out of its utilization of rights under this License and You
agree to work with Initial Developer and Contributors to distribute such responsibility on an
equitable basis. Nothing herein is intended or shall be deemed to constitute any admission of
liability.
EXHIBIT A.
“The contents of this file are subject to the gSOAP Public License Version 1.3 (the “License”);
you may not use this file except in compliance with the License. You may obtain a copy of
262
16 Third-party materials and licenses
the License at http://www.cs.fsu.edu/~engelen/soaplicense.html. Software distributed
under the License is distributed on an “AS IS” basis, WITHOUT WARRANTY OF ANY KIND, either
express or implied. See the License for the specific language governing rights and limitations
under the License.
The Original Code of the gSOAP Software is: stdsoap.h, stdsoap2.h, stdsoap.c, stdsoap2.c,
stdsoap.cpp, stdsoap2.cpp, soapcpp2.h, soapcpp2.c, soapcpp2_lex.l, soapcpp2_yacc.y, error2.h,
error2.c, symbol2.c, init2.c, soapdoc2.html, and soapdoc2.pdf, httpget.h, httpget.c, stl.h, stldeque.h, stllist.h, stlvector.h, stlset.h.
The Initial Developer of the Original Code is Robert A. van Engelen. Portions created by
Robert A. van Engelen are Copyright (C) 2001-2004 Robert A. van Engelen, Genivia inc. All
Rights Reserved.
Contributor(s): “________________________.“ [Note: The text of this Exhibit A may differ
slightly form the text of the notices in the Source Code files of the Original code. You should use
the text of this Exhibit A rather than the text found in the Original Code Source Code for Your
Modifications.]
EXHIBIT B.
“Part of the software embedded in this product is gSOAP software. Portions created by gSOAP
are Copyright (C) 2001-2004 Robert A. van Engelen, Genivia inc. All Rights Reserved. THE
SOFTWARE IN THIS PRODUCT WAS IN PART PROVIDED BY GENIVIA INC AND ANY EXPRESS
OR IMPLIED WARRANTIES, INCLUDING, BUT NOT LIMITED TO, THE IMPLIED WARRANTIES
OF MERCHANTABILITY AND FITNESS FOR A PARTICULAR PURPOSE ARE DISCLAIMED. IN NO
EVENT SHALL THE AUTHOR BE LIABLE FOR ANY DIRECT, INDIRECT, INCIDENTAL, SPECIAL,
EXEMPLARY, OR CONSEQUENTIAL DAMAGES (INCLUDING, BUT NOT LIMITED TO, PROCUREMENT OF SUBSTITUTE GOODS OR SERVICES; LOSS OF USE, DATA, OR PROFITS; OR BUSINESS INTERRUPTION) HOWEVER CAUSED AND ON ANY THEORY OF LIABILITY, WHETHER IN
CONTRACT, STRICT LIABILITY, OR TORT (INCLUDING NEGLIGENCE OR OTHERWISE) ARISING IN ANY WAY OUT OF THE USE OF THIS SOFTWARE, EVEN IF ADVISED OF THE POSSIBILITY OF SUCH DAMAGE.“
16.2.15 Chromium licenses
16.2.15.1 Main license
Copyright (c) 2002, Stanford University All rights reserved.
Some portions of Chromium are copyrighted by individiual organizations. Please see the files
COPYRIGHT.LLNL and COPYRIGHT.REDHAT for more information.
Redistribution and use in source and binary forms, with or without modification, are permitted
provided that the following conditions are met:
• Redistributions of source code must retain the above copyright notice, this list of conditions
and the following disclaimer.
• Redistributions in binary form must reproduce the above copyright notice, this list of conditions and the following disclaimer in the documentation and/or other materials provided
with the distribution.
• Neither the name of Stanford University nor the names of its contributors may be used
to endorse or promote products derived from this software without specific prior written
permission.
THIS SOFTWARE IS PROVIDED BY THE COPYRIGHT HOLDERS AND CONTRIBUTORS “AS
IS” AND ANY EXPRESS OR IMPLIED WARRANTIES, INCLUDING, BUT NOT LIMITED TO, THE
IMPLIED WARRANTIES OF MERCHANTABILITY AND FITNESS FOR A PARTICULAR PURPOSE
ARE DISCLAIMED. IN NO EVENT SHALL THE COPYRIGHT OWNER OR CONTRIBUTORS BE LIABLE FOR ANY DIRECT, INDIRECT, INCIDENTAL, SPECIAL, EXEMPLARY, OR CONSEQUENTIAL
263
16 Third-party materials and licenses
DAMAGES (INCLUDING, BUT NOT LIMITED TO, PROCUREMENT OF SUBSTITUTE GOODS
OR SERVICES; LOSS OF USE, DATA, OR PROFITS; OR BUSINESS INTERRUPTION) HOWEVER
CAUSED AND ON ANY THEORY OF LIABILITY, WHETHER IN CONTRACT, STRICT LIABILITY,
OR TORT (INCLUDING NEGLIGENCE OR OTHERWISE) ARISING IN ANY WAY OUT OF THE
USE OF THIS SOFTWARE, EVEN IF ADVISED OF THE POSSIBILITY OF SUCH DAMAGE.
16.2.15.2 COPYRIGHT.LLNL file
This Chromium distribution contains information and code which is covered under the following
notice:
Copyright (c) 2002, The Regents of the University of California. Produced at the Lawrence
Livermore National Laboratory For details, contact: Randall Frank ([email protected]). UCRLCODE-2002-058 All rights reserved.
This file is part of Chromium. For details, see accompanying documentation.
Redistribution and use in source and binary forms, with or without modification, are permitted
provided that the following conditions are met:
Redistributions of source code must retain the above copyright notice, this list of conditions
and the disclaimer below.
Redistributions in binary form must reproduce the above copyright notice, this list of conditions and the disclaimer (as noted below) in the documentation and/or other materials provided
with the distribution.
Neither the name of the UC/LLNL nor the names of its contributors may be used to endorse or
promote products derived from this software without specific prior written permission.
THIS SOFTWARE IS PROVIDED BY THE COPYRIGHT HOLDERS AND CONTRIBUTORS “AS
IS” AND ANY EXPRESS OR IMPLIED WARRANTIES, INCLUDING, BUT NOT LIMITED TO, THE
IMPLIED WARRANTIES OF MERCHANTABILITY AND FITNESS FOR A PARTICULAR PURPOSE
ARE DISCLAIMED. IN NO EVENT SHALL THE REGENTS OF THE UNIVERSITY OF CALIFORNIA, THE U.S. DEPARTMENT OF ENERGY OR CONTRIBUTORS BE LIABLE FOR ANY DIRECT,
INDIRECT, INCIDENTAL, SPECIAL, EXEMPLARY, OR CONSEQUENTIAL DAMAGES (INCLUDING, BUT NOT LIMITED TO, PROCUREMENT OF SUBSTITUTE GOODS OR SERVICES; LOSS OF
USE, DATA, OR PROFITS; OR BUSINESS INTERRUPTION) HOWEVER CAUSED AND ON ANY
THEORY OF LIABILITY, WHETHER IN CONTRACT, STRICT LIABILITY, OR TORT (INCLUDING
NEGLIGENCE OR OTHERWISE) ARISING IN ANY WAY OUT OF THE USE OF THIS SOFTWARE,
EVEN IF ADVISED OF THE POSSIBILITY OF SUCH DAMAGE.
Additional BSD Notice
1. This notice is required to be provided under our contract with the U.S. Department of
Energy (DOE). This work was produced at the University of California, Lawrence Livermore
National Laboratory under Contract No. W-7405-ENG-48 with the DOE.
2. Neither the United States Government nor the University of California nor any of their
employees, makes any warranty, express or implied, or assumes any liability or responsibility
for the accuracy, completeness, or usefulness of any information, apparatus, product, or process
disclosed, or represents that its use would not infringe privately-owned rights.
3. Also, reference herein to any specific commercial products, process, or services by trade
name, trademark, manufacturer or otherwise does not necessarily constitute or imply its endorsement, recommendation, or favoring by the United States Government or the University of
California. The views and opinions of authors expressed herein do not necessarily state or reflect
those of the United States Government or the University of California, and shall not be used for
advertising or product endorsement purposes.
16.2.15.3 COPYRIGHT.REDHAT file
This Chromium distribution contains information and code which is covered under the following
notice:
Copyright 2001,2002 Red Hat Inc., Durham, North Carolina.
264
16 Third-party materials and licenses
All Rights Reserved.
Permission is hereby granted, free of charge, to any person obtaining a copy of this software
and associated documentation files (the “Software”), to deal in the Software without restriction, including without limitation on the rights to use, copy, modify, merge, publish, distribute,
sublicense, and/or sell copies of the Software, and to permit persons to whom the Software is
furnished to do so, subject to the following conditions:
The above copyright notice and this permission notice (including the next paragraph) shall be
included in all copies or substantial portions of the Software.
THE SOFTWARE IS PROVIDED “AS IS”, WITHOUT WARRANTY OF ANY KIND, EXPRESS OR
IMPLIED, INCLUDING BUT NOT LIMITED TO THE WARRANTIES OF MERCHANTABILITY, FITNESS FOR A PARTICULAR PURPOSE AND NON-INFRINGEMENT. IN NO EVENT SHALL RED
HAT AND/OR THEIR SUPPLIERS BE LIABLE FOR ANY CLAIM, DAMAGES OR OTHER LIABILITY, WHETHER IN AN ACTION OF CONTRACT, TORT OR OTHERWISE, ARISING FROM, OUT
OF OR IN CONNECTION WITH THE SOFTWARE OR THE USE OR OTHER DEALINGS IN THE
SOFTWARE.
16.2.16 curl license
COPYRIGHT AND PERMISSION NOTICE
Copyright (c) 1996 - 2009, Daniel Stenberg, [email protected].
All rights reserved.
Permission to use, copy, modify, and distribute this software for any purpose with or without
fee is hereby granted, provided that the above copyright notice and this permission notice appear
in all copies.
THE SOFTWARE IS PROVIDED “AS IS”, WITHOUT WARRANTY OF ANY KIND, EXPRESS OR
IMPLIED, INCLUDING BUT NOT LIMITED TO THE WARRANTIES OF MERCHANTABILITY, FITNESS FOR A PARTICULAR PURPOSE AND NONINFRINGEMENT OF THIRD PARTY RIGHTS. IN
NO EVENT SHALL THE AUTHORS OR COPYRIGHT HOLDERS BE LIABLE FOR ANY CLAIM,
DAMAGES OR OTHER LIABILITY, WHETHER IN AN ACTION OF CONTRACT, TORT OR OTHERWISE, ARISING FROM, OUT OF OR IN CONNECTION WITH THE SOFTWARE OR THE USE
OR OTHER DEALINGS IN THE SOFTWARE.
Except as contained in this notice, the name of a copyright holder shall not be used in advertising or otherwise to promote the sale, use or other dealings in this Software without prior written
authorization of the copyright holder.
16.2.17 libgd license
Portions copyright 1994, 1995, 1996, 1997, 1998, 1999, 2000, 2001, 2002 by Cold Spring
Harbor Laboratory. Funded under Grant P41-RR02188 by the National Institutes of Health.
Portions copyright 1996, 1997, 1998, 1999, 2000, 2001, 2002 by Boutell.Com, Inc.
Portions relating to GD2 format copyright 1999, 2000, 2001, 2002 Philip Warner.
Portions relating to PNG copyright 1999, 2000, 2001, 2002 Greg Roelofs.
Portions relating to gdttf.c copyright 1999, 2000, 2001, 2002 John Ellson ([email protected]).
Portions relating to gdft.c copyright 2001, 2002 John Ellson ([email protected]).
Portions copyright 2000, 2001, 2002, 2003, 2004, 2005, 2006, 2007 Pierre-Alain Joye
([email protected]).
Portions relating to JPEG and to color quantization copyright 2000, 2001, 2002, Doug Becker
and copyright (C) 1994, 1995, 1996, 1997, 1998, 1999, 2000, 2001, 2002, Thomas G. Lane. This
software is based in part on the work of the Independent JPEG Group. See the file READMEJPEG.TXT for more information.
Portions relating to WBMP copyright 2000, 2001, 2002 Maurice Szmurlo and Johan Van den
Brande.
265
16 Third-party materials and licenses
Permission has been granted to copy, distribute and modify gd in any context without fee,
including a commercial application, provided that this notice is present in user-accessible supporting documentation.
This does not affect your ownership of the derived work itself, and the intent is to assure
proper credit for the authors of gd, not to interfere with your productive use of gd. If you have
questions, ask. “Derived works” includes all programs that utilize the library. Credit must be
given in user-accessible documentation.
This software is provided “AS IS.“ The copyright holders disclaim all warranties, either express
or implied, including but not limited to implied warranties of merchantability and fitness for a
particular purpose, with respect to this code and accompanying documentation.
Although their code does not appear in gd, the authors wish to thank David Koblas, David
Rowley, and Hutchison Avenue Software Corporation for their prior contributions.
16.2.18 BSD license from Intel
All rights reserved.
Redistribution and use in source and binary forms, with or without modification, are permitted
provided that the following conditions are met:
• Redistributions of source code must retain the above copyright notice, this list of conditions
and the following disclaimer.
• Redistributions in binary form must reproduce the above copyright notice, this list of conditions and the following disclaimer in the documentation and/or other materials provided
with the distribution.
• Neither the name of the Intel Corporation nor the names of its contributors may be used
to endorse or promote products derived from this software without specific prior written
permission.
THIS SOFTWARE IS PROVIDED BY THE COPYRIGHT HOLDERS AND CONTRIBUTORS “AS
IS” AND ANY EXPRESS OR IMPLIED WARRANTIES, INCLUDING, BUT NOT LIMITED TO, THE
IMPLIED WARRANTIES OF MERCHANTABILITY AND FITNESS FOR A PARTICULAR PURPOSE
ARE DISCLAIMED. IN NO EVENT SHALL THE COPYRIGHT OWNER OR CONTRIBUTORS BE LIABLE FOR ANY DIRECT, INDIRECT, INCIDENTAL, SPECIAL, EXEMPLARY, OR CONSEQUENTIAL
DAMAGES (INCLUDING, BUT NOT LIMITED TO, PROCUREMENT OF SUBSTITUTE GOODS
OR SERVICES; LOSS OF USE, DATA, OR PROFITS; OR BUSINESS INTERRUPTION) HOWEVER
CAUSED AND ON ANY THEORY OF LIABILITY, WHETHER IN CONTRACT, STRICT LIABILITY,
OR TORT (INCLUDING NEGLIGENCE OR OTHERWISE) ARISING IN ANY WAY OUT OF THE
USE OF THIS SOFTWARE, EVEN IF ADVISED OF THE POSSIBILITY OF SUCH DAMAGE.
16.2.19 libjpeg License
The authors make NO WARRANTY or representation, either express or implied, with respect to
this software, its quality, accuracy, merchantability, or fitness for a particular purpose. This software is provided “AS IS”, and you, its user, assume the entire risk as to its quality and accuracy.
This software is copyright (C) 1991-2010, Thomas G. Lane, Guido Vollbeding. All Rights
Reserved except as specified below.
Permission is hereby granted to use, copy, modify, and distribute this software (or portions
thereof) for any purpose, without fee, subject to these conditions:
(1) If any part of the source code for this software is distributed, then this README file must
be included, with this copyright and no-warranty notice unaltered; and any additions, deletions,
or changes to the original files must be clearly indicated in accompanying documentation.
(2) If only executable code is distributed, then the accompanying documentation must state
that “this software is based in part on the work of the Independent JPEG Group”.
266
16 Third-party materials and licenses
(3) Permission for use of this software is granted only if the user accepts full responsibility for
any undesirable consequences; the authors accept NO LIABILITY for damages of any kind.
These conditions apply to any software derived from or based on the IJG code, not just to the
unmodified library. If you use our work, you ought to acknowledge us.
Permission is NOT granted for the use of any IJG author’s name or company name in advertising or publicity relating to this software or products derived from it. This software may be
referred to only as “the Independent JPEG Group’s software”.
We specifically permit and encourage the use of this software as the basis of commercial products, provided that all warranty or liability claims are assumed by the product vendor.
ansi2knr.c is included in this distribution by permission of L. Peter Deutsch, sole proprietor of
its copyright holder, Aladdin Enterprises of Menlo Park, CA. ansi2knr.c is NOT covered by the
above copyright and conditions, but instead by the usual distribution terms of the Free Software
Foundation; principally, that you must include source code if you redistribute it. (See the file
ansi2knr.c for full details.) However, since ansi2knr.c is not needed as part of any program
generated from the IJG code, this does not limit you more than the foregoing paragraphs do.
The Unix configuration script “configure” was produced with GNU Autoconf. It is copyright
by the Free Software Foundation but is freely distributable. The same holds for its supporting
scripts (config.guess, config.sub, ltmain.sh). Another support script, install-sh, is copyright by X
Consortium but is also freely distributable.
The IJG distribution formerly included code to read and write GIF files. To avoid entanglement
with the Unisys LZW patent, GIF reading support has been removed altogether, and the GIF
writer has been simplified to produce “uncompressed GIFs”. This technique does not use the
LZW algorithm; the resulting GIF files are larger than usual, but are readable by all standard GIF
decoders.
We are required to state that
“The Graphics Interchange Format(c) is the Copyright property of CompuServe Incorporated.
GIF(sm) is a Service Mark property of CompuServe Incorporated.“
16.2.20 x86 SIMD extension for IJG JPEG library license
Copyright 2009 Pierre Ossman <[email protected]> for Cendio AB
Copyright 2010 D. R. Commander
Based on
x86 SIMD extension for IJG JPEG library - version 1.02
Copyright (C) 1999-2006, MIYASAKA Masaru.
This software is provided ’as-is’, without any express or implied warranty. In no event will the
authors be held liable for any damages arising from the use of this software.
Permission is granted to anyone to use this software for any purpose, including commercial
applications, and to alter it and redistribute it freely, subject to the following restrictions:
1. The origin of this software must not be misrepresented; you must not claim that you wrote
the original software. If you use this software in a product, an acknowledgment in the product
documentation would be appreciated but is not required.
2. Altered source versions must be plainly marked as such, and must not be misrepresented as
being the original software.
3. This notice may not be removed or altered from any source distribution.
267
17 VirtualBox privacy policy
Policy version 4, Apr 22, 2010
This privacy policy sets out how Oracle Corporation (“Oracle”) treats personal information
related to the virtualbox.org website and the VirtualBox application.
§ 1 virtualbox.org. The “virtualbox.org” website logs anonymous usage information such as
your IP address, geographical location, browser type, referral source, length of visit and number
of page views while you visit (collectively, “anonymous data”). In addition, but only if you
choose to register, the website’s bug tracking and forum services store the data you choose to
reveal upon registration, such as your user name and contact information.
§ 2 Cookies. The virtualbox.org website, the bug tracker and the forum services use cookies to
identify and track the visiting web browser and, if you have registered, to facilitate login. Most
browsers allow you to refuse to accept cookies. While you can still visit the website with cookies
disabled, logging into the bug tracker and forum services will most likely not work without them.
§ 3 VirtualBox registration process. The VirtualBox application may ask that the user optionally register with Oracle. in der If you choose to register, your name, e-mail address, country and
company will be submitted to Oracle and stored together with the IP address of the submitter as
well as product version and platform being used. The standard Oracle Privacy Policies as posted
on http://www.oracle.com/html/privacy.html apply to this data.
§ 4 Update notifications. The VirtualBox application may contact Oracle to find out whether
a new version of VirtualBox has been released and notify the user if that is the case. In the
process, anonymous data such as your IP address and a non-identifying counter, together with
the product version and the platform being used, is sent so that the server can find out whether
an update is available. By default, this check is performed once a day. You change this interval
or disable these checks altogether in the VirtualBox preferences.
§ 5 Usage of personal information. Oracle may use anonymous and personal data collected
by the means above for statistical purposes as well as to automatically inform you about new
notices related to your posts on the bug tracker and forum services, to administer the website
and to contact you due to technical issues. Oracle may also inform you about new product
releases related to VirtualBox.
In no event will personal data without your express consent be provided to any third parties,
unless Oracle may be required to do so by law or in connection with legal proceedings.
§ 6 Updates. Oracle may update this privacy policy by posting a new version on the
virtualbox.org website. You should check this page occasionally to ensure you are happy with
any changes.
268
Glossary
A
ACPI Advanced Configuration and Power Interface, an industry specification for BIOS and hardware extensions to configure PC hardware and perform power management. Windows
2000 and higher as well as Linux 2.4 and higher support ACPI. Windows can only enable
or disable ACPI support at installation time.
AHCI Advanced Host Controller Interface, the interface that supports SATA devices such as hard
disks. See chapter 5.1, Hard disk controllers: IDE, SATA (AHCI), SCSI, SAS, page 71.
AMD-V The hardware virtualization features built into modern AMD processors. See chapter
10.3, Hardware vs. software virtualization, page 157.
API Application Programming Interface.
APIC Advanced Programmable Interrupt Controller, a newer version of the original PC PIC
(programmable interrupt controller). Most modern CPUs contain an on-chip APIC (“local APIC”). Many systems also contain an I/O APIC (input output APIC) as a separate chip
which provides more than 16 IRQs. Windows 2000 and higher use a different kernel if
they detect an I/O APIC during installation. Therefore an I/O APIC must not be removed
after installation.
ATA Advanced Technology Attachment, an industry standard for hard disk interfaces (synonymous with IDE). See chapter 5.1, Hard disk controllers: IDE, SATA (AHCI), SCSI, SAS, page
71.
B
BIOS Basic Input/Output System, the firmware built into most personal computers which is
responsible of initializing the hardware after the computer has been turned on and then
booting an operating system. VirtualBox ships with its own virtual BIOS that runs when a
virtual machine is started.
C
COM Microsoft Component Object Model, a programming infrastructure for modular software.
COM allows applications to provide application programming interfaces which can be accessed from various other programming languages and applications. VirtualBox makes
use of COM both internally and externally to provide a comprehensive API to 3rd party
developers.
269
Glossary
D
DHCP Dynamic Host Configuration Protocol. This allows a networking device in a network
to acquire its IP address (and other networking details) automatically, in order to avoid
having to configure all devices in a network with fixed IP addresses. VirtualBox has a
built-in DHCP server that delivers an IP addresses to a virtual machine when networking is
configured to NAT; see chapter 6, Virtual networking, page 83.
DKMS Dynamic Kernel Module Support. A framework that simplifies installing and updating external kernel modules on Linux machines; see chapter 2.3.2, The VirtualBox kernel module,
page 32.
E
EFI Extensible Firmware Interface, a firmware built into computers which is designed to replace
the aging BIOS. Originally designed by Intel, most modern operating systems can now
boot on computers which have EFI instead of a BIOS built into them; see chapter 3.12,
Alternative firmware (EFI), page 51.
EHCI Enhanced Host Controller Interface, the interface that implements the USB 2.0 standard.
G
GUI Graphical User Interface. Commonly used as an antonym to a “command line interface”, in
the context of VirtualBox, we sometimes refer to the main graphical VirtualBox program
as the “GUI”, to differentiate it from the VBoxManage interface.
GUID See UUID.
I
IDE Integrated Drive Electronics, an industry standard for hard disk interfaces. See chapter 5.1,
Hard disk controllers: IDE, SATA (AHCI), SCSI, SAS, page 71.
I/O APIC See APIC.
iSCSI Internet SCSI; see chapter 5.10, iSCSI servers, page 82.
M
MAC Media Access Control, a part of an Ethernet network card. A MAC address is a 6-byte
number which identifies a network card. It is typically written in hexadecimal notation
where the bytes are separated by colons, such as 00:17:3A:5E:CB:08.
MSI Message Signalled Interrupts, as supported by modern chipsets such as the ICH9; see chapter 3.4.1, “Motherboard” tab, page 43. As opposed to traditional pin-based interrupts, with
MSI, a small amount of data can accompany the actual interrupt message. This reduces
the amount of hardware pins required, allows for more interrupts and better performance.
270
Glossary
N
NAT Network Address Translation. A technique to share networking interfaces by which an
interface modifies the source and/or target IP addresses of network packets according to
specific rules. Commonly employed by routers and firewalls to shield an internal network
from the Internet, VirtualBox can use NAT to easily share a host’s physical networking
hardware with its virtual machines. See chapter 6.3, Network Address Translation (NAT),
page 85.
O
OVF Open Virtualization Format, a cross-platform industry standard to exchange virtual appliances between virtualization products; see chapter 1.12, Importing and exporting virtual
machines, page 26.
P
PAE Physical Address Extension. This allows accessing more than 4 GB of RAM even in 32-bit
environments; see chapter 3.3.2, “Advanced” tab, page 42.
PIC See APIC.
PXE Preboot Execution Environment, an industry standard for booting PC systems from remote
network locations. It includes DHCP for IP configuration and TFTP for file transfer. Using
UNDI, a hardware independent driver stack for accessing the network card from bootstrap
code is available.
R
RDP Remote Desktop Protocol, a protocol developed by Microsoft as an extension to the ITU
T.128 and T.124 video conferencing protocol. With RDP, a PC system can be controlled
from a remote location using a network connection over which data is transferred in both
directions. Typically graphics updates and audio are sent from the remote machine and
keyboard and mouse input events are sent from the client. A VirtualBox extension package
by Oracle provides VRDP, an enhanced implementation of the relevant standards which is
largely compatible with Microsoft’s RDP implementation. See chapter 7.1, Remote display
(VRDP support), page 90 for details.
S
SAS Serial Attached SCSI, an industry standard for hard disk interfaces. See chapter 5.1, Hard
disk controllers: IDE, SATA (AHCI), SCSI, SAS, page 71.
SATA Serial ATA, an industry standard for hard disk interfaces. See chapter 5.1, Hard disk
controllers: IDE, SATA (AHCI), SCSI, SAS, page 71.
SCSI Small Computer System Interface. An industry standard for data transfer between devices,
especially for storage. See chapter 5.1, Hard disk controllers: IDE, SATA (AHCI), SCSI, SAS,
page 71.
271
Glossary
SMP Symmetrical Multiprocessing, meaning that the resources of a computer are shared between several processors. These can either be several processor chips or, as is more common with modern hardware, multiple CPU cores in one processor.
T
TAR A widely used file format for archiving. Originally, this stood for “Tape ARchive” and was
already supported by very early Unix versions for backing up data on tape. The file format
is still widely used today, for example, with OVF archives (with an .ova file extension); see
chapter 1.12, Importing and exporting virtual machines, page 26.
U
UUID A Universally Unique Identifier – often also called GUID (Globally Unique Identifier) – is
a string of numbers and letters which can be computed dynamically and is guaranteed to
be unique. Generally, it is used as a global handle to identify entities. VirtualBox makes
use of UUIDs to identify VMs, Virtual Disk Images (VDI files) and other entities.
V
VM Virtual Machine – a virtual computer that VirtualBox allows you to run on top of your actual
hardware. See chapter 1.2, Some terminology, page 10 for details.
VMM Virtual Machine Manager – the component of VirtualBox that controls VM execution. See
chapter 10.2, VirtualBox executables and components, page 155 for a list of VirtualBox components.
VRDE VirtualBox Remote Desktop Extension. This interface is built into VirtualBox to allow
VirtualBox extension packages to supply remote access to virtual machines. A VirtualBox
extension package by Oracle provides VRDP support; see chapter 7.1, Remote display (VRDP
support), page 90 for details.
VRDP See RDP.
VT-x The hardware virtualization features built into modern Intel processors. See chapter 10.3,
Hardware vs. software virtualization, page 157.
X
XML The eXtensible Markup Language, a metastandard for all kinds of textual information. XML
only specifies how data in the document is organized generally and does not prescribe how
to semantically organize content.
XPCOM Mozilla Cross Platform Component Object Model, a programming infrastructure developed by the Mozilla browser project which is similar to Microsoft COM and allows applications to provide a modular programming interface. VirtualBox makes use of XPCOM on
Linux both internally and externally to provide a comprehensive API to third-party developers.
272