1
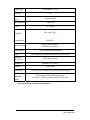
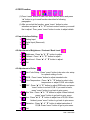
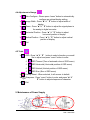
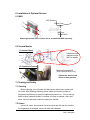
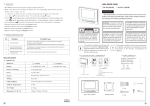
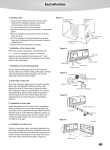
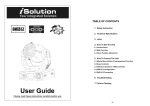
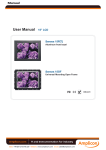
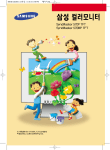
Touch LCD Monitor User Manual Index of Contents 1 Version v1.01 Date: 20/07/2006 1. Specification ............................................................................... 2 2. Control Panel .............................................................................. 4 3. I/O Connector .............................................................................. 4 3.1 USB Interface for Touch Panel............................................... 4 3.2 RS-232 Interface for Touch Panel .......................................... 4 4. OSD Function.............................................................................. 5 4.1 Input Interface Setting ............................................................ 5 4.2 Adjustment of Brightness / Contrast / Back Level .................. 5 4.3 Adjustment of Color................................................................ 5 4.4 Adjustment of Image .............................................................. 6 4.5 Tools....................................................................................... 6 5. Maintenance of Power Supply ................................................... 6 6. Installation of Optional Devices ................................................ 7 6.1 MSR ....................................................................................... 7 6.2 Second Monitor ...................................................................... 7 7. Cleaning and Safety ................................................................... 7 7.1 Cleaning ................................................................................. 7 7.2 Screen.................................................................................... 7 7.3 Case....................................................................................... 8 7.4 Safety ..................................................................................... 8 Attention 1. This manual contains important information for the proper maintenance and setup of the product. Before setup and use of the product, please read through this manual carefully. 2. This manual shall apply only to the included product(s). 3. If there is any problem found on products, please ask a qualified service technician to check. Please do NOT try to repair by yourself. The damage caused by incorrect operation and repair is NOT included in warranty. 4. The specifications may be modified without any advance notice. Please inquire your supplier for latest specification, driver, or manual. 1. Specification MODEL XTS4000 SPEC 2 Version v1.01 Date: 20/07/2006 Display Type Active Matrix TFT LCD LCD Size Display Area (mm) 15" 304(W) x 228(H) Max. Resolution 1024 x 768 Colors 16.7 million Brightness 250~ cd/m² (Typ.) Contrast Ratio Input Connector Power Supply Color Dimension (W x H x D) Temperature 300~500 : 1 D-SUB 15 PIN Female x 1 24 PIN DVI Connector x 1 12V / 3A External Power Adapter Whole Black Color or Black Color with Silver Front Panel 378 x 348 x 226 mm Operation : 0°C to 40°C Humidity Touch Panel Optional Integrated Device 10% to 90% TW 5-wrie or ELO Resistive Touch Panel (USB or RS-232) VFD Customer Display, MSR Card Reader, Second 15”” LCD Screen with or without Touch Panel Brightness is measured when the touch panel is not equipped. Please note that touch panel will have influence on brightness. 3 Version v1.01 Date: 20/07/2006 2. Control Panel ¡ ¡ ¶ MENU Push Button Description of Function Power On/Off MENU ▲▼ OSD Menu & Confirmation Change and Selection for Detail of Each Setting Reserved 3. I/O Connector I/O 3.1 USB Interface for Touch Panel DVI USB Port for Touch Panel Signal Port VGA Signal Port 12V Power Input 3.2 RS-232 Interface for Touch Panel DVI Signal Port VGA Signal Port 4 12V Power RS-232 Port for Input Touch Panel Version v1.01 Date: 20/07/2006 4. OSD Function (1) Press “menu” button to start OSD menu shown above and press “▲” button to go to each function described in following paragraphs. (2) After you select the function, press “menu” button to enter submenu and press “▲” & ” ▼” button to select function you would like to adjust. Then, press “menu” button to enter to adjust details. 4.1 Input Interface Setting ¾ ¾ ¾ Analog Input Digital Input (Reserved) Exit 4.2 Adjustment of Brightness / Contrast / Back Level ¾ ¾ ¾ ¾ Brightness : Press “▲” & ” ▼” button to adjust. Contrast : Press “▲” & ” ▼” button to adjust. Black Level : Press “▲” & ” ▼” button to adjust. Exit 4.3 Adjustment of Color ¾ ¾ ¾ ¾ ¾ ¾ ¾ ¾ Auto Color Setup : Press “menu” button to do auto color setup for optimal setting of color. sRGB : Press “menu” button to adjust standard color. Color Temperature : Press “▲” & ” ▼” button to select color temperature or adjust R.G.B. color depth. CMY : Press “▲” & ” ▼” button to adjust RGB color and press “menu” button to select R,G,B. If you want to leave, press “menu” button to go back to prior menu. Skin Tone : Press “▲” & ” ▼” button to adjust. When finished, press “menu” button to go back to prior menu. Hue : Press “▲” & ” ▼” button to adjust hue of R,G,B. When finished, press “menu” button to go back to prior menu. Saturation : Press “▲” & ” ▼” button to adjust saturation of R,G,B. Press “menu” button to go to prior menu. Exit 5 Version v1.01 Date: 20/07/2006 4.4 Adjustment of Image ¾ ¾ ¾ ¾ ¾ ¾ Auto-Configure : Please press “menu” button to automatically configure an optimal display setting. Image Width : Press “▲” & ” ▼” button to adjust width of display. Phase : Press “▲” & ” ▼” button to adjust the signal phase in the analog to digital converter. Horizontal Position : Press “▲” & ” ▼” button to adjust horizontal position of display. Vertical Position : Press “▲” & ” ▼” button to adjust vertical position of display. Exit 4.5 Tools ¾ ¾ ¾A ¾ OSD : Press “▲” & ” ▼” button to select a function you would like to adjust and press “menu” button to enter. OSD Timeout (Time of automatic close of OSD menu) OSD Horizontal (Horizontal position of OSD menu) OSD Vertical (Vertical position of OSD menu) OSD Size (Size of OSD menu) Factory Reset : When selected, it will recover to default. Sharpness : Press “menu” button to enter and press “▲” & ” A ▼” button to adjust sharpness of character. Exit 5. Maintenance of Power Supply 6 Version v1.01 Date: 20/07/2006 6. Installation of Optional Devices 6.1 MSR LCD Surface Plastic Case Machine Screws M3*5 # Both right and left side of screen can be screwed with MSR separately. 6.2 Second Monitor (1) Internal Stand Install stand with machine screws M3*5 w/ washer (2) Combine to System Machine Screws M4*8 (Round Head & Black Color) Please use short screw driver on this process. 7. Cleaning and Safety 7.1 Cleaning Before cleaning, turn off power and disconnect cables from system and AC outlet. After finishing cleaning, please make sure that the monitor is completely dry before you reconnect cables and power it on. Do not use any liquid or spray cleaners directly on surface of screen or cabinet. Use a soft, clean, lint-free cloth with cleaners to clear your monitor. 7.2 Screen Use a soft, clean, lint-free cloth to remove dust and dirt from the monitor. For fingerprints & smudges, use a soft cloth with cleaners. 7 Version v1.01 Date: 20/07/2006 7.3 Case Clean cabinet of monitor with a soft cloth slightly moistened with a mild detergent solution. Rinse the cloth with clean water, wring it dry, and wipe down the cabinet to remove any detergent residue. 7.4 Safety (1) To reduce risk of electric shock, please follow all safety notices, never open case of products, and turn off power before cleaning. (2) The product comes with a power cord. (The type of power cord may be different according to different countries.) The power cord plug will only fit into a safety ground outlet. Do not attempt to fit the plug into an outlet that has not been configured for this purpose. Please only use power cord that comes with the product. Using an unauthorized power cord may invalidate the warranty of the product. (3) Do not insert any object or block the inside four edges of the screen. (4) Do not pour liquid into or onto product or wash with a wet cloth. If the products becomes wet, please do not turn on or attempt to repair. Ask a qualified service technician to check it for you before you turn on the power again. (5) Use products under suitable environment described in the specification (6) Keep the products away from bumps and drops. (7) Keep the products away from dust, sand, and dirt. 8 Version v1.01 Date: 20/07/2006