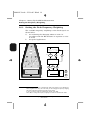
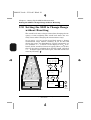
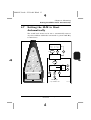
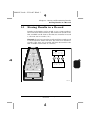
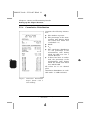
1
bb090913.book : Front Black 1
Precision Integrating
Sound Level Meter
Type
Type
Type
Type
2236
2236
2236
2236
A – 009
B – 009
C –009
D – 009
With software version 2.1 or higher
Revision
November 1996
Brüel & Kjær
BB0909–13
bb090913.book : Front Black 2
Trademarks
IBM is a registered trademark of International Business Machines
Inc., USA
Copyright © 1993, 1996, Brüel&Kjær Sound & Vibration Measurement A/S
All rights reserved. No part of this publication may be reproduced
or distributed in any form, or by any means, without prior consent
in writing from Brüel & Kjær Sound & Vibration Measurment A/S,
Nærum, Denmark.
0–2
Precision Integrating Sound Level Meter Type 2236
User Manual
Brüel & Kjær
bb090913.book : bb090913_TOC.doc Black 3
Contents
Useful Information
Describes the sound level meter and its general operating principles.
An Example Measurement
A familiarization guide which explains, step by step, a typical
measurement.
Setting Up the SLM for Measurement
Measuring
4
How to calibrate and measure with the sound level meter.
Storing and Transferring Results
5
What you are able to do with your results.
Specifications
The specifications and information regarding other equipment
available for use with the sound level meter.
Service and Repair
6
7
Service and repair of the sound level meter.
Appendices
Explains specific terminology used in the manual and contains
instructions on how to control the sound level meter from a
computer.
Precision Integrating Sound Level Meter Type 2236
User Manual
2
3
How to prepare the sound level meter for measuring.
BB0909–13
1
0–3
8
bb090913.book : bb090913_TOC.doc Black 4
Index
Fold
Out
Controls, Display and Sockets
An overview of the sound level meter’s pushkeys, controls and main
display.
0–4
Precision Integrating Sound Level Meter Type 2236
User Manual
Brüel & Kjær
bb090913.book : 2236-ch1_TOC.doc Black,Blue 1
Chapter 1
Useful Information
1.1
About this Manual ..............................................................
1– 2
1.2
About the Type 2236 Sound Level Meter .................
1– 2
Parameters.........................................................................
Settings ..............................................................................
Data Operations ................................................................
Memory ..............................................................................
1–2
1–3
1–7
1–9
1.3
Practical Hints ....................................................................
BB0909–13
Precision Integrating Sound Level Meter Type 2236
User Manual
1 – 10
1–1
bb090913.book : 2236-ch1 Black 2
Chapter 1 – Useful Information
About this Manual
1.1
About this Manual
Figures are used to guide you through using the pushkeys.
Please note the following when using the figures:
n× Press this pushkey n times
OK Press this to save any changes made in connection with
the Settings or 〈Data〉 pushkeys
NO Press this to return to the screen indicated without saving any changes made
1.2
About the Type 2236 Sound Level
Meter
1.2.1
Parameters
Precision Integrating Sound Level Meter Type 2236 is a Type
1 sound level meter complying with BS 5969 and BS 6698. It
can measure the following parameters:
●
MaxL: maximum SPL since the last reset
●
MinL: minimum SPL since the last reset
●
MaxP: maximum Peak level since the last reset
●
Peak: maximum Peak level in 1s interval
●
SPL: maximum RMS level in 1s interval (according to
IEC 651)
●
Leq: equivalent continuous sound level (Leq according to
IEC 804)
●
LIm: equivalent continuous impulse sound level (if time
weighting is I) (LIm according to IEC 804, Appendix B)
●
SEL: Sound Exposure Level (if A-weighted, then = LEA,
according to IEC 804)
●
IEL: Impulse Sound Exposure Level (if time weighting is
I)
1–2
Precision Integrating Sound Level Meter Type 2236
User Manual
Brüel & Kjær
bb090913.book : 2236-ch1 Black 3
Chapter 1 – Useful Information
About the Type 2236 Sound Level Meter
●
LEPd: Daily Personal Noise Exposure Level (see section
8.2)*
●
LN(3) (default L90): RMS level exceeded N3% of the meas-
urement time (LN(3))†
●
LN(2) (default L10): RMS level exceeded N2% of the meas-
urement time (LN(2))†
●
LN(1) (default L1): RMS level exceeded N1% of the meas-
urement time (LN(1))†
●
OVL: Input signal overloading instrument (% of the measurement time)
In addition, Precision Integrating Sound Level Meter Types
2236 C–009 and 2236 D–009 contain 1/1-octave filter sets
between 31.5 Hz and 8 kHz which comply with BS 2475
(1964). They can measure all the above-mentioned parameters in each of the filter bands.
1.2.2
Settings
Checking and Changing the Settings
The sound level meter’s Settings are additional to the basic
measurement set-up. They are very useful and are based on
a very simple principle (see the example in Fig. 1.1). There
are eleven of them in all:
●
Auto Logging
●
Calibration
●
Peak Weighting
●
Date and Time
●
Auto Start
●
Change Range Reset
●
Contrast
●
Percentiles
* Not available with I time weighting
† Not available with I time weighting
BB0909–13
Precision Integrating Sound Level Meter Type 2236
User Manual
1–3
bb090913.book : 2236-ch1 Black 4
Chapter 1 – Useful Information
About the Type 2236 Sound Level Meter
●
Exposure Time
●
Interface
●
Output Formats
Checking
You can check the first of the sound level meter’s Settings by
pressing the 〈Show〉 pushkey. You can then step through
them by pressing 〈Show〉. However, the Settings are cyclic
and you can step forwards and backwards through them using Parameter 〈▲〉 and 〈 ▼〉, respectively (see Fig. 1.1).
30
.... 110
00:00:00
F SPL
58.6 dBA
Show
Previous
Setting
AUTO LOGGING
Parameter
▼
to log
Show or Parameter
▼
Next
Setting
-every 1 s.
(Leq L10 L90)
Edit
AUTO LOGGING
to log
▼
▼
Level
Previous
parameter
Parameter
-every 1 s.
▼
Level
▼
(Leq L10 L90)
Edit
or Parameter
▼
Next
parameter
931085/1e
Fig.1.1
Principle of checking and changing the sound level meter’s Settings
Changing
When you reach a Setting you want to change, press 〈Edit〉.
A cursor ( ) appears on the first set-up line you can change.
1–4
Precision Integrating Sound Level Meter Type 2236
User Manual
Brüel & Kjær
bb090913.book : 2236-ch1 Black 5
Chapter 1 – Useful Information
About the Type 2236 Sound Level Meter
If there are other set-up lines on the screen, you can move
the cursor to them using Level 〈▲〉 and 〈▼〉.
When the cursor is on the set-up line of the Setting you want
to change, press Parameter 〈▲〉 and 〈▼〉 to step through
the available parameters. You can also step through them by
pressing 〈Edit〉 (see Fig. 1.1).
When you have the set-up you desire for that Setting, press
〈OK〉 to save the changes and check the changed Setting. An
accept cursor (■) replaces the edit cursor ( ) to show that the
sound level meter has accepted the change.
If you change a Setting by mistake, press 〈NO〉 instead of
〈OK〉 to revert to its previous set-up.
Fig. 1.2 shows an overview of the available Settings.
BB0909–13
Precision Integrating Sound Level Meter Type 2236
User Manual
1–5
bb090913.book : 2236-ch1 Black 6
Chapter 1 – Useful Information
About the Type 2236 Sound Level Meter
30
PAUSE
F SPL
.... 110
00:00:00
58.6 dBA
Show
OK
OUTPUT FORMATS
Show
AUTO LOGGING
NO
NO
Show
OK
INTERFACE
Show
OK
CALIBRATION
NO
NO
Show
OK
EXPOSURE TIME
NO
Show
OK
PEAK WEIGHTING
NO
Show
OK
PERCENTILES
Show
OK
DATE/TIME
NO
NO
Show
OK
CONTRAST
Show
OK
AUTO START
NO
NO
OK
Show
Show
OK
NO
CHANGE RANGE
931084/2e
Fig.1.2 An overview of the sound level meter’s Settings
1–6
Precision Integrating Sound Level Meter Type 2236
User Manual
Brüel & Kjær
bb090913.book : 2236-ch1 Black 7
Chapter 1 – Useful Information
About the Type 2236 Sound Level Meter
Fast Edit
In addition to the normal way of changing the set-up of a
Setting (that is, pressing 〈Show〉, stepping through to the
desired “Setting” and pressing 〈Edit〉), you can also use two
pushkeys together to “fast edit” a Setting (that is, go directly
to a Setting with the edit cursor).
If you press 〈Edit〉 and, within three seconds, the pushkey
indicated in Table 1.1, the selected Setting appears with the
edit cursor ( ). You can now check and change the set-up of
the Setting as described earlier in this section. When you
have finished changing the Setting, pressing 〈NO〉 or 〈OK〉,
however, returns you to the main screen.
Fast Edit Pushkey (Edit +) ...
Level ▲ or ▼
Parameter ▲ or ▼ (Disp. param.: Peak, MaxP)
Parameter ▲ or ▼ (Disp. param.: LN)
Parameter ▲ or ▼ (Disp. param.: LEP,d)
Data
▼
▼
0
OK
... Goes to Setting
Calibration
Peak Frequency Weighting
Percentiles
Exposure Time
Output Formats
Change Range with Reset
Contrast
Auto Start
Status (only via Fast Edit)
Table 1.1 Fast edit pushkeys and the Settings accessed. Where display
parameters are shown in parenthesis (for example, (Disp. param.: LN)), then the display must be showing the indicated
parameter (in this example, LN) when the Fast Edit keys are
pressed to go to the indicated setting (in this example, Percentiles)
1.2.3
Data Operations
The sound level meter’s 〈Data〉 pushkey allows you to print
your measurement results (data) and control the sound level
meter’s memory. It operates on a similar principle as Settings
(see section 1.2.2) except that you press 〈Data〉 instead of
〈Show〉. In addition, the sound level meter returns to the
BB0909–13
Precision Integrating Sound Level Meter Type 2236
User Manual
1–7
bb090913.book : 2236-ch1 Black 8
Chapter 1 – Useful Information
About the Type 2236 Sound Level Meter
main screen after you have accepted changes to the selected
operation. There are four data operations, each with its own
screen:
●
Print
●
Store
●
Recall
●
Erase
Fig. 1.3 shows an overview of the data operations.
30
PAUSE
F SPL
NO
OK
Data
.... 110
00:00:00
58.6 dBA
Data
PRINT
ERASE
NO
OK
Data
Data
OK
NO
RECALL
STORE
NO
Data
OK
930791/2e
Fig.1.3
1–8
An overview of the data operations available via the Data pushkey
Precision Integrating Sound Level Meter Type 2236
User Manual
Brüel & Kjær
bb090913.book : 2236-ch1 Black 9
Chapter 1 – Useful Information
About the Type 2236 Sound Level Meter
1.2.4
Memory
The sound level meter has three types of memory:
●
Buffer
●
Log
●
Memory
Buffer
Contains the set-up and all results for the current measurement (i.e. since the last reset) – see section 1.2.1. From these,
the cumulative and level distributions and the Overall Results are calculated. The buffer is updated once a second.
Log
Contains the automatically Logged Results (see section 5.5.2):
●
Leq
●
L10
●
L90
●
measurement time of results (if logging period is not
0.1 sec)
Precision Integrating Sound Level Meter Types 2236 A–009
and C–009 can contain up to 21600 sets of results (i.e. up to
64800 results with their measurement times). This is enough
to log, for example, 2months of Leq, L10 and L90 values logged
every 5 minutes.
Precision Integrating Sound Level Meter Types 2236 B–009
and D–009 can contain up to 86400 sets of results (i.e. up
to 259200 results with their measurement times). This is
enough to log, for example, 8months of Leq, L10 and L90
values logged every 5 minutes.
Memory
Contains the Overall Results which you have manually stored
in a Record together with the set-up. Can contain up to 40
Records.
BB0909–13
Precision Integrating Sound Level Meter Type 2236
User Manual
1–9
bb090913.book : 2236-ch1 Black 10
Chapter 1 – Useful Information
Practical Hints
Overall Results consist of:
●
MaxL
●
MinL
●
MaxP
●
Leq (or LIm)
●
SEL (or IEL)
●
LEP,d
●
Exposure Time
●
Ovl
●
LN1 (default L1)
●
LN2 (default L10)
●
LN3 (default L90)
●
Frequency weighting of RMS
signal
●
Frequency weighting of Peak
signal
●
Time weighting
●
Measurement range
●
Elapsed measurement time
●
Start date and time of measurement
●
Number of pauses
measurement
during
Note: The three LN values in Overall Results are fixed as
the selected LNs when the results were stored. You can, therefore, only see these three LN values after recalling Overall
Results.
1.3
Practical Hints
The sound level meter is designed as a self-contained unit to
meet the requirements given in IEC 651 and similar national
standards. However, some of the requirements given in the
standards are based on measurements of pure tones under
free field conditions. Practical measurements under similar
conditions require the following extra precautions:
1 – 10
●
Do not stand close to the sound level meter
●
Do not use a windscreen or protective cover
●
Using a microphone extension cable, increase the distance between the microphone and any objects which can
cause disturbances
Precision Integrating Sound Level Meter Type 2236
User Manual
Brüel & Kjær
bb090913.book : 2236-ch1 Black 11
Chapter 1 – Useful Information
Practical Hints
The influence of your presence on the measurement can easily
be checked by changing the distance between you and the
microphone and observing the change in the measured sound
pressure level. If your position influences the measurement
result, then use a microphone extension cable or spatially
average your measurements (that is, measure at different
positions and average the results). Note that, when dealing
with pure tones, a small change in the position of the microphone can influence the result just as much as your physical
presence.
Fortunately, the combination of free sound field and pure
tones is very rare. With sound coming from several directions
and as you are measuring over a broad frequency band, the
influence of the sound level meter’s housing, tripod and user
becomes insignificant, and the above precautions need not be
taken.
Figs. 6.8 and 6.9 show the influence of Tripod UA 0801 and
Protective Cover UA 1236 under free field conditions and with
pure tones.
BB0909–13
Precision Integrating Sound Level Meter Type 2236
User Manual
1 – 11
bb090913.book : 2236-ch1 Black 12
1 – 12
Precision Integrating Sound Level Meter Type 2236
User Manual
Brüel & Kjær
bb090913.book : 2236-ch2_TOC.doc Black,Blue 1
Chapter 2
An Example Measurement
2.1
Introduction ...........................................................................
2– 2
2.2
Making a Measurement ...................................................
2– 2
BB0909–13
Precision Integrating Sound Level Meter Type 2236
User Manual
2–1
bb090913.book : 2236-ch2 Black 2
Chapter 2 – An Example Measurement
Introduction
2.1
Introduction
This chapter guides you through the basic functions of the
sound level meter by instructing you on how to make a noise
measurement in a free sound field. You can find further information on the various steps in the relevant sections of the
User Manual.
It is a good idea to have the fold-out back cover open so that
you have an annotated illustration of the sound level meter
in front of you while you follow the example measurement.
We have assumed that the sound level meter is switched off
and has not been used before following these instructions. If
it has, ensure that you are using the default set-up (see
section 3.3) before following the steps below.
We have also assumed that you will calibrate the sound level
meter with Sound Level Calibrator Type 4231 and that you
will print out your results using Serial Printer WQ 1138.
2.2
Making a Measurement
Switching On
1.
Press
.
The sound level meter switches on. After a self-test, the
sound level meter is set up in Pause mode in the default
set-up. The quasi-analogue scale shows the input signal
to the preamplifier and displayed parameter shows the
current SPL. The buffer, log and memory are empty.
Since the displayed parameter (SPL) is an RMS parameter, you can see the frequency weighting of the RMS
signal (shown in the bottom right-hand corner of the
screen). See the fold out back cover for more details of
the main screen.
2–2
Precision Integrating Sound Level Meter Type 2236
User Manual
Brüel & Kjær
bb090913.book : 2236-ch2 Black 3
Chapter 2 – An Example Measurement
Making a Measurement
Calibrating the Sound Level Meter
2.
Press 〈Show〉.
The screen shows the default Auto Logging screen.
3.
Press Parameter 〈▲〉.
The screen changes to the Calibration screen. It shows
the current calibration factor.
4.
Press 〈Edit〉.
▼
The screen shows the calibration set-up (see Fig. 2.1).
CALIBRATION
Calibr. level:
94.0 dB
930989/1e
Fig.2.1 The calibration set-up screen
5.
Read the correct calibration level from the calibrator’s
calibration chart and use Parameter 〈▲〉 and 〈▼〉 to set
the sound level meter to this level.*
6.
Fit the calibrator onto the sound level meter and rest the
sound level meter on a table or other flat surface. Ensure
that the calibrator fits snugly on the microphone.
7.
Switch on the calibrator.
The calibrator emits the 1 kHz calibration signal.
8.
Press 〈OK〉.
* Sound Level Calibrator Type 4231 provides a nominal calibration signal of 94dB at 1 kHz.
However, each calibrator is slightly different. It is, therefore, important to set the calibration
level to the one given on the calibration chart for the calibrator used.
BB0909–13
Precision Integrating Sound Level Meter Type 2236
User Manual
2–3
bb090913.book : 2236-ch2 Black 4
Chapter 2 – An Example Measurement
Making a Measurement
The sound level meter checks the calibration signal
against the calibration level you set in step 5. It then
asks if you want to calibrate according to the expected
level.
9.
Press 〈OK〉.
The sound level meter calibrates itself according to the
calibration level you set in step 5 and returns to the
Calibration screen, which now shows the new calibration
factor.
10. Press 〈OK〉.
The sound level meter returns to the main screen.
Checking the Weightings
11. With sound level meters without filter sets (Types
2236 A–009 and 2236 B–009), press 〈Frequency Wt.〉
three times.
The frequency weighting of the RMS signal (displayed in
the bottom right-hand corner of the screen) changes
through the three available weightings.
12. With sound level meters with filter sets (Types
2236 C–009 and 2236 D–009), press 〈Frequency Wt.〉
twelve times.
The frequency weighting of the RMS signal (displayed in
the bottom right-hand corner of the screen) changes
through the three available total weightings and the nine
available octave filters (displayed at the left-hand side of
the screen under the quasi-analogue scale). It then returns to the original frequency weighting of the RMS
signal.
13. Press 〈F/S/I〉 three times.
The time weighting displayed in the bottom left-hand
corner of the screen changes through the three available
weightings.
2–4
Precision Integrating Sound Level Meter Type 2236
User Manual
Brüel & Kjær
bb090913.book : 2236-ch2 Black 5
Chapter 2 – An Example Measurement
Making a Measurement
Setting up the Sound Level Meter to Log
14. Press 〈Show〉.
The screen shows the default Auto Logging screen (see
Fig. 2.2). You can see that the sound level meter is set
up so that it doesn’t store Logged Results in its log.
AUTO LOGGING
Off
930990/1
Fig.2.2 The default Auto Logging set-up screen
15. Press 〈Edit〉.
You can now set up the sound level meter to automatically
store Logged Results in its log.
16. Press Parameter 〈▲〉.
▼
The screen changes to the Auto Logging set-up screen
shown in Fig. 2.3. You can see that the sound level meter
is set up to automatically store Logged Results (Leq, L10
and L90) in its log every 1s.
AUTO LOGGING
to log
-every 1 s.
(Leq L10 L90)
931086/1e
Fig.2.3 One of the Auto Logging set-up screens
BB0909–13
Precision Integrating Sound Level Meter Type 2236
User Manual
2–5
bb090913.book : 2236-ch2 Black 6
Chapter 2 – An Example Measurement
Making a Measurement
17. Press 〈OK〉 twice.
The sound level meter returns to the main screen.
You are now ready to start an A-weighted measurement
of noise with a FAST time weighting. Leq, L10 and L90
will be automatically logged into the sound level meter’s
log.
Measuring
18. Select an appropriate measurement range using Level
〈▲〉 or 〈▼〉.
An appropriate measurement range is when the signal
remains on the quasi-analogue scale at all times and no
overload (indicated by + in the upper right-hand corner
of the screen) occurs.
Note: It is important to select an appropriate measurement range before starting to measure as, if you change
the range, either the sound level meter will reset, or the
distributions and LNs will not be available.
0
▼
19. Press
.
20. Press
▼
This clears the sound level meter’s buffer of results and
sets the elapsed time to zero.
.
The sound level meter starts measuring. The timer on
the right-hand side of the screen starts counting the
elapsed measurement time. The A-weighted SPL is
shown at the bottom of the screen. After each second, the
Leq, L10 and L90 are transferred to the sound level meter’s
log.
21. Use Parameter 〈▲〉 or 〈▼〉 to look at the various parameters available.
The quasi-analogue scale always shows the SPL, regardless of the selected parameter. Note that, when a Peak
parameter is selected, the frequency weighting of the
Peak signal is shown. Note also that, when changing the
parameter, the sound level meter does not reset.
2–6
Precision Integrating Sound Level Meter Type 2236
User Manual
Brüel & Kjær
bb090913.book : 2236-ch2 Black 7
22. After a few minutes, press
▼
Chapter 2 – An Example Measurement
Making a Measurement
.
The sound level meter stops measuring and logging. The
timer shows the total measurement time.
Checking the Sound Level Meter’s Calibration
23. Press 〈Show〉.
The screen shows the default Auto Logging screen.
24. Press Parameter 〈▲〉.
The screen changes to the Calibration screen.
25. Press 〈Edit〉.
The screen shows the calibration set-up from before the
measurement.
26. Fit the calibrator onto the sound level meter and rest the
sound level meter on a table or other flat surface. Ensure
that the calibrator fits snugly on the microphone.
27. Switch on the calibrator.
The calibrator emits the 1kHz calibration signal.
28. Press 〈OK〉.
The sound level meter checks the calibration signal
against the calibration level you set in step 5. They should
be the same. If they are not, note the difference for inclusion in your measurement report.
29. Press 〈NO〉 twice.
The sound level meter returns to the Calibration screen
and then to the main screen without being recalibrated.
Storing Results in the Sound Level Meter’s Memory
30. Press 〈Data〉.
The first Data screen (Print Set-up) appears.
BB0909–13
Precision Integrating Sound Level Meter Type 2236
User Manual
2–7
bb090913.book : 2236-ch2 Black 8
Chapter 2 – An Example Measurement
Making a Measurement
31. Press Parameter 〈▲〉.
The Store Set-up screen (see Fig. 2.4) appears.
STORE
Overall Results
-as Rec. No. 1
930996/1e
Fig.2.4 The Store Set-up screen
32. Press 〈OK〉.
The Overall Results of the measurement you have just
made are stored as Record No.1 in the sound level meter’s
memory.
Printing out Overall Results
Warning! When connecting the sound level meter to the
printer, ensure that both the printer and the sound level
meter are switched off. Otherwise the instruments could be
damaged.
33. Switch the sound level meter off. Connect it to Serial
Printer WQ 1138 via the Serial Interface socket on the
base of the sound level meter using 9-pole Cable with 25pole Adaptor AO1386.
34. Switch the sound level meter on.
35. Hold down the printer’s 〈On Line〉 pushkey and switch
the printer on.
The printer prints its set-up.
36. Ensure that the printer’s baud rate is 9600 (see the printer’s instruction manual for details on how to change its
baud rate).
2–8
Precision Integrating Sound Level Meter Type 2236
User Manual
Brüel & Kjær
bb090913.book : 2236-ch2 Black 9
Chapter 2 – An Example Measurement
Making a Measurement
The sound level meter is set, by default, to output the
overall results with a short heading at a baud rate of
9600. To get a print-out, the printer and the sound level
meter must have the same baud rate.
37. Press 〈Data〉.
The Print Set-up screen appears (see Fig. 2.5).
PRINT
Overall Results
930997/1e
Fig.2.5 The default Print Set-up screen
38. Press 〈OK〉.
The printer prints the Overall Results (see section 1.2.4)
together with a short heading containing the measurement set-up (the frequency weightings of the RMS and
Peak signals, the time weighting and the measurement
range). After transferring the results to the printer, the
sound level meter displays the main screen.
BB0909–13
Precision Integrating Sound Level Meter Type 2236
User Manual
2–9
bb090913.book : 2236-ch2 Black 10
2 – 10
Precision Integrating Sound Level Meter Type 2236
User Manual
Brüel & Kjær
bb090913.book : 2236-ch3_TOC.doc Black,Blue 1
Chapter 3
Setting Up the SLM for
Measurement
3.1
Mounting the Microphone ...............................................
3– 3
3.2
Fitting Batteries ..................................................................
3– 4
Replacing Batteries ........................................................... 3 – 5
Using an External Power Supply ..................................... 3 – 6
The Back-up Battery ......................................................... 3 – 6
3.3
Switching the SLM On and Off.....................................
3– 8
3.4
Setting the Measurement Range .................................
3– 9
3.5
Setting the Time Weighting .........................................
3 – 11
3.6
Setting the Frequency Weighting ..............................
3 – 12
Introduction ..................................................................... 3 – 12
Setting the RMS Frequency Weighting ......................... 3 – 12
Setting the Peak Frequency Weighting ......................... 3 – 14
BB0909–13
Precision Integrating Sound Level Meter Type 2236
User Manual
3–1
bb090913.book : 2236-ch3_TOC.doc Black,Blue 2
Chapter 3 – Setting Up the SLM for Measurement
3.7
Setting the Percentiles ...................................................
3 – 15
3.8
Setting the Exposure Time ...........................................
3 – 17
3.9
Setting the Date and Time............................................
3 – 18
3.10 Setting the SLM to Change Range
without Resetting ..............................................................
3 – 20
3.11 Setting up Auto Logging ................................................
3 – 21
3.12 Setting the Viewing Conditions ..................................
3 – 24
3–2
Precision Integrating Sound Level Meter Type 2236
User Manual
Brüel & Kjær
bb090913.book : 2236-ch3 Black 3
Chapter 3 – Setting Up the SLM for Measurement
Mounting the Microphone
3.1
Mounting the Microphone
Before mounting the microphone, note the following precautions:
●
When screwing in the microphone, input stage, protection
grid and extension cables, do it gently to avoid damaging the threads.
●
Do not touch the diaphragm with any object — it is very
delicate. Small amounts of dust on the diaphragm will
not affect the microphone response.
Mounting the Microphone and Input Stage
1.
Gently screw Microphone Type 4188 (supplied with the
sound level meter) onto Input Stage ZC 0025.
2.
Insert the input stage into the input stage socket and
secure by turning the threaded retaining ring (see
Fig. 3.1).
Connecting the Microphone Extension Cable
1.
Gently screw Microphone Type 4188 (supplied with the
sound level meter) onto Input Stage ZC 0025.
2.
Insert the input stage into Microphone Extension Cable
AO 0408 (3 m) or AO 0409 (10 m) and secure by turning
the threaded retaining ring.
3.
Insert the other end of the microphone extension cable
into the input stage socket and secure by turning the
threaded retaining ring (see Fig. 3.2).
Note: Connecting a recommended microphone extension cable has no effect on the sound level meter’s calibration. Therefore, you do not have to recalibrate after connecting one of
the recommended microphone extension cables.
BB0909–13
Precision Integrating Sound Level Meter Type 2236
User Manual
3–3
bb090913.book : 2236-ch3 Black 4
Chapter 3 – Setting Up the SLM for Measurement
Fitting Batteries
Fig.3.1
Mounting the input stage and microphone onto the sound level
meter
3.2
Fitting Batteries
Important:
Before removing batteries or disconnecting a power supply
from the sound level meter, make sure the instrument is
switched off from the front panel by pressing
. You risk
draining the back-up battery if you remove the batteries while
the sound level meter is switched on.
3–4
Precision Integrating Sound Level Meter Type 2236
User Manual
Brüel & Kjær
bb090913.book : 2236-ch3 Black 5
Chapter 3 – Setting Up the SLM for Measurement
Fitting Batteries
Fig.3.2 Connecting a microphone extension cable to the sound level meter
3.2.1
Replacing Batteries
1.
Make sure the sound level meter is switched off by pressing
.
2.
Press the two tabs on the upper edge of the battery
compartment and remove the lid.
3.
Replace the old batteries with new ones (four 1.5 V LR6/
AA size alkaline batteries) as shown in the battery compartment and press the compartment lid back into place.
Note: If you cannot switch on the sound level meter after
replacing the batteries, check that they are correctly inserted.
The sound level meter is designed so that it will not work if
BB0909–13
Precision Integrating Sound Level Meter Type 2236
User Manual
3–5
bb090913.book : 2236-ch3 Black 6
Chapter 3 – Setting Up the SLM for Measurement
Fitting Batteries
the batteries are wrongly inserted in the battery compartment.
Warnings!
It is possible for batteries to explode or leak if they are
handled incorrectly, so:
3.2.2
●
For long-term storage, remove the batteries and keep the
sound level meter in a dry place.
●
Never mix different makes or types of battery.
●
Never mix charged and discharged batteries.
●
Always label the outside of the battery compartment with
the type of batteries contained.
Using an External Power Supply
The sound level meter can be powered from a regulated or
smoothed 7–15 V DC supply via the External Power socket
on the base (e.g. from the mains supply via an adaptor).
You can connect the external power supply even when the
batteries are installed. The sound level meter automatically
selects the source with the highest supply voltage. The external power supply will not damage the batteries but neither
will it recharge the batteries.
Always switch off the sound level meter by pressing
before
unplugging the external power supply. Otherwise you risk
draining the back-up battery.
3.2.3
The Back-up Battery
The sound level meter has a back-up battery for running the
clock and maintaining the memory, log and buffer, even when
the sound level meter is switched off or the main batteries
are removed.
The back-up battery is automatically recharged when there
are batteries in the sound level meter. It is fully charged
3–6
Precision Integrating Sound Level Meter Type 2236
User Manual
Brüel & Kjær
bb090913.book : 2236-ch3 Black 7
Chapter 3 – Setting Up the SLM for Measurement
Fitting Batteries
after about 10hours. Fully charged, the back-up battery runs
the clock and retains the results for about 6months.
These charge times are typical for a sound level meter at
room temperature.
If the back-up battery is flat, the date and time will be reset
to a factory set date. If you find that the date and time are
wrong, this is probably the reason.
BB0909–13
Precision Integrating Sound Level Meter Type 2236
User Manual
3–7
bb090913.book : 2236-ch3 Black 8
Chapter 3 – Setting Up the SLM for Measurement
Switching the SLM On and Off
3.3
Switching the SLM On and Off
Switching the Sound Level Meter On
Press
.
The sound level meter tests its memory and then returns
to Pause mode with the set-up it had when it was last
switched off. While testing its memory, the display shows the
version of the sound level meter (e.g. 2236 A–009).
The default set-up is:
Frequency weighting (RMS):
Frequency weighting (Peak):
Time weighting:
Displayed parameter:
Displayed range:
Output formats:
LN1:
LN2:
LN3:
Auto logging:
Exposure Time:
Reset at range change:
Auto start:
A
C
F
SPL
30 – 110 dB
Overall Results
Short Heading
Logged Results
Short Heading
Printer
Level Distribution
Short Heading
5dB resolution
Cumulative Distribution
Short Heading
5dB resolution
L1
L10
L90
Off
7:30 hours
On
Off
Note:
●
0
3–8
▼
To switch the sound level meter on in the default set-up,
press and hold
and then press
for about 1 s. The
Precision Integrating Sound Level Meter Type 2236
User Manual
Brüel & Kjær
bb090913.book : 2236-ch3 Black 9
Chapter 3 – Setting Up the SLM for Measurement
Setting the Measurement Range
sound level meter erases all results and returns to the
default set-up in Pause mode.* Note that this procedure
will reset your calibration. You must therefore recalibrate
your instrument as described in section 4.1 after resetting. We recommend that you do not reset the instrument
in this way if you are using an accredited calibration.
●
0
▼
To erase all results in the log, memory and buffer, press
and 〈Data〉.
Switching the Sound Level Meter Off
Press
.
The sound level meter goes into Pause mode and switches
off. No measurement data from the buffer, log and memory
are lost.
3.4
Setting the Measurement Range
The measurement range is shown to the left and right of the
quasi-analogue scale. Sound level meters without filter sets
(Types 2236 A–009 and 2236 B–009) have 5 measurement
ranges, each with a dynamic range of 80 dB. Sound level
meters with filter sets (Types 2236 C–009 and 2236 D–009)
have an extra measurement range from 10 to 90 dB (you must
have one of the octave filters activated to select this range).
●
10 – 90 dB†
●
20 – 100 dB
●
30 – 110 dB
●
40 – 120 dB
●
50 – 130 dB
●
60 – 140 dB
* Baud rate and handshake are not affected
† Only available with sound level meters with filter sets (Types 2236 C–009 and 2236
D–009) and when the filter is selected.
BB0909–13
Precision Integrating Sound Level Meter Type 2236
User Manual
3–9
bb090913.book : 2236-ch3 Black 10
Chapter 3 – Setting Up the SLM for Measurement
Setting the Measurement Range
To move the measurement range
by 10 dB, press Level 〈▲〉 or 〈▼〉,
respectively.*
Edit
NO
Settings
OK
Show
0
Level
Frequency Wt.
•
•
•
Parameter
F
S
I
Data
30
.... 110
00:00:01
58.6 dBA
F SPL
Brüel & Kjær
B
7/6-'89
K
Type 2236
931018/1e
If you have selected a measurement range that is too low,
the signal will cause an overload. If the sound level meter is
currently overloaded, a + is shown to the right of the quasianalogue scale. If the sound level meter has been overloaded
during a measurement since the last reset, OVL is shown at
the right-hand side of the screen, under the quasi-analogue
scale.
* You can set the sound level meter to reset when changing the measurement range (see section 3.10).
Then, if there are more than 1min of measurement results in the buffer (i.e. the elapsed time shown
is greater than 1min), the screen tells you that changing the measurement range will erase all previous
measurement results from the buffer.
If you do not want to erase the measurement results, press 〈NO〉. The measurement range will not
change.
Press 〈OK〉 to change the range and erase the measurement results.
3 – 10
Precision Integrating Sound Level Meter Type 2236
User Manual
Brüel & Kjær
bb090913.book : 2236-ch3 Black 11
Chapter 3 – Setting Up the SLM for Measurement
Setting the Time Weighting
3.5
Setting the Time Weighting
The time weightings available are shown below:
F:
S:
I:
for normal measurements
for checking average levels of fluctuating noise
for measuring impulsive noise
30
PAUSE
F SPL
00:00:00
58.6 dBA
·F
·S
·I
Edit
NO
.... 110
Settings
OK
*
reset
Show
30
PAUSE
S SPL
0
.... 110
00:00:00
58.6 dBA
Level
Frequency Wt.
·F *
·S
·I
Parameter
reset
•
•
•
F
S
I
Data
30
PAUSE
I SPL
30
00:00:00
58.6 dBA
.... 110
PAUSE
F SPL
Brüel & Kjær
.... 110
00:00:00
58.6 dBA
B
7/6-'89
K
·F *
·S
·I
Type 2236
reset
931020/1e
930499/1e
The display shows N.A. if you select a time weighting which
is not available with the current displayed parameter.
* If there are more than 1min of measurement results in the buffer (i.e. the elapsed time
shown is greater than 1min), the screen tells you that changing the time weighting will
erase all previous measurement results from the buffer.
If you do not want to erase the measurement results, press 〈NO〉.
Press 〈OK〉 to change the time weighting and erase the measurement results.
BB0909–13
Precision Integrating Sound Level Meter Type 2236
User Manual
3 – 11
bb090913.book : 2236-ch3 Black 12
Chapter 3 – Setting Up the SLM for Measurement
Setting the Frequency Weighting
Note: If results are being logged every 0.1 s, the sound level
meter sets the time weighting to 12 ms (shown on the display
by q). You cannot change the time weighting until you change
the logging rate or switch off auto logging (see section 3.11).
3.6
Setting the Frequency Weighting
3.6.1
Introduction
If the selected parameter is Peak or MaxP, then the frequency
weighting of the Peak signal is shown. Otherwise, the frequency weighting of the RMS signal is shown. Therefore, the
frequency weighting shown always corresponds to the selected parameter.
3.6.2
Setting the RMS Frequency Weighting
The available frequency weightings of the RMS signal are
shown below:
A:
C:
for general sound level measurements
for checking the low-frequency content of a noise (if the
C-weighted level is much higher than the A-weighted
level, then there is a large amount of low-frequency
noise)
L:
for determining the “unweighted” SPL
XHz: (with filters) for measuring the frequency content of a
noise in order to choose, for example, the relevant
hearing protection
* If there are more than 1min of measurement results in the buffer (i.e. the elapsed time
shown is greater than 1min), the screen tells you that changing the frequency weighting
will erase all previous measurement results from the buffer.
If you do not want to erase the measurement results, press 〈NO〉.
Press 〈OK〉 to change the frequency weighting and erase the measurement results.
† Press Frequency Wt. 〈▲〉 to change the frequency weighting in the opposite direction to
Frequency Wt. 〈▼〉.
3 – 12
Precision Integrating Sound Level Meter Type 2236
User Manual
Brüel & Kjær
bb090913.book : 2236-ch3 Black 13
Chapter 3 – Setting Up the SLM for Measurement
Setting the Frequency Weighting
30
PAUSE
F SPL
.... 110
00:00:00
58.6 dBL
*†
Frequency Wt
30
PAUSE
F SPL
▼
.... 110
00:00:00
58.6 dBC
*†
Frequency Wt
Without
filter set
30
PAUSE
F SPL
▼
.... 110
00:00:0
58.6 dBA
*†
Edit
NO
Frequency Wt
Settings
▼
OK
Show
30
.... 110
8kHz
PAUSE 00:00:00
F SPL 58.6 dB
0
With
filter set
Level
*†
Frequency Wt
Frequency Wt.
•
•
•
Parameter
F
S
I
30
.... 110
4kHz
PAUSE 00:00:00
F SPL 58.6 dB
Data
30
*†
.... 110
PAUSE
F SPL
Brüel & Kjær
▼
Frequency Wt
▼
00:00:00
58.6 dBA
B
7/6-'89
K
Type 2236
30
.... 110
31.5Hz
PAUSE 00:00:0
F SPL 58.6 dB
*†
Frequency Wt
▼
931021/1e
931516/1e
* See footnote on previous page.
† See footnote on previous page.
BB0909–13
Precision Integrating Sound Level Meter Type 2236
User Manual
3 – 13
bb090913.book : 2236-ch3 Black 14
Chapter 3 – Setting Up the SLM for Measurement
Setting the Frequency Weighting
3.6.3
Setting the Peak Frequency Weighting
The available frequency weightings of the Peak signal are
shown below:
C:
for measuring the damaging effects of noise (in
accordance with the EU directive on exposure to noise
at work)
for special applications
L:
30
PAUSE 00:00:00
F MaxP --·- dBC
Edit
NO
Settings
.... 110
OK
Show
Show
3x
OK
NO
0
Level
PEAK WEIGHTING
Frequency Wt.
•
•
•
C
Parameter
F
S
I
Data
NO
Edit
reset
*
OK
▼
PEAK WEIGHTING
C
Brüel & Kjær
▼
▼
PEAK WEIGHTING
B
7/6-'89
K
C
L
Param.
C
▼
Type 2236
931022e
930724/2e
* If there are more than 1min of measurement results in the buffer (i.e. the elapsed time
shown is greater than 1min), the screen tells you that changing the frequency weighting
will erase all previous measurement results from the buffer.
If you do not want to erase the measurement results, press 〈NO〉.
Press 〈OK〉 to change the frequency weighting and erase the measurement results.
3 – 14
Precision Integrating Sound Level Meter Type 2236
User Manual
Brüel & Kjær
bb090913.book : 2236-ch3 Black 15
Chapter 3 – Setting Up the SLM for Measurement
Setting the Percentiles
3.7
Setting the Percentiles
Three LN parameters (percentile levels) are transferred over
the interface to a printer or computer (see sections 5.6 and
5.7) with Overall Results. You can choose three percentiles
or use the default percentiles L1, L10 and L90. The selected
percentiles can also be displayed one after another on the
display (see section 4.8). N can have values of between 1 and
99 in integer (1) steps.
Note:
BB0909–13
●
Changing the percentiles does not reset the sound level
meter. Therefore, you can view any percentile levels during or after a measurement.
●
The sound level meter always logs L10 and L90 in Logged
Results, regardless of the percentiles you have selected.
Precision Integrating Sound Level Meter Type 2236
User Manual
3 – 15
bb090913.book : 2236-ch3 Black 16
Chapter 3 – Setting Up the SLM for Measurement
Setting the Percentiles
30
.... 110
00:00:01
46.5 dBA
F L50
Show
8x
OK
NO
PERCENTILES
1:L1
2:L10
3:L90
▼
Edit
99
.
.
2
1
PERCENTILES
1:L1
2:L10
3:L90
▼
Param.
▼
Edit
NO
Settings
OK
NO
Show
▼
OK
Level
▼
0
Frequency Wt.
•
•
•
▼
Level
Parameter
F
S
I
99
.
.
2
1
PERCENTILES
1:L1
2:L10
3:L90
▼
Param.
▼
Data
NO
▼
OK
▼
Level
PERCENTILES
1:L1
2:L10
3:L90
B
7/6-'89
K
Type 2236
▼
Brüel & Kjær
▼
99
.
.
2
1
PERCENTILES
1:L1
2:L10
3:L90
NO
Param.
▼
OK
931202/1e
3 – 16
▼
Precision Integrating Sound Level Meter Type 2236
User Manual
931087/2e
Brüel & Kjær
bb090913.book : 2236-ch3 Black 17
Chapter 3 – Setting Up the SLM for Measurement
Setting the Exposure Time
3.8
Setting the Exposure Time
Exposure Time is used in the calculation of LEP,d (see section
8.2). It can have values of between 1min and 24hours.
30
.... 110
F LEPd
00:00:01
46.5 dBA
Show
OK
9x
NO
EXPOSURE TIME
(LEPd meas.)
7:30 hh:mm
Edit
NO
OK
Edit
NO
Settings
OK
24*
.
.
01
00
EXPOSURE TIME
(LEPd meas.)
▼
Show
7:30 hh:mm
0
Level
▼
Param.
▼
▼
NO
OK
Level
Frequency Wt.
•
•
•
Parameter
F
S
I
▼
59
.
.
01
00†
EXPOSURE TIME
(LEPd meas.)
Data
▼
7 30 hh:mm
EXPOSURE TIME
(LEPd meas.)
NO
▼
7 30 hh:mm
Brüel & Kjær
B
7/6-'89
K
▼
Param.
▼
OK
Type 2236
931026/1e
*24 only available if mm = 00
†
00 not available if hh = 00
931088/2e
Note: Changing the Exposure Time does not reset the sound
level meter. Therefore, you can investigate the effect of different Exposure Times on the LEP,d after a measurement.
BB0909–13
Precision Integrating Sound Level Meter Type 2236
User Manual
3 – 17
bb090913.book : 2236-ch3 Black 18
Chapter 3 – Setting Up the SLM for Measurement
Setting the Date and Time
3.9
Setting the Date and Time
The sound level meter’s clock operates, even when the sound
level meter is switched off, if the internal back-up battery is
charged up (see section 3.2.3). It is factory set to Central
European Time (CET).
30
.... 110
PAUSE
F SPL
4x
00:00:00
58.6 dBA
Show
OK
NO
DATE/TIME
31 MAR 1993
09:30:00
Edit
31
.
.
2
1
DATE/TIME
Edit
Settings
OK
▼
NO
Show
31 MAR 1993
09:30:00
▼
Param.
▼
▼
0
NO
Level
OK
Level
▼
Frequency Wt.
Parameter
Dec
.
.
Feb
Jan
DATE/TIME
F
S
I
Data
31 MAR 1993
09:30:00
▼
•
•
•
Param.
▼
▼
DATE/TIME
NO
▼
▼
OK
Level
31 MAR 1993
09:30:00
▼
Brüel & Kjær
B
7/6-'89
K
Type 2236
931027/1e
3 – 18
See next page
Precision Integrating Sound Level Meter Type 2236
User Manual
930726/2e
Brüel & Kjær
bb090913.book : 2236-ch3 Black 19
Chapter 3 – Setting Up the SLM for Measurement
Setting the Date and Time
See previous page
▼
Level
▼
2050
.
.
1994
1993
DATE/TIME
▼
31 MAR 1993
09:30:00
▼
NO
▼
Param.
▼
OK
Level
▼
▼
23
.
.
01
00
▼
DATE/TIME
31 MAR 1993
09:30:00
▼
NO
▼
Param.
▼
OK
Level
▼
59
.
.
01
00
DATE/TIME
▼
31 MAR 1993
09 30:00
▼
NO
▼
Param.
▼
OK
Level
▼
59
.
.
01
00
DATE/TIME
▼
31 MAR 1993
09:30 00
NO
▼
Param.
▼
OK
930700/1e
BB0909–13
Precision Integrating Sound Level Meter Type 2236
User Manual
3 – 19
bb090913.book : 2236-ch3 Black 20
Chapter 3 – Setting Up the SLM for Measurement
Setting the SLM to Change Range without Resetting
3.10 Setting the SLM to Change Range
without Resetting
The sound level meter always resets when changing the frequency or time weighting. The sound level meter also normally resets when changing the measurement range.
0
▼
As an option, you can set the sound level meter to change
measurement range without resetting. If you do this and
change the range, the distributions and LN parameters are
not available (N.A. is shown on the display if an LN is selected). If the sound level meter is logging when you do this,
then all LN values, including those already logged, will show
N.A. To begin logging LN values again, reset the sound level
meter by Pressing
.
30
PAUSE
F SPL
Edit
NO
Settings
.... 110
00:00:00
58.6 dBA
OK
Show
Show
6x
NO
OK
0
CHANGE RANGE
Level
with reset
Frequency Wt.
F
S
I
NO
Data
Edit
CHANGE RANGE
CHANGE RANGE
with reset
with reset
▼
▼
•
•
•
Parameter
OK
▼
with
Param.
without
Brüel & Kjær
B
7/6-'89
K
931028e
3 – 20
▼
Type 2236
Precision Integrating Sound Level Meter Type 2236
User Manual
930727/2e
Brüel & Kjær
bb090913.book : 2236-ch3 Black 21
Chapter 3 – Setting Up the SLM for Measurement
Setting up Auto Logging
Note:
●
If an overload has occurred, the results are not correct.
You can, however, accept them (for example, if the overload was of relatively short duration). If the sound level
meter is set to not reset when changing the measurement
range, you will be unable to see from the Overall Results
at which measurement range the overloads took place.
You can, however, see when they took place in the Logged
Results (see sections 5.6 and 5.7 for how to view them).
●
The sound level meter takes 6 ms to change measurement
range. If you change range when the sound pressure level
is near its maximum and the sound level meter is set to
not reset when changing the measurement range, you
will reduce the accuracy of the measurement.
3.11 Setting up Auto Logging
You can set the sound level meter to automatically log:
●
Leq
●
L10
●
L90
●
measurement time of results
and store them at regular intervals in its log or send them
via the Serial Interface to a PC. The logging time (i.e. the
time between each set of results) can be one of the following:
●
0.1 s*
●
5 min
●
1s
●
10 min
●
10 s
●
15 min
●
30 s
●
30 min
●
1 min
●
1hour
* Only Leq is logged. The sound level meter sets the time weighting to 12 ms (shown on
the display by q). You cannot change the time weighting. When the logging time is reset
to any other value, or the autologging is switched off, the time weighting is restored to
its previous setting.
BB0909–13
Precision Integrating Sound Level Meter Type 2236
User Manual
3 – 21
bb090913.book : 2236-ch3 Black 22
Chapter 3 – Setting Up the SLM for Measurement
Setting up Auto Logging
30
PAUSE
F SPL
.... 110
00:00:00
58.6 dBA
Show
OK
NO
AUTO LOGGING
Off
Edit
Edit
Settings
to interface
AUTO LOGGING
Off
OK
▼
NO
to log
Show
▼
Param.
Off
▼
0
▼
NO
Level
OK
Level*
Frequency Wt.
F
S
I
▼
Data
AUTO LOGGING
to log
–every 1s
(Leq L10 L90)
▼
▼
•
•
•
Parameter
AUTO LOGGING
to log
-every 1s
(Leq L10 L90)
NO
Brüel & Kjær
B
7/6-'89
K
1 hour
.
.
1s
0.1s
▼
Param.
▼
OK
Type 2236
931210/1e
* only available if not “Off”
931089/2e
If you change the range or the frequency or time weighting
while the sound level meter is set to log results in the sound
level meter’s memory, the sound level meter stops logging
and auto logging is set to Off. This is because the measurement set-up information in the log would no longer be relevant for further logged results.
3 – 22
Precision Integrating Sound Level Meter Type 2236
User Manual
Brüel & Kjær
bb090913.book : 2236-ch3 Black 23
Chapter 3 – Setting Up the SLM for Measurement
Setting up Auto Logging
If you change the auto logging status to log to the sound level
meter’s memory, the sound level meter will, after a warning,
erase any previously logged results.
Results are not logged while the sound level meter is in Pause
mode. For more information about logging during pauses, see
section 5.8.
0
BB0909–13
▼
Pressing
section 5.3.
does not erase the log. To erase the log, see
Precision Integrating Sound Level Meter Type 2236
User Manual
3 – 23
bb090913.book : 2236-ch3 Black 24
Chapter 3 – Setting Up the SLM for Measurement
Setting the Viewing Conditions
3.12 Setting the Viewing Conditions
The sound level meter’s screen can be changed to cope with
various lighting, temperatures, conditions and viewing angles. You can switch on a back-light and adjust the screen’s
contrast. The contrast adjustment may be especially useful
in very high or very low temperature environments.
To switch the back-light on, press
.
The back-light switches off automatically 30s after the last
key press. To switch the back-light off before this, press
.
To set the screen’s contrast, follow the instructions below:
30
Edit
NO
F SPL
Settings
.... 110
00:00:01
58.6 dBA
OK
Show
7x
Show
NO
OK
0
Level
Frequency Wt.
•
•
•
CONTRAST
TestTestTestTes
tTestTestTestTe
Parameter
F
S
I
Data
NO
CONTRAST
TestTestTestTes
tTestTestTestTe
Edit
OK
▼
▼
CONTRAST
TestTestTestTes
tTestTestTestTe
Brüel & Kjær
B
7/6-'89
K
Param.
▼
Type 2236
931031/1e
3 – 24
▼
.
.
.
Precision Integrating Sound Level Meter Type 2236
User Manual
930800/2e
Brüel & Kjær
bb090913.book : 2236-ch4_TOC.doc Black,Blue 1
Chapter 4
Measuring
4.1
Calibrating..............................................................................
4– 2
Introduction ....................................................................... 4 – 2
Calibrating the Sound Level Meter.................................. 4 – 3
Checking the Calibration .................................................. 4 – 5
4.2
Checking the Sound Level Meter .................................
4.3
Starting a New Measurement
4.4
Pausing a Measurement
4.5
Continuing a Measurement .........................................
4 – 11
4.6
Starting a Frequency Analysis....................................
4 – 12
4.7
Setting the SLM to Start Automatically ................
4 – 13
4.8
Changing the Displayed Parameter .........................
4 – 15
BB0909–13
4– 7
...................................... 4 – 8
............................................... 4 – 10
Precision Integrating Sound Level Meter Type 2236
User Manual
4–1
bb090913.book : 2236-ch4 Black 2
Chapter 4 – Measuring
Calibrating
4.1
Calibrating
4.1.1
Introduction
When to Calibrate
The standards recommend that you calibrate your sound level
meter before each set of measurements (see section 4.1.2) and
check the calibration after each set (see section 4.1.3).
Connecting a recommended microphone extension cable has
no effect on the sound level meter’s calibration. Therefore,
you do not have to recalibrate after connecting one of the
recommended microphone extension cables.
Principle of Calibration
The sound level meter uses a calibration factor to check for
drift. This is shown on the Calibration screen. When calibrating, the sound level meter first checks the calibration signal
against the calibration level you set. The sound level meter
shows you the factor required for correct calibration and asks
if you want to recalibrate. If you press 〈OK〉, the sound level
meter calibrates itself according to this new calibration level
(i.e. it adjusts itself to the calibration level you entered).
During this procedure, the sound level meter is automatically
set to use the reference measurement range and to show SPL
on the display. The frequency and time weighting settings
are not changed. Therefore, calibration at frequencies other
than 1 kHz requires correction for the frequency weighting
used (see Fig. 6.1).
Calibrating for Free Field or Diffuse Field Measurements
The sound level meter is calibrated in the same way for free
field measurements (according to IEC) and diffuse field measurements (according to ANSI). However, the calibration levels
for some calibrators may be different, depending on which
measurements are to be made. See the calibrator’s user manual for more details.
4–2
Precision Integrating Sound Level Meter Type 2236
User Manual
Brüel & Kjær
bb090913.book : 2236-ch4 Black 3
Chapter 4 – Measuring
Calibrating
Always remove the Random Incidence Corrector DZ9566 (if
fitted) from the microphone when calibrating or checking the
calibration.
Which Calibrators Can I Use?
The sound level meter can be calibrated with Sound Level
Calibrator Type 4231, Multifunction Acoustic Calibrator Type
4226 or a similar calibrator. All are referred to on the sound
level meter’s display as the calibrator.
Each calibrator is slightly different. The actual calibration
level is not necessarily equal to the nominal calibration level.
It is, therefore, important to set the calibration level to the
one given on the calibration chart for the calibrator used.
4.1.2
Calibrating the Sound Level Meter
Sound Level Calibrator Type 4231 provides a nominal pressure field calibration signal of 94 or 114 dB at 1 kHz. The
nominal diffuse field calibration signal is also 94 or 114 dB
but the nominal free field calibration signal is 93.8 or
113.8 dB.
Multifunction Acoustic Calibrator Type 4226 provides a nominal calibration signal of 94, 104 or 114 dB at a range of
frequencies.
For day to day calibration, you only need to calibrate at one
level at one frequency. In order to comply with the standards,
calibrate the sound level meter with a reference signal of
94 dB at 1 kHz*.
* Calibration at frequencies other than 1 kHz requires correction for the frequency weighting
used (see Chapter 6). The sound level meter can correct up to ± 0.5 dB from the nominal
calibration level.
BB0909–13
Precision Integrating Sound Level Meter Type 2236
User Manual
4–3
bb090913.book : 2236-ch4 Black 4
Chapter 4 – Measuring
Calibrating
Fig.4.1
4–4
Fitting Sound Level Calibrator Type 4231 onto the sound level
meter. Multifunction Acoustic Calibrator Type 4226 is fitted in a
similar way (see its manual)
Precision Integrating Sound Level Meter Type 2236
User Manual
Brüel & Kjær
bb090913.book : 2236-ch4 Black 5
Chapter 4 – Measuring
Calibrating
To calibrate:
1.
Fit the calibrator carefully onto the sound level meter
and rest the sound level meter on a table or other flat
surface. Ensure that the calibrator fits snugly on the
microphone (see Fig. 4.1).
2.
For the multifunction acoustic calibrator, set it up to
calibrate at 94dB and 1 kHz (see the calibrator’s instruction manual).
3.
Switch on the calibrator.
The calibrator emits a 1 kHz calibration signal.
4.
4.1.3
Follow the instructions given in the figure below to calibrate to the relevant level for the type of measurements
to be made:*
Checking the Calibration
Follow the instructions given in section 4.1.2 until the sound
level meter asks whether you want to recalibrate or not. Press
〈NO〉 twice to return to the main screen.
* For Sound Level Calibrator Type 4231, choose a calibration level of 94 dB for diffuse
field or 93.8 dB for free field. For Multifunction Acoustic Calibrator Type 4226, choose a
calibration level of 94 dB for both diffuse and free field.
BB0909–13
Precision Integrating Sound Level Meter Type 2236
User Manual
4–5
bb090913.book : 2236-ch4 Black 6
Chapter 4 – Measuring
Calibrating
30
.... 110
F SPL
2x
00:00:01
58.6 dBA
Show
OK
NO
CALIBRATION
Factor:
X.X dB
To calibrate
press Edit
Edit
Edit
NO
Settings
OK
124.5
:
123.5
114.5
:
113.5
94.5
:
93.6
93.5
▼
Show
0
CALIBRATION
Calibr. level:
94.0 dB
Level
Frequency Wt.
NO
Parameter
OK
▼
Param.
▼
check cal.
level
F
S
I
New calibration
Factor: X.X dB
Use new factor?
NO/OK
Data
▼
•
•
•
CALIBRATION
Calibr. level:
94.0 dB
Brüel & Kjær
B
7/6-'89
K
NO
OK
calibrate
Type 2236
931032/1e
4–6
Precision Integrating Sound Level Meter Type 2236
User Manual
930701/3e
Brüel & Kjær
bb090913.book : 2236-ch4 Black 7
Chapter 4 – Measuring
Checking the Sound Level Meter
4.2
Checking the Sound Level Meter
Before you start a longer series of measurements, it is good
practice to check the status of the sound level meter’s battery,
log and memory. To do this, press 〈Edit〉 and 〈OK〉. The sound
level meter shows the status screen. Press 〈OK〉 to return to
the sound level meter’s main screen.
STATUS
Battery : 3.9 V
Free log : 123h12
Free Records: 36
930988/1e
Fig.4.2 The sound level meter’s status screen
Battery:
With fresh batteries, the status screen will show approximately 6V. When there is about half an hour’s operation left
(when there is approximately 4 V), the battery voltage level
flashes (“3.9 V” will flash in the example shown in Fig. 4.2)*;
in very cold weather, much less than half an hour is left.The
length of time fresh batteries last depends on the conditions
of use (temperature, use of the back-light, etc.). Fresh alkaline
batteries in a sound level meter without a filter set (Type
2236 A–009 or 2236 B–009) will take over 12 hours to wear
out. Those in a sound level meter with a filter set (Type
2236 C–009 or 2236 D–009) will take over 10 hours to wear
out.
Note: The battery voltage will normally be higher just after
the sound level meter is switched on. Therefore, always wait
a minute or so before checking the battery status.
* The main screen also shows a battery low warning (see Fold Out).
BB0909–13
Precision Integrating Sound Level Meter Type 2236
User Manual
4–7
bb090913.book : 2236-ch4 Black 8
Chapter 4 – Measuring
Starting a New Measurement
Free log:
The hours and minutes left in the log at the current rate of
logging are shown*.
Free Records:
The number of empty Records left in the memory is also
shown.
Starting a New Measurement †
4.3
1.
Calibrate the sound level meter as described in section
4.1.
2.
Select a suitable measurement range.
Edit
NO
Settings
OK
Show
This reduces the risk of you
having to change the range
during a measurement in order to avoid Overloads. Overloads reduce the validity of
your results and changing
the measurement range may
cause a reset.
0
Level
Frequency Wt.
•
•
•
Parameter
F
S
I
Data
Press
0
.
00:00:01
46.5 dBA
F SPL
Brüel & Kjær
3.
..... 110
▼
30
B
7/6-'89
K
Type 2236
931033/1e
If there are more than 1min of measurement results in
the sound level meter’s buffer (i.e. the elapsed time shown
on the screen is greater than 1min), the screen tells you
* Up to a maximum of 255h59.
† If you are only interested in instantaneous parameters (e.g. Peak or SPL), you can miss
out steps 3 and 5.
4–8
Precision Integrating Sound Level Meter Type 2236
User Manual
Brüel & Kjær
bb090913.book : 2236-ch4 Black 9
Chapter 4 – Measuring
Starting a New Measurement
that resetting will erase all previous measurement results from the buffer. If this occurs, press 〈OK〉 to confirm
that you want to reset the sound level meter.
The results in the sound level meter’s display buffer are
erased and the elapsed time is set to zero. The overload
hold is reset so that the sound level meter indicates that
there have not been any overloads since the last reset.
0
4.
▼
Note: To erase all results in the Log, Memory and display
buffer, press
and 〈Data〉.
If you want to measure according to IEC standards (i.e.
free field), simply point the sound level meter towards
the sound source.
5.
Press
▼
If you want to measure according to ANSI standards (i.e.
diffuse field), fit the supplied Random Incidence Corrector
DZ9566 on the microphone. The direction of the sound
level meter is unimportant. If, however, the sound field
is free, measure with the sound level meter at an angle
of between 70 and 80˚ to the sound source.
.
The sound level meter starts measuring with the selected
set-up.
Note:
BB0909–13
●
When mounting the sound level meter on a tripod, position the tripod so that one of its legs points in the same
direction as the sound level meter. This will reduce the
risk of damaging the microphone if the tripod is accidentally knocked over.
●
See section 1.3 for practical hints and information about
measuring according to standards.
Precision Integrating Sound Level Meter Type 2236
User Manual
4–9
bb090913.book : 2236-ch4 Black 10
Chapter 4 – Measuring
Pausing a Measurement
4.4
Pausing a Measurement
The Pause mode of the sound level meter allows you to store results in its memory or transfer
results across the interface to a
printer or computer.
Edit
NO
Settings
OK
Press
0
•
•
•
side of the display. The clock
stops counting the measurement
time. The display and quasi-analogue scale continue to show the
current status of the displayed
parameter and input signal level,
respectively. In Pause mode, however, no results or overload indications are added to the buffer or
the log. For more information
about logging during pauses, see
section 5.8.
Parameter
F
S
I
Data
30
.... 110
PAUSE
F SPL
Brüel & Kjær
00:06:00
66.5 dBA
B
7/6-'89
K
.
PAUSE is shown on the left-hand
Level
Frequency Wt.
▼
Show
Type 2236
931034/1e
4 – 10
Precision Integrating Sound Level Meter Type 2236
User Manual
Brüel & Kjær
bb090913.book : 2236-ch4 Black 11
Chapter 4 – Measuring
Continuing a Measurement
Continuing a Measurement
Press
Settings
OK
Show
0
Level
Frequency Wt.
•
•
•
Parameter
F
S
I
.
“PAUSE” disappears from the
display. The clock continues
counting the measurement time
from the point at which it
stopped. Results are added to the
buffer and, if selected, the log.
For more information about logging during pauses, see section
5.8.
Edit
NO
▼
4.5
Data
30
.... 110
31.5Hz
00:06:00
F SPL 66.5 dB
Brüel & Kjær
B
7/6-'89
K
Type 2236
931684/1e
BB0909–13
Precision Integrating Sound Level Meter Type 2236
User Manual
4 – 11
bb090913.book : 2236-ch4 Black 12
Chapter 4 – Measuring
Starting a Frequency Analysis
Starting a Frequency Analysis*
4.6
A frequency analysis is a series of measurements in various
frequency bands. Each measurement is made as for a normal
broad-band measurement (see section 4.3).
Using Frequency Wt. 〈▲〉 or
〈▼〉, change the frequency
weighting to the centre frequency of the band in which
you want to start the analysis
(see section 3.6.2).
2.
Press
3.
Press
4.
After you have completed the
measurement in that frequency band, press
.
5.
Store the Overall Results in
the Memory (see section 5.1).
Edit
NO
Settings
OK
Show
0
▼
1.
.
Level
•
•
•
Parameter
F
S
I
Data
30
.... 110
31.5Hz
00:06:00
F SPL 66.5 dB
Brüel & Kjær
B
7/6-'89
K
.
▼
Frequency Wt.
▼
0
Type 2236
931684/1e
6.
Using Frequency Wt. 〈▲〉 or 〈▼〉, change the frequency
weighting to the centre frequency of the band in which
you want to continue the analysis.
The sound level meter resets. You are now ready to measure in the next frequency band.
7.
Repeat steps 3 to 6 for the other bands in which you
want to analyse.
* Only available with sound level meters with filter sets (Types 2236 C–009 and 2236
D–009)
4 – 12
Precision Integrating Sound Level Meter Type 2236
User Manual
Brüel & Kjær
bb090913.book : 2236-ch4 Black 13
Chapter 4 – Measuring
Setting the SLM to Start Automatically
4.7
Setting the SLM to Start
Automatically
The sound level meter can be set to automatically start at
any time and date within the next month (e.g. from 19th May
to 18th June).
30
.... 110
PAUSE
F SPL
Show
5x
Edit
NO
Settings
00:00:00
58.6 dBA
OK
NO
AUTO START
Off
OK
Show
0
Edit
Frequency Wt.
▼
Level
Parameter
On
AUTO START
Off
Param.
Off
F
S
I
▼
NO
B
7/6-'89
K
OK
Level*
AUTO START
Off
Brüel & Kjær
▼
Type 2236
See next page
931036e
BB0909–13
▼
Data
▼
•
•
•
▼
* only available if "On"
Precision Integrating Sound Level Meter Type 2236
User Manual
930731/2e
4 – 13
bb090913.book : 2236-ch4 Black 14
Chapter 4 – Measuring
Setting the SLM to Start Automatically
See previous page
▼
Level*
▼
▼
31
.
.
02
01
AUTO START
On
–day
19 May
–time 12:00:00
NO
▼
Param.
▼
OK
▼
Level
▼
23
.
.
01
00
▼
AUTO START
On
–day
19 May
–time 12:00:00
▼
NO
▼
Param.
▼
OK
Level
▼
59
.
.
02
01
▼
AUTO START
On
–day
19 May
–time 12 00:00
NO
Param.
▼
OK
* only available if "On"
4 – 14
▼
Precision Integrating Sound Level Meter Type 2236
User Manual
930789/1e
Brüel & Kjær
bb090913.book : 2236-ch4 Black 15
Chapter 4 – Measuring
Changing the Displayed Parameter
Auto Start only works if the sound level meter is switched
off at the set time. Then, at this time, the sound level meter
will switch on, reset and, after a pause of 5 seconds, start
measuring with the set-up it had when it was switched off.
Once the sound level meter has started measuring with Auto
Start, you can control it in the normal way. Measurement
will continue until it is switched off manually or the batteries
run out. Logging will continue until the memory is full or the
batteries run out.
If the sound level meter is already switched on at the time
it has been set to automatically start measuring, Auto Start
is cancelled and has no effect.
When the set Auto Start time has passed, Auto Start will be
switched off when you switch off the sound level meter (until
then, it will appear as though it is set in the Auto Start
screen). This prevents the sound level meter from repeating
an automatic measurement every month.
Auto Start does not affect your use of the sound level meter
while the sound level meter is switched on. Therefore, you
can set the sound level meter up to start measuring at a
particular time and date while measuring without affecting
your current measurement results.
4.8
Changing the Displayed
Parameter
The parameters available are listed in section 1.2.1. The selected parameter and its level are shown at the bottom of the
screen. After a reset, “––.–” is shown for the level until after
the first second after a Pause. This is because the level is
not yet available. The quasi-analogue scale always shows the
current RMS input signal level, regardless of the selected
parameter.
BB0909–13
Precision Integrating Sound Level Meter Type 2236
User Manual
4 – 15
bb090913.book : 2236-ch4 Black 16
Chapter 4 – Measuring
Changing the Displayed Parameter
A DC level corresponding to the instantaneous RMS level is
emitted from the DC Output socket at the base of the sound
level meter for recording on a plotter. The signal emitted from
the AC Output socket is unaffected by which parameter or
frequency weighting is selected. It is always the L-weighted
output from the preamplifier and is for recording noise signals
on tape, transferring signals to an analyser or listening to
the input on headphones.
To step forwards and backwards
through the available parameters, press Parameter 〈▲〉 or
〈▼〉, respectively.
Edit
NO
Settings
OK
When a Peak parameter is
shown, the frequency weighting
shows the current weighting of
the Peak signal. When an RMS
parameter is shown, the frequency weighting shows the current
weighting of the RMS signal.
Show
0
Level
Frequency Wt.
•
•
•
Parameter
F
S
I
The display shows N.A. if you select a displayed parameter which
is not available with the current
time weighting or after changing
the measurement range without
resetting.
Data
30
.... 110
F MaxP
Brüel & Kjær
B
7/6-'89
00:00:01
65.6 dBC
K
Type 2236
931037/1e
4 – 16
Precision Integrating Sound Level Meter Type 2236
User Manual
Brüel & Kjær
bb090913.book : 2236-ch5_TOC.doc Black,Blue 1
Chapter 5
Storing and Transferring Results
5.1
Storing Results in a Record ............................................
5– 3
5.2
Recalling Results from a Record ..................................
5– 4
5.3
Erasing Results ....................................................................
5– 5
5.4
Setting up the Interface ...................................................
5– 6
5.5
Setting up the Output Formats ....................................
5– 8
Introduction ....................................................................... 5 – 8
Output Formats............................................................... 5 – 10
Level Distribution ........................................................... 5 – 15
Cumulative Distribution ................................................. 5 – 16
Checking and Changing the Output Formats ............... 5 – 17
5.6
Printing ..................................................................................
5 – 18
5.7
Transferring Results to a Computer ........................
5 – 21
5.8
Interpreting the Log Times ..........................................
5 – 24
BB0909–13
Precision Integrating Sound Level Meter Type 2236
User Manual
5–1
bb090913.book : 2236-ch5_TOC.doc Black,Blue 2
Chapter 5 – Storing and Transferring Results
5.9
Recording on a DAT-recorder ......................................
5–2
Precision Integrating Sound Level Meter Type 2236
User Manual
5 – 25
Brüel & Kjær
bb090913.book : 2236-ch5 Black 3
Chapter 5 – Storing and Transferring Results
Storing Results in a Record
5.1
Storing Results in a Record
Results in the buffer can be stored as one of 40 records in
the sound level meter’s memory. The results are stored in the
first available record (that is, the first set of results in record
1, the next set in record 2, etc.).
Example: If you have stored 4 records and then erased record
2, the sound level meter will store the next set of results in
record 2. The next set of results will then be stored in the
first available record (that is, record 5).
30
PAUSE
F SPL
Edit
NO
Settings
OK
.... 110
00:20:00
58.6 dBA
Show
NO 2 x Data
OK
0
Level
Frequency Wt.
•
•
•
STORE
Overall Results
–As Rec. No. X
Parameter
F
S
I
Data
STORE
Overall Results
–As Rec. No. X
Brüel & Kjær
B
7/6-'89
K
Type 2236
931038e
BB0909–13
Precision Integrating Sound Level Meter Type 2236
User Manual
930510/1e
5–3
bb090913.book : 2236-ch5 Black 4
Chapter 5 – Storing and Transferring Results
Recalling Results from a Record
5.2
Recalling Results from a Record
Results in a record in the memory can be recalled to the
sound level meter’s buffer. You can then look at that record’s
Overall Results.
30
.... 110
PAUSE
F SPL
00:00:00
58.6 dBA
NO 3 x Data
OK
RECALL
Record
–no.XX
Edit
NO
Edit
NO
Settings
OK
Show
▼
*
0
XX
.
.
.
1
RECALL
Record
–no.XX
Level
Frequency Wt.
•
•
•
Data
RECORD NO.1
00:20:00
F MaxL 103.2 dBA
RECORD NO.1
00:20:00
F MaxL 103.2 dBA
Brüel & Kjær
B
7/6-'89
K
▼
OK
Leq
.
.
MaxP
Peak
▼
Param.
▼
NO
Type 2236
* XX = Last Record in memory
931039/1e
5–4
Param.
OK
Parameter
F
S
I
▼
Precision Integrating Sound Level Meter Type 2236
User Manual
930511/4e
Brüel & Kjær
bb090913.book : 2236-ch5 Black 5
Chapter 5 – Storing and Transferring Results
Erasing Results
5.3
Erasing Results
You can erase results from a single record, all records (that
is, the entire memory) or the log.
30
PAUSE
F SPL
.... 110
00:00:00
58.6 dBA
NO 4 x Data
OK
ERASE
Record
–no. XX
Edit
Edit
Settings
OK
▼
NO
Show
▼
Logged Results
ERASE
Record
–no. XX
All Records
Param.
Record
▼
0
Level
▼
NO
OK
Level*
Frequency Wt.
Parameter
▼
F
S
I
†
▼
Data
▼
•
•
•
ERASE
Record
–no. 1
Brüel & Kjær
B
7/6-'89
K
NO
Type 2236
931040/1e
BB0909–13
XX
.
.
.
1
ERASE
Record
–no. XX
▼
Param.
▼
OK
* only available when Record selected
XX = last Record in memory
†
Precision Integrating Sound Level Meter Type 2236
User Manual
930512/3e
5–5
bb090913.book : 2236-ch5 Black 6
Chapter 5 – Storing and Transferring Results
Setting up the Interface
5.4
Setting up the Interface
The interfaces of the sound level meter and the instrument
(for example, a printer or computer) it is connected to via the
Serial Interface socket must have the same set-up to enable
them to communicate without losing or corrupting data.
Both the handshake and the baud rate of the sound level
meter’s interface can be set.
The following types of handshake are available:
●
hardwire
●
XON/XOFF
●
none
The following baud rates are available:
5–6
●
1200
●
9600
●
2400
●
19200
●
4800
Precision Integrating Sound Level Meter Type 2236
User Manual
Brüel & Kjær
bb090913.book : 2236-ch5 Black 7
Chapter 5 – Storing and Transferring Results
Setting up the Interface
30
.... 110
00:00:01
58.6 dBA
F SPL
Show
10 x
NO
OK
INTERFACE
– 9600 Baud
– XON/XOFF
Edit
Edit
NO
Settings
OK
Show
▼
19200
.
.
2400
1200
▼
INTERFACE
– 9600 Baud
– XON/XOFF
0
Param.
▼
Level
Frequency Wt.
▼
NO
OK
Level
Parameter
▼
•
•
•
F
S
I
Data
Brüel & Kjær
B
7/6-'89
K
▼
INTERFACE
– 9600 Baud
– XON/XOFF
NO
Type 2236
Hardwire
Param.
No handshake
▼
OK
931041/1e
BB0909–13
▼
XON/XOFF
INTERFACE
– 9600 Baud
– XON/XOFF
Precision Integrating Sound Level Meter Type 2236
User Manual
931090/2e
5–7
bb090913.book : 2236-ch5 Black 8
Chapter 5 – Storing and Transferring Results
Setting up the Output Formats
5.5
Setting up the Output Formats
5.5.1
Introduction
The output formats determine how the results are transferred
to a printer or computer. Each type of result has its own
independent output format.
Results
The following results are available with both long and short
headings:
●
Overall Results (see section 1.2.4)
●
Logged Results (see section 1.2.4)
●
Level Distribution
●
Cumulative Distribution
Short Heading
Displays the set-up of the sound level meter in a short format
together with the date and time of the start of the measurement (for overall results or distributions) or of the first logging (for logged results). See Fig. 5.2 to Fig. 5.8 for examples
of output formats with short headings.
5–8
Precision Integrating Sound Level Meter Type 2236
User Manual
Brüel & Kjær
bb090913.book : 2236-ch5 Black 9
Chapter 5 – Storing and Transferring Results
Setting up the Output Formats
Long Heading
A heading with space for remarks
about the measurement together
with the set-up of the sound level
meter in a long format and the
date and time of the start of the
measurement (for overall results
or distributions) or of the first logging (for logged results). See
Fig. 5.1 for an example of an output with a long heading (Overall
Results).
Note: The long heading in
spreadsheet format (see section
5.5.2) is the same as the short
heading and is not as described
above.
Fig.5.1
BB0909–13
Overall Results output
format with a long heading
Precision Integrating Sound Level Meter Type 2236
User Manual
5–9
bb090913.book : 2236-ch5 Black 10
Chapter 5 – Storing and Transferring Results
Setting up the Output Formats
5.5.2
Output Formats
You can print your logged results in any of the three formats
described in this section. The format you choose will depend
on the type of printer you are using.
Printer
For use with an IBM® Proprinter or compatible serial printer
(for example, Serial Printer WQ 1138). The format is shown
in Figs. 5.2 and 5.3.
Fig.5.2
5 – 10
Printer output format
with short heading (results logged every 1s)
Fig.5.3
Printer output format
with short heading (results logged every 0.1s)
Precision Integrating Sound Level Meter Type 2236
User Manual
Brüel & Kjær
bb090913.book : 2236-ch5 Black 11
Chapter 5 – Storing and Transferring Results
Setting up the Output Formats
“P” indicates that there has been a pause during that logging
interval (see section 5.8).
“O” indicates that there has been an overload (OVL) during
the logging interval.
Printer (24 character/line)
You must use this format when you use Graphics Printer
Type 2318. It uses a special character set (also for overall
results). Do not use this format with any other type of printer.
“P” indicates that there has been a pause during that logging
interval (see section 5.8).
“O” indicates that there has been an overload (OVL) during
the logging interval.
“&” indicates that there has been both a pause and an overload (OVL) during the logging interval.
Printer (24 character/line) output format when results have
been logged every 0.1s is the same as the Printer output
format (see Fig. 5.3).
BB0909–13
Precision Integrating Sound Level Meter Type 2236
User Manual
5 – 11
bb090913.book : 2236-ch5 Black 12
Chapter 5 – Storing and Transferring Results
Setting up the Output Formats
Fig.5.4
5 – 12
Printer (24 character/
line) output format with
short heading (results
logged every 1s)
Precision Integrating Sound Level Meter Type 2236
User Manual
Brüel & Kjær
bb090913.book : 2236-ch5 Black 13
Chapter 5 – Storing and Transferring Results
Setting up the Output Formats
Spreadsheet
A comma-delimited format (i.e. all text is in inverted commas
(”) and data are separated by commas) for use with spreadsheet programs (e.g. Excel).
Fig.5.5 Spreadsheet output format (results logged every 1s)
“P” indicates that there has been a pause during that logging
interval (see section 5.8).
“O” indicates that there has been an overload (OVL) during
the logging interval.
BB0909–13
Precision Integrating Sound Level Meter Type 2236
User Manual
5 – 13
bb090913.book : 2236-ch5 Black 14
Chapter 5 – Storing and Transferring Results
Setting up the Output Formats
Fig.5.6 Spreadsheet output format (results logged every 0.1s)
5 – 14
Precision Integrating Sound Level Meter Type 2236
User Manual
Brüel & Kjær
bb090913.book : 2236-ch5 Black 15
Chapter 5 – Storing and Transferring Results
Setting up the Output Formats
5.5.3
Level Distribution
Contains the following information:
●
The number of pauses
●
The percentage of the measurement time during which
the sound level meter was
overloaded (OVL)
●
MaxP
●
Leq
●
The level distribution (i.e. the
percentage of the measurement time during which the
SPL was within a certain dB
range)
●
If there has been an underload, the percentage of the
measurement time during
which the sound level meter
was underloaded
All values are to one decimal
place.
Level distribution is available
with 1 or 5 dB resolution.
Fig.5.7
BB0909–13
Level Distribution output
format with a short
heading
Precision Integrating Sound Level Meter Type 2236
User Manual
5 – 15
bb090913.book : 2236-ch5 Black 16
Chapter 5 – Storing and Transferring Results
Setting up the Output Formats
5.5.4
Cumulative Distribution
Contains the following information:
●
The number of pauses
●
The percentage of the measurement time during which
the sound level meter was
overloaded (OVL)
●
MaxP
●
Leq
●
The cumulative distribution
(i.e. the percentage of the
measurement time during
which the SPL was over a
certain dB level)
●
If there has been an underload, the percentage of the
measurement time during
which the sound level meter
was underloaded
All values are to one decimal
place.
Cumulative distribution is available with 1 or 5 dB resolution.
Fig.5.8
5 – 16
Cumulative Distribution
output format with a
short heading
Precision Integrating Sound Level Meter Type 2236
User Manual
Brüel & Kjær
bb090913.book : 2236-ch5 Black 17
Chapter 5 – Storing and Transferring Results
Setting up the Output Formats
5.5.5
Checking and Changing the Output Formats
30
.... 110
00:00:01
58.6 dBA
F SPL
11 x
Show
OK
NO
OUTPUT FORMATS
Logged Results
-short heading
-printer
Edit
NO
OUTPUT FORMATS
Logged Results
-short heading
-printer
OK
Settings
▼
▼
Edit
▼
Logged Res.
Overall Res.
Param.
Cum. Distr.
Level Distr.
▼
NO
OK
Level
Show
▼
0
▼
Frequency Wt.
•
•
•
Parameter
F
S
I
OUTPUT FORMATS
Logged Results
-short heading
-printer
OK
Data
▼
Level
▼
long
Param.
▼
short
NO
▼
Level*
▼
OUTPUT FORMATS
Logged Results
-short heading
-printer
B
7/6-'89
K
Type 2236
▼
Brüel & Kjær
Logged Results:
OUTPUT FORMATS
Logged Results
-short heading
-printer
printer
printer :24chr
spreadsheet
▼
Param.
Distribution:
▼
5dB resolut.
OK
NO
1dB resolut.
* only available when Logged Results or
Cumulative or Level Distribution selected
931042/1e
BB0909–13
Precision Integrating Sound Level Meter Type 2236
User Manual
931091/2e
5 – 17
bb090913.book : 2236-ch5 Black 18
Chapter 5 – Storing and Transferring Results
Printing
5.6
Printing
You can print results directly from the sound level meter by
using any of the following printers:
●
Portable Printer Type 2322
●
An IBM® Proprinter compatible serial printer
●
Graphics Printer Type 2318.
The baud rates (see section 5.4) of the sound level meter and
the printer must be the same to enable them to communicate
without losing or corrupting data.
Warning! When connecting the sound level meter to a printer, ensure that both the printer and the sound level meter
are switched off. Otherwise the instruments could be damaged. Note that this does not apply to Portable Printer Type
2322, since it does not have a power switch.
To print:
1.
2.
5 – 18
Connect the printer to the sound level meter via the
Serial Interface socket on the base of the sound level
meter. Use one of the following cables:
●
For Portable Printer Type 2322, use Interface Cable
AO 0532 (supplied with printer).
●
For serial printers with a 25-pole interface, use 9pole Cable with 25-pole Adaptor AO 1386
●
For serial printers with a 9-pole interface, use 9-pole
Cable with 25-pole Adaptor AO 1386, but remove the
adaptor.
●
For IBM® Proprinter compatible parallel printers,
use Interface Module UL 0064.
●
For Graphics Printer Type 2318, use Interface Cable
AO 0404.
The communications settings (baud rate and handshake)
on the sound level meter must match those of the printer.
Precision Integrating Sound Level Meter Type 2236
User Manual
Brüel & Kjær
bb090913.book : 2236-ch5 Black 19
Chapter 5 – Storing and Transferring Results
Printing
If you are using Portable Printer Type 2322, then set the
2236 to 9600 baud and XON/XOFF handshake (see section 5.4 for instructions). If you are using another printer,
please refer to your printer manual for settings.
3.
Set up the Output Format of the results you want to
print (see section 5.5). If you are using Portable Printer
Type 2322 or an IBM® Proprinter compatible, select
“Printer”. For printing on a Graphics Printer Type 2318,
select “Printer (24 char./line)”.
4.
Set the sound level meter in Pause mode and follow the
instructions given in the figure below.
The printer prints the selected results in the selected output
format (see section 5.5).
To stop printing:
To stop printing at any time, press 〈NO〉. This will stop
printing immediately and delete all unprinted data from the
printer’s buffer.
BB0909–13
Precision Integrating Sound Level Meter Type 2236
User Manual
5 – 19
bb090913.book : 2236-ch5 Black 20
Chapter 5 – Storing and Transferring Results
Printing
30
.... 110
PAUSE
F SPL
00:20:00
58.6 dBA
NO
Data
OK
PRINT
Overall Results
Edit
Edit
Settings
OK
▼
NO
Show
PRINT
Overall Results
▼
All Records
Record
Cum. Distrib. Param.
Level Distrib.
Logged Res.
▼
Overall Res.
0
▼
Level
NO
OK
Level*
Frequency Wt.
F
S
I
▼
†
Data
▼
▼
•
•
•
Parameter
XX
.
.
2
1
PRINT
Record
-no.XX
PRINT
Overall Results
NO
Brüel & Kjær
B
7/6-'89
K
▼
Param.
▼
OK
Type 2236
* only available when Record selected
†
XX = last Record in memory
931043/1e
5 – 20
Precision Integrating Sound Level Meter Type 2236
User Manual
930516/2e
Brüel & Kjær
bb090913.book : 2236-ch5 Black 21
Chapter 5 – Storing and Transferring Results
Transferring Results to a Computer
Errors
If the printer does not print out, check:
●
The baud rates and handshake of the sound level meter
and printer. If they are not the same, switch the printer
off, correct the sound level meter’s baud rate and/or handshake (see section 5.4) so that they are the same as the
printer’s and switch the printer on again (some printers
only check the interface while switching on)
●
The interface cable between the sound level meter and
the printer
If neither of these steps work, consult your local Brüel&Kjær
service representative.
5.7
Transferring Results to a
Computer
You can also control the sound level meter from a computer
(see section 8.3).
Warning! When connecting the sound level meter to the
computer, ensure that both the computer and the sound level
meter are switched off. Otherwise the instruments could be
damaged.
To transfer:
BB0909–13
1.
Connect the computer to the sound level meter via the
Serial Interface socket on the base of the sound level
meter using 9-pole Cable with 25-pole Adaptor AO 1386.
If the computer has a 9-pole interface socket, remove the
adaptor.
2.
Start a communications program (e.g. BK–Link, ProComm, or Brüel & Kjær Reporter or Brüel & Kjær dB2XL)
on the computer. If you are using Reporter or dB2XL,
then please refer to your Reporter or dB2XL documentation for more information.
Precision Integrating Sound Level Meter Type 2236
User Manual
5 – 21
bb090913.book : 2236-ch5 Black 22
Chapter 5 – Storing and Transferring Results
Transferring Results to a Computer
3.
Configure the computer as follows:
9600 Baud
8 data bits
1 stop bit
Parity: none
Handshake: XON/XOFF
4.
On the computer, enter the name of the file to which you
want the results to be transferred (see the instruction
manual for the communications program).
5.
Set the sound level meter’s baud rate to 9600 and its
handshake to XON/XOFF (see section 5.4).
The baud rates and handshake of the sound level meter
and the computer must be the same to enable them to
communicate without losing or corrupting data.
5 – 22
6.
Set up the Output Format of the results you want to
transfer (see section 5.5). If you are using Reporter or
dB2XL, or will be using the Logged Results in a spreadsheet program, select the Spreadsheet format.
7.
Set the sound level meter in Pause mode and follow the
instructions given in the figure below.
Precision Integrating Sound Level Meter Type 2236
User Manual
Brüel & Kjær
bb090913.book : 2236-ch5 Black 23
Chapter 5 – Storing and Transferring Results
Transferring Results to a Computer
30
.... 110
PAUSE
F SPL
00:20:00
58.6 dBA
NO
Data
OK
PRINT
Overall Results
Edit
Edit
Settings
OK
▼
NO
Show
PRINT
Overall Results
▼
All Records
Record
Cum. Distrib. Param.
Level Distrib.
Logged Res.
▼
Overall Res.
0
Level
▼
NO
OK
Level*
Frequency Wt.
Parameter
▼
F
S
I
†
▼
Data
▼
•
•
•
PRINT
Overall Results
Brüel & Kjær
B
7/6-'89
K
NO
Type 2236
XX
.
.
2
1
PRINT
Record
-no.XX
▼
Param.
▼
OK
* only available when Record selected
†
XX = last Record in memory
931043/1e
BB0909–13
Precision Integrating Sound Level Meter Type 2236
User Manual
930516/2e
5 – 23
bb090913.book : 2236-ch5 Black 24
Chapter 5 – Storing and Transferring Results
Interpreting the Log Times
The results are transferred to the computer under the name
you have chosen from the computer program.
●
If you have used a standard communications program to
save the data as a spreadsheet file, then you can import
the results into a spreadsheet program (e.g. Microsoft
Excel).
●
If you are using Brüel & Kjær Reporter software, then the
data will be displayed in Reporter.
●
If you are using Brüel & Kjær dB2XL, then the data will
automatically be displayed in Microsoft Excel.
Errors
If the results are not transferred, check:
●
The baud rates and handshake of the sound level meter
and computer. If they are not the same for both, change
the configuration of the computer so that the settings
match those for the sound level meter.
●
Which port is used on the computer.
●
The interface cable between the sound level meter and
the computer.
If none of these steps work, consult your local Brüel&Kjær
service representative.
5.8
Interpreting the Log Times
When logged data is displayed, each log is tagged with the
time the measurement was taken. Sometimes, you may pause
measurement while logging readings, which may cause some
confusion when interpreting your log. This section gives examples that show how to interpret your time readings.
Assume that the sound level meter is set to log at regular
intervals of 10 seconds. The times attached to the logged data
use the following rules:
●
5 – 24
In the print-out, the times always refer to the start of a
measurement period.
Precision Integrating Sound Level Meter Type 2236
User Manual
Brüel & Kjær
bb090913.book : 2236-ch5 Black 25
Chapter 5 – Storing and Transferring Results
Recording on a DAT-recorder
10
:12
●
When a pause is activated (for example, 3 seconds after
a measurement period has started) the measurement will
immediately stop. When pause is deactivated, the measurement will continue and ends when a total of 10 seconds has expired (7 seconds later). This is independent
of the duration of the pause. The measurement period
therefore has been broken into two parts with a pause
in between (see Fig. 5.9).
●
Time periods in which a pause has occurred will be
marked with a P in the print-out. For example, the measurement marked :22P in Fig. 5.9.
7
3
25 s Pause
:22P
10
:57
10
:07
10
:17
Seconds
Logging Time Stamps
960554e
Fig.5.9 An example of logging times with pause intervals
5.9
Recording on a DAT-recorder
Recording signals on a DAT-recorder via the sound level meter
is useful for getting a calibrated recording for full analysis
of impulsive noise or for examining the noise for pure tones.
Also, later on, you can listen to the signal in order to be able
to identify certain events such as a barking dog or slamming
door.
To record:
1.
Connect the DAT recorder to the sound level meter via
the AC Out socket on the base of the sound level meter
using LEMO to BNC Cable AO0403.
An adaptor may be required for the input sockets of
certain DAT-recorders.
2.
BB0909–13
Set the maximum input of the DAT-recorder to at least
500mVrms.
Precision Integrating Sound Level Meter Type 2236
User Manual
5 – 25
bb090913.book : 2236-ch5 Black 26
Chapter 5 – Storing and Transferring Results
Recording on a DAT-recorder
3.
Set the sound level meter to a suitable range (one that
covers the sound levels and does not cause overloads).
It is important to do this to ensure that you know what
range the recorded signal represents.
4.
Start recording.
5.
Record the calibration signal from the calibrator.
This will allow you to accurately adjust the sensitivity of
the analysis equipment on playback.
6.
Measure.
7.
After measuring, record the calibration signal again.
8.
Stop recording and switch the sound level meter off.
For more information on recording using a DAT-recorder, see
the recorder’s manual.
Errors
If the DAT-recorder does not record, check:
●
The cable between the sound level meter and the DATrecorder
●
The DAT-recorder
If neither of these steps works, consult your local Brüel&Kjær
service representative.
5 – 26
Precision Integrating Sound Level Meter Type 2236
User Manual
Brüel & Kjær
bb090913.book : 2236-ch6_TOC.doc Black,Blue 1
Chapter 6
Specifications
6.1
Specifications .........................................................................
6.2
Ordering Information ......................................................
BB0909–13
Precision Integrating Sound Level Meter Type 2236
User Manual
6– 2
6 – 10
6–1
bb090913.book : 2236-ch6 Black 2
Chapter 6 – Specifications
Specifications
6.1 Specifications
Noise Floor:
Under reference conditions:
Standards:
Conforms with IEC 651 (1979) and IEC 804 (1985)
Type 1, and IEC 1672 (Draft, June 1996) Class
1. Conforms with ANSI S1.4 – 1983 and Draft
S1.43, 6th September, 1992 Type 1I. Conforms
with BS 5969 and BS 6698 Type 1 I.
1/1-octave filter set conforms with IEC 1260 – 1995,
Class 1; ANSI S1.11–86, order 3, Type 1–D; and
BS 2475 (1964). (Types 2236 C and 2236 D only)
Measuring Ranges:
Range
(dB)
Max.
Peak
level
Upper limit (RMS) for
signals with crest
factor = 10 (20 dB)
10* – 90
93
73
20† – 100
103
83
30 – 110
113
93
40 – 120
123
103
50 – 130
133
113
60 – 140
143
123
Frequency Weighting
A
C
Lin
Typical Noise Floor
17
18
23
Max. Noise Floor
20
20
26
Level at which noise
floor causes a non-linearity of < 0.4 dB
30
30
36
Level at which noise
floor causes a non-linearity of < 1 dB
26
26
32
At 40°C and 95% RH, add 2 dB to typical values
and 3 dB to maximum values.
Includes preamplifier’s electrical noise and microphone’s thermal noise.
Parameters:
* Only available with Types 2236 C–009 and 2236 D–009
when filter selected.
† For linearity range specifications, see the table given
under Noise Floor.
MaxL, MinL, MaxP, Peak, SPL, Leq, LIm, SEL, IEL,
LEP,d, LN (3 values with L90, L10 and L1 as default)
and Overload in % of measurement time
Resolution:
LN Values: 0.5 dB
Other Parameters: 0.1 dB
Relative Response
(dB)
2
0
L
L
A
C
C
–5
– 10
– 15
5
10
20
50
100
200
500
1k
2k
5k
10k
Frequency (Hz)
20k
50k
930733/1e
Fig.6.1 Nominal frequency weighting characteristics
6–2
Precision Integrating Sound Level Meter Type 2236
User Manual
Brüel & Kjær
bb090913.book : 2236-ch6 Black 3
Chapter 6 – Specifications
Specifications
Relative response (dB)
10
0
– 10
– 20
– 30
– 40
– 50
– 60
– 70
– 80
0.05
0.125
0.25
0.5
1
2
3
4
8 10
20
30
50 f/fm
932122/1e
Fig.6.2
1
/1-octave filter characteristics as a function of frequency, f, against centre frequency, fm. IEC tolerances are shown as dashed lines
Relative response (dB)
1
0
–1
–2
–3
–4
–5
0.5
0.6
0.7
0.8
0.9
1
1.5
2 f/fm
932123/1e
Fig.6.3
1
/1-octave filter characteristics as a function of frequency, f, against centre frequency, fm (detail of Fig.6.2). IEC tolerances are shown as dashed lines
BB0909–13
Precision Integrating Sound Level Meter Type 2236
User Manual
6–3
bb090913.book : 2236-ch6 Black 4
Chapter 6 – Specifications
Specifications
Frequency Weighting:
●
Selected independently for RMS and Peak
RMS:
A, C according to BS5969 Type 1
L: As shown in Fig.6.1 with Type 1 tolerances
Peak:
C according to BS5969 Type 1
L: As shown in Fig.6.1 with Type 1 tolerances
Filter*:
Band-pass Filters: Nine 1/1-octave filters at 1/1octave intervals (base 10)
Centre Frequencies: 31.5, 63, 125, 250, 500Hz,
1, 2, 4, 8kHz
Characteristics: As shown in Figs. 6.2 and 6.3
●
●
Battery low, pause and overload with hold indicators
Time weighting and elapsed measurement time
Frequency weighting (Peak or RMS) or filter
centre frequency†, selected parameter with level
Back-light with switch
The quasi-analogue bar is updated 10 times per
second
Displayed parameter level updated once per second
Exchange Rate:
3dB
Detectors:
Reset:
Simultaneous RMS and Peak with independent
frequency weightings
Linearity Range: 80dB
Pulse Range: 83dB
Non-linear Distortion: Too small to affect accuracy
Peak Detector Rise Time: Typically 50µs
Resets Buffer (including elapsed time) to zero
Warning prior to reset if elapsed time > 1min
Reset when changing frequency or time weighting
Resets all results in Log, Memory and Buffer if
held down together with 〈Data〉
Optional reset when changing level of measurement range (LNs and distributions not available if
range change is without reset)
Time Weighting:
S, F, I according to BS5969 Type 1 (typically better
than Type 0). See Fig.6.4
When Logging Every 0.1 s: 12 ms (indicated on
the display by q)
Memory:
40 Records of Overall Results
Result Logging:
Display:
Leq, L10 and L90
Logged Every: 0.1‡, 1, 10, 30s, 1, 5, 10, 15,
30min or 1hour
4 line LCD showing:
●
Measuring range and quasi-analogue bar
showing input signal
† Only available with Types 2236 C–009 and 2236 D–009
when filter selected.
‡ Only Leq logged at this setting
* Only available with Types 2236 C–009 and 2236 D–009
when filter selected.
Reading in dB referred to continuous signal level (dB)
0
I
F
S
–10
nominal
measured
4 kHz
– 20
t
– 30
1
10
100
Pulse length (ms)
t
931682e
Fig.6.4 Response of the sound level meter to tone bursts of varying characteristics
6–4
Precision Integrating Sound Level Meter Type 2236
User Manual
Brüel & Kjær
bb090913.book : 2236-ch6 Black 5
Chapter 6 – Specifications
Specifications
Logged To: log or interface
Memory Capacity: 128KBytes (Types 2236
A–009 and 2236 C–009). Equivalent to 21600
sets of results (for example, 6h of 1s logging).
512KBytes (Types 2236 B–009 and 2236 D–009).
Equivalent to 86400 sets of results (for example,
24h of 1s logging)
Microphone:
Type 4188 Prepolarized Free-field 1/2″ Condenser
Microphone
Sensitivity: –30 dB re 1V/Pa ±2 dB
Frequency Range: 8Hz to 12.5 kHz ±2 dB
Capacitance: 12pF
Serial Interface:
Compatible with EIA–574
Compatible with EIA–232–E with 25-pole adaptor
Baud Rate: 1200 – 19200
Data Bits: 8
Stop Bit: 1
Parity: None
Handshake: Hardwire, XON/XOFF or None
Result Output Formats:
Overall and Logged Results, Level and Cumulative Distribution
Heading: Long or short
Output Format Types: Printer, Printer (24 char./
line) or Spreadsheet
Distribution Resolution: 1 or 5 dB
Effect of Magnetic Field
80A/m (1Ørsted) at 50 Hz gives <34 dB (L)
Calibration Conditions:
Reference Frequency: 1000 Hz
Reference SPL: 94dB
Reference Temperature: 20°C (68°F)
Reference RH: 65%
Reference Range: 50 – 130 dB (set automatically
during calibration sequence)
Reference Direction of Incidence: Frontal
Calibration Correction with Extension Cable:
0 dB
Environmental Effects:
Storage Temperature: –25 to +70°C (–13 to
+158°F)
Operating Temperature: –10 to +50°C (14 to
122°F)
Effect of Temperature: <0.5 dB (–10 to +50°C)
Effect of Humidity: <0.5 dB for 30%<RH<90%
(at 40°C, 1 kHz)
Vibration Sensitivity
<80 dB with L-weighting at 1m/s–2 horizontally
<85 dB with L-weighting at 1m/s–2 vertically
Batteries:
Short-circuit protected coaxial socket (LEMO series 00)
Output: 50mV/dB equivalent to 0 – 4 V
Output Resistance: 100 Ω
Output: Sampled detector output
Updated: 160 times per second
Four 1.5 V LR6/AA size alkaline cells
Lifetime (at room temperature):
Typically > 12h for Types 2236 A–009 and
2236 B–009.
Typically > 10h for Types 2236 C–009 and
2236 D–009
Internal back-up battery:
Keeps clock and memories operating for 6months
(typically) if fully charged.
AC Output:
External Power Supply:
DC Output:
Short-circuit protected coaxial socket (LEMO series 00)
Output: 0.5V RMS corresponding to the top of
the selected measurement range ±2 dB depending
on the microphone’s sensitivity
Output Resistance: 100 Ω
Signal: Output signal from preamplifier (L frequency weighting)
Clock:
Real-time (calendar) and measurement duration
Factory set to CET
Warm-up Time:
Must fulfil the following specifications
Voltage: regulated or smoothed 7–15V DC
Voltage Ripple: <100mV peak to peak
Maximum Current: 400 mA
Average Current: ~100 mA at 7 V
Socket:
Centre Pin: Positive
Casing: Negative
Pin Diameter: 2.0mm
External Diameter: 5.5mm
Physical Characteristics:
Size: 257×97×41mm
Weight: 460g (incl. batteries)
Less than 5s
BB0909–13
Precision Integrating Sound Level Meter Type 2236
User Manual
6–5
bb090913.book : 2236-ch6 Black 6
Chapter 6 – Specifications
Specifications
CE-mark indicates compliance with EMC Directive
Safety
EN 61010–1 (1993) and IEC 1010–1 (1990): Safety requirements for electrical
equipment for measurement, control and laboratory use
EMC Emission
EN 50081–1 (1992): Generic emission standard. Part 1: Residential,
commercial and light industry
EN 50081–2 (1993): Generic emission standard. Part 2: Industrial environment
CISPR 22 (1993): Radio disturbance characteristics of information technology
equipment. Class B Limits
FCC Rules, Part 15: Complies with the limits for a Class B digital device
EMC Immunity
EN 50082–1 (1992): Generic immunity standard. Part 1: Residential,
commercial and light industry
RF immunity implies that sound level indications of 45 dB or greater will be
affected by no more than ±0.5 dB
EN 50082–2 (1995): Generic immunity standard. Part 2: Industrial environment
RF immunity implies that sound level indications of 60 dB (see note, below) or
greater will be affected by no more than ±0.5 dB
Note:
RF immunity is 14 dB better than the requirements given in IEC 1672 (Draft, June 1996) Class 1.
6–6
Precision Integrating Sound Level Meter Type 2236
User Manual
Brüel & Kjær
bb090913.book : 2236-ch6 Black 7
Chapter 6 – Specifications
Specifications
Frequency Response
Relative response (dB)
3
2
Tol.
1
Tol.
0
-1
Tol.
Tol.
-2
Frequency response satisfies IEC 651 Type 1
-3
10
20
50
100
200
500
1k
2k
5k
10k
20k
Frequency (Hz)
931262/1e
Fig.6.5 Typical free-field response of Microphone Type 4188 for 0 ° incidence without
random incidence corrector
Relative response (dB)
3
2
1
0
-1
-2
Frequency response satisfies ANSI S 1.4–1984 Type 1
-3
10
20
50
100
200
500
1k
2k
Frequency (Hz)
5k
10k
20k
931263/1e
Fig.6.6 Typical diffuse-field response of Microphone Type 4188 with random incidence
corrector
BB0909–13
Precision Integrating Sound Level Meter Type 2236
User Manual
6–7
bb090913.book : 2236-ch6 Black 8
Chapter 6 – Specifications
Specifications
Directional Characteristics:
Brüel
& Kj
ær
0°
0°
Brüel
& Kj
ær
30
°
0°
33
30
°
30
60
0°
°
QP 5
102
QP 5
102
°
0°
60
0°
33
30
50
90°
40
30
20
10
0
1 kHz
50
270°
40
30
20
10
0
8 kHz
0
0
10
10
20
20
30
30
5dB
40
40
50
90°
50
270°
QP 5
102
QP 5
102
0°
0°
0°
12
24
0°
15
0°
21
21
15
0°
0°
12
0°
24
180°
Brüel
& Kj
ær
180°
Brüel
& Kj
ær
0°
Brüel
& Kj
ær
0°
Brüel
& Kj
ær
30
0°
°
33
30
0°
°
33
30
60
0°
°
30
60
0°
50
90°
40
30
20
10
0
2 kHz
50
270°
40
30
20
10
0
12.5
kHz
0
0
10
10
20
20
30
30
40
40
50
90°
QP 5
102
QP 5
102
°
50
270°
QP 5
102
QP 5
102
0°
0°
24
12
0°
0°
24
180°
21
0°
Brüel
& Kj
ær
180°
Brüel
& Kj
ær
21
15
0°
15
0°
0°
12
0°
Brüel
& Kj
ær
30
0°
°
33
30
60
0°
QP 5
102
°
4 kHz
0
0
10
10
20
20
30
30
40
40
50
90°
50
270°
QP 5
102
0°
0
0°
24
21
15
0°
0°
12
+021 ....
04
LVO
00:00:20
A B d 6 ·3 8 L x a M F
K
B
98'-6/7
ræjK & leürB
180°
6322 epyT
Brüel
& Kj
ær
931238/1e
Fig.6.7 Directional characteristics of the complete instrument at 1, 2, 4, 8, 12.5 kHz
6–8
Precision Integrating Sound Level Meter Type 2236
User Manual
Brüel & Kjær
bb090913.book : 2236-ch6 Black 9
Chapter 6 – Specifications
Specifications
Effect of Accessories
(a)
1
Relative
Response
(dB)
0
–1
100
200
500
1k
2k
5k
10k
20k
Frequency (Hz) 931236/1e
100
200
500
1k
2k
5k
10k
20k
Frequency (Hz) 931235/1e
(b)
1
Relative
Response
(dB)
0
–1
Fig.6.8 (a) Effect of the sound level meter’s casing on its frequency response (for reference) compared to (b) the effect of Tripod UA 0801 on the sound level meter’s
frequency response
1
Relative
Response
(dB)
0
–1
100
200
500
1k
2k
5k
10k
20k
Frequency (Hz) 931234/1e
Fig.6.9 Effect of Protective Cover UA 1236 on the sound level meter’s frequency response
BB0909–13
Precision Integrating Sound Level Meter Type 2236
User Manual
6–9
bb090913.book : 2236-ch6 Black 10
Chapter 6 – Specifications
Ordering Information
6.2 Ordering Information
Carrying Cases:
KE 0325:
Type 2236 A
Type 2236 B
Type 2236 C
Type 2236 D
Precision Integrating Sound
Level Meter
Precision Integrating Sound
Level Meter (extended memory)
Precision Integrating Sound
Level Meter with 1/1 -octave filter
set
Precision Integrating Sound
Level Meter with 1/1 -octave filter
set (extended memory)
Carrying Case with insert for
sound level meter, Sound Level
Calibrator Type 4231 and Tripod
UA 1251
Brüel&Kjær reserves the right to change specifications and accessories without notice.
Includes the following accessories:
Type 4188:
KE 0323:
UA 1236:
4 × QB 0013
Prepolarized Condenser Microphone Cartridge
Shoulder Bag
Protective Cover
Four 1.5 V LR6/AA size alkaline
cells
Optional Accessories:
Type 4231:
Type 4226:
Type 7694
Type 7692
Type 2322
UA 1251:
UA 0801:
UA 1254:
UA 0237:
UA 0459:
AO 0408:
AO 0409:
AO 0403
AO 1386
UL 0064
ZG 0386
ZG 0387
ZG 0388
Sound Level Calibrator
Multifunction Acoustic Calibrator
Reporter Software
dB2XL Communication Macro
for Microsoft Excel™
Portable Printer (includes connector cable AO 0532)
Tripod
Tripod
Microphone Holder (for tripod)
Windscreen (∅ 90 mm)
Windscreen (∅ 65 mm)
Microphone Extension Cable
(3 m)
Microphone Extension Cable
(10 m)
LEMO to BNC Cable
9-pole Cable with 25-pole Adaptor (for computer and serial
printer)
Interface Module
Power Supply for Europe
Power Supply for UK
Power Supply for USA
Upgrades:
ZT0326
6 – 10
Octave Filter Set
Precision Integrating Sound Level Meter Type 2236
User Manual
Brüel & Kjær
bb090913.book : 2236-ch7_TOC.doc Black,Blue 1
Chapter 7
Service and Repair
BB0909–13
Precision Integrating Sound Level Meter Type 2236
User Manual
7–1
bb090913.book : 2236-ch7 Black 2
Chapter 7 – Service and Repair
Precision Integrating Sound Level Meter Type 2236 is designed and constructed to provide many years of reliable
operation. However, if a fault occurs which impairs the sound
level meter’s correct function, then remove its main batteries
and disconnect any external power supply to prevent risk of
further damage.
For repair, contact your local Brüel&Kjær service representative.
7–2
Precision Integrating Sound Level Meter Type 2236
User Manual
Brüel & Kjær
bb090913.book : 2236-ch8_TOC.doc Black,Blue 1
Chapter 8
Appendices
8.1
SEL.............................................................................................
8– 2
8.2
LEP,d ..........................................................................................
8– 3
8.3
Controlling the Sound Level Meter
from a Computer ..................................................................
8– 4
Introduction ....................................................................... 8 – 4
Commands ......................................................................... 8 – 6
BB0909–13
Precision Integrating Sound Level Meter Type 2236
User Manual
8–1
bb090913.book : 2236-ch8 Black 2
Chapter 8 – Appendices
SEL
;;
;;
;;
;;
8.1
SEL
SEL (the Sound Exposure Level) is the constant sound level
which, if maintained over 1s, would have the same energy
as the measured Leq over the measurement time, T (see
Fig. 8.1).
Sound Pressure Level (dB)
SEL
1s
Time-varying RMS
Leq
Measurement duration
Time (s)
831794/1e
Fig.8.1 SEL compared to weighted Leq
If the time weighting is I, SEL becomes IEL.
8–2
Precision Integrating Sound Level Meter Type 2236
User Manual
Brüel & Kjær
bb090913.book : 2236-ch8 Black 3
Chapter 8 – Appendices
LEP,d
8.2
LEP,d
LEP,d (the Daily Personal Noise Exposure Level) is the constant sound level which, if maintained over 8 hours, would
have the same energy as the measured A-weighted Leq extended over the Exposure Time, Te (see Fig. 8.2).
L
LAeq
L EP,d
T
Te
t
8h
913275/1e
Fig.8.2 LEP,d compared to LAeq
In Fig. 8.2:
LAeq = the average level during the Exposure Time
T
= the actual measurement time
Te
= The Exposure Time
The Exposure Time can be set using the sound level meter’s
Settings (see section 3.8). Therefore, you can investigate the
effect of different Exposure Times on the LEP,d.
BB0909–13
Precision Integrating Sound Level Meter Type 2236
User Manual
8–3
bb090913.book : 2236-ch8 Black 4
Chapter 8 – Appendices
Controlling the Sound Level Meter from a Computer
8.3
Controlling the Sound Level
Meter from a Computer
8.3.1
Introduction
Messages From the Sound Level Meter
This chapter describes the operation of the sound level meter
via its serial interface. It assumes that you are familiar with
manual operation of the sound level meter and have some
experience of interface programming.
Command Syntax
All commands can be truncated to a mnemonic indicated by
capitals in the section title:
e.g. AUTOLog can be written as AUTOL
If a command is unknown, the sound level meter sends the
following message:
UNKNOWN COMMAND
If a parameter following a command is unknown, the sound
level meter normally treats the command message as a query
message. In some cases, the sound level meter sends an explanatory message instead.
All messages sent to the sound level meter must end with
〈Return〉.
All messages from the sound level meter end with 〈CR〉 and
〈LF〉 (carriage return and line feed).
Note: In the syntax diagrams in section 8.3.2, SP represents
〈Space bar〉 and CR represents 〈CR〉 and 〈LF〉 (carriage
return and line feed).
Setting up the Computer
Warning! When connecting the sound level meter to the
computer, ensure that both the computer and the sound level
8–4
Precision Integrating Sound Level Meter Type 2236
User Manual
Brüel & Kjær
bb090913.book : 2236-ch8 Black 5
Chapter 8 – Appendices
Controlling the Sound Level Meter from a Computer
meter are switched off. Otherwise the instruments could be
damaged.
1.
Connect the computer to the sound level meter via the
Serial Interface socket on the base of the sound level
meter using 9-pole Cable with 25-pole Adaptor AO1386.
If the hrscomputer has a 9-pole interface socket, remove
the adaptor.
2.
Start a communications program (e.g. BK–Link or ProComm) on the computer. Alternatively, use Brüel & Kjær
software such as Reproter or dB2XL, which are written
specifically for communicating with your sound level meter and working with and displaying sound level meter
data.
3.
Configure the computer as follows:
9600 Baud
8 data bits
1 stop bit
Parity: none
Handshake: XON/XOFF (see section 5.4)
4.
Switch on the sound level meter.
5.
Set the sound level meter’s handshake to XON/XOFF and
its baud rate to 9600 (see section 5.4).
6.
Press 〈Enter〉 on the computer.
Communication is established and the prompt (> ) is
shown on the computer screen. The sound level meter
can now be controlled from the computer.
Note: The baud rates and handshake of the sound level meter
and the computer must be the same to enable them to communicate without losing or corrupting data.
BB0909–13
Precision Integrating Sound Level Meter Type 2236
User Manual
8–5
bb090913.book : 2236-ch8 Black 6
Chapter 8 – Appendices
Controlling the Sound Level Meter from a Computer
8.3.2
Commands
There are two types of commands:
●
Commands: Change the set-up of the sound level meter
or order it to do something.
●
Queries: Cause the sound level meter to display information about its setup.
The command and query messages available are listed in
Table 8.1.
Message
Command
Query
AUTOLog
•
•
AUTOStart
•
BATt
Message
Command
Query
FW
•
•
•
HAndshake
•
•
•
OFf
•
BAUd
•
•
PAuse
•
CLock
•
•
PErcentile
•
CONtinue
•
PRint
•
DEFault
•
PW
•
•
DISp
•
•
RANge
•
•
•
RESet
•
ELapsed
ERASE
•
EXPosure
•
•
STOre
•
FOrmat
•
•
TW
•
•
VErsion
FREE
•
•
SETup
•
•
Table 8.1 Command and query message overview
8–6
Precision Integrating Sound Level Meter Type 2236
User Manual
Brüel & Kjær
bb090913.book : 2236-ch8 Black 7
Chapter 8 – Appendices
Controlling the Sound Level Meter from a Computer
AUTOLog
The AUTOLog command message sets the destination of the
data and rate of logging. The query message shows the current status. When logging data over the interface, the sound
level meter cannot be controlled from the computer except to
change the status of the auto logging. Changing the rate of
logging data resets the sound level meter. The data fields and
their settings are listed in Table 8.1.
Field Name
Field Setting
Comments
Status (command)
I
L
O
To interface
To internal log
Off
Rate
0.1*
1s
10 s
30 s
1m
5m
10 m
15 m
30 m
1h
0.1s, Leq only
Status (response)
*
1minute
1hour
INTERFACE
LOG
OFF
Causes TW Status to be set to Q. TW Status cannot be changed while AUTOLog Rate is 0.1 and
Status is not Off
Table 8.2 AUTOLog data fields and codes
BB0909–13
Precision Integrating Sound Level Meter Type 2236
User Manual
8–7
bb090913.book : 2236-ch8 Black 8
Chapter 8 – Appendices
Controlling the Sound Level Meter from a Computer
To Sound Level Meter
Status
AUTOLOG
SP
—
Rate
SP
—
930664e
Fig.8.3 Syntax for the AUTOLog command
To Sound Level Meter
AUTOLOG
From Sound Level Meter
Status
MEASUREMENTS RESET
CR
—
AUTOLOGGING:
SP
—
Rate
SP
—
930665e
Fig.8.4
8–8
Syntax for the AUTOLog query message and sound level meter
response
Precision Integrating Sound Level Meter Type 2236
User Manual
Brüel & Kjær
bb090913.book : 2236-ch8 Black 9
Chapter 8 – Appendices
Controlling the Sound Level Meter from a Computer
AUTOStart
The AUTOStart command message sets the auto start time,
day of the month and status. The query message shows the
current auto start status. The data fields and their settings
are listed in Table 8.3.
To Sound Level Meter
Date
AUTOSTART
SP
—
Time
SP
—
Status
SP
—
930662e
Fig.8.5 Syntax for the AUTOStart command
To Sound Level Meter
AUTOSTART
From Sound Level Meter
Date
AUTOSTART:
Time
SP
—
SP
—
Status
SP
—
930663/1e
Fig.8.6
Syntax for the AUTOStart query message and sound level meter
response
Field Name
Field Setting
Date
DD
Time
HH:MM:SS
Status
ON
OFF
Comments
Up to 1 month ahead
Table 8.3 AUTOStart data fields and codes
BB0909–13
Precision Integrating Sound Level Meter Type 2236
User Manual
8–9
bb090913.book : 2236-ch8 Black 10
Chapter 8 – Appendices
Controlling the Sound Level Meter from a Computer
BATt
The BATt query message shows the current voltage level and
status of the battery. Together with the FREE command, it
is equivalent to the Status Fast Edit function available from
the front plate of the sound level meter. The data fields and
their settings are listed in Table 8.4.
To Sound Level Meter
BATT
From Sound Level Meter
Level
BATTERY VOLTAGE:
SP
—
Status
SP
—
VOLTS
SP
—
930666e
Fig.8.7
Syntax for the BATt query message and sound level meter response
Field Name
Field Setting
Comments
Level
XX.X
Volts
Status
LOW
Replace batteries
Table 8.4 BATt data fields and codes
BAUd
The BAUd command message sets the sound level meter’s
baud rate. After you have changed the sound level meter’s
baud rate, you must change the computer’s baud rate to the
same value in order to continue communicating with the
sound level meter.
8 – 10
Precision Integrating Sound Level Meter Type 2236
User Manual
Brüel & Kjær
bb090913.book : 2236-ch8 Black 11
Chapter 8 – Appendices
Controlling the Sound Level Meter from a Computer
The query message shows the current baud rate. The data
fields and their settings are listed in Table 8.5.
To Sound Level Meter
Rate
SP
—
BAUD
From Sound Level Meter
Rate
SETTING BAUD RATE TO:
930667e
Fig.8.8 Syntax for the BAUd command
To Sound Level Meter
BAUD
From Sound Level Meter
Rate
BAUD RATE:
SP
—
930668e
Fig.8.9
Syntax for the BAUd query message and sound level meter response
Field Name
Field Setting
Rate (command)
12
24
48
96
192
Rate (response)
1200
2400
4800
9600
19200
Comments
1200
2400
4800
9600
19200
Table 8.5 BAUd data fields and codes
BB0909–13
Precision Integrating Sound Level Meter Type 2236
User Manual
8 – 11
bb090913.book : 2236-ch8 Black 12
Chapter 8 – Appendices
Controlling the Sound Level Meter from a Computer
CLock
The CLock command message sets the date and time on the
sound level meter’s calendar and clock. The query message
shows the date and time on the sound level meter’s calendar
and clock. The data fields and their settings are listed in
Table 8.6.
To Sound Level Meter
Date
CLOCK
Time
SP
—
SP
—
930669e
Fig.8.10 Syntax for the CLock command
To Sound Level Meter
CLOCK
From Sound Level Meter
Date
CURRENT DATE & TIME:
SP
—
Time
SP
—
930670/1e
Fig.8.11 Syntax for the CLock query message and sound level meter response
Field Name
Field Setting
Date
YYYY-MM-DD
Time
HH:MM:SS
Table 8.6 CLock data fields and codes
8 – 12
Precision Integrating Sound Level Meter Type 2236
User Manual
Brüel & Kjær
bb090913.book : 2236-ch8 Black 13
Chapter 8 – Appendices
Controlling the Sound Level Meter from a Computer
CONtinue
The CONtinue command message starts a measurement
without resetting the sound level meter.
To Sound Level Meter
CONTINUE
From Sound Level Meter
MEASUREMENTS CONTINUED
930671e
Fig.8.12 Syntax for the CONtinue command
DEFault
The DEFault command message sets the sound level meter
to its default set-up.*
To Sound Level Meter
DEFAULT
From Sound Level Meter
SET TO DEFAULT SET–UP
CR
—
MEASUREMENT RESET
930672e
Fig.8.13 Syntax for the DEFault command
* Baud rate and handshake are not affected.
BB0909–13
Precision Integrating Sound Level Meter Type 2236
User Manual
8 – 13
bb090913.book : 2236-ch8 Black 14
Chapter 8 – Appendices
Controlling the Sound Level Meter from a Computer
DISp
The DISp command message sets the parameter to be shown
on the sound level meter’s screen. The query message shows
the current displayed parameter, its current level and if the
sound level meter is or has been overloaded since the last
reset. The data fields and their settings are listed in Table 8.7.
To Sound Level Meter
Parameter
DISP
SP
—
930673e
Fig.8.14 Syntax for the DISp command
To Sound Level Meter
DISP
From Sound Level Meter
%
Parameter
DISPLAYED PARAMETER:
SP
—
Level
SP
—
SP
—
dB
†
*
SP
—
+
SP
—
OVL
* If currently overloaded
† If overloaded since last reset
930674/2e
Fig.8.15 Syntax for the DISp query message and sound level meter response
8 – 14
Precision Integrating Sound Level Meter Type 2236
User Manual
Brüel & Kjær
bb090913.book : 2236-ch8 Black 15
Chapter 8 – Appendices
Controlling the Sound Level Meter from a Computer
Field Name
Field Setting
Parameter (command)
Parameter (query
response)
Level
MAXP
PEAK
SPL
MAXL
MINL
Leq
SEL
LEPd
OVL
LN1
LN2
LN3
MAXP
PEAK
SPL
MAXL
MINL
Leq
LIm
SEL
IEL
LEPd
OVL
LN1
LN2
LN3
XXX.X
Comments
Set to Leq or LIm
Set to SEL or IEL
LEP,d
LN(1)
LN(2)
LN(3)
Leq
LIm
LEP,d
LN(1)
LN(2)
LN(3)
dB or %
Table 8.7 DISp data fields and codes
BB0909–13
Precision Integrating Sound Level Meter Type 2236
User Manual
8 – 15
bb090913.book : 2236-ch8 Black 16
Chapter 8 – Appendices
Controlling the Sound Level Meter from a Computer
ELapsed
The ELapsed query message shows the current elapsed measurement time. The data fields and their settings are listed
in Table 8.8.
To Sound Level Meter
ELAPSED
From Sound Level Meter
Time
ELAPSED TIME (HHHH:MM:SS):
SP
—
930675/1e
Fig.8.16 Syntax for the ELapsed query message and sound level meter
response
Field Name
Time
Field Setting
HHHH:MM:SS
Table 8.8 ELapsed data fields and codes
8 – 16
Precision Integrating Sound Level Meter Type 2236
User Manual
Brüel & Kjær
bb090913.book : 2236-ch8 Black 17
Chapter 8 – Appendices
Controlling the Sound Level Meter from a Computer
ERASE
The ERASE command message erases the selected results.
The data field settings are listed in Table 8.16.
To Sound Level Meter
Result
ERASE
SP
—
960399e
Fig.8.17 Syntax for the ERASE command
Field Name
Result
Field Setting
L_R
X
ALL
Comments
Logged Results
Record No. X (1-40)
All Records
Table 8.9 ERASE data fields and codes
BB0909–13
Precision Integrating Sound Level Meter Type 2236
User Manual
8 – 17
bb090913.book : 2236-ch8 Black 18
Chapter 8 – Appendices
Controlling the Sound Level Meter from a Computer
EXPosure
The EXPosure command message sets the Exposure Time.
The query message shows the current Exposure Time. The
data fields and their settings are listed in Table 8.10.
To Sound Level Meter
Time
EXPOSURE
SP
—
930676e
Fig.8.18 Syntax for the EXPosure command
To Sound Level Meter
EXPOSURE
From Sound Level Meter
Time
EXPOSURE TIME (HH:MM):
SP
—
930677e
Fig.8.19 Syntax for the EXPosure query message and sound level meter
response
Field Name
Time
Field Setting
HH:MM
Comments
Between 1min and 24hours
Table 8.10 EXposure data fields and codes
8 – 18
Precision Integrating Sound Level Meter Type 2236
User Manual
Brüel & Kjær
bb090913.book : 2236-ch8 Black 19
Chapter 8 – Appendices
Controlling the Sound Level Meter from a Computer
FOrmat
The FOrmat command message sets the selected Output Format. The query message shows the current Output Format
for the selected results. The data fields and their settings are
listed in Table 8.11.
To Sound Level Meter
Type
FORMAT
Heading
SP
—
SP
—
Format
SP
—
Res.
SP
—
930794e
Fig.8.20 Syntax for the FOrmat command
To Sound Level Meter
Type
FORMAT
SP
—
From Sound Level Meter
Type
Heading
:
SP
—
Format
,
SP
—
Res.
SP
—
dB,
SP
930793e
Fig.8.21 Syntax for the FOrmat query message and sound level meter
response
BB0909–13
Precision Integrating Sound Level Meter Type 2236
User Manual
8 – 19
bb090913.book : 2236-ch8 Black 20
Chapter 8 – Appendices
Controlling the Sound Level Meter from a Computer
Field Name
Field Setting
Comments
Type (command, query)
O_R
L_R
L_D
C_D
Overall Results
Logged Results
Level Distribution
Cumulative Distribution
Format (command)*
PR24
PR
SP
Printer (24 char.)
Printer
Spreadsheet
Res.†
1
5
dB
Heading (command)
SH
LO
Short
Long
Type (query response)
OVERALL RESULTS
LOGGED RESULTS
LEVEL DISTRIBUTION
CUMULATIVE
DISTRIBUTION
Overall Results
Logged Results
Level Distribution
Cumulative Distribution
Format (query response)
PRINTER 24 CHAR.
PRINTER
SPREADSHEET
Printer (24 char.)
Printer
Spreadsheet
Heading (query
response)
SHORT HEADER
LONG HEADER
* Only available if Type is Logged_Results
† Only available if Type is Level_Distribution or Cumulative_Distribution
Table 8.11 FOrmat data fields and code
FREE
The FREE query message shows how much time is left in
the sound level meter’s log at the current logging rate, and
how many records are left in the sound level meter’s memory.
Together with the BATt command, it is equivalent to the
Status Fast Edit function available from the front plate of
the sound level meter. The data fields and their settings are
listed in Table 8.12.
8 – 20
Precision Integrating Sound Level Meter Type 2236
User Manual
Brüel & Kjær
bb090913.book : 2236-ch8 Black 21
Chapter 8 – Appendices
Controlling the Sound Level Meter from a Computer
To Sound Level Meter
FREE
From Sound Level Meter
SP
—
FREE LOG:
Log
Status
CR
—
FREE RECORDS:
SP
—
Memory
Status
930680e
Fig.8.22 Syntax for the FREE query message and sound level meter response
Field Name
Field Setting
Log Status
HHH:MM
Memory Status
XX
Comments
Records
Table 8.12 FREE data fields and codes
FW
The FW command message sets the frequency weighting of
the RMS signal. The query message shows the current frequency weighting of the RMS signal. The data fields and their
settings are listed in Table 8.12.
To Sound Level Meter
Status
FW
SP
—
From Sound Level Meter
MEASUREMENT RESET
930681/1e
Fig.8.23 Syntax for the FW command
BB0909–13
Precision Integrating Sound Level Meter Type 2236
User Manual
8 – 21
bb090913.book : 2236-ch8 Black 22
Chapter 8 – Appendices
Controlling the Sound Level Meter from a Computer
To Sound Level Meter
FW
From Sound Level Meter
Status
FREQUENCY WEIGHTING:
SP
—
930682e
Fig.8.24 Syntax for the FW query message and sound level meter response
Field Name
Status (command)
Status (response)
Field Setting
A
C
L
31*
63*
12*
25*
50*
1K*
2K*
4K*
8K*
Comments
31.5Hz
63Hz
125Hz
250Hz
500Hz
1kHz
2kHz
4kHz
8kHz
A
C
L
31.5 HZ*
63 HZ*
125 HZ*
250 HZ*
500 HZ*
1 KHZ*
2 KHZ*
4 KHZ*
8 KHZ*
* Only available with sound level meters with filter sets (Types 2236 C–009 and 2236 D–009)
Table 8.13 FW data fields and codes
8 – 22
Precision Integrating Sound Level Meter Type 2236
User Manual
Brüel & Kjær
bb090913.book : 2236-ch8 Black 23
Chapter 8 – Appendices
Controlling the Sound Level Meter from a Computer
HAndshake
The HAndshake command message sets the form of data
exchange over the interface. The query message shows the
current status. The data fields and their settings are listed
in Table 8.14.
To Sound Level Meter
Status
HANDSHAKE
SP
—
932125/1e
Fig.8.25 Syntax for the HAndshake command
To Sound Level Meter
HANDSHAKE
From Sound Level Meter
Status
HANDSHAKE:
SP
—
932124e
Fig.8.26 Syntax for the HAndshake query message and sound level meter
response
Field Name
Field Setting
Status (command)
HW
X
NO
Status (response)
HARDWIRE
XON/XOFF
NONE
Comments
Hardwire
XON/XOFF
None
Table 8.14 HAndshake data fields and codes
BB0909–13
Precision Integrating Sound Level Meter Type 2236
User Manual
8 – 23
bb090913.book : 2236-ch8 Black 24
Chapter 8 – Appendices
Controlling the Sound Level Meter from a Computer
OFf
The OFf command message switches the sound level meter
off. To switch the sound level meter on, send any character
to the sound level meter (e.g. 〈Break〉).
To Sound Level Meter
OFF
From Sound Level Meter
MEASUREMENTS PAUSED
CR
—
SLM OFF
930683e
Fig.8.27 Syntax for the OFf command
PAuse
The PAuse command message puts the sound level meter in
Pause mode. The pause will take effect on the next even
second of the sound level meter’s clock. Therefore, you must
wait for one full second before sending the next command to
be sure that the pause condition has taken effect.
To Sound Level Meter
PAUSE
From Sound Level Meter
MEASUREMENTS PAUSED
930684e
Fig.8.28 Syntax for the PAuse command
8 – 24
Precision Integrating Sound Level Meter Type 2236
User Manual
Brüel & Kjær
bb090913.book : 2236-ch8 Black 25
Chapter 8 – Appendices
Controlling the Sound Level Meter from a Computer
PErcentile
The PErcentile command message sets the selected percentile. The query message shows all the current percentiles.
The data fields and their settings are listed in Table 8.15.
To Sound Level Meter
No
Percent
SP
—
PERCENTILE
SP
—
930688e
Fig.8.29 Syntax for the PErcentile command
To Sound Level Meter
PERCENTILE
To Sound Level Meter
Percent
PERCENTILE LEVELS:
SP
—
L
930689e
Fig.8.30 Syntax for the PErcentile query message and sound level meter
response
Field Name
Field Setting
Comments
No.
LN1
LN2
LN3
LN1 (default L1)
LN2 (default L10)
LN3 (default L90)
Percent
X
1 to 99
Table 8.15 PErcentile data fields and codes
BB0909–13
Precision Integrating Sound Level Meter Type 2236
User Manual
8 – 25
bb090913.book : 2236-ch8 Black 26
Chapter 8 – Appendices
Controlling the Sound Level Meter from a Computer
PRint
The PRint command message prints the selected results in
the current output format to a connected printer or computer.
If no results are selected, the sound level meter prints the
last selected results. The data fields and their settings are
listed in Table 8.16.
To Sound Level Meter
Result
PRINT
SP
—
930685e
Fig.8.31 Syntax for the PRint command
Field Name
Result
Field Setting
O_R
L_R
L_D
C_D
X
ALL
Comments
Overall Results
Logged Results
Level Distribution
Cumulative Distribution
Record No. X
All Records
Table 8.16 PRint data fields and codes
To stop a print-out in progress, transmit 〈Control〉 + C (i.e.,
hexadecimal: 03; or ASCII: ETX).
PW
The PW command message sets the frequency weighting of
the Peak signal. The query message shows the current frequency weighting of the Peak signal. The data fields and their
settings are listed in Table 8.17.
8 – 26
Precision Integrating Sound Level Meter Type 2236
User Manual
Brüel & Kjær
bb090913.book : 2236-ch8 Black 27
Chapter 8 – Appendices
Controlling the Sound Level Meter from a Computer
To Sound Level Meter
Status
PW
SP
—
From Sound Level Meter
MEASUREMENT RESET
930686/1e
Fig.8.32 Syntax for the PW command
To Sound Level Meter
PW
From Sound Level Meter
Status
PEAK WEIGHTING:
SP
—
930687e
Fig.8.33 Syntax for the PW query message and sound level meter response
Field Name
Field Setting
Status (command)
C
L
Status (query response)
C
LIN
Table 8.17 PW data fields and codes
RANge
The RANge command message sets the measurement range.
The query message shows the current measurement range.
The data fields and their settings are listed in Table 8.18.
BB0909–13
Precision Integrating Sound Level Meter Type 2236
User Manual
8 – 27
bb090913.book : 2236-ch8 Black 28
Chapter 8 – Appendices
Controlling the Sound Level Meter from a Computer
To Sound Level Meter
Status
RANGE
SP
—
930690e
Fig.8.34 Syntax for the RANge command
To Sound Level Meter
RANGE
From Sound Level Meter
Status
RANGE:
SP
—
930691e
Fig.8.35 Syntax for the RANge query message and sound level meter
response
Field Name
Field Setting
Status (command)
90*
100
110
120
130
140
Status (query response)
10 – 90*
20 – 100
30 – 110
40 – 120
50 – 130
60 – 140
Comments
10 – 90
20 – 100
30 – 110
40 – 120
50 – 130
60 – 140
* Only available with sound level meters with filter sets (Types 2236 C–009 and 2236 D–009) when
RMS Frequency Weighting is 31.5Hz – 8kHz
Table 8.18 RANge data fields and codes
8 – 28
Precision Integrating Sound Level Meter Type 2236
User Manual
Brüel & Kjær
bb090913.book : 2236-ch8 Black 29
Chapter 8 – Appendices
Controlling the Sound Level Meter from a Computer
RESet
The RESet command message resets the sound level meter.
Note: There is no reset warning.
To Sound Level Meter
RESET
From Sound Level Meter
MEASUREMENT RESET
930693e
Fig.8.36 Syntax for the RESet command
SETup
The SETup query message shows the sound level meter’s
current set-up. The data fields and their settings are listed
in Table 8.19.
To Sound Level Meter
SETUP
From Sound Level Meter
Parameter
MEASUREMENT SET–UP
CR
—
Status
:
SP
—
930694/1e
Fig.8.37 Syntax for the SETup query message and sound level meter response
BB0909–13
Precision Integrating Sound Level Meter Type 2236
User Manual
8 – 29
bb090913.book : 2236-ch8 Black 30
Chapter 8 – Appendices
Controlling the Sound Level Meter from a Computer
Field Name
Field Setting
Comments
Parameter
FREQUENCY WEIGHTING
PEAK WEIGHTING
TIME WEIGHTING
DISPLAYED PARAMETER
RANGE
CHANGE RANGE
PERCENTILE LEVELS
AUTO LOGGING
AUTO LOGGING RATE
EXPOSURE TIME
AUTO START
Frequency weighting (RMS)
Frequency weighting (Peak)
Status
A/C/L/XXX HZ*
C/L
FAST/SLOW/IMPULSE/Q
(5ms)
XXX
XX – XXX dB
WITH/WITHOUT RESET
LN1 LN2 LN3
ON/OFF
XX
HH:MM
ON/OFF
See Table 8.12
Displayed Parameter
See Table 8.1
* Only available with sound level meters with filter sets (Types 2236 C–009 and 2236 D–009)
Table 8.19 SETup data fields and codes
8 – 30
Precision Integrating Sound Level Meter Type 2236
User Manual
Brüel & Kjær
bb090913.book : 2236-ch8 Black 31
Chapter 8 – Appendices
Controlling the Sound Level Meter from a Computer
STOre
The STOre command message saves the overall results to
the next available record.
To Sound Level Meter
STORE
960400e
Fig.8.38 Syntax for the STOre command
TW
The TW command message sets the time weighting. The
query message shows the current time weighting. The data
fields and their settings are listed in Table 8.20.
To Sound Level Meter
Status
TW
SP
—
From Sound Level Meter
MEASUREMENT RESET
930697/1e
Fig.8.39 Syntax for the TW command
BB0909–13
Precision Integrating Sound Level Meter Type 2236
User Manual
8 – 31
bb090913.book : 2236-ch8 Black 32
Chapter 8 – Appendices
Controlling the Sound Level Meter from a Computer
To Sound Level Meter
TW
From Sound Level Meter
TIME WEIGHTING:
Status
SP
—
930698e
Fig.8.40 Syntax for the TW query message and sound level meter response
Field Name
Field Setting
Status (command)
S
F
I
Status (query response)
SLOW
FAST
IMPULSE
Q*
*
Comments
Slow
Fast
Impulse
Appears when AUTOLog Rate is 0.1. Cannot be changed while AUTOLog Rate is 0.1 and autologging is active
Table 8.20 TW data fields and codes
8 – 32
Precision Integrating Sound Level Meter Type 2236
User Manual
Brüel & Kjær
bb090913.book : 2236-ch8 Black 33
Chapter 8 – Appendices
Controlling the Sound Level Meter from a Computer
VErsion
The VErsion query message shows the version no. and log
capacity, in bytes, of the sound level meter. The data fields
and their settings are listed in Table 8.21.
To Sound Level Meter
VERSION
From Sound Level Meter
SP
—
VERSION:
Version
Status
CR
—
LOGGING MEMORY:
SOFTWARE:
SP
—
SP
—
Memory
Status
Software
Status
SP
—
CR
—
KBYTES
930699/1e
Fig.8.41 Syntax for the VErsion query message and sound level meter
response
Field Name
Field Setting
Comments
Version Status
2236 X–009
X = A, B, C or D
Software Status
N.NN (VP XXXX)
Values for N.NN and XXXX
depend on version number
Memory Status
128*
512†
KBytes
*
†
Available with Precision Integrating Sound Level Meters Types 2236 A–009 and 2236 C–009.
Upgrade to 512KBytes available
Available with Precision Integrating Sound Level Meters Types 2236 B–009 and 2236 D–009
Table 8.21 VErsion data fields and codes
BB0909–13
Precision Integrating Sound Level Meter Type 2236
User Manual
8 – 33
bb090913.book : 2236-ch8 Black 34
8 – 34
Precision Integrating Sound Level Meter Type 2236
User Manual
Brüel & Kjær
bb090913.book : bb090913_IX.doc Black,Blue 1
Index
Numerics
1/1-octave filter ................................ 3–12, 8–21
4226, calibration with ................................... 4–3
4231, calibration with ................................... 4–3
BS 5969 ................................................ 1–2, 6–2
BS 6698 ................................................ 1–2, 6–2
Buffer ............................................................. 1–9
C
A
A, frequency weighting ........... 3–12, 6–4, 8–22
AC Output .......................................... 4–16, 6–5
Accessories .................................................. 6–10
ANSI Draft S 1.43 ......................................... 6–2
ANSI S 1.4 ..................................................... 6–2
Auto logging ................................................ 3–21
default ...................................................... 3–8
effect on time weighting ....................... 3–21
Auto start .................................................... 4–13
default ...................................................... 3–8
AUTOLog ....................................................... 8–7
AUTOStart .................................................... 8–9
B
Back-light .................................................... 3–24
Back-up battery ............................................ 3–6
BATt ............................................................ 8–10
Battery
back-up .................................................... 3–6
level ............................................... 4–7, 8–10
replacing .................................................. 3–5
warnings .................................................. 3–6
BAUd ........................................................... 8–10
Baud rate ............................................ 5–6, 8–10
BS 2475 .......................................................... 1–3
BB0909–13
C, frequency weighting .......... 3–12, 3–14, 6–4,
......................................................... 8–22, 8–27
Calendar ........................................... 3–18, 8–12
wrong date or time .................................. 3–7
Calibration .................................................... 2–3
checking ................................................... 2–7
conditions ................................................. 6–5
free or diffuse field measurements ......... 4–2
nominal level ........................................... 4–3
when ......................................................... 4–2
Calibration set-up
Multifunction Acoustic Calibrator Type
4226 ....................................................... 4–3
Sound Level Calibrator Type 4231 ........ 4–3
Calibrators .................................................... 4–3
Changing
batteries ................................................... 3–5
displayed parameter ............................. 4–15
level, reset due to .................................. 3–10
Settings ........................................... 1–4, 1–7
Checking
calibration ....................................... 2–7, 4–5
Settings .................................................... 1–4
status ....................................................... 4–7
CLock ........................................................... 8–12
Clock ............................................................ 3–18
Precision Integrating Sound Level Meter Type 2236
User Manual
Index – 1
bb090913.book : bb090913_IX.doc Black,Blue 2
Index
Command message overview ........................8–6
Computer
control from ..............................................8–4
set-up ........................................................8–4
transferring results to ...........................5–21
Computer control
switching on the SLM ............................8–24
syntax .......................................................8–4
CONtinue .....................................................8–13
Contrast .......................................................3–24
Controlling from a computer .........................8–4
Controls .............................................................. 5
Cumulative Distribution ....................1–9, 5–16
not available ...........................................3–20
FREE ............................................................8–20
Free memory, log ................................4–7, 8–20
Free-field calibration .....................................4–2
Free-field response ........................................6–7
Frequency analysis, making a ....................4–12
Frequency response .......................................6–7
Frequency weighting
default (Peak) ...........................................3–8
default (RMS) ...........................................3–8
Peak .............................................3–14, 8–26
reset due to changing .................3–12, 3–14
RMS .............................................3–12, 8–21
shown on display ........................3–12, 4–16
FW ................................................................8–21
D
H
Daily Personal Noise Exposure Level ..........8–3
Data ................................................................1–7
Date ...................................................3–18, 8–12
wrong date or time ...................................3–7
DAT-recorder ...............................................5–25
DC Output ..........................................4–16, 6–5
DEFault .......................................................8–13
Default set-up .....................................3–8, 8–13
switching on in .........................................3–8
Diffuse-field calibration ................................4–2
Diffuse-field response ....................................6–7
Directional characteristics ............................6–8
DISp .............................................................8–14
Display ............................................................... 5
Displayed parameter ........................4–15, 8–14
default ......................................................3–8
Distribution
Cumulative ....................................1–9, 5–16
Level ..............................................1–9, 5–15
HAndshake ..................................................8–23
Handshake .....................................................5–6
Hardwire ........................................................5–6
Heading .................................................5–8, 5–9
E
ELapsed .......................................................8–16
Elapsed time ................................................8–16
ERASE .........................................................8–17
Erase ..............................................................5–5
Example measurement .................................2–2
EXposure ......................................................8–18
Exposure Time .........................3–17, 8–3, 8–18
default ......................................................3–8
Extension cable, microphone ........................3–3
External power supply ..................................3–6
F
F, time weighting ........................................3–11
Fast edit .........................................................1–7
Fast time weighting ....................................3–11
Filter .................................................3–12, 8–21
characteristics ..........................................6–3
Fitting batteries .............................................3–5
FOrmat .........................................................8–19
Index – 2
I
I, time weighting .........................................3–11
IEC 1672 ........................................................6–2
IEC 651 ..........................................................6–2
IEC 804 ...........................................................6–2
Impulse time weighting ..............................3–11
Interface set-up ...................................5–6, 8–23
L
L, frequency weighting ............3–12, 3–14, 6–4
..........................................................8–22, 8–27
LEP,d ..................................................3–17, 8–3
Level Distribution ..............................1–9, 5–15
not available ...........................................3–20
Light .............................................................3–24
Linear frequency weighting ............3–12, 3–14,
.................................................6–4, 8–22, 8–27
LN parameters ............................................8–25
not available ...........................................3–20
Log ..................................................................1–9
capacity ..................................................8–33
capacity left ..............................................4–7
free ..........................................................8–20
Logged Results ...........................1–9, 3–21, 8–7
erasing ......................................................5–5
Interpreting times .................................5–24
use in spreadsheet program ..................5–22
Long heading .................................................5–9
M
Measurement .................................................2–6
continue ..................................................8–13
elapsed time ...........................................8–16
example ....................................................2–2
pause ......................................................8–24
Precision Integrating Sound Level Meter Type 2236
User Manual
Brüel & Kjær
bb090913.book : bb090913_IX.doc Black,Blue 3
Index
range ............................................. 3–9, 8–27
standards, re ......................................... 1–10
start automatically ................................ 4–13
Memory .......................................................... 1–9
capacity left ............................................. 4–7
Microphone
extension cable ........................................ 3–3
mounting ................................................. 3–3
response ................................................... 6–7
Mounting the microphone ............................ 3–3
Multifunction Acoustic Calibrator Type 4226
setting up for calibration with ................ 4–3
Power supply, external ................................. 3–6
Practical hints ............................................. 1–10
PRint ............................................................ 8–26
Printer (24 char./line) output format ........ 5–11,
................................................. 5–12, 5–19
Printer output format ...................... 5–10, 5–19
Printing ....................................................... 5–18
Overall Results ........................................ 2–8
results .................................................... 8–26
stopping ...................................... 5–19, 8–26
PW ............................................................... 8–26
Q
N
N.A. ................................................... 3–11, 4–16
Nominal calibration level ............................. 4–3
None (handshake) ......................................... 5–6
q (on display) ............................................... 3–12
Quasi-analogue display .....................................5
Query message overview .............................. 8–6
R
O
Octave filter ...................................... 3–12, 8–21
OFf ............................................................... 8–24
Off ....................................................... 3–9, 8–24
On .............................................. 2–2, 3–8, 8–24
Ordering information .................................. 6–10
Output
AC Output socket .................................. 4–16
DC Output socket .................................. 4–16
Output Formats .......................................... 5–10
Output formats ............................................. 5–8
checking and changing .............. 5–17, 8–19
Cumulative Distribution ...................... 5–16
default ...................................................... 3–8
Level Distribution ................................. 5–15
Printer ........................................ 5–10, 5–19
Printer (24 char./line) ..... 5–11, 5–12, 5–19
Spreadsheet ................................ 5–13, 5–22
Overall Results ................................... 1–10, 5–9
erasing ..................................................... 5–5
printing .................................................... 2–8
recalling ................................................... 5–4
storing ...................................................... 2–7
Overload ...................................................... 3–21
indication via interface ......................... 8–14
P
Parameters
available .................................................. 1–2
changing the displayed .............. 4–15, 8–14
PAuse ........................................................... 8–24
Pause ........................................................... 8–24
Effect on log times ................................. 5–24
Peak frequency weighting ............... 3–14, 8–26
reset due to changing ............................ 3–14
PErcentile .................................................... 8–25
Percentiles ........................................ 3–15, 8–25
default ...................................................... 3–8
BB0909–13
Random incidence corrector ................ 4–3, 4–9
RANge .......................................................... 8–27
Range
default ...................................................... 3–8
measurement ................................ 3–9, 8–27
reset due to change ............................... 3–20
Recall ............................................................. 5–4
Recording ..................................................... 5–25
Records
erasing ..................................................... 5–5
free ........................................................... 4–7
recalling results from .............................. 5–4
storing results in .......................... 5–3, 8–31
Replacing batteries ....................................... 3–5
RESet ........................................................... 8–29
Reset ................................................... 4–9, 8–29
at range change ..................................... 3–20
default ................................................ 3–8
due to changing measurement range ... 3–10
due to changing Peak frequency
weighting ............................................. 3–14
due to changing RMS frequency
weighting ............................................. 3–12
due to changing time weighting ........... 3–11
Results
erasing .......................................... 5–5, 8–17
Logged ........................................... 1–9, 3–21
Overall ................................................... 1–10
printing .................................................. 8–26
recalling ................................................... 5–4
storing .................................. 2–7, 5–3, 8–31
transfer to computer ............................. 5–21
RMS frequency weighting ............... 3–12, 8–21
reset due to changing ............................ 3–12
S
S, time weighting ........................................ 3–11
Screen contrast ........................................... 3–24
Precision Integrating Sound Level Meter Type 2236
User Manual
Index – 3
bb090913.book : bb090913_IX.doc Black,Blue 4
Index
SEL .................................................................8–2
Serial interface ..............................................6–5
Service and repair ............................................. 1
Setting up .......................................................2–5
computer ..................................................8–4
interface .................................................8–23
Settings ..........................................................1–3
changing ..........................................1–4, 1–7
checking ....................................................1–4
overview ...................................................1–6
SETup ..........................................................8–29
Set-up ...........................................................8–29
default ...........................................3–8, 8–13
Short heading ................................................5–8
Sockets ............................................................... 5
Sound Exposure Level (SEL) ........................8–2
Sound Level Calibrator Type 4231
setting up for calibration with ................4–3
Specifications .................................................6–2
Spreadsheet output format ..............5–13, 5–22
Start measurement automatically ....4–13, 8–9
Status ....................................................1–7, 4–7
battery ....................................................8–10
STore ............................................................8–31
Store ...............................................................5–3
Storing Overall Results ......................2–7, 8–31
Switching
off ..............................................................3–9
on .....................................................2–2, 3–8
Syntax
computer control ......................................8–4
time .........................................................3–11
X
XON/XOFF .....................................................5–6
T
Time ..................................................3–18, 8–12
wrong date or time ...................................3–7
Time weighting .................................3–11, 8–31
default ......................................................3–8
fixed ........................................................3–12
reset due to changing ............................3–11
To .......................................................5–19, 8–26
Transferring results to computer ...............5–21
Turning
off ..............................................................3–9
on ..............................................................3–8
TW ................................................................8–31
V
VErsion ........................................................8–33
Version no. ...................................................8–33
Viewing conditions ......................................3–24
W
Weighting
frequency ..................................................6–4
frequency, Peak .....................................3–14
frequency, RMS ......................................3–12
Index – 4
Precision Integrating Sound Level Meter Type 2236
User Manual
Brüel & Kjær