1
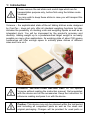
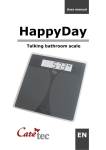
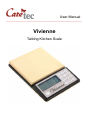
User Manual ____________________________________________________________ Vivienne Talking Kitchen Scale Table of Contents 1: Introduction 2: Description of the device 3: Power Supply 4: Starting up and keys description 4.1: ON/OFF 4.2: Weighing 4.3: Menu 4.4: Tare Weight Function 4.5: Volume 4.6: Key Lock 4.7: Repeat 4.8: Reference Measurement 4.8.1: Setting the Reference Weight („Desired Weight“) 4.8.2: Reference Measurement 4.9: Adding Weight 4.10: Time 4.10.1: Time Announcement 4.10.2: Setting the Time manually 4.11: Date 4.11.1: Date Announcement 4.11.2: Setting the Date manually 4.12: Timer 4.13: Measuring Units 4.14: Weighing Liquids 4.15: Scale Counter 4.15.1: Setting the Scale Counter 4.15.2: Operating the Scale Counter 4.16: Target Weighing Function 4.16.1: Setting the Target Weight 4.16.2: Operating the Target Weight Function 5: Safety Instructions 6: Cleaning the device 7: Technical data 8: Guarantee and Service 9: Legal Notice on the Disposal of Electronic Devices 9.1: Disposal of used Electronic Devices 9.2: Recycling Batteries 10: Symbols used 11: Manufacturer 2 page 3 page 4 page 5 page 6 page 6 page 6 page 6 page 6 page 6 page 7 page 7 page 7 page 7 page 7 page 7 page 8 page 8 page 8 page 8 page 8 page 8 page 8 page 8 page 9 page 9 page 9 page 9 page 9 page 10 page 10 page 10 page 10 page 11 page 11 page 11 page 11 page 11 page 12 page 12 1: Introduction Please remove the red sticks and scotch tape which are for transportation purpose only, before first using the kitchen scale Vivienne! You may wish to keep these sticks in case you will transport the kitchen scale. Vivienne – the sophisticated state-of-the-art talking kitchen scale designed by CareTec - does not only offer all standard weighing functions but also includes the possibility of counting units and weighing liquids as well as an integrated clock. You will be impressed by the product’s accuracy and diversity. Adding weight up to a predetermined target weight is as easily possible as many other applications. Its weighing plate of about 180 square centimetres will offer enough space to soundly place dishes of different sizes and form on it. CONSULT INSTRUCTIONS BEFORE USE! Do not operate Vivienne without reading the instruction manual. Get acquainted with the device and all the accessories. Keep the instruction for reference reading and pass it on with the device. Caution: This device may only be returned within the test period and including all component parts as well as the clean and original packaging. Charges will be prorated for used parts or 3 parts unfixed from the packaging, as well as a possible cleaning of the device and its components. Caution: of 5 kg! Never exceed the allowed maximum weight 2: Description of the device Included in the delivery are a set of batteries (4 x 1.5 V AAA) and a printed user manual. A power supply unit can be ordered optionally. Put Vivienne on its 6 rubber feet, so that the slightly sloped part with the palpable buttons and the big display is facing towards you. Front Side The operating elements and the display should face towards you. You can now feel the following buttons: near the left corner there is a round button with a tactile dot: the ON/OFF key. To the right of the ON/OFF key is a group consisting of 12 keys. These keys are arranged in 4 rows with 3 keys each and will be described (from top to bottom) as follows: First Row In the following manual the three keys of the first row will be called – from left to right – key 1, key 2 and key 3. Key 1 will start the adding weight function, key 2 is needed to operate the reference measurement and key 3 is the function key for the target weighing process. Second Row The keys of the second row will be referred to as key 4, key 5 and key 6 (from left to right). Press key 4 to recall the current time. To recall the current date, press key 6. Key 5, which is also accentuated with a tactile dot, is the menu key. To enter the menu, press and hold key 5. To leave the menu, simultaneously press key 4 and 6. Third Row The keys of the third row are called key 7, key 8 and key 9 (from left to right). You will need key 7 to activate the timer and key 8 to switch between the different measuring units. Key 9 will activate the scale counter. Forth Row The left key (or minus-key) and the right key (or plus-key) of this row will set the volume. Press the right key to increas and the left one to decrease the 4 volume. The middle key also referred to as key 0, will repeat the last measurement taken. Right behind the surface with the operating elements you find the weighing plate. This is where you put the items you wish to weigh. Left Side On the left side of the device there are three sockets. The one closest to you is an earphone socket, the one in the middle is a service connector for our technicians and the one farthest away from you is the socket for the power supply unit. Caution: Earphones and a power supply unit are NOT included in the delivery and have to be ordered separately! Bottom On the bottom of the device you can feel six squared rubber feet, which prevent the device from sliding. Right below the area with the operating elements (i.e. the area closer to you) you can feel the rectangular battery lid, as well as the loudspeaker grill. 3: Power Supply Vivienne can be operated with batteries as well as a power supply unit. A suitable power supply unit is optional and has to be ordered separately. Batteries To access the battery compartment on the bottom pull the latch of the lid towards the loudspeaker grill and lift it at the same time. The lid can not be removed completely. Insert the batteries observing the correct polarity: the flat negative side of the battery must show to the tactile spring located in the battery compartment. Once the batteries are properly inserted, you will hear a melody for confirmation. Close the battery cover gently, until it clicks into place. Caution: Change batteries as soon as Vivienne announces „batteries empty“! Mains Operation: Vivienne can also be operated with an external power supply unit (optional). Connect the power supply unit to the middle socket located on the left side of the device. The batteries can remain inside the device while using it with the power supply unit. 5 4: Starting up and keys description Always place Vivienne on a horizontal, stable and non-slippery surface. Use adequate dishes for weighing solids or liquids. 4.1: ON/OFF To switch the device on, press the ON/OFF key (round button on the left hand corner). You will hear the announcement: „ready“. To turn the device off, press and hold the ON/OFF key until you hear a melody confirming the shutdown of the device. 4.2: Weighing Place the weighing sample in the center of the weighing plate. Once the value is no longer changing, the weight is shown on the large display and announced in a clear, natural voice. 4.3: Menu Press and hold key 5 (second row, middle key – marked with a tactile dot) to enter the menu. You can now select one of the following setting options, by pressing either the minus- or the plus-key: time date timer To confirm one of these functions press the ON/OFF key. To enter one of the settings offered, press and hold the ON/OFF key. To leave menu simultaneously press key 4 and 6 (second row, right and left key). 4.4: Tare Weight Function You can set the scale to zero at any point of the weighing process. To do so press the ON/OFF key after the weight has been announced. Vivienne will say: “tare” and the value shown on the display will be set to zero. The scale is now ready for a new weighing process. The tare weight function is extremely useful if you like to weigh things in a container. You can put the dish on the weighing plate, set the value to zero and start adding weight. You may repeat this process until a maximum load capacity of 5 kg. 4.5: Volume Use the plus and minus keys to set the volume. These two keys are located in the forth row of keys next to the round ON/OFF key. Use the left key to decrease and the right key to increase the volume of the speech output. Vivienne offers 6 volume levels and will announce the current volume level. 6 4.6: Key Lock To activate the key lock simultaneously press and hold the two volume keys. You will hear “keys locked”. To release the key lock, press and hold the two volume keys again until you hear: “keys unlocked”. Caution: The key lock is also deactivated by disconnecting the power supply. 4.7: Repeat To repeat the last result press key 0 (forth row, middle key). 4.8: Reference Measurement This function allows you to determine a so-called desired weight before the measurement. If you start the weighing process after setting the desired weight, Vivienne will indicate by acoustic signals whether the weighing sample is near or exceeding your desired reference value. 4.8.1: Setting the Reference Weight (“Desired Weight“) Press and hold key 2 (first row, middle key) until you hear “launch desired weight”. Place the desired weight on the weighing plate. Vivienne will announce the weight and you can now save it by pressing the ON/OFF key. 4.8.2: Reference Measurement After setting a desired weight, again press key 2 and you will hear “desired weight”. Start adding weight. You will hear a tone frequency while doing so. The closer you are to your desired weight, the higher and faster the toneintervals will be. When exceeding the desired weight, the sounds will become lower again. A continuous beep sound indicates that the desired weight has been reached exactly. To end this function while still weighing, simultaneously press key 4 and 6 (second row, right and left key) or press key 2 or the ON/OFF key. To change the desired weight, proceed as described in chapter 4.8.1. Caution: Please note the filling capacity when you reach the desired weight. 4.9: Adding Weight Vivienne enables you to add weight and recall both, the value added as well as the total weight (value saved). Put a weighing sample on the plate and press key 1 (first row, left key) after the weight has been announced. The already applied weight will then be saved. When adding weight Vivienne will not only announce the value of the weight added, but also indicate the total saved weight. After removing everything from the weighing 7 plate the last value will be announced. To add weight more than once, repeat the process accordingly. To delete the saved value, press and hold key 1. 4.10: Time 4.10.1: Time Announcement Press key 4 (the left key in the second row) and Vivienne will announce the current time. 4.10.2: Setting the Time manually If you want to set the time manually, press and hold key 4 (row 2, left key) until you hear “set time”. You can now set the time by pressing the minusor plus key. Confirm your setting with the ON/OFF key and proceed the same way when setting the minutes. 4.11: Date 4.11.1: Date Announcement Press key 6 (the right key in the second row) and Vivienne will announce the current date. 4.11.2: Setting the Date manually If you want to set the date manually, press and hold key 6 (row 2, right key) until you hear “set date”. You can now set the date by pressing the minusor plus key. Confirm each setting with the ON/OFF key and proceed as described. 4.12: Timer Press and hold key 7 (third row, left key) to enter the settings for the timer. By pressing the minus- or plus key you first have to decide whether the timer should be active or not. Confirm your selection with the ON/OFF key. After this, select the minutes by pressing the minus- or plus key and confirm by pressing the ON/OFF key. Proceed accordingly to set the seconds. The timer is now active and Vivienne will once again announce the settings you have made. During the countdown phase you will hear a beep sound after every minute. During the last minute of the countdown phase Vivienne will emit a beep sound every 10 seconds, just as during the last 10 seconds of the countdown process. You can always recall the remaining time by pressing key 7. If you would like to exit the settings menu before starting the timer function, simultaneously press key 4 and 6. 4.13: Measuring Units Press key 8 (third row, middle key) to switch between the weighing units. 8 4.14: Weighing Liquids Press key 8 (third row, middle key) to select one of the liquids available: milk (1030 grams / liter), cooking oil (910 grams / liter) or water (998 grams / liter). After your selection you can measure the respective liquid. 4.15: Scale Counter Do you have a jar full of candy and would like to know how many pieces this jar contains? Vivienne’s scale counter function will help you to find out the exact number of candy in the jar. Caution: Calculations are based on a certain reference weight. The exact number of pieces may therefore vary if not all pieces are of the exact same weight! 4.15.1: Setting the Scale Counter Press and hold key 9 (third row, right key) to enter the scale counter function. You will hear “Setting the scale counter – apply reference weight”. Put one or more pieces of the items you want to measure on the weighing plate and confirm the reference weight by pressing the ON/OFF key. Vivienne will now ask you to enter a number. Enter the number of pieces equivalent to the reference weight with the number keys (e.g. for “1” press key 1) and confirm with the ON/OFF key. If you enter zero or no number at all, the scale counter will automatically assume that the reference weight refers to one piece. You can always exit the scale counter function by simultaneously pressing key 4 and 6. If you would like to change the reference weight, re-start the scale counter by pressing and holding key 9 again. 4.15.2: Operating the Scale Counter After setting the reference weight you can place the container holding the respective items (e.g. the jar of candy) on the weighing plate and start the scale counter by pressing key 9. Vivienne will then announce the exact number of pieces in the container. As long as the scale counter function is active you can repeat this procedure by pressing key 0 (forth row, middle key). Each keystroke on key 9 will switch between the scale counter function and the normal weighing function. 4.16: Target Weighing Function This function allows you to enter a desired target weight before the weighing process. You just enter the weight you need via the number keys and Vivienne will then emit different acoustic signals indicating whether the weighing sample is near the desired target weight. 9 4.16.1: Setting the Target Weight Press and hold key 3 (first row, right key) until you hear „set target weight“. Enter the target weight by pressing the number keys (e.g. number key 5 to enter “5” etc.) and confirm your choice by pressing the ON/OFF key. 4.16.2: Operating the Target Weight Function After setting the target weight, once again press key 3 and Vivienne will announce “Target Measurement”. Start adding weight. You will hear a tone frequency while doing so. The closer you are to the target weight, the higher and faster the tone-intervals will be. A continuous beep sound indicates that the target weight has been reached exactly. To end this function while still weighing, simultaneously press key 4 and 6 (second row, right and left key) or press key 3 or the ON/OFF key. To change the stored target weight, proceed as described in chapter 4.16.1. 5: Safety Instructions Do not expose the device to high humidity, extremely high or low temperatures or any dust or dirt. The operating temperature of the device lies between +5 and +30°C. If any liquid enters the device, remove the batteries, path the case dry with a cloth and let the device dry completely. Place the device on a horizontal, stable and non-slippery surface, such as a kitchen counter. If you do not use the device for an extended period, remove the batteries to avoid leakage. When inserting the batteries pay attention to the correct polarity. This kitchen scale is designed to support a maximum load of 5 kilogrammes. Never exceed the allowed maximum weight! When not in use, do not place any items on the weighing plate. Serviceability and measurement accuracy may be impaired by electromagnetic fields (e.g. by using a cell phone in direct proximity of the device). 6: Cleaning the device Use a lightly moistened cloth to clean the case of the device. Caution: No liquids should enter the device! Avoid strong acid or scrubbing cleansers and do not clean the surface with rough sponges as they might damage the case of the device. 10 7: Technical data Dimensions: Weight: L/B/H: 220x145x(25.5-26.8)mm 612g 660g (incl. batteries) Power Supply: 4 x 1.5V AAA Micro batteries power supply unit (not included in the delivery) Scope of Delivery: Talking kitchen scale Vivienne, 4 x 1.5V AAA Micro batteries, printed user manual Optional: power supply unit, earphones 8: Guarantee and Service From the date of purchase, we issue to the original purchaser of this product a guarantee of: twenty-four (24) months on the device itself, twelve (12) months on the accessories (e.g. power supply, earphones etc.), six (6) months on wear parts (e.g. battery, case etc.) Please note that we do not issue any guarantee on batteries! During the guarantee periods mentioned above, the product will be either repaired or replaced free of charge. In no event shall CareTec be liable for indirect, special or consequential damages. The exposure of the device to liquids, strong electromagnetic fields, heat as well as dropping the device or opening the case causes immediate loss of guarantee. In case of problems please contact CareTec or your local distributor before returning the device without any apparent reason. We will then inform you about the necessary procedures. The device may only be opened by authorized technicians! CareTec reserves the right to make any changes or improvements to its products without further notice. 9: Legal Notice on the Disposal of Electronic Devices 9.1: Disposal of used Electronic Devices This product must be disposed of separately from household waste at specially designated collection and recycling points. For further information please contact your local authorities. 9.2: Recycling Batteries Batteries must not be disposed of in household waste. As a consumer you are legaly obligated to bring your old batteries to public collecting points (in your community or any shop that provides these batteries). 11 Pb-Cd-Hg These signs can be found on contaminant-laden batteries. Pb = containing lead Cd = containing cadmium Hg = containing mercury 10: Symbols used Caution. Additional information. Must be disposed off separately from household waste. Manufactured by. 11: Manufacturer CareTec International GmbH, Stubenbastei 1, A-1010 Vienna, Austria is the manufacturer of this product. Phone: (+43 1) 513 80 81 0 Fax: (+43 1) 513 80 81 9 E-mail: [email protected] Web: www.caretec.at Vivienne 09/2011 12