1
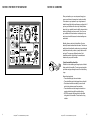
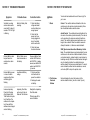
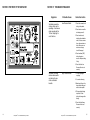
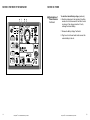
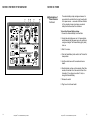
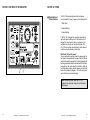
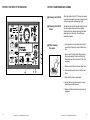
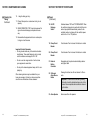
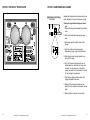
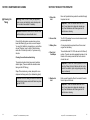
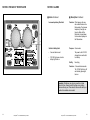
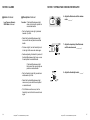
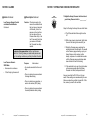
TABLE OF CONTENTS
■ Sections
64
Respironics® PLV-100 Patient Manual, p/n 35555
1
Preface
2
Introduction
3
You and Your Ventilator
4
Do’s and Don’ts
5
The Front of the Ventilator
6
The Back of the Ventilator
7
Setting-Up & Checking the Ventilator
8
Alarms
9
Maintenance and Cleaning
10
Power
11
Troubleshooting Guide
12
Humidifiers
13
Important Words to Know
14
Daily Ventilator Checklist
15
Notes
Respironics® PLV-100 Patient Manual, p/n 35555
1
Warnings and
Cautions
▼ Throughout this manual the following definitions apply:
•
Warning: A condition that may cause injury to a patient or operator if instructions
are not followed.
•
Caution: A condition that may cause damage or shorten the service life of the PLV-100.
▲ Personnel using and operating the PLV-100 must become familiar with this instruction
manual before initial setup and use.
Warnings
▲ Equipment that does not function correctly or alerts the user to a potential problem, (by
sounding an alarm), must not be used until the problem is corrected.
▲ Do not use the PLV-100 in the presence of flammable anesthetics.
▲ Do not remove any covers or panels. Refer all servicing to authorized service personnel.
▲ To avoid the entrainment of battery gases into the intake ports on the rear panel do not
operate the PLV-100 directly above a battery.
▲ Due to the wide variety of disposable tubing, the user must be certain the connection to
the patient air outlet fits properly.
Cautions
▲ Do not place containers of liquids on the ventilator. Do not spill liquids on the ventilator.
▲ The PLV-100 must be periodically checked and maintained to ensure proper operation.
▲ Do not use the PLV-100 to charge a deeply discharged external battery.
Thank you for using the Respironics PLV-100
▲ Connect the PLV-100 only to a grounded outlet.
▲ If either front panel circuit breaker trips, reset by pushing the round circuit breaker knob in
until it “clicks” back into position. If the breakers continue to trip after resetting, return the
ventilator to an authorized service personnel for repair.
▲ Do not position the PLV-100 as to block the air intake ports located on the rear panel.
▲ Performance may be affected at temperatures below -5°C (23°F) and above 41°C
(106°F).
▲ Do not disconnect the external battery while the unit is operating under load. This may cause
the unit to repeat the diagnostic start-up cycle.
▲ Do not operate the unit on the internal batteries in place of external batteries.
▲ To decrease the chance of depleting the wheelchair battery, do not use the battery as the
external power source for the PLV-100.
▲ Storage of the unit with a partially discharged internal battery severely decreases the
battery life. Always store the unit with the power plug connected to AC voltage, or only
after fully charging the internal battery from AC voltage.
▲ Frequent and/or prolonged use of the unit on internal battery shortens the battery life. This
requires close monitoring of the battery strength and may require battery replacement
sooner than the normal maintenance interval.
▲ Caution: Federal law restricts this device to sale by or on the order of a physician.
2
Respironics® PLV-100 Patient Manual, p/n 35555
Respironics® PLV-100 Patient Manual, p/n 35555
63
SECTION 15: NOTES
SECTION 1: PREFACE
Important reminders from your home care team:
_______________________________________________________________________________
Respironics wishes to thank Karen Glenn, RRT, and Barry Make, MD, of the National
Center for Home Mechanical Ventilation for their assistance in the writing of this
manual. Their professional expertise was invaluable in the organization and presentation of this material. We know that you will find this information helpful in your use of
the PLV®-100 ventilator.
_______________________________________________________________________________
_______________________________________________________________________________
_______________________________________________________________________________
Users of the manual are also referred to the PLV-100 Operating Manual for additional
information on the operation of this ventilator.
_______________________________________________________________________________
_______________________________________________________________________________
_______________________________________________________________________________
_______________________________________________________________________________
Questions for your home care team:
_______________________________________________________________________________
_______________________________________________________________________________
_______________________________________________________________________________
_______________________________________________________________________________
_______________________________________________________________________________
_______________________________________________________________________________
_______________________________________________________________________________
_______________________________________________________________________________
_______________________________________________________________________________
_______________________________________________________________________________
_______________________________________________________________________________
62
Respironics® PLV-100 Patient Manual, p/n 35555
Respironics® PLV-100 Patient Manual, p/n 35555
3
SECTION 2: INTRODUCTION
SECTION 14: DAILY VENTILATOR CHECKLIST
Your new ventilator is the PLV-100 made by Respironics. Your health care professional (doctor, nurse or therapist) has ordered this ventilator to meet your needs.
This manual is designed to help you use and care for the PLV-100. Please read this
manual and become familiar with the PLV-100 before using the ventilator. Before using
the ventilator for the first time, make sure your health care professional (doctor, nurse
or therapist) demonstrates how to use the PLV-100.
Ventilator Settings Checklist
Date Settings last changed
Mode:
___________
___________
Tidal volume:
___________
Rate:
___________
The PLV-100 is controlled by a small computer chip and is electrically powered. It can
be plugged into a wall outlet or connected to a car-type battery. It also has an internal
battery for short-term emergency power.
Inspiratory Flow:
___________
Sensitivity Points to:
___________
The PLV-100 is designed for long term use in the home.
Airway Pressure Limit
Because of its small and lightweight design, the PLV-100 is portable. However, check
with your home care company before traveling with the ventilator.
For more help call your home care company or Respironics.
4
Respironics® PLV-100 Patient Manual, p/n 35555
points to:
___________
Low Pressure Alarm
Set points to:
___________
Usual breath pressure:
___________
Humidifier Setting
___________
Air Temperature
___________
Oxygen % or Flow
___________
PLV-100 Serial Number:
___________
Date PLV-100 in use:
___________
PLV-100 hours at start:
___________
Respironics® PLV-100 Patient Manual, p/n 35555
61
SECTION 14: DAILY VENTILATOR CHECKLIST
My Doctor
Name: _______________________________
Address: _____________________________
____________________________________
Phone _______________________________
My Home Care Company
SECTION 3: YOU AND YOUR VENTILATOR
Your body needs to move fresh air into and out of the lungs. Muscles help pump the
air into the lungs. As fresh air moves through the nose and mouth it is warmed, filtered, and moisturized. The air then travels through the windpipe and into the lungs.
The lungs are the sight where the oxygen from the air is absorbed by the body and
carbon dioxide is released.
Your doctor has ordered the PLV-100 ventilator to help pump air into your lungs. This
ventilator is adjustable to meet your personal needs. Because your doctor knows how
much air you need from the ventilator, the ventilator is set to:
Name: _______________________________
• Pump the right amount of air into your lungs with each breath, (called the tidal volume).
Address: _____________________________
• Deliver the right number of breaths each minute, (called the breathing rate).
____________________________________
Phone: _______________________________
If power failure: Power Company
Name: _______________________________
• Move air into your lungs at the speed you need, (called inspiratory flow).
The PLV-100 ventilator provides all of your breaths or just some of your breaths. A
machine breath is when the ventilator delivers a breath. When you take a breath on
your own, this is called a patient breath. Your ventilator can even be set to deliver a
breath when you start to take a breath on your own – called an assisted breath.
Phone: _______________________________
Patient Name: _________________________
Address: _____________________________
60
Respironics® PLV-100 Patient Manual, p/n 35555
Respironics® PLV-100 Patient Manual, p/n 35555
5
SECTION 4: DO'S AND DON'TS
■
Please Do!
• Read this manual and learn how to operate the PLV100 before using it.
• Use the PLV-100 only at the settings prescribed. If you
are unsure of the settings, contact your home care
company or doctor.
Tidal Volume
Size of the breath the ventilator delivers. This is measured in
liters (1 liter= about 1 quart).
Inspiratory Flow
Speed the ventilator delivers a breath. This is measured in liters
per minute (abbreviated LPM).
• If there is a problem with the PLV-100, FIRST MAKE
SURE THAT YOU ARE ABLE TO BREATHE – use a
backup ventilator or manual resuscitator if necessary –
then call your home care company immediately.
Patient Rate
Number of breaths the machine is set to deliver each minute. It
is measured in breaths per minute (abbreviated BPM).
• If the circuit breaker on the front of the ventilator trips,
reset it once. If it trips again, use a backup ventilator or
manual resuscitator and call your home care company
immediately.
Machine Breath
Breath given by the machine at the set tidal volume, (size of the
breath), and the set inspiratory flow rate, (rate the breath is delivered).
• Use the Daily Ventilator Checklist each day, (located in
Section 14 at the back of this manual), to make sure
that the ventilator is working right.
• Connect the PLV-100 to a 3-prong, grounded outlet
when wall power is used. Check with your home care
company or power company if your are unsure about
the outlets in your home.
• Replace the fuse on the back of the ventilator, (when
needed), with a 5 amp slow blow fuse, type 3AG.
6
SECTION 13: IMPORTANT WORDS TO KNOW
Respironics® PLV-100 Patient Manual, p/n 35555
Assisted Breath
Breath given by the ventilator at the set tidal volume and inspiratory flow rate that the patient starts by beginning to breathe in.
This kind of breath can only happen in Assist/Control Mode and
SIMV Mode.
Patient Breath
Breath taken on your own through the ventilator tubing. You can
take the breath at the speed and size you want. This kind of
breath is only possible in the SIMV mode.
Respironics® PLV-100 Patient Manual, p/n 35555
59
SECTION 12: HUMIDIFIERS
LIFECARE®
Artificial Nose
SECTION 4: DO'S AND DON'TS
The Artificial Nose Humidifier
The artificial nose is a short piece of tubing. When
you breathe out, the moisture in this air is trapped
inside the tubing. The next breath you take goes
through the tubing and picks up the moisture. This
process happens with each breath.
General important points:
• Artificial noses are very easy to use when you
are away from home because they do not need
refilling and cannot spill.
• Phlegm can get trapped in the artificial nose
and block the air from going through it.
• They must be changed on a regular schedule,
usually more often than the ventilator tubing.
• They do not give as much humidity as the
heated humidifier, and some individuals who
have tracheostomy tubes may not get enough
humidity.
58
Respironics® PLV-100 Patient Manual, p/n 35555
■ Please Don't!
• Don't use the PLV-100 until a health care professional,
(your doctor, nurse or respiratory therapist), says that
you are ready to operate it.
• Don't use any equipment if it does not work right or
continues to alarm.
• Don't set containers of liquid on or near the PLV-100.
• Don't block the intake air ports on the back of the ventilator.
• Don't use the PLV-100 at temperatures below 23°F
(-5°C) and above 106°F (41°C).
• Don't open the case of the PLV-100. All repairs must
be done by specially trained service people.
Respironics® PLV-100 Patient Manual, p/n 35555
7
SECTION 5: THE FRONT OF THE VENTILATOR
SECTION 12: HUMIDIFIERS
When you breathe on your own, air passes through your
nose or mouth where it is warmed and moisture is added.
This moisture is very important for your lungs because it
helps the lungs fight infection and keeps your phlegm thin. If
you use your ventilator with a tube in your throat (tracheostomy tube), you probably have a humidifier, because the air
does not go through your nose or mouth. Even if you use
your ventilator with a nasal mask or mouthpiece you may
want to use a humidifier because it makes breathing more
comfortable.
Basically, there are two kinds of humidifiers. One is an
electrically heated container that holds water. The other is a
small device that catches the moisture in air you exhale and
adds it the next breath you take in, (usually called an artificial nose). There are many different brands of both
humidifiers available. Always follow the manufacturer’s
directions for your specific humidifier.
Typical Heat and Water Humidifier
A breath from the ventilator goes through a piece of ribbed
tubing and into the humidifier. The air is warmed and picks
up moisture and goes through the rest of the ribbed tubing
to you.
General important points:
• These humidifiers give the most moisture.
• These humidifiers need to be plugged into a wall outlet.
• Since these humidifiers use water, you need to add
water to the container several times each day.
• These humidifiers must be changed or cleaned on a
regular schedule along with the ventilator tubing.
• NEVER dump water that has collected in the ribbed
tubing back in the humidifier. This can lead to a lung
infection.
8
Respironics® PLV-100 Patient Manual, p/n 35555
Respironics® PLV-100 Patient Manual, p/n 35555
57
SECTION 11: TROUBLESHOOTING GUIDE
Symptom
Ventilator is working
and an alarm sounds
once briefly for about 3
seconds. 120 VAC light
is flashing.
SECTION 5: THE FRONT OF THE VENTILATOR
Probable Cause
Corrective Action
Switch to Battery Alert
sounding.
1. Check the battery
voltage and make
sure the battery has
enough power.
■ Mode
1. Mode
3. Check the house
fuse/circuit breaker.
56
Battery Cable connections are reversed on
the battery.
Reconnect Battery Cable
with the WHITE cable to
the POSITIVE (+) battery
terminal, and the BLACK
cable to the NEGATIVE
(–) terminal.
External Battery power
is in use. An alarm
sounds and the External Battery light is
flashing.
Low External Battery
voltage
1. Plug the ventilator
into a wall outlet to
power the ventilator.
Increase Inspiratory
Flow light is flashing
after changing Rate,
Tidal Volume or Inspiratory Flow Rate. The
numbers in the Inspiratory Flow and Rate
windows have changed
and are flashing.
Inspiratory Flow Rate
set too low for the set
Rate and Tidal Volume.
2. Recharge the external battery.
Respironics® PLV-100 Patient Manual, p/n 35555
Control: The ventilator delivers all breaths at the size
and rate set on the machine, (machine breaths). More
than the allotted breaths cannot be taken.
Assist/Control: The ventilator delivers all breaths at the
size set on the machine, (machine breaths). The rate set
on the machine is the minimum number of breaths received. The ventilator delivers more breaths when you
begin to take a breath. When the ventilator senses an
attempt to breathe in, it delivers an assisted breath.
2. Check that the
power cord is securely plugged into
back of ventilator
and the wall outlet.
External Battery cable
has just been connected and an alarm
sounds.
Your doctor has decided which one of these is right for
you to use:
SIMV (Synchronized Intermittent Mandatory Ventilation): The ventilator delivers machine breaths at the size
and rate set on the machine. Additional breaths, that are
not machine breaths, (patient breaths), may be taken by
breathing normally. When the ventilator senses the beginning of a breath just before the ventilator delivers a
machine breath, it delivers an assisted breath. To make it
easier to breathe, without machine assistance, connect
an H-valve (SIMV valve) in the patient circuit.
2. Tidal Volume
Knob and
Window
Sets and displays the size, (tidal volume), of the
machine breaths in liters, (one liter = about 1 quart).
Readjust the Inspiratory
Flow Rate knob.
*Refer to page 40 for
more information.
Respironics® PLV-100 Patient Manual, p/n 35555
9
SECTION 5: THE FRONT OF THE VENTILATOR
SECTION 11: TROUBLESHOOTING GUIDE
Symptom
Ventilator passed the
start-up check and is
operating. A continuous
alarm sounds and the
15 Sec. Delay light is
on all the time.
Probable Cause
Low Pressure Alarm
Corrective Action
1. Check the connection of
tubing to the patient.
2. Check trach or mask for
air leaking around it.
3. Check entire circuit,
including the exhalation
valve, for loose connections, disconnections or
holes. Re-secure connections or change
circuit if damaged.
4. Check medium (PAP)
tubing for water or
mucous. Replace tubing
if dirty.
5. Check that the Low
Pressure Alarm is set
correctly.
Ventilator is working
and an alarm sounds
only during the machine or assisted
breaths.
High Pressure Alarm
1. You are speaking or
coughing.
2. You need suctioning.
3. Water has built up in the
large ribbed tubing and
needs to be emptied.
4. The large ribbed tubing
is pinched. Check
tubing for damage after
freeing.
5. Check that the Airway
Pressure Limit is set
correctly.
10
Respironics® PLV-100 Patient Manual, p/n 35555
Respironics® PLV-100 Patient Manual, p/n 35555
55
SECTION 11: TROUBLESHOOTING GUIDE
SECTION 5: THE FRONT OF THE VENTILATOR
WARNING: Whenever there is an alarm, check that you can
breathe; use a back-up ventilator or manual resuscitator if
needed, unless you find and fix the problem right away.
Symptom
Probable Cause
Ventilator switched
“ON” and does not
operate. A continuous
alarm sounds.
1. There is no power to
the unit.
1. Plug into wall outlet to
power ventilator and
charge batteries.
2. Circuit breaker
tripped.
2. Push the circuit
breakers back in. If
the circuit breaker
trip again, do not
use this ventilator,
and call your home
care company.
3. Shipping fuse problem.
54
Corrective Action
“1.0” or “2.0” is displayed in Tidal Volume
window. Ventilator does
not operate and “Fast
Beep” alarm sounds.
Ventilator computer
problem.
The ventilator passed
the start-up check and
begins operation. A 3second alarm sounds
and Internal Battery
light is flashing.
Low Internal Battery
voltage
Respironics® PLV-100 Patient Manual, p/n 35555
3. Check that the shipping fuse is in place,
or replace.
DO NOT USE THIS
UNIT. Call your home
care company to service your ventilator.
1. Connect ventilator to
a wall outlet or an
external battery at
once to keep ventilator working.
■ Mode
(Continued)
3. Rate Knob
and Window
This knob sets the number of machine breaths delivered
each minute, (counted as BPM = breaths per minute).
Depending on the ventilator Mode used, the window
shows:
a. Control Mode: The number of machine breaths is
shown.
b. Assist/Control Mode: The total number of machine
breaths and assisted breaths are shown.
c. SIMV Mode: The total number of machine breaths,
assisted breaths and patient breaths are shown.
4. I:E Ratio
Window
Shows the ratio of length of time used to breathe in (inspiration) compared to the length of time used to breathe out
(expiration) during machine breaths. There are 2 numbers
in this window separated by a colon (for example, 1:2).
5. Inspiratory
Flow Rate
Knob and
Window
Sets and shows the Inspiratory Flow Rate, (that is how
fast the ventilator delivers the breath).
6. Increase
Inspiratory
Flow Light
This light turns on when the machine’s settings are changed
to values that it cannot accommodate. See page 43.
2. Recharge Internal
Battery.
Respironics® PLV-100 Patient Manual, p/n 35555
11
SECTION 5: THE FRONT OF THE VENTILATOR
SECTION 10: POWER
■ Explanation of
Power Sources
Continued
To check the Internal Battery voltage (continued):
6. Read the voltage level in the Inspiratory Flow Rate
window; this is not the amount of time left in the battery charge. If the voltage is less than 10 volts,
recharge the Internal Battery.
7. Release the Battery Voltage Test Switch.
8. Plug the unit into the wall outlet and/or connect the
external battery to the unit.
12
Respironics® PLV-100 Patient Manual, p/n 35555
Respironics® PLV-100 Patient Manual, p/n 35555
53
SECTION 10: POWER
■ Explanation of
Power Sources
Continued
SECTION 5: THE FRONT OF THE VENTILATOR
Internal Battery 12 Volt DC Power:
The PLV-100 has a built-in internal battery for a short
term power source. A fully charged battery powers the
PLV-100 for up to one hour, depending upon the ventilator
settings. An audible alarm sounds and the Internal Battery light flashes when the internal battery voltage is low.
The internal battery slowly recharges whenever the ventilator is connected to a wall outlet — even when the
Power Switch is off.
To check the Internal Battery voltage:
1. Unplug the Power Cord from the wall outlet. A 3-second alarm sounds warning that the power source the
ventilator is using has changed.
■ Pressure
7. Sensitivity
Knob
In Assist/Control Mode, this controls the amount of
breathing effort needed to start an assisted breath.
In SIMV Mode, this controls the amount of breathing
effort needed to count patient breaths or assisted
breaths.
8. Assist/
Spontaneous
Light
This light turns on briefly when:
In Assist/Control Mode - when there is an assisted
breath.
In SIMV Mode - when there is an assisted breath or a
patient breath.
2. Disconnect the External Battery. A 3-second alarm
sounds to tell you that the power the ventilator is using
has changed. The Internal Battery light (gold) turns on.
Important: This light does not turn on in the Control
Mode.
3. Wait 2-3 minutes.
4. Push the Battery Voltage Test Switch to the "Internal"
or up position.
9. Low Pressure
Alarm Set
Knob
This sets the pressure at which the low pressure alarm
sounds. This alarm sounds when the ventilator becomes
disconnected from the patient. This safety alarm has a
15-second delay.
10. 15 Second
Delay Light
As part of normal operation, this light turns on after each
machine breath and turns off during each machine
breath.
5. Hold the switch up until the ventilator delivers a breath.
52
Respironics® PLV-100 Patient Manual, p/n 35555
Respironics® PLV-100 Patient Manual, p/n 35555
13
SECTION 5: THE FRONT OF THE VENTILATOR
SECTION 10: POWER
■ Explanation of
Power Sources
Continued
The external battery slowly recharges whenever it is
connected to the ventilator that is using the wall outlet
for its power source — even when the Power Switch is
off. Use a battery charger to recharge an external
battery that has been used for a few hours.
To check the External Battery voltage:
1. Connect the External Battery to the ventilator.
2. Unplug the wall outlet power cord. A 3-second alarm
sounds warning that the power source the ventilator is
using has changed. The External Battery light (white)
turns on.
3. Wait 2-3 minutes.
4. Push the Read Battery Volts switch to the "External" or
down position.
5. Hold the switch down until the machine delivers a
breath.
6. Read the battery voltage on the Inspiratory Flow Rate
window; this number is not the amount of time left on
the battery. If the voltage is less than 10 volts, recharge the External Battery.
7. Release the switch.
8. Plug the unit into the wall outlet.
14
Respironics® PLV-100 Patient Manual, p/n 35555
Respironics® PLV-100 Patient Manual, p/n 35555
51
SECTION 10: POWER
■ Explanation of
Power Sources
Continued
SECTION 5: THE FRONT OF THE VENTILATOR
External Battery 12 Volt DC Power:
The PLV-100 can be powered by an optional external
battery, such as a deep-cycle boat battery. This makes it
easier to leave your home. An external battery (when fully
charged) lasts for up to 24 hours, depending upon the
ventilator settings. An audible alarm sounds and the External Battery light flashes when the external battery is
low.
■ Pressure
(Continued)
11.
Pressure
Gauge
Displays the pressure in the ventilator tubing in cmH2O,
(centimeters of water) .
12.
Exhalation
Valve Tubing
Connector
The smallest (1/8") smooth tubing of the ventilator circuit
connects to this port. This controls the exhalation valve,
(the valve that lets you breathe out).
13.
The medium (3/16") tubing from the ventilator circuit connects to this port. Number of breaths and pressure are
sensed by the ventilator through this tubing.
2. Connect the WHITE wire of the cable to the POSITIVE
(+) battery terminal and the BLACK wire of the cable to
the NEGATIVE (-) battery terminal.
Assist/PAP
(Proximal
Airway
Pressure)
Connector
14.
Patient Air
Outlet
Connector
The large ribbed ventilator tubing connects to this port.
The ventilator delivers machine and assisted breaths
through this tubing.
Note: If these are switched when you connect the
cable to the PLV-100, an alarm sounds, but the PLV100 is not damaged.
15.
Airway
Pressure
Limit Knob
Sets the limit of pressure that can reach the lungs.
To Connect the External Battery:
1. Use the Respironics external battery cable from your
home care company. Twelve-foot and six-foot cables
are available. Your home care company can provide
you with a battery and instruct you on how to set it up.
3. Line up the white dot near the External Battery receptacle on the front of the PLV-100 with the dot on the
external battery cable connector.
4. Push the cable connector into the ventilator and twist
to the right to lock.
50
Respironics® PLV-100 Patient Manual, p/n 35555
Respironics® PLV-100 Patient Manual, p/n 35555
15
SECTION 5: THE FRONT OF THE VENTILATOR
SECTION 10: POWER
■ Explanation of
Power Sources
The PLV-100 automatically selects the best power
source available. It looks for power in the following order:
1. Wall Outlet
2. External Battery
3. Internal Battery
If the PLV-100 is plugged into a working wall outlet, the
wall outlet power is always used. If the ventilator is not
plugged into a wall outlet or there is a power loss, the
ventilator looks for and use the external battery. The
PLV-100 only uses the internal battery if neither the wall
outlet nor an external battery can be used.
Wall Outlet (120 volt AC power):
To use a wall outlet, securely connect the power cord into
the Power Cord receptacle on the back of the PLV-100 and
plug the other end into a wall outlet. For safety, the wall outlet
must be grounded and must have three holes to fit the threepronged plug. The outlet should be checked for safety by
your home care company, electric company or electrician
before the ventilator is plugged in. This is the only power
source that does not need recharging.
Note: Whenever possible, leave the PLV-100
plugged into a wall outlet to keep the unit’s batteries
fully charged.
16
Respironics® PLV-100 Patient Manual, p/n 35555
Respironics® PLV-100 Patient Manual, p/n 35555
49
SECTION 9: MAINTENANCE AND CLEANING
■ PLV-100
Preventive
Maintenance
The PLV-100 must have preventive maintenance done at
least every 8,000 hours of ventilator use, or once a year
whichever occurs first. The PLV-100 has an hour meter
that records the number of hours the ventilator is used.
The hour meter is located behind the Machine Air Inlet
filter located on the back of the ventilator. The hour meter
can be seen after the filter is removed. A loaner ventilator
may be provided by Respironics or through your home
care company during this warranty or contract service.
SECTION 5: THE FRONT OF THE VENTILATOR
■ Power
16. Read Battery
Volts Switch
Whenever the ventilator is powered by a battery, the
voltage (charge) left in the battery can be checked. To
check the battery, push and hold the switch in the up
position when the internal (back-up) battery is in use.
Push and hold the switch in the down position when an
external battery is in use. The voltage is displayed on the
Inspiratory Flow Rate window (5) after the ventilator gives
the next breath.
Before the ventilator is sent in for maintenance or service,
make sure you are able to breathe by using a backup or
loaner ventilator.
Important: Wait 2-3 minutes after beginning to use the
internal or external batteries before checking the voltage. Refer to the Power Section for more information.
17. Power Source
Lights
120 VAC (Green light): Lit when power is from a wall
outlet.
Internal (Gold light): Lit when ventilator is using the
internal battery. This light flashes when the internal battery charge is low.
Important: The internal battery only supplies enough
power for up to one hour of use, depending upon the
ventilator settings. This is intended for switching between AC and external battery power only.
External (White light): Lit when ventilator is using an
optional external battery. This light flashes when the
external battery charge is low.
48
Respironics® PLV-100 Patient Manual, p/n 35555
Respironics® PLV-100 Patient Manual, p/n 35555
17
SECTION 5: THE FRONT OF THE VENTILATOR
SECTION 9: MAINTENANCE AND CLEANING
■ Cleaning the PLV-100
Clean the outside of the PLV-100 every two weeks,
or as often as needed. Use a clean, damp (not wet)
cloth and soapy water (dishwashing liquid).
■ Cleaning the PLV-100
Filters
The Machine Air Inlet filter and the Patient Air Inlet
filter are located on the back of the ventilator.
Check both of them twice a week and clean them
when they look a little dusty. These filters are
cleaned and reused.
■ Filter Cleaning
Procedure
1. Unscrew and remove the white plastic covers
over both the Patient Air Inlet and Machine Air
Inlet.
2. Look to see if the black foam filters are dusty.
They need cleaning if they look a little dusty.
Check and clean them more often if they look
very dusty.
3. Remove the dirty filters and insert clean filters.
4. Screw the white plastic covers over the clean
filters.
5. Rinse the dirty filters in warm water.
6. Let the filters air dry before storing in a clean
plastic bag in a dust-free area.
7. Replace the filters when they become worn or
discolored.
18
Respironics® PLV-100 Patient Manual, p/n 35555
Respironics® PLV-100 Patient Manual, p/n 35555
47
SECTION 9: MAINTENANCE AND CLEANING
■ Cleaning the
Tubing
Continued
10.
Hang the tubing up to dry.
11. Place all other parts on a clean towel to dry; do not
wipe dry.
12. WHEN COMPLETELY DRY, check all equipment for
signs of wear and damage, and replace as necessary.
SECTION 5: THE FRONT OF THE VENTILATOR
■ Power
(Continued)
18. On-Off/
Recharge
Switch
Switches between "ON" and "OFF/RECHARGE". When
the ventilator is plugged into a wall outlet, both the internal and any optional external battery connect to the
ventilator continue to charge, with the ventilator power
switch in the “on” or “off” positions.
19. 5 Amp Circuit
Breaker
Circuit breaker. Push in to reset if white stem is visible.
20. 2 Amp Circuit
Breaker
Circuit breaker. Push in to reset if white stem is visible.
21. External
Battery
Connector
Receptacle plug for optional external battery cable or
auto lighter cable.
22. 30 Second
Alarm Silence
Button
Pressing this button turns off most alarms for 30 seconds.
23. Alarm Speaker
Alarms sound from this speaker.
13. Reassemble all equipment and store in a clean plastic bag, in a dust-free area.
Important Points to Remember
• Do not get water inside any of the small and medium
sized tubings. These small tubings do not dry inside,
and this moisture can damage the PLV-100.
• Do not re-use the vinegar solution. It will not clean
your equipment a second time.
• Do not put the cleaned equipment away until it is completely dry.
Other cleaning solutions may be available from your
home care company. Contact your home care professional for more information on these cleansers.
46
Respironics® PLV-100 Patient Manual, p/n 35555
Important: If alarms are not silenced by pressing
this button, check the troubleshooting section of this
manual. Some important alarms cannot be silenced
by this button.
Respironics® PLV-100 Patient Manual, p/n 35555
19
SECTION 6: THE BACK OF THE VENTILATOR
SECTION 9: MAINTENANCE AND CLEANING
■ Cleaning the Tubing
Continued
Replace the tubings when they become dirty or wet
inside, damaged, or the connections are not tight.
Cleaning the large ribbed tubings and connectors:
1. Remove all tubing and take apart the exhalation
valve.
2. Wash your hands before cleaning the equipment.
3. Rinse warm water through the inside of the
tubings.
4. Scrub the insides in warm soapy water,
(dishwashing liquid), using a soft bottle brush.
5. Rinse all parts under running tap water to remove all of the soap.
6. Mix 1 cup (8 ounces) vinegar and 3 cups of
distilled water in a clean sink or a large, clean
container. You can use more, or less of the
vinegar and water, but it must remain in the ratio
of 1 part vinegar to 3 parts water.
7. Soak the large tubing and connectors in the
vinegar and water for one hour.
8. Dispose of the vinegar and water and completely rinse the equipment under warm running
water.
9. Shake the parts to remove the extra water.
20
Respironics® PLV-100 Patient Manual, p/n 35555
Respironics® PLV-100 Patient Manual, p/n 35555
45
SECTION 9: MAINTENANCE AND CLEANING
■ Cleaning the
Tubing
Warning: When it is time to clean your equipment,
make sure you can breathe by using a backup ventilator or manual resuscitator if necessary.
SECTION 6: THE BACK OF THE VENTILATOR
1. Patient Air
Inlet
Important: There is a reusable foam filter in this
inlet. It must always be in place and cleaned regularly. See Maintenance and Cleaning section for
instructions on cleaning.
Important: Assemble a clean circuit to connect to the
ventilator before you remove the old circuit.
Clean all of the tubing twice a week unless you have
been told differently by your doctor, nurse or therapist.
You may find it helpful to set regular days, such as Monday and Thursday, as not to forget. Clean the tubing
more often if it looks dirty inside, or if you have a lung
infection.
2. Sensor Vent
The PLV-100 samples the room air and makes automatic
pressure adjustments.
3. Battery Fuse
A 5-amp slow blow fuse protects the unit from current
surges from the battery.
4. Rear Feet/
Cord Wraps
These feet allow the PLV-100 to be used in the "face-up"
position. The cord can also be wrapped clockwise, (in the
direction of the arrow), around the four feet to store or
shorten the cord.
Cleaning the small and medium tubing:
The small and medium tubing have smooth outsides,
without ridges. (These are called the exhalation valve
tubing and the PAP tubing.)
Important: If used in the "face-up" position, DO NOT
block the Patient Air Inlet or Machine Air Inlet on the
back of the ventilator, (such as by placing on a shag
carpet or blanket).
Wipe off the outside using a clean, damp cloth or one
dampened with soapy water, (from dishwashing liquid).
CAUTION: Do not let water get inside of the small and
medium tubing, because moisture left behind may damage the PLV-100.
44
Respironics® PLV-100 Patient Manual, p/n 35555
Room air for patient delivery enters the ventilator through
the patient air inlet.
5. Machine Air
Inlet
Pulls room air through the filter to the inside of the ventilator to help cool the motor.
Important: There is a reusable foam filter in this
inlet. It must always be in place and cleaned regularly. See Maintenance and Cleaning section for
instructions on cleaning.
Respironics® PLV-100 Patient Manual, p/n 35555
21
SECTION 6: THE BACK OF THE VENTILATOR
SECTION 8: ALARMS
■ Alarm Continued
■ Description Continued
Increase Inspiratory Flow Alert
Function: If this happens, the new
rate number flashes in the
Rate window. The Increase
Inspiratory Flow light continues to flash until the
Rate knob is turned down
to the number displayed in
the Rate window.
Switch to Battery Alert
Purpose: Occurs when:
The power to the PLV-100
changes from a wall outlet
to a battery.
• 3 second alarm sound
• 120 VAC light goes out and a
battery light turns on
Set By:
No setting.
Function: A 3-second alarm sounds.
The 120 VAC light turns off
and a battery power light
turns on.
Important: All batteries can only give power for a limited
amount of time. Always check the voltage on any battery
before and during use. Plan ahead to have another battery or
a wall outlet available when needed.
22
Respironics® PLV-100 Patient Manual, p/n 35555
Respironics® PLV-100 Patient Manual, p/n 35555
43
SECTION 8: ALARMS
■ Alarm Continued
SECTION 6: THE BACK OF THE VENTILATOR
■ Description Continued
Increase Inspiratory Flow Alert
6. Power Cord
Connector
The power cord connects to this receptacle.
7. Remote Alarm
An optional Respironics Remote Alarm connects to this
plug.
8. Hour Meter
Located behind the Machine Air Inlet filter (5). (See the
Maintenance and Cleaning section for preventive maintenance schedule).
Purpose: Flashes when:
• Flashing Increase Inspiratory
Flow light (red)
The current combination of Tidal
Volume, and Rate settings cannot be given by the PLV-100
because the Inspiratory Flow
Rate is too low.
• New setting(s) are shown after
the PLV-100’s automatic adjustments
Set By:
No setting.
Function: The PLV-100 fixes the problem
on its own by making changes in
the following order:
1. The PLV-100 first turns up the Inspiratory
Flow Rate to give the set Tidal Volume and
the set Rate. If this happens, the number
in the Inspiratory Flow Rate window
flashes until it reaches the new, higher
flow. The Increase Inspiratory Flow light
continues to flash until the Inspiratory Flow
Rate knob, (and the Rate knob if necessary), is turned up to the number shown in
the window.
2. If the maximum Inspiratory Flow Rate
(120) is reached and more changes are
required, the PLV-100 next lowers the Rate
until there is enough time to deliver the set
Tidal Volume.
42
Respironics® PLV-100 Patient Manual, p/n 35555
Respironics® PLV-100 Patient Manual, p/n 35555
23
SECTION 7: SETTING UP AND CHECKING THE VENTILATOR
DO NOT connect yourself to the PLV-100 until a
trained health care professional has taught you how
to use it.
The PLV-100 should NOT be connected to you as
you follow these instructions.
SECTION 8: ALARMS
■ Alarm Continued
■ Description Continued
Low External Battery Alarm
Continued
1. Select Power Source:
Securely plug the power cord into the power cord
connector on the back of the ventilator, then into
a 3-prong wall outlet.
Low Internal Battery Alarm
• Continuous sound
AND/OR
Function: Warns that the External
Battery is out of power. If
you do not plug the ventilator into a wall outlet, the
unit switches to the internal
battery. When the PLV-100
switches to internal battery
power, a 3-second alarm
sounds, the External Battery light (white) turns off
and the Internal Battery
light (gold) turns on.
• Flashing Internal Battery light
TUR
Purpose: Alarms when:
N
& PULL
Connect the ventilator to the optional external
battery by lining up the dot on the battery cable
plug with the dot above the external battery connector on the front of the ventilator. Turn the plug
clockwise (right) to lock in place. See Power
section for instructions on connecting the battery
cable to the battery.
The voltage of the Internal Battery
is low, (below 9.5 volts).
Set By: No setting.
Function: Warns that the Internal
Battery is out of power.
Plug the PLV-100 into a
wall outlet immediately or
the PLV-100 stops working!
By plugging the ventilator
into a wall outlet restores
power to the ventilator and
allows the internal battery
to recharge.
Important: It takes several hours to recharge the internal
battery completely.
24
Respironics® PLV-100 Patient Manual, p/n 35555
Respironics® PLV-100 Patient Manual, p/n 35555
41
SECTION 8: ALARMS
■ Alarm Continued
SECTION 7: SETTING UP AND CHECKING THE VENTILATOR
■ Description Continued
Inverse I:E Ratio Alert
Purpose:
Flashes when:
The time to breathe in
(inspiratory time) is longer
than the time to breathe
out (expiratory time).
• Flashing number in the I:E
window
Set By:
No Setting.
Function:
The numbers in the window flash when:
• The inspiratory time is
longer than expiratory
time, or
• The expiratory time is
very long, (when the I:E
ratio is more than 1:9.9).
This display is blank in the
SIMV Mode.
2. Securely Connect the Patient Circuit to the
Ventilator:
The large ribbed tubing connects to the ventilator Patient Air Outlet port.
The smallest (1/8”) tubing connects to the ventilator Exhalation Valve Tubing port.
The medium (3/16”) tubing connects to the ventilator Assist/PAP Tubing port.
3. Press the On-Off/Recharge Switch to "ON"
The PLV-100 performs the following 5 second
self check when the unit is turned on:
a. The alarm beeps for 1 second.
b. All display windows read 8's for 1 second.
c. Each light briefly turns on one at a time.
d. WATCH the Tidal volume window to check that
it briefly reads "0.0".
e. Another short alarm beeps.
Low External Battery Alarm
Purpose:
f. The ventilator begins delivering breaths.
The voltage of the External
Battery is low, (below 9.5
volts).
• Continuous sound
• Flashing External Battery light
Set By:
40
Alarms when:
Respironics® PLV-100 Patient Manual, p/n 35555
No setting.
Respironics® PLV-100 Patient Manual, p/n 35555
25
SECTION 7: SETTING UP AND CHECKING THE VENTILATOR
Stop: The Tidal Volume window must display
“0.0” before the unit begins delivering breaths.
If the Tidal Volume Window shows a “1.0” or
“2.0”, DO NOT USE THIS ventilator! Call your
home care company immediately!
Check the ventilator settings. Once the ventilator is
adjusted to your settings, the ventilator remembers
them even after the unit is turned off. However,
each time you turn the ventilator on, re-check all
the settings in case the knobs were turned while
the machine was off.
SECTION 8: ALARMS
■ Alarm Continued
Low Pressure Alarm in
SIMV Mode Continued
■ Description Continued
• Continue until the Assist/Spontaneous light turns on once for each
patient or assisted breath.
Respironics Recommendation: Set the Low Pressure Alarm
5 to 10 cmH2O below your usual breath pressure setting. Your
settings for both the Low Pressure Alarm and the Sensitivity
are written on your Daily Ventilator Checklist.
Purpose:
Alarms when:
Remote Alarm (optional)
While you check the ventilator, it may begin to
alarm, this is okay. Push the 30 Second Alarm
Silence button to temporally turn off the alarms.
4. The Mode knob should be set to _________
Mode.
5. Adjust the Tidal Volume knob until the Tidal
Volume window reads _________.
• Continuous sound
• Flashing alarm light
Any alarm on the PLV-100 is activated.
Set By: No setting.
Function: A Respironics Remote
alarm (optional) can be
plugged into the ventilator
and put in another room to
let someone else know
when the ventilator is
alarming. This alarm
sounds and flashes anytime the PLV-100 is
alarming.
See Accessories Section of Operating Manual or more information.
26
Respironics® PLV-100 Patient Manual, p/n 35555
Respironics® PLV-100 Patient Manual, p/n 35555
39
SECTION 8: ALARMS
■ Alarm Continued
SECTION 7: SETTING UP AND CHECKING THE VENTILATOR
■ Description Continued
Low Pressure Alarm in
SIMV Mode Continued
6. Adjust the Rate knob until the window
reads _______.
Function: If the Assist/Spontaneous light
does not turn on with a patient or
an assisted breaths:
• Turn the Sensitivity knob right (clockwise/
towards +3) a little.
• Check that the Assist/Spontaneous light
turns on with the next patient or assisted
breath.
• If it does not light, turn the Sensitivity knob
to the right a little more and check again.
7. Adjust the Inspiratory Flow Rate knob
until the window reads _________.
• Continue adjusting the Sensitivity knob until
the Assist/Spontaneous light turns on once
for each patient or assisted breath.
If the Assist/Spontaneous light
blinks more than once during one
patient or assisted breath:
• Turn the Sensitivity knob left (counterclockwise/towards -6) a little.
8. Adjust the Sensitivity knob to ______ .
• Check that the Assist/Spontaneous light
comes on only once with the next patient
or assisted breath.
• If it still blinks more than once, turn the
Sensitivity knob to the left more and check
again.
38
Respironics® PLV-100 Patient Manual, p/n 35555
Respironics® PLV-100 Patient Manual, p/n 35555
27
SECTION 7: SETTING UP AND CHECKING THE VENTILATOR
9. Adjust the Low Pressure Alarm Set knob to ______ .
Steps for Checking the Low Pressure Alarm.
A. The 30 Second Alarm Silence light must be off.
B. With a clean towel or clean hand, tightly block the
end of the large tubing that connects to you. Let the
ventilator deliver a breath. An alarm may sound. At
the end of the breath, the 15 Sec Delay light turns
on.
C. Unblock the end of the tubing and wait 15 seconds.
D. After 15 seconds, an alarm should sound, and the
15 Sec Delay light should still be on.
If the alarm did not sound:
• Look at the 30 Second Alarm Silence light. If this
light is turned on, wait until this light turns off, then
repeat the steps for Checking that the Low Pressure Alarm is set correctly. If the 30 Second Alarm
Silence light is not on, then:
• Check the Low Pressure Alarm settings listed in #9
of this section or on the Daily Ventilator Checklist.
Turn the Low Pressure Alarm Set knob to the correct setting.
• Repeat the steps for Checking that the Low Pressure Alarm is set correctly.
WARNING: Improper setting of the Low Pressure
Alarm may result in harm. Settings more than 10
cmH2O below the system pressure may prevent the
unit from warning of circuit leaks or disconnects.
28
Respironics® PLV-100 Patient Manual, p/n 35555
SECTION 8: ALARMS
■ Alarm Continued
Low Pressure Alarm in
SIMV Mode Continued
■ Description Continued
Purpose
Alarms when:
• The machine did not sense a breath
taken in the last 15 seconds.
• The pressure in the tubing during the
last machine or assisted breath was
less than the Low Pressure Alarm Set
point, (there is no 15-second delay in
this alarm when in the SIMV mode.)
Set by:
Low Pressure Alarm Set
knob and the Sensitivity
knob.
Function:
The Low Pressure Alarm
must be set a little less
than your usual breath
pressure, (how high the
needle rises on the Pressure gauge during a
machine breath). In order
for the Low Pressure
Alarm to work properly,
the Sensitivity knob must
be adjusted correctly. The
Sensitivity knob must be
set so that the Assist/
Spontaneous light comes
on once during each patient breath or assisted
breath, (not machine
breath).
Respironics® PLV-100 Patient Manual, p/n 35555
37
SECTION 8: ALARMS
■ Alarm Continued
SECTION 7: SETTING UP AND CHECKING THE VENTILATOR
■ Description Continued
AIRWAY
PRESSURE LIMIT
50
60
40
Low Pressure Alarm in Control
and Assist/Control Modes
Continued
Function If the alarm sounds, this
means the ventilator thinks
that you have not received
a full breath, (that is, the
pressure in the circuit has
not risen above the Low
Pressure Alarm Set), in the
last 15 seconds. Each time
you receive a full breath,
the 15 second time delay
restarts.
Respironics Recommendation: Set the Low Pressure
Alarm 5 to 10 cmH2O below your usual breath pressure setting. Your setting is written on your Daily Ventilator Checklist.
Low Pressure Alarm in
SIMV Mode
• Alarm sound is continuous.
• 15 Sec Delay Light remains lit.
Purpose:
Alarms when:
• You are disconnected from the ventilator.
• There is a leak or loose connection in
the large ribbed tubing.
• There is a leak, loose connection, or
water in the medium (PAP) tubing.
70
10. Adjust the Airway Pressure Limit knob to set
your Airway Pressure Limit to ___________ .
80
30
90
20
10
cmH2O
100
Steps for Checking the Airway Pressure Limit Alarm
A. The 30 Second Alarm Silence light must be
off.
B. With a clean towel or clean hand, tightly block
the end of the tubing that connects to you.
C. Watch the Pressure gauge needle as the
ventilator delivers the next breath. The needle
on the Pressure gauge should go up to your
Airway Pressure Limit number, (written
above), and pause. A constant alarm sounds
until the Pressure gauge needle drops back
down. Unblock the end of the tubing.
D. If the needle did not go up to the right number
on the pressure gauge adjust the Airway
Pressure Limit knob, and repeat the test.
Now you know that the PLV-100 is set for your
needs. These settings are remembered by the ventilator even when the ventilator is turned off. At this
time, connect yourself to the ventilator.
• There is a leak or loose connection in
the small (Exhalation Valve) tubing.
36
Respironics® PLV-100 Patient Manual, p/n 35555
Respironics® PLV-100 Patient Manual, p/n 35555
29
SECTION 7: SETTING UP AND CHECKING THE VENTILATOR
SECTION 8: ALARMS
■ Important
Points To
Remember
■ Alarm Continued
• Check all tubing connections each time before turning
on the ventilator.
• Check all settings each time the ventilator is turned on
before using.
• Always check the alarm settings before connecting
yourself to the ventilator.
■ Description Continued
Low Pressure Alarm in Control
and Assist/Control Modes
Purpose:
• You are disconnected
from the ventilator.
• Alarm sound is continuous.
• There is a leak or loose
connection in the large
ribbed tubing.
• 15 Sec Delay Light remains lit.
• Once the PLV-100 is set to your needs, these settings
stay in the ventilator until the knobs are turned.
• There is a leak, loose
connection, or water in
the medium (PAP)
tubing.
• Do not change any of the ventilator settings unless your
doctor, nurse or respiratory therapist informs you to.
• Whenever your doctor, nurse or respiratory therapist
changes any of the ventilator settings, write these changes
down in the “Setting Up and Checking the Ventilator”
section and on your Daily Ventilator Checklist.
• There is a leak or loose
connection in the small
(Exhalation Valve)
tubing.
• When using the SIMV mode, connect an H-valve in the
patient circuit to make it easier to take patient breaths.
30
Respironics® PLV-100 Patient Manual, p/n 35555
Alarms when:
• The exhalation valve is
not assembled correctly or is damaged.
Set By:
Low Pressure Alarm Set
knob.
Function:
The Low Pressure Alarm
must be set a little less
than your usual breath
pressure, (how high the
needle rises on the Pressure gauge during a
machine breath). When
the pressure rises above
the Low Pressure Alarm
Set point, the 15 second
delay timer starts.
Respironics® PLV-100 Patient Manual, p/n 35555
35
SECTION 8: ALARMS
■ Alarm
SECTION 8: ALARMS
■ Description
Airway Pressure Limit Alarm
Purpose:
• Alarm sounds during a machine breath.
Alarms when:
The pressure in the
circuit is above the Airway Pressure Limit
setting.
• Sound is on and off.
Set by:
Airway Pressure Limit
knob.
Function:
Alarm sounds and the
extra pressure is released from the circuit.
The needle on the Pressure gauge goes up and
briefly stops at the Airway Pressure Limit
setting. The alarm
sounds until the needle
drops back down.
Respironics Recommendation: Set the Airway Pressure
Limit 10 to 20 cmH2 O above your usual breath pressure
setting. Your setting for the Airway Pressure Limit is written
on your Daily Ventilator Checklist.
34
■ Alarms Are
Important
Respironics® PLV-100 Patient Manual, p/n 35555
Alarms are designed to warn of changes. The changes
may be in the ventilator, tubings, connections, or in your
lungs. These changes may affect your ability to breathe
or the ventilator’s ability to help you breathe.
Alarms only work when they are set right for your needs.
If set wrong, there may either be too many alarms, or they
may not warn of possible problems. Alarm settings are
written on your Daily Ventilator Checklist, and when your
health care professional changes the settings, be sure to
write the new settings on your Daily Ventilator Checklist
and in the “Setting Up & Checking the Ventilator” section
of this manual.
WARNING!: DO NOT change any settings unless specifically told to do so by your Health Care Professional.
■ Responding to
Alarms
When an alarm sounds:
1. Answer all alarms immediately.
2. Make sure that you can breathe. Use a back-up ventilator or manual resuscitator if needed.
3. Notice whether the alarm sound is on and off or continuous.
4. Look to see if the pressure gauge needle is going up
and down as usual.
Respironics® PLV-100 Patient Manual, p/n 35555
31
SECTION 8: ALARMS
■ Responding to
Alarms
Continued
SECTION 8: ALARMS
5. The Alarm Silence button silences most alarm sounds
for 30 seconds.
6. If the cause of the alarm cannot be found or fixed DO
NOT USE THE VENTILATOR. Use another means of
ventilation or manual resuscitator, and call your home
care company for assistance.
■ Alarm
Microprocessor Failure Alarm
■
Description
Purpose:
Alarms when:
• “Fast beep” alarm sound
• “1.0” or “2.0” shows in the Tidal
Volume window
** Alarm Silence does not silence
this alarm.
Function: The PLV-100 is always
checking the internal computer. If a problem is found,
the ventilator repeats the
start-up check and a “fast
beep” sounds. The Tidal
Volume window shows either
“1.0” or “2.0” as error codes.
Respironics® PLV-100 Patient Manual, p/n 35555
Description
Purpose: Alarms when:
• “Fast beep” alarm sound
** Alarm Silence does not silence
this alarm.
The ventilator is not working
properly.
Set By:
No setting.
Function: This alarm warns of a mechanical problem with the
ventilator.
WARNING! DO NOT USE THE UNIT WHEN THE “FAST
BEEP” ALARM IS SOUNDING. The ventilator must be
serviced by a trained service person.
No setting.
WARNING! DO NOT USE THIS EQUIPMENT! Have
the ventilator serviced by a trained service person.
32
Ventilator Malfunction Alarm
The PLV-100 computer is
not working properly.
Set By:
■
■ Alarm Continued
Purpose: Alarms when:
Power Failure Alarm
There is no available power
source for the PLV-100.
• Continuous sound
** Alarm Silence does not silence
this alarm.
Set By:
No setting.
Function: This alarm warns when the
power switch is “ON” and all
power sources are drianed
or disconnected.
Respironics® PLV-100 Patient Manual, p/n 35555
33