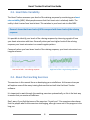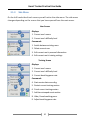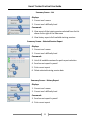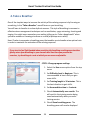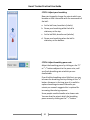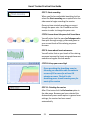
1
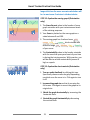
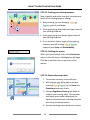
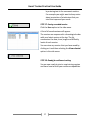
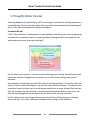
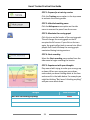
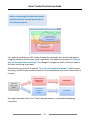
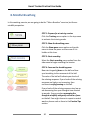
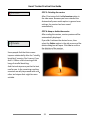
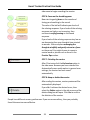
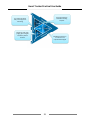
Heart Tracker Home Edition Version 3.0 Practical Use Guide © 1998 – 2012 Biocom Technologies. All rights reserved. The physiological data derived from Heart Tracker should only be used for educational purposes. The data cannot be used under any circumstances for medical diagnosis. Professionals should work within the scope of their licenses and/or certifications when interpreting or applying data derived from Heart Tracker. Heart Tracker Practical Use Guide Table of Contents Table of Contents ............................................................................................................. 2 1. Welcome .................................................................................................................. 3 2. Scientific Background ............................................................................................... 4 2.1. Resilience ......................................................................................................... 4 2.2. Calming Response............................................................................................. 5 2.3. Heart Rate Variability ....................................................................................... 8 2.4. About the Coaching Exercises ........................................................................... 8 3. Heart Tracker Software Orientation ......................................................................... 9 3.1. Software Navigation ......................................................................................... 9 3.1.1. Main Menu ................................................................................................. 9 3.1.2. Side Menu ................................................................................................ 10 3.2. Training Session Procedure – Step-by-Step..................................................... 12 4. Take a Breather ...................................................................................................... 18 5. Thoughts Roller Coaster ......................................................................................... 23 6. Managing Your Thinking......................................................................................... 26 7. Practice Tips ........................................................................................................... 29 8. Mindful Breathing .................................................................................................. 30 9. The Sound of Calm ................................................................................................. 32 10. Summary .............................................................................................................. 34 11. What Is Next? ....................................................................................................... 36 2 Heart Tracker Practical Use Guide 1. Welcome Welcome to the Heart Tracker – a unique biofeedback tool implementing powerful techniques helping to build and maintain your body and mind resilience. The Heart Tracker reflects not only more than 10 years of experience in delivering resilience building programs, but also the insights gained from our valued clients. We appreciate any feedback that you may have for improving the quality of this tool and manual. And we’d love to hear about the difference this tool has made to your life. We guarantee that the Heart Tracker will enable you to build your resilience far quicker and more easily than any other available program. This guide is based on training instructional materials provided by Dr. Wayne Jencke, Innate Intelligence (Australia). 3 Heart Tracker Practical Use Guide 2. Scientific Background 2.1. Resilience In general, resilient people have the ability to: Be aware of their thoughts and feelings Calm their mind Practice constructive thinking Engage fully in what they are doing Utilize positive emotional intelligence Either transform or transcend difficult situations In this manual you will focus on developing a foundation resilience skill called mindfulness, which is defined as: “a state of calm awareness of the present moment characterized by acceptance, openness and curiosity towards your thoughts and feelings rather than judgments of them” 4 Heart Tracker Practical Use Guide Or you might prefer another description: “your unproductive thoughts become less sticky, which makes it easier to let them go and get on with your life” There are several reasons why we focus on mindfulness in this manual: 1. Compelling research suggesting that mindfulness enables you to more effectively cope with life’s inevitable challenges. 2. Many of our clients tell us that mindfulness was one of the techniques that had the greatest impact on reducing their levels of stress. 2.2. Calming Response As the first part of the foundation our method focuses on developing your ability to calm your mind – the state of calm awareness intrinsic to mindfulness. In order to learn this skill, you will be using the Heart Tracker software. The software provides real-time feedback on your levels of the physiological calming response (explained down below) carried out by the parasympathetic nervous system (PNS). The PNS, along with the sympathetic nervous system (SNS), collectively form your autonomic nervous system (ANS). ANS is represented by specific structures in your brain and neural fibers spreading all over the body’s organs. In healthy people these two parts of the autonomic nervous system work synergistically to ensure optimal functioning of the body. 5 Heart Tracker Practical Use Guide Some examples of the influence of the autonomic nervous system Function Sympathetic (Stress Response) Parasympathetic (Calming response) Digestion Decreases Increases Blood pressure Increases Decreases Heart rate Increases Decreases Respiration rate Increases Decreases Sweating Increases Decreases Emotions Negative Positive Thinking Narrow and detailed Broad and expansive The PNS is the most dynamic part of the autonomic nervous system and tends to respond more quickly than the SNS. For example, when confronted with a stressor the PNS decreases in activity, which allows the SNS to dominate. This activates the so called stress response (also known as “fright, fight or flight”). When the stressor has passed, the PNS increases in activity and calms the body restoring it to its normally balanced state. Consequently the PNS is commonly called the calming or relaxation response (also known as “rest and digest”). Consequently people with lower levels of the calming response take longer to recover and therefore are more vulnerable to stress. Research shows that people with higher levels of the calming response are more resilient, stress tolerant and are able to perform under pressure. So what has the autonomic nervous system got to do with stress resilience? 6 Heart Tracker Practical Use Guide In healthy human beings, normally when a stressful situation has passed, the PNS increases in activity which decreases the activity of the SNS. It works like PNS is effectively applying the brakes to the SNS. So the increase in PNS is essential in order to recover from stress. When exposed to constant stress, the overall activity of the PNS decreases, which means that you are less able to recover from stress (less resilient). Research shows that effective resilience techniques such as exercise, constructive thinking, yoga, massage and meditation all increase the activity of the PNS. 7 Heart Tracker Practical Use Guide 2.3. Heart Rate Variability The Heart Tracker measures your levels of the calming response by monitoring your heart rate variability (HRV). Most people assume that their heart rate is relatively stable. The reality is that it varies from beat to beat. This variation in your heart rate is called HRV. Research shows that lower levels of HRV correspond with lower levels of the calming response. It is possible to identify your levels of the calming response by observing a graph of how your heart rate varies with time. Generally when you have higher levels of the calming response your heart rate varies in a smooth regular pattern. Conversely when you have lower levels of the calming response, your heart rate varies in an irregular manner. Low level of HRV – Low calming response High level of HRV – High calming response 2.4. About the Coaching Exercises The exercises in this manual focus on developing your mindfulness. At the same time you will explore some of the many training features that are built into the Heart Tracker software. It is important to work through the coaching exercises systematically, as this is the best way to ensure that you master mindfulness. Don’t worry if you find that some of the exercises “stretch you”. Our experience has shown that the people who find the exercises challenging, often get more out of the program in the long run. 8 Heart Tracker Practical Use Guide 3. Heart Tracker Software Orientation 3.1. Software Navigation Heart Tracker is very intuitive and user friendly. There are only two main menus (called toolbars) that you need to understand: Main Menu Horizontal bar on top of the screen that allows you to navigate between screens. Side Menu Context sensitive vertical bar on the left side of the screen that controls the functionality on each screen. 3.1.1. Main Menu When you start the Heart Tracker, you will notice this main menu at the top of the screen. Depending on which menu option you select, one of the following screens will open: User Change your personal information and training settings. Training Undertake a training session. Summary Show reports for selected training sessions or their history. Help Show the software electronic user’s manual. Exit Closes the Heart Tracker software. 9 Heart Tracker Practical Use Guide 3.1.2. Side Menu On the left hand side of each screen you will notice the side menu. The side menu changes depending on the screen that you have opened from the main menu. User Screen Displays: 1 1. Current user’s name 2 2. Current user’s difficulty level 3 Commands: 4 1. Switch between existing users 2. Delete current user 5 3. Edit current user’s personal information 6 4. Edit current user’s training settings Training Screen Displays: 1 1. Current user’s name 2 2. Current user’s difficulty level 4 3. Current breathing pacer rate 5 Commands: 6 4. Start session data recording 7 5. Restart current training session 8 3 9 6. Finish current training session 7. Add time stamped event marker 8. Hide / show breathing pacer 9. Adjust breathing pacer rate 10 Heart Tracker Practical Use Guide Summary Screen - List Displays: 1 2 1. Current user’s name 2. Current user’s difficulty level 3 Commands: 4 3. View report of the training session selected from the list shown to the right of the side menu 4. View history report of all available training sessions Summary Screen – Selected Session Report Displays: 1 2 1. Current user’s name 2. Current user’s difficulty level 3 Commands: 3. List of all available sessions for quick report selection 4. Send current report by email 4 5. Print current report 5 6. Delete selected training session data 6 Summary Screen – History Report Displays: 1 2 1. Current user’s name 2. Current user’s difficulty level 3 Commands: 4 3. Send current report by email 4. Print current report 11 Heart Tracker Practical Use Guide 3.2. Training Session Procedure – Step-by-Step This section will introduce you to the concepts and features that will enable you to effectively use the Heart Tracker software for HRV biofeedback. Before you start this exercise please ensure that you have installed and activated the Heart Tracker software as per the instructions in the Product Setup Guide. STEP 1: Device connection Plug the sensor cable connector into a spare USB port. STEP 2: Sensor hookup - Option A Hook the plastic ear-clip sensor to your earlobe. Make sure it is placed securely and will not fall off due to minor head movements. STEP 2: Sensor hookup - Option B Hook the plastic ear-clip sensor to your index or middle finger. STEP 3: Running software Start the software by double-clicking the Heart Tracker icon on your Windows desktop. STEP 4: Program login Select your User ID on the login screen and click Enter. 12 Heart Tracker Practical Use Guide STEP 5: Beginning a new training session Once the main screen opens, select the Training option from the main menu. STEP 6: Getting pulse wave signal At the bottom of the training screen you will notice the pulse wave trace. When you first open the training screen, the trace will be a straight line. When the software detects a good signal the trace will change to a wave like pattern. Wait a few seconds until clean and regular pulse wave appears. As soon as good pulse signal is detected, a green line will appear in the heart rate graph, which traces your heart rate variations occurring with time. STEP 7: Getting prompt to start recording Wait until a message prompting you to start recording will appear in the middle of the scoring graph. 1 3 2 STEP 8: Explore the heart rate graph (Orientation only) 1. Your Current heart rate is displayed here. This is the value that is plotted on the heart rate graph. Many people are quite surprised to find that their heart rate varies so much – don’t worry this is normal. 2. Your Average heart rate is also displayed here. Because it is an average, it will vary less than your current heart rate value. By the way when you go to the doctors, they are measuring your average heart rate. 3. Moving the sensor may result in a spike (sudden jump) in the heart rate graph. This will have 13 Heart Tracker Practical Use Guide minimal impact on your training but you should always be careful with the sensor, as it is easily damaged if mistreated. STEP 9: Explore the chart controls (Orientation only) 1 2 3 4 5 6 1. Increase the graph size so that it occupies the full screen. Click again to revert the graph to its original size. 2. Shift the graph to the center of the screen. 3. Shrink the graph vertically by increasing the vertical scale. 4. Stretch the graph vertically by decreasing the vertical scale. 5. Shrink the graph horizontally by increasing the horizontal scale. 6. Stretch the graph horizontally by decreasing the vertical scale. STEP 10: Start recording Select the Start recording menu option from the side menu to begin recording the session. STEP 11: Data accumulation The software will begin to accumulate data, which it uses to calculate your levels of the calming response. A message will appear in the middle of the scoring screen advising you when the accumulation phase will be completed. As soon as the accumulation phase is over, the software calculates your levels of the calming response and a line appears on the scoring graph. The time of data accumulation is set in your user settings. It could be set to ½, 1, 2 or 5 minutes. The 14 Heart Tracker Practical Use Guide longer this time the more accurate calculation will be. In most cases 2 minutes is the best choice. 1 STEP 12: Explore the scoring graph (Orientation only) 4 1. The Score Current value in the header of score graph coincides with your instantaneous levels of the calming response. 2 3 2. Your Score is plotted on the score graph as a value between 0 and 100. 3. The scoring graph has 4 colored zones (pink, orange, yellow and green) which coincide with different ranges (Low, Medium, High or Superb) of your score. 4. The Sustainability value in the header coincides with the zone that you spend most of your time in during the training session. With practice, you will be able to achieve sustainability scores of high or superb. STEP 13: Explore the chart controls (Orientation only) 1 2 3 4 1. Turn on audio feedback by clicking this icon. Specifically chosen audio may play depending on which zone the score is in. Click again to turn it off. 2. Increase the graph size so that it occupies the full screen. Click again to revert the graph to its original size. 3. Shrink the graph horizontally by increasing the horizontal scale. 4. Stretch the graph horizontally by decreasing the vertical scale. 15 Heart Tracker Practical Use Guide STEP 14: Tracking your calming response. 1 Now sit quietly and notice how your instantaneous levels of the calming response change. 4 1. When training, you are aiming for High or Superb values of your Score. 2 3 2. Score graph going down indicates lower levels of your calming response. 3. Score graph going up indicates higher levels of your calming response. 4. If you maintain higher levels of the calming response you will achieve High or Superb values of your Score and Sustainability. STEP 15: Finishing the session When you have finished, click on the End session option in the side menu. A dialogue box will open. Click Yes to confirm that you want to end the session. STEP 16: Review the session data 1. The session summary screen will open. 3 1 2 4 2. With practice you will be able to achieve scores of High to Superb for the Score and Consistency summary charts. 3. Average Regulatory Power graph helps to visualize your training effort. The narrower and higher green spike is displayed, the higher and sustained your calming response was during the whole session. 4. You can also keep notes about each session 16 Heart Tracker Practical Use Guide by entering text in the comments section. For example you might want to keep notes about a variation of a technique that you tried that improved your score. STEP 17: Saving recorded session Click the Save option in the side menu. A list of all saved sessions will appear. The sessions are sequenced in chronological order with your latest session at the top. The list summarizes the date, time, length and difficulty levels of each session. You can view any session that you have saved by clicking on it and then selecting the View selected option in the side menu. STEP 18: Ready for resilience training You are now ready to start a new training session and learn how to build your resilience capabilities. 17 Heart Tracker Practical Use Guide 4. Take a Breather One of the simplest ways to increase the activity of the calming response is by focusing on something. In the “Take a Breather” we will focus on your breathing. You will learn to breathe in a slow rhythmic manner. This style of breathing is common to effective stress management techniques such as meditation, yoga, swimming, chanting and singing. You might even remember your mother telling you to “take a deep breath” when you were anxious or throwing a tantrum as a child (or perhaps as an adult). Heart Tracker incorporates a breathing pacer that enables you to breathe at an optimal rate in order to maximize the activation of the calming response. If you start to feel light headed when practicing the breathing coaching exercises then gently return your breathing to your normal rate. Next time you practice the exercises, try breathing at a rate at which you are more comfortable. STEP 1: Change program settings 1. Select the User menu option from the top menu 2. Set Difficulty level to Beginner. This is recommended at least until you gain some skills. 3. Set Training length to 10 minutes. This is the best duration to gain skills. 4. Set Accumulation time to 1 minute. 5. Check Automatically save results. This will result in the training session being saved automatically when you end a training session. 6. Check Show breathing pacer. The breathing pacer will now be displayed 18 Heart Tracker Practical Use Guide automatically when you open the training screen. 7. Click the Save menu option in the side menu. STEP 2: Prepare for a training session Click the Training menu option in the top menu to activate the standard breathing pacer. STEP 3. Show the breathing pacer If the breathing pacer was hidden before, select the Show pacer menu option on the side menu to show it. If the breathing pacer is displayed and you want to hide it, select the Hide pacer menu option on the side menu to show it. STEP 4: Learning the breather The standard breathing pacer consists of a ball that moves in a vertical direction to which you can time the rate at which you breathe. 1 1. Inhale as the ball ascends. 5 2. Exhale as the ball descends. 3. Watch for this breathing prompt. 4 4. Breathing pacer rate (default – 6 br/min). 2 3 5. Click these buttons to adjust breathing pacer rate The breathing pacer is set to a default breathing rate of 6 breaths per minute. This involves taking one breath every 10 seconds (60 seconds divided by 6). 19 Heart Tracker Practical Use Guide STEP 5: Adjust your breathing Now start to gently change the rate at which you breathe so that it coincides with the movement of the ball: a. As the ball rises, breathe in (inhale). b. Pause your breathing while the ball is stationary at the top. c. As the ball falls, breathe out (exhale). d. Pause your breathing when the ball is stationary at the bottom. STEP 6: Adjust breathing pacer rate Adjust the breathing pacer by clicking on the “+” or ” –“ buttons adjacent to the pacer rate, until you find a breathing rate at which you are comfortable. If you find the breathing rate a little fast, you can increase the breathing rate by clicking on the “+” button. However in the long term it is useful to explore breathing at around 6 breaths per minute, as research suggests this is optimal for increasing the calming response. Some people need to breathe at a slower rate. You can slow the rate at which the breathing pacer moves by clicking on the ” –“ button. 20 Heart Tracker Practical Use Guide STEP 7: Start recording When you find a comfortable breathing rhythm select the Start recording menu option from the side menu to begin recording the session. Once you have started recording you cannot change the pacer rate. You’ll need to end the session in order to change the pacer rate. STEP 8: Learn about the pacer ball transitions You will notice that the pacer ball changes color from pink through orange, yellow and green as your current levels of the calming response increase. STEP 9: Learn about heart rate waves You will notice that as your levels of the calming response increase the heart rate graph becomes smooth and regular like tide waves. STEP 10: Keep your score high If you are doing the breathing exercise correctly you should be able to maintain a score of 90 or more for at least 10 minutes or more. The ball in the breathing pacer should remain green for most of the session STEP 11: Finishing the session After 10 minutes click the End session option in the side menu. Because you have selected the Automatically save results option in general user settings, the session has been saved automatically. 21 Heart Tracker Practical Use Guide STEP 12: Keep or delete the session After ending the session, session preview will be automatically displayed. If you didn’t achieve the desired score, then select the Delete option in the side menu and the delete dialog box will open. Click Yes to confirm the deletion of the session. Before we go on, it’s important to make it clear that most people find the “Take a Breather” exercise challenging. Very few people are able to sustain a score of 90 for more for 10 minutes. We’ll explain why in Section 6. However you will easily be able to sustain high scores when you have completed the remaining exercises in this manual. 22 Heart Tracker Practical Use Guide 5. Thoughts Roller Coaster Breathing deeply and rhythmically by itself is not enough to activate the calming response in a sustainable way. There is one other factor that you need to know about before breathing will work. In fact this tip underpins all resilience techniques. So what is this tip? In the “Take a Breather” coaching exercise, you probably noticed that your score was going up and down for no apparent reason. You were probably thinking wouldn’t it be good to know what causes your score to go up (and down)? What causes the score to increase? What causes the score to decrease? So let’s clear up the mystery – the scores were reflecting your thinking. Generally when you lose focus, and your thoughts start to wander, your levels of the calming response will decrease. You probably are thinking to yourself “But I wasn’t thinking anything!” The reality is that we have a constant stream of thoughts – we just don’t pay attention to them. This makes sense as we don’t want to clutter up our minds by paying attention to every thought that we have. Also the thoughts are often fleeting – they pass so quickly that we barely notice them. Yet they last long enough to have an impact on your levels of the calming response. So let’s explore how your thoughts impact your levels of the calming response. However before we start, let’s make a few more changes to the settings on the software. 23 Heart Tracker Practical Use Guide STEP 1: Prepare for a training session Click the Training menu option in the top menu to activate the training mode. STEP 2: Hide the breathing pacer Click the Hide pacer menu option on the side menu to remove the pacer from the screen. STEP 3: Maximize the scoring graph Click this icon on the header of the scoring graph. This will change the scoring graph so that it occupies the full screen. If you click on the icon again, the graph will go back to normal size. Most people find it useful to keep the scoring graph maximized during training sessions. STEP 4: Start recording Select the Start recording menu option from the side menu to begin recording the session. STEP 5: Experiment with your thoughts Superb level of the calming response High level of the calming response Medium level of the calming response Low level of the calming response Play around with trying to make your score go up or down. When your score goes up or down, notice what you were thinking about at the time and record it in the table below. For example you might be thinking “But I wasn’t thinking anything” and your score went down. Thought Score Direction But I was not thinking anything! Down 24 Heart Tracker Practical Use Guide STEP 6: Finishing the session After 10 minutes click the End session option in the side menu. Because you have selected the Automatically save results option in general user settings, the session has been saved automatically. STEP 7: Keep or delete the session After ending the session, session preview will be automatically displayed. If you didn’t achieve the desired score, then select the Delete option in the side menu and the delete dialog box will open. Click Yes to confirm the deletion of the session. Most people are surprised at the extent to which their mind wanders. This is one of the biggest advantages of the Heart Tracker, as it provides you with immediate feedback as to when your mind is wandering. This allows you to develop your awareness of your thinking and feelings. 25 Heart Tracker Practical Use Guide 6. Managing Your Thinking In this section we will explore why mindfulness is the most effective way to manage your wandering thoughts. Let’s revisit the definition of mindfulness: “a state of calm awareness of the present moment characterized by acceptance, openness and curiosity towards your thoughts and feelings rather than judgments of them” Research highlights that the ability to accept your thoughts and feelings, rather than judging them, is the most important dimension of mindfulness. To understand why mindfulness is important, we’d like you to think about the last time you were judged by somebody. How did it feel? Typically being judged will arouse a negative emotion such as anger, frustration, or a feeling of incompetence. Research shows that thoughts that invoke negative emotions will decrease your levels of the calming response. Conversely how do you feel when somebody accepts you? Typically is generates positive emotions like warmth and acceptance. 26 Heart Tracker Practical Use Guide And not surprisingly thoughts that invoke positive emotions increase your levels of the calming response. Positive emotions (acceptance) increase the calming response Negative emotions (judgment) decrease the calming response Let’s explore mindfulness a little further by way of an example. Let’s assume that you are using the software, and the score starts to go down. You might think to yourself “I have to stop my thoughts from wandering”. This thought is a judgment, which is likely to result in the score continuing to go down. Alternatively you can think to yourself “it’s ok for my thoughts to wander”, which is more accepting, and will invoke a positive emotion. As a consequence your score is more likely to increase. The score starts to go down I have to stop my thoughts from wandering! JUDGMENTAL It is OK for my thoughts to wander. ACCEPTING You might remember that in the “Take a breather exercise” contained the following instruction: 27 Heart Tracker Practical Use Guide If you are doing the breathing exercise correctly you should be able to maintain a score of 90 or more for at least 10 minutes or more. The ball in the breathing pacer should remain green for most of the session. How many people judged themselves by thinking something like: “I’m nowhere near 90.” “I can’t even do this for 20 seconds.” “Why won’t the ball change to green?” No wonder most people struggle with the “Take a breather exercise”. 28 Heart Tracker Practical Use Guide 7. Practice Tips Before we continue, it’s useful to explore some coaching tips that will assist in making the remaining exercises easier: In all the coaching exercises you are exploring improving your levels of the calming response. You will find that the harder you try to achieve a high score (a judgment), the less likely you are to achieve it. Some days will be better than others. If you constantly compare your coaching outcomes, with your best efforts (a judgment), then your calming response scores will not be as good as you’d like them to be. When you are first learning, the easiest way to manage a thought mindfully is to repeat a neutral/calming (non-judgmental) word or phrase to yourself and then gently return to your focus on the breath. Examples of phrases include: Interesting Curious Thoughts come and go Accept Chill Relax Easy I It’s ok for my thoughts to wander It’s useful to repeat the phrase in a slow and rhythmical manner, as this simulates the way many people talk when they are calm. 29 Heart Tracker Practical Use Guide 8. Mindful Breathing In this coaching exercise, we are going to do the “Take a Breather” exercise, but from a mindful perspective. STEP 1: Prepare for a training session Click the Training menu option in the top menu to activate the training mode. STEP 2: Show the breathing pacer Click the Show pacer menu option on the side menu to show the pacer on the screen if it is hidden at this time. STEP 3: Start recording Select the Start recording menu option from the side menu to begin recording the session. Superb level of the calming response High level of the calming response Medium level of the calming response Low level of the calming response STEP 4: Focus on the breathing pacer Now start to gently focus on the ball and time your breathing to the movement of the ball. The color of the ball will indicate your levels of the calming response. If your levels of the calming response are high or are increasing, then continue to enjoy focusing on the ball. If your levels of the calming response stay low or are decreasing then your thoughts have started to wander. You can explore managing the thoughts mindfully and gently return to a focus on the ball. You might choose to repeat a neutral word or phrase such as those in the Practice Tips section. 30 Heart Tracker Practical Use Guide STEP 5: Finishing the session After 10 minutes click the End session option in the side menu. Because you have selected the Automatically save results option in general user settings, the session has been saved automatically. STEP 6: Keep or delete the session After ending the session, session preview will be automatically displayed. If you didn’t achieve the desired score, then select the Delete option in the side menu and the delete dialog box will open. Click Yes to confirm the deletion of the session. Some people find that their scores improve substantially after the “mindful breathing” exercise. Don’t worry if you didn’t. It takes a little time to get the hang of mindful breathing. And the technique may not be the best one for you. In the remaining coaching exercises we will play around with some other techniques that might be more suitable. 31 Heart Tracker Practical Use Guide 9. The Sound of Calm In this coaching session, you are going to explore focusing on a sound, rather than the visual cue of the standard breathing pacer. STEP 1: Configure sound options 1. Select the User menu option from the top menu. 2. Select the User settings menu option from the side menu. 3. At the bottom of the settings screen, select Sound 1 from the pull down menu. 4. Click the Save menu option in the side menu. STEP 2: Prepare for a training session Click the Training menu option in the top menu to activate the training mode. STEP 3: Show the breathing pacer Click the Show pacer menu option on the side menu to show the pacer on the screen if it is hidden at this time. STEP 4: Activate pacer sound Click on the Speaker icon on the Pacer window header. A red dot will appear in front of the speaker to indicate that the sound has been activated. To switch the sound off, click on the speaker icon again. STEP 5: Start recording Select the Start recording menu option from the 32 Heart Tracker Practical Use Guide side menu to begin recording the session. Superb level of the calming response High level of the calming response Medium level of the calming response Low level of the calming response STEP 6: Focus on the breathing pacer Now start to gently focus on the sound and timing your breathing to the sound. The color of the ball will indicate your levels of the calming response. If your levels of the calming response are high or are increasing, then continue to enjoy focusing on the sound response. If your levels of the calming response stay low or are decreasing then your thoughts have started to wander. You can explore managing the thoughts mindfully and gently return to a focus on the sound. You might choose to repeat a neutral word or phrase such as those in the Practice Tips section. STEP 7: Finishing the session After 10 minutes click the End session option in the side menu. Because you have selected the Automatically save results option in general user settings, the session has been saved automatically. STEP 8: Keep or delete the session After ending the session, session preview will be automatically displayed. If you didn’t achieve the desired score, then select the Delete option in the side menu and the delete dialog box will open. Click Yes to confirm the deletion of the session. People have different sensory preferences. If you are more auditory, then you probably found this exercise more effective. 33 Heart Tracker Practical Use Guide 10. Summary Let’s quickly recap what we have learnt to date: 1. Effective resilience techniques increase the levels of the calming response. 2. Heart Tracker monitors heart rate variability, which is a measure of the calming response. 3. The software is an educational tool and should not be used for the purposes of medical diagnosis. 4. Mindfulness is a foundation resilience skill. 5. Mindfulness is “a state of calm awareness of the present moment characterized by acceptance, openness and curiosity towards your thoughts and feelings ,rather than judgments of them”. 6. Focusing is a simple way to activate the calming response. 7. Slow rhythmic breathing is a focusing technique common to many stress management techniques. 8. When you lose focus and your thoughts start to wander, your levels of the calming response will decrease. 9. The best way to manage your wandering thoughts is mindfulness. 10. Judging your thoughts activates a negative emotion, which results in lower levels of the calming response. 11. Accepting your thoughts activates a positive emotion, which increases your levels of the calming response. In the process of becoming more mindful, you will also develop several of the thinking and behavioral habits of resilient people. 34 Heart Tracker Practical Use Guide Focusing techniques activate the calming response You need to be aware that your thoughts are wandering Accepting, rather than judging, your thoughts activates a positive emotion Mindfulness allows you to move on from unproductive thoughts 35 Heart Tracker Practical Use Guide 11. What Is Next? At this point you have learned two simple techniques that will develop your mindfulness 1. Mindful Breathing 2. Sounds of Calm Our experience has shown that one of these techniques will work for you. Your aim is to play around with the techniques and work out the technique that is most effective for you. This is the major advantage of the Heart Tracker software – it allows you to identify and fine tune a mindfulness technique. You avoid wasting your time, money and effort on techniques that don’t work for you. While first learning, it is useful to practice for a minimum of 20 minutes per day. This might be in one block of 20 minutes or 2 smaller blocks of 10 minutes. We find that most people seem to find the time to practice – this is primarily because they enjoy the calming experience of the exercises. However the benefits of mindfulness are not confined to when you are practicing. You will find that the benefits creep into the rest of your life. Some of these benefits include: improved attentiveness and concentration; better relationships; higher levels of positive emotions; improved immune system; lower blood pressure; and better sleep quality. It should be remembered that the software is a learning tool. Accordingly we would like you to be able to practice mindfulness whenever you want – not just when you are connected to the software. 36